Table of Contents
Hide
- What is MySQL?
- How to connect Django (and Django REST Framework) to MySQL?
- Pre-requisites and assumptions
- Step 1 – Installing MySQL
- Installing MySQL on Windows
- Installing MySQL on Linux
- Step 2 – Creating MySQL database and user
- Step 3 – Installing Django with dependencies
- Step 4 – Configuring database access in Django settings
- Building a simple API with Django REST Framework and MySQL
- Creating a simple model
- Creating DRF serializers
- Creating DRF API views
- Registering API URLs
- Testing our API
- Conclusion
First of all, I feel like I should clarify a potential confusion around Django and Django REST Framework that some people might have:
Django is a fully-featured web development framework, whereas Django REST Framework is a package for Django that makes the job of building RESTful APIs easier.
So if you’re wondering how to connect Django REST Framework to MySQL, your actual question should be – how to connect Django to MySQL and then build an API on top of it.
Let’s explore this topic and also build a simple API example to see MySQL in action.
What is MySQL?
MySQL is one of the most popular open-source relational database solutions. It’s particularly loved by the PHP community, though other developers often use it too.
While MySQL is not the most feature-rich solution (unlike, for example, PostgreSQL), it focuses on efficiently implementing the most commonly used functionality. That means MySQL can run on a pretty modest system while still providing you with all the features your project needs (unless you’re building a back-end for the Pentagon).
Django has integrated support for MySQL, so making your project work with it is easy. You can do it in four steps:
- Install and configure MySQL
- Create a database with a user
- Install Django with necessary dependencies and start a project
- Specify database connection details in Django settings
Let’s review each step in detail.
Pre-requisites and assumptions
To keep this article concise and relevant, I’ll have to make a few assumptions:
- You have a basic knowledge of Django
- You’re setting up a dev environment rather than production
- You have Python 3 installed on your system (either 3.6, 3.7 or 3.8)
- You have
pipinstalled and ready to use - Optionally, you have
virtualenvorvenvon your system and you run all commands within a virtual environment (good practice)
Step 1 – Installing MySQL
Installing MySQL on Windows
Like most Windows software, you can download and run an installer to get MySQL set up.
Head to the official downloads page and select either the web or the offline installer. The page will ask you to log in or sign up, but you can skip that step.
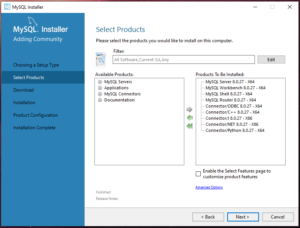
Run the installer; it will ask you to choose the setup type. You can go with the developer setup – it has all you need (and probably even too much).
Personally, I don’t like installing the following:
- Router
- Integration for Visual Studio
- Documentation
- Examples and samples
But if you select the custom setup, you’ll be asked to grind through a big list of options to choose from. Instead, you can select the developer setup, click next, then back, then select the custom setup and click next again. That will pre-select all the developer components for you. Then you can remove whatever you don’t want.
The rest of the installation is straightforward – you can click through the remaining steps with default options.
Installing MySQL on Linux
On Linux, the installation process is even easier.
Open up the terminal and start with updating your packages index:
sudo apt updateNext, install the MySQL server:
sudo apt install mysql-serverThe last step is to configure the server. The following command will initialize the configuration wizard, which will ask you a bunch of questions:
sudo mysql_secure_installationThose questions are mainly around hardening your MySQL server, but since we’re setting up a dev environment, you don’t need to stress about them.
In short, you can choose the following answers and options:
- Would you like to setup VALIDATE PASSWORD component? – YES
- Select password validation policy (0, 1 or 2) – 0
- Password for root user – Enter password & YES
- Remove anonymous users? – YES
- Disallow root login remotely? – YES
- Remove test database and access to it? – YES
- Reload privilege tables now? – YES
Step 2 – Creating MySQL database and user
On Windows, open the start menu and look up MySQL Command Line Client. That should open the MySQL shell for you.
On Linux, the following command should log you into MySQL shell:
sudo mysqlOnce you’re in the shell, the commands are the same for Windows and Linux.
First, create a new database:
create database `database-name`;Note that if you use hyphens in your database name, you need to wrap it in grave accent ` characters. Also, note the semicolon ; at the end – each line must end with it.
Next, create a database user like so:
create user `database-user`@localhost identified by 'password';The @localhost here specifies the host from which the user will connect. Since we access the database locally, we specify localhost.
Note also that the password has to be wrapped in single quotes ' rather than grave accents `, unlike the database and user names.
Lastly, give our user the privileges to work on the database:
grant all on `database-name`.* to `database-user`@localhost;Note the .* following the database name – it implies granting permissions on all tables of the database.
Step 3 – Installing Django with dependencies
Now comes the part where we configure our virtual environment.
Django relies on the mysqlclient package for working with MySQL. So we need to install it along with Django (and Django REST Framework):
pip install -U django mysqlclient djangorestframeworkIf you’re on Linux, chances are you might run into the following error while trying to install mysqlclient:
ERROR: Could not find a version that satisfies the requirement mysqlclient (from versions: 1.3.0, 1.3.1, ...)
ERROR: No matching distribution found for mysqlclient
To solve it, you need to install some system packages required for mysqlclient compilation:
sudo apt install python3-dev libmysqlclient-devAfter that, try running the pip command above again.
Step 4 – Configuring database access in Django settings
Finally, we need to create a Django project and configure the settings.
I’ve created this installation cheat sheet for Django projects with DRF – it contains commands to create a new project as well as some handy DRF settings.
Otherwise, you can simply run the following:
python -m django startproject project-name .Note the dot . at the end – it instructs Django to create project files in the current directory rather than a new one.
Now open the settings.py file and update the DATABASES section with your database and user details:
DATABASES = {
    'default': {
        'ENGINE': 'django.db.backends.mysql',
        'NAME': '<db-name>',
        'USER': '<db-user>',
        'PASSWORD': '<db-password>',
        'HOST': '127.0.0.1',
        'PORT': '3306',
    }
}
Provided everything is correct, you should have access to the database now. One way to test it is to run Django’s initial migrations:
python manage.py migrateIf the migrations are applied, then you’re all set!
Building a simple API with Django REST Framework and MySQL
As I mentioned earlier, I’m going to build a very simple API example using Django REST Framework to show MySQL in action. It will have a single function – manage notes.
Keep in mind that at any time you can refer to the GitHub repo of this project for reference.
Start a new app to keep things organized:
python manage.py startapp notesThen add it to the INSTALLED_APPS inside the settings.py file along with DRF:
INSTALLED_APPS = [
    ... # Django apps are here
    'rest_framework',
    'notes.apps.NotesConfig',
]
Creating a simple model
We will need the following model, which should go into the models.py file of your app:
from django.db import models

class Note(models.Model):
    text = models.TextField()
Generate and run migrations to update the database:
python manage.py makemigrations
python manage.py migrate
Creating DRF serializers
The next step is to create a model serializer.
For those who don’t know, serializers are part of the Django REST Framework. They are a bunch of special classes used to convert model instances from Python objects into JSON and back.
Let’s create a separate file to store our serializers and call it serializers.py. Here is what it should contain:
from rest_framework import serializers
from .models import Note

class NoteSerializer(serializers.ModelSerializer):
    class Meta:
        model = Note
fields = '__all__'NOTE: Normally, I would create a separate app for the API because it's a good practice to keep an app for a single purpose only. But for the sake of simplicity, I'll keep API files in the same folder for this project.
Creating DRF API views
The next question is hot to pass some data to our serializer so it can convert it from and to JSON.
As you probably know, views in Django handle the incoming HTTP requests and generate responses for them. Hence they are also used for passing data to serializers.
However, API endpoints are somewhat different to regular web pages. They don’t need to render HTML code – they simply need to return raw data.
Django REST Framework implements a subset of views that make building API endpoints easier. They are called API views.
We want our API to be able to perform all of the CRUD operations (Create, Read, Update, Delete) on the notes. Each operation requires a separate view.
Luckily for us, DRF provides a boilerplate class for that called ModelViewSet. It packages four API views (one per each of the CRUD operations) into a single class.
NOTE: In fact, there are five views in a view set because DRF supports both full and partial updates. Partial updates are handy when you want to update one or a few fields on a big object. Instead of sending the full object, you'd only send the fields for change, which is faster.
Let’s create a new viewset inside the views.py file of our app to work with our notes serializer:
from rest_framework import viewsets
from .models import Note
from .serializers import NoteSerializer

class NoteViewSet(viewsets.ModelViewSet):
    serializer_class = NoteSerializer
    queryset = Note.objects.all()
It’s amazing how DRF allows us to build an entire set of views with just three lines of code.
Registering API URLs
We want all notes-related endpoints to be available via the following URL:
http://domain.name/api/notes/As you might know, in Django, the file called urls.py is responsible for registering views and connecting them to URLs.
However, our views are “packaged” together inside the viewset. So we cannot register them the usual way. We need to “unpack” them first.
There are a few classes called routers in DRF that can do this job for us.
The following snippet demonstrates how to create a router and add our viewset to it:
... # Other imports are here
from django.urls import path, include  # Ensure `include` is imported
from rest_framework import routers
from notes.views import NoteViewSet

# Notes router
notes_router = routers.SimpleRouter()
notes_router.register(
    r'notes',
    NoteViewSet,
    basename='note',
)

... # urlpatterns code is here
Lastly, we can add the URLs generated by our router to the list of urlpatterns:
urlpatterns = [
    ... # Admin routes are registered here

    # API
    path('api/', include(notes_router.urls))
]
Testing our API
Our API should be functional now. Let’s give it a quick test. Start the Django dev server:
python manage.py runserverNavigate to http://127.0.0.1:8000/api/notes/. You should see Django REST Framework’s Browsable API. It would display an empty list of notes and a form to post a new note:
Conclusion
Django is a very versatile framework, and making it speak with MySQL doesn’t take much effort.
Django REST Framework, in turn, relies on Django’s ORM to work with database models. So regardless of which database you are using, your DRF code will be the same.
MySQL can be a great choice for smaller applications and microservices. But for bigger, monolith applications, you might want to consider using a database with a broader feature set, like PostgreSQL.
You can find the full source code of the little API we built in its GitHub repository.
-
Fedsie
- Posts: 11
- Joined: Fri Aug 12, 2016 11:22 pm
ERROR with code sudo pip3 install mysqlclient
I get the following error in RED text when I try to install mysqlclient
could not find a version that satisfies the requirement mysqlclient (from versions: )
No matching distribution found for mysqlclient
I recently set up SD card and didn’t have any problem getting through this step. I’m just getting the students to set up the software. They get stuck at this point. Can anyone help please?
We are using the latest Raspian Stretch install.
-

DougieLawson
- Posts: 42328
- Joined: Sun Jun 16, 2013 11:19 pm
- Location: A small cave in deepest darkest Basingstoke, UK

Re: ERROR with code sudo pip3 install mysqlclient
Tue Dec 05, 2017 9:03 am
Python3 has mysql.connector as a replacement for mysqldb. You can use pip3 or apt to install it.
Mysqlclient is an apt installed library sudo apt install libmysqlclient gets that installed.
Languages using left-hand whitespace for syntax are ridiculous
DMs sent on https://twitter.com/DougieLawson or LinkedIn will be answered next month.
Fake doctors — are all on my foes list.
The use of crystal balls and mind reading is prohibited.
-
Fedsie
- Posts: 11
- Joined: Fri Aug 12, 2016 11:22 pm
Re: ERROR with code sudo pip3 install mysqlclient
Tue Dec 05, 2017 11:49 am
DougieLawson wrote: ↑
Tue Dec 05, 2017 9:03 am
Python3 has mysql.connector as a replacement for mysqldb. You can use pip3 or apt to install it.Mysqlclient is an apt installed library sudo apt install libmysqlclient gets that installed.
Thanks for your quick response, Dougie, I’ll give it a go.
-

topshed
- Raspberry Pi Foundation Employee & Forum Moderator

- Posts: 89
- Joined: Mon Feb 04, 2013 12:05 pm
- Location: Surrey


Re: ERROR with code sudo pip3 install mysqlclient
Tue Dec 05, 2017 1:34 pm
The original command you were trying should work, and is the recommended way of installing this library for the Weather Station.
If you’re using the latest Raspbian build then it should use PiWheels to download the library.
Are your students using the one-line installer or following the manual step-by-step process?
—
Richard Hayler — Citizen Science Programme Manager
-
Fedsie
- Posts: 11
- Joined: Fri Aug 12, 2016 11:22 pm
Re: ERROR with code sudo pip3 install mysqlclient
Wed Dec 13, 2017 10:40 pm
topshed wrote: ↑
Tue Dec 05, 2017 1:34 pm
The original command you were trying should work, and is the recommended way of installing this library for the Weather Station.If you’re using the latest Raspbian build then it should use PiWheels to download the library.
Are your students using the one-line installer or following the manual step-by-step process?
We are using the manual step-by-step process.
-
Fedsie
- Posts: 11
- Joined: Fri Aug 12, 2016 11:22 pm
Re: ERROR with code sudo pip3 install mysqlclient
Wed Dec 13, 2017 10:41 pm
DougieLawson wrote: ↑
Tue Dec 05, 2017 9:03 am
Python3 has mysql.connector as a replacement for mysqldb. You can use pip3 or apt to install it.Mysqlclient is an apt installed library sudo apt install libmysqlclient gets that installed.
I tried this, but I got the message:
E: Unable to locate package libmysqlclient
-
Fedsie
- Posts: 11
- Joined: Fri Aug 12, 2016 11:22 pm
Re: ERROR with code sudo pip3 install mysqlclient
Wed Dec 13, 2017 10:54 pm
topshed wrote: ↑
Tue Dec 05, 2017 1:34 pm
The original command you were trying should work, and is the recommended way of installing this library for the Weather Station.If you’re using the latest Raspbian build then it should use PiWheels to download the library.
Are your students using the one-line installer or following the manual step-by-step process?
I’m not sure why it won’t download. I have already set up the weather station software on another SD card and didn’t have this problem that time. I did do it from my home, and I’m having this problem now at school. So I don’t know if that’s why I have this issue. Anyway, we’ve decided to just go back and use the SD card that I set up so we can move forward. I just wanted to let the students have the opportunity to set it up themselves. Thanks for your help.
-
topshed
- Raspberry Pi Foundation Employee & Forum Moderator
- Posts: 89
- Joined: Mon Feb 04, 2013 12:05 pm
- Location: Surrey
Re: ERROR with code sudo pip3 install mysqlclient
Fri Dec 15, 2017 8:08 am
It may be that your school network sits behind a proxy filter that is blocking access. Perhaps you could ask your network administrator for advice?
—
Richard Hayler — Citizen Science Programme Manager
Return to “Weather station”
I’m using Python more and more so it’s not surprising that recently the need arose to connect to and insert into a MySQL database. I was using (and usually do) Python3, and I ran into a couple of issues in the begining. This post will document those issues and the solutions I found to get MySQL and Python3 to work together.
Package Installation
Support for MySQL doesn’t ship with the Python installer, therefore we need to install a package that adds this functionality. I usually use pip3 for this task, and I tried the following.
pip3 install MySQLdb
I found code examples online showing import MySQLdb statements, so I figured that was the name of the package. I was wrong.
Could not find a version that satisfies the requirement MySQLdb (from versions: )
No matching distribution found for MySQLdb
So I thought, let’s try just pip3 install mysql
Collecting mysql
  Using cached https://files.pythonhosted.org/packages/06/ef/c4efbf2a51fb46aba9be03a973638d9539c9ca10a5259b2cbb1a66133b2e/mysql-0.0.1.tar.gz
Collecting MySQL-python (from mysql)
  Using cached https://files.pythonhosted.org/packages/a5/e9/51b544da85a36a68debe7a7091f068d802fc515a3a202652828c73453cad/MySQL-python-1.2.5.zip
Installing collected packages: MySQL-python, mysql
  Running setup.py install for MySQL-python ... error
    Complete output from command "c:program filespython36python.exe" -u -c "import setuptools, tokenize;__file__='C:\Users\admin\AppData\Local\Temp\pip-install-88jce1si\MySQL-python\setup.py';f=getattr(tokenize, 'open', open)(__file__);code=f.read().replace('rn', 'n');f.close();exec(compile(code, __file__, 'exec'))" install --record C:UsersadminAppDataLocalTemppip-record-f7l848e_install-record.txt --single-version-externally-managed --compile:
    running install
    running build
    running build_py
    creating build
[omitted output]
    building '_mysql' extension
    creating buildtemp.win-amd64-3.6
    creating buildtemp.win-amd64-3.6Release
    C:Program Files (x86)Microsoft Visual Studio2017CommunityVCToolsMSVC14.12.25827binHostX64x64cl.exe /c /nologo /Ox /W3 /GL /DNDEBUG /MT -Dversion_info=(1,2,5,'final',1) -D__version__=1.2.5 "-IC:Program Files (x86)MySQLMySQL Connector C 6.0.2include" "-Ic:program filespython36include" "-Ic:program filespython36include" "-IC:Program Files (x86)Microsoft Visual Studio2017CommunityVCToolsMSVC14.12.25827Include" "-IC:Program Files (x86)Windows Kits10include10.0.16299.0shared" "-IC:Program Files (x86)Windows Kits10include10.0.16299.0um" "-IC:Program Files (x86)Windows Kits10include10.0.16299.0winrt" "-IC:Program Files (x86)Windows Kits10include10.0.16299.0ucrt" "-IC:Program Files (x86)Windows KitsNETFXSDK4.6.1includeum" /Tc_mysql.c /Fobuildtemp.win-amd64-3.6Release_mysql.obj /Zl
    _mysql.c
    _mysql.c(42): fatal error C1083: Cannot open include file: 'config-win.h': No such file or directory
    error: command 'C:\Program Files (x86)\Microsoft Visual Studio\2017\Community\VC\Tools\MSVC\14.12.25827\bin\HostX64\x64\cl.exe' failed with exit status 2
Okay this is more like it, but now I’m receiving an error instead of installing a package.
The Python MySQL cl.exe Distraction
Searching the error error: command 'C:\Program Files (x86)\Microsoft Visual Studio\2017\Community\VC\Tools\MSVC\14.12.25827\bin\HostX64\x64\cl.exe' failed with exit status 2 and I learned that cl.exe is the Visual C++ compiler.
Apparently, the installation of the compiler is done via Visual Studio. I have Visual Studio installed so I loaded up the Visual Studio Installer – the program used to add functionality to VS. Sure enough, I didn’t have the Visual C++ components installed. I started installing it. It was taking awhile because the installation size was over 1 GB. While that was going on I continued to research MySQL and Python3. Before the process finished, I learned that the MySQLdb was not designed for Python3; the functionality was replaced by the mysqlclient package.
The Right Package (mysqlclient)
Now knowing that MySQLdb was out and mysqlclient was in, I went ahead and installed that package.
pip3 install mysqlclient
Collecting mysqlclient
  Using cached https://files.pythonhosted.org/packages/32/4b/a675941221b6e796efbb48c80a746b7e6fdf7a51757e8051a0bf32114471/mysqlclient-1.3.12-cp36-cp36m-win_amd64.whl
Installing collected packages: mysqlclient
Successfully installed mysqlclient-1.3.12
Example CRUD Operations
Now that the right MySQL package is installed, let’s do some basic Create, Read, Update, and Delete (CRUD) operations.
Create
The following example opens a CSV file containing records of gold PRICE on a given day (TIMESTAMP) from a given SOURCE.
import MySQLdb as mdb

PRICE     = 0
TIMESTAMP = 1
SOURCE    = 2

conn = mdb.connect('hostname', 'username', 'p@s$w0rd', 'database')
cursor = conn.cursor()

with open('gold_price.csv', 'r') as gold_prices:
    lines = gold_prices.read().splitlines()

    for i in range(1, len(lines)):
        _tuple = lines[i].split(',')
        cursor.execute("INSERT INTO gold_price (price, time, source) VALUES (%s, '%s', '%s');" %
        (_tuple[PRICE], _tuple[TIMESTAMP], _tuple[SOURCE]))

cursor.close()
conn.commit()
conn.close()
Retrieve
This bit fetches all the rows in a table (i.e. gold_price) and prints out each row – as a tuple.
import MySQLdb as mdb

conn = mdb.connect('www.jasonfavrod.com', 'econ', 'i8peanut$', 'econ')
cursor = conn.cursor()

cursor.execute('SELECT * FROM gold_price;')

for row in cursor.fetchall():
    print(row)

cursor.close()
conn.close()
# Output
(1319.03, 'https://www.xe.com/currencyconverter/convert/?Amount=1&From=XAU&To=USD', datetime.datetime(2018, 5, 12, 19, 30, 2))
(1313.33, 'https://www.xe.com/currencyconverter/convert/?Amount=1&From=XAU&To=USD', datetime.datetime(2018, 5, 14, 21, 0, 3))
(1290.68, 'https://www.xe.com/currencyconverter/convert/?Amount=1&From=XAU&To=USD', datetime.datetime(2018, 5, 15, 21, 0, 3))
[output omited]
Update
Here I’ll update the gold price on a give date to $1300.
import MySQLdb as mdb

conn = mdb.connect('www.jasonfavrod.com', 'econ', 'i8peanut$', 'econ')
cursor = conn.cursor()

cursor.execute("UPDATE gold_price SET price = %s WHERE time = %s", ("1300", "2018.05.15-21:00:03"))
cursor.close()
conn.commit()
conn.close()
Delete
Now we can delete that altered entry.
import MySQLdb as mdb

conn = mdb.connect('www.jasonfavrod.com', 'econ', 'i8peanut$', 'econ')
cursor = conn.cursor()


cursor.execute("DELETE from gold_price WHERE time = '%s'" % "2018-05-23 02:56:07")
cursor.close()
conn.commit()
conn.close()
For more on the mysqlclient for Python3, see their Github project.