New issue
Have a question about this project? Sign up for a free GitHub account to open an issue and contact its maintainers and the community.
By clicking “Sign up for GitHub”, you agree to our terms of service and
privacy statement. We’ll occasionally send you account related emails.
Already on GitHub?
Sign in
to your account
Comments
![]()
Hi
I’ve just been creating an ECDSA-keyed CSR using a config file and ran into what I think is a bug. If i just hit when prompted for e.g. Country Code (to accept the value in my config file) then i get an error and output:
error, no objects specified in config file
problems making Certificate Request
The issue and solution (to re-enter the prompted-for values) is described here:
https://superuser.com/a/944378
The same procedure works fine with an RSA-keyed CSR request so I suspect the issue may be a bug in the EC implementation of openssl req.
I’m using a homebrew-installed openssl on my Mac (Sierra, 10.2.3):
# openssl version
OpenSSL 1.0.2k  26 Jan 2017
My config file is:
[ req ]
distinguished_name = req_distinguished_name
req_extensions     = req_ext
[ req_distinguished_name ]
countryName                 = GB
stateOrProvinceName         = London
localityName               = London
organizationName           = <redacted>
commonName                 = <redacted>
[ req_ext ]
subjectAltName = @alt_names
[alt_names]
DNS.1   = <redacted>
DNS.2   = <redacted>
DNS.3	= <redacted>
and i am running:
openssl req -nodes -new -days 365 -key <domain>.ec.key -config <domain>.ec.conf -out <domain>.ec.csr
Hopefully that all makes sense. Please let me know if you need any more info, i search so i’m hoping this isn’t a dupe but apologies if it is.
Cheers
Neil
![]()
Neil — I just went through this same issue. While the command ran I was seeing prompts like «US []:» and I was just hitting enter because the values I wanted were in the file.
I added the line prompt=no to the [req] section and my request ran without error. like this:
[req]
distinguished_name=req_distinguished_name
req_extensions = v3_req
prompt = no
Hope this helps!
Edited to add: I second Neil’s suggestion that this is a bug. It seems to me that hitting enter on those prompts should have caused the default values to be used.
patelruchit, IoTravis, reidparhamdexcom, vladem, binary-person, and gzacharski reacted with hooray emoji
Atemu, binary-person, varshaneya, entrity, gvlasov, Camusensei, justin-lovell, omarsd03, z3niths, and gzacharski reacted with heart emoji
![]()
This isn’t a bug. What happens when you just press Enter on all prompts where no default is given, you end up with an empty subject. That’s what the error complains about.
prompt = no is exactly the right way to handle things if you want to specify the DN entirely in the config file. Or, as suggested on superuser.com, -subj on the command line.
djeikyb, liquidspikes, jeremyakers, FergusNelson, and lequickbrownfox reacted with thumbs down emoji
djeikyb, wischi-chr, and jeremyakers reacted with confused emoji
![]()
Hi @levitte.
I take your point but I believe the UI is misleading and doesn’t fit well with the principal of least surprise. It appears to at least me (and others based on what I have seen via Googling) that pressing will use the value shown. Compounding that is a pretty unhelpful error message when the creation of the cert fails; worth noting that the behaviour differs between ECC and RSA-based certs. I personally believe this could be relatively easily tidied up (though i fully appreciate it’s not exactly earth-shattering in priority).
Does that make sense? I’d be interested to hear your thoughts on this.
Cheers
![]()
In a way it makes sense… We do, however, expect people to read the manual, which says this re this business:
DISTINGUISHED NAME AND ATTRIBUTE SECTION FORMAT
       There are two separate formats for the distinguished name and attribute
       sections. If the prompt option is set to no then these sections just
       consist of field names and values: for example,

        CN=My Name
        OU=My Organization
        emailAddress=someone@somewhere.org

       This allows external programs (e.g. GUI based) to generate a template
       file with all the field names and values and just pass it to req. An
       example of this kind of configuration file is contained in the EXAMPLES
       section.

       Alternatively if the prompt option is absent or not set to no then the
       file contains field prompting information. It consists of lines of the
       form:

        fieldName="prompt"
        fieldName_default="default field value"
        fieldName_min= 2
        fieldName_max= 4
...
It’s not like we’re making it a mystery… I can understand, though, if it’s not particularly intuitive for those who haven’t read the manual.
I agree, though, that the error message isn’t the best (read: it’s actually quite bad)… so that could change to something better.
![]()
Below worked for me, without creating any config.
openssl req -x509 -nodes -days 365 -newkey rsa:1024 -keyout «cert.key» -out «cert.pem» -subj «/»
prachi-ag reacted with thumbs down emoji
djeikyb, sufiyanpk7, calix2, bloodberrys, jnsvd, adamlwgriffiths, and Chandrakanth-Challa reacted with rocket emoji
![]()
In a way it makes sense…
No, it doesn’t.
It’s not like we’re making it a mystery…
Yes, you are.
The user experience is terrible. Fix it.
![]()
Jesus christ, I lost FOUR HOURS trying to add subject alternative name… Still NO GO.
Are you guys crazy?!
![]()
yeah i’m here on purpose and I can’t make heads or tails of whats going on. not great?
![]()
![]()
I just ran into this again: (It’s very easy to forget about this little nuance unless you use these tools on a regular basis)
$ openssl req -key private.key.pem -new -sha256 -out csr.pem -config csr.cnf
You are about to be asked to enter information that will be incorporated
into your certificate request.
What you are about to enter is what is called a Distinguished Name or a DN.
There are quite a few fields but you can leave some blank
For some fields there will be a default value,
If you enter '.', the field will be left blank.
-----
US []:
The message from the tool specifically says «For some fields there will be a default value,
If you enter ‘.’, the field will be left blank.» which pretty clearly implies that hitting «enter» will use the default value that’s present in the config file, and that you have to enter a PERIOD to get a blank value if that’s what’s desired.
So this is either a bug in the behavior, or a bug in the displayed message. Either way I find it hard to accept the argument that this isn’t a bug. The behavior doesn’t match the message that’s presented to the user. So either the message or wrong, or the behavior is wrong. Which is it?
![]()
Below worked for me, without creating any config. openssl req -x509 -nodes -days 365 -newkey rsa:1024 -keyout «cert.key» -out «cert.pem» -subj «/»
I did with config, but received an error. -subj «/» solved my problem.
Q
Why am I getting the «no objects specified in config file» error
when running the OpenSSL «req -new» command?
A
![]()
If you are getting the «no objects specified in config file» error
when running the OpenSSL «req -new» command, because OpenSSL receives
no value for all DN (Distinguished Name) fields.
OpenSSL requires non-blank value at least for one DN field
to identify the subject.
The test below shows you an example of the «no objects specified in config file» error:
C:Usersfyicenter>type test.cnf
# unnamed section of generic options
default_md = md5

# default section for "req" command options
[req]
input_password     = fyicenter
prompt             = yes
distinguished_name = my_req_dn_prompt

[my_req_dn_prompt]

# Minimum of 4 bytes are needed for common name
commonName         = Common Name
commonName_default = FYIcenter.com CA

# ISO2 country code only
countryName         = Country Name
countryName_default = US

# State is optional, no minimum limit
stateOrProvinceName         = State
stateOrProvinceName_default = NY

# City is required
localityName         = City
localityName_default = New York

# Organization is optional
organizationName         = Organization
organizationName_default = FYIcenter.com

# Organization Unit is optional
organizationalUnitName         = Department
organizationalUnitName_default = IT

# Email is optional
emailAddress         = Email
emailAddress_default = ca@fyicenter.com

C:Usersfyicenter>localopensslopenssl.exe

OpenSSL> req -new -key rsa_test.key -out test.csr -config test.cnf
You are about to be asked to enter information that will be incorporated
into your certificate request.
What you are about to enter is what is called a Distinguished Name or a DN.
There are quite a few fields but you can leave some blank
For some fields there will be a default value,
If you enter '.', the field will be left blank.
-----
Common Name [FYIcenter.com CA]:.
Country Name [US]:.
State [NY]:.
City [New York]:.
Organization [FYIcenter.com]:.
Department [IT]:.
Email [ca@fyicenter.com]:.
error, no objects specified in config file
problems making Certificate Request
error in req
Note that «.» are entered to remove default values of all DN fields.
OpepSSL is not able to create the subject for the new CSR.
⇒ OpenSSL «req -new» — Repeating DN Fields
⇐ OpenSSL «req new -batch» — Using DN Default Values Only
⇑ OpenSSL «req» Command
⇑⇑ OpenSSL Tutorials
Содержание
- Prosody и первый запуск
- «error, no objects specified in config file» when creating CSR with ECDSA key & config file #3536
- Comments
- Footer
- NuclideCertificatesGenerator — ERROR — openssl failed: error, no objects specified in config file #1604
- Comments
- Issue and Steps to Reproduce
- Actual Behavior
- Versions
- Replace NSX-T 3 SSL/TLS Certificates – Common errors
- 1. Certificate validation failed. Reason : Certificate is not compliant as certificate of type SERVER: Basic constraints Extension is not present in the certificate
- 2. Certificate validation failed. Reason : Certificate : certificate does not verify with supplied key
- 3. Certificate validation failed. Reason : Certificate was rejected: CRL check failed: Couldn’t get LDAP context from URI ldap:/// ”
- 4. error, no objects specified in config file
- unixforum.org
- Достойный контроллер домена на Linux. (Подробный HowTo) (MDS, Ldap, Samba, Postfix, SQUID)
- Достойный контроллер домена на Linux. (Подробный HowTo)
Prosody и первый запуск
Добрый день Комрады! Поставил Prosody дабы потыкать и получить собственный Jabber-сервер (сервер Ubuntu 16.04). Но увы, вылазит ошибка.
При попытке зайти с мобильного клиента (Conversations), выдает ошибку «Сервер не ответственен за домен», хотя я для приличия еще добавил помимо домена ip-адрес сервера. Xabber тоже шлет лесом. Десктопные аналогично.
В логах самого Prosody одно и тоже
В prosody.cfg.lua указан мой домен. Сертефикаты в /etc/prosody/certs тоже положил (прежде сгенерировав sudo prosodyctl cert generate domenname.com)


SRV-записи в DNS добавили?
Да, https://kingant.net/check_xmpp_dns показывает все ok. В клиенте так же указывал адрес сервере ip. Эффект тот же.

hostname в prosody указан? По дефолту там естественно localhost, т.е. если у тебя нужных записей в hosts, то будет несовпадение. Плюс смотри SRV записи.
Я идиот. Забыл удалить строчку
SRV вроде верно указан — http://i.imgur.com/bjmYe5f.png На сервере крутится так же сайт и почта с тем же доменом и проблем нет. Порты открыты и снаружи простукиваются.
Строку удалил, но теперь что-то новенькое. Ругается на сертификат =
Права на сертификат. В зависимости от дистрибутива, нужно root:prosody 640 или что-то вроде того, насколько позволяет осторожность.
Решил в конфинге изменить сертефикат на уже имеющийся localhost. Кстати, вдруг кому надо в будущем права посмотреть (версия Prosody 0.9.10):
С этим сертификатом все заработало без проблем. Не знаю, на сколько это критично использовать этот сертификат. Решил по новой генерировать, под себя. С сертификатами дел раньше не имел. Полезли новые ошибки:
Источник
«error, no objects specified in config file» when creating CSR with ECDSA key & config file #3536
I’ve just been creating an ECDSA-keyed CSR using a config file and ran into what I think is a bug. If i just hit when prompted for e.g. Country Code (to accept the value in my config file) then i get an error and output:
The issue and solution (to re-enter the prompted-for values) is described here:
https://superuser.com/a/944378
The same procedure works fine with an RSA-keyed CSR request so I suspect the issue may be a bug in the EC implementation of openssl req .
I’m using a homebrew-installed openssl on my Mac (Sierra, 10.2.3):
My config file is:
and i am running:
Hopefully that all makes sense. Please let me know if you need any more info, i search so i’m hoping this isn’t a dupe but apologies if it is.
The text was updated successfully, but these errors were encountered:
Neil — I just went through this same issue. While the command ran I was seeing prompts like «US []:» and I was just hitting enter because the values I wanted were in the file.
I added the line prompt=no to the [req] section and my request ran without error. like this:
Hope this helps!
Edited to add: I second Neil’s suggestion that this is a bug. It seems to me that hitting enter on those prompts should have caused the default values to be used.
This isn’t a bug. What happens when you just press Enter on all prompts where no default is given, you end up with an empty subject. That’s what the error complains about.
prompt = no is exactly the right way to handle things if you want to specify the DN entirely in the config file. Or, as suggested on superuser.com, -subj on the command line.
Hi @levitte.
I take your point but I believe the UI is misleading and doesn’t fit well with the principal of least surprise. It appears to at least me (and others based on what I have seen via Googling) that pressing will use the value shown. Compounding that is a pretty unhelpful error message when the creation of the cert fails; worth noting that the behaviour differs between ECC and RSA-based certs. I personally believe this could be relatively easily tidied up (though i fully appreciate it’s not exactly earth-shattering in priority).
Does that make sense? I’d be interested to hear your thoughts on this.
In a way it makes sense. We do, however, expect people to read the manual, which says this re this business:
It’s not like we’re making it a mystery. I can understand, though, if it’s not particularly intuitive for those who haven’t read the manual.
I agree, though, that the error message isn’t the best (read: it’s actually quite bad). so that could change to something better.
Below worked for me, without creating any config.
openssl req -x509 -nodes -days 365 -newkey rsa:1024 -keyout «cert.key» -out «cert.pem» -subj «/»
It’s not like we’re making it a mystery.
The user experience is terrible. Fix it.
Jesus christ, I lost FOUR HOURS trying to add subject alternative name. Still NO GO.
Are you guys crazy?!
yeah i’m here on purpose and I can’t make heads or tails of whats going on. not great?
Just found this trying to find documentation for config file options.
This is awful, for anyone finding this, have a look at : https://apfelboymchen.net/gnu/notes/openssl%20multidomain%20with%20config%20files.html
«Creating these config files, however, is not easy! «
I just ran into this again: (It’s very easy to forget about this little nuance unless you use these tools on a regular basis)
The message from the tool specifically says «For some fields there will be a default value,
If you enter ‘.’, the field will be left blank.» which pretty clearly implies that hitting «enter» will use the default value that’s present in the config file, and that you have to enter a PERIOD to get a blank value if that’s what’s desired.
So this is either a bug in the behavior, or a bug in the displayed message. Either way I find it hard to accept the argument that this isn’t a bug. The behavior doesn’t match the message that’s presented to the user. So either the message or wrong, or the behavior is wrong. Which is it?
Below worked for me, without creating any config. openssl req -x509 -nodes -days 365 -newkey rsa:1024 -keyout «cert.key» -out «cert.pem» -subj «/»
I did with config, but received an error. -subj «/» solved my problem.
© 2023 GitHub, Inc.
You can’t perform that action at this time.
You signed in with another tab or window. Reload to refresh your session. You signed out in another tab or window. Reload to refresh your session.
Источник
NuclideCertificatesGenerator — ERROR — openssl failed: error, no objects specified in config file #1604
Issue and Steps to Reproduce
npm 5.6.0
node v8.11.4
Actual Behavior
nuclide-start-server —verbose
2018-08-30 18:54:39,663 — root — INFO — Invoked nuclide_server_manager.
2018-08-30 18:54:39,663 — NuclideServerManager — INFO — NuclideServerManager was created with these options: <‘certs_dir’: None, ‘server_cert’: None, ‘server_key’: None, ‘verbose’: True, ‘dump_core’: True, ‘insecure’: False, ‘inspect’: False, ‘quiet’: False, ‘debug’: False, ‘json_output_file’: None, ‘version’: None, ‘command’: u’start’, ‘timeout’: 10, ‘common_name’: None, ‘workspace’: None, ‘ca’: None, ‘port’: None>
2018-08-30 18:54:39,663 — NuclideServerManager — INFO — Starting to clean up old Nuclide processes/files.
2018-08-30 18:54:39,690 — NuclideServerManager — INFO — Cleaning up old certificate files.
2018-08-30 18:54:39,691 — NuclideServerManager — INFO — Finished cleaning up old Nuclide processes/files.
2018-08-30 18:54:39,691 — root — WARNING — Failed to clean up old core dumps ([Errno 2] No such file or directory: ‘/var/tmp/cores’)
2018-08-30 18:54:39,692 — NuclideServerManager — INFO — Trying to determine the port to use for Nuclide server.
2018-08-30 18:54:39,719 — NuclideServerManager — INFO — Found an open port: 9090.
2018-08-30 18:54:39,719 — NuclideServerManager — INFO — Initialized NuclideServer.
2018-08-30 18:54:39,744 — NuclideServerManager — INFO — Starting NuclideServer.
2018-08-30 18:54:39,744 — NuclideServerManager — INFO — Using https.
2018-08-30 18:54:39,744 — NuclideServerManager — INFO — Checking if certificate dir /home/leo/.certs exists.
2018-08-30 18:54:39,779 — NuclideCertificatesGenerator — ERROR — openssl failed: error, no objects specified in config file
problems making Certificate Request
Traceback (most recent call last):
File «scripts/nuclide_server_manager.py», line 429, in
server_start_result = manager.start_nuclide()
File «scripts/nuclide_server_manager.py», line 252, in start_nuclide
return <‘exit_code’: self.start_server(server), ‘server’: server>
File «scripts/nuclide_server_manager.py», line 288, in start_server
ca, server_cert, server_key = self._generate_certificates()
File «scripts/nuclide_server_manager.py», line 222, in _generate_certificates
expiration_days=CERTS_EXPIRATION_DAYS)
File «/usr/lib/node_modules/nuclide/pkg/nuclide-server/scripts/nuclide_certificates_generator.py», line 86, in init
self.generate()
File «/usr/lib/node_modules/nuclide/pkg/nuclide-server/scripts/nuclide_certificates_generator.py», line 104, in generate
raise RuntimeError(‘Failed to generate certs.’)
RuntimeError: Failed to generate certs.
Versions
- Atom:
- Nuclide:
- Client OS: windows 10
- Server OS (optional): ubuntu 16.04
The text was updated successfully, but these errors were encountered:
Источник
Replace NSX-T 3 SSL/TLS Certificates – Common errors
This is the fourth post out of a small series about replacing NSX-T SSL / TLS Certificates:
While describing how to replace the NSX-T Manager and Cluster Certs both, through the GUI and manually, I’ve faced a few of errors. Since those error messages are not always entirely clear, I wanted to share some of my findings with you.
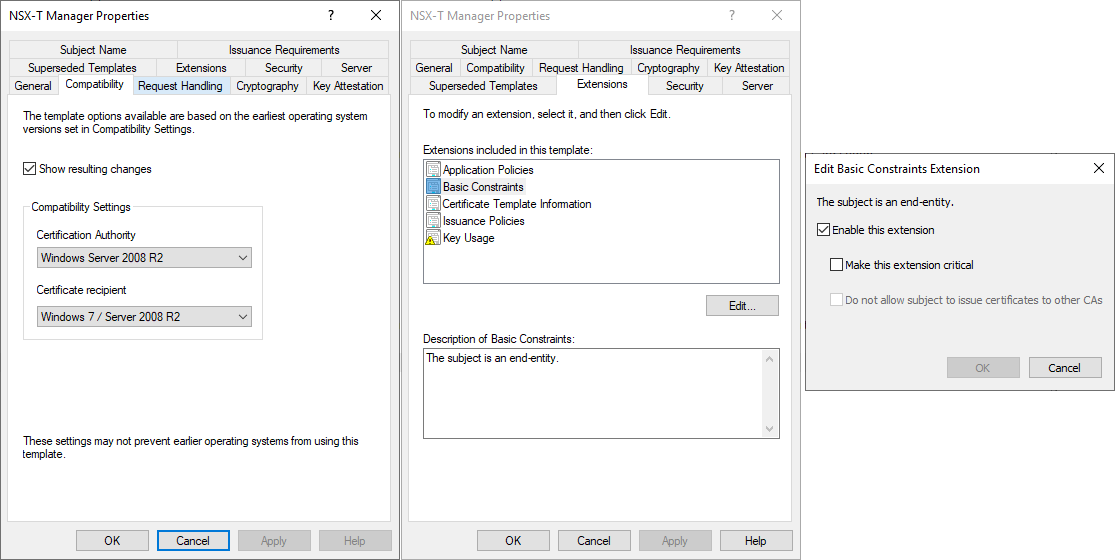
1. Certificate validation failed. Reason : Certificate is not compliant as certificate of type SERVER: Basic constraints Extension is not present in the certificate
After running the command to actually change the certificate, you get a message, similar to:
This means, that your Certificate does not have the Extension “Basic constraints” available / enabled.
In case of a Windows based Certificate Authority, check your Certificate Template Settings. Make sure you have the extension “Basic Constraints” available and Enabled. In order to have this extension available, your compatibility settings must be Windows Server 2008 R2 (or newer).
2. Certificate validation failed. Reason : Certificate : certificate does not verify with supplied key
After running the command to actually change the certificate, you get a message, similar to:
This is a good example of a non-intuitive error description. When you upload the Certificate (not matter whether through the GUI-Method or the Manual-Method) it already checks if the certificate and the key fit together.
If you get this error message after trying to activate the already uploaded certificate, it most likely means, that you haven’t uploaded the complete certificate chain as part of your NSX-T Certificate.
If you upload your certificate file, it must look similar to
—–BEGIN CERTIFICATE—–
NSX-T Manager cert
—–END CERTIFICATE—–
—–BEGIN CERTIFICATE—–
Intermediate CA Cert
—–END CERTIFICATE—–
—–BEGIN CERTIFICATE—–
Root CA Cert
—–END CERTIFICATE—–
3. Certificate validation failed. Reason : Certificate was rejected: CRL check failed: Couldn’t get LDAP context from URI ldap:/// ”
After running the command to actually change the certificate, you get a message, similar to:
This is a tricky one. And a known Issue too – check KB78794
With NSX-T 3, VMware has added a check for Certificate Revocation List (CRL). From a security perspective, it’s quite a good move.
To fix this, VMware recommends the use of HTTP CDP based Certificates.
Alternatively, as a workaround, you can also disable the CRL check – run the following command (fill the <> with your information:
curl –insecure -u :
-X GET “https:// /api/v1/global-configs/SecurityGlobalConfig”
You will get an response, similar to this:
You will need lines 2, 3 and 13. Then run the following command (again, customized to your environment):
curl –insecure -u :
If it succeeds, you will get the previous output again, but with an incremented revision number and crl_checking_enabled set to false.
4. error, no objects specified in config file
When trying to create the key and csr file with openssl, you’ll get an error similar to:
I’m not sure where this exactly comes from, it appears to me like an issue in openssl.
But you can easyly fix this by adding “prompt = no” to the section [req] in your certificate conf file. Of course, you need to specify the desired values in the conf file too, since its not asking for it anymore.
Источник
unixforum.org
Форум для пользователей UNIX-подобных систем
- Темы без ответов
- Активные темы
- Поиск
- Статус форума
Достойный контроллер домена на Linux. (Подробный HowTo) (MDS, Ldap, Samba, Postfix, SQUID)

Достойный контроллер домена на Linux. (Подробный HowTo)
Сообщение HidX » 18.01.2009 20:39
Глава I – Настройка сервера и домена.
Добрый вечер. Хотелось бы поделиться с вами одним интересным моим проектом – Контроллер домена на Linux. В данной теме реализован подробный мануал (Howto) по настройке и внедрению рабочего домена с консолью управления – Mandriva Directory Server.
Немного истории:
Вообще я далеко не профи в *nix системах, но всё таки активно интересуюсь и изучаю их. По поводу домена на linux я слышал множество упрёков и похвал. И вот около года назад задался вопросом поднятия домена на Linux. Во первых просто интересно, а во вторых он абсолютно бесплатен, что и требовала компания где я работал. За год перебрал кучу вариантов, кучу сборок С подобной реализацией на сомнительных диструбутивах, поднял несчётное количество ПАКетов ldap SAmba. Но мне казалось что всё это не то. Либо безумно неудобное управление, либо куча лишнего. Куча лишнего было в готовых дистрибутивах (аля-домен за одну минуту.). Было боязно внедрять их в мою не большую и не маленькую компанию(Более 100 рабочих станций в одном только офисе). Во первых неизвестно что и как разработчики делали с дистрибутивом, во вторых поддержка на иностранном языке ))) А самому разгребать последствия не хочется.
Не так давно, наткнулся на статью Oliver Meyer. По сборке и настройке домена на Debian ИСПользуя консоль управления Mandriva Directory Server. Оказалось то что нужно. Ничего лишнего, простота управления доменом. Есть конечно свои минусы и багги.
Статья Оливера была отличной, но имела свои минусы ( да и вообще она была на немецком ). На основе этой статьи я начал писать свой проект.
Собственно мой проект — это перевод статьи Оливера (безумно спасибо ему!) + я добавил что то своё, поправил некоторые моменты из за которых могли возникнуть большие проблемы, и написал несколько дополнений (групповые политики для настройки рабочих сред пользователей, дополнительные модули для консоли и т.д.)
В итоге получилось . Довольно удачный проект который позволяет, даже мало знающему в Linux человеку, поднять рабочий стабильный PDC с удобной консолью управления, а так же в перспективе написания к этой консоли своих собственных модулей на уровне phyton ИЛИ PHP .
Заранее прошу прощения за грамматические ошибки и возможный бред в тексте. Писал по ночам. Буду по возможности что то добавлять и исправлять.
Итак. Для начала ставим сам Debian. У меня под рукой оказался debian-40r5 — я ставлю его. Стандартная установка. При установке выбрал Русский язык и вбил вручную настройки сети.
В ходе проделанной работы по этому мануалу мы получим:
• OpenLdap сервер.
• Samba сервер в качестве первичного контроллера домена (PDC), а так же файлсервера.
• DNS сервер (Bind).
• Корпоративный DHCP сервер.
• Административная консоль управления службами Mandriva Directory Server.
• Групповые политики для автоматической настройки рабочих станций на Windows (начиная c XP).!
• Корпоративный кэширующий прокси сервер (SQUID).
• Расширенный почтовый сервер Postfix, с поддержкой Imap и POP3 сервера (Dovecot), с проверкой на вирусы и фильтрации почты (Amavis, Spamassassin, ClamAV), SMTP сервером, с поддержкой квот, SSL и TSL.
• Сервер синхронизации времени.
• Сервер печати Cups.
• NFS сервер.
• MMC php плагины.
Планы на ближайшее время. Реализовать
• BDC – Дополнительный (резервный) контроллер домена.
• SQUID — Проверка на вирусы, аутентификация по группам домена, модуль статистики для MDS (на основе lightsquid) — УжЕ готово.
Имя компьютера – pdc
Имя домена Samba – adsl.com
Хостнэйм сервера – pdc.adsl.com
Ip адрес сервера – 192.168.50.237
Ip адрес шлюза – 192.168.50.235
Мой админский пароль – example
Предполагается что установка Debian прошла без сюрпризов и сервер полностью готов для настройки. Первоначально я буду пользоваться текстовым редактором vim, он в отличие от vi более удобен, но чуть позже, когда мы обновим репозитарии, я поставлю редактор ee т.к. он на мой взгляд самый удобный ( и вообще напоминает о freebsd  ). Единственное, в Debian редактор ee немного глючит: может не правильно вставить скопированный текст. Так что лучше проверять конфиги после переноса.. или продолжать пользоваться редактором vim.
Для начала проверим сетевые настройки. А именно файлы hosts, hostname, interfaces, resolv.conf
Что бы не было конфликтов при установке пакетов, идём в ребут.
После перезагрузки проверяем что бы хост нэйм был правильным.
Сеть настроили, теперь приступим за обновления репозитариев для Debian. Собственно настройка производится путём редактирования файла /etc/apt/sources.list. В нём нужно вписать путь к серверу с пакетами.
По умолчанию там стоит ссылка на пакеты с CD диска установки Debian и ссылка на сервера с обновлениями безопасности для Debian.
Т.к. у меня установочный диск с Debian не постоянно в Cd-Rom приводе, комментируем эту строку, путём добавления вперёд значка # (удалять не буду, малоли пригодится.)
Далее добавляем ниже ссылки на стандартные сервера с пакетами Dibian. Оттуда будут устанавливаться стандартное программное обеспечение:
Ещё ниже добавляем ссылку на сервер Mandriva Directory Server. Оттуда будет ставиться сама главная консоль управления доменом и службами:
Ниже добавляем ссылку на сервер с которого будет ставиться такие пакеты как ClamAV & Spamassassin. Ну и + обновления для них от туда же будет подтягиваться:
# Debian Volatile
deb http://volatile.debian.org/debian-volatile etch/volatile main contrib non-free
Ниже добавляем ссылку на сервер бэкпорт с которого будет ставиться самый свежий пакет Devecot:
# Debian Etch Backports
deb http://www.backports.org/debian etch-backports main
Сохраняем и выходим из редактирования файла.
В итоге у меня получился вот такой файл репозитариев /etc/apt/sources.list
Обновляем репозитарии командой:
В конце обновления, система может написать ошибку. Что то вроде этого:
Предлагаю не обращать внимания на это, пакеты всё равно будут устанавливаться с проблемных серверов.
Далее настраиваем поддержку ACL, это необходимо для шар самбы, что бы корректно сохранялись права виндовых машин, что бы эти права наследовались, что бы профиль пользователя Windows перемещался корректно ну и т.д.
В этом файле добавляем опцию ”acl” между опциями defaults,acl,errors=remount-ro, в раздел где будут храниться шары самбы сервера. В моём случае это раздел ”/”.
Далее нужно перемонтировать этот раздел:
mount -o remount /
Проверяем:
mount -l
После исполнения этой команды должен появиться список разделов с различными опциями. В моём разделе должна стоять опция acl, это означает что поддержка acl включена.
/dev/sda1 on / type ext3 (rw, acl ,errors=remount-ro)
2. Установка необходимого программного обеспечения.
Для начала установим простые утилиты для удобства настройки сервера. Их у меня будет три – это текстовый редактор ee, файловый менеджер Midnight commander и SSH сервер для удобства администрирования. Midnight commander – что то вроде Norton Commander, с ним легко и быстро можно перемещаться по файловой системе сервера, хоть в данном мануале использовать его я практически не буду, тем не менее я считаю что его нужно поставить.
apt-get install ee
apt-get install mc
apt-get install ssh openssh-server
Далее буду редактировать файлы через ee.
После простых утилит, ставим ntp сервер. Он нужен для синхронизации времени. У сервака будет точное время, а так же все рабочии станции пользователей будут синхронизировать часы с этим сервером.
apt-get install ntp
Итак, теперь пришло время установки основного программного обеспечения сервера. На этих программах и будет всё держаться.
apt-get install mmc-web-base mmc-web-mail mmc-web-network mmc-web-proxy mmc-web-samba mmc-agent python-mmc-plugins-tools python-mmc-base python-mmc-mail python-mmc-network python-mmc-proxy python-mmc-samba postfix postfix-ldap sasl2-bin libsasl2 libsasl2-modules amavisd-new libdbd-ldap-perl libnet-ph-perl libnet-snpp-perl libnet-telnet-perl lzop nomarch zoo clamav clamav-daemon gzip bzip2 unzip unrar-free unzoo arj spamassassin libnet-dns-perl razor pyzor slapd ldap-utils libnss-ldap libpam-ldap dhcp3-server dhcp3-server-ldap bind9 samba smbclient smbldap-tools cupsys cupsys-client foomatic-db-engine foomatic-db foomatic-db-hpijs foomatic-db-gutenprint foomatic-filters foomatic-filters-ppds fontconfig hpijs-ppds linuxprinting.org-ppds make mkisofs
К слову – пакет mkisofs нужен для утилиты бэйкапа шар самбы, так что важно его поставить.
Ставим пакеты dovecot
apt-get install -t etch-backports dovecot-common dovecot-imapd dovecot-pop3d
При установке нужно будет ответить на несколько вопросов. Нужно ввести ответы, без кавычек:
• LDAP попросит ввести пароль админа, вначале я написал, что буду везде использовать пароль «example», его и ввожу.
• SAMBA спросит имя домена у меня это «ADSL». Вторым она спросит про smb.conf файл. Отвечаем «No».
• При установке почтовых пакетов будет задан ряд вопросов. Тут в принципе всё по умолчанию должно быть нормально. Конфигурация «Internet Site», имя почты «pdc.adsl.com».
• Затем идёт конфигурация Libnss-LDAP. В Сервер URI LDAP вводим « ldap ://127.0.0.1/», имя базы поиска вводим «dc=adsl,dc=com», версию Ldap указываем «3», Ldap акаунт для рута вводим «cn=admin,dc=adsl,dc=com», пароль для Ldap админа – example.
• Ну и наконец Libpam-LDAP. Выберите «Да», когда Вас спросят, должен ли локальный root быть админом базы данных. На вопрос о логине Ldap базы данных вводим «Нет». Ldap акаунт для рута вводим «cn=admin,dc=adsl,dc=com». И последнее вводим пароль от Ldap «example»
Так, далее ставим пакет dcc-client. Т.к. я его не нашёл в репозитариях Dibian, будем ставить его же от Ubuntu. Я ставил его на рабочий домен, вроде всё подходит, конфликтов не возникало. Для этого находим его на сайте поиска пакетов для Ubuntu. (http://packages.ubuntu.com).
Итак, создаём у себя папку для хранения закаченных пакетов пакетов.
Далее входим на страницу с найденным пакетом http://packages.ubuntu.com/ru/dapper/dcc-client. В разделе Загрузка пакета выбираем вашу архитектуру сервера, у меня это i386. Откроется страница с серверами. Выбираем любой и копируем ссылку на пакет.
Входим в нашу папку и закачиваем туда выбранный пакет.
Тут есть одна тонкость, пакет dcc-client, зависит от пакета dcc-common. Так что его тоже нужно закачать и установить. Находим его на том же сайте (http://packages.ubuntu.com/ru/dapper/dcc-common) и так же закачиваем с любого сервера.
wget http://ftp.oleane.net/pub/ubuntu/pool/univ. 2.74-2_i386.deb
В итоге в директории webpkg у нас будут два скаченных пакета.
pdc:/webpkg# ls
dcc-client_1.2.74-2_i386.deb dcc-common_1.2.74-2_i386.deb
dpkg -i dcc-client_1.2.74-2_i386.deb dcc-common_1.2.74-2_i386.deb
3. Конфигурация домена.
Всё, все пакеты и компоненты установлены. Теперь необходимо их настроить. Сначало будем настраивать самое трудное это slapd, samba, nss и т.д. от них зависит работоспособность сервера.
Переносим схемы MMC, которые мы будем прописывать в LDAP. Всего их 6, это схемы dns, dhcp, samba, mail, mmc, printer. По их названию можно понять для чего каждая схема служит.
cp /usr/share/doc/python-mmc-base/contrib/ldap/mmc.schema /etc/ldap/schema/
cp /usr/share/doc/python-mmc-base/contrib/ldap/mail.schema /etc/ldap/schema/
zcat /usr/share/doc/python-mmc-base/contrib/ldap/samba.schema.gz > /etc/ldap/schema/samba.schema
zcat /usr/share/doc/python-mmc-base/contrib/ldap/printer.schema.gz > /etc/ldap/schema/printer.schema
zcat /usr/share/doc/python-mmc-base/contrib/ldap/dnszone.schema.gz > /etc/ldap/schema/dnszone.schema
zcat /usr/share/doc/python-mmc-base/contrib/ldap/dhcp.schema.gz > /etc/ldap/schema/dhcp.schema
Далее пропишем в конфиге Ldap эти схемы
там прямо ниже уже прописанных схем (include /etc/ldap/schema/inetorgperson.schema) вставляем следующее:
Сохраняем и выходим из файла.
Далее нужно получить наш админский пароль от LDAP в шифрованном виде. Шифруем с помощью SSHA.
slappasswd -s example
Я получил вот такую строчку zgbmt9l5XDohI+3FquZbTRLWsJD2+3Pg (у вас он будет другой) открываем блокнот, и сохраняем эту строчку туда, она нам понадобиться. Далее мы снова открываем конфиг Ldap.
Находим строчку — #rootdn «cn=admin,dc=ads,dc=com» (у вас она будет другой). И раскоментируем её, убирая спереди знак #. Ниже неё добавляем переменную rootpw с нашим шифрованным паролем. В итоге получим:
В этом же файле находим строчку # Indexing options for database #1 нижеё строка index objectClass eq удаляем её. И в место неё вставляем следующие строки
Находим в этом же файле строку access to attrs=userPassword,shadowLastChange и изменяем её на следующее:
Далее находим строчку loglevel 0 и вписываем вместо 0 число 256. Это нужно что бы работал журнал в mmc.
В итоге у меня получился вот такой конфиг файла slapd.conf — Сверьте со своим конфигом! :
Теперь правил файл /etc/ldap/ldap.conf добавляя в самый его низ две строчки:
Настройка ldap окончена, рестартим его:
Да, кстати по поводу журналов в mmc. Мы так же должны добавить в файл /etc/syslog.conf следующее (Где то в середине, я думаю вы поймёте куда добавлять):
Теперь перейдём к настройке SAMBA:
Стапаем самбу что бы не было конфликтов.
/etc/init.d/samba stop
Копируем конфиг самбы который идёт в состав mmc:
cp /usr/share/doc/python-mmc-base/contrib/samba/smb.conf /etc/samba/
И переходим к его редактированию:
ee /etc/samba/smb.conf
Конфиг должен быть таким (подставьте свои значения) — Сверьте со своим конфигом! Обязательно проследите что бы последовательность строчек была такой же как в эталоном конфиге (иначе могут быть проблемы.) :
Сохраняем конфиг и выходим.
Теперь нужно протестировать конфиг самбы на ошибки командой testparm:
Теперь получим SID нашего домена:
net getlocalsid ADSL
В ответ он мне выдаст номер Sid’a. Сохраните его в какой ни будь файл. Он нам понадобится очень скоро.
Проверяем регистрацию сида в Ldap:
slapcat | grep sambaDomainName
В ответ что то типа:
Ура, самба закончилась. Перейдём к конфигурации smbLdap tools. Это так же важная часть домена:
Для начала созданим файлы конфигурации для smbldap-tools.
Сейчас будем настраивать главный файл конфиграции smbldap-tools. В него нужно вставить номер нашего SID , котопрый мы получили чуть выше… А так же подставить свои значения.
Ставим права на конфиг файлы smbldap-tools:
chmod 0644 /etc/smbldap-tools/smbldap.conf
chmod 0600 /etc/smbldap-tools/smbldap_bind.conf
Так. Всё готово. Теперь нужно наполнить нашу ldap базу. А так же создать глобальный аканут администратора ldap. (Administrator).
smbldap-populate -m 512 -a Administrator
Вас попросят ввести пароль администратора. Я ввёл example. Так же, в будующем, нужно будет изменить uid номер учётной записи администратора. Иначе будут проблемы с почтой для этого акаунта.
Дополнительно мы добавим Administrator в группу Domain Users.
smbldap-usermod -u 3000 -G «Domain Users» Administrator
Так. Теперь конфигурируем NSS LDAP. Что бы иметь позможность получать списки и данные Ldap.
Копируем предорженый файл mmc в /etc/nsswitch.conf
cp /usr/share/doc/python-mmc-base/contrib/ldap/nsswitch.conf /etc/nsswitch.conf
После этого создадим необходимые директории для samba. Которые мы указывали в её конфиге:
mkdir -p /home/samba/shares/public/
mkdir /home/samba/netlogon/
mkdir /home/samba/profiles/
mkdir /home/samba/partage/
mkdir /home/samba/archives/
И зададим им соответствующие права:
chown -R :»Domain Users» /home/samba/
chmod 777 /var/spool/samba/ /home/samba/shares/public/
chmod 755 /home/samba/netlogon/
chmod 770 /home/samba/profiles/ /home/samba/partage/
chmod 700 /home/samba/archives/
Сделали почти половину. Сейчас займёмся Конфигурацией PAM LDAP. Тут нужно будет добавить поддержку ldap в Pam, путём добавления некоторых строк в файлы pam. Эти файлы должны иметь примерно следующий вид:
После этой надстроки. Мы должны ОБЯЗАТЕЛЬНО перезагрузиться.
Итак. Кульминационный момент. После перезагрузки. Мы должны дать право группе Domain Admins добавлять машины в домен (обязательно в команде замените имя домена на свой.):
net -U Administrator rpc rights grant ‘ADSLDomain Admins’ SeMachineAccountPrivilege
Если после выполнения команды ошибок не обнаружилось, то всё хорошо. Настройка домена прошла успешно, теперь остались мелочи… настройка вспомогательных служб сервера.
Если же были выявлены ошибки. То советую не продолжать дальнейшие действия, а искать проблему вашей ошибку. Скорей всего что то не правильно в конфиге samba и slapd. Обязательно проверте каждую строчку конфига и сравните её с этой же строчкой моего мануала.
4. Конфигурация дополнительных служб домена.
Так. Домен мы настроили, это уже пол дела. Теперь будем настраивать дополнительные службы домена. Это почта, прокси сервер, антивирус, антиспам и т.д. А начнём мы пожалуй с почтового сервера.
Настроим протокол безопасности SSL. Для этого создадим файл конфигурации:
Теперь создадим наш SSL сертификат, используя наш файл конфигурации:
openssl req -x509 -new -config /etc/ssl/mail.cnf -out /etc/ssl/certs/mail.pem -keyout /etc/ssl/private/mail.key -days 365 -nodes -batch
Так. Наш ключик создан. Теперь поставим на него права. Что бы только root имел право его читать:
chmod 600 /etc/ssl/private/mail.key
Далее, настраиваем пакет аутентификации SASL. Его настройка нужна т.к. почтовый сервер Postfix использует его для атентификации юзеров в LDAP.
mkdir -p /var/spool/postfix/var/run/saslauthd/
ee /etc/default/saslauthd
Источник
This is the fourth post out of a small series about replacing NSX-T SSL / TLS Certificates:
- Replace NSX-T 3 SSL / TLS Certificates – GUI MethodReplace
- Replace NSX-T 3 SSL / TLS Certificates – Manual Method
- Replace NSX-T 3 SSL / TLS Certificates – Cluster Certificate
- –> Replace NSX-T 3 SSL / TLS Certificates – Common errors
While describing how to replace the NSX-T Manager and Cluster Certs both, through the GUI and manually, I’ve faced a few of errors. Since those error messages are not always entirely clear, I wanted to share some of my findings with you.
1. Certificate validation failed. Reason : Certificate is not compliant as certificate of type SERVER: Basic constraints Extension is not present in the certificate
After running the command to actually change the certificate, you get a message, similar to:
{
  "error_code": 36432,
  "error_message": "Certificate validation failed. Reason : Certificate is not compliant as certificate of type SERVER: Basic constraints Extension is not present in the certificate",
  "module_name": "node-services"
}
This means, that your Certificate does not have the Extension “Basic constraints” available / enabled.
In case of a Windows based Certificate Authority, check your Certificate Template Settings. Make sure you have the extension “Basic Constraints” available and Enabled. In order to have this extension available, your compatibility settings must be Windows Server 2008 R2 (or newer).
2. Certificate validation failed. Reason : Certificate <certificate attributes>: certificate does not verify with supplied key
After running the command to actually change the certificate, you get a message, similar to:
{
  "error_code": 36432,
  "error_message": "Certificate validation failed. Reason : Certificate CN=nsxt-3.vraccoon.lab,OU=Lab,O=vRaccoon Corp,L=Germany,ST=BER,C=DE was not verifiably signed by CN=nsxt-3.vraccoon.lab,OU=Lab,O=vRaccoon Corp,L=Germany,ST=BER,C=DE: certificate does not verify with supplied key",
  "module_name": "node-services"
}
This is a good example of a non-intuitive error description. When you upload the Certificate (not matter whether through the GUI-Method or the Manual-Method) it already checks if the certificate and the key fit together.
If you get this error message after trying to activate the already uploaded certificate, it most likely means, that you haven’t uploaded the complete certificate chain as part of your NSX-T Certificate.
If you upload your certificate file, it must look similar to
—–BEGIN CERTIFICATE—–
NSX-T Manager cert
—–END CERTIFICATE—–
—–BEGIN CERTIFICATE—–
Intermediate CA Cert
—–END CERTIFICATE—–
—–BEGIN CERTIFICATE—–
Root CA Cert
—–END CERTIFICATE—–
3. Certificate validation failed. Reason : Certificate was rejected: CRL check failed: Couldn’t get LDAP context from URI ldap:///<CRL path>”
After running the command to actually change the certificate, you get a message, similar to:
{
  "error_code": 36432,
  "error_message": "Certificate validation failed. Reason : Certificate was rejected: CRL check failed: Couldn't get LDAP context from URI ldap:///CN=vraccoon-DC-CA,CN=dc,CN=CDP,CN=Public%20Key%20Services,CN=Services,CN=Configuration,DC=vraccoon,DC=lab?certificateRevocationList?base?objectClass=cRLDistributionPoint",
  "module_name": "node-services"
}
This is a tricky one. And a known Issue too – check KB78794
With NSX-T 3, VMware has added a check for Certificate Revocation List (CRL). From a security perspective, it’s quite a good move.
To fix this, VMware recommends the use of HTTP CDP based Certificates.
Alternatively, as a workaround, you can also disable the CRL check – run the following command (fill the <> with your information:
curl –insecure -u <user>:<password> -X GET “https://<manager-fqdn>/api/v1/global-configs/SecurityGlobalConfig”
You will get an response, similar to this:
{
  "crl_checking_enabled" : true,
  "ca_signed_only" : false,
  "resource_type" : "SecurityGlobalConfig",
  "id" : "750efc5c-42d4-455e-b167-3497ba3ce879",
  "display_name" : "750efc5c-42d4-455e-b167-3497ba3ce879",
  "_create_user" : "system",
  "_create_time" : 1590267915849,
  "_last_modified_user" : "system",
  "_last_modified_time" : 1590330655250,
  "_system_owned" : false,
  "_protection" : "NOT_PROTECTED",
  "_revision" : 7
}
You will need lines 2, 3 and 13. Then run the following command (again, customized to your environment):
curl –insecure -u <user>:<password> -X PUT “https://<manager-fqdn>/api/v1/global-configs/SecurityGlobalConfig” -H “Content-Type: application/json” -d ‘{“crl_checking_enabled”:false, “resource_type” : “SecurityGlobalConfig”,”_revision” : <revision number>}’
If it succeeds, you will get the previous output again, but with an incremented revision number and crl_checking_enabled set to false.
4. error, no objects specified in config file
When trying to create the key and csr file with openssl, you’ll get an error similar to:
vraccoon@ubu:/tmp$ openssl req -nodes -newkey rsa:2048 -keyout nsxt-3.key -config nsxt-3.cnf -out nsxt-3.csr
Generating a RSA private key
...................................................................+++++
.............................................................................................................................................................+++++
writing new private key to 'nsxt-3.key'
-----
You are about to be asked to enter information that will be incorporated
into your certificate request.
What you are about to enter is what is called a Distinguished Name or a DN.
There are quite a few fields but you can leave some blank
For some fields there will be a default value,
If you enter '.', the field will be left blank.
-----
DE []:
Germany []:
BER []:
vRaccoon Corp []:
LAB []:
nsxt-3.vraccoon.lab []:
error, no objects specified in config file
problems making Certificate Request
I’m not sure where this exactly comes from, it appears to me like an issue in openssl.
But you can easyly fix this by adding “prompt = no” to the section [req] in your certificate conf file. Of course, you need to specify the desired values in the conf file too, since its not asking for it anymore.
Можно ли создать запрос сертификата PKCS # 10 / сертификат X.509 с идентифицирующей информацией только в атрибуте / расширении альтернативного имени субъекта? В соответствии с X.509 4.1.2.6 Тема , субъект может быть пустым для сертификата, субъект которого не является центром сертификации, если subjectAltName является критическим.
Но когда я использую этот конфигурационный файл с пустым разделом отличительного имени:
# request.config
[ req ]
distinguished_name = req_distinguished_name
req_extensions = v3_req
prompt = no

[ req_distinguished_name ]

[ v3_req ]
keyUsage = nonRepudiation, digitalSignature, keyEncipherment
subjectAltName=critical,email:certtest@example.com
и команды
openssl genrsa 1024 > key.pem
openssl req -new -key key.pem -out req.pem -config request.config
OpenSSL жалуется:
error, no objects specified in config file
problems making Certificate Request
Ответы:
Это сработало для меня:
файл test-no-cn.cnf
[req]
default_bits       = 4096
encrypt_key        = no
default_md         = sha256
distinguished_name = req_distinguished_name
req_extensions = v3_req

[ req_distinguished_name ]

[ v3_req ]
keyUsage = nonRepudiation, digitalSignature, keyEncipherment
subjectAltName=critical,email:certtest@example.com,URI:http://example.com/,IP:192.168.7.1,dirName:dir_sect

[dir_sect]
C=DK
O=My Example Organization
OU=My Example Unit
CN=My Example Name
Генерация CSR
openssl req -new -newkey rsa:4096 -nodes -config test-no-cn.cnf -subj "/" -outform pem -out test-no-cn.csr -keyout test-no-cn.key
Подпишите CSR
openssl x509 -req -days 365 -in test-no-cn.csr -signkey test-no-cn.key -out test-no-cn.crt -outform der -extensions v3_req -extfile test-no-cn.cnf
Посмотреть полученный сертификат
openssl x509 -inform der -in test-no-cn.crt -noout -text
Я также столкнулся с этой ошибкой «никакие объекты не указаны». Это отображало подсказку как это для различных полей:
US []:
И я просто нажимал Enter, потому что я уже установил эти значения в файле .cnf. Оказывается, мне нужно было снова ввести все значения, и тогда это сработало.
Проблема prompt = noв оригинальном конфиге. КОТОРЫЙ ДЕЛАЕТ openssl reqПредположим , вы собираетесь указать данные , подлежащие в конфигурационном файле и попадает в предварительную проверку в req.c .
Существует обходной путь: удалите prompt = noи добавьте -subj /к своей openssl reqкомандной строке. Вот пример сценария, который создает CSR и самозаверяющий сертификат:
cat > openssl.cnf <<EOF
[ req ]
distinguished_name = req_distinguished_name
req_extensions = v3_req

[ req_distinguished_name ]

[ v3_req ]
keyUsage = nonRepudiation, digitalSignature, keyEncipherment
subjectAltName=critical,email:certtest@example.com
EOF
openssl req -newkey rsa:2048 -config openssl.cnf -nodes -new -subj "/"
  -out req.csr
openssl req -newkey rsa:2048 -config openssl.cnf -nodes -new -subj "/"
  -x509 -out cert.crt
Попробуйте «commonName = необязательный» в разделах политики в файле конфигурации openssl.
Кажется, вы вводите одно единственное значение из группы «отличное_имение» со своей клавиатуры, и оно работает нормально … Я имею в виду, что вам не нужно вводить другие значения и вы можете использовать их значения по умолчанию (как указано в файле openssl.conf), что говорит
[ req ]
...
distinguished_name = req_distinguished_name
prompt = no
...

Should work fine.