Содержание
- Ошибка ADB при выполнении команды adb shell pm grant…
- Как решить проблему «an exception occurred while executing»?
- Error no permission specified adb
- Set permission #18
- Comments
- Footer
- pts.blog
- Flattr this blog
- Blog Archive
- Recommended
- 2011-10-02
- How to fix the adb no permissions error on Ubuntu Lucid
- 52 comments:
Ошибка ADB при выполнении команды adb shell pm grant…
Некоторым Android приложениям необходимые специальные права, которые можно получить с помощью команды adb shell pm grant. На новых устройствах она может завершиться с ошибкой. Как ее исправить?
Вы установили приложение SystemUI Tuner или GSam Battery Monitor или что еще подобное? Этим приложениям, помимо того что их необходимо установить с Google Play, для правильной работы необходимо выдать повышенные привилегии с помощью утилиты adb и ввода команды adb shell pm grant.
Если на старых Android устройствах эта команда выполняется без каких либо проблем, то на новых вы можете получить ошибку «Security exception: grantRuntimePermission: Neither user 2000 nor current process has android.permission.GRANT_RUNTIME_PERMISSIONS. » или Exception occurred while executing.
Как решить проблему
«an exception occurred while executing»?
Чтобы исправить ошибку, не нужно выполнять каких либо сложных действий, все лежит на поверхности. Убедитесь что у вас установлена самая новая версия adb на компьютере, а также что вы включили «Отладку по USB» и прошли авторизацию.
А теперь самое главное! Найдите и активируйте два параметра в меню разработчика Android:
- Установка через USB
- Отладка по USB (Настройки безопасности)
После активации попробуйте заново выполнить команды adb shell pm grant для повышения привилегий приложению. Все должно заработать как надо!
У вас еще остались дополнительные вопросы? Задавайте их в комментариях, рассказывайте о том, что у вас получилось или наоборот!
Вот и все! Оставайтесь вместе с сайтом Android +1, дальше будет еще интересней! Больше статей и инструкций читайте в разделе Статьи и Хаки Android.
Источник
Error no permission specified adb

Краткое описание:
Пакет LADB позволяет вам использовать ADB Shell на устройствах без рут благодаря Wireless ADB Debugging
Описание:
Пакет LADB это ADB сервер с библиотеками приложения. Обычно сервер не может подключится к локальном устройству, так как это требует USB подключения. Однако Android опция Android’s Wireless ADB Debugging позволяет серверу и приложению общаться друг с другом локально.
Это купленная версия с Google Play без всякого взлома и модификаций!
Установка через SAI (Split APKs Installer)
Требуется Android: 8.0+
Русский интерфейс: Да
Версия: 1.3.2 LADB — Local ADB Shell
Версия: 1.3.1 LADB — Local ADB Shell
Версия: 1.2.3 LADB — Local ADB Shell
Версия: 1.1.2  ladp-1.1.2-split-en-ru-xxhdpi-arm64_v8a.zip ( 2.35 МБ )
Сообщение отредактировал iMiKED — 20.10.22, 21:43
 Kucher2000, да.
Подробно изучил — на Android 10 и ниже для работы нужно после каждой перезагрузки активировать через ADB на пк, что делает довольно бесполезным данное приложение для андроида ниже 11.
Можно тут почитать, но я честно говоря смысла не вижу, если не Android 11: This app gives you a local ADB shell, no need for root
Сообщение отредактировал clever_man — 25.12.20, 20:42

Тип: Новая версия
Версия: 1.2.3
Краткое описание: paid
- Текст теперь можно выделять
- Увеличен максимальный размер буфера
ladp-1.2.3-split-en-ru-xxhdpi-arm64_v8a.zip ( 2.5 МБ )
Тип: Новая версия
Версия: 1.2.4
Краткое описание: paid
Исправление ошибок и вылетов, найденные пользователями
Сообщение отредактировал clever_man — 13.01.21, 18:17
Добрый! Подскажите, сабж позволяет полностью удалять предустановленные приложения без рут или только заморозка?
Сообщение отредактировал Verel — 16.01.21, 03:33
Всех приветствую. Honor 7a pro, показывает вот это и дальше ничего.

А всё понял, Android 8 требует (api 26).
Сообщение отредактировал MarS1234 — 08.03.21, 16:28
Тип: Новая версия
Версия: 1.3.1
Краткое описание: gp
- Fixed janky scrolling
- Automatically open keyboard when ready
- Better text contrast
- Fix issue where multiple devices are connected
- Possibly fix incompatibility with Shizuku (thank you Rikku!)
- Added horizontal scrolling
- Reduced text size
- Say «Hello world!» when the connection is made
- Automatically retry if a connection cannot be made
LADB после старта на A10 начинает сканировать сеть и спрашивает «Allow USB Debugging: the computer’s RSA key fingerprint 5B:3C. :15 Allow?» Поскольку в данном случае ADB дебаг идёт через localhost самого тела, и на самом теле запущены ADB сервер и клиент, то как узнать RSA key fingerprint (adbkey) своего смартфона?
Упоминалось как разрешить wireless debugging на стандартном А10 через USB провод с ПК. Но во многих кастомных прошивках опция Wireless (Network) Debugging уже добавлена в Developer Options. Поэтому есть смысл использовать эту утилиту в А10, но неясно как узнать или добавить RSA key fingerprint тела?
Сообщение отредактировал sambul71 — 02.04.21, 04:54
Источник
Set permission #18
Running the adb command to set the permission results in a ‘no permission specified’ error. Google seems to agree with the command itself, so I suspect a wrong id?
The text was updated successfully, but these errors were encountered:
Hmm. it should work. Are you sure you didn’t misspell anything?
adb shell pm grant com.dp.logcatapp android.permission.READ_LOGS
Also, what version of Android?
I presume the error was misreading the command. It appears as 3 lines when displayed by the app, given my screen resolution and font size. It is really all on a single line.
Here a slight alternative:
Open a DOS window by pressing the «Windows» key then typing «cmd» then enter.
Use «cd /folder_to_adb.exe»
Type «adb devices»
If your phone is recognized;
Type «adb shell» and enter
You are now in an interactive linux style shell executing in your phone.
Type: «pm grant com.dp.logcatapp android.permission.READ_LOGS»
pm is a command which will read 3 parameters
grant is the first parameter
com.dp.logcatapp is the second parameter. It is the internal name that identify the app
Finally, the third parameter is the name of the permission.
This works without needing root. The app, after restart, immediately print all those log lines.
Thanks for sharing the source code.
Do I have to restart the app or my device?
Is there a possibility to show in Logcat Reader if READ_LOGS is already granted?
I sent the command with adb and got no error, so I guess it worked. But Logcat doesn’t show logs from other apps.
Huawei P20 Pro with Android 9.
same issue with Motorola G7 here
You need to kill the app and restart it too :
adb shell pm grant com.dp.logcatapp android.permission.READ_LOGS
© 2023 GitHub, Inc.
You can’t perform that action at this time.
You signed in with another tab or window. Reload to refresh your session. You signed out in another tab or window. Reload to refresh your session.
Источник
pts.blog
Flattr this blog
Blog Archive
- ►2021 (1)
- ►October (1)
- ►2020 (3)
- ►December (1)
- ►April (2)
- ►2019 (2)
- ►February (2)
- ►2018 (5)
- ►June (1)
- ►April (4)
- ►2017 (6)
- ►December (1)
- ►October (1)
- ►September (1)
- ►February (3)
- ►2016 (8)
- ►November (1)
- ►July (1)
- ►June (1)
- ►May (1)
- ►April (1)
- ►March (1)
- ►February (1)
- ►January (1)
- ►2015 (5)
- ►December (1)
- ►November (1)
- ►March (2)
- ►February (1)
- ►2014 (22)
- ►October (2)
- ►September (3)
- ►August (2)
- ►July (3)
- ►June (2)
- ►April (3)
- ►January (7)
- ►2013 (24)
- ►December (9)
- ►November (2)
- ►October (3)
- ►August (5)
- ►May (1)
- ►April (2)
- ►March (1)
- ►February (1)
- ►2012 (21)
- ►December (2)
- ►November (5)
- ►September (2)
- ►August (2)
- ►June (2)
- ►April (2)
- ►March (2)
- ►February (1)
- ►January (3)
- ▼2011 (30)
- ►December (2)
- ►November (3)
- ▼October (5)
- Long standby time for Cyanogenmod 7.1 on ZTE Blade.
- Getting started with IntelliJ to write Android app.
- Named return value optimization in gcc
- How to initiate and receive voice and video calls .
- How to fix the adb no permissions error on Ubuntu .
- ►September (1)
- ►August (6)
- ►June (3)
- ►May (1)
- ►April (3)
- ►March (1)
- ►February (2)
- ►January (3)
- ►2010 (49)
- ►December (6)
- ►November (6)
- ►October (3)
- ►September (1)
- ►August (4)
- ►July (3)
- ►June (10)
- ►May (2)
- ►April (2)
- ►March (3)
- ►February (4)
- ►January (5)
- ►2009 (53)
- ►December (5)
- ►November (9)
- ►October (7)
- ►September (4)
- ►August (4)
- ►July (3)
- ►June (6)
- ►May (6)
- ►April (5)
- ►March (4)
- ►2008 (1)
- ►September (1)
Recommended
2011-10-02
How to fix the adb no permissions error on Ubuntu Lucid
This blog post explains how to fix the no permissions error the Android Debugger displays when running the adb devices command Linux. The solutions presented here have been tested and found working on Ubuntu Lucid, but they should also work on other Ubuntu and Linux versions as well.
This official help center page has many working and non-working answers to the problem, and many comments. The root cause of the problem is that the current user doesn’t have sufficient permissions to access the USB device file created when the phone was connected in USB debug mode.
Killing all running adb server instances with sudo killall adb, disconnecting the phone, reconnecting the phone, and then running sudo adb devices instead (so adb gets run as root) fixes the problem.
Alternatively, it is possible to implement a long-term fix which doesn’t require sudo, thus it works with e.g. IntelliJ IDE integration:
- Create a file named /tmp/android.rules with the following contents (hex vendor numbers were taken from the vendor list page):
- Run the following commands (without the leading $ ):
- Disconnect the USB cable between the phone and the computer.
- Reconnect the phone.
- Run adb devices to confirm that now it has permission to access the phone.
Please note that it’s possible to use , USER=»$LOGINNAME» instead of , MODE=»0666″ in the .rules file, substituting $LOGINNAME for your login name, i.e. what id -nu prints.
Yay, it’s working, thanks! 🙂
Thank You very much. It helps.
Thank you man, you rock 🙂 I´ve read and tried 50 manuals like yours but each one was missing the most important step. : to unplug and plug in again the phone 😀 🙂 thx again
#pt-br
Muito bom. Funcionou perfeitamente por aqui. Obrigado pela dica.
#en
Very good. It worked perfectly here. Thanks for the tip.
Thanks 🙂 helped me 🙂
Thank you so much! Now to move forward.
Thanks very much! If you want, you can add Archos devices to the list (ID: 0e79)
Thanks a ton..it really worked. )
You made my day! Thanks a lot!
Perfect 🙂 Thank you
You rock! Thank you!
Thank you very much : )
Wonderful walk through
This works too:
assuming adb is in your path etc:
sudo pkill -f adb (killall adb remaining)
sudo env PATH=$PATH adb devices
@georges: Your commands constitute a good short-term solution, but after a few hours adb stops working, and your commands have to be run again (. and again). The solution in my bog post solves the problem for good.
@georges: after hours searching and nothing working, (previously I had no problems in ubuntu, but moved to Linux Mint Debian Edition) your solution worked for me. Thanks georges and pts!
THIS WORKED PERFECTLY! Thank you. I wish I could point all the questions here
Thanks, It works.
Thank you so much.
It worked for my LG P970 perfectly .
I was trying to fastboot (command not found) and with this min changes, you saved me.
Thank you very much. It worked.
Thanks. This worked for me 🙂
Thank a ton. it works like a butter..
April 25, 2013 at 7:59:00 AM GMT+2 Anonymous said.
Thank you, it worked like a charm. 🙂
You are king 🙂 Thanx very much
worked for me, thanks a lot
thank you You saved my ass.
You rock man!
I already have the file /etc/udev/rules.d/51-android.rules but I’m smart enough not to overwrite it. For those less knowledgeable, perhaps you might change your instructions to: cat tmpfile >> udevfile
Big thanks for the info.
I am having problems and need help please
after typing in the command:
chown. root.
i get:usage chown [:GROUP] [FILE2].
then i typed command:
service udev restart
unknown command udev
usage: service [-h|-?]
service list
service check SERVICE
service call SERVICE CODE [i32 INT |s16 STR].
options:
i32 write the integer INT into the send parcel s16 write the utf-16 string STR into the send parcel
then i tried killall adb but i get: adb no process killed
any suggestions please?
February 23, 2014 at 9:48:00 AM GMT+1 Anonymous said.
Thank you! Working like a Charm on Ubuntu 14.04 and my Zopo Mobile
God Bless You man!
THANX A LOT!!
GOD BLESS YOU!!
Thanks a lot. Works like a charm
Thanks. it worked for me. 🙂
Many thanks, it work 🙂
You are awesome! This old post helped me today! For anyone lost, Lava Iris 300 use HTC’s vendor id: 0bb4
Thank you very much. its saves my day 🙂 ..
Many thanks man! Finally a good fix! I was having a problem with ZTE V790 and Ubuntu 14.04, but now is all set 🙂
Excelente.. me quieto el sombrero. Gracias
July 3, 2015 at 7:41:00 PM GMT+2 Anonymous said.
Источник
Starting with MacroDroid V3.16.11 (with some effort) you can now invoke the following features on a non-rooted device:
Battery Saver Action
Location Mode Action
NFC Enable/Disable Action
Set Language Action
Logcat Trigger
+ others as shown within the app.
In order to do this you will need a Windows/Linux based PC or a Mac plus Google’s ADB tool which can be downloaded from the links below:
Windows — https://dl.google.com/android/repositor … indows.zip
Linux — https://dl.google.com/android/repositor … -linux.zip
Mac — https://dl.google.com/android/repositor … darwin.zip
For instructions on configuring your device to connect via adb please see the following information:
https://developer.android.com/studio/co … e/adb.html
Once you have a working adb connection, you need to run the following command from the command line/terminal on your computer:
adb shell pm grant com.arlosoft.macrodroid android.permission.WRITE_SECURE_SETTINGS
followed by:
adb shell pm grant com.arlosoft.macrodroid android.permission.CHANGE_CONFIGURATION
If you are using the demo mode action you will also need the following permission:
adb shell pm grant com.arlosoft.macrodroid android.permission.DUMP
If you are using the volume button long press trigger you will need the following permission:
adb shell pm grant com.arlosoft.macrodroid android.permission.SET_VOLUME_KEY_LONG_PRESS_LISTENER
If you are using the Logcat trigger you will need the following permission:
adb shell pm grant com.arlosoft.macrodroid android.permission.READ_LOGS
These commands will give MacroDroid permission to write to some restricted device settings that can normally only be done by system apps (or using root hacks).
It’s a little bit of work but hopefully a nice solution for users who are unable to or don’t want to root their device.
The features above are currently the only features that can be utilised by this adb permission hack, but I hope in the future I can expand the capability to allow additional features.
Additional information for Helper File
Starting with MacroDroid v5.8 a new helper file is available to perform some limited functionality that cannot be done directly in the app. In order to grant ADB access to this helper file please use the following command:
adb shell pm grant com.arlosoft.macrodroid.helper android.permission.WRITE_SECURE_SETTINGS
Содержание
- Solved: no permissions (user in plugdev group; are your udev rules wrong?)
- Solution 1
- Solution 2
- Solution 3
- Solution 4
- How To Fix: error: insufficient permissions for device with ADB [Quick Tip]
- Fix error: insufficient permissions for device error
- Similar Posts
- How to Install MySQL in Ubuntu Linux
- Install And Use Official Telegram Desktop Client In Linux
- How to Disable UEFI Secure Boot in Windows 10
- Icons Look too Small? Enable Fractional Scaling to Enjoy Your HiDPI 4K Screen in Ubuntu Linux
- How To Install Ubuntu Along With Windows
- How to Go Full Dark Mode With LibreOffice
- pts.blog
- Flattr this blog
- Blog Archive
- Recommended
- 2011-10-02
- How to fix the adb no permissions error on Ubuntu Lucid
- 52 comments:
Solved: no permissions (user in plugdev group; are your udev rules wrong?)
If you are trying to access your android devices shell using adb on a new Ubuntu machine, there are higher chances that your may seen an error like below,
This error is because, your Ubuntu machine user is not able to access adb shell due to some permission restrictions. As we have observed, there are 3 possible solutions for resolving this issue, either one of these should work for you.
Solution 1
Know the USB Vendor Id and Product Id of your android device using lsusb command as,
As seen above, For Our mobile idVendor is 2e04 and idProduct is c008, add this details to udev rule as, [ Replace idVendor and idProduct as per your device ]
Now, disconnect the USB cable and reconnect it and check adb devices is able to show your device.
Solution 2
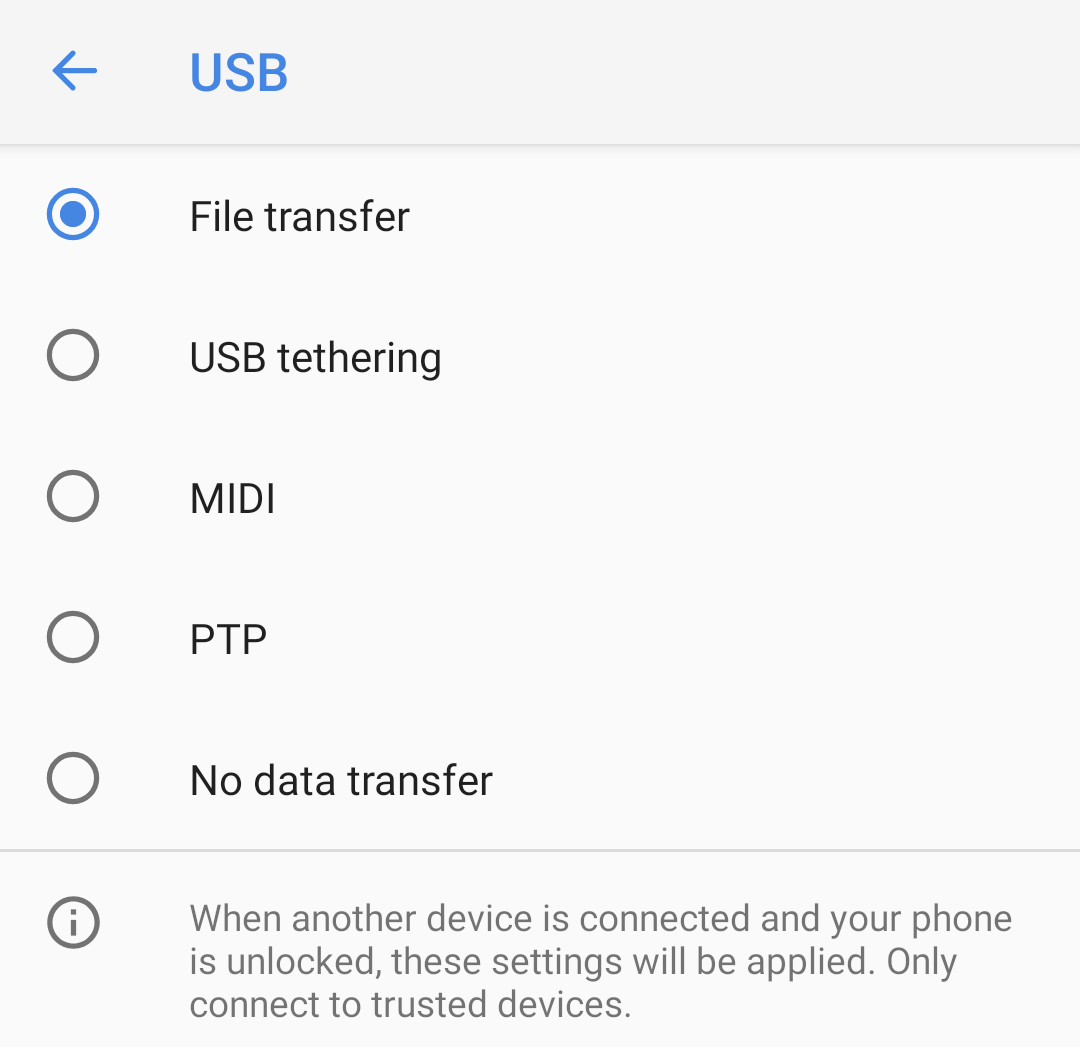
In our case, if we use with sudo permissions i.e. “sudo adb devices” was working fine and we could access adb, but we were getting above errors with normal user. In our case, rest of 2 solutions didn’t worked because “our mobile was connected to laptop in “USB Tethering Mode” from Hotspot and Tethering settings options.
Till you access adb shell, switch USB to “File Transfer” mode
and try again, as,
Solution 3
As mentioned in https://developer.android.com/studio/run/device Make sure that you are in the plugdev group. Add your user to playdev group as below,
Solution 4
Even by followed all 3 options and still it didn’t worked and got same issue of “no permissions (user in plugdev group; are your udev rules wrong?)” ,
there is one more thing, we can do (and same worked for us), Enable “Developer Options” and then turn OFF and turn ON “USB Debugging” option, try and see if it worked.
If not, scroll below in same “Developer Options” and click on “Default USB Configuration” and from there choose “File Transfer” instead of “No data transfer”
Источник
How To Fix: error: insufficient permissions for device with ADB [Quick Tip]
The other day I was installing Ubuntu Touch on my Nexus 7. During the installation process, I encountered an error while using adb (Android Debug Bridge). When I was trying to boot into bootloader using adb, it gave the following error:
error: insufficient permissions for device
What helped me was to restart the adb server in sudo mode.
I am going to show you the steps I used to fix the “insufficient permissions for device error” in Ubuntu Linux.
Fix error: insufficient permissions for device error
First step is to stop the running adb server:
Next step is to start the server again but this time with root privileges:
The output of this command will be like this:
$ sudo adb start-server
* daemon not running. starting it now on port 5037 *
* daemon started successfully *
As the last and final step, you must detach the device attached to it and connect it again.
The reason is self-explanatory, I believe. The adb server needs to run with root privileges and if that’s not the case, you see the “insufficient permission for device” error.
On a related topic, I recommend reading about the root user in Ubuntu and clear the concept around this topic.
I hope this quick post helps you. Ciao 🙂
Creator of It’s FOSS. An ardent Linux user & open source promoter. Huge fan of classic detective mysteries ranging from Agatha Christie and Sherlock Holmes to Detective Columbo & Ellery Queen. Also a movie buff with a soft corner for film noir.
Similar Posts

How to Install MySQL in Ubuntu Linux
This tutorial teaches you to install MySQL in Ubuntu based Linux distributions. You’ll also learn how to verify your install and how to connect to MySQL for the first time.

Install And Use Official Telegram Desktop Client In Linux
Complete screenshot tutorial to show you how to install and use the official Telegram desktop client on Ubuntu and other Linux distributions.

How to Disable UEFI Secure Boot in Windows 10
Secure boot may not allow you to boot from a bootable USB. Follow this simple tutorial with screenshots and learn to disable UEFI secure boot in Windows 10.

Icons Look too Small? Enable Fractional Scaling to Enjoy Your HiDPI 4K Screen in Ubuntu Linux
Icons, applications, menus and everything else looks too small on a UHD screen in Ubuntu. The fractional scaling feature will help you enjoy your HiDPI screen.

How To Install Ubuntu Along With Windows
Brief: This detailed guide shows you how to dual boot Ubuntu with Windows legacy BIOS systems. If you are not sure, read this to know if you have BIOS or UEFI system. Continuing my experimentation with different Linux distribution, I installed Xubuntu last week. Xubuntu is a variant of Ubuntu with Xfce desktop environment instead…
» data-medium-file=»https://itsfoss.com/wp-content/uploads/2020/11/libreoffice-dark-mode-1-300×169.png» data-large-file=»https://itsfoss.com/wp-content/uploads/2020/11/libreoffice-dark-mode-1.png» data-lazy-srcset=»https://itsfoss.com/wp-content/uploads/2020/11/libreoffice-dark-mode-1-768×432.png 768w, https://itsfoss.com/wp-content/uploads/2020/11/libreoffice-dark-mode-1-300×169.png 300w, https://itsfoss.com/wp-content/uploads/2020/11/libreoffice-dark-mode-1-150×84.png 150w, https://itsfoss.com/wp-content/uploads/2020/11/libreoffice-dark-mode-1.png 800w» data-lazy-sizes=»(max-width: 768px) 100vw, 768px» data-lazy-src=»https://itsfoss.com/wp-content/uploads/2020/11/libreoffice-dark-mode-1-768×432.png?is-pending-load=1″ srcset=»data:image/gif;base64,R0lGODlhAQABAIAAAAAAAP///yH5BAEAAAAALAAAAAABAAEAAAIBRAA7″>
How to Go Full Dark Mode With LibreOffice
Want to use LibreOffice in complete dark mode? Here’s what you need to do for that in Linux.
Источник
pts.blog
Flattr this blog
Blog Archive
- ►2021 (1)
- ►October (1)
- ►2020 (3)
- ►December (1)
- ►April (2)
- ►2019 (2)
- ►February (2)
- ►2018 (5)
- ►June (1)
- ►April (4)
- ►2017 (6)
- ►December (1)
- ►October (1)
- ►September (1)
- ►February (3)
- ►2016 (8)
- ►November (1)
- ►July (1)
- ►June (1)
- ►May (1)
- ►April (1)
- ►March (1)
- ►February (1)
- ►January (1)
- ►2015 (5)
- ►December (1)
- ►November (1)
- ►March (2)
- ►February (1)
- ►2014 (22)
- ►October (2)
- ►September (3)
- ►August (2)
- ►July (3)
- ►June (2)
- ►April (3)
- ►January (7)
- ►2013 (24)
- ►December (9)
- ►November (2)
- ►October (3)
- ►August (5)
- ►May (1)
- ►April (2)
- ►March (1)
- ►February (1)
- ►2012 (21)
- ►December (2)
- ►November (5)
- ►September (2)
- ►August (2)
- ►June (2)
- ►April (2)
- ►March (2)
- ►February (1)
- ►January (3)
- ▼2011 (30)
- ►December (2)
- ►November (3)
- ▼October (5)
- Long standby time for Cyanogenmod 7.1 on ZTE Blade.
- Getting started with IntelliJ to write Android app.
- Named return value optimization in gcc
- How to initiate and receive voice and video calls .
- How to fix the adb no permissions error on Ubuntu .
- ►September (1)
- ►August (6)
- ►June (3)
- ►May (1)
- ►April (3)
- ►March (1)
- ►February (2)
- ►January (3)
- ►2010 (49)
- ►December (6)
- ►November (6)
- ►October (3)
- ►September (1)
- ►August (4)
- ►July (3)
- ►June (10)
- ►May (2)
- ►April (2)
- ►March (3)
- ►February (4)
- ►January (5)
- ►2009 (53)
- ►December (5)
- ►November (9)
- ►October (7)
- ►September (4)
- ►August (4)
- ►July (3)
- ►June (6)
- ►May (6)
- ►April (5)
- ►March (4)
- ►2008 (1)
- ►September (1)
Recommended
2011-10-02
How to fix the adb no permissions error on Ubuntu Lucid
This blog post explains how to fix the no permissions error the Android Debugger displays when running the adb devices command Linux. The solutions presented here have been tested and found working on Ubuntu Lucid, but they should also work on other Ubuntu and Linux versions as well.
This official help center page has many working and non-working answers to the problem, and many comments. The root cause of the problem is that the current user doesn’t have sufficient permissions to access the USB device file created when the phone was connected in USB debug mode.
Killing all running adb server instances with sudo killall adb, disconnecting the phone, reconnecting the phone, and then running sudo adb devices instead (so adb gets run as root) fixes the problem.
Alternatively, it is possible to implement a long-term fix which doesn’t require sudo, thus it works with e.g. IntelliJ IDE integration:
- Create a file named /tmp/android.rules with the following contents (hex vendor numbers were taken from the vendor list page):
- Run the following commands (without the leading $ ):
- Disconnect the USB cable between the phone and the computer.
- Reconnect the phone.
- Run adb devices to confirm that now it has permission to access the phone.
Please note that it’s possible to use , USER=»$LOGINNAME» instead of , MODE=»0666″ in the .rules file, substituting $LOGINNAME for your login name, i.e. what id -nu prints.
Yay, it’s working, thanks! 🙂
Thank You very much. It helps.
Thank you man, you rock 🙂 I´ve read and tried 50 manuals like yours but each one was missing the most important step. : to unplug and plug in again the phone 😀 🙂 thx again
#pt-br
Muito bom. Funcionou perfeitamente por aqui. Obrigado pela dica.
#en
Very good. It worked perfectly here. Thanks for the tip.
Thanks 🙂 helped me 🙂
Thank you so much! Now to move forward.
Thanks very much! If you want, you can add Archos devices to the list (ID: 0e79)
Thanks a ton..it really worked. )
You made my day! Thanks a lot!
Perfect 🙂 Thank you
You rock! Thank you!
Thank you very much : )
Wonderful walk through
This works too:
assuming adb is in your path etc:
sudo pkill -f adb (killall adb remaining)
sudo env PATH=$PATH adb devices
@georges: Your commands constitute a good short-term solution, but after a few hours adb stops working, and your commands have to be run again (. and again). The solution in my bog post solves the problem for good.
@georges: after hours searching and nothing working, (previously I had no problems in ubuntu, but moved to Linux Mint Debian Edition) your solution worked for me. Thanks georges and pts!
THIS WORKED PERFECTLY! Thank you. I wish I could point all the questions here
Thanks, It works.
Thank you so much.
It worked for my LG P970 perfectly .
I was trying to fastboot (command not found) and with this min changes, you saved me.
Thank you very much. It worked.
Thanks. This worked for me 🙂
Thank a ton. it works like a butter..
April 25, 2013 at 7:59:00 AM GMT+2 Anonymous said.
Thank you, it worked like a charm. 🙂
You are king 🙂 Thanx very much
worked for me, thanks a lot
thank you You saved my ass.
You rock man!
I already have the file /etc/udev/rules.d/51-android.rules but I’m smart enough not to overwrite it. For those less knowledgeable, perhaps you might change your instructions to: cat tmpfile >> udevfile
Big thanks for the info.
I am having problems and need help please
after typing in the command:
chown. root.
i get:usage chown [:GROUP] [FILE2].
then i typed command:
service udev restart
unknown command udev
usage: service [-h|-?]
service list
service check SERVICE
service call SERVICE CODE [i32 INT |s16 STR].
options:
i32 write the integer INT into the send parcel s16 write the utf-16 string STR into the send parcel
then i tried killall adb but i get: adb no process killed
any suggestions please?
February 23, 2014 at 9:48:00 AM GMT+1 Anonymous said.
Thank you! Working like a Charm on Ubuntu 14.04 and my Zopo Mobile
God Bless You man!
THANX A LOT!!
GOD BLESS YOU!!
Thanks a lot. Works like a charm
Thanks. it worked for me. 🙂
Many thanks, it work 🙂
You are awesome! This old post helped me today! For anyone lost, Lava Iris 300 use HTC’s vendor id: 0bb4
Thank you very much. its saves my day 🙂 ..
Many thanks man! Finally a good fix! I was having a problem with ZTE V790 and Ubuntu 14.04, but now is all set 🙂
Excelente.. me quieto el sombrero. Gracias
July 3, 2015 at 7:41:00 PM GMT+2 Anonymous said.
Источник