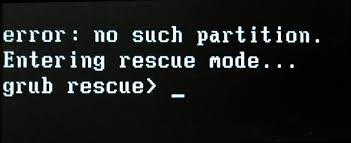
Некоторые пользователи, которые ранее настроили свои компьютеры на двойную загрузку дистрибутивов Windows и Linux (чаще всего с Ubuntu), сообщают, что их компьютер входит в режим восстановления Grub и отображает ошибку Нет такого раздела — Grub Rescue.
Ошибка Нет такого раздела — Grub Rescue
После тщательного изучения этой конкретной проблемы выясняется, что существует несколько различных ситуаций, которые могут вызвать появление этой проблемы. Вот список потенциальных виновников, которые могут нести ответственность за эту проблему:
- Загрузчик GRUB поврежден или удален — если вы видите эту ошибку из-за какого-либо типа поврежденных данных, связанных с загрузчиком GRUP, или после того, как вы неохотно удалили связанные с ним данные, вы можете решить проблему, вручную перенастроив утилиту для загрузки с помощью правильные файлы.
- Загрузчик неправильно настроен или поврежден. Поскольку эта проблема также может возникать из-за неправильно настроенных или поврежденных данных BCD, вы сможете решить эту проблему, перестроив данные конфигурации загрузки из командной строки с повышенными привилегиями.
- Текущая конфигурация загрузки несовместима — если проблема вызвана неверными данными, которые загружаются в загрузчик GRUB, вы можете решить проблему, используя резервную копию реестра, чтобы восстановить ваш компьютер до хорошей конфигурации.
Теперь, когда вы знаете всех потенциальных виновников, вот список методов, которые другие затронутые пользователи успешно использовали для решения проблемы и предотвращения загрузки своего компьютера в режим восстановления Grub:
Безусловно, наиболее эффективное исправление, с которого вам следует начать, поскольку оно наименее разрушительно — это вручную перенастроить загрузчик GRUB и убедиться, что приоритет отдается основной ОС.
Несколько затронутых пользователей подтвердили, что им наконец удалось обойти состояние восстановления GRUB, выполнив ряд инструкций, предназначенных для ручной перенастройки загрузчика GRUP для определения приоритета основной ОС.
Если этот сценарий применим, следуйте приведенным ниже инструкциям, чтобы сделать это непосредственно через меню восстановления GRUB:
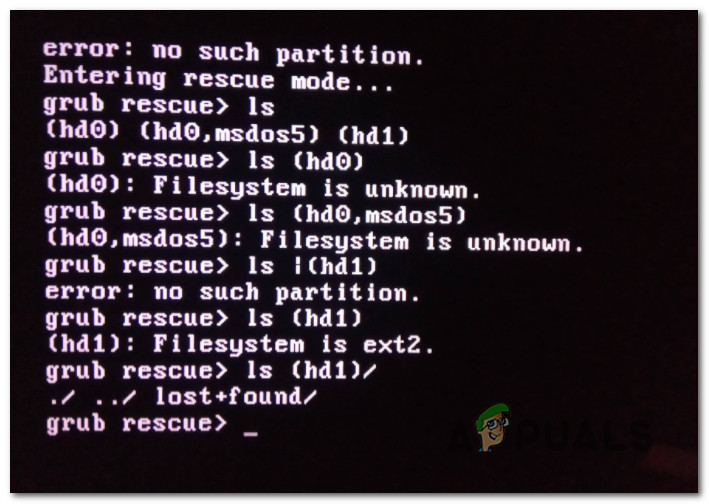
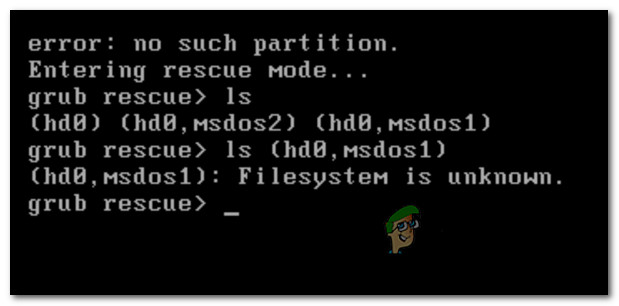
- Когда ваш компьютер войдет в режим восстановления GRUB, введите следующую команду и нажмите Enter, чтобы просмотреть все доступные разделы: ls
- После того, как вы это сделаете, вы должны получить обзор всех разделов, которые в настоящее время есть на вашем основном диске. На этом этапе вам необходимо убедиться, что вы выбрали основную ОС. В нашем случае правильный раздел (hd0, msdos2), поэтому мы использовали следующую команду для опроса раздела: ls (hd0, msdos2)
Примечание. Убедитесь, что вы заменили раздел правильным примером в вашем случае. Если вы получили сообщение вроде «Файловая система — это ext2 или ext3», вы правильно определили раздел, в котором находится ваша основная ОС.
Примечание 2: Если вы опрашиваете раздел и получаете сообщение «Файловая система неизвестна», вы выбрали неправильный раздел.Сообщение об ошибке неправильного раздела в GRUB
- После выбора правильного раздела введите «set» и нажмите Enter, чтобы запросить и получить окончательный список вашего основного раздела.
- Затем введите следующие команды и нажмите Enter после каждой команды, чтобы изменить приоритет загрузчика GRUB на правильный: set boot = (hd0, msdos5) set prefix = (hd0, msdos5) / boot / grub insmod normal normal
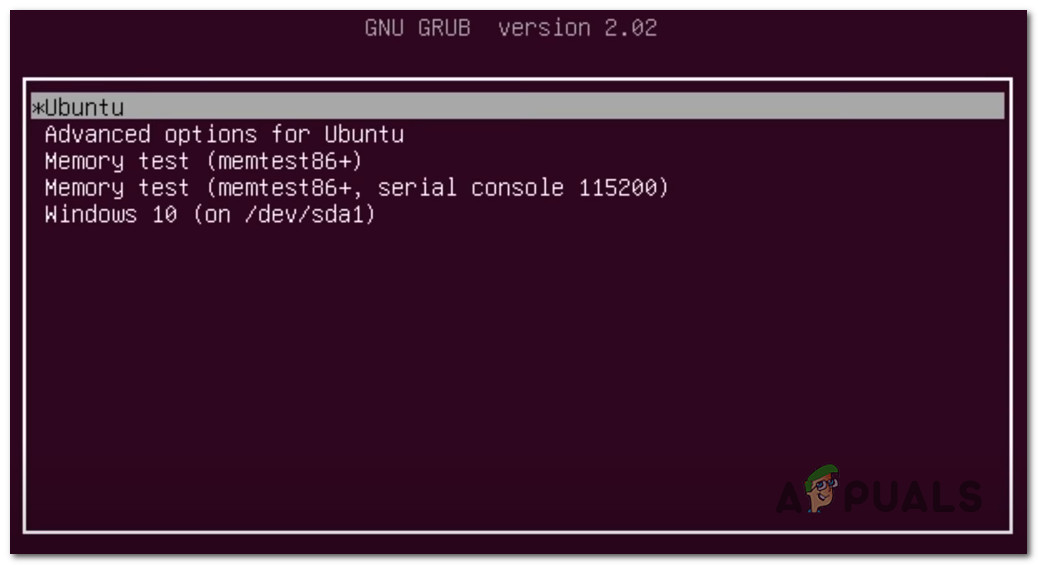
- После того, как вы введете последнюю команду, вы попадете в главное меню GNU Grub. Как только вы попадете на этот экран, просто выберите ОС, с которой вы хотите загрузиться, и нажмите Enter.
Загрузка с основного раздела в GRUB
В случае, если этот метод не сработал для вас и последовательность загрузки в конечном итоге загрузится с той же ошибкой No such Partition -Grub Rescue, вернитесь к следующему потенциальному исправлению ниже.
Метод 2: восстановление файлов данных конфигурации загрузки (BCD)
Если первый метод не сработал для вас, следующим шагом будет использование утилиты данных конфигурации загрузки (BCD), чтобы найти установочные файлы Windows на всех дисках и добавить их обратно в список загрузки, чтобы последовательность загрузки могла найти это во время запуска.
Этот метод успешно использовался многими пользователями, которые ранее сталкивались с ошибкой No such Partition — Grub Rescue. Восстановление кластеров файлов BCD позволило им нормально выполнять двойную загрузку без принудительного входа в меню восстановления GRUP.
ВАЖНО! Этот метод потребует от вас подключения совместимого установочного носителя Windows. Если у вас его нет наготове, вы можете создать установочный носитель Windows с нуля и загрузить его на USB-накопитель.
Выполнив все требования, следуйте приведенным ниже инструкциям:
- Подключите USB-накопитель с установочным носителем и запустите компьютер обычным способом, нажав кнопку питания.
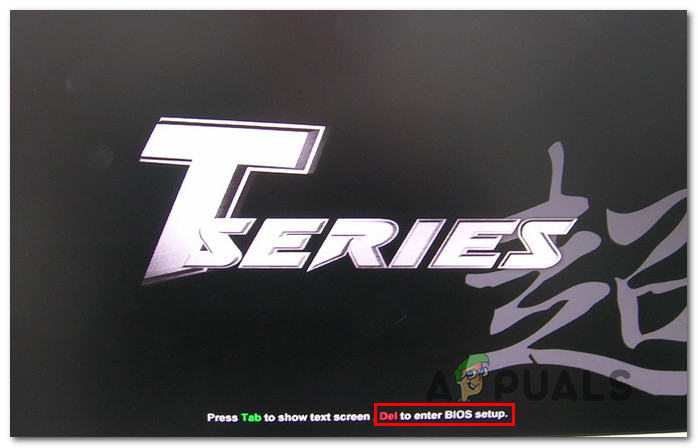
- Для доступа к кнопке настройки нажмите соответствующую кнопку в зависимости от производителя вашей материнской платы.
Доступ к меню настройки BIOS / UEFI
Примечание: ключ настройки будет отличаться от производителя к производителю. Чаще всего клавиша настройки представляет собой одну из клавиш F (F2, F4, F6, F8), клавишу Esc или клавишу Del (на компьютерах / ноутбуках Del). Если у вас возникли проблемы с доступом к меню настройки, поищите в Интернете конкретные инструкции по доступу к нему.
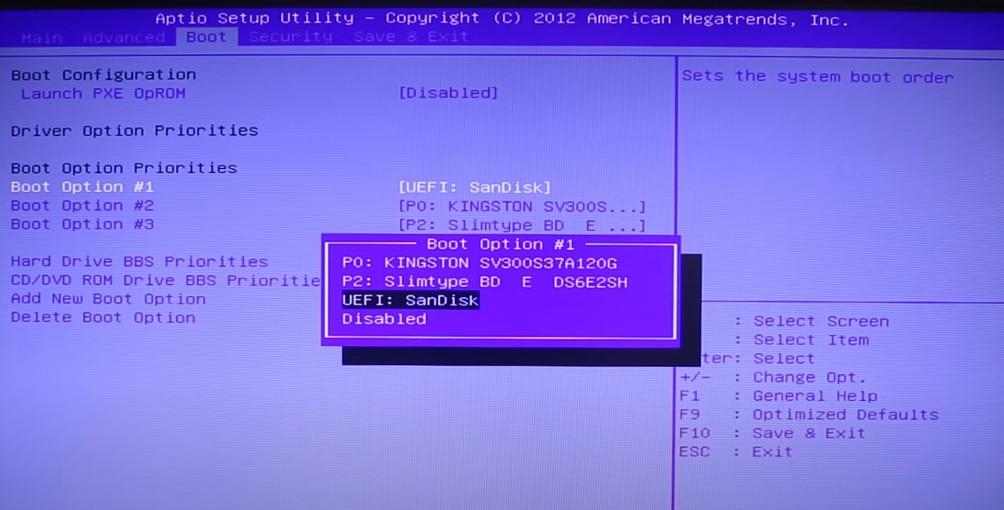
- Как только вы войдете в меню «Настройка», перейдите на вкладку «Загрузка» и убедитесь, что USB-накопитель, содержащий установочный носитель, установлен как вариант загрузки №1.
Загрузка с установочного носителя
- Сохраните изменения, затем перезагрузите компьютер, дайте компьютеру загрузиться с установочного носителя и дождитесь загрузки установочных файлов.
- Когда вы перейдете на первую страницу, нажмите «Далее», затем нажмите «Восстановить компьютер» в правом нижнем углу экрана.
Ремонт компьютера с установочного носителя
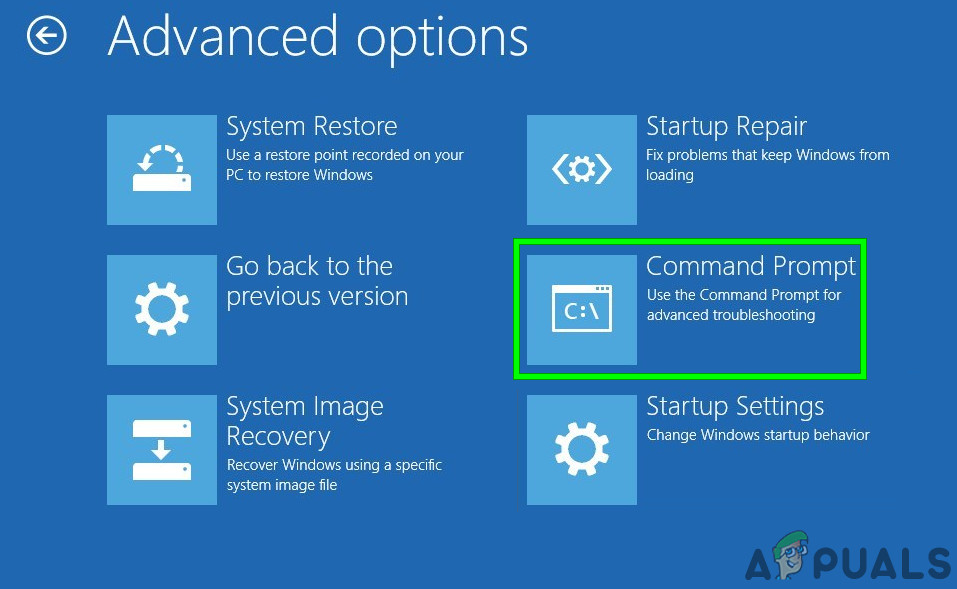
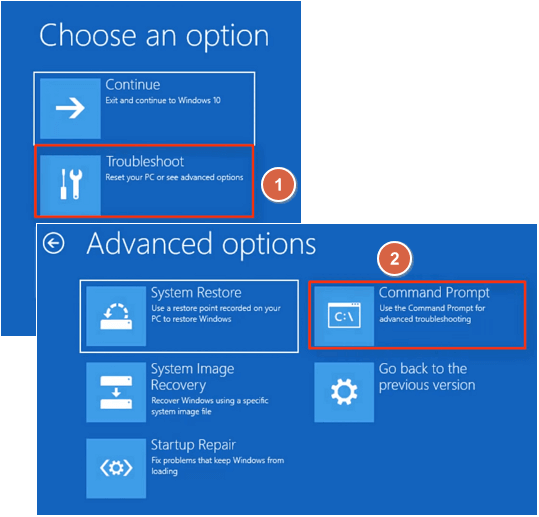
- Затем дождитесь загрузки меню «Восстановление», затем выберите «Устранение неполадок» и нажмите «Командная строка» в списке доступных параметров:
Доступ к командной строке через меню восстановления
Примечание. В некоторых версиях Windows 10 вы также можете загрузиться из меню «Восстановление», вызвав 3 последовательных прерывания системы во время процедуры запуска.
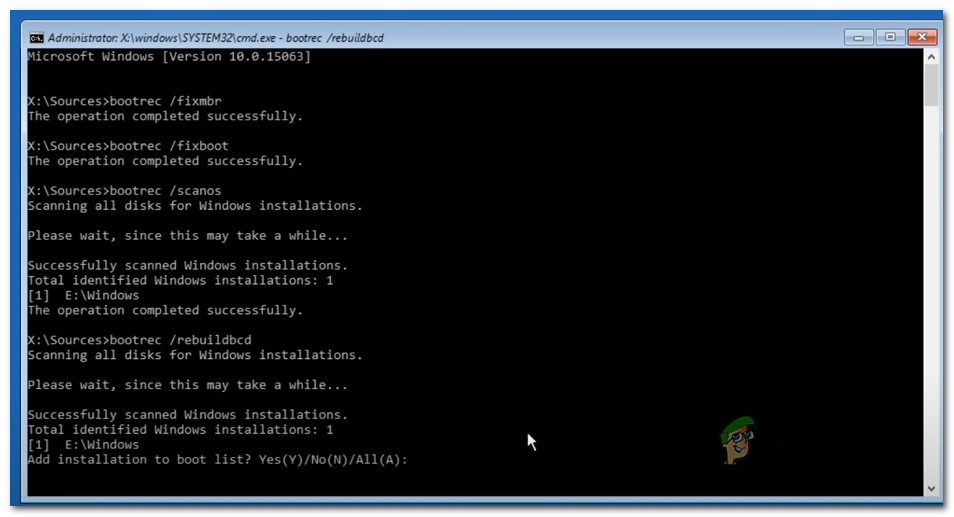
- Как только вы войдете в командную строку с повышенными привилегиями, введите следующую команду и нажмите Enter, чтобы исправить зависимости MBR, связанные с вашей установкой Windows: bootrec / fixmbr
- После успешной обработки команды введите следующие команды и нажмите Enter, чтобы исправить данные конфигурации загрузки, связанные с вашей установкой Windows: bootrec / fixboot
Примечание. Если вы получаете сообщение об ошибке «Доступ запрещен» при вводе одной из двух вышеперечисленных команд, следуйте этим инструкциям, чтобы решить проблему с доступом к bootrec.
- Затем введите следующую команду и нажмите Enter, чтобы просканировать все ваши диски на наличие установочного носителя Windows: bootrec / scanos
Примечание. Эта операция может занять некоторое время в зависимости от размера ваших разделов. Не закрывайте это окно до завершения операции.
- Если операция завершена успешно, введите следующую команду для эффективного восстановления данных конфигурации BCD: bootrec / rebuildbcd
- Когда вас попросят подтвердить, введите Y и нажмите Enter, чтобы подтвердить и начать операцию.
Подтвердите операцию построения файловой системы BCD
- Наконец, введите «exit» и нажмите клавишу «Ввод», чтобы выйти из командной строки с повышенными привилегиями и позволить Windows нормально загрузиться.
В случае, если конечный результат такой же (попытка загрузки заканчивается той же ошибкой «Нет такого раздела»), перейдите к следующему способу ниже.
Метод 3: Использование резервной копии реестра для восстановления последней удачной конфигурации
Если ни один из вышеперечисленных методов не помог вам, возможно, вы сможете исправить текущую конфигурацию с помощью последней удачной резервной копии, которая должна позволить вам без проблем выполнять двойную загрузку.
Для этого вам потребуется использовать меню «Дополнительные параметры», чтобы открыть командную строку с повышенными привилегиями и выполнить ряд команд, которые позволят вам загрузиться с использованием последней удачной конфигурации.
Сообщается, что этот метод успешно использовался многими пользователями, столкнувшимися с ошибкой No such Partition -Grub Rescue.
Чтобы использовать резервную копию реестра для восстановления последней удачной конфигурации, следуйте приведенным ниже инструкциям:
- Вставьте совместимый установочный носитель Windows и загрузитесь с него, нажав любую клавишу при появлении соответствующего запроса.
Загрузка с установочного носителя
Примечание. Если у вас нет совместимого установочного носителя или ваша система не загружается с него, выполните шаги с 1 по 4 из метода 2.
- Как только вам удастся успешно загрузиться с установочного носителя, нажмите «Восстановить компьютер» в нижнем левом углу экрана.
Ремонт вашего компьютера
- Когда вы, наконец, войдете в меню Advanced Recovery, нажмите «Устранение неполадок», затем нажмите «Командная строка» в списке доступных параметров.
Доступ к командной строке через меню восстановления
- Как только вы войдете в командную строку с повышенными привилегиями, введите «C:» и нажмите клавишу ВВОД, чтобы получить доступ к разделу, в котором вы установили Windows. Если вы установили Windows на другой раздел, замените букву соответствующим образом.
- Затем введите «dir» и нажмите Enter, чтобы получить доступ к корневому каталогу диска с ОС.
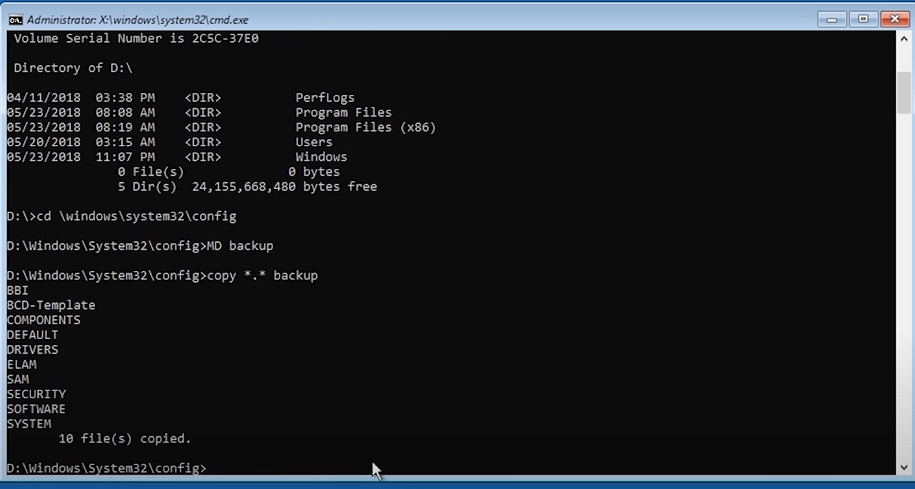
Примечание. Перед тем как продолжить, рекомендуется создать резервную копию текущего реестра. Для этого введите следующую команду и нажимайте Enter после каждой команды: cd windows system32 config MD backup copy *. * BackupРезервное копирование реестра
- Затем введите следующие команды и нажмите Enter, чтобы получить доступ к последней удачной конфигурации и изменить поведение по умолчанию для загрузки с нее: CD regback copy *. * ..
- Когда появится подсказка, нажмите A и еще раз нажмите Enter.
- Наконец, введите exit и нажмите Enter, чтобы выйти и нормально загрузиться. Это приведет вас в главное меню GRUP, где вы сможете выполнить двойную загрузку по своему усмотрению.
Contents
- Overview
-
GRUB 2 Terminal Commands
- Normal
- grub>
- grub rescue>
-
General Troubleshooting Preparation
- Boot-Repair
-
Search & Set
- How & Where to Search
-
Specific Troubleshooting
- grub>
- grub rescue>
- GRUB
-
Editing the GRUB 2 Menu During Boot
- Key Points About Terminal Menu Editing:
- Menu Editing Examples
- Post Boot Follow Up
- Fallback mode
-
GRUB 2 Errors
-
Selected Problems and Bugs
- External Drive Installs and »grub-pc» Updates
- External Drive Installs and MBR Selection
- Boot Partition is in Logical Volume whose Volume Group contains a snapshot
- insmod fails with «error: no such disk»
-
Selected Problems and Bugs
- Links
This page provides the user with information on options available for repairing GRUB 2 boot issues and specific instructions on how to use the GRUB 2 terminal. The instructions are written for GRUB 1.99, which is the version of GRUB 2 which is included on Ubuntu 11.04, Natty Narwhal, and later. Differences for version 1.98 (Ubuntu 10.4, Lucid Lynx) are noted when the procedures differ.

GRUB 2’s ability to fix boot problems is greatly improved over the original GRUB bootloader. In addition to an automatic fallback mode if booting from a menuentry in a submenu, GRUB 2 allows the user to edit its menu before the operating system is loaded. The rescue mode GRUB 2 terminal can help boot an operating system so that permanent repairs to system files can be made.
The instructions on this page are written for a fully-installed Ubuntu operating system. WUBI boot problems are not covered in detail although they are addressed in several sections.
Overview
GRUB 2 boot problems can leave the system in several states. The user may see one of the following displays on the monitor when a boot fails. The display provides the first indication of what might be causing the failure to boot. Here are the failure prompts and displays, and the possible cause of each:
-
grub> prompt: GRUB 2 loaded modules but was unable to find the grub.cfg file.
-
grub rescue> prompt: GRUB 2 failed to find its grub folder, or failed to load the normal module.
-
grub>: — The grub prompt on a blank screen.
-
GRUB 2 has found the boot information but has been either unable to locate or unable to use an existing GRUB 2 configuration file (usually grub.cfg).
-
-
grub rescue>: — The rescue mode.
-
GRUB 2 is unable to find the grub folder or its contents are missing/corrupted. The grub folder contains the GRUB 2 menu, modules and stored environmental data.
-
-
GRUB — a single word at the top left of the screen, with no prompt and no cursor.
- GRUB has failed to find even the most basic information, usually contained in the MBR or boot sector.
-
Busybox or Initramfs: GRUB 2 began the boot process but there was a problem passing control to the operating system. Possible causes include an incorrect UUID or root= designation in the ‘linux’ line or a corrupted kernel.
-
Frozen splash screen, blinking cursor with no grub> or grub rescue prompt. Possible video issues with the kernel. While these failures are not of GRUB 2’s making, it may still be able to help. GRUB 2 allows pre-boot editing of its menu and the user may restore functionality by adding and/or removing kernel options in a menuentry before booting.
Each of the GRUB 2 failure modes can normally be corrected either from the GRUB 2 terminal or by using an Ubuntu LiveCD. Additionally, there are compatible 3rd party bootable «rescue» CD/USB options which may also work. If using an Ubuntu LiveCD, it is recommended, but not always necessary, to use the same version CD as the system you are trying to repair. This ensures compatability of any modules and configuration files that may be loaded while attempting to repair the system.
GRUB 2 Terminal Commands
 Here are some useful tips and features for use with the GRUB 2 terminal:
-
Turning off the splash image. This may make viewing the terminal easier. Press c at the GRUB 2 menu to get to the command line and then type: set color_normal=white/blue or the color combination you wish to use. «black» as the second entry retains the menu’s transparency and should be avoided as a selection if the user wants to work with a solid background color.
-
TAB completion. This feature is very handy. At any point, pressing the TAB key may complete an entry, if the element is unique, or display available options. Typing a few additional characters and pressing TAB again may allow tab completion to finish the entry.
-
set pager=1 To prevent text from scrolling off the screen, type set pager=1.
-
Help. Type help to view a list of all the commands. Type help x to view help commands beginning with the letter «x». Tab completion and using the up arrow to repeat commands work the same as in a normal terminal.
Normal
When GRUB 2 is fully functional, the GRUB 2 terminal is accessed by pressing c. If the menu is not displayed during boot, hold down the SHIFT key until it appears. If it still does not appear, try pressing the ESC key repeatedly.
From a GRUB 2 terminal with the grub> prompt, a wide variety of commands are available.
- A few of the more important commands:
Command
Result / Example
boot
Initiate the boot sequence, also F10 or CTRL-x
cat
Display the contents of readable files; cat (hd0,1)/boot/grub/grub.cfg
configfile
Load a GRUB 2 configuration file such as grub.cfg; configfile (hd0,5)/boot/grub/grub.cfg
initrd
Loads the initrd.img, necessary for booting; initrd (hd0,5)/initrd.img
insmod
Loads a module; insmod (hd0,5)/boot/grub/normal.mod, or insmod normal
linux
Loads the kernel; insmod /vmlinuz root=(hd0,5) ro
loop
Mount a file as a device; loopback loop (hd0,2)/iso/my.iso
ls
Lists the contents of a partition/folder; ls, ls /boot/grub, ls (hd0,5)/, ls (hd0,5)/boot
lsmod
List loaded modules
normal
Activate the normal module, if loaded
search
Search for a device. Type help search for the available options.
set
Review current settings, or set XXX to set a variable such as colors, prefix, root
vbeinfo
Display GRUB 2 available resolutions
To view the complete command list, type help. For details on a particular command, type help [command]
grub>
When GRUB 2 is unable to boot or display the GRUB 2 menu the system will be left at a GRUB 2 terminal if possible. If the system boots to the grub> prompt, the usual modules and commands are normally available. The user may need to manually load modules using the insmod [module] command before some commands will work.
grub rescue>
In the grub rescue mode, only a limited set of commands are available. These commands are sufficient to investigate the contents of the drives, set prefix (path to the grub folder) and root (partition), load modules and boot.
The rescue mode provides fewer commands than the normal GRUB prompt line, but also provides these additional commands:
-
Command
Result / Example
dump
Clears memory
exit
Exit GRUB 2
normal
Return to the standard «grub>» mode if possible.
Among the commands which can be used in the grub rescue mode:
-
boot
cat
chain
help
insmod
linux
ls
multiboot
normal
search
set
unset
General Troubleshooting Preparation
Boot-Repair
The majority of this guide is devoted to working with the GRUB 2 terminal, which is used to enter commands to attempt to repair a broken bootloader. Boot-Repair is a GUI application which can automatically analyze boot problems and select the proper course of action to repair them. Its simple interface provides beginners as well as experienced Linux users an easy method of repairing the majority of GRUB 2 problems.
Additionally, Boot-Repair contains an automated method to run a boot info script which performs a series of tests and provides a file containing much valuable information regarding the status of the computer’s operating and boot systems. This file can be inspected by community helpers on forums or IRC channels to help diagnose boot problems.
Boot-Repair can be run from a LiveCD or an operating Linux system. To download the package run the following commands:
-
sudo add-apt-repository ppa:yannubuntu/boot-repair && sudo apt-get update
sudo apt-get install -y boot-repair && boot-repair
Visit the Boot-Repair community document for more information.
Boot-Repair is available from the Launchpad repositories and can be run from a CD or a working Linux OS.
Search & Set
A great many boot problems are due to incorrect paths to required files. The GRUB 2 terminal, in either ‘failure’ mode, provides a robust ability to search hard drive(s) and partitions and to inspect their contents.
In order to boot successfully, the root, prefix, linux and initrd variables must be correct. The user must verify the paths and names of these items. If they are incorrect, use the commands below to find and fix them. GRUB 2 variable settings can be viewed with the set command.
In the following examples, X is a hard drive number; Y is a partition number. If a command example includes either of these replace them with the appropriate value.
How & Where to Search
In the graphic below, the text in red are commands to be entered by the user, and text in green is the output of the command on an operating system (i.e. what you would like to see if your Ubuntu installation is on sda1).

-
The first hard drive is 0. The first partition is 1. Thus sda1 becomes (hd0,1), sdb5 is (hd1,5).
-
Use the ls command in the follow manner
- «Tab completion» may work — enter part of the filename and press the TAB key.
|
Command |
Purpose |
|
ls |
Search the entire computer for devices and partitions: (hd0) (hd1) (hd0,1) (hd0,5) (hd1,1) |
|
ls / |
Search the root directory of the device designated as root (use the set command to check root). |
|
ls (hdX,Y) |
View information about a partition — format, size, UUID, etc. |
|
ls (hdX,Y)/ |
View the root contents of a partition. Use this command to look for the presence of vmlinuz and initrd.img symlinks |
|
ls (hdX,Y)/boot/ |
View the contents of a folder |
|
ls (hdX,Y)/boot/ |
Inspect the /boot folder. It should contain the actual kernel (linux-3.2…) and initrd image (initrd.img-3.2….) |
|
ls (hdX,Y)/boot/grub/ |
Inspect the /boot/grub folder. It should contain grub.cfg and many *.mod files. If looking for a specific file, include the name in the search to limit the number of returns. If available, the command set pager=1 will also limit returns to a single screen. |
|
What to Look For |
Where It Should Be (Default Installation) |
Specific / General Search Example |
|
grub.cfg |
(hdX,Y)/boot/grub/ or /boot/grub/ |
ls (hdX,Y)/boot/grub/grub.cfg or ls /boot/grub/ |
|
vmlinuz |
(hdX,Y)/ or / |
ls (hdX,Y)/vmlinuz or ls /vmlinuz or ls / |
|
linux-3.2.0-14* |
(hdX,Y)/boot/ or /boot/ |
ls (hdX,Y)/boot/vmlinuz-3.2.0-14 |
|
initrd |
(hdX,Y)/ or / |
ls (hdX,Y)/ or ls /initrd |
|
initrd.img-3.20-14 |
(hdX,Y)/ or /boot/ |
ls (hdX,Y)/boot/initrd.img-3.20-14 or ls (hdX,Y)/boot/ |
* Note: Use the full kernel name, including -generic, when searching or setting a kernel variable. Using the «TAB completion» technique may eliminate some typing and be more accurate if available.
Use the following commands to set these parameters (if incorrect). Substitute the correct value for X and Y. (Example: set root=(hdX,Y) becomes set root=(hd0,5) )
|
Task |
Command |
Notes |
|
Set the prefix |
set prefix=(hdX,Y)/boot/grub |
Use the actual location of the grub folder |
|
Set root |
set root=(hdX,Y) |
|
|
Set the kernel |
linux /vmlinuz root=/dev/sda1 ro |
Set the kernel if the symlink vmlinuz exists in / |
|
Set the kernel |
linux (hdX,Y)/boot/vmlinuz-3.0.2-14 root=/dev/sda1 ro |
Set the kernel itself |
|
Set the initrd image |
initrd /initrd.img |
Set the initrd image if the symlink exists in / |
|
Set the initrd image |
initrd (hdX,Y)/boot/initrd.img-3.0.2-14 |
Set the initrd image itself |
Specific Troubleshooting
Use the section below based on the type of GRUB 2 terminal prompt displayed on the monitor.
 The commands which follow assume you have determined the proper parameters for prefix, root, linux, and initrd. Review the Search & Set section of this page for guidance .
grub>
Terminal Display: The GRUB 2 header/version information and a grub> prompt.

If GRUB 2 leaves you at the grub> prompt, it has normally found the grub folder and loaded at least some basic modules. The configuration file (grub.cfg) may be missing, misnamed, or corrupted.
Quick Fix:
-
Use the Search & Set section to confirm the correct paths are set. Inspect the contents of the /boot/grub folder. Look for the grub.cfg file. It could be misnamed or missing. If not located in /boot/grub, use the ls command look for another .cfg file or look in /boot or other locations. If you locate the correct .cfg file:
-
configfile /boot/grub/grub.cfg or configfile (hdX,Y)/boot/grub/grub.cfg
If a .cfg with another name is located, substitute its path/filename in the command.
If the configuration file is loaded and not corrupt, when the above command is executed the GRUB 2 menu should appear and the user can make a selection to boot. Once booted into the system, correct the filename or move the configuration file to its proper location. Run update-grub. If the configuration file is not found, a message will be generated and the user must enter the boot commands manually.
Extended Fix:
The following commands should set the root and prefix paths and load the kernel and initrd image. With this information, GRUB 2 does not need a configuration file and should be able to boot the system if the only problem was a corrupted or missing menu.
-
Press ENTER after completing each line. Some entries will not provide feedback. This is normal.
-
If a «file not found» or similar error message is displayed while running these commands, ensure you are using the correct X,Y values and the correct paths are set.
|
1. set root=(hdX,Y) |
Confirm the correct X,Y values and press ENTER. |
|
Example: If the Ubuntu system is on sda5, enter: set root=(hd0,5) |
|
|
2. linux /vmlinuz root=/dev/sdXY ro |
Example: linux /vmlinuz root=/dev/sda5 ro |
|
If the vmlinuz symlink does not exist, use the full path to the kernel in /boot |
|
|
Example: linux /boot/vmlinuz-3.2.0-14-generic root=/dev/sda1 ro |
|
|
If successful, after ENTER there will be a slight delay and no messages. |
-
Wubi users only — substitute these commands in Steps 1 and 2:
-
1.set root=(loop0)
2. linux /vmlinuz root=/dev/sdXY loop=/ubuntu/disks/root.disk ro
|
3. initrd /initrd.img |
Selects the latest initrd image. |
|
If the vmlinuz symlink does not exist, use the full path to the initrd image in /boot |
|
|
If successful, after ENTER there will be a slight delay and no messages. |
|
|
4. boot |
Boot to the latest kernel on the selected partition. |
If the system fails to boot:
-
Attempt to find the GRUB 2 configuration file. The normal name is grub.cfg file. If not found, look for a misnamed .cfg file or in alternate locations. The menu configuration file may contain settings required for a successful boot (such as non-standard kernel options) even if the paths/filenames are correct.
-
Use the set command to confirm the correct root and prefix settngs. Also inspect the folders’ actual contents with the ls command. The grub prompt normally means the GRUB 2 folder is intact but doesn’t guarantee the integrity of other system files.
-
root= should point to the drive and partition on which Ubuntu is installed. If you use the ls / command you should see the main Ubuntu system folders.
-
If the system boots, please refer to the [[#Post-Boot Follow Up|Post Boot Follow Up] section
If the system fails to boot, proceed to the [#grub rescue|grub rescue]] section for more detailed troubleshooting options.
grub rescue>
The GRUB 2 rescue mode is a major enhancement to the GRUB bootloader. The presence of the grub rescue> prompt signifies that GRUB 2 has failed to find the grub folder, the grub.cfg file, and/or the associated modules. The rescue prompt is presented so the user can provide the path to the grub folder, load the necessary modules, and provide the proper boot commands.

A common reason for the grub rescue> prompt is an incorrect path to the grub folder. Reasons for the prompt also include a failure to update GRUB 2 after certain system or partition operations, improper designation of the grub folder location, missing linux or initrd.img symlinks in /, or a failed installation.
To successfully boot from the grub rescue> prompt:
-
The grub folder must exist and contain the necessary GRUB 2 files and modules.
-
The proper paths must be set via the set prefix command.
- Many GRUB 2 commands will not work until the correct path is set.
If the path to the grub folder (normally /boot/grub) is not correct, an unknown command or file not found message is likely.
- Many GRUB 2 commands will not work until the correct path is set.
- The necessary modules must be loaded.
- The kernel cannot be loaded until the ‘linux’ module is loaded.
- A Linux kernel and initrd.img must be located and loaded.
Use the General Troubleshooting Preparation section to locate the correct partitions and file locations. Once the user has confirmed the paths and existence of the proper folders using the Search & Set section, run the following commands:
|
1. set prefix=(hdX,Y)/boot/grub |
Use the values determined earlier. |
|
Example: If the Ubuntu system is on sda5, enter: set prefix=(hd0,5)/boot/grub |
|
|
2.* set root=(hdX,Y) |
Confirm the correct X,Y values and press ENTER. |
|
Example: If the Ubuntu system is on sda5, enter: set root=(hd0,5) |
|
|
3. insmod normal |
Load the normal module. |
|
If the module loads there will be no message. |
|
|
If the module fails to load, try the full path: insmod (hdX,Y)/boot/grub/normal.mod |
|
|
4. normal |
Transition to the normal GRUB 2 mode with increased functionality. |
|
If the module loads there will be no message. |
|
|
If the module loads, HELP, TAB completion and command recall using the UP/DN keys should be available. |
|
|
5. set |
(Optional) Review the current settings. |
|
6. insmod linux |
Load the linux module. An error message usually means the path is incorrect. |
|
7.* linux /vmlinuz root=/dev/sdXY ro |
Selects the latest kernel. |
|
Example: linux /vmlinuz root=/dev/sda5 ro |
|
|
If the vmlinuz symlink does not exist in /, use the full path to the kernel in /boot |
|
|
Example: linux /boot/vmlinuz-3.2.0-14-generic root=/dev/sda1 ro |
|
|
8. initrd /initrd.img |
Selects the latest initrd image. |
|
If the initrd symlink does not exist in /, use the full path to the initrd image in /boot |
|
|
If successful, after ENTER there will be a slight delay and no messages. |
|
|
9. boot |
Boot to the latest kernel on the selected partition. |
-
* Wubi users only — substitute these commands in Steps 2 and 7:
-
1.set root=(loop0)
2. linux /vmlinuz root=/dev/sdXY loop=/ubuntu/disks/root.disk ro
Some additional considerations:
-
The current prefix and root settings may be checked at any time with the set command. To remove a setting, use the unset command.
-
Example: unset prefix
-
-
Modules must be loaded before they can be used. If a module has not been loaded a unknown command error is displayed. If an incorrect path is specified, a file not found error message may be displayed.
-
The linux module must be loaded to be able to load both the kernel and the initrd image unless the normal module is loaded first.
-
If the modules cannot be found in the /boot/grub folder, the user may be able to load them from the /usr/lib/grub/i386-pc folder. The address if Ubuntu was installed on sda1 would be (hd0,1)/usr/lib/grub/i386-pc and the command would be:
-
insmod (hd0,1)/usr/lib/grub/i386-pc/normal.mod
-
Refer to the Post Boot Follow Up section if the system successfully boots.
GRUB
Presence of the word GRUB at the top left of the monitor with no blinking cursor indicates that GRUB 2 can not even find the Master Boot Record (or equivalent) information. Thus, the core.img file, the /boot and /grub folder locations and contents are completely unknown to GRUB 2.

The seriousness of the problem cannot be assessed without the use of another operating system or an Ubuntu LiveCD or equivalent. The Ubuntu partition should be mounted for inspection and the user can then check to see if the system files are intact. If so, the user can use the »ChRoot» procedure from the LiveCD to reinstall GRUB 2 and rewrite the information to the MBR.
Details on this procedure are contained in the Grub2/Installing community documentation.
Following a failed boot, GRUB 2 is designed to display the GRUB 2 menu on the next boot and await user input. This will happen even if the user has set the system to boot without displaying the GRUB 2 menu. This provides the user the opportunity to select a different menu option or edit a menuentry to change boot parameters. While this can cause problems on a server, for most users it is a benefit which will prevent constant rebooting during unmonitored operations.

In addition to its troubleshooting benefits, pre-boot editing of the GRUB 2 menu also allows users to add or remove kernel options, change operating modes, and accomplish other tasks such as testing fonts and splash images. For users who like to experiment, the settings altered via the GRUB 2 terminal are non-persistent and won’t affect future boots.
- If the menu is displayed, the automatic countdown may be stopped by pressing any key other than the ENTER key.
- If the menu is not normally displayed during boot, hold down the SHIFT key as the computer attempts to boot to display the GRUB 2 menu.
- In certain circumstances, if holding the SHIFT key method does not display the menu pressing the ESC key repeatedly may display the menu.
- Press the ‘e’ key to reveal the selection’s settings.
- Use the UP/DN/Left/Right cursor keys to navigate to the desired point for editing.
-
Make a single or numerous changes at any spot in the menu. Do not use ENTER to move between lines.
-
TAB completion is available, which is useful in entering kernel and initrd entries.
- After starting to type the kernel or initrd name, press TAB.
- If additional characters are not added, look at the bottom of the menu as there may be multiple choices. Add characters until only one entry is visible at the bottom, then TAB again.
- When editing is complete:
-
CTRL-x or F10 — boot with the changed settings (highlighted for emphasis).
-
CTRL-c or F2 — jump to the command line to perform diagnostics, load modules, change settings, etc.
-
If an edit is incomplete and GRUB 2 detects an error in the kernel or initrd line it will return to the line when exiting this mode.
-
-
ESC — Discard all changes and return to the main menu.
- The choices are listed at the bottom of the screen as a reminder.
-
- Edits made to the menu in this manner are non-persistent. They remain in effect only for the current boot.
-
Once successfully booted, the changes can be made permanent by editing the appropriate file, saving the file, and running update-grub as ‘root’.
-
- Change a kernel version if one is available but not listed on the GRUB 2 menu.
-
Use the TAB key after entering part of the kernel or initrd version to see which ones are available.
-
-
Add or remove kernel options from the linux line.
-
Remove quiet to display system messages during boot.
-
Remove existing options and add nomodeset to avoid module loading, especially if having video issues.
-
- Boot to the recovery mode even if it is not listed on the menu.
-
Remove existing kernel options from the linux line and add single
-
- Remove references to UUIDs
-
Remove the entire search line
-
On the linux line, replace «root=UUID=<some alphanumeric>» with «root=/dev/sdXY»
-
Post Boot Follow Up
Any changes made from the GRUB 2 terminal are not permanent. After successfully booting into the system the user must take several steps to ensure the problem is permanently fixed.
- Update the GRUB 2 configuration file
-
sudo update-grub
-
-
Reinstall GRUB 2 to the drive’s MBR or equivalent
-
Install to the drive, not to the partition. Example: sda, not sda1
sudo grub-install /dev/sdX
-
-
Inspect the GRUB 2 configuration file. The default is /boot/grub/grub.cfg
-
For problems with booting the main linux kernel, verify the search, linux, and initrd lines in the [### BEGIN /etc/grub.d/10_linux ###] section of the file.
- Ensure the paths and kernel/initrd image versions are correct.
- Confirm the UUID numbers.
-
UUIDs can be checked with the sudo blkid command.
-
- Verify the existence and contents of the system boot folders.
-
/ should contain the symlinks vmlinuz and initrd.img
-
/boot/ should contain the actual kernel (vmlinuz-X.X.X-XX…) and initrd image (initrd.img-X.X.X-XX…)
-
/boot/grub should contain grub.cfg and numerous module files (*.mod)
-
For a corrupted GRUB 2 installation, purging and reinstalling GRUB 2 is very easy if the user has a working Internet connection. Refer to Grub2/Installing#Purging & Reinstalling GRUB 2 for guidance.
Fallback mode
It is possible to configure Grub2 to fall back to a known good menu-entry if the default menu-entry for some reason fails to boot. An example script that can be used for this is available at this webpage (in German).
GRUB 2 Errors
GRUB 2 does not report error numbers. If a number is associated with an error, it is a problem with the transition from GRUB legacy to GRUB 2.
A GRUB 2 error will leave the user at the grub> or grub rescue> prompt, the word GRUB with no cursor, or a hung boot caused by improper system path designations or a corrupted operating system. These issues are addressed earlier on this page — go to the General Troubleshooting Preparation section to start the recovery process.
Selected Problems and Bugs
External Drive Installs and »grub-pc» Updates
Launchpad Bug 496435 Installs of Ubuntu on external drives can cause problems as grub-install uses device names (e.g. sda, sdb) rather than UUIDs in certain circumstances. If connected to another machine when an update of grub-pc is made, the upgrade may be written to the incorrect device and make the computer unbootable.
A workaround is posted on the bug link above.
External Drive Installs and MBR Selection
Launchpad Bug 414996
When installing Ubuntu to a USB drive, the potential exists for GRUB 2 to write to the hard drive’s MBR or split the installation between the hard drive and the USB drive (rather than completely on the USB device). This can render the main drive unbootable.
Workaround: During the final stages of the install there is an «Advanced» button which allows the user to select the install location. See the bug report for more details.
Boot Partition is in Logical Volume whose Volume Group contains a snapshot
Launchpad Bug 563895
When your boot partition (the one providing /boot) is a LV, make sure not to have any LVM snapshots inside the containing VG. At reboot this will render your system unbootable, dropping you in a «grub rescue>«-shell with the following message: «error: no such disk.»
The grub-rescue-shell provided does not help you, because all modules (esp. lvm) are unreachable. You’ll have to boot from a install medium and remove all snapshots that are in the same VG as your boot partition by hand.
This issue is extremely annoying if your server is in a remote datacenter since the origin of the problem cannot be spotted easily and repairing the system may be hard.
While this will be fixed in the upcoming Maverick Meerkat 10.10 release, the current Lucid Lynx LTS 10.04 is affected.
A workaround would be to install ubuntu using a separated non-LVM partition for /boot if you are using LVM snapshots regularly.
There’s some kind of irony that if you’re careful and take a LVM snapshot before upgrading (and possibly rebooting) your system, this will trigger the bug.
insmod fails with «error: no such disk»
Several grub2 modules, such as the linux-module depends on other modules, which is attempted to be auto-loaded. For this to work, the variable $prefix, must be set to where the grub2 modules can be found. Usually, this is accomplished with the command «set prefix=/boot/grub«.
Links
Grub2
Grub2/Displays
Grub2/Installing
Grub2/Submenus
Grub2/Upgrading
Boot-Repair
CategoryBootAndPartition
Данная статья рассказывает историю моих о мучениях и за одно несет в себе полезную информацию для тех, кто столкнулся с такой же проблемой «no such partition grub rescue». Часть с установкой, софтом и прочем будет сильно урезана, ибо статья не об этом. Итак, поехали!
Началось все с того, что захотелось мне после прочтения очередного номера журнала про линукс посмотреть вживую на все нововведения, ибо в последние годы не пользовался линукс дистрибутивами и сидел полностью на окнах. И вот скачал самый популярный дистрибутив Ubuntu, оторвал от диска D 100Гб на новый раздел L, установил, поигрался.
Надоело, поставил вместо него более любимый мною дистрибутив Linux Mint, поигрался, и вот решил сносить все это через пару дней.
Загружаюсь в Windows, управление дисками, раздел L – удалить, диск D расширить и возвращаю диску обратно его родные 100Гб.
Перезагружаюсь…BIOS…ASUS…error: no such partition grub rescue. Перезагружаюсь опять, BIOS – перепроверяю все настройки. Все верно, сохранить и перезагрузить. И опять после BIOS идет error: no such partition grub rescue. Ни выбора системы, ни возможности загрузить Windows. Сразу пошел за ноутом и гуглить.
Grub — это загрузчик систем, который устанавливается с Linux и пишет всю нужную информацию на самый первый раздел на диске — MBR (master boot record). А его файлы размещаются на диске с системой Linux
Так вот, после удаления Linux, компьютер просто «не знает, что делать» поскольку обращаясь в папку с grub, ничего не находит (все же было удалено). Вот и получаем «grub rescue».
Решения и тщетные попытки все исправить
Для начала, если есть желание удалить любой дистрибутив линукс, лучше прочтите, как это правильно делать. А не так, как я – удалить рездел и думать, что все так просто.
Если же вы не удаляли линукс, но получили эту ошибку «error: no such partition grub rescue>», то все можно легко исправить, указав в новый раздел и папку на нем с файлами GRUB подобной информации полно на форумах. Но в моём случае это не подходило, ибо удален не просто сам линукс, но и раздел на котором он был и возвращен к диску D. Ищу дальше и, натыкаясь на статью, что такую ошибку исправить можно 2 способами:
— исправить раздел MBR с помощью загрузочного диска Windows;
— исправить раздел MBR с помощью live CD с Linux.
У меня уже была флешка с Linux Mint – с нее и загрузился и выбрал «Попробовать Mint».
Открываем терминал (Ctrl+Alt+T) и пишем:
sudo apt-get install lilo ждем установки, далее sudo lilo -M /dev/sda mbr
После перезагружаемся и все должно работать, очень многим этот способ помог, но не мне. Выдавало на 2-й команде ошибку. Начал искать еще способы и наткнулся на пост о том, что можно запустить установку windows и на моменте управления дисками, удалить все разделы, включая «Зарезервировано системой» — и это свободное место преобразовать в новый раздел. Оставить только раздел с окнами и D. Записал образ, запустил установку, удалил все разделы, создал на их месте новый один раздел. Перезагрузка — no such partition grub rescue.
Хоть этот способ и многим помог, но опять же — только не мне. Идем дальше:
Запустить восстановление системы с диска/флешки, отрыть дополнительные параметры, консоль и там ввести bootrec.exe /fixmbr. Написало, что все выполнено успешно. Перезагрузка — no such partition grub rescue. Психанул запустил установку Windows и удалил все разделы, кроме D, создал один новый и переустановил систему. Все заработало.
P.S. Хоть я и не смог решить проблему «деликатными» методом, но по отзывам эти методы помогали большинству. Надуюсь, помогут и вам при такой проблеме. И вам не придется все переустанавливать.
Спасибо за внимание.
Главная » Windows » Появляется ошибка error no such partition | Как восстановить загрузчик
Хочу поделиться небольшой историей о том, как я благополучно снес Ubuntu, но ничем хорошим это не кончилось.
У меня на ноутбуке HP стоит Windows 10, но мне захотелось попрактиковаться в работе с Linux-системами, для чего я установил Ubuntu. Поработав в ней немного, я решил ее снести (стёр раздел с Ubuntu утилитой AOEMI Partition Assistant) и установить на виртуальную машину – Virtual Box. При этом, ноутбук я не выключал.
Я отошел на час и когда вернулся ноутбук выключен, когда я его включил, появляется сообщение на черном экране – no such partition grub rescue.
В нашем случае, GRUB – загрузчик для Linux, ведет запись информации на первый раздел диска MBR, файлы загрузчика помещаются на раздел с установленной системой в моем случае на раздел с Ubuntu.
Я удалил раздел с системой Ubuntu, в итоге загрузчика физически не существует, о нем остались только некоторые записи. Ноутбук не может ничего делать, а в Windows просто так вы не попадете.
- Проводим восстановление загрузчика Windows 7
- Как восстановить загрузчик в Windows 8
- Проводим восстановление загрузчика Windows 10
К счастью, решение проблемы я нашел быстро, причем не одно, сейчас я расскажу, что нужно делать при появлении такой проблемы.
Для решения этой проблемы есть два способа – использование загрузочного Live CD дистрибутива Linux, либо загрузочный диск или флешка с Windows. При себе я имел только флешку с Windows. Но расскажу и о методе при помощи Linux.
Полезно: Как установить Ubuntu (Подробная инструкция)
Исправляем с помощью Linux
Возьмите загрузочный диск, можно и флешку с Linux, например, Mint, а может быть у вас есть Ubuntu. Создать такой носитель придется на другом компьютере. Загрузитесь с него. Теперь нам понадобится терминал, для этого зажимаем клавиши Ctrl+Alt+T. В терминале пишем команду:
sudo apt-get install lilo
Начинается загрузка пакета, а потом его установка, после чего вводим вот эту команду:
sudo lilo -M /dev/sda mbr
Хочу заметить, что для установки пакета вам понадобится интернет.
Теперь вы можете перезагрузить компьютер и убедиться, что ошибка error no such partition entering rescue mode исчезла.
Скорее всего вы столкнулись с проблемами еще при вводе команд. Например, не установился пакет lilo, либо вторая команда вообще не помогла. У меня было тоже самое и я не нашел этому решения, поэтому рекомендую использовать загрузочный диск с Windows.
Это интересно: Как избавиться от ошибки disk read error occurred
Исправляем с помощью Windows
В данном пункте мы будет восстанавливать загрузчик, а старые записи о grub будут очищены. Вот, что необходимо сделать:
- При установленной операционной системе Windows 7 необходим загрузочный носитель, либо флешка с этой системой, хотя, может подойти и любая другая, например, Windows 8.
- Загрузитесь с установочного диска / флешки. Должно появиться окно с предложением об установки Windows.
- Нам нужна только командная строка, поэтому нажимаем комбинацию клавиш Shift+F10.
- В окне командной строки нужно ввести команду bootrec. На выходе мы получаем ключи, которые можем использовать с этой командной:
- Bootrec /FixMbr – мы записываем главную загрузочную запись в системный раздел, а таблица раздела при это не перезаписывается. Применяем при повреждении загрузочной записи;
- Bootrec /FixBoot – записывает новый загрузочный сектор. Применяется, если загрузочный сектор был заменен, поврежден;
- Bootrec /ScanOs – ведется сканирование диска на все операционные системы, установленные на диске;
- Bootrec /RebuildBcd – используется для поиска всех ОС на диске, а также для перестройки хранилища конфигурации загрузки.
Для восстановления загрузочной записи я ввел команду с таким ключом – Bootrec /FixMbr.
После этого я перезагрузил компьютер и все стало работать. Появилась эмблема Windows 10, и я благополучно оказался в системе.
Это интересно: Что делать при появлении ошибки The boot configuration data file is missing some required information или 0xc0000034 в Windows 8 | 8.1 | 10
Надеюсь данная статья поможет вам в решении ошибки error no such partition.
( 24 оценки, среднее 4.21 из 5 )
Some users that have previously configured their computers to dual-boot Windows and Linux distributions (most commonly with Ubuntu) are reporting that their PC is entering Grub Rescue Mode and displaying the error No Such Partition – Grub Rescue.
After investigating this particular issue thoroughly, it turns out that there are several different situations that might trigger the apparition of this issue. Here’s a list of potential culprits that might be responsible for this issue:
- GRUB Bootloader is Corrupted or Deleted – If you are seeing this error due to some type of corrupted data associated with the GRUP Bootloader or after you have unwillingly deleted data associated with it, you can fix the issue by manually reconfiguring the utility to boot using the correct files.
- The bootloader is Misconfigured or Corrupted – Since this issue can also occur due to misconfigured or corrupted BCD data, you should be able to fix the issue by rebuilding the Boot Configuration data from an elevated Command Prompt.
- Current Boot Configuration is inconsistent – In case the issue is being caused by bad data that’s being fed into the GRUB bootloader, you can potentially fix the issue by using a Registry Backup to restore your computer back to a good configuration.
Now that you know every potential culprit, here’s a list of methods that other affected users have successfully used to fix the issue and prevent their computer from booting into Grub rescue mode:
Method 1: Manually Reconfigure GRUB Bootloader
By far, the most effective fix and the one you should start with since it’s the least destructive is to manually reconfigure the GRUB bootloader and make sure that the primary OS is prioritized.
Several affected users have confirmed that they finally managed to bypass the GRUB rescue state by following a set of instructions designed to manually reconfigure the GRUP Bootloader to prioritize the main OS.
If this scenario is applicable, follow the instructions below to do so directly via the GRUB Rescue menu:
- Once your PC enters GRUB Rescue Mode, type the following command and press Enter to get an overview of all your available partitions:
ls
- After you do this, you should get an overview of all partitions that you currently have on your primary disk. At this point, you need to make sure that you select the primary OS. In our case, the correct partition is (hd0,msdos2), so we used the following command to interrogate the partition:
ls (hd0, msdos2)
Note: Make sure to replace the partition with the correct example in your case. If you get a message saying something like ‘File System is ext2 or ext3‘, you have correctly identified the partition that holds your primary OS.
Note 2: If you interrogate a partition and you get the message ‘Filesystem is unknown‘, you didn’t select the correct partition.
Incorrect partition error message in GRUB - Once the correct partition is selected, type the ‘set‘ and press Enter to interrogate and get a definitive listing of your main partition.
- Next, type the following commands and press Enter after each command to change the priority of GRUB Bootloader to the correct one:
set boot = (hd0, msdos5)
set prefix=(hd0, msdos5)/boot/grub
insmod normal
normal
- After you input the final command, you’ll be taken to the main GNU Grub menu. Once you get to this screen, simply select the OS that you want to boot from and press Enter.

Booting from the main partition in GRUB
In case this method didn’t work for you and the booting sequence eventually boots in the same No Such Partition -Grub Rescue error, move back to the next potential fix below.
Method 2: Rebuilding the Boot Configuration Data files (BCD)
If the first method didn’t work for you, the next step would be to use the Boot Configuration Data (BCD) utility to locate the Windows installation files on all disks and add them back to the boot list so that the booting sequence can locate it during startup.
This method was successfully used by a lot of users that were previously dealing with No Such Partition – Grub Rescue error. Rebuilding the BCD file clusters successfully allowed them to dual-boot normally without being forced into the GRUP Rescue menu.
IMPORTANT: This method will require you to plug in a compatible installation Windows installation media. If you don’t have one at the ready, you can create the Windows installation media from scratch and load it on a USB drive.
Once you meet all requirements, follow the instructions below:
- Plug-in the USB stick containing the installation media and start your computer normally via the power button.
- Access the Setup key by pressing the correspondent button depending on your motherboard manufacturer.

Accessing the BIOS / UEFI Setup menu Note: The setup key will be different from manufacturer to manufacturer. Most commonly the Setup key is either one of the F keys (F2, F4, F6, F8), the Esc key, or the Del key (on Del computers/laptops). If you’re having trouble accessing the Setup menu, search online for specific instructions on accessing it.
- Once you’re inside the Setup menu, access the Boot tab and make sure to set the USB stick containing the installation media as Boot Option #1.

Booting from the installation media - Save the changes, then restart and allow your computer to boot from the installation media and wait for the installation files to load.
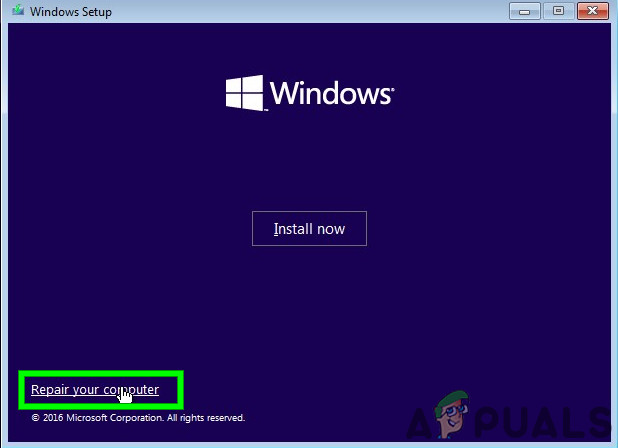
- Once you get to the first page, click on Next, then click on Repair your computer from the bottom-right corner of the screen.

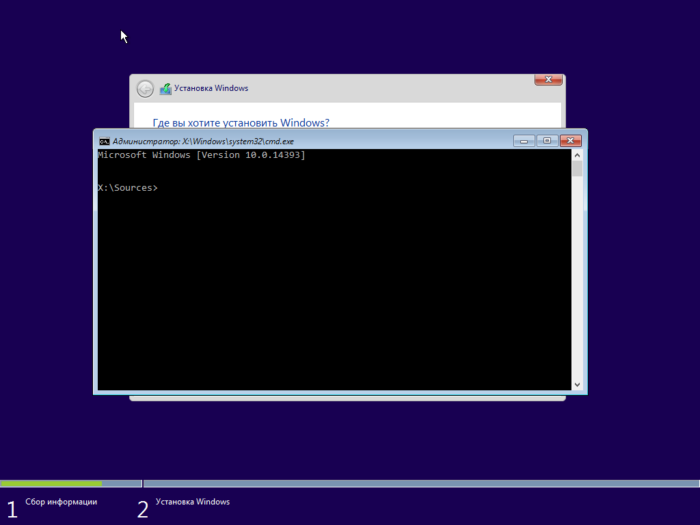
Repairing Computer via installation media - Next, wait for the Recovery menu to load, then select Troubleshoot and click on Command Prompt from the list of available options:

Accessing the Command Prompt via the Recovery menu Note: On certain Windows 10 versions, you might also be able to boot from the Recovery menu by forcing 3 consecutive system interruptions during the startup procedure.
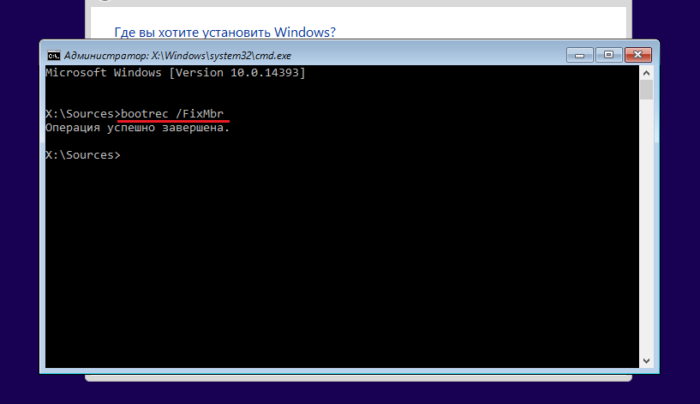
- Once you’re inside the elevated Command Prompt, type the following command and press Enter to fix the MBR dependencies associated with your Windows installation:
bootrec /fixmbr
- Once the command is processed successfully, type the following commands and press Enter to fix the Boot Configuration Data associated with your Windows installation:
bootrec /fixboot
Note: If you get the ‘Access is denied’ error while inputting one of the 2 commands above, follow these instructions to fix the bootrec access problem.
- Next, type the following command and press Enter to scan all your disks for the Windows installation media:
bootrec /scanos
Note: This operation might take some time depending on the size of your partitions. Don’t close this window until the operation is complete.
- If the operation is completed successfully, type the following command to effectively rebuild the BCD configuration data:
bootrec /rebuildbcd
- When asked to confirm, type Y and press Enter to confirm and start the operation.

Confirm the operation of building the BCD file system - Finally, type ‘exit’ and press enter to effectively leave the elevated CMD prompt and allow your Windows to boot normally.

In case the end result is the same (the boot attempt ends with the same No Such Partition error), move down to the next method below.
Method 3: Using the Registry Backup to Restore the last good Configuration
If none of the methods above have worked for you, you might be able to fix the current configuration with the last known good backup that should allow you to dual boot without issues.
Doing this will require you to use the Advanced Options menu to open an elevated Command Prompt and run a series of commands that will allow you to boot using the last known good configuration.
This method was reportedly used successfully by a lot of users dealing with the No Such Partition -Grub Rescue error.
In order to use the Registry Backup to restore the last known good configuration, follow the instructions below:
- Insert a compatible Windows installation media and boot from it by pressing any key when prompted to do so.

Booting from the installation media Note: If you don’t have a compatible installation media or your system doesn’t boot from it, follow steps 1 to 4 from Method 2.
- Once you manage to successfully boot from the installation media, click on Repair your computer from the bottom-left corner of the screen.
Repairing your computer - Once you’re finally inside the Advanced Recovery menu, click on Troubleshoot, then click on Command Prompt from the list of available Options.
Accessing the Command Prompt via the Recovery menu - Once you are inside the elevated Command prompt, type ‘C:‘ and press enter to access the partition where you installed Windows. If you installed Windows on a different partition, replace the letter accordingly.
- Next, type ‘dir‘ and press Enter to access the root location of your OS drive.
Note: It’s recommended to back up the current registry before going forward. To do this, input the following command and press Enter after each command:cd windowssystem32config MD backup copy *.* backup

Backing up the Registry - Next, type the following commands and press Enter to access the last known good configuration and modify the default behavior to boot from it:
CD regback
copy *.* ..
- When prompted by the prompt, press A and hit Enter once again.
- Finally, type exit and press Enter to exit and boot normally. This should take you to the main GRUP menu where you should be able to dual boot as you see fit.

Kevin Arrows
Kevin is a dynamic and self-motivated information technology professional, with a Thorough knowledge of all facets pertaining to network infrastructure design, implementation and administration. Superior record of delivering simultaneous large-scale mission critical projects on time and under budget.
Updated by
Cici on Dec 06, 2022
How to Fix Error: No Such Partition Grub Rescue Windows 11/10
How to fix error no such partition grub rescue on Windows 11/10? Here are practical ways to try out.
| Workable Solutions | Step-by-step Troubleshooting |
|---|---|
| Fix 1. Fix MBR and Rebuild BCD |
Method 1. EaseUS Partition Master…Full steps Method 2. Windows 11/10 Automatic Repair…Full steps |
| Fix 2. Boot Sector Code with Windows 11/10 Automatic Repair | Step 1. Restart your PC a few times during the boot sequence; Step 2. From the list of options…Full steps |
| Fix 3. Configure and Set Active Partition |
Method 1. EaseUS Partition Master…Full steps Method 2. Diskpart…Full steps |
About «Error No Such Partition. Grub Rescue»
«I was dual-booting Windows 10 and Linux Ubuntu on my desktop. Since the system was unable to detect Ubuntu in the initial menu that appears on rebooting, I deleted the partition onto which I had installed Ubuntu while in Windows 10. I then installed PowerISO, which prompted me to reboot the system. Now, however, it led me to the grub rescue prompt and said, «no such partition. Grub rescue>», How can I fix no such partition grub rescue Windows 10?»
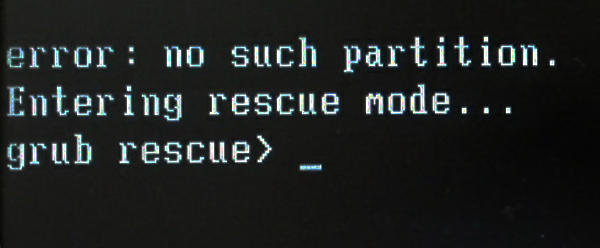
No such partition is a common error that usually occurs in Windows & Ubuntu dual boot system. It always appears when you intend to boot your computer but get stuck at the boot screen with the following error messages:
Example 1:
error: no such partition.
grub rescue>
Example 2:
error: no such partition.
Entering rescue mode…
grub rescue>
Possible Causes of Error No Such Partition Grub Rescue
Windows 10 grub rescue occurs for the following reasons:
- Corrupt boot directory
- Deactivating the correct partition
- Invalid boot loader configuration
- Damaged boot sector code
- Deleting/resizing/merging/splitting Ubuntu partition
For the problems caused by these reasons, we give the following solutions to helping you solve no such partition, grub rescue error on Windows 10.
Try these practical methods to fix Windows no such partition grub rescue error.
- Fix MBR and rebuild BCD
- Restore Boot Sector Code with Windows 11/10 Automatic Repair
- Manually configure and mark system partition as active
1 — Fix MBR and Rebuild BCD
Part of GRUB lives in the Master Boot Record (MBR), while the other parts live in the Linux boot partition. At most times, the error no such partition grub rescue on Windows 10 happens after you deleting or formatting Ubuntu partition, which corrupts the MBR boot sector & boot sector code files and finally makes Windows 10 is unable to boot.
In this case, you can try to rebuild MBR and restore the BCD files to fix the issue. Both EaseUS partition management software and Windows 10 Automatic Repair can help you solve Windows 10 grub rescue problem.
Method 1. Rebuild MBR with EaseUS Partition Management Tool (Recommended)
EaseUS Partition Master makes it quite simple to partition hard drives on Windows 11/10/8.1/8/7/Vista/XP and take full advantage of your disk space for best computer performance. With this tool, you can rebuild MBR effortlessly with a wizard-like interface.
Except for the partition checking and repairing function, EaseUS Partition Master provides more one-stop disk partition features, such as resize/move partition to solve low disk space issue, clone disk, merge partitions, create/delete/format partition, wipe data, and disk/partition conversion (convert MBR to GPT), and more.
Step 1. Create a WinPE bootable disk
- Launch EaseUS Partition Master, and click «Bootable Media» on the toolbar. Select «Create bootable media».
- Click «Next» to finish the process.

Step 2. Boot EaseUS Partition Master Bootable USB
- Connect the bootable USB or CD/DVD to your PC.
- Press F2 or Del when you restart the computer to enter the BIOS screen. Set and boot your computer from «Removable Devices» or «CD-ROM Drive». And then EaseUS Partition Master will run automatically.
Step 3. Rebuild MBR
- Click «Toolkit» and choose «Rebuild MBR».

- Select the disk and the type of MBR. Then, click «Rebuild».

- After that, you can see «MBR has been successfully rebuilt on Disk X».

Method 2. Fix MBR and Restore the BCD with Windows 11/10 Automatic Repair
You can also use the Windows 10 Automatic Repair feature to fix error no such partition grub rescue in Windows 10. When Windows 10 is unable to boot, you can restart the system several times and the system will enter into WinRE mode. Or you can use a Windows 10 bootable media (DVD or USB flash drive) to get into this recovery environment.
Here’s the step-by-step guide.
Step 1. Connect the Windows 10 bootable media to your computer (DVD disc or USB flash drive).
Step 2. In WinRE mode, under the «Choose an option» tab, click the «Troubleshoot» button.
Step 3. Then click the «Advanced options» feature. In the pop-up window, choose «Command Prompt» to start to fix BCD files.
Step 4. Once CMD starts, type the following commands in turn:
bootrec /fixmbr
bootrec /fixboot
bootrec /rebuildbcd
Step 5. Close Command Prompt and restart your computer.
Rebuild MBR and BCD is an applicable method in fixing error no such partition grub rescue in Windows 10. However, if you are still experiencing the issue, you may proceed to the next solution.
2 — Restore Boot Sector Code with Windows 11/10 Automatic Repair
Damaged boot sector code may cause the Windows 10 grub rescue error prompt. If rebuilding MBR can’t fix Windows 10 grub rescue issue, you should try to restore the boot sector code into consideration with the Windows repair option.
Step 1. Restart your PC a few times during the boot sequence.
Step 2. From the list of options, select «Troubleshoot» > «Advanced options» > «Startup Repair».
Step 3. The repair process will now start.
Step 4. After the repair process finishes, check if error no such partition is resolved.
You can also solve this problem by using a Windows bootable DVD or USB flash drive. To start restoring the boot sector code, follow the steps shown below:
Step 1. Connect your USB flash drive to your computer or insert Windows 10 DVD to your PC.
Step 2. Restart the computer to enter into Automatic Repair mode.
Step 3. Click «Troubleshoot» > «Advanced Options» > «Command Prompt» to open CMD.
Step 4. In the CMD window, type the following command and hit Enter afterward:
diskpart
select disk 0
list volume
Step 5. Now, all volumes will be displayed here. In the Type column, you will find the «DVD-ROM» value, remember the drive letter of the Windows 10 bootable disc. Here we take the letter F as an example. Type the following command lines and hit Enter afterward:
Exit
F:
cd boot
Dir
Step 6. Next, you need to check if you have bootsect.exe files in the list. If so, enter the following command:
bootsect /nt60 SYS /mbr
Exit
bootsect nt60 SYS mbr
Step 7. Exit the command prompt and restart your computer. Check if no such partition grub rescue error is resolved.
3 — Configure and Set Active Partition
A very common cause for error no such partition to show up is not having the correct partition set as active. The BIOS tries to start the boot loader up from the active partition, and the bootloader searches for its configuration data from the active partition as well. So if the active partition is corrupted or incorrectly set, the Error: no such partition. Grub rescue can happen.
Like rebuilding MBR demonstrated below, you have two ways to set system partition as active: one is using EaseUS partition management software, and the other is using Diskpart to manually input command lines to finish the job.
Method 1. Set Active Partition in One-click by Using EaseUS Partition Master
Step 1. Run EaseUS partition manager software. On the disk map, right-click the target partition and choose «Advanced».
Step 2. Then, select «Set Active» from the drop-down menu. Click «Yes». And choose «Execute 1 Task(s)» and click «Apply».
Method 2. Mark System Partition as Active Using Diskpart
Step 1. Use diskpart from the command line to set the correct partition.
Step 2. Connect the Windows 10 bootable media to your computer (DVD or USB flash drive).
Step 3. Restart your computer to enter into Automatic Repair mode.
Step 4. Go to «Troubleshoot» > «Advanced Options» > «Command Prompt» to launch the CMD.
Step 5. Now, Type diskpart and hit the Enter. Type the following commands in order and hit enter afterward:
list disk: (this lists all hard drives in your computer)
select disk n: (n means the disk where Windows 10 is installed. Here you can choose disk 0 or any other disk where Windows 10 is installed)
list volume: (this list all volumes on system disk)
select volume n: (n refers to the number of system partition)
active: (it can mark the correct system partition active)
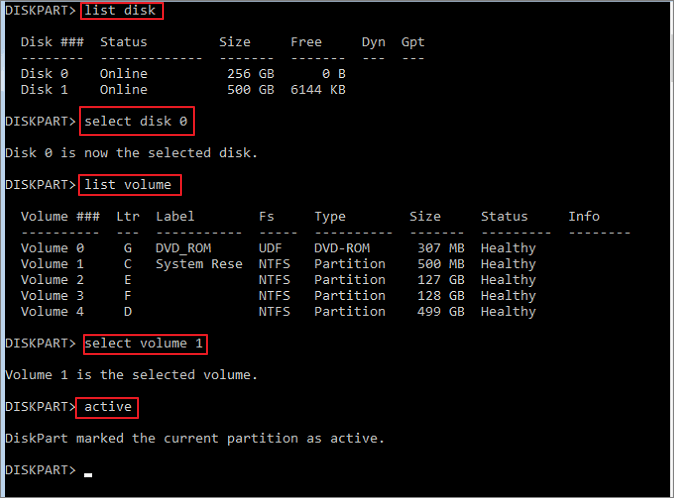
Type quit to exit Command Prompt. Restart your PC and check if this resolves the Windows 10 grub rescue error.
Final Verdict
You can use the three most effective ways to fix Windows 10 grub rescue problem. You can learn that both Windows Automatic Repair and EaseUS Partition Master can be helpful in resolving the problem.
We highly recommend you use EaseUS Partition Master to help you partition the hard drive correctly. Using the tool is far easier than the manually inputting command lines to fix error no such partition grub rescue on Windows 10.
All you need to do is download and launch the program, select the partition, and then choose precisely what you want to do with it. EaseUS Partition Master allows you to directly transfer space from one drive to another to make full use of disk space.
FAQs About Error No Such Partition Grub Rescue
Do you have more questions about fixing error no such partition entering rescue mode on Windows 10? If so, check the following hot topics and their answers.
How do I fix error no such partition?
In conclusion, you have three ways to fix error no such partition:
- Fix 1. Rebuild the MBR and BCD
- Fix 2. Manually configuring the active partition
- Fix 3. Restore boot sector code
How do I fix grub error no such partition unknown file system?
Corrupted or damaged MBR or BCD may cause grub error no such partition unknown file system, try to rebuild MBR and BCD files at first. If MBR fixing is not useful, continue trying to restore the boot sector code and make system partition as active to make sure your Windows can reboot properly.
How do I get rid of grub rescue error?
You can use the three solutions to solving Windows 10 grub rescue error. In order to prevent this issue from happening again, you should pay attention to the following points:
- If you want to delete the Ubuntu operating system on both systems, you should do it the right way.
- If you want to reinstall the Ubuntu operating system, make sure you install the new system to the original partition.
- You’d better not restore your Ubuntu to the old version, or you will damage Grub.
How do you fix error attempt to read or write outside of hd0?
When you try to I install Ubuntu on an older computer after the installation finished, you may encounter the following problem while rebooting the computer:
error: attempt to read or write outside of disk’ hd0′.
Entering rescue mode…
grub rescue>
To fix this issue, you can make a boot repair USB disk and use the Windows automatic repair feature to troubleshoot. Or you can try some workarounds from the technical forum.
The No Such Partition Grub Rescue error is also known as the ‘Death Screen of Linux’. And this error mainly occurs when your grub configuration is messed up for some reason. In this article, we will try to solve this problem of ours using a live CD image of the same OS and try to fix your installation.
Pre-requisites
- You have a live CD/DVD/USB of the Operating System (must be of the same version).
- You have a stable internet connection.
- And you do not have a Wubi (Ubuntu inside Windows) installation on your system.
Let’s get started!
6 Easy Steps to Fix No Such Partition Grub Rescue Error
We need to re-install grub because it is either deleted or corrupt. And to re-install, we will copy the grub file from the live USB to your grub directory. Note that this will remove any custom configuration you have made to the grub file. Follow these steps to fix your grub file.
1. Locate your Root/boot partition
Boot from the Live USB stick and, in the terminal, type the following commands to gain administrative privileges :
Now, type the following commands to know your disk partitioning structure :
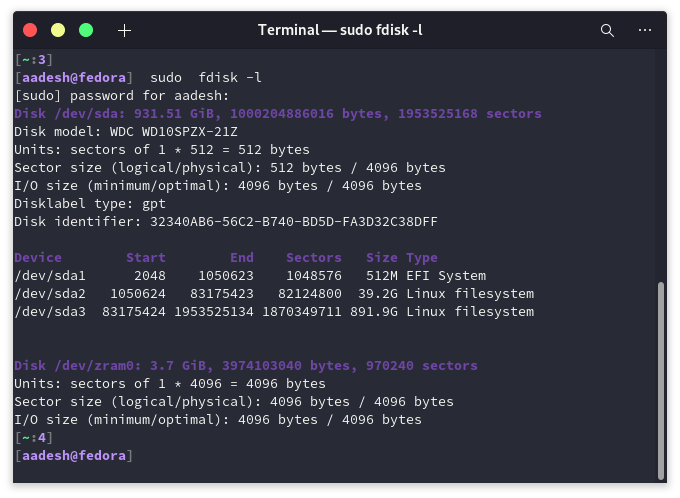
In the output, you will see text like /dev/sda1 or /dev/sda2 etc. If you have a separate Boot partition (EFI filesystem), note its location (usually it is 500 MB). And, if you don’t have a separate boot partition, then locate your root (/) partition. If you don’t know where your root is located, then you have to guess. Typically, it’s 30-50 GB in size.
2. Mount the Root/Boot Partition
To modify the changes in our root/boot partition, we will have to mount it first. To do that, type the following commands in your terminal :
sudo mkdir /mnt/temp
sudo mount /dev/sda2 /mnt/temp
Your sdX number can be different from mine, use the number where your root partition is located. And for separate boot partition, mount it as follows :
sudo mkdir /mnt/temp /mnt/temp/boot
sudo mount /dev/sdXY /mnt/temp  # Mount the main partition.
sudo mount /dev/sdXZ /mnt/temp/boot  # Mount the /boot partition.
3. Be CHROOT
Now that we have mounted the partition, we will have to mount several items in preparation of the chroot, run the following commands :
for i in /dev /dev/pts /proc /sys; do sudo mount -B $i /mnt/temp$i;  done
sudo cp /etc/resolv.conf /mnt/temp/etc/resolv.conf
sudo chroot /mnt/temp
If everything went well, you will see ‘root’ in the terminal prompt.
4. Update apt and Purge GRUB2 packages
Run the following commands as chroot to update apt :
Now, purge the old damaged grub files using these commands :
apt-get purge grub grub-pc grub-common
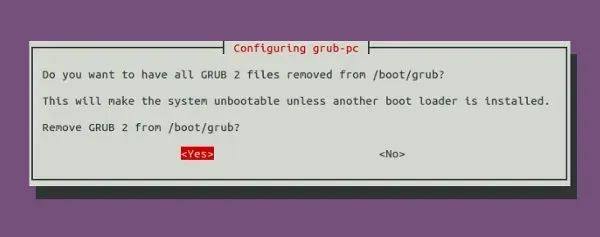
A prompt will appear asking for your confirmation to remove GRUB2 press and then press enter.
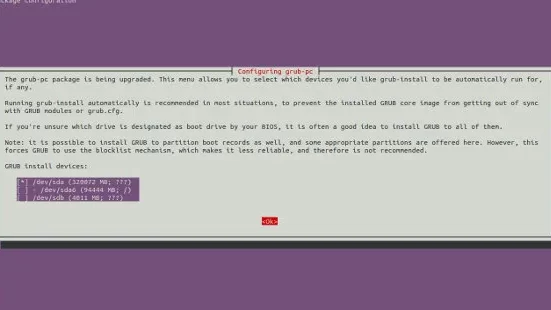
5. Re-install GRUB bootloader
We need to keep a few things in our mind before we we-install GRUB :
- While installation, it will ask you to add extra kernel options, if you don’t know about it then you probably don’t need it too. Just press the Tab key to navigate to Ok and press Enter.
- Installation notes will appear before your screen. Again, press Ok to continue.
- It will now ask you to select the drive where it will install the GRUB bootloader. DO NOT select a partition (sda1, sda2) – select a drive (sda, sdb) using the spacebar. The selected drive will be highlighted using an asterisk (*).
Now, use the following commands to install GRUB again :
apt-get install grub-common grub-pc
Now, update GRUB and exit out of chroot:
6. Unmount all the Partitions
If you have only mounted the root partition before, run the following commands :
for i in /dev/pts /dev /proc /sys; do sudo umount /mnt/temp$i ; done
And if you have also mounted the /boot partition, then run the following commands :
for i in /dev/pts /dev /proc /sys /boot; do sudo umount /mnt/temp$i ; done
Finally, reboot the system and remove the live USB stick.
Summary
The recovery process was a little exhaustive, but it works. Hopefully, you were able to access your PC after this troubleshooting process.
References
- https://ubuntuforums.org/showthread.php?t=1581099