Error opening data media no such file or directory twrp
- Если желаете остаться на офиц. прошивке, то можно загрузиться в систему и пользоваться ей, но TWRP «слетит» при первой же загрузке системы. Для загрузки в TWRP придется повторить пункт 6.
Чтобы TWRP не слетал, из TWRP прошейте архив Disable_Dm-Verity_ForceEncrypt_v1.4.zip, ниже. - Для установки локализованной/кастомной прошивки идем дальше.
- Можно не прошивать рекавери, а только разово подгрузить его, для этого используйте fastboot boot twrp.img без команды fastboot flash recovery twrp.img после выхода из TWRP восстановится стандартное рекавери.
- Можно стереть рекавери fastboot erase recovery
- FAQ по TWRP recovery
Для истории  xiaomi-mi-8-se-twrp3.2.1-7to-recovery-8.6.26.img ( 26.79 МБ )
Сообщение отредактировал D_Godunov — 02.04.19, 23:42
Архив прошивок Mi 8 SE sirius
Recovery — для установки из Recovery он же «три точки», TWRP;
Fastboot — для установки в режиме Fastboot (заяц) из MiFlash, EDL.
прекратите писать чушь и вводить в заблуждение остальных. отвечать мне не надо я не намерен с вами препираться.
Сообщение отредактировал D_Godunov — 22.06.19, 04:20
 Dogsly,
здесь тоже, но успешно, как я понял http://www.miui.com/fo…15875536&pid=228338452
а у того скорее всего проблема в «зашифрованной дате». надо было формат дата или прошить no-verity-opt-encrypt-6.0.zip
Сообщение отредактировал D_Godunov — 27.06.18, 13:07
1. Там есть две ссылки с разными размерами, кто знает что к чему там?
2. Присутствует ли в miui10 английский язык?
Сообщение отредактировал kraftz0r — 28.06.18, 11:16
Все крайне просто.
1. Скачал на ПК по ссылке предоставленной в шапке темы .zip архив прошивки China Developer 8.6.21 Recovery.
2. Залил прошивку в память телефона. На смартфоне была установлена MIUI 9 China Stable V9.5.8.0.OEBCNFA.
3. Прошил тело на MIUI 10 через три точки с с заблокированным загрузчиком.
p.s. При восстановлении данных с ми-аккаунта, наблюдались проблемы с Google Services. Play Market крашил постоянно. После перезагрузки тела и обновления всех приложений, сервисы обновились и все стало в порядке.
Google Play на Xiaomi Mi 8/SE с китайской прошивкой
Способ установки Google Play Store и исправление синхронизации контактов google (Google Contacts Sync).
Скачайте Google Installer затем распакуйте и установите на телефоне Google-Installer for Mi8.zip ( 159.7 КБ )
Разрешите установку из неизвестных источников.
Весь процесс установки популярно в картинках показан здесь http://en.miui.com/thread-2824236-1-1.html
После установки необходимо предоставить все разрешения. Зеленая иконка Security App › Manage › Permissions › Google Contacts Sync › разрешить все, т.е. зеленые галочки ✓ на всех пунктах.
Удачи :4PDA:
Сообщение отредактировал D_Godunov — 26.07.18, 19:20
TWRP для Mi 8 SE Sirius от LR.Team Китайский и английский языки. Версии Magisk между 16.6 и 18.2 не работают на Mi8SE.
❗ Внимание! Перед скачиванием TWRP читать обязательно: Пояснение о версиях TWRP (0928, 1102 и 1227), что куда шить.
- TWRP-3.3.1-1001 для MIUI 11
 recovery-TWRP-3.3.1-1001-XIAOMI8SE-CN-wzsx150.img ( 64 МБ )
ТОЛЬКО для прошивок начиная с Dev 8.12.27 и выше, а также для Stable V10.3.1.0.PEBCNXM и выше
- TWRP-3.3.0-0423 для Android 9TWRP-3.3.0-0423-XIAOMI8SE-CN-wzsx150.zip ( 23.75 МБ )
TWRP-3.2.3-0331 Встроенный Magisk 19.0 для Android 9
TWRP-3.2.3-0331-XIAOMI8SE-CN-wzsx150.zip ( 23.74 МБ ) - TWRP-3.2.3-1227 ТОЛЬКО для прошивок начиная с Dev 8.12.27 и выше на Android 9 PieTWRP-3.2.3-1227-XIAOMI8SE-CN-wzsx150.zip ( 23.46 МБ )
Для прошивок до Dev 8.12.27 и ниже, а также для Stable V10.2.3.0.PEBCNXM и ниже
- TWRP-3.2.3-1217 Встроенный Magisk 16.6. для Android 8/9
TWRP-3.2.3-1217-XIAOMI8SE-CN-wzsx150.zip ( 23.46 МБ ) TWRP-3.2.3-1102 Встроенный Magisk 16.6. для Android 8/9TWRP-3.2.3-1102-XIAOMI8SE-CN-wzsx150.zip ( 23.41 МБ )
TWRP-3.2.3-0928-XIAOMI8SE-CN-wzsx150.zip ( 23.24 МБ )Встроен Magisk 16.4. для Android 8 Oreo
TWRP-3.2.3-0810-XIAOMI8SE-CN-wzsx150.zip ( 22.84 МБ ) То же самое, что и выше, но добавлен русский язык и шрифт от ув. DriffeX автора MiRoom.
Источник: http://portal.mi-room.ru/files/twrp-recovery/
TWRP-3.2.3-MIUI_8.12.27+ ТОЛЬКО для прошивок начиная с Dev 8.12.27 и выше на Android 9 Pie repack TurboPonyTWRP-3.2.3-MIUI_8.12.27+.img ( 27.37 МБ )
TWRP-3.2.3-1102_DX Встроенный Magisk 16.6. для Android 8/9 TWRP-3.2.3-1102_DX.img ( 25.18 МБ )


2019.04.23
1. Update to the latest 3.3.0 version, adjust the optimization
2019.03.31
1. Update the built-in root to magisk-v19.0, update of other built-in functions.
2. If the built-in root does not go into the system, Try it again, or completely remove the old magisk and root system.
3. Other optimizations
2018.12.27 update content:
1. Update the new version of the rom can not go to the twrp problem
2018.12.17 update content:
1. Update to fix some oil can not get twrp problem, repeatedly restart into the fastboot mode
2018.11.02 update:
1. Update support official Android 9 rom
2. Update and optimize some functions
3. Increase automatic The option to restart after the upgrade is completed. In the twrp setting, the default is automatic restart. Uncheck the box to not restart. It is convenient to perform some operations after the automatic upgrade to prevent the twrp from being overwritten, etc.
2018.9.28 update:
1. Add support to remove dm checksum and cancel forced encryption. The removal of the dm check function is mainly to prevent the card screen caused by the dm check and to prevent the official rec from covering the twrp.
Cancel the forced encryption function is used to permanently decrypt the data, you need to format the data, otherwise you can not enter the system, do not understand the machine is not recommended. Please be careful! !
2. Update the built-in magisk to 16.6, which is said to be the latest version of the card screen. The updated version will cause the card screen. At the same time fix the bug that the built-in magisk can’t brush the module.
2018.8.10 update:
1. Update to 3.2.3
2. Support new version official rom
3. Added signature boot and restore official rec and other functions
4. Built-in magisk 16.3, it is said that the high version will be card screen
5. Update the decryption data mechanism, theoretically decrypt the data more stable Some
important notes:
1. This rec supports data partition automatic decryption , encrypted data can be used normally under rec . The official system defaults to encrypting data partitions.
2. This rec support to brush into the official original full card brush package.
3. The bootloader must be unlocked to be able to brush into a third-party rec.
4. Built-in root system / remove root function, through the root system, you can also remove dm check, prevent card screen, and can make the system root privileges.
5. Set the screen password to the machine friend, enter twrp need to enter the lock screen password, otherwise you can not temporarily decrypt the data.
The root system is strongly recommended, otherwise twrp may be overwritten by the official rec.
Modify the optimization project:
* Delete redundant languages, keep English, add Chinese language, default Chinese.
* Modify the default configuration, for example, the default time zone is the East eight zone, the default screen brightness, the default vibration, the default 24 hours, the default return button is on the right, the default Chinese and so on.
* Modify the default configuration file path to reduce the possibility of conflicts with other people’s compiled versions.
* Adjust and optimize the Chinese text and description, and re-edit all the items one by one, which is more accurate, understandable and humanized. Also added display mtp enable off display, file operation result display, operation page title display, permission description when modifying permissions, etc. UI text display.
* Modify the unlocking interface and adjust the height of the sliding unlocking bar, which can effectively prevent misoperation (the original unlocking bar and the operating unlocking bar are of the same height. When the unlocking is completed, the sliding may be repeated, and the corresponding action is directly operated).
* Open more partition backup and restore, such as modern baseband partition, bootloader, persist, cust and other partitions, easy to back up the underlying files before the brush machine, brush the machine can restore the underlying file.
* Add the .bin and .mbn format image files to be flushed so that you do not need to use the zip flash package to flash the underlying files. The original version only supports the brushing of .img format image files. (Be sure to pay attention to the selected partition. )
* Solve the problem of interface jam when using the simulation operation (the simulation operation is mainly for testing the theme, and no actual operation).
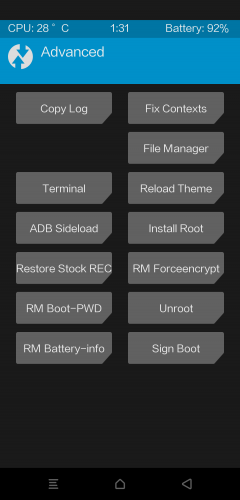
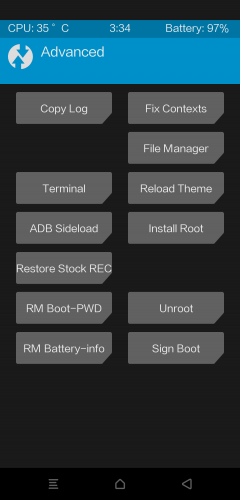
* Added manual installation root function in Advanced Options > Root System. Add a display root system option on this basis for manual operation.
* Added the ability to cancel forced encryption, in Advanced Options > Unenforce Encryption. You can remove the official system to force encryption and cancel the check.
* Change the built-in root method, add magisk as the default root method.
* Fix some interface buttons and key operations.
* The adb/usb debug mode is enabled by default, which is convenient for operating the phone through the computer command line in rec mode.
* By default, MTP is enabled. In the rec state, the mobile phone can also be connected to a computer to facilitate file copying.
* Modify the logo interface, modify the header of the main interface page, and add the display phone model and team name, author name.
* Fix some logical relationships and modify some interface displays.
* Increase the removal of root function
* Increase the clear power-on password function
* Increase the clear battery information function
Important instructions:
1. The rec support data partition automatic decryption , encrypted data without formatting can also be used under rec normal. The official system defaults to encrypting data partitions.
2. This rec supports brushing into the official original full card brush package.
3. The bootloader must be unlocked in order to flush third-party rec.
4. Built-in root system / remove the root function, through the root system, you can also remove the dm check to prevent the card screen, while allowing the system root privileges.
The root system is strongly recommended, otherwise twrp may be covered by the official rec.
Сообщение отредактировал D_Godunov — 08.10.19, 09:23
Источник
В этой статье мы покажем вам, как исправить ошибку Невозможно смонтировать хранилище при восстановлении TWRP. Операционная система Android — это операционная система с открытым исходным кодом, которая позволяет выполнять различные настройки операционной системы. Для всех настроек вам нужно только разблокировать загрузчик телефона и установить пользовательское восстановление, потому что стандартное восстановление устройства не может установить эти файлы. Если у вас есть оба этих требования, вы сможете прошить широкую коллекцию пользовательских двоичных файлов, различных модов и таможенных ROM, а также рутировать свое устройство, установив приложение Magisk.
Восстановление TWRP оказалось очень полезным для пользователей Android. После того, как вы установили восстановление TWRP на свое устройство, вы можете использовать его для очистки различных разделов устройства, выполнения полных резервных копий Nandroid вместе с прошивкой файлов, упомянутых выше. Но ваши задачи и операции иногда могут быть прерваны из-за некоторых ошибок в кастомном рекавери. Наиболее часто встречающаяся и тревожная ошибка — это ошибка невозможности смонтировать хранилище в TWRP. В этой статье мы рассмотрим возможные причины этого сообщения об ошибке, а затем обсудим возможные решения этой проблемы, ставшей жертвами многих несчастных пользователей.

Есть разные причины возникновения ошибки невозможности смонтировать хранилище при восстановлении TWRP. Во-первых, внутренняя память вашего устройства может быть зашифрована. Почему это вызывает ошибку? Ну, это потому, что в этом случае TWRP не может расшифровать внутреннее хранилище вашего устройства, пока он выполняет задачу, поэтому он не может использовать или получить доступ к любым файлам, которые доступны или загружены во внутреннем хранилище вашего устройства. Вот почему эта ошибка в основном возникает, когда вы используете TWRP-восстановление для прошивки файла, который загружается во внутреннее хранилище вашего файла.
Если проблема, упомянутая выше, не так, возможно, раздел данных вашего устройства поврежден. Это может произойти из-за неправильной прошивки файла, прошивки неправильного типа файла или из-за прошивки файла в неправильном разделе данных. Как узнать, что это действительно проблема? В этих случаях ваш интерфейс TWRP показывает, что внутренняя память вашего устройства полностью пуста и имеет 0 МБ занятого места. Но вам не о чем беспокоиться, потому что это не так, и ваши данные могут быть в безопасности. Поскольку мы уже обсудили возможные причины ошибки TWRP не удается смонтировать хранилище, давайте обсудим способы решения проблемы.
Как исправить ошибку невозможности смонтировать хранилище в TWRP Recovery
Ниже мы упомянули три различных метода, с помощью которых вы можете исправить ошибку невозможности смонтировать хранилище при восстановлении TWRP. Вам необходимо следить за тем, чтобы вы следовали методам в том порядке, в котором мы их упомянули. Кроме того, не забудьте загрузить устройство в режиме TWRP.
Исправление 1: удалить экран блокировки
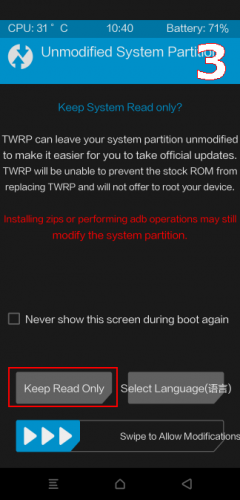
Если вы используете графический ключ блокировки на своем устройстве, вы должны либо удалить его, либо изменить его на PIN-код или пароль, потому что восстановление TWRP не может расшифровать блокировки шаблона. Заменить блокировку на устройстве очень просто, но мы показали вам, как это сделать:
ШАГ 1: Прежде всего, выйдите из режима TWRP и загрузите телефон в систему.
ШАГ 2: Когда вы вернетесь в систему, перейдите в «Настройки»> «Безопасность», а оттуда — в «Блокировка экрана»> «Блокировка».
ШАГ 3: Оттуда выберите ПИН-код или Пароль или снимите блокировку. После этого загрузите устройство обратно в режим TWRP.
ШАГ 4: После этого восстановление TWRP попросит вас ввести ПИН-код или пароль вашего устройства. Это расшифрует внутреннюю память вашего телефона.
Теперь вы можете попробовать прошить некоторые файлы на свое устройство, чтобы проверить, исправлена ли ошибка невозможности подключения хранилища при восстановлении TWRP или она все еще возникает. Если вы все еще видите сообщение об ошибке, перейдите к следующему способу.
Исправление 2: восстановить или изменить файловую систему
Второй способ, который вы можете попробовать, — это восстановить или изменить файловую систему вашего устройства. Сделать это можно прямо из TWRP.
ШАГ 1: Прежде всего, загрузите ваше устройство в режим TWRP.
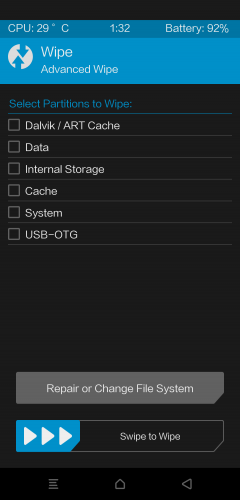
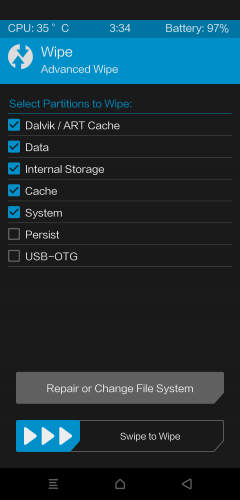
ШАГ 2: Затем перейдите в Wipe> Advanced Wipe и там нажмите на опцию Wipe и Advanced Wipe.
ШАГ 3: После этого нажмите «Раздел данных», а затем нажмите «Восстановить или изменить файловую систему». Там нажмите на кнопку Восстановить файловую систему и дождитесь завершения процесса. Затем проверьте, исправляет ли он ошибку Невозможно смонтировать хранилище в TWRP.

ШАГ 4: Если проблема решена, все в порядке, но если ошибка все еще существует, вернитесь в Восстановление или изменение файловой системы. На этот раз выберите опцию «Изменить файл».
ШАГ 5: Вы увидите меню, в котором вам нужно выбрать EXT 2 и подтвердить его, проведя пальцем вправо.
ШАГ 6: После этого вам нужно снова переключиться на EXT 4 и подтвердить его.
ШАГ 7: После этого вернитесь на главный экран TWRP и перейдите к опции Mount.
ШАГ 8: Откройте раздел с данными и попробуйте снова прошить несколько файлов.
Проверьте, сталкиваетесь ли вы по-прежнему с ошибкой невозможности смонтировать хранилище в TWRP или нет. Если вы все еще сталкиваетесь с ошибкой, перейдите к следующему способу.
Исправление 3: форматирование внутренней памяти
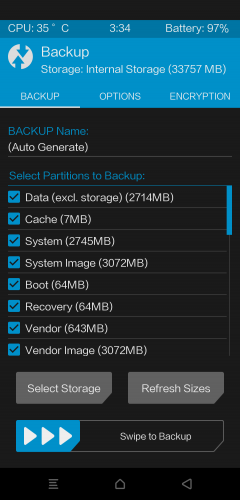
Если вы попробовали два вышеуказанных метода и по-прежнему сталкиваетесь с ошибкой невозможности смонтировать хранилище при восстановлении TWRP, вам следует попробовать этот последний вариант, который обязательно исправит ошибку невозможности смонтировать хранилище в TWRP. Этот метод включает форматирование вашего внутреннего хранилища, при котором вам придется стереть все данные вашего устройства. Итак, поскольку вы теперь знаете, что этот метод будет включать удаление ваших данных, вам следует ознакомиться с нашим руководством о том, как выполнить резервное копирование ваших данных, чтобы избежать потери некоторых важных файлов или данных.

Когда вы закончите резервное копирование, выполните шаги, указанные ниже:
ШАГ 1: Загрузите ваше устройство в режим TWRP.
ШАГ 2: Затем перейдите в Wipe> Advanced Wipe и там выберите внутреннюю память.

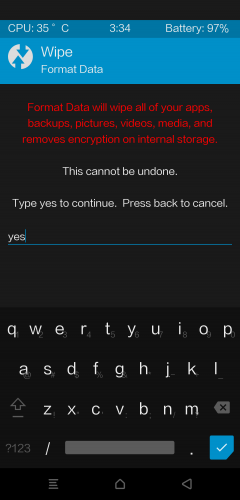
ШАГ 3: Затем проведите пальцем вправо, чтобы отформатировать этот раздел, и все ваши данные будут удалены.
ШАГ 4: Как только вы закончите, ошибка невозможности смонтировать хранилище в TWRP будет исправлена. Ваше внутреннее хранилище в TWRP по-прежнему будет показывать вам 0 МБ, но на этот раз это будет правда.
Так что с нашей стороны! Мы надеемся, что эта статья оказалась для вас полезной. Если у вас есть какие-либо вопросы или вопросы, не стесняйтесь размещать их в разделе комментариев ниже.
![]()
phone: nexus 5
android: 6.0
I try to flash the recovery https://dl.twrp.me/hammerhead/twrp-3.0.2-0-hammerhead.img to my phone.
The Twrp has been installed successfully,but bootloop when i reboot.
However, whenever I boot into TWRP, I’m getting error mesages
    E: Find_file: Error opening '/sys/class/backlight'
    E: Unable to mount '/data'
    E: Unable to recreate /data/media folder.
    Updating partition details...
    E: Unable to mount '/data'
    ...done
    E: Unable to mount storage.
    E: Unable to mount /data/media during GUI startup.
    Full SELinux support is present.
    E: Unable to mount /data/media/TWRP.twrps when trying to read settings file.
    E: Unable to mount '/data'
    MTP Enabled
    E: Unable to mount '/data'
![]()
check the recovery.fstab placed in initrd/ect
and change the input format of
dev/block/mmcblk0p2 /cache ext4 defaults defaults
to
/cache ext4 dev/block/mmcblk0p2 defaults defaults
for example.
![]()
Pretty old thread, but here’s what worked for me:
fastboot erase cache
fastboot erase userdata
fastboot flash recovery twrp-3.1.0-0-hammerhead.img
fastboot reboot
allowed me to boot into TWRP. There I’ve formatted the data partition. Then I did
adb push lineage-14.1-20170509-nightly-hammerhead-signed.zip /sdcard/
adb push open_gapps-arm-7.1-nano-20170509.zip /sdcard/
and used TWRP / INSTALL to install Lineage OS without any further problem.
![]()
@amanessinger please do not advise to execute those commands without notifying that it will wipe all of their files and data!
![]()
Oh yeah, that’s definitely right. In my case. I didn’t care. I just wanted Nougat on a device not supported by Google any more.
On the other hand, this is about a boot loop. I didn’t find any other way to get out of it. A brick with data still in it wouldn’t have been any better for me. But yes, thanks for the warning. I forgot.
![]()
Maybe is useful for urs… But i fixed it changing the format in the fstab.
Of
Code:
dev/block/mmcblk0p2 /cache ext4 defaults defaults
To
Code:
/cache ext4 dev/block/mmcblk0p2 defaults
defaults
Enjoy.
El viernes, 12 de mayo de 2017, Andreas Manessinger <
notifications@github.com> escribió:
…

Installing TWRP onto a smartphone or tablet typically requires you to use a Fastboot command to overwrite your current recovery system. Some people have trouble with the Command Prompt and in turn end up getting a cannot load twrp.img error, or being told there is no such file or directory. But there is a way to fix it.
The reason why someone is getting this specific error has to do with the last part of the Fastboot command. So, for example, a typical command to install a Custom Recovery (TWRP in this case) onto an Android device looks like this: fastboot flash recovery twrp.img. We can break this command down to see what it’s actually doing. . .
Fastboot – this initiates the Fastboot.exe file which is the file doing all of the work
Flash – this tells the Fastboot.exe file we want to install something onto the connected device
Recovery – this tells the Fastboot.exe file that when we install something, we’re installing it onto the recovery partition
TWRP.img – this tells the Fastboot.exe file what we want to install onto the connected device
So what the “cannot load ‘twrp.img’: No such file or directory” error is telling us is what it looked for the twrp.img file in the current directory (which should be where your ADB and Fastboot tools are installed) and couldn’t find it. There are a few ways this can happen but 9 times out of 10 it has to do with the file path of the twrp.img file.
Some people forget to rename the file to twrp.img. Others may forget to put it in the ADB and Fastboot tools folder. They may even have two different installs of ADB and Fastboot tools over the years. There are many reasons but we can eliminate any file path related issues by doing the following.
Time needed: 3 minutes.
- Drag and drop the twrp.img file into the Command Prompt instead of typing out the filename
Watch the video below to show how it’s done.
I received a comment the other day from someone who was receiving this exact error. Again, the only reason why this error would come up is related to the file path of the twrp.img image. There are so many ways this can get mixed up when trying to execute that Fastboot command but the suggestion above should avoid all of that.
It can be a bit difficult to explain over text so you may want to see me do it via the video.
Instead of typing out that twrp.img part of the Fastboot command, we’re going to leave it open-ended right before the file. So instead of the typed out command being fastboot flash recovery twrp.img, we’re just going to type out “fastboot flash recovery “.
You’ll want to make note of the extra space I left after the word “recovery”.
That is very important because we need a space after the word recovery and before the file path of the twrp.img image. If not, we end up with a command that looks like fastboot flash recoveryE:ImagesXiaomiRedmi-Note-6-Protwrp.img. To the Fastboot.exe file, this command messes up the syntax.
Some TWRP users, especially those who install custom ROMs, sometimes run into an issue where TWRP will an error that reads “Unable to mount storage”. The internal storage will also show up as 0mb in TWRP, even if you have a ton of free space.
What’s happening in a majority of these cases is that TWRP is unable to decrypt your internal storage – basically, TWRP does not properly handle encrypted storage. Another cause could be corruption of the /data partition, and TWRP being unable to find it.
If you are experiencing TWRP unable to mount storage, and internal storage showing as 0mb, read through this guide for how to fix it.
How to Fix TWRP Unable to Mount Storage
Warning: This option will remove all the data contains in your mobile. Please make a back-up of your data before proceeding to the next step we will not be responsible for any loss of your data.
- The first thing to try is if somehow your internal storage became encrypted when using a legacy screen lock method.
- Go to your Android device’s Settings > Security > Screen Lock, and change your screen lock method to either Pass or Pin. Create a new one.
- Reboot into TWRP, and it should ask for a password – enter the pass or pin you just created.
- TWRP will attempt to decrypt your device’s internal storage, and if it succeeds, you should not have further issues. However, if this does not solve your issue of “unable to mount data, internal storage 0mb”, continue with the rest of this guide.
- Reboot your device into TWRP again.
- Navigate to Wipe > Advance Wipe > Data, and choose Repair or Change File System.
- Press Repair File System to see if this fixes the issue. If not, continue.
- Press Change File System, choose Ext2, and swipe to confirm.
- Now switch back to Ext4 and swipe to confirm.
- Go back to TWRP main menu, then the Mount menu, and check if your partitions can be mounted now.
- If you are still unable to mount your partitions, you need to repair Internal partition, which will most likely wipe your internal storage.

Kamil Anwar
Kamil is a certified MCITP, CCNA (W), CCNA (S) and a former British Computer Society Member with over 9 years of experience Configuring, Deploying and Managing Switches, Firewalls and Domain Controllers also an old-school still active on FreeNode.
Back to top button