Привет всем читателям. Сегодня мы вместе с вами снова вернемся к протоколу TFTP и поговорим о том как превратить наш с вами маршрутизатор фирмы Cisco в TFTP сервер. Соглашусь с вами, что надобность в этом на практике возникает не очень часто, но все же лучше знать и уметь пользоваться данным функционалом, мало ли в жизни всякое бывает.
Конечно если есть необходимость в постоянном TFTP сервере, то лучше поднять его на отдельной машинке и тихо мирно работать с ним не трогая более важные устройства, такие как маршрутизаторы. Но иногда бывают моменты когда необходимо быстро перебросить всего несколько файлов с одного маршрутизатора на другой, вот в таких случаях и пригодится умение конфигурировать ваш маршрутизатор в качестве TFTP сервера. Ведь согласитесь, быстрее ввести пару команд на одном маршрутизаторе, сделать его TFTP сервером и скопировать с него файлы с помощью TFTP клиента другого маршрутизатора, чем разворачивать где то в сети TFTP сервер, сначала копировать файлы с первого маршрутизатора на TFTP сервер, а уже потом скачивать с TFTP сервера файлы на другой маршрутизатор. Какая то двойная работа получается.
Разбирать конфигурирование маршрутизаторов фирмы Cisco в качестве TFTP сервера, мы опять же будем на примере, но в этот раз для симуляции сети мы будем использовать GNS3. Соберем в нем следующую простенькую схему, содержащую 3 маршрутизатора, имеющих как минимум по 2 Ethernet интерфейса (в данном примере использован IOS от Cisco 2691 — c2691-advipservicesk9-mz.124-15.T6.bin):
 |
| Данная схема сети должна быть собрана в GNS3 |
Внесем в конфигурации маршрутизаторов следующие команды:
Маршрутизатор R1:
R1(config)#interface fastEthernet 0/0
R1(config-if)# ip address 192.168.1.2 255.255.255.252
R1(config-if)#no shutdown
Маршрутизатор R2:
R2(config)#interface fastEthernet 0/0
R2(config-if)#ip address 192.168.1.1 255.255.255.252
R2(config-if)# no shutdown
R2(config)#interface fastEthernet 0/1
R2(config-if)#ip address 192.168.2.1 255.255.255.252
R2(config-if)#no shutdown
Маршрутизатор R3:
R3(config)#interface fastEthernet 0/0
R3(config-if)#ip address 192.168.2.2 255.255.255.252
R3(config-if)#no shutdown
Как вы уже наверное поняли с помощью данных команды, мы с вами назначили IP адреса интерфейсам маршрутизатора, и как следствие установили связь между ними (проверить это можно с помощью команды ping). Настраивать маршрутизацию нет необходимости так как в этот раз она нам не пригодится. Далее будем считать что наша заготовка для опытов готова и перейдем непосредственно к настройке TFTP сервера.
В простейшем случае, для того чтобы сконфигурировать ваш маршрутизатор в качестве TFTP сервера необходимо ввести на нем команду вида tftp-server <место от куда брать файл> <имя файла>.
Давайте попробуем настроить маршрутизатор R2 так, чтобы он раздавал файл своей конфигурации, сохраненный во флеш памяти, по TFTP. Для этого выполним на нем команды:
R2#copy running-config flash:
R2(config)#tftp-server flash:r2-confg
Здесь первой командой мы копируем текущую конфигурацию нашего устройства во флеш память. По умолчанию, если согласится со всеми ее параметрами нажав Enter, эта команда очищает флеш память и создает в ней файл с именем <hostname>-confg (в нашем случае r2-confg). Вторая же команда запускает на маршрутизаторе TFTP сервер, который будет раздавать файл r2-confg, хранящийся во флеш памяти маршрутизатора (полный перечень мест/устройств из которых маршрутизатор может делать файлы доступными по TFTP можно получить с помощью команды tftp—server ?, в зависимости от модели устройства придется использовать разные места). Данная команда не вносит ни каких ограничений, на то кто может скачивать данный файл, поэтому его может скачать любое устройство, с установленным TFTP клиентом, имеющее связь с маршрутизатором по протоколу IP. Проверим это попробовав скопировать данный файл используя машрутизаторы R1 и R3.
На маршрутизаторе R1:
Копируем файл с TFTP сервера во флеш память:
R1#copy tftp flash
Address or name of remote host []? 192.168.1.1
Source filename []? r2-confg
Destination filename [r2-confg]?
Accessing tftp://192.168.1.1/r2-confg…
Erase flash: before copying? [confirm]n
Loading r2-confg from 192.168.1.1 (via FastEthernet0/0): !
[OK — 937 bytes]
Verifying checksum… OK (0x237E)
937 bytes copied in 0.228 secs (4110 bytes/sec)
Просматриваем содержимое флеш памяти:
R1#show flash:
System CompactFlash directory:
File Length Name/status
1 937 r2-confg
[1004 bytes used, 16776208 available, 16777212 total]
16384K bytes of ATA System CompactFlash (Read/Write)
Просматриваем содержимое самого файла:
R1#more flash:r2-confg
На маршрутизаторе R3:
R3#copy tftp flash
Address or name of remote host []? 192.168.2.1
Source filename []? r2-confg
Destination filename [r2-confg]?
Accessing tftp://192.168.2.1/r2-confg…
Erase flash: before copying? [confirm]n
Loading r2-confg from 192.168.2.1 (via FastEthernet0/0): !
[OK — 937 bytes]
Verifying checksum… OK (0x237E)
937 bytes copied in 0.248 secs (3778 bytes/sec)
Как мы и говорили выше файлы раздаваемые TFTP сервером доступны, со всех устройств имеющих связь с ним. А как обстоят дела с записью? Попробуем записать какой либо файл на наш TFTP сервер:
R3#copy running-config flash
R3#copy flash tftp
Source filename [r2-confg]? r3-confg
Address or name of remote host []? 192.168.2.1
Destination filename [r3-confg]?
TFTP: error code 2 received — 16739
%Error opening tftp://192.168.2.1/r3-confg (Permission denied)
Как легко заметить из приведенного выше вывода — записать файл не получилось. Аналогичный результат будет, если мы попробуем произвести запись с маршрутизатора R1. Из этого можно сделать вывод, что запись на TFTP сервер, сконфигурированный на маршрутизаторе фирмы Cisco, запрещена, даже в тех случаях, когда любой клиент имеет доступ на чтение.
А можно ли это как то ограничить доступ на чтение? Да можно, но для этого придется сконфигурировать наш TFTP сервер немного другим образом. Для начала отключим действующий в настоящий момент на маршрутизаторе TFTP сервер, сделаем это с помощью команды (стоит отметить, что данная команда не останавливает TFTP сервер полностью, а лишь отменяет раздачу файла r2-confg):
R2(config)#no tftp-server flash:r2-confg
А уже далее сделаем опять тот же самый файл доступным на TFTP сервере, но уже только одному определенному хосту в сети:
R2(config)#access-list 1 permit 192.168.1.2
R2(config)#access-list 1 deny any
R2(config)#tftp-server flash:r2-confg 1
С помощью первых двух команд мы создаем ACL (Список контроля доступа)с номером 1. В первой строке мы разрешаем доступ хосту с IP адресом 192.168.1.2 (маршрутизатор R1). А второй командой мы запрещаем доступ всем другим хостам. В третье строке мы прикрепляем ACL к нашему TFTP серверу (та самая единичка добавленная в конце команды). Если вам не совсем понятен принцип работы ACL, то не стоит огорчаться, мы рассмотрим эту тему подробнее в наших следующих статьях.
Теперь давайте попробуем еще раз выполнить копирование файла r2-confg с маршрутизатора R2 на маршрутизаторы R1 и R3:
Маршрутизатор R1:
R1#copy tftp flash
Address or name of remote host [192.168.1.1]?
Source filename [r2-confg]?
Destination filename [r2-confg]?
Accessing tftp://192.168.1.1/r2-confg…
Erase flash: before copying? [confirm]n
Loading r2-confg from 192.168.1.1 (via FastEthernet0/0): !
[OK — 937 bytes]
Verifying checksum… OK (0x237E)
937 bytes copied in 0.224 secs (4183 bytes/sec)
Маршрутизатор R3:
R3#copy tftp flash:
Address or name of remote host []? 192.168.2.1
Source filename []? r2-confg
Destination filename [r2-confg]?
Accessing tftp://192.168.2.1/r2-confg…
%Error opening tftp://192.168.2.1/r2-confg (No such file or directory)
Как видно из вывода команд, маршрутизатор R1 успешно скопировал файл с TFTP сервера, а маршрутизатор R3 не смог получить доступ к данному файлу. Это говорит о том , что мы все сделали верно, и наш ACL прикрученный к TFTP серверу работает.
На сегодня это все. До новых встреч.
P.S. В этой статье и далее будем считать, что команды раскрашенные синим цветом предназначены для ввода команд или их параметров в устройство, а зеленые команды — это реакция маршрутизатора, выводимая на экран.
Доброго времени суток!
Специалисты, помогите слоупоку(
Был собран стенд GNS3 — VMWare (Windows XP SP2), топология выглядит где-то так (циски 7200):

Конфиг R0:
Current configuration : 1481 bytes
!
version 12.4
service timestamps debug datetime msec
service timestamps log datetime msec
service password-encryption
!
hostname R0
!
boot-start-marker
boot-end-marker
!
no aaa new-model
!
ip cef
interface FastEthernet0/0
ip address 192.168.1.20 255.255.255.0
duplex full
!
interface Serial1/0
ip address 12.1.1.1 255.255.255.252
serial restart-delay 0
!
!
router eigrp 1
redistribute static
network 12.0.0.0
network 192.168.1.0
no auto-summary
!
ip route 0.0.0.0 0.0.0.0 12.1.1.2
!
no ip http server
no ip http secure-server
!
control-plane
!
gatekeeper
shutdown
!
!
line con 0
password 7 110A1016141D
login
stopbits 1
line aux 0
stopbits 1
line vty 0 4
password 7 05080F1C2243
login
!
!
end
Пинги между Варей и Р0 проходят.
Задача следующая была: сгенерировать ключи RSA и экспортировать их на TFTP сервер.
Сделать это ну никак не выходит. При попытке сохранить ключ на ТФТП:
R0(config)#crypto key export rsa test_keys_rsa pem url tftp: 3des 123456789
, получаю ошибку:
% Key name: test_keys_rsa
  Usage: General Purpose Key
Exporting public key...
Address or name of remote host []? 192.168.1.29
Destination filename [test_keys_rsa.pub]?
TFTP: error code 2 received - 16739
% Error: failed to open file.
% Error: failed to export key.
При создании ключей, добавлял параметр «exportable».
R0#show crypto key mypubkey rsa
% Key pair was generated at: 09:04:35 UTC Jul 28 2011
Key name: test_keys_rsa
Usage: General Purpose Key
Key is exportable.
Key Data:
 305C300D 06092A86 4886F70D 01010105 00034B00 30480241 00C4B29D CDB14B5C
 18BC1B94 A4D2E75D 467A5FA4 7A1EAB70 31F81D41 1B840642 8DA1904A 59F4426A
 7D3FB33D 43DD6D29 132A5A34 95FBAAC2 8FB14734 D6A6884B 9F020301 0001
% Key pair was generated at: 09:52:36 UTC Jul 29 2011
также присутствует другая проблемка — не могу копировать файл конфигурации на ТФТП:
R0#copy running-config tftp:
Address or name of remote host []? 192.168.1.29
Destination filename [r0-confg]?
TFTP: error code 2 received - 16739

%Error opening tftp://192.168.1.29/r0-confg (Permission denied)
Службу ТФТП в Винде вручную ставил, руководствуясь данным гайдом: http://www.panvasoft.com/rus/blog/144/
Фаервол погасил.
Сразу извиняюсь, если понаписывал (-ваю) глупостей — я в цисках новичек.
Заранее спасибо)
//заранее прошу прощение, если подобная тема уже обсуждалась, но поиск мне в этом деле не помог)
//надеюсь тема в правильном разделе.
Изменено 29 июля, 2011 пользователем Former_Human
I’m trying to copy a new IOS version from a tftp server via «copy tftp flash.» I continuously get a %error opening tftp (permission denied). I’ve done this countless times with other IOS versions with no problems. Can you tell me if this is a problem with the router or Solarwinds tftp server? I’ve reviewed the security tabs and unblocked the file, but still get the same message. Any thoughts anyone?
Read these next…

Roku TV being used as Wallboard Issues
Hardware
Helping someone out at their shop. They have 4 large Roku screens and 2 laptops with dual HDMI ports for video. They are viewing static website business dashboards and PowerPoint. At first all 4 screens connected to wireless, worked for a while but with a…
Charging for SSO
Security
We have SSO set up with around 5 or 6 solution providers via our M365. Not one of them charges for this, they just sent us the documentation.I identified another online service in use by one of our departments which would benefit from using SSO for staff …
Spark! Pro series — 9th February 2023
Spiceworks Originals
Today in History: America meets the Beatles on “The Ed Sullivan Show”
At approximately 8:12 p.m. Eastern time, Sunday, February 9, 1964, The Ed Sullivan Show returned from a commercial (for Anacin pain reliever), and there was Ed Sullivan standing …
Green Brand Rep Wrap-Up: January 2023
Spiceworks Originals
Hi, y’all — Chad here. A while back, we used to feature the top posts from our brand reps (aka “Green Gals/Guys/et. al.) in a weekly or monthly wrap-up post. I can’t specifically recall which, as that was approximately eleven timelines ago. Luckily, our t…
Help with domain controller setup
Windows
I just got a new job as the only IT person for a business with around 270 employees (I would say probably less than half use computers) They don’t have any policies or procedures when it comes to IT, as they have never had an IT person. My background cons…


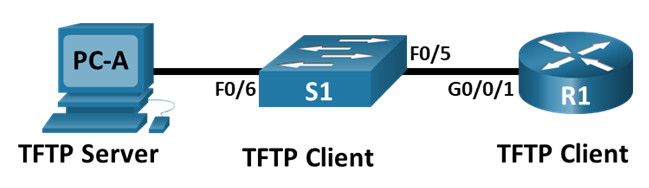
Lab – Use TFTP, Flash, and USB to Manage Configuration Files (Instructor Version)
Topology
Addressing Table
| Device | Interface | IP Address | Subnet Mask | Default Gateway |
|---|---|---|---|---|
| R1 | G0/0/1 | 192.168.1.1 | 255.255.255.0 | N/A |
| S1 | VLAN 1 | 192.168.1.11 | 255.255.255.0 | 192.168.1.1 |
| PC-A | NIC | 192.168.1.3 | 255.255.255.0 | 192.168.1.1 |
Objectives
- Part 1: Build the Network and Configure Basic Device Settings
- Part 2: Use TFTP to Back Up and Restore the Switch Running Configuration
- Part 3 Use TFTP to Back Up and Restore the Router Running Configuration
- Part 4: Back Up and Restore Running Configurations Using Router Flash Memory
- Part 5: (Optional) Use a USB Drive to Back Up and Restore the Running Configuration
Background / Scenario
Cisco networking devices are often upgraded or swapped out for a number of reasons. It is important to maintain backups of the latest device configurations, as well as a history of configuration changes. A TFTP server is often used to backup configuration files and IOS images in production networks. A TFTP server is a centralized and secure method used to store the backup copies of the files and restore them as necessary. Using a centralized TFTP server, you can back up files from many different Cisco devices.
In addition to a TFTP server, most of the current Cisco routers can back up and restore files locally from CompactFlash (CF) memory or a USB flash drive. The CF is a removable memory module that has replaced the limited internal flash memory of earlier router models. The IOS image for the router resides in the CF memory, and the router uses this IOS Image for the boot process. With the larger size of the CF memory, additional files can be stored for backup purposes. A removable USB flash drive can also be used for backup purposes.
In this lab, you will use TFTP server software to back up the Cisco device running configuration to the TFTP server. You can edit the file using a text editor and copy the new configuration back to a Cisco device. The instructions here for the TFTP server configuration and operation are generic and there may be some differences in terminology with your TFTP server software.
Note: The routers used with CCNA hands-on labs are Cisco 4221 with Cisco IOS XE Release 16.9.4 (universalk9 image). The switches used in the labs are Cisco Catalyst 2960s with Cisco IOS Release 15.2(2) (lanbasek9 image). Other routers, switches, and Cisco IOS versions can be used. Depending on the model and Cisco IOS version, the commands available and the output produced might vary from what is shown in the labs. Refer to the Router Interface Summary Table at the end of the lab for the correct interface identifiers.
Note: Ensure that the routers and switches have been erased and have no startup configurations. If you are unsure contact your instructor.
Instructor Note: Refer to the Instructor Lab Manual for the procedures to initialize and reload devices
Required Resources
- 1 Router (Cisco 4221 with Cisco IOS XE Release 16.9.3 universal image or comparable)
- 1 Switch (Cisco 2960 with Cisco IOS Release 15.2(2) lanbasek9 image or comparable)
- 1 PC (Windows with a terminal emulation program, such as Tera Term)
- Console cables to configure the Cisco IOS devices via the console ports
- Ethernet cables as shown in the topology
- USB flash drive (Optional)
Instructions
Part 1: Build the Network and Configure Basic Device Settings
In Part 1, you will set up the network topology and configure basic settings, such as the interface IP addresses for router R1, switch S1 and PC-A.
Step 1: Cable the network as shown in the topology.
Attach the devices as shown in the topology diagram, and cable as necessary.
Step 2: Configure basic settings for the router.
a. Assign a device name to the router.
router(config)# hostname R1
b. Disable DNS lookup to prevent the router from attempting to translate incorrectly entered commands as though they were host names.
R1(config)# no ip domain-lookup
c. Assign class as the privileged EXEC encrypted password.
R1(config)# enable secret class
d. Assign cisco as the console password and enable login.
R1(config)# line console 0
R1(config-line)# password cisco
R1(config-line)# login
e. Assign cisco as the VTY password and enable login.
R1(config)# line vty 0 4
R1(config-line)# password cisco
R1(config-line)# login
f. Encrypt the plaintext passwords.
R1(config)# service password-encryption
g. Create a banner that warns anyone accessing the device that unauthorized access is prohibited.
R1(config)# banner motd $ Authorized Users Only! $
h. Configure interfaces as listed in the table above.
R1(config-if)# interface g0/0/1
R1(config-if)# ip address 192.168.1.1 255.255.255.0
R1(config-if)# no shutdown
R1(config-if)# end
i. Save the running configuration to the startup configuration file.
R1# copy running-config startup-config
Note: Use the question mark (?) to help with the correct sequence of parameters needed to execute this command.
Step 3: Configure basic settings for the switch.
a. Assign a device name to the switch.
switch(config)# hostname S1
b. Disable DNS lookup to prevent the router from attempting to translate incorrectly entered commands as though they were host names.
S1(config)# no ip domain-lookup
c. Assign class as the privileged EXEC encrypted password.
S1(config)# enable secret class
d. Assign cisco as the console password and enable login.
S1(config)# line console 0
S1(config-line)# password cisco
S1(config-line)# login
e. Assign cisco as the VTY password and enable login.
S1(config)# line vty 0 4
S1(config-line)# password cisco
S1(config-line)# login
f. Encrypt the plaintext passwords.
S1(config)# service password-encryption
g. Create a banner that warns anyone accessing the device that unauthorized access is prohibited.
S1(config)# banner motd $ Authorized Users Only! $
h. Shut down all unused interfaces.
S1(config)# interface range f0/1-4, f0/7-24, g0/1-2
S1(config-if-range)# shutdown
S1(config-if-range)# end
i. Configure interface VLAN 1 as specified in the table above.
S1(config)# interface vlan 1
S1(config-if)# ip address 192.168.1.11 255.255.255.0
S1(config-if)# no shutdown
S1(config-if)# exit
S1(config)# ip default-gateway 192.168.1.1
j. Save the running configuration to the startup configuration file.
S1# copy running-config startup-config
Note: Use the question mark (?) to help with the correct sequence of parameters needed to execute this command.
Step 4: Verify connectivity from PC-A.
a. Ping from PC-A to S1.
b. Ping from PC-A to R1.
If the pings are not successful, troubleshoot the basic device configurations before continuing.
Part 2: Use TFTP to Back Up and Restore the Switch Running Configuration
Step 1: Verify connectivity to switch S1 from PC-A.
The TFTP application uses the UDP Layer 4 transport protocol, which is encapsulated in an IP packet. For TFTP file transfers to function, there must be Layer 1 and 2 (Ethernet, in this case) and Layer 3 (IP) connectivity between the TFTP client and the TFTP server. The LAN topology in this lab uses only Ethernet at Layers 1 and 2. However, TFTP transfers can also be accomplished over WAN links that use other Layer 1 physical links and Layer 2 protocols. As long as there is IP connectivity between the client and server, as demonstrated by ping, the TFTP transfer can take place. If the pings are not successful, troubleshoot the basic device configurations before continuing.
Note: A common misconception is that you can TFTP a file over the console connection. This is not the case because the console connection does not use IP. The TFTP transfer can be initiated from the client device (router or switch) using the console connection, but there must be IP connectivity between the client and server for the file transfer to take place.
Step 2: Start the TFTP server.
Start the TFTP program on PC-A. Ensure that the TFTP program is using a directory that you have WRITE permission for, such as a folder on your desktop.
Step 3: Explore the copy command on a Cisco device.
a. Console into switch S1 and, from the privileged EXEC mode prompt, enter copy ? to display the options for source or “from” location and other available copy options. You can specify flash: or flash0: as the source. However, if you simply provide a filename as the source, flash0: is assumed and is the default. Note that running-config is also an option for the source location.
S1# copy ?
  /erase          Erase destination file system.
  /error          Allow to copy error file.
  /noverify       Don't verify image signature before reload.
  /verify         Verify image signature before reload.
  bs:             Copy from bs: file system
  cns:            Copy from cns: file system
  flash:          Copy from flash: file system
  ftp:            Copy from ftp: file system
  http:           Copy from http: file system
  https:          Copy from https: file system
  logging         Copy logging messages
  null:           Copy from null: file system
  nvram:          Copy from nvram: file system
  rcp:            Copy from rcp: file system
  running-config  Copy from current system configuration
  scp:            Copy from scp: file system
  startup-config  Copy from startup configuration
  system:         Copy from system: file system
  tar:            Copy from tar: file system
  tftp:           Copy from tftp: file system
  tmpsys:         Copy from tmpsys: file system
  vb:             Copy from vb: file system
  xmodem:         Copy from xmodem: file system
  ymodem:         Copy from ymodem: file system
b. Use the ? to display the destination options after a source file location is chosen. The flash: file system for S1 is the source file system in this example.
S1# copy flash: ?
  flash:          Copy to flash: file system
  ftp:            Copy to ftp: file system
  http:           Copy to http: file system
  https:          Copy to https: file system
  null:           Copy to null: file system
  nvram:          Copy to nvram: file system
  rcp:            Copy to rcp: file system
  running-config  Update (merge with) current system configuration
  scp:            Copy to scp: file system
  startup-config  Copy to startup configuration
  system:         Copy to system: file system
  tftp:           Copy to tftp: file system
  tmpsys:         Copy to tmpsys: file system
  vb:             Copy to vb: file systesystem
Step 4: Transfer the running-config file from switch S1 to TFTP server on PC-A.
a. From the privileged EXEC mode on the switch, enter the copy running-config tftp: command. Provide the remote host address of the TFTP server (PC-A), 192.168.1.3. Press Enter to accept default destination filename (s1-confg) or provide your own filename. The exclamation marks (!!) indicate the transfer process is in progress and is successful.
S1# copy running-config tftp:
Address or name of remote host []? 192.168.1.3
Destination filename [s1-confg]?
!!
1465 bytes copied in 0.663 secs (2210 bytes/sec)
S1#
The TFTP server may also displays transfer progress.
Note: If you do not have permission to write to the current directory that is used by the TFTP server, the following error message displays:
S1# copy running-config tftp:
Address or name of remote host []? 192.168.1.3
Destination filename [s1-confg]?
%Error opening tftp://192.168.1.3/s1-confg (Permission denied)
Note: Other issues, such as a firewall blocking TFTP traffic, can prevent the TFTP transfer. Please check with your instructor for further assistance.
b. Check the directory on the TFTP server (usually the default directory for the TFTP server software) to verify that the file was transferred successfully. Your TFTP server may have a dialog for this, or you can simply use the File Explorer provided by your Operating System.
Step 5: Create a modified switch running configuration file.
The saved running configuration file, s1-confg, can also be restored to the switch by using the copy command from the switch. The original or a modified version of the file can be copied to the flash file system of the switch.
a. Navigate to the TFTP directory on PC-A by using the file system of PC-A, and then locate the s1-confg file. Open this file using a text editor program, such as WordPad.
b. With the file open, locate the hostname S1 line. Replace S1 with Switch1. Delete all the self-generated crypto keys, as necessary. A sample of the keys is displayed below. These keys are not exportable and can cause errors while updating the running configuration.
crypto pki trustpoint TP-self-signed-1566151040
 enrollment selfsigned
 subject-name cn=IOS-Self-Signed-Certificate-1566151040
 revocation-check none
 rsakeypair TP-self-signed-1566151040
!
!
crypto pki certificate chain TP-self-signed-1566151040
 certificate self-signed 01
  3082022B 30820194 A0030201 02020101 300D0609 2A864886 F70D0101 05050030
  31312F30 2D060355 04031326 494F532D 53656C66 2D536967 6E65642D 43657274

  E99574A6 D945014F B6FE22F3 642EE29A 767EABF7 403930CA D2C59E23 102EC12E
  02F9C933 B3296D9E 095EBDAF 343D17F6 AF2831C7 6DA6DFE3 35B38D90 E6F07CD4
  40D96970 A0D12080 07A1C169 30B9D889 A6E2189C 75B988B9 0AF27EDC 6D6FA0E5
  CCFA6B29 729C1E0B 9DADACD0 3D7381
       quit
c. Save this file as a plain text file with a new filename, Switch1-confg.txt, in this example.
Note: When saving the file, an extension, such as .txt, may be added to the filename automatically.
d. If your TFTP software has the option, use it to show the contents of its directory to verify that the file is present.
Step 6: Copy the modified running configuration file from the TFTP server to switch S1.
a. From the privileged EXEC mode on the switch, enter the copy tftp running-config command. Provide the remote host address of the TFTP server, 192.168.1.3. Enter the new filename, Switch1-confg.txt. The exclamation mark (!) indicates the transfer process is in progress and is successful.
S1# copy tftp: running-config
Address or name of remote host []? 192.168.1.3
Source filename []? Switch1-confg.txt
Destination filename [running-config]?
Accessing tftp://192.168.1.3/Switch1-confg.txt...
Loading Switch1-confg.txt from 192.168.1.3 (via Vlan1): !
[OK - 1580 bytes]
[OK]
1580 bytes copied in 9.118 secs (173 bytes/sec)
*Mar 1 00:21:16.242: %PKI-4-NOAUTOSAVE: Configuration was modified. Issue "write memory" to save new certificate
*Mar 1 00:21:16.251: %SYS-5-CONFIG_I: Configured from tftp://192.168.1.3/Switch1-confg.txt by console
Switch1#
After the transfer has completed, the prompt has changed from S1 to Switch1, because the running configuration is updated with the hostname Switch1 command in the modified running configuration.
b. Enter the show running-config command to examine running configuration file.
Switch1# show running-config
Building configuration...

Current configuration : 3062 bytes
!
! Last configuration change at 00:09:34 UTC Mon Mar 1 1993
!
version 15.0
no service pad
service timestamps debug datetime msec
service timestamps log datetime msec
no service password-encryption
!
hostname Switch1
!
boot-start-marker
boot-end-marker
<output omitted>
Note: This procedure merges the running-config from the TFTP server with the current running-config in the switch or router. If changes were made to the current running-config, the commands in the TFTP copy are added. Alternatively, if the same command is issued, it updates the corresponding command in the switch or router current running-config.
If you want to completely replace the current running-config with the one from the TFTP server, you must erase the switch startup-config and reload the device. You will then need to configure the VLAN 1 management address, so there is IP connectivity between the TFTP server and the switch.
Part 3: Use TFTP to Back Up and Restore the Router Running Configuration
The backup and restore procedure from Part 3 can also be performed with a router. In Part 4, the running configuration file will be backed up and restored using a TFTP server.
Step 1: Verify connectivity to router R1 from PC-A.
If the pings are not successful, troubleshoot the basic device configurations before continuing.
Step 2: Transfer the running configuration from router R1 to TFTP server on PC-A.
a. From the privileged EXEC mode on R1, enter the copy running-config tftp command. Provide the remote host address of the TFTP server, 192.168.1.3, and accept the default filename.
b. Verify that the file has been transferred to the TFTP server.
Step 3: Restore the running configuration file to the router.
a. Erase the startup-config file on the router.
b. Reload the router.
c. Configure the G0/0/1 interface on the router with an IP address 192.168.1.1.
d. Verify connectivity between the router and PC-A.
e. Use the copy command to transfer the running-config file from the TFTP server to the router. Use running-config as the destination.
f. Verify the router has updated the running-config.
Part 4: Back Up and Restore Configurations Using Router Flash Memory
Current generation Cisco routers do not have internal flash memory. The flash memory for these routers uses CompactFlash (CF) memory. The use of CF memory allows for more available flash memory and easier upgrades without the need to open the router case. Besides storing the necessary files, such as IOS images, the CF memory can store other files, such as a copy of the running configuration. In Part 5, you will create a backup copy of the running configuration file and save it on the USB memory on the router.
Note: If the router does not use CF, the router may not have enough flash memory for storing the backup copy of running configuration file. You should still read through the instructions and become familiar with the commands.
Step 1: Display the router file systems.
The show file systems command displays the available file systems on the router. The flash0: file system is the default file system on this router as indicated by the asterisk (*) symbol (at the beginning of the line). The flash0: file system can also be referenced using the name flash:. The total size of the flash0: is approximately 7GB with about 6GB available. Currently flash0: and nvram: are the only available file systems.
R1# show file systems
File Systems:

       Size(b)       Free(b)      Type  Flags  Prefixes
             -             -    opaque     rw   system:
             -             -    opaque     rw   tmpsys:
*   7194652672    6299918336      disk     rw   bootflash: flash:
    1804468224    1723789312      disk     ro   webui:
             -             -    opaque     rw   null:
             -             -    opaque     ro   tar:
             -             -   network     rw   tftp:
             -             -    opaque     wo   syslog:
      33554432      33543116     nvram     rw   nvram:
             -             -   network     rw   rcp:
             -             -   network     rw   ftp:
             -             -   network     rw   http:
             -             -   network     rw   scp:
             -             -   network     rw   sftp:
             -             -   network     rw   https:
             -             -    opaque     ro   cns:
Where is the startup-config file located?
nvram:
Note: Verify there is at least 1 MB (1,048,576 bytes) of free space. If there is not enough space in the flash memory, please contact your instructor for further instructions. You can determine the size of flash memory and space available using the show flash or dir flash: command at the privileged EXEC prompt.
Step 2: Copy the router running configuration to flash.
A file can be copied to flash by using the copy command at the privileged EXEC prompt. In this example, the file is copied into flash0:, because there is only one flash drive available as displayed in the previous step, and it is also the default file system. The R1-running-config-backup file is used as the filename for the backup running configuration file.
Note: Remember that filenames are case-sensitive in the IOS file system.
a. Copy the running configuration to flash memory.
R1# copy running-config flash:
Destination filename [running-config]? R1-running-config-backup
2169 bytes copied in 0.968 secs (2241 bytes/sec)
b. Use dir command to verify the running-config has been copied to flash.
R1# dir flash:
Directory of bootflash:/

   11  drwx            16384   Aug 2 2019 04:15:13 +00:00  lost+found
370945  drwx             4096  Sep 25 2019 20:17:11 +00:00  .installer
338689  drwx             4096   Aug 2 2019 04:15:55 +00:00  .ssh
217729  drwx             4096   Aug 2 2019 04:17:59 +00:00  core
379009  drwx             4096  Sep 25 2019 20:19:13 +00:00  .prst_sync
80641  drwx             4096   Aug 2 2019 04:16:09 +00:00  .rollback_timer
161281  drwx             4096   Aug 2 2019 04:16:11 +00:00  gs_script
112897  drwx            77824  Sep 25 2019 20:23:03 +00:00  tracelogs
362881  drwx             4096  Aug 23 2019 17:19:54 +00:00  .dbpersist
298369  drwx             4096   Aug 2 2019 04:16:41 +00:00  virtual-instance
   12  -rw-               30  Sep 25 2019 20:19:13 +00:00  throughput_monitor_params
 8065  drwx             4096   Aug 2 2019 04:17:55 +00:00  onep
   13  -rw-               35  Sep 25 2019 20:20:19 +00:00  pnp-tech-time
249985  drwx             4096  Aug 20 2019 17:40:11 +00:00  Archives
   14  -rw-            64414  Sep 25 2019 20:20:28 +00:00  pnp-tech-discovery-summary
   15  -rw-             3509  Sep 25 2019 20:24:32 +00:00  R1-running-config-backup
   17  -rw-          5032908  Sep 19 2019 14:16:23 +00:00  isr4200_4300_rommon_1612_1r_SPA.pkg
   18  -rw-        517153193  Sep 21 2019 04:24:04 +00:00  isr4200-universalk9_ias.16.09.04.SPA.bin

7194652672 bytes total (6299643904 bytes free)
c. Use the more command to view the running-config file in flash memory. Examine the file output and scroll to the Interface section. Notice the no shutdown command is not included with the GigabitEthernet0/1. The interface is shut down when this file is used to update the running configuration on the router.
R1# more flash:R1-running-config-backup
<output omitted>
interface GigabitEthernet0/1
 ip address 192.168.1.1 255.255.255.0
 duplex auto
 speed auto
<output omitted>
Step 3: Erase the startup configuration and reload the router.
Step 4: Restore the running configuration from flash.
a. Verify the router has the default initial configuration.
b. Copy the saved running-config file from flash to update the running-config.
Router# copy flash:R1-running-config-backup running-config
c. Use the show ip interface brief command to view the status of the interfaces. The interface GigabitEthernet0/1 was not enabled when the running configuration was updated, because it is administratively down.
R1# show ip interface brief
Interface              IP-Address      OK? Method Status                Protocol
GigabitEthernet0/0/0   unassigned      YES unset  administratively down down
GigabitEthernet0/0/1   192.168.1.1     YES TFTP   administratively down down
Serial0/1/0            unassigned      YES unset  administratively down down
Serial0/1/1            unassigned      YES unset  administratively down down
The interface can be enabled using the no shutdown command in the interface configuration mode on the router.
Another option is to add the no shutdown command for the GigabitEthernet0/0/1 interface to the saved file before updating the router running configuration file. This will be done in Part 5 using a saved file on a USB flash drive.
Note: Because the IP address was configured by using a file transfer, TFTP is listed under the Method heading in the show ip interface brief output.
Part 5: (Optional) Use a USB Drive to Back Up and Restore the Running Configuration
A USB flash drive can be used to backup and restore files on a router with an available USB port. One USB port is available on the 4221 routers.
Note: USB ports are not available on all routers, but you should still become familiar with the commands.
Note: Some ISR G1 routers (1841, 2801, or 2811) use File Allocation Table (FAT) file systems, which results in a maximum size limit for the USB flash drives that can be used in this part of the lab. The recommended maximum size for an ISR G1 is 4 GB. If you receive the following message, the file system on the USB flash drive may be incompatible with the router or the capacity of the USB flash drive may have exceeded maximum size of the FAT file system on the router.
*Feb 8 13:51:34.831: %USBFLASH-4-FORMAT: usbflash0 contains unexpected values in partition table or boot sector. Device needs formatting before use!
Step 1: Insert a USB flash drive into a USB port on the router.
Notice the message on the terminal when inserting the USB flash drive.
*Sep 24 23:00:33.242: %IOSD_INFRA-6-IFS_DEVICE_OIR: Device usb0 added
Step 2: Verify that the USB flash file system is available.
R1# show file systems
File Systems:

       Size(b)       Free(b)      Type  Flags  Prefixes
             -             -    opaque     rw   system:
             -             -    opaque     rw   tmpsys:
*   7194652672    6297677824      disk     rw   bootflash: flash:
     256589824     256577536      disk     rw   usb0:
    1804468224    1723789312      disk     ro   webui:
             -             -    opaque     rw   null:
             -             -    opaque     ro   tar:
             -             -   network     rw   tftp:
             -             -    opaque     wo   syslog:
      33554432      33543116     nvram     rw   nvram:
             -             -   network     rw   rcp:
             -             -   network     rw   ftp:
             -             -   network     rw   http:
             -             -   network     rw   scp:
             -             -   network     rw   sftp:
             -             -   network     rw   https:
             -             -    opaque     ro   cns:
Step 3: Copy the running configuration file to the USB flash drive.
Use the copy command to copy the running configuration file to the USB flash drive.
R1# copy running-config usb0:
Destination filename [running-config]? R1-running-config-backup.txt
2198 bytes copied in 0.708 secs (3105 bytes/sec)
Step 4: List the file on the USB flash drive.
Use the dir command (or show command) on the router to list the files on the USB flash drive. In this sample, a flash drive was inserted into USB port 0 on the router.
R1# dir usb0:
Directory of usb0:/

    6  -rwx             3539  Sep 25 2019 20:41:58 +00:00  R1-running-config-backup.txt
    3  drwx             4096  Sep 24 2019 13:32:26 +00:00  System Volume Information

256589824 bytes total (256573440 bytes free)
Step 5: Erase the startup-config and reload the router.
Step 6: Modify the saved file.
a. Remove the USB drive from the router.
Router#
*Sep 24 23:00:27.674: %IOSD_INFRA-6-IFS_DEVICE_OIR: Device usb0 removed
b. Insert the USB drive into the USB port of a PC.
c. Modify the file using a text editor. The no shutdown command is added to the GigabitEthernet0/0/1 interface. Save the file as a plain text file on to the USB flash drive.
interface GigabitEthernet0/0/1
 ip address 192.168.1.1 255.255.255.0
 no shutdown
 duplex auto
 speed auto
d. Remove the USB flash drive from the PC safely.
Step 7: Restore the running configuration file to the router.
a. Insert the USB flash drive into a USB port on the router. Notice the port number where the USB drive has been inserted if there is more than one USB port available on the router.
*Sep 24 23:00:33.242: %IOSD_INFRA-6-IFS_DEVICE_OIR: Device usb0 added
b. List the files on the USB flash drive.
R1# dir usb0:
Directory of usb0:/

    6  -rwx             3539  Sep 25 2019 20:41:58 +00:00  R1-running-config-backup.txt
    3  drwx             4096  Sep 24 2019 13:32:26 +00:00  System Volume Information

256589824 bytes total (256573440 bytes free)
c. Copy the running configuration file to the router.
Router# copy usb0:R1-running-config-backup.txt running-config
Destination filename [running-config]?
2344 bytes copied in 0.184 secs (12739 bytes/sec)
R1#
d. Verify that the GigabitEthernet0/1 interface is enabled.
R1# show ip interface brief
Interface              IP-Address      OK? Method Status                Protocol
GigabitEthernet0/0/0   unassigned      YES unset  administratively down down
GigabitEthernet0/0/1   192.168.1.1     YES TFTP   up                    up
Serial0/1/0            unassigned      YES unset  administratively down down
Serial0/1/1            unassigned      YES unset  administratively down down
The G0/1 interface is enabled because the modified running configuration included the no shutdown command.
Reflection Questions
1. What command do you use to copy a file from the flash to a USB drive?
copy flash:filename usb0:
2. What command do you use to copy a file from the USB flash drive to a TFTP server?
copy usb0:filename tftp:
Router Interface Summary Table
| Router Model | Ethernet Interface #1 | Ethernet Interface #2 | Serial Interface #1 | Serial Interface #2 |
|---|---|---|---|---|
| 1800 | Fast Ethernet 0/0 (F0/0) | Fast Ethernet 0/1 (F0/1) | Serial 0/0/0 (S0/0/0) | Serial 0/0/1 (S0/0/1) |
| 1900 | Gigabit Ethernet 0/0 (G0/0) | Gigabit Ethernet 0/1 (G0/1) | Serial 0/0/0 (S0/0/0) | Serial 0/0/1 (S0/0/1) |
| 2801 | Fast Ethernet 0/0 (F0/0) | Fast Ethernet 0/1 (F0/1) | Serial 0/1/0 (S0/1/0) | Serial 0/1/1 (S0/1/1) |
| 2811 | Fast Ethernet 0/0 (F0/0) | Fast Ethernet 0/1 (F0/1) | Serial 0/0/0 (S0/0/0) | Serial 0/0/1 (S0/0/1) |
| 2900 | Gigabit Ethernet 0/0 (G0/0) | Gigabit Ethernet 0/1 (G0/1) | Serial 0/0/0 (S0/0/0) | Serial 0/0/1 (S0/0/1) |
| 4221 | Gigabit Ethernet 0/0/0 (G0/0/0) | Gigabit Ethernet 0/0/1 (G0/0/1) | Serial 0/1/0 (S0/1/0) | Serial 0/1/1 (S0/1/1) |
| 4300 | Gigabit Ethernet 0/0/0 (G0/0/0) | Gigabit Ethernet 0/0/1 (G0/0/1) | Serial 0/1/0 (S0/1/0) | Serial 0/1/1 (S0/1/1) |
Note: To find out how the router is configured, look at the interfaces to identify the type of router and how many interfaces the router has. There is no way to effectively list all the combinations of configurations for each router class. This table includes identifiers for the possible combinations of Ethernet and Serial interfaces in the device. The table does not include any other type of interface, even though a specific router may contain one. An example of this might be an ISDN BRI interface. The string in parenthesis is the legal abbreviation that can be used in Cisco IOS commands to represent the interface.
Device Configs
Router R1
R1# show run
Building configuration...


Current configuration : 3476 bytes
!
! Last configuration change at 20:51:21 UTC Wed Sep 25 2019
!
version 16.9
service timestamps debug datetime msec
service timestamps log datetime msec
service password-encryption
platform qfp utilization monitor load 80
no platform punt-keepalive disable-kernel-core
!
hostname R1
!
boot-start-marker
boot-end-marker
!
!
enable secret 5 $1$dWNi$ZFS7MSiKRPGn7B9nN6mPS/
!
no aaa new-model
!
no ip domain lookup
!
!
!
login on-success log
!
!
subscriber templating
!
!
multilink bundle-name authenticated
!
!
crypto pki trustpoint TP-self-signed-3903873913
 enrollment selfsigned
 subject-name cn=IOS-Self-Signed-Certificate-3903873913
 revocation-check none
 rsakeypair TP-self-signed-3903873913
!
!
crypto pki certificate chain TP-self-signed-3903873913
 certificate self-signed 01
  30820330 30820218 A0030201 02020101 300D0609 2A864886 F70D0101 05050030

        quit
!
license udi pid ISR4221/K9 sn FGL23313183
no license smart enable
diagnostic bootup level minimal
!
spanning-tree extend system-id
!
!
redundancy
 mode none
!
!
interface GigabitEthernet0/0/0
 no ip address
 shutdown
 negotiation auto
!
interface GigabitEthernet0/0/1
 ip address 192.168.1.1 255.255.255.0
 negotiation auto
!
interface Serial0/1/0
!
interface Serial0/1/1
!
ip forward-protocol nd
ip http server
ip http authentication local
ip http secure-server
!
!
control-plane
!
banner motd ^C Authorized Users Only! ^C
!
line con 0
 password 7 00071A150754
 login
 transport input none
 stopbits 1
line aux 0
 stopbits 1
line vty 0 4
 password 7 110A1016141D
 login
!
end
Switch S1
S1#show run
Building configuration...

Current configuration : 1498 bytes
!
!
version 15.0
no service pad
service timestamps debug datetime msec
service timestamps log datetime msec
service password-encryption
!
hostname S1
!
boot-start-marker
boot-end-marker
!
enable secret 4 06YFDUHH61wAE/kLkDq9BGho1QM5EnRtoyr8cHAUg.2
!
no aaa new-model
system mtu routing 1500
!
!
no ip domain-lookup
!
spanning-tree mode pvst
spanning-tree extend system-id
!
vlan internal allocation policy ascending
!
interface FastEthernet0/1
!
interface FastEthernet0/2
!
interface FastEthernet0/3
!
interface FastEthernet0/4
!
interface FastEthernet0/5
!
interface FastEthernet0/6
!
interface FastEthernet0/7
!
interface FastEthernet0/8
!
interface FastEthernet0/9
!
interface FastEthernet0/10
!
interface FastEthernet0/11
!
interface FastEthernet0/12
!
interface FastEthernet0/13
!
interface FastEthernet0/14
!
interface FastEthernet0/15
!
interface FastEthernet0/16
!
interface FastEthernet0/17
!
interface FastEthernet0/18
!
interface FastEthernet0/19
!
interface FastEthernet0/20
!
interface FastEthernet0/21
!
interface FastEthernet0/22
!
interface FastEthernet0/23
!
interface FastEthernet0/24
!
interface GigabitEthernet0/1
!
interface GigabitEthernet0/2
!
interface Vlan1
 ip address 192.168.1.11 255.255.255.0
!
ip default-gateway 192.168.1.1
ip http server
ip http secure-server
!
line con 0
 password 045802150C2E
 login
line vty 0 4
 password 045802150C2E
 login
line vty 5 15
 password 045802150C2E
 login
!
end
Download PDF & PKT file Completed 100% Score:
[sociallocker id=”54558″][/sociallocker]
Не удаётся получить файл с tftp сервера
Система: Ubuntu 14.04.1 Используется tftpd-hpa. При попытке скачать файл, сервер отвечает «Permission denied».
Проковырялся уже долго и ничего не понял. Где ему недостаточно прав?

Уверены, что сервер? Может клиент не может записать получаемый файл?
Проверялось и локально на сервере (первая вставка) и с помощью PXE клиента VirtualBox. Поведение одинаковое.
Ну что ещё приходит в голову — selinux или что там в Ubuntu за дополнительную безопасность отвечает?
В этом плане по-умолчанию всё стоит. Как проверить?
Отключить, проверить tftp, если помогло, разобраться с настройкой.
Поменял
Заработало, но меню не захотело показывать.
Соответственно вопрос про файл remap. Что в нём неправильно?
На этом же сервере работают Samba и Apache. Дополнительных плясок вокруг доп. безопасности не делали.
Для ищущих решение как загрузить Windows PE из меню syslinux’a
Использовался syslinux 4.05
Утилиты вроде pxelinux.0, pxechain.com можно не копировать, а создавать жёсткую ссылку. Естественно, не забывайте об ограничениях этого метода.
[SEO] booting .wim via pure syslinux [/SEO]
Источник
Techienoobie
Information Technology, Project Management, Networking Engineering, Hobbies
Pages
Friday, June 13, 2014
How to configure TFTP Server in your Linux Machine (Debian), and how to solve Permission Denied Error (Error Code 2)
I personally use a Virtualized Kali Linux in my Windows 7 machine to do a lot of things. Primarily to do IT security analysis and research for the companies I work with. But mostly, I find maintaining a Linux machine in an image comes in handy for a lot of things: I can use the Kali/Linux machine as an tftp/scp server to backup devices;
So suppose you want to copy startup-config files from your Cisco to your laptop running a virtual machine of Kali Linux, (Debian). Let us suppose further that your Cisco router/switch cannot do SSH otherwise, we’ll just use scp which is safer, and does not need any further special configuration for Linux devices.
Here’s how to do it:
- Make sure you have the Virtual Machine in Bridged Adapter to your WIndows 7 machine’s ethernet adapter. I’m using virtual box so in my case, I have to create a bridged adapter first. In Virtuabox (not in the Guest OS or Virtual Machine’s Window) click File >> preferences >> Network . Then under tha tabe Bridged Adapters, create at least one adapter.


 |
| In this example., /srv/tftp is the default folder. You can change this. |
You are now ready to use tftp. login to your cisco device telnet . Then from your Cisco device, type copy startup-config tftp: specify the correct answer to all the following questions, then you will be faced with this error!
Address or name of remote host []? 10.48.2.61
TFTP: error code 2 received — 16739
%Error opening tftp://10.48.2.61/maphl2sw04-confg (Permission denied)
That’s because Linux TFTP servers will not allow anyone to write a file to its default location unless the filename exists and has proper permissions. Thus, to resolve this, you need to create the file, and give it permission 666, as per hte below picture.
 |
| touch is the command to create the file |
After that tftp is successful.
Address or name of remote host []? 10.48.2.61
!! 20645 bytes copied in 0.109 secs (189404 bytes/sec)
Источник
Error Opening TFTP (Permission Denied)
Reduce Complexity & Optimize IT Capabilities
10 Replies
I have seen this error before, so I suspect you should check the below steps to resolve.
1.Check the IOS name and size in both TFTP and in your system.If you have any existing IOS in your system then rename it.
2. Check the Ip add and range of both the devices.
3. Shut the firewall and related application.
Do you have any inbound access-list blocking tftp? Please try to do it in a reverse way to the same tftp server and confirm you are not having a problem with your tftp server. Try loading a different IOS and also check the memory on the IOS.
— First of all the connection to router is through telnet/ssh or console cable?
— Can you telnet the router and ping the pc where the tftp server is loaded?
— Can you download the existing Router IOS to the tftp server?
— The directory where located the IOS you want to load to the router is defined to the tftp server?
— Finally the name of the IOS which you want to upload is correctly written in command syntax? (including .bin extension).
Console cable is when you are quite sure that your «pc» would be directly connected with your Router and Telnet or SSH. You can use it when you would be in another place and you need to access it by a remote session. So, there is a difference between both connections.
Ditto on that, I had the same problem and was banging my head on my desk. I turned off the Windows firewall and BINGO! I’m sure I can config it later for in/out access, but killing the firewall temporarily for the duration of the procedure worked perfectly. Thanks for the tips!
BTW, I am using Windows XP Pro to host the TFTP server.
This topic has been locked by an administrator and is no longer open for commenting.
To continue this discussion, please ask a new question.
Read these next.

Bitlocker on a server
I need to encrypt my servers. Bitlocker being the main option. While I know I can store Bitlocker keys in AD to automatically unlock domain computers, how does this work with the domain servers? My fear is one day, I’ll end up restarting both of my d.

Creating powershell script
I need help with creating PowerShell script. Im not really that good at it. We are trying to delete alot of data then move it. Before we do that we need to run a script which can do the following:• The purpose of the script is to log each user• Show what .

Snap! — Flying Boats, Metaverse Vision, Floppy Disks in 2023, Replicated Cheese
Your daily dose of tech news, in brief. Welcome to the Snap! Flashback: January 12, 1997: HAL 9000 Becomes Operational (Read more HERE.) Bonus Flashback: January 12, 2005: NASA launched «Deep Impact» (Read more HERE.) You need to hear .

Spark! Pro Series — 12 January 2023
Today in History: 1984 Pyramid mystery unearthed An international panel overseeing the restoration of the Great Pyramids in Egypt overcomes years of frustration when it abandons modern construction techniques in favor of the method employed by .

Managing confidential/PII data in a non profit environment
I am looking for some suggestions on how manage confidential and Personally Identifiable Information in our non profit environment. We run a number of grant programs that require applicants to upload tax documentation, IDs, and other financial information.
Источник
tftp server Cisco
I set up a Cisco Catalyst 2960X with a reasonably standard config and was looking to copy the config back to my laptop where ttp64 is installed.
I keep coming up against the following error messaqe on the switch
I have also tried saving this as a txt file and d get the same error.
It’s been a while since I’ve had to do this and I can’t quite figure out where I’m going wrong.
Any suggestions gratefully received!
- local_offer Tagged Items
- cisco
- Cisco Catalyst 2960-24TC-S Managed Ethernet Switch star 4.8
 Cisco Catalyst 2960-24TC-S Managed Ethernet Switch star 4.8
Reduce Complexity & Optimize IT Capabilities
7 Replies

run tftp from the my documents folder, I suspect NTFS permissions are causing problems
You could also try the TFTP server build into this -> PXE Server for Windows — Serva Opens a new window

Permissions for definite; I had the same trouble the first time that I tried to copy a config file.
run tftp from the my documents folder, I suspect NTFS permissions are causing problems
I managed to get it to work using Serva, not sure why tftp stopped working though

Just use putty and capture (log) the «sho config». That will save it to a readable text file.
That’s fine unless you want to upload a new IOS, for that you’ll need TFTP.

I assume you mean tftpd64? Either way, for giggles, try another server package like Solar Winds and specify the root directory to be in the root C: or wherever. I’ve seen different server packages do odd things. TFTP is simple enough that it’s almost not worth troubleshooting unless you have some kind of mandate to only use a certain software.
If it is TFTPD32 or 64, try not changing the filename. Cisco devices can be very fussy about file and directory names.
This topic has been locked by an administrator and is no longer open for commenting.
To continue this discussion, please ask a new question.
Read these next.
Bitlocker on a server
I need to encrypt my servers. Bitlocker being the main option. While I know I can store Bitlocker keys in AD to automatically unlock domain computers, how does this work with the domain servers? My fear is one day, I’ll end up restarting both of my d.
Creating powershell script
I need help with creating PowerShell script. Im not really that good at it. We are trying to delete alot of data then move it. Before we do that we need to run a script which can do the following:• The purpose of the script is to log each user• Show what .
Snap! — Flying Boats, Metaverse Vision, Floppy Disks in 2023, Replicated Cheese
Your daily dose of tech news, in brief. Welcome to the Snap! Flashback: January 12, 1997: HAL 9000 Becomes Operational (Read more HERE.) Bonus Flashback: January 12, 2005: NASA launched «Deep Impact» (Read more HERE.) You need to hear .
Spark! Pro Series — 12 January 2023
Today in History: 1984 Pyramid mystery unearthed An international panel overseeing the restoration of the Great Pyramids in Egypt overcomes years of frustration when it abandons modern construction techniques in favor of the method employed by .
Managing confidential/PII data in a non profit environment
I am looking for some suggestions on how manage confidential and Personally Identifiable Information in our non profit environment. We run a number of grant programs that require applicants to upload tax documentation, IDs, and other financial information.
Источник

\если тема похожая была — я извиняюсь за кривизну рук при поиске 
Доброго времени суток!
Господа, специалисты, помогите слоупоку(
Был собран корявый стенд GNS3 — VMWare (Windows XP SP2), топология выглядит где-то так (циски 7200):
Конфиг R0:
Код
Current configuration : 1481 bytes
!
version 12.4
service timestamps debug datetime msec
service timestamps log datetime msec
service password-encryption
!
hostname R0
!
boot-start-marker
boot-end-marker
!
no aaa new-model
!
ip cef
interface FastEthernet0/0
 ip address 192.168.1.20 255.255.255.0
 duplex full
!
interface Serial1/0
 ip address 12.1.1.1 255.255.255.252
 serial restart-delay 0
!
!
router eigrp 1
 redistribute static
 network 12.0.0.0
 network 192.168.1.0
 no auto-summary
!
ip route 0.0.0.0 0.0.0.0 12.1.1.2
!
no ip http server
no ip http secure-server
!
control-plane
!
gatekeeper
 shutdown
!
!
line con 0
 password 7 110A1016141D
 login
 stopbits 1
line aux 0
 stopbits 1
line vty 0 4
 password 7 05080F1C2243
 login
!
!
end
Пинги между Варей и Р0 проходят.
Задача следующая была: сгенерировать ключи RSA и экспортировать их на TFTP сервер.
Сделать это ну никак не выходит. При попытке сохранить ключ на ТФТП:
Код
R0(config)#crypto key export rsa test_keys_rsa pem url tftp: 3des 123456789
, получаю ошибку:
Код
% Key name: test_keys_rsa
   Usage: General Purpose Key
Exporting public key...
Address or name of remote host []? 192.168.1.29
Destination filename [test_keys_rsa.pub]?
TFTP: error code 2 received - 16739
% Error: failed to open file.
% Error: failed to export key.
При создании ключей, добавлял параметр «exportable».
Код
R0#show crypto key mypubkey rsa
% Key pair was generated at: 09:04:35 UTC Jul 28 2011
Key name: test_keys_rsa
 Usage: General Purpose Key
 Key is exportable.
 Key Data:
  305C300D 06092A86 4886F70D 01010105 00034B00 30480241 00C4B29D CDB14B5C
  18BC1B94 A4D2E75D 467A5FA4 7A1EAB70 31F81D41 1B840642 8DA1904A 59F4426A
  7D3FB33D 43DD6D29 132A5A34 95FBAAC2 8FB14734 D6A6884B 9F020301 0001
% Key pair was generated at: 09:52:36 UTC Jul 29 2011
также присутствует другая борода — не могу копировать файл конфигурации на ТФТП:
Код
R0#copy running-config tftp:
Address or name of remote host []? 192.168.1.29
Destination filename [r0-confg]?
TFTP: error code 2 received - 16739

%Error opening tftp://192.168.1.29/r0-confg (Permission denied)
Службу ТФТП в Винде вручную ставил, руководствуясь данным гайдом: http://www.panvasoft.com/rus/blog/144/
Фаервол погасил.
Сразу извиняюсь, если понаписывал (-ваю) глупостей — я в цисках нуб.
Помогите-спасите. Заранее спасибо)
__________________
Помощь в написании контрольных, курсовых и дипломных работ, диссертаций здесь