I can confirm this error. You basically only need a Gradle project using JDK 11 and this issue already triggers:
error: option -Xbootclasspath/p: not allowed with target 11
Caused by: wsimport failed
        at com.sun.tools.ws.ant.WsTask2.execute(WsTask2.java:432)
        at com.sun.tools.ws.ant.WsImport2.execute(WsImport2.java:558)
        at uk.co.boothen.gradle.wsimport.WsImportRunnable.run(WsImportRunnable.java:73)
        at org.gradle.workers.internal.DefaultWorkerServer.execute(DefaultWorkerServer.java:41)
        at org.gradle.workers.internal.AbstractClassLoaderWorker.executeInClassLoader(AbstractClassLoaderWorker.java:34)
        at org.gradle.workers.internal.IsolatedClassloaderWorker.execute(IsolatedClassloaderWorker.java:55)
        at org.gradle.workers.internal.IsolatedClassloaderWorkerFactory$1$1.execute(IsolatedClassloaderWorkerFactory.java:46)
        at org.gradle.workers.internal.AbstractWorker$1.call(AbstractWorker.java:44)
        at org.gradle.workers.internal.AbstractWorker$1.call(AbstractWorker.java:41)
        at org.gradle.internal.operations.DefaultBuildOperationExecutor$CallableBuildOperationWorker.execute(DefaultBuildOperationExecutor.java:416)
        at org.gradle.internal.operations.DefaultBuildOperationExecutor$CallableBuildOperationWorker.execute(DefaultBuildOperationExecutor.java:406)
        at org.gradle.internal.operations.DefaultBuildOperationExecutor$1.execute(DefaultBuildOperationExecutor.java:165)
        at org.gradle.internal.operations.DefaultBuildOperationExecutor.execute(DefaultBuildOperationExecutor.java:250)
        at org.gradle.internal.operations.DefaultBuildOperationExecutor.execute(DefaultBuildOperationExecutor.java:158)
        at org.gradle.internal.operations.DefaultBuildOperationExecutor.call(DefaultBuildOperationExecutor.java:102)
        at org.gradle.internal.operations.DelegatingBuildOperationExecutor.call(DelegatingBuildOperationExecutor.java:36)
        at org.gradle.workers.internal.AbstractWorker.executeWrappedInBuildOperation(AbstractWorker.java:41)
        at org.gradle.workers.internal.IsolatedClassloaderWorkerFactory$1.execute(IsolatedClassloaderWorkerFactory.java:42)
        at org.gradle.workers.internal.DefaultWorkerExecutor$1.call(DefaultWorkerExecutor.java:107)
        at org.gradle.workers.internal.DefaultWorkerExecutor$1.call(DefaultWorkerExecutor.java:101)
        at org.gradle.internal.work.DefaultConditionalExecutionQueue$ExecutionRunner.runExecution(DefaultConditionalExecutionQueue.java:215)
        at org.gradle.internal.work.DefaultConditionalExecutionQueue$ExecutionRunner.runBatch(DefaultConditionalExecutionQueue.java:164)
        at org.gradle.internal.work.DefaultConditionalExecutionQueue$ExecutionRunner.run(DefaultConditionalExecutionQueue.java:131)
        ... 3 more
У меня есть веб-проект в netbeans, когда я пытаюсь очистить и построить его, возникает эта ошибка
error: option -Xbootclasspath/p: not allowed with target 11
Перекрестно проверил все зависимости, все файлы jar включены. Но проект может быть развернут в tomcat (я подозреваю, что развертывается более старая версия войны), может ли кто-нибудь помочь?
Журнал очистки и удаления приложений
    ant -f /xx/xx/app -Dnb.internal.action.name=rebuild -DforceRedeploy=false -Dbrowser.context=/xx/xx/app clean dist
    init:
    undeploy-clean:
    deps-clean:
    galeva_base.init:
    galeva_base.deps-clean:
    Updating property file: /xx/xx/base_project/build/built-clean.properties
    Deleting directory /xx/xx/base_project/build
    base_project.clean:
    do-clean:
    Deleting directory /xx/xx/app/build
    check-clean:
    clean:
    init:
    deps-module-jar:
    base_project.init:
    base_project.deps-jar:
    Created dir: /xx/xx/base_project/build
    Updating property file: /xx/xx/base_project/build/built-jar.properties
    Created dir: /xx/xx/base_project/build/classes
    Created dir: /xx/xx/base_project/build/empty
    Created dir: /xx/xx/base_project/build/generated-sources/ap-source-output
    Compiling 40 source files to /xx/xx/base_project/build/classes
    base_project.compile:
    Created dir: /xx/xx/base_project/dist
    Copying 1 file to /xx/xx/base_project/build
    Copy libraries to /xx/xx/base_project/dist/lib.
    Building jar: /xx/xx/base_project/dist/base_project.jar
    To run this application from the command line without Ant, try:
    java -jar "/xx/xx/base_project/dist/base_project.jar"
   base_project.deploy:
    base_project.jar:
    deps-ear-jar:
    deps-jar:
    Created dir: /xx/xx/app/build/web/WEB-INF/classes
    Created dir: /xx/xx/app/build/web/META-INF
    Copying 1 file to /xx/xx/app/build/web/META-INF
    Copying 3 files to /xx/xx/app/build/web
    library-inclusion-in-archive:
    Copying 1 file to /xx/xx/app/build/web/WEB-INF/lib
    Copying 1 file to /xx/xx/app/build/web/WEB-INF/lib
    library-inclusion-in-manifest:
    Created dir: /xx/xx/app/build/empty
    Created dir: /xx/xx/app/build/generated-sources/ap-source-output
    Compiling 17 source files to /xx/xx/app/build/web/WEB-INF/classes
    error: option -Xbootclasspath/p: not allowed with target 11
    BUILD FAILED (total time: 5 seconds)
Версия openjdk
Jdk 11
Версия Netbeans
12,3
Версия Tomcat
Tomcat 10
1 ответ
ANT по умолчанию использует Java 1.6 JRE, которая больше не подходит для функций Java 11. Определение исходной и целевой версии исправило это для меня при использовании maven, который в этом случае ведет себя так же.
<property name="ant.build.javac.source" value="11"/>
<property name="ant.build.javac.target" value="11"/>
0
LenglBoy
24 Апр 2021 в 01:32
Recommend Projects
-

React
A declarative, efficient, and flexible JavaScript library for building user interfaces.
-
Vue.js
🖖 Vue.js is a progressive, incrementally-adoptable JavaScript framework for building UI on the web.
-
Typescript
TypeScript is a superset of JavaScript that compiles to clean JavaScript output.
-
TensorFlow
An Open Source Machine Learning Framework for Everyone
-
Django
The Web framework for perfectionists with deadlines.
-
Laravel
A PHP framework for web artisans
-
D3
Bring data to life with SVG, Canvas and HTML. 📊📈🎉
Recommend Topics
-
javascript
JavaScript (JS) is a lightweight interpreted programming language with first-class functions.
-
web
Some thing interesting about web. New door for the world.
-
server
A server is a program made to process requests and deliver data to clients.
-
Machine learning
Machine learning is a way of modeling and interpreting data that allows a piece of software to respond intelligently.
-
Visualization
Some thing interesting about visualization, use data art
-
Game
Some thing interesting about game, make everyone happy.
Recommend Org
-
Facebook
We are working to build community through open source technology. NB: members must have two-factor auth.
-
Microsoft
Open source projects and samples from Microsoft.
-
Google
Google ❤️ Open Source for everyone.
-
Alibaba
Alibaba Open Source for everyone
-
D3
Data-Driven Documents codes.
-
Tencent
China tencent open source team.
In this part we will see how to write a Simple REST Style Web Service using NetBeans and GlassFish Server Server and we will test the service.
Requirements:
1. NetBeans ID
2. GlassFish Server.
Usually NetBeans comes along with the GlassFish Server and also in build
support for generating REST Services using the Jersey Framework.
So , once we have installed the NetBeans ID and GlassFish we can
create our first webservice now.
Note : This is a quick guide of creating REST using Jersey Framework, we are not
going in detail about the annotations we are using in the REST Webservice , we
will discuss the basic annotation right now ,in later part we will cover in
detail about each annotations with respective example.
Step 1:
Open NetBeans ID.
File—>New —> New Project —> Java Web—>Web Application and
click the «Next» Button.
Give a name to the Project say «MyFirstREST» (I am using
this name here for this example) and click the «Next»
Button.
Select the Server as «GlassFish Server» and select the
J2EE Version as «Java EE 5» click the «Finish»
Button.
So , now our project folders are created .

Step 2:
Creating Package.
Right click on the Project Node «MyFirstREST» and select :
New —> Java Package and give name as «com.test» (You can provide your own
name for this example i am using this name)
Now we have a package where all our
service class will be kept.
Step 3:
Writing the REST Business Logic.
There are couple of annotations i
liked to discussed here, these are the very basic and commonly used
annotations.
@Path — Mention the Path from which
you want to access a REST Service either class level or method level.
@GET — Performs HTTP get Operation useful for getting info read only.
@Produces — This Produces the Respective output in different format such as
XML,JSON,TEXT,HTML etc to the client.
Step 4:
Implementing the Jersey Framework & Writing our First REST Service
NetBeans generally comes along with
the Jersey Framework if you don’t have the Framework install , manually you
should have to download it and add the jars to the libraries.
But i am not going
to discuss about that , i assume you all are smart guys , and you have NetBeans
with J2EE Supported version , so basically you will have Jersey supported
framework install in the NetBeans Itself.
So , We don’t need actually write any code from implementing this frame work
in web.xml, NetBeans automatically does for us., that’s the advantage of
using NetBeans.
So now this can achieve by following these steps :
Right click on the «com.test»(Package i am using for this
example, you can use your own)ans select
New—>Other—>WebService—>RESTful
WebServices from Patterns.

Select patterns as «Simple Root Resource» and Press the
«Next» Button

Give path Name as»MyPath» and class Name
as»MypathResource» and select the MIME Type as
«text/plain». and importantly select the check box for Jersey
framework and click the «finish» Button.

Step 5:
Develop the code.
By default a class name called «MypathResource» will be created
with some methods and instance variable define in it.Delete the code and
replace with the following code.
package com.test;
import javax.ws.rs.core.Context;
import javax.ws.rs.core.UriInfo;
import javax.ws.rs.PathParam;
import javax.ws.rs.Consumes;
import javax.ws.rs.PUT;
import javax.ws.rs.Path;
import javax.ws.rs.GET;
import javax.ws.rs.Produces;
@Path(«Mypath»)
public class MypathResource {
@GET
@Produces(«text/plain»)
public String getText() {
return «My First RESTful
Servivce….»;
}
}
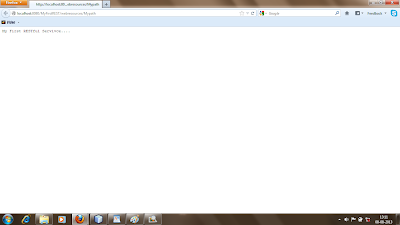
This is the very basic and simplest RESTful Service , it will accept the
Path «MyPath» in the URL and invoke the method getText which in turn
return a Response as Text with the wording «My First RESTful Servivce…»
Step 6:
Clean & Build , Deploy to check the service.
Right Click on the Project Node «MyFirstREST» and select
Clean and build this will clean the directory and compiles the Java files
and creates a WAR Archive.
Once , the Clean and build is finish successfully again RightClick on the
ProjectNode «MyFirstREST» and select «Deploy».
Once the Deployment is done we can check the service by:
Right click on the REST Service created under folder called «Restful
Web Service» and select «Test
Resource Uri»
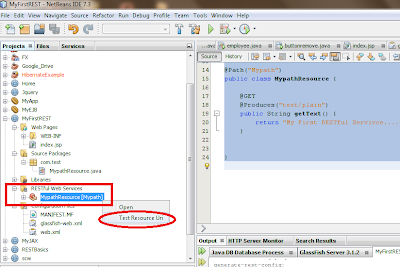
or we can directly access using the URL
Note : The Port Number will differ based upon your Server Configuration Setting.
Result :
Main Components :
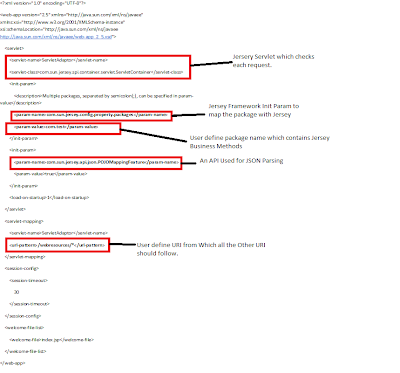
How all these is happening ?
The main Gate Keeper or the main Servlet for this is specified in the
web.xml which performs the Jersey Mechanism , Please refer the image below for
detail explanation of Jersey Servlet define in web.xml .
That’s all for the day, In the Next
Section we will be seeing different useful annotations and how to produce
different form of Outputs.
Thanks for Reading.
Please provide your valuable suggestion and comments.
<< Prev Index Next>>
————————————————————————————————

blogs