Некоторые пользователи, которые ранее настроили свои компьютеры на двойную загрузку дистрибутивов Windows и Linux (чаще всего с Ubuntu), сообщают, что их компьютер входит в режим восстановления Grub и отображает ошибку Нет такого раздела — Grub Rescue.
Ошибка Нет такого раздела — Grub Rescue
После тщательного изучения этой конкретной проблемы выясняется, что существует несколько различных ситуаций, которые могут вызвать появление этой проблемы. Вот список потенциальных виновников, которые могут нести ответственность за эту проблему:
- Загрузчик GRUB поврежден или удален — если вы видите эту ошибку из-за какого-либо типа поврежденных данных, связанных с загрузчиком GRUP, или после того, как вы неохотно удалили связанные с ним данные, вы можете решить проблему, вручную перенастроив утилиту для загрузки с помощью правильные файлы.
- Загрузчик неправильно настроен или поврежден. Поскольку эта проблема также может возникать из-за неправильно настроенных или поврежденных данных BCD, вы сможете решить эту проблему, перестроив данные конфигурации загрузки из командной строки с повышенными привилегиями.
- Текущая конфигурация загрузки несовместима — если проблема вызвана неверными данными, которые загружаются в загрузчик GRUB, вы можете решить проблему, используя резервную копию реестра, чтобы восстановить ваш компьютер до хорошей конфигурации.
Теперь, когда вы знаете всех потенциальных виновников, вот список методов, которые другие затронутые пользователи успешно использовали для решения проблемы и предотвращения загрузки своего компьютера в режим восстановления Grub:
Безусловно, наиболее эффективное исправление, с которого вам следует начать, поскольку оно наименее разрушительно — это вручную перенастроить загрузчик GRUB и убедиться, что приоритет отдается основной ОС.
Несколько затронутых пользователей подтвердили, что им наконец удалось обойти состояние восстановления GRUB, выполнив ряд инструкций, предназначенных для ручной перенастройки загрузчика GRUP для определения приоритета основной ОС.
Если этот сценарий применим, следуйте приведенным ниже инструкциям, чтобы сделать это непосредственно через меню восстановления GRUB:
- Когда ваш компьютер войдет в режим восстановления GRUB, введите следующую команду и нажмите Enter, чтобы просмотреть все доступные разделы: ls
- После того, как вы это сделаете, вы должны получить обзор всех разделов, которые в настоящее время есть на вашем основном диске. На этом этапе вам необходимо убедиться, что вы выбрали основную ОС. В нашем случае правильный раздел (hd0, msdos2), поэтому мы использовали следующую команду для опроса раздела: ls (hd0, msdos2)
Примечание. Убедитесь, что вы заменили раздел правильным примером в вашем случае. Если вы получили сообщение вроде «Файловая система — это ext2 или ext3», вы правильно определили раздел, в котором находится ваша основная ОС.
Примечание 2: Если вы опрашиваете раздел и получаете сообщение «Файловая система неизвестна», вы выбрали неправильный раздел.Сообщение об ошибке неправильного раздела в GRUB
- После выбора правильного раздела введите «set» и нажмите Enter, чтобы запросить и получить окончательный список вашего основного раздела.
- Затем введите следующие команды и нажмите Enter после каждой команды, чтобы изменить приоритет загрузчика GRUB на правильный: set boot = (hd0, msdos5) set prefix = (hd0, msdos5) / boot / grub insmod normal normal
- После того, как вы введете последнюю команду, вы попадете в главное меню GNU Grub. Как только вы попадете на этот экран, просто выберите ОС, с которой вы хотите загрузиться, и нажмите Enter.
Загрузка с основного раздела в GRUB
В случае, если этот метод не сработал для вас и последовательность загрузки в конечном итоге загрузится с той же ошибкой No such Partition -Grub Rescue, вернитесь к следующему потенциальному исправлению ниже.
Метод 2: восстановление файлов данных конфигурации загрузки (BCD)
Если первый метод не сработал для вас, следующим шагом будет использование утилиты данных конфигурации загрузки (BCD), чтобы найти установочные файлы Windows на всех дисках и добавить их обратно в список загрузки, чтобы последовательность загрузки могла найти это во время запуска.
Этот метод успешно использовался многими пользователями, которые ранее сталкивались с ошибкой No such Partition — Grub Rescue. Восстановление кластеров файлов BCD позволило им нормально выполнять двойную загрузку без принудительного входа в меню восстановления GRUP.
ВАЖНО! Этот метод потребует от вас подключения совместимого установочного носителя Windows. Если у вас его нет наготове, вы можете создать установочный носитель Windows с нуля и загрузить его на USB-накопитель.
Выполнив все требования, следуйте приведенным ниже инструкциям:
- Подключите USB-накопитель с установочным носителем и запустите компьютер обычным способом, нажав кнопку питания.
- Для доступа к кнопке настройки нажмите соответствующую кнопку в зависимости от производителя вашей материнской платы.
Доступ к меню настройки BIOS / UEFI
Примечание: ключ настройки будет отличаться от производителя к производителю. Чаще всего клавиша настройки представляет собой одну из клавиш F (F2, F4, F6, F8), клавишу Esc или клавишу Del (на компьютерах / ноутбуках Del). Если у вас возникли проблемы с доступом к меню настройки, поищите в Интернете конкретные инструкции по доступу к нему.
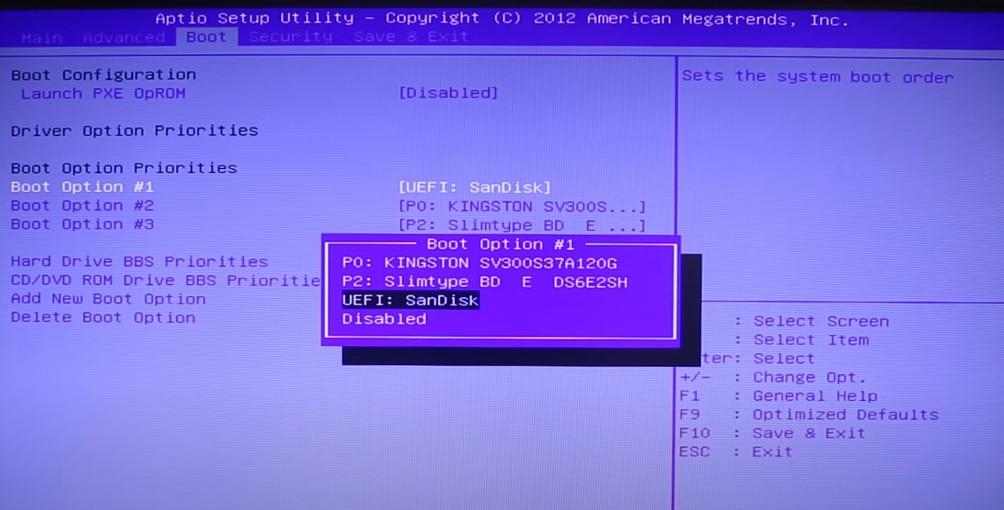
- Как только вы войдете в меню «Настройка», перейдите на вкладку «Загрузка» и убедитесь, что USB-накопитель, содержащий установочный носитель, установлен как вариант загрузки №1.
Загрузка с установочного носителя
- Сохраните изменения, затем перезагрузите компьютер, дайте компьютеру загрузиться с установочного носителя и дождитесь загрузки установочных файлов.
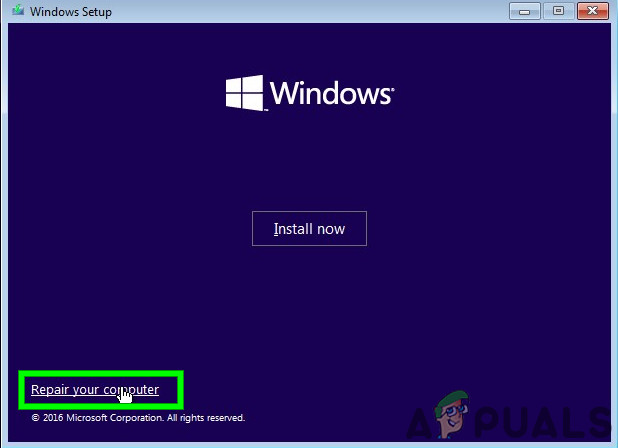
- Когда вы перейдете на первую страницу, нажмите «Далее», затем нажмите «Восстановить компьютер» в правом нижнем углу экрана.
Ремонт компьютера с установочного носителя
- Затем дождитесь загрузки меню «Восстановление», затем выберите «Устранение неполадок» и нажмите «Командная строка» в списке доступных параметров:
Доступ к командной строке через меню восстановления
Примечание. В некоторых версиях Windows 10 вы также можете загрузиться из меню «Восстановление», вызвав 3 последовательных прерывания системы во время процедуры запуска.
- Как только вы войдете в командную строку с повышенными привилегиями, введите следующую команду и нажмите Enter, чтобы исправить зависимости MBR, связанные с вашей установкой Windows: bootrec / fixmbr
- После успешной обработки команды введите следующие команды и нажмите Enter, чтобы исправить данные конфигурации загрузки, связанные с вашей установкой Windows: bootrec / fixboot
Примечание. Если вы получаете сообщение об ошибке «Доступ запрещен» при вводе одной из двух вышеперечисленных команд, следуйте этим инструкциям, чтобы решить проблему с доступом к bootrec.
- Затем введите следующую команду и нажмите Enter, чтобы просканировать все ваши диски на наличие установочного носителя Windows: bootrec / scanos
Примечание. Эта операция может занять некоторое время в зависимости от размера ваших разделов. Не закрывайте это окно до завершения операции.
- Если операция завершена успешно, введите следующую команду для эффективного восстановления данных конфигурации BCD: bootrec / rebuildbcd
- Когда вас попросят подтвердить, введите Y и нажмите Enter, чтобы подтвердить и начать операцию.
Подтвердите операцию построения файловой системы BCD
- Наконец, введите «exit» и нажмите клавишу «Ввод», чтобы выйти из командной строки с повышенными привилегиями и позволить Windows нормально загрузиться.
В случае, если конечный результат такой же (попытка загрузки заканчивается той же ошибкой «Нет такого раздела»), перейдите к следующему способу ниже.
Метод 3: Использование резервной копии реестра для восстановления последней удачной конфигурации
Если ни один из вышеперечисленных методов не помог вам, возможно, вы сможете исправить текущую конфигурацию с помощью последней удачной резервной копии, которая должна позволить вам без проблем выполнять двойную загрузку.
Для этого вам потребуется использовать меню «Дополнительные параметры», чтобы открыть командную строку с повышенными привилегиями и выполнить ряд команд, которые позволят вам загрузиться с использованием последней удачной конфигурации.
Сообщается, что этот метод успешно использовался многими пользователями, столкнувшимися с ошибкой No such Partition -Grub Rescue.
Чтобы использовать резервную копию реестра для восстановления последней удачной конфигурации, следуйте приведенным ниже инструкциям:
- Вставьте совместимый установочный носитель Windows и загрузитесь с него, нажав любую клавишу при появлении соответствующего запроса.
Загрузка с установочного носителя
Примечание. Если у вас нет совместимого установочного носителя или ваша система не загружается с него, выполните шаги с 1 по 4 из метода 2.
- Как только вам удастся успешно загрузиться с установочного носителя, нажмите «Восстановить компьютер» в нижнем левом углу экрана.
Ремонт вашего компьютера
- Когда вы, наконец, войдете в меню Advanced Recovery, нажмите «Устранение неполадок», затем нажмите «Командная строка» в списке доступных параметров.
Доступ к командной строке через меню восстановления
- Как только вы войдете в командную строку с повышенными привилегиями, введите «C:» и нажмите клавишу ВВОД, чтобы получить доступ к разделу, в котором вы установили Windows. Если вы установили Windows на другой раздел, замените букву соответствующим образом.
- Затем введите «dir» и нажмите Enter, чтобы получить доступ к корневому каталогу диска с ОС.
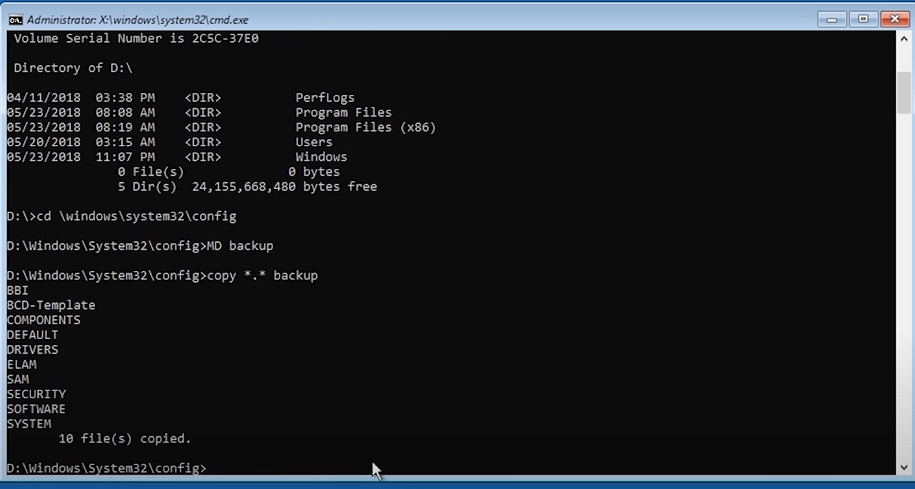
Примечание. Перед тем как продолжить, рекомендуется создать резервную копию текущего реестра. Для этого введите следующую команду и нажимайте Enter после каждой команды: cd windows system32 config MD backup copy *. * BackupРезервное копирование реестра
- Затем введите следующие команды и нажмите Enter, чтобы получить доступ к последней удачной конфигурации и изменить поведение по умолчанию для загрузки с нее: CD regback copy *. * ..
- Когда появится подсказка, нажмите A и еще раз нажмите Enter.
- Наконец, введите exit и нажмите Enter, чтобы выйти и нормально загрузиться. Это приведет вас в главное меню GRUP, где вы сможете выполнить двойную загрузку по своему усмотрению.
Ever get into the freaking condition, when your system doesn’t boot successfully and throw your control to a grub rescue utility informing the following error?
error: no such partition.
Entering rescue mode...
grub rescue>
I went through this situation today. And here is how I rescued with it.
Note: Other possible solutions might be available, but this is just what worked for me. You are recommended to explore the web first, then go with the solution that suits *your* condition perfectly.
1. Reason
Actually, I was trying to resize my Linux (Ubuntu 16.04 LTS) partition which is dual booted with Windows 10. For that, my first step was to unallocate the partition which I wanted to merge with my ext4 (Linux partition). For this, first I logged in Windows and tried to unallocate the partition I wanted to merge (Local Disk :D) but I found out that it can be done with Gparted from Ubuntu as well. But still.
“I started to explore windows storage management console, and a couple of times I detached and reallocate this partition, together with separating out a partition of 3 GB from it. I was just playing and testing the working of the console. But this fun, lead me to freak, later in the day.”
2. Problem
Now the next step was to use Gparted from Linux. But for that, I needed to reboot and login to my Ubuntu 16.04 LTS and here is the twist. When I did reboot my laptop to switch the OS. Oh my God! I get encountered with this scary error.
error: no such partition.
Entering rescue mode...
grub rescue>
I was screwed up! I didn’t know what the hack is done with my system.
I searched the web and found out the reason for this error that was “I deleted a Windows partition. and somehow (I don’t know how), I messed up with some grub configurations.”
3. Solution
But something worked like heaven for me. Here is the solution, if you ever get into this, proceed as follows.
4. List File Systems
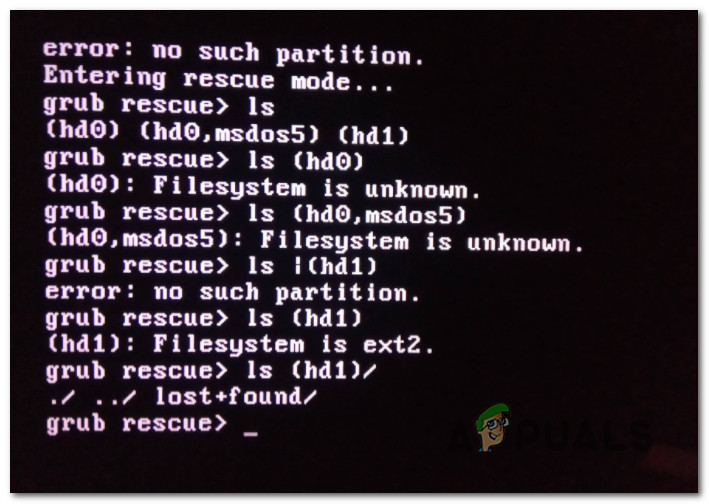
error: no such partition.
Entering rescue mode...
grub rescue> ls
(hd0) (hd0,msdos5) (hd0,msdos3) (hd0,msdos2) (hd0,msdos1)
This “ls” command will list possible file systems where grub might be available. Now our next step is to find out, that which among these listed systems is the one that we can use for booting.
5. Find the File System we may use to boot
grub rescue> ls (hd0,msdos1)
(hd0,msdos1): Filesystem is unknown.
grub rescue> ls (hd0,msdos2)
(hd0,msdos2): Filesystem is unknown.
grub rescue> ls (hd0,msdos3)
(hd0,msdos3): Filesystem is unknown.
grub rescue> ls (hd0,msdos5)
(hd0,msdos5): Filesystem is ext2.
Hurray! we have found out, that which filesystem we have to choose for booting. In this case, it is (hd0, msdos5).
6. Configuration
grub rescue> set root=(hd0,msdos5)
grub rescue> set prefix=(hd0,msdos5)/boot/grub
grub rescue> insmod normal
grub rescue> normal
After this, I could see the old booting menu, where I may select between Ubuntu and Windows. At this point, it seems that the problem is solved, but that’s not the truth!
Now if you again reboot your system, you will again get into this grub rescue. If you want to permanently fix this issue. Proceed as follows (after step 3).
7. Updating System grub
Login to Ubuntu and just give these 2 commands.
$ sudo update-grub
$ sudo grub-install /dev/sda
Now try to reboot! Hopefully, you are back to your previous experience of booting. After going through this, now I don’t feel that grub rescue is a freaking issue, on the other hand, it’s a simple utility to rescue our system with faulty grub configurations.
Updated:
- Unfortunately, sometimes this process doesn’t work. I recommend you to have a look at this post if you want to give a try to recover your files.
- Recently, I found out here, that sometimes
insmod normaldoesn’t work due to the absence of a complete path ofnormalmodule. If this is the case, please try the complete path withinsmod (hdX, Y)/boot/grub/normal.mod. If this doesn’t work please try the command using “semicolon” instead of “coma” after “hdX” as pointed out here. - Also, the location of the complete path to
normal.modis not consistent across all the systems. Therefore, you may uselsorsearch.filecommands to find out the exact location of your system’s `normal.mod` as explained here. - In my case, I didn’t get into condition when
insmod normaldoesn’t work. So, all these additional updates, I have not performed myself. Therefore, I request you all if any of these *updated* points doesn’t work or if you see a bug in these, then please let me know in the comments section below.
Aftermath:
When I was back with my Linux and an unallocated partition, I proceeded ahead for my goal of re-sizing. Explore the second part of this journey on How to resize your Linux partition with Gparted?
See you in the next post.
Some users that have previously configured their computers to dual-boot Windows and Linux distributions (most commonly with Ubuntu) are reporting that their PC is entering Grub Rescue Mode and displaying the error No Such Partition – Grub Rescue.
After investigating this particular issue thoroughly, it turns out that there are several different situations that might trigger the apparition of this issue. Here’s a list of potential culprits that might be responsible for this issue:
- GRUB Bootloader is Corrupted or Deleted – If you are seeing this error due to some type of corrupted data associated with the GRUP Bootloader or after you have unwillingly deleted data associated with it, you can fix the issue by manually reconfiguring the utility to boot using the correct files.
- The bootloader is Misconfigured or Corrupted – Since this issue can also occur due to misconfigured or corrupted BCD data, you should be able to fix the issue by rebuilding the Boot Configuration data from an elevated Command Prompt.
- Current Boot Configuration is inconsistent – In case the issue is being caused by bad data that’s being fed into the GRUB bootloader, you can potentially fix the issue by using a Registry Backup to restore your computer back to a good configuration.
Now that you know every potential culprit, here’s a list of methods that other affected users have successfully used to fix the issue and prevent their computer from booting into Grub rescue mode:
Method 1: Manually Reconfigure GRUB Bootloader
By far, the most effective fix and the one you should start with since it’s the least destructive is to manually reconfigure the GRUB bootloader and make sure that the primary OS is prioritized.
Several affected users have confirmed that they finally managed to bypass the GRUB rescue state by following a set of instructions designed to manually reconfigure the GRUP Bootloader to prioritize the main OS.
If this scenario is applicable, follow the instructions below to do so directly via the GRUB Rescue menu:
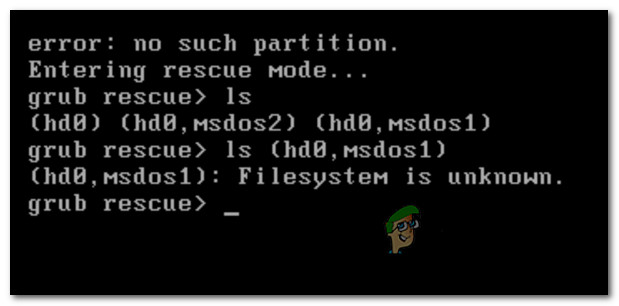
- Once your PC enters GRUB Rescue Mode, type the following command and press Enter to get an overview of all your available partitions:
ls
- After you do this, you should get an overview of all partitions that you currently have on your primary disk. At this point, you need to make sure that you select the primary OS. In our case, the correct partition is (hd0,msdos2), so we used the following command to interrogate the partition:
ls (hd0, msdos2)
Note: Make sure to replace the partition with the correct example in your case. If you get a message saying something like ‘File System is ext2 or ext3‘, you have correctly identified the partition that holds your primary OS.
Note 2: If you interrogate a partition and you get the message ‘Filesystem is unknown‘, you didn’t select the correct partition.
Incorrect partition error message in GRUB - Once the correct partition is selected, type the ‘set‘ and press Enter to interrogate and get a definitive listing of your main partition.
- Next, type the following commands and press Enter after each command to change the priority of GRUB Bootloader to the correct one:
set boot = (hd0, msdos5)
set prefix=(hd0, msdos5)/boot/grub
insmod normal
normal
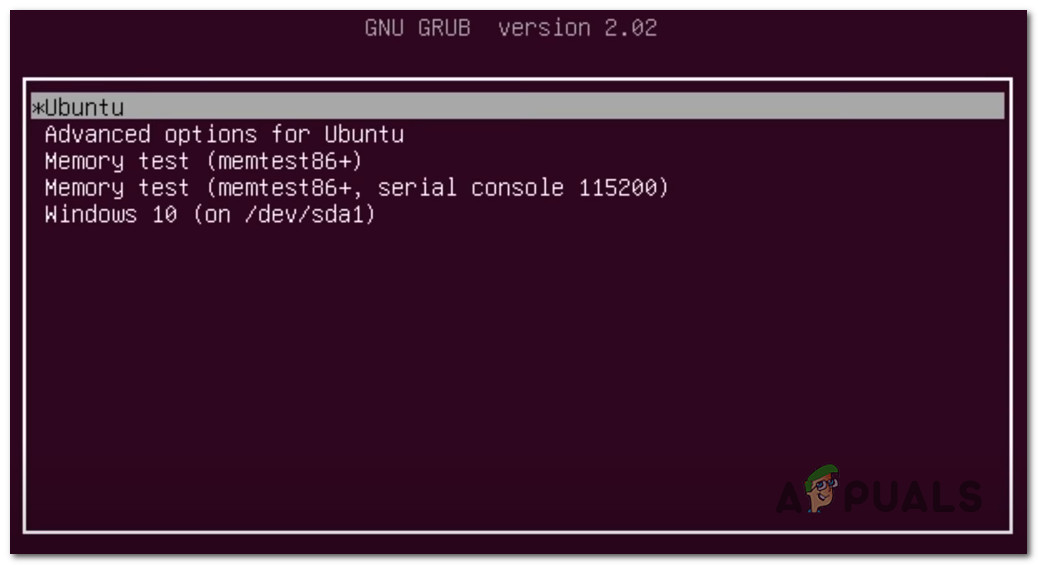
- After you input the final command, you’ll be taken to the main GNU Grub menu. Once you get to this screen, simply select the OS that you want to boot from and press Enter.

Booting from the main partition in GRUB
In case this method didn’t work for you and the booting sequence eventually boots in the same No Such Partition -Grub Rescue error, move back to the next potential fix below.
Method 2: Rebuilding the Boot Configuration Data files (BCD)
If the first method didn’t work for you, the next step would be to use the Boot Configuration Data (BCD) utility to locate the Windows installation files on all disks and add them back to the boot list so that the booting sequence can locate it during startup.
This method was successfully used by a lot of users that were previously dealing with No Such Partition – Grub Rescue error. Rebuilding the BCD file clusters successfully allowed them to dual-boot normally without being forced into the GRUP Rescue menu.
IMPORTANT: This method will require you to plug in a compatible installation Windows installation media. If you don’t have one at the ready, you can create the Windows installation media from scratch and load it on a USB drive.
Once you meet all requirements, follow the instructions below:
- Plug-in the USB stick containing the installation media and start your computer normally via the power button.
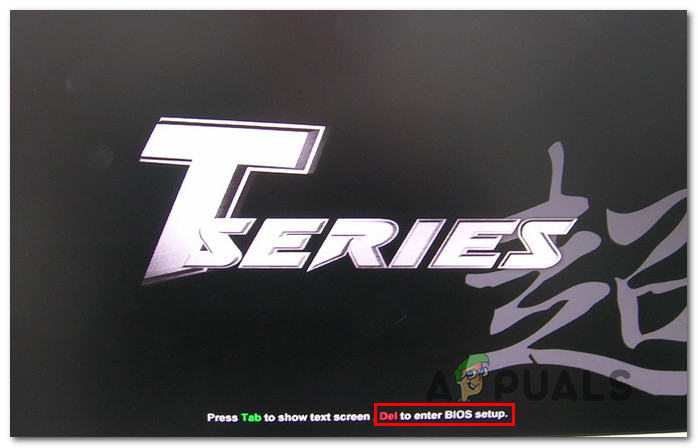
- Access the Setup key by pressing the correspondent button depending on your motherboard manufacturer.

Accessing the BIOS / UEFI Setup menu Note: The setup key will be different from manufacturer to manufacturer. Most commonly the Setup key is either one of the F keys (F2, F4, F6, F8), the Esc key, or the Del key (on Del computers/laptops). If you’re having trouble accessing the Setup menu, search online for specific instructions on accessing it.
- Once you’re inside the Setup menu, access the Boot tab and make sure to set the USB stick containing the installation media as Boot Option #1.

Booting from the installation media - Save the changes, then restart and allow your computer to boot from the installation media and wait for the installation files to load.
- Once you get to the first page, click on Next, then click on Repair your computer from the bottom-right corner of the screen.

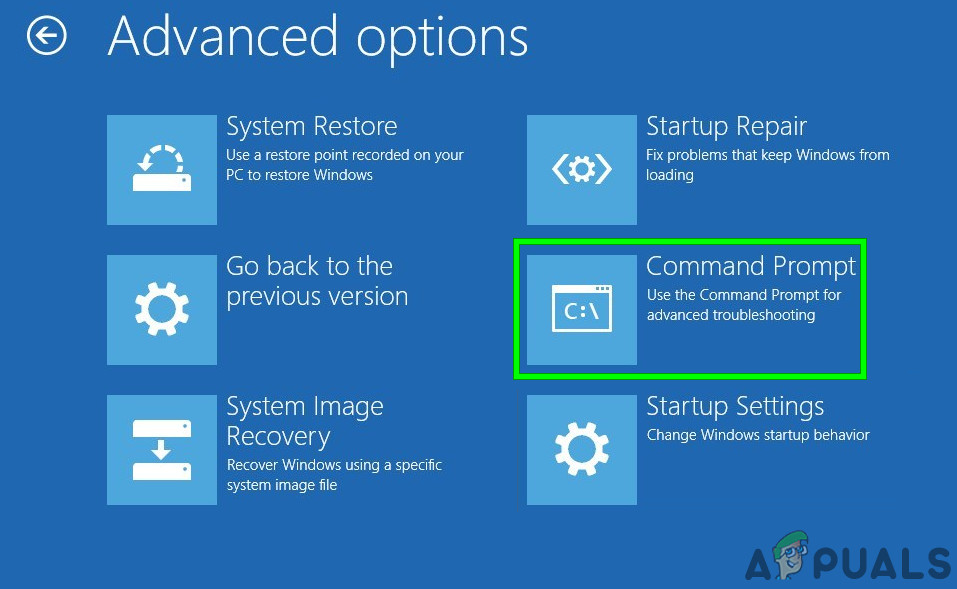
Repairing Computer via installation media - Next, wait for the Recovery menu to load, then select Troubleshoot and click on Command Prompt from the list of available options:

Accessing the Command Prompt via the Recovery menu Note: On certain Windows 10 versions, you might also be able to boot from the Recovery menu by forcing 3 consecutive system interruptions during the startup procedure.
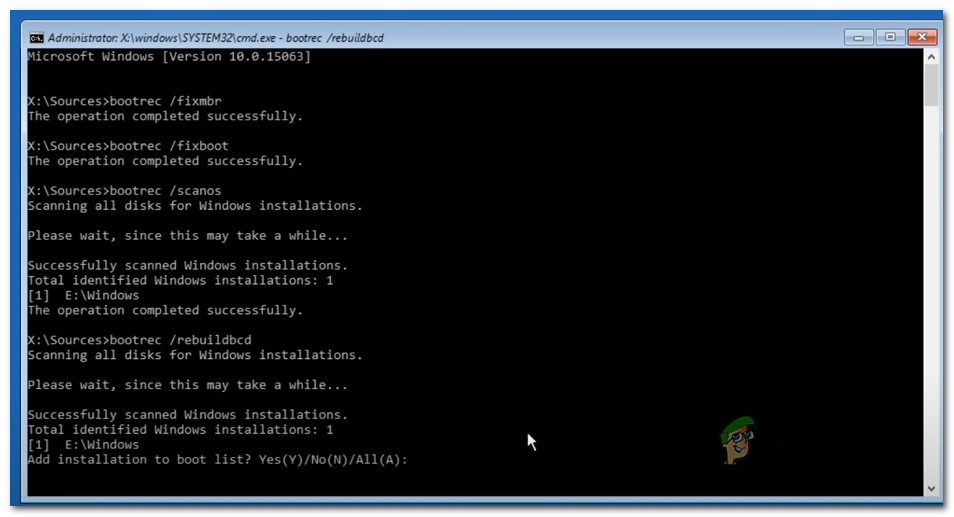
- Once you’re inside the elevated Command Prompt, type the following command and press Enter to fix the MBR dependencies associated with your Windows installation:
bootrec /fixmbr
- Once the command is processed successfully, type the following commands and press Enter to fix the Boot Configuration Data associated with your Windows installation:
bootrec /fixboot
Note: If you get the ‘Access is denied’ error while inputting one of the 2 commands above, follow these instructions to fix the bootrec access problem.
- Next, type the following command and press Enter to scan all your disks for the Windows installation media:
bootrec /scanos
Note: This operation might take some time depending on the size of your partitions. Don’t close this window until the operation is complete.
- If the operation is completed successfully, type the following command to effectively rebuild the BCD configuration data:
bootrec /rebuildbcd
- When asked to confirm, type Y and press Enter to confirm and start the operation.

Confirm the operation of building the BCD file system - Finally, type ‘exit’ and press enter to effectively leave the elevated CMD prompt and allow your Windows to boot normally.

In case the end result is the same (the boot attempt ends with the same No Such Partition error), move down to the next method below.
Method 3: Using the Registry Backup to Restore the last good Configuration
If none of the methods above have worked for you, you might be able to fix the current configuration with the last known good backup that should allow you to dual boot without issues.
Doing this will require you to use the Advanced Options menu to open an elevated Command Prompt and run a series of commands that will allow you to boot using the last known good configuration.
This method was reportedly used successfully by a lot of users dealing with the No Such Partition -Grub Rescue error.
In order to use the Registry Backup to restore the last known good configuration, follow the instructions below:
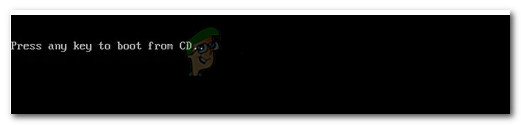
- Insert a compatible Windows installation media and boot from it by pressing any key when prompted to do so.

Booting from the installation media Note: If you don’t have a compatible installation media or your system doesn’t boot from it, follow steps 1 to 4 from Method 2.
- Once you manage to successfully boot from the installation media, click on Repair your computer from the bottom-left corner of the screen.
Repairing your computer - Once you’re finally inside the Advanced Recovery menu, click on Troubleshoot, then click on Command Prompt from the list of available Options.
Accessing the Command Prompt via the Recovery menu - Once you are inside the elevated Command prompt, type ‘C:‘ and press enter to access the partition where you installed Windows. If you installed Windows on a different partition, replace the letter accordingly.
- Next, type ‘dir‘ and press Enter to access the root location of your OS drive.
Note: It’s recommended to back up the current registry before going forward. To do this, input the following command and press Enter after each command:cd windowssystem32config MD backup copy *.* backup

Backing up the Registry - Next, type the following commands and press Enter to access the last known good configuration and modify the default behavior to boot from it:
CD regback
copy *.* ..
- When prompted by the prompt, press A and hit Enter once again.
- Finally, type exit and press Enter to exit and boot normally. This should take you to the main GRUP menu where you should be able to dual boot as you see fit.

Kevin Arrows
Kevin is a dynamic and self-motivated information technology professional, with a Thorough knowledge of all facets pertaining to network infrastructure design, implementation and administration. Superior record of delivering simultaneous large-scale mission critical projects on time and under budget.
The other day I was trying to extend my root partition of Ubuntu which I dual boot with Windows 8. The partition extension was successful except that I screwed up the Grub configuration. When I booted in my laptop after the partition changes, I was welcomed by the Death Screen of Linux saying:
error: no such partition
grub rescue
After googling a bit, I found this mega thread on Ubuntu forum that helped me. But since it is a very complicated thread, I have re-written the tutorial so that one can follow it easily. So there are some assumption and some requirements to fix the error: no such partition grub rescue problem.
Requirements and presumptions:
- You must have a live CD/DVD/USB of the same version of OS
- You must have internet connection
- You are dual booting Windows with Ubuntu (no Wubi installation)
- You do not have a separate /boot partition
Now lets see how can we rescue the grub here.
How To Fix: error: no such partition grub rescue
We’ll be using chroot to rescue grub. The whole concept is that since grub configuration files have been deleted or corrupted, it needs to be re-installed. And using the live CD of exact OS version, we can install the grub configuration again. It will delete all the changes (if any) you have made to the grub.
Please follow these steps to easily fix grub rescue problem in Ubuntu (or other Linux distributions):
Step 1: Know you root partition
Boot from live CD, DVD or USB drive. Try Ubuntu from live disk. Open a terminal (Ctrl+Alt+T) and use the following command:
sudo su
fdisk -l
Here, you will see the drive name and partition number. It should look like sdXY. Where X is the drive letter and Y is the partition number. Usually it should be like sdaY. You have to recognize the partition where root has been installed.
Step 2: Mount the root partition
Once we have got the partition where root has been installed, we’ll mount the root partition where Ubuntu has been installed. Use the following commands to mount it:
sudo mkdir /mnt/temp
sudo mount /dev/sdXY /mnt/temp
Replace XY with appropriate values.
Step 3: Be the CHROOT
Once we have the partition mounted, next step is to mount certain items in preparation of the chroot. Run the following commands one by one:
for i in /dev /dev/pts /proc /sys; do sudo mount -B $i /mnt/temp$i;  done
sudo cp /etc/resolv.conf /mnt/temp/etc/resolv.conf
sudo chroot /mnt/temp
If the above commands ran successfully, you’ll see [email protected]:/# in the terminal indicating that you are in chroot mode.
Step 4: Purge Grub 2 packages
Now when we are in chroot environment (you can think of it as if we are behaving as root for the mounted partition)., time to get rid of the Grub 2 packages but before that lets update the repository.
apt-get update
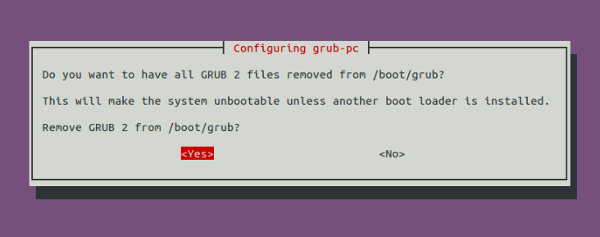
apt-get purge grub grub-pc grub-commonWhile removing the grub, you’ll see a strange screen asking if you want to remove Grub 2 packages. Press TAB to select Yes. It will be highlighted once selected. Press enter to proceed.
Step 5: Re-install Grub packages
As we deleted the previous Grub, we deleted the messed up settings as well as any favourite settings stored in it. Now we’ll install a new and fresh Grub. Few things to keep in mind before you go on with the command to install the Grub.
- While installing the new Grub, it will ask you to add extra kernel options. Just press TAB to go to OK and press enter to continue.
- It will bring you the installation notes. Press Tab to OK followed by enter and continue.
- When it presents with you the device option (to ask on which partition should it install Grub), choose the option in the format of sdX. DO NOT select the drive partition in 4 letter format i.e. sda4 etc. When you select the partition, it should have an asterisk (*) before it like [*] sdX. If it does not, highlight (with tab) and press SPACE to select it. Tab OK and press enter.
It should look like this:
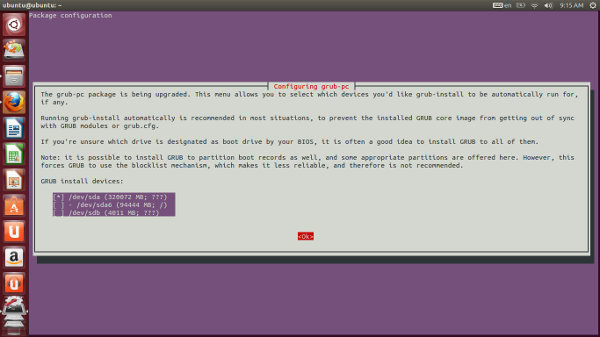
Now when you taken all those things in mind, use the command below to install the Grub.
apt-get install grub-common grub-pcUpdate the grub and exit the chroot:
update-grub
exit
Step 6: Unmount the partition:
We mounted something at the start, didn’t we? Well lets just unmount them.
for i in /dev/pts /dev /proc /sys; do sudo umount /mnt/temp$i ; doneThat’s it. Reboot your system and you should see the good old Grub boot screen as before. I hope this tutorial helped you to get rid of error: no such partition grub rescue problem and the tutorial was easy to follow. Any question, suggestions or a word of thanks is always welcomed. Stay tuned for more Linux tutorials.