Содержание
- How to turn on «USB debugging»
- Samsung device
- HUAWEI
- Mi device
- Enable «Install via USB» without creating MI Account
- 7 Answers 7
- How to turn on «USB debugging»
- Samsung device
- HUAWEI
- Mi device
- Boot Parameters to Enable Debugging
- Plus what you can do in debug mode
- How to Disable USB Debugging on Android
- Security Risks of USB Debugging
- Android Debugging Apps
- How to Enable USB Debugging With a Broken Screen
- First, you need to enable «Developer Options Menu».
- Now, you can enable USB Debugging mode.
How to turn on «USB debugging»
Samsung device
1. Tap «Setting»
2. Tap «Developer options»
3. Turn on «Developer options» and «USB Debugging»
HUAWEI
1. Tap «Setting»
2. Tap «About phone»
3. Tap «Build number» for seven times to turn on Developer mode.
4. Back to «Setting» and enter «Developer options»
5. Turn on «Developer options»
6. 6.0 and higher version, please open «Allow ADB debugging in charge only mode» first
7. Turn on «USB Debugging»
Mi device
1. Tap «Setting»
2. Tap «My device»
3. Tap «About phone»
4. Tap the «MIUI version» for seven times to turn on Developer mode.
5. Tap «Developer options»
6. Turn on «Developer options» and «USB Debugging»
The detailed tutorial as follows:
1. Enter «Setting»

2. Enter «Setting» — «About phone»

3. Tap «Build number» for seven times to turn on Developer mode.

4. Back to «Setting» and enter «Developer options»

5. Turn on «Developer options» and «USB Debugging»

6. Please allow the following options if available «Install via USB» and «USB debugging (security settings)».
Источник
Enable «Install via USB» without creating MI Account
I am trying to create some apps on my xiaomi smartphone (MIUI 8), but when I try to run an app, the error INSTALLATION_CANCELED_BY_USER appears. I found that the problem is that I must enable the «Install via USB» option from developer settings. When I try to do so, I get a screen that says I have to login/signup with an MI account in order to enable this option, which is something I am not willing to do. So, I have 3 questions:
- Why did they make it neccessary to provide an account for enabling an option like this?
- Is there any way I can bypass the MI login screen and enable the option?
- The reason I don’t want to connect my phone to an MI account is that I am concerned about personal data being uploaded. Is it a logical concern?


7 Answers 7
What I didn’t want was to continue having an MI account connected to my device. So I just created a temporary account, enabled the «Install via USB» option and then logged out from the MI account. So, now I hope the option stays enabled 🙂
For those who have already inserted their SIM card into the Xiaomi phone, the above answers all would work.
But, if you are using Xiaomi Redmi 5 only for development purposes, you will need to do as below:
You will need to sign up/sign in for a Mi account before you continue.
Extract the SIM card from your non-Redmi phone. (It should be nano SIM. Contact your telecom provider to get one if you have a micro or normal SIM).
Insert SIM card into Redmi phone.
Go to Settings -> Additional Settings -> Developer options.
Under Debugging, click on ‘Install via USB’ option.
The phone will enable this.
Remove the SIM card.
That’s it!! You should now be able to install your apps via USB from Android studio.
Please remember not to disable this option, otherwise, you may need to re-insert your SIM card.
PLEASE NOTE: The above steps are guaranteed to work on Xiaomi Redmi 5 phone. Please improve this answer if the steps are different for other models of Xiaomi.

None of the other solutions floating around the internet worked for me (Chinese VPN, Disabling MIUI optimization. ). I also could not temporarily sign into a Mi account, since I’d uninstalled as many MIUI system apps as I could and thus sign-in wasn’t working anymore (and I just didn’t want to sign in to begin with).
YMMV — it worked for me when I did it in early 2019, but it may not work any more if they changed something. I changed to custom ROM and can’t test it anymore.
If you want to change it back, just re-run the commands with a 0 at the end and remove what you added to the text files.
This requires root, shell access with su , and a way to edit text files as root. I used Termux and and an android root file manager that can edit text files.
First, run the following command ( su first, to switch to root):
If you also want to enable «USB debugging (Security settings)», for granting permissions, simulating UI input, etc. via ADB, run the following command too:
Next, we need to edit the file
so that MIUI actually lets us do these things:
No reboot necessary. MIUI annoyingness circumvented 🙂
Источник
How to turn on «USB debugging»
Samsung device
1. Tap «Setting»
2. Tap «Developer options»
3. Turn on «Developer options» and «USB Debugging»
HUAWEI
1. Tap «Setting»
2. Tap «About phone»
3. Tap «Build number» for seven times to turn on Developer mode.
4. Back to «Setting» and enter «Developer options»
5. Turn on «Developer options»
6. 6.0 and higher version, please open «Allow ADB debugging in charge only mode» first
7. Turn on «USB Debugging»
Mi device
1. Tap «Setting»
2. Tap «My device»
3. Tap «About phone»
4. Tap the «MIUI version» for seven times to turn on Developer mode.
5. Tap «Developer options»
6. Turn on «Developer options» and «USB Debugging»
The detailed tutorial as follows:
1. Enter «Setting»
2. Enter «Setting» — «About phone»
3. Tap «Build number» for seven times to turn on Developer mode.
4. Back to «Setting» and enter «Developer options»
5. Turn on «Developer options» and «USB Debugging»
6. Please allow the following options if available «Install via USB» and «USB debugging (security settings)».
Источник
Boot Parameters to Enable Debugging
Plus what you can do in debug mode

Tap Build number repeatedly until you see a notification that reads «You are now a developer.»

Go back to the main Settings menu, then tap Developer options.

If using Android Pie, you must tap Advancedoptions to reveal the Developer options.
Tap the toggle switch in the top-right corner to enable developer options (if it’s not already enabled).
Tap OK to confirm.
Tap the USB debugging toggle switch.
Tap OK to confirm.
The next time you plug your device into a computer, you’ll receive a prompt asking if you want to authorize USB debugging for that computer. Tap OK to confirm.
If your PC doesn’t detect your Android device, you may need to download the appropriate device driver.
How to Disable USB Debugging on Android
To turn off USB debugging, return to the Developer options menu and tap the USB debugging toggle switchagain.
To reset which computers can access your Android device in debug mode, return to the Developer optionsmenu and tap Revoke USB debugging authorizations.
Security Risks of USB Debugging
Putting your device in debug mode leaves it more vulnerable to malware and outside attacks. For this reason, you’ll receive a security prompt each time you connect your device to a new PC. Avoid plugging your device into public charging ports or using public Wi-Fi networks with debug mode enabled.
If you lose your device with debug mode turned on, a tech savvy thief could access your personal data without knowing your passwords. Therefore, you should always turn off debugging when you don’t need it.
For extra security, set up the Find My Device feature, which allows you to locate your device or erase its data remotely if it’s ever lost or stolen.
Android Debugging Apps
There are apps available in the Google Play store that purportedly make it easier to enable USB debugging; however, considering how simple the process already is, there’s no reason to download an app for this purpose.
How to Enable USB Debugging With a Broken Screen
If your Android’s touchscreen is broken, yet you can still see the display, it may be possible to use a mouse to activate debug mode, provided your device supports On-The-Go (OTG) technology. If it does, connect a mouse via an OTG cable to navigate your device settings without using the touch screen.
F.A.Q.TutorialsTroubleshootKnowledge BaseContact SupportDonate to Kingo
The ways to enable USB Debugging mode, which is accounted for the key step in Android rooting process, vary from one Android version to another. USB Debugging is required by adb, which is used for rooting, backing up, installing a custom ROM, tacking screenshots from computer and more.
1. Android 2.0-2.3.x Settings > Applications > Development > USB Debugging. 2. Android 3.0- 4.1.x Settings > Developer Options > USB Debugging. 3. Android 4.2.x and higher. In Android 4.2 and higher versions, the Developer Options menu and USB Debugging option have been hidden. In former 4.X versions of Android, USB Debugging option is under Developer Options menu.
First, you need to enable «Developer Options Menu».
Now, you can enable USB Debugging mode.
4. Android 5.0 Lollipop To enable USB Debugging on Android 5.0 Lollipop is the same as Android 4.2.x.
- Settings > About Phone > Build number > Tap it 7 times to become developer;
- Settings > Developer Options > USB Debugging.
Warning USB Debugging should only be enabled when you need it. Leaving it enabled all the time is kind of a security risk for that this mode grants you high-level access to your device. Say if you connect your Android phone to a USB charging port in a public location, the port could use the USB access to your phone to access data on your phone or install malware. This could happen when and only when USB debugging mode is enabled.
To disable USB Debugging and other developer options when you don’t need them, slide the switch at the top of the screen to OFF.
PRODUCTS Super RootOne Click RootUniversal Android RootHTC Bootloader UnlockSONY Bootloader Unlock MANUFACTURERS LG RootHTC RootZTE RootVIVO RootOPPO RootHuawei RootLenovo RootAlcatel RootSamsung RootMicromax Root ANDROID VERSIONS Root Jelly Bean (4.1.2)Root Jelly Bean (4.2.2)Root Kitkat (4.4.2, 4.4.4)Root Lollipop (5.0.1, 5.1, 5.1.1)Root Marshmallow (6.0, 6.0.1)Root Nougat (7.0, 7.1)Root Oreo (8.0, 8.1) WHY ROOT Top Root AppsCustomizationSave Battery/PowerBlock/Remove AdsSpeed Up/BoostUninstall/Delete BloatwaresEasy/Effective Backup Install/Flash a Custom ROMPokemon Go ABOUT EULADisclaimerOpen SourcePrivacy PolicyCooperationContact UsDonate to KingoRootAbout KingoRootSitemap
В дальнейшем, вы можете отключить отладку в том же разделе меню, а при необходимости — отключить и убрать из меню Настроек пункт «Для разработчиков» (ссылка на инструкцию с необходимыми действиями была приведена выше).
When a kernel debugging connection is established, the system gives a kernel debugger control over its execution. Also, when a bug check occurs or a kernel-mode program communicates with a debugger, the computer waits for a response from a kernel debugger before it continues.
There are four basic debugging methods that you can configure by using boot parameters:
Single-computer (local) debugging
Debugging with a null-modem cable
Debugging with an IEEE 1394 cable (only if the target computer and the host computer are both running Microsoft Windows 7 or a later version of Windows)
Debugging with a USB 2.0 debug cable (only if the target computer and the host computer are both running Microsoft Windows 7 or a later version of Windows)
To enable kernel debugging on a single computer, use the BCDEdit /debug boot option.
To use BCDEdit, open a Command Prompt window with elevated privileges (right-click Command Prompt and click Run as administrator from the shortcut menu).
The /debug option has the following syntax:
The <ID> is the ID that is associated with the boot entry, such as for the default OS boot entry. If you do not specify an <ID>, the command modifies the operating system that is currently active. For more information about working with boot entry identifiers, see Boot Options Identifiers.
The following command enables kernel debugging for the current Windows operating system boot entry:
You can use the bcdedit /enum command to view the current boot entries and their settings.
For more details, see BCDEdit /debug.
To enable debugging with a null-modem cable in Windows, use BCDEdit and set the debugging connection type to «SERIAL». You can set this globally by using the BCDEdit /dbgsettings command followed by serial, or set it for a specific boot entry by using the BCDEdit /set command followed by debugtype serial. You must also use the BCDEdit /debug command to enable kernel debugging globally or for the desired operating system.
If BCDEdit has not been used, the default global debug settings are for serial communications, using COM1 and a baud rate of 115,200.
To display the current settings, use the following command:
To use BCDEdit, open a Command Prompt window with elevated privileges (right-click Command Prompt and click Run as administrator from the shortcut menu).
To set the global debug settings to serial communications, use the following syntax:
bcdedit /dbgsettings serial [ debugport:port] [ baudrate:baud]
The following example shows how to specify serial communications as the global debug setting.
To set the debug settings to serial for a specific boot entry, or for the current entry, use the following syntax:
bcdedit /set [<ID>] debugtype serial
bcdedit /set [<ID>] debugportport
bcdedit /set [<ID>] baudratebaud
If no <ID> is specified, the settings apply to the currently active boot entry.
The following example shows how to specify the serial debug settings for a the default boot entry. To enable the debug settings, you must reboot your computer and select that boot entry you have configured for debugging.
You can use the bcdedit /enum command to view the current boot entries and their settings.
For more details, see BCDEdit /debug and BCDEdit /dbgsettings.
To enable debugging with an IEEE 1394 cable in Windows, use BCDEdit and set the debugging connection type to «1394». You can set this globally by using the BCDEdit /dbgsettings command followed by 1394, or set it for a specific boot entry by using the BCDEdit /set command followed by debugtype 1394. You must also use the BCDEdit /debug command to enable kernel debugging globally or for the desired operating system.
To use BCDEdit, open a Command Prompt window with elevated privileges (right-click Command Prompt and click Run as administrator from the shortcut menu).
To set the debug settings for 1394 globally, use the following syntax:
bcdedit /dbgsettings 1394 [ channel:channel ]
The following example shows how to specify 1394 as the global debug setting.
To set the debug settings to 1394 for a specific boot entry, or for the current entry, use the following syntax:
bcdedit /set [<ID>] debugtype 1394
bcdedit /set [<ID>] channelchannel
If an <ID> is not specified, the settings apply to the current boot entry.
The following example shows how to specify the 1394 debug settings for a specific boot entry, and how to use the /debug option to enable kernel debugging for the default boot entry. Note that to enable the debug settings, you must reboot your computer and select the boot entry you have configured for debugging.
You can use the bcdedit /enum command to view the current boot entries and their settings.
For more details, see BCDEdit /debug and BCDEdit /dbgsettings.
To enable debugging with a USB cable in these versions of Windows, use BCDEdit and set the debugging connection type to «USB». You can set this globally by using the BCDEdit /dbgsettings command followed by usb, or set it for a specific boot entry by using the BCDEdit /set command followed by debugtype usb. You must also use the BCDEdit /debug command to enable kernel debugging globally or for the desired operating system.
To use BCDEdit, open a Command Prompt window with elevated privileges (right-click Command Prompt and click Run as administrator from the shortcut menu).
To set the debug settings for USB globally, use the following syntax:
bcdedit /dbgsettings usb [targetname:name]
The following example shows how to specify USB as the global debug setting.
To set the debug settings to USB for a specific boot entry, or for the current entry, use the following syntax:
bcdedit /set [<ID>] debugtype usb
bcdedit /set [<ID>] targetnamename]
If no <ID> is specified, the settings apply to the current boot entry.
The following example shows how to specify the USB debug settings for a specific boot entry, and how to use the /debug command to enable kernel debugging for the default boot entry. Note that to enable the debug settings, you must reboot your computer and select the boot entry you have configured for debugging.
You can use the bcdedit /enum command to view the current boot entries and their settings.
For more details, see BCDEdit /debug and BCDEdit /dbgsettings.
To enable boot debugging, use the BCDEdit /bootdebug command and specify the appropriate boot component. If you wish to perform kernel debugging after Windows starts, use the BCDEdit /debug command as well.
You must also select a debugging connection (serial, 1394, or USB). This can be done with either the BCDEdit /dbgsettings or BCDEdit /set command, just as in normal kernel debugging.
For more details, see BCDEdit /bootdebug.

Когда люди приобретают мобильное устройство на платформе Android, то в большинстве случаев следуют моде, не догадываясь о том, насколько возможности нового девайса превосходят их прежний телефон. Чаще всего владельцы новых смартфонов или планшетов применяют только 10% изо всех возможностей электронного устройства. Из внимания пользователей выпадает так называемый режим USB-отладки, или USB Debugging.
Данный режим будет интересен как для профессионалов, так и для обычных владельцев, т.к. позволяет совершить следующие действия (необходима также утилита ADB (Android Debug Bridge – отладочный мост Андроид), из состава Android SDK):
Для наглядного примера по активации режима USB-отладки можно будет произвести все манипуляции на смартфоне ZTE V880H с установленной производителем мобильной операционной системой Android 4.2.1 Jelly Bean.
Для этого нужно выполнить несколько простых действий.
1. Зайти в «Меню», найти иконку приложения «Настройки».

2. После этого открыть касанием пункт «Настройки» и найти подпункт «Для разработчиков».

3. Нужно зайти в данный подпункт, выбрать из предложенных в нем название «Отладка для USB» и активировать его, поставив галочку в квадратике рядом.

4. Следующий шаг проявит система, которая задаст вопрос пользователю «Разрешить отладку USB?» и напишет ниже пояснение сути данного режима. Нужно будет подтвердить «ОК» или нажать на слово «Отмена».

5. Если выбран «ОК», то режим USB-отладки будет включен и рядом с его названием загорится галочка.

6. Теперь владелец сможет производить со своим устройством описанные выше манипуляции. Следует помнить, что для них обязательно будет нужна утилита ADB (Android Debug Bridge – отладочный мост Андроид).
Итак, режим USB-отладки активирован, и пользователь может расширить в применении способности своего устройства на платформе Android, которое теперь станет для его владельца действительно необходимым помощником. Что такое режим USB-отладки (USB Debugging) на Андроид
Источник
Сегодня пишем очередное дополнение. На этот раз к инструкции по русификации смартфона Xiaomi с помощью приложения MoreLocale 2. К сожалению, не у всех пользователей, она проходит гладко, о чем нам было сообщено с помощью формы обратной связи. Проблема, на которую были жалобы — это ошибка приблизительно такого вида:
C:ADB>adb shell pm grant jp.co.c_lis.ccl.morelocale android.permission.CHANGE_CONFIGURATION
Operation not allowed: java.lang.SecurityException: grantRuntimePermission: Neither user 2000 nor current process has android.permission.GRANT_RUNTIME_PERMISSIONS.
Она возникает, если не активировать пункт USB Debugging (Security settings) в меню «Для разработчиков» (смотреть пункт 5.1 инструкции по русификации).
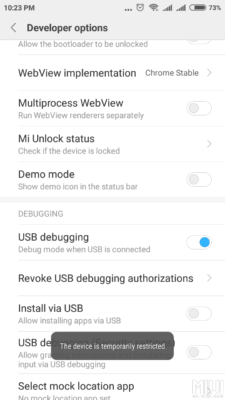
Но, при попытке его активации, возникает еще одна ошибка: «This devices is temporarily restricted». Для ее устранения необходимо:
- Отключить Wi-Fi и включить мобильный интернет. На телефоне должен быть Mi аккаунт
- Перезагрузиться и попробовать еще раз включить пункт «USB Debugging (Security settings)».
Если случилось так, что после этого ошибка не пропала и пункт по прежнему не включается, то нам придется воспользоваться VPN, чтобы показать смартфону, что он соединяется с сервером из Китая. Рассмотрим на примере бесплатного сайта VPNGate. Вы можете использовать любой другой.
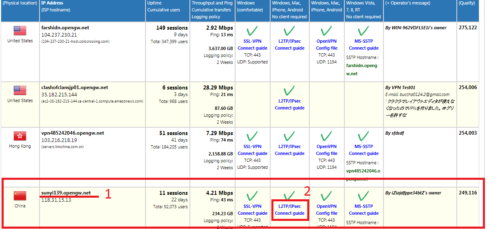
- Заходим на сайт VPNGate. Здесь нам нужно выбрать китайский сервер с поддержкой L2TP/IPsec. Листаем вниз главную страницу, снимаем все лишние галочки (как на скриншоте) и нажимаем кнопку «Refresh server list»
- В обновившемся списке находим китайский флаг слева.
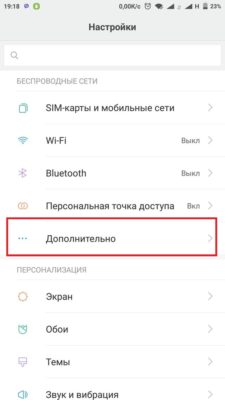
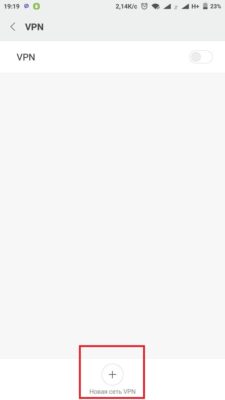
- Открываем в смартфоне Настройки—>Дополнительно—>VPN. И внизу нажимаем «Добавить новую сеть».

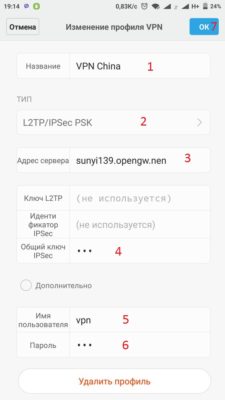
- В поле «Название» пишем любое имя вашей сети. В пункте «ТИП» выбираем L2TP/IPSec PSK.
- Возвращаемся к сайту и находим адрес китайского сервера. В нашем случае это: sunyi139.opengw.net. Его мы вписываем в наши настройки телефона, в поле «Адрес сервера».
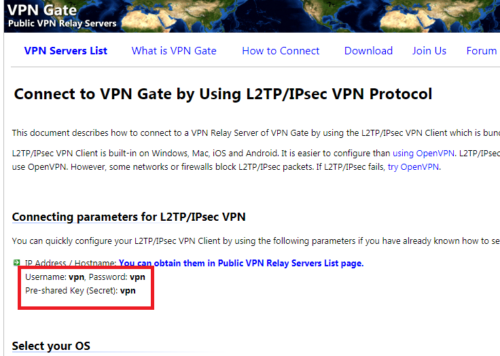
- Опять к сайту. Открываем ссылку L2TP/IPsec Connect guide. И увидим данные, которых нам не достает для подключения, а именно: Username (Имя пользователя); Password (Пароль); Pre-shared Key (Secret) (Общий ключ IPSec). В данном случае, все три одинаковые и имеют значение: vpn.
- В настройках VPN вписываем их и нажимаем ОК. Конечный результат выглядит так:
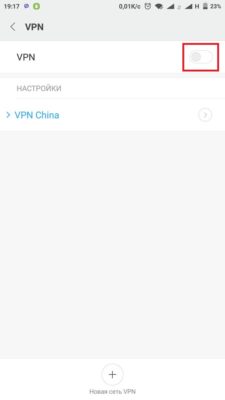
- Теперь в меню VPN мы активируем одноименный переключатель и опять пытаемся включить пункт «USB Debugging (Security settings)»


Надеемся, что у вас все получилось.
-
#1
My device is rooted. Everything was OK. I don’t know when and how it happend that I cannot anymore get USB debugging to work for me. I want to control apps via USB debugging.
To get rid of «java.lang.SecurityException: Injecting to another application requires INJECT_EVENTS permission» it seems I need to switch on «USB debugging (Security settings)».
When I try it asks me «Sign in with your MI account».
Is there a way to turn on «USB debugging (Security settings)» without MI account?
What is the MI account doing? Am I too paranoid suspecting Xiaomi to read and use private information?
-
#2
Create a new Mi Account with spoofed information, then login… Problem solved.
Game the gamer!
Sent from my Redmi Note 5 using Tapatalk
-
#3
Does creating and configuring an MI account in the device create an ongoing link between the device and Xiaomi servers like it is the case with other vendors like Samsung and HTC? They for instance backup all contacts and can do what they want with the emails and phone numbers.
-
#4
Does creating and configuring an MI account in the device create an ongoing link between the device and Xiaomi servers like it is the case with other vendors like Samsung and HTC? They for instance backup all contacts and can do what they want with the emails and phone numbers.
You can select not to sync contacts, notes and all that in Xiaomi Cloud settings
-
#5
Does creating and configuring an MI account in the device create an ongoing link between the device and Xiaomi servers like it is the case with other vendors like Samsung and HTC? They for instance backup all contacts and can do what they want with the emails and phone numbers.
Nobody knows what is behind.
Question is to be raised to XIAOMI China.
-
#6
Does creating and configuring an MI account in the device create an ongoing link between the device and Xiaomi servers like it is the case with other vendors like Samsung and HTC? They for instance backup all contacts and can do what they want with the emails and phone numbers.
There are configurable settings in Mi Cloud to either allow or disallow these synchronisation. The choice is yours.
Sent from my Redmi Note 5 using Tapatalk