
-
#1

Всем привет, сабж думаю понятен. Встречаю очень много подобных вопросов на форуме и в дискорде.
Ну чтож начнем, команда RAGE:MP при публикации prerelease версии опубликовала список изменений:
[devblog] RAGE Multiplayer 1.1.0-DP#1 Goes Public Beta!
В этом списке изменений есть специальный раздел — 0.3.7 compatibility guide (0.3.7 руководство по совместимости)
В этом списке как раз написаны почти все необходимые действия для перевода мода на 1.1.
Казалось бы, на этом можно закончить гайд и закрыть тему, но я разжую вам еще подробнее (чтобы каждый Рахим понял):
- Make sure your server-side resources use correct seat IDs (it starts from 0, not -1 anymore)
Убедитесь, что ваши серверные ресурсы используют правильные идентификаторы рабочих мест (они начинаются с 0, а не с -1).
Это значит что вы должны ТОЛЬКО В СЕРВЕРНОЙ ЧАСТИ изменить все места в коде где используется seat свойства игрока и машин изменить с -1 на 0. - C# only: Make sure to update GetData syntax (in most of cases you can just autoreplace «GetData(» with «GetData<object>(» for exact 0.3.7 behavior).
Только для C#: обязательно обновите синтаксис GetData (в большинстве случаев вы можете просто автоматически заменить GetData (»на« GetData <object> (»для точного поведения 0.3.7).
Это значит что вы должны изменить способ использования GetData и ей подобных переменных под новый вид (с явным указанием типа данных). ТОЛЬКО ЕСЛИ У ВАС СЕРВЕР НА C# - C# only: «Client» got renamed with «Player».
Только C#: «Client» переименован в «Player».
Это значит что вы должны изменить в вашем моде все типы переменных Client на Player. ТОЛЬКО ЕСЛИ У ВАС СЕРВЕР НА C# - C# only: Vehicle occupants API now returns Entity instead of Player — that’s because 1.1 synchronized peds could be vehicle occupants too
Только C#: API для пассажиров транспортных средств теперь возвращает Entity вместо Player — это потому, что синхронизированные пешеходы 1.1 также могут быть пассажирами транспортных средств. - C# only: EntityCreated/Destroyed events now pass Entity argument instead of NetHandle
Только C#: события EntityCreated / Destroyed теперь передают аргумент Entity вместо NetHandle. - Optional: Make sure to use RGSC IDs instead of RGSC Nicknames
Необязательно: убедитесь, что вы используете идентификаторы RGSC вместо псевдонимов RGSC. - Make sure to implement new chat API initerface. 0.3.7-.1.1 compatibility wrapper (CEF code):
Обязательно внедрите новый интерфейс API чата. Обертка совместимости 0.3.7 — 1.1 (код CEF):JavaScript:
let api = {"chat:push": chatAPI.push, "chat:clear": chatAPI.clear, "chat:activate": chatAPI.activate, "chat:show": chatAPI.show};
for(let fn in api)
{
    mp.events.add(fn, api[fn]);
}
И последние 5 пунктов рассказывают о том как именно изменить бинарники самого сервера и что произошло с плагинами и в целом c# составляющей сервера:
- 0.3.7 plugins should be removed from /plugins/, it’s not compatible. Moreover, both «bridge.dll» and «rpfencrypt.dll» are redutant: C# API doesn’t require a plugin to work.
Плагины 0.3.7 следует удалить из /plugins/, это несовместимо. Более того, и «bridge.dll», и «rpfencrypt.dll» являются избыточными: для работы C # API не требуется плагин.
Это значит что вы должны удалить все плагины из папки plugins (они больше не используются). Вся серверная часть на c# переехала в папку dotnet и сам файл bridge.dll больше не нужон. - DLCPack files should be moved from /client_packages/dlcpacks to /client_packages/game_resources/dlcpacks. If required, custom server-sided gameconfig.xml (/client_packages/game_resources/common/data/gameconfig.xml) could be used.
Файлы DLCPack следует переместить из /client_packages/dlcpacks в /client_packages /game_resources/dlcpacks. При необходимости можно использовать настраиваемый серверный файл gameconfig.xml (/client_packages/game_resources/common/data/gameconfig.xml).
Это значит что все dlcpacks переехали в новую папку (client_packages /game_resources/dlcpacks). А также появился новый способ настраивать конфиг игры (ограничения, лимиты) в файле client_packages/game_resources/common/data/gameconfig.xml - Don’t confuse «/server-files/ragemp-server.exe» (1.1) with «/server-files/server.exe» or «/server-files/dotnet/» with «/server-files/bridge/»
Не путайте «/server-files/ragemp-server.exe» (1.1) с «/server-files/server.exe» или «/server-files /dotnet/» с «/server-files /bridge/»
Это значит что вам надо заменить старый файл server.exe на новый ragemp-server.exe, а также еще раз говорится о изменениях в серверной части (см. пункт 1). - Review all your custom synchronization code, some parts might be redutant with 1.1
Просмотрите весь свой собственный код синхронизации, некоторые части могут быть изменены с 1.1. - More may follow, be sure to check this again if you find incompatibility issues.
Возможно, последуют другие, обязательно проверьте это еще раз, если вы обнаружите проблемы несовместимости.
На этом все, если есть какие то дополнительные вопросы или у вас возникли проблемы, пишите в эту тему, постараюсь помочь.
Данная статья сделана при поддержке — @FireFeed ака Владик, спасибо ему.
Последнее редактирование: 17 Авг 2021
-
#2
Благодарю Вас за такую полезную статью!
-
#3
было ли какое то изменение в чекпоинтах? После перевода на 1.1 у меня пропали абсолютно все чекпоинты(домов, магазинов)
-
#4
было ли какое то изменение в чекпоинтах? После перевода на 1.1 у меня пропали абсолютно все чекпоинты(домов, магазинов)
Покажи код.
-
#5
JavaScript:
methods.loadAllBlips = function () {

    methods.createBlip(new mp.Vector3(536.4715576171875, -3126.484375, 5.073556900024414), 598, 0, 0.8, 'Army');
    methods.createBlip(new mp.Vector3(450.0621337890625, -984.3471069335938, 43.69164276123047), 60, 0, 0.8);
JavaScript:
methods.createBlip = function (pos, sprite, color, scale, name, dimension) {
    if (scale == undefined)
        scale = 0.8;
    if (dimension == undefined)
        dimension = -1;
    if (name == undefined)
        return mp.blips.new(sprite, pos,
            {
                color: color,
                scale: scale,
                shortRange: true,
                dimension: dimension
            });
    return mp.blips.new(sprite, pos,
        {
            name: name,
            color: color,
            scale: scale,
            shortRange: true,
            dimension: dimension
        });
};
-
#6
JavaScript:
methods.loadAllBlips = function () {

    methods.createBlip(new mp.Vector3(536.4715576171875, -3126.484375, 5.073556900024414), 598, 0, 0.8, 'Army');
    methods.createBlip(new mp.Vector3(450.0621337890625, -984.3471069335938, 43.69164276123047), 60, 0, 0.8);
JavaScript:
methods.createBlip = function (pos, sprite, color, scale, name, dimension) {
    if (scale == undefined)
        scale = 0.8;
    if (dimension == undefined)
        dimension = -1;
    if (name == undefined)
        return mp.blips.new(sprite, pos,
            {
                color: color,
                scale: scale,
                shortRange: true,
                dimension: dimension
            });
    return mp.blips.new(sprite, pos,
        {
            name: name,
            color: color,
            scale: scale,
            shortRange: true,
            dimension: dimension
        });
};
Это блипы (метки на карте) они не отображаются у тебя?
-
#7
Это блипы (метки на карте) они не отображаются у тебя?
извиняюсь, мозг слегка отказал и не то скниул.
вот как я понимаю создание самих пикапов.
JavaScript:
pickups.createAll = function() {
    methods.debug('pickups.createPickups');

    methods.createCpVector(pickups.EmsGarderobPos1, 'Нажмите ~g~E~s~ чтобы открыть меню', 1, -1, pickups.Blue);
    methods.createCpVector(pickups.EmsGarderobPos2, 'Нажмите ~g~E~s~ чтобы открыть меню', 1, -1, pickups.Blue);
    methods.createCpVector(pickups.EmsGarderobPos3, 'Нажмите ~g~E~s~ чтобы открыть меню', 1, -1, pickups.Blue);
    methods.createCpVector(pickups.EmsGarderobPos4, 'Нажмите ~g~E~s~ чтобы открыть меню', 1, -1, pickups.Blue);
    methods.createCpVector(pickups.EmsGarderobPos5, 'Нажмите ~g~E~s~ чтобы открыть меню', 1, -1, pickups.Blue);
JavaScript:
pickups.EmsGarderobPos1 = new mp.Vector3(299.0457458496094, -598.6067504882812, 42.28403091430664);
pickups.EmsGarderobPos2 = new mp.Vector3(-244.68588256835938, 6318.1396484375, 31.44457244873047);
pickups.EmsGarderobPos3 = new mp.Vector3(1206.7554931640625, -1465.3013916015625, 33.85951614379883);
pickups.EmsGarderobPos4 = new mp.Vector3(1838.8011474609375, 3689.89111328125, 33.27003479003906);
pickups.EmsGarderobPos5 = new mp.Vector3(-372.43133544921875, 6106.17626953125, 30.449552536010742);
-
#8
извиняюсь, мозг слегка отказал и не то скниул.
вот как я понимаю создание самих пикапов.
JavaScript:
pickups.createAll = function() {
    methods.debug('pickups.createPickups');

    methods.createCpVector(pickups.EmsGarderobPos1, 'Нажмите ~g~E~s~ чтобы открыть меню', 1, -1, pickups.Blue);
    methods.createCpVector(pickups.EmsGarderobPos2, 'Нажмите ~g~E~s~ чтобы открыть меню', 1, -1, pickups.Blue);
    methods.createCpVector(pickups.EmsGarderobPos3, 'Нажмите ~g~E~s~ чтобы открыть меню', 1, -1, pickups.Blue);
    methods.createCpVector(pickups.EmsGarderobPos4, 'Нажмите ~g~E~s~ чтобы открыть меню', 1, -1, pickups.Blue);
    methods.createCpVector(pickups.EmsGarderobPos5, 'Нажмите ~g~E~s~ чтобы открыть меню', 1, -1, pickups.Blue);
JavaScript:
pickups.EmsGarderobPos1 = new mp.Vector3(299.0457458496094, -598.6067504882812, 42.28403091430664);
pickups.EmsGarderobPos2 = new mp.Vector3(-244.68588256835938, 6318.1396484375, 31.44457244873047);
pickups.EmsGarderobPos3 = new mp.Vector3(1206.7554931640625, -1465.3013916015625, 33.85951614379883);
pickups.EmsGarderobPos4 = new mp.Vector3(1838.8011474609375, 3689.89111328125, 33.27003479003906);
pickups.EmsGarderobPos5 = new mp.Vector3(-372.43133544921875, 6106.17626953125, 30.449552536010742);
Что именно не работает?
-
#9
сами метки не появляются (на земле нету этих пикапов)
Последнее редактирование: 15 Авг 2021
-
#10
притом если встать на координаты метки, она высветит сообщение и откроется меню, но на земле она не отображается.

-
#11
createCpVector эту функцию покажи
-
#12
createCpVector эту функцию покажи
JavaScript:
methods.createCpVector = function (pos, message, scale, dimension, color, height) {
    return methods.createCp(pos.x, pos.y, pos.z, message, scale, dimension, color, height);
};

methods.createCp = function (x, y, z, message, scale = 1, dimension = -1, color = [33, 150, 243, 100], height = undefined) {

    if (height == undefined)
        height = scale / 2;

    let checkpointID = checkPointStaticList.length;
    checkPointStaticList.push({id: checkpointID, x: parseFloat(x), y: parseFloat(y), z: parseFloat(z), color: color, scale: scale, height: height});
    if (message)
        Container.Data.Set(999999, 'checkpointStaticLabel' + checkpointID, message);
    return checkpointID;
};
-
#13
JavaScript:
methods.createCpVector = function (pos, message, scale, dimension, color, height) {
    return methods.createCp(pos.x, pos.y, pos.z, message, scale, dimension, color, height);
};

methods.createCp = function (x, y, z, message, scale = 1, dimension = -1, color = [33, 150, 243, 100], height = undefined) {

    if (height == undefined)
        height = scale / 2;

    let checkpointID = checkPointStaticList.length;
    checkPointStaticList.push({id: checkpointID, x: parseFloat(x), y: parseFloat(y), z: parseFloat(z), color: color, scale: scale, height: height});
    if (message)
        Container.Data.Set(999999, 'checkpointStaticLabel' + checkpointID, message);
    return checkpointID;
};
«checkPointStaticList» где происходит само создание маркеров?
-
#14
Возможно ли перейти на сборке State99?
-
#15
Возможно ли перейти на сборке State99?
конечно, почему нет.
-
#17
в каком смысле?) перевести сборку за тебя?
-
#18
в каком смысле?) перевести сборку за тебя?
Покажите, я просто не могу разобраться!
-
#19
Покажите, я просто не могу разобраться!
с чем именно?
-
#20
«checkPointStaticList» где происходит само создание маркеров?
Код:
methods.getCheckPointStaticList = function () {
    return checkPointStaticList;
};

methods.updateCheckpointList = function (player) {
    if(!mp.players.exists(player))
        return;
    try {
        for (let i = 0; i < methods.parseInt(methods.getCheckPointStaticList().length / 500) + 1; i++)
            player.call('client:updateCheckpointList', [methods.getCheckPointStaticList().slice(i * 500, i * 500 + 499)]);
    }
    catch (e) {
        methods.debug(e);
    }
};What is Bridge.dll? What Does It Do?
The Bridge.dll library is 0.63 MB. The download links for this library are clean and no user has given any negative feedback. From the time it was offered for download, it has been downloaded 2610 times and it has received 4.0 out of 5 stars.
Table of Contents
- What is Bridge.dll? What Does It Do?
- Operating Systems Compatible with the Bridge.dll Library
- Guide to Download Bridge.dll
- Methods to Fix the Bridge.dll Errors
- Method 1: Installing the Bridge.dll Library to the Windows System Directory
- Method 2: Copying The Bridge.dll Library Into The Program Installation Directory
- Method 3: Doing a Clean Reinstall of the Program That Is Giving the Bridge.dll Error
- Method 4: Fixing the Bridge.dll Error using the Windows System File Checker (sfc /scannow)
- Method 5: Getting Rid of Bridge.dll Errors by Updating the Windows Operating System
- Guides to Manually Update the Windows Operating System
- The Most Seen Bridge.dll Errors
- Other Dynamic Link Libraries Used with Bridge.dll
Operating Systems Compatible with the Bridge.dll Library
- Windows 10
- Windows 8.1
- Windows 8
- Windows 7
- Windows Vista
- Windows XP
Guide to Download Bridge.dll
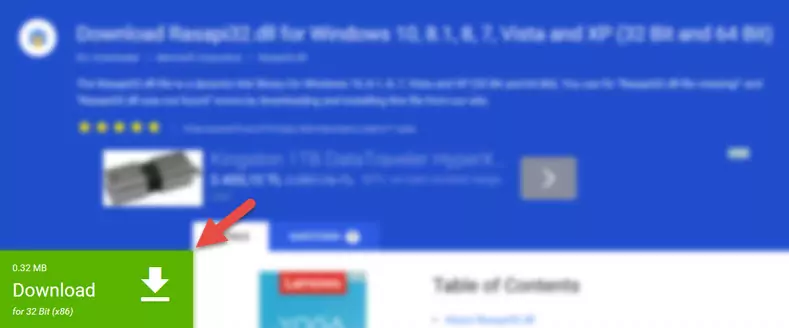
- First, click the «Download» button with the green background (The button marked in the picture).

Step 1:Download the Bridge.dll library - When you click the «Download» button, the «Downloading» window will open. Don’t close this window until the download process begins. The download process will begin in a few seconds based on your Internet speed and computer.
Methods to Fix the Bridge.dll Errors
ATTENTION! In order to install the Bridge.dll library, you must first download it. If you haven’t downloaded it, before continuing on with the installation, download the library. If you don’t know how to download it, all you need to do is look at the dll download guide found on the top line.
Method 1: Installing the Bridge.dll Library to the Windows System Directory
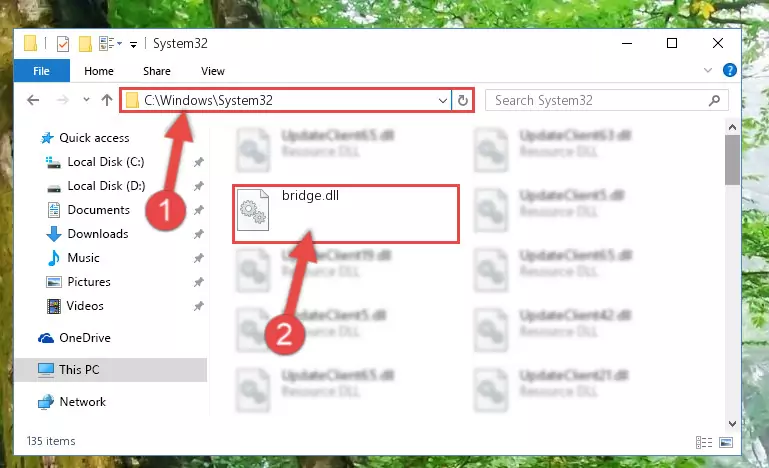
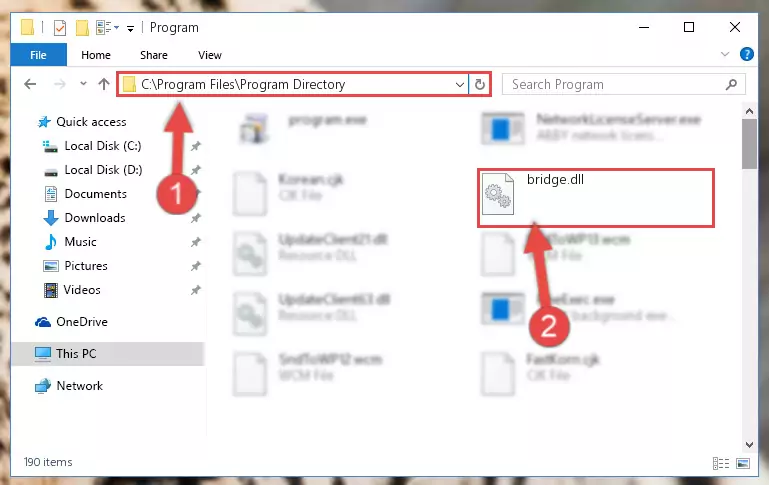
- The file you downloaded is a compressed file with the «.zip» extension. In order to install it, first, double-click the «.zip» file and open the file. You will see the library named «Bridge.dll» in the window that opens up. This is the library you need to install. Drag this library to the desktop with your mouse’s left button.
- Copy the «Bridge.dll» library you extracted and paste it into the «C:WindowsSystem32» directory.
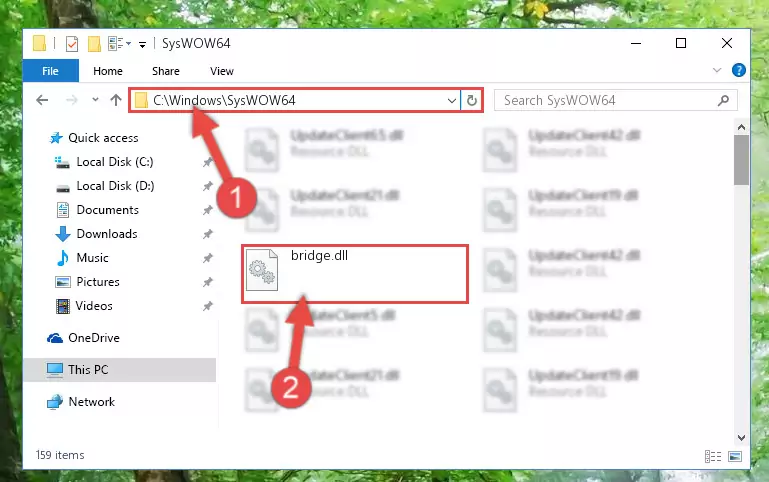
Step 2:Copying the Bridge.dll library into the Windows/System32 directory - If you are using a 64 Bit operating system, copy the «Bridge.dll» library and paste it into the «C:WindowssysWOW64» as well.
NOTE! On Windows operating systems with 64 Bit architecture, the dynamic link library must be in both the «sysWOW64» directory as well as the «System32» directory. In other words, you must copy the «Bridge.dll» library into both directories.
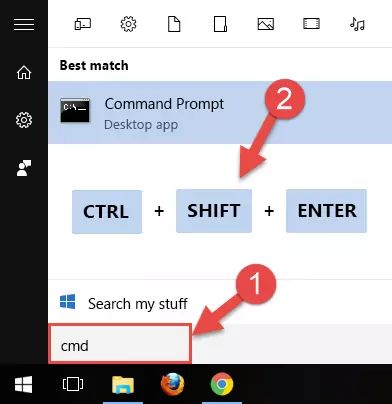
Step 3:Pasting the Bridge.dll library into the Windows/sysWOW64 directory - In order to run the Command Line as an administrator, complete the following steps.
NOTE! In this explanation, we ran the Command Line on Windows 10. If you are using one of the Windows 8.1, Windows 8, Windows 7, Windows Vista or Windows XP operating systems, you can use the same methods to run the Command Line as an administrator. Even though the pictures are taken from Windows 10, the processes are similar.
- First, open the Start Menu and before clicking anywhere, type «cmd» but do not press Enter.
- When you see the «Command Line» option among the search results, hit the «CTRL» + «SHIFT» + «ENTER» keys on your keyboard.
- A window will pop up asking, «Do you want to run this process?«. Confirm it by clicking to «Yes» button.
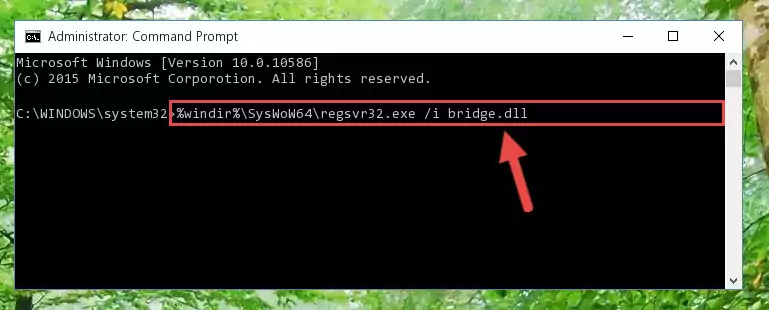
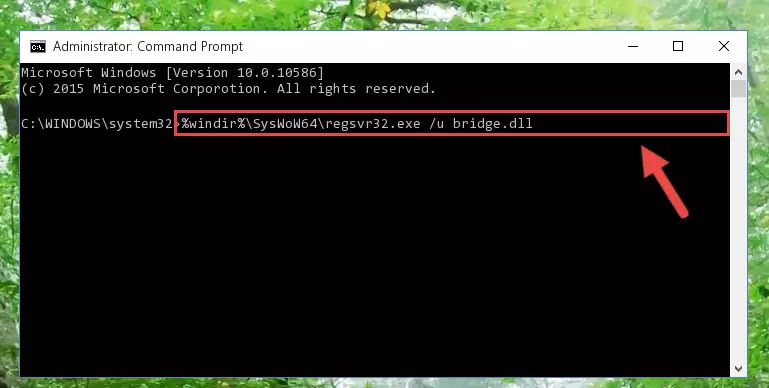
Step 4:Running the Command Line as an administrator - Paste the command below into the Command Line that will open up and hit Enter. This command will delete the damaged registry of the Bridge.dll library (It will not delete the file we pasted into the System32 directory; it will delete the registry in Regedit. The file we pasted into the System32 directory will not be damaged).
%windir%System32regsvr32.exe /u Bridge.dll
Step 5:Deleting the damaged registry of the Bridge.dll - If you are using a 64 Bit operating system, after doing the commands above, you also need to run the command below. With this command, we will also delete the Bridge.dll library’s damaged registry for 64 Bit (The deleting process will be only for the registries in Regedit. In other words, the dll file you pasted into the SysWoW64 folder will not be damaged at all).
%windir%SysWoW64regsvr32.exe /u Bridge.dll
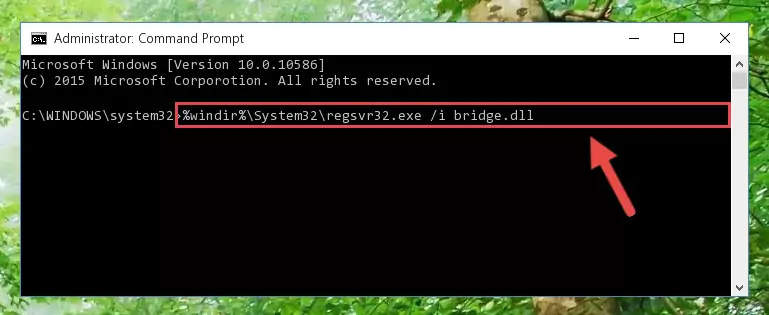
Step 6:Uninstalling the damaged Bridge.dll library’s registry from the system (for 64 Bit) - You must create a new registry for the dynamic link library that you deleted from the registry editor. In order to do this, copy the command below and paste it into the Command Line and hit Enter.
%windir%System32regsvr32.exe /i Bridge.dll
Step 7:Creating a new registry for the Bridge.dll library - If you are using a Windows with 64 Bit architecture, after running the previous command, you need to run the command below. By running this command, we will have created a clean registry for the Bridge.dll library (We deleted the damaged registry with the previous command).
%windir%SysWoW64regsvr32.exe /i Bridge.dll
Step 8:Creating a clean registry for the Bridge.dll library (for 64 Bit) - If you did the processes in full, the installation should have finished successfully. If you received an error from the command line, you don’t need to be anxious. Even if the Bridge.dll library was installed successfully, you can still receive error messages like these due to some incompatibilities. In order to test whether your dll issue was fixed or not, try running the program giving the error message again. If the error is continuing, try the 2nd Method to fix this issue.
Method 4: Fixing the Bridge.dll Error using the Windows System File Checker (sfc /scannow)
- In order to run the Command Line as an administrator, complete the following steps.
NOTE! In this explanation, we ran the Command Line on Windows 10. If you are using one of the Windows 8.1, Windows 8, Windows 7, Windows Vista or Windows XP operating systems, you can use the same methods to run the Command Line as an administrator. Even though the pictures are taken from Windows 10, the processes are similar.
- First, open the Start Menu and before clicking anywhere, type «cmd» but do not press Enter.
- When you see the «Command Line» option among the search results, hit the «CTRL» + «SHIFT» + «ENTER» keys on your keyboard.
- A window will pop up asking, «Do you want to run this process?«. Confirm it by clicking to «Yes» button.
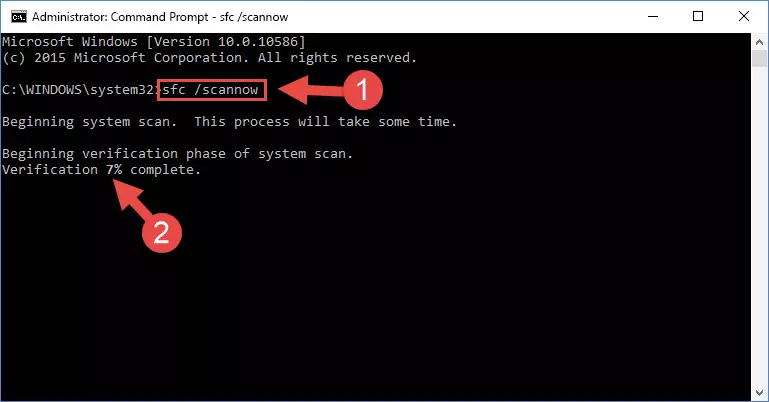
Step 1:Running the Command Line as an administrator - Paste the command below into the Command Line that opens up and hit the Enter key.
sfc /scannow
Step 2:Scanning and fixing system errors with the sfc /scannow command - This process can take some time. You can follow its progress from the screen. Wait for it to finish and after it is finished try to run the program that was giving the dll error again.
Method 5: Getting Rid of Bridge.dll Errors by Updating the Windows Operating System
Some programs require updated dynamic link libraries from the operating system. If your operating system is not updated, this requirement is not met and you will receive dll errors. Because of this, updating your operating system may solve the dll errors you are experiencing.
Most of the time, operating systems are automatically updated. However, in some situations, the automatic updates may not work. For situations like this, you may need to check for updates manually.
For every Windows version, the process of manually checking for updates is different. Because of this, we prepared a special guide for each Windows version. You can get our guides to manually check for updates based on the Windows version you use through the links below.
Guides to Manually Update the Windows Operating System
- Guide to Manually Update Windows 10
- Guide to Manually Update Windows 8.1 and Windows 8
- Guide to Manually Update Windows 7 and Windows Vista
- Guide to Manually Update Windows XP
The Most Seen Bridge.dll Errors
If the Bridge.dll library is missing or the program using this library has not been installed correctly, you can get errors related to the Bridge.dll library. Dynamic link libraries being missing can sometimes cause basic Windows programs to also give errors. You can even receive an error when Windows is loading. You can find the error messages that are caused by the Bridge.dll library.
If you don’t know how to install the Bridge.dll library you will download from our site, you can browse the methods above. Above we explained all the processes you can do to fix the dll error you are receiving. If the error is continuing after you have completed all these methods, please use the comment form at the bottom of the page to contact us. Our editor will respond to your comment shortly.
- «Bridge.dll not found.» error
- «The file Bridge.dll is missing.» error
- «Bridge.dll access violation.» error
- «Cannot register Bridge.dll.» error
- «Cannot find Bridge.dll.» error
- «This application failed to start because Bridge.dll was not found. Re-installing the application may fix this problem.» error
Other Dynamic Link Libraries Used with Bridge.dll
- Npdjvu.dll
- Npdrmv2.dll
- Npdocbox.dll
- Npdsplay.dll
- Npcdt.dll
Чаще всего проблемы bridgeplugin.dll типа DLL, возникают в результате повреждения или отсутствия файла, связанного с Intel.BridgePlugin. Для устранения неполадок, связанных с файлом DLL, большинство профессионалов ПК заменят файл на соответствующую версию. Запуск сканирования реестра после замены файла, из-за которого возникает проблема, позволит очистить все недействительные файлы bridgeplugin.dll, расширения файлов или другие ссылки на файлы, которые могли быть повреждены в результате заражения вредоносным ПО.
Системные файлы с расширением файла DLL, также известны в качестве формата Dynamic Link Library. Bridgeplugin.dll для %%os%% и почти для всех версий операционной системы Windows можно скачать ниже. Если у нас нет необходимой копии версии bridgeplugin.dll, вы можете просто нажать кнопку Request (Запрос), чтобы её запросить. В редких случаях, если вы не можете найти версию необходимого вам файла ниже, мы рекомендуем вам обратиться за дополнительной помощью к Intel Corporation.
Как правило, при размещении файла bridgeplugin.dll в надлежащем каталоге, проблемы, связанные с данным файлом, больше не возникают, однако следует выполнить проверку, чтобы убедиться в том, что проблему удалось устранить. Затем вы можете повторно открыть Intel.BridgePlugin, чтобы проверить выводится ли сообщение об ошибке.
| Bridgeplugin.dll Описание файла | |
|---|---|
| Расширение файла: | DLL |
| Тип приложения: | Intel BridgePlugin |
| Новейшие программы: | Intel.BridgePlugin |
| Вер: | 1.0.0.11 |
| Программист: | Intel Corporation |
| File: | bridgeplugin.dll |
| Размер (в байтах): | 241664 |
| SHA-1: | 8299e3b2820e34e76d0223f8152796d42106e1b9 |
| MD5: | 003d4cd39b871b15cb28184cad44ae74 |
| CRC32: |
Продукт Solvusoft
Загрузка
WinThruster 2023 — Сканировать ваш компьютер на наличие ошибок реестра в bridgeplugin.dll
Windows
11/10/8/7/Vista/XP
Установить необязательные продукты — WinThruster (Solvusoft) | Лицензия | Политика защиты личных сведений | Условия | Удаление
DLL
bridgeplugin.dll
Идентификатор статьи: 1017273
Bridgeplugin.dll
| Имя файла | Контрольная сумма MD5 | Размер (в байтах) | Загрузить | |||||||||||||||||
|---|---|---|---|---|---|---|---|---|---|---|---|---|---|---|---|---|---|---|---|---|
| + bridgeplugin.dll | 003d4cd39b871b15cb28184cad44ae74 | 236.00 KB | ||||||||||||||||||
|
Типичные ошибки Bridgeplugin.dll
Обнаруженные проблемы bridgeplugin.dll с Intel.BridgePlugin включают:
- «Bridgeplugin.dll не найден.»
- «Отсутствует файл Bridgeplugin.dll.»
- «Bridgeplugin.dll нарушение прав доступа.»
- «Не удается зарегистрировать bridgeplugin.dll. «
- «Файл %USERPROFILE%Localassemblydl3VWMO359O.DCYP971MNXC.6GPc23ebae00168a72_14cacb01bridgeplugin.dll не найден.»
- «Не могу запустить Intel.BridgePlugin. Отсутствует компонент bridgeplugin.dll. Переустановите Intel.BridgePlugin. «
- «Не удалось выполнить приложение, так как bridgeplugin.dll не найден. Повторная установка Intel.BridgePlugin может решить проблему. «
Проблемы bridgeplugin.dll, связанные с Intel.BridgePlugins, возникают во время установки, при запуске или завершении работы программного обеспечения, связанного с bridgeplugin.dll, или во время процесса установки Windows. Документирование случаев проблем bridgeplugin.dll в Intel.BridgePlugin является ключевым для определения причины проблем с электронной Intel BridgePlugin и сообщения о них Intel Corporation.
Создатели Bridgeplugin.dll Трудности
Отсутствующие или поврежденные файлы bridgeplugin.dll являются распространенными источниками ошибок bridgeplugin.dll. Поскольку bridgeplugin.dll является внешним файлом, он предоставляет прекрасную возможность для чего-то нежелательного.
Повреждение bridgeplugin.dll происходит во время неожиданного завершения работы, вирусов или других проблем, связанных с Intel.BridgePlugins. После повреждения bridgeplugin.dll не может загрузиться, вызывая проблемы Intel.BridgePlugin при запуске.
Другая возможность проблем Intel.BridgePlugin и bridgeplugin.dll связана с нарушением реестра. Эти разбитые ссылки на пути bridgeplugin.dll вызывают ошибки с Intel.BridgePlugin из-за неправильной регистрации bridgeplugin.dll. Неверная установка/удаление Intel.BridgePlugin, bridgeplugin.dll, который перемещен, или отсутствующий bridgeplugin.dll может создать эти неработающие ссылки на путь к файлам.
В основном, осложнения bridgeplugin.dll из-за:
- Поврежденная или недопустимая запись реестра bridgeplugin.dll.
- Зазаражение вирусом повреждает файл bridgeplugin.dll.
- Аппаратный сбой, связанный с Intel Corporation, например видеокарта, повреждает bridgeplugin.dll.
- Версия файла bridgeplugin.dll перезаписана установкой другого программного обеспечения.
- bridgeplugin.dll злонамеренно или ошибочно удален другой программой (кроме Intel.BridgePlugin).
- bridgeplugin.dll злонамеренно (или ошибочно) удален другой мошенникой или действительной программой.