Up until now, we’ve been working with our local authentication and authorization functionalities. Everything works great with our setup and we provide different security functionalities for our users (login, logout, email verification, lockout, etc.). But, what if our users want to use their social profiles to log in with our application? Well, in this article, we are going to learn how to sign in with a Google account using our existing Angular and Web API applications.
For complete navigation through the entire series, you can visit the Angular with ASP.NET Core Identity page.
There’s a lot to cover so, let’s move on.
Creating Google Credentials on the Google API Platform
The first thing we have to do is to register our application on the Google API Platform. With this registration, we will acquire a clientId that we are going to use for the token validation process.
Basically, once you create your credentials, your page should look something like this:
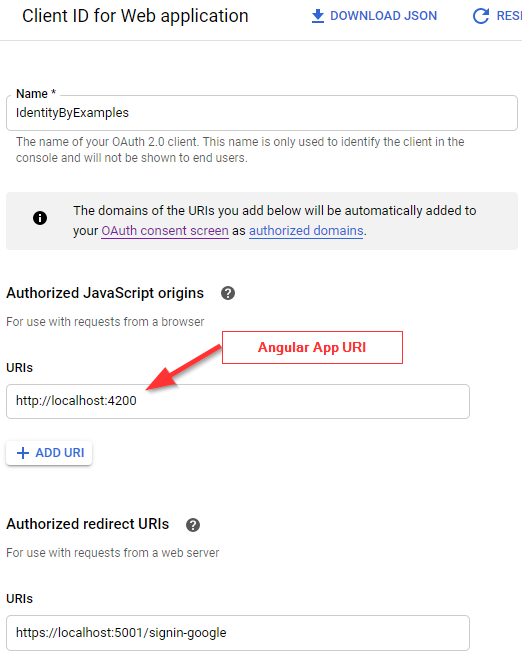
If you don’t know how to obtain the clientId for your application, we strongly suggest reading our External Identity Provider with ASP.NET Core Identity article. In the first section, you can find everything explained about this credentials creation process in great detail.
Once you have the required credentials, we can move on.
Angularx-Social-Login Library to Help Us Sign in with Google
To sign in with Google, we are going to use the angularx-social-login library, which is going to help us a lot in the process.
Let’s start with the installation part:
npm i @abacritt/angularx-social-login
After the installation, we have to modify the app.module.ts file:
import { SocialLoginModule, SocialAuthServiceConfig } from '@abacritt/angularx-social-login';
import { GoogleLoginProvider } from '@abacritt/angularx-social-login';
We have to import the SocialLoginModule class, the SocialAuthServiceConfig interface, and the GoogleLoginProvider class.
After that, we have to add the SocialLoginModule in the imports array:
imports: [
    BrowserModule,
    HttpClientModule,
    BrowserAnimationsModule,
    SocialLoginModule,
And modify the providers array in the same file:
Wanna join Code Maze Team, help us produce more awesome .NET/C# content and get paid? >> JOIN US! <<
providers: [
    {
      provide: HTTP_INTERCEPTORS,
      useClass: ErrorHandlerService,
      multi: true
    },
    {
      provide: 'SocialAuthServiceConfig',
      useValue: {
        autoLogin: false,
        providers: [
          {
            id: GoogleLoginProvider.PROVIDER_ID,
            provider: new GoogleLoginProvider(
              'your client id', {
                scope: 'email',
                plugin_name: 'the name of the Google OAuth project you created'
              }
            )
          },
        ],
        onError: (err) => {
          console.error(err);
        }
      } as SocialAuthServiceConfig
    }
  ],
It is important to notice that when we create a new GoogleLoginProvider instance, we pass our clientId (created on the Google API Platform) as a parameter. Of course, it is always a better practice to store it in some file, but this will work for the learning process. Of course, you will have a different clientId value.
Now, let’s modify the authentication.service.ts file by importing the required classes:
import { SocialAuthService, SocialUser } from "@abacritt/angularx-social-login";
import { GoogleLoginProvider } from "@abacritt/angularx-social-login";
Then, as we have created a Subject for regular authentication, we are going to do the same for the external one to emit our user to all the subscribers:
private authChangeSub = new Subject<boolean>();
private extAuthChangeSub = new Subject<SocialUser>();
public authChanged = this.authChangeSub.asObservable();
public extAuthChanged = this.extAuthChangeSub.asObservable();
Then, let’s inject the SocialAuthService class in the constructor:
constructor(private http: HttpClient, private envUrl: EnvironmentUrlService,
  private jwtHelper: JwtHelperService, private externalAuthService: SocialAuthService) {
    this.externalAuthService.authState.subscribe((user) => {
      console.log(user)
      this.extAuthChangeSub.next(user);
    })
  }
We also use the authState property from the externalAuthService service, to subscribe to the authentication response and emit the user’s data.
And create two functions to help us in the process:
public signInWithGoogle = ()=> {
  this.externalAuthService.signIn(GoogleLoginProvider.PROVIDER_ID);
}

public signOutExternal = () => {
  this.externalAuthService.signOut();
}
In the sigInWithGoogle function, we call the signIn function from the SocialAuthService class and pass a provider_id as a parameter. The signIn function is going to fetch the User’s data from the Google provider and return it back to our Angular application. Also, it emits an event to all the subscribers passing that user object and returns the Promise with the populated user object. We will use it later on in our app. The signOut function just removes the user and emits an event to all the subscribers passing null for the user’s value.
That’s it. Our library is prepared and ready to use.
Wanna join Code Maze Team, help us produce more awesome .NET/C# content and get paid? >> JOIN US! <<
Executing Google Sign-in Action
Our library is prepared but we still need to trigger the sign-in action.
The first thing we are going to do is to modify the login.component.html file by adding a new button on the form:
<div class="card">
    <div class="card-body">
        <h1 class="card-title">Login</h1>
        ...
        <form [formGroup]="loginForm" autocomplete="off" novalidate (ngSubmit)="loginUser(loginForm.value)">
            ...
        </form>
        <hr>
        <div>
            <h2>External Providers</h2>
            <div style="padding: 20px;">
                <button class="btn btn-info" type="button" (click)="externalLogin()">Google</button>
            </div>
        </div>
    </div>
</div>
Logically, we have to add the externalLogin function in our .ts file:
externalLogin = () => {
  this.showError = false;
  this.authService.signInWithGoogle();
}
Here, we hide the error message from the page and then call the signInWithGoogle function, which calls the signIn function from an external service.
Now, let’s test it.
Let’s start our Angular application and navigate to the Login page:
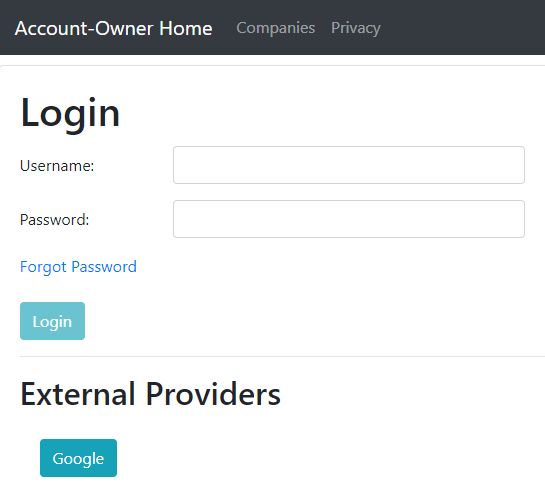
As soon as we click the Google button, we are going to see the popup window:
Wanna join Code Maze Team, help us produce more awesome .NET/C# content and get paid? >> JOIN US! <<
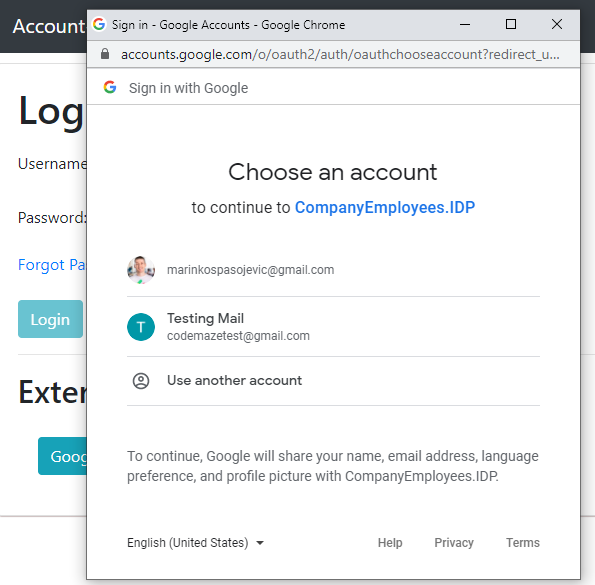
If we close the window, we are going to see the error message in the console:
Object
error: "popup_closed_by_user"
[[Prototype]]: Object
But if we select our account, we are going to see the user object returned from Google’s account:
{id: "108223206370324493495", name: "Testing Mail", email: "[email protected]", photoUrl: …}
authToken: "ya29.a0AfH6SMB_pXBrYm1wdIB3v-uAGohuXWDKfmsszvsFxuH4hn-gW7E5tf1IW4v32rgJbY6cEDsYgxcsWoVAfSs2ono..."
email: "[email protected]"
firstName: "Testing"
id: "108223206370324493495"
idToken: "eyJhbGciOiJSUzI1NiIsImtpZCI6ImJjNDk1MzBlMWZmOTA4M2RkNWV..."
lastName: "Mail"
name: "Testing Mail"
photoUrl: "https://lh6.googleusercontent.com/-URt2WpWJqRw/AAAAAAAAAAI/AAAAAAAAAAA/AMZuucmGZsYnDp0Ow4ubf2H-lN8kScXsYA/s96-c/photo.jpg"
provider: "GOOGLE"
response: Ew {NT: "108223206370324493495", Ad: "Testing Mail", tV: "Testing", uT: "Mail", TJ: "https://lh6.googleusercontent., …}
__proto__: Object
As we can see, we have different information regarding our Google account. The important part for the Web API’s side is that we have the provider property and the idToken property. These are the properties we are going to send to our server-side application.
Sending Data to the Server
As we know, from our previous posts, our authentication works around the JWT generated by our Web API application. So, in order to continue with the same practice, we have to send some parameters to the server-side app for validation.
That said, let’s start with a new interface:
export interface ExternalAuthDto {
    provider: string;
    idToken: string;
}
Then, we have to modify the externalLogin function:
externalLogin = () => {
  this.showError = false;
  this.authService.signInWithGoogle();

  this.authService.extAuthChanged.subscribe( user => {
    const externalAuth: ExternalAuthDto = {
      provider: user.provider,
      idToken: user.idToken
    }

    this.validateExternalAuth(externalAuth);
  })
}
We call the signInWithGoogle function to start the sign-in process. Then, as soon as we get the data from our Subject, we extract the provider and idToken properties to a new externalAuth object and use it in the validateExternalAuth function:
private validateExternalAuth(externalAuth: ExternalAuthDto) {
  this.authService.externalLogin('api/accounts/externallogin', externalAuth)
    .subscribe({
      next: (res) => {
          localStorage.setItem("token", res.token);
          this.authService.sendAuthStateChangeNotification(res.isAuthSuccessful);
          this.router.navigate([this.returnUrl]);
    },
      error: (err: HttpErrorResponse) => {
        this.errorMessage = err.message;
        this.showError = true;
        this.authService.signOutExternal();
      }
    });
}
So, we send an HTTP request to the API’s endpoint where we are going to generate a new JWT (amongst all the other logic – but we’ll come to that). Also, we store that token in storage and navigate to the Home page. If an error happens, we show it on the page and sing out the user from the external provider.
Of course, for this to work, we have to add the externalLogin function in the authentication.service.ts file:
public externalLogin = (route: string, body: ExternalAuthDto) => {
  return this.http.post<AuthResponseDto>(this.createCompleteRoute(route, this.envUrl.urlAddress), body);
}
With all this in place, we are ready to learn how to sign in with Google using our Web API application.
In our Angular application, we use the externalLogin function to fetch the user’s data from the Google provider and extract provider and idtoken in a new object, which we send to the server for validation. Just to make things clear, we are going to validate only idtoken. The provider is here for other purposes.
That said, let’s create our DTO in the Entities folder:
public class ExternalAuthDto
{
    public string? Provider { get; set; }
    public string? IdToken { get; set; }
}
Then, for validation purposes, we need to install the Google.Apis.Auth library:

Now, let’s open the appsettins.json file and add the GoogleAuthSettings property:
Wanna join Code Maze Team, help us produce more awesome .NET/C# content and get paid? >> JOIN US! <<
"GoogleAuthSettings": {
  "clientId": "client id from the Google OAuth Project"
},
Here, we just store the clientId of our application.
Then, let’s open the JwtHandler class and modify the constructor:
private readonly IConfiguration _configuration;
private readonly IConfigurationSection _jwtSettings;
private readonly IConfigurationSection _goolgeSettings;
private readonly UserManager<User> _userManager;
public JwtHandler(IConfiguration configuration, UserManager<User> userManager)
{
    _userManager = userManager;
    _configuration = configuration;
    _jwtSettings = _configuration.GetSection("JwtSettings");
    _goolgeSettings = _configuration.GetSection("GoogleAuthSettings");
}
After that, we can add a new method to validate idtoken:
public async Task<GoogleJsonWebSignature.Payload> VerifyGoogleToken(ExternalAuthDto externalAuth)
{
    try
    {
        var settings = new GoogleJsonWebSignature.ValidationSettings()
        {
            Audience = new List<string>() { _goolgeSettings.GetSection("clientId").Value }
        };

        var payload = await GoogleJsonWebSignature.ValidateAsync(externalAuth.IdToken, settings);
        return payload;
    }
    catch (Exception ex)
    {
        //log an exception
        return null;
    }
}
This method accepts the externalAuth parameter that we send from the client and returns the GoogleJsonWebSignature.Payload object that contains different users’ information. Before we start the validation, we have to create a ValidationSettings object and populate the Audience property with the clientId of our application. With this property, we ensure the token validation is for our application (because we assigned the clientId of our app). Finally, we call the ValidateAsync method and pass the token and the settings parameters. This method validates our token and if valid, returns the user’s data (Name, Family Name, Given Name, Email…).
Also, we wrap this method inside the try-catch block because the ValidateAsync method will throw an exception if idtoken is invalid.
Modifying Controller
After the validation part, we can add an action inside the AccountsController:
[HttpPost("ExternalLogin")]
public async Task<IActionResult> ExternalLogin([FromBody] ExternalAuthDto externalAuth)
{
    var payload =  await _jwtHandler.VerifyGoogleToken(externalAuth);
    if(payload == null)
        return BadRequest("Invalid External Authentication.");

    var info = new UserLoginInfo(externalAuth.Provider, payload.Subject, externalAuth.Provider);

    var user = await _userManager.FindByLoginAsync(info.LoginProvider, info.ProviderKey);
    if (user == null)
    {
        user = await _userManager.FindByEmailAsync(payload.Email);

        if (user == null)
        {
            user = new User { Email = payload.Email, UserName = payload.Email };
            await _userManager.CreateAsync(user);

            //prepare and send an email for the email confirmation

            await _userManager.AddToRoleAsync(user, "Viewer");
            await _userManager.AddLoginAsync(user, info);
        }
        else
        {
            await _userManager.AddLoginAsync(user, info);
        }
    }

    if (user == null)
        return BadRequest("Invalid External Authentication.");

    //check for the Locked out account

    var token = await _jwtHandler.GenerateToken(user);
    return Ok(new AuthResponseDto { Token = token, IsAuthSuccessful = true });
}
The first thing, we do here is validate idtoken and populate the payload variable. If it is null, it means that validation failed and we return a bad request. Next, we create a new UserLoginInfo variable to use for adding external login info (information about the external login provider) for the specific user.
Now comes the fun part.
Wanna join Code Maze Team, help us produce more awesome .NET/C# content and get paid? >> JOIN US! <<
In our database, we can have three different situations. The user that tries to log in doesn’t exist at all, the user exists but without external login information, and the user exists with the external login information. This is exactly what we check in the rest of the code.
So, by using the FindByLoginAsync method, we try to find a user by the external login information. If we find one, we navigate to the end of the method and just generate a new token. But if we can’t find that user, we try to find them by email from the payload object. If we still can’t find the user, we create a new user, connect them to the Viewer role (AddToRoleAsync), and assign the external provider information by calling the AddLoginAsync method. Also, you can add the email confirmation logic here. But, if we manage to find a user by email, this means the user exists but without the external login information, so, we create one.
Finally, if the user is still null, we call the BadRequest method. Otherwise, we create a token and send it back to the client. Of course, if you want, you can add the lockout logic here.
Testing Google Sign-in Functionality
Now, we can test this.
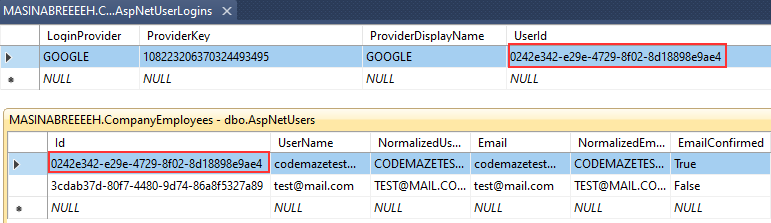
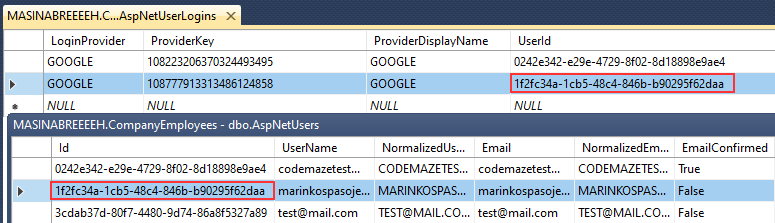
We have the codemazetest user in the database without external login info. If we login with that user:
We are going to see the Home page soon enough. This means our authentication was successful. Also, we can check the database and see the connected external info for this user:
Wanna join Code Maze Team, help us produce more awesome .NET/C# content and get paid? >> JOIN US! <<
Moreover, we can test this with a different account that doesn’t exist in the database (the other one from the picture), and we will find a new user in the database with the external info connected:
Awesome.
But we still have one thing to do.
Logout From External Provider
After successful login, we can click the logout button and we will be logged out for sure. But, if you inspect the logout logic, you can see that we only delete the JWT stored in local storage. This means we didn’t remove the user object from the external provider. In other words, we didn’t use the signOut function.
That said, let’s add one more property inside the authetication.service.ts file:
...
public isExternalAuth: boolean;

constructor(private http: HttpClient, private envUrl: EnvironmentUrlService,
  private jwtHelper: JwtHelperService, private externalAuthService: SocialAuthService) {
    this.externalAuthService.authState.subscribe((user) => {
      console.log(user);
      this.extAuthChangeSub.next(user);
      this.isExternalAuth = true;
    })
  }
We have a new isExternal property that we set to true once the external authentication is successfully completed.
Now, let’s open the menu.component.ts file and modify the logout function:
public logout = () => {
  this.authService.logout();

  if(this.authService.isExternalAuth)
    this.authService.signOutExternal();

  this.router.navigate(["/"]);
}
Lastly in the logout function, we check the isExternalAuth property and if it is true, we sign out the user from the application. We have to do this check, otherwise, the application will throw an error if a user is not authenticated via an external provider.
That’s it. We can now safely sign out from our application whether we use our external account or not.
Of course, we just have to set this isExternalAuth property to false, if we try to authenticate with our credentials. So, let’s do that inside the loginUser function:
loginUser = (loginFormValue) => {
    this.authService.isExternalAuth = false;
    this.showError = false;
    const login = { ...loginFormValue };

    ...
Conclusion
Excellent.
We did a great job here and covered a lot of functionalities on the Angular’s and the Web API’s side.
Feel free to check the entire flow to verify that everything is working as expected.
Until the next article,
All the best.
Wanna join Code Maze Team, help us produce more awesome .NET/C# content and get paid? >> JOIN US! <<

![]()
As a client developer, Creating apps with authentication might be a tedious process. As we need to handle authentication in the server and maintain the code. It does have some multiple cases to be maintained based on authentication mechanisms. (Basic, OAuth, etc) This blog helps you create a standalone backend less authentication for your react app. (or additionally) you can add server configurations too to authenticate with your server.
Why OAuth?
There are many reasons to use OAuth.
- It is secure.
- It doesn’t require any credentials from the user. So no need of remembering multiple passwords.
- Websites can also get essential information about users without spending much time in forms.
And specifically in our case, we don’t need a server to authenticate or to get initial details of the user. 😉
I found a package which is called as react-google-login. Which provides simple mechanisms to add the Google login. You can either directly use their GoogleLogin component or you can use custom buttons. They also provide custom hooks like useGoogleLogin and useGoogleLogout so it will be easy for hooks lovers. (Both methods are described below)
The documentation they provided for this repository is awesome. But it’s missing in some ways which are addressed in this blog. Like in detail, this blog helps in creating your application in the Google developer console and access clientId. The initial access_token obtained by this package will last for only one hour (For security reasons). And we need to iterate the process to access the new access_token using refresh_token. So you can make a production-ready application.
Steps
- We need to create an application in the Google developer console. It provides
clientIdis used to identify your application for authentication details. Follow the below steps to get the client ID.- Go to the Credentials page. ( if you are new, then create a project and follow these steps)
- Click Create credentials > OAuth client ID.
- Select the Web application type.
- Name your OAuth 2.0 client and click Create
- Make sure you provided your domain and redirect URL. So that Google identifies the origin domain to which it can provide authentication.

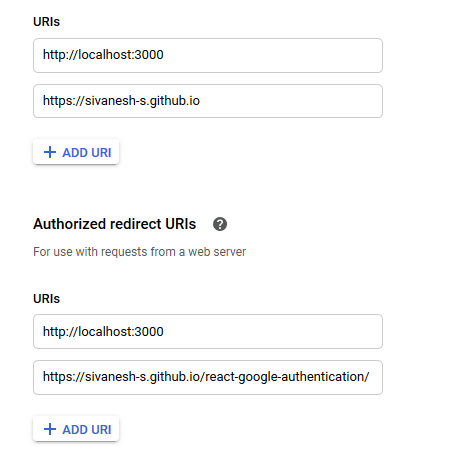
You can also add your local route for development. Now authentication setup in Google developer console is ready.
Lets code

Let’s start with code. View my repo for accessing all code snippets. View Demo.
In your CRA install react-google-login package
npm i react-google-login
Enter fullscreen mode
Exit fullscreen mode
Create a Login component that acts as a login button.

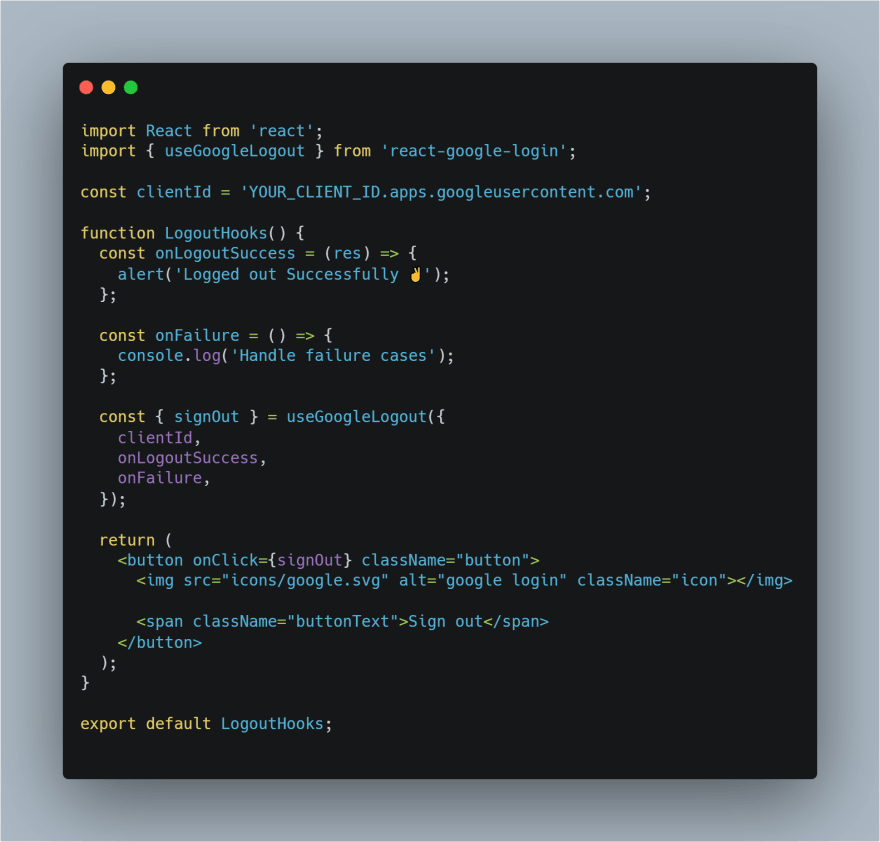
Similarly, create a Logout component

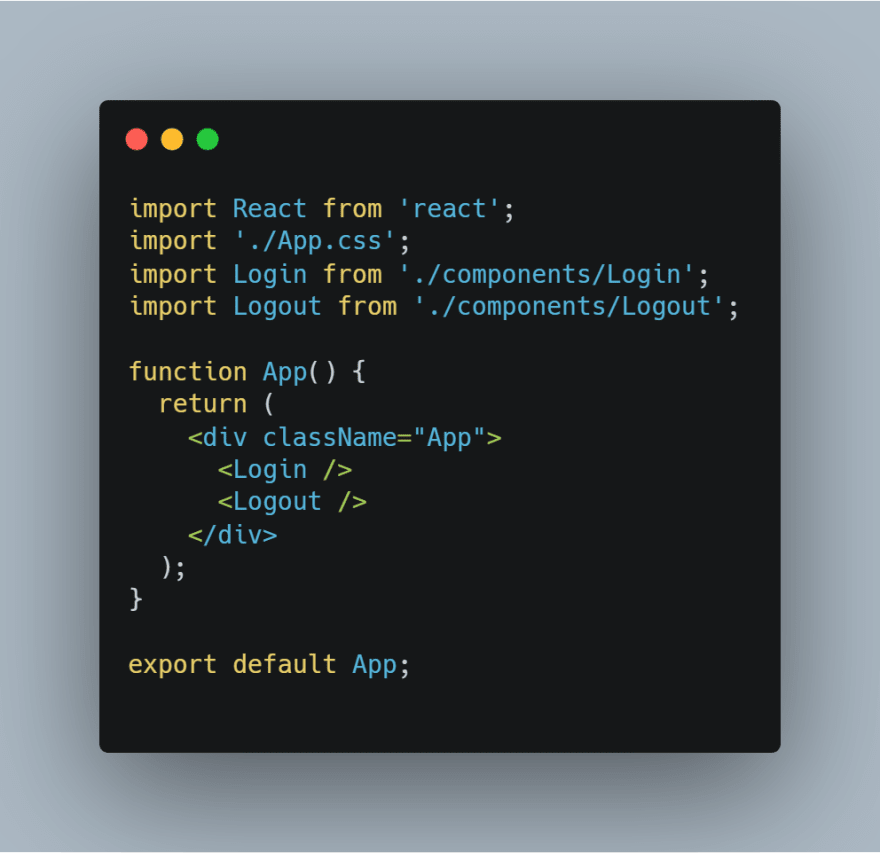
And add both in the required location of your app. Mine is in App.js
Now running your application will show profileObj in the console after logging in.
Congrats 🎉 You successfully made it 😃.
But after 1 hour your tokenId gets expired and hence it won’t be used to access data or authenticate users. And hence we need to generate new tokenId. To make things work we need to add some additional cases in the Login component.
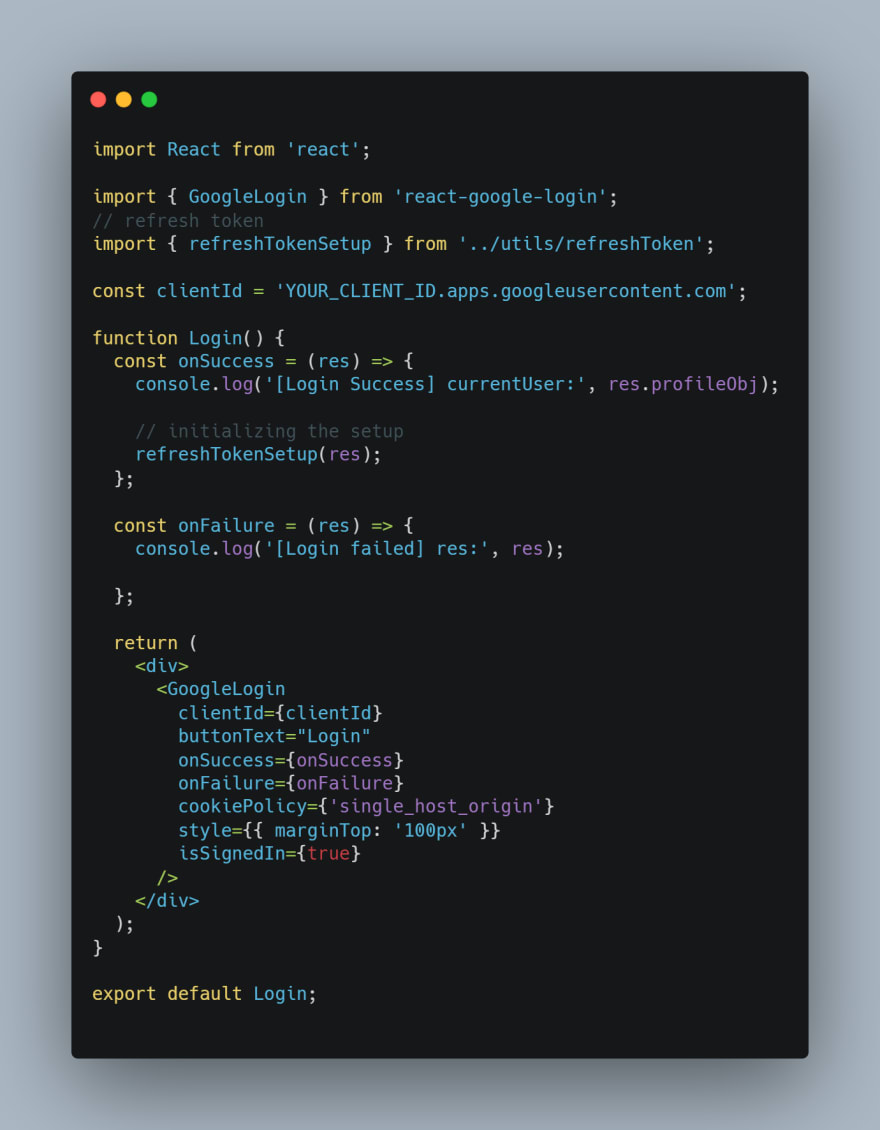
refreshTokenSetup function will take care of handling new tokenIds
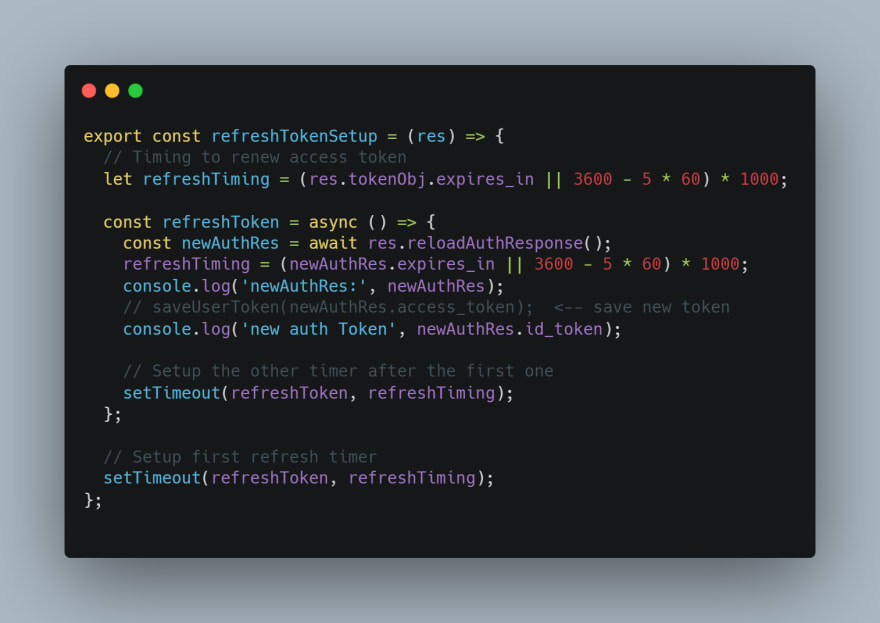
This function checks for expires_in timestamp or our custom time (before the token expires) and calls reloadAuthResponse which is a util function provided by the library and it handles refresh_token and obtains new tokenId.
And Yeah 😃 Google login is added to your application successfully 🎉. So now you can access the user’s name, photo URL, email, google Id, etc.
Additional
The above way uses the Google Login default button. You can also use your custom button using render prop.

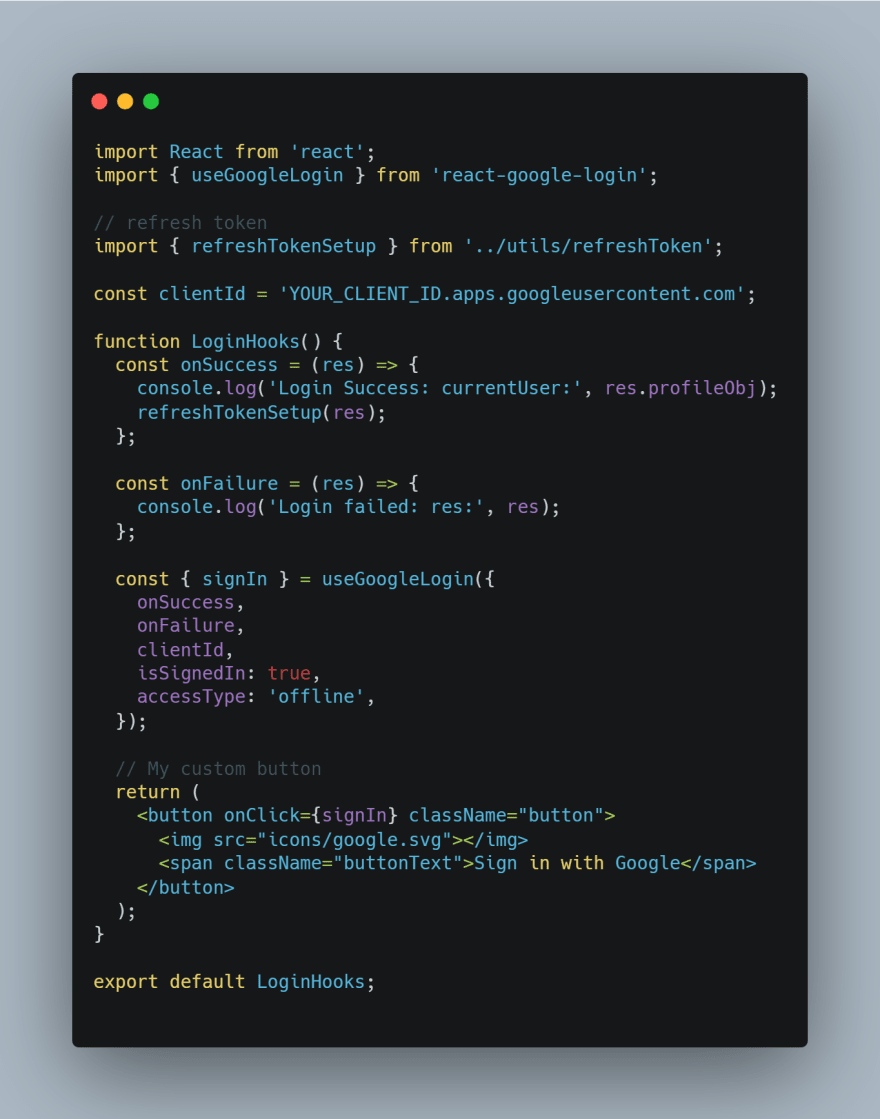
We can also implement the same functionality using React Hooks. ❤️
LoginHooks.js
LogoutHooks.js
Server-side verification
If you wish to add Server side verification, Send the tokenId from client to server once onSuccess in Login component called.
So while handling authenticated routes, All requests from the client need to send the tokenId of the user in the header as Bearer token. At Server, once token received it must be verified either this tokenId
- belongs to the current application.
- Has it expired
You can do them manually but google suggests using their authentication library (Minimal effort required).
In the Server side (Here Node.js is used).
Install Google’s official supported library google-auth-library package which is used to authenticate and verify OAuth apps.
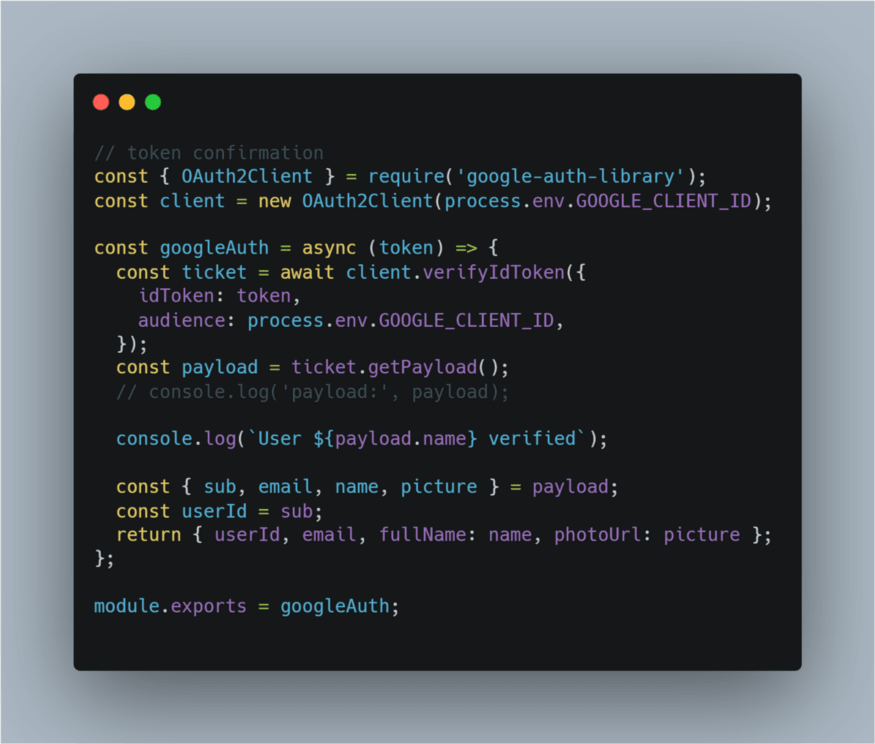
Here, With our GOOGLE_CLIENT_ID sent it verifies whether this token belongs to our application or not. And it parses them and provides profile details in the getPayload function. And you can use them to access user data.
Any queries feel free to comment or chat with me personally in my social media accounts below.
I love to be connected with developers. 😃
Twitter | LinkedIn | GitHub
Read next

This Week In React #132: Astro, Remix, Server Components, useGlobalState, Next.js, Redwood, Expo Router, Expo Image…
Sebastien Lorber — Jan 25

How to create an awesome navigation menu using chakra-UI and framer-motion.
Chetan Verma — Jan 25

Include ChatGPT on your WordPress website
Thomas Hansen — Jan 25

Which websites are best to learn Programming?
Ridhi Singla — Jan 16
Once unpublished, all posts by sivaneshs will become hidden and only accessible to themselves.
If sivaneshs is not suspended, they can still re-publish their posts from their dashboard.
Note:
Once unpublished, this post will become invisible to the public and only accessible to Sivanesh Shanmugam.
They can still re-publish the post if they are not suspended.
Thanks for keeping DEV Community 👩💻👨💻 safe. Here is what you can do to flag sivaneshs:
Make all posts by sivaneshs less visible
sivaneshs consistently posts content that violates DEV Community 👩💻👨💻’s
code of conduct because it is harassing, offensive or spammy.
Привет, @sugarmanz , этот фрагмент вызывается после того, как пользователь нажимает кнопку?
да. Хотя это через действие Vue Store. Так что я не уверен, повлияет ли это на что-нибудь.
Кроме того, я не уверен, что это на 100% связано, но похоже, что объект gapi имеет проблемы с аутентификацией через файлы cookie в Chrome. В Opera после аутентификации объект gapi сообщает, что он аутентифицирован до тех пор, пока я явно не выйду из учетной записи Google, даже сохраняя его через разные вкладки одного и того же происхождения. Теперь, когда я думаю об этом, это имеет смысл и определенно является желаемым результатом. Есть мысли о том, почему это не будет работать так же в Chrome?
Какую версию Chrome вы используете? Вы блокируете сторонние файлы cookie?
Я не блокирую сторонние файлы cookie. И моя версия Chrome: 64.0.3282.140 (Official Build) (64-bit)
Не могли бы вы попробовать общедоступное приложение? Или полный фрагмент кода?
Это тоже происходит со мной. Если вы откроете новую вкладку в Chrome, проблема исчезнет. Если вы обновите ту же страницу, проблема останется.
@emhagman, можете ли вы воспроизвести проблему из приведенной мной ссылки?
@TMSCH Эта ошибка появляется только в 32-битном Chrome
@ wjf444128852 интересно, это ценная информация. Я посмотрю, смогу ли я воспроизвести в 32-битном Chrome.
Не уверен, что вы, ребята, исправили ошибку, но я не могу воспроизвести ее в своей 64-битной версии Chrome. Интересно отметить, что изначально я столкнулся с проблемой, используя 64-разрядную версию Chrome, и мне удавалось постоянно воспроизводить ее до сегодняшнего дня. Я бы тестировал 32-разрядную версию, но поскольку 32-разрядная версия Chrome устарела в Ubuntu, мне немного сложнее тестировать.
@sugarmanz спасибо за обновление. Кажется, что 32-разрядная проблема, которую наблюдает
Дайте мне знать, если вы снова заметите проблему @sugarmanz!
Привет,
Может кто-нибудь мне помочь?
Я уже проверил блокировку сторонних файлов cookie и он не заблокирован.
Столкнувшись с той же проблемой. Любой обходной путь?
Бывает только в Хроме. Работает в Firefox.
Моя текущая версия Chrome: Версия 67.0.3396.62 (Официальная сборка) (64-разрядная)
Обновлять:
Обновление до версии 67.0.3396.79 (официальная сборка) (64-разрядная версия), похоже, устранило это.
Мы наблюдаем ту же проблему на Chrome version 67.0.3396.99 (64-bit) . Для нас он работает над Mozilla.
Я также сталкиваюсь с этим в Safari версии 12.0 (14606.1.20.40.2)
Есть новости по этому поводу? Есть ли ошибка Chromium, которую нужно отслеживать? Я заметил похожее поведение в # 377
Имея и эту проблему. Chrome 67.0.3396.99 (официальная сборка) (64-разрядная версия) в OS X 10.11.6. Достаточно просто скопировать код из кнопки « настраиваемой графики» и заменить его собственным идентификатором клиента. Я думаю, что у меня даже такая же проблема с упомянутым выше образцом, но нет сообщения об ошибке для его проверки.
Блокировка сторонних файлов cookie отключена. Он работает без проблем, когда я нахожусь в режиме инкогнито. Я сел за компьютер, которым раньше не пользовался, и он там тоже работал. Похоже, это как-то связано с тем, что Chrome уже знает адрес электронной почты для входа?
Если я вхожу в свою учетную запись Google и пытаюсь использовать кнопку входа, окно входа мигает на долю секунды, закрывается, и я получаю предупреждение об ошибке popup_closed_by_user. Если я не вошел в свою учетную запись, появляется окно с запросом моего имени пользователя и пароля, а затем закрывается, и я получаю ту же ошибку.
Не вижу никаких проблем в Safari.
Отредактировано для упоминания: это происходит только на одном из моих компьютеров. Компьютер, на котором он работает, работает под управлением той же версии Chrome, но с OS X 10.13.5. Он также только сегодня начал не работать на другом моем компьютере. Вчера я вошел на тот же сайт без проблем.
У меня возникла эта проблема с использованием плагина angular5-social-login . Невероятно, но проблема была решена простым удалением учетных данных и последующим их добавлением. Согласно этому сообщению, есть много других, у которых такая же проблема и решение: qaru
Это происходит при использовании нескольких учетных записей, вот и все.
Это происходит при использовании нескольких учетных записей, вот и все.
так ….. довольно сломался …
@bochunz, извини, что раздражаю тебя, но это все еще не работает, и это довольно большая функция, разве многие люди не используют несколько учетных записей ??
Я тестировал в режиме инкогнито и однопользовательскую работу, несколько перерывов, на
Google Chrome | 69.0.3497.100 (Официальная сборка) (64-разрядная версия)
— | —
Редакция | 8920e690dd011895672947112477d10d5c8afb09-refs / branch-heads / 3497 @ {# 948}
ОС | Mac OS X
JavaScript | V8 6.9.427.23
@lopugit Я видел подобные проблемы ранее на некоторых других сайтах. Я даже мог воспроизвести это с помощью одного пользователя. Но, похоже, проблема исчезла. Вы все еще сталкиваетесь с этой проблемой?
Мы отправили исправление для ошибки popup_closed_by_user. Убедитесь, что ошибка исправлена.
Имея и эту проблему. Chrome 67.0.3396.99 (официальная сборка) (64-разрядная версия) в OS X 10.11.6. Достаточно просто скопировать код из кнопки « настраиваемой графики» и заменить его собственным идентификатором клиента. Я думаю, что у меня даже такая же проблема с упомянутым выше образцом, но нет сообщения об ошибке для его проверки.
Блокировка сторонних файлов cookie отключена. Он работает без проблем, когда я нахожусь в режиме инкогнито. Я сел за компьютер, которым раньше не пользовался, и он там тоже работал. Похоже, это как-то связано с тем, что Chrome уже знает адрес электронной почты для входа?
Если я вхожу в свою учетную запись Google и пытаюсь использовать кнопку входа, окно входа мигает на долю секунды, закрывается, и я получаю предупреждение об ошибке popup_closed_by_user. Если я не вошел в свою учетную запись, появляется окно с запросом моего имени пользователя и пароля, а затем закрывается, и я получаю ту же ошибку.
Не вижу никаких проблем в Safari.
Отредактировано для упоминания: это происходит только на одном из моих компьютеров. Компьютер, на котором он работает, работает под управлением той же версии Chrome, но с OS X 10.13.5. Он также только сегодня начал не работать на другом моем компьютере. Вчера я вошел на тот же сайт без проблем.
Просто включите куки. это решило проблему для меня
Имея и эту проблему. Chrome 67.0.3396.99 (официальная сборка) (64-разрядная версия) в OS X 10.11.6. Достаточно просто скопировать код из кнопки « настраиваемой графики» и заменить его собственным идентификатором клиента. Я думаю, что у меня даже такая же проблема с упомянутым выше образцом, но нет сообщения об ошибке для его проверки.
Блокировка сторонних файлов cookie отключена. Он работает без проблем, когда я нахожусь в режиме инкогнито. Я сел за компьютер, которым раньше не пользовался, и он там тоже работал. Похоже, это как-то связано с тем, что Chrome уже знает адрес электронной почты для входа?
Если я вхожу в свою учетную запись Google и пытаюсь использовать кнопку входа, окно входа мигает на долю секунды, закрывается, и я получаю предупреждение об ошибке popup_closed_by_user. Если я не вошел в свою учетную запись, появляется окно с запросом моего имени пользователя и пароля, а затем закрывается, и я получаю ту же ошибку.
Не вижу никаких проблем в Safari.
Отредактировано для упоминания: это происходит только на одном из моих компьютеров. Компьютер, на котором он работает, работает под управлением той же версии Chrome, но с OS X 10.13.5. Он также только сегодня начал не работать на другом моем компьютере. Вчера я вошел на тот же сайт без проблем.Просто включите куки. это решило проблему для меня
Но что, если пользователь вашего приложения решит заблокировать сторонние файлы cookie?
У меня тоже такая проблема. Chrome 70.0.3538.102 (официальная сборка) (64-разрядная версия) в Windows 7.
- Блокировка сторонних файлов cookie отключена.
- Я вхожу в две разные учетные записи Google. Выбор нужной учетной записи из списка приводит к ошибке popup_closed_by_user.
- Работает в режиме инкогнито. Работает в Internet Explorer. В обоих случаях я не был авторизован в Google и прошел полный процесс авторизации.
- Я подключаюсь к http: // localhost : 3000 для тестирования.
РЕДАКТИРОВАТЬ: Примерно через 20 минут он начал работать. Идентификатор клиента и конфигурация панели инструментов разработчика для моего приложения были совершенно новыми, возможно, их нужно было где-то перенаправить в базу данных?
Ошибка присутствует в версии 78.0.3904.108 (официальная сборка) (64-разрядная).
Эта ошибка все еще присутствует в версии 85.0.4183.121 (официальная сборка) (64-разрядная версия).
По-прежнему встречается в версии 85.0.4183.83 (официальная сборка) (64-разрядная)
У меня версия 86.0.4240.111 (официальная сборка) (64-разрядная), и это все еще происходит
Начали работать с версией 87.0.4280.88
Была ли эта страница полезной?
0 / 5 — 0 рейтинги