Arduino programming is an open-source and simple stage that arranges the Arduino board into working with a particular goal in mind. An Arduino code is written in C++ yet with extra capacities and strategies. An Arduino is an equipment and programming stage broadly utilised in hardware.
In this article, we go through three quick fixes for the error ‘was not declared in this scope’.
Also read: How to solve the Tower of Hanoi problem using Python?
What does the error mean?
Every programming language has a concept of Scope. Scope tells us where a specific variable, constant or function is accessible and usable. It refers to the area of code a statement, block, or name. The scope of an entity determines where that entity is usable in other parts of the program. The scope of a block determines where that block can be used in other blocks, and the scope of a name determines where that name can be used in other names.
There are two types of scope in programming languages: local and global. Local scope refers to the identifiers and symbols visible inside a block of code. Global scope, on the other hand, refers to the identifiers and symbols visible outside a block of code.
The error ‘was not declared in this scope’ generally occurs when a variable or function is not accessible to its call. A global variable in Arduino is the variable that is declared outside any function, including the setup() and loop() functions. Any variable declared inside a function or loop has restrictive access and is a local variable.
If any other function calls a local variable, it gives an error. To call any variable or function in any other function, including the setup() and loop() function, it should be declared as a global variable.
Also read: How to stop an Arduino program?
There are the quick fixes for the Arduino error: was not declared in the scope.
Declare the variable
Before assigning a value to the variable, make sure to define it. There are 16 data types commonly used in Arduino coding. Each data type expresses the nature of the value assigned to it. If the data type and value doesn’t match, an error arises. Also, if a variable is assigned any value without its declaration or data type, the error occurs.
Always ensure to declare the variable before the assignment. There are two ways to do this.
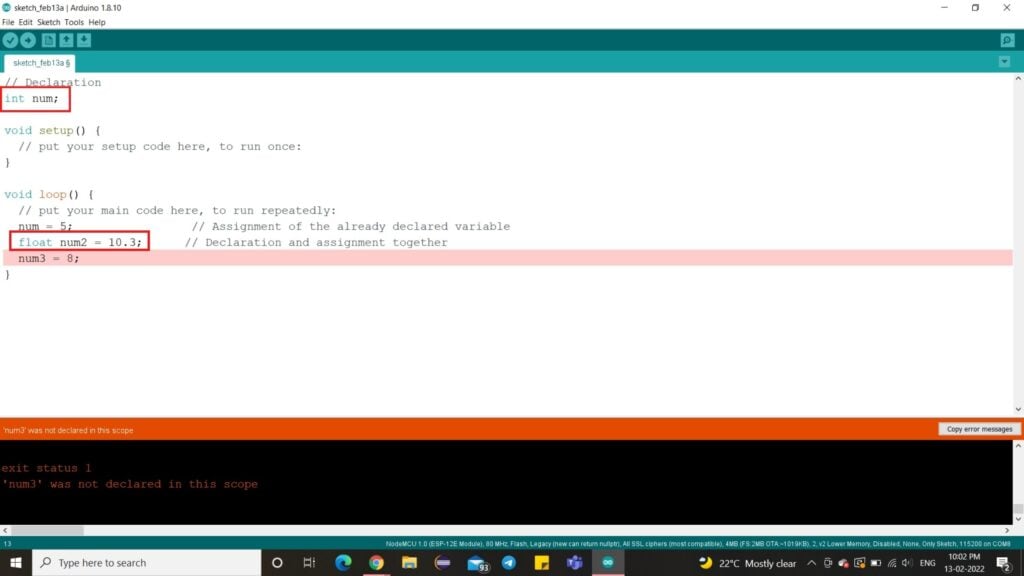
There are three variables in the above example – num1, num2 and num3. The variable num1 has been declared separately and assigned to a data type corresponding value in the loop. The variable num2 has been declared and assigned in the same line of code. The variable num3, on the other hand, has directly been assigned a value without its declaration. This causes the error, as shown above.
Other details
There may be errors arising even after proper declaration and assignment of the variable. This may be due to incorrect or absence of the closing brackets, semicolons or improper declaration of functions. Ensure proper use of syntax when defining loops and functions. Every opening in curly brace must be accounted for and closed. Extra closing braces also cause errors. Alongside, semicolons hold their importance. A semicolon missed can cause the entire program to go haywire.
Library folder
Many times, variables call or use functions that require importing a few specific libraries.

In the example above, the variable num calls the square root function – sqrt() from the maths library of Arduino. If we call a function without including its library first, an error occurs. There are multiple inbuilt and standard libraries in Arduino, while a few special libraries must be included separately.
Also read: What is ‘does not name a type’ in Arduino: 2 Fixes.
by Vlad Turiceanu
Passionate about technology, Windows, and everything that has a power button, he spent most of his time developing new skills and learning more about the tech world. Coming… read more
Updated on March 4, 2021
- Several Arduino users get the error was not declared in this scope. Do you face the same when trying to compile your code?
- The program can’t find the definition of your variable. Declare it before using it elsewhere.
- To make sure that you’re always prepared, don’t hesitate to bookmark our Arduino errors section.
- Visit our Developer Tools Hub for more development & IT-related software solutions.
XINSTALL BY CLICKING THE DOWNLOAD FILE
This software will keep your drivers up and running, thus keeping you safe from common computer errors and hardware failure. Check all your drivers now in 3 easy steps:
- Download DriverFix (verified download file).
- Click Start Scan to find all problematic drivers.
- Click Update Drivers to get new versions and avoid system malfunctionings.
- DriverFix has been downloaded by 0 readers this month.
Arduino users often face the same error – was not declared in this scope – when trying a code they’ve made.
Let us help you out if you happen to be new to Arduino coding as well. When you get this annoying error while compiling your code, there are a few quick fixes to apply.
How can I fix Arduino error was not declared in this scope?
1. Always declare a variable before assigning a value to it

Are you seeing the number was not declared in this scope error? Then, the problem most likely resides in not declaring the number variable to begin with.
A variable in Arduino is a place to store a piece of data, with a name, a value, and a type. Most people tend to use the variable number in their loop function.
However, they need to define a variable before they use it elsewhere.
2. Make sure the loop is not missing its closing brace

If the same error keeps coming up even after creating a variable and giving it a value, pay more attention to the little things.
Even without a simple accolade, the compiler gets mixed signals since the loop is not closed and may give you these errors in return.
Things are no different for extra semicolons or functions that are not defined properly.

In case of getting the Serial1 was not declared in this scope error, chances are your Arduino has no Serial1.
Assuming that you use Arduino Uno, you need to comment the Serial1 and un-comment the SoftwareSerial part in order to solve the problem.
Have you tried to apply the above tricks? Let us know if they proved to be helpful in solving the Arduino error was not declared in this scope.
If you know any other working solutions, feel free to share them by using the comments area below.
![]()
Newsletter
СОДЕРЖАНИЕ ►
- Произошла ошибка при загрузке скетча в Ардуино
- programmer is not responding
- a function-definition is not allowed arduino ошибка
- expected initializer before ‘}’ token arduino ошибка
- ‘что-то’ was not declared in this scope arduino ошибка
- No such file or directory arduino ошибка
- Compilation error: Missing FQBN (Fully Qualified Board Name)
Ошибки компиляции Arduino IDE возникают при проверке или загрузке скетча в плату, если код программы содержит ошибки, компилятор не может найти библиотеки или переменные. На самом деле, сообщение об ошибке при загрузке скетча связано с невнимательностью самого программиста. Рассмотрим в этой статье все возможные ошибки компиляции для платы Ардуино UNO R3, NANO, MEGA и пути их решения.
Произошла ошибка при загрузке скетча Ардуино
Самые простые ошибки возникают у новичков, кто только начинает разбираться с языком программирования Ардуино и делает первые попытки загрузить скетч. Если вы не нашли решение своей проблемы в статье, то напишите свой вопрос в комментариях к этой записи и мы поможем решить вашу проблему с загрузкой (бесплатно!).
avrdude: stk500_recv(): programmer is not responding
Что делать в этом случае? Первым делом обратите внимание какую плату вы используете и к какому порту она подключена (смотри на скриншоте в правом нижнем углу). Необходимо сообщить Arduino IDE, какая плата используется и к какому порту она подключена. Если вы загружаете скетч в Ардуино Nano V3, но при этом в настройках указана плата Uno или Mega 2560, то вы увидите ошибку, как на скриншоте ниже.

Такая же ошибка будет возникать, если вы не укажите порт к которому подключена плата (это может быть любой COM-порт, кроме COM1). В обоих случаях вы получите сообщение — плата не отвечает (programmer is not responding). Для исправления ошибки надо на панели инструментов Arduino IDE в меню «Сервис» выбрать нужную плату и там же, через «Сервис» → «Последовательный порт» выбрать порт «COM7».
a function-definition is not allowed here before ‘{‘ token
Это значит, что в скетче вы забыли где-то закрыть фигурную скобку. Синтаксические ошибки IDE тоже распространены и связаны они просто с невнимательностью. Такие проблемы легко решаются, так как Arduino IDE даст вам подсказку, стараясь отметить номер строки, где обнаружена ошибка. На скриншоте видно, что строка с ошибкой подсвечена, а в нижнем левом углу приложения указан номер строки.

expected initializer before ‘}’ token / expected ‘;’ before ‘}’ token
Сообщение expected initializer before ‘}’ token говорит о том, что вы, наоборот где-то забыли открыть фигурную скобку. Arduino IDE даст вам подсказку, но если скетч довольно большой, то вам придется набраться терпения, чтобы найти неточность в коде. Ошибка при компиляции программы: expected ‘;’ before ‘}’ token говорит о том, что вы забыли поставить точку с запятой в конце командной строки.
‘что-то’ was not declared in this scope
Что за ошибка? Arduino IDE обнаружила в скетче слова, не являющиеся служебными или не были объявлены, как переменные. Например, вы забыли продекларировать переменную или задали переменную ‘DATA’, а затем по невнимательности используете ‘DAT’, которая не была продекларирована. Ошибка was not declared in this scope возникает при появлении в скетче случайных или лишних символов.

Например, на скриншоте выделено, что программист забыл продекларировать переменную ‘x’, а также неправильно написал функцию ‘analogRead’. Такая ошибка может возникнуть, если вы забудете поставить комментарий, написали функцию с ошибкой и т.д. Все ошибки также будут подсвечены, а при нескольких ошибках в скетче, сначала будет предложено исправить первую ошибку, расположенную выше.
exit status 1 ошибка компиляции для платы Arduino
Данная ошибка возникает, если вы подключаете в скетче библиотеку, которую не установили в папку libraries. Например, не установлена библиотека ИК приемника Ардуино: fatal error: IRremote.h: No such file or directory. Как исправить ошибку? Скачайте нужную библиотеку и распакуйте архив в папку C:Program FilesArduinolibraries. Если библиотека установлена, то попробуйте скачать и заменить библиотеку на новую.

Довольно часто у новичков выходит exit status 1 ошибка компиляции для платы arduino uno /genuino uno. Причин данного сообщения при загрузке скетча в плату Arduino Mega или Uno может быть огромное множество. Но все их легко исправить, достаточно внимательно перепроверить код программы. Если в этом обзоре вы не нашли решение своей проблемы, то напишите свой вопрос в комментариях к этой статье.
missing fqbn (fully qualified board name)
Ошибка возникает, если не была выбрана плата. Обратите внимание, что тип платы необходимо выбрать, даже если вы не загружаете, а, например, делаете компиляцию скетча. В Arduino IDE 2 вы можете использовать меню выбора:
— список плат, которые подключены и были идентифицированы Arduino IDE.
— или выбрать плату и порт вручную, без подключения микроконтроллера.
|
26.04.2014, 22:31
Beitrag #1 |
||
|
||
|
i2cLCD : ‘POSITIVE’ was not declared in this scope
Hallo allerseits, habe ein Problem mit ner Fehlermeldung beim Compelieren. _1_Wire_DS18b20_Auslesen_i2cLCD:13: error: ‘POSITIVE’ was not declared in this scope Das seltsame dabei ist das der Sketch heute Nachmittag genau so auf dem Arduiono schon lief .. #include <OneWire.h> OneWire ds(ONE_WIRE_BUS); ————————————- lg Nils[/quote] |
||
|
|


|
27.04.2014, 09:03
Beitrag #2 |
|
RE: i2cLCD : ‘POSITIVE’ was not declared in this scope
Hallo Nils, Code:
besser Code:
und im setup() dann Code:
Dazu dann die Lib im Anhang benutzen. Vorher das Verzeichnis der LCD-Lib wegsichern. Sollte in der IDE >= 1.5.x laufen. Grüße Ricardo Nüchtern betrachtet…ist besoffen besser |
|
|

|
27.04.2014, 10:15
Beitrag #3 |
|
RE: i2cLCD : ‘POSITIVE’ was not declared in this scope
Hallo Ricardo, hab es jetzt mal geändert, aber bekomme jetzt noch mehr Fehlermeldungen _1_Wire_DS18b20_Auslesen_i2cLCD:14: error: no matching function for call to ‘LiquidCrystal_I2C::LiquidCrystal_I2C(int, int, int, int, int, int, int, int)’ Code:
#include <OneWire.h> OneWire ds(ONE_WIRE_BUS); /*-----( Declare Constants )-----*/ /***************************************************************************** // OneWire ds(12); // 1Wire Instance on Arduino digital pin 2 byte i; void setup(void) { Bin noch Neuling in Sachen Arduino … |
|
|
 :
:|
27.04.2014, 11:06 Beitrag #4 |
|
RE: i2cLCD : ‘POSITIVE’ was not declared in this scope
Hallo Nils, das Problem sieht man hier:
Die IDE ist falsch installiert bzw. sind die Libraries falsch abgelegt. Grüße Ricardo Nüchtern betrachtet…ist besoffen besser |
|
|
|
27.04.2014, 14:11 Beitrag #5 |
|
RE: i2cLCD : ‘POSITIVE’ was not declared in this scope
Hallo Ricardo, hab deine Anregungen vom Thread befolgt, Arduino nochmal kompl. gelöscht und zuerst die 1.0.5 Version draufgespielt. Dann die Libs nochmal in den Ordner libraries geschoben. Werden im Skript auch als erkannt angezeigt. Code:
Build options changed, rebuilding all Verwende die Bibliothek OneWire im Ordner: C:Program Files (x86)ArduinolibrariesOneWire (legacy) Verwende die Bibliothek dallas_temperature_control im Ordner: C:Program Files (x86)Arduinolibrariesdallas_temperature_control (legacy) Verwende die Bibliothek Wire im Ordner: C:Program Files (x86)ArduinohardwarearduinoavrlibrariesWire (legacy) C:Program Files (x86)Arduinohardwaretoolsavrbinavr-g++ -c -g -Os -w -fno-exceptions -ffunction-sections -fdata-sections -MMD -mmcu=atmega2560 -DF_CPU=16000000L -DARDUINO=156 -DARDUINO_AVR_MEGA2560 -DARDUINO_ARCH_AVR -IC:Program Files (x86)Arduinohardwarearduinoavrcoresarduino -IC:Program Files (x86)Arduinohardwarearduinoavrvariantsmega -IC:Program Files (x86)ArduinolibrariesOneWire -IC:Program Files (x86)Arduinolibrariesdallas_temperature_control -IC:Program Files (x86)ArduinohardwarearduinoavrlibrariesWire C:UserspapaAppDataLocalTempbuild5311542397420308395.tmpDS18B20_i2cLCD_ino.cpp -o C:UserspapaAppDataLocalTempbuild5311542397420308395.tmpDS18B20_i2cLCD_ino.cpp.o DS18B20_i2cLCD_ino.ino:15: error: 'LiquidCrystal_I2C' does not name a type Hier der Sketch : Code:
#include <OneWire.h> #include <Wire.h> OneWire ds(ONE_WIRE_BUS); /*-----( Declare Constants )-----*/ /***************************************************************************** // OneWire ds(12); // 1Wire Instance on Arduino digital pin 2 byte i; void setup(void) { void loop(void) { // Output 64 Bit hardware id of Dallas Chip: // Check for invalid CRC in address: // Check for family code which is not DS18B20: // The DallasTemperature library can do all this work for you! delay(1000); // maybe 750ms is enough, maybe not // Check whether chip is present: Serial.print("P="); // Present = 1 void display_1WSensor(){ Was ich nicht verstehe ist das es vorher einwandfrei lief, und plötzlich nicht mehr ohne die Datei zu ändern… hmm.. Bin noch Neuling in Sachen Arduino … |
|
|
|
27.04.2014, 14:32 Beitrag #6 |
|
RE: i2cLCD : ‘POSITIVE’ was not declared in this scope
Hallo Nils, bei mir läuft der aktuelle Sketch ohne Probleme durch den Compiler! Suche bitte auf deinem Rechner nach einer Datei LiquidCrystal_I2C.h . Die Datei darf nur einmal gefunden werden. Wenn mehrfach vorhanden dann bereinigen. Grüße Ricardo Nüchtern betrachtet…ist besoffen besser |
|
|
|
27.04.2014, 15:06 Beitrag #7 |
|
RE: i2cLCD : ‘POSITIVE’ was not declared in this scope
Hallo nochmal, jap, hab die Datei runtergeladen, entpackt und in den Libraries Orden geschoben (Also den vorhandenen überschrieben). Weist du wann ich welche Methode benutzen muss damit es funzt? Danke Dir für deine Hilfe ! lg Nils Bin noch Neuling in Sachen Arduino … |
|
|
|
27.04.2014, 15:18 Beitrag #8 |
|
RE: i2cLCD : ‘POSITIVE’ was not declared in this scope
Hallo Nils,
Würde ich so nie machen.
Damit wurde der vorhandene Ordner der Lib geleert und mit dem neuen Inhalt beschrieben. Grüße Ricardo Nüchtern betrachtet…ist besoffen besser |
|
|