Error handling is the process of responding to and recovering from error conditions in your program. Swift provides first-class support for throwing, catching, propagating, and manipulating recoverable errors at runtime.
Some operations aren’t guaranteed to always complete execution or produce a useful output. Optionals are used to represent the absence of a value, but when an operation fails, it’s often useful to understand what caused the failure, so that your code can respond accordingly.
As an example, consider the task of reading and processing data from a file on disk. There are a number of ways this task can fail, including the file not existing at the specified path, the file not having read permissions, or the file not being encoded in a compatible format. Distinguishing among these different situations allows a program to resolve some errors and to communicate to the user any errors it can’t resolve.
Representing and Throwing Errors
In Swift, errors are represented by values of types that conform to the Error protocol. This empty protocol indicates that a type can be used for error handling.
Swift enumerations are particularly well suited to modeling a group of related error conditions, with associated values allowing for additional information about the nature of an error to be communicated. For example, here’s how you might represent the error conditions of operating a vending machine inside a game:
- enum VendingMachineError: Error {
- case invalidSelection
- case insufficientFunds(coinsNeeded: Int)
- case outOfStock
- }
Throwing an error lets you indicate that something unexpected happened and the normal flow of execution can’t continue. You use a throw statement to throw an error. For example, the following code throws an error to indicate that five additional coins are needed by the vending machine:
- throw VendingMachineError.insufficientFunds(coinsNeeded: 5)
Handling Errors
When an error is thrown, some surrounding piece of code must be responsible for handling the error—for example, by correcting the problem, trying an alternative approach, or informing the user of the failure.
There are four ways to handle errors in Swift. You can propagate the error from a function to the code that calls that function, handle the error using a do—catch statement, handle the error as an optional value, or assert that the error will not occur. Each approach is described in a section below.
When a function throws an error, it changes the flow of your program, so it’s important that you can quickly identify places in your code that can throw errors. To identify these places in your code, write the try keyword—or the try? or try! variation—before a piece of code that calls a function, method, or initializer that can throw an error. These keywords are described in the sections below.
Note
Error handling in Swift resembles exception handling in other languages, with the use of the try, catch and throw keywords. Unlike exception handling in many languages—including Objective-C—error handling in Swift doesn’t involve unwinding the call stack, a process that can be computationally expensive. As such, the performance characteristics of a throw statement are comparable to those of a return statement.
Propagating Errors Using Throwing Functions
To indicate that a function, method, or initializer can throw an error, you write the throws keyword in the function’s declaration after its parameters. A function marked with throws is called a throwing function. If the function specifies a return type, you write the throws keyword before the return arrow (->).
- func canThrowErrors() throws -> String
- func cannotThrowErrors() -> String
A throwing function propagates errors that are thrown inside of it to the scope from which it’s called.
Note
Only throwing functions can propagate errors. Any errors thrown inside a nonthrowing function must be handled inside the function.
In the example below, the VendingMachine class has a vend(itemNamed:) method that throws an appropriate VendingMachineError if the requested item isn’t available, is out of stock, or has a cost that exceeds the current deposited amount:
- struct Item {
- var price: Int
- var count: Int
- }
- class VendingMachine {
- var inventory = [
- «Candy Bar»: Item(price: 12, count: 7),
- «Chips»: Item(price: 10, count: 4),
- «Pretzels»: Item(price: 7, count: 11)
- ]
- var coinsDeposited = 0
- func vend(itemNamed name: String) throws {
- guard let item = inventory[name] else {
- throw VendingMachineError.invalidSelection
- }
- guard item.count > 0 else {
- throw VendingMachineError.outOfStock
- }
- guard item.price <= coinsDeposited else {
- throw VendingMachineError.insufficientFunds(coinsNeeded: item.price — coinsDeposited)
- }
- coinsDeposited -= item.price
- var newItem = item
- newItem.count -= 1
- inventory[name] = newItem
- print(«Dispensing (name)«)
- }
- }
The implementation of the vend(itemNamed:) method uses guard statements to exit the method early and throw appropriate errors if any of the requirements for purchasing a snack aren’t met. Because a throw statement immediately transfers program control, an item will be vended only if all of these requirements are met.
Because the vend(itemNamed:) method propagates any errors it throws, any code that calls this method must either handle the errors—using a do—catch statement, try?, or try!—or continue to propagate them. For example, the buyFavoriteSnack(person:vendingMachine:) in the example below is also a throwing function, and any errors that the vend(itemNamed:) method throws will propagate up to the point where the buyFavoriteSnack(person:vendingMachine:) function is called.
- let favoriteSnacks = [
- «Alice»: «Chips»,
- «Bob»: «Licorice»,
- «Eve»: «Pretzels»,
- ]
- func buyFavoriteSnack(person: String, vendingMachine: VendingMachine) throws {
- let snackName = favoriteSnacks[person] ?? «Candy Bar»
- try vendingMachine.vend(itemNamed: snackName)
- }
In this example, the buyFavoriteSnack(person: vendingMachine:) function looks up a given person’s favorite snack and tries to buy it for them by calling the vend(itemNamed:) method. Because the vend(itemNamed:) method can throw an error, it’s called with the try keyword in front of it.
Throwing initializers can propagate errors in the same way as throwing functions. For example, the initializer for the PurchasedSnack structure in the listing below calls a throwing function as part of the initialization process, and it handles any errors that it encounters by propagating them to its caller.
- struct PurchasedSnack {
- let name: String
- init(name: String, vendingMachine: VendingMachine) throws {
- try vendingMachine.vend(itemNamed: name)
- self.name = name
- }
- }
Handling Errors Using Do-Catch
You use a do—catch statement to handle errors by running a block of code. If an error is thrown by the code in the do clause, it’s matched against the catch clauses to determine which one of them can handle the error.
Here is the general form of a do—catch statement:
- do {
- try expression
- statements
- } catch pattern 1 {
- statements
- } catch pattern 2 where condition {
- statements
- } catch pattern 3, pattern 4 where condition {
- statements
- } catch {
- statements
- }
You write a pattern after catch to indicate what errors that clause can handle. If a catch clause doesn’t have a pattern, the clause matches any error and binds the error to a local constant named error. For more information about pattern matching, see Patterns.
For example, the following code matches against all three cases of the VendingMachineError enumeration.
- var vendingMachine = VendingMachine()
- vendingMachine.coinsDeposited = 8
- do {
- try buyFavoriteSnack(person: «Alice», vendingMachine: vendingMachine)
- print(«Success! Yum.»)
- } catch VendingMachineError.invalidSelection {
- print(«Invalid Selection.»)
- } catch VendingMachineError.outOfStock {
- print(«Out of Stock.»)
- } catch VendingMachineError.insufficientFunds(let coinsNeeded) {
- print(«Insufficient funds. Please insert an additional (coinsNeeded) coins.»)
- } catch {
- print(«Unexpected error: (error).»)
- }
- // Prints «Insufficient funds. Please insert an additional 2 coins.»
In the above example, the buyFavoriteSnack(person:vendingMachine:) function is called in a try expression, because it can throw an error. If an error is thrown, execution immediately transfers to the catch clauses, which decide whether to allow propagation to continue. If no pattern is matched, the error gets caught by the final catch clause and is bound to a local error constant. If no error is thrown, the remaining statements in the do statement are executed.
The catch clauses don’t have to handle every possible error that the code in the do clause can throw. If none of the catch clauses handle the error, the error propagates to the surrounding scope. However, the propagated error must be handled by some surrounding scope. In a nonthrowing function, an enclosing do—catch statement must handle the error. In a throwing function, either an enclosing do—catch statement or the caller must handle the error. If the error propagates to the top-level scope without being handled, you’ll get a runtime error.
For example, the above example can be written so any error that isn’t a VendingMachineError is instead caught by the calling function:
- func nourish(with item: String) throws {
- do {
- try vendingMachine.vend(itemNamed: item)
- } catch is VendingMachineError {
- print(«Couldn’t buy that from the vending machine.»)
- }
- }
- do {
- try nourish(with: «Beet-Flavored Chips»)
- } catch {
- print(«Unexpected non-vending-machine-related error: (error)«)
- }
- // Prints «Couldn’t buy that from the vending machine.»
In the nourish(with:) function, if vend(itemNamed:) throws an error that’s one of the cases of the VendingMachineError enumeration, nourish(with:) handles the error by printing a message. Otherwise, nourish(with:) propagates the error to its call site. The error is then caught by the general catch clause.
Another way to catch several related errors is to list them after catch, separated by commas. For example:
- func eat(item: String) throws {
- do {
- try vendingMachine.vend(itemNamed: item)
- } catch VendingMachineError.invalidSelection, VendingMachineError.insufficientFunds, VendingMachineError.outOfStock {
- print(«Invalid selection, out of stock, or not enough money.»)
- }
- }
The eat(item:) function lists the vending machine errors to catch, and its error text corresponds to the items in that list. If any of the three listed errors are thrown, this catch clause handles them by printing a message. Any other errors are propagated to the surrounding scope, including any vending-machine errors that might be added later.
Converting Errors to Optional Values
You use try? to handle an error by converting it to an optional value. If an error is thrown while evaluating the try? expression, the value of the expression is nil. For example, in the following code x and y have the same value and behavior:
- func someThrowingFunction() throws -> Int {
- // …
- }
- let x = try? someThrowingFunction()
- let y: Int?
- do {
- y = try someThrowingFunction()
- } catch {
- y = nil
- }
If someThrowingFunction() throws an error, the value of x and y is nil. Otherwise, the value of x and y is the value that the function returned. Note that x and y are an optional of whatever type someThrowingFunction() returns. Here the function returns an integer, so x and y are optional integers.
Using try? lets you write concise error handling code when you want to handle all errors in the same way. For example, the following code uses several approaches to fetch data, or returns nil if all of the approaches fail.
- func fetchData() -> Data? {
- if let data = try? fetchDataFromDisk() { return data }
- if let data = try? fetchDataFromServer() { return data }
- return nil
- }
Disabling Error Propagation
Sometimes you know a throwing function or method won’t, in fact, throw an error at runtime. On those occasions, you can write try! before the expression to disable error propagation and wrap the call in a runtime assertion that no error will be thrown. If an error actually is thrown, you’ll get a runtime error.
For example, the following code uses a loadImage(atPath:) function, which loads the image resource at a given path or throws an error if the image can’t be loaded. In this case, because the image is shipped with the application, no error will be thrown at runtime, so it’s appropriate to disable error propagation.
- let photo = try! loadImage(atPath: «./Resources/John Appleseed.jpg»)
Specifying Cleanup Actions
You use a defer statement to execute a set of statements just before code execution leaves the current block of code. This statement lets you do any necessary cleanup that should be performed regardless of how execution leaves the current block of code—whether it leaves because an error was thrown or because of a statement such as return or break. For example, you can use a defer statement to ensure that file descriptors are closed and manually allocated memory is freed.
A defer statement defers execution until the current scope is exited. This statement consists of the defer keyword and the statements to be executed later. The deferred statements may not contain any code that would transfer control out of the statements, such as a break or a return statement, or by throwing an error. Deferred actions are executed in the reverse of the order that they’re written in your source code. That is, the code in the first defer statement executes last, the code in the second defer statement executes second to last, and so on. The last defer statement in source code order executes first.
- func processFile(filename: String) throws {
- if exists(filename) {
- let file = open(filename)
- defer {
- close(file)
- }
- while let line = try file.readline() {
- // Work with the file.
- }
- // close(file) is called here, at the end of the scope.
- }
- }
The above example uses a defer statement to ensure that the open(_:) function has a corresponding call to close(_:).
Note
You can use a defer statement even when no error handling code is involved.
Обработка ошибок
Обработка ошибок — это процесс реагирования на возникновение ошибок и восстановление после появления ошибок в программе. Swift предоставляет первоклассную поддержку при генерации, вылавливании и переносе ошибок, устранении ошибок во время выполнения программы.
Некоторые операции не всегда гарантируют полное выполнение или конечный результат. Опционалы используются для обозначения отсутствия значения, но когда случается сбой, важно понять, что вызвало сбой, для того, чтобы соответствующим образом изменить код.
В качестве примера, рассмотрим задачу считывания и обработки данных из файла на диске. Задача может провалиться по нескольким причинам, в том числе: файл не существует по указанному пути, или файл не имеет разрешение на чтение, или файл не закодирован в необходимом формате. Отличительные особенности этих различных ситуаций позволяют программе решать некоторые ошибки самостоятельно и сообщать пользователю какие ошибки она не может решить сама.
Отображение и генерация ошибок
В Swift ошибки отображаются значениями типов, которые соответствуют протоколу Error. Этот пустой протокол является индикатором того, что это перечисление может быть использовано для обработки ошибок.
Перечисления в Swift особенно хорошо подходят для группировки схожих между собой условий возникновения ошибок и соответствующих им значений, что позволяет получить дополнительную информацию о природе самой ошибки. Например, вот как отображаются условия ошибки работы торгового автомата внутри игры:
enum VendingMachineError: Error {
    case invalidSelection
    case insufficientFunds(coinsNeeded: Int)
    case outOfStock
}
Генерация ошибки позволяет указать, что произошло что-то неожиданное и обычное выполнение программы не может продолжаться. Для того чтобы «сгенерировать» ошибку, вы используете инструкцию throw. Например, следующий код генерирует ошибку, указывая, что пять дополнительных монет нужны торговому автомату:
throw VendingMachineError.insufficientFunds(coinsNeeded: 5)Обработка ошибок
Когда генерируется ошибка, то фрагмент кода, окружающий ошибку, должен быть ответственным за ее обработку: например, он должен исправить ее, или испробовать альтернативный подход, или просто информировать пользователя о неудачном исполнении кода.
В Swift существует четыре способа обработки ошибок. Вы можете передать (propagate) ошибку из функции в код, который вызывает саму эту функцию, обработать ошибку, используя инструкцию do-catch, обработать ошибку, как значение опционала, или можно поставить утверждение, что ошибка в данном случае исключена. Каждый вариант будет рассмотрен далее.
Когда функция генерирует ошибку, последовательность выполнения вашей программы меняется, поэтому важно сразу обнаружить место в коде, которое может генерировать ошибки. Для того, чтобы выяснить где именно это происходит, напишите ключевое слово try — или варианты try? или try!— до куска кода, вызывающего функцию, метод или инициализатор, который может генерировать ошибку. Эти ключевые слова описываются в следующем параграфе.
Заметка
Обработка ошибок в Swift напоминает обработку исключений (exceptions) в других языках, с использованием ключевых слов try, catch и throw. В отличие от обработки исключений во многих языках, в том числе и в Objective-C- обработка ошибок в Swift не включает разворачивание стека вызовов, то есть процесса, который может быть дорогим в вычислительном отношении. Таким образом, производительные характеристики инструкции throw сопоставимы с характеристиками оператора return.
Передача ошибки с помощью генерирующей функции
Чтобы указать, что функция, метод или инициализатор могут генерировать ошибку, вам нужно написать ключевое слово throws в реализации функции после ее параметров. Функция, отмеченная throws называется генерирующей функцией. Если у функции установлен возвращаемый тип, то вы пишете ключевое слово throws перед стрелкой возврата (->).
func canThrowErrors() throws -> String
func cannotThrowErrors() -> String
Генерирующая функция передает ошибки, которые возникают внутри нее в область вызова этой функции.
Заметка
Только генерирующая ошибку функция может передавать ошибки. Любые ошибки, сгенерированные внутри non-throwing функции, должны быть обработаны внутри самой функции.
В приведенном ниже примере VendingMachine класс имеет vend(itemNamed: ) метод, который генерирует соответствующую VendingMachineError, если запрошенный элемент недоступен, его нет в наличии, или имеет стоимость, превышающую текущий депозит:
struct Item {
    var price: Int
    var count: Int
}

class VendingMachine {
    var inventory = [
        "Candy Bar": Item(price: 12, count: 7),
        "Chips": Item(price: 10, count: 4),
        "Pretzels": Item(price: 7, count: 11)
    ]
    var coinsDeposited = 0

    func vend(itemNamed name: String) throws {
        guard let item = inventory[name] else {
            throw VendingMachineError.invalidSelection
        }

        guard item.count > 0 else {
            throw VendingMachineError.outOfStock
        }

        guard item.price <= coinsDeposited else {
            throw VendingMachineError.insufficientFunds(coinsNeeded: item.price - coinsDeposited)
        }

        coinsDeposited -= item.price

        var newItem = item
        newItem.count -= 1
        inventory[name] = newItem

        print("Dispensing (name)")
    }
}
Реализация vend(itemNamed: ) метода использует оператор guard для раннего выхода из метода и генерации соответствующих ошибок, если какое-либо требование для приобретения закуски не будет выполнено. Потому что инструкция throw мгновенно изменяет управление программой, и выбранная позиция будет куплена, только если все эти требования будут выполнены.
Поскольку vend(itemNamed: ) метод передает все ошибки, которые он генерирует, вызывающему его коду, то они должны быть обработаны напрямую, используя оператор do-catch, try? или try!, или должны быть переданы дальше. Например, buyFavoriteSnack(person:vendingMachine: ) в примере ниже — это тоже генерирующая функция, и любые ошибки, которые генерирует метод vend(itemNamed: ), будут переноситься до точки, где будет вызываться функция buyFavoriteSnack(person:vendingMachine: ).
let favoriteSnacks = [
    "Alice": "Chips",
    "Bob": "Licorice",
    "Eve": "Pretzels"
]
func buyFavoriteSnack(person: String, vendingMachine: VendingMachine) throws {
    let snackName = favoriteSnacks[person] ?? "Candy Bar"
    try vendingMachine.vend(itemNamed: snackName)
}
В этом примере, функция buyFavoriteSnack(person:vendingMachine: ) подбирает любимые закуски данного человека и пытается их купить, вызывая vend(itemNamed: ) метод. Поскольку метод vend(itemNamed: ) может сгенерировать ошибку, он вызывается с ключевым словом try перед ним.
Генерирующие ошибку инициализаторы могут распространять ошибки таким же образом, как генерирующие ошибку функции. Например, инициализатор структуры PurchasedSnack в списке ниже вызывает генерирующую ошибку функции как часть процесса инициализации, и он обрабатывает любые ошибки, с которыми сталкивается, путем распространения их до вызывающего его объекта.
struct PurchasedSnack {
    let name: String
    init(name: String, vendingMachine: VendingMachine) throws {
        try vendingMachine.vend(itemNamed: name)
        self.name = name
    }
}
Обработка ошибок с использованием do-catch
Используйте инструкцию do-catch для обработки ошибок, запуская блок кода. Если выдается ошибка в коде условия do, она соотносится с условием catch для определения того, кто именно сможет обработать ошибку.
Вот общий вид условия do-catch:
do {
    try выражение
    выражение
} catch шаблон 1 {
    выражение
} catch шаблон 2  where условие {
    выражение
} catch шаблон 3, шаблон 4 where условие {
    выражение
} catch {
    выражение
}
Вы пишете шаблон после ключевого слова catch, чтобы указать какие ошибки могут обрабатываться данным пунктом этого обработчика. Если условие catch не имеет своего шаблона, то оно подходит под любые ошибки и связывает ошибки к локальной константе error. Более подробно о соответствии шаблону см. Шаблоны.
Например, следующий код обрабатывает все три случая в перечислении VendingMachineError, но все другие ошибки должны быть обработаны окружающей областью:
var vendingMachine = VendingMachine()
vendingMachine.coinsDeposited = 8
do {
    try buyFavoriteSnack(person: "Alice", vendingMachine: vendingMachine)
} catch VendingMachineError.invalidSelection {
    print("Ошибка выбора.")
} catch VendingMachineError.outOfStock {
    print("Нет в наличии.")
} catch VendingMachineError.insufficientFunds(let coinsNeeded) {
    print("Недостаточно средств. Пожалуйста вставьте еще (coinsNeeded) монетки.")
} catch {
    print("Неожиданная ошибка: (error).")
}
// Выведет "Недостаточно средств. Пожалуйста вставьте еще 2 монетки.
В приведенном выше примере, buyFavoriteSnack(person:vendingMachine: ) функция вызывается в выражении try, потому что она может сгенерировать ошибку. Если генерируется ошибка, выполнение немедленно переносится в условия catch, которые принимают решение о продолжении передачи ошибки. Если ошибка не генерируется, остальные операторы do выполняются.
В условии catch не нужно обрабатывать все возможные ошибки, которые может вызвать код в условии do. Если ни одно из условий catch не обрабатывает ошибку, ошибка распространяется на окружающую область. Однако распространяемая ошибка должна обрабатываться некоторой внешней областью. В функции nonthrowing условие включения do-catch должно обрабатывать ошибку. В функции throwing либо включающая условие do-catch, либо вызывающая сторона должна обрабатывать ошибку. Если ошибка распространяется на область верхнего уровня без обработки, вы получите ошибку исполнения.
Например, приведенный ниже пример можно записать так, чтобы любая ошибка, которая не является VendingMachineError, вместо этого захватывалась вызывающей функцией:
func nourish(with item: String) throws {
    do {
        try vendingMachine.vend(itemNamed: item)
    } catch is VendingMachineError {
        print("Некорректный вывод, нет в наличии или недостаточно денег.")
    }
}

do {
    try nourish(with: "Beet-Flavored Chips")
} catch {
    print("Unexpected non-vending-machine-related error: (error)")
}
// Выведет "Некорректный вывод, нет в наличии или недостаточно денег."
В nourish(with: ), если vend(itemNamed : ) выдает ошибку, которая является одним из кейсов перечисления VendingMachineError, nourish(with: ) обрабатывает ошибку, печатая сообщение. В противном случае, nourish(with: ) распространяет ошибку на свое место вызова. Ошибка затем попадает в общее условие catch.
Преобразование ошибок в опциональные значения
Вы можете использовать try? для обработки ошибки, преобразовав ее в опциональное значение. Если ошибка генерируется при условии try?, то значение выражения вычисляется как nil. Например, в следующем коде x и y имеют одинаковые значения и поведение:
func someThrowingFunction() throws -> Int {
    // ...
}

let x = try? someThrowingFunction()

let y: Int?
do {
    y = try someThrowingFunction()
} catch {
    y = nil
}
Если someThrowingFunction() генерирует ошибку, значение x и y равно nil. В противном случае значение x и y — это возвращаемое значение функции. Обратите внимание, что x и y являются опциональными, независимо от того какой тип возвращает функция someThrowingFunction().
Использование try? позволяет написать краткий код обработки ошибок, если вы хотите обрабатывать все ошибки таким же образом. Например, следующий код использует несколько попыток для извлечения данных или возвращает nil, если попытки неудачные.
func fetchData() -> Data? {
    if let data = try? fetchDataFromDisk() { return data }
    if let data = try? fetchDataFromServer() { return data }
    return nil
}
Запрет на передачу ошибок
Иногда вы знаете, что функции throw или методы не сгенерируют ошибку во время исполнения. В этих случаях, вы можете написать try! перед выражением для запрета передачи ошибки и завернуть вызов в утверждение того, что ошибка точно не будет сгенерирована. Если ошибка на самом деле сгенерирована, вы получите сообщение об ошибке исполнения.
Например, следующий код использует loadImage(atPath: ) функцию, которая загружает ресурс изображения по заданному пути или генерирует ошибку, если изображение не может быть загружено. В этом случае, поскольку изображение идет вместе с приложением, сообщение об ошибке не будет сгенерировано во время выполнения, поэтому целесообразно отключить передачу ошибки.
let photo = try! loadImage(atPath: "./Resources/John Appleseed.jpg")Установка действий по очистке (Cleanup)
Вы используете оператор defer для выполнения набора инструкций перед тем как исполнение кода оставит текущий блок. Это позволяет сделать любую необходимую очистку, которая должна быть выполнена, независимо от того, как именно это произойдет — либо он покинет из-за сгенерированной ошибки или из-за оператора, такого как break или return. Например, вы можете использовать defer, чтобы удостовериться, что файл дескрипторов закрыт и выделенная память вручную освобождена.
Оператор defer откладывает выполнение, пока не происходит выход из текущей области. Этот оператор состоит из ключевого слова defer и выражений, которые должны быть выполнены позже. Отложенные выражения могут не содержать кода, изменяющего контроль исполнения изнутри наружу, при помощи таких операторов как break или return, или просто генерирующего ошибку. Отложенные действия выполняются в обратном порядке, как они указаны, то есть, код в первом операторе defer выполняется после кода второго, и так далее.
func processFile(filename: String) throws {
    if exists(filename) {
        let file = open(filename)
        defer {
            close(file)
        }
        while let line = try file.readline() {
            // работаем с файлом.
        }
        // close(file) вызывается здесь, в конце зоны видимости.
    }
}
Приведенный выше пример использует оператор defer, чтобы удостовериться, что функция open(_: ) имеет соответствующий вызов и для close(_: ).
Заметка
Вы можете использовать оператор defer, даже если не используете кода обработки ошибок.
Если вы нашли ошибку, пожалуйста, выделите фрагмент текста и нажмите Ctrl+Enter.
All programmers, especially skilled ones, need to worry about error handling. There is no shame in errors. They don’t mean you’re a terrible programmer. Concerning yourself with error handling simply means you acknowledge that you don’t control everything.
In this chapter, you’ll learn the fundamentals of error handling: what it is, how to implement and when to worry about it.
What is error handling?
Error handling is the art of failing gracefully. Although you have complete control of your code, you don’t control outside events and resources. These include user input, network connections and external files your app needs to access.
Imagine you’re in the desert and you decide to surf the internet. You’re miles away from the nearest hotspot with no cellular signal. You open your internet browser. What happens? Does your browser hang there forever with a spinning wheel of death, or does it immediately alert you to the fact that you have no internet access?
When you’re designing the user experience for your apps, you must think about the error states. Think about what can go wrong and how you want your app to respond to it.
First level error handling with optionals
Before you deep-dive into error handling protocols and blocks, you’ll start with the most straightforward error-handling mechanism possible. When programming, it’s essential to use the simplest solution at your disposal. There is no point in building a complicated solution when changing one line of code would work.
Failable initializers
When you attempt to initialize an object, it may fail. For example, if you’re converting a String into an Int, there is no guarantee it’ll work.
let value = Int("3")          // Optional(3)
let failedValue = Int("nope") // nil
enum PetFood: String {
  case kibble, canned
}

let morning = PetFood(rawValue: "kibble")  // Optional(.kibble)
let snack = PetFood(rawValue: "fuuud!")    // nil
struct PetHouse {
  let squareFeet: Int

  init?(squareFeet: Int) {
    if squareFeet < 1 {
      return nil
    }
    self.squareFeet = squareFeet
  }
}

let tooSmall = PetHouse(squareFeet: 0) // nil
let house = PetHouse(squareFeet: 1)    // Optional(Pethouse)
Optional chaining
Have you ever seen a prompt in Xcode from the compiler that something is wrong, and you are supposed to add ! to a property? The compiler tells you that you’re dealing with an optional value and sometimes suggests that you deal with it by force unwrapping.
class Pet {
  var breed: String?

  init(breed: String? = nil) {
    self.breed = breed
  }
}

class Person {
  let pet: Pet

  init(pet: Pet) {
    self.pet = pet
  }
}

let delia = Pet(breed: "pug")
let olive = Pet()

let janie = Person(pet: olive)
let dogBreed = janie.pet.breed! // This is bad! Will cause a crash!
if let dogBreed = janie.pet.breed {
  print("Olive is a (dogBreed).")
} else {
  print("Olive’s breed is unknown.")
}
class Toy {

  enum Kind {
    case ball
    case zombie
    case bone
    case mouse
  }

  enum Sound {
    case squeak
    case bell
  }

  let kind: Kind
  let color: String
  var sound: Sound?

  init(kind: Kind, color: String, sound: Sound? = nil) {
    self.kind = kind
    self.color = color
    self.sound = sound
  }
}

class Pet {

  enum Kind {
    case dog
    case cat
    case guineaPig
  }

  let name: String
  let kind: Kind
  let favoriteToy: Toy?

  init(name: String, kind: Kind, favoriteToy: Toy? = nil) {
    self.name = name
    self.kind = kind
    self.favoriteToy = favoriteToy
  }
}

class Person {
  let pet: Pet?

  init(pet: Pet? = nil) {
    self.pet = pet
  }
}

let janie = Person(pet: Pet(name: "Delia", kind: .dog,
                   favoriteToy: Toy(kind: .ball,
                   color: "Purple", sound: .bell)))
let tammy = Person(pet: Pet(name: "Evil Cat Overlord",
                   kind: .cat, favoriteToy: Toy(kind: .mouse,
                   color: "Orange")))
let felipe = Person()
if let sound = janie.pet?.favoriteToy?.sound {
  print("Sound (sound).")
} else {
  print("No sound.")
}
if let sound = tammy.pet?.favoriteToy?.sound {
  print("Sound (sound).")
} else {
  print("No sound.")
}

if let sound = felipe.pet?.favoriteToy?.sound {
  print("Sound (sound).")
} else {
  print("No sound.")
}
Map and compactMap
Let’s say you want to create an array of pets that are owned by the team. First off, you need to create an array of team members:
let team = [janie, tammy, felipe]
let petNames = team.map { $0.pet?.name }
for pet in petNames {
  print(pet)
}
Optional("Delia")
Optional("Evil Cat Overlord")
nil

let betterPetNames = team.compactMap { $0.pet?.name }

for pet in betterPetNames {
  print(pet)
}
Delia
Evil Cat Overlord
Error protocol
Swift includes the Error protocol, which forms the basis of the error-handling architecture. Any type that conforms to this protocol represents an error.
class Pastry {
  let flavor: String
  var numberOnHand: Int

  init(flavor: String, numberOnHand: Int) {
    self.flavor = flavor
    self.numberOnHand = numberOnHand
  }
}

enum BakeryError: Error {
  case tooFew(numberOnHand: Int)
  case doNotSell
  case wrongFlavor
  case inventory
  case noPower
}
Throwing errors
What does your program do with these errors? It throws them, of course! That’s the actual terminology you’ll see: throwing errors then catching them.
class Bakery {
  var itemsForSale = [
    "Cookie": Pastry(flavor: "ChocolateChip", numberOnHand: 20),
    "PopTart": Pastry(flavor: "WildBerry", numberOnHand: 13),
    "Donut" : Pastry(flavor: "Sprinkles", numberOnHand: 24),
    "HandPie": Pastry(flavor: "Cherry", numberOnHand: 6)
  ]

  func open(_ now: Bool = Bool.random()) throws -> Bool {
    guard now else {
      throw Bool.random() ? BakeryError.inventory
                          : BakeryError.noPower
    }
    return now
  }

  func orderPastry(item: String,
                   amountRequested: Int,
                   flavor: String)  throws  -> Int {
    guard let pastry = itemsForSale[item] else {
      throw BakeryError.doNotSell
    }
    guard flavor == pastry.flavor else {
      throw BakeryError.wrongFlavor
    }
    guard amountRequested <= pastry.numberOnHand else {
      throw BakeryError.tooFew(numberOnHand:
                               pastry.numberOnHand)
    }
    pastry.numberOnHand -= amountRequested

    return pastry.numberOnHand
  }
}
let bakery = Bakery()
bakery.open()
bakery.orderPastry(item: "Albatross",
                   amountRequested: 1,
                   flavor: "AlbatrossFlavor")
Handling errors
After your program throws an error, you need to handle that error. There are two ways to approach this problem: You can immediately handle your errors or bubble them up to another level.
do {
  try bakery.open()
  try bakery.orderPastry(item: "Albatross",
                          amountRequested: 1,
                          flavor: "AlbatrossFlavor")
} catch BakeryError.inventory, BakeryError.noPower {
  print("Sorry, the bakery is now closed.")
} catch BakeryError.doNotSell {
  print("Sorry, but we don’t sell this item.")
} catch BakeryError.wrongFlavor {
  print("Sorry, but we don’t carry this flavor.")
} catch BakeryError.tooFew {
  print("Sorry, we don’t have enough items to fulfill your
         order.")
}

Not looking at the detailed error
If you don’t care about the error details, you can use try? to wrap the result of a function (or method) in an optional. The function will then return nil instead of throwing an error. No need to set up a do {} catch {} block.
let open = try? bakery.open(false)
let remaining = try? bakery.orderPastry(item: "Albatross",
                                        amountRequested: 1,
                                        flavor: "AlbatrossFlavor")
Stoping your program on an error
Sometimes you know for sure that your code is not going to fail. For example, if you certainly know the bakery is now open and you just restocked the cookie jar, you’ll be able to order a cookie. Add:
do {
  try bakery.open(true)
  try bakery.orderPastry(item: "Cookie",
                         amountRequested: 1,
                         flavor: "ChocolateChip")
}
catch {
  fatalError()
}
try! bakery.open(true)
try! bakery.orderPastry(item: "Cookie", amountRequested: 1,
                        flavor: "ChocolateChip")
Advanced error handling
Cool, you know how to handle errors! That’s neat, but how do you scale your error handling to a more extensive, more complex app?
PugBot
The sample project you’ll work with in this second half of the chapter is PugBot. The PugBot is cute and friendly, but sometimes it gets lost and confused.

enum Direction {
  case left
  case right
  case forward
}
enum PugBotError: Error {
  case invalidMove(found: Direction, expected: Direction)
  case endOfPath
}

class PugBot {
  let name: String
  let correctPath: [Direction]
  private var currentStepInPath = 0

  init(name: String, correctPath: [Direction]) {
    self.correctPath = correctPath
    self.name = name
  }

  func move(_ direction: Direction) throws {
    guard currentStepInPath < correctPath.count else {
      throw PugBotError.endOfPath
    }
    let nextDirection = correctPath[currentStepInPath]
    guard nextDirection == direction else {
      throw PugBotError.invalidMove(found: direction,
                                    expected: nextDirection)
    }
    currentStepInPath += 1
  }

  func reset() {
    currentStepInPath = 0
  }
}
let pug = PugBot(name: "Pug",
                 correctPath: [.forward, .left, .forward, .right])

func goHome() throws {
  try pug.move(.forward)
  try pug.move(.left)
  try pug.move(.forward)
  try pug.move(.right)
}

do {
  try goHome()
} catch {
  print("PugBot failed to get home.")
}
Handling multiple errors
Since you’re a smart developer, you’ve noticed that you’re not handling errors in goHome(). Instead, it just passes the error up to the caller. You might benefit from a function that can try to move the PugBot and handle errors by reporting what went wrong in a String.
func moveSafely(_ movement: () throws -> ()) -> String {
  do {
    try movement()
    return "Completed operation successfully."
  } catch PugBotError.invalidMove(let found, let expected) {
    return "The PugBot was supposed to move (expected),
            but moved (found) instead."
  } catch PugBotError.endOfPath {
    return "The PugBot tried to move past the end of the path."
  } catch {
    return "An unknown error occurred."
  }
}
pug.reset()
moveSafely(goHome)

pug.reset()
moveSafely {
  try pug.move(.forward)
  try pug.move(.left)
  try pug.move(.forward)
  try pug.move(.right)
}

Rethrows
A function that takes a throwing closure as a parameter has to choose: either catch every error or be a throwing function. Let’s say you want a utility function to perform a certain movement or set of movements, several times in a row. You could define this function as follows:
func perform(times: Int, movement: () throws -> ()) rethrows {
  for _ in 1...times {
    try movement()
  }
}
Error handling for asynchronous code
The do-try-catch mechanism works only for synchronous code. You can’t use throws to throw errors if you execute your code asynchronously. Swift has you covered, but you first need to understand how to work with asynchronous closures and Grand Central Dispatch (GCD).
GCD
Modern operating environments are multi-threaded, meaning work can happen simultaneously on multiple threads of execution. For example, all networking operations execute in a background thread, so they don’t block the user interface that happens on the main thread.
//1
func log(message: String) {
  let thread = Thread.current.isMainThread ? "Main"
               : "Background"
  print("(thread) thread: (message).")
}

//2
func addNumbers(upTo range: Int) -> Int {
  log(message: "Adding numbers...")
  return (1...range).reduce(0, +)
}
let queue = DispatchQueue(label: "queue")
// 1
func execute<Result>(backgroundWork: @escaping () -> Result,
                     mainWork: @escaping (Result) -> ()) {
  // 2
  queue.async {
    let result = backgroundWork()
    // 3
  DispatchQueue.main.async {
      mainWork(result)
    }
  }
}
execute(backgroundWork: { addNumbers(upTo: 100) },
        mainWork:       { log(message: "The sum is ($0)") })
Background thread: Adding numbers...
Main thread: The sum is 5050.
Result
You use the Result type defined in the Swift standard library to capture errors thrown by asynchronous functions. Here’s how it is defined:
enum Result<Success, Failure> where Failure: Error {
  case success(Success)
  case failure(Failure)
}
// 1
struct Tutorial {
  let title: String
  let author: String
}

// 2
enum TutorialError: Error {
  case rejected
}

// 3
func feedback(for tutorial: Tutorial) -> Result<String,
                                                TutorialError> {
  Bool.random() ? .success("published") : .failure(.rejected)
}
func edit(_ tutorial: Tutorial) {
  queue.async {
    // 1
    let result = feedback(for: tutorial)
    DispatchQueue.main.async {
      switch result {
        // 2
        case let .success(data):
          print("(tutorial.title) by (tutorial.author) was
                 (data) on the website.")
        // 3
        case let .failure(error):
          print("(tutorial.title) by (tutorial.author) was
                 (error).")
      }
    }
  }
}

let tutorial = Tutorial(title: "What’s new in Swift 5.1",
                        author: "Cosmin Pupăză")
edit(tutorial)
let result = feedback(for: tutorial)
do {
  let data = try result.get()
  print("(tutorial.title) by (tutorial.author) was
         (data) on the website.")
} catch {
  print("(tutorial.title) by (tutorial.author) was (error).")
}
Challenges
Before moving on, here are some challenges to test your knowledge of error handling. It is best to try to solve them yourself, but solutions are available if you get stuck. These came with the download or are available at the printed book’s source code link listed in the introduction.
Challenge 1: Even strings
Write a throwing function that converts a String to an even number, rounding down if necessary.
Challenge 2: Safe division
Write a throwing function that divides type Int types.
Key points
- A type can conform to the Error protocol to work with Swift’s error-handling system.
- Any function that can throw an error, or call a function that can throw an error, has to be marked with throws or rethrows.
- When calling an error-throwing function, you must embed the function call in a
doblock. Within that block, youtrythe function, and if it fails, youcatchthe error. - You use GCD and
Resultto handle errors asynchronously. - An escaping closure is a closure parameter that can be stored and called after the function returns.
Swift 2 introduced error handling by way of the
throws, do, try and catch keywords.
It was designed to work hand-in-hand with
Cocoa error handling conventions,
such that any type conforming to the ErrorProtocol protocol
(since renamed to Error)
was implicitly bridged to NSError and
Objective-C methods with an NSError** parameter,
were imported by Swift as throwing methods.
- (NSURL *)replaceItemAtURL:(NSURL *)url
                    options:(NSFileVersionReplacingOptions)options
                      error:(NSError * _Nullable *)error;
For the most part,
these changes offered a dramatic improvement over the status quo
(namely, no error handling conventions in Swift at all).
However, there were still a few gaps to fill
to make Swift errors fully interoperable with Objective-C types.
as described by Swift Evolution proposal
SE-0112: “Improved NSError Bridging”.
Not long after these refinements landed in Swift 3,
the practice of declaring errors in enumerations
had become idiomatic.
Yet for how familiar we’ve all become with
Error (née ErrorProtocol),
surprisingly few of us are on a first-name basis with
the other error protocols to come out of SE-0112.
Like, when was the last time you came across LocalizedError in the wild?
How about RecoverableError?
CustomNSError qu’est-ce que c’est?
At the risk of sounding cliché,
you might say that these protocols are indeed pretty obscure,
and there’s a good chance you haven’t heard of them:
LocalizedError-
A specialized error that provides
localized messages describing the error and why it occurred. RecoverableError-
A specialized error that may be recoverable
by presenting several potential recovery options to the user. CustomNSError-
A specialized error that provides a
domain, error code, and user-info dictionary.
If you haven’t heard of any of these until now,
you may be wondering when you’d ever use them.
Well, as the adage goes,
“There’s no time like the present”.
This week on NSHipster,
we’ll take a quick look at each of these Swift Foundation error protocols
and demonstrate how they can make your code —
if not less error-prone —
then more enjoyable in its folly.
Communicating Errors to the User
Too many cooks spoil the broth.
Consider the following Broth type
with a nested Error enumeration
and an initializer that takes a number of cooks
and throws an error if that number is inadvisably large:
struct Broth {
  enum Error {
    case tooManyCooks(Int)
  }

  init(numberOfCooks: Int) throws {
    precondition(numberOfCooks > 0)
    guard numberOfCooks < redacted else {
      throw Error.tooManyCooks(numberOfCooks)
    }

    // ... proceed to make broth
  }
}
If an iOS app were to communicate an error
resulting from broth spoiled by multitudinous cooks,
it might do so
with by presenting a UIAlertController
in a catch statement like this:
import UIKit
class ViewController: UIViewController {
override func viewDidAppear(_ animated: Bool) {
super.viewDidAppear(animated)
do {
self.broth = try Broth(numberOfCooks: 100)
} catch let error as Broth.Error {
let title: String
let message: String
switch error {
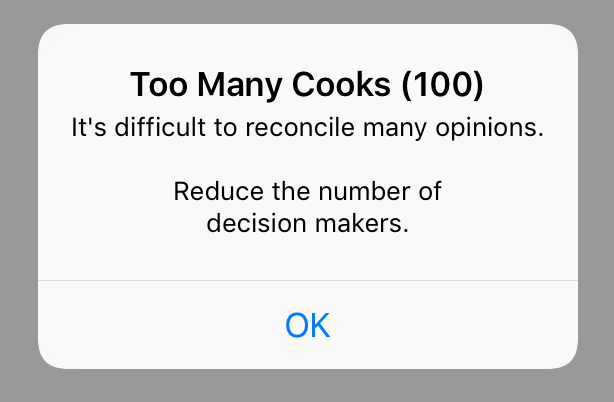
case .tooManyCooks(let numberOfCooks):
title = "Too Many Cooks ((numberOfCooks))"
message = """
It's difficult to reconcile many opinions.
Reduce the number of decision makers.
"""
}
let alertController =
UIAlertController(title: title,
message: message,
preferredStyle: .alert)
alertController.addAction(
UIAlertAction(title: "OK",
style: .default)
)
self.present(alertController, animated: true, completion: nil)
} catch {
// handle other errors...
}
}
}
Such an implementation, however,
is at odds with well-understood boundaries between models and controllers.
Not only does it create bloat in the controller,
it also doesn’t scale to handling multiple errors
or handling errors in multiple contexts.
To reconcile these anti-patterns,
let’s turn to our first Swift Foundation error protocol.
Adopting the LocalizedError Protocol
The LocalizedError protocol inherits the base Error protocol
and adds four instance property requirements.
protocol LocalizedError : Error {
    var errorDescription: String? { get }
    var failureReason: String? { get }
    var recoverySuggestion: String? { get }
    var helpAnchor: String? { get }
}
These properties map 1:1 with familiar NSError userInfo keys.
| Requirement | User Info Key |
|---|---|
errorDescription |
NSLocalizedDescriptionKey |
failureReason |
NSLocalizedFailureReasonErrorKey |
recoverySuggestion |
NSLocalizedRecoverySuggestionErrorKey |
helpAnchor |
NSHelpAnchorErrorKey |
Let’s take another pass at our nested Broth.Error type
and see how we might refactor error communication from the controller
to instead be concerns of LocalizedError conformance.
import Foundation

extension Broth.Error: LocalizedError {
    var errorDescription: String? {
        switch self {
        case .tooManyCooks(let numberOfCooks):
            return "Too Many Cooks ((numberOfCooks))"
        }
    }

    var failureReason: String? {
        switch self {
        case .tooManyCooks:
            return "It's difficult to reconcile many opinions."
        }
    }

    var recoverySuggestion: String? {
        switch self {
        case .tooManyCooks:
            return "Reduce the number of decision makers."
        }
    }
}
Using switch statements may be overkill
for a single-case enumeration such as this,
but it demonstrates a pattern that can be extended
for more complex error types.
Note also how pattern matching is used
to bind the numberOfCooks constant to the associated value
only when it’s necessary.
Now we can
import UIKit

class ViewController: UIViewController {
    override func viewDidAppear(_ animated: Bool) {
        super.viewDidAppear(animated)

        do {
            try makeBroth(numberOfCooks: 100)
        } catch let error as LocalizedError {
            let title = error.errorDescription
            let message = [
                error.failureReason,
                error.recoverySuggestion
            ].compactMap { $0 }
             .joined(separator: "nn")

            let alertController =
                UIAlertController(title: title,
                                  message: message,
                                  preferredStyle: .alert)
            alertController.addAction(
                UIAlertAction(title: "OK",
                              style: .default)
            )

            self.present(alertController, animated: true, completion: nil)
        } catch {
            // handle other errors...
        }
    }
}
If that seems like a lot of work just to communicate an error to the user…
you might be onto something.
Although UIKit borrowed many great conventions and idioms from AppKit,
error handling wasn’t one of them.
By taking a closer look at what was lost in translation,
we’ll finally have the necessary context to understand
the two remaining error protocols to be discussed.
Communicating Errors on macOS
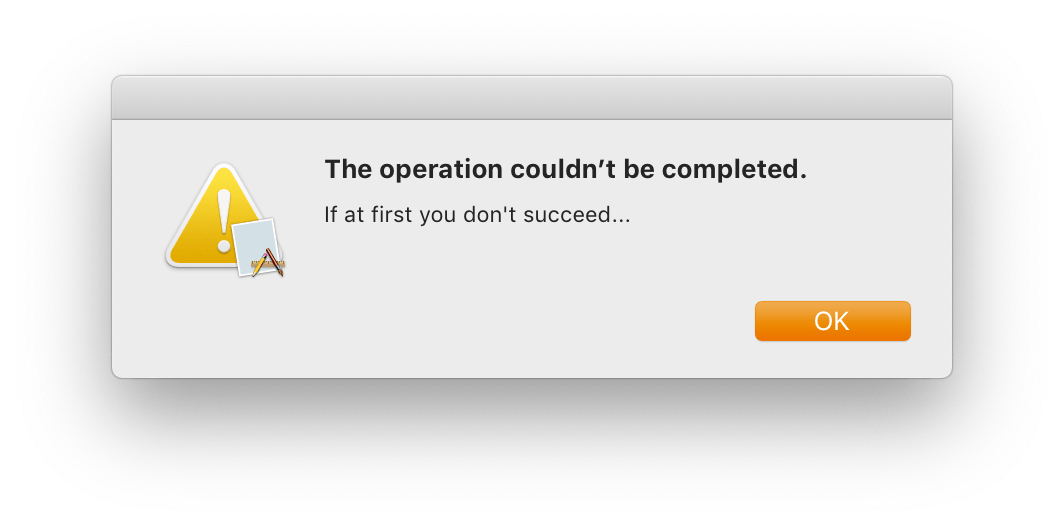
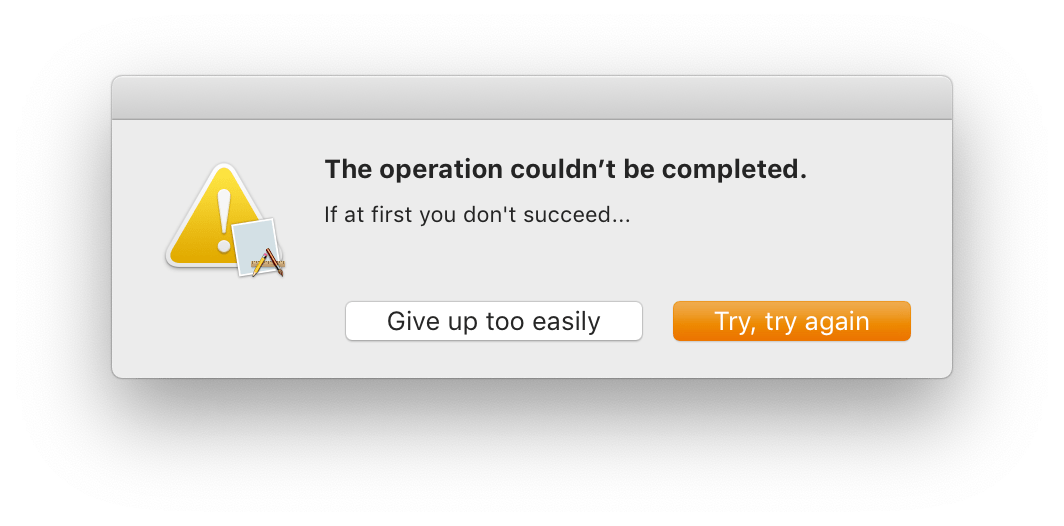
If at first you don’t succeed, try, try again.
Communicating errors to users is significantly easier on macOS than on iOS.
For example,
you might construct and pass an NSError object
to the presentError(_:) method,
called on an NSWindow.
import AppKit

@NSApplicationMain
class AppDelegate: NSObject, NSApplicationDelegate {
  @IBOutlet weak var window: NSWindow!

  func applicationDidFinishLaunching(_ aNotification: Notification) {
    do {
      _ = try something()
    } catch {
      window.presentError(error)
    }
  }

  func something() throws -> Never {
    let userInfo: [String: Any] = [
      NSLocalizedDescriptionKey:
        NSLocalizedString("The operation couldn’t be completed.",
                          comment: "localizedErrorDescription"),
      NSLocalizedRecoverySuggestionErrorKey:
        NSLocalizedString("If at first you don't succeed...",
                          comment: "localizedErrorRecoverSuggestion")
    ]

    throw NSError(domain: "com.nshipster.error", code: 1, userInfo: userInfo)
  }
}
Doing so presents a modal alert dialog
that fits right in with the rest of the system.
But macOS error handling isn’t merely a matter of convenient APIs;
it also has built-in mechanisms for allowing
users to select one of several options
to attempt to resolve the reported issue.
Recovering from Errors
To turn a conventional NSError into
one that supports recovery,
you specify values for the userInfo keys
NSLocalizedRecoveryOptionsErrorKey and NSRecoveryAttempterErrorKey.
A great way to do that
is to override the application(_:willPresentError:) delegate method
and intercept and modify an error before it’s presented to the user.
extension AppDelegate {
  func application(_ application: NSApplication,
           willPresentError error: Error) -> Error
  {
    var userInfo: [String: Any] = (error as NSError).userInfo
    userInfo[NSLocalizedRecoveryOptionsErrorKey] =  [
      NSLocalizedString("Try, try again",
                        comment: "tryAgain")
      NSLocalizedString("Give up too easily",
                        comment: "giveUp")
    ]
    userInfo[NSRecoveryAttempterErrorKey] = self

    return NSError(domain: (error as NSError).domain,
                   code: (error as NSError).code,
                   userInfo: userInfo)
  }
}
For NSLocalizedRecoveryOptionsErrorKey,
specify an array of one or more localized strings
for each recovery option available the user.
For NSRecoveryAttempterErrorKey,
set an object that implements the
attemptRecovery(fromError:optionIndex:) method.
extension AppDelegate {
  // MARK: NSErrorRecoveryAttempting
  override func attemptRecovery(fromError error: Error,
                  optionIndex recoveryOptionIndex: Int) -> Bool
  {
    do {
      switch recoveryOptionIndex {
      case 0: // Try, try again
        try something()
      case 1:
        fallthrough
      default:
        break
      }
    } catch {
      window.presentError(error)
    }

    return true
  }
}
With just a few lines of code,
you’re able to facilitate a remarkably complex interaction,
whereby a user is alerted to an error and prompted to resolve it
according to a set of available options.
Cool as that is,
it carries some pretty gross baggage.
First,
the attemptRecovery requirement is part of an
informal protocol,
which is effectively a handshake agreement
that things will work as advertised.
Second,
the use of option indexes instead of actual objects
makes for code that’s as fragile as it is cumbersome to write.
Fortunately,
we can significantly improve on this
by taking advantage of Swift’s superior type system
and (at long last) the second subject of this article.
Modernizing Error Recovery with RecoverableError
The RecoverableError protocol,
like LocalizedError is a refinement on the base Error protocol
with the following requirements:
protocol RecoverableError : Error {
    var recoveryOptions: [String] { get }

    func attemptRecovery(optionIndex recoveryOptionIndex: Int, resultHandler handler: @escaping (Bool) -> Void)
    func attemptRecovery(optionIndex recoveryOptionIndex: Int) -> Bool
}
Also like LocalizedError,
these requirements map onto error userInfo keys
(albeit not as directly).
| Requirement | User Info Key |
|---|---|
recoveryOptions |
NSLocalizedRecoveryOptionsErrorKey |
attemptRecovery(optionIndex:_:) attemptRecovery(optionIndex:)
|
NSRecoveryAttempterErrorKey *
|
The recoveryOptions property requirement
is equivalent to the NSLocalizedRecoveryOptionsErrorKey:
an array of strings that describe the available options.
The attemptRecovery functions
formalize the previously informal delegate protocol;
func attemptRecovery(optionIndex:)
is for “application” granularity,
whereas
attemptRecovery(optionIndex:resultHandler:)
is for “document” granularity.
Supplementing RecoverableError with Additional Types
On its own,
the RecoverableError protocol improves only slightly on
the traditional, NSError-based methodology
by formalizing the requirements for recovery.
Rather than implementing conforming types individually,
we can generalize the functionality
with some clever use of generics.
First,
define an ErrorRecoveryDelegate protocol
that re-casts the attemptRecovery methods from before
to use an associated, RecoveryOption type.
protocol ErrorRecoveryDelegate: class {
    associatedtype RecoveryOption: CustomStringConvertible,
                                   CaseIterable

    func attemptRecovery(from error: Error,
                         with option: RecoveryOption) -> Bool
}
Requiring that RecoveryOption conforms to CaseIterable,
allows us to vend options directly to API consumers
independently of their presentation to the user.
From here,
we can define a generic DelegatingRecoverableError type
that wraps an Error type
and associates it with the aforementioned Delegate,
which is responsible for providing recovery options
and attempting recovery with the one selected.
struct DelegatingRecoverableError<Delegate, Error>: RecoverableError
  where Delegate: ErrorRecoveryDelegate,
        Error: Swift.Error
{
  let error: Error
  weak var delegate: Delegate? = nil

  init(recoveringFrom error: Error, with delegate: Delegate?) {
    self.error = error
    self.delegate = delegate
  }

  var recoveryOptions: [String] {
    return Delegate.RecoveryOption.allCases.map { "($0)" }
  }

  func attemptRecovery(optionIndex recoveryOptionIndex: Int) -> Bool {
    let recoveryOptions = Delegate.RecoveryOption.allCases
    let index = recoveryOptions.index(recoveryOptions.startIndex,
                                      offsetBy: recoveryOptionIndex)
    let option = Delegate.RecoveryOption.allCases[index]

    return self.delegate?.attemptRecovery(from: self.error,
                                          with: option) ?? false
  }
}
Now we can refactor the previous example of our macOS app
to have AppDelegate conform to ErrorRecoveryDelegate
and define a nested RecoveryOption enumeration
with all of the options we wish to support.
extension AppDelegate: ErrorRecoveryDelegate {
  enum RecoveryOption: String, CaseIterable, CustomStringConvertible {
    case tryAgain
    case giveUp

    var description: String {
      switch self {
      case .tryAgain:
        return NSLocalizedString("Try, try again",
                     comment: self.rawValue)
      case .giveUp:
        return NSLocalizedString("Give up too easily",
                     comment: self.rawValue)
      }
    }
  }

  func attemptRecovery(from error: Error,
             with option: RecoveryOption) -> Bool
  {
    do {
      if option == .tryAgain {
        try something()
      }
    } catch {
      window.presentError(error)
    }

    return true
  }

  func application(_ application: NSApplication, willPresentError error: Error) -> Error {
    return DelegatingRecoverableError(recoveringFrom: error, with: self)
  }
}
The result?
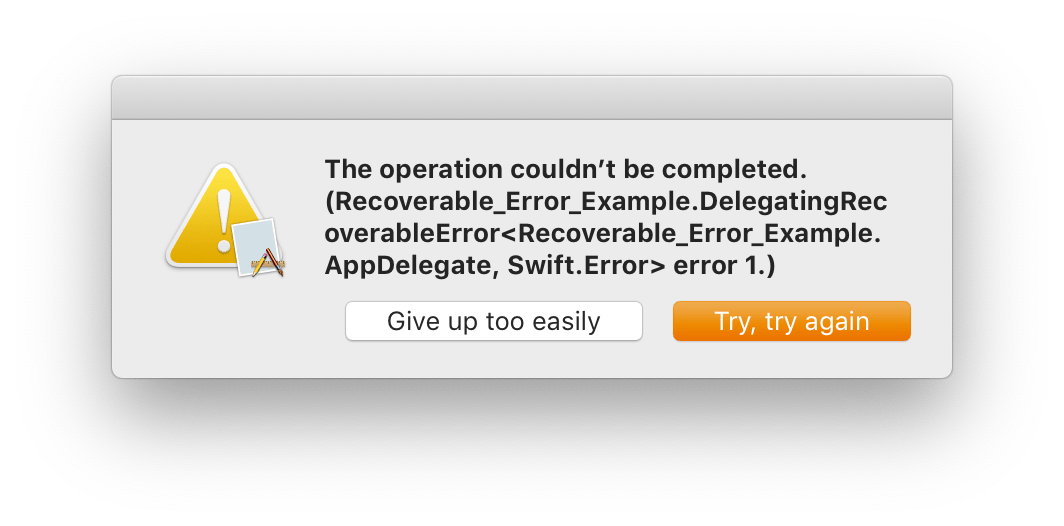
…wait, that’s not right.
What’s missing?
To find out,
let’s look at our third and final protocol in our discussion.
Improving Interoperability with Cocoa Error Handling System
The CustomNSError protocol
is like an inverted NSError:
it allows a type conforming to Error
to act like it was instead an NSError subclass.
protocol CustomNSError: Error {
    static var errorDomain: String { get }
    var errorCode: Int { get }
    var errorUserInfo: [String : Any] { get }
}
The protocol requirements correspond to the
domain, code, and userInfo properties of an NSError, respectively.
Now, back to our modal from before:
normally, the title is taken from userInfo via NSLocalizedDescriptionKey.
Types conforming to LocalizedError can provide this too
through their equivalent errorDescription property.
And while we could extend DelegatingRecoverableError
to adopt LocalizedError,
it’s actually much less work to add conformance for CustomNSError:
extension DelegatingRecoverableError: CustomNSError {
  var errorUserInfo: [String: Any] {
    return (self.error as NSError).userInfo
  }
}
With this one additional step,
we can now enjoy the fruits of our burden.
In programming,
it’s often not what you know,
but what you know about.
Now that you’re aware of the existence of
LocalizedError, RecoverableError, CustomNSError,
you’ll be sure to identify situations in which they might
improve error handling in your app.
Useful AF, amiright?
Then again,
“Familiarity breeds contempt”;
so often,
what initially endears one to ourselves
is what ultimately causes us to revile it.
Such is the error of our ways.
-
Tweet -
Share
0 -
Reddit -
+1 -
Pocket -
Pinterest
0 -
LinkedIn
0
[Download the Xcode 9 playground from GitHub so you can follow along with my detailed discussion and try iOS error handling using the do-try-catch feature yourself!]
This tutorial is the second in my series of tutorials on incorporating error checking into your Swift 4-based iOS apps. Remember that by “error checking,” I mean gracefully handling “unexpected values, events, and conditions that arise during program execution.” Today, I’ll limit my discussion of error checking to what Swift’s authors call “Error Handling.” Please read my first, introductory article in this series if you haven’t already. I can’t emphasize enough why you need to use error checking. Remember my discussion of app quality, user intolerance of buggy apps, and the huge amount of choices consumers have? The quality of your apps represents your reputation. Do you want a bad reputation when customers choose apps largely based on reviews? They can and will vote with their fingers (and wallets) and find other apps if they don’t like your app(s). Download my Xcode 9 playground so you can follow along with my discussion, run the code, and experiment with my Swift code by making your own changes.
This article is also a sequel to a tutorial I wrote on “iOS file management with FileManager in protocol-oriented Swift 4,” where I promised to add error checking to my code. iOS file management code absolutely needs error checking because of the nature of file manipulation:
… consider the task of reading and processing data from a file on disk. There are a number of ways this task can fail, including the file not existing at the specified path, the file not having read permissions, or the file not being encoded in a compatible format. Distinguishing among these different situations allows a program to resolve some errors and to communicate to the user any errors it can’t resolve.
“ERROR HANDLING” IN SWIFT 4
Reading Apple’s “The Swift Programming Language (Swift 4.1)” documentation, you’d think that “Error Handling” is the only way to deal with runtime errors. While it isn’t by far the only way to deal with errors, it is an important language feature. I’ll show you how to unleash Swift’s many other capabilities for error checking as this series of tutorials proceeds.
Overview of the Error Handling process
In Swift Error Handling, you mark methods that are capable of generating serious errors with the throws keyword. The definition of “serious” is subjective and up to you the programmer. You then must write code in your throws method (or block) that detects an unexpected condition, initializes an Error object with information describing the condition, and does a throw of the Error. Any other method that calls a method marked with the throws keyword must be able to handle a thrown Error. The calling method should wrap its call to a throws-marked method in a do try construct and either 1) do a catch and handle the Error or 2) do a catch and pass the Error off to the next caller in the call stack by doing a throw of the Error.
Note that you can catch or create and throw NSError objects for interoperability with Objective-C.
Some Apple SDKs still throw traditional exceptions in the form of NSException. Swift’s authors seem to be pushing towards use of Error Handling as the standard for error checking. Discussing exception handling is beyond the scope of this article.
When using an Apple SDK like Foundation, the authors of that code get to decide what constitutes “serious” and you must deal with any Error or NSError instances that are thrown. (You’ll want to at least try to handle NSException, too, if any are thrown while your app is running; if you don’t handle exceptions, your app will crash.)
Error Handling with do try catch
Earlier, I mentioned that if some block of code is marked as throws, you must handle it. You may ask yourself, “Well, how the heck should I know when to handle an Error or NSError? Do I look up every API call I make in the documentation?”
Thankfully, you don’t have to look up every call in every block of code that you write. The Swift compiler will tell you if you need to handle an Error or NSError.
Watch what happens when I try to create an instance of the FileHandle class, a member of Foundation. I start by writing the following statement…
|
let fileHandle = FileHandle(forReadingFrom: url) |
… and the compiler flags it with the error message, “Call can throw, but it is not marked with ‘try’ and the error is not handled” as shown here:
![]()
That tells me a whole lot. “Call can throw, but it is not marked with ‘try’” means that init(forReadingFrom:) is marked with the throws and is capable of reporting an Error or NSError.
But wait a minute. What about the last part of that error message; the thing about ‘and the error is not handled’?” Humor me and let me just add the try for now:
|
let fileHandle = try FileHandle(forReadingFrom: url) |
![]()
You see that we’re not quite finished yet. I’m not yet doing anything if an error is thrown. I’m not handling the error. That’s where Swift’s do try catch syntax comes into the picture. Here’s what I’d do in the simplest and broadest case:
|
do { let fileHandle = try FileHandle(forReadingFrom: url) // … fileHandle.closeFile() } catch { print(«Something went wrong here.») // write some code to recover from error } |
That catch allows me to handle anything that was thrown, but I wouldn’t get any detailed information describing the error. This is a “catch all” methodology, and you’ll generally see more specific catch clauses, like those shown below, but I can’t miss anything thrown using this broad methodology for error capturing.
Now I’ll specifically handle an Error. Notice my comment about leaving out the cast to Error. You should be able to figure that one out yourself. Note also that localizedDescription is the only information I can get from Error:
|
do { let fileHandle = try FileHandle(forReadingFrom: url) // … fileHandle.closeFile() } catch let error // as Error — warning: «‘as’ test is always true» { print(error.localizedDescription) // write some code to recover from error } |
Because the explanation for “error” given on the documentation page for init(forReadingFrom:) states that “If an error occurs, upon return contains an NSError object that describes the problem,” a more precise form of the previous code block would be:
|
do { let fileHandle = try FileHandle(forReadingFrom: url) // … fileHandle.closeFile() } catch let error as NSError { print(error.localizedDescription) print(error.domain) print(error.localizedFailureReason) print(error.localizedRecoveryOptions) // write some code to recover from error } |
NSError provides more information in this case — and I want to look for an NSError if I want to get information about the problem that occurred.
Watch what the compiler tells me if I try to catch an Error and an NSError:

The compiler is telling me that my catch for NSError is redundant and will be ignored. If I switch the order of the catch statements, everything’s OK because I assume that the Swift compiler is looking to handle the most specific errors first and then catch more general ones later:
|
do { let fileHandle = try FileHandle(forReadingFrom: url) // … fileHandle.closeFile() } catch let error as NSError { print(error.localizedDescription) // write some code to recover from error } catch let error // as Error — «‘as’ test is always true» { print(error.localizedDescription) // write some code to recover from error } |
Suppose I want “pass the buck,” so to speak, to someone else so they can handle the error? I can propagate the error up the call stack to the method that called my FileHandle-related code:
|
do { let fileHandle = try FileHandle(forReadingFrom: url) // … fileHandle.closeFile() } catch let error as NSError { throw error // just pass the error on… } |
Some code is capable of throwing different Error type instances, each one specifically tailored to the type of problem that occurred. In this case, you may end up with a long list of catch clauses. You can see an example in Apple’s documentation.
Finally, here’s an example of multiple catch statements, meant to be able to capture detailed error information and capture all error possibilities:
|
do { let fileHandle = try FileHandle(forReadingFrom: url) // … fileHandle.closeFile() } catch let error as NSError { print(error.localizedDescription) // write some code to recover from error } catch let error // as Error — «‘as’ test is always true» { print(error.localizedDescription) // write some code to recover from error } |
Error Handling versus exception handling
Just because Swift Error Handling looks like something called “exception handling” in languages like Objective-C and C++, it isn’t. When an error is detected and a developer throws an exception in one of these languages, something called “stack unwinding” occurs (see also here), which is a resource intensive process. Don’t confuse Swift’s Error Handling with exception handling:
Error handling in Swift resembles exception handling in other languages, with the use of the try, catch and throw keywords. Unlike exception handling in many languages–including Objective-C–error handling in Swift does not involve unwinding the call stack, a process that can be computationally expensive. As such, the performance characteristics of a throw statement are comparable to those of a return statement.
This is a big difference and I urge you to spend a little time researching exception handling in other languages and comparing it to Swift’s Error Handling. This difference constitutes a good reason for you to take advantage of Swift’s Error Handling: it’s convenient and efficient.
The problem with NSException
When I encounter an NSException thrown from some Objective-C API, I can’t handle it unless I jump through hoops. You can examine several suggested courses of action here and here.
In Swift, I can’t wrap an attempt to access an item of an Array at a specific index in a do-try-catch. If my code happens to attempt accessing an Array index which doesn’t exist, I get an NSException of “Fatal error: Index out of range.”
I don’t know why Swift’s authors haven’t addressed this issue.
SWIFT 4 CODE FOR ERROR HANDLING
You should be able to master Swift’s Error Handling after walking through the next example.
Creating an Error and reporting it
What’s the use of going through all the rigamarole of detecting erroneous conditions and flagging them if you don’t know the who, what, when, where, how, and why the error occurred? Swift provides an elegant mechanism for you to capture as much information as you want when an error occurs. You create a struct type and use value semantics designed to capture information describing the error condition.
From Apple’s documentation:
In Swift, errors are represented by values of types that conform to the Error protocol. This empty protocol indicates that a type can be used for error handling.
Swift enumerations are particularly well suited to modeling a group of related error conditions, with associated values allowing for additional information about the nature of an error to be communicated.
Here’s my tried and tested FileSystemError type:
|
1 2 3 4 5 6 7 8 9 10 11 12 13 14 15 16 17 18 19 20 21 22 23 24 25 26 27 28 29 30 31 |
struct FileSystemError : Error { enum Category { case Read case Write case Rename case Move case Delete } let type: Category let verboseDescription: String let inMethodName: String let inFileName: String let atLineNumber: Int static func handle(error: FileSystemError) -> String { let readableError = «»« nERROR — operation: [(error.type)]; reason: [(error.verboseDescription)]; in method: [(error.inMethodName)]; in file: [(error.inFileName)]; at line: [(error.atLineNumber)]n ««» print(readableError) return readableError } } // end struct FileSystemError |
It’s pretty powerful. It lets me group similar errors into categories and use those classifications throughout my code to, for example, label erroneous conditions or make decisions based on those labels. I can get a human readable description of an instance of my error type, making debugging very straightforward. Remember that “Structure types automatically receive a memberwise initializer if they do not define any of their own custom initializers.” Whenever I need to describe a FileSystemError, Xcode’s autocomplete requires me to fill in all values (click on the image to enlarge it):

iOS file management code with Error Handling
Let me walk you through an example of implementing Error Handling for one method. First I’ll show you the raw code, then I’ll explain it. I’m going to describe my code in series of steps — steps that are also comments in my code shown below. So as you read the code in this section, please refer to the corresponding step explanations in the next section.
I added the readBytes method shown below to the original file management code I wrote, displayed, and explained in my article on “iOS file management with FileManager in protocol-oriented Swift 4.”
|
1 2 3 4 5 6 7 8 9 10 11 12 13 14 15 16 17 18 19 20 21 22 23 24 25 26 27 28 29 30 31 32 33 34 35 36 37 38 39 40 41 42 43 44 45 46 47 48 49 50 51 52 53 54 |
extension AppFileManipulation { … // STEP 0 — mark with «throws» func readBytes(_ bytes: Int, startingAt offset: Int = 0, from file: String, at directory: AppDirectories) throws -> String? { var textRead: String? = nil var fileHandle: FileHandle // STEP 1 var url: URL = buildFullPath(forFileName: file, inDirectory: directory) // STEP 2 do { // STEP 3 fileHandle = try FileHandle(forReadingFrom: url) // the only throw // STEP 4 defer { fileHandle.closeFile() print(«Defer: file closed.») } // STEP 5: this CAN push the pointer in file to EOF let totalBytes = fileHandle.availableData // STEP 6 if (bytes > totalBytes.count) || ((bytes + offset) > totalBytes.count) { print(«Cannot read out of bounds.») textRead = nil } else // STEP 7 { // after calling availableData, it’s always // a good idea to reset the offset fileHandle.seek(toFileOffset: UInt64(offset)) let data = fileHandle.readData(ofLength: bytes) textRead = String(bytes: data, encoding: .utf8) print(«Finished reading file.») } } catch // STEP 8 { // propagate the error to the caller throw FileSystemError(type: .Read, verboseDescription: «Error during read file.», inMethodName: #function, inFileName: #file, atLineNumber: #line) } return textRead } // end func readBytes } // end extension AppFileManipulation |
Error Handling step explanations
While reading each of the following steps, refer to the correspondingly numbered comments in my code above.
STEP 0: Mark the method as throws.
STEP 1: Create a full path to the file from which I want to read.
STEP 2: The init(forReadingFrom:) initializer for FileHandle is marked as throws:
|
convenience init(forReadingFrom url: URL) throws |
So wrap it in a do try catch block. My do is a bit broad in scope, but possibly wrapping multiple calls in multiple do clauses in the same method is unreadable to me.
STEP 3: try to create a FileHandle instance for reading from a file using the init(forReadingFrom:) initializer.
STEP 4: Wrap the closeFile() call for the file (handle) I just opened in a defer statement block so that the file will be closed “no matter how program control is transferred” out of my readBytes method. Even if an exception is thrown, the file, a valuable resource, will not be left open. What would’ve happened if I had placed the call to closeFile() towards the end of my readBytes method? Suppose further that I made many calls to my readBytes method and they all failed with a throw? Files are valuable resources.
STEP 5: Find the size of the file in bytes using the handle’s availableData property so I can determine how many bytes I can safely read.*
STEP 6: Make sure the developer doesn’t read outside the bounds of the file’s size. Notice I’m not throwing an exception here. I’m showing you that you have choices when dealing with errors. This is a judgement call. I could say that a bounds mistake while reading can be handled by returning nil to the caller. The caller can then decide what to do when nil is returned. Conversely, Apple considers the failure of a FileHandle initializer to be worthy of an Error. Why not just return nil? I believe that Swift’s authors are pushing the language to be more expressive and that marking methods with throws conveys information more immediately than does having to look up the meaning of a return value, if one was used.
STEP 7: Read the data from the file. Call seek(toFileOffset:) to move the file pointer to the position in the file at which the developer wishes to start reading. Call readData(ofLength:) to grab as many bytes as the developer requested. Finally, convert the data chunk read from file into a string encoded as UTF-8. That string is returned to the caller. Remember that the file we’re reading from will be closed by the defer statement I discussed in STEP 4.
STEP 8: If an exception is thrown in STEP 3, it is caught here in the catch clause. Notice that I built a very precise error message by using the FileSystemError type’s initializer. I’m able to get details like the method name, file name, and line number in which the exception occurred using the little-known but well-documented Swift “Literal Expression” list.
NOTE: In STEP 8, I could’ve caught the NSError thrown by the init(forReadingFrom:) method for FileHandle, but I wanted to show you how to create your own custom Error instances.
* Note that availableData, and several other FileHandle methods and properties, are not marked with throws, but some of their documentation pages state that, for example, “This method raises NSFileHandleOperationException if attempts to determine the file-handle type fail or if attempts to read from the file or channel fail.” What does Apple mean about “this method?” The top of the page for availableData is clearly marked as “Instance Property.” There’s a way to clarify this kind of questionable documentation. I do so by using the Swift compiler.
I wrap a questionable property or method like this in a do try catch block and watch for compiler output:
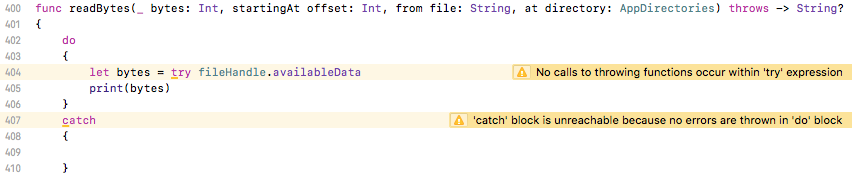
Notice that the line
|
let bytes = try fileHandle.availableData |
is flagged with the warning “No calls to throwing functions occur within ‘try’ expression.”
RUNNING MY CODE
I’ll first show you examples of my code running successfully and then show you how I deal with exceptions.
Creating some files to manipulate
Let me first use my AppFile class to create some files, one of which I’ll read to obtain some data:
|
1 2 3 4 5 6 7 8 9 10 11 12 13 14 15 16 17 18 19 20 21 22 23 |
struct AppFile : AppFileManipulation, AppFileStatusChecking, AppFileSystemMetaData { let fileName: String var currentAppDirectory: AppDirectories var currentFullPath: URL? init(fileName: String, currentAppDirectory: AppDirectories) { self.fileName = fileName self.currentAppDirectory = currentAppDirectory self.currentFullPath = buildFullPath(forFileName: fileName, inDirectory: currentAppDirectory) } … func write() { writeFile(containing: «We were talkingnAbout the spacenBetween us all», to: currentAppDirectory, withName: «karma.txt») writeFile(containing: «And the peoplenWho hide themselvesnBehind a wall», to: currentAppDirectory, withName: fileName) } … let file = AppFile(fileName: «dharma.txt», currentAppDirectory: .Documents) file.write() … |
Here are the file writes in action:

Reading from file without problems
Here’s the code for reading from one of the files I just wrote out:
|
1 2 3 4 5 6 7 8 9 10 11 12 13 14 15 16 17 18 19 20 21 22 23 24 25 26 27 28 29 30 31 32 33 34 |
struct AppFile : AppFileManipulation, AppFileStatusChecking, AppFileSystemMetaData { … func read(at:Int) throws -> String? { do { let fileContents = try readBytes(48, startingAt: at, from: fileName, at: currentAppDirectory) return fileContents } catch let error as FileSystemError { // propagate the error to the caller throw error } } … let file = AppFile(fileName: «dharma.txt», currentAppDirectory: .Documents) do { if let contents = try file.read(at: 0) { print(contents) } else { print(«Returned nil.») } } catch let error as FileSystemError { FileSystemError.handle(error: error) } |
Here’s the file read in action — and a still image of the console output just in case you have trouble keeping up with the ani-GIF:

|
Finished reading file. Defer: file closed. And the people Who hide themselves Behind a wall |
Problem while reading from file
Let me introduce some code into my readBytes function that will throw a FileSystemError. I won’t go into detail as to how I induced an error. Just let me show you where I created several statements that throw. Refer to STEP 7 in my readBytes. I’ll call a couple of lines of code that throw in this section of my method (notice my comment just after the opening brace of my else clause):
|
… else // STEP 7 { // print(«Introduce read error.») // after calling availableData, it’s always // a good idea to reset the offset fileHandle.seek(toFileOffset: UInt64(offset)) let data = fileHandle.readData(ofLength: bytes) textRead = String(bytes: data, encoding: .utf8) print(«Finished reading file.») } … |
I could have dealt with the Error where it occurred in readBytes, but instead I’m going to propagate the error up the call stack until I want to deal with the Error. This is the beauty of Error Handling. I can deal with an error deep down inside an SDK. I can deal with it in intermediate-level code that serves as an interface to an SDK, without informing the user as she/he may not need to know about it. Or I can deal with an error at, for example, the UIViewController level and inform the user directly because the error is so severe as to render an app useless.
So I induce the error so that STEP 8 in my readBytes method is invoked. I collect information about a thrown error and re-throw it to the caller, like so:
|
… catch // STEP 8 { // propagate the error to the caller throw FileSystemError(type: .Read, verboseDescription: «Error during read file.», inMethodName: #function, inFileName: #file, atLineNumber: #line) } … |
The calling method, read(at:), in my AppFile instance does a catch of the thrown Error, and does a throw up to the next block of code in the call stack, as shown here:
|
… func read(at:Int) throws -> String? { do { let fileContents = try readBytes(48, startingAt: at, from: fileName, at: currentAppDirectory) return fileContents } catch let error as FileSystemError { // propagate the error to the caller throw error } } … |
Finally, the code that started the whole file read process handles the error by calling my static handle(error:) method of my FileSystemError Swift structure:
|
do { if let contents = try file.read(at: 0) { print(contents) } else { print(«Returned nil.») } } catch let error as FileSystemError { FileSystemError.handle(error: error) } |
Here’s the output to console as the error is caught, both as it happened and as a snapshot:
|
Introduce read error. Defer: file closed. ERROR — operation: [Read]; reason: [Error during read file.]; in method: [readBytes(_:startingAt:from:at:)]; in file: [File System Error Checking.playground]; at line: [326] |
CONCLUSION
Please again review my introductory remarks on error checking in Swift. Today, we knocked out the topics on “handling Swift-defined and Objective-C-defined instances of Error and NSError, respectively,” “defining my own error types using the Error protocol,” and “using the defer construct to perform mandatory cleanup that would otherwise get skipped because an Error is thrown,” but we still need to go over:
- the absence of value,
nil; - expressions like
if let; - constructs like
guard; - creating failable initializers (
init?); and, - using best practices during design to avoid having an overbearing amount of error handling code in my projects.
-
Tweet -
Share
0 -
Reddit -
+1 -
Pocket -
Pinterest
0 -
LinkedIn
0
![]()
Avid and well-published author, software engineer, designer, and developer, now specializing in iOS mobile app development in Objective-C and Swift, but with a strong background in C#, C++, .NET, JavaScript, HTML, CSS, jQuery, SQL Server, MySQL, Oracle, Agile, Test Driven Development, Git, Continuous Integration, Responsive Web Design, blah, blah, blah … Did I miss any fad-based catch phrases? My brain avatar was kindly provided by http://icons8.com under a Creative Commons Attribution-NoDerivs 3.0 Unported license.
View all posts by Andrew Jaffee