This topic has been deleted. Only users with topic management privileges can see it.
-
Hello I recently built a Retro Pie with a raspberry pie 3 and have followed all instructions to the latter. But for some odd reason everytime I start a psx game I get the «bios not found expect bugs» message and the problems that entails.
I have been using a Usb to transfer roms and have looked all over the internet and tried different things including. Renaming files, trying different BIOS, updating emulators everything except stuff that involves messing with command lines as I am afraid of breaking something.
The only thing I can think of what could have done this is that I had to move my sd image to a new sd card other then that I dont know why this is happening. So im asking is there anything I did wrong? Is there a bug or can I not actually transport bios through usb I would be gratefull for any help.
(Sorry for any formatting issues I typed this through mobile)
-
@Skull-Knight The information you’re providing isn’t particularly detailed, in terms of allowing us to suggest things and troubleshoot them.
Are you saying you’re mounting a USB drive as your ROM folder? Where is it being mounted (i.e. ~/RetroPie? ~/RetroPie/roms?).
The BIOS should be copied to ~/RetroPie/BIOS . I can’t say more without knowing what is happening there, other than I do not seem to have such problems. The wiki page suggests some MD5/SHA1 hashes for the BIOS files, in case you want to check whether you’re using a correct one, though I’ve found — as well as others — that other BIOS files work similarly well.
Best of luck.
-
@Skull-Knight Im going to take a stab in the dark and assume you are trying to play the ps1 berserk game?
-
Same issue. RetroPie is installed on a Pi3, ROMs are on a USB flash drive formatted to FAT32.
ROMs are in retropie/roms/psx
The emulator sees without issues:
CTR — Crash Team Racing (USA).bin
CTR — Crash Team Racing (USA).cueBIOS files are in retropie/BIOS
SCPH1001.bin
SCPH5500.binI’ve tried:
scph1001.bin
SCPH1001.BINKeep getting the same error, «bios not found expect bugs».
Any ideas?
-
You have to make sure that the .bin files you are uploading have lowercase letters and their MD5 checksum are correct.
PSX scph5500.bin 8dd7d5296a650fac7319bce665a6a53c
PSX scph5501.bin 924e392ed05558ffdb115408c263dccf
PSX scph5502.bin e56ec1b027e2fe8a49217d9678f7f6bbOnce the checksums are similar, you can just rename the .bin files. This was how I got my BIOS working last night.
-
@nehal1802
Make sure it’s in /home/pi/RetroPie/BIOSMore info: https://github.com/retropie/retropie-setup/wiki/Playstation-1
Transfer by sftp or any other means to get to that folder.
Bios names don’t need to be in caps. You also just need one of them. Any psx bios that’s not listed in the wiki will also work. -
@nehal1802 and @Skull-Knight
Please share exactly how your USB drive is mounted. What are the contents of fstab?
Thanks.
-
@Darksavior
Upon looking in the file manager at /home/pi/RetroPie/
I have found that the BIOS folder is missing is there anyway to create a new folder or will I have to re-install retro pie? -
@Skull-Knight You can certainly create it, but as I asked before, can you share the contents of your fstab file for mounting?
You may be mounting at the wrong mount point. I expect you will have an actual BIOS folder, but it’s being hidden as you may be mounting your USB drive on the RetroPie folder.
-
@pjft
Im sorry I am new to all this can you explain what fstab is? and where I can find it. -
@Skull-Knight Sure.
In the command line at your Pi / via SSH, type
cat /etc/fstab -
i’m guessing, but i don’t think either are running roms from USB, but rather using it to transfer via https://github.com/retropie/retropie-setup/wiki/Transferring-Roms#usb-stick
i’m not sure if this works to transfer BIOS files.. someone else said as much in another thread (can anyone confirm). if it doesn’t, you’ll have to use SFTP or samba transfers via wireless or a network cable.
(or you could copy it from the stick via the linux commandline, but that requires a bit more explanation)
-
@pjft
upon looking I have received an almost exact replica of what appears in the fstab section of this page.
(https://github.com/RetroPie/RetroPie-Setup/wiki/Running-ROMs-from-a-USB-drive) -
This post is deleted!
-
@Skull-Knight Can you confirm the exact line of your USB mount point?
Is it something like
UUID=<drive ID> /home/pi/RetroPie vfat nofail,user,uid=pi,gid=pi 0 2?
If so, it means you’re mounting on the RetroPie folder — just like me, so I know the set up.
It means your BIOS folder is currently in the SD card, but you’re mounting over it.
You could certainly create a new folder on your USB drive, but the standard BIOS folder will usually already have some required BIOS files there.
My recommendation, as awful as it may seem, is:
- Boot your Pi without your USB drive there
- Now, as you navigate to the BIOS folder you will see one there
- Plug in a second USB drive (not THAT one you’re using) and copy the BIOS folder to it
- Now copy the BIOS folder from that USB drive to the one you’re using
- Restart your Pi with the USB drive plugged in
If that’s not the case at all (i.e. if you’re just doing what @dankcushions is suggesting) then, sure, you may just create a BIOS folder there, but I’m struggling to figure out why the folder would not exist there in the first place.
-
@pjft
The only reason I can think of as to why the bios folder is not there is because I had to move everything to a new SD card as I ran out of space on the old one and maybe as it was moving everything for some reason it skipped on the bios folder.
-
@Skull-Knight Yeah, that could have been it then. I’d hope (unconfirmed) that if you go to the RetroPie-Setup script and update/install all packages again, the folder will be created… maybe?
Try it with the PSX emulator, see if it creates it. But yes, you can create it yourself — and, as long as you don’t run into problems with other emulators, I suppose you’ll be fine-ish. But yeah, if any emulator doesn’t behave as expected, I’d suggest it could be related to that.
-
@pjft
Ok I just looked back in the file manager and have found that the BIOS folder has reappeared inside the folder is
/fba
/mame2003
/palettes
*NstDatabase.xml
fast.bin
skip.bin
system.binI have no idea how the folder came back or if it was there all along and I was dumb enough not to see it but it still does not explain why the psx bios wont work.
-
@Skull-Knight Well, it does, right?
I don’t see any PSX Bios file in it

-
Ohhhhh that explains it how do I create a psx bios folder?

Contributions to the project are always appreciated, so if you would like to support us with a donation you can do so here.
Hosting provided by
Mythic-Beasts. See the
Hosting Information
page for more information.
Содержание
- Как настроить эмуляцию RetroArch PS1 для игр PlayStation
- Как настроить эмуляцию RetroArch PS1 для игр PlayStation
- Знакомьтесь, RetroArch
- BIOS, геймпад PS1 и другие необходимые вещи
- Несколько настроек для начала
- Создание файлов.cue для ваших игр PSX
- Установите Beetle PSX (HW)
- Запустите Retroarch PS1 Games
- Настройка игр в RetroArch
- Настройки графики
- Шейдеры в RetroArch
- Homebrew PCSX-Rearmed won’t recognize bios file — how do I fix this?
- Fierfek
- Deleted User
- Fierfek
- MarioKartFan
- Fierfek
- Attachments
- TurdPooCharger
- nl255
- Fierfek
- Attachments
- TurdPooCharger
- Fierfek
- TurdPooCharger
Как настроить эмуляцию RetroArch PS1 для игр PlayStation

Как настроить эмуляцию RetroArch PS1 для игр PlayStation
Как настроить эмуляцию RetroArch PS1 для игр PlayStation? Эмуляция — самая популярная игра для ПК. Она позволяет вам вновь пережить славные дни ретро-игр на вашем ПК. А также часто позволяет вам повторить свои впечатления от этих игр.
Возвращение к старой игре, особенно из эпохи PS1, может часто шокировать. Удивитесь тому, насколько лучше эти игры выглядят через призму ностальгии.
Используя эмуляцию RetroArch PS1, вы можете масштабировать и настраивать эти игры.
 Как настроить эмуляцию RetroArch PS1 для игр PlayStation
Знакомьтесь, RetroArch
RetroArch не является эмулятором. Он сам по себе воспринимает его как концентратор для эмуляторов. И Медиа доступ через единый унифицированный интерфейс.
Под эмуляцией игр на ПК обычно подразумевается полный эмулятор. И разные программы для каждой платформы. Но RetroArch на самом деле может эмулировать довольно большое количество систем в одной программе.
Эмуляторы RetroArchs, называемые ядрами, обычно являются портированными эмуляторами из другие разработчики на сцене. Однако некоторые эмуляторы на самом деле созданы только для RetroArch. И из-за этого они могут быть даже лучше, чем современные автономные эмуляторы на рынке.
Это относится к ведущему ядру RetroArch PS1 Beetle PSX. И вы сейчас узнаете, как установить и использовать его, в этой статье.
BIOS, геймпад PS1 и другие необходимые вещи
Для оптимального RetroArch Для эмуляции PS1 вам понадобится следующее:
- Современный геймпад с двойными джойстиками. Я рекомендую площадку PS3 для этого подлинного управления. Или панель Xbox One для лучшей поддержки. Если вы используете не Xbox pad, убедитесь, что у вас включен драйвер или оболочка XInput.
- Современный ПК с Windows для лучшей производительности (и наиболее точного управления). Хотя RetroArch достаточно кроссплатформенный для для работы и на других платформах.
- Файл bio PS1, соответствующий глобальному региону игры, в которую вы хотите играть. Он должен быть помещен в системную папку Retroarch.
Немного расширив примечание к файлам BIOS, мы не можем юридически сказать вам, где их скачать. Мы можем сказать вам, что наиболее распространенными файлами BIOS являются:
- scph5500 (NTSC Япония)
- scph5501 (NTSC US)
- scph5502 (PAL Европа)
- scph5552 (PAL Europe)
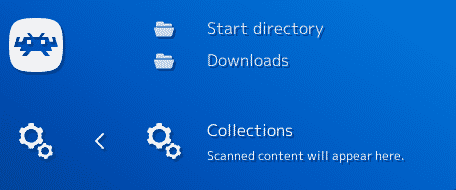
Вы можете проверить каталог по умолчанию, который Retroarch сканирует на наличие файлов BIOS. Смотрите в разделе «Настройки» — >, Каталог — >, Система / BIOS.
Обратите внимание, что имена файлов BIOS чувствительны к регистру. Поэтому должны быть написаны без заглавных букв и дополнены.bin.
Несколько настроек для начала
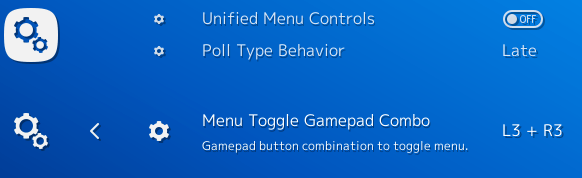
Пока у вас есть геймпад с поддержкой XInput, вам не нужно делать очень много. Чтобы приступить к эмуляции RetroArch PS1. Тем не менее, есть несколько вещей, которые вы можете настроить для оптимального геймплея. Сначала перейдите в «Опции» -> «Ввод».
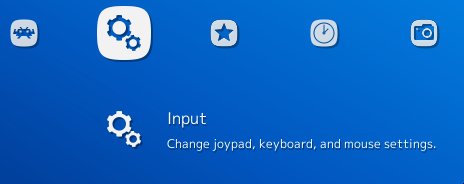
Теперь, используйте левую / правую кнопки на D-Pad, чтобы выбрать пункт меню «Переключатель геймпада». Я рекомендую установить L3 + R3 в качестве вашего ярлыка.
Если вы выполнили все до этого, ваш контроллер готов к использованию. И вы получили файл (-ы) биоса PS1, который Вам позволит играть в ваши игры. Некоторые игры могут работать без BIOS. Но для полной совместимости мы настоятельно рекомендуем один из них.
Теперь давайте перейдем к главному вопросу: установке ядра эмуляции.
Создание файлов.cue для ваших игр PSX
Когда вы копируете игру для PS1, вы всегда должны делать это в формате BIN или BIN / CUE. Это существенно разделит выходные файлы на файл BIN. В них хранится большая часть игровых данных. И файл CUE, который и ищет ретроарх при сканировании игр PS1.
Если по какой-либо причине вы этого не имеете файл cue, сопровождающий ваш bin-файл, или если ваша игра PS1 имеет другой формат, например img, то вам нужно создать файл cue для этой игры. И поместить его в ту же папку, что и основной файл образа.
Создать файл CUE достаточно просто. И чтобы сделать его еще проще, вы можете использовать этот онлайн-инструмент для генерации текста для файла подсказки. Просто перетащите файл img или bin с играми в поле на сайте. И он сгенерирует для него текстовый файл.
Обратите внимание, что если сломанная игра PS1 разделена на разные звуковые дорожки, вы должны также скопировать их все в онлайн-инструмент. Чтобы все файлы игры содержались в одном файле.
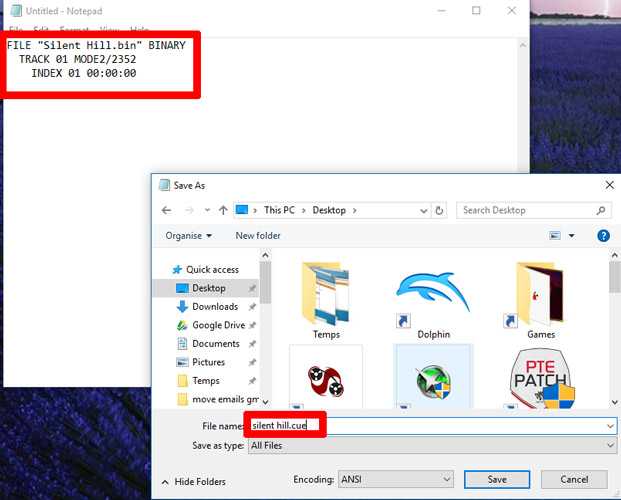
Затем скопируйте и вставьте текст файла подсказки в файл блокнота. Сохраните его, используя то же имя файла, что и основной файл изображения игры. И сохраните его в той же папке, что и основной файл изображения.
Теперь Retroarch сканирует ваши игры PS1. Он найдет их по созданным вами файлам и добавит их в вашу библиотеку.
Установите Beetle PSX (HW)
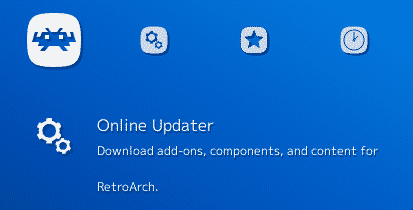
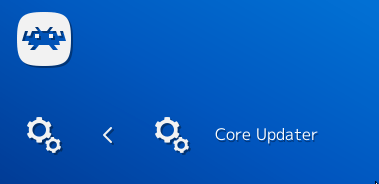
Сначала перейдите в Главное меню, затем выберите Online Updater.
В Online Updater выберите Core Updater.
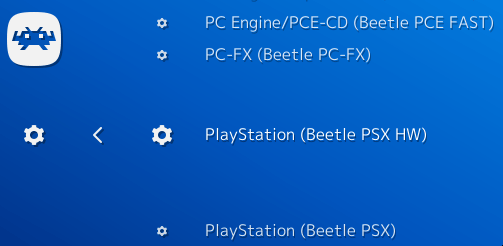
Прокрутите вниз до Playstation (PSX HW). Вы также можете выбрать не-HW версию, но я рекомендую использовать HW. Выберите ее, чтобы установить.
После установки вернитесь в главное меню и загрузите ядро.
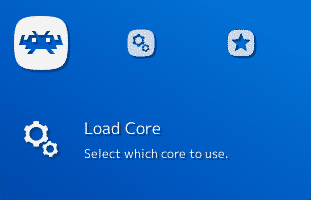
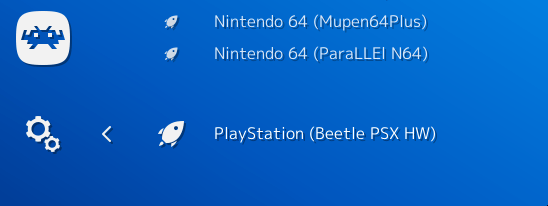
Find PlayStation (Beetle PSX HW) — выберите его! Это загрузит ядро в RetroArch.
Вы установили ядро. Теперь, как перевести свои игры в собственно RetroArch?
Запустите Retroarch PS1 Games
Вернитесь в главное меню и выберите «Загрузить содержимое».

Выберите каталог сканирования.
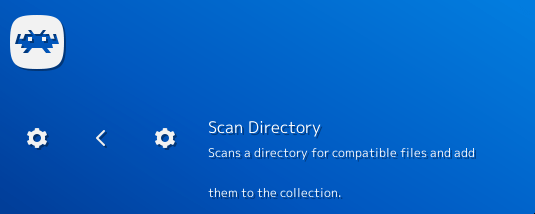
Для правильной работы необходимо, чтобы все ваши игровые файлы PS1 хранились в одной папке на вашем ПК. Если вы этого не сделаете, организуйте их и запишите, где они находятся в проводнике Windows, чтобы найти их в RetroArch. Мои, например, находятся на моем дополнительном жестком диске в Emulation / PS1 / Games.
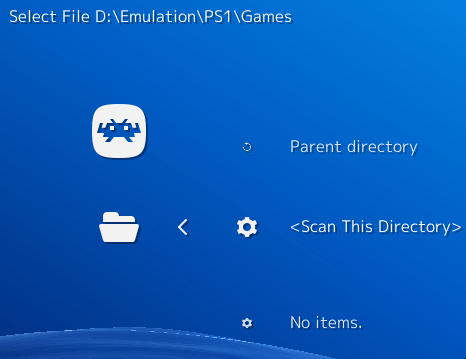
Выберите Сканировать этот каталог, чтобы сканировать ваши игры и добавлять их в RetroArch.
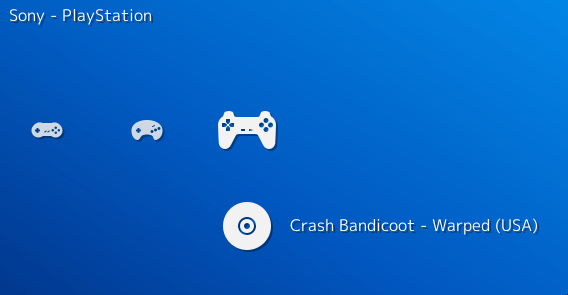
Теперь, когда они на месте, вы можете вернуться в главное меню. Если вы прокрутите вправо, вы поймете, что есть новое меню для игр PS1.
Настройка игр в RetroArch
Вы сделали это. Вы в игре и готовы начать играть. Но подождите — графика выглядит взорванной и пиксельной! Как вы можете это исправить?
Нажмите комбинацию геймпада, которую вы установили для открытия меню в игре ранее. Для меня это L3 + R3.
В главном меню теперь есть опция быстрого меню. Выберите его.

В Быстром Меню вы увидите множество различных опций. Давайте рассмотрим соответствующие.
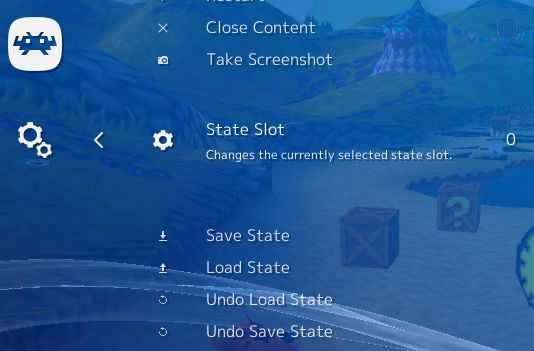
Параметры «Сохранить состояние» позволяют вам сохранять игровое состояние практически точно там, где вы находитесь. Существует несколько слотов для сохранения. Ивы можете использовать их, чтобы пропустить обычное сохранение. Или непосредственно перед сложным сегментом.
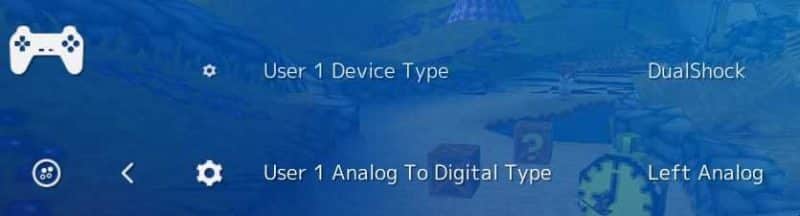
Если ваши аналоговые джойстики не настроены, возможно, вы играете в игру PS1, которая их не поддерживает. Чтобы это исправить, перейдите к элементу «Управление». И установите для параметра «Пользовательский 1-аналого-цифровой тип» значение «Левый аналоговый».
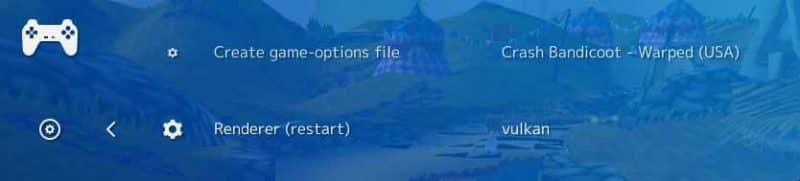
Прокрутите вниз до «Параметры». Выбирается vulkan или используйте opengl, если ваш GPU не поддерживает его. Vulkan — лучший вариант. И он должен обеспечивать полный доступ к дополнительным функциям, предлагаемым эмуляцией RetroArch PS1.
Настройки графики
Перезагрузите при необходимости. В «Быстрое меню -> Параметры» можно установить намного больше графических параметров. Вот соответствующие и что с ними делать.
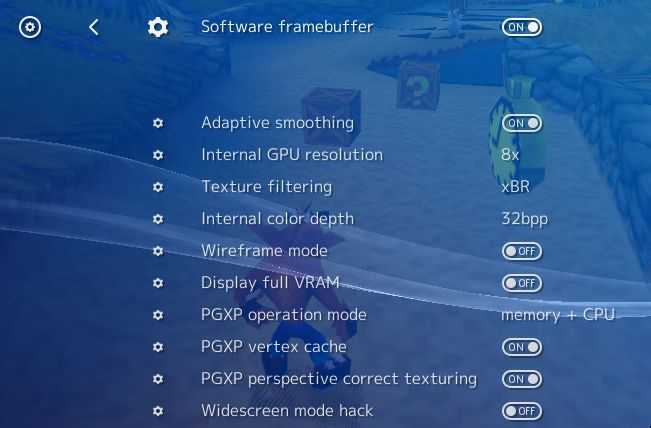
- Программный буфер кадров / адаптивное сглаживание Оставьте их включенными.
- Внутреннее разрешение графического процессора. Собственное значение составляет 240p, 2x — 480p, 4x — 720p, 8x — 1080p, 16x — 4K. Они не точны, но в значительной степени соответствуют ожиданиям, которые мы можем ожидать из-за качества. Мы рекомендуем использовать 8x, если ваше железо может с этим справиться. Или даже 16x, если вы хотите отказаться от AA и иметь аппаратную мощность для этого.
- Текстурная фильтрация — Несколько настроек, но xBR и SABR являются лучшими. И не должны требовать слишком высокой производительности.
- Внутренняя глубина цвета. Измените это значение с 16bpp по умолчанию на 32bpp. Для увеличения глубины цвета при минимальной производительности..
- Каркас / полная VRAM Оставьте их в покое.
- Режим работы PGXP — Включите это, чтобы воспользоваться некоторыми преимуществами эмуляции RetroArch PS1. Установите его в память только для наименьших визуальных глюков. Память + процессор в некоторых играх выглядят хорошо, но могут испортить другие вещи.
- PGXP Vertex Cache и корректное текстурирование перспективы Включите их.
- Широкоэкранный режим Hack. Это приведет к некоторым визуальным сбоям внешние границы вашего экрана. Но должны хорошо выглядеть в большинстве игр. Личные предпочтения.
Шейдеры в RetroArch
Шейдеры — это визуальные фильтры, которые позволяют добавлять все виды сумасшедших вещей в игровую графику. Вы можете сгладить края, используя различные степени сглаживания. Придать границу своей игре или попытаться воссоздать подлинный опыт игры на экране 90-х годов. Добавив немного шума или линий развертки к изображению.
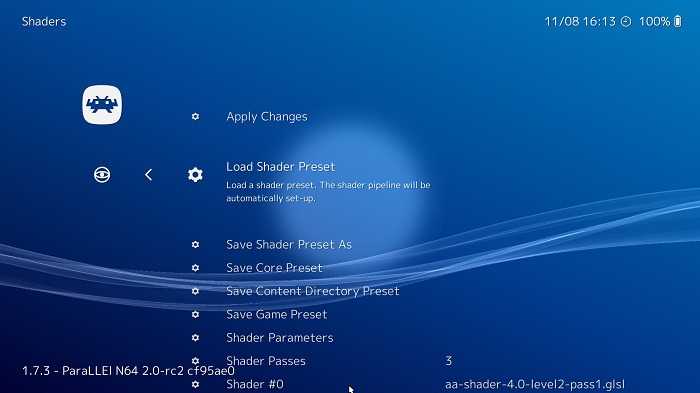
Чтобы поиграть с шейдерами, после того, как вы загрузили ядро и игру, перейдите в Главное меню — >, Быстрое меню — >, Шейдеры — >, Загрузить предустановку шейдеров.
Здесь, кроме папки presets вы найдете три категории шейдеров cg, glsl и slang. Какой из них вы будете использовать, будет зависеть от того, какие видеодрайверы вы используете. И от мощности вашего ПК. (шейдеры могут быть довольно интенсивными в плане графики).
CG-шейдеры лучше всего использовать для более низких конечных ПК. И совместимыми с видеодрайверами gl и DirectX, GLSL. Работает только с драйверами OpenGL, а Slang предназначен исключительно для Vulkan.
Помня об этом, зайдите в любую папку шейдеров, соответствующую вашему драйверу, и поиграйтесь с ними.
Вы можете добавить затенение cel в игру. Например, в поле cel, сгладить края в папке шейдеров сглаживания. Добавить эффекты линии развертки CRT в crt и т. д.
После того, как вы включите шейдер, он сразу же вступит в силу. И вы увидите, хотите ли вы его сохранить. В меню шейдеров вы можете выбрать Сохранить основной набор. Или Сохранить игровой набор, чтобы сохранить настройки шейдера для этого ядра или игры соответственно.
Если вы более смелый, вы можете даже войти в Параметры шейдера. Отрегулируйте этот шейдер по своему вкусу, затем сохраните его как новый шейдер. Перейдя в меню «Сохранить предустановку шейдера как в меню шейдера».
Проходы шейдера позволяют использовать несколько фильтров шейдеров одновременно. Вы обнаружите, что многие пресеты шейдеров уже используют несколько проходов.
Источник
Homebrew PCSX-Rearmed won’t recognize bios file — how do I fix this?
Fierfek
Member
Trying to play SotN, according to the compatibility list I should be using 1001. The problem is that retroarch won’t recognize the bios.
I’ve tried:
1. Putting the file in /cores/system
2. Putting the file in /system
3. Putting the file outside the retroarch directory and changing the bios directory in the settings.
When I navigate the bios directory to each folder, it says it can’t find any files. The bios setting only lets me choose auto or HLE.
I’m certain I’m using the right bios file here:
scph1001.BIN
MD5: 924E392ED05558FFDB115408C263DCCF
CR32: 37157331.
512 KB (524,288 bytes)
How do I get PCSX to find the bios? Also, is auto or HLE better? (if I have to give up here)
Deleted User
Guest
Trying to play SotN, according to the compatibility list I should be using 1001. The problem is that retroarch won’t recognize the bios.
I’ve tried:
1. Putting the file in /cores/system
2. Putting the file in /system
3. Putting the file outside the retroarch directory and changing the bios directory in the settings.
When I navigate the bios directory to each folder, it says it can’t find any files. The bios setting only lets me choose auto or HLE.
I’m certain I’m using the right bios file here:
scph1001.BIN
MD5: 924E392ED05558FFDB115408C263DCCF
CR32: 37157331.
512 KB (524,288 bytes)
How do I get PCSX to find the bios? Also, is auto or HLE better? (if I have to give up here)
Fierfek
Member

MarioKartFan
Well-Known Member
Fierfek
Member
That didn’t work either.
Here’s what I’ve got, see image. Above is what’s in the folder, below is what I see when I set the bios directory in retroarch. I have no clue why PCSX won’t recognize the file.
Attachments
TurdPooCharger
Try a different BIOS. Install 7-Zip and right mouse click the *.bin file → CRC SHA to compare the hash of the downloaded BIOS file that can be added here.
[docs.libretro.com] Sony — PlayStation (PCSX ReARMed)
- sdmc:/retroarch/cores/system/
- scph101.bin (CRC32: 171BDCEC, SHA256: ACA9CBFA974B933646BAAD6556A867ECA9B81CE65D8AF343A7843F7775B9FFC8)
- scph1001.bin (CRC32: 55847D8C, SHA256: 42E4124BE7623E2E28B1DB0D8D426539646FAEE49D74B71166D8BA5BD7C472ED)
- scph5501.bin (CRC32: 8D8CB7E4, SHA256: 11052B6499E466BBF0A709B1F9CB6834A9418E66680387912451E971CF8A1FEF)
- scph7001.bin (CRC32: 502224B6, SHA256: 39DCC1A0717036C9B6AC52FEFD1EE7A57D3808E8CFBC755879FA685A0A738278)
The PSXONPSP660.BIN renamed as scph1001.bin can also be substituted. (CRC32: 5660F34F, SHA256: CBE758E1C8ECE593C8E14CE1E8B3436428A01C608032A02613B3A4B442B4D712, MD5: C53CA5908936D412331790F4426C6C33)
You only need one of these, not all.
nl255
Well-Known Member
Trying to play SotN, according to the compatibility list I should be using 1001. The problem is that retroarch won’t recognize the bios.
I’ve tried:
1. Putting the file in /cores/system
2. Putting the file in /system
3. Putting the file outside the retroarch directory and changing the bios directory in the settings.
When I navigate the bios directory to each folder, it says it can’t find any files. The bios setting only lets me choose auto or HLE.
I’m certain I’m using the right bios file here:
scph1001.BIN
MD5: 924E392ED05558FFDB115408C263DCCF
CR32: 37157331.
512 KB (524,288 bytes)
How do I get PCSX to find the bios? Also, is auto or HLE better? (if I have to give up here)
Fierfek
Member
Try a different BIOS. Install 7-Zip and right mouse click the *.bin file → CRC SHA to compare the hash of the downloaded BIOS file that can be added here.
[docs.libretro.com] Sony — PlayStation (PCSX ReARMed)
- sdmc:/retroarch/cores/system/
- scph101.bin (CRC32: 171BDCEC, SHA256: ACA9CBFA974B933646BAAD6556A867ECA9B81CE65D8AF343A7843F7775B9FFC8)
- scph1001.bin (CRC32: 55847D8C, SHA256: 42E4124BE7623E2E28B1DB0D8D426539646FAEE49D74B71166D8BA5BD7C472ED)
- scph5501.bin (CRC32: 8D8CB7E4, SHA256: 11052B6499E466BBF0A709B1F9CB6834A9418E66680387912451E971CF8A1FEF)
- scph7001.bin (CRC32: 502224B6, SHA256: 39DCC1A0717036C9B6AC52FEFD1EE7A57D3808E8CFBC755879FA685A0A738278)
The PSXONPSP660.BIN renamed as scph1001.bin can also be substituted. (CRC32: 5660F34F, SHA256: CBE758E1C8ECE593C8E14CE1E8B3436428A01C608032A02613B3A4B442B4D712, MD5: C53CA5908936D412331790F4426C6C33)
You only need one of these, not all.
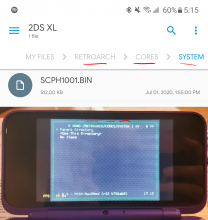
Alright, so after more research, I’ve got all 4 bios files mentioned in that link, plus 5500 and 5502. Retroarch says in «information» that 5500, 5501, and 5502 are present (it doesn’t even list the others). I’ve got them all lowercase, both filename and extension. They’re in /retroarch/cores/system.
See image attached, retroarch can see at least some of the files. But when I launch a game then go into the quick menu>options>use bios, it only has auto and hle.
I’m at a loss. Retroarch says it can see the files but won’t let me use them? I really need help here.
Attachments
TurdPooCharger
Just one BIOS. Not multiple. Remove all of them and add back only the scph1001.bin . I recommend the (55847D8C) or (5660F34F).
Just because a file is named scph1001.bin doesn’t make it a real ps1/psx bios. Check the hash with that 7-Zip CRC SHA function.
Fierfek
Member
Just one BIOS. Not multiple. Remove all of them and add back only the scph1001.bin . I recommend the (55847D8C) or (5660F34F).
Just because a file is named scph1001.bin doesn’t make it a real ps1/psx bios. Check the hash with that 7-Zip CRC SHA function.
Removed all of them from my 3ds except the 1001 (which is the correct file, I checked the hash). PCSX still won’t recognize it, only allows auto and hle.
Could I have a broken core or something? I downloaded retroarch like a week ago from the stable builds, it should be fine.
I’ve got the single file in /retroarch/cores/system, then I go into directory settings and make sure it’s pointing to that specific folder, then I boot up a game and go to options>use bios. Still only seeing auto and hle.
Just tried the same thing with 5501 (verified the hash). Still no bios options.
Is there another setting somewhere I could have accidentally turned off or something? What do I need besides having the right file in the right place?
TurdPooCharger
- RetroArch – Convert PlayStation 1 BIN/CUE to CHD
- [that nitro site] PSX2PSP v1.4.2: How to Convert PSX games to PSP
- This website cannot be linked here because it contains warez.
- You’ll want this one: PSX2PSPv1.4.2.rar (Size: 2.28 MB, CRC32: B12B2998)
- Don’t use the psx2psp_v.1.4.2.rar (size 1.42 MB, CRC32: 6C35071C) from psp.brewology.com. That one sucks!
 Don’t use the psx2psp_v.1.4.2.rar (size 1.42 MB, CRC32: 6C35071C) from psp.brewology.com. That one sucks!
***
If converting this to CHD format,
- Download the mame02##b_64bit.exe , and extract only the chdman.exe with 7-Zip.
- On your computer, create a New folder. Place these files into the folder.
- Castlevania.bin
- Castlevania.cue
- chdman.exe
- While browsing inside this folder, hold the Shift key on the keyboard and right mouse click → Open command window here.
- In the Command Prompt window, copy and paste this code. Press Enter to convert.
- Castlevania.chd (Size: 366 MB, CRC32: D431083D)
- Castlevania.chd → Castlevania — Symphony of the Night.chd
- sdmc:/roms/psx/ Castlevania — Symphony of the Night.chd
If converting this to PBP format,
- Download the PSX2PSPv1.4.2.rar and extract the contents to its own PSX2PSPv1.4.2 folder with 7-Zip.
- Go in the PSX2PSPv1.4.2_BASE subfolder. Launch the PSX2PSP.exe program. Click on the Options and ensure this setting is kept like this.
- Common → Compression level: 1 (worst)
- You do not want to max this out to 9 (best), or the game will crash RetroArch.
- Choose the BIN, select the output folder, and press Convert.
- ISO/PBP File: Castlevania.bin
- Output PBP folder:
- Within the SLUS00067 output folder, rename, cut, and paste the converted PBP rom to the (micro)SD card.
- EBOOT.PBP (Size: 399 MB, CRC32: D129506C)
- EBOOT.PBP → Castlevania — Symphony of the Night.pbp
- sdmc:/roms/psx/ Castlevania — Symphony of the Night.pbp
***
(1) To pause the game and open MAIN MENU , tap the lower half of the bottom screen. To hide the bottom screen, tap the upper half.
(2) To enable the left Circle Pad: MAIN MENU → Quick Menu → Controls → Port 1 Controls → Analog to Digital Type: Left Analog
(3) For ‘Pixel Perfect’ resolution, MAIN MENU → Settings → Video → Scaling →
- Integer Scale: ON
- Aspect Ratio: 1:1 PAR (16:15 DAR)
- This will be (256×240) out of the (400×240).
(4) When switching between RetroArch .CIA ⇄ .3DSX, you will likely need to repeat the above step 3 (Conditional) to clear the old settings.
(5) Learn how to adjust or tweak other settings in PCSX ReARMed.
- RetroArch 3DS: Full speed PS1 now possible with PCSX ReARMed w/ Unai renderer!
(6) If you rather have this game made into a standalone HOME Menu injection.
- [Release] PS1 Forwarder Creator
Источник
-
Partition Wizard
-
Partition Magic
- PSX BIOS – PlayStation PS1 BIOS: How to Download and Install
By Amy | Follow |
Last Updated October 18, 2022
You will learn what PSX BIOS is, how to get the PS1 BIOS download, and how to install PS1 BIOS from this post of MiniTool. To get the details, read this post now!
What Is PS1 BIOS
The PlayStation X (PSX), a famous Sony digital video recorder, comes with an integrated PlayStation 2 video game console. It is one of the best tools for gamers who like playing games. In short words, PSX is a general-purpose consumer video tool with millions of fans across the world who want to play PSX games via scph1001.bin.
PSX BIOS (Basic Input Output System) is the hardware that your computer reads when it is powered on. It is mainly used to test and initialize the device on your PC. You can’t use the system fully without PSX BIOS. Your emulator can work without any glitches because of PS1 BIOS.
Tip: PSX BIOS is also referred to as PlayStation PS1 BIOS (scph1001.bin).
Therefore, the first thing you need to do is to check if the PlayStation emulator includes a BIOS file after you download and install it. If the emulator doesn’t have a BIOS file, you need to download the file separately. Without the BIOS file, your emulator won’t work. To play games, you are required to run PSX ROM too.
Simply put, you have to get an emulator if you want to play PS1 games on computers, while the emulator should contain a BIOS file.
Further reading:
The PS One is a smaller and redesigned version of the original PlayStation console. Released on July 7, 2000, it outsold all other consoles including the PlayStation 2. Extra changes were made to the PS One model like the removals of the serial and parallel ports at the rear and removals of the reset button. While the PS One is compatible with all PlayStation Roms, compatibility with peripherals varies.
To play PS2 games on your computer, you need to download and configure PS2 BIOS. You can get the detailed information about it from this post: PCSX2/PS2 (PlayStation 2) BIOS: Definition, Download, and Setup
PS1 BIOS Download
Tip: If you receive the “NO BIOS found” message, it means that you have downloaded the wrong type of BIOS for the emulator. Hence, you should double-check if you get the right file type before starting the PSX BIOS download process.
Ensure that you have a stable and fast Internet connection before trying to download the PS1 BIOS file. Then you can download the correct PS1 BIOS file (SCPH1001.bin) by clicking here. What you need to do now is to wait patiently until the download process ends.
How to Install PSX BIOS
After the PS1 BIOS download process finishes, you can install the BIOS via steps below.
Step 1: Extract the BIOS file from the downloaded zip file. Usually, you can do that by double-clicking the zip file.
Step 2: Drag the SCPH1001.BIN file under the extracted zip file to the PSX BIOS folder.

Step 3: Open PSX and go to File > Configuration.
Step 4: Tap on the BIOS tab to continue the process.
Tip: If you fail to choose the file, you can convert the SCPH1001.bin file to the ISO format via ISO creators like ISO Workshop, Powser ISO, etc. After that, choose the file again.
Step 5: Click on the SCPH1001. BIN and click Open.
Step 6: Click on OK to save the changes and close PSX.
After you set up the PlayStation emulator and find the right SCPH1001.bin, you can play ROM games with your friends or family members.
Also read: Free Download Windows XP ISO: Home & Professional (32 & 64 Bit)
About The Author

Position: Columnist
Having writing articles about computer tech for a long time, I am rather experienced especially on the aspect of computer optimization, PC enhancement, as well as tech terms explanation. The habit of looking through tech forums makes me a great computer issues collector. And then, many articles related to these issues are released, which benefit plenty of users. Professional, effective, and innovative are always the pursuit of an editing worker.
-
Partition Wizard
-
Partition Magic
- PSX BIOS – PlayStation PS1 BIOS: How to Download and Install
By Amy | Follow |
Last Updated October 18, 2022
You will learn what PSX BIOS is, how to get the PS1 BIOS download, and how to install PS1 BIOS from this post of MiniTool. To get the details, read this post now!
What Is PS1 BIOS
The PlayStation X (PSX), a famous Sony digital video recorder, comes with an integrated PlayStation 2 video game console. It is one of the best tools for gamers who like playing games. In short words, PSX is a general-purpose consumer video tool with millions of fans across the world who want to play PSX games via scph1001.bin.
PSX BIOS (Basic Input Output System) is the hardware that your computer reads when it is powered on. It is mainly used to test and initialize the device on your PC. You can’t use the system fully without PSX BIOS. Your emulator can work without any glitches because of PS1 BIOS.
Tip: PSX BIOS is also referred to as PlayStation PS1 BIOS (scph1001.bin).
Therefore, the first thing you need to do is to check if the PlayStation emulator includes a BIOS file after you download and install it. If the emulator doesn’t have a BIOS file, you need to download the file separately. Without the BIOS file, your emulator won’t work. To play games, you are required to run PSX ROM too.
Simply put, you have to get an emulator if you want to play PS1 games on computers, while the emulator should contain a BIOS file.
Further reading:
The PS One is a smaller and redesigned version of the original PlayStation console. Released on July 7, 2000, it outsold all other consoles including the PlayStation 2. Extra changes were made to the PS One model like the removals of the serial and parallel ports at the rear and removals of the reset button. While the PS One is compatible with all PlayStation Roms, compatibility with peripherals varies.
To play PS2 games on your computer, you need to download and configure PS2 BIOS. You can get the detailed information about it from this post: PCSX2/PS2 (PlayStation 2) BIOS: Definition, Download, and Setup
PS1 BIOS Download
Tip: If you receive the “NO BIOS found” message, it means that you have downloaded the wrong type of BIOS for the emulator. Hence, you should double-check if you get the right file type before starting the PSX BIOS download process.
Ensure that you have a stable and fast Internet connection before trying to download the PS1 BIOS file. Then you can download the correct PS1 BIOS file (SCPH1001.bin) by clicking here. What you need to do now is to wait patiently until the download process ends.
How to Install PSX BIOS
After the PS1 BIOS download process finishes, you can install the BIOS via steps below.
Step 1: Extract the BIOS file from the downloaded zip file. Usually, you can do that by double-clicking the zip file.
Step 2: Drag the SCPH1001.BIN file under the extracted zip file to the PSX BIOS folder.
Step 3: Open PSX and go to File > Configuration.
Step 4: Tap on the BIOS tab to continue the process.
Tip: If you fail to choose the file, you can convert the SCPH1001.bin file to the ISO format via ISO creators like ISO Workshop, Powser ISO, etc. After that, choose the file again.
Step 5: Click on the SCPH1001. BIN and click Open.
Step 6: Click on OK to save the changes and close PSX.
After you set up the PlayStation emulator and find the right SCPH1001.bin, you can play ROM games with your friends or family members.
Also read: Free Download Windows XP ISO: Home & Professional (32 & 64 Bit)
About The Author
Position: Columnist
Having writing articles about computer tech for a long time, I am rather experienced especially on the aspect of computer optimization, PC enhancement, as well as tech terms explanation. The habit of looking through tech forums makes me a great computer issues collector. And then, many articles related to these issues are released, which benefit plenty of users. Professional, effective, and innovative are always the pursuit of an editing worker.
sonyplaystation какой эмулятор выбрать?
Правила форума
Чтобы получить быстрый и точный ответ по теме, указываем эмулятор, версию, название игры полностью. Если эмулятор или ром был скачан не с нашего сайта, обязательно указываем и это.
Если вопрос касается общей работы эмулятора, название игры указывать не обязательно.
sonyplaystation какой эмулятор выбрать?
Всем Привет! Скачала эмулятор для Сони плей стейшн pSX v1.13, компьютер пишет запуск программы не возможен, т.к. отсутствует d3dx9_26.dll. Что это значит и как это исправить? или какой лучше скачать эмулятор, который будет работать? а точнее на котором будет работать need for speed и resident evil?
Как получать файл bin известно, где-то год назад (я уже не помню на каком эмуляторе) resident evil загружался, но там была ошибка в самой игре, в самом начале.
Сейчас скачала need for speed порше и в нем нет файла Bin.ecm который надо перетаскивать на unecem.exe. Есть только файл cue. Это нормально? но проверить работает ли какой-нибудь файл я не могу, т.к. скаченный Эмулятор вообще не запускается.
Помогите пожалуйста разобраться, любимые игры на Сеге и Денди почти все пройдены, хочется в плейстейшн тоже поиграть ![]()
- Kattie
- Сообщения: 16
- Зарегистрирован: 03.02.11 в 12:24
Re: sonyplaystation какой эмулятор выбрать?
![]() Shred » 07.11.11 в 20:16
Shred » 07.11.11 в 20:16
Kattie писал(а):отсутствует d3dx9_26.dll
Похоже DirectX требует, и видимо девятый ![]()
Насчет эмулей. Обычно пользовался ePSXe (1.6.0, 1.7.0), вроде не подводили. Как раз Обитель Зла на них шел.
А насчет архива ПоршЭ, что-то там да должно быть, 350 метров всё таки весит, один cue вряд ли столько затянет.

-

Shred - Сообщения: 746
- Зарегистрирован: 25.03.09 в 23:23

Re: sonyplaystation какой эмулятор выбрать?
![]() Kattie » 07.11.11 в 21:16
Kattie » 07.11.11 в 21:16
«Похоже DirectX требует, и видимо девятый» это программа какая-то? может ее скачать где-то нужно?
Сейчас скачала 1.6.0, пишет запуск невозможен, отсутствует MSVBVM50.DLL.
Скачала 1.7.0. окошечко открывается ![]() что бы загрузить игру, я так понимаю надо нажать run ps-exe? и выбрать файл bin. Выбираю файл, он пишет «Error PSX BIOS not found (biosscph1001.bin)» Как это исправить? как запустить игру?
что бы загрузить игру, я так понимаю надо нажать run ps-exe? и выбрать файл bin. Выбираю файл, он пишет «Error PSX BIOS not found (biosscph1001.bin)» Как это исправить? как запустить игру?
Сейчас скачаю resident evil, попробую его запустить.
год назад у меня был старый ноутбук Acer, с пямятью 512, и на нем эмулятор работал. вот только не помню какой( но точно с этого сайта.
- Kattie
- Сообщения: 16
- Зарегистрирован: 03.02.11 в 12:24
Re: sonyplaystation какой эмулятор выбрать?
![]() Kattie » 07.11.11 в 21:45
Kattie » 07.11.11 в 21:45
Блин, про Резидент эвил, так же пишет( про биос что-то(
Error PSX BIOS not found (biosscph1001.bin)
что делать? ![]()
- Kattie
- Сообщения: 16
- Зарегистрирован: 03.02.11 в 12:24
Re: sonyplaystation какой эмулятор выбрать?
![]() Shred » 07.11.11 в 21:52
Shred » 07.11.11 в 21:52
Kattie писал(а):«Похоже DirectX требует, и видимо девятый» это программа какая-то?
Да, что-то в этом роде, доп. прогр-е обеспечение. В интернете его скачать легко.
Насчет «Error PSX BIOS not found (biosscph1001.bin)», видимо биос Вы не качали, в разделе →эмуляторов← есть биос и плагины, их нужно скачать и скопировать в соответствующие папки эмулятора (plugins, bios). После этого, запустить эмуль и пройти основную настройку в Config→wizard guide.
А игры запускал обычно через File→Run ISO. Еще можно смонтировать образ игры на виртуальный диск и запускать через File→Run CDROM.
-
Shred - Сообщения: 746
- Зарегистрирован: 25.03.09 в 23:23
Re: sonyplaystation какой эмулятор выбрать?
![]() iddqd » 08.11.11 в 0:12
iddqd » 08.11.11 в 0:12
Какая Ос у Вас? Эмулятор pSX 1.13 выдает оригинальную графику «железной» PlayStation (вроде). DirectX обновите с microsoft.com — это онлайн установщик
Советую не останавливаться на каком-то одном эмуляторе PSX. Есть еще такие эмуляторы:
PCSX Reloaded — обновляется довольно часто. Плагины видео, звуковые используются те же, что и в ePSXe. Кроме того, можно менять плагин управления
PSXjin — бывший PCSX-ReRecording. Видеоплагин вшит.
Xebra/Arbex — японский эмулятор, очень хорош по совместимости. Читайте здесь как запускать на нем игры.
Сами игры можно скачать например тут — с фтп эмупарадайза или с зеркала на megaupload. Еще есть мега-сайт для халявщиков:
http://nitroroms.com/list-of-systems
там игры PSX в другом формате образа, но качать один файл в один поток с высокой скоростью.
Кстати, напишите конфигурацию Вашего компа — может он и эмуляцию PS2 потянет. Или DreamCast.
- iddqd
- Сообщения: 431
- Зарегистрирован: 18.03.08 в 8:07
Re: sonyplaystation какой эмулятор выбрать?
![]() Kattie » 08.11.11 в 22:07
Kattie » 08.11.11 в 22:07
Биос скачала, только не в специальные папки. Сейчас исправила и эмулятор заработал. Спасибо ![]() Правда не без глюков( в need for speed сначала все нормально, но через некоторое время начинает заедать меню так, что там ничего не выбрать, все мигает, все в пикселях. Наугад что-то выбирается, а сама гонка идет нормально.
Правда не без глюков( в need for speed сначала все нормально, но через некоторое время начинает заедать меню так, что там ничего не выбрать, все мигает, все в пикселях. Наугад что-то выбирается, а сама гонка идет нормально.
Может еще раз скачать нужно?
а вот resident evil, дальше надписи с предупреждением о сценах жестокости не идет( когда скачивала его, видела комменты под игрой, у кого-то та же проблема. как исправить ее?
У меня ноутбук, процессор 2,2, ОС виндоус 7, 4Гб, 320. ничего особенного ![]()
Кстати была такая игра, старая, на компе, называется Driver/водила, кажется 1999 года, она только на 98 виндоус работала, даже на xp не хотела. Там надо выполнять задания, действие происходит в Нью-Ерке, Лос Анджелесе, Сан-Франциско и Майами кажется. Может быть кто-нибудь знает, если увлекался ей, может ли она на виндоус 7 работать? хочу скачать где-нибудь.
- Kattie
- Сообщения: 16
- Зарегистрирован: 03.02.11 в 12:24
Re: sonyplaystation какой эмулятор выбрать?
![]() Shred » 08.11.11 в 22:31
Shred » 08.11.11 в 22:31
Насчет глюка ПоршЭ — скорей всего дело в видео плагине, у меня подобная история с футболом была. Попробуйте другие плагины в Config→Video. А глюк Резидента также: либо видео плагин другой нужен, либо биос.
Драйвер у меня на XP работает. А на 7-ке не знаю как там обстоят дела.
-
Shred - Сообщения: 746
- Зарегистрирован: 25.03.09 в 23:23
Re: sonyplaystation какой эмулятор выбрать?
![]() Kattie » 08.11.11 в 22:46
Kattie » 08.11.11 в 22:46
Окей попробую поменять ![]()
Сейчас скачала DirectX, и эмулятор pSX v1.13 заработал, но опять же не без глюков. Меню в need for speed отлично работает, но вот когда начала играть, внезапно выходит ошибка, что программа работает не правильно( и все закрывается.
резидент эвил пока не работает, но щас попробую менять плагины.
А у меня с водилой был диск, сейчас не найти его,а так можно бы было проверить ![]() Всю ее проходила когда-то,хочется вспомнить
Всю ее проходила когда-то,хочется вспомнить ![]()
- Kattie
- Сообщения: 16
- Зарегистрирован: 03.02.11 в 12:24
Re: sonyplaystation какой эмулятор выбрать?
![]() Kattie » 11.11.11 в 21:45
Kattie » 11.11.11 в 21:45
Эх, ничего так нормально и не настроилось в этих двух Эмуляторах( need for speed с глюками, а resident evil не идет.
Пробовала везде менять биос, (файлов биос всего три? из скаченных с сайта. Это верно?) все их пробовала менять и с разными настройками в видео.
Может если кто-то сейчас играет в эти игры, напишет какой биос и какие плагины у них стоят? и на каком эмуляторе. Что б наверняка знать ![]()
- Kattie
- Сообщения: 16
- Зарегистрирован: 03.02.11 в 12:24
Re: sonyplaystation какой эмулятор выбрать?
![]() Shred » 12.11.11 в 1:27
Shred » 12.11.11 в 1:27
Я кажется понял в чем дело — у меня стоит левый биос: «Sony PlayStation BIOS (U)(v4.1)(1997-12-16)[SCPH-7001 + SCPH-9001]», плагин выбран Pete’s D3D Driver 1.47, эмуль ePSXe 1.6.0
Так что скорей всего дело в этом биосе.
-
Shred - Сообщения: 746
- Зарегистрирован: 25.03.09 в 23:23
Re: sonyplaystation какой эмулятор выбрать?
![]() Антоха 007 » 12.11.11 в 10:53
Антоха 007 » 12.11.11 в 10:53
На сайте pSX рекомендуется scph1001, я и в других эмуляторах его юзаю, проблем нет.
- Антоха 007
- Сообщения: 1318
- Зарегистрирован: 30.06.07 в 12:59
- Откуда: Сибирь
Re: sonyplaystation какой эмулятор выбрать?
![]() Kattie » 16.11.11 в 19:58
Kattie » 16.11.11 в 19:58
я тоже scph1001 ставлю, ну и другие пробовала. Моторейсер например отлично идет и нид фо спид роад челендж тоже ![]() а вот ресидент эвил и нид фо спид порше нет. Да я уже забила на это как-то. Лучше в Соник из старого поиграю
а вот ресидент эвил и нид фо спид порше нет. Да я уже забила на это как-то. Лучше в Соник из старого поиграю ![]()
Shred: а этот биос «Sony PlayStation BIOS (U)(v4.1)(1997-12-16)[SCPH-7001 + SCPH-9001] его где-то скачать можно?
- Kattie
- Сообщения: 16
- Зарегистрирован: 03.02.11 в 12:24
Re: sonyplaystation какой эмулятор выбрать?
![]() Shred » 16.11.11 в 20:04
Shred » 16.11.11 в 20:04
Конечно можно, я же где-то его взял ![]()
Введите всё это название биоса в любой поисковик (гугл, яндекс и т.д.) и должно надыбать.
-
Shred - Сообщения: 746
- Зарегистрирован: 25.03.09 в 23:23
Вернуться в Телевизионные приставки
Кто сейчас на конференции
Сейчас этот форум просматривают: нет зарегистрированных пользователей и гости: 2
Страница 3 из 23
-
Какая ещё тонкая настройка, когда уже решили, что некоторые глюки не лечатся?
-
Это не настройка и не глюки, а особенности графики PS1.
-
John Freeman, как бы ты тему назвал? может переименуешь?
-
Позволю себе не согласиться! Как раз Silent Hill — именно та игра, которая, как по мне, от этого глюка даже выигрывает. Особенно в темном городе такая имитация оптической иллюзии — это очень к месту. А в обычном городе из-за этого иногда кажется, что местный туман живее, чем во второй части.
Кстати, так как я не играл в игры с медленной анимацией на приставке, то вообще не думал, что такое возникает только в эмуляторе.
-
Очень странно… На китайском телевизоре 1998 года выпуска, с мутным екраном, малой диагональю и сверхнизким разрешением, никакого «желе» не наблюдал
-
Вот именно по вышеперечисленным причинам и не наблюдал, сколько раз говорить.
-
MisterGrim, это я к тому, что некоторые товарисчи ругаются на «желе» в эмуляторах.
Последнее редактирование: 22 авг 2008
-
Сам-Сунг, дык. На мониторе с некислой диагональю и сверхвысоким разрешением все косяки игр становятся куда заметнее. Потому что их проще разглядеть.
-
Werecat13, это не у игр косяки, а у Sony
-
dukeee

- Регистрация:
- 26 авг 2008
- Сообщения:
- 2
народ как настроить bios в ePSXe v 1.7.0? или киньте настроеный пжалста
-
а что там настраивать? выбрал версию боиса и все дела
-
В папке ePSXe в подпапку bios положить файлы scph1001.bin и scph7502.bin, затем в меню (Config->BIOS) выбрать нужный.
Биосы можно взять на emu-land.net: http://www.emu-land.net/consoles/psx/bios. -
а может кто поделиться опытом, как лучше настроить эмулятор для игры в 2D игры? пробую-пробую, но либо получаются смазанные персонажи, либо пропадают некоторые детали заднего фона. Обычно использую Pete’s Soft Plugin.
Последнее редактирование: 10 сен 2008
-
с ним некоторые буквы не читаются и другие огрехи в виде полос и провалов
-
если отключить фильтрацию, вроде нормуль будет
-
MisterGrim, а есть разница, какой биос брать, на качестве эмулирования отразится?
kerlik, безусловно, именно для 2D хорошо юзать софтварный плагин от Pete. Он лучше и быстрее. Но, к сожалению, он не универсален, очень часто мы имеет дело одновременно с 3D и спрайтами.
Для opengl2 обычно делаю так, и картинка на плоских играх лично меня удовлетворяет:
================================
Texture filtering — Extended+smoothed sprites
Hi-Res textures — None (я вообще никогда и нигде не использую 2xSaI, если рисованные герои — это одно, то реальные лица очень сильно искажаются)
Screen filtering — on
Shader effects — Fullscreen Smoothing — Maximum
================================
-
Думаю разница небольшая, но лучше всего брать последнюю версию. На качестве не отразится, разве что на запуске игр. ну там скажем японский биос для ntsc-jap игр… хотя все версии поломаны и спокойно должны запускаться. ты же не будешь в сам биос лезть.
добавлено через 57 секунд
кстати, не знаю почему, но всякие русские сборники у меня идут только под Pete’s-плагины. С другими плагинами начальное меню с выбором игр просто не грузится…. как скажем VGS тоже их никогда не запускал.Последнее редактирование: 11 сен 2008
genius_corp нравится это.
-
Из хелпа:
У меня нормально работает с обоими. А если что-то не работает, то опять же с обоими. Но можно поэкспериментировать с другими версиями.
genius_corp нравится это.
-
Спасибо. Её и использую.Я когда-то экспериментировал с opengl2 по этому поводу. Всё в разделе Compatibility. Эта проблема касается не только начального меню сборников. Например, у меня не отображался экран Loading в Duke Nukem Land Of The Babes. Проблему я эту решил. Сейчас глянул — вот такие настройки стоят:
Off-Screen Drawing — Standard
Framebuffer effects — Standard
Framebuffer upload — FullДа уж, в своё время я очень сильно парился над опциями. Тут принцип «всё на максимум» не работает. Нужно долго и нудно подбирать параметры под себя.


Страница 3 из 23