 Довольно распространённая проблема среди пользователей операционной системы Windows любых версий – ошибка msi при установке программ из файла с расширением .msi. В этой статье я опишу часто встречаемые проблемы с установщиком Windows 7/10/XP и варианты их решения, а также сделаю видео по текущему вопросу.
Файлы с расширением .msi это обычные пакеты установки (дистрибутивы) из которых ставится программа. В отличии от обычных «setup.exe», для запуска файла msi система использует службу Windows Installer (процесс msiexec.exe). Говоря простыми словами, установщик Windows разархивирует и запускает файлы из дистрибутива. Когда Windows Installer не работает, то появляются различные ошибки.
Вообще, меня это жутко бесит, т.к. после глупого сообщения об ошибке совсем непонятно что делать дальше. Microsoft специально разработали установщик Windows Installer для расширения возможностей установки программ (в основном это касается системных администраторов), но не позаботились должным образом о безглючной работе этой службы или хотя бы об адекватных сообщениях о проблемах. А нам теперь это разгребать 🙂
Неполадки могут быть с работой самой службы или могут возникать в процессе установки программ, когда всё настроено, в принципе, правильно. В первом случае нужно ковырять службу установщика, а во втором решать проблему с конкретным файлом. Рассмотрим оба варианта, но сначала второй.
Ошибки msi файлов
Очень часто ошибки появляются из-за недостаточных прав системы на файлы или папки. Нельзя сказать, что Windows Installer не работает, в этом случае достаточно просто добавить нужные права и всё заработает. Буквально вчера я столкнулся с тем, что скаченный дистрибутив .msi не захотел устанавливаться, при этом успешно запускается мастер установки, выбираются параметры, но затем система думает несколько секунд и выдаёт ошибку:
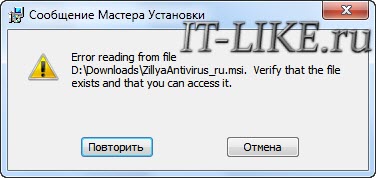
«Error reading from file «имя файла» verify that the file exists and that you can access it» (Error 1305). Переводится «Ошибка чтения из файла … проверьте существует ли файл и имеете ли вы к нему доступ». Ну не тупняк ли? Естественно, что кнопка «Повторить» не помогает, а отмена прекращает всю установку. Сообщение особой смысловой нагрузки также не несёт, т.к. файл точно существует и я имею к нему доступ, иначе бы просто не смог его запустить и получить это сообщение, к тому же почему-то на английском языке 🙂
А ошибка в том, что не Я должен иметь доступ к файлу, а установщик Windows, точнее сама Система. Решается очень просто:
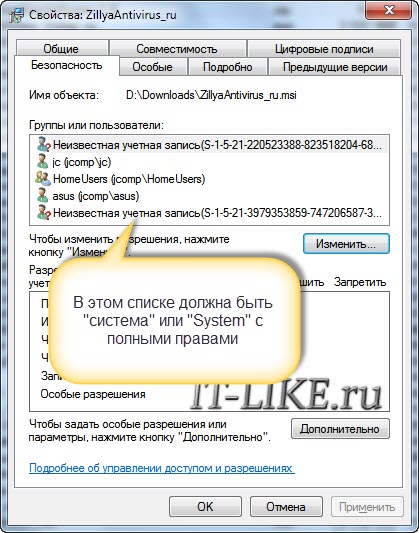
- Кликаем правой кнопкой по файлу с расширением .msi, выбираем «Свойства»
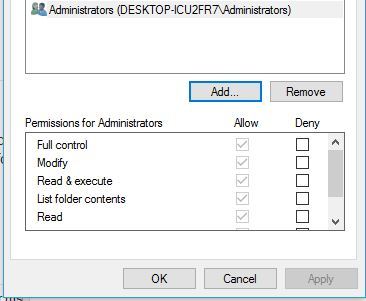
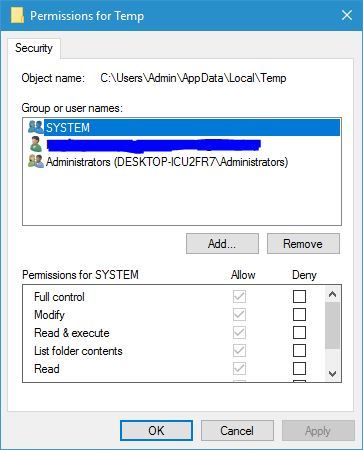
- На вкладке «Безопасность» смотрим, есть ли в списке пользователь с именем «система» или «System»

- Скорее всего вы такого не увидите. Поэтому будем добавлять вручную. Нажимаем кнопку «Изменить…», затем «Добавить…»
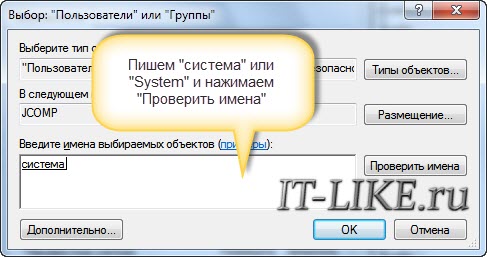
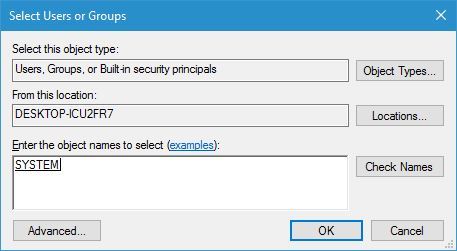
- В поле пишем «система» или «System» (если у вас английская Windows) и нажимаем «Проверить имена». При этом слово должно стать подчёркнутым как на картинке.

- Нажимаем «ОК», ставим галочку «Полный доступ», «ОК»
- Кнопка «Дополнительно» -> «Изменить разрешения…» ставим «Добавить разрешения, наследуемые от родительских объектов», «ОК» три раза.
Теперь ошибка установщика не появится! Можно добавить доступ на всю папку, из которой вы обычно инсталлируете программы, например на папку «Downloads», как у меня. Смотрим видео по решению проблем с правами доступа:
В Windows XP вкладки «Безопасность» не будет, если включён простой общий доступ к файлам. Чтобы его выключить, нужно зайти в и выключить опцию «Использовать простой общий доступ к файлам». В урезанных версиях Windows 7/10 и XP вкладки «Безопасность» нет в принципе. Чтобы её увидеть, нужно загрузить Windows в безопасном режиме и зайти в неё под администратором.
Ещё способы решить проблему
- Запускайте установку, войдя в систему под администраторским аккаунтом
- Правой кнопкой по пакету «.msi» и выбираем «Запуск от имени Администратора»
- Выключите антивирус на время
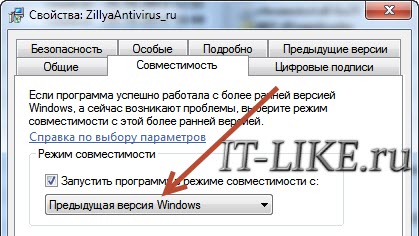
- Включить режим совместимости с предыдущими операционными системами. Для этого зайдите в свойства файла msi и на вкладке «Совместимость» поставьте галочку «Запустить программу в режиме совместимости»

- Если файл на флешке, то попробуйте скопировать его куда-нибудь на жёсткий диск и запустить оттуда (бывает, что запрещена установка программ со съёмных накопителей)
- Попробуйте просто создать новую папку с любым именем в корне диска, перекинуть туда дистрибутив и запустить его оттуда
Описанный метод поможет при разных сообщениях, с разными номерами. Например, вы можете видеть такие ошибки файлов msi:
- Error 1723
- Internal Error 2203
- Системная ошибка 2147287035
- Ошибка «Невозможно открыть этот установочный пакет»
- Ошибка 1603: Во время установки произошла неустранимая ошибка
Во всех этих случаях должна помочь установка прав на файл и/или на некоторые системные папки. Проверьте, имеет ли доступ «система» к папке временных файлов (вы можете получать ошибку «Системе не удается открыть указанное устройство или файл»). Для этого:
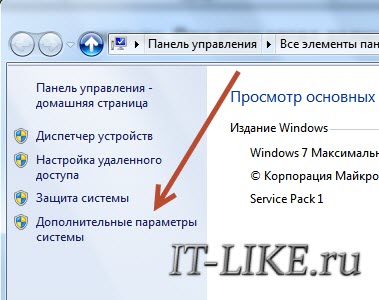
- Сначала узнаем нужные пути. Нажмите «Win + Pause» и зайдите в

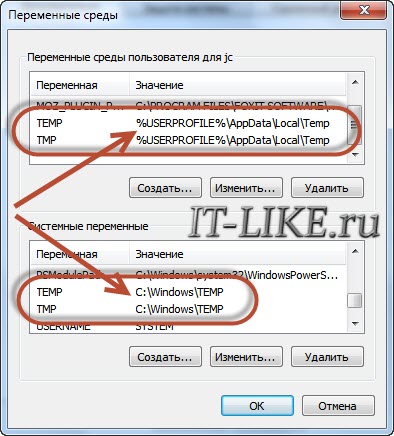
- В списках ищем переменные с названиями «TEMP» и «TMP» (значения обычно совпадают), в них записаны пути к временным папкам, которые использует установщик Windows

- Теперь идём к этим папкам и смотрим в их свойствах, имеет ли к ним доступ «система». Чтобы быстро получить путь к временной папке пользователя, кликните два раза по переменной, скопируйте путь и вставьте его в адресной строке «Проводника» Windows
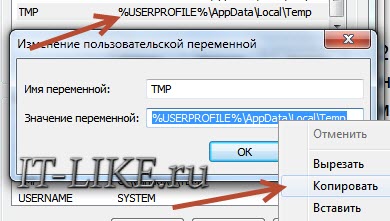

После нажатия «Enter» путь преобразится на «нормальный» и вы переместитесь в реальную временную папку. Права на неё и надо проверять. Также рекомендую очистить временные папки от всего что там скопилось или даже лучше удалить их и создать новые с такими же названиями. Если не получается удалить папку, почитайте как удалить неудаляемое, но это не обязательно.
Если служба Windows Installer всё равно не хочет работать, то проверьте права на папку «C:Config.Msi», сюда «система» также должна иметь полный доступ. В этом случае вы могли наблюдать ошибку «Error 1310». На всякий случай убедитесь, что к папке КУДА вы инсталлируете софт также есть все права.
Если вы используете шифрование папок, то отключите его для указанных мной папок. Дело в том, что хотя мы сами имеем к ним доступ, служба Microsoft Installer не может до них достучаться пока они зашифрованы.
Ещё ошибка может быть связана с битым файлом. Может быть он не полностью скачался или оказался битым уже на сервере. Попробуйте скачать его ещё раз оттуда же или лучше с другого места.
Ошибка установщика Windows
В случае общих проблем не будут устанавливаться никакие msi файлы, процесс установки, скорее всего, даже не начнётся. При этом могут появляться ошибки вида:
- Нет доступа к службе установщика Windows
- Не удалось получить доступ к службе установщика Windows
- Ошибка пакета установщика Windows (1719)
или ещё нечто подобное со словами «ошибка msi», «Windows Installer Error». Всё это означает, что система дала сбой и теперь её надо лечить. Может вы ставили какой-то софт, который испортил системные файлы и реестр, или подхватили вирус. Конечно, никогда не будет лишним удалить вирусы, или убедиться что их нет. Но оставьте этот вариант на потом, т.к. обычно проблема кроется в другом.
Сначала давайте проверим работает ли служба Windows Installer:
- Нажмите «Win + R» и введите services.msc
- Найдите в конце списка службу «Установщик Windows» или «Windows Installer»

- Тип запуска должен быть «Вручную». Если она «Отключена», то зайдите в «Свойства» и выберите «Вручную»
- Затем кликните по ней правой кнопкой и выберите «Запустить» или «Перезапустить». Если ошибок нет и состояние переходит в режим «Работает», то здесь всё нормально.
- Нажмите «Win + R» и введите msiexec. Если модуль MSI работает нормально, то должно появиться окно с версией установщика и параметрами запуска, а не ошибка.

Следующее что я посоветую сделать – это выполнить команду сканирования системы на повреждённые и изменённые системные файлы. Нажмите «Win + R» и введите
Sfc /scannow
Произойдёт поиск и замена испорченных файлов на оригинальные, при этом может потребоваться вставить установочный диск с Windows XP-7-10. После окончания процесса перегрузитесь и посмотрите, решена ли проблема.
Microsoft сам предлагает утилиту, призванную решить нашу проблему. Запустите программу Easy Fix и следуйте мастеру.
Скачать Easy Fix
Параметры реестра и службы
Следующий способ устранения ошибки – восстановление рабочих параметров в реестре установщика Windows Installer.
Скачать msiserver.reg
Для этого скачайте архив и запустите оттуда два reg-файла, соответственно своей версии Windows. Согласитесь с импортом настроек.
Важно! Перед последним действием желательно создать точку восстановления системы! Если способ не поможет или станет хуже, вы сможете восстановиться до прежнего состояния.
В Windows XP или Windows Server 2000 установите последнюю версию установщика 4.5.
Скачать Windows Installer 4.5
Если не помогло, то проделайте ещё перерегистрацию компонентов:
- Нажмите «Win + R» и введите «cmd». Затем в чёрном окне введите последовательно команды:
MSIExec /unregister
MSIExec /regserver - В ответ должна быть пустота, никаких ошибок. Если проблема не решена, введите ещё команду
regsvr32 msi.dll - Закройте чёрное окно
Если пишет, что не хватает прав, то нужно запускать командную строку от имени Администратора.
Если команды выполнились, но не помогло, то скачайте файл и запустите msi_error.bat из архива, проверьте результат.
Последний вариант — скачайте программу Kerish Doctor, почитайте мою статью, там есть функция исправления работы службы установщика и многих других частых проблем Windows.
Также, многие программы используют .NET Framework, поэтому не будет лишним установить последнюю версию этого пакета. И, напоследок, ещё один совет: если в пути к файлу-дистрибутиву есть хоть одна папка с пробелом в начале названия, то удалите пробел. Такой простой приём решит вашу проблему 🙂
Подведение итогов
Ошибки с установщиком Windows очень неприятные, их много и сразу непонятно куда копать. Одно ясно – система дала сбой и нужно восстанавливать её до рабочего состояния. Иногда ничего не помогает и приходится переустанавливать Windows. Однако не торопитесь это делать, попробуйте попросить помощи на этом форуме. В точности опишите вашу проблему, расскажите что вы уже делали, какие сообщения получили, и, возможно, вам помогут! Ведь мир не без добрых людей 🙂
by Milan Stanojevic
Milan has been enthusiastic about technology ever since his childhood days, and this led him to take interest in all PC-related technologies. He’s a PC enthusiast and he… read more
Updated on March 25, 2021
- Missing or damaged source files can cause issues on Windows 10 when it comes to installing new software or launching apps that are already installed.
- Error messages caused by missing or corrupted source files are quite common, so make sure you follow the troubleshooting steps listed below if they happen to you as well.
- This troubleshooting guide is part of our hub dedicated to System Errors, so bookmark it in case anything similar ever happens again.
- Take a look at our Fix page for more articles that may interest you.
XINSTALL BY CLICKING THE DOWNLOAD FILE
This software will repair common computer errors, protect you from file loss, malware, hardware failure and optimize your PC for maximum performance. Fix PC issues and remove viruses now in 3 easy steps:
- Download Restoro PC Repair Tool that comes with Patented Technologies (patent available here).
- Click Start Scan to find Windows issues that could be causing PC problems.
- Click Repair All to fix issues affecting your computer’s security and performance
- Restoro has been downloaded by 0 readers this month.
Computer errors can occur once in a while, and some errors such as Source file not found can occur while installing certain applications on your Windows 10 PC.
This error can prevent you from installing new applications, therefore it’s important that you know how to properly fix it.
How do I fix source file not found errors?
1. Common source file not found errors
1.1 Check your installation media for damage
Sometimes this error occurs when you’re installing a new application from a DVD or a CD media. Apparently, this error can occur if your installation media is damaged, therefore be sure to clean it with a soft, lint-free cloth.
If you have more than one DVD drive, be sure that the installation media is inserted in the correct drive.
1.2 Disable your antivirus software
Certain antivirus tools can interfere with the installation process and cause Source file not found error to appear. If you’re experiencing this error on your computer, we strongly suggest that you temporarily disable your antivirus and try to run the setup again.
If that doesn’t work, you might have to temporarily uninstall your antivirus and check if that solves the problem.
1.3 Install the software from your hard drive
If you’re getting this error while installing software from the installation media, you might want to consider installing it from your hard drive. To do that, you just need to copy the contents of the installation media and run it from your hard drive.
Simply open the installation media and select all files. Create a new folder on your PC and paste all the files from the installation media. Remove the installation media from your computer and start the setup process from your hard drive.
Keep in mind that this method doesn’t always work, but it might work for some applications.
1.4 Uninstall your DVD drive driver
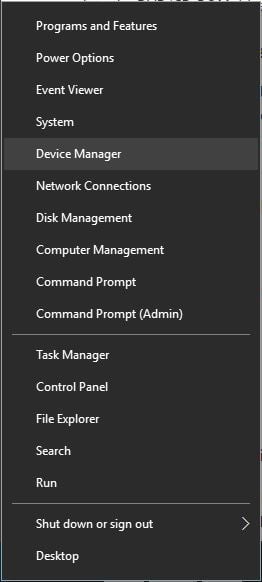
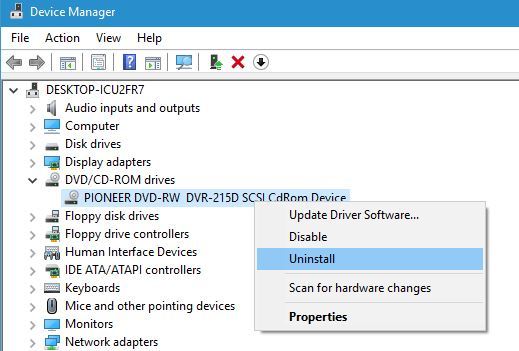
- Press Windows Key + X to open Win + X menu and choose Device Manager from the list.

- When Device Manager opens, locate the DVD driver, right-click it and choose Uninstall from the menu.

- When the confirmation message appears, click OK.
- Now restart your PC.
If you can’t install software from your DVD drive, it might be because the driver is corrupt. One way to fix this problem is to uninstall your DVD driver and let Windows 10 install it again.
When your PC restarts the default driver should be installed. Try to start the installation again and check if the problem is resolved.
1.5 Be sure to extract the setup file from the archive
Many applications are distributed in archives because it’s the most convenient way to transfer large amount of files while providing some form of compression. However, this problem can occur if you try to start the installation directly from the archive without extracting your files.
Even though this is a more convenient way to install applications, many applications can’t be installed without extracting their files first. To properly install the application that comes in an archive you need to open the archive and extract all files to your PC.
After doing that, navigate to the extraction folder and run the setup file from there.
1.6 Unregister and reregister Windows Installer
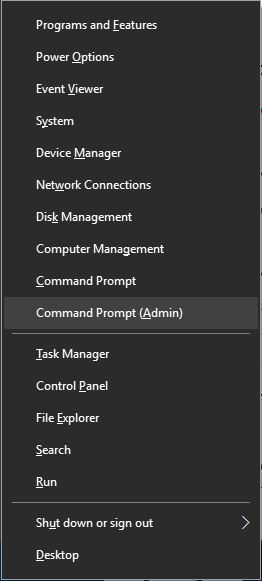
- Press Windows Key + X and choose Command Prompt (Admin).
- When Command Prompt opens, enter msiexec /unreg and press Enter to unregister the Windows Installer.
- After the command is executed, enter msiexec /regserver and press Enter. This will reregister Windows Installer.
- Close Command Prompt and check if the problem is resolved.
Many installations rely on Windows Installer service in order to run, and if there’s any problem with Windows Installer, you’ll have to unregister and reregister it.
1.7 Use Registry Editor
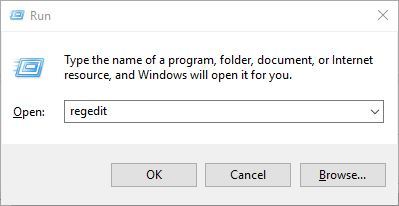
- Press Window Key + R and enter regedit.
- Press Enter or click OK.

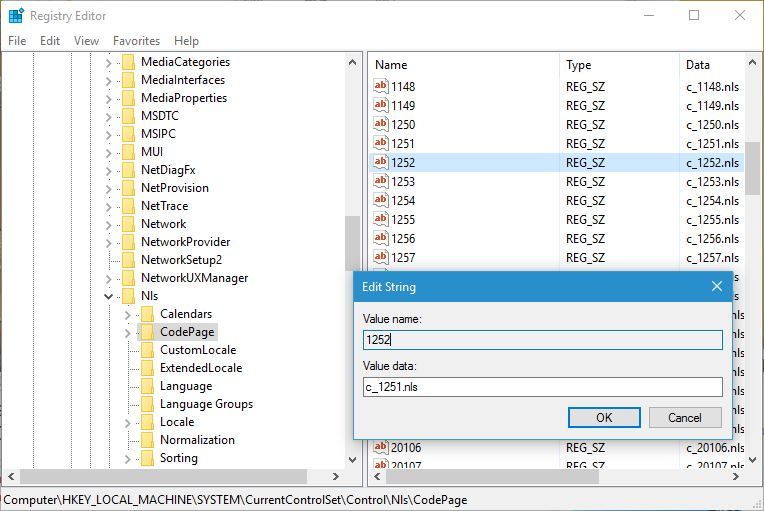
- When Registry Editor opens, navigate to the following key in the left pane:
- HKEY_LOCAL_MACHINESYSTEMCurrentControlSetControlNlsCodePage
- In the right pane locate 1252 string and double click it.
- When Edit String window opens, change the Value data from c_1252.nls to c_1251.nls.

- Click OK to save changes.
- Close Registry Editor and restart your PC.
- After your PC restarts, run the setup again and check if the problem is resolved.
Sometimes you can fix Source not found error simply by making few changes to your registry. We have to mention that modifying your registry comes with certain risks, therefore we advise you to back up your registry before making any changes to it.
1.8 Delete the installation folder and disable your antivirus
- Locate the Maya installation folder and delete it. By default, it should be C:autodesk.
- After deleting the folder, disable your antivirus software completely.
- Download Maya installer and extract it.
- Keep your antivirus disabled and run the installation again.
Users reported this error while installing Maya software, and according to them, the problem can be fixed by deleting the installation folder and disabling your antivirus.
After disabling the antivirus and recreating the installation folder, the software should be installed without any errors.
1.9 Clear the Temp folder
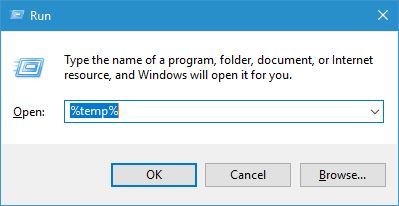
- Press Windows Key + R and enter %temp%.
- Press Enter or click OK.
- When the Temp folder opens delete all files from it.
- Open the Run dialog once again and enter %TEMP%.
- Press Enter or click OK.
- Delete all files from the Temp folder.

Applications will sometimes move installation files to the Temp folder on your PC. However, those files can become corrupt and prevent the installation from running.
If you’re having Source file not found error, you might be able to fix it by deleting everything from the Temp folder. After you delete all files from both Temp folders, try to start the installation again.
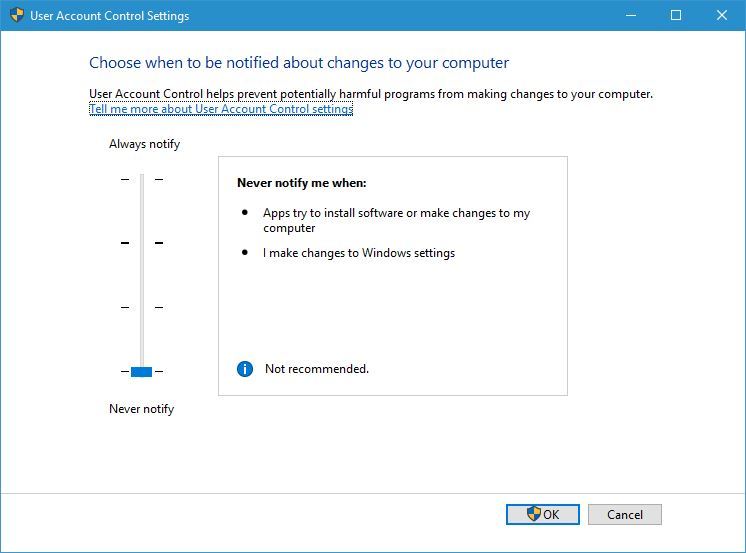
1.10 Disable User Account Control
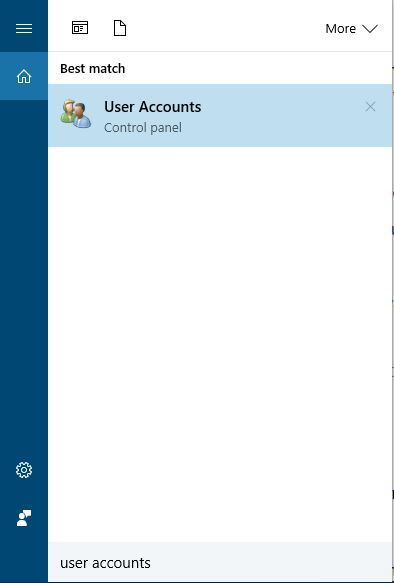
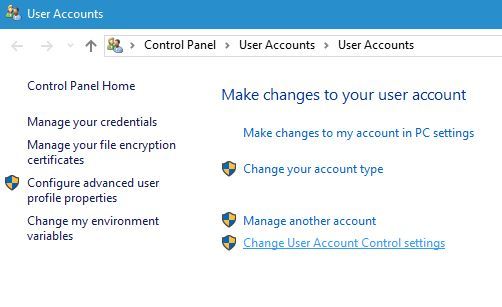
- Press Windows Key + S and enter user accounts.
- Select User Accounts from the menu.

- Select Change User Account Control settings.

- Lower the slider all the way down to Never notify.
- Click OK to save changes.

Some PC issues are hard to tackle, especially when it comes to corrupted repositories or missing Windows files. If you are having troubles fixing an error, your system may be partially broken.
We recommend installing Restoro, a tool that will scan your machine and identify what the fault is.
Click here to download and start repairing.
User Account Control is a security feature designed to notify you whenever you make a change to your system. This feature can sometimes protect you from malicious software, but in most cases, users disable it because of its frequent notifications.
In fact, User Account Control can interfere with the installation process and cause Source file not found error to appear. After disabling User Account Control, restart your PC and check if the error is resolved.
1. 11 Run the setup as administrator
- Locate the setup file and right-click it.
- Choose Run as administrator from the menu.
In some cases, this error can occur if you don’t have the administrator privileges, but you can fix this problem with just a couple of clicks. In addition to running the setup as administrator, users are also suggesting to disable your antivirus and check if that solves the issue.
1.12 Install the latest Windows updates
Windows updates often fix many hardware and software errors, and if you’re having this problem on your PC, we strongly suggest that you check if you have the latest updates installed.
Simply navigate to the Windows Update section and download the latest updates for your PC. After installing the updates, the issue should be resolved.
2. Source file not found Asus Smart Gesture
2.1 Extract the setup file to a different location
Users reported that this error occurs when you extract Asus Smart Gesture files to your PC. This problem most likely occurs because the path to the setup file exceeds the limit set by Windows.
Since you can’t change the limit, you’ll have to change the path to the setup file. The simplest way to do that is to extract the installer files to the C: directory and run the setup file from there.
After doing that, you should be able to install Asus Smart Gesture without any problems.
2.2 Make sure that you’re using the correct setup file
Users reported this issue while trying to reinstall Asus Smart Gesture. According to them, they deleted the previous installation, but while trying to install the software, they got the Source file not found error.
According to users, to fix this problem be sure to run the Setup file and not the Setup TP driver file. After starting the correct setup process, the error should be resolved.
3. Source file not found disk1.cab error
3.1 Move the installation to a different partition
Users reported this error while installing League of Legends, and according to them, they managed to fix the problem simply by moving their installation to a different partition. To do this, simply change the installation directory from C to D while installing the game and the problem should be resolved.
3.2 Move the setup file to the root directory
Source file not found disk1.cab error can appear while installing SourceTree software on your PC. According to users, they managed to fix this issue simply by moving the setup file to the root directory of any hard drive partition.
Root directory is C:, D:, etc., so you can move it to any root directory and try to install it from there. Although this solution applies to SourceTree software, it can also be used for any other application.
3.3 Change the values in your registry
- Open Registry Editor and navigate to the HKEY_LOCAL_MACHINESoftwareMicrosoftWindows NTCurrentVersionWinLogonAllocateCDRoms key in left pane.
- Locate AllocateCDRoms value in the right pane and double click it. If the Value data is set to 1 change it to 0.
- Restart your PC and try to install the application again.
One way to fix this error is to make changes to your registry. Modifying the registry comes with certain risks, therefore be sure to create a backup of your registry before proceeding.
3.4 Copy all installation files to your hard drive
If you’re installing the application from your hard drive, be sure to copy all files from the installation media to your hard drive. If you have an application that requires two CDs for installation, be sure to copy files from both of them to your hard drive and try to run the setup.
Some users are also suggesting to copy files from both CDs to the same directory before trying to start the installation.
4. Source file not found error in Maya
4.1 Copy the file and change its extension
- Locate the problematic file.
- Go to the View tab and check the File name extensions option.

- After that, create the copy of the problematic file.
- Keep the same name of the file, but change its extension from .bin to .dll.
- After doing that, try to install the software again.

According to users, you can fix this problem simply by finding the file mentioned in the error message and changing its extension. It seems that the file is present in the directory, but instead of having the .dll extension, it has .bin extension for some reason.
4.2 Remove the failed installation and disable your antivirus
According to users, both Norton and Avast can cause this problem to appear on your PC. To fix this problem you need to disable Norton or Avast and delete the failed installation.
After that, try to install the software again. Users reported problems with Super Anti-Spyware tool as well, therefore be sure to disable it if you have it installed.
By following these steps, you should be able to get rid of any Windows 10 errors caused by faulty or missing source files.
If you know of any other solution to this issue that we may have missed out on, let us know by leaving us a message in the comments section below.
![]()
Newsletter
by Milan Stanojevic
Milan has been enthusiastic about technology ever since his childhood days, and this led him to take interest in all PC-related technologies. He’s a PC enthusiast and he… read more
Updated on March 25, 2021
- Missing or damaged source files can cause issues on Windows 10 when it comes to installing new software or launching apps that are already installed.
- Error messages caused by missing or corrupted source files are quite common, so make sure you follow the troubleshooting steps listed below if they happen to you as well.
- This troubleshooting guide is part of our hub dedicated to System Errors, so bookmark it in case anything similar ever happens again.
- Take a look at our Fix page for more articles that may interest you.
XINSTALL BY CLICKING THE DOWNLOAD FILE
This software will repair common computer errors, protect you from file loss, malware, hardware failure and optimize your PC for maximum performance. Fix PC issues and remove viruses now in 3 easy steps:
- Download Restoro PC Repair Tool that comes with Patented Technologies (patent available here).
- Click Start Scan to find Windows issues that could be causing PC problems.
- Click Repair All to fix issues affecting your computer’s security and performance
- Restoro has been downloaded by 0 readers this month.
Computer errors can occur once in a while, and some errors such as Source file not found can occur while installing certain applications on your Windows 10 PC.
This error can prevent you from installing new applications, therefore it’s important that you know how to properly fix it.
How do I fix source file not found errors?
1. Common source file not found errors
1.1 Check your installation media for damage
Sometimes this error occurs when you’re installing a new application from a DVD or a CD media. Apparently, this error can occur if your installation media is damaged, therefore be sure to clean it with a soft, lint-free cloth.
If you have more than one DVD drive, be sure that the installation media is inserted in the correct drive.
1.2 Disable your antivirus software
Certain antivirus tools can interfere with the installation process and cause Source file not found error to appear. If you’re experiencing this error on your computer, we strongly suggest that you temporarily disable your antivirus and try to run the setup again.
If that doesn’t work, you might have to temporarily uninstall your antivirus and check if that solves the problem.
1.3 Install the software from your hard drive
If you’re getting this error while installing software from the installation media, you might want to consider installing it from your hard drive. To do that, you just need to copy the contents of the installation media and run it from your hard drive.
Simply open the installation media and select all files. Create a new folder on your PC and paste all the files from the installation media. Remove the installation media from your computer and start the setup process from your hard drive.
Keep in mind that this method doesn’t always work, but it might work for some applications.
1.4 Uninstall your DVD drive driver
- Press Windows Key + X to open Win + X menu and choose Device Manager from the list.
- When Device Manager opens, locate the DVD driver, right-click it and choose Uninstall from the menu.
- When the confirmation message appears, click OK.
- Now restart your PC.
If you can’t install software from your DVD drive, it might be because the driver is corrupt. One way to fix this problem is to uninstall your DVD driver and let Windows 10 install it again.
When your PC restarts the default driver should be installed. Try to start the installation again and check if the problem is resolved.
1.5 Be sure to extract the setup file from the archive
Many applications are distributed in archives because it’s the most convenient way to transfer large amount of files while providing some form of compression. However, this problem can occur if you try to start the installation directly from the archive without extracting your files.
Even though this is a more convenient way to install applications, many applications can’t be installed without extracting their files first. To properly install the application that comes in an archive you need to open the archive and extract all files to your PC.
After doing that, navigate to the extraction folder and run the setup file from there.
1.6 Unregister and reregister Windows Installer
- Press Windows Key + X and choose Command Prompt (Admin).
- When Command Prompt opens, enter msiexec /unreg and press Enter to unregister the Windows Installer.
- After the command is executed, enter msiexec /regserver and press Enter. This will reregister Windows Installer.
- Close Command Prompt and check if the problem is resolved.
Many installations rely on Windows Installer service in order to run, and if there’s any problem with Windows Installer, you’ll have to unregister and reregister it.
1.7 Use Registry Editor
- Press Window Key + R and enter regedit.
- Press Enter or click OK.
- When Registry Editor opens, navigate to the following key in the left pane:
- HKEY_LOCAL_MACHINESYSTEMCurrentControlSetControlNlsCodePage
- In the right pane locate 1252 string and double click it.
- When Edit String window opens, change the Value data from c_1252.nls to c_1251.nls.
- Click OK to save changes.
- Close Registry Editor and restart your PC.
- After your PC restarts, run the setup again and check if the problem is resolved.
Sometimes you can fix Source not found error simply by making few changes to your registry. We have to mention that modifying your registry comes with certain risks, therefore we advise you to back up your registry before making any changes to it.
1.8 Delete the installation folder and disable your antivirus
- Locate the Maya installation folder and delete it. By default, it should be C:autodesk.
- After deleting the folder, disable your antivirus software completely.
- Download Maya installer and extract it.
- Keep your antivirus disabled and run the installation again.
Users reported this error while installing Maya software, and according to them, the problem can be fixed by deleting the installation folder and disabling your antivirus.
After disabling the antivirus and recreating the installation folder, the software should be installed without any errors.
1.9 Clear the Temp folder
- Press Windows Key + R and enter %temp%.
- Press Enter or click OK.
- When the Temp folder opens delete all files from it.
- Open the Run dialog once again and enter %TEMP%.
- Press Enter or click OK.
- Delete all files from the Temp folder.
Applications will sometimes move installation files to the Temp folder on your PC. However, those files can become corrupt and prevent the installation from running.
If you’re having Source file not found error, you might be able to fix it by deleting everything from the Temp folder. After you delete all files from both Temp folders, try to start the installation again.
1.10 Disable User Account Control
- Press Windows Key + S and enter user accounts.
- Select User Accounts from the menu.
- Select Change User Account Control settings.
- Lower the slider all the way down to Never notify.
- Click OK to save changes.
Some PC issues are hard to tackle, especially when it comes to corrupted repositories or missing Windows files. If you are having troubles fixing an error, your system may be partially broken.
We recommend installing Restoro, a tool that will scan your machine and identify what the fault is.
Click here to download and start repairing.
User Account Control is a security feature designed to notify you whenever you make a change to your system. This feature can sometimes protect you from malicious software, but in most cases, users disable it because of its frequent notifications.
In fact, User Account Control can interfere with the installation process and cause Source file not found error to appear. After disabling User Account Control, restart your PC and check if the error is resolved.
1. 11 Run the setup as administrator
- Locate the setup file and right-click it.
- Choose Run as administrator from the menu.
In some cases, this error can occur if you don’t have the administrator privileges, but you can fix this problem with just a couple of clicks. In addition to running the setup as administrator, users are also suggesting to disable your antivirus and check if that solves the issue.
1.12 Install the latest Windows updates
Windows updates often fix many hardware and software errors, and if you’re having this problem on your PC, we strongly suggest that you check if you have the latest updates installed.
Simply navigate to the Windows Update section and download the latest updates for your PC. After installing the updates, the issue should be resolved.
2. Source file not found Asus Smart Gesture
2.1 Extract the setup file to a different location
Users reported that this error occurs when you extract Asus Smart Gesture files to your PC. This problem most likely occurs because the path to the setup file exceeds the limit set by Windows.
Since you can’t change the limit, you’ll have to change the path to the setup file. The simplest way to do that is to extract the installer files to the C: directory and run the setup file from there.
After doing that, you should be able to install Asus Smart Gesture without any problems.
2.2 Make sure that you’re using the correct setup file
Users reported this issue while trying to reinstall Asus Smart Gesture. According to them, they deleted the previous installation, but while trying to install the software, they got the Source file not found error.
According to users, to fix this problem be sure to run the Setup file and not the Setup TP driver file. After starting the correct setup process, the error should be resolved.
3. Source file not found disk1.cab error
3.1 Move the installation to a different partition
Users reported this error while installing League of Legends, and according to them, they managed to fix the problem simply by moving their installation to a different partition. To do this, simply change the installation directory from C to D while installing the game and the problem should be resolved.
3.2 Move the setup file to the root directory
Source file not found disk1.cab error can appear while installing SourceTree software on your PC. According to users, they managed to fix this issue simply by moving the setup file to the root directory of any hard drive partition.
Root directory is C:, D:, etc., so you can move it to any root directory and try to install it from there. Although this solution applies to SourceTree software, it can also be used for any other application.
3.3 Change the values in your registry
- Open Registry Editor and navigate to the HKEY_LOCAL_MACHINESoftwareMicrosoftWindows NTCurrentVersionWinLogonAllocateCDRoms key in left pane.
- Locate AllocateCDRoms value in the right pane and double click it. If the Value data is set to 1 change it to 0.
- Restart your PC and try to install the application again.
One way to fix this error is to make changes to your registry. Modifying the registry comes with certain risks, therefore be sure to create a backup of your registry before proceeding.
3.4 Copy all installation files to your hard drive
If you’re installing the application from your hard drive, be sure to copy all files from the installation media to your hard drive. If you have an application that requires two CDs for installation, be sure to copy files from both of them to your hard drive and try to run the setup.
Some users are also suggesting to copy files from both CDs to the same directory before trying to start the installation.
4. Source file not found error in Maya
4.1 Copy the file and change its extension
- Locate the problematic file.
- Go to the View tab and check the File name extensions option.
- After that, create the copy of the problematic file.
- Keep the same name of the file, but change its extension from .bin to .dll.
- After doing that, try to install the software again.
According to users, you can fix this problem simply by finding the file mentioned in the error message and changing its extension. It seems that the file is present in the directory, but instead of having the .dll extension, it has .bin extension for some reason.
4.2 Remove the failed installation and disable your antivirus
According to users, both Norton and Avast can cause this problem to appear on your PC. To fix this problem you need to disable Norton or Avast and delete the failed installation.
After that, try to install the software again. Users reported problems with Super Anti-Spyware tool as well, therefore be sure to disable it if you have it installed.
By following these steps, you should be able to get rid of any Windows 10 errors caused by faulty or missing source files.
If you know of any other solution to this issue that we may have missed out on, let us know by leaving us a message in the comments section below.
![]()
Newsletter
В наши дни цифровое хранилище файлов невероятно надежно, но это не значит, что время от времени что-то может пойти не так. Возможно, вы просто занимаетесь своими делами, пытаетесь открыть или скопировать файл в Windows, когда внезапно появляется ошибка «Не удается прочитать с исходного файла или диска», как нежелательная шутка в честь Хэллоуина.
Это может быть неприятно, когда ваши драгоценные данные оказываются вне досягаемости, но есть много исправлений, которые стоят между вами и, наконец, разочаровываются в восстановлении вашей информации!
Выключить и снова включить
Да, это клише. Тем не менее, первое, что вы должны попробовать на компьютере с Windows, который говорит, что он не может прочитать ваши данные, это отключить его. Затем сделайте глубокий вдох, сосчитайте до десяти и снова включите его.
Во многих случаях эти ошибки сводятся к программным гремлинам, изгнанным при новой загрузке. Это займет всего несколько секунд, так что стоит пойти.
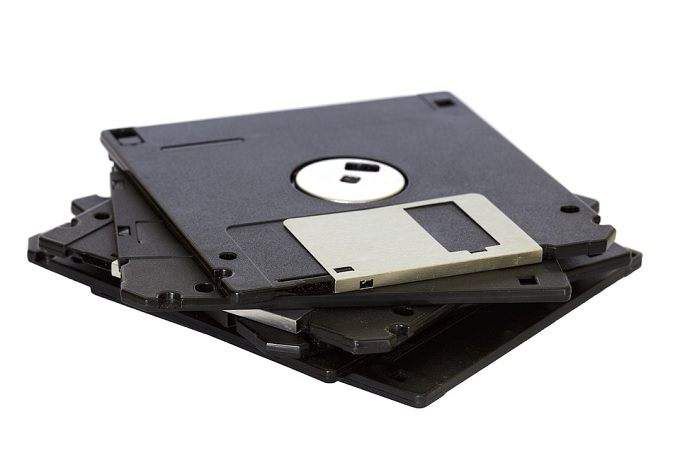
Несовместимость формата диска
Хотя два жестких диска могут выглядеть одинаково, способ организации их данных может существенно различаться. Каждая операционная система имеет свой собственный способ разделения физического пространства на механическом жестком диске или твердотельном диске. Единственный способ изменить эту систему — отформатировать диск, что означает, что все данные на нем будут стерты.
Windows будет хорошо играть с дисками, отформатированными в FAT16, FAT 32 и NTFS. Он не будет читать диски, отформатированные для Mac или Linux без дополнительного программного обеспечения.
Для чтения дисков в формате Mac вы можете использовать HFSExplorer. Вы можете использовать Linux Reader для чтения дисков, отформатированных для Linux. В качестве бонуса, Linux Reader также читает форматы Mac.
Если диск, на который вы пытаетесь скопировать файл FAT32, должен знать, что он не может обрабатывать отдельные файлы размером более 4 ГБ. Вам нужно будет переформатировать целевой диск в NTFS или заархивировать файл и использовать функцию разделения файлов программы сжатия.
По возможности на современном компьютере с Windows старайтесь придерживаться NTFS.
Блюз плохих секторов
«Плохой сектор» — это раздел запоминающего устройства, в котором отказывается или записывается или читается. «Логические» поврежденные сектора не являются физически дефектными, но они повреждены из-за сбоя питания или из-за плохого программного обеспечения, которое записало ненужные данные на эту часть диска.
Плохие сектора являются частой причиной ошибок чтения с диска, поэтому рекомендуется всегда проверять их. К счастью, в Windows есть встроенная утилита, известная как Check Disk (CHKDSK). Это отсканирует рассматриваемый носитель и попытается восстановить поврежденные сектора, что также может в некоторых случаях восстановить ваши потерянные данные.

Если сектор действительно не подлежит восстановлению, он будет помечен как плохой, и Windows в будущем воздержится от записи данных туда.
Запускать CHKDSK в Windows 10 очень просто, просто следуйте этому простому руководству, чтобы убедиться, что ваши жесткие диски в хорошем состоянии.
Щелчок Смерти
Механические жесткие диски имеют движущиеся части и невероятно точные допуски. Хотя большинство из них будут работать намного дольше ожидаемого срока службы, конец рано или поздно наступит.
Если жесткий диск выходит из строя физически, вы получите ошибки чтения диска при попытке работы с содержимым диска. В кругах компьютерных техников одним из главных признаков того, что неисправный жесткий диск ответственен за ошибки чтения диска, является так называемый «щелчок смерти».

Если вы внимательно слушаете, вы услышите, как диск издает ритмичный щелчок. Это действительно плохой знак. Если этот диск все равно будет читать какие-либо файлы, рекомендуется создать резервные копии как можно скорее. Если диск не хочет возвращать ваши файлы, есть специалисты по восстановлению данных, которые могут спасти и восстановить диск для вас, но это невероятно дорого.
Так что, если информация не является ценной и незаменимой, щелчок смерти — знак, чтобы отпустить ее.
Повреждение оптического диска и грязные линзы
Не многие по-прежнему используют оптические диски на компьютерах с Windows, но если вы один из немногих, кому нужно получать информацию с CD, DVD или BluRay-диска, возможно, стоит проверить поверхность диска на наличие повреждений.
Иногда, просто протирая диск той же тканью, которую вы использовали для чистки линз камеры или очков, вы удаляете отпечатки пальцев и другой мусор.

Если внешний слой диска поцарапан, можно использовать буфер диска или жидкость для ремонта диска, чтобы попытаться исправить. Если царапина достаточно глубока, чтобы повредить слой диска, на котором фактически хранятся данные, это конец строки.
В некоторых случаях проблема не в диске, а в самом приводе . Если у вас есть другой привод для тестирования диска, сначала сделайте это, чтобы исключить диск как виновника. Использование очистителя линз привода иногда может решить проблему, но любые другие проблемы обычно требуют замены диска.
Загадки соединения
Дисководы любого типа взаимодействуют с вашим компьютером через какое-то соединение. Для внешних накопителей в наши дни это почти всегда USB. Это означает, что USB-кабель или USB-порты на компьютере или диске могут быть неисправны.
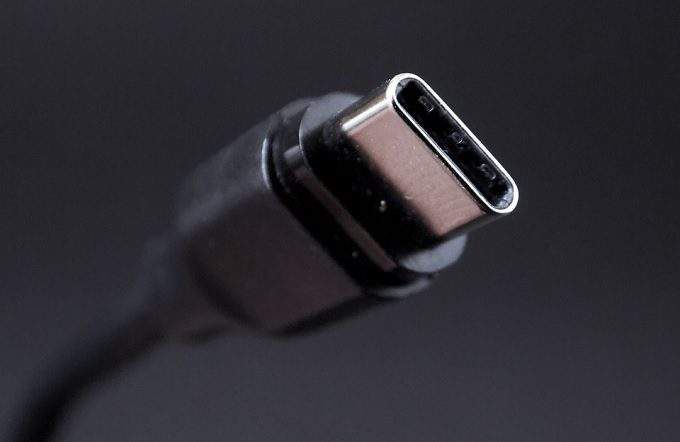
Попробуйте использовать альтернативный кабель или порт на вашем компьютере, чтобы исключить их в качестве источника проблемы. Попытка внешнего диска на другом компьютере также определит, действительно ли проблема в диске или компьютере.
Для внутренних дисков, то же самое относится. Попробуйте использовать альтернативные кабели SATA для внутренних дисков SATA. Вы также можете изменить порт SATA, используемый конкретным диском, чтобы увидеть, не поврежден ли сам порт.
Проблемы с питанием
Некоторым внешним USB-накопителям требуется больше энергии, чем может обеспечить один стандартный USB-порт. Обычно они поставляются с кабелем, который оснащен двумя разъемами USB-A.
Один несет власть и данные, тогда как другой несет власть. Если вы попытаетесь использовать кабель с одним разъемом со стандартным портом USB, который не обеспечивает питание выше заданного уровня, накопитель либо не загрузится, либо не будет работать надежно.

Дважды проверьте требования производителя к источнику питания и убедитесь, что вы даете этому внешнему накопителю достаточно сока для правильной работы.
Неподдерживаемые имена файлов
Что в имени? Иногда Windows просто не понимает имя файла, используемого для конкретного файла.
Если на исходном диске используется формат имени файла, который противоречит правилам имен файлов Windows, вам придется переименовать этот файл во что-то другое.
Владение файлами идет наперекосяк
Владельцы файлов — это то, что большинству пользователей никогда не нужно беспокоиться, но иногда Windows не берет на себя ответственность за диск или определенные файлы, что делает невозможным работу с ними.
Хорошей новостью является то, что вы можете вручную проверять и изменять владельца файлов в Windows 10. Это легко, но немного затянуто. К счастью, это превосходное руководство проведет вас через процесс в кратчайшие сроки.

Чтение фундаментально
Иногда вы просто должны признать, что ваши данные ушли с диска и никогда не вернутся. Так что даже попытка всех этих потенциальных исправлений может не вытащить ваш бекон из огня. Вот почему единственное реальное решение для устранения ошибки чтения с диска — это хорошие стратегии резервного копирования .
Благодаря дешевым технологиям хранения, облачным решениям для резервного копирования и быстрым интернет-соединениям, на самом деле нет никакой причины навсегда потерять вашу информацию. Просто убедитесь, что у вас есть регулярные резервные копии уникальных, незаменимых файлов.
Распространяйте копии по таким службам, как DropBox или OneDrive, и подумайте о том, чтобы получить внешний SSD вместо более подверженных сбоям внешних механических дисков. Старая поговорка о «унции профилактики» никогда не была более подходящей.
When installing an OnTime desktop application, the following message may appear:
Error. Source file not found. Verify that the file exists and that you can access it.

The error message may also read: Error reading from file. Verify that the file exists and that you can access it.

This is a generic error and may have several causes and solutions. The following may be useful in resolving the issue:
Restart the PC
If files are currently in use or locked, this can prevent the installation from completing. If other software installations or updates are still waiting for the computer to restart, this may also block OnTime from installing. Restarting the computer may help eliminate these potential blocks.
Try Downloading Again
It may be that the downloaded setup file was corrupted. Try downloading the setup file directly from the OnTime website again. Try using a different web browser, without download accelerators or other tools that manipulate downloaded files.
Install as Administrator
Ensure that you have permissions to install the program as an Administrator. The OnTime desktop apps do not require administrative permissions themselves to run, but administrative permissions are required for installation and updates.
Temporarily Disable Antivirus and/or Security Software
In some cases, antivirus software may have quarantined the installation files used by the setup program. Try the following:
- Temporarily disable any antivirus or security programs running on the PC.
- Download the OnTime installer file again.
- Run the installer.
- Once the program is installed, be sure to reenable antivirus or security programs running on the PC.
Run the Setup File Locally
If you are executing the setup file from a network location, the above issue may occur. Try copying the setup file to a local drive on the PC and executing it from there.
Manually Remove the Temporary Installer Folder
When running the OnTime installer, files and folders are temporarily placed into a folder on the PC. This is normally under the ProgramData folder. This folder is hidden by default, so be sure to enable Show Hidden items within File Explorer to browse this folder. Within the ProgramData folder, locate the folder referenced in the error message. The folder name will begin and end with curly braces ( { } ). Delete this folder. Once the folder is deleted, try installing OnTime again.
Run Setup with Logging
Starting the setup file with logging support turned on can help pinpoint the exact reason for the error. A logged setup can be executed by using the following syntax:
<setup.exe> /l=<path to logfile>
For example:
OTMSSetup.exe /l=C:Log.txt
Article ID: 235, Created: April 4, 2017 at 12:45 PM, Modified: November 25, 2022 at 4:32 PM
На чтение 10 мин. Просмотров 3k. Опубликовано 03.09.2019
Компьютерные ошибки могут возникать один раз в течение некоторого времени, и некоторые ошибки, такие как Исходный файл не найден , могут возникать при установке определенных приложений на ПК с Windows 10.
Эта ошибка может помешать вам установить новые приложения, поэтому важно, чтобы вы знали, как правильно ее исправить.
Содержание
- Шаги по исправлению исходного файла не найдены ошибки
- Исправлено – «Исходный файл не найден» Asus Smart Gesture
- Исправлено – «Исходный файл не найден» disk1.cab
- Исправлено – «Исходный файл не найден» Maya
Шаги по исправлению исходного файла не найдены ошибки
Решение 1. Проверьте установочный носитель на наличие повреждений
Иногда эта ошибка возникает, когда вы устанавливаете новое приложение с DVD или CD. По-видимому, эта ошибка может возникнуть, если ваш установочный носитель поврежден, поэтому обязательно чистите его мягкой безворсовой тканью.
Если у вас более одного DVD-привода, убедитесь, что установочный носитель вставлен в правильный привод.
Решение 2. Отключите антивирусное программное обеспечение .
Некоторые антивирусные инструменты могут мешать процессу установки и вызывать ошибку Исходный файл не найден . Если вы столкнулись с этой ошибкой на вашем компьютере, мы настоятельно рекомендуем вам временно отключить антивирус и попытаться снова запустить установку.
Если это не сработает, возможно, вам придется временно удалить антивирус и проверить, решает ли это проблему.
Решение 3. Установите программное обеспечение с жесткого диска
Если вы получаете эту ошибку при установке программного обеспечения с установочного носителя, возможно, вы захотите установить его с жесткого диска. Для этого вам просто нужно скопировать содержимое установочного носителя и запустить его с жесткого диска.
Просто откройте установочный носитель и выберите все файлы. Создайте новую папку на вашем ПК и вставьте все файлы с установочного носителя. Извлеките установочный носитель из компьютера и запустите процесс установки с жесткого диска.
Имейте в виду, что этот метод не всегда работает, но он может работать для некоторых приложений.
- ЧИТАЙТЕ ТАКЖЕ: исправлено: проблемы с жесткими дисками Seagate в Windows 10
Решение 4. Удалите драйвер DVD-привода
Если вы не можете установить программное обеспечение с вашего DVD-привода, это может быть связано с повреждением драйвера. Одним из способов решения этой проблемы является удаление драйвера DVD и повторная установка Windows 10. Это простая процедура, и вы можете сделать это, выполнив следующие действия:
-
Нажмите Windows Key + X , чтобы открыть меню Win + X, и выберите Диспетчер устройств из списка.

-
Когда откроется Диспетчер устройств , найдите драйвер DVD, щелкните его правой кнопкой мыши и выберите в меню Удалить .
- Когда появится подтверждающее сообщение, нажмите ОК .
- Теперь перезагрузите компьютер.


Когда ваш компьютер перезагрузится, должен быть установлен драйвер по умолчанию. Попробуйте начать установку снова и проверьте, решена ли проблема.
Решение 5. Обязательно извлеките установочный файл из архива .
Многие приложения распространяются в архивах, потому что это наиболее удобный способ передачи большого количества файлов, обеспечивая некоторую форму сжатия. Однако эта проблема может возникнуть, если вы попытаетесь запустить установку непосредственно из архива без извлечения файлов.
Несмотря на то, что это более удобный способ установки приложений, многие приложения не могут быть установлены без предварительного извлечения их файлов. Чтобы правильно установить приложение, входящее в архив, необходимо открыть архив и распаковать все файлы на компьютер.
После этого перейдите к папке извлечения и оттуда запустите установочный файл.
Решение 6. Отмена регистрации и повторной регистрации установщика Windows
Многие установки полагаются на службу установщика Windows для запуска, и если есть какие-либо проблемы с установщиком Windows, вам придется отменить регистрацию и перерегистрировать ее. Это простая процедура, и для этого вам нужно выполнить следующие шаги:
-
Нажмите Windows Key + X и выберите Командная строка (Администратор) .
- Когда откроется Командная строка , введите msiexec/unreg и нажмите Enter , чтобы отменить регистрацию установщика Windows.
- После выполнения команды введите msiexec/regserver и нажмите Enter. . Это приведет к повторной регистрации установщика Windows.
- Закройте Командную строку и проверьте, решена ли проблема.

- ЧИТАЙТЕ ТАКЖЕ: исправлено: ошибка «Файл используется» в Windows 10
Решение 7. Используйте редактор реестра
Иногда вы можете исправить ошибку Source not found , просто сделав несколько изменений в вашем реестре. Мы должны отметить, что изменение вашего реестра сопряжено с определенными рисками, поэтому мы рекомендуем вам сделать резервную копию вашего реестра, прежде чем вносить в него какие-либо изменения.
Чтобы редактировать реестр, сделайте следующее:
-
Нажмите Клавишу окна + R и введите regedit . Нажмите Enter или нажмите ОК .
- Когда откроется Редактор реестра , перейдите к клавише HKEY_LOCAL_MACHINESYSTEMCurrentControlSetControlNlsCodePage на левой панели.
- В правой панели найдите строку 1252 и дважды щелкните ее.
-
Когда откроется окно Изменить строку , измените Значение данных с c_1252.nls на c_1251.nls .
- Нажмите ОК , чтобы сохранить изменения.
- Закройте Редактор реестра и перезагрузите компьютер.
- После перезагрузки компьютера снова запустите программу установки и проверьте, устранена ли проблема.


Решение 8. Удалите папку установки и отключите антивирус .
Пользователи сообщали об этой ошибке при установке программного обеспечения Maya, и, по их мнению, проблему можно исправить, удалив папку установки и отключив антивирус. Для этого выполните следующие действия:
- Найдите папку установки Maya и удалите ее. По умолчанию это должно быть C: autodesk .
- После удаления папки полностью отключите антивирусную программу.
- Загрузите установщик Maya и распакуйте его.
- Отключите антивирус и снова запустите установку.
После отключения антивируса и повторного создания папки установки, программное обеспечение должно быть установлено без ошибок.
Решение 9. Очистите папку Temp .
Приложения иногда перемещают установочные файлы в папку Temp на вашем ПК. Однако эти файлы могут быть повреждены и препятствовать запуску установки.
Если у вас ошибка Исходный файл не найден , вы можете исправить ее, удалив все из папки Temp. Для этого выполните следующие действия:
-
Нажмите Windows Key + R и введите % temp% . Нажмите Enter или нажмите ОК .
- Когда откроется папка Temp , удалите из нее все файлы.
-
Откройте диалоговое окно Выполнить еще раз и введите % TEMP% . Нажмите Enter или нажмите ОК .
- Удалите все файлы из папки Temp.


После того, как вы удалите все файлы из обеих папок Temp, попробуйте начать установку снова.
- ЧИТАЙТЕ ТАКЖЕ: Удалите заблокированные файлы Windows с помощью Wise Force Deleter
Решение 10. Отключение контроля учетных записей .
Контроль учетных записей пользователей – это функция безопасности, предназначенная для уведомления вас о любых изменениях в вашей системе. Эта функция иногда может защитить вас от вредоносного программного обеспечения, но в большинстве случаев пользователи отключают его из-за частых уведомлений.
Фактически, контроль учетных записей может мешать процессу установки и вызывать ошибку Исходный файл не найден .
Чтобы решить эту проблему, необходимо отключить контроль учетных записей, выполнив следующие действия:
-
Нажмите Windows Key + S и введите учетные записи пользователей . Выберите в меню Аккаунты пользователей .
-
Выберите Изменить настройки контроля учетных записей .
-
Опустите ползунок до конца, чтобы Никогда не уведомлять . Нажмите ОК , чтобы сохранить изменения.


После отключения контроля учетных записей перезагрузите компьютер и проверьте, устранена ли ошибка.
Решение 11. Запустите установку от имени администратора .
В некоторых случаях эта ошибка может возникать, если у вас нет прав администратора, но вы можете решить эту проблему всего парой кликов. Чтобы запустить установку от имени администратора, выполните следующие действия:
- Найдите установочный файл и щелкните его правой кнопкой мыши.
- Выберите в меню Запуск от имени администратора .
В дополнение к запуску установки в качестве администратора, пользователи также предлагают отключить антивирус и проверить, решает ли это проблему.
Решение 12. Установите последние обновления Windows .
Обновления Windows часто исправляют многие аппаратные и программные ошибки, и если у вас есть эта проблема на вашем ПК, мы настоятельно рекомендуем вам проверить, установлены ли последние обновления.
Просто перейдите в раздел Windows Update и загрузите последние обновления для вашего ПК. После установки обновлений проблема должна быть решена.
Исправлено – «Исходный файл не найден» Asus Smart Gesture
Решение 1. Извлеките установочный файл в другое место .
Пользователи сообщают, что эта ошибка возникает при извлечении файлов Asus Smart Gesture на компьютер. Эта проблема, скорее всего, возникает из-за того, что путь к файлу установки превышает ограничение, установленное Windows.
Поскольку вы не можете изменить лимит, вам придется изменить путь к файлу установки. Самый простой способ сделать это – извлечь файлы установщика в каталог C: и запустить оттуда файл установки.
После этого вы сможете без проблем установить Asus Smart Gesture.
- ЧИТАЙТЕ ТАКЖЕ: последние обновления ASUS установили вредоносное ПО на ваш компьютер
Решение 2. Убедитесь, что вы используете правильный файл настройки .
Пользователи сообщили об этой проблеме при попытке переустановить Asus Smart Gesture. По их словам, они удалили предыдущую установку, но при попытке установить программное обеспечение они получили ошибку Исходный файл не найден .
По словам пользователей, для решения этой проблемы обязательно запустите файл Setup , а не файл драйвера Setup TP. После запуска правильного процесса установки ошибка должна быть устранена.
Исправлено – «Исходный файл не найден» disk1.cab
Решение 1. Переместите установку в другой раздел .
Пользователи сообщали об этой ошибке при установке League of Legends, и, по их словам, им удалось решить проблему, просто перенеся установку в другой раздел. Для этого просто измените каталог установки с C на D во время установки игры, и проблема должна быть решена.
Решение 2. Переместите установочный файл в корневой каталог .
Ошибка Исходный файл не найден disk1.cab может возникнуть при установке программного обеспечения SourceTree на компьютер. По словам пользователей, им удалось решить эту проблему, просто переместив установочный файл в корневой каталог любого раздела жесткого диска. Корневой каталог – это C :, D: и т. Д., Поэтому вы можете переместить его в любой корневой каталог и попробовать установить его оттуда.
Хотя это решение относится к программному обеспечению SourceTree, его также можно использовать для любого другого приложения.
Решение 3. Измените значения в своем реестре
Один из способов исправить эту ошибку – внести изменения в реестр. Изменение реестра сопряжено с определенными рисками, поэтому перед продолжением обязательно создайте резервную копию реестра.
Чтобы решить эту проблему, сделайте следующее:
- Откройте редактор реестра и перейдите к клавише HKEY_LOCAL_MACHINESoftwareMicrosoftWindows NTCurrentVersionWinLogonAllocateCDRoms в левой панели.
- Найдите значение AllocateCDRoms в правой панели и дважды щелкните его. Если для Значение данных установлено значение 1, измените его на 0.
- Перезагрузите компьютер и попробуйте снова установить приложение.
- ЧИТАЙТЕ ТАКЖЕ: Исправлено: «Ошибка чтения из файла» в Windows 10
Решение 4. Скопируйте все установочные файлы на жесткий диск .
Если вы устанавливаете приложение с жесткого диска, обязательно скопируйте все файлы с установочного носителя на жесткий диск. Если у вас есть приложение, для установки которого требуются два компакт-диска, обязательно скопируйте файлы с обоих на жесткий диск и попробуйте запустить установку.
Некоторые пользователи также предлагают скопировать файлы с обоих компакт-дисков в один и тот же каталог перед началом установки.
Исправлено – «Исходный файл не найден» Maya
Решение 1. Скопируйте файл и измените его расширение .
По словам пользователей, вы можете решить эту проблему, просто найдя файл, упомянутый в сообщении об ошибке, и изменив его расширение. Кажется, что файл присутствует в каталоге, но вместо расширения .dll он почему-то имеет расширение .bin.
Вы можете легко это исправить, выполнив следующие действия:
- Найдите проблемный файл.
-
Перейдите на вкладку Вид и выберите параметр Расширения имен файлов .
- После этого создайте копию проблемного файла.
- Сохраните то же имя файла, но измените его расширение с .bin на .dll .
- После этого попробуйте установить программное обеспечение снова.

Решение 2. Удалите неудачную установку и отключите антивирус .
По словам пользователей, как Norton, так и Avast могут вызвать эту проблему на вашем ПК. Чтобы решить эту проблему, вам нужно отключить Norton или Avast и удалить неудачную установку.
После этого попробуйте установить программное обеспечение снова. Пользователи также сообщали о проблемах с инструментом Super Anti-Spyware, поэтому обязательно отключите его, если он у вас установлен.
Ошибка Исходный файл не найден может помешать вам установить приложения на ваш компьютер, но вы сможете исправить это с помощью одного из наших решений.
На чтение 11 мин. Опубликовано 15.12.2019
Computer errors can appear at any time, but some errors such as Error reading from file usually appear while you install a new software on your Windows 10 PC.
This error can prevent you from installing new applications, therefore it’s crucial to know how to fix it.
But first, here are some more examples of this problem:
- Ableton Live 10 error reading from a file – This error usually appears when working with a music production software, Ableton.
- Error reading from file verify that the file exists
- Uppercut error reading from a file – Users of mobile utility software, Uppercut have also reported this issue.
- Ableton Live 9 source file not found – The problem is as common in Ableton Live 9, as it is in Ableton Live 10.
- Error reading file Maya – The problem also appears when working with AutoDesk’s modeling software, Maya.
Steps to fix error reading from file
Table of contents:
Fix – Error reading from file
Solution 1 – Reset your security permissions
This error can occur while installing VIPRE software, and according to users, the issue is caused by your security permissions. If your security permissions are modified, you might experience issues while installing certain software, therefore you need to reset those permissions.
Several folders can be affected by this issue, and the list of affected folders includes the following:
- C:ProgramData
- C:ProgramDataGFI Software
- C:ProgramDataGFI SoftwareAntimalware
- %UserProfile%AppData
- %UserProfile%AppDataRoaming
- %UserProfile%AppDataRoamingGFI Software
- %UserProfile%AppDataRoamingGFI SoftwareAntimalware
To fix this issue you’ll need to check security permissions for these folders on a working PC and alter them on your PC. Keep in mind that some folders on the list are related to VIPRE software, therefore if you’re installing a different application you’ll need to change the security permissions for different folders.
Solution 2 – Add Full control for SYSTEM
As we already mentioned, Error reading from file message can appear if your system doesn’t have the necessary privileges over certain folder. Many applications store their files in the Temp folder during the installation, but if your system doesn’t have Full control over that folder you might experience all sorts of errors during the installation process.
To fix this problem, you need give Full control to the SYSTEM user over the Temp folder. You can do that by following these steps:
- READ ALSO: Fix: “The type of printhead is incorrect” error
- Navigate to C:UsersusernameAppDataLocal folder. If you can’t find this folder, be sure to go to the View tab in File Explorer and check Hidden items checkbox.
- Locate Temp folder, right click it and choose Properties.
- Go to Security tab. Check if SYSTEM is available in Group or user names section. Also check if SYSTEM has Full control over this folder. If SYSTEM isn’t available at all, click the Edit button.
- Now click the Add button.
- Select Users or Groups window will appear. In the Enter the object names to select field enter SYSTEM and click Check Names. If your input is valid, click OK to add it.
- SYSTEM will now be added to the Group or user names section. Select SYSTEM and be sure to check Full control in the Allow column.
- After doing that, click Apply and OK to save changes.
- After giving Full control to the SYSTEM over the Temp folder, try to install the software again.

Instead of giving the Full control over the Temp folder, some users are suggesting to give Full control to your user account or to the Users group over the installation directory, so you might want to try that as well.
Solution 3 – Move the setup file to a different directory
Sometimes this problem can occur due to the location of your setup file. Windows Installer has a limit of 256 characters, and if the path to your setup file or the designation path contains more than 256 characters you’ll encounter this error. One of the simplest ways to fix this problem is to move the setup file to C: and try to run it from there.
Solution 4 – Be sure to extract all files from the archive
It’s not uncommon for setup files to be stored in an archive, but before running the setup file, be sure to extract all the files from the archive. After that, try running the setup file from the extraction folder.
In addition, be sure that the path to the extraction folder doesn’t contain more than 256 characters. You can avoid this problem simply by creating a new folder in C: and extracting the installation files to it.
Solution 5 – Make sure that Read-only option isn’t enabled
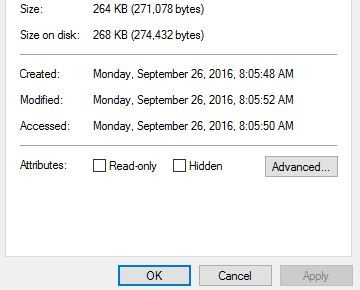
If you’re getting Error reading from file message, you might want to check if the Read-only option is enabled. This option can sometimes cause errors, therefore it’s best that you disable it. To do that, follow these steps:
- Locate the problematic file and right click it. Choose Properties from the menu.
- Navigate to the General tab and be sure that Read-only option isn’t checked.
- Click Apply and OK to save changes.
- After disabling Read-only option, check if the problem is resolved.
Solution 6 – Delete installation folders from ProgramData
Users reported this error while trying to install Family Tree Maker software, and in order to fix this problem, you need to remove Family Tree Maker directories from the ProgramData folder. To do that, follow these steps:
- Open File Explorer and navigate to C:.
- Look for ProgramData folder. If you can’t find the folder, go to View tab and check Hidden items option.
- Once you enter ProgramData folder, look for Family Tree Maker folder and delete it. Sometimes this folder can be located inside different folders in ProgramData, therefore be sure to check all folders that have random array of numbers and letters as their name.
- After deleting Family Tree Maker folders, try to install the software again.
Although this solution works for Family Tree Maker software, you can apply the similar method to fix problems with other applications as well. If the application that you’re trying to install has some files in the ProgramData directory, be sure to delete them and try to install the software again.
Solution 7 – Download and install basic drivers
Users reported that Error reading from file message appears while trying to install HP printer software on their PC. This can be a big problem because it can prevent you from installing your printer, but there’s a simple way to solve this problem.
If you can’t install HP printing software, you can still install basic printer driver that doesn’t include the printing software. To do that, simply visit the HP’s website and navigate to the download section. Locate your printer and choose the basic driver option.
After you download the basic driver, install it and you should be able to use your printer without any problems.
Update drivers automatically
If you don’t want the hassle of searching for drivers on your own, you can use a tool that will do this for you automatically. Of course, as you’re not able to connect to the internet at the moment, this tool won’t be useful.
However, once you get online, it will help you to keep all your drivers up to date, so you won’t be in this situation anymore.
Tweakbit’s Driver Updater (approved by Microsoft and Norton Antivirus) will help you update drivers automatically and prevent PC damage caused by installing the wrong driver versions. After several tests, our team concluded that this is the best-automatized solution.
Here is a quick guide on how to use it:
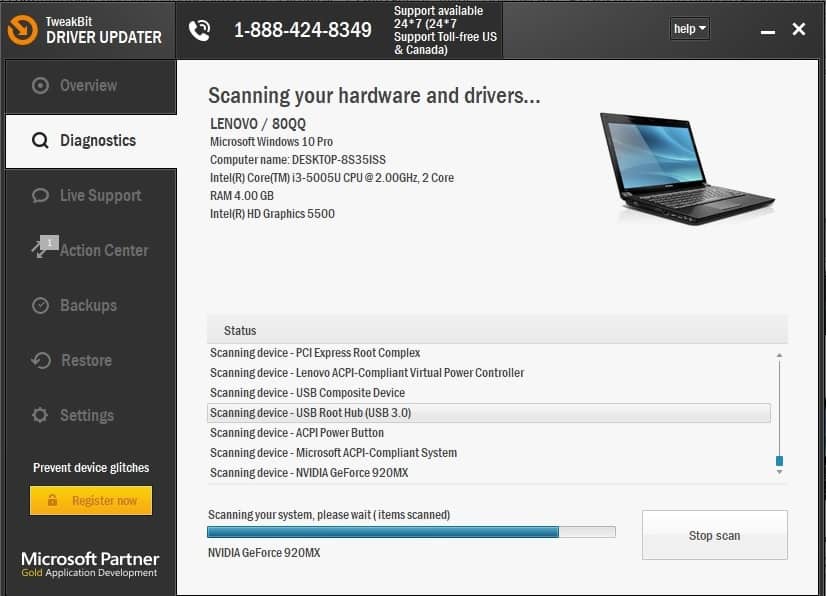
- Download and install TweakBit Driver Updater
- Once installed, the program will start scanning your PC for outdated drivers automatically. Driver Updater will check your installed driver versions against its cloud database of the latest versions and recommend proper updates. All you need to do is wait for the scan to complete.
- Upon scan completion, you get a report on all problem drivers found on your PC. Review the list and see if you want to update each driver individually or all at once. To update one driver at a time, click the ‘Update driver’ link next to the driver name. Or simply click the ‘Update all’ button at the bottom to automatically install all recommended updates.
Note:Some drivers need to be installed in multiple steps so you will have to hit the ‘Update’ button several times until all of its components are installed.

Solution 8 – Check if your setup file is encrypted
Sometimes this error can appear if you’re trying to run a setup file that is encrypted by your PC. Users reported that their download folder was set to encrypt all downloaded files, and that caused the problem with the installation process.
To fix this issue, you need to move the setup file to a different folder and decrypt it. Alternatively, you can download the setup file to a folder that isn’t encrypted by your PC. After doing that, run the setup file and your application should install without any problems.
Solution 9 – Create a Downloads folder on your system drive
Error reading from file message can appear if you don’t have Downloads folder on your C drive. According to users, they moved the Downloads folder to a different drive in order to preserve space, but that caused this error to appear.
Apparently, if you run the setup file from a non-default Downloads folder you might get this error while installing certain applications. To fix this problem, you need to create a temporary Downloads folder on your C drive and move the setup file to it.
After doing that, you should be able to use the setup file and install the application without any problems.
Solution 10 – Create a download folder and move vumclient.zip to it
According to users, this error occurs when you try to install VMware vCenter Update Manager. This problem can be easily solved by creating a new Download folder and moving the vumclient.zip file to it. To do that, follow these steps:
- Mount the vCenter Server installation media.
- Navigate to the UpdateManager_Install_Locationdocrootvcidownloads and rename the Download folder to Download.old.
- Now create a new Download folder.
- Open the installation media and navigate to the rr_moved directory.
- Locate the vumclient.zip file and copy it to the new Download folder that you created in previous step.
- After doing that, try to install vCenter Update Manager again.
Error reading from file message can affect almost any application, and in most cases you can fix the problem by changing your security permissions or by changing the location of the setup file.
Editor’s Note: This post was originally published in May 2016 and has been since completely revamped and updated for freshness, accuracy, and comprehensiveness.
Live’s installer MSI file may not run correctly or will fail to install if certain Windows services are not set up correctly. There are a few factors involved in the installation process on Windows.
Note: You might not need to complete every step, so test the installation each time, by trying to launch the Live installer.
нехватает файла (он недоступен или ошибка-вроде так)
Adobe Premier Pro 2.0 программа, качал с adobe.com
не знаю, в чем дело-563 метра качал 12 (!) часов, а теперь из-за одного файла все в пустую?
или его можно так скачать?
Error 1311. Source file not found:
C:DOCUME
1LOCALSTempRar$DIO2.953Data1.cab
Verify that the file exists and that you can access it.
заранее огромное спасибо! ! (повторный вопрос)