New issue
Have a question about this project? Sign up for a free GitHub account to open an issue and contact its maintainers and the community.
By clicking “Sign up for GitHub”, you agree to our terms of service and
privacy statement. We’ll occasionally send you account related emails.
Already on GitHub?
Sign in
to your account
Closed
minhEPFL opened this issue
Jun 17, 2020
· 6 comments
Comments
![]()
Hello,
I have been trying to upload a sketch to my ATMega328P using a programmer, but I get the following problem:

This problem appeared after a library update from Arduino IDE. Can somebody please help me?
Best regards,
Minh
![]()
Hi @minhEPFL , it looks something went wrong while extracting avrdude package. Try reinstalling avr core 1.8.3 (and make sure no antivirus is kicking in and that there’s enough space on disk)
![]()
Hi @facchinm , thank you for the quick reply. I have tried to re-install Arduino IDE 1.8.12, but without success: the same problem is still here. Is that what you meant? If no, can you please explain how to re-install avr core 1.8.3?
![]()
You need to open Board Manager (from Tools/Boards) and search for AVR, removing core 1.8.3 and then reinstalling it
![]()
Oh my God, thanks a lot @facchinm . Everything works again!
![]()
avrdude: Version 6.3-20190619
Copyright (c) 2000-2005 Brian Dean, http://www.bdmicro.com/
Copyright (c) 2007-2014 Joerg Wunsch
     System wide configuration file is "C:UsersELCOTAppDataLocalArduino15packagesarduinotoolsavrdude6.3.0-arduino17/etc/avrdude.conf"

     Using Port                    : COM3
     Using Programmer              : arduino
     Overriding Baud Rate          : 115200
An error occurred while uploading the sketch
![]()
Hola @minhEPFL , parece que algo salió mal al extraer el
avrdudepaquete. Intente reinstalar avr core 1.8.3 (y asegúrese de que no esté funcionando ningún antivirus y de que haya suficiente espacio en el disco)
Como se hace eso me esta pasando pero no puedo arreglarlo ayuda por favor
![]()
arduino
locked as resolved and limited conversation to collaborators
Aug 16, 2021
Содержание
- avrdude: can’t open config file «/Users/jenkins/jenkins/workspace/toolchain-avr-mac32/objdir/etc/avrdude.conf»: No such file or directory #4379
- Comments
- Pocket AVR Programmer Hookup Guide
- Troubleshooting
- AVRDUDE Not Recognized
- Configuration File Not Found
- Driver Related Issues
- Drivers Not Installed
- Driver Conflicts
- Error Connecting To AVR Programmer
- 1.8.8 Arduino IDE Windows Installer drops avrdude.conf in incorrect directory #8344
- Comments
- Про Ардуино и не только
- среда, 10 октября 2018 г.
- Прошивка USBasp
- 1. Подготовка Ардуино
- 2. Подключение USBasp к Ардуино
- 3. Установка джампера JP2 на USBasp
- 4. Скачивание прошивки
- 5. Прошивка USBasp
avrdude: can’t open config file «/Users/jenkins/jenkins/workspace/toolchain-avr-mac32/objdir/etc/avrdude.conf»: No such file or directory #4379
a problem with avrdude In OSX 10.10
command » avrdude -v » show errors as follows
and i also set AVRDUDE_CONF=$AVR_TOOLS_DIR/etc/avrdude.conf
it seems avrdue_bin use a hardcode path, i don’t want create this path for configure file ,how can i resolve?
The text was updated successfully, but these errors were encountered:
I have the same problem with arduino-1.6.7-linus32 on a raspberrypi.
Previously, I got an error saying there was an «id_type» error at line 332 in avrdude.conf. I removed and re-installed arduino. Now I get the error that avrdude.conf does not exist both in the IDE and from the command line.
Re-installed. Now avrdude.conf can be read but I am back to the «id_type» error.
A previous post suggested that there might be another avrdude.cnof file on the machine, but there is not.
Hi @fr0zenrain , the avrdude executable is a script (you can open it using Textedit) that wraps avrdude_bin executable. It doesn’t wrap the conf path since it is passed by the IDE.
If you are in Arduino.app/Contents/Java/hardware/tools/avr/ , the right way to execute avrdude is ./bin/avrdude -C etc/avrdude.conf
@astrawa , I believe your problem is totally different. Where did you get the IDE for RPi? Can you open another issue? Thanks 😉
This is still a problem. Jenkins directory is still hard coded into avrdude
The fact that jenkins is hardcoded as the config path is a non-problem, since you must specify a config file with -C . The Arduino IDE already performs this correctly, please contact your distributor ( platformio or anyone else) if you are experiencing problems with their buildsystem.
avrdude wil not accept -c for programmer or -C or location of .conf file 3 days working on trying to solve this
Cant believe no one can solve this.
avrdude –c avrisp –p t84 -b 19200 -P /dev/cu.usbmodem14201 –u –U flash:w:firmware.hex
you are typing –c instead of -c , (a longer dash instead of the «normal» dash). I don’t know where this «long dash» comes from, but if this is the command line you’re using I’m pretty sure avrdude will not recognize –c , you must use -c and the same for all the other options.
The ascii code is 45 (or 2D in hex). You can copy and paste this one: — if unsure.
BTW this issue really doesn’t belong this repository because is not related to Arduino or the Arduino IDE.
If you’re using the avrdude from the Arduino IDE, as already said, the path to config file must be specified with -C path/to/avrdude.conf .
If you’re using an avrdude obtained in other ways we can’t help you, but probably the -C solution will work as well.
Said that, I’m going to lock this issue from further comments.
Источник
Pocket AVR Programmer Hookup Guide
Troubleshooting
Below are a few troubleshooting tips for resolving some of the AVRDUDE errors that you may run into.
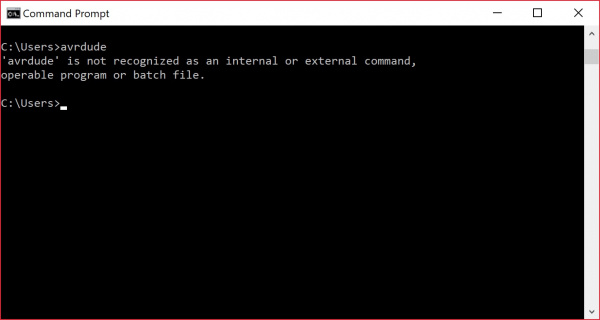
AVRDUDE Not Recognized
If you are having issues getting a response from AVRDUDE, you may receive the following error. It’s probably due to certain environmental variables or your computer settings preventing you from properly using AVRDUDE.
The error output in the command line may look similar to the screenshot below.
One solution may be to try following the instructions provided by AVRDUDE to install it for your OS. For Windows, you could automatically install WinAVR 20100110 as explained briefly on page 35 of the AVRDUDE documents v6.3.
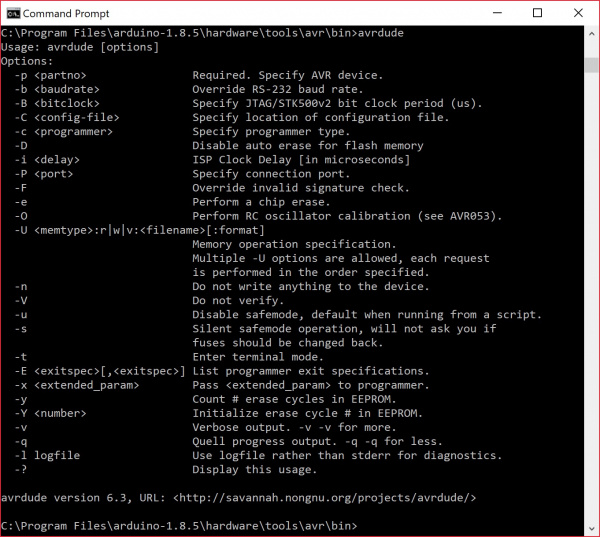
Otherwise, you can move to the Arduino IDE program folder where avrdude.exe is located. Try doing a search within the Arduino program folder to determine the path. Then navigate to the location where it is located using the cd.. and cd commands. In this case, Arduino IDE v1.8.5 was installed and located in the Program Files folder of my C: drive under . program filesarduino-1.8.5hardwaretoolsavrbin. Type in the change directory commands to navigate to the proper location in the command line. From the screenshot of the error, I needed to move up the directory by using the following command.
Then I needed to move into the Arduino’s program folder that is located in the C: drive.
Your command line should look similar to the image below.

Once you are in the proper working directory, type in avrdude again. You should see an output similar to the image below.
Configuration File Not Found
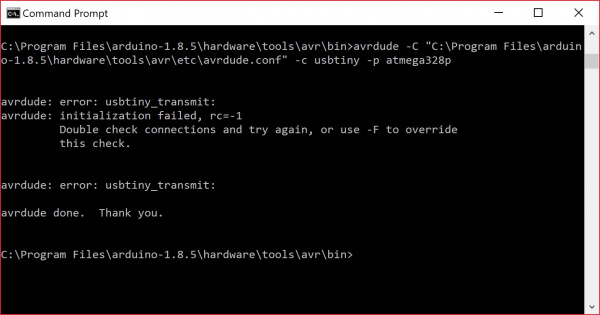
If you are having trouble reading the AVR device signature to verify the device using the command avrdude -c usbtiny -p atmega328P ; and you receive this error:
It’s probably due to the way AVRDUDE was installed on a computer. In this case, AVRDUDE could not find the location of the avrdude.conf file. This is probably due to environmental variables or your computer settings preventing you from properly using AVRDUDE. If you remember from the earlier troubleshooting tip, AVRDUDE was located in the Arduino IDE program folder. While the working directory was correct, the avrdude.conf file was in a different folder as you can see from the image below on a Windows OS.

The easiest solution would be to adjust the environmental settings by automatically installing it for your OS as explained in the avrdude-docs (v6.3). For Windows, you could install WinAVR 20100110 as explained briefly on page 35 of the AVRDUDE documents v6.3.
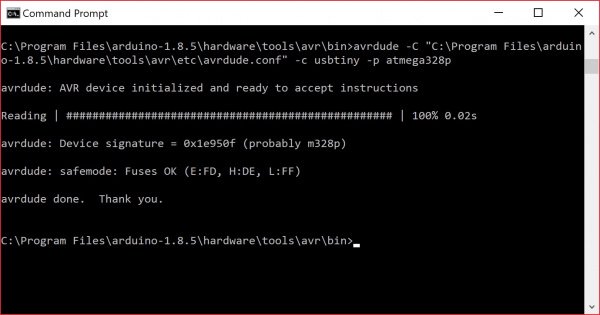
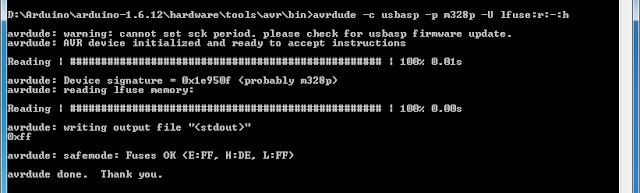
Otherwise, you could use the -C command and provide the path in quotes ( «. avrdude.conf» ) where the avrdude.conf file is located. For the Arduino IDE v1.8.5, it was located in . arduino-1.8.5hardwaretoolsavretc directory. Assuming that you have AVRDUDE in the working directory, the command should like similar to command below to read an ATmega328P.
A successful device signature read with the configuration file should look similar to the output below.
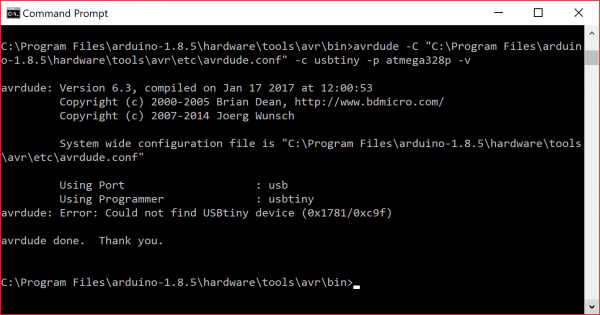
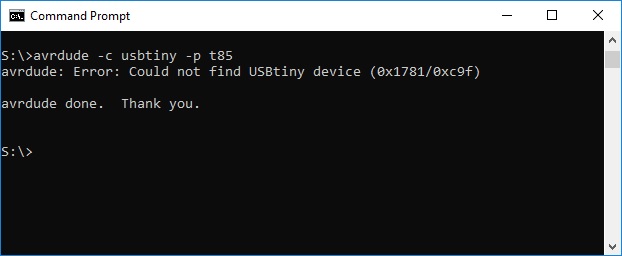
If you run AVRDUDE commands and receive this error below, the issue may be related to the drivers for the AVR Programmer whose device ID is 0x1781/0xc9f . Either the drivers are not installed or there is a driver conflict.
Drivers Not Installed
One solution is to ensure that the drivers are installed as explained earlier. You may also want to try another USB cable or unplugging/replugging the AVR programmer back into your COM port. The error output in the command line may look similar to the screenshot below.
Driver Conflicts
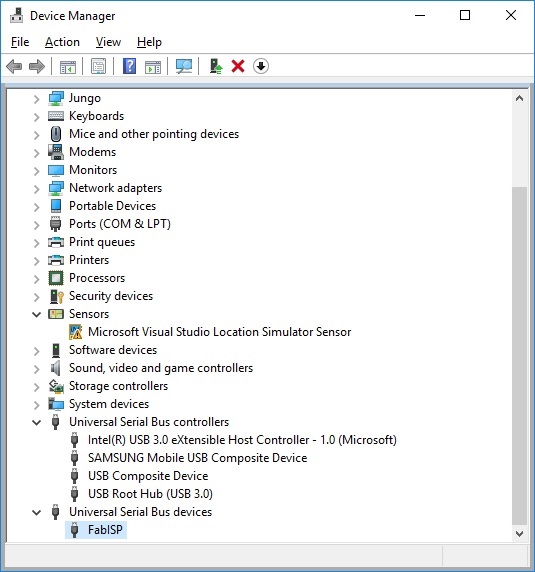
If you have installed the correct drivers as explained earlier, it’s possible that there is a driver conflict. You’ll receive the same error but the solution may not be as intuitive as you may think. The output in the screenshot below occurred when using the Tiny AVR Programmer to verify an ATtiny85’s device signature. The drivers were installed correctly and had been working with the Pocket AVR Programmer. However, the Tiny AVR Programmer was still not recognized.
Opening up the device manager, the Tiny AVR Programmer showed up as a different driver (i.e. FabISP) and name as shown below.
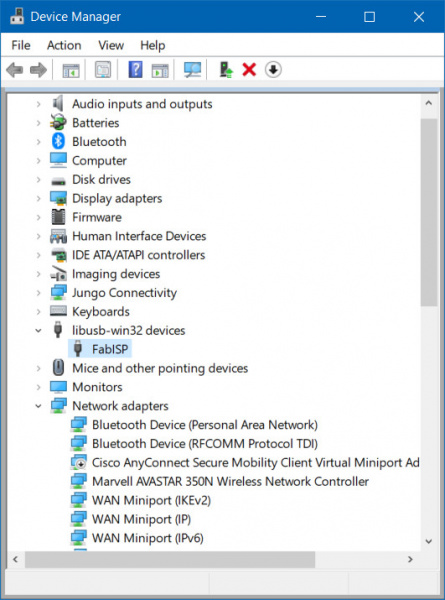
Note: In some cases, the driver may appear under libusb-win32 devices > FabISP. If the drivers listed inder the libusb-win32 devices tree fail to work, you will need to follow the directions to reinstall the driver.
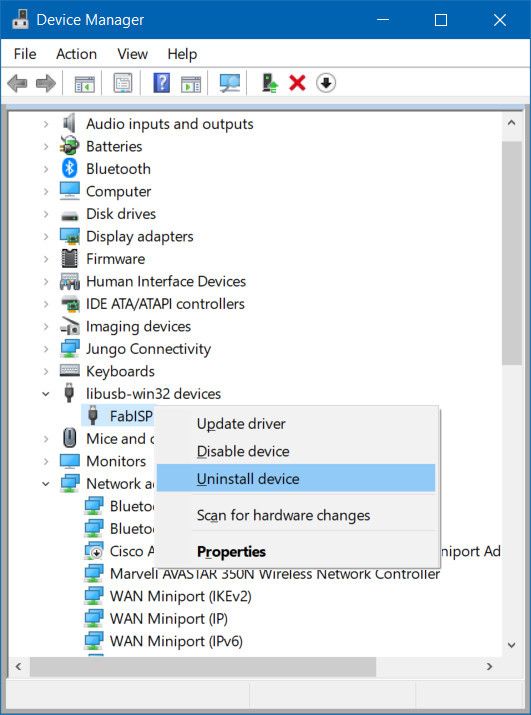
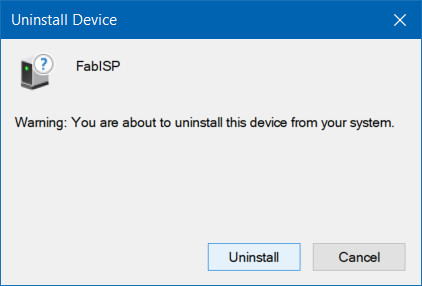
The solution was to right click and delete the driver. Simply right click the COM port that it enumerated on and select «Uninstall device«.
You may see a window pop up similar to the image below. Click on the button labeled Uninstall. In some cases, Windows may provide an option to «Delete the driver software for this device.» if the option is provided, simply mark the checkbox before clicking on the button to uninstall.
After uninstalling, power cycle the programmer by unplugging/replugging the Tiny AVR Programmer from the USB port. Head back to the Installing Drivers section and follow the instructions to Automatically Install the Drivers using Zadig.
Error Connecting To AVR Programmer
If you receive an error similar to the output below, it is probably due to the connection to the AVR programmer.
One solution is to try to unplug and replug the AVR programmer back to your COM port. You may also want to check the USB cable or ensure that the drivers are installed correctly. The output in the command line may look similar to the screenshot below.
Heads Up! The following are only a few errors that we have run into when using AVRDUDE. To browse other common issues and how to troubleshoot, you may want to try checking the AVRDUDE online manual.
AVRDUDE Online Manual: Troubleshooting
Or do a search online with the error that you are having and check different forums to see if anyone else has run into the same issues as you have.
Источник
1.8.8 Arduino IDE Windows Installer drops avrdude.conf in incorrect directory #8344
While attempting to upload a sketch, Blink, the configuration file for avrdude is not found.
The text was updated successfully, but these errors were encountered:
- File > Preferences > Show verbose output during: > compilation (uncheck) > upload (check) > OK
- Sketch > Upload
- After the upload fails you’ll see a button on the right side of the orange bar «Copy error messages». Click that button.
- Paste the error messages in a reply here using code fencing.
The avrdude.conf file is installed here:
The global configuration expects the avrdude configuration file to be here:
This directory does not exist with a clean installation from the Windows installer.
The workaround is to create the directory and copy the existing avrdude.conf to it. This immediately results in the ability to upload sketches to the attached Arduino devices.
It’s not clear what the long-term fix is for this.
The system is Windows 10. It is unlikely that other OSes will have the same issue. The zip file version has not been tested or inspected for this issue.
The global configuration expects the avrdude configuration file to be here:
This directory does not exist with a clean installation from the Windows installer.
How much of that directory structure did exist?
The Arduino IDE comes with the full installation of Arduino AVR Boards bundled in the IDE installation folder, including AVRDUDE. In a fresh installation, the location of avrdude.conf that will be used is /hardware/tools/avr/etc/avrdude.conf. AVRDUDE is only installed to C:UsersUSERAppDataLocalArduino15packagesarduinotoolsavrdude when you do an update of Arduino AVR Boards via Tools > Board > Boards Manager (or some other 3rd party hardware package that has a dependency on the AVRDUDE tool). It seems like you might have had an incomplete installation of an AVR package installed on your system before you did this installation of the Arduino IDE.
The workaround we recommend on the Arduino forum for this class of problem is to delete the C:UsersUSERAppDataLocalArduino15 folder . In your case, that’s probably not necessary since you seem to have found your own, less invasive, solution.
I’ll leave it to the Arduino developers to determine whether they want to investigate if the IDE can be improved to avoid this sort of problem in the future, or whether it should be treated as a rare glitch that should just be worked around when it does occur..
Источник
Про Ардуино и не только
среда, 10 октября 2018 г.
Прошивка USBasp
1. Подготовка Ардуино
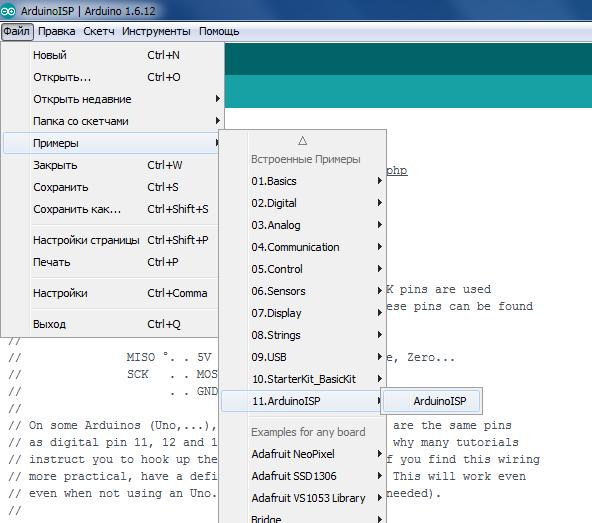
В качестве программатора можно использовать любую имеющуюся плату Ардуино. Для этого подключаем ее к компьютеру и загружаем в нее скетч ArduinoISP из стандартных примеров:
2. Подключение USBasp к Ардуино
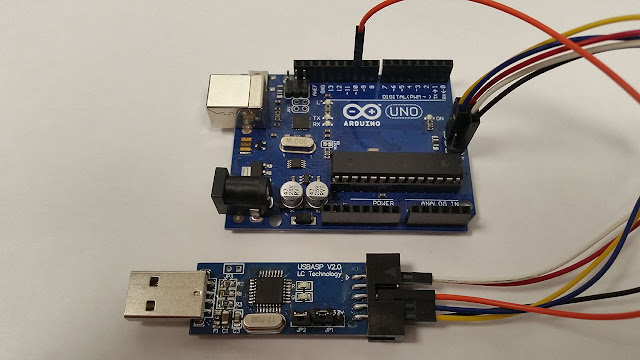
Микроконтроллеры семейства AVR, а значит и базирующиеся на них платы (как Ардуино, так и USBasp) поддерживают программирование по ISP-технологии с использованием линий связи SPI. Поэтому сейчас нам нужно:
- соединить выводы Ардуино MOSI, MISO, SCK GND и VCC (5В или 3.3В) с одноименными выводами USBasp;
- цифровой вывод 10 Ардуино подключить к выводу RESET USBasp;
- установить электролитический конденсатор на 10мкФ между RESET и GND Ардуино, чтобы предотвратить автоматическую перезагрузку. Хотя возможно будет работать и без конденсатора, зависит от используемой платы Ардуино.
Для подключения можете использовать как ICSP разъем Ардуино, так и цифровые выводы — не принципиально. Я, например, взял MOSI, MISO, SCK, GND и VCC с ICSP разъема:
На всякий случай приведу таблицу соответствия сигналов MOSI, MISO и SCK цифровым выводам различных плат Ардуино:
| Плата Ардуино | MOSI | MISO | SCK |
|---|---|---|---|
| Uno, Duemilanove | 11 или ICSP-4 | 12 или ICSP-1 | 13 или ICSP-3 |
| Nano | 11 или ICSP-4 | 12 или ICSP-1 | 13 или ICSP-3 |
| Pro Mini | 11 | 12 | 13 |
| Mega1280, Mega2560 | 51 или ICSP-4 | 50 или ICSP-1 | 52 или ICSP-3 |
| Leonardo | ICSP-4 | ICSP-1 | ICSP-3 |
| Due | ICSP-4 | ICSP-1 | ICSP-3 |
| Zero | ICSP-4 | ICSP-1 | ICSP-3 |
| 101 | 11 или ICSP-4 | 12 или ICSP-1 | 13 или ICSP-3 |
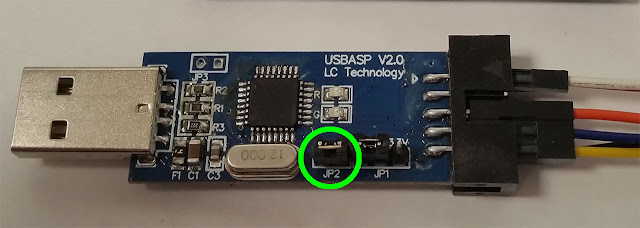
3. Установка джампера JP2 на USBasp
На плате USBasp присутствуют 3 джампера, хотя распаян у вас, скорее всего, будет только JP1 — выбор напряжения питания программируемого микроконтроллера. Для прошивки USBasp (и любых других манипуляций с ним при помощи программатора) необходимо установить джампер JP2. Советую не мучиться с замыканием контактов подручными средствами и впаять пару штырьков, так будет надежней:
4. Скачивание прошивки
Заходим на страничку автора USBasp https://www.fischl.de/usbasp/ и скачиваем последнюю версию прошивки в разделе Download — Firmware and circuit. На момент написания данной статьи актуальной является версия от 28.05.2011. Файлы прошивки находятся внутри архива по пути usbasp.2011-05-28binfirmware, их там три штуки, для каждого типа микроконтроллера (программатор USBasp может быть построен на базе ATmega8, ATmega48 или ATmega88). У меня в USBasp установлен микроконтроллер ATmega8, поэтому я буду использовать файл usbasp.atmega8.2011-05-28.hex.
Прошивать USBasp будем при помощи уже знакомого нам avrdude, входящего в состав IDE Arduino. Файл прошивки нужно поместить в каталог avrdude, чтобы потом не пришлось указывать полный путь к нему. Для этого запускаем Проводник Windows и переходим в каталог Arduino_dirhardwaretoolsavrbin, где Arduino_dir — это путь к IDE Arduino. В моем случае он выглядит так: d:Arduinoarduino-1.6.12hardwaretoolsavrbin, сюда я копирую файл usbasp.atmega8.2011-05-28.hex.
5. Прошивка USBasp
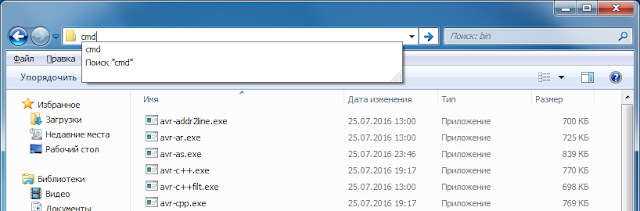
После копирования файла прошивки в каталог avrdude поместите курсор в адресную строку Проводника, удалите из нее путь, введите cmd и нажмите Enter.
Запустится интерпретатор командной строки. В нем нужно ввести команду:
avrdude -C ..etcavrdude.conf -p m8 -c arduino -P com18 -b 19200 -U flash:w:usbasp.atmega8.2011-05-28.hex
Не забудьте проверить и с корректировать ее параметры:
-C ..etcavrdude.conf — путь к конфигурационному файлу (без этого параметра avrdude иногда ругается: can’t open config file «»: Invalid argument)
-p m8 — определяет тип микроконтроллера. Значение m8 сообщает avrdude о том, что мы собираемся работать с ATmega8. Если у вас в USBasp установлен ATmega48 или ATmega88, то замените это значение на m48 или m88 соответственно.
-P com18 — определяет COM порт, присвоенный плате Ардуино. У меня это com18, вам нужно подставить свое значение.
-U flash:w:usbasp.atmega8.2011-05-28.hex — определяет действие, которое мы хотим выполнить. В данном случае мы хотим записать в FLASH память данные из файла usbasp.atmega8.2011-05-28.hex. При необходимости скорректируйте имя файла прошивки в соответствии с типом микроконтроллера в USBasp.
Убедитесь, что команда набрана верно и программатор правильно соединен с Ардуино. После этого подключаем Ардуино к компьютеру и нажимаем Enter в интерпретаторе командной строки. Должен отобразиться прогресс перезаписи содержимого FLASH памяти, а затем сообщение об успешном выполнении команды — avrdude done. Thank you:
Источник
Please be positive and constructive with your questions and comments.
-

jeremyzschau
- Posts: 130
- Joined: Fri Feb 27, 2015 11:00 pm

avrdude: error reading system
I am trying to upload to my gemma. Please help.
Arduino: 1.8.5 (Mac OS X), Board: «Adafruit Gemma (ATtiny85 @ 8MHz)»
Sketch uses 3844 bytes (72%) of program storage space. Maximum is 5310 bytes.
Global variables use 187 bytes of dynamic memory.
avrdude: can’t open config file «/Users/jeremy/Library/Arduino15/packages/adafruit/hardware/avr/1.4.13/bootloaders/gemma/avrdude.conf»: No such file or directory
avrdude: error reading system wide configuration file «/Users/jeremy/Library/Arduino15/packages/adafruit/hardware/avr/1.4.13/bootloaders/gemma/avrdude.conf»
avrdude: error reading system wide configuration file «/Users/jeremy/Library/Arduino15/packages/adafruit/hardware/avr/1.4.13/bootloaders/gemma/avrdude.conf»
This report would have more information with
«Show verbose output during compilation»
option enabled in File -> Preferences.
-
Dsmith9583
- Posts: 2
- Joined: Sun Dec 30, 2018 5:39 am

Re: avrdude: error reading system
Post
by Dsmith9583 » Sun Dec 30, 2018 5:47 am
I am have the same problem. i am running Windows 10. using the Arduino IDE 1.8.8 i have unistalled and reinstalled the IDE and adafruit package. the gemma directory does not show up in the bootloader directory. any idea why?
i have read and gone over the instructions several times with out luck.
error message below
Thank You
David
Arduino: 1.8.8 (Windows 10), Board: «Adafruit Gemma (ATtiny85 @ 8MHz)»
Sketch uses 700 bytes (13%) of program storage space. Maximum is 5310 bytes.
Global variables use 9 bytes of dynamic memory.
C:UsersdsmitAppDataLocalArduino15packagesarduinotoolsavrdude6.3.0-arduino14/bin/avrdude -CC:UsersdsmitAppDataLocalArduino15packagesadafruithardwareavr1.4.13/bootloaders/gemma/avrdude.conf -v -pattiny85 -carduinogemma -Uflash:w:C:UsersdsmitAppDataLocalTemparduino_build_202161/Gamma_Blink.ino.hex:i
avrdude: Version 6.3-20171130
Copyright (c) 2000-2005 Brian Dean, http://www.bdmicro.com/
Copyright (c) 2007-2014 Joerg Wunsch
System wide configuration file is «C:UsersdsmitAppDataLocalArduino15packagesadafruithardwareavr1.4.13/bootloaders/gemma/avrdude.conf»
avrdude: can’t open config file «C:UsersdsmitAppDataLocalArduino15packagesadafruithardwareavr1.4.13/bootloaders/gemma/avrdude.conf»: No such file or directory
avrdude: error reading system wide configuration file «C:UsersdsmitAppDataLocalArduino15packagesadafruithardwareavr1.4.13/bootloaders/gemma/avrdude.conf»
avrdude: error reading system wide configuration file «C:UsersdsmitAppDataLocalArduino15packagesadafruithardwareavr1.4.13/bootloaders/gemma/avrdude.conf»
This report would have more information with
«Show verbose output during compilation»
option enabled in File -> Preferences.
-
Dsmith9583
- Posts: 2
- Joined: Sun Dec 30, 2018 5:39 am
Re: avrdude: error reading system
Post
by Dsmith9583 » Sun Dec 30, 2018 3:47 pm
I was able to get this working. Under Tools / Programer I selected «USBtinyISP» and Not «Arduino Gemma»
I hope this helps anyone else having this problem.
Best Regards
David
Please be positive and constructive with your questions and comments.