Не удается напечатать документ
Общие причины для Windows и Mac OS X
Устройство находится в спящем режиме или режиме глубокого сна.
Нажмите кнопку  (РЕЖИМ ЭНЕРГОСБЕРЕЖЕНИЯ), чтобы перевести устройство в режим ожидания.
Кабели ЛВС или USB отключены.
Убедитесь, что кабель должным образом подключен к устройству и компьютеру.
Возникла проблема с кабелем.
Замените кабель новым.
Устройство находится в автономном режиме.
Нажмите кнопку (ПЕЧАТЬ), а затем выберите [Online (Готов)].
На сенсорной панели отображается сообщение об ошибке.
Проверьте сообщения об ошибках, которые отображаются на сенсорной панели, или нажмите [?] на сенсорной панели.
Настройки интерфейса отключены.
Проверьте настройки интерфейса сенсорной панели на соответствие настройкам устройства и среды подключения к сети.
Возникла проблема с функцией печати.
Проверьте, возможна ли печать конфигурации.
Индикатор выключателя питания часто мигает с периодичностью примерно в 0,3 секунды.

На устройстве могла возникнуть неполадка. Немедленно отключите шнур питания и свяжитесь с дилером.
Устройство не установлено в качестве принтера по умолчанию.
Установите устройство в качестве принтера по умолчанию.
Щелкните правой кнопкой мыши значок [OKI MB562(*) (OKI MB562(*))] в папке [Devices and Printers (Устройства и принтеры)], а затем выберите [Set as Default Printer (Установить в качестве принтера по умолчанию)].
* Обозначает тип драйвера. (например, PCL6/PS/XPS/FAX)
Для драйвера принтера указан неверный порт вывода принтера.
Выберите порт вывода для подключения кабеля ЛВС или USB.
Принтер обрабатывает данные из другого интерфейса.
Дождитесь завершения печати.
На сенсорной панели отображается [Receiving data timeout (Истек период ожидания приема данных)], печать не выполняется.
На сенсорной панели нажмите [Device Settings (Настройки устройства)] и выберите [Admin Setup (Админ. настр.)] > [Print Setup (Настройка печати)] > [Print menu (Меню «Печать»)] > [Printer Adjust (Настройка принтера)] > [Timeout Injob (Время ожидания)], затем задайте более длинный промежуток времени. По умолчанию установлен интервал 40 секунд.
На сенсорной панели отображается [Received invalid data (Получены неверные данные)], печать не выполняется.
Выбранный язык моделирования может не поддерживаться данным устройством (моделью). Убедитесь, что используемый драйвер принтера поддерживает данную модель устройства.
© Oki Data Corporation, 2014. Все права защищены.
Источник
Error Message List
Wait a moment. Network initializing .
The network is being initialized.
Wait for a while until the machine connects to the network.
Checking File System
File system in a flash memory device is being checked. Wait for a while.
Inspection is required. PU Flash Error
Turn the machine off, and then back on. If the same error occurs, contact your dealer.
Inspection is required. PU Communication Error
Turn the machine off, and then back on. If the same error occurs, contact your dealer.
Offline Mode
Press [Print] > [Online] on the operator panel. The (STATUS) button turns off when the machine turns online.
Data present.
Data remains unprinted. Wait for a while and if the message does not disappear, check the data.
Deleting data.
The job was cancelled or user is unauthorized. Wait for a while.
Warming up.
The machine is adjusting the temperature of the fuser unit. Wait for a while.
Preparing .
Color registration and density are being adjusted. Wait for a while.
Wait a moment. Executing maintenance.
The programs on the machine are being updated.
Do not turn the machine off until the update completes.
The machine automatically restarts after the update completes.
Toner Low.
The toner indicated on the screen is low. Have a new toner cartridge ready.
Waste Toner Full Replace with new Toner Cartridge.
Waste toner is full. Replace the toner cartridge with a new one.
C: Cyan (blue), M: Magenta (red)
C Non Recommended Toner.
An optimum C (Cyan, blue) toner cartridge is not installed.
Use a toner cartridge that matches your machine.
M Non Recommended Toner.
An optimum M (Magenta, red) toner cartridge is not installed.
Use a toner cartridge that matches your machine.
Y Non Recommended Toner.
An optimum Y (Yellow) toner cartridge is not installed.
Use a toner cartridge that matches your machine.
K Non Recommended Toner.
An optimum K (Black) toner cartridge is not installed.
Use a toner cartridge that matches your machine.
Error Postscript
A postscript error has occurred. Please check data.
Image Drum Unit Near Life
The image drum indicated on the screen is near life. Have a new image drum ready.
C: Cyan (blue), M: Magenta (red), Y: Yellow, K: Black
Fuser Unit Near Life
The fuser unit is near life. Have a new fuser unit ready.
Belt Unit Near Life.
The belt unit is near life. Have a new belt unit ready.
Please change Fuser Unit.
The fuser unit reaches its lifetime.
Replace the fuser unit with a new one.
Please change Belt Unit.
The belt unit reaches its lifetime.
Replace the belt unit with a new one.
Toner Empty
The toner indicated on the screen is empty. Replace the empty toner cartridge with a new one.
C: Cyan (blue), M: Magenta (red), Y: Yellow, K: Black
Toner cartridge not installed.
A color toner cartridge indicated on the screen is not installed.
Install the toner cartridge.
C: Cyan (blue), M: Magenta (red), Y: Yellow, K: Black
Please install new Image Drum Unit. Image Drum Life.
The image drum indicated on the screen reaches its lifetime.
Replace the image drum with a new one.
C: Cyan (blue), M: Magenta (red), Y: Yellow, K: Black
[TRAY] Empty.
No paper is loaded in the indicated tray. Load paper.
File System is full.
Memory in the file system is full.
Delete unnecessary files.
File System is write protected.
The File System is write-protected.
Contact the administrator of the MFP.
Memory Overflow
Insufficient memory error has occurred during collate printing.
Reduce the number of pages to print.
Memory Overflow
Memory full error has occurred while receiving PC Fax data. Press [Close].
Access Limitation Error
Unauthorized job was sent or unauthorized user attempted to print or send a fax. Data was deleted. Contact your administrator to use this machine.
File erasing .
Stored document files are being deleted.
Wait for a while.
Erased Data Full
Files supposed to be deleted are full. Erase the files.
Expired saved files have been deleted.
Private printing files whose storage period expired were automatically deleted.
Disk Read/Write Error
An error has occurred in the file system. Press [Close].
Flash Error
An error has occurred when firmware was being updated.
Contact the administrator.
Invalid print data received.
Invalid print data or PC fax transmission data was received. To erase the message, press [Close].
If you performed private printing, the data was deleted because it was incomplete. Print again.
Received data has been discarded because Job Type is restricted.
Data whose job type is not defined in the acceptable job type settings was received. The data was discarded without being processed.
Select a job type defined in the acceptable job type settings for [Job Type] of the printer driver and print again.
Paper request on MP Tray.
Selecting the message displays «Please install paper on MP Tray. Please set paper A4 (or another paper size). To cancel, select [Cancel]». To print, load the specified size of paper on the MP tray and select [Start]. To cancel the print job, select [Cancel] on the operator panel.
Tray Media Mismatch: 461, 462, 463, 464 Please install paper [MEDIA_SIZE] [MEDIA_TYPE] on [TRAY].
The size and type of paper set in the machine do not match those indicated on the screen. Use the same size and type of paper selected on the application.
Tray Media Mismatch: 460 Please install paper [MEDIA_SIZE] [MEDIA_TYPE] on [TRAY].
The size and type of paper loaded in the MP tray do not match those indicated on the screen. Make sure that the size and type of paper loaded in the MP tray match those selected on the application.
Wait a moment. Network Configuration writing .
Network settings for this machine is changed. The new settings are being stored. Wait for a while.
Wait a moment. Network initializing .
Network settings for this machine are initializing. Wait for a while.
Please install paper on [TRAY] . : 490, 491, 492, 493, 494 Please set paper [MEDIA_SIZE]
No paper is loaded in the indicated tray. Load paper of the displayed size.
Please close [TRAY].: 440, 441, 430, 431, 432, 433
The tray is not installed. Install the cassette. If the cassette is already inserted, pull it out, and then insert it again.
Memory Overflow: 420
Data is too complicated. Memory full error has occurred during processing. Reduce the volume of the print data.
Please install new K Toner Cartridge. 414, 415, 416, 417
Waste toner of the toner cartridge is full. Opening and closing the front cover can resume printing for a while, but it may damage the image drum. Replace the toner cartridge with a new one as soon as possible.
C: Cyan (blue), M: Magenta (red), Y:Yellow, K:Black
[COLOR] Toner Empty: 410, 411, 412, 413
The indicated cartridge ran out of toner.
Opening and closing the front cover can resume printing for a while, but it may damage the image drum. Replace the toner cartridge with a new one as soon as possible.
C: Cyan (blue), M: Magenta (red), Y: Yellow, K: Black
C Non Recommended Toner. Error: 552, 556, 616, 622
The installed C (Cyan, blue) toner cartridge is not optimum.
We recommend using an optimum toner cartridge.
M Non Recommended Toner. Error: 551, 555, 615, 621
The installed M (Magenta, red) toner cartridge is not optimum.
We recommend using an optimum toner cartridge.
Y Non Recommended Toner. Error: 550, 554, 614, 620
The installed Y (Yellow) toner cartridge is not optimum.
We recommend using an optimum toner cartridge.
K Non Recommended Toner. Error: 553, 557, 617, 623
The installed K (Black) toner cartridge is not optimum.
We recommend using an optimum toner cartridge.
[COLOR] Toner Cartridge not installed: 610, 611, 612, 613
A color toner cartridge indicated on the screen is not installed.
Install the toner cartridge.
C: Cyan (blue), M: Magenta (red), Y: Yellow, K: Black
Please check [COLOR] Toner Cartridge.: 540, 541, 542, 543
The image drum sensor error has occurred in the image drum indicated on the screen.
Uninstall the image drum, and then install it again.
If the message persists, uninstall the toner cartridge and install it again.
If the toner cartridge is not installed, install it.
C: Cyan (blue), M: Magenta (red), Y: Yellow, K: Black
Paper Size Error. Please open the scanner unit and the Output Tray and check paper size. Error: 400
Paper size error has occurred in the indicated tray. Make sure that the size of paper loaded in the tray matches the [Paper Size] setting set on the operator panel. Load paper according to the paper size and direction set. To resume printing, open and close the output tray.
If the setting set on the operator panel is wrong, cancel printing first, set the right paper size from [Paper Size] on the operator panel, and then print again.
Make sure that the cassette does not feed multiple sheets of paper at a time after starting printing. If it happens, remove paper, and then load paper correctly.
Paper Jam: 390 Please open the scanner unit and the Output Tray.
Paper jammed via the paper feed path from the MP tray. Remove jammed paper.
If the edge of the jammed paper is not visible, open the front cover and remove the paper.
Paper Jam: 391, 392, 393 Please open the scanner unit and the Output Tray.
A paper jammed via the paper feed path from the indicated tray.
Pull out the cassette, and then remove paper. If multiple sheets of paper are fed at a time, remove paper and reload paper.
Make sure that the paper stoppers are set in the right position.
Paper Jam: 380, 381, 382, 385, 389 Please open the scanner unit and the Output Tray.
A paper jam has occurred inside the machine.
Open the output tray and remove jammed paper.
Paper Jam: 370, 371, 372 Please open the scanner unit and the Output Tray.
A paper jam has occurred inside the machine.
Open the output tray and remove jammed paper.
Please install new Image Drum Unit. Error: 350, 351, 352, 353
The image drum indicated on the screen reaches its lifetime.
Replace the image drum with a new one.
Opening and closing the output tray can resume printing for a while. Replace with a new one as soon as possible, however.
C: Cyan (blue), M: Magenta (red), Y: Yellow, K: Black
Please install new Image Drum Unit. Error: 560, 561, 562, 563, 564, 565, 566, 567
The image drum indicated on the screen reaches its lifetime.
Replace the image drum with a new one.
C: Cyan (blue), M: Magenta (red), Y: Yellow, K: Black
Install New Image Drum. Printing disabled due to low threshold of Image Drum life. Error: 680, 681, 682, 683
Printing has stopped because the image drum indicated on the screen reached its lifetime. Replace with a new image drum to print.
C: Cyan (blue), M: Magenta (red), Y: Yellow, K: Black
Please change Fuser Unit.: 354
The fuser unit reaches its lifetime.
Replace the fuser unit with a new one.
Opening and closing the output tray can resume printing for a while. Replace with a new one as soon as possible for maintaining the print quality.
Please change Belt Unit.: Error: 355
The belt unit reaches its lifetime.
Replace the belt unit with a new one.
Opening and closing the output tray can resume printing for a while. Replace with a new one as soon as possible for maintaining the print quality.
Please change Belt Unit.: 356
Waste toner of the belt unit is full. Replace the belt unit with a new one. Opening and closing the output tray can resume printing for a while. Replace with a new one as soon as possible for maintaining the print quality.
Please check [COLOR] Toner Cartridge.: 544, 545, 546, 547
A color toner cartridge indicated on the screen is not installed.
Make sure that the lever on the toner cartridge is fully turned and the protective tape is removed.
C: Cyan (blue), M: Magenta (red), Y: Yellow, K: Black
Please check Image Drum Unit. Error: 340, 341,342, 343
The indicated image drum is not installed correctly.
Remove and re-install the image drum.
C: Cyan (blue), M: Magenta (red), Y: Yellow, K: Black
Please check Fuser Unit.: 320
The fuser unit is not properly installed. Remove and re-install the fuser unit.
Please check Belt Unit.: 330
The belt unit is not properly installed. Remove and re-install the belt unit.
Please check the Output Tray.: 310
Indicated cover is open. Close the cover.
Error: 310 The output tray.
Power OFF/ON
Turn the machine off, and then back on.
If the same error occurs, contact your dealer.
Inspection is required.
Turn the machine off, and then back on.
If the same error occurs, contact your dealer.
Cancelling .
The cancel button was pressed while copying. The copy job is being cancelled. Wait for a while.
ADF Cover Open
The ADF cover of the scanner is open. Close the cover.
Document Jam Please open the scanner unit and the ADF cover.
Paper jammed in the ADF of the scanner.
Open the ADF cover and remove jammed paper.
Lamp Error. Please call service.
Light volume of the scanner is low. Contact your dealer.
USB Memory Full
Scan To USB Memory was cancelled because the USB Memory is full.
Check the free space in the USB Memory.
Writing Failed
The USB Memory is write-protected. Unlock the protection.
USB Memory disconnected.
The USB Memory was removed while performing Scan To USB Memory. Connect USB Memory and try again.
Connect to PC failed.
No destination computer was found for Scan to Computer. Make sure that your computer is turned on and recordable.
To erase the message, press [Close].
Communication Error
An error has occurred during fax transmission or fax reception.
Telephone
The external phone is in use. Use the device after ending the call in progress.
File Transmission Error
An error such as a malfunction of the server or disconnection of a LAN cable has occurred while performing Scan To shared folder.
Check the network connection.
To erase the message, press [Close].
Please check SMTP settings.
Cannot connect to the SMTP server. Check the network settings.
Please check POP3 settings.
Cannot connect to the POP3 server. Check the network settings.
SMTP Login failed.
An attempt to log into the SMTP server ended up an authentication error.
Check the network settings.
SMTP Auth. Unsupported
The SMTP server does not support the authentication system.
Check the network settings.
POP3 Login failed.
An attempt to log into the POP3 server ended up an authentication error.
Check the network settings.
Getting target IP failed. Please Check DHCP settings.
The DHCP server cannot be detected. Check the network connection.
Please check DNS settings.
Cannot connect to the DNS server. Check the network connection.
Please check Server settings.
Cannot connect to the file server. Check the network settings.
Server Login failed.
Logging into the file server failed. Check the server settings.
Entering directory failed.
Connecting to the directory of the FTP server failed. Check the server settings.
Changing data Transfer Type failed.
File transmission failed because the file transfer type was not accepted by the FTP server. Change the FTP transfer type to «binary».
Not authorized to write file.
Files sent using Scan To shared folder could not be written. Check the access rights for the shared folder.
Storage Space Full
Memory in the FTP server is low. Delete unnecessary files and ensure the free space.
Please change File Name.
The specified file name is not acceptable. Check the FTP server settings and change the file name.
Device communication protocol not supported.
The server does not support CIFS or FTP. Check the server settings.
Please check Network Share Name.
The name of the network shared folder is not correct. Check the folder name.
Please insert USB Memory.
Scan To USB Memory or print from USB Memory with USB Memory not inserted was attempted.
Insert USB Memory.
[TRAY] missing.
The cassette in the indicated tray is pulled out.
Install the cassette.
Access Limitation Error Monochrome printing was performed due to the color printing limitation.
A color print job was converted to a mono print job due to an unauthorized user. Contact your administrator for color printing.
Access Limitation Error Data was deleted due to the color printing limitation.
A color print job was deleted due to an unauthorized user. Contact your administrator for color printing.
Access Limitation Error Deleted unauthorized user data.
Access Limitation Error Data was deleted due to the printing limitation.
Please remove the connected USB device. Unsupported USB device is connected.
An unsupported USB device is connected. Remove the USB device.
Please remove the connected USB device. USB device has not been recognized.
The connected USB device was not recognized. Remove the USB device.
Please remove the USB Hub. USB Hub is connected.
A USB hub is connected. Remove the USB hub. This machine does not support USB hub.
Inspection is required. SIP Error
Turn the machine off, and then back on. If the same error occurs, contact your dealer.
Job Log Database Error
A data base access error has occurred while writing or reading the job log. Turning the machine off and on may resolve the problem.
To erase the message, press [Close].
Job Log Buffer Full (Delete old logs)
Old job logs were deleted, because job log buffer was full.
Decode error occurred. Please check image data.
An error has occurred in the image data sent to this machine. Check the image data.
Access denied to PC. Please check PC.
Connecting to a computer failed when performing Scan to Computer. Check the settings on the computer.
Deleting data.
This machine ran out of color toner. Color print data is being deleted.
Wait for a while.
Color toner empty. Job cancelled
The print data was cancelled because color toner is empty. To delete the message, press the (OK) button.
Error PDF
The PDF file is damaged.
Invalid Password
This PDF file is password protected.
This document restricts printing to a valid owner password.
Password protected PDF files cannot be printed. Unprotect the PDF before printing.
It was not possible to communicate with the SNTP server.
Obtaining current time from the SNTP server failed. Check the server.
USB Memory disconnected.
The USB Memory was removed while printing from USB Memory. Do not remove USB Memory while printing is in progress.
Cannot open the file.
The specified file could not be Opened. Check the file.
Cannot read the file.
Files could not be read. Check the device where the files are stored.
Please close Rear Output Tray. 581:Cannot print with duplex.
2-sided printing failed because the rear output tray is open.
Close the rear output tray and tray again.
Please open the Output Tray. 409:Rear Output Tray Error
The rear output tray was moved while duplex printing.
Close the rear output tray and remove the jammed paper remaining inside of the unit.
Toner Empty
The indicated cartridge ran out of toner.
Replace the empty toner cartridge with a new one.
Wait Timeout is disabled. If your printer is connected to USB port, it may become unable to print a job without via the USB port.
Wait Timeout is disabled.
Press  button, select [Setting] > [Admin Setup] > [Print Setup] > [Print menu] > [Printer Adjust] > [Timeout Injob] on the operator panel, and then select a longer print timeout value.
Memory Overflow has occurred during Fax Tx reservation.
Insufficient memory error has occurred during Scan To fax.
Memory Overflow
Insufficient memory error has occurred during fax reception.
E-mail receiving has been cancelled.
Receiving E-mail was cancelled because the format of the E-mail is not supported or attached file is too large.
Check the file format and size of the attached file.
Wireless settings are incomplete.
Wrong values are set or items remain unset in the wireless LAN settings. Check the wireless settings.
Not connected to wireless access point.
No wireless LAN access points are found.
Make sure that the access point is turned on.
Disconnect and re-connect to wireless LAN.
Wireless startup failed.
Turn the machine off, check that the wireless LAN module is correctly installed, and then reboot the machine. If the error persists, contact your dealer.
Firmware Update Error Please try again. If network doesn’t work, please try firmware update over USB.
Updating the firmware failed. Update again.
Caution, unknown Consumable detected Go to User Manual «Trouble Shooting» to restore operation Error: 709
You can use any consumables in your product, but you must accept the risks of using non-genuine consumables.
If the use of non-genuine consumables causes damage to the product or results in your product not functioning to its full specification, then such damage or effect on the product is not covered by warranty.
To accept these risks and to restore function;
Turn off your product.
Press and hold the ![]() (CLEAR) button and turn your product on.
(CLEAR) button and turn your product on.
After start up, release the ![]() (CLEAR) button.
(CLEAR) button.
Note: This operation will be recorded for future reference.
[PAGES] Pages Left.
The image drum indicated on the screen reaches its lifetime.
Replace the image drum with a new one.
C: Cyan (blue), M: Magenta (red), Y: Yellow, K: Black
Image Drum Life. Print Quality Not Guaranteed.
The image drum indicated on the screen reaches its lifetime.
Replace the image drum with a new one.
C: Cyan (blue), M: Magenta (red), Y: Yellow, K: Black
Receiving data timeout.
Data could not received within a certain period of time.
Set a longer data reception timeout value.
IPv4 address is conflicted. Please change IPv4 address.
The IP address assigned to this machine is duplicated with that of another device.
Check the IP addresses, and then assign another IP address.
Duplex print error.
Duplex printing is not available on the specified paper.
Check the size and thickness of paper.
Changing Language. Panel operation is disabled.
Display language is being changed.
Wait for a while.
Language Change Failed. Error num: [CODE]
Switching display languages failed. Press the power button to turn the machine off, and then back on.
Detected an abnormality of internal database. The data must be deleted. After pressing [Format], the data will be deleted, and then reboot.
Data base is beyond restoration.
To delete the data base, press [Format].
Copyright © 2017 Oki Electric Industry Co., Ltd. All rights reserved.
Источник
Не удается напечатать документ
Общие причины для Windows и Mac OS X
Устройство находится в спящем режиме или режиме глубокого сна.
Нажмите кнопку (РЕЖИМ ЭНЕРГОСБЕРЕЖЕНИЯ), чтобы перевести устройство в режим ожидания.
Кабели ЛВС или USB отключены.
Убедитесь, что кабель должным образом подключен к устройству и компьютеру.
Возникла проблема с кабелем.
Замените кабель новым.
Устройство находится в автономном режиме.
Нажмите кнопку (ПЕЧАТЬ), а затем выберите [Online (Готов)].
На сенсорной панели отображается сообщение об ошибке.
Проверьте сообщения об ошибках, которые отображаются на сенсорной панели, или нажмите [?] на сенсорной панели.
Настройки интерфейса отключены.
Проверьте настройки интерфейса сенсорной панели на соответствие настройкам устройства и среды подключения к сети.
Возникла проблема с функцией печати.
Проверьте, возможна ли печать конфигурации.
Индикатор выключателя питания часто мигает с периодичностью примерно в 0,3 секунды.
На устройстве могла возникнуть неполадка. Немедленно отключите шнур питания и свяжитесь с дилером.
Устройство не установлено в качестве принтера по умолчанию.
Установите устройство в качестве принтера по умолчанию.
Щелкните правой кнопкой мыши значок [OKI MB562(*) (OKI MB562(*))] в папке [Devices and Printers (Устройства и принтеры)], а затем выберите [Set as Default Printer (Установить в качестве принтера по умолчанию)].
* Обозначает тип драйвера. (например, PCL6/PS/XPS/FAX)
Для драйвера принтера указан неверный порт вывода принтера.
Выберите порт вывода для подключения кабеля ЛВС или USB.
Принтер обрабатывает данные из другого интерфейса.
Дождитесь завершения печати.
На сенсорной панели отображается [Receiving data timeout (Истек период ожидания приема данных)], печать не выполняется.
На сенсорной панели нажмите [Device Settings (Настройки устройства)] и выберите [Admin Setup (Админ. настр.)] > [Print Setup (Настройка печати)] > [Print menu (Меню «Печать»)] > [Printer Adjust (Настройка принтера)] > [Timeout Injob (Время ожидания)], затем задайте более длинный промежуток времени. По умолчанию установлен интервал 40 секунд.
На сенсорной панели отображается [Received invalid data (Получены неверные данные)], печать не выполняется.
Выбранный язык моделирования может не поддерживаться данным устройством (моделью). Убедитесь, что используемый драйвер принтера поддерживает данную модель устройства.
© Oki Data Corporation, 2014. Все права защищены.
Источник
Что означает ошибка сервера 504 Gateway Time Out и как ее исправить
Иногда при посещении отдельных страниц сайта мы сталкиваемся с тем, что на экране вместо желаемого контента появляется сообщение об ошибке с цифровым кодом. Для «непосвященного» пользователя это просто набор цифр, но на самом деле в этих цифрах заложена определенная информация. Все они группируются по видам причин возникновения сбоя.
Сообщения, кодирующиеся в формате 5хх, говорят о проблеме на стороне сервера, например, когда невозможно выполнить запрос из-за нарушения связи между несколькими серверами. Ошибка 504 Gateway Time Out не является распространенной, но это не значит, что на нее не стоит обращать внимания, особенно владельцу сайта. Рассмотрим некоторые причины возникновения данной ошибки и способы ее устранения как на стороне обычного посетителя, так и администратором веб-ресурса.
Ошибка 504 Gateway Time Out – это код состояния HTTP, который появляется, когда в течение заданного периода времени один сервер не получает своевременный ответ от другого сервера, который действует как шлюз или прокси.
Описания ошибки могут иметь различную форму:
- 504 Gateway Timeout nginx
- Gateway Timeout Error
- HTTP Error 504
- 504 Gateway Time-out – The server didn’t respond in time
- HTTP Error 504 – Gateway Timeout
Наличие дополнительного словесного описания помогает конкретизировать причину возникновения сбоя.
Производительный хостинг в подарок при заказе лицензии 1С-Битрикс
Выбирайте надежную CMS с регулярными обновлениями системы и профессиональной поддержкой. А мы подарим вам год хостинга – специально для сайтов на 1С-Битрикс.
Что делать посетителю сайта при возникновении ошибки 504
Итак, вы столкнулись с появлением на экране сообщения «error 504». Не спешите уходить с сайта, ведь возникновение сбоя может говорить о неправильной работе вашего браузера или даже наличии более серьезных проблем на уровне пользовательского софта. Попробуйте произвести довольно простые действия, чтобы убедиться, что с вашим программным обеспечением и настройками все в порядке.
- Перезагрузите проблемную страницу или текущий браузер. Если проблема устранилась и не повторяется вновь, особенно при посещении других сайтов, о ней можно просто забыть. При регулярном возникновении однотипных ошибок во время посещения разных ресурсов стоит покопаться в настройках собственного ПО поглубже.
- Зайдите на тот же самый сайт, где возникла ошибка сервера 504, используя альтернативный браузер. В случае, когда страница во время тестирования открылась корректно, обновите браузер, в котором случился сбой, до последней версии.
- Проверьте, как открываются страницы этого же сайта с другого компьютера или смартфона. Это позволит вам понять, не связано ли появление ошибки 504 с ПО конкретного устройства.
- При регулярном появлении HTTP ошибок, в т.ч. с кодом 504, очистите кэш браузера, удалите файлы cookies. Со временем в любом браузере накапливается много «мусора». Произведя очистку, вы поможете программе работать более корректно и даже быстрее.
- Произведите сброс настроек роутера или модема, отключив оборудование на некоторое время от сети. Данная операция вряд ли приведет к устранению ошибки 504, но может улучшить качество интернет-соединения. Провайдеры регулярно вносят изменения в настройки собственного софта, обновляют его. Иногда это приводит к конфликту в корректном взаимодействии пользовательского оборудования и серверов оператора. Перезагрузка устройства по питанию в большинстве случаев решает такие проблемы.
- Очистите кэш DNS. Данная операция кажется сложной для обычного пользователя, но на деле выполнить ее достаточно легко. Способ очистки зависит от вашей операционной системы, найдите соответствующий мануал в интернете.
- Для опытных пользователей подойдет рекомендация временно переключить DNS-сервер на Google Public DNS , что как минимум поможет определить, возник ли ошибочный код состояния HTTP по причине DNS проблемы.
Если после проведения всех вышеозначенных рекомендаций любая ошибка, в т.ч. 504 Gateway Time Out, продолжает возникать регулярно, обратитесь в техподдержку проблемного интернет-ресурса.
Решение проблем с появлением ошибки сервера 504 администратором веб-ресурса
Некорректная работа сайта чаще всего просто раздражает посетителя и приводит к тому, что пользователь находит альтернативный ресурс. Для владельца сайта такие сбои могут носить более глобальные последствия. Поэтому очень важно своевременно обнаруживать баги и максимально быстро устранять их. Для раннего мониторинга стоит использовать все возможные инструменты:
- проводить регулярную симуляцию пользовательского поведения на сайте;
- настроить автоматизированный мониторинг работоспособности ресурса как встроенными инструментами администрирования, так и с использованием специальных скриптов;
- обеспечить качественную работу службы технической поддержки сайта, своевременную обработку всех поступающих сообщений, особенно связанных с информацией о появлении разного рода ошибок на стороне пользователя.
Соблюдение последнего правила не только позволит практически без дополнительных затрат отслеживать все возможные проблемы, которые возникают при посещении сайта. Своевременная обработка пользовательских запросов, быстрый ответ, выдача рекомендаций и публичное обсуждение повышают лояльность и создают дополнительный PR-эффект.
Почти все ошибки с кодом 5хх, возникающие из-за невозможности обработки определенного количества запросов, поступающих на сервер, решаются методом апгрейда железа (использованием высокопроизводительного хостинга) либо оптимизацией работы программного обеспечения. Второй способ зависит от вида движка, на котором создан конкретный сайт. При использовании условно-бесплатных программ (WordPress, OpeneCart и других) все проблемы придется решать на уровне администрирования, с привлечением конкретного веб-программиста, разработавшего данный сайт. Если баги возникают на платных платформах (1С-Битрикс, UMI.CMS, NetCat CMS), напишите об ошибке 504 Gateway Time Out в техподдержку разработчика. Отправить сообщение о проблеме следует и разработчикам платных скриптов, если они установлены на вашем сайте, и вы считаете, что сбои возникают по причине их некорректного исполнения.
Вот некоторые причины, приводящие к возникновению ошибки 504 Gateway Time Out
- Резкий скачок нагрузки на сайт вследствие поступления большого количества внешних запросов, вызванного DDoS-атаками или действиями вирусного ПО, пиковым посещением сайта, например, в момент проведения различных акций в интернет-магазине, или единовременной загрузкой на сайт большого объема контента (импорт информации из CSV- или XML-файлов).
- Некорректная работа скриптов, плагинов и дополнений, конфликтующих как между собой, так и внутри.
- Превышение лимита доступных ресурсов при использовании виртуального хостинга.
Еще одна возможная причина возникновения ошибки 504 – исполняемый скрипт не укладывается в отведенный лимит времени. Это бывает, когда скрипт обращается к другим сайтам либо просто выполняет тяжелую операцию, например, строит поисковый индекс.
Рекомендации по устранению ошибки 504 Gateway Time Out методами администрирования сайта
Ошибка 504 Gateway Time Out может быть вызвана недавними изменениями или обновлениями на сайте. Если после отката к состоянию, предшествующему изменениям, баг исчез, следует найти конкретное действие, повлекшее возникновение ошибки. Для этого необходимо проверить журнал ошибок соответствующей CMS. Пользователи WordPress могут включить журналирование ошибок в файле wp-config.php добавлением следующих строк:
Все возникающие варианты ошибок будут записаны в файле wp-contents/debug.log.
Для проверки работоспособности плагинов и расширений попробуйте отключить те, которые вызывают подозрение как источники возникновения ошибки 504. В первую очередь это касается устаревших скриптов, но причиной могут оказаться и обновления. Если проблема исчезла, далее следует найти некорректный плагин или дополнение и устранить или исправить его. Один из способов улучшения работы исполняемого скрипта – увеличить значение параметра PHP max_execution_time или облегчить скрипт.
При использовании CDN для более быстрого получения контента, в частности CloudFlare, который работает как CDN и как сервис предотвращения негативных последствий от DDoS, вы можете столкнуться с двумя типами ошибок 504. В случае возникновения проблемы на стороне CloudFlare лучшим решением будет связаться с поддержкой CloudFlare или отключить его. Второй вариант – когда сбой возникает на стороне хостинг-провайдера. В этой ситуации также необходимо обратиться в службу поддержки хостера.
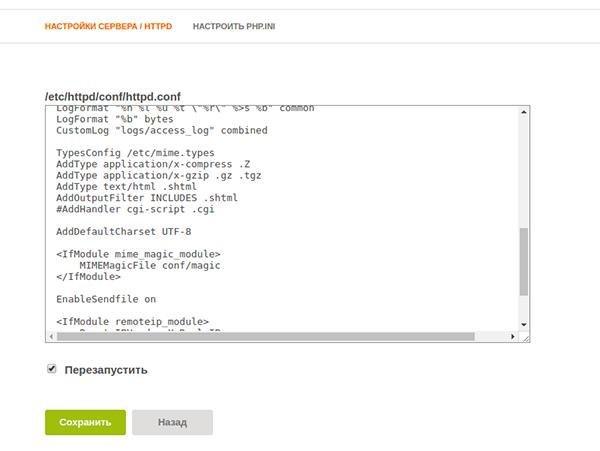
Часто ошибку 504 можно видеть на серверах, где используется VPS-хостинг и установлен Nginx в качестве фронтенда и Apache в качестве бэкенда. Для устранения проблемы в Apache можно увеличить значение timeout по умолчанию в файле httpd.conf:
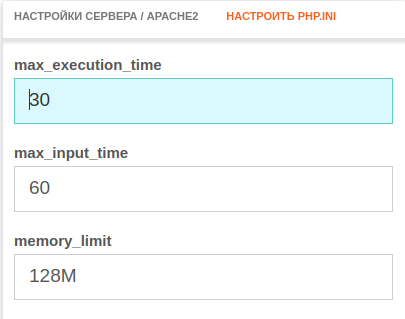
Также увеличить лимит в max_execution_time в php.ini:
После внесения изменений следует перезапустить Apache. Ошибка 504 Gateway Time Out должна исчезнуть.
Аналогичным образом проблема с появлением ошибки HTTP 504 решается пользователями Nginx. Попробуйте увеличить такие параметры в файле /etc/nginx/conf.d/timeout.conf:
Также рекомендуется увеличить max_execution_time в php.ini:
Далее перезапустите Nginx и откройте сайт.
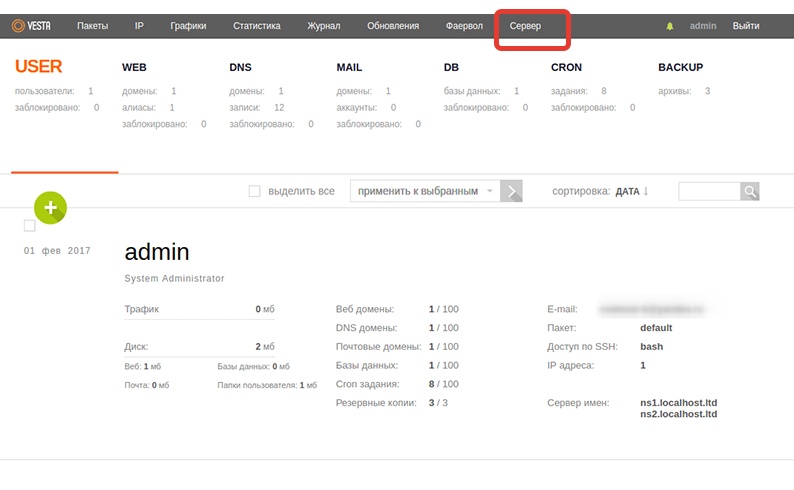
Более простым решением устранения данной проблемы является использование панели управления сервером.
Данный способ позволяет администрировать настройки веб-сервера без использования консоли, один раз настроить их под ваш проект и больше не подключаться к серверу без острой необходимости.
Например, в бесплатной панели управления Vesta Control Panel достаточно внести изменения в раздел «Сервер» и навсегда забыть о возможности возникновения ошибок на сайте.
 И далее внести соответствующие изменения.
Аналогичным способом проблема устраняется и при использовании альтернативных панелей управления хостингом – Ajenti, CentOS Web Panel, ISPmanager и других.
Если вы считаете, что появление 504 Gateway Timeout вызвано превышением лимита использования ресурсов серверного железа, оптимальным решением будет аренда выделенного сервера или VPS. Когда ваш сайт уже размещен на виртуальном хостинге, но ни одна из рекомендаций не привела к исправлению error 504, обратитесь к хостинг-провайдеру. В этом случае подробно опишите причины, которые, как вы полагаете, привели к появлению сбоя.
Заключение
В данной статье мы рассмотрели основные причины возникновения ошибки HTTP 504 Gateway Timeout и популярные способы устранения неполадки. Уверен, некоторые администраторы веб-ресурсов сталкивались с подобными проблемами, выходящими за рамки приведенных примеров и рекомендаций.
Буду благодарен, если вы поделитесь своим опытом в комментариях.
Источник
Read Data Timeout in 31 Seconds PHP 500 Error
The server encountered an internal error or misconfiguration and was unable to complete your request.
Please contact the server administrator, [email protected] and inform them of the time the error occurred, and anything you might have done that may have caused the error.
More information about this error may be available in the server error log.
In web server error log, the PHP web app which is assigned to the handler fcgid-script for execution through FastCGI protocol provided by mod_fcgid, has the errors similar to the following logged:
The error indicates that the PHP script had hit its maximum execution time limit, and was terminated before completing its operating gracefully. Increase the time given to PHP scripts to run in order to resolve the issue.
To increase time limit for PHP execution, modify the following option in php.ini PHP configuration file (if you’re using custom php.ini file for domain or website, change the custom php.ini instead of global php.ini):
max_execution_time
max_execution_time sets the maximum time in seconds a script is allowed to run before it is terminated by the parser. The purpose of the setting to to prevent poorly written scripts from eating up system resources. The default duration a PHP script is allowed to run is 30 seconds, but many scripts may require more than 30 seconds. For example, to allow maximum execution time of 300 seconds, change the value to:
Restart the Apache HTTPD server when for the changes to take effect.
Other than PHP timeout limit, the web server can have other timeout configurations. If the PHP script execution is FCGId, then the other primary timeout limit a PHP script will hit is from FastCGI protocol, especially IPCCommTimeout, or its new name FcgidIOTimeout.
Источник
We are connecting to click house through go library and we have 5 threads which are inserting data in batches using the multiple insert method
We are inserting around 1000 records per batch and we have 5 batches running at any point in time. We are seeing the following exception every 10-20 minutes.
2018.08.08 17:40:02.658716 [ 28 ] <Error> ServerErrorHandler: Code: 210, e.displayText() = DB::NetException: Connection reset by peer: while reading from socket (127.0.0.1:49066), e.what() = DB::NetException, Stack trace:

0. /usr/bin/clickhouse-server(StackTrace::StackTrace()+0x16) [0x56d1436]
1. /usr/bin/clickhouse-server(DB::Exception::Exception(std::__cxx11::basic_string<char, std::char_traits<char>, std::allocator<char> > const&, std::__cxx11::basic_string<char, std::char_traits<char>, std::allocator<char> > const&, int)+0x22) [0x510bcd2]
2. /usr/bin/clickhouse-server(DB::ReadBufferFromPocoSocket::nextImpl()+0x248) [0x56ee2b8]
3. /usr/bin/clickhouse-server(DB::TCPHandler::runImpl()+0x57a) [0x2dc4dca]
4. /usr/bin/clickhouse-server(DB::TCPHandler::run()+0x2b) [0x2dc5acb]
5. /usr/bin/clickhouse-server(Poco::Net::TCPServerConnection::start()+0xf) [0x58c56af]
6. /usr/bin/clickhouse-server(Poco::Net::TCPServerDispatcher::run()+0x16a) [0x58c5a8a]
7. /usr/bin/clickhouse-server(Poco::PooledThread::run()+0x77) [0x5966e97]
8. /usr/bin/clickhouse-server(Poco::ThreadImpl::runnableEntry(void*)+0x38) [0x5962d58]
9. /usr/bin/clickhouse-server() [0x938cc0f]
10. /lib/x86_64-linux-gnu/libpthread.so.0(+0x76ba) [0x7fd3183cd6ba]
11. /lib/x86_64-linux-gnu/libc.so.6(clone+0x6d) [0x7fd317bf641d]

2018.08.09 05:27:21.728982 [ 22 ] <Error> executeQuery: Code: 209, e.displayText() = DB::Exception: Timeout exceeded while receiving data from client. Waited for 300 seconds, timeout is 300 seconds., e.what() = DB::Exception (from 127.0.0.1:51130) (in query: INSERT into test.data (eventDate, eventDateTime, projectId, url, duration) VALUES), Stack trace:

0. /usr/bin/clickhouse-server(StackTrace::StackTrace()+0x16) [0x56d1436]
1. /usr/bin/clickhouse-server(DB::Exception::Exception(std::__cxx11::basic_string<char, std::char_traits<char>, std::allocator<char> > const&, int)+0x22) [0x2db80f2]
2. /usr/bin/clickhouse-server(DB::TCPHandler::readData(DB::Settings const&)+0x2cd) [0x2dc43ad]
3. /usr/bin/clickhouse-server(DB::TCPHandler::processInsertQuery(DB::Settings const&)+0x206) [0x2dc4646]
4. /usr/bin/clickhouse-server(DB::TCPHandler::runImpl()+0x477) [0x2dc4cc7]
5. /usr/bin/clickhouse-server(DB::TCPHandler::run()+0x2b) [0x2dc5acb]
6. /usr/bin/clickhouse-server(Poco::Net::TCPServerConnection::start()+0xf) [0x58c56af]
7. /usr/bin/clickhouse-server(Poco::Net::TCPServerDispatcher::run()+0x16a) [0x58c5a8a]
8. /usr/bin/clickhouse-server(Poco::PooledThread::run()+0x77) [0x5966e97]
9. /usr/bin/clickhouse-server(Poco::ThreadImpl::runnableEntry(void*)+0x38) [0x5962d58]
10. /usr/bin/clickhouse-server() [0x938cc0f]
11. /lib/x86_64-linux-gnu/libpthread.so.0(+0x76ba) [0x7fd3183cd6ba]
12. /lib/x86_64-linux-gnu/libc.so.6(clone+0x6d) [0x7fd317bf641d]
Any thoughts on why this is happening?
![]()
Had the exact same problem.
TL;DR: Disable your firewall (or make the appropiate rule changes)
Disabled mine, everything works great.
![]()
I have the same Problem since three days und five try’s to install the support packages. The Connection via Simulink works….
![]()
I had the same problem after selecting «Connect directly to host computer» during the «Hardware Setup» of Simulink Support Package for Raspberry Pi Hardware version 18.2.0. I do not get the error message if I select «Connect to wireless network» (depending on what you are trying to do, this might be an acceptable workaround).
![]()
I have same issue, I tried connect directly and over LAN also, results were same. After «rpi = raspi();» command, SSH doesnt work with default user and password.
![]()
I have a similar issue since installing R2018B, which then automatically updated the Raspberry Pi Matlab server to version 18.2.1 from 18.1.0. If the connection is left too long without use it times out afterwards. For example, If I do this in a script:
clear dac
clear rpi
rpi=raspi
dac = rpi.spidev(‘CE1’,1,2000000)
writeDAC0(rpi,dac,2.0)
for i=1:100
writeDAC0(rpi,dac,2.0+i/100)
fprintf(‘%d ‘,i)
pause(1)
end
It works fine, and if I am fast enough to start the for loop again, it keeps going. If I enter these commands manually, and wait too long after the rpi=raspi command, then the dac = … command times out. If I enter the rpi=raspi and the dac = … commands quickly and wait too long for the writeDAC0 command, it times out. If I try the writeDAC0 command again after a few seconds, it times out.
The behaviour is the same if I just try simple commands like rpi.writeDigitalPin, etc.
Timeout message: Timeout while receiving data from remote server
I’ve tried running a continuous ping in a command shell (Windows), but this makes no difference. netstat -n reports the TCP connection to 18734 active throughout the whole process, whether I time out or not, so I suspect it is somewhere in the matlabIOserver on the Raspberry Pi, or in Matlab on windows.
Everything works fine with no timeouts on R2018A and matlabIOserver v18.1.0.
Working configuration:
- Windows 64 bit
- Matlab R2018A
- Raspberry Pi Model 3 B (not +)
- server_v18.1.0 on Rapberry Pi
Not working configuration:
- Windows 64 bit
- Matlab R2018B
- Raspberry Pi Model 3 B (not +)
- server_v18.2.1 on Rapberry Pi
![]()
Update: disabling the windows fireall for private networks resolved the issue for R2018B
![]()
Check out youtube video ‘Request Timed Out Fix Windows 10/8/7’ this worked for me, without disabling the firewall
![]()
Hi, I am having the same problem. Desactivating the firewalls does not work for me and continueing the video «Request Timed Out Fix Windows 10/8/7» give me error because I am connected with WIFI to Internet I think.
Any other suggestion to try to solve this problem?
Thank you!
![]()
It appears that the Matlab Server running on the PI pings the host computer every 5-7 seconds as a heart beat. If these pings fail the Server on the PI closes the connection.
Allowing ping responces in the firewall for private networks seems to be the fix for this issue.
I am using Ruby 1.9.3 in my app server that is running on an AWS EC2 instance. I have my Postgres DB running on a separate EC2 instance but both instances are in the same security group. When m Ruby code connects to the DB, it uses the Sequel ORM gem ( http://sequel.rubyforge.org/ ) .
Now, I have configured that Postgres 9.1.4 DB to be able to accept connections properly from the app server instance.
However, every now and then, I noticed on the app server’s logs that it will have trouble connecting to the Postgres DB instance and I would see error messages like these :
PG::Error: could not receive data from server: Connection timed out
or
PG::Error: connection not open
So I went to the Postgres DB instance and looked in /var/log/postgresql/postgresql-9.1-main.log and I see a bunch of messages like these:
2012-11-07 08:15:17 UTC LOG:  could not receive data from client: Connection timed out
2012-11-07 08:15:17 UTC LOG:  unexpected EOF on client connection
I did searching around the web including stack overflow, and have made sure that my PostgreSQL does not have SSL enabled ( I have «ssl=off» inside my postgresql.conf file )
At this point, I am not exactly sure what exactly is the issue in the Postgres configuration. I do not what to mess with the maximum # of connections or maximum timeout values on my production server without a good proven reason.
The app server can connect to the DB most of the time, and this problem only shows up intermittently.
On the Ruby-side, this is the error trace for «connection not open» when making the Postgres call :
PG::Error: connection not open
/var/lib/gems/1.9.1/gems/sequel-3.38.0/lib/sequel/adapters/postgres.rb:145:in `async_exec'
/var/lib/gems/1.9.1/gems/sequel-3.38.0/lib/sequel/adapters/postgres.rb:145:in `block in execute_query'
/var/lib/gems/1.9.1/gems/sequel-3.38.0/lib/sequel/database/logging.rb:33:in `log_yield'
/var/lib/gems/1.9.1/gems/sequel-3.38.0/lib/sequel/adapters/postgres.rb:145:in `execute_query'
/var/lib/gems/1.9.1/gems/sequel-3.38.0/lib/sequel/adapters/postgres.rb:132:in `block in execute'
/var/lib/gems/1.9.1/gems/sequel-3.38.0/lib/sequel/adapters/postgres.rb:111:in `check_disconnect_errors'
/var/lib/gems/1.9.1/gems/sequel-3.38.0/lib/sequel/adapters/postgres.rb:132:in `execute'
/var/lib/gems/1.9.1/gems/sequel-3.38.0/lib/sequel/adapters/postgres.rb:372:in `_execute'
/var/lib/gems/1.9.1/gems/sequel-3.38.0/lib/sequel/adapters/postgres.rb:234:in `block (2 levels) in execute'
/var/lib/gems/1.9.1/gems/sequel-3.38.0/lib/sequel/adapters/postgres.rb:379:in `check_database_errors'
/var/lib/gems/1.9.1/gems/sequel-3.38.0/lib/sequel/adapters/postgres.rb:234:in `block in execute'
/var/lib/gems/1.9.1/gems/sequel-3.38.0/lib/sequel/database/connecting.rb:229:in `block in synchronize'
/var/lib/gems/1.9.1/gems/sequel-3.38.0/lib/sequel/connection_pool/threaded.rb:105:in `hold'
/var/lib/gems/1.9.1/gems/sequel-3.38.0/lib/sequel/database/connecting.rb:229:in `synchronize'
/var/lib/gems/1.9.1/gems/sequel-3.38.0/lib/sequel/adapters/postgres.rb:234:in `execute'
/var/lib/gems/1.9.1/gems/sequel-3.38.0/lib/sequel/dataset/actions.rb:744:in `execute'
/var/lib/gems/1.9.1/gems/sequel-3.38.0/lib/sequel/adapters/postgres.rb:483:in `fetch_rows'
/var/lib/gems/1.9.1/gems/sequel-3.38.0/lib/sequel/model/base.rb:785:in `primary_key_lookup'
/var/lib/gems/1.9.1/gems/sequel-3.38.0/lib/sequel/model/base.rb:124:in `[]'
Similarly, this is the trace for «could not receive data from server» :
    PG::Error: could not receive data from server: Connection timed out
/var/lib/gems/1.9.1/gems/sequel-3.38.0/lib/sequel/adapters/postgres.rb:124:in `block'
/var/lib/gems/1.9.1/gems/sequel-3.38.0/lib/sequel/adapters/postgres.rb:124:in `ensure in check_disconnect_errors'
/var/lib/gems/1.9.1/gems/sequel-3.38.0/lib/sequel/adapters/postgres.rb:124:in `check_disconnect_errors'
/var/lib/gems/1.9.1/gems/sequel-3.38.0/lib/sequel/adapters/postgres.rb:132:in `execute'
/var/lib/gems/1.9.1/gems/sequel-3.38.0/lib/sequel/adapters/postgres.rb:372:in `_execute'
/var/lib/gems/1.9.1/gems/sequel-3.38.0/lib/sequel/adapters/postgres.rb:234:in `block (2 levels) in execute'
/var/lib/gems/1.9.1/gems/sequel-3.38.0/lib/sequel/adapters/postgres.rb:379:in `check_database_errors'
/var/lib/gems/1.9.1/gems/sequel-3.38.0/lib/sequel/adapters/postgres.rb:234:in `block in execute'
/var/lib/gems/1.9.1/gems/sequel-3.38.0/lib/sequel/database/connecting.rb:229:in `block in synchronize'
/var/lib/gems/1.9.1/gems/sequel-3.38.0/lib/sequel/connection_pool/threaded.rb:105:in `hold'
/var/lib/gems/1.9.1/gems/sequel-3.38.0/lib/sequel/database/connecting.rb:229:in `synchronize'
/var/lib/gems/1.9.1/gems/sequel-3.38.0/lib/sequel/adapters/postgres.rb:234:in `execute'
/var/lib/gems/1.9.1/gems/sequel-3.38.0/lib/sequel/dataset/actions.rb:744:in `execute'
/var/lib/gems/1.9.1/gems/sequel-3.38.0/lib/sequel/adapters/postgres.rb:483:in `fetch_rows'
/var/lib/gems/1.9.1/gems/sequel-3.38.0/lib/sequel/model/base.rb:785:in `primary_key_lookup'
/var/lib/gems/1.9.1/gems/sequel-3.38.0/lib/sequel/model/base.rb:124:in `[]'
I observed that if I have both the App server and the Postgres DB running on the same instance, then there are no connectivity issues, at least not yet. Maybe the Postgres is less lenient towards non-local DB connections?
Please let me know what I might have missed, I appreciate it!
IS