I have my project on GitHub at some location, git@github.com:myname/oldrep.git.
Now I want to push all my code to a new repository at some other location, git@github.com:newname/newrep.git.
I used the command:
git remote add origin git@github.com:myname/oldrep.git
but I am receiving this:
fatal: remote origin already exists.
![]()
vvvvv
21.1k17 gold badges46 silver badges66 bronze badges
asked Aug 3, 2009 at 11:32
![]()
uzumaki narutouzumaki naruto
6,8693 gold badges17 silver badges12 bronze badges
5
You are getting this error because «origin» is not available. «origin» is a convention not part of the command. «origin» is the local name of the remote repository.
For example you could also write:
git remote add myorigin git@github.com:myname/oldrep.git
git remote add testtest git@github.com:myname/oldrep.git
See the manual:
http://www.kernel.org/pub/software/scm/git/docs/git-remote.html
To remove a remote repository you enter:
git remote rm origin
Again «origin» is the name of the remote repository if you want to
remove the «upstream» remote:
git remote rm upstream
answered Aug 3, 2009 at 11:41
![]()
7
The previous solutions seem to ignore origin, and they only suggest to use another name. When you just want to use git push origin, keep reading.
The problem appears because a wrong order of Git configuration is followed. You might have already added a ‘git origin’ to your .git configuration.
You can change the remote origin in your Git configuration with the following line:
git remote set-url origin git@github.com:username/projectname.git
This command sets a new URL for the Git repository you want to push to.
Important is to fill in your own username and projectname
![]()
answered Apr 5, 2012 at 11:49
![]()
HoetmaaiersHoetmaaiers
3,3532 gold badges19 silver badges29 bronze badges
4
If you have mistakenly named the local name as «origin», you may remove it with the following:
git remote rm origin
answered Aug 13, 2010 at 11:45
![]()
ÖzgürÖzgür
7,9992 gold badges68 silver badges66 bronze badges
2
METHOD1->
Since origin already exist remove it.
git remote rm origin
git remote add origin https://github.com/USERNAME/REPOSITORY.git
METHOD2->
One can also change existing remote repository URL by ->git remote set-url
If you’re updating to use HTTPS
git remote set-url origin https://github.com/USERNAME/REPOSITORY.git
If you’re updating to use SSH
git remote set-url origin git@github.com:USERNAME/REPOSITORY.git
If trying to update a remote that doesn’t exist you will receive a error. So be careful of that.
METHOD3->
Use the git remote rename command to rename an existing remote.
An existing remote name, for example, origin.
git remote rename origin startpoint
# Change remote name from 'origin' to 'startpoint'
To verify remote’s new name->
git remote -v
If new to Git try this tutorial->
TRY GIT TUTORIAL
answered Jun 23, 2017 at 11:10
![]()
0
You can simply edit your configuration file in a text editor.
In the ~/.gitconfig you need to put in something like the following:
[user]
        name  = Uzumaki Naruto
        email = myname@example.com

[github]
        user = myname
        token = ff44ff8da195fee471eed6543b53f1ff
In the oldrep/.git/config file (in the configuration file of your repository):
[remote "github"]
        url = git@github.com:myname/oldrep.git
        push  = +refs/heads/*:refs/heads/*
        push  = +refs/tags/*:refs/tags/*
If there is a remote section in your repository’s configuration file, and the URL matches, you need only to add push configuration. If you use a public URL for fetching, you can put in the URL for pushing as ‘pushurl’ (warning: this requires the just-released Git version 1.6.4).
![]()
answered Aug 3, 2009 at 19:05
![]()
Jakub NarębskiJakub Narębski
301k65 gold badges219 silver badges230 bronze badges
I had the same issue, and here is how I fixed it, after doing some research:
- Download GitHub for Windows, or use something similar, which includes a shell.
- Open the
Git Shellfrom the task menu. This will open a power shell including Git commands. - In the shell, switch to your old repository, e.g.
cd C:pathtooldrepository. - Show the status of the old repository.
-
Type
git remote -vto get the remote path for fetch and push remote. If your local repository is connected to a remote, it will show something like this:origin https://user@bitbucket.org/team-or-user-name/myproject.git (fetch) origin https://user@bitbucket.org/team-or-user-name/myproject.git (push) -
If it’s not connected, it might show
originonly.
-
Now remove the remote repository from the local repository by using
git remote rm origin -
Check again with
git remote -v, as in step 4. It should showoriginonly, instead of the fetch and push path. -
Now that your old remote repository is disconnected, you can add the new remote repository. Use the following to connect to your new repository:
Note: In case you are using Bitbucket, you would create a project on Bitbucket first. After creation, Bitbucket will display all required Git commands to push your repository to remote, which look similar to the next code snippet. However, this works for other repositories as well.
cd /path/to/my/repo # If you haven't done that yet.
git remote add mynewrepo https://user@bitbucket.org/team-or-user-name/myproject.git
git push -u mynewrepo master # To push changes for the first time.
That’s it.
![]()
Dmitri
2,6382 gold badges23 silver badges40 bronze badges
answered Jan 23, 2014 at 13:28
![]()
MichaelMichael
3,9424 gold badges30 silver badges46 bronze badges
-
git remote rm origin -
git remote -v
It will not display any repository name -
git remote add origin git@github.com:username/myapp.git -
git push origin master
It will start the process and creating the new branch.
You can see your work is pushed to github.
![]()
answered Aug 10, 2018 at 10:54
![]()
devdev
1911 silver badge11 bronze badges
git remote rm origin
git remote add origin git@github.com:username/myapp.git
answered Apr 8, 2017 at 9:54
![]()
AayushiAayushi
77710 silver badges14 bronze badges
You don’t have to remove your existing «origin» remote, just use a name other than «origin» for your remote add, e.g.
git remote add github git@github.com:myname/oldrep.git
answered Feb 15, 2012 at 22:39
![]()
The below two commands should help set up.
git remote set-url origin https://github.com/USERNAME/NEW_REPO.git

git push --set-upstream origin main
![]()
buddemat
3,89612 gold badges23 silver badges47 bronze badges
answered Feb 1, 2022 at 20:07
![]()
Mansi ShahMansi Shah
1271 silver badge5 bronze badges
I had the same problem when I first set up using Bitbucket.
My problem was that I needed to change the word origin for something self-defined. I used the name of the application. So:
git remote add AppName https://someone@bitbucket.org/somewhere/something.git
![]()
answered Apr 9, 2014 at 9:44
![]()
Michael MurphyMichael Murphy
1,8512 gold badges17 silver badges21 bronze badges
You should change the name of the remote repository to something else.
git remote add origin git@github.com:myname/oldrep.git
to
git remote add neworigin git@github.com:myname/oldrep.git
I think this should work.
Yes, these are for repository init and adding a new remote. Just with a change of name.
![]()
answered May 3, 2014 at 14:49
![]()
nirvanastacknirvanastack
4552 gold badges5 silver badges13 bronze badges
You could also change the repository name you wish to push to in the REPOHOME/.git/config file
(where REPOHOME is the path to your local clone of the repository).
answered Aug 3, 2009 at 12:57
![]()
nolim1tnolim1t
3,9431 gold badge16 silver badges7 bronze badges
You need to check the origin and add if not exists.
if ! git config remote.origin.url >/dev/null; then
    git remote add origin git@github.com:john/doe.git
fi
Create file check.sh, paste the script update your git repository URL and run ./check.sh.
answered Jan 6, 2020 at 9:18
![]()
Madan SapkotaMadan Sapkota
24.5k11 gold badges112 silver badges117 bronze badges
This can also happen when you forget to make a first commit.
answered Jun 23, 2017 at 3:39
![]()
Clay MortonClay Morton
3352 silver badges15 bronze badges
I had the same issue but I found the solution to it. Basically «origin» is another name from where your project was cloned. Now the error
fatal: remote origin already exists.
LITERALLY means origin already exists. And hence to solve this issue, our goal should be to remove it.
For this purpose:
git remote rm origin
Now add it again
git remote add origin https://github.com/__enter your username here__/__your repositoryname.git__
This did fix my issue.
answered Oct 6, 2020 at 14:03
![]()
I just faced this issue myself and I just removed it by removing the origin.
the origin is removed by this command
git remote rm origin
if you’ve added the remote repo as origin try implementing this command.
![]()
lys
8192 gold badges10 silver badges33 bronze badges
answered Feb 25, 2021 at 7:58
![]()
Try to remove first existing origin, In order to see the which existing origin has registered with bash you can fire below command.
git remote -v
after you know the which version of origin has register with bash then you can remove existing origin by firing below command
git remote rm origin
Once you removed existing origin you can add new origin by firing below command in you case ..
git remote add origin git@github.com:myname/oldrep.git
Once you add your origin in git, then you can push your local commit to remote origin
git push -u origin --all
answered Jul 24, 2021 at 22:20
![]()
Step:1
git remote rm origin
Step:2
git remote add origin enter_your_repository_url
Example:
git remote add origin https://github.com/my_username/repository_name.git
answered May 6, 2020 at 5:48
![]()
if you want to create a new repository with the same project inside the github and the previous Remote is not allowing you to do that in that case First Delete That Repository on github then you simply need to delete the .git folder C:UsersShivaAndroidStudioProjectsyourprojectname.git delete that folder,(make sure you click on hidden file because this folder is hidden )
Also click on the minus(Remove button) from the android studio Setting->VersionControl
click here for removing the Version control from android And then you will be able to create new Repository.
answered Jun 3, 2020 at 13:24
![]()
Try this command it works for me.
rm -rf .git/
answered Jun 8, 2022 at 4:39
![]()
git remote rm origin
and then
git push -f
answered Mar 24, 2022 at 16:03
![]()
RasikhRasikh
111 silver badge2 bronze badges
3
Содержание
- Git Remote Add Upstream – fatal: remote upstream already exists
- 6 thoughts on “Git Remote Add Upstream – fatal: remote upstream already exists”
- How to fix ‘fatal: remote origin already exists’ Git error
- Learning objective
- What is the ‘fatal: remote origin already exists’ error?
- What is a remote origin in Git?
- Detect and fix errors 5x faster
- Resolving ‘fatal: remote origin already exists’
- 1. Remove the Existing Remote
- 2. Update the Existing Remote’s URL
- 3. Rename the Existing Remote
- How to prevent ‘fatal: remote origin already exists’
- K8s troubleshooting with Komodor
- Git error — Fatal: remote origin already exists and how to fix it
- «Remote origin already exists» error
- What is a remote repository?
- How does the «remote» tool work?
- “origin” is a convention, not a part of the `git remote` command
- Remote “origin” might’ve been configured if you cloned the repo
- Conclusion
- Learn from Nana, AWS Hero & CNCF Ambassador, how to enforce K8s best practices with Datree
- рџЌї Techworld with Nana: How to enforce Kubernetes best practices and prevent misconfigurations from reaching production. Watch now.
- Headingajsdajk jkahskjafhkasj khfsakjhf
Git Remote Add Upstream – fatal: remote upstream already exists
While attempting to add https://github.com/alanrenouf/vCheck-vSphere as an upstream something went awry and I was constantly presented with the error:
fatal: remote upstream already exists

OK, but when I tried to fetch the upstream it failed with:
fatal: ‘upstream’ does not appear to be a git repository

Being new to git this took a little while to figure out, but I thought I’d document it in case it would be helpful for someone else.
Inside a repository you can check your remote repositories configured with:
From which I could see that my fork was correctly configured with a URL, but not the upstream

This can be corrected with:
and confirmed with again:

Subsequently, I was able to fetch the upstream:

6 thoughts on “Git Remote Add Upstream – fatal: remote upstream already exists”
Thanks for posting this fix! I’ve been using GitHub for Windows and this seemingly undocumented issue has been annoying the hell out of me.
You are welcome. Glad it was of some use 🙂
Источник
How to fix ‘fatal: remote origin already exists’ Git error

Learning objective
What is the ‘fatal: remote origin already exists’ error?
fatal: remote origin already exists is a common Git error that occurs when you clone a repository from GitHub, or an external remote repository, into your local machine and then try to update the pointing origin URL to your own repository.
In the context of Kubernetes, the error can occur when you configure orchestrations to include Git repositories. For example, by using: git remote add origin [url].gits
fatal: remote origin already exists is caused by the cloned repository already having a URL configured. Specifically, a URL that leads to the original profile where the repository source is.
What is a remote origin in Git?
remote origin , as the name implies, is the place where code is stored remotely. It is the centralized server or zone where everyone pushes code to and pulls code from.
Remote repositories are versions of your project hosted on Git-compatible platforms such as GitHub, Bitbucket, GitLab, and Assembla. origin is the standard and generic handle that is used to associate the host site’s URL.
For example, you can have an alternative remote URL called dev , which then becomes the handle for a separate repository but for the same code.
When you run git remote -v , you will get a list of handles and associated URLs. So if you have different handlers for the same remote, the console output could look something like this:
This means that you can run the following command: git push dev master
The changes made will get pushed up to the master branch at the URL associated with dev and not origin .

Detect and fix errors 5x faster
Komodor monitors your entire K8s stack, identifies issues, and uncovers their root cause.
Resolving ‘fatal: remote origin already exists’
For most development environments, origin is the default handler used. Here are 3 ways to resolve fatal: remote origin already exists .
1. Remove the Existing Remote
remote refers to the hosted repository. origin is the pointer to where that remote is. Most of the time, origin is the only pointer there is on a local repository.
If you want to change the pointing URL attached to origin , you can remove the existing origin and then add it back in again with the correct URL.
To remove your handler, use the remove command on remote , followed by the handler name – which, in our case, is origin .
Here is an example: git remote remove origin
To check that handler is deleted properly, run the following: git remote -v
You will either get an empty list, or you will get a list of remote handlers that are currently attached to the project with origin removed from the list.
Now you can run git remote add origin [url].git without encountering the fatal: remote origin already exists error.
2. Update the Existing Remote’s URL
You are not always required to remove the origin handler from remote . An alternative way to solve fatal: remote origin already exists is to update the handler’s pointing URL.
To do this, you can use the set-url command, followed by the handler name (which is origin in our case) and the new URL.
Here is the syntax for updating an existing origin URL: git remote set-url origin [new-url]
Once this is completed, you can now push and pull code from the newly configured Git repository location.
3. Rename the Existing Remote
Alternatively, you can rename origin to something else. This means that instead of deleting the handler’s pointing URL to make room for the new one, you can rename it and keep the original details.
To do this, use the rename command on: remote .
For example, if you want to rename origin to dev , you can use the following command: git remote rename origin dev
Now when you run git remote -v , you will get dev as the handler instead of origin .
This will give you room to add a new origin to the list of attached handlers. So when you run git remote add origin [url].git , you will no longer get the fatal: remote origin already exists error prompt.
How to prevent ‘fatal: remote origin already exists’
To prevent fatal: remote origin already exists error from occurring, you can check if the origin handler already exists. If it does not, running the git add remote origin command should not produce this issue.
The most important thing to note here is that origin is only a handler’s short name. It is a reference to the URL, which is where the actual remote repository is hosted.
The handler origin just happens to be the standardized default. This is what makes fatal: remote origin already exists so common. The error itself can occur against any handler, provided that it has the same placeholder name.
To check if origin even exists, run git remote -v to get a list of current remote handlers and the associated URLs.
If origin exists, you can do one of the following:
- remove origin from the remote list via remove command, like so: git remote remove origin
- update origin pointing URL with set-url , like so: git remote set-url origin [new-url]
- rename the existing origin handler to something else via rename command: git remote rename origin [new-name]
K8s troubleshooting with Komodor
We hope that the guide above helps you better understand the troubleshooting steps you need to take in order to fix the fatal: remote origin already exists error.
Keep in mind that this is just one of many Git errors that can pop up in your k8s logs and cause the system to fail. Due to the complex and distributed nature of k8s,
the search for the root cause of each such failure can be stressful, disorienting and time-consuming.
This is why we created Komodor, which acts as a single source of truth (SSOT) to streamline and shorten your k8s troubleshooting processes. Among other features, it offers:
Источник
Git error — Fatal: remote origin already exists and how to fix it


![]()
«Remote origin already exists» error
The error `fatal: remote origin already exists` is caused when you attempt to create a link to a remote repository called “origin” when a remote link with that name is already configured.
The solution is to update the URL of the remote repository with the name “origin” to the URL of the remote repository you want to add, instead of trying to create a new remote repository with that name.
You can do that with this command:
‍
It’s possible to inadvertently configure your local repository wrong if you don’t totally get what the commands that you’re running mean, or if you cloned a repository that already has a remote with the name “origin” configured.
To help you avoid making this mistake again, let’s unpack the concept of remote repositories a little. This error is usually caused by misunderstanding one of several things: what a remote repository is, how the `remote` command works, or more specifically what “origin” part of these commands means.
What is a remote repository?
To understand what a remote repository is, it’s important to first understand that Git stores and operates on your data in your local file system. In fact, Git is referred to as a distributed version control system because the source code is stored, or distributed, locally across any number of computers and servers. This is different from many of the source control tools that preceded Git.
Those tools were known as centralized version control systems (SVN or Subversion are the most well known examples), and they only operated on data hosted on a server by uploading changes in real time.
This meant that everybody always had access to the same data, because they were all working from the same server, but changes were slow to update and relied on a stable internet connection at all times.
Because all work stored in a Git repository lives in your local file system, source control operations are blazing fast and don’t require an internet connection, since you don’t upload each change to a server as it happens. The tradeoff is that your code isn’t easily accessible to others, so you need to regularly upload your changes to a server in order for other people to access them.
This is where remote repositories, or remotes, come in. A remote repository is a Git repository that lives on a server and is set up to be a mirror of your local work. Every time you run the `git push` command, you push your latest changes into that remote repository. Then, when somebody pulls from that remote repository, they receive your changes and end up with the same code you have.
This means that your code usually lives in multiple places — in your local Git repository, in the remote one living on the server (GitHub is the most well known server), and in the file system of anybody else who has downloaded your work from the remote repository into a local repository of their own.
In a nutshell, a remote repository is where you upload your locally stored changes so that others can access them.
Now that we’ve covered what a remote repository is and why it’s necessary, it’s time to talk about how you can attach one to your local repository. Usually, this isn’t something that happens automatically — you need to configure remotes by hand
Git’s `remote` tool provides a number of commands to configure remotes: add, remove, rename, etc. You can read the full documentation here, but for the purposes of solving the error this article is about, we are going to be most concerned with “add”, “remove”, and “reset-url”.
Let’s cover the few specific use-cases relevant to us briefly below:
git remote add is going to be the most commonly used command. This is how you can attach a remote to your repository. It associates the “url” parameter with the “name” you pass in. Looks like this, as you probably already know:
git remote remove is pretty self-explanatory, and is also used frequently. If you don’t want to have a particular remote attached to your repository, just pass its name to this command and that remote will be completely removed. It won’t persist in history, caching or anywhere else:
In theory, you could remove the `origin` remote and then re-add it, but instead of doing that in two steps, you can actually knock it out in just one with the `set-url` command that I showed you at the top of this article. In one step, this command will update the URL of a repository for the given name you pass in.
Just for an example, if we were to list the remotes with `git remote —verbose` before and after running this command, they might look like this:
Let’s run the `set-url` command:
‍
And looking at the list again:
“origin” is a convention, not a part of the `git remote` command
It’s worth noting that using “origin” for the name of your default remote repository is simply a convention — you could name your default remote “cheese” for all the difference it would make.
It’s frustrating, because this convention is actually the primary source of remote naming errors. At first glance it’s not obvious whether “origin” is part of the `git remote` command or just a parameter, a misconception that is further supported by the wording of the Git error: it’s not obvious that “origin” is a parameter, and not a part of the failing command.
And yes, this means that the error thrown at the top of the article could just as easily read “fatal: remote cheese already exists.”
Remote “origin” might’ve been configured if you cloned the repo
Since “origin” is such a common convention, there’s a good chance that any repository you clone already has a remote configured with this name, because remotes are included when a repository is cloned.‍
Cloning a repository and trying to add your own remote server to “origin” without realizing that that name is already in use is a very common way this error is caused. And again — the solution is to use `git remote set-url` instead of `git remote add`.
Conclusion
As I mentioned at the beginning of this article, we broke down the concept of remote repositories in Git and went over a few of the most common commands that you’ll need to understand in order to use them properly. For further reading, you can find formal documentation on the `git remote` command here.
Nota bene: It’s easy to just copy and paste random bits of code that you find on Google to quickly fix the error, but generally speaking it’s much more useful to understand the underlying concepts so that you don’t have to keep Googling the same commands over and over again. So, if anything is still confusing, I’d encourage you to re-read this article and dig into the documentation linked above, as well as try out the examples and everything else you find for yourself.В
I hope this helps, and good luck!
Learn from Nana, AWS Hero & CNCF Ambassador, how to enforce K8s best practices with Datree
рџЌї Techworld with Nana: How to enforce Kubernetes best practices and prevent misconfigurations from reaching production. Watch now.
Headingajsdajk jkahskjafhkasj khfsakjhf
Lorem ipsum dolor sit amet, consectetur adipiscing elit. Suspendisse varius enim in eros elementum tristique. Duis cursus, mi quis viverra ornare, eros dolor interdum nulla, ut commodo diam libero vitae erat. Aenean faucibus nibh et justo cursus id rutrum lorem imperdiet. Nunc ut sem vitae risus tristique posuere.
Источник
Introduction
Most of the content is written in GitHub Flavored Markdown with some metadata (or variables) found in YAML files. Everything is stored on a GitHub repository: https://github.com/galaxyproject/training-material.
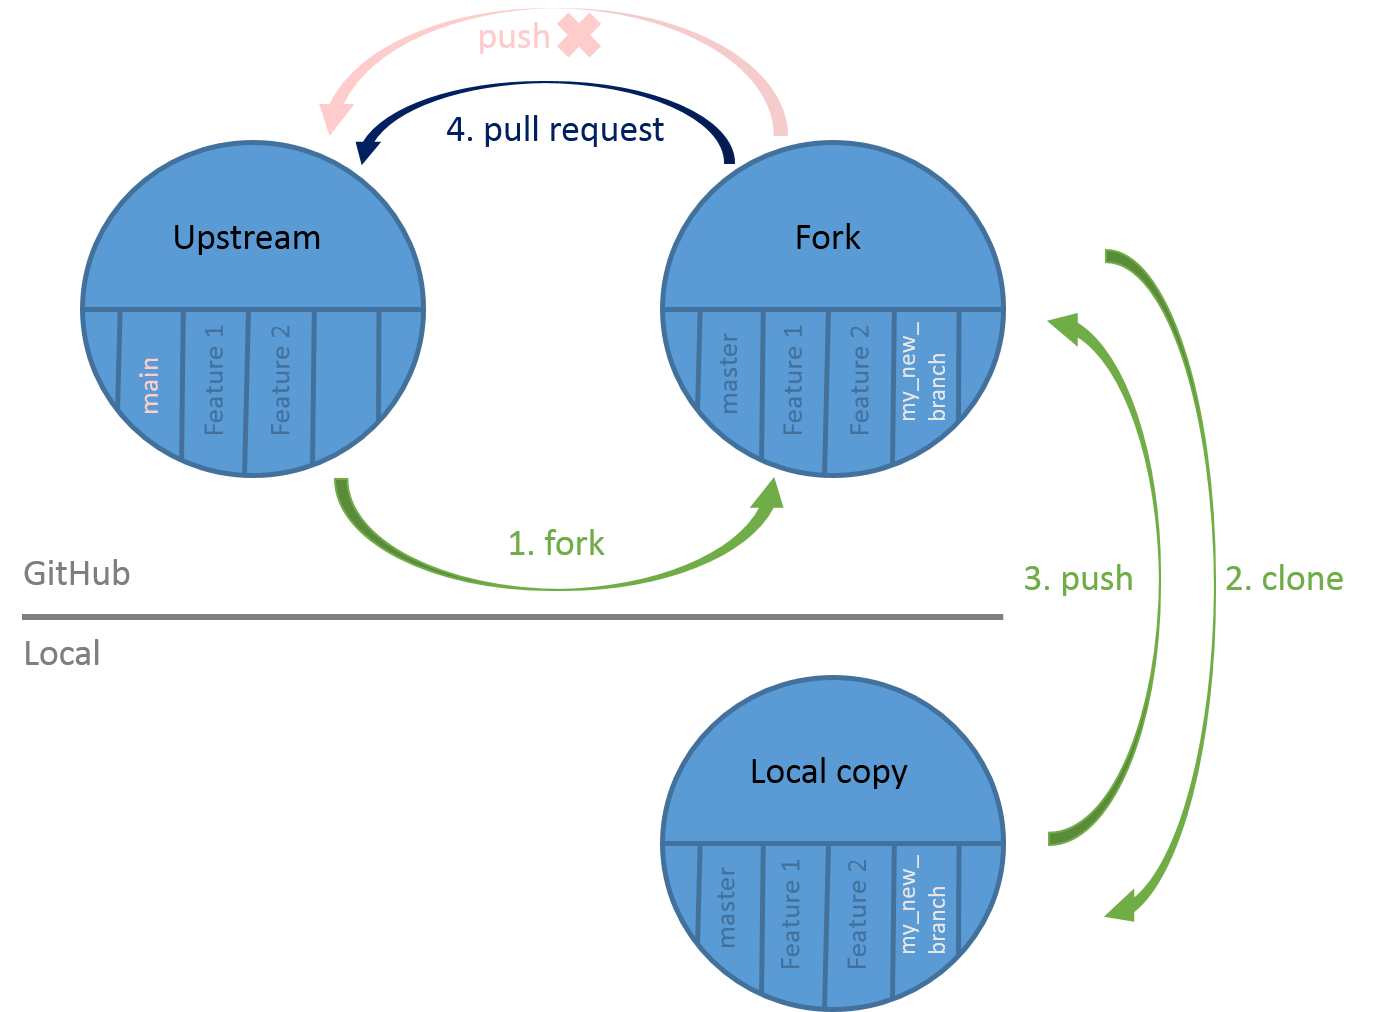
The process of development of new content is open and transparent, using git and following the GitHub flow:
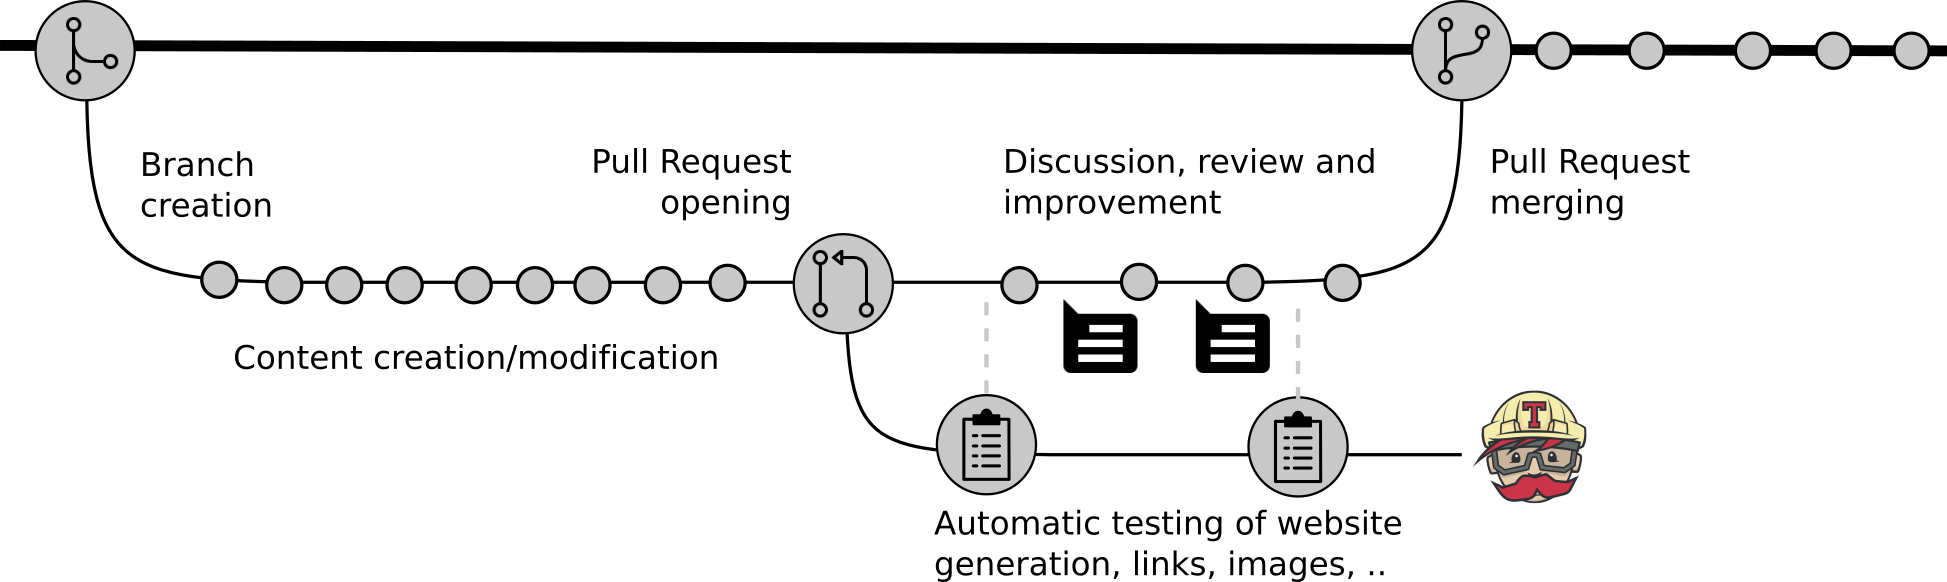
- Create a fork
- Clone your fork of this repository to create a local copy on your computer
- Create a new branch in your local copy for each significant change
- Commit the changes in that branch
- Push that branch to your fork on GitHub
- Submit a pull request from that branch to the original repository
- If you receive feedback, make changes in your local clone and push them to your branch on GitHub: the pull request will update automatically
- Pull requests will be merged by the training team members after at least one other person has reviewed the Pull request and approved it.
Agenda
In this tutorial, you will learn how to contribute to the GitHub repository:
- Introduction
- Create a fork of this repository on GitHub
- Clone the GitHub repository on your computer
- Create a new branch
- Make your changes on this branch
- Push your branch on your GitHub repository
- Open a pull request
- Make the requested changes
- Check the automatic tests
- Stay up to date
- Close the Pull Request
- Conclusion
Create a fork of this repository on GitHub
A fork is a copy of a repository. Forking a repository allows you to freely experiment with changes without affecting the original project:
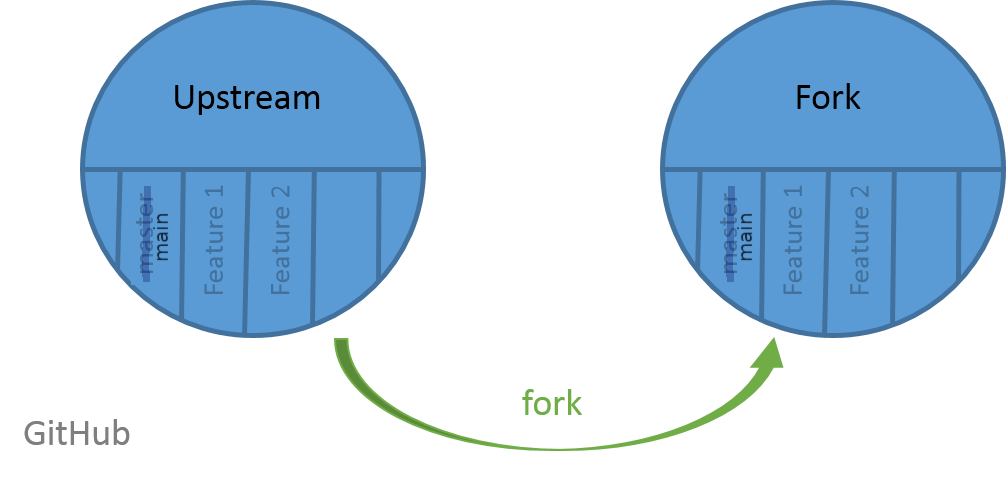
Forking a repository is a simple two-step process:
Hands-on: Fork the repository
- Go on the GitHub repository: https://github.com/galaxyproject/training-material
Click on Fork (top-right corner of the page)

Clone the GitHub repository on your computer
To modify the content of the repository, you need a copy of it on your computer. This step of importing a git repository is called “cloning”:
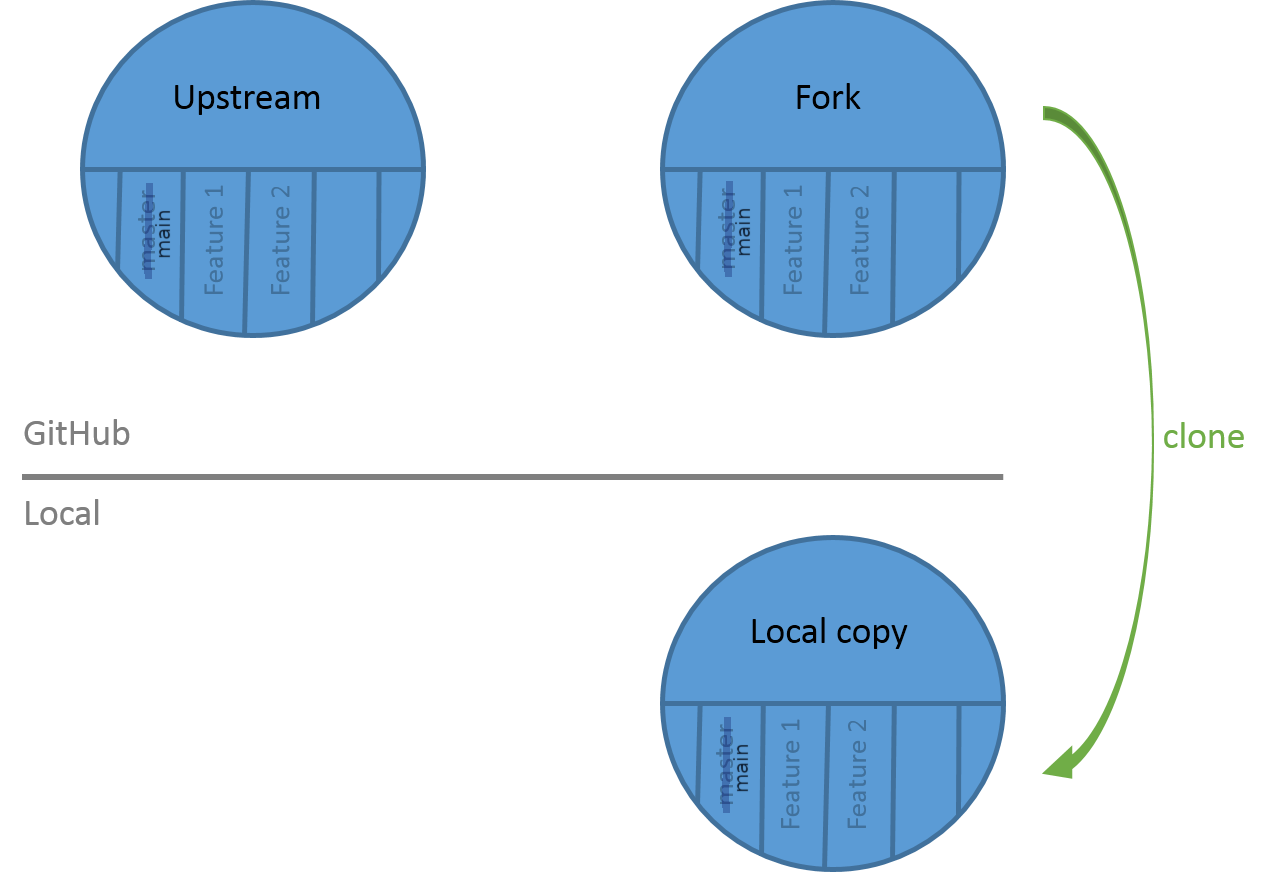
Hands-on: Clone the GitHub repository
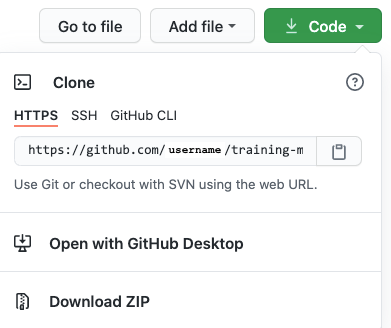
- Get the URL of your fork. You can find this on the main page of your fork under the green button:
Click on Code (right)
Copy the URL
It should be something like
https://github.com/< Your GitHub Username >/training-material.git- Open a terminal
- Navigate with
cdto the folder in which you will clone the repositoryClone the repository with the command:
$ git clone https://github.com/< Your GitHub Username >/training-material.gitNavigate to the repository
Create a new branch
You have now your repository locally and you want to modify it. For this example tutorial, you will add yourself as contributor of the project to appear on the Hall of Fame.
In GitHub flow, there is a concept: one new feature or change = one branch.
When you’re working on a project, you’re going to have a bunch of different features or ideas in progress at any given time – some of which are ready to go, and others which are not. Branching exists to help you manage this workflow. You should develop different features on different branches to help keep the changes you make simple and easy to review.

Here for this tutorial, you will create a branch called “my_new_branch” in which you will modify the CONTRIBUTORS.yaml file, the file used to generate the Hall of Fame.
Hands-on: Create a branch
List the existing branch
The branch on which you are is shown with the
*Create a new branch
$ git checkout -b my_new_branch
Switched to a new branch 'my_new_branch'
List the existing branch to check that the branch has been created and you are now on it
This branch is added to your local copy:

Make your changes on this branch
You have created your first branch! Now you want to make the change in the CONTRIBUTING.yaml file. By changing a file in this branch, it will diverge from the main branch. It will contain data that is only on this new branch:

Hands-on: Make changes in a branch
- Open with your favorite text editor the
CONTRIBUTORS.yamlfile that is on your computerAdd yourself in the
CONTRIBUTORS.yamlfileYou should use your GitHub username and add it followed by
:at the correct position given the alphabetical order- Save the file
Check the changes you made
$ git status
On branch my_new_branch
Changes not staged for commit:
  (use "git add/rm <file>..." to update what will be committed)
  (use "git checkout -- <file>..." to discard changes in working directory)

    modified:   CONTRIBUTORS.yaml

no changes added to commit (use "git add" and/or "git commit -a")
Add the file and commit the changes
$ git add CONTRIBUTORS.yaml $ git commit -m "Add ..."- Check that there are no more changes to commit with
git status
Push your branch on your GitHub repository
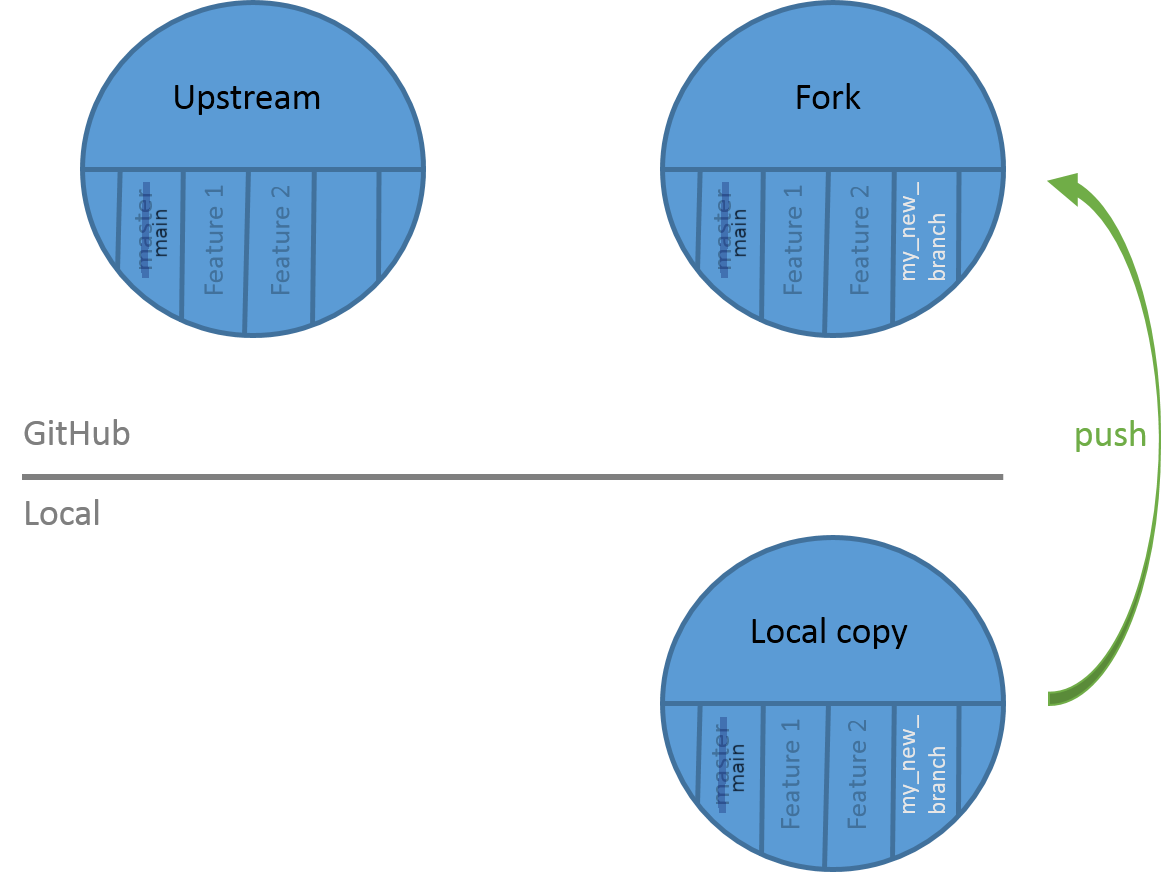
The changes you made on your branch are only on the local copy of the repository. To propagate them online, you need to push them on your fork on GitHub:
Hands-on: Push the changes
Push the changes to the GitHub repository
$ git push origin my_new_branchWhen you
git pushed, you specifiedorigin. Git repositories can know that forks exist in multiple places. When you clone one, it creates a “remote” (a remote repository) which it namesorigin, set to the URL that you used when you cloned. By having multiple remotes, you can manage more complex workflows.- Go to your GitHub repository
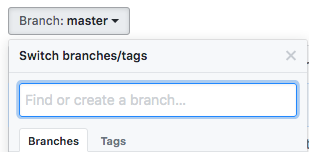
- Change to the “my_new_branch” branch:
Click on Branch: main (left)
Select the branch “my_new_branch”
- Check that your name is in the
CONTRIBUTORS.yamlfile
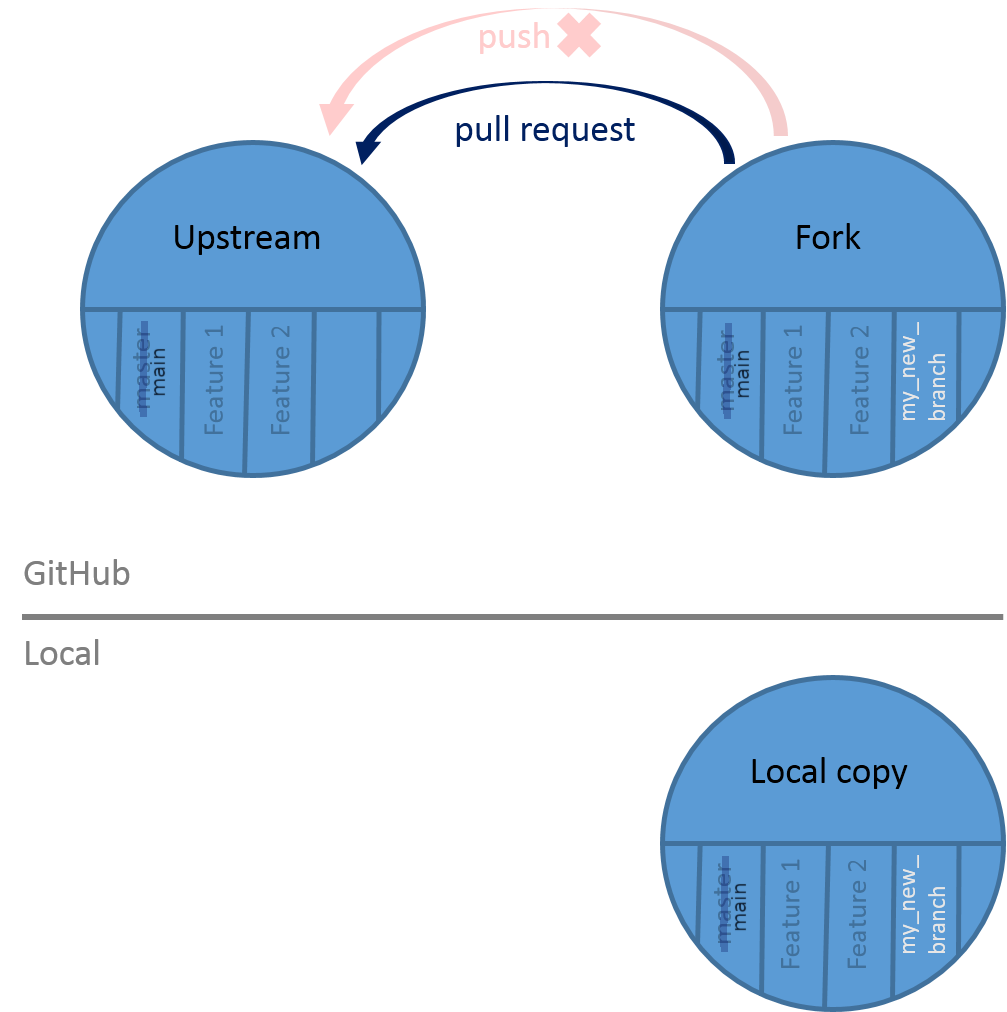
Open a pull request
You pushed your changes to GitHub, but currently they are only on your fork. You want to have these changes in the main GitHub repository in order to appear on our Hall of Fame online. You can’t add or push directly the main GitHub repository, so you need to create what we call a pull request:
Hands-on: Create a pull request
- Go to your GitHub repository
Click on Compare & pull request
Check that the selected branch are correct: main on the left and your branch name on the right
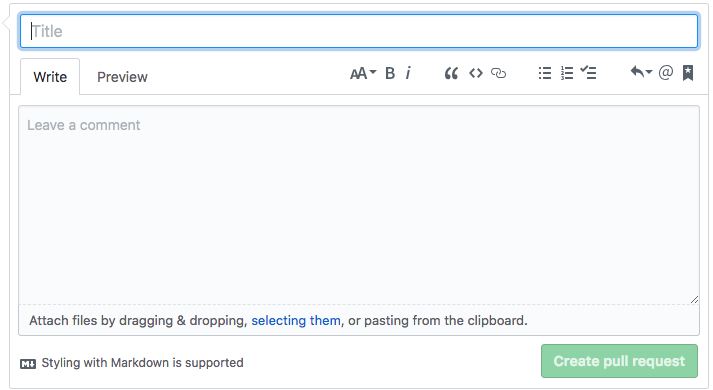
Fill in the pull request description
- Add a title for the Pull Request
- Add a message explaining the changes you made (Be kind )
- Click on Create pull request
- Go to Pull requests to check if it is there


Once the pull is open, it will be reviewed. There are two possible outcomes:
- Your pull request is accepted. Congratulations! Your changes will be merged into the main branch of the original repository. The website will be re-built and you will be in the Hall of Fame
- Your pull request needs modifications: the reviewers will ask for some changes, possibly because the automatic tests are failing.
Make the requested changes
One of the reviewers of your pull request asked you to add your name after your GitHub username in the CONTRIBUTORS.yaml file
Hands-on: Make further changes
Make the requested changes in the
CONTRIBUTORS.yamlfileIt should look like
bebatut:
     name: Bérénice Batut
Check the changes that you made
$ git status
On branch my_new_branch
Changes not staged for commit:
  (use "git add/rm <file>..." to update what will be committed)
  (use "git checkout -- <file>..." to discard changes in working directory)

    modified:   CONTRIBUTORS.yaml

no changes added to commit (use "git add" and/or "git commit -a")
Add the file and commit the changes
$ git add CONTRIBUTORS.yaml $ git commit -m "Add ..."- Check that there are no more changes to commit with
git statusPush the new changes to GitHub
$ git push origin my_new_branchThe pull request should be automatically updated
- Check that the new changes are added to the pull request on GitHub
Check the automatic tests
When a pull request is opened, some automated tests are automatically launched on Travis to be sure that the changes do not break the website, the URL are valid, etc.
On the bottom of your pull request, you can see the status of the tests:
-
Yellow (with circle)

The tests are still running
-
Red (with cross)
When it is red, you can investigate why by clicking on Details. You will be redirected on Travis where you can see the logs of the tests. Get in touch with us on Gitter if you need help to understand the issue.
-
Green (with tick)
The tests passed. Good job!
Even it is green, we recommend to check the result of the tests, as some of tests are allowed to fail (to avoid too much noise).


Stay up to date
You now want to work on a new tutorial or make some other new changes. However since you get a local copy, some changes have happened to the original GitHub repository. You need then to update your local copy of the repository before changing anything.
Hands-on: Update the local copy
Move to the
mainbranchAdd a reference to the original GitHub repository
$ git remote add upstream https://github.com/galaxyproject/training-material.gitUpdate the local copy of the repository by “pulling” in the content of the original GitHub repository
You can now restart the GitHub flow to propose new changes: start by creating a new branch.
Close the Pull Request
Great! You now know how to make pull request on GitHub, and how to make changes after a review.
Reviewers can now approve and merge your pull request.
Because this was just a practice pull request, let’s close it again.
Hands-on: Close the Pull Request
Once you have run through all these steps, please close the pull request again.
- Go to the list of pull request tab on GitHub
- Click on your pull request
- Scroll to the bottom of the page
- Click on “Close pull request” button
Whenever you add your first real contribution, you can add yourself to the
CONTRIBUTORS.yamlfile in that PR.
Conclusion
With this tutorial, you have learned some basics git commands and principles:
You also learned the GitHub flow and its cycle:
- Create a new branch in your local copy
- Commit the changes in that branch
- Push that branch to your fork on GitHub
- Submit a pull request from that branch to the main repository
- Wait for feedbacks and make requested changes
- Update your local copy
- Restart the cycle
You can now contribute and help us to improve our tutorials!
This tutorial was a quick introduction to explain the basics of contributing to the training material. We recommend that everyone follow a more detailed git tutorials:
- Software Carpentry tutorial which explains a bit more in detail some git commands and the concept of remote, local and stagging
- Learn Git Branching by GitHub to test the different git commands
You should also download, print and keep always with you the Git Cheat Sheet
Key points
Work on your fork
1 branch = 1 feature
1 pull request = 1 branch
Be careful of the branch you’re working on
Check the automated tests
Frequently Asked Questions
Have questions about this tutorial? Check out the tutorial FAQ page or the FAQ page for the Contributing to the Galaxy Training Material topic to see if your question is listed there.
If not, please ask your question on the GTN Gitter Channel or the
Galaxy Help Forum
Feedback
Did you use this material as an instructor? Feel free to give us feedback on how it went.
Did you use this material as a learner or student? Click the form below to leave feedback.

Citing this Tutorial
- Cyril Monjeaud, Bérénice Batut, Contributing with GitHub via command-line (Galaxy Training Materials). https://training.galaxyproject.org/training-material/topics/contributing/tutorials/github-command-line-contribution/tutorial.html Online; accessed TODAY
- Batut et al., 2018 Community-Driven Data Analysis Training for Biology Cell Systems 10.1016/j.cels.2018.05.012
@misc{contributing-github-command-line-contribution,
author = "Cyril Monjeaud and Bérénice Batut",
title = "Contributing with GitHub via command-line (Galaxy Training Materials)",
year = "",
month = "",
day = ""
url = "url{https://training.galaxyproject.org/training-material/topics/contributing/tutorials/github-command-line-contribution/tutorial.html}",
note = "[Online; accessed TODAY]"
}
@article{Hiltemann_2023,
	doi = {10.1371/journal.pcbi.1010752},
	url = {https://doi.org/10.1371%2Fjournal.pcbi.1010752},
	year = 2023,
	month = {jan},
	publisher = {Public Library of Science ({PLoS})},
	volume = {19},
	number = {1},
	pages = {e1010752},
	author = {Saskia Hiltemann and Helena Rasche and Simon Gladman and Hans-Rudolf Hotz and Delphine Larivi{`{e}}re and Daniel Blankenberg and Pratik D. Jagtap and Thomas Wollmann and Anthony Bretaudeau and Nadia Gou{'{e}} and Timothy J. Griffin and Coline Royaux and Yvan Le Bras and Subina Mehta and Anna Syme and Frederik Coppens and Bert Droesbeke and Nicola Soranzo and Wendi Bacon and Fotis Psomopoulos and Crist{'{o}}bal Gallardo-Alba and John Davis and Melanie Christine Föll and Matthias Fahrner and Maria A. Doyle and Beatriz Serrano-Solano and Anne Claire Fouilloux and Peter van Heusden and Wolfgang Maier and Dave Clements and Florian Heyl and Björn Grüning and B{'{e}}r{'{e}}nice Batut and},
	editor = {Francis Ouellette},
	title = {Galaxy Training: A powerful framework for teaching!},
	journal = {PLoS Comput Biol} Computational Biology}
}
Congratulations on successfully completing this tutorial!
Developing GTN training material
This tutorial is part of a series to develop GTN training material, feel free to also look at:
- Creating a new tutorial
- Contributing with GitHub via command-line
- Overview of the Galaxy Training Material
- Creating Slides
- Creating content in Markdown
- Adding Quizzes to your Tutorial
- Principles of learning and how they apply to training and teaching
- Design and plan session, course, materials
- Including a new topic
- Contributing with GitHub via its interface
- Teaching Python
- Creating Interactive Galaxy Tours
- Updating diffs in admin training
- GTN Metadata
- Tools, Data, and Workflows for tutorials
- Running the GTN website online using GitPod
- Running the GTN website locally
- Adding auto-generated video to your slides
- Generating PDF artefacts of the website
“fatal: remote origin already exists” problem, you get this git error when you try to create a link to a remote repository called “origin” when another remote repository with that name already exists.
The answer is to alter the URL of the remote repository with the name “origin” to the URL of the remote repository you want to add, rather than trying to establish a new remote repository with the name “origin.”
You can do so with the following command:
git remote set-url origin https://github.com/your/repository You may configure your local repository wrong if you don’t completely comprehend the instructions you’re doing, or if you cloned a repository that already has a remote with the name “origin” configured.
Let’s take a closer look at remote repositories so you don’t make the same mistake again. The most typical cause of this problem is a misunderstanding of one or more of the following: what a remote repository is, how the remote command works, or, more specifically, what the “origin” aspect of these instructions means.
Why Does the «Remote Origin Already Exists» Error Occur?
Consider the following scenario: You’re working through a Git instruction that you discovered online. So far, everything has gone smoothly. Then you come upon a line that looks like this:
git remote add origin <Your-URL>/<Your-REPOSITORY-NAME>.git When you try to run the command above, you get the dreaded error message:
fatal: remote origin already exists. This message is actually quite simple to comprehend. Git does not have a central server, unlike centralized VCSs. Remote repositories, or simply remotes, are what we call them in Git. Remotes are repositories to which you may have read and/or write permissions.
These are normally located on machines other than your own, and you can connect to them using SSH or HTTP. Keep in mind that, despite their name, remotes aren’t always found on remote machines: local remotes, although sounding like an oxymoron, are entirely feasible.
Remotes have names to help you recognise them, and you can have as many as you need or wish per repository. You can’t have two remotes with the same name, though. So, if you try to add a remote with the same name as an existing remote, you’ll get an error message. A fatal blunder.
If you wish to double-check if the remote called origin exists, use the following command:
This will cause your Git to display a list of all available remotes for the current repository. If you want extra information, use the verbose parameter with the remote command, such as this:
This will yield the names of each remote as well as their URLs:
origin	https://github.com/your/repository (fetch)
origin	https://github.com/your/repository (push)
By the way, the phrase “origin” will not always appear in the message. Assume you’re trying to add a codeleaks remote, but there’s already one with that name. The error message in this scenario would be:
fatal: remote codeleaks already exists. The default remote is called origin, just like the default branch in Git is called controller—though that could change in the near future—but you can call it anything you want as long as it’s a legal Git name.
Four Approaches to Resolving the «Remote Origin Already Exists» Error
After explaining why, the error notice appears, we’ll go over some of the possible strategies for resolving the issue. Keep in mind that the remedy you choose will be dependent on your individual situation because this problem can occur in a variety of ways.
Approach 01: Remove the Remote that already exists
The first example we’ll look at is when a remote called origin already exists, but it’s the wrong remote for whatever reason. Let’s pretend you were previously using GitLab to store your online repositories and then switched to GitHub (or vice versa). You could do so by following the instructions below:
- Using GitHub or GitLab, create a newbit online repository.
- Remove the existing origin remote from your local repository.
- Assign the correct origin remote to the new online repository.
- Your code will be pushed to the new origin.
If you omit step #2 for whatever reason, Git will display the “remote origin already exists” message. As a result, simply deleting the existing remote could be a viable option:
As previously stated, origin is simply a term for a distant. For you, it could be a different name. You can use the Git remote command, which you saw before, to verify that the remote has been destroyed. After that, if everything looks good, you can proceed to adding the chosen remote.
Approach 02: Update the URL of Existing Remote
We just showed you how to remove an existing remote, so perhaps you can install a new one with the correct URL this time. However, you may believe that removing the remote and re-adding it with a different link will have a result that is eerily similar to changing the URL of the original remote. Of course, if that’s the case, you’re correct.
So, let’s see how we can get the same outcome as we did in the previous section, but in a shorter amount of time. You only need to use one command:
git remote set-url <REMOTE-NAME> <NEW-URL> We’ve already mentioned that we’ll be talking about origin throughout this post, but there’s nothing stopping you from using whatever remote names you choose. So, using origin as the remote name and a URL to a real repo, a complete example may look like this:
git remote set-url origin https://github.com/git/git.git Approach 03: Rename the Remote that already exists
Let’s imagine you already have a remote called origin for any reason. You’d want to add a new origin, but you’d like to maintain the previous one as well. What would you do if you had to do it?
Easy. Before you add the new remote, rename the old one. All you have to do now is run the following command:
git remote rename <old-name> <new-name> Let’s imagine you wish to rename your backup remote to origin remote. You’d simply take off:
git remote rename origin backup Then you can add your new remote called origin as usual, and the “remote origin already exists” error should be gone.
Approach 04: Don’t need to do Anything
I promise you, this isn’t a joke. But here’s the deal: When following a tutorial with a step that asks you to add a remote called origin, you may get the “remote origin already exists” issue. If you try to run the command and receive an error message, it’s possible you’ve previously done it and aren’t aware of it.
You can use the Git remote command with the verbose option to see if that’s the case, as we’ve seen before:
You’ll be able to see all of the existing remotes, as well as the URLs they link to. If the existing remote already has the same URL as the tutorial, your repo is ready to use and there is no need to do anything else.
«Remote Origin Already Exists» Nothing to get Panic
Git is a must-have in the toolkit of any modern software engineer. Unfortunately, many engineers regard Git as a difficult technology to master. Those assertions include some truth.
Though the most common Git commands are simple to learn and understand, you may come into a particularly challenging component of the tool from time to time. You might, for example, receive a strange error message. Or you can be tripped up by the different ways Git allows you to go back and tweak things.
Conclusion
In conclusion, we discussed how to fix the git error fatal: remote origin already exists. We deconstructed the notion of Git remote repositories and went over a few of the most frequent commands you’ll need to know in order to use them effectively.
This article discusses how to resolve the issue git fatal: remote origin already exists error during the push or add commands.
Fix git fatal: remote origin already exists error on push
You must run the ‘git init’ command to enable git for any application or folder/directory.
Once git is initialized, we must either create a new repository or clone an existing repository to map this to the existing directory.
if this directory is created in the nested folder of any git repository, the git command throws git fatal: remote origin already exists error.

What does its origin mean?
This error comes during multiple use cases.
- created a local nested folder app, It is a child folder of a local git repository, these folders map to the new remote repository.
B:blogjswork>git remote add origin https://github.com/intkiran/react-auth0-login.git
fatal: remote origin already exists.
An error would
fatal: remote origin already exists.
From the above code, It creates an origin local name and adds it to an existing repository.
In any local repository, How do you know the remote repository url?
using the -v option gives the local name with a remote url as described following
And the output is
origin  https://github.com/intkiran/react-auth0-login.git (fetch)
origin  https://github.com/intkiran/react-auth0-login.git (push)
It gives the remote repository url mapped with the local name i.e origin.
Origin is the local name for the remote repository given by default.
This error occurs after adding a new url to the existing origin.
This post covers the solution for the following errors in the git command
- fatal: No such remote:
- Remote origin already exists on ‘git push’ to a new repository
There are many ways we can fix this.
Remove the original name from the given existing repository
First, delete the local name origin for a given remote repository using the following command.
next, add the original name to the new remote repository
git remote add origin remote-repo-url
set-url Change origin name from the given existing git repository
git remote set-url neworigin remote-repo-url
if remote-repo-url does not exist, it gives an error fatal: No such remote:.
Replace current origin with new url in Git
below set the new url for the local name origin.
git remote set-url origin remote-repo-url
rename existing origin name in Git
The last approach is to rename the existing origin to the new name
git remote rename origin neworigin
Finally, Verify the name mapped to the URLs using the below command.
wrap
There are many ways we can fix these errors with the above solutions.