
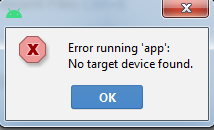
Error Running App — No Target Device Found
⛔️ Error running ‘app’: No target device found.
The above error you may get when trying to run your Android Application on IntelliJ Android Studio, it means that there is no device available to run your application. You would require either of the below two kinds of devices.
- 1. External Device: You need to connect an external physical Android device to your computer with Developer settings enabled, or,
- 2. Virtual Device: You need to have an AVD — Android Virtual device (an emulator) available.
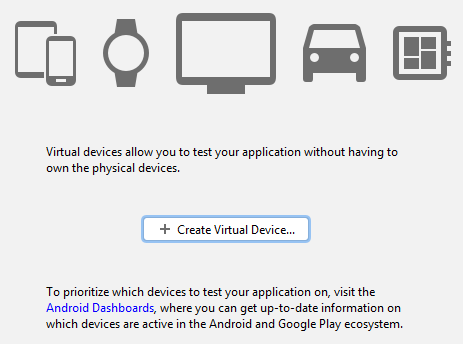
Let’s assume that you want to run the application on an AVD, you need to do the below steps,
- Click on Menu: Tools → AVD Manager
- Now click on + Create Virtual Device
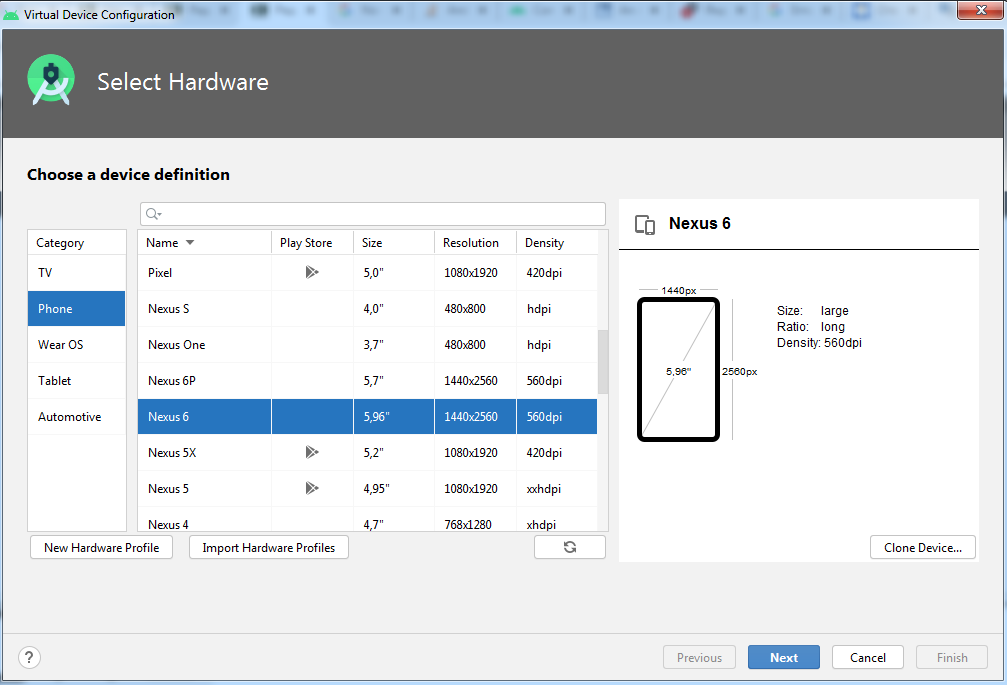
- You would see options like — Pixel XL, 3a XL Nexus e.t.c, select one of the devices and click Next.
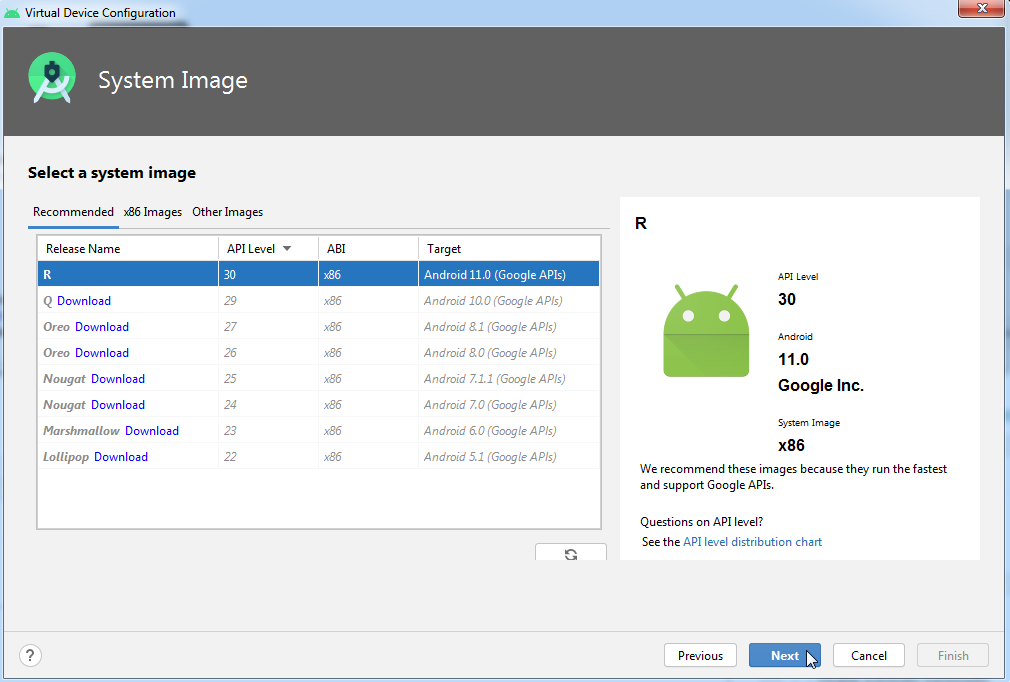
- On the Select a system image page you need to select an image — Note if the image is not earlier download you would need to do it — Recommend once are among R, Q, Oreo, Nougat
- You would now be taken to a new prompt Component installer that will download and install the image — not this would take a while depending on your internet speed. Once the installation completes click Finish.
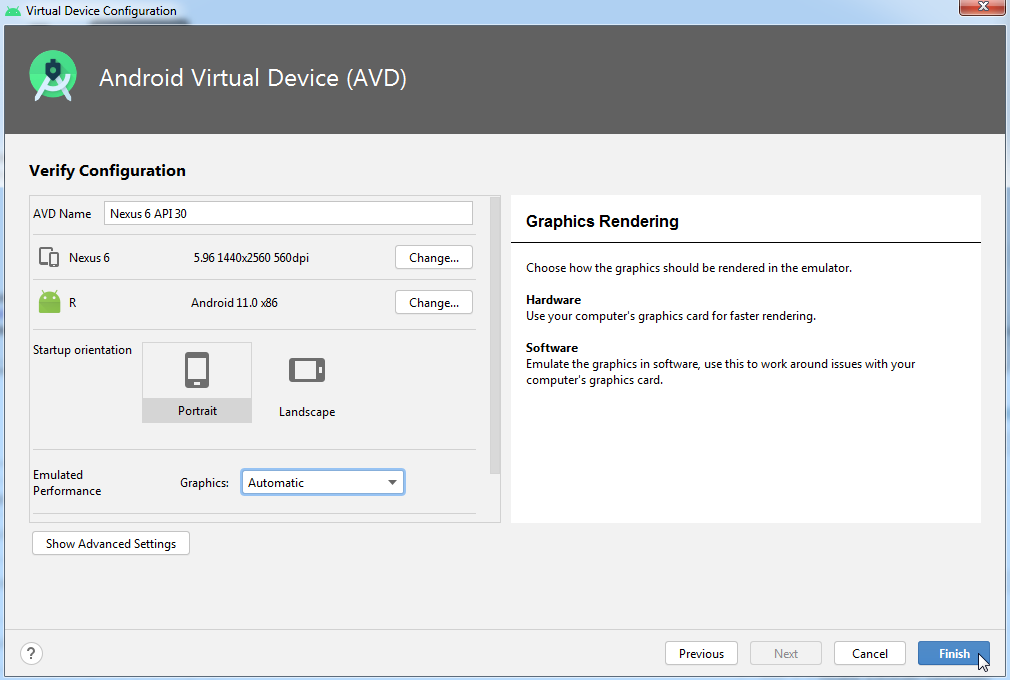
- Now select the AVD and click Next — You can provide a new to the AVD here and set standard mode — portrait or landscape e.t.c., now click Finish
- Now try to run your application. It should work!
Packages to install:
- Google APIs Intel x86 Atom System Image (system-images;android-R;google_apis;x86)

Preparing "Install Google APIs Intel x86 Atom System Image (revision: 4)".
Downloading https://dl.google.com/android/repository/sys-img/google_apis/x86-R_r04.zip
"Install Google APIs Intel x86 Atom System Image (revision: 4)" ready.
Installing Google APIs Intel x86 Atom System Image in
C:Usersc2cAppDataLocalAndroidSdksystem-imagesandroid-Rgoogle_apisx86
"Install Google APIs Intel x86 Atom System Image (revision: 4)" complete.
"Install Google APIs Intel x86 Atom System Image (revision: 4)" finished.Trying to run build an Android application and “Android studio no target device found” is the error that you are getting, then I am here to help you out.
This one is one of the common issues you would face while trying to build your first Android app. However, fixing the error is not as complicated as it seems.
The error simply means that no device can be used to run the Android app that you have built. So if you do provide Android Studio, a tool to run the Android app, you will get rid of the error.
Anyway, to make you understand better, let me just go ahead and share all the steps you have to follow to fix this no target device found error:

Step 1: Check If All The Essential Packages Are Installed Or Not
Before you fix the error, the first thing that we need to do is make sure that all the essential packages are installed.
So to check this, you will need to go ahead and follow these steps:
1. At first, launch Android Studio from your computer.
2. From the top navigation menu, go to the SDK manager.

3. Select the SDK tools tab.
4. Over here look, if the Android SDK Build-Tools, Android Emulator, Android SDK Platform-Tools, and Android SDK tools are installed or not.

5. If any of these packages are not fixed, do download them. Also, if there is any update, you can consider updating them as well.
Step 2: Create A Virtual Device
As the error says, no target device is found. Hence we have to create a target device. So Android studio can use it to run the Android app.
To create a virtual device, here are all the steps that you will need to follow:
1. From the Android Studio, go to Tools.
2. Then go to AVD Manager.
3. Over here, click on the “+Create Virtual Device” button.

4. Next, you will need to select “Nexus 5x”. Or you can choose any other device according to your preference and hit the Next button.

5. Then you will need to download your preferred Android version. For this tutorial, I have selected Nougat. However, you can download any of your favorite Android version and click on the Next button.

6. Next, give your AVD device a name or leave it as it is and hit the Finish button.

7. Then, wait for a couple of moments and let the virtual machine creation.
8. Once done, you can click on the build app button to run your Android app.

Final Words:
So that was the fix for the Android Studio no target device found an error. Now go ahead and try these steps out and see how they are working for you. Also, if you would like to ask or any problem that you are facing, then do feel free to comment below, and I will surely help you out with your query.
Also Check:
- Taskbar Won’t Hide In Fullscreen
- How to update TWRP recovery
Error running No target device found
Данная ошибка означает, что отсутствует устройство для отладки (можно подключить устройство по USB или скачать виртуальное устройство). Скачаем виртуальное устройство (перед этим не забудьте поставить в BIOS Virtualization Technology), для этого заходим Tools далее AVD Manager

И создаем виртуальное устройство Create Virtual Device
Virtual Device Configuration выбираем устройство по вкусу, далее Next
Выбираем API Level и далее Next
Настраиваем и жмем Finish
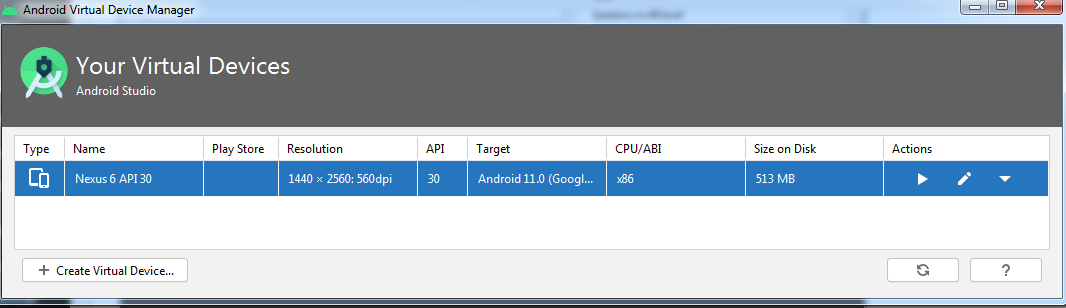
Мы создали виртуальное устройство (Virtual Devices)
 1155
1155
Android Studio Shows Error Running App: no target device found
List of things I have already done, but the problem persists:
- Enabled USB debugging option in mobile developer options, didnt work so i also enabled allow installing apps via usb, but nope.
- Changed the USB cable.
- Installed three types of drivers:
- OEM USB driver
- Universal USB driver
- SDB driver 2.0 In the device manager each of them recognized my device as Android device and also showed Android composite ADB interface, but because my Android Studio was not recognizing I still installed and uninstalled all of them.
Apart from all of these if you have any suggestions please answer.

1 Answer 1
Choose «Run» then «Edit Configurations». In the «General» tab, check the «Deployment Target Options» section.
In my case, the target was already set to «USB Device» and the checkbox «Use same device for future launches» was checked.
I had to change the target to «Show Device Chooser Dialog» and I unchecked the check box. Then my device appeared in the list.
If your device still doesn’t appear, then you have to enable USB-Debugging in the smartphone settings again.
у меня возникли проблемы с получением Android-приложения, которое я разработал, работая на своем телефоне. ( Android Studio on Windows 7 попытка запустить приложение на Samsung Note 3 под управлением Android 5.0 )
вот что я сделал до сих пор:
- повернул на USB debugging и разрешено unknown sources
- установлен Google USB Driver
- перезапустить компьютер
- пробовал updating the driver для телефона, но никаких обновлений не было доступно
- повернул на debugging на build.gradle файл
и все же он все еще возвращается Error running app: No target device found
я также попробовал опцию диалога, когда я запускаю приложение, но это говорит No USB devices or running emulators detected
Android Отбеливание, первая установка использует Android Studio. Если вы не правы, пожалуйста, исправить ее.
Я сталкивался ошибки:После нажатия кнопки «Выполнить», запрос не находит виртуальное устройство, и я уже был новое виртуальное устройство в AVD Manager. Неправильно, как показано:

Процесс решения:Во-первых, я проверил много онлайновых решений и обнаружили, что все варианты, чтобы выбрать Открыть в Run — Edit Configurations — App — Общие — Deployment Target Options, как показано ниже:

Но моя Android-студия версия 3.5.2 и нет целевых развертывания вариантов.
Позже я нашел Android версии моего Android SDK по 10, а Android версия установленного виртуального устройства 5,1, может быть, версии ошибочны, так что я пошел установить 10 версию, но я до сих пор не решил проблему. Позже я обнаружил, что я установил 5.1 и 10 версий одного и то же устройство. Edited версию устройства версии 5.1, после того, как Android версия была изменена на 10, кнопку Run можно увидеть рядом с виртуальным оборудованием! (Позже я обнаружил, что только для загрузки в Android версию, не создать устройство, и начал загружать устройство создания MOMG.) Диаграмма процесса выглядит следующей образом:


Позже, я использовал этот метод , чтобы закончить снова (5.1, я выбрал 10 версии версии Lollipop), и у меня есть «2.7 AVGA API 22 2» в диспетчере Android Virtual Device, показывая , что он клонирование оборудования 10 Версии , не и та же операция, только уже не выбрать 10, что версия, но использовать свой собственный 5.1, но есть сообщение об ошибке «ошибки при создании AVD См Idea.log для детализации.», как показано ниже:

После этого, я удалил исходную версию виртуального устройства, повторите операцию версии виртуального устройства установки 5.1, то результат будет возможно, результат выглядит следующим образом:

иллюстрироватьДля того же само устройство, можно клонировать первое виртуальное оборудование, созданное, клонированные устройства Android версия совпадает, и то же устройство не позволяет два Android версии.