Установите Python, Numpy, Matplotlib, Scipy в Windows
Всякий раз, когда я пытаюсь запустить скрипт через Virtualenv в pycharm, я получаю такую ошибку:
C:UsersCostelloPycharmProjectstestvenvScriptspython.exe C:/Users/Costello/PycharmProjects/test C:UsersCostelloPycharmProjectstestvenvScriptspython.exe: can't find '__main__' module in 'C:/Users/Costello/PycharmProjects/test' Все работает нормально через idle или vs code. Я полагаю, что это должно быть что-то с тем, как я настроил свой pycharm, но понятия не имею, что.
edit: это происходит независимо от того, что я запускаю, даже с простой функцией печати.
изменить: даже при выборе обычного интерпретатора Python, то же самое происходит только в pycharm
C:UsersCostelloAppDataLocalProgramsPythonPython37python.exe: can't find '__main__' module in 'C:/Users/Costello/PycharmProjects/test' - 3 Можете ли вы показать нам свой код?
- Что бы я ни бегал. Даже пробовал простую печать («бла бла») prntscr.com/kn60cu
- 1 Как вы запускаете код? Это не похоже на файл Python, он не заканчивается на .py
- Он заканчивается на py, и это файл python, вы можете видеть, что он заканчивается на test.py и значок python рядом с файлом. Разобрался в чем дело, отправил ответ. спасибо, ребята
Разобрался в чем дело. В окне конфигурации в pycharm мне нужно было выбрать правильный путь к скрипту:

- 2 Путь к сценарию вводит в заблуждение (ИМХО), поскольку он также должен включать файл сценария.
В вашем Pycharm:
- Выбрать
Run - Edit Configurations - В
Configuration tabs, ВыбратьModule nameв опцииChoose target to runи введите имя вашего файла python - Нажмите
Applyа такжеOKкнопка
Или простой способ — когда вы запускаете свой код в первый раз (в новом файле), просто введите клавиатуру Alt+Shift+F10 для запуска и сохранения конфигурации. Во второй раз (после сохранения конфигурации) просто введите Alt+F10 для запуска вашего кода.
- также называется «путь к сценарию»
Перейдите в «Редактировать конфигурацию» и укажите только свое имя файла, например filename.py
Существующий путь ——> C:Usersnp4PycharmProjectsTESTvenv
Попробуйте с этим ——> C:Usersnp4PycharmProjectsTESTvenvMultiSites.py
Я столкнулся с этой проблемой, когда мой cmd был вынужден «Завершить задачу» диспетчером задач. Моя проблема решена, когда я перезапускаю свою IDE.
«Открыть диалоговое окно« Редактировать настройки запуска / отладки »» (вверху, рядом с «Выполнить») «Изменить конфигурации» «Путь к сценарию:» -> выберите правильный путь к сценарию.
В Pycharm (Ubuntu):
- Создать новый проект
- Дайте название проекта
- Щелкните правой кнопкой мыши папку bin
- Создать новый файл Python
- Напишите свой код
- Верхняя правая сторона: Добавить конфигурацию
- Левая сторона: щелкните правой кнопкой мыши знак «+»
- Введите полное имя файла
- Home / Downloads / myfile.py как «Путь к сценарию»
- python 2.x / 3.x как интерпретатор Python
- Нажмите «Применить / ОК»
Я исправил это, удалив значения из Возможности переводчика в конфигурациях запуска / отладки. Пытаясь добавить интерпретатор, я добавил путь Python к указанному полю.
После расчистки поля все наладилось.
Ты можешь найти run/debug configuration настройки в раскрывающемся списке слева от значка запуска в правом верхнем углу окна pycharm.
Tweet
Share
Link
Plus
Send
Send
Pin
![]()
Could you please give me a hand with this?
I’m running on Alpine 3.10, Python 3.7. It works locally (Ubuntu 20.04, Python3.8) but for some reason fails in CI (alpine) and I’m having hard time figuring out in what direction to dig
Terraform v0.12.24
+ provider.aws v2.66.0
+ provider.external v1.2.0
+ provider.local v1.4.0
+ provider.null v2.1.2
module "lambda" {
  source  = "terraform-aws-modules/lambda/aws"
  version = "1.5.0"

  function_name = module.name.qualified_name
  description   = local.description
  handler       = "main.handler"
  runtime       = "python3.8"
  publish       = true

  source_path = "../../src/"
....
 Error: failed to execute "python3": source_path must be set.
[2020-06-16T12:04:23.320Z]

   on .terraform/modules/lambda/terraform-aws-lambda-1.5.0/package.tf line 3, in data "external" "archive_prepare":
    3: data "external" "archive_prepare" {
![]()
![]()
Sure, first, make sure that you use latest version of the module where more under-the-hood improvements and bugfixes were made.
Your error message means that source_path is wrong. You can write it like this:
source_path = "${path.module}/../../src/"
or try to use absolute path.
![]()
Also, it should work on Python 3.6 as you mentioned another day 
![]()
@antonbabenko thanks for suggestions!
source_path = "${path.module}/../../src/"
^ was the first thing I tried. It didn’t work so I thought to change it to how it shown in examples but didn’t help either. Thus I’m here. Is there anything else to try to debug it?
![]()
Have you tried to use an absolute path?
![]()
If you would use terragrunt, you should use this hack:
source_path = jsonencode("${path.module}/../../src/")
Ref: gruntwork-io/terragrunt#1211
![]()
Even if it works it is not usable since the absolute path will be different in CI and locally. But I’m going to give it a try. No plane terraform wrapped into a little bit of shell
![]()
You can enable debug as described in README.
export TF_LAMBDA_PACKAGE_LOG_LEVEL=DEBUG2
terraform apply
A little bit of shell… can be related to the bug linked above. Wrap it with jsonencode().
![]()
@antonbabenko weird, but I’m getting the same results as for jsonencode as for absolute path
do I read it right that error message
failed to execute "python3": source_path must be set.
comes from package.py, i.e. it is python script complaining about source_path, not terraform, right?
![]()
Ok, it is from here
    # Validate the query.
    if not os.path.exists(source_path):
        abort('source_path must be set.')
I would suggest changing the message to something that actually describes what is going on — here the program checks that path it got points to something that exists. So a better message would be to display the content of the variable and tell the user that it does not exist. Then user will be able to act on it. Right, now it is somewhat misguiding. Going to experiment with the code a little bit
![]()
@antonbabenko 🤦 forgot to commit src; that is why it works locally and not it CI. Kind of obviously. Anyhow, going to send a pull request to improve the message
![]()
Nevermind, that code already got changed in the latest version. Then no pull request. Thanks for your help!
![]()
Thanks! Good luck
PS: No automation = no need to commit anything anywhere = works on my machine 100% ![]()
![]()
I’m going to lock this issue because it has been closed for 30 days ⏳. This helps our maintainers find and focus on the active issues. If you have found a problem that seems similar to this, please open a new issue and complete the issue template so we can capture all the details necessary to investigate further.
![]()
github-actions
bot
locked as resolved and limited conversation to collaborators
Nov 11, 2022
You may need to add Python to PATH if you’ve installed Python, but typing python on the command line doesn’t seem to work. You may be getting a message saying that the term python isn’t recognized, or you may end up with the wrong version of Python running.
A common fix for these problems is adding Python to the PATH environment variable. In this tutorial, you’ll learn how to add Python to PATH. You’ll also learn about what PATH is and why PATH is vital for programs like the command line to be able to find your Python installation.
The steps that you’ll need to take to add something to PATH will depend significantly on your operating system (OS), so be sure to skip to the relevant section if you’re only interested in this procedure for one OS.
Note that you can use the following steps to add any program to PATH, not just Python.
How to Add Python to PATH on Windows
The first step is to locate the directory in which your target Python executable lives. The path to the directory is what you’ll be adding to the PATH environment variable.
To find the Python executable, you’ll need to look for a file called python.exe. The Python executable could be in a directory in C:Python or in your AppData folder, for instance. If the executable were in AppData, then the path would typically look something like this:
C:Users<USER>AppDataLocalProgramsPython
In your case, the <USER> part would be replaced by your currently logged-in user name.
Once you’ve found the executable, make sure it works by double-clicking it and verifying that it starts up a Python REPL in a new window.
If you’re struggling to find the right executable, you can use Windows Explorer’s search feature. The issue with the built-in search is that it’s painfully slow. To perform a super-fast full system search for any file, a great alternative is Everything:
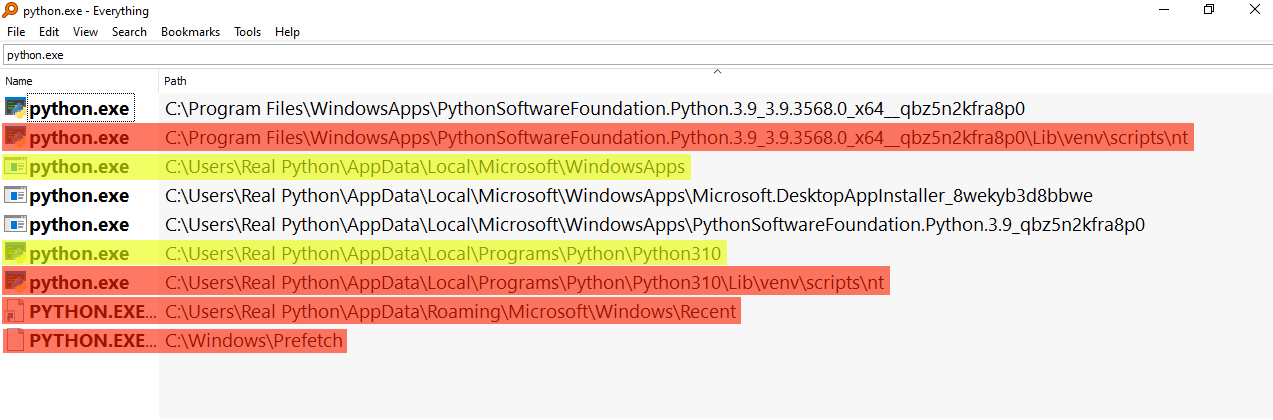
Those paths highlighted in yellow, namely those at WindowsApps and Python310, would be ideal candidates to add to PATH because they look like executables at the root level of an installation. Those highlighted in red wouldn’t be suitable because some are part of a virtual environment—you can see venv in the path—and some are shortcuts or internal Windows installations.
You may also encounter Python executables that are installed within the folder for a different program. This is due to the fact that many applications bundle their own version of Python within them. These bundled Python installations would also be unsuitable.
Once you’ve located your Python executable, open the Start menu and search for the Edit the system environment variables entry, which opens up a System Properties window. In the Advanced tab, click on the button Environment Variables. There you’ll see User and System variables, which you’ll be able to edit:
In the section entitled User Variables, double-click on the entry that says Path. Another window will pop up showing a list of paths. Click the New button and paste the path to your Python executable there. Once that’s inserted, select your newly added path and click the Move Up button until it’s at the top.
That’s it! You may need to reboot your computer for the changes to take effect, but you should now be able to call python from the command line.
For setting the PATH environment variable from the command line, check out the section on Configuring Environment Variables in the Windows Python coding setup guide. You can also find instructions in the supplemental materials:
You may also want to set up PATH on your Linux or macOS machine, or perhaps you’re using Windows Subsystem for Linux (WSL). If so, read the next section for the procedure on UNIX-based systems.
How to Add Python to PATH on Linux and macOS
Since Python typically comes pre-installed on UNIX-based systems, the most common problem on Linux and macOS is for the wrong python to run, rather than not finding any python. That said, in this section, you’ll be troubleshooting not being able to run python at all.
The first step is locating your target Python executable. It should be a program that you can run by first navigating to the containing directory and then typing ./python on the command line.
You need to prepend the call to the Python executable with its relative path in the current folder (./) because otherwise you’ll invoke whichever Python is currently recorded on your PATH. As you learned earlier, this might not be the Python interpreter that you want to run.
Often the Python executable can be found in the /bin/ folder. But if Python is already in the /bin/ folder, then it’s most likely already on PATH because /bin/ is automatically added by the system. If this is the case, then you may want to skip to the section on the order of paths within PATH.
Since you’re probably here because you’ve installed Python but it’s still not being found when you type python on the command line, though, you’ll want to search for it in another location.
That said, it might be that /bin/ has been removed from PATH altogether, in which case you might skip forward to the section on mangaging PATH.
Once you’ve located your Python executable and are sure it’s working, take note of the path for later. Now it’s time to start the process of adding it to your PATH environment variable.
First, you’ll want to navigate to your home folder to check out what configuration scripts you have available:
You should see a bunch of configuration files that begin with a period (.). These are colloquially known as dotfiles and are hidden from ls by default.
One or two dotfiles get executed whenever you log in to your system, another one or two run whenever you start a new command-line session, and most others are used by other applications for configuration settings.
You’re looking for the files that run when you start your system or a new command-line session. They’ll probably have names similar to these:
.profile.bash_profile.bash_login.zprofile.zlogin
The keywords to look for are profile and login. You should, in theory, only have one of these, but if you have more than one, you may need to read the comments in them to figure out which ones run on login. For example, .profile file on Ubuntu will typically have the following comment:
# This file is not read by bash(1), if ~/.bash_profile or ~/.bash_login
# exists.
So, if you have .profile but also .bash_profile, then you’ll want to use .bash_profile.
You can also use a .bashrc or .zshrc file, which are scripts that run whenever you start a new command-line session. Run command (rc) files are common places to put PATH configurations.
To add the Python path to the beginning of your PATH environment variable, you’re going to be executing a single command on the command line.
Use the following line, replacing <PATH_TO_PYTHON> with your actual path to the Python executable, and replace .profile with the login script for your system:
$ echo export PATH="<PATH_TO_PYTHON>:$PATH" >> ~/.profile
This command adds export PATH="<PATH_TO_PYTHON>:$PATH" to the end of .profile. The command export PATH="<PATH_TO_PYTHON>:$PATH" prepends <PATH_TO_PYTHON> to the PATH environment variable. It’s similar to the following operation in Python:
>>>
>>> PATH = "/home/realpython/apps:/bin"
>>> PATH = f"/home/realpython/python:{PATH}"
>>> PATH
'/home/realpython/python:/home/realpython/apps:/bin'
Since PATH is just a string separated by colons, prepending a value involves creating a string with the new path, a colon, then the old path. With this string, you set the new value of PATH.
To refresh your current command-line session, you can run the following command, replacing .profile with whichever login script you’ve chosen:
Now, you should be able to call python from the command line directly. The next time you log in, Python should automatically be added to PATH.
If you’re thinking this process seems a bit opaque, you’re not alone! Read on for more of a deep dive into what’s going on.
Understanding What PATH Is
PATH is an environment variable that contains a list of paths to folders. Each path in PATH is separated by a colon or a semicolon—a colon for UNIX-based systems and a semicolon for Windows. It’s like a Python variable with a long string as its value. The difference is that PATH is a variable accessible by almost all programs.
Programs like the command line use the PATH environment variable to find executables. For example, whenever you type the name of a program into the command line, the command line will search various places for the program. One of the places that the command line searches is PATH.
All the paths in PATH need to be directories—they shouldn’t be files or executables directly. Programs that use PATH take each directory in turn and search all the files within it. Subdirectories within directories in PATH don’t get searched, though. So it’s no good just adding your root path to PATH!
It’s also important to note that programs that use PATH typically don’t search for anything except executables. So, you can’t use PATH as a way to define shortcuts to commonly used files.
Understanding the Importance of Order Within PATH
If you type python into the command line, the command line will look in each folder in the PATH environment variable for a python executable. Once it finds one, it’ll stop searching. This is why you prepend the path to your Python executable to PATH. Having the newly added path first ensures that your system will find this Python executable.
A common issue is having a failed Python installation on your PATH. If the corrupted executable is the first one that the command line comes across, then the command line will try and run that and then abort any further searching. The quick fix for this is just adding your new Python directory before the old Python directory, though you’d probably want to clean your system of the bad Python installation too.
Reordering PATH on Windows is relatively straightforward. You open the GUI control panel and adjust the order using the Move Up and Move Down buttons. If you’re on a UNIX-based operating system, however, the process is more involved. Read on to learn more.
Managing Your PATH on UNIX-based Systems
Usually, your first task when managing your PATH is to see what’s in there. To see the value of any environment variable in Linux or macOS, you can use the echo command:
$ echo $PATH
/usr/local/sbin:/usr/local/bin:/usr/sbin:/home/realpython/badpython:/usr/bin:/sbin:/bin:/usr/games:/usr/local/games
Note that the $ symbol is used to tell the command line that the following identifier is a variable. The issue with this command is that it just dumps all the paths on one line, separated by colons. So you might want to take advantage of the tr command to translate colons into newlines:
$ echo $PATH | tr ":" "n"
/usr/local/sbin
/usr/local/bin
/usr/sbin
/home/realpython/badpython
/usr/bin
/sbin
/bin
/usr/games
/usr/local/games
In this example, you can see that badpython is present in PATH. The ideal course of action would be to perform some PATH archaeology and figure out where it gets added to PATH, but for now, you just want to remove it by adding something to your login script .
Since PATH is a shell string, you don’t have access to convenient methods to remove parts of it, like you would if it were a Python list. That said, you can pipe together a few shell commands to achieve something similar:
export PATH=`echo $PATH | tr ":" "n" | grep -v 'badpython' | tr "n" ":"`
This command takes the list from the previous command and feeds it into grep, which, together with the -v switch, will filter out any lines containing the substring badpython. Then you can translate the newlines back to colons, and you have a new and valid PATH string that you use right away to replace your old PATH string.
Though this can be a handy command, the ideal solution would be to figure out where that bad path gets added. You could try looking at other login scripts or examine specific files in /etc/. In Ubuntu, for instance, there’s a file called environment, which typically defines a starting path for the system. In macOS, that might be /etc/paths. There can also be profile files and folders in /etc/ that might contain startup scripts.
The main difference between configurations in /etc/ and in your home folder is that what’s in /etc/ is system-wide, while whatever’s in your home folder will be scoped to your user.
It can often involve a bit of archeology to track down where something gets added to your PATH, though. So, you may want to add a line in your login or rc script that filters out certain entries from PATH as a quick fix.
Conclusion
In this tutorial, you’ve learned how to add Python, or any other program, to your PATH environment variable on Windows, Linux, and macOS. You also learned a bit more about what PATH is and why its internal order is vital to consider. Finally, you also discovered how you might manage your PATH on a UNIX-based system, seeing as it’s more complex than managing your PATH on Windows.
- 1. Настройка локальной среды
- 2. Получение Python
- 1. Платформа Windows
- 2. Платформа Linux
- 3. Mac OS
- 3. Настройка PATH
- 1. Настройка PATH в Unix / Linux
- 2. Настройка PATH в Windows
- 3. Переменные среды Python
- 4. Запуск Python
- 1. Интерактивный интерпретатор
- 2. Скрипт из командной строки
- 3. Интегрированная среда разработки
Python 3 доступен для Windows, Mac OS и большинства вариантов операционной системы Linux.
Настройка локальной среды
Откройте окно терминала и введите «python», чтобы узнать, установлен ли он и какая версия установлена.
Получение Python
Платформа Windows
Бинарники последней версии Python 3 (Python 3.6.4) доступны на этой странице
загрузки
Доступны следующие варианты установки.
- Windows x86-64 embeddable zip file
- Windows x86-64 executable installer
- Windows x86-64 web-based installer
- Windows x86 embeddable zip file
- Windows x86 executable installer
- Windows x86 web-based installer
Примечание. Для установки Python 3.6.4 минимальными требованиями к ОС являются Windows 7 с пакетом обновления 1 (SP1). Для версий от 3.0 до 3.4.x Windows XP является приемлемым.
Платформа Linux
Различные варианты использования Linux используют разные менеджеры пакетов для установки новых пакетов.
На Ubuntu Linux Python 3 устанавливается с помощью следующей команды из терминала.
sudo apt-get install python3-minimalУстановка из исходников
Загрузите исходный tar-файл Gzipped с URL-адреса загрузки Python
https://www.python.org/ftp/python/3.6.4/Python-3.6.4.tgz
Extract the tarball tar xvfz Python-3.5.1.tgz Configure and Install: cd Python-3.5.1 ./configure --prefix = /opt/python3.5.1 make sudo make installMac OS
Загрузите установщики Mac OS с этого URL-адреса
https://www.python.org/downloads/mac-osx/
Дважды щелкните этот файл пакета и следуйте инструкциям мастера для установки.
Самый современный и текущий исходный код, двоичные файлы, документация, новости и т.д. Доступны на официальном сайте Python —
Python Official Website
−https://www.python.org/
Вы можете загрузить документацию Python со следующего сайта. Документация доступна в форматах HTML, PDF и PostScript.
Python Documentation Website
−www.python.org/doc/
Настройка PATH
Программы и другие исполняемые файлы могут быть во многих каталогах. Следовательно, операционные системы предоставляют путь поиска, в котором перечислены каталоги, которые он ищет для исполняемых файлов.
Важными особенностями являются:
- Путь хранится в переменной среды, которая является именованной строкой, поддерживаемой операционной системой. Эта переменная содержит информацию, доступную для командной оболочки и других программ.
- Переменная пути называется PATH в Unix или Path в Windows (Unix чувствительна к регистру, Windows — нет).
- В Mac OS установщик обрабатывает детали пути. Чтобы вызвать интерпретатор Python из любого конкретного каталога, вы должны добавить каталог Python на свой путь.
Настройка PATH в Unix / Linux
Чтобы добавить каталог Python в путь для определенного сеанса в Unix —
В csh shell
— введите setenv PATH «$ PATH:/usr/local/bin/python3» и нажмите Enter.
В оболочке bash (Linux)
— введите PYTHONPATH=/usr/local/bin/python3.4 и нажмите Enter.
В оболочке sh или ksh
— введите PATH = «$PATH:/usr/local/bin/python3» и нажмите Enter.
Примечание.
/usr/local/bin/python3
— это путь к каталогу Python.
Настройка PATH в Windows
Чтобы добавить каталог Python в путь для определенного сеанса в Windows —
-
В командной строке введите путь
%path%;C:Python
и нажмите Enter.
Примечание.
C:Python
— это путь к каталогу Python.
Переменные среды Python
| S.No. | Переменная и описание |
|---|---|
| 1 | PYTHONPATH Он играет роль, подобную PATH. Эта переменная сообщает интерпретатору Python, где можно найти файлы модулей, импортированные в программу. Он должен включать каталог исходной библиотеки Python и каталоги, содержащие исходный код Python. PYTHONPATH иногда задается установщиком Python. |
| 2 | PYTHONSTARTUP Он содержит путь к файлу инициализации, содержащему исходный код Python. Он выполняется каждый раз, когда вы запускаете интерпретатор. Он называется как .pythonrc.py в Unix и содержит команды, которые загружают утилиты или изменяют PYTHONPATH. |
| 3 | PYTHONCASEOK Он используется в Windows, чтобы проинструктировать Python о поиске первого нечувствительного к регистру совпадения в инструкции импорта. Установите эту переменную на любое значение, чтобы ее активировать. |
| 4 | PYTHONHOME Это альтернативный путь поиска модуля. Он обычно встроен в каталоги PYTHONSTARTUP или PYTHONPATH, чтобы упростить библиотеку модулей коммутации. |
Запуск Python
Существует три разных способа запуска Python —
Интерактивный интерпретатор
Вы можете запустить Python из Unix, DOS или любой другой системы, которая предоставляет вам интерпретатор командной строки или окно оболочки.
Введите
python
в командной строке.
Начните кодирование сразу в интерактивном интерпретаторе.
$python # Unix/Linux or python% # Unix/Linux or C:>python # Windows/DOSВот список всех доступных параметров командной строки —
| S.No. | Вариант и описание |
|---|---|
| 1 | -d предоставлять отладочную информацию |
| 2 | -O генерировать оптимизированный байт-код (приводящий к .pyo-файлам) |
| 3 | -S не запускайте сайт импорта, чтобы искать пути Python при запуске |
| 4 | -v подробный вывод (подробная трассировка по операциям импорта) |
| 5 | -X отключить встроенные исключения на основе классов (просто используйте строки); устаревший, начиная с версии 1.6 |
| 6 | -c cmd запустить скрипт Python, отправленный в виде строки cmd |
| 7 | file запустить скрипт Python из заданного файла |
Скрипт из командной строки
Сценарий Python можно запустить в командной строке, вызвав интерпретатор в вашем приложении, как показано в следующем примере.
$python script.py # Unix/Linux or python% script.py # Unix/Linux or C:>python script.py # Windows/DOSПримечание. Убедитесь, что права файлов разрешают выполнение.
Интегрированная среда разработки
Вы можете запустить Python из среды графического интерфейса пользователя (GUI), если у вас есть приложение GUI в вашей системе, которое поддерживает Python.
Для разработки Python приложений рекомендую PyCharm от компании JetBrains, как наиболее развитую и удобную IDE.
Запуск Python с терминала зачастую неизбежен. Однако, если вы впервые установили Python в Windows 10, запуск его через Терминал Windows возможен только в том случае, если он добавлен в переменную среды Windows PATH.
Это может показаться сложным, но бояться нечего. Чтобы помочь вам преодолеть повороты, связанные с добавлением Python в PATH Windows после его установки, давайте рассмотрим варианты и несколько необходимых шагов.
Если вам не удалось добавить Python в PATH в вашей ОС Windows, вы не сможете запустить интерпретатор Python, запустить виртуальную среду программирования или выполнить такие команды, как pip install, из терминала.
Мы исследуем лучшие способы создания виртуальных сред Python и управления ими.
Это потому, что, когда вы запускаете любую программу, отличную от программы по умолчанию, из командной строки, машина ищет исполняемый файл в текущей папке или в ПУТИ Windows.
Если его нет в переменной PATH, терминал возвращает ошибку «команда не найдена». Добавление в PATH — это мощный инструмент, даже если вы выполняете команду из созданного или пакетного файла по умолчанию , добавление родительского исполняемого файла в переменную PATH также делает его доступным для вызова из терминала.
Как Вручную Добавить Python В ПУТЬ Windows
Во-первых, если вы не установили Python на свой компьютер, перейдите на сайт python.org, чтобы загрузить и установить предпочитаемую версию.
После успешной установки Python на ваш компьютер проверьте, не добавлен ли он в PATH Windows. Откройте свой терминал и введите python, затем нажмите клавишу Enter. Команда может вернуть ошибку, в которой говорится, что «python не распознается как внутренняя или внешняя команда, работающая программа или пакетный файл», что означает, что Python еще не добавлен в переменную PATH вашего компьютера.
Чтобы запускать программы Python из командной строки, выполните шаги, выделенные ниже.
Найдите путь установки Python на свой компьютер
Чтобы добавить Python в ваш Windows PATH, вам нужно получить путь его установки. Для этого откройте панель поиска Windows и введите python.exe (не нажимайте клавишу Enter). Затем кликните правой кнопкой мыши Python.exe, который появляется в появившемся меню, и выберите опцию Открыть расположение файла.
В открывшихся окнах проводника кликните длинную панель каталогов слева от строки поиска. Выделите и скопируйте весь текст пути в буфер обмена с помощью Ctrl + С. Затем перейдите к следующим шагам ниже.
Далее: Добавить Python В PATH В пользовательских переменных
Чтобы добавить Python в PATH в пользовательских переменных, кликните правой кнопкой мыши «Этот компьютер» и выберите «Свойства». Оказавшись в меню свойств, нажмите на опцию Advanced system settings. В следующем окне выберите вкладку Advanced и выберите Environment Variables.
Environment Variables меню состоит из двух отдельных частей: верхняя часть называется Пользовательские переменные, а нижняя часть имени системных переменных. Однако в этом случае мы сосредоточимся на пользовательских переменных.
В меню пользовательских переменных найдите переменную с именем Path. Затем вставьте путь, который вы скопировали ранее, в параметр «Значение переменной», используя Ctrl + v, и нажмите «ОК».
Однако, если вы не можете найти эту переменную, вам может потребоваться ее создать. Для этого нажмите New. Затем в форме имени переменной введите путь и вставьте свой путь Python в поле значения переменной.
Вернитесь в папку пути установки Python и дважды кликните Scripts, чтобы открыть этот каталог. Затем скопируйте его путь из панели пути в верхней части окон (помимо панели поиска), как вы это делали ранее для пути установки Python.
Скопировав путь к скриптам, вернитесь к переменным среды. Затем выберите переменную Path и нажмите Edit. Введите точку с запятой после пути к исполняемому файлу Python и вставьте после него путь скриптов, который вы только что скопировали. Затем нажмите ОК.
Добавление Python в PATH с опцией системных переменных
Вы также можете добавить Python в системную переменную PATH. Хотя это всего лишь альтернатива, и в ней нет необходимости, если вы уже добавили ее в переменные Users.
Чтобы использовать параметр «Системные переменные», выполните шаги, выделенные выше, для копирования пути Python и его сценария. Затем вернитесь в переменные среды. Затем в сегменте системных переменных найдите переменную с именем Path. Кликните эту переменную и кликните Изменить.
В следующем появившемся окне нажмите New и вставьте путь, который вы скопировали ранее, в открывшееся пространство. Повторите этот процесс и для пути скриптов. Затем нажмите ОК и закройте окно переменных среды.
Автоматически добавлять Python в Windows PATH
Вы также можете автоматически добавить Python в PATH Windows во время установки. Хотя этот метод работает не во всех случаях, вы все равно можете попробовать.
Для этого щелкните свой установочный файл и установите флажок «Добавить Python 3.7 в PATH». Номер версии будет меняться при установке разных версий Python.
Установка этого флажка автоматически добавляет Python в ваш путь к Windows. Это означает, что вы можете запускать команды Python через командную строку сразу после установки.
Подтвердите, что Python добавлен в Windows PATH
Чтобы узнать, добавлен ли Python в PATH Windows, откройте терминал и введите python —version, затем нажмите клавишу Enter. Если команда возвращает текущую установленную версию Python, это означает, что вы успешно добавили ее в Windows PATH.
Однако, чтобы проверить, добавили ли вы каталог Scripts в Windows PATH, попробуйте запустить пакет установки pip на терминале, заменив «package» на предпочитаемую вами библиотеку. Если вы установили Python 2.7.9 и выше, команда устанавливает названный пакет, указывая, что вы также успешно добавили скрипты Python в путь.
Помимо добавления Python в PATH Windows, вы можете добавить текстовые редакторы, интегрированные среды разработки (IDE), Git, Node, Anaconda и многие другие программы.
Например, управлять проектом с помощью Sublime Text легко, когда вы открываете терминал в каталоге папки вашего проекта и запускаете subl. команда. Это откроет редактор в вашей текущей папке и отобразит его на боковой панели, еще один экономящий время ярлык для продуктивной работы с Sublime Text.
Содержание
- Pycharm выдает ошибку «не удается найти модуль __main__» »
- Установите Python, Numpy, Matplotlib, Scipy в Windows
- How to fix python can’t find ‘__main__’ module error in easy 2 ways?
- What is __main__ in python?
- Why does the error occur?
- Code example 1
- Code example 2
- How to fix the python can’t find ‘__main__’ module error?
- Add the main module to your script
- Move your script to the same directory as your main module
- Conclusion
- Python Error Can’t Find Main Module
- Resolve the can’t find ‘__main__’ module Error in Python
- Conclusion
- Работа с ошибками в Python
- Заголовок
- Чтение Traceback 1
- Чтение Traceback 2
- Некоторые ошибки с примерами кода
- Ошибки в синтаксисе
- Ошибки в логике
Pycharm выдает ошибку «не удается найти модуль __main__» »
Установите Python, Numpy, Matplotlib, Scipy в Windows
Всякий раз, когда я пытаюсь запустить скрипт через Virtualenv в pycharm, я получаю такую ошибку:
Все работает нормально через idle или vs code. Я полагаю, что это должно быть что-то с тем, как я настроил свой pycharm, но понятия не имею, что.
edit: это происходит независимо от того, что я запускаю, даже с простой функцией печати.
изменить: даже при выборе обычного интерпретатора Python, то же самое происходит только в pycharm
- 3 Можете ли вы показать нам свой код?
- Что бы я ни бегал. Даже пробовал простую печать («бла бла») prntscr.com/kn60cu
- 1 Как вы запускаете код? Это не похоже на файл Python, он не заканчивается на .py
- Он заканчивается на py, и это файл python, вы можете видеть, что он заканчивается на test.py и значок python рядом с файлом. Разобрался в чем дело, отправил ответ. спасибо, ребята
Разобрался в чем дело. В окне конфигурации в pycharm мне нужно было выбрать правильный путь к скрипту:
- 2 Путь к сценарию вводит в заблуждение (ИМХО), поскольку он также должен включать файл сценария.
В вашем Pycharm:
- Выбрать Run — Edit Configurations
- В Configuration tabs , Выбрать Module name в опции Choose target to run и введите имя вашего файла python
- Нажмите Apply а также OK кнопка
Или простой способ — когда вы запускаете свой код в первый раз (в новом файле), просто введите клавиатуру Alt+Shift+F10 для запуска и сохранения конфигурации. Во второй раз (после сохранения конфигурации) просто введите Alt+F10 для запуска вашего кода.
- также называется «путь к сценарию»
Перейдите в «Редактировать конфигурацию» и укажите только свое имя файла, например filename.py
Существующий путь ——> C:Usersnp4PycharmProjectsTESTvenv
Попробуйте с этим ——> C:Usersnp4PycharmProjectsTESTvenvMultiSites.py
Я столкнулся с этой проблемой, когда мой cmd был вынужден «Завершить задачу» диспетчером задач. Моя проблема решена, когда я перезапускаю свою IDE.
«Открыть диалоговое окно« Редактировать настройки запуска / отладки »» (вверху, рядом с «Выполнить») «Изменить конфигурации» «Путь к сценарию:» -> выберите правильный путь к сценарию.
В Pycharm (Ubuntu):
- Создать новый проект
- Дайте название проекта
- Щелкните правой кнопкой мыши папку bin
- Создать новый файл Python
- Напишите свой код
- Верхняя правая сторона: Добавить конфигурацию
- Левая сторона: щелкните правой кнопкой мыши знак «+»
- Введите полное имя файла
- Home / Downloads / myfile.py как «Путь к сценарию»
- python 2.x / 3.x как интерпретатор Python
- Нажмите «Применить / ОК»
Я исправил это, удалив значения из Возможности переводчика в конфигурациях запуска / отладки. Пытаясь добавить интерпретатор, я добавил путь Python к указанному полю.
После расчистки поля все наладилось.
Ты можешь найти run/debug configuration настройки в раскрывающемся списке слева от значка запуска в правом верхнем углу окна pycharm.
Источник
How to fix python can’t find ‘__main__’ module error in easy 2 ways?
Python can’t find ‘__main__’ module is one of the most common errors that can occur when running a Python script. We’ll cover why this error occurs and provide two different code examples that demonstrate how it can happen. We’ll also show you how to fix the error so that you can continue developing your web applications with Python.
What is __main__ in python?
__main__ is a special name in Python that is used to indicate the source file where the program execution starts. Every Python program has a ‘__main__’ module, and the code within that module is executed when the program is run. The ‘__main__’ module can be located in any file, but it is typically placed in a file named ‘ main.py ‘.
For example, consider the following ‘main.py’ file:
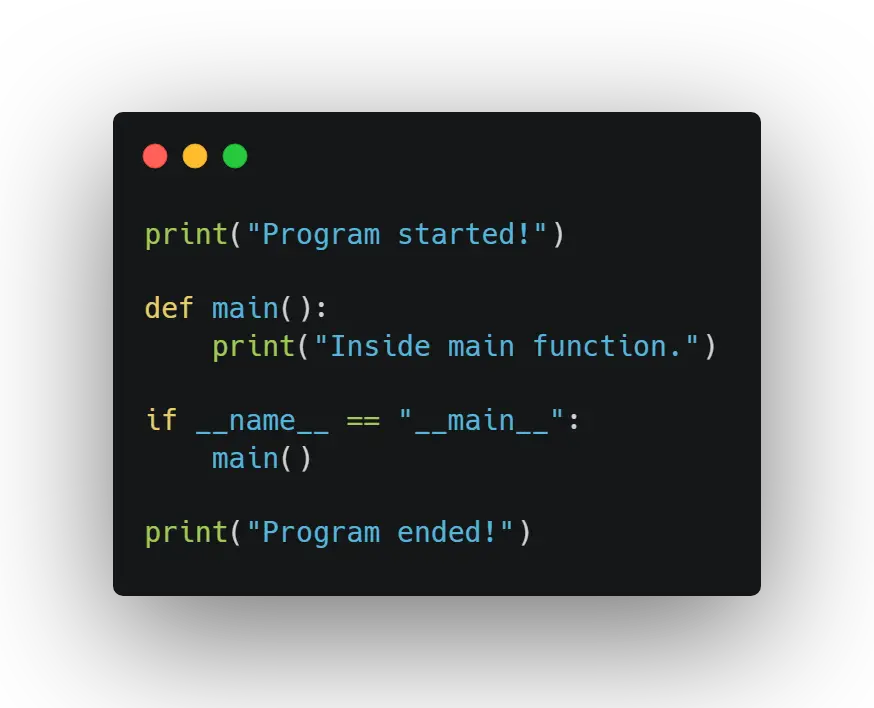
When this program is run, the output will be as follows:
Why does the error occur?
There are two main reasons why the python can’t find ‘__main__’ module error might occur. The first reason is that you haven’t specified the main module in your Python script. The second reason is that your main module is not located in the same directory as your Python script. We’ll discuss each of these reasons in more detail below.
Code example 1
Let’s say you have a Python script named my_script.py and it contains the following code:
If you try to run this script, you’ll get the python can’t find ‘__main__’ module error
This is because we haven’t specified the main module in our script. Python will look for a module named __main__ and, if it can’t find one, it will throw an error. To fix this, we need to add the main module to our script. We can do this by wrapping our code in an if __name__ == «__main__»: block:
Now when we run our script, we get the expected output:
Code example 2
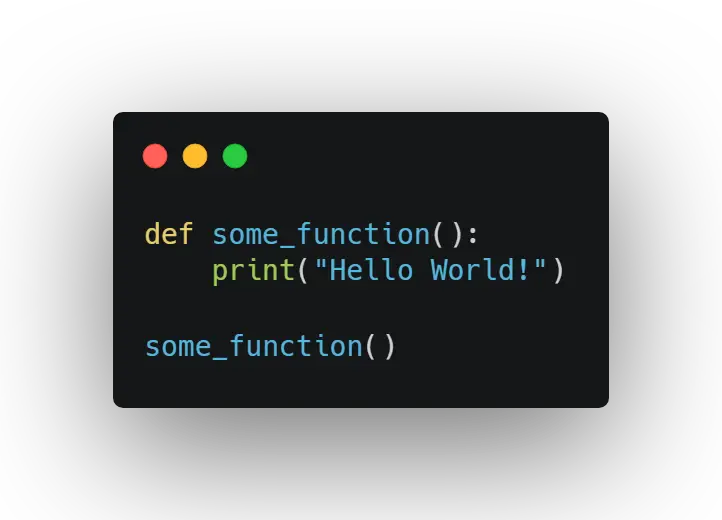
Let’s say you have a Python script named my_script.py and it contains the following code:
And you also have a Python module named some_module.py that contains the following code:
If you try to run my_script.py , you’ll get the following error:
This is because your main module ( my_script.py ) is not located in the same directory as your Python script. When Python tries to import some_module , it will look for it in the current directory (the directory where my_script.py is located). Since it can’t find it there, it will throw an error. You can fix this by moving your Python script to the same directory as your main module:
Now when you run my_script.py , it will be able to find and import some_module.py without any problems.
How to fix the python can’t find ‘__main__’ module error?
As we’ve seen in the examples above, there are two ways to fix the “python can’t find ‘__main__’ module” error. The first way is to add the main module to your Python script. The second way is to move your Python script to the same directory as your main module. Below, we’ll go through both of these strategies in further depth.
Add the main module to your script
If you get this error, it means that you haven’t specified the main module in your Python script. You can fix this by wrapping your code in an if __name__ == «__main__»: block:
When you run your script, Python will look for a module named __main__ and, if it can’t find one, it will throw an error. This block of code will ensure that Python can find your main module and avoid errors like python can’t find ‘__main__’ module
Move your script to the same directory as your main module
If you get this error, it means that your main module is not located in the same directory as your Python script. You can fix this by moving your Python script to the same directory as your main module:
When you run your Python script, it will look for modules in the current directory (the directory where my_script.py is located). By moving my_script.py to the same directory as we’re ensuring that our script can find all of the modules it needs.
Conclusion
In this article, we’ve discussed the “ python can’t find ‘__main__’ module ” error. We’ve seen two different code examples that demonstrate how this error can occur. And we’ve also shown you how to fix the error by either adding the main module to your script or moving your script to the same directory as your main module so that you can continue developing your web applications.
Источник
Python Error Can’t Find Main Module
In this article, we’ll discuss the error can’t find ‘__main__’ module , the causes of it, and how to resolve the error in Python.
Resolve the can’t find ‘__main__’ module Error in Python
We wrote a simple code to print in the PyCharm environment. As we see in the top right corner, the play button or running button is disabled, which means there is no way to run this code.
To be able to read this code, we need to add a configuration or add an interpreter, and then it gives us an execution. But if we click the play button, the program does not run.
The problem is that we don’t have an interpreter to run the codes on PyCharm, or we get an error when running the created interpreter. In our case, we created an interpreter, but still, the code doesn’t run.
So what caused the issue? The first reason is there is no virtual environment, and the second is the Python interpreter cannot find the project folder.
We need to check if we have installed Python on our system to resolve this issue. In the next step, we create a virtual environment for our project and specify the Python file we want to read.

To check the Python is installed or not, we open our terminal and type “python” and hit enter if you have Python installed on your system, it gives you the version of Python, and if nothing pops up, that means you do not have Python installed on our system. You need to download Python from here.
Let’s create a virtual environment for our project and create an empty folder. After that, we go to the PyCharm environment to delete the interpreter.
- Click on the top-left corner file.
- Go to settings. It will open up a project for you and then go to your project.
- We click on the plus( + ) button where we specifically tell the machine where we want to create our virtual environment.
- Once the virtual environment is created, you must select it.
- Click «OK» then «Apply» .
In the next step, we will add configuration.
- For our project, click on add configuration .
- Click on add new and select Python .
- After opening a new window, look at the script path where we have to select our project file, so you have to go through your project or wherever you saved your folder.
- Once you pick up the script path or the project file, it will automatically pick up the working directory. If it doesn’t, just click on the folder, go to the project folder, and pick it up yourself.
- Then click «Apply» and «OK» .
- We will run the code to see if everything is working fine. Click on the play button, and the code is executed successfully here.
To make it short, when you get the can’t find ‘__main__’ module error in Python. We resolve it by doing the following:
- Adding the main module to your script.
- Moving your script to the same directory as your main module.
Conclusion
We’ve discussed in this article how to resolve the can’t find ‘__main__’ module error in Python.
Hello! I am Salman Bin Mehmood(Baum), a software developer and I help organizations, address complex problems. My expertise lies within back-end, data science and machine learning. I am a lifelong learner, currently working on metaverse, and enrolled in a course building an AI application with python. I love solving problems and developing bug-free software for people. I write content related to python and hot Technologies.
Источник
Работа с ошибками в Python
Заголовок
Создайте файл solution.py со следующим кодом:
Наш код подразумевает печать содержимого переменной vector.
Запустим написанный скрипт, получим следующий вывод:
Сообщение означает, что при исполнении кода возникла ошибка. При этом Python сообщает нам кое-что ещё. Разберём это сообщение детально.
Чтение Traceback 1
Исходное сообщение нужно мысленно разделить на две части. Первая часть это traceback-сообщение:
Вторая часть — сообщение о возникшей ошибке:
Разберём первую часть. Traceback в грубом переводе означает «отследить назад». Traceback показывает последовательность/стэк вызовов, которая, в конечном итоге, вызвала ошибку.
является заголовочной. Она сообщает, что в последующих строках будет изложен стэк вызовов (он показан отступами). Обратите внимание на сообщение в скобках, оно указывает на порядок вызовов. В данном случае (он же случай по умолчанию) тот вызов, в котором произошла ошибка, будет в последовательности вызовов указан последним.
Вторая и третья строки:
показывают информацию о вызове (в нашем случае он один). Во-первых, здесь есть информация о файле, в котором произошёл вызов («solution.py»), затем указан номер строки, где этот вызов происходит («line 1″), в конце стоит информация о том, откуда произошёл вызов (» «). В нашем случае вызов происходит непосредственно из модуля, т.е. не из функции. Наконец, вывод содержит не только номер строки, но и саму строку «for coord in vector:».
Заключительная строка сообщения:
содержит вид (тип) ошибки («NameError»), и после двоеточия содержит подсказку. В данном случае она означает, что имя «vector» не определено.
В самом деле, если взглянуть снова на код, то можно убедиться, что мы нигде не объявили переменную «vector».
Подведём итоги. При попытке запуска мы получили следующий вывод
Он говорит нам о возникновении ошибки. Эта ошибка обнаружилась интерпретатором в первой строке файла «solution.py». Сама ошибка является ошибкой имени и указывает на необъявленное имя — «vector».
Чтение Traceback 2
Оберните код из solution.py в функцию:
Запустим наш код
На этот раз сообщение об ошибке сложнее, однако структура у него та же.
Часть со стеком вызовов увеличилась:
Поскольку «most recent call last», читать будем её сверху вниз.
Вызовов на этот раз два. Первый вызов:
Произошел в пятой строке. Судя по строчке кода, это вызов написанной нами функции print_vector(5) с аргументом 5.
Следом за ней второй вызов:
Этот вызов происходит внутри функции print_vector, содержащейся в файле «solution.py». Вызов находится в строке 2.
Сама же ошибка имеет вид:
Как и в первом примере, сообщение об ошибке содержит её тип и подсказку. В нашем случае произошла ошибка типа. В подсказке же указано, что объект типа int не является итерируемым, т.е. таким объектом, который нельзя использовать в цикле for.
В нашем коде возникла ошибка. Её вызвала последовательность вызовов. Первый вызов произошел непосредственно из модуля — в строке 5 происходит вызов функции print_vector(5). Внутри этой функции ошибка возникла в строчке 2, содержащей проход по циклу. Сообщение об ошибке означает, что итерироваться по объекту типа int нельзя. В нашем случае мы вызвали функцию print_vector от числа (от 5).
Некоторые ошибки с примерами кода
Ошибки в синтаксисе
Наиболее частая ошибка, которая возникает в программах на Python — SyntaxError: когда какое-то утверждение записано не по правилам языка, например:
Тот же тип ошибки возникнет, если забыть поставить двоеточие в цикле:
При неправильном использовании пробелов и табуляций в начале строки возникает IndentationError:
А теперь посмотрим, что будет, если в первой строке цикла воспользоваться пробелами, а во второй — табуляцией:
NameError возникает при обращении к несуществующей переменной:
Ошибки в логике
Напишем простую программу на деление с остатком и сохраним как sample.py:
Возникла ошибка TypeError, которая сообщает о неподходящем типе данных. Исправим программу:
запустим на неподходящих данных:
Возникнет ValueError. Эту ошибку ещё можно воспринимать как использование значения вне области допустимых значений (ОДЗ).
Теперь запустим программу на числовых данных:
При работе с массивами нередко возникает ошибка IndexError. Она возникает при выходе за пределы массива:
Что будет, если вызвать бесконечную рекурсию? Опишем её в программе endless.py
Через некоторое время после запуска возникнет RecursionError:
Источник