That file is too large for the destination file system. I’m trying to transfer a file from my computer to my Seagate FreeAgent external hard drive. The file is about 4GB. I still have 238 GB free of the 465 GB, so its not strickly a matter of space. Is there a way to change how big of files the hard drive can handle? — by u/sbryce from Reddit.com
Don’t bother if you are having the ‘file is too large for the destination file system’ error while trying to transfer or save big files on your storage devices.
Here on this page, we’ll show you two efficient and fast solutions to get rid of this error, making everything ready and easy for big file transferring on Windows 11/10/8/7. Check the details here now:
| Workable Solutions | Step-by-step Troubleshooting |
|---|---|
|
1. Convert FAT32 to NTFS without Formatting |
Step 1: Install and launch EaseUS Partition Master on your computer….Full steps |
| 2. Format FAT32 to NTFS | Step 1. Connect your USB flash drive to the computer and right-click…Full steps |
What Caused The ‘File is too large for the destination file system’ Error?

When facing the «The file is too large for the destination file system» issue in Windows 10/8/7, you might get confused about why you would not be able to copy the file to your USB flash drive when there is sufficient free space.
The main cause of this error is:
- The files you want to transfer is larger than 4 GB.
- The USB flash drive is using the FAT32 file system of which the maximum file size is 4GB.
- For a FAT16 USB flash drive, the maximum file size is 2GB. Also, there is a built-in limitation in the FAT32 file system.
Although the total size of the files you can store on a FAT32 drive could be up to 2TB, you cannot save an individual file that exceeds 4GB on it.
Fix «File Is Too Large for Destination File System» Error [2 Instant Fixes]
After figuring out the reason for «The file is too large for the destination file system» issue, you can fix it with ease, that is to convert the file system from FAT32/FAT16 to NTFS. Here we will introduce you to two easy solutions. We will show you how to use these two methods to fix the «The file is too large for the destination file system» error with simple steps.Video Tutorial for Fixing File Is Too Large for the Destination File System
Here we’ve collected these two fixes in this video, and you can follow this video that includes the two methods as a guide. Check the details here:
0:33 Check file system
0:43 Convert FAT32 to NTFS — No data loss
1:35 Format FAT32 to NTFS — Data loss
Solution 1: Converting FAT32 to NTFS without Data Loss & Free
If you want to finish this task in a more convenient way, here’s a good solution. Converting FAT32 to NTFS without data loss using the free partition tool — EaseUS Partition Master Free. This third-party partition software is an optimal choice. It allows you to fix «The file is too large for the destination file system» issue without formatting as well as data loss. The program works well in Windows 10/8/7 or any other previous versions.
Download EaseUS Partition Master Free now, and here is the guide with detailed steps:
Step 1. Install and launch EaseUS Partition Master on your computer.
Step 2. On Partition Manager, right-click on a FAT32 partition and click «Advanced», select «NTFS to FAT».
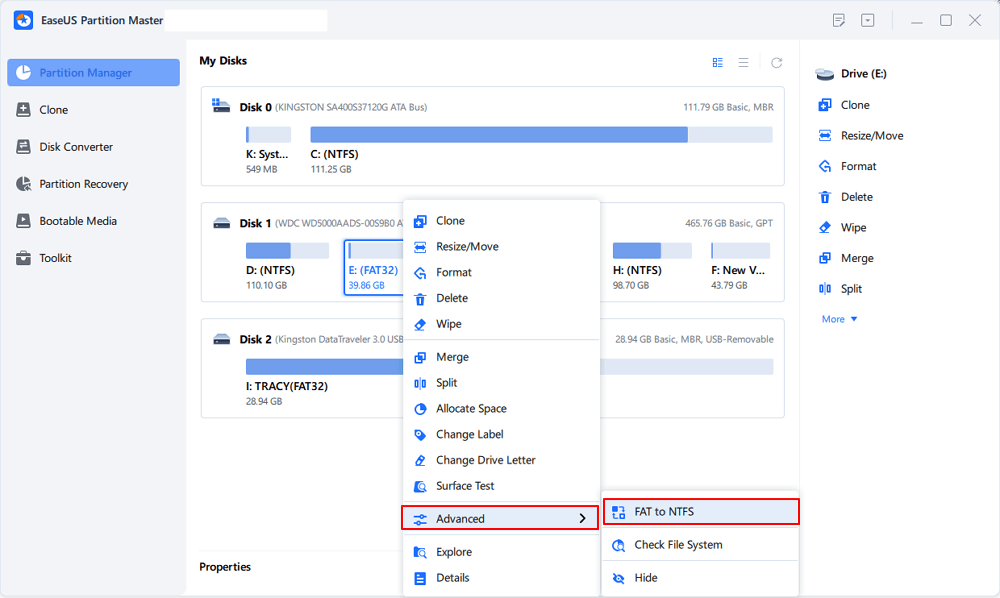
Step 3. Click «Proceed» on the pop-up dialog box to continue.
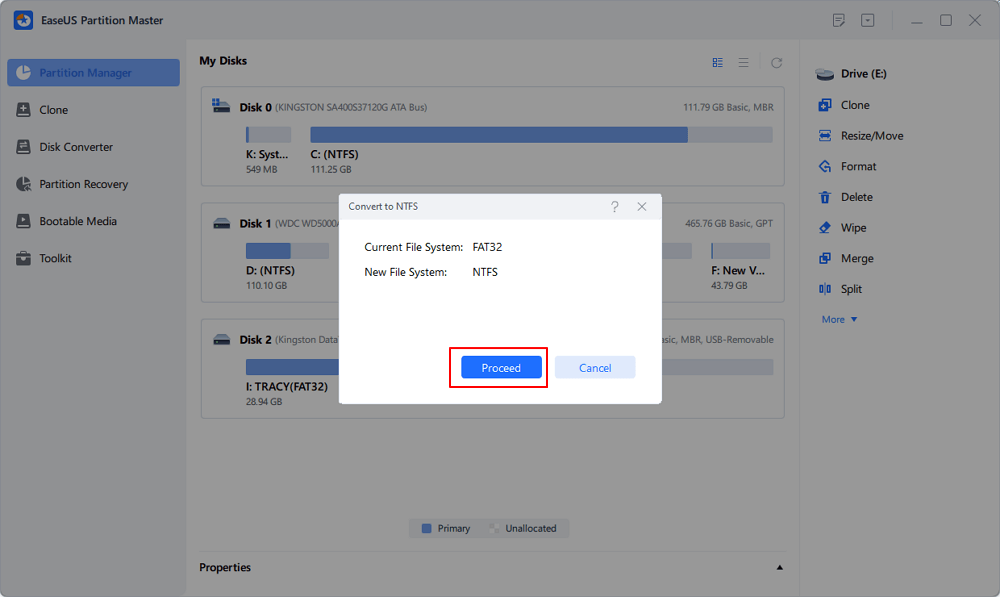
Step 4. Click «Apply» to start the converting process. Wait until the operation process is finished.
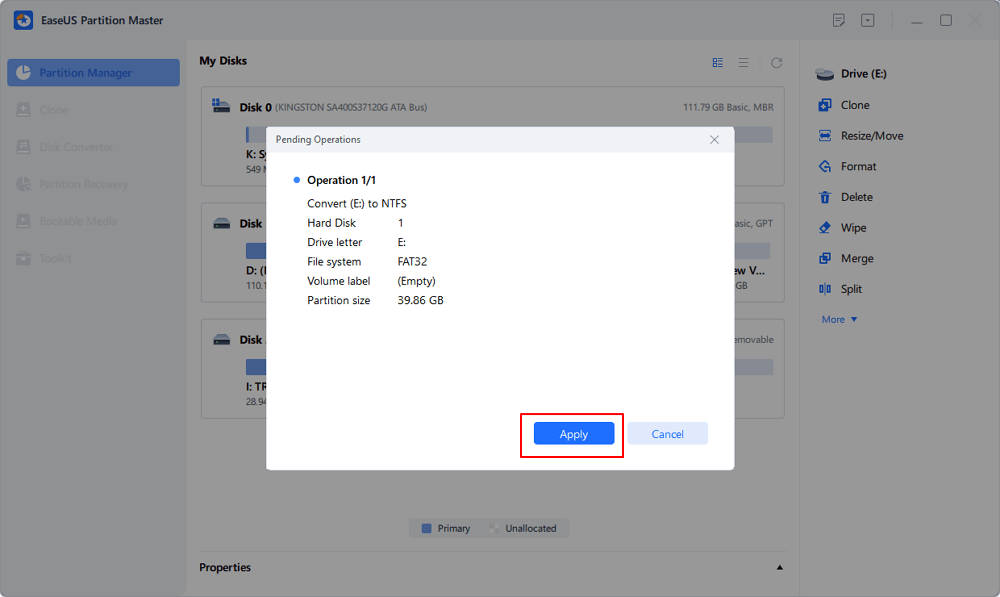
After finishing all the steps, you can copy files larger than 4GB successfully. Apart from converting a file system, EaseUS Partition Master Free also enables you to clone OS to SSD, resize partitions, and delete partitions as well.
You May Also Fee Like to Learn:
Aside from converting FAT32 to NTFS, you can also convert NTFS to FAT32 reversely. Also, if you want to learn how to flexibly change the file system of your devices to other formats, such as exFAT, EXT2/3/4, you can also follow the tutorials here and apply EaseUS Partition Master for help.
Solution 2: Formatting FAT32 to NTFS with Windows built-in feature
Formatting is the easiest way for you to convert FAT32 to NTFS. But notice that it will erase all the existing data on the drive. So, it is recommended only when there are no files on your external hard drive or USB flash drive. If there are files existing on your storage device, you can back them up by manually copying or using free backup software in advance. Here’s how to do it with Windows built-in format feature.
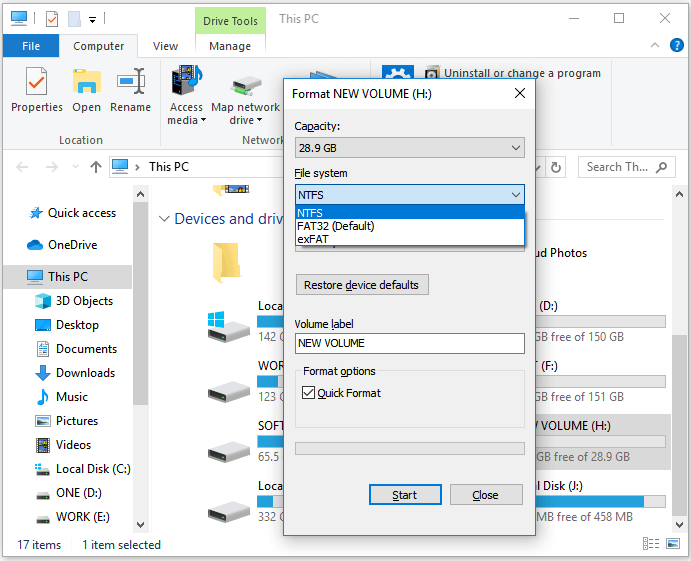
Step 1: Connect your USB flash drive to the computer.
Step 2: Right-click on the USB drive or external hard drive and click «Format».
Step 3: Change the type to NTFS.
Done!! Now you have fixed the issue «The file is too large for the destination file system» and can successfully copy a file larger than 4GB to the external USB drive or hard drive.
The Bottom Line
Once you understand «the file is too large for the destination file system» is caused by the FAT32 file system, the solution is specific: change the file system. If you use the Windows built-in features or utilities to convert the file system, you need to back up the files on the storage device first since the operations will erase the files on your device. Thus, if you want to convert FAT32 to another file system directly without data loss, using EaseUS Partition Master Free is more advisable for you.
FAQs About File Is Too Large for Destination File System Error
When you complete fixing this error on your drive and successfully transfer big files to your target drive, you may also want to learn some tips on how to prevent this error from happening again. Follow the questions listed below and find your answers here.
1. How do I transfer a file that is too large?
To transfer files that are too large to a new device, you have 3 ways to try:
- ① Change file system of target device to NTFS or exFAT for storing large files.
- ② Use a file transfer software like EaseUS Todo PCTrans to transfer all files at once.
- ③ Compress all large files and transfer them.
2. How do I avoid file is too large for destination file system error?
To best way to prevent or avoid this error is to select a proper file system format for your device.
- On Windows partition drives, using NTFS for storing large files.
- On removable storage devices, like USB or external hard drive larger than 64GB, using exFAT will be perfect.
3. How do I fix file too large for destination file system error?
To fix the «File is too large for the destination file system» error, you have to format the destination drive to NTFS for exFAT. Unlike FAT32, NTFS and exFAT support storing files larger than 4GB that FAT32 can’t. If you are afraid of losing essentials, you can use the Convert feature in EaseUS Partition Master to Convert FAT32 to NTFS successfully.
4. Why does it say the file is too large for the destination file system?
When the file system of your destination device doesn’t support saving the target large file, then the operating system would pop up the warning message and suggest you to set a suitable file system for the destination drive. FAT32 supports all types of files but every single file should not goes up to 4GB or even larger. Once the file breaks the limit, you’ll receive the error.
Главная » Уроки и статьи » Железо
Файл слишком велик для конечной файловой системы — Что делать?
Довольно часто каждый пользователь компьютера сталкивается с различными проблемами при записи данных на флешку. Одной из самых частых ошибок является «Файл слишком велик для конечной файловой системы». Вроде бы съемный носитель имеет много свободного места, при этом появляется сообщение об ошибке. Проблема довольно распространённая, однако решается практически в несколько кликов.
Почему появляется ошибка
Каждый съемный носитель имеет свою файловую систему. На данный момент для Windows наиболее актуальными являются FAT и NTFS. Проблема с большими файлами возникает именно в первом случае. Дело в том, что система FAT устарела и имеет ограничение максимального размера файла – 4GB.
Что делать в том случае, если ваш файл занимает, к примеру, более 4GB? Многие могут подумать разделить файл на несколько частей, однако данный способ не совсем корректен. Оптимальным вариантом является изменить файловую систему флэш-накопителя на NTFS. После этого действия сообщение «размер файла слишком велик» больше появляться не будет.
Конвертируем файловую систему в NTFS
Чтобы в будущем не появлялось сообщение «Файл слишком велик для конечной файловой системы» можно один раз сменить формат файловой системы и забыть о проблеме.
Существует несколько способов это сделать
Через форматирование флешки
Важно: при форматировании все файлы с флешки будут удалены.
Открываем Мой компьютер, жмем правой кнопкой мыши по флешке и выбираем «Форматировать…». В новом окне меняем файловую систему на NTFS, а размер кластера (размер единицы распределения) ставим 4096 байт. Далее жмем «Начать».

Через командную строку
Заходим в «Мой компьютер» и смотрим, какую метку (букву) имеет накопитель. Это может быть K,L,M и т.д. Запоминаем букву и открываем командную строку, где прописываем следующую команду:
convert L: /FS:NTFS
(в нашем случае метка диска «L»).
Решение проблемы без форматирования накопителя
Если ваша цель – записать файл на накопитель и переместить его на другой компьютер, то в таком случае действительно можно файловую систему не трогать. Как вариант, можно попробовать сжать файл при помощи архиватора. Так как в основном загрузочные образы имеют размер примерно 4,7 GB, то после сжатия они будут занимать примерно 3,5GB, соответственно без проблем скопируются на накопитель.
В единичных случаях можно воспользоваться именно этим способом (для извращенцев). Если вы планируете использовать накопитель для записи объемных образов на постоянной основе, то необходимо форматировать файловую систему в формат NTFS.
Разделение файла на части
Этот способ подойдет владельцем маленьких флешек, и почти не связан с нашей темой.
Чтобы iso образ разделить на несколько частей потребуется архиватор WinRar или похожий.
Первым делом нажимаем на файл ПКМ, после выбираем «Добавить в архив». После откроется всплывающее окно, где потребуется указать дополнительные параметры архивации. Во вкладке «Общие» внизу окна указываем 2000 MB в поле «Разделить тома по размеру», затем нажимаем ОК.
По завершению процесса будет создано 2 файла, которые можно копировать на флешку. Чтобы соединить разделенный образ в единое целое необходимо скопировать файлы с накопителя на другой компьютер, после нажать ПКМ на первую часть образа и выбрать «Извлечь в образ». Через несколько минут появится целый образ в формате iso.
Надеюсь теперь все вопросы, связанные с этой ошибкой, будут закрыты.
Понравилось? Поделись с друзьями!
Дата: 28.08.2018
Автор/Переводчик: ThreePC
If you encounter an Error 0x800700DF: The file size exceeds the limit allowed and cannot be saved, error messages during copying or moving the file to another drive or external drive. this article will help you to rid of this problem.
Error Message
An unexpected error is keeping you from copying the file. If you continue to receive the error, you can use the error code to search for help with this problem.
Error 0x800700DF: The file size exceeds the limit allowed and cannot be saved.
There has limitation to the size of files to transfer within a system another drive or to an external drive. Have you noted? the location where you have lots of space and not able to copy any file in 50 Mb in size. This is the permitted limit set in the registry, however, smaller files can be transferred.
You have to edit the registry settings to get rid of this problem, let’s see how to do it.
Follow the instruction to resolve the issue
Solution 1: Editing the registry
Before making any changes in the registry, you must take registry backup first or you can also create a system restore point. and then you can start changes in registry settings.
- Press Win+ R key, type REGEDIT and hit Enter button to open the registry editor.
- Now navigate to the following location in the registry editor.
HKEY_LOCAL_MACHINESYSTEMCurrentControlSetServicesWebClientParameters
- Select Parameters and you will see a DWORD key called FileSizeLimitInBytes
- Right-click on the FileSizeLimitInBytes and click Modify
- If Hexadecimal is selected, make sure the current value should be set to 2faf080.
- Now, select the Decimal, and note the current value, which must be set to 50000000
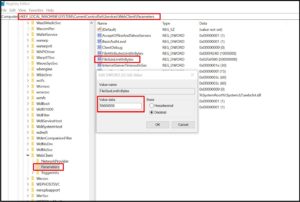
This decimal value indicates the allowed file size limit is about 50 Mb, but you can extend the limit up to 4 GB. This is a maximum permissible value.
- To modify the decimal value, Type 4294967295 in the Value data box, and click OK. Then close the registry editor.
- The next step is to restart the WebClient services or reboot your computer. Press Win+R, and then type ‘services.msc’. when the service window will open, find the WebClient Services.
- Double click on it Press Stop and then Start button to restart the services.
When it’s done, you are able to copy the file without an issue.
Solution 2: Change File System
If you are getting the error 0x800700DF, while you try to copy the file in an external disk like a USB pen drive or SD card. You need to change your external disk file system. To do this, you have to format the disk, Let’s take an example of a USB pen drive.
- Plug on a USB pen drive into your computer, the pen drive will show you in This PC.
- Right-click and select Format option, go to the file system option and then select the NTFS file system.

FAT16, FAT32 file system does not support to copy the larger file size.
- Once formatting is done you can try to copy the files on Pen Drive, now you will not encounter the error code 0x800700DF
I hope these solutions help you to resolve the issue.
We hope you like this article helpful. For more tech-related content you can explore the complete website or you can reach out to our YouTube channel iTechBestPractices
I am thanking you to visiting our website.

- Forum
- TeamSpeak 3 Technical Discussions [EN/DE]
- Permission System
- [Resolved] Selected icon file is too large. The maximum allowed file size is 0 kB.

-
March 5th, 2013, 09:25 PM
#1
Selected icon file is too large. The maximum allowed file size is 0 kB.
Selected icon file is too large.
The maximum allowed file size is 0 kB.
-
March 5th, 2013, 09:42 PM
#2
Search in your ServerGroup, the permission i_max_icon_filesize, and set the value = 8192 bytes (for example)
-
March 6th, 2013, 12:20 AM
#3
that permissions is 8192…..but icons are in groups, watch this
http://i48.tinypic.com/veqlit.png
http://i45.tinypic.com/w1y5x2.png
-
March 6th, 2013, 11:59 AM
#4
If the value = 8192, this error messsage is not logical:
The maximum allowed file size is 0 kB.
Reproduce this error and then …
Right click on you name >> Permissions >> Permissions overview >> … filter by i_max_icon_filesize >> export as TXT … and attach this file here
-
March 6th, 2013, 03:13 PM
#5
-
March 6th, 2013, 03:39 PM
#6
There are things we do not understand in your posts:
In post #3 displays an image without icons on the server (remote), but in the server group «Owner» is assigned an icon (Icon ID -1022533389 0 0 75)Well, go to Permissions >> Client Permissions >> Fantom >> remove Icon Max Filesize and Manage IconsAnd try again.
-
March 6th, 2013, 06:53 PM
#7
I resolved problem….Problem is «b_icon_manage» in cilent permissions
thanks a lot for help
-
June 16th, 2013, 10:59 PM
#8
Selected icon file is too large. The maximum allowed file size is 0 kB.
hi we have some problems, we want to change te general pic ( client icon for every body) tis is what is says
Selected icon file is too large. The maximum allowed file size is 0 kB.
And icon maxfilesize is also 8192
can you help us??
grtz
-
June 17th, 2013, 09:24 AM
#9
possibly overridden by channel group, check channel group permissions, client permissions etc.
When sending PMs please make sure to include a reference link to the thread in question in the body of your message.
-
June 28th, 2013, 09:23 PM
#10
-
February 18th, 2015, 06:23 PM
#11
I have similar problem. i can�t upload any icon for groups nad its says:
ICon have right size, format and size is about 1kb. I have all rights at the server.Thanks
Last edited by dante696; February 18th, 2015 at 11:05 PM.
Reason: merged
-
February 18th, 2015, 11:04 PM
#12
Check the value for i_max_icon_filesize it should be 8192
Thread merged, we did answer it already.
-
July 2nd, 2015, 05:19 PM
#13
Still cannot fix «The Maximum allowed file size is 0kb»
http://gyazo.com/702386a30ca399b7bd90a04f993c7886
I was uploading icons without problems, but now I keep getting this error. Tried changing the values of the Icon Max FileSize and Manage icon permission. Still no luck.
Last edited by dante696; July 3rd, 2015 at 09:05 AM.
Reason: merged
-
July 3rd, 2015, 06:31 PM
#14
Fixed
Originally Posted by Breezi
*FIXED*
I removed both Manage Icons & Icon Max Filesize (Bytes) from all server ranks and added it to only Server Admin. Then I set the Max Filesize to 8192, which then let me upload icons again.
http://prntscr.com/7oed0g


Thread Information
Users Browsing this Thread
There are currently 1 users browsing this thread. (0 members and 1 guests)
Similar Threads
-
Replies: 2
Last Post: March 31st, 2014, 04:31 PM
-
Replies: 6
Last Post: January 18th, 2014, 09:39 AM
-
Replies: 2
Last Post: February 20th, 2013, 04:24 PM
Posting Permissions

- You may not post new threads
- You may not post replies
- You may not post attachments
- You may not edit your posts
- BB code is On
- Smilies are On
- [IMG] code is Off
- [VIDEO] code is Off
- HTML code is Off
Forum Rules