Hi!
Unfortunately we are currently facing the same errors.
We are running a freshly installed Windows Server 2016 where our developers work using RDP.
There are just two containers at the moment: apache-dev (based on centos:7) and redis-dev.
The redis container is started as follows:
docker run —rm -v c:/apps/redis/redis.log:/var/log/redis.log -v c:/apps/redis/redis.conf:/usr/local/etc/redis/redis.conf:ro -itd -p 6379:6379 —name redis-dev redis:3 redis-server /usr/local/etc/redis/redis.conf
Both work as expected, but are not heavily used, since we’re just evaluating docker in our new environment.
After a few hours (mostly over night) — I return to the server (which has not been used meanwhile) just to notice, that there seems to be something wrong — e.g. the php application running on the apache container complaining that redis is not reachable, or that it is not able to access our Oracle Database (which does not run in a containerized environment). Apache itself was reachable through the local browser at that time.
I then stop both containers.
If I try to start the containers again, I get something like this:
C:appsredis>start_redis.bat
b33f8ccf8121de2e8e12e00e823ec891f40a104c8576a46d83e9b22a9de4ed9c
docker: Error response from daemon: driver failed programming external connectivity on endpoint redis-dev (b36dc0f21c4f40665b38dac87e5a4eb7482c72cd8c9430fadcecac1224be56b0): Error starting userland proxy: mkdir /port/tcp:0.0.0.0:6379:tcp:172.17.0.3:6379: input/output error.
The batch file just contains the commmand from above.
If I use «Restart docker» on the «Reset» tab in the docker gui, I am again able to start both containers.
This issue hit me various times. Another example: I spawned a bash inside the apache container to test a few things but noticed, there was no internet connectivity. So I stopped the container and got the very same error on starting it. Restarted docker, started the container — spawned a bash, everything ok again.
It always seems like network connectivity gets lost after some time — and whatever happens prevents the containers to start again, after they have been stopped.
I uploaded a diagnostic, hoping that it helps:
0399F110-0301-424D-B0F7-3CC0E0C7C8CC/2017-08-22_09-16-15
I’m happy to provide more details — just don’t know where to start my search…
Thanks!
Nico
Share this post and Earn Free Points!
To resolve this issue from the title [ Error starting userland proxy ] we must dot the following things from this article. Usually use dockers from Linux , but this time I had to fight them under Windows 10. After a few minutes I found out again that everything was easier under Linux, because I was facing problems all the time with correct and stable operation of Docker for Windows. But to the point, what was the problem?
Table of Contents
Introduction
Windows Fast Startup
Windows Fast Startup is a feature in Microsoft Windows that allows the operating system to boot up faster by saving a snapshot of the system state to a file on the hard drive when the system is shut down.
When Fast Startup is enabled, the system state is saved to a file called the “hibernation file” (hiberfil.sys). This file contains a copy of the system memory, as well as the system’s current device drivers and system files.
When the system is restarted, the operating system reads the hibernation file and uses it to restore the system to the state it was in when it was shut down. This allows the system to start up much faster than it would if it had to load all the device drivers and system files from scratch.
Note that Fast Startup may not be available on all systems, and it may not be compatible with certain hardware or software configurations.
Error Starting Userland Proxy
The “Error starting userland proxy: listen tcp 0.0.0.0:80: bind: address already in use” error typically occurs when another process is already using the TCP port that you are trying to bind to.
This error can occur when you are trying to start a service or application that listens on a specific port, and that port is already in use by another process.
To resolve this issue, you will need to find the process that is using the port and either stop it or configure your service or application to use a different port.
Problem
We run the container and we get the error:
Starting docker_jenkins_1 ... error

Starting docker_nexus_1   ...


ERROR: for docker_jenkins_1  Cannot start service jenkins: driver failed programming external connectivity on endpoint docker_jenkins_1 (f275652123e7c423e6cb482efc6bf88775b1b971c971b3f4e2f30010a3a4debf): Error starting userland proxy: listeStarting docker_nexus_1   ... error


ERROR: for docker_nexus_1  Cannot start service nexus: driver failed programming external connectivity on endpoint docker_nexus_1 (bf3bfd7a65e23a2f0625d8389689359dc7990599a6fac0bd13aed0cf00619f32): Error starting userland proxy: listen tcp 0.0.0.0:8081: bind: Only one usage of each socket address (protocol/network address/port) is normally permitted.


ERROR: for jenkins  Cannot start service jenkins: driver failed programming external connectivity on endpoint docker_jenkins_1 (f275652123e7c423e6cb482efc6bf88775b1b971c971b3f4e2f30010a3a4debf): Error starting userland proxy: listen tcp 0.0.0.0:50000: bind: Only one usage of each socket address (protocol/network address/port) is normally permitted.


ERROR: for nexus  Cannot start service nexus: driver failed programming external connectivity on endpoint docker_nexus_1 (bf3bfd7a65e23a2f0625d8389689359dc7990599a6fac0bd13aed0cf00619f32): Error starting userland proxy: listen tcp 0.0.0.0:8081: bind: Only one usage of each socket address (protocol/network address/port) is normally permitted.

ERROR: Encountered errors while bringing up the project.
The problem is with the Fast Startup feature, which was introduced in Windows 10. Its purpose is to make Windows start faster. But nothing happens magically. Behind the buzz word “Fast Startup” there is a kind of hibernation and cache of certain elements of the application. As a result, when the system is restarted, they are not restarted, but use the cache. And this is why, despite restarting or shutting down and restarting the computer, we still get the error that the port is already in the device.,
Possible Solutions
To solve the above problem, just turn off the Fast Startup options. We can do it, for example, in the following two ways:
#1 Solution – Turn Off Fast Startup
- Open the Start Menu and enter Power Options
- Click in the left side menu: Choose what the power buttons do
- In the Shutdown options section, CHECK the checkbox: Enable fast startup (recommended)
- Restart the computer. Remember to close all running containers before restarting.
#2 Solution – Change Registry
The second way is to change an entry in the system registry.
- Start the Registry Editor or enter regedit in the Start Menu.
- We are looking for an entry below, Open the file: HiberbootEnabled and change the value:
- 0 – disable Fast Startup
- 1 – turn on Fast Startup
HKEY_LOCAL_MACHINESYSTEMCurrentControlSetControlSession ManagerPower
#3 Solution – Kill Another Process
Here are a few steps you can try to troubleshoot this issue:
- Use the
lsofcommand to find the process that is using the port:
lsof -i :80
This will list all the processes that are using the port 80.
- Find the process ID (PID) of the process using the port, and use the
killcommand to stop it:
lsof -i :80
#4 Solution – Use Different Port
Alternatively you can use different port to not have conflict with other applications.
Unfortunately, I noticed that despite disabling Fast Start, I was sometimes getting this error again. I also noticed that this only happened when I hadn’t disabled all running containers before restarting or shutting down my computer, too …
Always turn off all containers after finishing work 🙂
Error starting userland proxy: listen tcp4 0.0 0.0 3306 bind: address already in use, Cannot start service Ports are not available docker, Docker Cannot start service Ports are not available
Could You Please Share This Post?
I appreciate It And Thank YOU! :)
Have A Nice Day!
Docker — удобный инструмент для создания изолированных сред. Именно этой своей особенностью он и удобен для разворачивания различных приложений, требующих дополнительных зависимостей.
Managed Kubernetes помогает разворачивать контейнерные приложения в инфраструктуре Selectel. Сосредоточьтесь на разработке, а мы займемся рутинными операциями по обеспечению работы вашего кластера Kubernetes.
В прошлой статье о Docker-контейнерах мы рассказывали о преимуществах контейнеризации в целом, а в этой рассмотрим их относительно СУБД PostgreSQL, также расскажем о ее установке внутри контейнера.
Чтобы больше понять о преимуществах контейнеризации PostgreSQL, немного забежим вперед и для примера посмотрим на те зависимые пакеты, которые автоматически будут установлены вместе с приложениями, относящимся непосредственно к PostgreSQL, если мы будем ставить СУБД на сервер:
sudo apt install postgresql postgresql-contribReading package lists... Done
Building dependency tree
Reading state information... Done
The following additional packages will be installed:
libllvm10 libpq5 libxslt1.1 postgresql-12 postgresql-client-12
postgresql-client-common postgresql-common
Suggested packages:
postgresql-doc postgresql-doc-12 libjson-perl
Recommended packages:
sysstatВ нашем примере их три: libllvm10, libpq5, libxslt1.1. Однако, в зависимости от дистрибутива, может быть и больше. Посмотрим от каких пакетов на самом деле зависит пакет postgresql-12 (спойлер: 25 обязательных пакетов и 1 рекомендованный):
sudo apt-cache depends postgresql-12postgresql-12
|Depends: locales
Depends: locales-all
Depends: postgresql-client-12
Depends: postgresql-common
Depends: ssl-cert
Depends: tzdata
|Depends: debconf
Depends: <debconf-2.0>
cdebconf
debconf
Depends: libc6
Depends: libgcc-s1
Depends: libgssapi-krb5-2
Depends: libicu66
Depends: libldap-2.4-2
Depends: libllvm10
Depends: libpam0g
Depends: libpq5
Depends: libselinux1
Depends: libssl1.1
Depends: libstdc++6
Depends: libsystemd0
Depends: libuuid1
Depends: libxml2
Depends: libxslt1.1
Depends: zlib1g
Recommends: sysstatНаличие или отсутствие тех или иных пакетов, различные версии и другие факторы напрямую влияют на стабильность работы PostgreSQL. Используя контейнеризацию, возможные конфликты несовместимости нивелируются, т.к. все необходимые зависимости уже будут находиться в среде контейнера. Если загрузить готовый образ контейнера с ресурса Docker Hub (об этом ниже в статье), мы получим протестированную на совместимость и полностью готовую к работе среду.
Еще одно важное преимущество использования контейнеризации среды PostgreSQL — воспроизводимость. Разработчики и те, кто вносит какие-либо изменения в код процедур или добавляет новый функционал, могут быстро развернуть тестовую среду, полностью идентичную боевой, чтобы проверить свои гипотезы.
И, наконец, отказоустойчивость. Если с сервером что-то случится, точно такой же контейнер может быть запущен на другом сервере с уже примонтированным хранилищем датафайлов.
Откроем консоль управления Selectel, перейдем в представление Облачная платформа и нажмем на кнопку Создать сервер.

Далее вводим имя сервера, выбираем образ операционной системы (остановимся на Ubuntu 20.04 LTS 64-bit) и фиксированную конфигурацию сервера с 2 vCPU и 4 ГБ RAM. Объем дискового пространства диска установим в 20 ГБ. Еще раз проверяем конфигурацию сервера и нажимаем Создать.

Проверим сетевые настройки, копируем пароль для root и удостоверимся в нижней части экрана, что все настройки корректны. Нажмем кнопку Создать.
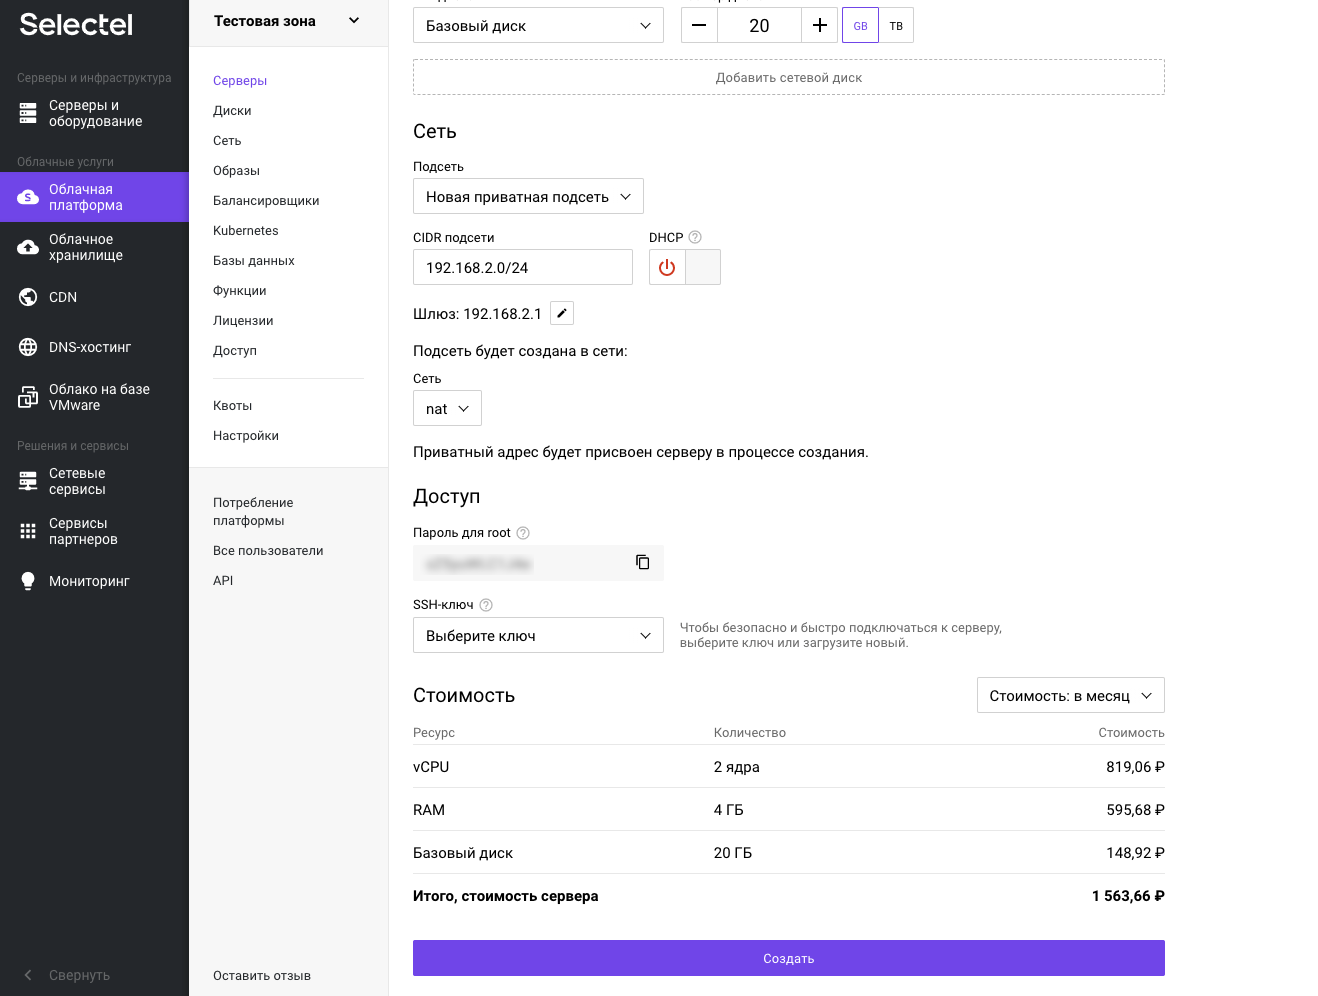
Подождем минуту или две пока сервер не перейдет в состояние Active.

Теперь можем приступать к установке PostgreSQL в Docker. Поехали!
Как установить PostgreSQL в Docker из образа
Перед началом работы с PostgreSQL в контейнере Docker, установим сам Docker. Предварительно, добавим ключ для работы с репозиторием Docker Hub:
curl -fsSL https://download.docker.com/linux/ubuntu/gpg | sudo apt-key add -Добавим этот репозиторий в локальный список репозиториев и установим Docker:
sudo add-apt-repository "deb [arch=amd64] https://download.docker.com/linux/ubuntu $(lsb_release -cs) stable"sudo apt install docker-ceЗапустим демон Docker и активируем его автозапуск:
sudo systemctl start dockersudo systemctl enable dockerПоскольку за пределами жизненного цикла контейнера не остается каких либо данных, на файловой системе сервера (или другом файловом хранилище) необходимо создать каталог для хранения данных, которые будут появятся в процессе работы экземпляра PostgreSQL.
mkdir -p $HOME/docker/volumes/postgresЧтобы получить из репозитория Docker Hub готовый образ контейнера с PostgreSQL, выполним следующую команду:
sudo docker pull postgresUsing default tag: latest
latest: Pulling from library/postgres
f7ec5a41d630: Pull complete
d073cd070242: Pull complete
03790957a916: Pull complete
b3776ac15dab: Pull complete
7144fd00aec4: Pull complete
54f6491bd120: Pull complete
247ab23c6036: Pull complete
57800498c536: Pull complete
bcb15a4d14f4: Pull complete
cfc751ecbc6e: Pull complete
bbf042afd4a4: Pull complete
453056a20de6: Pull complete
d5b1a75378ef: Pull complete
7841e2074775: Pull complete
Digest: sha256:61d5d8ef6cb4e2035f053f26b6b455c201a809354084cc8426b6904b8dd35602
Status: Downloaded newer image for postgres:latest
docker.io/library/postgres:latestТеперь все готово к запуску.
Как запустить контейнер PostgreSQL
Выполним команду docker с ключом run:
sudo docker run --rm --name selectel-pgdocker -e POSTGRES_PASSWORD=selectel -e POSTGRES_USER=selectel -e POSTGRES_DB=selectel -d -p 5432:5432 -v $HOME/docker/volumes/postgres:/var/lib/postgresql/data postgresЕсли возникла ошибка вида: «Error starting userland proxy: listen tcp4 0.0.0.0:5432: bind: address already in use.», то следует вначале посмотреть какой процесс задействует порт 5432:
sudo ss -lptn 'sport = :5432'State Recv-Q Send-Q Local Address:Port Peer Address:Port Process
LISTEN 0 244 127.0.0.1:5432 0.0.0.0:* users:(("postgres",pid=2592,fd=3)Затем прибить” процесс по его PID и вновь выполнить запуск Docker-контейнера:
sudo kill 2592Разберем ключи, которые мы использовали для запуска контейнера:
- —rm — ключ активирует автоматическое удаление контейнера и связанную с ним файловую систему после остановки контейнера. Полезный ключ для экономии дискового пространства.
- —name — ключ устанавливает имя контейнера. В пределах одного сервера имена контейнеров должны быть уникальны. Даже если один из них остановлен.
- -e — ключ задает переменные окружения, с которыми будет запущен контейнер. В нашей ситуации мы добавляем пароль суперпользователя, (POSTGRES_PASSWORD=selectel), имя суперпользователя (POSTGRES_USER=selectel) и имя базы данных по умолчанию (POSTGRES_DB=selectel) к базе данных.
- -d — ключ указывает, что контейнер должен быть запущен в в фоновом режиме (возвращает управление после его запуска).
- -p — ключ указывает на привязку внутреннего порта контейнера к порту сервера (используем порт по умолчанию 5432).
- -v — ключ создает точку монтирования каталога $HOME/docker/volumes/postgres на сервере к каталогу /var/lib/postgresql/data внутри контейнера.
Как подключиться к PostgreSQL в контейнере
После успешного запуска контейнера с PostgreSQL, попробуем к нему подключиться при помощи утилиты psql. Установим ее из пакета postgresql-client:
sudo apt install postgresql-clientТеперь можно подключиться и выполнить тестовый SQL-запрос:
psql -h 127.0.0.1 -U selectel -d selectelPassword for user selectel:
psql (12.6 (Ubuntu 12.6-0ubuntu0.20.04.1), server 13.2 (Debian 13.2-1.pgdg100+1))
WARNING: psql major version 12, server major version 13.
Some psql features might not work.
Type "help" for help.
selectel=#Если появилось приглашение к вводу запроса, значит все действия были выполнены правильно.
Еще один вариант подключиться к базе данных, не устанавливая дополнительных утилит — подключиться непосредственно к Docker-контейнеру. Для этого выполним команду docker exec с дополнительными ключами:
sudo docker exec -it selectel-pgdocker psql -U selectelpsql (13.2 (Debian 13.2-1.pgdg100+1))
Type "help" for help.
selectel=#Приглашение к вводу запроса будет означать корректность ввода команды. Разберем ключи, которые мы использовали для выполнения команды:
- -i — ключ активирует интерактивную работу с терминалом.
- -t — ключ запускает псевдо-терминал (pseudo-TTY).
- selectel-pgdocker — имя контейнера, к которому выполняется подключение.
- psql — указание на запуск утилиты для подключение к базе данных PostgreSQL.
- -U — ключ указывает на имя пользователя, которое будет использоваться для подключения к базе данных.
Теперь попробуем создать новую таблицу, добавить в нее данные и выполнить запрос:
selectel=# create table cities (name varchar(80));CREATE TABLEselectel=# insert into cities values ('Moscow');INSERT 0 1selectel=# select * from cities; name
--------
Moscow
(1 row)Чтобы остановить запущенный контейнер выполним docker stop и укажем имя контейнера:
sudo docker stop selectel-pgdockerФайлы и процессы, созданные контейнером, принадлежат пользователю postgres, который является внутренним по отношению к контейнеру. В отсутствие пространства имен пользователей внутри контейнера, UID и GID в контейнере могут иметь произвольное значение. На самом сервере этим UID и GID могут соответствовать привилегированные пользователи или группы соответственно.
Например, пользователь на хосте с тем же UID или GID, что и пользователь postgres в контейнере, сможет получить доступ к данным в различных каталогах хоста, а также сможет завершить любой запущенный процесс. Чтобы избежать такой бреши в безопасности, укажем при запуске контейнера специализированные переменные USERMAP_UID и USERMAP_GID:
sudo docker run --rm --name selectel-pgdocker -e POSTGRES_PASSWORD=selectel -e POSTGRES_USER=selectel -e POSTGRES_DB=selectel -e USERMAP_UID=999 -e USERMAP_GID=999 -d -p 5432:5432 -v $HOME/docker/volumes/postgres:/var/lib/postgresql/data postgresКак запустить PostgreSQL в контейнере в составе docker-compose
Еще одним вариантом запуска PostgreSQL в Docker-контейнере, является запуск контейнера с базой данных в составе docker-compose. В первую очередь, создадим соответствующий yml-файл:
nano docker-compose.ymlversion: '3.1'
volumes:
pg_selectel:
services:
pg_db:
image: postgres
restart: always
environment:
- POSTGRES_PASSWORD=selectel
- POSTGRES_USER=selectel
- POSTGRES_DB=selectel
volumes:
- pg_project:/var/lib/postgresql/data
ports:
- ${POSTGRES_PORT:-5432}:5432Затем установим docker-compose:
sudo apt install docker-composeТеперь запустим контейнер:
sudo docker-compose up -dКлюч -d указывает, что docker-compose должен быть запущен в в фоновом режиме (вернет управление после его запуска).
Проверим возможность подключения к базе данных:
psql -h 192.168.0.4 -U selectel -d selectelPassword for user selectel:
psql (12.6 (Ubuntu 12.6-0ubuntu0.20.04.1), server 13.2 (Debian 13.2-1.pgdg100+1))
WARNING: psql major version 12, server major version 13.
Some psql features might not work.
Type "help" for help.
selectel=#Появление приглашения к вводу команд для PostgreSQL означает корректность выполненных настроек.
Чтобы остановить запущенный контейнер, выполним docker-compose stop:
sudo docker-compose stopЗаключение
Мы рассказали о работе с базой данных PostgreSQL в контейнере Docker, запуске, выполнении запросов и остановке. Как и говорили в начале статьи, работа с контейнеризованной в Docker базой данных упрощает процесс разработки и администрирование. Контейнеры могут быть легко перезапущены на другом сервере и сервис, предоставляемый базой данных, не прервется.