Всем привет питаюсь собрать т17 из кучу плат. есть 4 абсолютно рабочих плат, назовём их так A. B. C. D. платы абсолютно одинаковые.
Так вот A. B. работают вместе и майнят. Так же C. D. работают вместе. Но нам нужно 3 платы в т17. И проблема такая берем A и B. к нему
добавляем платы C или D чтоб получилось 3 платы как положено, и оно не стартует. ругается на разное напряжение. Voltage are different. Will exit.
В чём проблема я понять не могу.
Скрытый текст
Booting Linux on physical CPU 0x0
Linux version 4.6.0-xilinx-gff8137b-dirty (lzq@armdev2) (gcc version 4.8.3 20140320 (prerelease) (Sourcery CodeBench Lite 2014.05-23) ) #25 SMP PREEMPT Fri Nov 23 15:30:52 CST 2018
CPU: ARMv7 Processor [413fc090] revision 0 (ARMv7), cr=18c5387d
CPU: PIPT / VIPT nonaliasing data cache, VIPT aliasing instruction cache
Machine model: Xilinx Zynq
cma: Reserved 16 MiB at 0x0e000000
Memory policy: Data cache writealloc
On node 0 totalpages: 61440
free_area_init_node: node 0, pgdat c0b39280, node_mem_map cde10000
Normal zone: 480 pages used for memmap
Normal zone: 0 pages reserved
Normal zone: 61440 pages, LIFO batch:15
percpu: Embedded 12 pages/cpu @cddf1000 s19776 r8192 d21184 u49152
pcpu-alloc: s19776 r8192 d21184 u49152 alloc=12*4096
pcpu-alloc: [0] 0 [0] 1
Built 1 zonelists in Zone order, mobility grouping on. Total pages: 60960
Kernel command line: mem=240M console=ttyPS0,115200 ramdisk_size=33554432 root=/dev/ram rw earlyprintk
PID hash table entries: 1024 (order: 0, 4096 bytes)
Dentry cache hash table entries: 32768 (order: 5, 131072 bytes)
Inode-cache hash table entries: 16384 (order: 4, 65536 bytes)
Memory: 203752K/245760K available (6345K kernel code, 231K rwdata, 1896K rodata, 1024K init, 223K bss, 25624K reserved, 16384K cma-reserved, 0K highmem)
Virtual kernel memory layout:
vector : 0xffff0000 — 0xffff1000 ( 4 kB)
fixmap : 0xffc00000 — 0xfff00000 (3072 kB)
vmalloc : 0xcf800000 — 0xff800000 ( 768 MB)
lowmem : 0xc0000000 — 0xcf000000 ( 240 MB)
pkmap : 0xbfe00000 — 0xc0000000 ( 2 MB)
modules : 0xbf000000 — 0xbfe00000 ( 14 MB)
.text : 0xc0008000 — 0xc090c424 (9234 kB)
.init : 0xc0a00000 — 0xc0b00000 (1024 kB)
.data : 0xc0b00000 — 0xc0b39fe0 ( 232 kB)
.bss : 0xc0b39fe0 — 0xc0b71c28 ( 224 kB)
Preemptible hierarchical RCU implementation.
Build-time adjustment of leaf fanout to 32.
RCU restricting CPUs from NR_CPUS=4 to nr_cpu_ids=2.
RCU: Adjusting geometry for rcu_fanout_leaf=32, nr_cpu_ids=2
NR_IRQS:16 nr_irqs:16 16
efuse mapped to cf800000
ps7-slcr mapped to cf802000
L2C: platform modifies aux control register: 0x72360000 -> 0x72760000
L2C: DT/platform modifies aux control register: 0x72360000 -> 0x72760000
L2C-310 erratum 769419 enabled
L2C-310 enabling early BRESP for Cortex-A9
L2C-310 full line of zeros enabled for Cortex-A9
L2C-310 ID prefetch enabled, offset 1 lines
L2C-310 dynamic clock gating enabled, standby mode enabled
L2C-310 cache controller enabled, 8 ways, 512 kB
L2C-310: CACHE_ID 0x410000c8, AUX_CTRL 0x76760001
zynq_clock_init: clkc starts at cf802100
Zynq clock init
sched_clock: 64 bits at 333MHz, resolution 3ns, wraps every 4398046511103ns
clocksource: arm_global_timer: mask: 0xffffffffffffffff max_cycles: 0x4ce07af025, max_idle_ns: 440795209040 ns
Switching to timer-based delay loop, resolution 3ns
clocksource: ttc_clocksource: mask: 0xffff max_cycles: 0xffff, max_idle_ns: 537538477 ns
ps7-ttc #0 at cf80a000, irq=18
Console: colour dummy device 80×30
Calibrating delay loop (skipped), value calculated using timer frequency.. 666.66 BogoMIPS (lpj=3333333)
pid_max: default: 32768 minimum: 301
Mount-cache hash table entries: 1024 (order: 0, 4096 bytes)
Mountpoint-cache hash table entries: 1024 (order: 0, 4096 bytes)
CPU: Testing write buffer coherency: ok
CPU0: thread -1, cpu 0, socket 0, mpidr 80000000
Setting up static identity map for 0x100000 — 0x100058
CPU1: failed to boot: -1
Brought up 1 CPUs
SMP: Total of 1 processors activated (666.66 BogoMIPS).
CPU: All CPU(s) started in SVC mode.
devtmpfs: initialized
VFP support v0.3: implementor 41 architecture 3 part 30 variant 9 rev 4
clocksource: jiffies: mask: 0xffffffff max_cycles: 0xffffffff, max_idle_ns: 19112604462750000 ns
pinctrl core: initialized pinctrl subsystem
NET: Registered protocol family 16
DMA: preallocated 256 KiB pool for atomic coherent allocations
cpuidle: using governor menu
hw-breakpoint: found 5 (+1 reserved) breakpoint and 1 watchpoint registers.
hw-breakpoint: maximum watchpoint size is 4 bytes.
zynq-ocm f800c000.ps7-ocmc: ZYNQ OCM pool: 256 KiB @ 0xcf880000
vgaarb: loaded
SCSI subsystem initialized
usbcore: registered new interface driver usbfs
usbcore: registered new interface driver hub
usbcore: registered new device driver usb
media: Linux media interface: v0.10
Linux video capture interface: v2.00
pps_core: LinuxPPS API ver. 1 registered
pps_core: Software ver. 5.3.6 — Copyright 2005-2007 Rodolfo Giometti <giometti@linux.it>
PTP clock support registered
EDAC MC: Ver: 3.0.0
Advanced Linux Sound Architecture Driver Initialized.
clocksource: Switched to clocksource arm_global_timer
NET: Registered protocol family 2
TCP established hash table entries: 2048 (order: 1, 8192 bytes)
TCP bind hash table entries: 2048 (order: 2, 16384 bytes)
TCP: Hash tables configured (established 2048 bind 2048)
UDP hash table entries: 256 (order: 1, 8192 bytes)
UDP-Lite hash table entries: 256 (order: 1, 8192 bytes)
NET: Registered protocol family 1
RPC: Registered named UNIX socket transport module.
RPC: Registered udp transport module.
RPC: Registered tcp transport module.
RPC: Registered tcp NFSv4.1 backchannel transport module.
PCI: CLS 0 bytes, default 64
Trying to unpack rootfs image as initramfs…
rootfs image is not initramfs (no cpio magic); looks like an initrd
Freeing initrd memory: 12584K (cceb7000 — cdb01000)
hw perfevents: enabled with armv7_cortex_a9 PMU driver, 7 counters available
futex hash table entries: 512 (order: 3, 32768 bytes)
workingset: timestamp_bits=28 max_order=16 bucket_order=0
jffs2: version 2.2. (NAND) (SUMMARY) © 2001-2006 Red Hat, Inc.
io scheduler noop registered
io scheduler deadline registered
io scheduler cfq registered (default)
dma-pl330 f8003000.ps7-dma: Loaded driver for PL330 DMAC-241330
dma-pl330 f8003000.ps7-dma: DBUFF-128x8bytes Num_Chans-8 Num_Peri-4 Num_Events-16
e0000000.serial: ttyPS0 at MMIO 0xe0000000 (irq = 158, base_baud = 6249999) is a xuartps
console [ttyPS0] enabled
xdevcfg f8007000.ps7-dev-cfg: ioremap 0xf8007000 to cf86e000
[drm] Initialized drm 1.1.0 20060810
brd: module loaded
loop: module loaded
CAN device driver interface
gpiod_set_value: invalid GPIO
libphy: MACB_mii_bus: probed
macb e000b000.ethernet eth0: Cadence GEM rev 0x00020118 at 0xe000b000 irq 31 (00:0a:35:00:00:00)
Generic PHY e000b000.etherne:00: attached PHY driver [Generic PHY] (mii_bus:phy_addr=e000b000.etherne:00, irq=-1)
e1000e: Intel(R) PRO/1000 Network Driver — 3.2.6-k
e1000e: Copyright(c) 1999 — 2015 Intel Corporation.
ehci_hcd: USB 2.0 ‘Enhanced’ Host Controller (EHCI) Driver
ehci-pci: EHCI PCI platform driver
usbcore: registered new interface driver usb-storage
mousedev: PS/2 mouse device common for all mice
i2c /dev entries driver
Xilinx Zynq CpuIdle Driver started
sdhci: Secure Digital Host Controller Interface driver
sdhci: Copyright(c) Pierre Ossman
sdhci-pltfm: SDHCI platform and OF driver helper
mmc0: SDHCI controller on e0100000.ps7-sdio [e0100000.ps7-sdio] using ADMA
ledtrig-cpu: registered to indicate activity on CPUs
usbcore: registered new interface driver usbhid
usbhid: USB HID core driver
nand: device found, Manufacturer ID: 0x2c, Chip ID: 0xda
nand: Micron MT29F2G08ABAGAWP
nand: 256 MiB, SLC, erase size: 128 KiB, page size: 2048, OOB size: 128
nand: WARNING: pl35x-nand: the ECC used on your system is too weak compared to the one required by the NAND chip
Bad block table found at page 131008, version 0x01
Bad block table found at page 130944, version 0x01
6 ofpart partitions found on MTD device pl35x-nand
Creating 6 MTD partitions on «pl35x-nand»:
0x000000000000-0x000002800000 : «BOOT.bin-env-dts-kernel»
0x000002800000-0x000004800000 : «ramfs»
0x000004800000-0x000005000000 : «configs»
0x000005000000-0x000006000000 : «reserve»
0x000006000000-0x000008000000 : «ramfs-bak»
0x000008000000-0x000010000000 : «reserve1»
NET: Registered protocol family 10
sit: IPv6 over IPv4 tunneling driver
NET: Registered protocol family 17
can: controller area network core (rev 20120528 abi 9)
NET: Registered protocol family 29
can: raw protocol (rev 20120528)
can: broadcast manager protocol (rev 20120528 t)
can: netlink gateway (rev 20130117) max_hops=1
zynq_pm_ioremap: no compatible node found for ‘xlnx,zynq-ddrc-a05’
zynq_pm_late_init: Unable to map DDRC IO memory.
Registering SWP/SWPB emulation handler
hctosys: unable to open rtc device (rtc0)
ALSA device list:
No soundcards found.
RAMDISK: gzip image found at block 0
EXT4-fs (ram0): couldn’t mount as ext3 due to feature incompatibilities
EXT4-fs (ram0): mounted filesystem without journal. Opts: (null)
VFS: Mounted root (ext4 filesystem) on device 1:0.
devtmpfs: mounted
Freeing unused kernel memory: 1024K (c0a00000 — c0b00000)
EXT4-fs (ram0): re-mounted. Opts: block_validity,delalloc,barrier,user_xattr
random: dd urandom read with 0 bits of entropy available
ubi0: attaching mtd2
ubi0: scanning is finished
ubi0: attached mtd2 (name «configs», size 8 MiB)
ubi0: PEB size: 131072 bytes (128 KiB), LEB size: 126976 bytes
ubi0: min./max. I/O unit sizes: 2048/2048, sub-page size 2048
ubi0: VID header offset: 2048 (aligned 2048), data offset: 4096
ubi0: good PEBs: 64, bad PEBs: 0, corrupted PEBs: 0
ubi0: user volume: 1, internal volumes: 1, max. volumes count: 128
ubi0: max/mean erase counter: 18/9, WL threshold: 4096, image sequence number: 243014538
ubi0: available PEBs: 0, total reserved PEBs: 64, PEBs reserved for bad PEB handling: 40
ubi0: background thread «ubi_bgt0d» started, PID 708
UBIFS (ubi0:0): background thread «ubifs_bgt0_0» started, PID 711
UBIFS (ubi0:0): recovery needed
UBIFS (ubi0:0): recovery completed
UBIFS (ubi0:0): UBIFS: mounted UBI device 0, volume 0, name «configs»
UBIFS (ubi0:0): LEB size: 126976 bytes (124 KiB), min./max. I/O unit sizes: 2048 bytes/2048 bytes
UBIFS (ubi0:0): FS size: 1396736 bytes (1 MiB, 11 LEBs), journal size 888833 bytes (0 MiB, 5 LEBs)
UBIFS (ubi0:0): reserved for root: 65970 bytes (64 KiB)
UBIFS (ubi0:0): media format: w4/r0 (latest is w4/r0), UUID A0A086A4-06D4-4248-A29E-AC296967A2B9, small LPT model
ubi1: attaching mtd5
ubi1: scanning is finished
ubi1: attached mtd5 (name «reserve1», size 128 MiB)
ubi1: PEB size: 131072 bytes (128 KiB), LEB size: 126976 bytes
ubi1: min./max. I/O unit sizes: 2048/2048, sub-page size 2048
ubi1: VID header offset: 2048 (aligned 2048), data offset: 4096
ubi1: good PEBs: 1020, bad PEBs: 4, corrupted PEBs: 0
ubi1: user volume: 1, internal volumes: 1, max. volumes count: 128
ubi1: max/mean erase counter: 1445/822, WL threshold: 4096, image sequence number: 3389548455
ubi1: available PEBs: 0, total reserved PEBs: 1020, PEBs reserved for bad PEB handling: 36
ubi1: background thread «ubi_bgt1d» started, PID 720
UBIFS (ubi1:0): background thread «ubifs_bgt1_0» started, PID 723
UBIFS (ubi1:0): recovery needed
UBIFS (ubi1:0): recovery completed
UBIFS (ubi1:0): UBIFS: mounted UBI device 1, volume 0, name «reserve1»
UBIFS (ubi1:0): LEB size: 126976 bytes (124 KiB), min./max. I/O unit sizes: 2048 bytes/2048 bytes
UBIFS (ubi1:0): FS size: 123039744 bytes (117 MiB, 969 LEBs), journal size 6221824 bytes (5 MiB, 49 LEBs)
UBIFS (ubi1:0): reserved for root: 4952683 bytes (4836 KiB)
UBIFS (ubi1:0): media format: w4/r0 (latest is w4/r0), UUID 721E72E7-F382-4130-AD9F-6C10D9102537, small LPT model
IPv6: ADDRCONF(NETDEV_UP): eth0: link is not ready
IPv6: ADDRCONF(NETDEV_UP): eth0: link is not ready
macb e000b000.ethernet eth0: unable to generate target frequency: 25000000 Hz
macb e000b000.ethernet eth0: link up (100/Full)
IPv6: ADDRCONF(NETDEV_CHANGE): eth0: link becomes ready
In axi fpga driver!
request_mem_region OK!
AXI fpga dev virtual address is 0xcfb38000
*base_vir_addr = 0xab013
In fpga mem driver!
request_mem_region OK!
fpga mem virtual address is 0xd2000000
2021-05-26 05:48:27 driver-btm-api.c:663:init_freq_mode: This is scan-user version
2021-05-26 05:48:27 driver-btm-api.c:2028:bitmain_soc_init: opt_multi_version = 1
2021-05-26 05:48:27 driver-btm-api.c:2029:bitmain_soc_init: opt_bitmain_ab = 1
2021-05-26 05:48:27 driver-btm-api.c:2030:bitmain_soc_init: opt_bitmain_work_mode = 0
2021-05-26 05:48:27 driver-btm-api.c:2031:bitmain_soc_init: Miner compile time: Thu Apr 23 16:29:07 CST 2020 type: Antminer T17
2021-05-26 05:48:27 driver-btm-api.c:2032:bitmain_soc_init: commit version: 1c5be6f 2020-04-20 16:18:14, build by: lol 2020-04-23 16:35:04
2021-05-26 05:48:27 driver-btm-api.c:1844:show_sn: no SN got, please write SN to /nvdata/sn
2021-05-26 05:48:27 driver-btm-api.c:1167:miner_device_init: Detect 256MB control board of XILINX
2021-05-26 05:48:27 driver-btm-api.c:1115:init_fan_parameter: fan_eft : 0 fan_pwm : 0
2021-05-26 05:48:27 thread.c:885:create_read_nonce_reg_thread: create thread
2021-05-26 05:48:33 driver-btm-api.c:1099:init_miner_version: miner ID : 81646c042b10481c
2021-05-26 05:48:33 driver-btm-api.c:1105:init_miner_version: FPGA Version = 0xB013
2021-05-26 05:48:35 eeprom.c:425:check_pattern_test_level: invalid pattern test result. ignore
2021-05-26 05:48:37 eeprom.c:425:check_pattern_test_level: invalid pattern test result. ignore
2021-05-26 05:48:39 eeprom.c:431:check_pattern_test_level: L1 board
2021-05-26 05:48:39 driver-btm-api.c:737:get_product_id: product_id[0] = 1
2021-05-26 05:48:39 driver-btm-api.c:737:get_product_id: product_id[1] = 1
2021-05-26 05:48:39 driver-btm-api.c:737:get_product_id: product_id[2] = 1
2021-05-26 05:48:39 driver-btm-api.c:1666:get_ccdly_opt: ccdly_opt[0] = 1
2021-05-26 05:48:39 driver-btm-api.c:1666:get_ccdly_opt: ccdly_opt[1] = 1
2021-05-26 05:48:39 driver-btm-api.c:1666:get_ccdly_opt: ccdly_opt[2] = 1
2021-05-26 05:48:39 driver-btm-api.c:1919:bitmain_board_init: g_ccdly_opt = 1
2021-05-26 05:48:39 driver-btm-api.c:676:_set_project_type: project:2
2021-05-26 05:48:39 driver-btm-api.c:706:_set_project_type: Project type: Antminer T17
2021-05-26 05:48:39 driver-btm-api.c:717:dump_pcb_bom_version: Chain [0] PCB Version: 0x0100
2021-05-26 05:48:39 driver-btm-api.c:718:dump_pcb_bom_version: Chain [0] BOM Version: 0x0100
2021-05-26 05:48:39 driver-btm-api.c:717:dump_pcb_bom_version: Chain [1] PCB Version: 0x0100
2021-05-26 05:48:39 driver-btm-api.c:718:dump_pcb_bom_version: Chain [1] BOM Version: 0x0100
2021-05-26 05:48:39 driver-btm-api.c:717:dump_pcb_bom_version: Chain [2] PCB Version: 0x0100
2021-05-26 05:48:39 driver-btm-api.c:718:dump_pcb_bom_version: Chain [2] BOM Version: 0x0100
2021-05-26 05:48:41 driver-btm-api.c:1939:bitmain_board_init: Fan check passed.
2021-05-26 05:48:42 board.c:36:jump_and_app_check_restore_pic: chain[0] PIC jump to app
2021-05-26 05:48:46 board.c:40:jump_and_app_check_restore_pic: Check chain[0] PIC fw version=0xb9
2021-05-26 05:48:48 board.c:36:jump_and_app_check_restore_pic: chain[1] PIC jump to app
2021-05-26 05:48:51 board.c:40:jump_and_app_check_restore_pic: Check chain[1] PIC fw version=0xb9
2021-05-26 05:48:53 board.c:36:jump_and_app_check_restore_pic: chain[2] PIC jump to app
2021-05-26 05:48:56 board.c:40:jump_and_app_check_restore_pic: Check chain[2] PIC fw version=0xb9
2021-05-26 05:48:56 thread.c:880:create_pic_heart_beat_thread: create thread
2021-05-26 05:48:56 power_api.c:55:power_init: power init …
2021-05-26 05:48:56 driver-btm-api.c:1949:bitmain_board_init: Enter 30s sleep to make sure power release finish.
2021-05-26 05:48:56 power_api.c:46:power_off: init gpio907
2021-05-26 05:49:28 power_api.c:232:set_iic_power_to_highest_voltage: setting to voltage: 17.00 …
2021-05-26 05:49:34 power_api.c:124:check_voltage_multi: retry time: 0
2021-05-26 05:49:36 power_api.c:86:get_average_voltage: chain[0], voltage is: 19.073291
2021-05-26 05:49:38 power_api.c:86:get_average_voltage: chain[1], voltage is: 18.436494
2021-05-26 05:49:39 power_api.c:86:get_average_voltage: chain[2], voltage is: 17.799697
2021-05-26 05:49:39 power_api.c:97:get_average_voltage: aveage voltage is: 18.436494
2021-05-26 05:49:39 power_api.c:110:check_voltage: target_vol = 17.00, actural_vol = 18.44, more than 1.0v diff.
2021-05-26 05:49:40 power_api.c:124:check_voltage_multi: retry time: 1
2021-05-26 05:49:42 power_api.c:86:get_average_voltage: chain[0], voltage is: 16.905732
2021-05-26 05:49:44 power_api.c:86:get_average_voltage: chain[1], voltage is: 16.348535
2021-05-26 05:49:47 power_api.c:86:get_average_voltage: chain[2], voltage is: 15.448447
2021-05-26 05:49:47 power_api.c:97:get_average_voltage: aveage voltage is: 16.234238
2021-05-26 05:49:47 power_api.c:182:set_iic_power_by_voltage: now set voltage to : 17.000000
2021-05-26 05:49:47 uart.c:80:set_baud: set fpga_baud = 115200, fpga_divider = 26
2021-05-26 05:49:57 driver-btm-api.c:1042:check_asic_number_with_power_on: Chain[0]: find 30 asic, times 0
2021-05-26 05:50:07 driver-btm-api.c:1042:check_asic_number_with_power_on: Chain[1]: find 30 asic, times 0
2021-05-26 05:50:17 driver-btm-api.c:1042:check_asic_number_with_power_on: Chain[2]: find 30 asic, times 0
2021-05-26 05:50:20 driver-btm-api.c:352:set_order_clock: chain[0]: set order clock, stragegy 3 clock_en=0x1
2021-05-26 05:50:21 driver-btm-api.c:352:set_order_clock: chain[1]: set order clock, stragegy 3 clock_en=0x1
2021-05-26 05:50:21 driver-btm-api.c:352:set_order_clock: chain[2]: set order clock, stragegy 3 clock_en=0x1
2021-05-26 05:50:21 driver-hash-chip.c:502:set_clock_delay_control: core_data = 0xb4
2021-05-26 05:50:21 uart.c:80:set_baud: set fpga_baud = 3000000, fpga_divider = 0
2021-05-26 05:50:21 driver-btm-api.c:1693:check_clock_counter: freq 50 clock_counter_limit 6
2021-05-26 05:50:22 uart.c:80:set_baud: set fpga_baud = 115200, fpga_divider = 26
2021-05-26 05:50:22 voltage[0] = 1730
2021-05-26 05:50:22 voltage[1] = 1730
2021-05-26 05:50:22 voltage[2] = 1690
2021-05-26 05:50:22 Voltage are different. Will exit.
2021-05-26 05:50:22 driver-btm-api.c:205:set_miner_status: ERROR_SOC_INIT
2021-05-26 05:50:22 driver-btm-api.c:146:stop_mining: stop mining: soc init failed!
2021-05-26 05:50:22 thread.c:930:cancel_read_nonce_reg_thread: cancel thread
2021-05-26 05:50:22 driver-btm-api.c:131:killall_hashboard: ****power off hashboard****
Как устранить ошибку температуры в журнале Antminer T17
Система контроля температуры майнера полагается на чип датчика температуры хэш-платы для предоставления данных в реальном времени для обнаружения. Различная хэш-плата может иметь несколько термочувствительных чипов, обычно расположенных рядом с хэш-чипом. Если чип не обнаружен при запуске майнера, хэш-плата не сработает.
Следует отметить, что микросхема датчика температуры обычно не повреждается. Когда возникает температурная ошибка, некоторые обслуживающие персонал напрямую заменяют чип датчика температуры, но неисправность не может быть устранена.
На самом деле проблема не в самом чипе. Скорее всего, это вызвано неисправной микросхемой U1 или последней микросхемой, или это может быть вызвано пониженным напряжением источника питания.
Если весь журнал майнера указывает на ошибку температуры, тогда мы можем сначала обновить прошивку. Если ошибка все еще отображается, проверьте силу тока на входе. Пониженное напряжение источника питания также не позволяет всей машине считывать температуру.
Например, следующая подсказка:
2020/04/27 04:15:48] WARN: chain[1] — 3 sensor(s) reported their temps!
[2020/04/27 04:16:02] ERROR: src/temp.c:218 chain[1] sen[2] — Lost, no updates for 10 sec
[2020/04/27 04:16:02] WARN: chain[1] — 2 sensor(s) reported their temps!
[2020/04/27 04:16:29] ERROR: src/temp.c:218 chain[1] sen[1] — Lost, no updates for 10 sec
[2020/04/27 04:16:29] WARN: chain[1] — 1 sensor(s) reported their temps!
[2020/04/27 04:17:29] INFO: Setting voltage from 17500 to 17400 mV gradually
[2020/04/27 04:17:39] ERROR: src/temp.c:218 chain[1] sen[3] — Lost, no updates for 10 sec
[2020/04/27 04:17:39] WARN: chain[1] — 0 sensor(s) reported their temps!
[2020/04/27 04:17:39] ERROR: driver-btm-chain.c:950 chain[1] — Failed to read temp from all sensors!

Если температура не может быть считана ни одной хэш-платой, ее необходимо снять и проверить с помощью тестером чипов антминер. Эта ситуация обычно вызвана неправильным хеш-чипом. Замените поврежденный чип, чтобы устранить неисправность.

Обратите внимание: использование хэш-платы от разных майнеров может привести к тому, что некоторая хэш-плата не сможет определить температуру. Поскольку версия хэш-платы отличается, используемая микросхема измерения температуры также может быть другой. Майнер распознает только одну программу прошивки на плате управления, остальные будут нечитаемыми.
Видеоурок по осмотру и ремонту хэш платы на примере модели: S9
(Методы обнаружения и восстановления большинства майнеров в Antminer в основном одинаковы)
Нажмите для просмотра:Видеоурок по ремонту и диагностике неисправностей AntminerS9.
Связанные инструменты обслуживания:
Официальный термореактивный гель — 220г
Новая версия многофункционального испытательного стенда
Инструмент для стружки олова
Нажмите, чтобы увидеть больше инструментов для обслуживания майнеров
заявлять
Учебники по ремонту и Скачать файлы относятся к оригинальным произведениям, которые запрещаются полностью или частично без письменного разрешения.
ASIC-майнеры настроены на довольно быструю и эффективную добычу криптовалюты и стали популярны. Однако в их работе случаются сбои – падает хешрейт, нагревается оборудование, возможно возникновение серьезных ситуаций, таких как пожар. Чтобы не допустить этого, нужно постоянно мониторить статус ASIC, понимать его значение.
Структура ASIC-майнера состоит из нескольких частей – программного и аппаратного обеспечения. Программное обеспечение помогает управлять деталями оборудования и способно отслеживать напряжение электрического тока, а также интенсивность охлаждения, и сообщать о возможных неисправностях. Аппаратное обеспечение состоит из блока питания и вентиляторов, микропроцессоров и плат, блока памяти.
Одна из важнейших ошибок, о которых сообщает программное обеспечение, это “DISABLED”. Статус означает, что майнинг остановлен в связи с поломкой во избежание перегрева деталей. Нужно найти поломку и устранить ее. Чтобы возобновить майнинг после ремонта, необходимо дать команду “mining start”. Если оборудование непригодно для восстановления, то можно купить ASIC у нас.
Другие статусы:
- ERROR_TEMP_LOST означает потерю датчика температуры. После того, как определитель теряется 2 раза и более, майнинг останавливается во избежание перегрева.
- ERROR_EEPROM_INFO появляется при ошибке чтения. Чтобы устранить сбой, надо перепрошить EEPROM.
- ERROR_SOC_INIT означает ошибку инициализации драйвера из-за поломки аппаратной части или проблем с программным обеспечением – несоответствия его модели майнера или неправильной установки. Необходима диагностика аппаратной части и переустановка программного обеспечения или использование предыдущей его версии.
- ERROR_POWER_LOST означает проблемы с блоком питания из-за его поломки или программное обеспечение его не опознает.
- ERROR_FAN_LOST – это выход из строя кулера или дефект датчика.
- ERROR_TEMP_TOO_LOW. Буквально статус означает низкую температуру. Проблема кроется в программном обеспечении либо потере датчика температуры.
- SUSPENDED – статус, при котором требуется перезагрузка.
- TUNING означает проведение тюнинга, при котором скорость добычи криптовалюты может снизиться.
Если какая-то деталь не подлежит восстановлению, то купить все для майнинга вы сможете у нас.
Актуальные цены на оборудование и аксессуары можно уточнить в Прайс-листе
Содержание
- Categories
- Статусы ASIC и устранение ошибок
- Основные ошибки в работе ASIC-майнера
- Categories
- Advanced ASIC Statuses: watch your devices with ease
- What are ASIC statuses and what is their purpose?
- What do ASIC statuses mean?
- Antminer kernel log
- Antminer kernel log
Categories
When the Antminer T17 kernel log shows EPPOR_FAN_LOST, it means that the cooling fan of the miner is missing. You can take the following methods to troubleshoot.

Troubleshooting:
1. Check whether the fan cable is loose or damaged; it is recommended to re-plug the fan cable or replaces the damaged fan data cable.
2. The fan is damaged, it is recommended to replace the fan.
3. Upgrade the firmware of the control board with the latest version.
4. The control board is damaged, it is recommended to replace the control board.
Click the article below to learn more!
About products purchase, please contact our sales manager:
 [email protected]
About miner repair and after-sale issues, please contact the repair manager email:
[email protected]
For business cooperation, please contact:
[email protected]
COMPLAINTS & SUGGESTIONS
If you have any dissatisfaction during the transaction or have valuable suggestions for us, please contact us via this email address:
[email protected]
Chinese New Year holiday notice
Due to the arrival of the Chinese New Year holiday, we will suspend shipments on January 17, 2023, and resume on January 30, 2023. The response of sales and tech service probably delay during the holidays.
Thank you for your support.
Zeus Mining (Hong Kong) International Co., Ltd.
Recently, many companies claiming to be mining companies imitate us and say that they are related to us, or that they are our branch companies, which has caused customers to be deceived. Please be careful not to believe any impostors, please check our correct contact information and beware of being deceived getting scammed, and losing money.
please check our right contact way: Here
Источник
Статусы ASIC и устранение ошибок
ASIC-майнеры настроены на довольно быструю и эффективную добычу криптовалюты и стали популярны. Однако в их работе случаются сбои – падает хешрейт, нагревается оборудование, возможно возникновение серьезных ситуаций, таких как пожар. Чтобы не допустить этого, нужно постоянно мониторить статус ASIC, понимать его значение.
Основные ошибки в работе ASIC-майнера
Структура ASIC-майнера состоит из нескольких частей – программного и аппаратного обеспечения. Программное обеспечение помогает управлять деталями оборудования и способно отслеживать напряжение электрического тока, а также интенсивность охлаждения, и сообщать о возможных неисправностях. Аппаратное обеспечение состоит из блока питания и вентиляторов, микропроцессоров и плат, блока памяти.
Одна из важнейших ошибок, о которых сообщает программное обеспечение, это “DISABLED”. Статус означает, что майнинг остановлен в связи с поломкой во избежание перегрева деталей. Нужно найти поломку и устранить ее. Чтобы возобновить майнинг после ремонта, необходимо дать команду “mining start”. Если оборудование непригодно для восстановления, то можно купить ASIC у нас.
- ERROR_TEMP_LOST означает потерю датчика температуры. После того, как определитель теряется 2 раза и более, майнинг останавливается во избежание перегрева.
- ERROR_EEPROM_INFO появляется при ошибке чтения. Чтобы устранить сбой, надо перепрошить EEPROM.
- ERROR_SOC_INIT означает ошибку инициализации драйвера из-за поломки аппаратной части или проблем с программным обеспечением – несоответствия его модели майнера или неправильной установки. Необходима диагностика аппаратной части и переустановка программного обеспечения или использование предыдущей его версии.
- ERROR_POWER_LOST означает проблемы с блоком питания из-за его поломки или программное обеспечение его не опознает.
- ERROR_FAN_LOST – это выход из строя кулера или дефект датчика.
- ERROR_TEMP_TOO_LOW. Буквально статус означает низкую температуру. Проблема кроется в программном обеспечении либо потере датчика температуры.
- SUSPENDED – статус, при котором требуется перезагрузка.
- TUNING означает проведение тюнинга, при котором скорость добычи криптовалюты может снизиться.
Если какая-то деталь не подлежит восстановлению, то купить все для майнинга вы сможете у нас.
Источник
Categories
The following faults come from the Antminer T17e log. If your miner has a similar fault, you can refer to the following methods to troubleshoot.
Fault 1: Chain 3 only find 2 asic
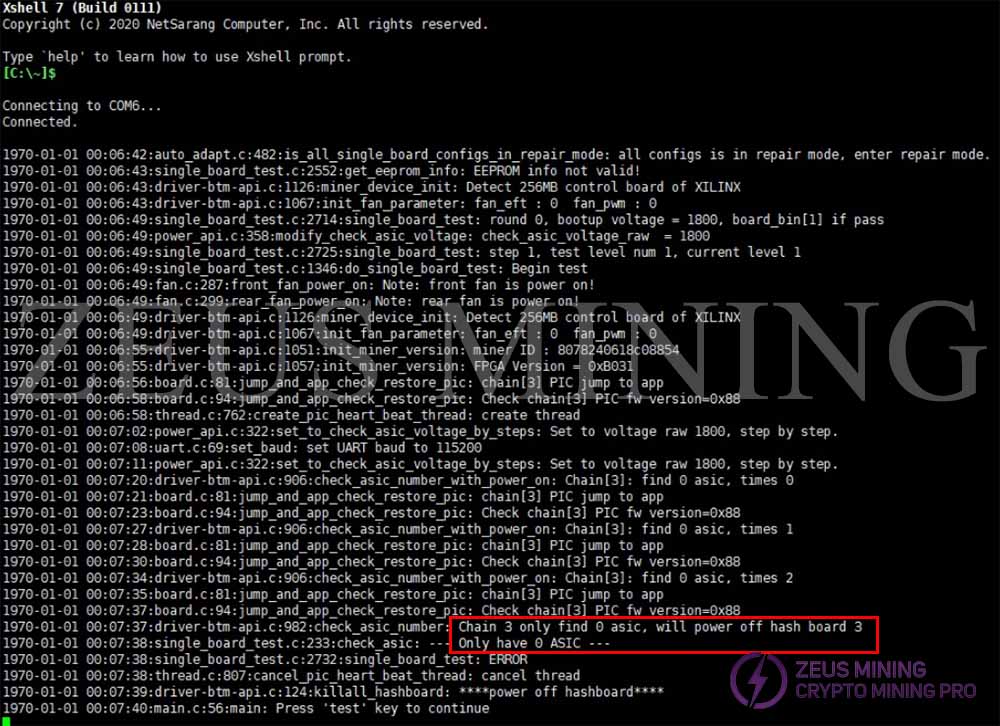
Troubleshooting:
Your test log shows the main control board does not recognize the ASIC chip of your hash board. So you need to check whether the total domain voltage is normal. If normal, check the RI signal of the chip. If it is found that the RI signal chip is abnormal (you need to check the chip core power supply: domain voltage, 1.8V power supply, 0.8V power supply), be sure to keep the chip core power supply and RI signal voltage correct before repairing the hash board. If the domain voltage is abnormal, repair the three main power sources of the hash board (power input voltage, DC circuit, boost circuit).
Fault 2: ERROR_PIC_LOST
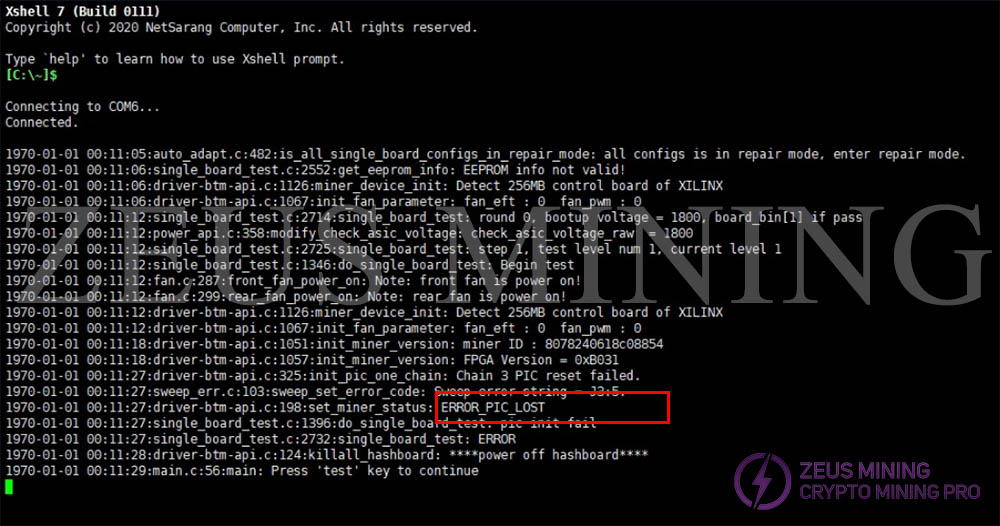
Troubleshooting:
The test log result shows a PIC error, i.e., the PIC chip is not working. It is recommended to check whether the cable of the hash board is loose or damaged. If it’s good, rewrite the PIC program.
About products purchase, please contact our sales manager:
[email protected]
About miner repair and after-sale issues, please contact the repair manager email:
[email protected]
For business cooperation, please contact:
[email protected]
COMPLAINTS & SUGGESTIONS
If you have any dissatisfaction during the transaction or have valuable suggestions for us, please contact us via this email address:
[email protected]
Chinese New Year holiday notice
Due to the arrival of the Chinese New Year holiday, we will suspend shipments on January 17, 2023, and resume on January 30, 2023. The response of sales and tech service probably delay during the holidays.
Thank you for your support.
Zeus Mining (Hong Kong) International Co., Ltd.
Recently, many companies claiming to be mining companies imitate us and say that they are related to us, or that they are our branch companies, which has caused customers to be deceived. Please be careful not to believe any impostors, please check our correct contact information and beware of being deceived getting scammed, and losing money.
please check our right contact way: Here
Источник
Advanced ASIC Statuses: watch your devices with ease
Hiveon ASIC firmware is not only a way to make your devices more profitable — it also simplifies tracking their condition with advanced ASIC statuses. Keep reading to find out the details.
What are ASIC statuses and what is their purpose?
The main mission of ASIC statuses is to inform you about the condition of your device. Did something go wrong? You will see the relevant status right next to the specific ASIC, and be able to react immediately. In this way, you will easily maintain your devices’ efficiency.
Apart from this, ASIC statuses also serve as filters, so it will be very easy for you to find all the devices with the same error, if necessary.
What do ASIC statuses mean?
Obviously, every status has its own meaning. Here are the explanations:
If one of your ASICs gets such a status, simply reboot the device. To make things even easier, enable the hashrate-watchdog to perform the reboot automatically.
This means that tuning is in progress at the moment. During this process, hashrate decrease and software restart are possible, so don’t worry if they happen.
This status indicates that the temperature is too low. It can occur on the Bitmain firmware, and as a result, ASIC stops mining. If you want, you can disable the temperature test on the Hiveon firmware, so this status won’t stop you from mining.
Check the fans — one of them is lost. It may already be out of order or, probably, there are issues with the sensor.
If you see this status then there is an error in setting voltage or in determining the type of PSU. This could happen due to several reasons:
- Power supply failure;
- Excessive decrease in the network — the unit is not able to deal with it;
- There is something wrong with wiring from the power supply to controller;
- The new ASIC series can determine the PSU model. In case the PSU is already worn out, the model may not be identified, and, as a result, the ASIC gets this error.
This status means that an error occurred during the driver initialization process. This could happen due to the following reasons:
- The firmware was installed incorrectly, or the kernel doesn’t match. If that’s the case, you can try to re-flash, install the SD-image, or roll back to another version of the firmware, and then back;
- The firmware doesn’t match the ASIC model;
- There are problems with the hardware.
An error occurred when reading the content of EEPROM (wrong format). To solve the problem, flash EEPROM.
There is an issue with a temperature sensor — it was lost two or more times. The reason for this may be fail of the chips on which the temperature sensors are located. For instance, the 17th model has 4 such chips on every board, and if 2 or more chips fail, it is difficult to determine the temperature, and the mining process stops. What is the solution? Everything is simple — replace the chips.
Keep in mind that ASIC statuses are available only with Hiveon ASIC firmware: you won’t be able to benefit from them when using only Hive OS.
To be the first to discover all the interesting news, follow us on Facebook! And, obviously, if you have extra questions about ASIC statuses, just get in touch with us.
Источник
Antminer kernel log
Antminer kernel log
About products purchase, please contact our sales manager:
[email protected]
About miner repair and after-sale issues, please contact the repair manager email:
[email protected]
For business cooperation, please contact:
[email protected]
COMPLAINTS & SUGGESTIONS
If you have any dissatisfaction during the transaction or have valuable suggestions for us, please contact us via this email address:
[email protected]
Chinese New Year holiday notice
Due to the arrival of the Chinese New Year holiday, we will suspend shipments on January 17, 2023, and resume on January 30, 2023. The response of sales and tech service probably delay during the holidays.
Thank you for your support.
Zeus Mining (Hong Kong) International Co., Ltd.
Recently, many companies claiming to be mining companies imitate us and say that they are related to us, or that they are our branch companies, which has caused customers to be deceived. Please be careful not to believe any impostors, please check our correct contact information and beware of being deceived getting scammed, and losing money.
please check our right contact way: Here
Источник
Как устранить ошибку температуры в журнале Antminer T17
Как устранить ошибку температуры в журнале Antminer T17
Система контроля температуры майнера полагается на чип датчика температуры хэш-платы для предоставления данных в реальном времени для обнаружения. Различная хэш-плата может иметь несколько термочувствительных чипов, обычно расположенных рядом с хэш-чипом. Если чип не обнаружен при запуске майнера, хэш-плата не сработает.
Следует отметить, что микросхема датчика температуры обычно не повреждается. Когда возникает температурная ошибка, некоторые обслуживающие персонал напрямую заменяют чип датчика температуры, но неисправность не может быть устранена.
На самом деле проблема не в самом чипе. Скорее всего, это вызвано неисправной микросхемой U1 или последней микросхемой, или это может быть вызвано пониженным напряжением источника питания.
Если весь журнал майнера указывает на ошибку температуры, тогда мы можем сначала обновить прошивку. Если ошибка все еще отображается, проверьте силу тока на входе. Пониженное напряжение источника питания также не позволяет всей машине считывать температуру.
Например, следующая подсказка:
2020/04/27 04:15:48] WARN: chain[1] — 3 sensor(s) reported their temps!
[2020/04/27 04:16:02] ERROR: src/temp.c:218 chain[1] sen[2] — Lost, no updates for 10 sec
[2020/04/27 04:16:02] WARN: chain[1] — 2 sensor(s) reported their temps!
[2020/04/27 04:16:29] ERROR: src/temp.c:218 chain[1] sen[1] — Lost, no updates for 10 sec
[2020/04/27 04:16:29] WARN: chain[1] — 1 sensor(s) reported their temps!
[2020/04/27 04:17:29] INFO: Setting voltage from 17500 to 17400 mV gradually
[2020/04/27 04:17:39] ERROR: src/temp.c:218 chain[1] sen[3] — Lost, no updates for 10 sec
[2020/04/27 04:17:39] WARN: chain[1] — 0 sensor(s) reported their temps!
[2020/04/27 04:17:39] ERROR: driver-btm-chain.c:950 chain[1] — Failed to read temp from all sensors!
Если температура не может быть считана ни одной хэш-платой, ее необходимо снять и проверить с помощью тестером чипов антминер. Эта ситуация обычно вызвана неправильным хеш-чипом. Замените поврежденный чип, чтобы устранить неисправность.
Обратите внимание: использование хэш-платы от разных майнеров может привести к тому, что некоторая хэш-плата не сможет определить температуру. Поскольку версия хэш-платы отличается, используемая микросхема измерения температуры также может быть другой. Майнер распознает только одну программу прошивки на плате управления, остальные будут нечитаемыми.
Видеоурок по осмотру и ремонту хэш платы на примере модели: S9
(Методы обнаружения и восстановления большинства майнеров в Antminer в основном одинаковы)
Нажмите для просмотра: Видеоурок по ремонту и диагностике неисправностей AntminerS9.
Связанные инструменты обслуживания:
Официальный термореактивный гель — 220г
Новая версия многофункционального испытательного стенда
Инструмент для стружки олова
Нажмите, чтобы увидеть больше инструментов для обслуживания майнеров
Источник
Руководство Antminer T17 Скачать
Руководство по ремонту Antminer T17 хэш плата Скачать
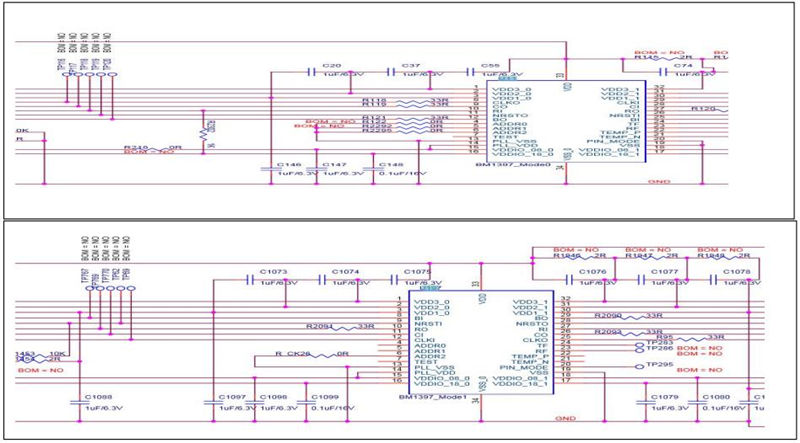
Эта версия содержит принципиальную принципиальную схему и направление сигнала чипа и введение напряжения.
В настоящее время мы публикуем на китайском языке, и скоро будет выпущена английская версия.
Базовый обзор:
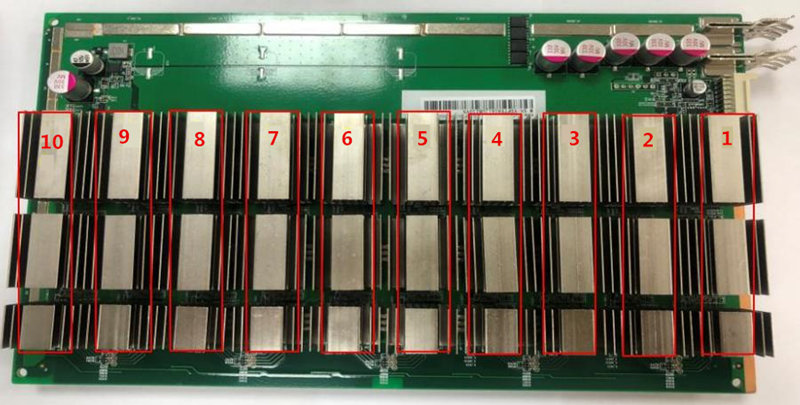
Одиночная хэш-плата Antminer T17 использует всего 30 хэш-чипов, модель — «BM1397», и направление сигнала последовательно передается от U1 к U30.
Направление сигнала: «CLK / CO / BO / RST», передается с U1 на U30, «RI» передается с U30 на U1
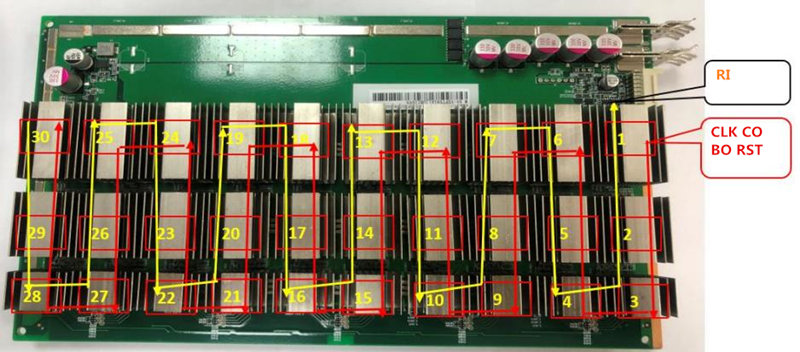
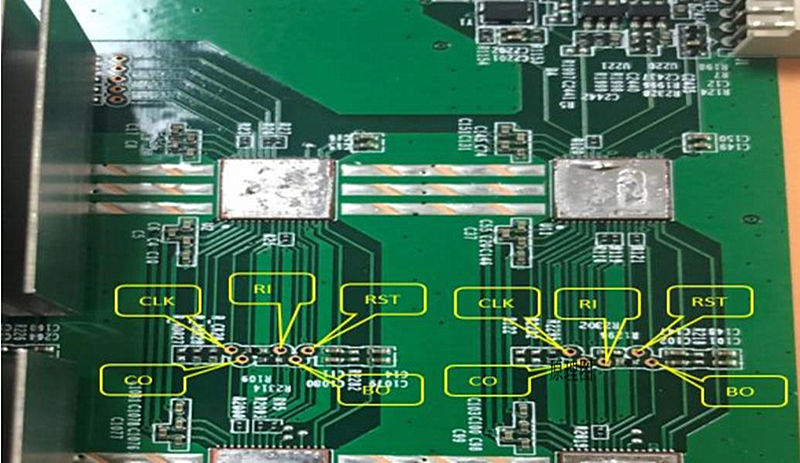
Он также проходит 5 контрольных точек для тестирования и обслуживания.
Пять контрольных точек: CLK-CO-RI-BO-RST.
(Обратите внимание: расположение контрольных точек в разных областях напряжения также отличается, см. Примечания к рисунку)
Примечания и инструкции по контрольным точкам см. В следующих статьях:
Вся плата состоит из 30 микросхем, разделенных на 10 областей напряжения, и каждая область напряжения содержит 3 микросхемы.
Описание области напряжения см. В следующих статьях:
В то же время мы также предоставляем для справки более подробную принципиальную схему:
Адрес загрузки руководства по ремонту Antminer T17 хэш плата:
Видеоурок по осмотру и ремонту хэш платы на примере модели: S9
(Методы обнаружения и восстановления большинства майнеров в Antminer в основном одинаковы)
Связанные инструменты обслуживания:
Источник
О ремонте Antminer T17/S17
DeathOfPower
Знающий
Кто-нибудь ремонтировал хэшплаты Antminer T17 или S17? Долго ли они работают после ремонта?
Antminer T17
После почти что года работы на стандартной прошивке сдохла одна хэшплата. При инициализации определялись только 24 чипа из 30. Асик стоял на балконе в шумопоглощающем ящике, что продают на Авито. От ящика до балконного окна с антикомариной сеткой были проложены 2 алюминиевые гофры чтобы горячий воздух выдувался за борт. Зимой при морозах асик тоже отлично работал. Остекление балкона хоть и есть но обычным одинарным стеклом, не стеклопакетами.
Сразу чинить не понёс — то некогда то отпуск. Потом сдохла вторая плата — в логе было что-то про питание, мол 0 вольт на плате. В итоге отнёс сразу 2 платы в ремонт. Забрал через неделю. Поставил — одна плата работает, на второй определяются 0 чипов. Тогда на улице было +5-7 градусов. Отнёс незаработавшую плату по гарантии (1 месяц). Пока её ремонтировали на той плате что сразу заработала через 2 дня 6 чипов перестали давать хэшрейт (после ремонта установил прошивку от Vnish — она позволяет задавать какую температуру чипов поддерживать ну и понижать напряжение чтоб меньше жрало электричества). При инициализации определяются все 30 а когда начинается майнинг у шести чипов хэшрейт — 0. Даже при стандартном напряжении и частоте.
Когда забирал одну плату из повторного ремонта отдал сразу вторую в повторный ремонт. В этот раз незаработавшая плата завелась и нормально работала. За это время сдохла 3-я плата — видит 24 чипа из 30.
Потом поехал забрал вторую плату из повторного ремонта. Привёз домой воткнул — не работает. При инициализации определяются то 17, то 24 то 6 то 1 чип. Отвёз её обратно. На следующий день звонят — мы подключили у нас работает. Повёз сам асик. У них подключили, вставили плату — работает. Привёз домой — в комнате включил — работает. Отнёс в ящик на балкон. Включаю — опять определяются то 17, то 24 то 6 то 1 чип.
Позвонил в сервис — говорят мол 17-я серия капризная им надо чтобы не меньше 15 градусов было в помещении. Но как это может быть? В инструкции пишут что рабочая температура окружающей среды от 0 до +25. Почему после ремонта надо вдруг не ниже 15 градусов?
В общем помайнил одной картой пару дней чтобы добраться до порога вывода намайненного с пула. Занёс опять домой. Постоял он часа 2, нагрелся. Включаю — та плата уже и в тепле не работает — определяются 24 чипа из 30. И что самое противное та плата что проработала дней 10 после ремонта тоже перестала запускаться — пишет 0 чипов из 30 найдено.
Вот и думаю — стоит ли пробовать ремонтировать 3-ю плату в другом месте, или лучше продать на запчасти. Блок питания то и управляющая плата в порядке. А с хэшплат можно повыпаивать чипы и отобрать нормальные.
Источник
Crazy-Mining.org
Главная » Майнинг » Оптимизированная Прошивка Antminer T17/T17+/S17/S17+/S17 Pro (Разгон ASIC на +30%)
Оптимизированная Прошивка Antminer T17/T17+/S17/S17+/S17 Pro (Разгон ASIC на +30%)
Firmware Antminer S17 / T17 Overclocking Performance +30% — Если у вас есть майнинговая ферма / отель или у вас большое количество S17 или T17 500+, свяжитесь с marc@asic.to, чтобы получить более выгодную сделку и узнать о нашей партнерской программе. Asic.to разработала прошивку для Antminer S17 / S17 Pro / S17 + / T17 и T17 + Antminer. Вы можете скачать и установить его на свой компьютер, чтобы увеличить свою прибыль.
- Разгон Antminer S17 / T17;
- Производительность
+ 30%;
Возможность понижение напряжения и разгон
15-25%;
Antminer S17 (нормальный) до 70-85th / s (
3100-3760w);
Antminer T17 до 65-й / с (потребление
3000 Вт);
Внимание: мы обратили внимание на то, что многие люди считают, что модели S17 с более высоким хешрейтом будут лучше, чем более медленные 50-е модели. Это неправда. 50-й, 53-й и 56-й, непрофессиональный S17 будет разгоняться до тех же настроек с очень небольшими отклонениями. С другой стороны, модели Pro смогут достичь тех же настроек при более низких температурах, что позволит добиться большего разгона при данной настройке охлаждения. Не слушайте, как реселлеры говорят вам, что иначе они пытаются продать вам устройство. Удачи Удачного майнинга.
Пожалуйста, примите к сведению: Как мы все уже знаем, несанкционированное вмешательство в вашу машину может привести к ее повреждению. Делаете это на свой страх и риск … Но веселитесь!
Официальная программа BitMain для управления и мониторинга Antminer (ASIC).
Функции прошивки:
- Разгон: более 85-х с S17 и 65-х / с T17!
- Бесплатно: скачайте и сразу же начните пользоваться.
- ASICboost и автонастройка: во всех наших версиях включена автонастройка частоты для достижения максимальной эффективности, а также использование ASICboost.
- Уменьшите количество аппаратных ошибок.
- СОХРАНЕНИЕ ЭНЕРГИИ
- Нет Bmminer
- Готовность к погружению / отключение вентилятора: поддержка высокоэффективного жидкостного иммерсионного охлаждения путем отключения вентилятора в настройках.
- Нижний тепловой порог: снижает стандартную защиту от перегрева, чтобы продлить срок службы машин.
- Полное развертывание фермы: отправьте файл конфигурации неограниченному количеству майнеров в одной сети. Перезагрузка не требуется!
- Мониторинг мощности: встроенная функция ваттметра.
- Найдите другой Asic в сети.
- Возможность массовой смены паролей и ssh порта.
- Развертывание с несколькими ASIC: настройте один компьютер и установите его на всех одним щелчком мыши.
- Бесплатно — небольшая комиссия в размере 2,8% для поддержки проекта.
- Поддерживает популярные ASIC: Поддержка всех моделей Antminer S17 + / S17 / S17 Pro / T17 + / T17, S9 / S9i / S9j.
- Стабильный: автоматическая настройка напряжения для лучшей стабильности и производительности хэш-панели.
- Спящий режим: майнинг может остановиться, и вентиляторы упадут до нормальной скорости, потребляя очень мало энергии.
- Asic Virus Scanner: инструмент, который проверяет подержанные асики на наличие ночного переключателя и других вариантов.
- Легкое удаление.
Итак, что вы получаете с нашей прошивкой:
1. Разгон с воздушным охлаждением до 85TH / s для S17 и 60TH / s для T17
2. Возможность иммерсионного охлаждения до 100TH / s и до 65 TH / s для T17.
3. Текущая информация о каждом чипе (зеленый, оранжевый, красный)
4. Диапазоны разгона (выберите желаемый вариант разгона).
5. Варианты понижения напряжения (снижение энергопотребления)
6. Индивидуальный разгон каждой платы отдельно (разгон и напряжение) Индивидуальный разгон каждой микросхемы (с помощью этой функции вы можете достичь максимальной скорости ASIC и продолжить стабильную работу)
7. АВТО НАСТРОЙКА (автоматический выбор частоты + оценка чипов в автоматическом режиме, увеличение срока службы майнера)
8. Уменьшение количества ошибок HW по сравнению с прошивкой Bitmain.
9. Функция создания рабочих + установка прошивки + передача конфигурации неограниченному количеству майнеров в одной сети одновременно
10. Установлена функция ASIC BOOST (снижение энергопотребления в среднем до 15-25% за счет оптимальной работы ASIC на текущем уровне хешрейта)
11. Функция автоматической проверки и уничтожения ASIC-вирусов и вредоносных программ (это вредоносное ПО часто есть у майнеров из Китая, замена платы управления ASIC — это, в конце концов, исправление)
12. Выходная функция потребления электроэнергии (ваттметр)
13. функция поиска ASIC (мигающие светодиоды)
14. массовая смена пароля, функция отключения порта SSH и порта SSH
15. Функция «спящий режим» при ее включении прекращается майнинг и вентиляторы падают на минимальную скорость.
16. Возможность отключения потребления электроэнергии при сбросе адресов интернета или пула (на прошивке майнер Bitmain продолжает потреблять электроэнергию)
17.Переработан алгоритм работы вентиляторов (бесшумный запуск, поддержание температуры на чипах, увеличение срока службы вентиляторов).
За поддержкой обращайтесь в наш канал поддержки Telegram https://t.me/AsicTo
Журнал изменений:
Meet release 2.0.3 for Antminer s17, s17pro, t17, s17+, t17+
самая безопасная прошивка на рынке, мы много работали над ее реализацией.
1) Общая стабильность, оптимизация и доработка основных драйверов.
2) Исправлены некорректно работающие профили для модели t17.
3) Исправлен перевод для корректного отображения русского языка.
4) Исправлена ошибка веб-сервера, когда майнер мог зависнуть в течение длительного времени безотказной работы.
5) Добавлена опция спящего режима.
6) Добавлена опция сбора за гостиницу (где вы можете перенаправить часть хешрейта на оплату электричества, размещения оборудования или оплату обслуживания майнеров).
7) Добавлен пересчет минимальной скорости хеширования, если одна или несколько плат не были инициализированы.
 Изменен режим работы кулеров при переводе их на 100% на 5 градусов от критической температуры (было 10).
9) Добавлена подпись для полной безопасности защиты от вирусов с полной возможностью отката к стоковой прошивке без SD-карты, при этом оставлен доступ к ssh для полного доступа к вашему оборудованию и полной децентрализации (SSH отключен по умолчанию).
10) Для тех, кто к сожалению пострадал от antbuild, мы сделали блокировку, чтобы ваш хеш не забирался.
11) Добавлена УНИКАЛЬНАЯ ЗАЩИТА . На аппаратном уровне против Antbuild и всех подобных вирусов навсегда !!
Meet firmware release 2.0.0 for Antminer s17, s17Pro, s17+, t17, t17+
1. Общая стабильность, доработка и рефакторинг основного драйвера.
2. Улучшено отображение хешрейта чипа.
3. Исправлено отображение вывода текущего часового пояса в региональных настройках.
4. Внесены незначительные изменения в дизайн веб-интерфейса.
5. Добавлены новые профили:
S17 + — 55-е, 60-е, 62-е, 68-е, 74-е, 80-е, 88-е.
T17 + — 40-е, 48-е, 55-е, 63-е, 68-е.
6. Добавлена автоматическая коррекция красных доменов (ТАЙМЕР).
7. Расширенные диапазоны поиска напряжения для профилей автонастройки.
8. Добавлена полная настройка ручной автонастройки майнера.
9. Сделано плавное изменение скорости вращения вентилятора при инициализации майнера (без резкого скачка).
10. Добавлена защита от разрыва цепи чипа для предотвращения выхода оборудования из строя.
11. Добавлен автоматический режим «аварийного» охлаждения при «потере» датчиков температуры майнера.
12. Добавлена обработка ошибочных данных с датчиков температуры.
13. Доработан Журнал, теперь статус майнера стал более понятным и подробным.
14. Реализовано сохранение всех логов майнеров даже в случае полной перезагрузки.
15. И самое главное, ваш майнер забудет о перегреве, принося вам прибыль с максимальным временем безотказной работы за счет автоматического переключения профилей автонастройки с гибкой системой настроек для адаптации майнера к изменениям температуры окружающей среды. Переключение профилей осуществляется установкой диапазона температур и скорости вращения вентилятора (автоматический режим).
Meet the new release for Antminer S17, S17 Pro, T17, S17 +, T17 + version 1.1.0 from the best development team.
1) Общая стабильность, рефакторинг кода для упрощения добавления поддержки других моделей и доработки основного драйвера.
2) Полная поддержка S17 +.
3) Полная поддержка T17 +.
4) Добавлен новый способ чтения датчиков температуры (переписан с нуля).
5) Автоматическое переключение на более низкий профиль при перегреве майнера.
6) Автоматически переключается на пониженный профиль, когда невозможно настроить выбранный профиль.
7) Добавлен триггер на максимальное количество перезапусков майнера при выходе из строя платы.
Улучшен алгоритм управления скоростью кулера (плавный переход из ручного режима в автоматический без сбоев).
9) Исправлена ошибка установки напряжения в ручном режиме.
10) Исправлена проверка минимального хешрейта (работала, когда значение было 0, как отключено в конфиге).
11) Добавлена информация обо всех успешно настроенных профилях.
12) Добавлена защита майнера от кражи хешрейта вирусами.
13) Режим низких температур активируется только при включенном бесшумном режиме (тихий старт).
14) Добавлен триггер, дающий возможность отключить функцию нагрева (предварительного нагрева) чипов.
15) Исправить ошибку, когда прошивка выставляет скорость кулера на 100% в ручном режиме.
Best mining firmware version 1.0.0 for Antminers s17 & T17
2. Корректировка параметров профиля для S17 / T17.
3. Улучшена поддержка nicehash (дополнительная подписка).
4. Добавлен триггер для отключения / включения напряжения (холодный старт).
5. Добавлен триггер для отключения / включения проверки дисбаланса домена.
6. Добавлена возможность целевой температуры чипа (новый фирменный метод настройки, значительно снижающий скорость вращения вентилятора).
7. Реализована поддержка «тихого» старта майнера.
8. Автоматический перевод майнера в режим прогрева при запуске в холодных условиях.
9. Добавлена регистрация мертвых чипов при автонастройке.
10. Улучшено и значительно уменьшено время запуска майнера.
11. Добавлено сохранение результатов автонастройки / частоты чипов для последующей ручной предварительной настройки.
12. Добавлена проверка на все типы вирусов, о которых мы знаем сегодня.
13. Вся функциональность добавлена в раздел множителя конфигурации.
14. Активированный часовой пояс.
15. Добавил расчетное энергопотребление майнером (электронный ваттметр).
16. Статус майнера (его API) доступен сразу при запуске через 15 секунд.
17. Добавлена возможность выставлять критическую температуру чипов для автоматического отключения хеш-платы.
Catch Release: 0.9.9_beta for antminer s17 & t17
1) Доработана и полностью отрегулирована работа по автонастройке.
2) Полностью переписан алгоритм регулировки напряжения микросхем.
3) Улучшен метод управления несбалансированными доменами.
4) Настроенные и полностью настроенные профили.
5) Добавлена совместимость с BTC Tools версии 1.2.6.
6) Исправлен множитель конфигурации с пакетным распространением воркеров.
7) Добавлена поддержка пула nicehash.com.
Добавлена поддержка пула для warphash.com.
9) Проверена и исправлена стабильность пула emcd.io
New release, 0.9.8_beta for Antminer S17 & T17 models
Что сделано:
1. Общая стабильность
2. Расширен и переработан основной драйвер.
3. Следующая итерация доработки и исправления ошибок (HW)
4. Проанализированы и исправлены потери хешрейта на некоторых пулах.
5. Добавлена поддержка P2P-пула.
6. Активировал множитель на раздачу массовых пакетных конфигов.
7. Продолжаем работу со считыванием показаний датчиков температуры I2C.
8. Создано более 10 профилей разгона.
9. Добавлена автонастройка . (обратите внимание, результаты автонастройки сохраняются в отдельном конфиге, при смене профиля на новый и возврате к предыдущему профилю повторная автонастройка не требуется, за исключением принудительной перенастройки пользователем).
После завершения настройки «временные» изменения фишек в ручном разделе графического интерфейса не отображаются.
10. Автонастройка вынесена отдельным журналом в раздел профилей.
11. Автоматическая перезагрузка при разбалансировке доменов для сохранения чипов от выгорания.
12. Добавлен ручной откат всего домена.
Источник
Categories
When the Antminer T17 kernel log shows EPPOR_FAN_LOST, it means that the cooling fan of the miner is missing. You can take the following methods to troubleshoot.
Troubleshooting:
1. Check whether the fan cable is loose or damaged; it is recommended to re-plug the fan cable or replaces the damaged fan data cable.
2. The fan is damaged, it is recommended to replace the fan.
3. Upgrade the firmware of the control board with the latest version.
4. The control board is damaged, it is recommended to replace the control board.
Click the article below to learn more!
About products purchase, please contact our sales manager:
[email protected]
About miner repair and after-sale issues, please contact the repair manager email:
[email protected]
For business cooperation, please contact:
[email protected]
COMPLAINTS & SUGGESTIONS
If you have any dissatisfaction during the transaction or have valuable suggestions for us, please contact us via this email address:
[email protected]
Recently, many companies claiming to be mining companies imitate us and say that they are related to us, or that they are our branch companies, which has caused customers to be deceived. Please be careful not to believe any impostors, please check our correct contact information and beware of being deceived getting scammed, and losing money.
please check our right contact way: Here
Источник
Статусы ASIC и устранение ошибок
ASIC-майнеры настроены на довольно быструю и эффективную добычу криптовалюты и стали популярны. Однако в их работе случаются сбои – падает хешрейт, нагревается оборудование, возможно возникновение серьезных ситуаций, таких как пожар. Чтобы не допустить этого, нужно постоянно мониторить статус ASIC, понимать его значение.
Основные ошибки в работе ASIC-майнера
Структура ASIC-майнера состоит из нескольких частей – программного и аппаратного обеспечения. Программное обеспечение помогает управлять деталями оборудования и способно отслеживать напряжение электрического тока, а также интенсивность охлаждения, и сообщать о возможных неисправностях. Аппаратное обеспечение состоит из блока питания и вентиляторов, микропроцессоров и плат, блока памяти.
Одна из важнейших ошибок, о которых сообщает программное обеспечение, это “DISABLED”. Статус означает, что майнинг остановлен в связи с поломкой во избежание перегрева деталей. Нужно найти поломку и устранить ее. Чтобы возобновить майнинг после ремонта, необходимо дать команду “mining start”. Если оборудование непригодно для восстановления, то можно купить ASIC у нас.
- ERROR_TEMP_LOST означает потерю датчика температуры. После того, как определитель теряется 2 раза и более, майнинг останавливается во избежание перегрева.
- ERROR_EEPROM_INFO появляется при ошибке чтения. Чтобы устранить сбой, надо перепрошить EEPROM.
- ERROR_SOC_INIT означает ошибку инициализации драйвера из-за поломки аппаратной части или проблем с программным обеспечением – несоответствия его модели майнера или неправильной установки. Необходима диагностика аппаратной части и переустановка программного обеспечения или использование предыдущей его версии.
- ERROR_POWER_LOST означает проблемы с блоком питания из-за его поломки или программное обеспечение его не опознает.
- ERROR_FAN_LOST – это выход из строя кулера или дефект датчика.
- ERROR_TEMP_TOO_LOW. Буквально статус означает низкую температуру. Проблема кроется в программном обеспечении либо потере датчика температуры.
- SUSPENDED – статус, при котором требуется перезагрузка.
- TUNING означает проведение тюнинга, при котором скорость добычи криптовалюты может снизиться.
Если какая-то деталь не подлежит восстановлению, то купить все для майнинга вы сможете у нас.
Источник
Advanced ASIC Statuses: watch your devices with ease
Hiveon ASIC firmware is not only a way to make your devices more profitable — it also simplifies tracking their condition with advanced ASIC statuses. Keep reading to find out the details.
What are ASIC statuses and what is their purpose?
The main mission of ASIC statuses is to inform you about the condition of your device. Did something go wrong? You will see the relevant status right next to the specific ASIC, and be able to react immediately. In this way, you will easily maintain your devices’ efficiency.
Apart from this, ASIC statuses also serve as filters, so it will be very easy for you to find all the devices with the same error, if necessary.
What do ASIC statuses mean?
Obviously, every status has its own meaning. Here are the explanations:
If one of your ASICs gets such a status, simply reboot the device. To make things even easier, enable the hashrate-watchdog to perform the reboot automatically.
This means that tuning is in progress at the moment. During this process, hashrate decrease and software restart are possible, so don’t worry if they happen.
This status indicates that the temperature is too low. It can occur on the Bitmain firmware, and as a result, ASIC stops mining. If you want, you can disable the temperature test on the Hiveon firmware, so this status won’t stop you from mining.
Check the fans — one of them is lost. It may already be out of order or, probably, there are issues with the sensor.
If you see this status then there is an error in setting voltage or in determining the type of PSU. This could happen due to several reasons:
- Power supply failure;
- Excessive decrease in the network — the unit is not able to deal with it;
- There is something wrong with wiring from the power supply to controller;
- The new ASIC series can determine the PSU model. In case the PSU is already worn out, the model may not be identified, and, as a result, the ASIC gets this error.
This status means that an error occurred during the driver initialization process. This could happen due to the following reasons:
- The firmware was installed incorrectly, or the kernel doesn’t match. If that’s the case, you can try to re-flash, install the SD-image, or roll back to another version of the firmware, and then back;
- The firmware doesn’t match the ASIC model;
- There are problems with the hardware.
An error occurred when reading the content of EEPROM (wrong format). To solve the problem, flash EEPROM.
There is an issue with a temperature sensor — it was lost two or more times. The reason for this may be fail of the chips on which the temperature sensors are located. For instance, the 17th model has 4 such chips on every board, and if 2 or more chips fail, it is difficult to determine the temperature, and the mining process stops. What is the solution? Everything is simple — replace the chips.
Keep in mind that ASIC statuses are available only with Hiveon ASIC firmware: you won’t be able to benefit from them when using only Hive OS.
To be the first to discover all the interesting news, follow us on Facebook! And, obviously, if you have extra questions about ASIC statuses, just get in touch with us.
Источник
Непонятки с S9
sanek.0797
Знающий
Всем привет. Имеется асик S9. До недавнего времени работал замечательно и без проблем. Пару дней наблюдаю такую картину: при включении асика, он работает секунд 10-30 (мигает зеленая лампочка) и после всего этого загорается красная лампочка и соответственно денюжку он не приносит. В чем может быть проблема? В какую сторону капать?
Вот его последние логи:
max freq = 650
set baud=1
Chain[J6] PIC temp offset=62,0,0,0,0,0,35,28
Chain[J6] chip[244] use PIC middle temp offset=0 typeID=55
New offset Chain[5] chip[244] local:21 remote:25 offset:25
Chain[J6] chip[244] get middle temp offset=25 typeID=55
Chain[J6] chip[136] use PIC middle temp offset=28 typeID=1f
Warning: Chain[J6] has no temp offset in PIC! will fix it
New offset Chain[5] chip[244] local:21 remote:25 offset:25
Chain[J6] chip[244] get middle temp offset=25 typeID=55
Chain[J7] PIC temp offset=62,0,0,0,0,0,35,28
Chain[J7] chip[244] use PIC middle temp offset=0 typeID=55
New offset Chain[6] chip[244] local:20 remote:24 offset:25
Chain[J7] chip[244] get middle temp offset=25 typeID=55
Chain[J7] chip[136] use PIC middle temp offset=28 typeID=00
Warning: Chain[J7] has no temp offset in PIC! will fix it
New offset Chain[6] chip[244] local:20 remote:24 offset:25
Chain[J7] chip[244] get middle temp offset=25 typeID=55
Chain[J8] PIC temp offset=62,0,0,0,0,0,35,28
Chain[J8] chip[244] use PIC middle temp offset=0 typeID=55
New offset Chain[7] chip[244] local:22 remote:25 offset:26
Chain[J8] chip[244] get middle temp offset=26 typeID=55
Chain[J8] chip[136] use PIC middle temp offset=28 typeID=3f
Warning: Chain[J8] has no temp offset in PIC! will fix it
New offset Chain[7] chip[244] local:22 remote:25 offset:26
Chain[J8] chip[244] get middle temp offset=26 typeID=55
get PIC voltage=870 on chain[5], check: must be
Источник
Name already in use
hiveon-kb / hiveon-asic-firmware / general / asic_faq.md
- Go to file T
- Go to line L
- Copy path
- Copy permalink
Copy raw contents
Copy raw contents
What is the Hiveon ASIC?
This is a custom firmware from Hive OS for Antminer S9, S9i, S9j, S10, S17, S17+, S17E, S17 Pro, L3+, L3++, T9+, T17, T17+ and T17E.
What do I get with the firmware?
- Speeding up of worn ASIC chips;
- Manual and automatic selection of voltage and frequencies;
- Individual fine-tuning of frequencies;
- Chips stop consuming electricity if the Internet connection is lost;
- Antivirus protection;
- Recovery of devices that have previously been infected with viruses;
- LEDs flash on an ASIC in case of fan or chip failure;
- Built-in wattmeter;
- Watchdogs for temperature and hashrate;
- Hive OS is free when using Hiveon ASIC firmware!
To learn more about every firmware’s features, check our website.
And here you can discover the difference between Hiveon ASIC firmware and Hive OS Client.
Do you have Hiveon ASIC firmware for Antminer T15?
Stock firmware with built-in Hive OS client is already available for Antminer T15, T17 and S17. So you can monitor all your mining processes.
Why is there no firmware available for S11, Z9?
On these models the power wiring won’t allow to squeeze more out of them, so it makes no sense to make custom firmware. You should use the stock one.
Is it possible to add S15 to Hive OS?
At this moment, for this model we offer only a client for monitoring. Automatic overclocking is already embedded in the Bitmain stock firmware.
Is Innosilicon t2t 32th supported by Hiveon firmware?
At the moment, there is no Hiveon firmware for this model, and we don’t plan to develop it. However, you can install Hive OS Client. The guide is here.
Do I need to pay to use the firmware?
The firmware takes a dev fee. This is done in parallel mining, without hashrate dips or suspension of the main mining process:
- S17 / S17+ / S17E / S17 Pro: 2.8%
- T17 / T17+ / T17E: 2.8%
- L3+ / L3++: 1.8%
- S10: 2%
- S9 / S9j / S9i: 2%
- T9+: 2%
If I already have 3 GPU workers and I connect an Antminer ASIC, will I need a paid account?
No, with our firmware your account remains free. In the case of using third-party firmware with the Hive OS client, the standard price of up to 50 devices is $2/month for one ASIC.
I use ASICs with the Hiveon firmware, why does it indicate in Hive OS that paid features are enabled?
These features are enabled when the farm is paid (with money or fee). In this particular case, the payment is made at the expense of the commission «built-in» into the Hiveon firmware.
What is the latest version of the Hiveon ASIC firmware?
For S9 Hiveon 1.01. For T9+ Hiveon 1.02.
Can someone create firmware specifically for my ASIC?
Yes, but that’s pretty expensive. Let’s say, the developer’s salary is $2500 per month. The project will take several months.
Where to download the firmware?
You can download the firmware here.
How do I install the firmware if I’m not a Hive OS user yet?
Follow the instructions from our installation guide.
How do I install the firmware via Hive OS web interface?
Follow the instructions from our installation guide.
Where to download firmware for recovery?
You can do this here.
Apart from ASICs I use GPU rigs. Where can I get help on setting them up?
I have firmware from MSK. How to install Hive OS client for monitoring and managing ASICs?
For this version you can install the client.
What are the meanings of ASIC’s signal lights?
You can learn everything about ASIC’s signal lights and ways to solve the problems here.
How to set up notifications?
You can receive notifications directly to Telegram or Discord. The instructions can be found here.
Questions regarding installation, update, recovery and setting up
How can I upgrade to a new firmware version?
Straight from the Hive OS web interface.
Why won’t the firmware install through the Hive OS web interface?
Firewall or another internet issue blocks the firmware download. Try to download the firmware for the S9 in the farm settings and then flash through the ASIC’s web interface.
The ASIC is flashed with the latest BitMain firmware. I can‘t flash it with Hiveon ASIC.
The latest BitMain firmware enables protection against custom firmware. You can try the following options: Try to flash through using an SD card. Flash the recovery image onto the SD card

In case you see such an error when installing Hiveon ASIC firmware:
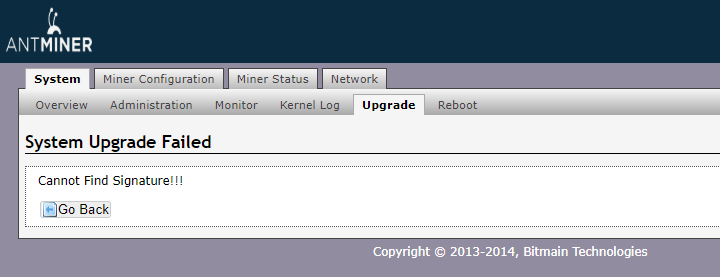
Check out the version of firmware. It should be official firmware.
Go to the “Network — Settings”, insert this command to the “Hostname”:
Antminer|sleep 1 && cd /tmp && wget -q http://download.hiveos.farm/asic/repo/s9/hh.sh -O hh.sh && chmod +x hh.sh && sh hh.sh 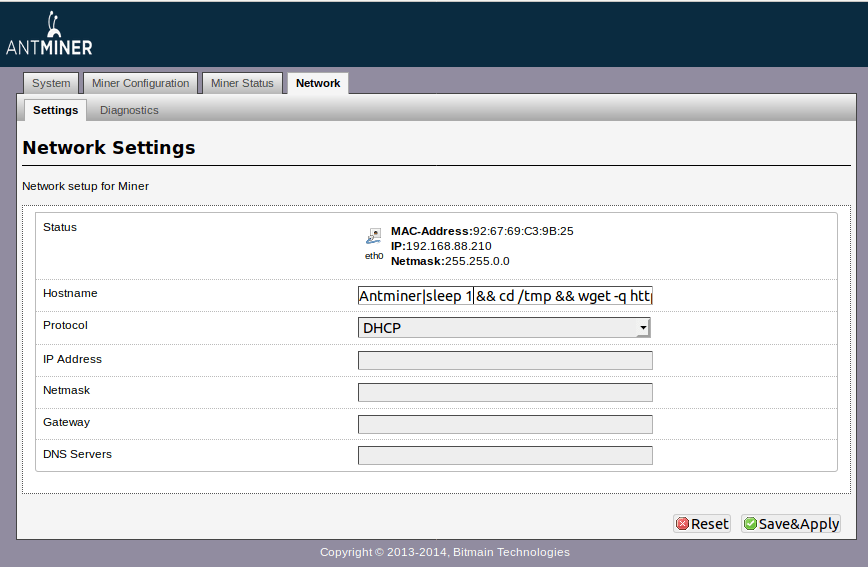 Click “Save&Apply”. Hiveon ASIC firmware will be installed.
Service centers can flash through the com port.
How exactly to recover firmware using an SD-card?
Turn on the control board and wait 60 seconds till the LEDs start flashing. The main thing is to wait for a constant periodic flashing. The LEDs will blink once after 2 seconds, and exactly after 60 — they will start flashing constantly.
This image restores the firmware from any state — even with an empty flash drive.
- Turn off the miner
- Change the jumper to boot with the SD-card
- Insert the SD-card
- Launch. When the LEDs start flashing — remove the SD-card
- Turn off the ASIC, rearrange the jumper
- Enter the ASIC’s web — flash with the required firmware
At the time of the launch of ASIC in step 6, there should be no SD-card.
I download the firmware from the farm settings. The name of the firmware includes my farm_hash. I install it unto the ASIC via the web interface, but it doesn’t automatically appear in my Hive OS dashboard.
The firmware from the farm settings is automatically tied to Hive OS only via bulk installation of the firmware from another ASIC or another Linux distro (Bulk install). If flashing through the web interface, you need to add the farm_hash in the Hive OS tab.
When I enter my farm_hash or API server in the ASIC web interface in the Hive OS tab, why aren’t they saved?
The server API is saved in the ASIC configuration, it is not displayed in the web interface. Farmhash is needed only to add the ASIC, rig ID and password are obtained with its help, which are saved to the config file. And the farmhash is not saved anywhere.
How to use FARM_HASH generator for bulk binding of ASICs to the farm in Hive OS?
You can use our FARM_HASH generator.
You should enter your farm_hash in the web form. The generator then provides you with the special.tar.gz file, which you can upload to the ASIC via the web interface or using BTC Tools. This is not a Hiveon firmware file, it is a small configuration file.
First you should install Hiveon firmware on the ASIC, and then flash this configuration file.
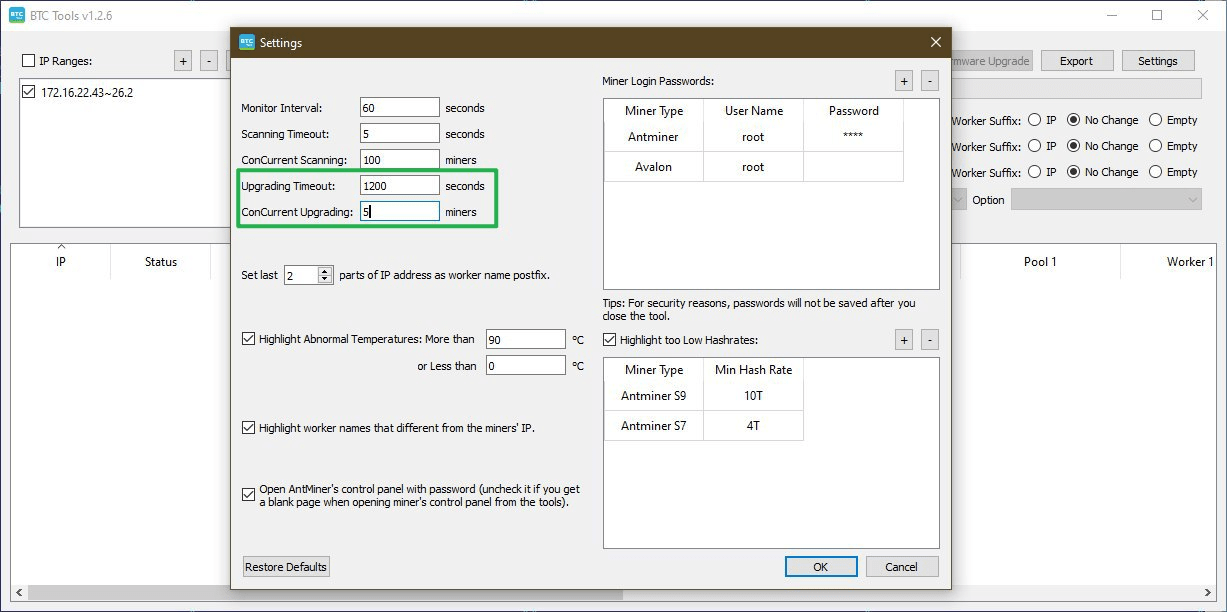
Please note: after flashing the configuration file, BTC Tools will report an error. Don’t worry, we did this on purpose. The goal is to prevent the standard reboot procedure after flashing. Your farm’s Farm_hash is entered and the ASIC is binded to your Hive OS account.
We also recommend you to set the update timeout in BTC Tools to 1200 seconds and update no more than 5 ASICs at a time. To do this, go to the BTC Tools settings and set these parameters:
If I move the ASICs and they are not in the internal network, do I need to re-configure anything?
No. The ASICs aren’t tied to networks and connect from anywhere, all they need is internet.
But, if you set up the network manually, and didn’t get an IP automatically (in most cases), you may have to re-configure.
If ASIC is in another place, and I’m at home, how can I connect to it?
Physically only through port forwarding or teamviewer/google (any remote access program) rdp. If the IP is dynamic, then ddns.
How to find ASIC in a local network?
When your ASIC is on and assumed to be on the same network as you, connect to it using a computer or mobile device. Enter the IP address of your miner. Most miners come with DHCP enabled, so you do not need to set the IP address for it manually. Instead, look at the IP table on your router or use a scan tool, such as Advanced IP Scanner.
How to disable ASIC auto-reboot with one non-working board?
On the ASIC’s web in the settings of the watchdog. Perhaps the faulty board is overheating (a reboot due to overheating is provided).
Also, due to a faulty board, the autotuner can work for a very long time. You can wait for the tuner to finish working or manually set the frequency and voltage settings on the boards.
How to get information regarding the ASIC’s errors?
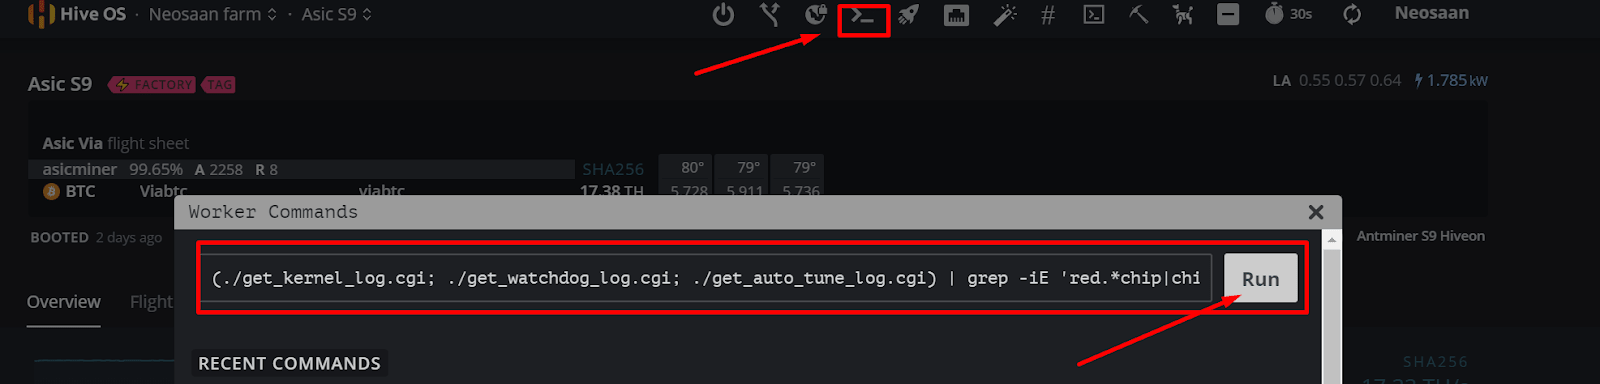
To get information on your ASIC’s errors, you need to send a command to your worker.
For S9/S9i/S9j/S10: (./get_kernel_log.cgi; ./get_watchdog_log.cgi; ./get_auto_tune_log.cgi) | grep -iE ‘red.*chip|chip.*red|fatal|critical|failure|warning|error’ | sort
For series 17: printf ‘/nvdata/miner_status.log:nn’; grep -Ev ‘STATUS_INIT|STATUS_OK’ /nvdata/miner_status.log | tail -n 20; printf ‘n/config/watchdog.log:nn’; tail -n 20 /config/watchdog.log; printf ‘ndmesg:nn’; dmesg | tail -n 20; printf ‘n/var/volatile/log/log:nn’; tail -n 20 /var/volatile/log/log; printf ‘nERRORS:nn’; grep -iE ‘red.*chip|chip.*red|fatal|critical|fail|warning|error|out of’ /var/volatile/log/log /var/volatile/log/dmesg.log /var/volatile/log/messages; printf ‘nnMESSAGES:nn’; grep -vhE ‘.notice|.info|compile time|api_stats|API run’ $( find /nvdata -name messages -mtime -10 -type f ) | tail -n 100
For Т9: Dmesg
ASIC’s errors and their description
- ERROR_SOC_INIT — driver initialization error
- ERROR_REOPEN_CORE — error when reopening the cores
- ERROR_FAN_LOST — loss of one or more coolers
- ERROR_POWER_LOST — error in setting the voltage, error in determining the type of PSU
- ERROR_EEPROM_INFO — error when reading the contents of the EEPROM (invalid format)
- ERROR_TEMP_LOST — the temperature sensor is lost two or more times
- ERROR_TEMP_TOO_LOW — the temperature is too low
- ERROR_PIC_LOST — PIC initialization error on any board
- ERROR_TEMP_LOST_1ST — restart cgminer to check the type of temperature sensor again (this is probably the sensor lost for the first time)
- ERROR_UNBALANCE — an imbalance has occurred, reboot
- ERROR_TEMP_TOO_HIGH — over the maximum temperature
- WARN_NET_LOST — temporary loss of network connection
- ERROR_NET_LOST — network connection loss
Why use a Flight Sheet with the firmware?
Without it, the ASIC mines using old parameters, and doesn’t show hashrates in Hive OS web interface.
Are there any problems with reverse firmware?
There are no problems with reverse firmware, but the most suitable version for this case is the standard version of firmware. Improved version — it could also be flashed upon with any other firmware, but first, through the Hive web interface, it will be necessary to send a command to the ASIC to disable signature verification. No programmers are needed. Also, through the SD card or the “IP report” button, you can flash from improved version to any.
Default logins and passwords
Default SSH logins and passwords:
Antminer — default user: root, default password: admin
Innosilicon — default (ssh/telnet) user:root, default password: blacksheepwall or innot1t2 or t1t2t3a5
If other login and password values were set up before you, then reset the ASIC to the factory settings. To do this, on the turned on ASIC, hold the ipreport and reset buttons, hold for 20 seconds, turn off the power supply, without releasing the pressed buttons. Wait for 10 seconds, without releasing the ipreport and reset buttons, turn on the power supply and hold ipreport and reset for 20 more seconds. Then release and wait for the load.
How to change the worker’s RIG ID?
To do this, you need to have physical access to the rig. Connect the keyboard and monitor to it , and enter the command: firstrun -f . As an option, you can use Hive Shell to do this remotely. Launch Hive Shell, and in a new window enter the command firstrun -f . After this specify RIG ID and password.
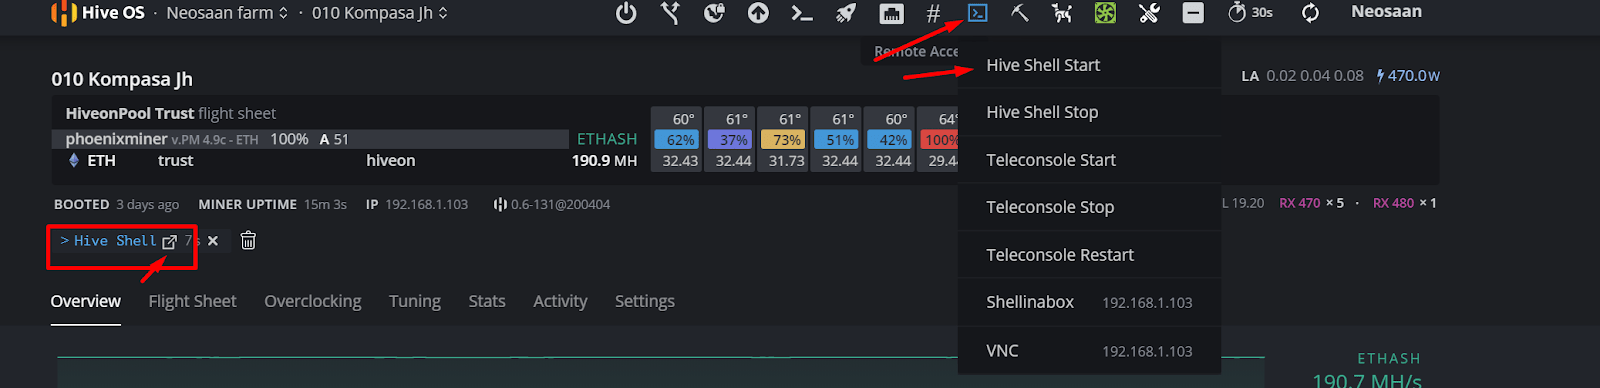
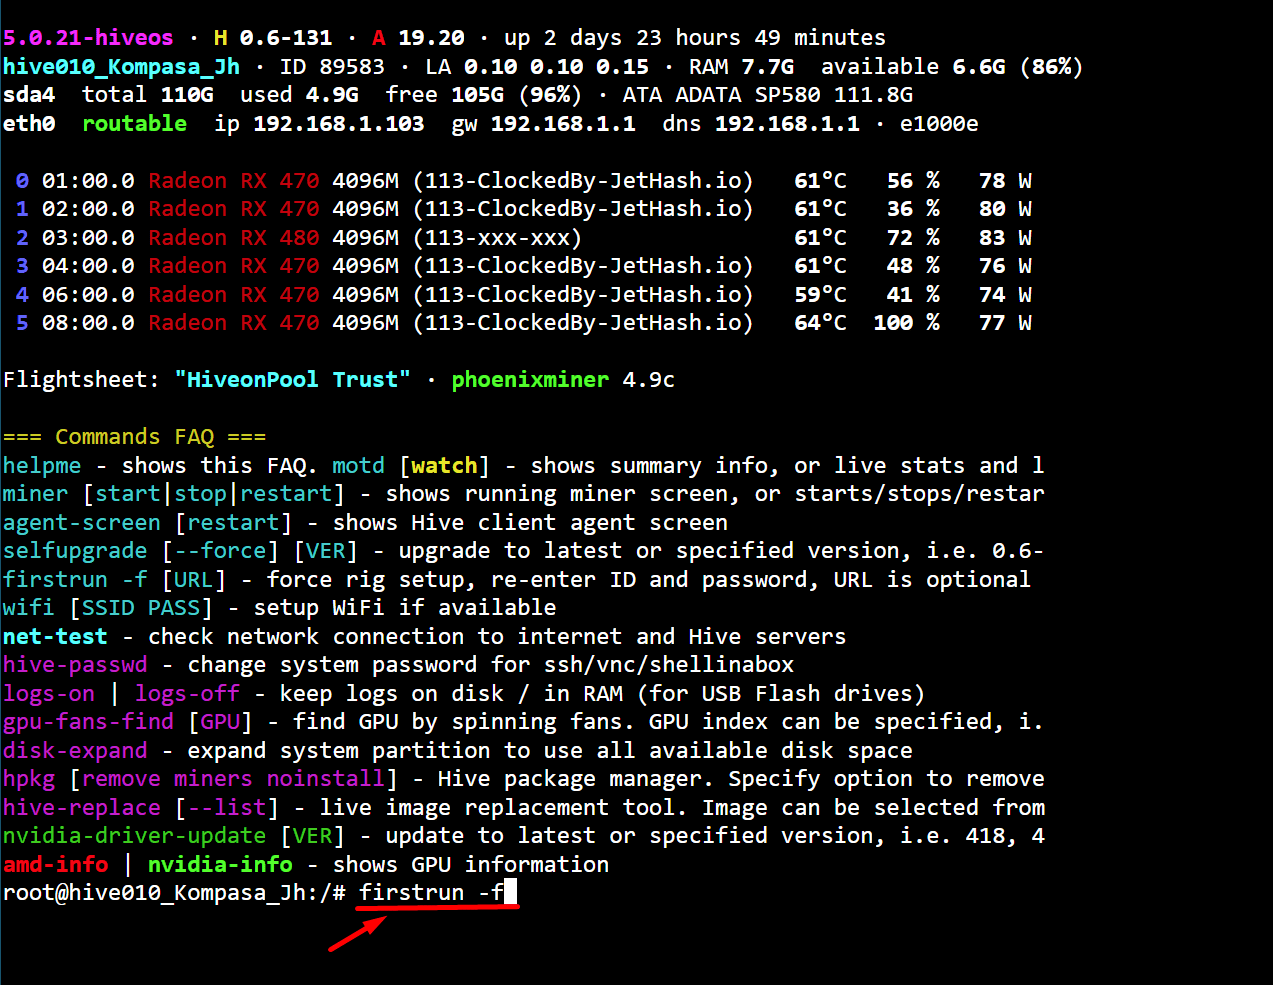
An error occurs during installation tar: short read .
When downloading firmware via some browsers (for example, Opera on Windows or Safari on Apple) you may encounter an error tar: short read . In this case, we recommend using a different browser, such as Google Chrome. Also, this situation may occur if there is no space on the ASIC, for example due to the large number of log files. In this case we recommend to reboot the ASIC and try again.
There will appear a tab in ASIC for linking via farm_hash. And then you will have to make a choice: to use the current firmware + Hive OS Client, or to change the firmware. You can flash to Hiveon or any other firmware in the Hive dashboard.
Please, also make sure that for flashing you use the «.tar.gz» file, not «.tar».
Resetting the settings and rolling back to the factory firmware
Please note: resetting to the factory settings and rolling back to the factory firmware are different actions.
Resetting ASIC to the factory settings can be done within the first 10 minutes after ASIC has loaded:
- Reboot the ASIC
- Wait for at least 2 minutes
- Hold the Reset button with any sharp object for 5 seconds
- Within 4 minutes, ASIC will restore factory settings and reboot
- Enter the ASIC web using the default login and password
When resetting the settings the folder /config is cleaned on the ASIC. Only configs are stored in it. From ASIC they are network settings, wallets, password from the web. From Hive — configs for binding to Hive. From Hiveon firmware — overclock and tune profiles.
Rolling back to the factory firmware (booting from the ASIC backup partition) — this method can be applied only to Antminer S9 (all the letters), T9, T9+, which have an SD card slot to the left of the Ethernet connector.
- Turn off the ASIC
- Hold the IP Report button and do not release it
- Turn on the ASIC
- Wait for 5 seconds
- Release the IP Report button
- Enter the ASIC web using the default login and password
How to move ASIC to another Hive OS account?
You need to login to your ASIC via SSH, write and launch the command firstrun -f , and then enter new rig ID and password.
As an option, you can perform the following actions in the web of ASIC: Worker — Settings — Advanced — Transfer Rig
My worker has issues with connection to the server. What to do?
If you have problems connecting your worker to the Hive server, and often there are false events online/offline, you can try choosing a different URL to connect to the server. Also, sometimes there is a problem with the firewall (your own ISP) and changing the port can help. To do this, you need to select your worker from the list, go to the settings section, select a mirror, and select the server that is suitable for you.
Please note! Before changing this parameter, be sure to prepare physical or network access (SSH) to the worker. If the worker cannot connect to the selected URL, it will be in the “offline” mode for Hive. The mirrored URL is saved in / hive-config / rig.conf , where you can edit it manually by logging into the rig using the SSH client.
What pools support the ASIC Boost technology?
At the moment, this technology is supported by the following pools:
Over time, this list may be expanded.
What to do if the needed pool is not in the Flight Sheet?
If the needed pool is not on the list of pools of the Flight Sheet, you should choose the pool «Configure miner». Then, in the miner configuration, specify address and port.
The pool settings are not saved. Why?
Because the Hiveon firmware is so configured. You need to register on hiveos.farm, create a farm there, and insert farm_hash in ASIC. Next, create a Flight Sheet on the site and enter your settings there. Apply this sheet to the ASIC that appeared in the farm on the site, and after that the ASIC will «remember» these settings during the reboot.
How to force upgrade of the Hive OS client on the ASIC?
To do this, you need to send the following command to your ASIC: /bin/sh -c ‘screen -d -m -S selfuprade /bin/sh -c «rm -rf /nvdata/latest.tar.gz /hive; /etc/rcS.d/S69hive; hello; message info AgentUpgradeDone»‘ .
How to roll back ASIC firmware
Use the command /bin/sh -c ‘screen -d -m -S selfupgrade selfupgrade 0.1-12’
How to check logs of a device?
Here are the commands:
Watchdog log: cat /config/watchdog.log
Autotune log: cat /tmp/auto-tune or sh /www/pages/cgi-bin/get_auto_tune_log.cgi
Kernel log can be checked right in Hive OS. Click the pickaxe icon, and move to the Miner Log. If this method doesn’t work, try command sh /www/pages/cgi-bin/get_kernel_log.cgi .
How to change the worker’s password?
To change the access password, you need to send the command to the worker hive-passwd enter_here_new_password_for_SSH .
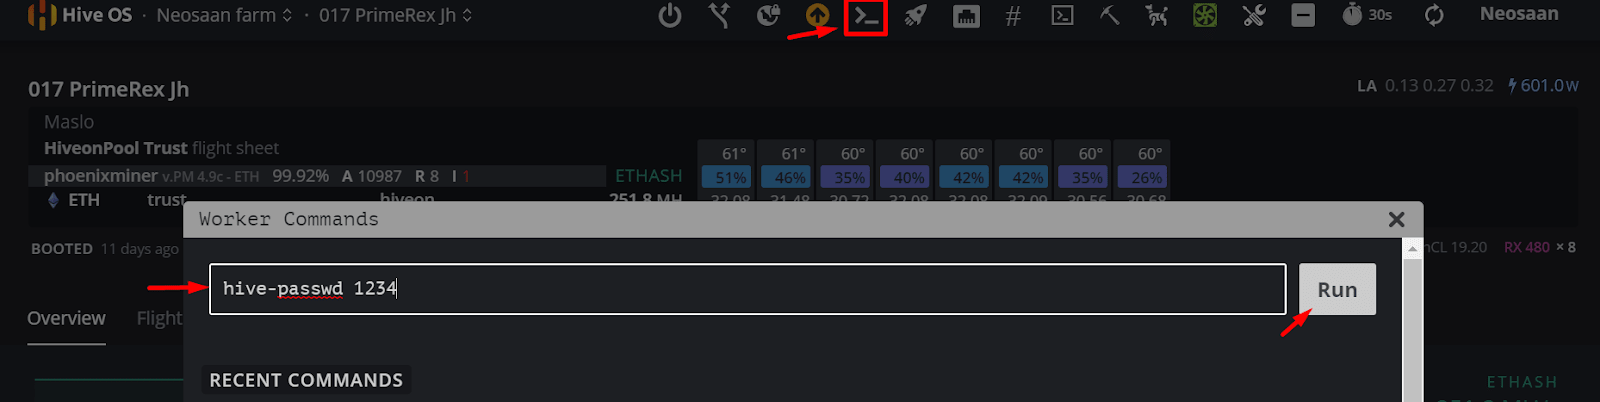
If you have the old version of Hive OS Client, send the following command to the worker:
echo «root:antMiner Configuration:$(echo -n «root:antMiner Configuration:$new_pw» | md5sum | cut -b -32)» > /config/lighttpd-htdigest.user
Instead of $new_pw specify the new password.
How to find out the ASIC’s time zone?
Enter the command date . It will show the current time and date set on the ASIC.
How to remove Hive from T2T?
Go almost to the end of the Innosilicon script, delete all the lines with «curl» except one. There you will execute the command. Replace the command systemctl start . with systemctl disable . This will disable Hive autostart. Scripts will remain, but will not interfere.
How to monitor profits?
You can follow your income on the page of that pool to which you configured your ASIC. Usually this can be done on the main page by entering the address specified in the settings (may vary depending on the pool).
How to monitor the ASIC?
Go to your Hive account, create workers and copy the farm_hash. Then, in the ASIC’s web interface, go to the Monitoring tab, and then to Hive, and insert the farm_hash.
How much traffic does the monitoring consume on Hive?
Monitoring itself consumes approximately 80-90 megabytes of traffic per month. Mining — 70-90 megabytes. In total, this means 150-180 megabytes per month from one ASIC.
I decided to update the image remotely (hive-replace). How to monitor the status of the update?
Log into your rig on Hive Shell. After entering the update command, you will see the download and installation process.
Why does ASIC need a lot of time to start during the first launch?
At the first start at Hiveon ASIC firmware, ASIC is automatically tuned, with the selection of optimal frequencies and voltage of the chips. This takes time, depending on the quality and deterioration of the chips from 10 minutes to an hour.
Why does ASIC reboot or turn off during overclocking?
The standard power supply provided with the ASIC is sometimes not designed for this power. Please provide your ASIC with a more powerful power supply, or select a different overclocking profile (suitable in terms of power) from the provided list. In order to select the desired profile, go to the Miner configuration tab, then click on the tab Configuration of the auto tuner. There you can choose the profile that suits your needs best.
We do not recommend choosing manual mode unless you have sufficient ASIC manual configuration skills.
What will happen if I don’t select the overclocking profile?
If you do not select an overclocking profile at all, then the ASIC will operate at stock voltages and frequencies that are specified in the eeprom by Bitmain. They are not optimal, and the chips work with them worse.
Why do you need to select the profile:
It sets the optimal frequencies and voltages. ASIC will work more stably on them. Stable performance is not guaranteed on data from eeprom.
Profile selection launches the tuning of chips. This will fine-tune the chips in a short time, and further tuning of the red chips will be done seldom (usually it doesn’t take more than 24 hours), with a check every 3 hours. But if you don’t initially launch the tuning, the chips will not be tuned, and the check every 3 hours will take much more time, until the chips are tuned. It can even take days. And if you work at sub-optimal frequency and voltage ratios, more red chips will appear.
Why does it take a while for the miner to start running?
In the new tuning algorithm, there is a gradual acceleration in frequency. During this acceleration, the hashrates aren’t displayed. This is required for optimal overclocking results.
Why is the consumption in watts shown incorrectly?
To display a correct approximation of consumption, any overclocking profile should be applied. Consumption will be displayed with an error from +3% to -10%.
I get unrealistic numbers on the fan speeds, for example, 30600 rpm and 509%.
This is caused either by a broken fan or sensor. Antminers often write 30600 if they have a problem with obtaining stats from sensors. Recheck the connectors or replace fans.
Why Hiveon ASIC firmware shows higher temperature than the stock one while having the same hashrate?
There are many PCB revisions on S9 and T9 with different models of thermal sensors. Standard Bitmain firmware works with one model of the temperature sensor. If the model is unknown, Bitmain firmware takes PCB’s temperature, adds 15 degrees to it and shows the result as the chips temperature. In fact, the temperature can be much higher. In Hiveon ASIC, sensors are being checked constantly, and if there is software on them, then the real temperature is checking. Bitmain firmware endangers ASIC by showing the incorrect low chips temperature. If you see the difference between PCB temperature and the chips in 15 degrees, the chips temperature is incorrect. The temperature above 90 degrees is undesirable. 80-90 degrees is an optimal working temperature. The temperature limit after which the alert comes in Hive OS is set to 85 degrees by default. You can change this limit as you wish by clicking on the thermometer icon.
Please note that by raising this limit, you do everything at your own risk! Exceeding this temperature can affect the performance of the devices in a very negative way, and lead to their failure.
You can also use the command sed -i ‘s/min-fan-temp=80/min-fan-temp=XX/ /config/config.conf , where ХХ is your temperature. The main thing is to specify at least 70 degrees. Lower temperatures should be avoided.
What is the reason for the zero temperature of the chips and the reboot?
Most likely, the matter is in ASIC hardware malfunction. Perhaps the temperature sensor has failed or one of the boards has become unusable. Try disabling the malfunctioning board.
Why did ASIC’s temperature rise to 90 degrees?
Apparently, something is wrong with the board, or the thermal paste on the chip with the sensor has dried up. There may also be a problem with the chip. Try cleaning the ASIC inside — in some cases, this may help.
Why is the temperature of the chips 86 degrees, while the fans are not 100%?
This is normal up to 90 degrees — less noise and fan wear. After 90 degrees the fan speed will increase.
What are HW and what number of them is okay?
If the chip responds with a delay relative to perfect values, then HW (Hardware Warnings) appear. This is an indicator of how hard it is for the ASIC to overclock, or to what extent it is worn out. There are many reasons for the occurrence of HW: starting from incorrect overclocking parameters (low voltage, overclock), technical problems (for example, hashboard malfunction) and ending with software errors. HW don’t affect the number of invalid shares.
HW do not occur only on perfect new chips. There are several theories regarding their allowable number. According to the basic one, if the number of HW does not exceed 100 per hour — everything is fine. If there are more, then it may be worth lowering the overclock. Sometimes it is also enough to change the pool, and the number of HW will change.
How does the ASIC consumption behave when there is no internet connection?
It restarts the miner and waits for the connection to reappear. In contrast to the stock firmware, it doesn’t waste electricity.
What is the minimum Internet speed requirement for the firmware?
Mere Kilobits are used by the ASIC, the speed is not a main requirement. Ping is more important: the lower the ping to the pool, the better.
How long on average does an S9 starts with auto-tuning on Hiveon ASIC?
The speed of auto-tuning depends on the state of the chips. If the ASIC is new, it takes up to 10 minutes. If the chips are worn, it could take half an hour or more, until each chip selects a parameter.
How to set up static IP for S9 in the improved Hiveon ASIC firmware? There is an error «Exec failed, exitcode=127, bash:netconf-set:command not found». The Hiveon ASIC firmware version is 1.02; 0.1-13.
Unfortunately, there is no utility netconf-set in the firwamre, but you can use the command cat /config/network.conf ? .
The first command:
printf ‘hostname=%snipaddress=%snnetmask=%sngateway=%sndnsservers=»%s»n’ ‘pir 47 nov’ ‘192.168.1.40’ ‘255.255.255.0’ ‘192.168.1.1’ ‘8.8.8.8’ > /tmp/network.conf
The second command. It is essential to check if all the addresses are correct:
But these are not all the commands. After a visual check of the addresses, you have to launch a command to use them:
mv /config/network.conf /config/network.conf.old && mv /tmp/network.conf /config/network.conf && sync && echo ‘ok’ > /config/network_restart
Caution: the command irrevocably and without any checks will force the ASIC to work with the addresses that were specified in the first command. Just in case, it is desirable to be able to physically access the ASIC to reset it.
How to disable Asic Boost in S9 firmware?
If you connect to the pool without Asic Boost support, this mode will not turn on. However, we recommend using a pool that supports the ASIC Boost mode. This will reduce power consumption and increase speed.
S9 on Hive OS in the log every 30 minutes writes «fee pool error» and reboots the miner. Why?
Most likely, you have no access to slushpool on the firewall. Dev fee goes to slushpool. If there is no connection to it, the ASIC reboots.
How to «cure» virus on S9/S10?
Try to complete the following steps:
- Write the image to the SD card, rearrange the jumper on the board and turn on the miner
- At first, 2 lamps blink simultaneously, you need to wait until the lamps start blinking sequentially
- Remove the card and bring the jumper back, restart the miner (via power)
The SD image is suitable for removing Antbuild on any Antminer S9 firmware. Since Antbuild burns the processor fuses, a regular firmware update after the “cure” will return the problem of two lamps, and the miner will stop loading. To avoid this, you need to delete several files from the firmware.
Open the firmware file in 7zip and delete the following files from the folder xilinx: BOOT.bin , devicetree.dtb and uImage . Save the changes. After that you can update the miner using the modified firmware file without fear of the two lamps issue. Any subsequent miner update will also require completing the above steps to modify the firmware
Please note that this image can deal only with Antbuild v1. Modern viruses, such as Antbuild v2, cannot be «cured» or removed. The issue can only be resolved by replacing the entire processor or control board.
L3+: monitoring and setting up
L3 with connected monitoring from Hive: after reboot, overclocking is reset to default. How to solve this problem?
If the firmware is MSK, then overclocking should not be reset. It is written in separate files. If the custom is from another author, then after applying the overclocking settings, you need to perform Miner Config in Hive (or click Miner Config in the top menu). The full config with overclocking settings will come back. Copy and paste all the parameters below the pools in Hive into the advanced parameters of the miner on the tuning tab or in the Flight Sheet (if mass overclocking is needed).
How to install firmware on L3+ remotely?
Enter the following commands:
/bin/sh -c ‘screen -d -m -S selfupgrade selfupgrade master’
Источник
Содержание
- Как устранить ошибку температуры в журнале Antminer T17
- I2c rw error status 0x4198fe00
- Вопрос
- Троян использует «режим Бога» Windows, чтобы спрятаться в системе
- Crash on OTA Update (IDFGH-1848) #231
- Comments
- Geend commented Jan 14, 2017
- michal037 commented Jan 14, 2017
- konrad282 commented Jan 14, 2017 •
- ustccw commented Jan 17, 2017
- ustccw commented Jan 17, 2017
- Scalpel78 commented Feb 4, 2017
- ppisljar commented Feb 19, 2017
- FayeY commented May 3, 2017
- ppisljar commented May 3, 2017
- Scalpel78 commented May 9, 2017
- gregstewart90 commented May 23, 2017
- chegewara commented Nov 20, 2017 •
- projectgus commented Nov 20, 2017
- chegewara commented Nov 21, 2017
- francescofcf commented Oct 3, 2018 •
- csibrak commented Oct 21, 2018 •
- javicordon commented Jan 24, 2019
- chegewara commented Jan 25, 2019
- javicordon commented Jan 25, 2019
Как устранить ошибку температуры в журнале Antminer T17
Как устранить ошибку температуры в журнале Antminer T17
Система контроля температуры майнера полагается на чип датчика температуры хэш-платы для предоставления данных в реальном времени для обнаружения. Различная хэш-плата может иметь несколько термочувствительных чипов, обычно расположенных рядом с хэш-чипом. Если чип не обнаружен при запуске майнера, хэш-плата не сработает.
Следует отметить, что микросхема датчика температуры обычно не повреждается. Когда возникает температурная ошибка, некоторые обслуживающие персонал напрямую заменяют чип датчика температуры, но неисправность не может быть устранена.
На самом деле проблема не в самом чипе. Скорее всего, это вызвано неисправной микросхемой U1 или последней микросхемой, или это может быть вызвано пониженным напряжением источника питания.
Если весь журнал майнера указывает на ошибку температуры, тогда мы можем сначала обновить прошивку. Если ошибка все еще отображается, проверьте силу тока на входе. Пониженное напряжение источника питания также не позволяет всей машине считывать температуру.
Например, следующая подсказка:
2020/04/27 04:15:48] WARN: chain[1] — 3 sensor(s) reported their temps!
[2020/04/27 04:16:02] ERROR: src/temp.c:218 chain[1] sen[2] — Lost, no updates for 10 sec
[2020/04/27 04:16:02] WARN: chain[1] — 2 sensor(s) reported their temps!
[2020/04/27 04:16:29] ERROR: src/temp.c:218 chain[1] sen[1] — Lost, no updates for 10 sec
[2020/04/27 04:16:29] WARN: chain[1] — 1 sensor(s) reported their temps!
[2020/04/27 04:17:29] INFO: Setting voltage from 17500 to 17400 mV gradually
[2020/04/27 04:17:39] ERROR: src/temp.c:218 chain[1] sen[3] — Lost, no updates for 10 sec
[2020/04/27 04:17:39] WARN: chain[1] — 0 sensor(s) reported their temps!
[2020/04/27 04:17:39] ERROR: driver-btm-chain.c:950 chain[1] — Failed to read temp from all sensors!
Если температура не может быть считана ни одной хэш-платой, ее необходимо снять и проверить с помощью тестером чипов антминер. Эта ситуация обычно вызвана неправильным хеш-чипом. Замените поврежденный чип, чтобы устранить неисправность.
Обратите внимание: использование хэш-платы от разных майнеров может привести к тому, что некоторая хэш-плата не сможет определить температуру. Поскольку версия хэш-платы отличается, используемая микросхема измерения температуры также может быть другой. Майнер распознает только одну программу прошивки на плате управления, остальные будут нечитаемыми.
Видеоурок по осмотру и ремонту хэш платы на примере модели: S9
(Методы обнаружения и восстановления большинства майнеров в Antminer в основном одинаковы)
Нажмите для просмотра: Видеоурок по ремонту и диагностике неисправностей AntminerS9.
Связанные инструменты обслуживания:
Официальный термореактивный гель — 220г
Новая версия многофункционального испытательного стенда
Инструмент для стружки олова
Нажмите, чтобы увидеть больше инструментов для обслуживания майнеров
Источник
I2c rw error status 0x4198fe00
![]()
Вопрос
![]()
![]()
We’re running various version of Ubuntu 14.04.2 LTS on Generation 2 Hyper-V Hosts. On a random Basis, the file system will be mounted Read-Only due to a «disk error» (which really isn’t the case here). As a result, we must reboot the Ubuntu guest to get the file system to mount RW again.
The Error we see is the following:
Apr 30 00:02:01 balticnetworkstraining kernel: [640153.968142] storvsc: Sense Key : Unit Attention [current]
Apr 30 00:02:01 balticnetworkstraining kernel: [640153.968145] storvsc: Add. Sense: Changed operating definition
Apr 30 00:02:01 balticnetworkstraining kernel: [640153.968161] sd 0:0:0:0: Warning! Received an indication that the operating parameters on this target have changed. The Linux SCSI layer does not automatically adjust these parameters.
Apr 30 01:23:26 balticnetworkstraining kernel: [645039.584164] hv_storvsc vmbus_0_4: cmd 0x2a scsi status 0x2 srb status 0x82
Apr 30 01:23:26 balticnetworkstraining kernel: [645039.584178] hv_storvsc vmbus_0_4: stor pkt ffff88006eb6c700 autosense data valid — len 18
Apr 30 01:23:26 balticnetworkstraining kernel: [645039.584180] storvsc: Sense Key : Unit Attention [current]
Apr 30 01:23:26 balticnetworkstraining kernel: [645039.584183] storvsc: Add. Sense: Changed operating definition
Apr 30 01:23:26 balticnetworkstraining kernel: [645039.584198] sd 0:0:0:0: Warning! Received an indication that the operating parameters on this target have changed. The Linux SCSI layer does not automatically adjust these parameters.
This relates to the VSS «Windows Server Backup» process that kicks off at midnight on the host and finishes an hour and half later.
Yes, we do have hv_vss_daemon and hv_kvp_daemon running for the correct kernel version we have. We’re currently running kernel version 3.13.0-49-generic #83 on one system and 3.16.0-34-generic #37 on the other. — We see the same errors on both.
As a result, we’ve been hesitant to drop any more ubuntu guests on our 2012R2 hyper-v system because of this. We can stop the backup process and all is good, but we need nightly backups to image all of our VM’s. All the windows guests have no issues of course. We also have some CentOS based guests running without issues from what we’ve seen.
Источник
Троян использует «режим Бога» Windows, чтобы спрятаться в системе
 Как известно, в операционной системе Windows Vista, 7, 8 и 10 есть своеобразная пасхалка — GodMode (режим Бога). Начиная с версии Vista можно создать папку со специфическим именем, которая перенаправляет на настройки Windows или служебные папки, такие как «Панель управления», «Компьютер», «Принтеры» и проч.
Например, если создать на рабочем столе папку с названием GodMode. (вместо GodMode можно указать любые символы), то внутри будут отображаться все настройки, в том числе и те, которые не включены в меню «Панели управления» или «Параметры»: скриншот.
Очень удобная фича для управления настройками в системе и для системного администрирования.
К сожалению, режим Бога используют не только сисадмины, но и авторы вирусов.
Специалисты из антивирусной компании McAfee Labs рассказывают о трояне Dynamer, который использует режим Бога, чтобы скрыться от обнаружения в системе.
Dynamer при установке записывает свои файлы в одну из таких папок внутри %AppData%. В реестре создаётся ключ, который сохраняется после перезагрузки, запуская каждый раз бинарник зловреда.
Таким образом, исполняемый файл нормально запускается по команде из реестра, но вручную зайти в эту папку нельзя: как указано в списке выше, папка <241d7c96-f8bf-4f85-b01f-e2b043341a4b>работает как ярлык на настройки «Подключение к компьютерам и программам на рабочем месте» (RemoteApp and Desktop Connections).
Вот содержимое папки, если открыть её в проводнике.
Более того, авторы трояна добавили к названию папки «com4.», так что Windows считает папку аппаратным устройством. Проводник Windows не может удалить папку с таким названием.

Аналогично, удаление невозможно из консоли.
Нормальные антивирусы обходят этот трюк вирусописателей. Чтобы удалить папку вручную, нужно запустить из консоли следующую команду.
Троян Dynamer впервые обнаружен несколько лет назад, но Microsoft до сих пор считает его «серьёзной угрозой» для пользователей Windows.
В качестве бонуса.
Список имён папок (GUID) в режиме Бога для быстрого доступа к отдельным настройкам Windows
Источник
Crash on OTA Update (IDFGH-1848) #231
I’m trying to use the 25_ota example. Unfortunately the applications crashes right after making the http request to the webserver.
So here is the last uart output from the esp32:
And here is the core dump:
To me it seems like there is a problem trying to write to the flash.
The text was updated successfully, but these errors were encountered:
I have a similar problem but on something else.
#233
I had the same issue but helped chosing [*] Run FreeRTOS only on first core option in the project config.
In addition, I must modify the checking header code in resolve_pkg function because my hello_world.bin file starts with 0xE9 0x08 instead of 0xE9 0x09.
@konrad282 you are right! there is a mini-error in header check ,we should not check second bytes which present that segment counts.
@Geend @michal037 as @konrad282 mentioned, we should change FreeRTOS work on first core at make menuconfig ,while there are some control-logic errors when working on dual core.
So this is a bug? And it will be fixed?
I am trying to use esp_ota_begin from arduino core . i guess it won’t work there as i can’t force FreeRTOS to run on first core only ? or is there a way ? (sorry i know its not the right forum, but it is somehow related, and fixing the issue with running this on multiple cores should solve my problem as well)
Hi, this problem should have been solved now, isn’t it?
yup, seems to work well with the latest esp-idf
I’m still getting error with the latest esp-idf.
It fails with the error:
I (4984) ota: Connected to http server
I (4984) ota: Send GET request to server succeeded
I (4994) ota: Writing to partition subtype 16 at offset 0x110000
I (5554) ota: esp_ota_begin succeeded
E (5554) esp_ota_ops: OTA image has invalid magic byte (expected 0xE9, saw 0x3c
E (5554) ota: Error: esp_ota_write failed! err=0x1503
I (5554) ota: Connection closed, all packets received
I (5564) ota: Total Write binary data length : 0
E (5564) ota: esp_ota_end failed!
E (5574) ota: Exiting task due to fatal error.
Error seems to originate at
if (it-> wrote_size == 0 && size > 0 && data_bytes[ 0 ] != 0xE9 ) <
Are you in the build directory or the root directory? I got this error if I wasn’t in the build directory.
cd /path/to/project/build python -m SimpleHTTPServer 8070
@projectgus Hi
Im having the same error (#231 (comment)) when im trying to update from external server, from internet. File is accessible and is proper compiled cause from lan app can read it and write to ota partition (veeeery slow but write it).
EDIT: not very slow, it just stop after 11KB write, and ota image is hello-world example. It stall for 5 minuts now, after last log line:
For errors like this:
E (5554) esp_ota_ops: OTA image has invalid magic byte (expected 0xE9, saw 0x3c
0x3c is the ASCII code for , and suggests that the response payload is HTML not an app binary file. This usually happens if there is a HTTP server error.
Unfortunately the OTA example is only a poor imitation of an HTTP client which sends a very basic HTTP request and doesn’t check for an error in the result. We are working on an HTTP/HTTPS client library which will provide a much more useful (and safe) abstraction for HTTP connections.
Also, @chegewara has determined that the OTA example currently doesn’t send a valid HTTP/1.1 request at all. This will be updated to a valid HTTP/1.0 request, same as in the HTTP & HTTPS examples.
To diagnose problems with the OTA example:
- Look at the server logs for error responses to the HTTP request.
- Log the header response after the request and look for error messages, etc.
The proper HTTP/HTTPS client library should be available soon, and this example will be updated to use it.
Just found the issue in my ota app. I have set ota file path this way and it works from linux ubuntu 14 server from vbox on local machine (laptop), but it causes mentioned error if i try to ota flash from home server.
#define EXAMPLE_FILENAME «ota.bin»
But if i change file path to this one then i can ota flash from home server:
#define EXAMPLE_FILENAME «/ota.bin»
I have the same problem.
I do not have much knowledge about HTTP connections.
These are my tests:
From Internet :
No problem — Works fine OTA OK
downloads correctly the image.bin and upgrade the firmware
From Android:
SimpleHTTpServer — ubi.jp — Works fine OTA OK
HFS HTTP File Server 1.0 — vortexinfinitum — Works fine OTA OK
Http Server – streamingnology inc — Not works OTA error
Tiny Web Server – Leonardo Javier Russo — Not works OTA error
HTTP Server powered by Apache — Tautvydas Andrikys — Not works OTA error
IOS:
AirDisk -XUEHUI wu — Not works OTA error
Files – File Manager & Browser – Hian Zin Jong — Works fine OTA OK
Now I would like to build a custom app to perform OTA, but I would like to know what is the reason why a server works and another server does not.
Apache2 default conf. is keepalive=On.
It could cause trouble.
Simply turn it off on the server. (It has solved my issues with OTA.)
I hope this info could help you.
Just checking if ESP-IDF v3.3 implements an «error check» in the result of an HTTP request.
An OTA update sometimes doesn’t get all the binary data length.
If it does implement an «error check» I will do a more robust debug on why sometimes it does downloads full bin, and why sometimes it doesn’t.
If it doesn’t yet, I will be implementing a data length check before, and retry (by MQTT 1. Run OTA 2. URL 3. bin_size) as a work around.
Unfortunately the OTA example is only a poor imitation of an HTTP client which sends a very basic HTTP request and doesn’t check for an error in the result. We are working on an HTTP/HTTPS client library which will provide a much more useful (and safe) abstraction for HTTP connections.
The proper HTTP/HTTPS client library should be available soon, and this example will be updated to use it.
@chegewara Indeed, it is the one I am currently using.
The example works fine as described, local and over Internet Server. My question is orientated to the HTTP request used for OTA. (i.e. It doesn’t seem to be persistent in case of Response Timeout or Keep-alive Timeout, or error check.)
When you get a bin from a web server esp_http_client_fetch_headers(client) returns the size of the bin file, or -1 if any error. If there is a keep-alive timeout as it was happening to me (in the middle of reading data from http stream), then connection is closed anyway and continues with the OTA. It doesn’t verifies if the data data read is the same size as returned from the http header.
Of course it shows the errors E (19325) esp-tls: read error :-76: E (19325) TRANS_SSL: esp_tls_conn_read error, errno=No more processes followed by E (26301) esp_image: invalid segment length 0xffffffff E (26301) native_ota_example: esp_ota_end failed! E (26301) native_ota_example: Exiting task due to fatal error.
Knowing this may happen, it can be improved and get a safer version of the library.
We are working on an HTTP/HTTPS client library which will provide a much more useful (and safe) abstraction for HTTP connections.
As for now, I modified the Keep-alive parameters on the server, and double checking the OTA to be written («downloaded») has the same size as reported in http header.
Источник