-
#1
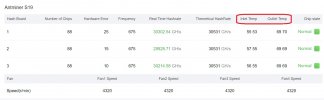
Асик работает 5 месяцев, идеальный температурный режим, чистый.
Начал отваливаться от пула, ругаясь на температуру. На выходе у вентиляторов воздух даже не горячий, как и у трех других.
Несмотря на чистоту, решили продуть на всякий случай. После продувки стал отваливаться гораздо чаще, почти сразу после начала работы
До продувки — примерно раз в сутки в течение последней недели.


2022-04-28 04:30:40 chain = 1 set freq to 662.50
2022-04-28 04:30:40 chain = 2 set freq to 662.50
2022-04-28 04:30:40 chain = 0 set freq to 668.75
2022-04-28 04:30:40 chain = 1 set freq to 668.75
2022-04-28 04:30:40 chain = 2 set freq to 668.75
2022-04-28 04:30:40 chain = 0 set freq to 675.00
2022-04-28 04:30:40 chain = 1 set freq to 675.00
2022-04-28 04:30:40 chain = 2 set freq to 675.00
2022-04-28 04:30:40 pulse_mode = 1, ccdly_sel = 0, pwth_sel = 1
2022-04-28 04:30:40 start do_core_reset
2022-04-28 04:30:53 end do_core_reset
2022-04-28 04:31:03 set_voltage_by_steps to 1584.
2022-04-28 04:31:05 Init done!
2022-04-28 04:31:05 STATUS_OKAY
2022-04-28 04:31:05 start the cached job
2022-04-28 04:31:05 Version num 65536
2022-04-28 04:31:05 Mask num 0x1fffe000
2022-04-28 04:31:05 opt_multi_version = 65536, interval timeout = 2290648
2022-04-28 04:31:05 freq = 675, percent = 90, hcn = 3883, timeout = 2290648
2022-04-28 04:31:05 set_start_time_point total_tv_start_sys=148 total_tv_end_sys=149
2022-04-28 04:31:05 set_voltage_by_steps to 1608.
2022-04-28 04:32:15 set_voltage_by_steps to 1598.
2022-04-28 04:32:17 set_voltage_by_steps to 1588.
2022-04-28 04:32:19 curr_vol = 1588, g_voltage = 1580,entrance_temp = 29
2022-04-28 04:32:19 set_voltage_by_steps to 1580.
2022-04-28 04:32:41 set_voltage_by_steps to 1540.
2022-04-28 04:32:55 over max temp, pcb temp 76 (max 75), chip temp 91(max 95) pcb temp rise 0 chip temp rise 0, total_exit_failure 0
2022-04-28 04:32:55 Sweep error string = P:1.
2022-04-28 04:32:55 ERROR_TEMP_TOO_HIGH: over max temp
2022-04-28 04:32:55 stop_mining: over max temp
2022-04-28 04:32:55 uninit_temp_info
2022-04-28 04:32:55 do not read temp anymore…
2022-04-28 04:32:55 cancel thread
2022-04-28 04:32:55 cancel thread
2022-04-28 04:32:55 cancel thread
2022-04-28 04:32:55 ****power off hashboard****
2022-04-28 04:32:59 temp monitor thread exit
-
#2
темпер 90 срабатывает защита.
Поставь прошивку последнюю
-
#3
Похоже всех фиксиков выдул…
-
#4
Ставь вниш, крути вентиляторы на 100%
-
#5
Фигня какая-то. Похоже на программную ошибку. Темпер плат зашкаливает, он намного выше темпера чипов. А в реале должно быть наоборот. И причём сразу на всех трёх платах так. Например у меня температура плат 44-45, а на чипах 75. Если бы на одной было, можно было бы подумать о неисправности датчиков или ещё чего на плате. Прошей последней версией прошивки. Глюки бывают. Я свой прошивал как-то по причине некорректной работы вентиляторов и переодических перезагрузок, проблема ушла. Сейчас вниш стоит. Можешь и его накатить, но он сверху родной прошивки ставится, не знаю, влияет как либо или нет.
-
#6
Это у тебя последняя версия смотрю, 88 чипов, платы алюминиевые?
-
#7
вот и лето пришло?)
2022-04-28 04:32:55 over max temp, pcb temp 76 (max 75), chip temp 91(max 95)
перегрев, и в логах пишет что у платы 76 градусов у чипов 91
на скрине все наоборот)
-
#8
вот и лето пришло?)
2022-04-28 04:32:55 over max temp, pcb temp 76 (max 75), chip temp 91(max 95)
перегрев, и в логах пишет что у платы 76 градусов у чипов 91
на скрине все наоборот)
Да, в логах инфа отличается от морды, и всё равно перегрев по платам идёт. Нужно перепрошить его, это не связанно с физическими процессами. Тут 99,99% глюк прошивки.
-
#9
Темпер плат зашкаливает, он намного выше темпера чипов.
Тут нет температуры чипов. Если переключится на китайский, а потом обратно на английский, то появится более корректная надпись: температура на входе и температура на выходе.
Поставь прошивку последнюю
Прошей последней версией прошивки.
Осторожней с советами. Для алюминиевого S19 нет «последней» версии прошивки. При попытке прошить от обычного S19 получите кирпич.
Начал отваливаться от пула, ругаясь на температуру.
Асик, случаем, не в шумбоксе стоит?
После продувки вентиляторы поставили правильно? А то у меня есть знакомец, который после чистки перепутал установку входных вентиляторов. Ему показалось, что все вентиляторы должны стоять этикетками наружу, в итоге асик пытался создать вакуум у себя внутри. У него только и на выходе температура зашкаливала.
-

Безымянный.jpg
103,7 КБ · Просмотры: 40
-
#10
Как то странно , на алюмишках вообще зачетные аппараты , не надо ни чего прошивать , где и в каких условиях стоит аппарат ? Вентиляторы на автомате стоят или профиль задан ?
-
#11
Как то странно , на алюмишках вообще зачетные аппараты , не надо ни чего прошивать , где и в каких условиях стоит аппарат ? Вентиляторы на автомате стоят или профиль задан ?
ТС по моему ясно написал про условия, где стоит асик. К тому же, там ещё три таких же, с ними проблем нет. Вентиляторы у него почти на максимуме крутят, а темпер запредельный.
-
#12
Тут нет температуры чипов. Если переключится на китайский, а потом обратно на английский, то появится более корректная надпись: температура на входе и температура на выходе
То есть по вашему у ТС температура на входе в асик на 10 градусов выше, чем на выходе из него? Вы его с кондиционером не перепутали? И это нормально и не глюк прошивки, так? И какую надпись считать корректной? Надпись chip Temp не сама по себе появилась же, так же как и chipState.
Осторожней с советами. Для алюминиевого S19 нет «последней» версии прошивки. При попытке прошить от обычного S19 получите кирпич.
А это что? Нижняя прошивка для старых S19, с текстолитовыми платами. Верхняя как раз под новые, где 88 чипов. У вниш кстати отдельная прошивка так же для 88 чиповых S19. Ну и прежде чем шить, всегда можно задать соответствующий вопрос в поддержку битмайна.
-
#13
Очень стыдно в этом признаваться, но не могу поступить иначе — уж очень много людей попытались помочь, После чистки не той стороной прикрутили входные вентиляторы )))
Shmikl — угадал
Вторая проблема — отваливается примерно раз в сутки, если продолжит проявляться, то я дополню этот пост.
По поводу советов прошить вниш — через загрузку с sd-карты не получилось, У наших асиков вместо разъема под microsd стоит microusb, с которого загрузка не поддерживается — ответ техподдержки вниш.

Последнее редактирование: 29 Апр 2022
-
#14
Очень стыдно в этом признаваться, но не могу поступить иначе — уж очень много людей попытались помочь, После чистки не той стороной прикрутили лицевые вентиляторы )))
Вторая проблема — отваливается примерно раз в сутки, если продолжит проявляться, то я дополню этот пост.
По поводу советов прошить вниш — через загрузку с sd-карты не получилось, У наших асиков вместо разъема под microsd стоит microusb, с которого загрузка не поддерживается — ответ техподдержки вниш.Посмотреть вложение 282160
поставьте заведомо рабочий БП, так Вы исключите проблему в БП
-
#15
У меня не открывается
-

Безымянный.jpg
117,6 КБ · Просмотры: 35

-
#16
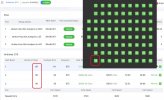
Надпись chip Temp не сама по себе появилась же, так же как и chipState.
Косорукие программеры способствовали её появлению. Там, где измеряется температура чипов, битмайн её указывает в таблице.
-
#17
И ещё о косоруких программерах. Обратите внимание на количество чипов.
-

Безымянный.jpg
263,8 КБ · Просмотры: 36
-
#18
У наших асиков вместо разъема под microsd стоит microusb
У меня microsd, но ни ВНИШ, ни МСК ставить пока не собираюсь.
-
#19
У меня не открывается

Да это раздел прошивок битмайн. Они его недавно переделали, фиг чего найдёшь теперь. Все файлы рекавери убрали вообще, слава богу, я свои сохранил. Теперь, чтобы с флешки восстановить, придётся файл у поддержки запрашивать
-
#20
И ещё о косоруких программерах. Обратите внимание на количество чипов.
У меня нет с чем сравнить, но помню, кто-то кидал скрин с 88 чипами
С момента публикации твита компании прошло около часа. Сам он выглядел так.
Introducing the #AntminerZ11 that packs 3X more hashing power than its predecessor! The Z11 mines #Zcash under the Equihash algorithm. Performing with a hash rate of 135 KSol/s and power consumption of 1418 W. Click here (https://t.co/woThhXNxjd) to learn more. pic.twitter.com/HzCLKR7dVc
— Antminer_main (@Antminer_main) March 19, 2019
Разработчики акцентируют внимание на высоких вычислительных мощностях и хорошей энергоэффективности.

Описание
Fuddware by efudd v2.3 это прошивка для ASIC Z-серии от Bitmain, разблокирующая настройки разгона с целью увеличения производительности устройства. Разработана пользователем efudd с форума Bitcointalk.
Если вы интересуетесь инвестированием в криптовалюту и хотите уберечься от частых ошибок и потери денег, рекомендую пройти БЕСПЛАТНЫЙ 3-х дневный марафон «Криптоинвестиции» от Школы Практического Инвестрирования. На марафоне вы узнаете актуальные стратегии и инструменты для инвестирования в крипту!
Основные особенности:
- Поддержка работы с Z9 mini, Z9 и Z11
- Полностью разблокированная частота
- Настройки частоты на каждую плату в отдельности
- Защита от вредоносного ПО, в том числе Antminer Malware
- Работа через SSH
- Отключена проверка подписи
- Поддержка NiceHash с #xnsub
- Функция Auto-Tune от Bitmain отключена
- Автоматическая проверка обновлений прошивки
- Поддержка пользователей через Discord
- Постоянные обновления и новые функции
В частности, в последующих релизах разработчик обещает добавить:
- Настройку температурных режимов и охлаждения через кривые
- Автоматическое управление напряжением
- Автоматический разгон на основе эвристического анализа индивидуальной производительности ваших устройств
Звучит весьма многообещающе, будем ждать последующих релизов. На данный момент за использование прошивки взимается dev fee 0% при майнинге на пуле Luxor (о нём ниже) и 3% для всех остальных.
Интерфейс выглядит следующим образом:

Общие вопросы
Что такое Hiveon ASIC?
Это кастомная прошивка от Hive OS для Antminer S9, S9i, S9j, S10, S17, S17+, S17E, S17 Pro, L3+, L3++, T9+, T17, T17+ и T17E.
Что дает прошивка?
- Ускорение изношенных ASIC чипов;
- Подбор поплатно напряжения и частот автоматически и вручную;
- Тонкий тюнинг частот индивидуально почипно;
- При пропадании интернета перестает потреблять электроэнергию чипами;
- Антивирусная защита;
- Восстановление устройств, которые ранее подверглись заражению вирусами;
- Мигание светодиодами на ASICе в случае поломки вентилятора или чипов;
- Встроенный Ваттметр;
- Вотчдоги по температуре, хешрейту;
- При использовании прошивки, Hive OS — бесплатно.
Узнать больше о фичах каждой прошивки можно на нашем сайте.
А вот здесь можно узнать о разнице между прошивкой Hiveon ASIC и клиентом Hive OS.
Есть ли прошивка для Antminer T15?
Доступна стандартная прошивка со встроенным Hive OS клиентом — для мониторинга работы Ваших ASICов.
Почему нет прошивки на S11, Z9?
На этих моделях разводка питания не позволяет выжимать много, соответственно делать прошивку смысла нет. Используйте стоковую.
Можно ли добавить в Hive OS S15?
На данный момент для этой модели доступен только клиент для мониторинга. Авторазгон уже встроен в заводскую прошивку Bitmain.
Поддерживается ли Innosilicon t2t 32th?
На данный момент, прошивки Hiveon на эту модель нет и не планируется. Можно поставить только клиент для мониторинга. Руководство здесь.
Сколько стоит прошивка?
Прошивка предполагает dev fee — параллельным майнингом, без просадок и приостановки основного майнинга:
- S17 / S17+ / S17E / S17 Pro: 2.8%
- T17 / T17+ / T17E: 2.8%
- L3+ / L3++: 1.8%
- S10: 2%
- S9 / S9j / S9i: 2%
- T9+: 2%
Более подробно:
Технически, наш DevFee реализован по времени. Существенным отличием является то, что
а) мы дожидаемся завершения работы над текущей шарой;
б) при переключении на DevFee, не происходит перезапуск майнера.
Мы ожидаем, когда ASIC завершит работу над шарой, далее очень быстро переключаемся на fee низкой сложности, с быстрыми мелкими шарами, потом переключаемся обратно на основной майнинг. В итоге, нет простоя в виде ожидания, перезапусков майнера и нет нерешенных шар.
Если у меня уже 3 GPU воркера и я подключу один Antminer, у меня станет платный аккаунт?
Нет, с нашей прошивкой аккаунт остается бесплатным. В случае использования сторонних прошивок с клиентом Hive OS, cтандартная цена до 50 устройств — 2$/мес с одного ASICа.
Я использую ASICи с прошивкой Hiveon, почему у меня в Hive OS указано что включены платные функции?
Эти функции включаются, когда ферма оплачивается. Деньгами или с помощью fee — различий нет. В этом конкретном случае случае оплата производится за счет комиссии, «встроенной» в прошивку Hiveon.
Какая последняя версия прошивки Hiveon ASIC?
Для S9 Hiveon 1.02 (есть бета 1.03). Для T9+ Hiveon 1.02.
Кто-то может написать прошивку специально для моего ASICa?
Да, но это довольно дорого. Зарплата разработчика, предположим, $2500 в месяц. Сама работа займет несколько месяцев.
Для начала необходимо поставить разблокированную прошивку через SD образ. Подробные инструкции (на английском) содержатся в этом посте.
- Увеличение одного напряжения приводит только к повышению температуры плат и чипов.
- Увеличивать надо и частоту и напряжение.
- Недостаточное напряжение для выбранной вами частоты, приведет к тому что платы перейдут в режим простоя и будут выдавать по 10-15 KSol/s каждая.
- Слишком сильное увеличение частоты или напряжения вызовет аналогичный эффект.
Как это делается пошагово:
- Сначала настройте частоты на обычный режим и дефолтное напряжение, делается это в разделе “Frequency”.
- Дайте Z11 поработать несколько часов, для того чтобы убедиться что всё работает должным образом.
- Увеличивайте частоту, напряжение и повторяйте до тех пор пока не найдете максимум. (Global — применяется ко всем платам, Per-hashboard — к отдельно взятой плате).
- Снижайте напряжение шагами по 5mV на плату, пока не найдете максимум для стабильной работы.
- Кулеры обязательно выставлять в ручной режим, на 75% или выше, по необходимости. Старайтесь держать температуру в пределах 85℃ или ниже.
- После достижения (и преодоления) рубежа в 780 МГц и 940-960 mV устройство должно начать выдавать эталонные 150-155 KSol, иногда такая производительность достигается и на меньшей частоте.
- Максимально достижимая частота 825 МГц, выше этого заставить Z11 стабильно работать еще никому не удавалось.
- Вы можете экспериментировать в диапазоне 750-825 МГц, путем экспериментов получая наиболее стабильные и производительные настройки.
Полезные ссылки
Где скачать прошивку?
Скачать прошивку можно здесь.
Как установить прошивку, если я еще не пользователь Hive OS?
Следуйте нашему гайду по установке.
Как установить прошивку через веб-интерфейс Hive OS?
Следуйте нашему гайду по установке.
Где найти прошивки для восстановления?
Вот здесь.
Кроме ASICов, я использую риги на GPU. Где я могу получить помощь по их настройке?
В нашем специализированном чате.
У меня прошивка от MSK. Как поставить Hive OS клиент для мониторинга и менеджмента ASICов?
Для Antminer S9 (MSKMINER) и S10 (MSKMINER), замена прошивки на Hiveon ASIC возможна только через SD карту.
Каковы значения световых индикаторов ASICа?
Вот здесь можно ознакомиться со значениями световых сигналов майнера и способами решения проблем.
Как настроить уведомления?
Вы можете получать в Telegram или Discord следующие уведомления:
- Вход в систему
- Изменение статуса воркера (онлайн/оффлайн)
- Загрузка устройства
- Перезагрузка устройства
- Перегрев
- Перегрузка процессора
- Повышение оборотов вентиляторов
- Неэффективная работа майнера
- Критические ошибки
Настройка уведомлений в Telegram:
- Если у вас ещё нет Telegram, скачайте его на ваш смартфон или компьютер, и создайте аккаунт.
- Найдите @hiveosbot и начните с ним чат.
- Вам пока не нужно отправлять боту сообщения — как только вы начнете чат, вы получите сообщение с кодом.
- В Hive OS, найдите страницу Notifications (Уведомления). Введите код.
- После того, как вы ввели код, отправьте боту следующее сообщение: /user yourlogin
“Yourlogin” замените своим логином для Hive Os.
- Вот и всё! В левой части страницы Notifications, вы сможете включить конкретные уведомления.
Кроме того, вы можете добавить этот бот в групповой чат, так что ваши администраторы тоже смогут мониторить воркеры. Чтобы сделать это, создайте группу и добавьте @hiveosbot в качестве участника. Для группы, код будет отрицательным (например, “-123456”).
Настройка уведомлений в Discord:
- Если у вас ещё нет сервера, откройте Discord и нажмите на иконку в виде плюса. Далее введите название сервера, выберите регион и нажмите на кнопку Create. Мы используем “MyHive” в качестве примера.

- Создайте ссылку для приглашения.

- Перейдите на страницу настроек вашей фермы и выберите вкладку Discord в секции уведомлений. Вы увидите там ссылку — кликните на неё, чтобы пригласитть Discord-бот на ваш сервер.

- Авторизуйте добавление бота в Discord:

- Введите в Discord команду hive.start:

- Бот ответит вам кодом авторизации:

- Скопируйте код авторизации и вставьте его во вкладку уведомлений Discord в настройка фермы. Нажмите на кнопку Subscribe (Подписаться).
- Отправьте команду согласно инструкциям в веб-интерфейсе:
Если вы всё сделали правильно, ваш статус изменится на Subscribed. В Discord-боте, это выглядит так:

- Протестируйте бот несколькими командами. Мы применили команду hello и несуществующую команду hello11:
Сообщения от бота Discord Hive доступны на сервере — значит, все работает правильно.
Вопросы по L3
L3+: мониторинг и настройка
Ознакомьтесь с данным видеороликом.
L3 с подключённым мониторингом от Hive: после ребута разгон сбрасывается в дефолт. Как решить проблему?
Если прошивка MSK, то не должен слетать разгон. Он пишется в отдельные файлы. Если кастом от другого автора, то после применения настроек разгона надо в Hive выполнить Miner Config (или вверху в меню нажать Miner Config). В ответ придет полный конфиг с настройками разгона. Все параметры ниже пулов скопировать и вставить в Hive в расширенные параметры майнера на вкладке тюнинга или в Полетном Листе (если нужен массовый разгон).
Вопросы по S9
Сколько в среднем S9 на Hiveon ASIC стартует с автотюнингом?
Скорость работы автотюнинга зависит от состояния чипов. Если ASIC новый, работает до 10 минут. Если чипы изношены — может пол часа и больше, пока каждый чип не подберет параметр.
Как в улучшенной прошивке Hiveon ASIC поставить статический IP для S9? Возникает вот такая ошибка «Exec failed, exitcode=127, bash:netconf-set:command not found». Версия Hiveon ASIC 1.02; 0.1-13.
К сожалению, утилиты netconf-set в прошивке нет, но вы можете выполнить команду cat /config/network.conf ?.
Первая команда:
printf ‘hostname=%snipaddress=%snnetmask=%sngateway=%sndnsservers=»%s»n’ ‘pir 47 nov’ ‘192.168.1.40’ ‘255.255.255.0’ ‘192.168.1.1’ ‘8.8.8.8’ > /tmp/network.conf
Вторая команда. Нужно проверить, все ли адреса правильные:
сat /tmp/network.conf
Но это еще не все команды. После визуальной проверки адресов надо будет дать команду на их использование:
mv /config/network.conf /config/network.conf.old && mv /tmp/network.conf /config/network.conf && sync && echo ‘ok’ > /config/network_restart
Осторожно: команда безвозвратно и без всяких проверок заставит ASIC работать с адресами, которые мы указали в первой команде. На всякий случай, желательно иметь возможность физического доступа к ASICу для его сброса.
Как отключить Asic Boost в прошивке S9?
Если вы подключитесь к пулу без поддержки Asic Boost, то этот режим и не включится. Тем не менее, мы рекомендуем использовать пул с поддержкой данного режима. Это снизит энергопотребление и увеличит скорость.
S9 на Hive OS в логе раз в 30 минут пишет «fee pool error» и перезагружает майнер. Почему?
Скорее всего, у вас на файрволе закрыт доступ к slushpool. Dev fee идёт на slushpool. Если соединения с ним нет, ASIC перезагружается.
Как лечить вирус на S9/S10?
Попробуйте выполнить следующие шаги:
- Записать образ на SD карту, переставить джампер на плате и включить майнер
- Вначале моргнут 2 лампочки одновременно, нужно дождаться когда лампочки начнут моргать последовательно
- Вынуть карту и вернуть джампер на место, перезапустить майнер (по питанию)
SD образ подходит для удаления Antbuild на любых прошивках Antminer S9. Так как Antbuild прожигает фьюзы процессора, то обычное обновление прошивки после «лечения» вернет проблему двух ламп, и майнер перестанет загружаться. Чтобы этого не произошло, нужно удалить несколько файлов из прошивки.
Открываем файл прошивки в 7zip и из папки xilinx удаляем файлы: BOOT.bin, devicetree.dtb и uImage. Сохраняем изменения, после этого можно обновить майнер, используя измененный файл прошивки без страха возвращения двух ламп. Любое последующее обновление майнера также будет нуждаться в выполнении вышеуказанных шагов по модификации прошивки
Образ восстановления: https://download.hiveos.farm/asic/repo/fw/Antminer/recovery/antbuild_v1_recovery_s9.img
Обратите внимание, что данный образ может справиться только с Antbuild v1. Современные вирусы, например Antbuild v2, «вылечить» или удалить невозможно. Вопрос можно решить только заменой процессора или контрольной платы целиком.
Мониторинг
Как мониторить доходность?
Ваш доход Вы можете наблюдать на странице пула, на который вы настроили ваш ASIC. Обычно это можно сделать на главной странице, введя адрес, указанный в настройках (может отличаться в зависимости от пула).
Как мониторить ASIC?
В личном кабинете Hive, создайте воркеры и скопируйте farmhash. Далее, в веб-интерфейсе ASICа, перейдите на вкладку Monitoring, и затем Hive, и впишите farmhash.
Сколько трафика потребляет мониторинг на Hive?
Сам мониторинг потребляет примерно 80-90 мегабайт трафика в месяц. Майнинг — 70-90 мегабайт. В сумме 150-180 мегабайт в месяц с одного ASICа.
Решил удаленно обновить образ (hive-replace). Как мониторить состояние обновления?
Зайдите на ваш риг по Hive Shell. После ввода команды обновления вы увидите процесс загрузки и установки.
Вопросы по установке, обновлению, восстановлению и настройке
Как можно обновиться до новой версии прошивки?
Прямо из веб-интерфейса Hive OS.
Почему прошивка может не вставать, если шьешь через веб-интерфейс Hive OS?
Фаервол или еще что-то с интернетом, что блокирует скачку прошивки. Попробуйте в настройках фермы скачать прошивку на S9, и прошиться через веб-интерфейс ASICа.
ASIC прошит последней прошивкой Bitmain. Не могу поставить Hiveon ASIC.
У последних прошивок Bitmain включена защита от кастомных прошивок. Варианты:
- Пробовать прошить через SD карту. Заливать на карту образ восстановления.

- Инструкция на форуме
- В сервисном центре могут прошить через com порт.

Как именно восстановить прошивку с помощью SD-карты?
Включите контрольную плату и подождите 60 секунд до начала мигания светодиодов. Главное — дождаться постоянного периодического мигания. Один раз они мигнут секунды через 2, а ровно через 60 секунд — начнут мигать постоянно.
Этот образ восстанавливает прошивку из любого состояния — даже с пустой флешкой
- Выключите майнер
- Поменяйте джампер для загрузки с SD-картой
- Вставьте SD-карту
- Запустите. Когда замигают диоды — вытащите SD-карту
- Выключите ASIC, переставьте джампер обратно
- Зайдите на веб ASICа — прошейтесь нужной прошивкой
На момент запуска ASICа на шаге 6, SD-карты быть не должно.
Качаю прошивку из настроек фермы. В названии прошивки есть farm_hash. Устанавливаю ее на ASIC через веб-интерфейс. ASIC автоматически не привязывается к Hive OS.
Прошивка из настроек фермы автоматически привязывается к Hive OS только для массовой установки прошивки с другого ASICа или другого Linux (Bulk install). Если прошивать через веб-интерфейс, нужно на вкладке Hive OS прописать farm_hash.
Почему, если ввести farm_hash или api сервер в веб-интерфейсе ASICа на вкладке Hive OS, они не сохраняются?
API сервер сохраняется в конфигурации ASICа, в веб-интерфейсе не отображается. farmhash нужен только для добавления ASICа, с его помощью получаются rigid и пароль, которые сохраняются в конфиг. А сам хешрейт нигде не сохраняется.
Как использовать FARM_HASH генератор для массовой привязки ASIC-ов к ферме на Hive OS?
Вы можете использовать наш генератор FARM_HASH.
Любой Antminer с Hive OS Client для ASIC: https://download.hiveos.farm/asic/repo/farm_hash/
Antminer S9 / T9 с прошивкой Hiveon ASIC: https://download.hiveos.farm/asic/repo/farm_hash_hiveon/
Antminer S17 / T17 с прошивкой Hiveon ASIC: https://download.hiveos.farm/asic/repo/farm_hash_hiveon_17/
Вы должны ввести свой farm_hash в веб-форму. Затем генератор предоставляет вам файл special.tar.gz, который вы можете загрузить в ASIC через веб-интерфейс или с помощью BTC Tools. Это не файл прошивки Hiveon, это небольшой файл конфигурации.
Сначала вы должны установить на ASIC прошивку Hiveon, а затем прошить этот файл конфигурации.
Обратите внимание: после прошивки файла конфигурации, BTC Tools сообщит об ошибке. Не волнуйтесь, мы сделали это специально. Цель состоит в том, чтобы предотвратить стандартную процедуру перезагрузки после перепрошивки. Farm_hash вашей фермы введен, а ASIC привязан к вашей учетной записи Hive OS.
Также, рекомендуем установить в BTC Tools таймаут обновления 1200 секунд и обновлять за один раз не более 5ти ASIC-ов. Для этого нужно зайти в настройки BTC Tools и установить данные параметры:

Если увезти ASICи и они будут не во внутренней сети, нужно ли что-то перенастраивать?
Нет. ASICи не привязаны к сетям и подключатся откуда угодно, где есть интернет.
Но, если настраивали сеть вручную, а не получали IP автоматически (у большинства так), возможно перенастроить придется.
Если ASIC в другом месте, а я дома, то как мне к нему подключиться?
Физически только через проброс портов или Teamviewer/Google (любая программа удаленного доступа) rdp. Если IP динамический, то ddns.
Как найти ASIC в локальной сети?
Когда ваш ASIC включен и предполагается, что он находится в одной сети с вами, подключитесь к нему с помощью компьютера или мобильного устройства. Введите IP-адрес вашего майнера. Большинство майнеров приходят с включенным DHCP, поэтому вам не нужно вручную устанавливать IP-адрес для него. Вместо этого посмотрите на таблицу IP на вашем маршрутизаторе или используйте инструмент сканирования.Например программу Advanced IP Scanner.
Как отключить автоперезагрузку ASICа с одной нерабочей платой?
В вебе ASICа в настройках вотчдога. Возможно, неисправная плата перегревается (предусмотрена перезагрузка из-за перегрева).
Также, из-за неисправной платы может очень долго работать автотюнер. Вы можете дождаться окончания работы тюнера или вручную установить настройки частоты и вольтажа на платы.
Как получить информацию по ошибкам ASIC-а?
Для получения информации по ошибкам вашего ASIC-а, вам нужно отправить вашему воркеру команду.
Для S9/S9i/S9j/S10: (./get_kernel_log.cgi; ./get_watchdog_log.cgi; ./get_auto_tune_log.cgi) | grep -iE ‘red.*chip|chip.*red|fatal|critical|failure|warning|error’ | sort
Для 17 серии: printf ‘/nvdata/miner_status.log:nn’; grep -Ev ‘STATUS_INIT|STATUS_OK’ /nvdata/miner_status.log | tail -n 20; printf ‘n/config/watchdog.log:nn’; tail -n 20 /config/watchdog.log; printf ‘ndmesg:nn’; dmesg | tail -n 20; printf ‘n/var/volatile/log/log:nn’; tail -n 20 /var/volatile/log/log; printf ‘nERRORS:nn’; grep -iE ‘red.*chip|chip.*red|fatal|critical|fail|warning|error|out of’ /var/volatile/log/log /var/volatile/log/dmesg.log /var/volatile/log/messages; printf ‘nnMESSAGES:nn’; grep -vhE ‘.notice|.info|compile time|api_stats|API run’ $( find /nvdata -name messages -mtime -10 -type f ) | tail -n 100
Для Т9: Dmesg

Ошибки ASIC и их расшифровка
- ERROR_SOC_INIT — ошибка инициализации драйвера
- ERROR_REOPEN_CORE — ошибка при переоткрытии ядер
- ERROR_FAN_LOST — потеря одного и более кулеров
- ERROR_POWER_LOST — ошибка выставления вольтажа, ошибка определения типа БП
- ERROR_EEPROM_INFO — ошибка чтения содержимого EEPROM (неверный формат)
- ERROR_TEMP_LOST — два и более раз потерян температурный датчик
- ERROR_TEMP_TOO_LOW — слишком низкая температура
- ERROR_PIC_LOST — ошибка инициализации PIC на любой из плат
- ERROR_TEMP_LOST_1ST — перезапустите cgminer, чтобы снова проверить тип датчика температуры (скорее всего, датчик потерян в первый раз)
- ERROR_UNBALANCE — произошел дисбаланс, перезагрузите
- ERROR_TEMP_TOO_HIGH — сверх максимальной температуры
- WARN_NET_LOST — потеря сетевого подключения
- ERROR_NET_LOST — потеря сетевого подключения
Зачем применять Полетный Лист на прошивке?
Без него майнит на старых параметрах, и не показывает хешрейт в веб-интерфейсе Hive OS.
Есть ли проблемы с обратной прошивкой?
С обратной прошивкой проблем нет, но больше всего для этого случая подойдет стандартная версия прошивки. Улучшенная версия тоже прошьется на что угодно, но предварительно через веб интерфейс Hive надо будет отправить команду на ASIC для отключения проверки подписи. Никаких программаторов не нужно. Также можно прошить с улучшенной версии на любую через SD карту или кнопку “IP report”.
Дефолтные логины и пароли
Стандартный пароль от нашей прошивки:
Логин: root
Пароль:
Пожалуйста, обратите внимание, символ «@».
Почти все пользователи не меняют имя пользователя и пароль по умолчанию для ASIC. Вскоре такой незащищенный ASIC будет заражен вирусом по стандартному паролю от другого зараженного устройства в локальной сети.
Логины и пароли SSH по умолчанию:
Antminer — пользователь по умолчанию: root, пароль по умолчанию: admin
Innosilicon — пользователь по умолчанию (ssh/telnet): root, пароль по умолчанию: blacksheepwall или innot1t2 или t1t2t3a5
Если до вас были установлены иные значения логина и пароля, то сбросьте настройки ASICа на заводские. Для этого на включенном ASICe зажмите ipreport и reset, держите 20 секунд, выключите блок питания, не отпуская зажатые кнопки. Ждите 10 секунд, не отпуская кнопки ipreport и reset, включите блок питания и еще 20 секунд держите ipreport и reset. Потом отпустите и дождитесь загрузки.
Как изменить RIG ID воркера?
Для этого нужно иметь физический доступ к ригу. Подключите к нему клавиатуру и монитор, и введите команду firstrun -f. Как вариант, можно воспользоваться Hive Shell для удаленного изменения. Для этого запустите Hive Shell, и в открывшемся окне напишите команду firstrun -f. После этого укажите RIG ID и пароль.

При установке возникает ошибка tar: short read
При скачивании прошивки через некоторые браузеры (например Opera на Windows или Safari на Apple), вы можете столкнуться с ошибкой tar: short read. В таком случае, рекомендуем воспользоваться другим браузером, например Google Chrome. Также данная ситуация может возникнуть в случае отсутствия места на ASIC, например из-за большого числа лог-файлов. В таком случае, рекомендуем перезагрузить ASIC и повторить попытку.
В ASICе появится вкладка для привязки по farm_hash. А далее решайте, оставаться на этой прошивке + Hive OS Client, или же менять прошивку. Перепрошиться на Hiveon или любую другую прошивку можно из дашборда Hive.
Пожалуйста, также убедитесь, что вы используете для прошивки файл «.tar.gz», а не «.tar».
Сброс настроек и возврат на заводскую прошивку
Пожалуйста, обратите внимание: сброс настроек на заводские настройки и возврат прошивки на заводскую прошивку это разные действия.
Сброс ASICа на заводские настройки можно сделать в течение первых 10 минут после загрузки ASICа:
- Перезагрузите ASIC
- Подождите минимум 2 минуты
- Зажмите кнопку Reset любым острым предметом на 5 секунд
- В течение 4 минут ASIC восстановит заводские настройки и перезагрузится
- Зайдите в веб ASICа, используя дефолтные логин и пароль
При сбросе настроек технически на ASICе очищается папка /config. В ней хранятся только конфиги. От ASICа это настройки сети, кошельков, пароль от веба. От Hive — конфиги для привязки к Hive. От прошивки Hiveon — профили разгона и тюна.
Возврат на заводскую прошивку (загрузка с резервного раздела ASICа) — этот метод применим только к Antminer S9 (все буквы), T9, T9+, у которых есть слот для SD карты слева от Ethernet разъема.
- Выключите ASIC
- Зажмите кнопку IP Report и не отпускайте ее
- Включите ASIC
- Подождите 5 секунд
- Отпустите IP Report
- Зайдите в веб ASICа, используя дефолтные логин и пароль
Как перенести ASIC на другой аккаунт Hive OS?
Вам нужно зайти на ваш ASIC по SSH, написать и выполнить команду firstrun -f, и после этого ввести новые rig ID и пароль.
Либо в вебе ASICа выполнить следующие действия: Worker — Settings — Advanced — Transfer Rig
У моего воркера проблемы с подключением к серверу. Что делать?
Если у вас проблемы с подключением вашего воркера к серверу Hive, и часто возникают ложные события в сети / не в сети, вы можете попробовать выбрать другой URL-адрес для подключения к серверу. Также, иногда возникает проблема с брандмауэром (ваш собственный ISP) и смена порта может помочь. Для этого вам нужно выбрать ваш воркер из списка, перейти в раздел настроек, выбрать зеркало, и выбрать подходящий для вас сервер.
Будьте внимательны! Прежде, чем изменить данный параметр, обязательно подготовьте физический или сетевой доступ (SSH) к воркеру. Если воркер не может подключиться к выбранному URL-адресу, он будет в состоянии — “не в сети” для Hive. Зеркальный URL-адрес сохраняется в /hive-config/rig.conf, где вы сможете редактировать его вручную, зайдя на риг с помощью SSH клиента.
Какие пулы поддерживают технологию ASIC Boost?
На данный момент, эту технологию поддерживают следующие пулы:
- emcd.io
- viabtc
- slushpool
- oneboost.ru
- f2pool.com
- btc.com
- antpool
- zpool.ca.
Со временем этот список, возможно, будет расширен.
Что делать, если нужного пула нет в Полетном Листе?
Если пула нет в списке пулов Полетного Листа, то выбирайте пул «Настроить майнер». В настройках майнера пропишите адрес и порт.
Почему у меня не запоминаются настройки пула?
Потому что прошивка Hiveon так настроена. Вам нужно зарегистрироваться на сайте hiveos.farm, создать там ферму, и прописать в ASICе farm_hash. Далее, создайте на сайте Полетный Лист и впишите туда ваши настройки. Примените этот лист к ASICу, появившемуся в ферме на сайте, и после этого ASIC будет помнить эти настройки при перезагрузке.
Как принудительно обновить клиент Hive OS на ASICe?
Для принудительного обновления версии клиента, вам нужно отправить на ASIC команду: /bin/sh -c ‘screen -d -m -S selfuprade /bin/sh -c «rm -rf /nvdata/latest.tar.gz /hive; /etc/rcS.d/S69hive; hello; message info AgentUpgradeDone»‘.
Как откатить прошивку ASICа
Используйте команду /bin/sh -c ‘screen -d -m -S selfupgrade selfupgrade 0.1-12’
Как просмотреть логи устройства?
Вот необходимые команды:
Вотчдог лог: cat /config/watchdog.log
Автотюн лог: cat /tmp/auto-tune или sh /www/pages/cgi-bin/get_auto_tune_log.cgi
Кернел лог можно просмотреть прямо в Hive OS. Кликните на иконку в виде кирки, и перейдите в пункт Miner Log. Если этот метод не срабатывает, выполните команду sh /www/pages/cgi-bin/get_kernel_log.cgi.
Как изменить пароль воркера?
Для смены пароля доступа, нужно отправить воркеру команду hive-passwd впишите_сюда_новый_пароль_для_SSH.

Если же у вас старая версия Hive OS Client, отправьте воркеру команду:
echo «root:antMiner Configuration:$(echo -n «root:antMiner Configuration:$new_pw» | md5sum | cut -b -32)» > /config/lighttpd-htdigest.user
Вместо $new_pw укажите новый пароль.
Как узнать часовой пояс ASIC-а?
Введите команду date. Она покажет текущие время и дату, выставленные на ASIC-е.
Как удалить Hive c T2T?
Перейдите почти в самый конец скрипта Innosilicon, удалите все строки с «curl», кроме одной. В ней будет выполнение команды. Заменить команду systemctl start …. на systemctl disable … Это отключит автозагрузку Hive. Скрипты останутся, но мешать не будут.
Всём добрый день. Подскажите пожалуйста, кто сталкивался. После запуска чудо аппарата т17, через некоторое время зелёная лампочка загорается, но мощность написано 0th. Куда копать? Логи приложил, скрин тоже. Заранее спасибо.
Спойлер
Booting Linux on physical CPU 0x0
Linux version 4.6.0-xilinx-gff8137b-dirty (lzq@armdev2) (gcc version 4.8.3 20140320 (prerelease) (Sourcery CodeBench Lite 2014.05-23) ) #25 SMP PREEMPT Fri Nov 23 15:30:52 CST 2018
CPU: ARMv7 Processor [413fc090] revision 0 (ARMv7), cr=18c5387d
CPU: PIPT / VIPT nonaliasing data cache, VIPT aliasing instruction cache
Machine model: Xilinx Zynq
cma: Reserved 16 MiB at 0x0e000000
Memory policy: Data cache writealloc
On node 0 totalpages: 61440
free_area_init_node: node 0, pgdat c0b39280, node_mem_map cde10000
Normal zone: 480 pages used for memmap
Normal zone: 0 pages reserved
Normal zone: 61440 pages, LIFO batch:15
percpu: Embedded 12 pages/cpu @cddf1000 s19776 r8192 d21184 u49152
pcpu-alloc: s19776 r8192 d21184 u49152 alloc=12*4096
pcpu-alloc: [0] 0 [0] 1
Built 1 zonelists in Zone order, mobility grouping on. Total pages: 60960
Kernel command line: mem=240M console=ttyPS0,115200 ramdisk_size=33554432 root=/dev/ram rw earlyprintk
PID hash table entries: 1024 (order: 0, 4096 bytes)
Dentry cache hash table entries: 32768 (order: 5, 131072 bytes)
Inode-cache hash table entries: 16384 (order: 4, 65536 bytes)
Memory: 203752K/245760K available (6345K kernel code, 231K rwdata, 1896K rodata, 1024K init, 223K bss, 25624K reserved, 16384K cma-reserved, 0K highmem)
Virtual kernel memory layout:
vector : 0xffff0000 — 0xffff1000 ( 4 kB)
fixmap : 0xffc00000 — 0xfff00000 (3072 kB)
vmalloc : 0xcf800000 — 0xff800000 ( 768 MB)
lowmem : 0xc0000000 — 0xcf000000 ( 240 MB)
pkmap : 0xbfe00000 — 0xc0000000 ( 2 MB)
modules : 0xbf000000 — 0xbfe00000 ( 14 MB)
.text : 0xc0008000 — 0xc090c424 (9234 kB)
.init : 0xc0a00000 — 0xc0b00000 (1024 kB)
.data : 0xc0b00000 — 0xc0b39fe0 ( 232 kB)
.bss : 0xc0b39fe0 — 0xc0b71c28 ( 224 kB)
Preemptible hierarchical RCU implementation.
Build-time adjustment of leaf fanout to 32.
RCU restricting CPUs from NR_CPUS=4 to nr_cpu_ids=2.
RCU: Adjusting geometry for rcu_fanout_leaf=32, nr_cpu_ids=2
NR_IRQS:16 nr_irqs:16 16
efuse mapped to cf800000
ps7-slcr mapped to cf802000
L2C: platform modifies aux control register: 0x72360000 -> 0x72760000
L2C: DT/platform modifies aux control register: 0x72360000 -> 0x72760000
L2C-310 erratum 769419 enabled
L2C-310 enabling early BRESP for Cortex-A9
L2C-310 full line of zeros enabled for Cortex-A9
L2C-310 ID prefetch enabled, offset 1 lines
L2C-310 dynamic clock gating enabled, standby mode enabled
L2C-310 cache controller enabled, 8 ways, 512 kB
L2C-310: CACHE_ID 0x410000c8, AUX_CTRL 0x76760001
zynq_clock_init: clkc starts at cf802100
Zynq clock init
sched_clock: 64 bits at 333MHz, resolution 3ns, wraps every 4398046511103ns
clocksource: arm_global_timer: mask: 0xffffffffffffffff max_cycles: 0x4ce07af025, max_idle_ns: 440795209040 ns
Switching to timer-based delay loop, resolution 3ns
clocksource: ttc_clocksource: mask: 0xffff max_cycles: 0xffff, max_idle_ns: 537538477 ns
ps7-ttc #0 at cf80a000, irq=18
Console: colour dummy device 80×30
Calibrating delay loop (skipped), value calculated using timer frequency.. 666.66 BogoMIPS (lpj=3333333)
pid_max: default: 32768 minimum: 301
Mount-cache hash table entries: 1024 (order: 0, 4096 bytes)
Mountpoint-cache hash table entries: 1024 (order: 0, 4096 bytes)
CPU: Testing write buffer coherency: ok
CPU0: thread -1, cpu 0, socket 0, mpidr 80000000
Setting up static identity map for 0x100000 — 0x100058
CPU1: failed to boot: -1
Brought up 1 CPUs
SMP: Total of 1 processors activated (666.66 BogoMIPS).
CPU: All CPU(s) started in SVC mode.
devtmpfs: initialized
VFP support v0.3: implementor 41 architecture 3 part 30 variant 9 rev 4
clocksource: jiffies: mask: 0xffffffff max_cycles: 0xffffffff, max_idle_ns: 19112604462750000 ns
pinctrl core: initialized pinctrl subsystem
NET: Registered protocol family 16
DMA: preallocated 256 KiB pool for atomic coherent allocations
cpuidle: using governor menu
hw-breakpoint: found 5 (+1 reserved) breakpoint and 1 watchpoint registers.
hw-breakpoint: maximum watchpoint size is 4 bytes.
zynq-ocm f800c000.ps7-ocmc: ZYNQ OCM pool: 256 KiB @ 0xcf880000
vgaarb: loaded
SCSI subsystem initialized
usbcore: registered new interface driver usbfs
usbcore: registered new interface driver hub
usbcore: registered new device driver usb
media: Linux media interface: v0.10
Linux video capture interface: v2.00
pps_core: LinuxPPS API ver. 1 registered
pps_core: Software ver. 5.3.6 — Copyright 2005-2007 Rodolfo Giometti <giometti@linux.it>
PTP clock support registered
EDAC MC: Ver: 3.0.0
Advanced Linux Sound Architecture Driver Initialized.
clocksource: Switched to clocksource arm_global_timer
NET: Registered protocol family 2
TCP established hash table entries: 2048 (order: 1, 8192 bytes)
TCP bind hash table entries: 2048 (order: 2, 16384 bytes)
TCP: Hash tables configured (established 2048 bind 2048)
UDP hash table entries: 256 (order: 1, 8192 bytes)
UDP-Lite hash table entries: 256 (order: 1, 8192 bytes)
NET: Registered protocol family 1
RPC: Registered named UNIX socket transport module.
RPC: Registered udp transport module.
RPC: Registered tcp transport module.
RPC: Registered tcp NFSv4.1 backchannel transport module.
PCI: CLS 0 bytes, default 64
Trying to unpack rootfs image as initramfs…
rootfs image is not initramfs (no cpio magic); looks like an initrd
Freeing initrd memory: 12584K (cceb7000 — cdb01000)
hw perfevents: enabled with armv7_cortex_a9 PMU driver, 7 counters available
futex hash table entries: 512 (order: 3, 32768 bytes)
workingset: timestamp_bits=28 max_order=16 bucket_order=0
jffs2: version 2.2. (NAND) (SUMMARY) © 2001-2006 Red Hat, Inc.
io scheduler noop registered
io scheduler deadline registered
io scheduler cfq registered (default)
dma-pl330 f8003000.ps7-dma: Loaded driver for PL330 DMAC-241330
dma-pl330 f8003000.ps7-dma: DBUFF-128x8bytes Num_Chans-8 Num_Peri-4 Num_Events-16
e0000000.serial: ttyPS0 at MMIO 0xe0000000 (irq = 158, base_baud = 6249999) is a xuartps
console [ttyPS0] enabled
xdevcfg f8007000.ps7-dev-cfg: ioremap 0xf8007000 to cf86e000
[drm] Initialized drm 1.1.0 20060810
brd: module loaded
loop: module loaded
CAN device driver interface
gpiod_set_value: invalid GPIO
libphy: MACB_mii_bus: probed
macb e000b000.ethernet eth0: Cadence GEM rev 0x00020118 at 0xe000b000 irq 31 (00:0a:35:00:00:00)
Generic PHY e000b000.etherne:00: attached PHY driver [Generic PHY] (mii_bus:phy_addr=e000b000.etherne:00, irq=-1)
e1000e: Intel(R) PRO/1000 Network Driver — 3.2.6-k
e1000e: Copyright(c) 1999 — 2015 Intel Corporation.
ehci_hcd: USB 2.0 ‘Enhanced’ Host Controller (EHCI) Driver
ehci-pci: EHCI PCI platform driver
usbcore: registered new interface driver usb-storage
mousedev: PS/2 mouse device common for all mice
i2c /dev entries driver
Xilinx Zynq CpuIdle Driver started
sdhci: Secure Digital Host Controller Interface driver
sdhci: Copyright(c) Pierre Ossman
sdhci-pltfm: SDHCI platform and OF driver helper
mmc0: SDHCI controller on e0100000.ps7-sdio [e0100000.ps7-sdio] using ADMA
ledtrig-cpu: registered to indicate activity on CPUs
usbcore: registered new interface driver usbhid
usbhid: USB HID core driver
nand: device found, Manufacturer ID: 0x2c, Chip ID: 0xda
nand: Micron MT29F2G08ABAGAWP
nand: 256 MiB, SLC, erase size: 128 KiB, page size: 2048, OOB size: 128
nand: WARNING: pl35x-nand: the ECC used on your system is too weak compared to the one required by the NAND chip
Bad block table found at page 131008, version 0x01
Bad block table found at page 130944, version 0x01
6 ofpart partitions found on MTD device pl35x-nand
Creating 6 MTD partitions on «pl35x-nand»:
0x000000000000-0x000002800000 : «BOOT.bin-env-dts-kernel»
0x000002800000-0x000004800000 : «ramfs»
0x000004800000-0x000005000000 : «configs»
0x000005000000-0x000006000000 : «reserve»
0x000006000000-0x000008000000 : «ramfs-bak»
0x000008000000-0x000010000000 : «reserve1»
NET: Registered protocol family 10
sit: IPv6 over IPv4 tunneling driver
NET: Registered protocol family 17
can: controller area network core (rev 20120528 abi 9)
NET: Registered protocol family 29
can: raw protocol (rev 20120528)
can: broadcast manager protocol (rev 20120528 t)
can: netlink gateway (rev 20130117) max_hops=1
zynq_pm_ioremap: no compatible node found for ‘xlnx,zynq-ddrc-a05’
zynq_pm_late_init: Unable to map DDRC IO memory.
Registering SWP/SWPB emulation handler
hctosys: unable to open rtc device (rtc0)
ALSA device list:
No soundcards found.
RAMDISK: gzip image found at block 0
EXT4-fs (ram0): couldn’t mount as ext3 due to feature incompatibilities
EXT4-fs (ram0): mounted filesystem without journal. Opts: (null)
VFS: Mounted root (ext4 filesystem) on device 1:0.
devtmpfs: mounted
Freeing unused kernel memory: 1024K (c0a00000 — c0b00000)
EXT4-fs (ram0): re-mounted. Opts: block_validity,delalloc,barrier,user_xattr
random: dd urandom read with 0 bits of entropy available
ubi0: attaching mtd2
ubi0: scanning is finished
ubi0: attached mtd2 (name «configs», size 8 MiB)
ubi0: PEB size: 131072 bytes (128 KiB), LEB size: 126976 bytes
ubi0: min./max. I/O unit sizes: 2048/2048, sub-page size 2048
ubi0: VID header offset: 2048 (aligned 2048), data offset: 4096
ubi0: good PEBs: 64, bad PEBs: 0, corrupted PEBs: 0
ubi0: user volume: 1, internal volumes: 1, max. volumes count: 128
ubi0: max/mean erase counter: 6/3, WL threshold: 4096, image sequence number: 2579122177
ubi0: available PEBs: 0, total reserved PEBs: 64, PEBs reserved for bad PEB handling: 40
ubi0: background thread «ubi_bgt0d» started, PID 708
UBIFS (ubi0:0): background thread «ubifs_bgt0_0» started, PID 711
UBIFS (ubi0:0): UBIFS: mounted UBI device 0, volume 0, name «configs»
UBIFS (ubi0:0): LEB size: 126976 bytes (124 KiB), min./max. I/O unit sizes: 2048 bytes/2048 bytes
UBIFS (ubi0:0): FS size: 1396736 bytes (1 MiB, 11 LEBs), journal size 888833 bytes (0 MiB, 5 LEBs)
UBIFS (ubi0:0): reserved for root: 65970 bytes (64 KiB)
UBIFS (ubi0:0): media format: w4/r0 (latest is w4/r0), UUID 85D84F26-1C71-4F38-B7D3-FE5BA6AD41D2, small LPT model
ubi1: attaching mtd5
ubi1: scanning is finished
ubi1: attached mtd5 (name «reserve1», size 128 MiB)
ubi1: PEB size: 131072 bytes (128 KiB), LEB size: 126976 bytes
ubi1: min./max. I/O unit sizes: 2048/2048, sub-page size 2048
ubi1: VID header offset: 2048 (aligned 2048), data offset: 4096
ubi1: good PEBs: 1020, bad PEBs: 4, corrupted PEBs: 0
ubi1: user volume: 1, internal volumes: 1, max. volumes count: 128
ubi1: max/mean erase counter: 1673/375, WL threshold: 4096, image sequence number: 3389548455
ubi1: available PEBs: 0, total reserved PEBs: 1020, PEBs reserved for bad PEB handling: 36
ubi1: background thread «ubi_bgt1d» started, PID 720
UBIFS (ubi1:0): background thread «ubifs_bgt1_0» started, PID 723
UBIFS (ubi1:0): UBIFS: mounted UBI device 1, volume 0, name «reserve1»
UBIFS (ubi1:0): LEB size: 126976 bytes (124 KiB), min./max. I/O unit sizes: 2048 bytes/2048 bytes
UBIFS (ubi1:0): FS size: 123039744 bytes (117 MiB, 969 LEBs), journal size 6221824 bytes (5 MiB, 49 LEBs)
UBIFS (ubi1:0): reserved for root: 4952683 bytes (4836 KiB)
UBIFS (ubi1:0): media format: w4/r0 (latest is w4/r0), UUID 721E72E7-F382-4130-AD9F-6C10D9102537, small LPT model
IPv6: ADDRCONF(NETDEV_UP): eth0: link is not ready
IPv6: ADDRCONF(NETDEV_UP): eth0: link is not ready
macb e000b000.ethernet eth0: unable to generate target frequency: 25000000 Hz
macb e000b000.ethernet eth0: link up (100/Full)
IPv6: ADDRCONF(NETDEV_CHANGE): eth0: link becomes ready
In axi fpga driver!
request_mem_region OK!
AXI fpga dev virtual address is 0xcfb38000
*base_vir_addr = 0xab013
In fpga mem driver!
request_mem_region OK!
fpga mem virtual address is 0xd2000000
random: nonblocking pool is initialized
Mar 30 20:03:21 (none) local0.notice bmminer: set_start_time_point total_tv_start_sys=1635 total_tv_end_sys=1636
Mar 30 20:03:24 (none) local0.notice cgminer: cgminer_socket_init reg bitmain_api_detect return: 0
Mar 30 20:03:25 (none) local0.notice cgminer: cgminer_socket_init reg bitmain_update_job return: 0
Mar 30 20:03:25 (none) local0.notice cgminer: cgminer_socket_init reg bitmain_shutdown return: 0
Mar 30 20:03:25 (none) local0.err cgminer: Miner compile time: Thu Apr 23 16:29:07 CST 2020 type: Antminer T17
Mar 30 20:03:25 (none) local0.notice cgminer[5457]: about to send detect
Mar 30 20:03:25 (none) local0.notice cgminer[5457]: set_start_time_point total_tv_start_sys=1639 total_tv_end_sys=1640
Mar 30 20:03:25 (none) local0.notice cgminer[5457]: Probing for an alive pool
Mar 30 20:03:25 (none) local0.notice cgminer[5457]: LOW POWER MODE!
Mar 30 20:03:25 (none) local0.notice cgminer[5457]: Switching to pool 1 stratum+tcp://sha256.poolbinance.com:443 — first alive pool
Mar 30 20:03:25 (none) local0.notice cgminer[5457]: in stratum_sthread
Mar 30 20:03:25 (none) local0.notice cgminer[5457]: Pool 1 difficulty changed to 131072
Mar 30 20:03:25 (none) local0.notice cgminer[5457]: LOW POWER MODE!
Mar 30 20:03:25 (none) local0.notice cgminer[5457]: in stratum_sthread
Mar 30 20:03:25 (none) local0.notice cgminer[5457]: Pool 2 difficulty changed to 131072
Mar 30 20:03:25 (none) local0.notice cgminer[5457]: Network diff set to 27.5T
Mar 30 20:03:25 (none) local0.notice cgminer[5457]: LOW POWER MODE!
Mar 30 20:03:25 (none) local0.warn cgminer[5457]: Pool 0 stratum+tcp://bs.poolbinance.com:3333 alive, testing stability
Mar 30 20:03:25 (none) local0.notice cgminer[5457]: in stratum_sthread
Mar 30 20:03:25 (none) local0.notice cgminer[5457]: Pool 0 difficulty changed to 131072
Mar 30 20:03:25 (none) local0.notice cgminer[5457]: POOL 1 support ab mode!
Mar 30 20:03:25 (none) local0.notice cgminer[5457]: POOL 0 support ab mode!
Mar 30 20:03:26 (none) local0.notice cgminer[5457]: update job
Mar 30 20:03:26 (none) local0.notice cgminer[5457]: job buf total len:2558, offset:2558
Mar 30 20:03:26 (none) local0.notice cgminer[5457]: about to send job, size is 2558
Mar 30 20:03:26 (none) local0.notice bmminer: bitmain_update_job_cb, rec job data 0xb4800528 size: 2558
Mar 30 20:03:26 (none) local0.notice bmminer: parse job buf len:2558
Mar 30 20:03:26 (none) local0.warn cgminer[5457]: Pool 0 stratum+tcp://bs.poolbinance.com:3333 stable for >120 seconds
Mar 30 20:03:26 (none) local0.warn cgminer[5457]: Switching to pool 0 stratum+tcp://bs.poolbinance.com:3333
Mar 30 20:03:30 (none) local0.notice cgminer[5457]: update job
Mar 30 20:03:30 (none) local0.notice cgminer[5457]: job buf total len:2558, offset:2558
Mar 30 20:03:30 (none) local0.notice cgminer[5457]: about to send job, size is 2558
Mar 30 20:03:30 (none) local0.notice bmminer: bitmain_update_job_cb, rec job data 0xb4800528 size: 2558
Mar 30 20:03:30 (none) local0.notice bmminer: parse job buf len:2558
Mar 30 20:03:31 (none) local0.warn cgminer[5457]: API running in IP access mode on port 4028 (14)
Mar 30 20:04:02 (none) local0.notice cgminer[5457]: update job
Mar 30 20:04:02 (none) local0.notice cgminer[5457]: job buf total len:2558, offset:2558
Mar 30 20:04:02 (none) local0.notice cgminer[5457]: about to send job, size is 2558
Mar 30 20:04:02 (none) local0.notice bmminer: bitmain_update_job_cb, rec job data 0xb4800528 size: 2558
Mar 30 20:04:02 (none) local0.notice bmminer: parse job buf len:2558
Mar 30 20:04:32 (none) local0.notice cgminer[5457]: update job
Mar 30 20:04:32 (none) local0.notice cgminer[5457]: job buf total len:2558, offset:2558
Mar 30 20:04:32 (none) local0.notice cgminer[5457]: about to send job, size is 2558
Mar 30 20:04:32 (none) local0.notice bmminer: bitmain_update_job_cb, rec job data 0xb4800528 size: 2558
Mar 30 20:04:32 (none) local0.notice bmminer: parse job buf len:2558
Mar 30 20:05:02 (none) local0.notice cgminer[5457]: update job
Mar 30 20:05:02 (none) local0.notice cgminer[5457]: job buf total len:2558, offset:2558
Mar 30 20:05:02 (none) local0.notice cgminer[5457]: about to send job, size is 2558
Mar 30 20:05:02 (none) local0.notice bmminer: bitmain_update_job_cb, rec job data 0xb4800528 size: 2558
Mar 30 20:05:02 (none) local0.notice bmminer: parse job buf len:2558
Mar 30 20:05:32 (none) local0.notice cgminer[5457]: update job
Mar 30 20:05:32 (none) local0.notice cgminer[5457]: job buf total len:2558, offset:2558
Mar 30 20:05:32 (none) local0.notice cgminer[5457]: about to send job, size is 2558
Mar 30 20:05:32 (none) local0.notice bmminer: bitmain_update_job_cb, rec job data 0xb4800528 size: 2558
Mar 30 20:05:32 (none) local0.notice bmminer: parse job buf len:2558
Mar 30 20:06:06 (none) local0.notice cgminer[5457]: update job
Mar 30 20:06:06 (none) local0.notice cgminer[5457]: job buf total len:2558, offset:2558
Mar 30 20:06:06 (none) local0.notice cgminer[5457]: about to send job, size is 2558
Mar 30 20:06:06 (none) local0.notice bmminer: bitmain_update_job_cb, rec job data 0xb4800528 size: 2558
Mar 30 20:06:06 (none) local0.notice bmminer: parse job buf len:2558
Mar 30 20:06:36 (none) local0.notice cgminer[5457]: update job
Mar 30 20:06:36 (none) local0.notice cgminer[5457]: job buf total len:2558, offset:2558
Mar 30 20:06:36 (none) local0.notice cgminer[5457]: about to send job, size is 2558
Mar 30 20:06:36 (none) local0.notice bmminer: bitmain_update_job_cb, rec job data 0xb4800528 size: 2558
Mar 30 20:06:36 (none) local0.notice bmminer: parse job buf len:2558
Mar 30 20:06:39 (none) local0.notice cgminer[5457]: Stratum from pool 0 detected new block at height 729735
Mar 30 20:06:39 (none) local0.notice cgminer[5457]: update job
Mar 30 20:06:39 (none) local0.notice cgminer[5457]: job buf total len:2206, offset:2206
Mar 30 20:06:39 (none) local0.notice cgminer[5457]: about to send job, size is 2206
Mar 30 20:06:39 (none) local0.notice bmminer: bitmain_update_job_cb, rec job data 0xb4800528 size: 2206
Mar 30 20:06:39 (none) local0.notice bmminer: parse job buf len:2206
Mar 30 20:06:40 (none) local0.notice cgminer[5457]: update job
Mar 30 20:06:40 (none) local0.notice cgminer[5457]: job buf total len:2591, offset:2591
Mar 30 20:06:40 (none) local0.notice cgminer[5457]: about to send job, size is 2591
Mar 30 20:06:40 (none) local0.notice bmminer: bitmain_update_job_cb, rec job data 0xb4800528 size: 2591
Mar 30 20:06:40 (none) local0.notice bmminer: parse job buf len:2591
Mar 30 20:07:10 (none) local0.notice cgminer[5457]: update job
Mar 30 20:07:10 (none) local0.notice cgminer[5457]: job buf total len:2590, offset:2590
Mar 30 20:07:10 (none) local0.notice cgminer[5457]: about to send job, size is 2590
Mar 30 20:07:10 (none) local0.notice bmminer: bitmain_update_job_cb, rec job data 0xb4800528 size: 2590
Mar 30 20:07:10 (none) local0.notice bmminer: parse job buf len:2590
Mar 30 20:07:42 (none) local0.notice cgminer[5457]: update job
Mar 30 20:07:42 (none) local0.notice cgminer[5457]: job buf total len:2590, offset:2590
Mar 30 20:07:42 (none) local0.notice cgminer[5457]: about to send job, size is 2590
Mar 30 20:07:42 (none) local0.notice bmminer: bitmain_update_job_cb, rec job data 0xb4800528 size: 2590
Mar 30 20:07:42 (none) local0.notice bmminer: parse job buf len:2590
Mar 30 20:08:12 (none) local0.notice cgminer[5457]: update job
Mar 30 20:08:12 (none) local0.notice cgminer[5457]: job buf total len:2590, offset:2590
Mar 30 20:08:12 (none) local0.notice cgminer[5457]: about to send job, size is 2590
Mar 30 20:08:12 (none) local0.notice bmminer: bitmain_update_job_cb, rec job data 0xb4800528 size: 2590
Mar 30 20:08:12 (none) local0.notice bmminer: parse job buf len:2590
Mar 30 20:08:40 (none) local0.notice cgminer[5457]: update job
Mar 30 20:08:40 (none) local0.notice cgminer[5457]: job buf total len:2590, offset:2590
Mar 30 20:08:40 (none) local0.notice cgminer[5457]: about to send job, size is 2590
Mar 30 20:08:40 (none) local0.notice bmminer: bitmain_update_job_cb, rec job data 0xb4800528 size: 2590
Mar 30 20:08:40 (none) local0.notice bmminer: parse job buf len:2590
Mar 30 20:09:12 (none) local0.notice cgminer[5457]: update job
Mar 30 20:09:12 (none) local0.notice cgminer[5457]: job buf total len:2590, offset:2590
Mar 30 20:09:12 (none) local0.notice cgminer[5457]: about to send job, size is 2590
Mar 30 20:09:12 (none) local0.notice bmminer: bitmain_update_job_cb, rec job data 0xb4800528 size: 2590
Mar 30 20:09:12 (none) local0.notice bmminer: parse job buf len:2590
Mar 30 20:09:42 (none) local0.notice cgminer[5457]: update job
Mar 30 20:09:42 (none) local0.notice cgminer[5457]: job buf total len:2590, offset:2590
Mar 30 20:09:42 (none) local0.notice cgminer[5457]: about to send job, size is 2590
Mar 30 20:09:42 (none) local0.notice bmminer: bitmain_update_job_cb, rec job data 0xb4800528 size: 2590
Mar 30 20:09:42 (none) local0.notice bmminer: parse job buf len:2590
Mar 30 20:10:14 (none) local0.notice cgminer[5457]: update job
Mar 30 20:10:14 (none) local0.notice cgminer[5457]: job buf total len:2590, offset:2590
Mar 30 20:10:14 (none) local0.notice cgminer[5457]: about to send job, size is 2590
Mar 30 20:10:14 (none) local0.notice bmminer: bitmain_update_job_cb, rec job data 0xb4800528 size: 2590
Mar 30 20:10:14 (none) local0.notice bmminer: parse job buf len:2590
Mar 30 20:10:46 (none) local0.notice cgminer[5457]: update job
Mar 30 20:10:46 (none) local0.notice cgminer[5457]: job buf total len:2590, offset:2590
Mar 30 20:10:46 (none) local0.notice cgminer[5457]: about to send job, size is 2590
Mar 30 20:10:46 (none) local0.notice bmminer: bitmain_update_job_cb, rec job data 0xb4800528 size: 2590
Mar 30 20:10:46 (none) local0.notice bmminer: parse job buf len:2590
Mar 30 20:11:20 (none) local0.notice cgminer[5457]: update job
Mar 30 20:11:20 (none) local0.notice cgminer[5457]: job buf total len:2590, offset:2590
Mar 30 20:11:20 (none) local0.notice cgminer[5457]: about to send job, size is 2590
Mar 30 20:11:20 (none) local0.notice bmminer: bitmain_update_job_cb, rec job data 0xb4800528 size: 2590
Mar 30 20:11:20 (none) local0.notice bmminer: parse job buf len:2590
Mar 30 20:11:42 (none) local0.notice cgminer[5457]: update job
Mar 30 20:11:42 (none) local0.notice cgminer[5457]: job buf total len:2590, offset:2590
Mar 30 20:11:42 (none) local0.notice cgminer[5457]: about to send job, size is 2590
Mar 30 20:11:42 (none) local0.notice bmminer: bitmain_update_job_cb, rec job data 0xb4800528 size: 2590
Mar 30 20:11:42 (none) local0.notice bmminer: parse job buf len:2590
Mar 30 20:12:12 (none) local0.notice cgminer[5457]: update job
Mar 30 20:12:12 (none) local0.notice cgminer[5457]: job buf total len:2590, offset:2590
Mar 30 20:12:12 (none) local0.notice cgminer[5457]: about to send job, size is 2590
Mar 30 20:12:12 (none) local0.notice bmminer: bitmain_update_job_cb, rec job data 0xb4800528 size: 2590
Mar 30 20:12:12 (none) local0.notice bmminer: parse job buf len:2590
2022-03-30 19:57:22 driver-btm-api.c:663:init_freq_mode: This is scan-user version
2022-03-30 19:57:22 driver-btm-api.c:2028:bitmain_soc_init: opt_multi_version = 1
2022-03-30 19:57:22 driver-btm-api.c:2029:bitmain_soc_init: opt_bitmain_ab = 1
2022-03-30 19:57:22 driver-btm-api.c:2030:bitmain_soc_init: opt_bitmain_work_mode = 0
2022-03-30 19:57:22 driver-btm-api.c:2031:bitmain_soc_init: Miner compile time: Thu Apr 23 16:29:07 CST 2020 type: Antminer T17
2022-03-30 19:57:22 driver-btm-api.c:2032:bitmain_soc_init: commit version: 1c5be6f 2020-04-20 16:18:14, build by: lol 2020-04-23 16:35:04
2022-03-30 19:57:22 driver-btm-api.c:1844:show_sn: no SN got, please write SN to /nvdata/sn
2022-03-30 19:57:22 driver-btm-api.c:1167:miner_device_init: Detect 256MB control board of XILINX
2022-03-30 19:57:22 driver-btm-api.c:1115:init_fan_parameter: fan_eft : 0 fan_pwm : 0
2022-03-30 19:57:22 thread.c:885:create_read_nonce_reg_thread: create thread
2022-03-30 19:57:28 driver-btm-api.c:1099:init_miner_version: miner ID : 812cf4025c208854
2022-03-30 19:57:28 driver-btm-api.c:1105:init_miner_version: FPGA Version = 0xB013
2022-03-30 19:57:30 eeprom.c:456:check_pattern_test_level: L6 board
2022-03-30 19:57:32 eeprom.c:456:check_pattern_test_level: L6 board
2022-03-30 19:57:33 eeprom.c:456:check_pattern_test_level: L6 board
2022-03-30 19:57:33 eeprom.c:545:eeprom_load: try higher voltage open core
2022-03-30 19:57:33 driver-btm-api.c:737:get_product_id: product_id[0] = 1
2022-03-30 19:57:33 driver-btm-api.c:737:get_product_id: product_id[1] = 1
2022-03-30 19:57:33 driver-btm-api.c:737:get_product_id: product_id[2] = 1
2022-03-30 19:57:33 driver-btm-api.c:1666:get_ccdly_opt: ccdly_opt[0] = 1
2022-03-30 19:57:33 driver-btm-api.c:1666:get_ccdly_opt: ccdly_opt[1] = 1
2022-03-30 19:57:33 driver-btm-api.c:1666:get_ccdly_opt: ccdly_opt[2] = 1
2022-03-30 19:57:33 driver-btm-api.c:1919:bitmain_board_init: g_ccdly_opt = 1
2022-03-30 19:57:33 driver-btm-api.c:676:_set_project_type: project:2
2022-03-30 19:57:33 driver-btm-api.c:706:_set_project_type: Project type: Antminer T17
2022-03-30 19:57:33 driver-btm-api.c:717:dump_pcb_bom_version: Chain [0] PCB Version: 0x0100
2022-03-30 19:57:33 driver-btm-api.c:718:dump_pcb_bom_version: Chain [0] BOM Version: 0x0100
2022-03-30 19:57:33 driver-btm-api.c:717:dump_pcb_bom_version: Chain [1] PCB Version: 0x0100
2022-03-30 19:57:33 driver-btm-api.c:718:dump_pcb_bom_version: Chain [1] BOM Version: 0x0100
2022-03-30 19:57:33 driver-btm-api.c:717:dump_pcb_bom_version: Chain [2] PCB Version: 0x0100
2022-03-30 19:57:33 driver-btm-api.c:718:dump_pcb_bom_version: Chain [2] BOM Version: 0x0100
2022-03-30 19:57:35 driver-btm-api.c:1939:bitmain_board_init: Fan check passed.
2022-03-30 19:57:37 board.c:36:jump_and_app_check_restore_pic: chain[0] PIC jump to app
2022-03-30 19:57:41 board.c:40:jump_and_app_check_restore_pic: Check chain[0] PIC fw version=0xb9
2022-03-30 19:57:42 board.c:36:jump_and_app_check_restore_pic: chain[1] PIC jump to app
2022-03-30 19:57:46 board.c:40:jump_and_app_check_restore_pic: Check chain[1] PIC fw version=0xb9
2022-03-30 19:57:48 board.c:36:jump_and_app_check_restore_pic: chain[2] PIC jump to app
2022-03-30 19:57:51 board.c:40:jump_and_app_check_restore_pic: Check chain[2] PIC fw version=0xb9
2022-03-30 19:57:51 thread.c:880:create_pic_heart_beat_thread: create thread
2022-03-30 19:57:51 power_api.c:55:power_init: power init …
2022-03-30 19:57:51 driver-btm-api.c:1949:bitmain_board_init: Enter 30s sleep to make sure power release finish.
2022-03-30 19:58:23 power_api.c:264:set_iic_power_to_custom_voltage: setting to voltage: 18.00 …
2022-03-30 19:58:29 power_api.c:124:check_voltage_multi: retry time: 0
2022-03-30 19:58:31 power_api.c:86:get_average_voltage: chain[0], voltage is: 18.179326
2022-03-30 19:58:32 power_api.c:86:get_average_voltage: chain[1], voltage is: 18.277295
2022-03-30 19:58:34 power_api.c:86:get_average_voltage: chain[2], voltage is: 18.314033
2022-03-30 19:58:34 power_api.c:97:get_average_voltage: aveage voltage is: 18.256885
2022-03-30 19:58:34 power_api.c:182:set_iic_power_by_voltage: now set voltage to : 18.000000
2022-03-30 19:58:34 uart.c:80:set_baud: set fpga_baud = 115200, fpga_divider = 26
2022-03-30 19:58:46 driver-btm-api.c:1042:check_asic_number_with_power_on: Chain[0]: find 30 asic, times 0
2022-03-30 19:58:55 driver-btm-api.c:1042:check_asic_number_with_power_on: Chain[1]: find 30 asic, times 0
2022-03-30 19:59:06 driver-btm-api.c:1042:check_asic_number_with_power_on: Chain[2]: find 30 asic, times 0
2022-03-30 19:59:09 driver-btm-api.c:352:set_order_clock: chain[0]: set order clock, stragegy 3 clock_en=0xff
2022-03-30 19:59:09 driver-btm-api.c:352:set_order_clock: chain[1]: set order clock, stragegy 3 clock_en=0xff
2022-03-30 19:59:10 driver-btm-api.c:352:set_order_clock: chain[2]: set order clock, stragegy 3 clock_en=0xff
2022-03-30 19:59:10 driver-hash-chip.c:502:set_clock_delay_control: core_data = 0xb4
2022-03-30 19:59:10 uart.c:80:set_baud: set fpga_baud = 3000000, fpga_divider = 0
2022-03-30 19:59:10 driver-btm-api.c:1693:check_clock_counter: freq 50 clock_counter_limit 6
2022-03-30 19:59:10 uart.c:80:set_baud: set fpga_baud = 115200, fpga_divider = 26
2022-03-30 19:59:10 voltage[0] = 1690
2022-03-30 19:59:10 voltage[1] = 1690
2022-03-30 19:59:10 voltage[2] = 1690
2022-03-30 19:59:10 power_api.c:140:set_working_voltage: working_voltage = 16.900000
2022-03-30 19:59:12 temperature.c:282:calibrate_temp_sensor_one_chain: Temperature sensor calibration: chain 0 success.
2022-03-30 19:59:13 temperature.c:282:calibrate_temp_sensor_one_chain: Temperature sensor calibration: chain 1 success.
2022-03-30 19:59:15 temperature.c:282:calibrate_temp_sensor_one_chain: Temperature sensor calibration: chain 2 success.
2022-03-30 19:59:15 uart.c:80:set_baud: set fpga_baud = 6000000, fpga_divider = 3
2022-03-30 19:59:16 driver-btm-api.c:252:check_bringup_temp: Bring up temperature is 28
2022-03-30 19:59:16 thread.c:900:create_check_miner_status_thread: create thread
2022-03-30 19:59:16 thread.c:890:create_set_miner_status_thread: create thread
2022-03-30 19:59:16 driver-btm-api.c:613:calculate_timeout: dev->timeout = 392
2022-03-30 19:59:16 thread.c:875:create_temperature_monitor_thread: create thread
2022-03-30 19:59:16 freq_tuning.c:159:freq_tuning_get_max_freq: Max freq of tuning is 760
2022-03-30 19:59:16 power_api.c:379:slowly_set_iic_power_to_custom_voltage: slowly setting to voltage: 17.60 …
2022-03-30 19:59:41 power_api.c:124:check_voltage_multi: retry time: 0
2022-03-30 19:59:44 power_api.c:86:get_average_voltage: chain[0], voltage is: 17.756836
2022-03-30 19:59:47 power_api.c:86:get_average_voltage: chain[1], voltage is: 17.860928
2022-03-30 19:59:51 power_api.c:86:get_average_voltage: chain[2], voltage is: 17.928281
2022-03-30 19:59:51 power_api.c:97:get_average_voltage: aveage voltage is: 17.848681
2022-03-30 20:02:06 thread.c:734:check_temperature: over max temp, pcb temp 59 (max 80), chip temp 104(max 103)
2022-03-30 20:02:06 driver-btm-api.c:205:set_miner_status: ERROR_TEMP_TOO_HIGH
2022-03-30 20:02:06 driver-btm-api.c:146:stop_mining: stop mining: over max temp
2022-03-30 20:02:06 thread.c:920:cancel_temperature_monitor_thread: cancel thread
2022-03-30 20:02:06 thread.c:930:cancel_read_nonce_reg_thread: cancel thread
2022-03-30 20:02:06 driver-btm-api.c:131:killall_hashboard: ****power off hashboard****
2022-03-30 20:02:39 driver-btm-api.c:644:set_timeout: freq 720 final timeout=163
2022-03-30 20:02:39 power_api.c:397:slowly_set_iic_power_to_working_voltage: slowly setting to voltage: 16.90 …
2022-03-30 20:03:03 power_api.c:124:check_voltage_multi: retry time: 0
2022-03-30 20:03:07 power_api.c:86:get_average_voltage: chain[0], voltage is: 17.787451
2022-03-30 20:03:10 power_api.c:86:get_average_voltage: chain[1], voltage is: 17.879297
2022-03-30 20:03:13 power_api.c:86:get_average_voltage: chain[2], voltage is: 17.934404
2022-03-30 20:03:13 power_api.c:97:get_average_voltage: aveage voltage is: 17.867051
2022-03-30 20:03:13 frequency.c:654:get_current_min_freq: current min freq 720
2022-03-30 20:03:13 driver-btm-api.c:1693:check_clock_counter: freq 720 clock_counter_limit 92
2022-03-30 20:03:16 register.c:1416:quick_dump_core_hash_clock_counter: bad clock counter. chain = 0, asic = 5, core = 0, found 0, clock counter 0x00000000
2022-03-30 20:03:16 driver-btm-api.c:2139:bitmain_soc_init: clock count check failed after retry, wait for hash rate protect later.
2022-03-30 20:03:16 thread.c:895:create_check_system_status_thread: create thread
2022-03-30 20:03:16 driver-btm-api.c:2155:bitmain_soc_init: Init done!
2022-03-30 20:03:16 driver-btm-api.c:205:set_miner_status: STATUS_INIT
2022-03-30 20:03:21 driver-btm-api.c:205:set_miner_status: STATUS_OKAY
2022-03-30 20:03:26 driver-btm-api.c:1325:dhash_chip_send_job: Version num 4
Connect with your social network account
Модераторы: Кузовщик, mich67, Franky
-
volga
- Заходит в гости
- Сообщения: 11
- Зарегистрирован: Вс фев 22, 2015 17:34
Нужна помощь! Ошибка Engine temperature too high
Добрый день! Возникла неприятная проблема с Пежо 308 2009г.в.
Нахожусь в 45 км от Тольятти. В Тольятти нет официального сервиса Пежо. На прошлой неделе при температуре -15 завели двигатель и двинулись. Через пару километров стрелка Температуры скакнула в красную зону и прилипла дисплей выдал Engine temperature too high — Высокая температура двигателя. STOP. На веревке оттащили обратно в деревню. Изучили форум и другие источники. Смотрим машину….охлаждающей жидкости в бачке меньше MIN….на месте постоянной стоянки подтеков не наблюдалось….смотрим на датчик Температуры охлаждающей жидкости….все мокро….значит гнало из под датчика через прокладку (рез.кольцо)….купили в EXIST аналог от Facet код 7.3328 14K (Италия) в комплекте с уплотнительным кольцом и стопорной скобой. Принято решение заменить датчик. Меняем как сказано в руководстве по ремонту…скидываем клеммы с АКБ….убираем воздуховод…скидываем колодку с датчика….выдергиваем стопорную скобу и вынимаем датчик. При визуальном осмотре видна трещина в районе завальцовки….весь датчик мокрый (охл.жидк). Устанавливаем новый датчик в обратной последовательности при этом и просушиваем колодку феном… доливаем в бачек охл.жидкость до нужного уровня. Заводим автомобиль. После запуска через секунд 10-15 стрелка прыгает в красную зону и там остается на мониторе опять сообщение Engine temperature too high — Высокая температура двигателя STOP.
ЧТО ДЕЛАТЬ? Новый датчик не подошел или не работает? Просто не ушла ошибка из «мозгов»? Звать эвакуатор и тащить авто на станцию? Ближайший официальный сервис в Самаре за 160 км. Не официальные есть в Тольятти это 50-55 км. Что делать? Своим ходом…Страшно нарваться на кап.ремонт двигателя. Жду Вашей помощи. Спасибо.
volga
-

SkyDolphin
- Эксперт
- Сообщения: 295
- Зарегистрирован: Пн фев 16, 2015 19:50
- Откуда: Новосибирск

Сообщение
SkyDolphin » Ср мар 04, 2015 10:49
вентилятор то включается?
-
volga
- Заходит в гости
- Сообщения: 11
- Зарегистрирован: Вс фев 22, 2015 17:34
Сообщение
volga » Ср мар 04, 2015 11:03
Вентилятор включается.
volga
-
SkyDolphin
- Эксперт
- Сообщения: 295
- Зарегистрирован: Пн фев 16, 2015 19:50
- Откуда: Новосибирск
Сообщение
SkyDolphin » Ср мар 04, 2015 11:17
может в помпе всё-таки дело?
-
Valera2010
- Ветеран клуба
- Сообщения: 3020
- Зарегистрирован: Пт ноя 19, 2010 21:07

Сообщение
Valera2010 » Ср мар 04, 2015 11:25
volga
Возможно термостат накрылся, пробег то какой?
-

sergeyvolk
- Ветеран клуба
- Сообщения: 2766
- Зарегистрирован: Пт дек 03, 2010 11:42
- Откуда: г.Волжский

Сообщение
sergeyvolk » Ср мар 04, 2015 11:25
Сдёрни колодку с датчика и посмотри изменится что нибудь. Может быть она залита.
SkyDolphin писал(а):
может в помпе всё-таки дело?
Даже если в помпе дело , антифриз за 15 сек до красной зоны не нагреется.
 [/url]
-
volga
- Заходит в гости
- Сообщения: 11
- Зарегистрирован: Вс фев 22, 2015 17:34
Сообщение
volga » Ср мар 04, 2015 11:38
Пробег около 48 000. На улице -12…. за 15 сек перегрется полюбому не может….колодку сдергивал и заводил- результат тот же (заводится и также в красную зону через 10-15 секунд и сообщение Engine temperature too high — Высокая температура двигателя. STOP.)….Пробовал на сдернутую колодку старый датчик—картина таже.
volga
-
volga
- Заходит в гости
- Сообщения: 11
- Зарегистрирован: Вс фев 22, 2015 17:34
Сообщение
volga » Ср мар 04, 2015 11:41
Valera2010 писал(а):volga
Возможно термостат накрылся, пробег то какой?
Как проверить термостат? от чего он мог накраться? у него есть связь с «мозгами» помимо датчика температуры охл.жидкости?
volga
-
Director
- Ветеран клуба
- Сообщения: 2770
- Зарегистрирован: Чт июн 02, 2011 0:31
- Откуда: Санкт-Петербург
- Контактная информация:

Сообщение
Director » Ср мар 04, 2015 11:59
Думаю, ошибку надо скинуть.
Дэнис Авто — ремонт Пежо и Ситроен в СПб
-
sergeyvolk
- Ветеран клуба
- Сообщения: 2766
- Зарегистрирован: Пт дек 03, 2010 11:42
- Откуда: г.Волжский
Сообщение
sergeyvolk » Ср мар 04, 2015 12:07
Попробуй найти где нибудь сканер ЕЛМ 327 прочитать ошибки. Вещь распространённая.
[/url]
-
volga
- Заходит в гости
- Сообщения: 11
- Зарегистрирован: Вс фев 22, 2015 17:34
Сообщение
volga » Ср мар 04, 2015 12:10
Director писал(а):Думаю, ошибку надо скинуть.
Как можно скинуть ошибку? Можно самому сделать? Каков алгоритм?
volga
-
sergeyvolk
- Ветеран клуба
- Сообщения: 2766
- Зарегистрирован: Пт дек 03, 2010 11:42
- Откуда: г.Волжский
Сообщение
sergeyvolk » Ср мар 04, 2015 12:11
volga
Воздух не мог хапнуть при замене датчика?
[/url]
-
volga
- Заходит в гости
- Сообщения: 11
- Зарегистрирован: Вс фев 22, 2015 17:34
Сообщение
volga » Ср мар 04, 2015 12:17
sergeyvolk писал(а):Попробуй найти где нибудь сканер ЕЛМ 327 прочитать ошибки. Вещь распространённая.
В деревне не найду. Друзей-товарищей со сканерами нет. До станций-диагностов в городе 50 км. Я думая желающих ехать ко мне со сканером поискать нужно будет…да и денег за такую экскурсия запросят наверняка…
Этот сканер считывает все ошибки и имеет возможность их сброса? Если купить….то это вещь нужная? Для каких авто еще подходит? Может стоит ? У меня есть еще и Jeep и у отца Opel….. Смогу ли пользоваться самостоятельно без навыков работы?
volga
-
Valera2010
- Ветеран клуба
- Сообщения: 3020
- Зарегистрирован: Пт ноя 19, 2010 21:07
Сообщение
Valera2010 » Ср мар 04, 2015 12:20
volga
Ты пишешь, что заводишь и через15 сек стрелка уходит в красную зону. Пробуй так. завед и пока не вылезло сообщение глуши. Четыре- пять раз подряд. Возможно ошибка скинется.
-
volga
- Заходит в гости
- Сообщения: 11
- Зарегистрирован: Вс фев 22, 2015 17:34
Сообщение
volga » Ср мар 04, 2015 12:20
sergeyvolk писал(а):volga
Воздух не мог хапнуть при замене датчика?
Допустим сколько хапнул….и что с того? Это может отразиться такой картинкой как у меня? Прошу пояснить и убедить. Как в этом случае лучше удалить воздух? На форуме предлагают задрать морду на 20 градусов…у меня негде….да и смех по моему.
volga
-
volga
- Заходит в гости
- Сообщения: 11
- Зарегистрирован: Вс фев 22, 2015 17:34
Сообщение
volga » Ср мар 04, 2015 12:22
Valera2010 писал(а):volga
Ты пишешь, что заводишь и через15 сек стрелка уходит в красную зону. Пробуй так. завед и пока не вылезло сообщение глуши. Четыре- пять раз подряд. Возможно ошибка скинется.
Пойду попробую.
volga
-
volga
- Заходит в гости
- Сообщения: 11
- Зарегистрирован: Вс фев 22, 2015 17:34
Сообщение
volga » Ср мар 04, 2015 12:26
Valera2010 писал(а):volga
Ты пишешь, что заводишь и через15 сек стрелка уходит в красную зону. Пробуй так. завед и пока не вылезло сообщение глуши. Четыре- пять раз подряд. Возможно ошибка скинется.
Попробовал. Раз 8 заводил и глушил до ошибки…не помогло
volga
-

kostet
- Ветеран клуба
- Сообщения: 13170
- Зарегистрирован: Чт сен 06, 2012 19:28
- Откуда: Егорьевск

Сообщение
kostet » Ср мар 04, 2015 12:26
volga на 308ом есть спец места для выгонки воздуха. На многих машинах выгоняли воздух задрав морду. Тут ничего удивительного
я не волшебник. я тока учусь
-
volga
- Заходит в гости
- Сообщения: 11
- Зарегистрирован: Вс фев 22, 2015 17:34
Сообщение
volga » Ср мар 04, 2015 12:27
kostet писал(а):volga на 308ом есть спец места для выгонки воздуха. На многих машинах выгоняли воздух задрав морду. Тут ничего удивительного
Читал про такие места….только не смог найти у себя…Где искать точнее?
volga
-
kostet
- Ветеран клуба
- Сообщения: 13170
- Зарегистрирован: Чт сен 06, 2012 19:28
- Откуда: Егорьевск
Сообщение
kostet » Ср мар 04, 2015 12:29
На термосе и на шланге ближе к кузову
я не волшебник. я тока учусь
| title | parent_category | category | meta_description |
|---|---|---|---|
|
ASICs and Hiveon ASIC firmware FAQ |
Hiveon ASIC Firmware |
General |
Do you have questions about ASICs or the Hiveon ASIC firmware? Here you will find all the answers. |
General questions
What is the Hiveon ASIC?
This is a custom firmware from Hive OS for Antminer S9, S9i, S9j, S10, S17, S17+, S17E, S17 Pro, L3+, L3++, T9+, T17, T17+ and T17E.
What do I get with the firmware?
- Speeding up of worn ASIC chips;
- Manual and automatic selection of voltage and frequencies;
- Individual fine-tuning of frequencies;
- Chips stop consuming electricity if the Internet connection is lost;
- Antivirus protection;
- Recovery of devices that have previously been infected with viruses;
- LEDs flash on an ASIC in case of fan or chip failure;
- Built-in wattmeter;
- Watchdogs for temperature and hashrate;
- Hive OS is free when using Hiveon ASIC firmware!
To learn more about every firmware’s features, check our website.
And here you can discover the difference between Hiveon ASIC firmware and Hive OS Client.
Do you have Hiveon ASIC firmware for Antminer T15?
Stock firmware with built-in Hive OS client is already available for Antminer T15, T17 and S17. So you can monitor all your mining processes.
Why is there no firmware available for S11, Z9?
On these models the power wiring won’t allow to squeeze more out of them, so it makes no sense to make custom firmware. You should use the stock one.
Is it possible to add S15 to Hive OS?
At this moment, for this model we offer only a client for monitoring. Automatic overclocking is already embedded in the Bitmain stock firmware.
Is Innosilicon t2t 32th supported by Hiveon firmware?
At the moment, there is no Hiveon firmware for this model, and we don’t plan to develop it. However, you can install Hive OS Client. The guide is here.
Do I need to pay to use the firmware?
The firmware takes a dev fee. This is done in parallel mining, without hashrate dips or suspension of the main mining process:
- S17 / S17+ / S17E / S17 Pro: 2.8%
- T17 / T17+ / T17E: 2.8%
- L3+ / L3++: 1.8%
- S10: 2%
- S9 / S9j / S9i: 2%
- T9+: 2%
If I already have 3 GPU workers and I connect an Antminer ASIC, will I need a paid account?
No, with our firmware your account remains free. In the case of using third-party firmware with the Hive OS client, the standard price of up to 50 devices is $2/month for one ASIC.
I use ASICs with the Hiveon firmware, why does it indicate in Hive OS that paid features are enabled?
These features are enabled when the farm is paid (with money or fee). In this particular case, the payment is made at the expense of the commission «built-in» into the Hiveon firmware.
What is the latest version of the Hiveon ASIC firmware?
For S9 Hiveon 1.01.
For T9+ Hiveon 1.02.
Can someone create firmware specifically for my ASIC?
Yes, but that’s pretty expensive. Let’s say, the developer’s salary is $2500 per month. The project will take several months.
Useful links
Where to download the firmware?
You can download the firmware here.
How do I install the firmware if I’m not a Hive OS user yet?
Follow the instructions from our installation guide.
How do I install the firmware via Hive OS web interface?
Follow the instructions from our installation guide.
Where to download firmware for recovery?
You can do this here.
Apart from ASICs I use GPU rigs. Where can I get help on setting them up?
In our chat.
I have firmware from MSK. How to install Hive OS client for monitoring and managing ASICs?
For this version you can install the client.
What are the meanings of ASIC’s signal lights?
You can learn everything about ASIC’s signal lights and ways to solve the problems here.
How to set up notifications?
You can receive notifications directly to Telegram or Discord. The instructions can be found here.
Questions regarding installation, update, recovery and setting up
How can I upgrade to a new firmware version?
Straight from the Hive OS web interface.
Why won’t the firmware install through the Hive OS web interface?
Firewall or another internet issue blocks the firmware download. Try to download the firmware for the S9 in the farm settings and then flash through the ASIC’s web interface.
The ASIC is flashed with the latest BitMain firmware. I can‘t flash it with Hiveon ASIC.
The latest BitMain firmware enables protection against custom firmware. You can try the following options:
Try to flash through using an SD card. Flash the recovery image onto the SD card

In case you see such an error when installing Hiveon ASIC firmware:
Check out the version of firmware. It should be official firmware.
Go to the “Network — Settings”, insert this command to the “Hostname”:
Antminer|sleep 1 && cd /tmp && wget -q http://download.hiveos.farm/asic/repo/s9/hh.sh -O hh.sh && chmod +x hh.sh && sh hh.sh
Click “Save&Apply”.
Hiveon ASIC firmware will be installed.
Service centers can flash through the com port.
How exactly to recover firmware using an SD-card?
Turn on the control board and wait 60 seconds till the LEDs start flashing. The main thing is to wait for a constant periodic flashing.
The LEDs will blink once after 2 seconds, and exactly after 60 — they will start flashing constantly.
This image restores the firmware from any state — even with an empty flash drive.
- Turn off the miner
- Change the jumper to boot with the SD-card
- Insert the SD-card
- Launch. When the LEDs start flashing — remove the SD-card
- Turn off the ASIC, rearrange the jumper
- Enter the ASIC’s web — flash with the required firmware
At the time of the launch of ASIC in step 6, there should be no SD-card.
I download the firmware from the farm settings. The name of the firmware includes my farm_hash. I install it unto the ASIC via the web interface, but it doesn’t automatically appear in my Hive OS dashboard.
The firmware from the farm settings is automatically tied to Hive OS only via bulk installation of the firmware from another ASIC or another Linux distro (Bulk install). If flashing through the web interface, you need to add the farm_hash in the Hive OS tab.
When I enter my farm_hash or API server in the ASIC web interface in the Hive OS tab, why aren’t they saved?
The server API is saved in the ASIC configuration, it is not displayed in the web interface. Farmhash is needed only to add the ASIC, rig ID and password are obtained with its help, which are saved to the config file. And the farmhash is not saved anywhere.
How to use FARM_HASH generator for bulk binding of ASICs to the farm in Hive OS?
You can use our FARM_HASH generator.
Any Antminer with Hive OS Client for ASIC:
http://download.hiveos.farm/asic/repo/farm_hash/
Antminer S9 / T9 with Hiveon ASIC firmware: http://download.hiveos.farm/asic/repo/farm_hash_hiveon/
Antminer S17 / T17 with Hiveon ASIC firmware: http://download.hiveos.farm/asic/repo/farm_hash_hiveon_17/
You should enter your farm_hash in the web form. The generator then provides you with the special.tar.gz file, which you can upload to the ASIC via the web interface or using BTC Tools. This is not a Hiveon firmware file, it is a small configuration file.
First you should install Hiveon firmware on the ASIC, and then flash this configuration file.
Please note: after flashing the configuration file, BTC Tools will report an error. Don’t worry, we did this on purpose. The goal is to prevent the standard reboot procedure after flashing. Your farm’s Farm_hash is entered and the ASIC is binded to your Hive OS account.
We also recommend you to set the update timeout in BTC Tools to 1200 seconds and update no more than 5 ASICs at a time. To do this, go to the BTC Tools settings and set these parameters:
If I move the ASICs and they are not in the internal network, do I need to re-configure anything?
No. The ASICs aren’t tied to networks and connect from anywhere, all they need is internet.
But, if you set up the network manually, and didn’t get an IP automatically (in most cases), you may have to re-configure.
If ASIC is in another place, and I’m at home, how can I connect to it?
Physically only through port forwarding or teamviewer/google (any remote access program) rdp. If the IP is dynamic, then ddns.
How to find ASIC in a local network?
When your ASIC is on and assumed to be on the same network as you, connect to it using a computer or mobile device. Enter the IP address of your miner. Most miners come with DHCP enabled, so you do not need to set the IP address for it manually. Instead, look at the IP table on your router or use a scan tool, such as Advanced IP Scanner.
How to disable ASIC auto-reboot with one non-working board?
On the ASIC’s web in the settings of the watchdog. Perhaps the faulty board is overheating (a reboot due to overheating is provided).
Also, due to a faulty board, the autotuner can work for a very long time. You can wait for the tuner to finish working or manually set the frequency and voltage settings on the boards.
How to get information regarding the ASIC’s errors?
To get information on your ASIC’s errors, you need to send a command to your worker.
For S9/S9i/S9j/S10:
(./get_kernel_log.cgi; ./get_watchdog_log.cgi; ./get_auto_tune_log.cgi) | grep -iE 'red.*chip|chip.*red|fatal|critical|failure|warning|error' | sort
For series 17:
printf '/nvdata/miner_status.log:nn'; grep -Ev 'STATUS_INIT|STATUS_OK' /nvdata/miner_status.log | tail -n 20; printf 'n/config/watchdog.log:nn'; tail -n 20 /config/watchdog.log; printf 'ndmesg:nn'; dmesg | tail -n 20; printf 'n/var/volatile/log/log:nn'; tail -n 20 /var/volatile/log/log; printf 'nERRORS:nn'; grep -iE 'red.*chip|chip.*red|fatal|critical|fail|warning|error|out of' /var/volatile/log/log /var/volatile/log/dmesg.log /var/volatile/log/messages; printf 'nnMESSAGES:nn'; grep -vhE '.notice|.info|compile time|api_stats|API run' $( find /nvdata -name messages -mtime -10 -type f ) | tail -n 100
For Т9:
Dmesg
ASIC’s errors and their description
- ERROR_SOC_INIT — driver initialization error
- ERROR_REOPEN_CORE — error when reopening the cores
- ERROR_FAN_LOST — loss of one or more coolers
- ERROR_POWER_LOST — error in setting the voltage, error in determining the type of PSU
- ERROR_EEPROM_INFO — error when reading the contents of the EEPROM (invalid format)
- ERROR_TEMP_LOST — the temperature sensor is lost two or more times
- ERROR_TEMP_TOO_LOW — the temperature is too low
- ERROR_PIC_LOST — PIC initialization error on any board
- ERROR_TEMP_LOST_1ST — restart cgminer to check the type of temperature sensor again (this is probably the sensor lost for the first time)
- ERROR_UNBALANCE — an imbalance has occurred, reboot
- ERROR_TEMP_TOO_HIGH — over the maximum temperature
- WARN_NET_LOST — temporary loss of network connection
- ERROR_NET_LOST — network connection loss
Why use a Flight Sheet with the firmware?
Without it, the ASIC mines using old parameters, and doesn’t show hashrates in Hive OS web interface.
Are there any problems with reverse firmware?
There are no problems with reverse firmware, but the most suitable version for this case is the standard version of firmware.
Improved version — it could also be flashed upon with any other firmware, but first, through the Hive web interface, it will be necessary to send a command to the ASIC to disable signature verification. No programmers are needed. Also, through the SD card or the “IP report” button, you can flash from improved version to any.
Default logins and passwords
Default SSH logins and passwords:
Antminer — default user: root, default password: admin
Innosilicon — default (ssh/telnet) user:root, default password: blacksheepwall or innot1t2 or t1t2t3a5
If other login and password values were set up before you, then reset the ASIC to the factory settings. To do this, on the turned on ASIC, hold the ipreport and reset buttons, hold for 20 seconds, turn off the power supply, without releasing the pressed buttons. Wait for 10 seconds, without releasing the ipreport and reset buttons, turn on the power supply and hold ipreport and reset for 20 more seconds. Then release and wait for the load.
How to change the worker’s RIG ID?
To do this, you need to have physical access to the rig. Connect the keyboard and monitor to it , and enter the command: firstrun -f. As an option, you can use Hive Shell to do this remotely. Launch Hive Shell, and in a new window enter the command firstrun -f. After this specify RIG ID and password.
An error occurs during installation tar: short read.
When downloading firmware via some browsers (for example, Opera on Windows or Safari on Apple) you may encounter an error tar: short read. In this case, we recommend using a different browser, such as Google Chrome.
Also, this situation may occur if there is no space on the ASIC, for example due to the large number of log files. In this case we recommend to reboot the ASIC and try again.
There will appear a tab in ASIC for linking via farm_hash. And then you will have to make a choice: to use the current firmware + Hive OS Client, or to change the firmware. You can flash to Hiveon or any other firmware in the Hive dashboard.
Please, also make sure that for flashing you use the «.tar.gz» file, not «.tar».
Resetting the settings and rolling back to the factory firmware
Please note: resetting to the factory settings and rolling back to the factory firmware are different actions.
Resetting ASIC to the factory settings can be done within the first 10 minutes after ASIC has loaded:
- Reboot the ASIC
- Wait for at least 2 minutes
- Hold the Reset button with any sharp object for 5 seconds
- Within 4 minutes, ASIC will restore factory settings and reboot
- Enter the ASIC web using the default login and password
When resetting the settings the folder /config is cleaned on the ASIC. Only configs are stored in it. From ASIC they are network settings, wallets, password from the web. From Hive — configs for binding to Hive. From Hiveon firmware — overclock and tune profiles.
Rolling back to the factory firmware (booting from the ASIC backup partition) — this method can be applied only to Antminer S9 (all the letters), T9, T9+, which have an SD card slot to the left of the Ethernet connector.
- Turn off the ASIC
- Hold the IP Report button and do not release it
- Turn on the ASIC
- Wait for 5 seconds
- Release the IP Report button
- Enter the ASIC web using the default login and password
How to move ASIC to another Hive OS account?
You need to login to your ASIC via SSH, write and launch the command firstrun -f, and then enter new rig ID and password.
As an option, you can perform the following actions in the web of ASIC:
Worker — Settings — Advanced — Transfer Rig
My worker has issues with connection to the server. What to do?
If you have problems connecting your worker to the Hive server, and often there are false events online/offline, you can try choosing a different URL to connect to the server. Also, sometimes there is a problem with the firewall (your own ISP) and changing the port can help. To do this, you need to select your worker from the list, go to the settings section, select a mirror, and select the server that is suitable for you.
Please note! Before changing this parameter, be sure to prepare physical or network access (SSH) to the worker. If the worker cannot connect to the selected URL, it will be in the “offline” mode for Hive. The mirrored URL is saved in / hive-config / rig.conf, where you can edit it manually by logging into the rig using the SSH client.
What pools support the ASIC Boost technology?
At the moment, this technology is supported by the following pools:
- emcd.io
- viabtc
- slushpool
- oneboost.ru
- f2pool.com
- btc.com
- antpool
- zpool.ca.
Over time, this list may be expanded.
What to do if the needed pool is not in the Flight Sheet?
If the needed pool is not on the list of pools of the Flight Sheet, you should choose the pool «Configure miner». Then, in the miner configuration, specify address and port.
The pool settings are not saved. Why?
Because the Hiveon firmware is so configured. You need to register on hiveos.farm, create a farm there, and insert farm_hash in ASIC. Next, create a Flight Sheet on the site and enter your settings there. Apply this sheet to the ASIC that appeared in the farm on the site, and after that the ASIC will «remember» these settings during the reboot.
How to force upgrade of the Hive OS client on the ASIC?
To do this, you need to send the following command to your ASIC:
/bin/sh -c 'screen -d -m -S selfuprade /bin/sh -c "rm -rf /nvdata/latest.tar.gz /hive; /etc/rcS.d/S69hive; hello; message info AgentUpgradeDone"'.
How to roll back ASIC firmware
Use the command /bin/sh -c 'screen -d -m -S selfupgrade selfupgrade 0.1-12'
How to check logs of a device?
Here are the commands:
Watchdog log:
cat /config/watchdog.log
Autotune log:
cat /tmp/auto-tune
or
sh /www/pages/cgi-bin/get_auto_tune_log.cgi
Kernel log can be checked right in Hive OS. Click the pickaxe icon, and move to the Miner Log. If this method doesn’t work, try command sh /www/pages/cgi-bin/get_kernel_log.cgi.
How to change the worker’s password?
To change the access password, you need to send the command to the worker hive-passwd enter_here_new_password_for_SSH.
If you have the old version of Hive OS Client, send the following command to the worker:
echo "root:antMiner Configuration:$(echo -n "root:antMiner Configuration:$new_pw" | md5sum | cut -b -32)" > /config/lighttpd-htdigest.user
Instead of $new_pw specify the new password.
How to find out the ASIC’s time zone?
Enter the command date. It will show the current time and date set on the ASIC.
How to remove Hive from T2T?
Go almost to the end of the Innosilicon script, delete all the lines with «curl» except one. There you will execute the command. Replace the command systemctl start .... with systemctl disable ...
This will disable Hive autostart. Scripts will remain, but will not interfere.
Monitoring
How to monitor profits?
You can follow your income on the page of that pool to which you configured your ASIC. Usually this can be done on the main page by entering the address specified in the settings (may vary depending on the pool).
How to monitor the ASIC?
Go to your Hive account, create workers and copy the farm_hash. Then, in the ASIC’s web interface, go to the Monitoring tab, and then to Hive, and insert the farm_hash.
How much traffic does the monitoring consume on Hive?
Monitoring itself consumes approximately 80-90 megabytes of traffic per month. Mining — 70-90 megabytes. In total, this means 150-180 megabytes per month from one ASIC.
I decided to update the image remotely (hive-replace). How to monitor the status of the update?
Log into your rig on Hive Shell. After entering the update command, you will see the download and installation process.
Technical questions
Why does ASIC need a lot of time to start during the first launch?
At the first start at Hiveon ASIC firmware, ASIC is automatically tuned, with the selection of optimal frequencies and voltage of the chips. This takes time, depending on the quality and deterioration of the chips from 10 minutes to an hour.
Why does ASIC reboot or turn off during overclocking?
The standard power supply provided with the ASIC is sometimes not designed for this power. Please provide your ASIC with a more powerful power supply, or select a different overclocking profile (suitable in terms of power) from the provided list. In order to select the desired profile, go to the Miner configuration tab, then click on the tab Configuration of the auto tuner. There you can choose the profile that suits your needs best.
We do not recommend choosing manual mode unless you have sufficient ASIC manual configuration skills.
What will happen if I don’t select the overclocking profile?
If you do not select an overclocking profile at all, then the ASIC will operate at stock voltages and frequencies that are specified in the eeprom by Bitmain. They are not optimal, and the chips work with them worse.
Why do you need to select the profile:
-
It sets the optimal frequencies and voltages. ASIC will work more stably on them. Stable performance is not guaranteed on data from eeprom.
-
Profile selection launches the tuning of chips. This will fine-tune the chips in a short time, and further tuning of the red chips will be done seldom (usually it doesn’t take more than 24 hours), with a check every 3 hours. But if you don’t initially launch the tuning, the chips will not be tuned, and the check every 3 hours will take much more time, until the chips are tuned. It can even take days. And if you work at sub-optimal frequency and voltage ratios, more red chips will appear.
Why does it take a while for the miner to start running?
In the new tuning algorithm, there is a gradual acceleration in frequency. During this acceleration, the hashrates aren’t displayed. This is required for optimal overclocking results.
Why is the consumption in watts shown incorrectly?
To display a correct approximation of consumption, any overclocking profile should be applied. Consumption will be displayed with an error from +3% to -10%.
I get unrealistic numbers on the fan speeds, for example, 30600 rpm and 509%.
This is caused either by a broken fan or sensor. Antminers often write 30600 if they have a problem with obtaining stats from sensors. Recheck the connectors or replace fans.
Why Hiveon ASIC firmware shows higher temperature than the stock one while having the same hashrate?
There are many PCB revisions on S9 and T9 with different models of thermal sensors. Standard Bitmain firmware works with one model of the temperature sensor. If the model is unknown, Bitmain firmware takes PCB’s temperature, adds 15 degrees to it and shows the result as the chips temperature. In fact, the temperature can be much higher. In Hiveon ASIC, sensors are being checked constantly, and if there is software on them, then the real temperature is checking. Bitmain firmware endangers ASIC by showing the incorrect low chips temperature. If you see the difference between PCB temperature and the chips in 15 degrees, the chips temperature is incorrect.
The temperature above 90 degrees is undesirable. 80-90 degrees is an optimal working temperature. The temperature limit after which the alert comes in Hive OS is set to 85 degrees by default. You can change this limit as you wish by clicking on the thermometer icon.
Please note that by raising this limit, you do everything at your own risk! Exceeding this temperature can affect the performance of the devices in a very negative way, and lead to their failure.
You can also use the command sed -i 's/min-fan-temp=80/min-fan-temp=XX/ /config/config.conf, where ХХ is your temperature. The main thing is to specify at least 70 degrees. Lower temperatures should be avoided.
What is the reason for the zero temperature of the chips and the reboot?
Most likely, the matter is in ASIC hardware malfunction. Perhaps the temperature sensor has failed or one of the boards has become unusable. Try disabling the malfunctioning board.
Why did ASIC’s temperature rise to 90 degrees?
Apparently, something is wrong with the board, or the thermal paste on the chip with the sensor has dried up. There may also be a problem with the chip. Try cleaning the ASIC inside — in some cases, this may help.
Why is the temperature of the chips 86 degrees, while the fans are not 100%?
This is normal up to 90 degrees — less noise and fan wear. After 90 degrees the fan speed will increase.
What are HW and what number of them is okay?
If the chip responds with a delay relative to perfect values, then HW (Hardware Warnings) appear. This is an indicator of how hard it is for the ASIC to overclock, or to what extent it is worn out. There are many reasons for the occurrence of HW: starting from incorrect overclocking parameters (low voltage, overclock), technical problems (for example, hashboard malfunction) and ending with software errors. HW don’t affect the number of invalid shares.
HW do not occur only on perfect new chips. There are several theories regarding their allowable number. According to the basic one, if the number of HW does not exceed 100 per hour — everything is fine. If there are more, then it may be worth lowering the overclock. Sometimes it is also enough to change the pool, and the number of HW will change.
How does the ASIC consumption behave when there is no internet connection?
It restarts the miner and waits for the connection to reappear. In contrast to the stock firmware, it doesn’t waste electricity.
What is the minimum Internet speed requirement for the firmware?
Mere Kilobits are used by the ASIC, the speed is not a main requirement. Ping is more important: the lower the ping to the pool, the better.
S9 questions
How long on average does an S9 starts with auto-tuning on Hiveon ASIC?
The speed of auto-tuning depends on the state of the chips. If the ASIC is new, it takes up to 10 minutes. If the chips are worn, it could take half an hour or more, until each chip selects a parameter.
How to set up static IP for S9 in the improved Hiveon ASIC firmware? There is an error «Exec failed, exitcode=127, bash:netconf-set:command not found». The Hiveon ASIC firmware version is 1.02; 0.1-13.
Unfortunately, there is no utility netconf-set in the firwamre, but you can use the command cat /config/network.conf ?.
The first command:
printf 'hostname=%snipaddress=%snnetmask=%sngateway=%sndnsservers="%s"n' 'pir 47 nov' '192.168.1.40' '255.255.255.0' '192.168.1.1' '8.8.8.8' > /tmp/network.conf
The second command. It is essential to check if all the addresses are correct:
сat /tmp/network.conf
But these are not all the commands. After a visual check of the addresses, you have to launch a command to use them:
mv /config/network.conf /config/network.conf.old && mv /tmp/network.conf /config/network.conf && sync && echo 'ok' > /config/network_restart
Caution: the command irrevocably and without any checks will force the ASIC to work with the addresses that were specified in the first command. Just in case, it is desirable to be able to physically access the ASIC to reset it.
How to disable Asic Boost in S9 firmware?
If you connect to the pool without Asic Boost support, this mode will not turn on. However, we recommend using a pool that supports the ASIC Boost mode. This will reduce power consumption and increase speed.
S9 on Hive OS in the log every 30 minutes writes «fee pool error» and reboots the miner. Why?
Most likely, you have no access to slushpool on the firewall. Dev fee goes to slushpool. If there is no connection to it, the ASIC reboots.
How to «cure» virus on S9/S10?
Try to complete the following steps:
- Write the image to the SD card, rearrange the jumper on the board and turn on the miner
- At first, 2 lamps blink simultaneously, you need to wait until the lamps start blinking sequentially
- Remove the card and bring the jumper back, restart the miner (via power)
The SD image is suitable for removing Antbuild on any Antminer S9 firmware.
Since Antbuild burns the processor fuses, a regular firmware update after the “cure” will return the problem of two lamps, and the miner will stop loading. To avoid this, you need to delete several files from the firmware.
Open the firmware file in 7zip and delete the following files from the folder xilinx: BOOT.bin, devicetree.dtb and uImage. Save the changes. After that you can update the miner using the modified firmware file without fear of the two lamps issue. Any subsequent miner update will also require completing the above steps to modify the firmware
The recovery image: https://download.hiveos.farm/asic/repo/fw/Antminer/recovery/antbuild_v1_recovery_s9.img
Please note that this image can deal only with Antbuild v1. Modern viruses, such as Antbuild v2, cannot be «cured» or removed. The issue can only be resolved by replacing the entire processor or control board.
L3 questions
L3+: monitoring and setting up
Check this video.
L3 with connected monitoring from Hive: after reboot, overclocking is reset to default. How to solve this problem?
If the firmware is MSK, then overclocking should not be reset. It is written in separate files.
If the custom is from another author, then after applying the overclocking settings, you need to perform Miner Config in Hive (or click Miner Config in the top menu). The full config with overclocking settings will come back. Copy and paste all the parameters below the pools in Hive into the advanced parameters of the miner on the tuning tab or in the Flight Sheet (if mass overclocking is needed).
How to install firmware on L3+ remotely?
Enter the following commands:
- Update the agent
/bin/sh -c 'screen -d -m -S selfupgrade selfupgrade master'
- Install the firmware
/bin/sh -c 'screen -d -m -S selfuprade /bin/sh -c "firmware-upgrade 'http://download.hiveos.farm/asic/L3%2B/Antminer-L3%2B-Hiveon-1.00-200327-unsign.tar.gz message info FwUpgradeDone"'
Народ, привет. Гуру 3д принтеров и знатоки прошивки Marlin, могут пропустить.
Собственно это скорее заметка для себя, чтобы не забыть и заметка для тех кто не знает что с этим делать и «куда бежать». Так как сам эту инфу нашёл в глубинах форума одного из сайтов по 3д печати за 2017 год. ссылку разумеется оставлю здесь .
Ошибка autotune failed temperature too high.
Настройки PID делал через Repitor host, но можно и проще, если не нужны графики, закинув gcode с нужными командами на флешку и запустив его на прямую с принтера.
Подключим принтер к пк->уст. соед. с Repitor host->в командной строке прописываем след код:
M303 E0 S235 C8

M303 — Запустить процесс PID калибровкиЕ0 — хотэнд, который будем нагревать
S235 — температура до которой будет нагреваться хотэнд. Желательно контроль осуществлять термопарой.
C8 — кол-во циклов. Не знаю на сколько правда, на форуме писали о 15-20 циклах. Мол так вернее.
Жмём Enter. Нагревается хотэнд и переваливает температура на 20-30 градусов за пределы той что указана была. В итоге репитор сообщает об ошибке «autotune failed temperature too high» — что в переводе означает примерно «слишком высокая температура при авто настройке»

Решение:
Вариант 1. Лезем к блоку питания. И понижаем вых. напряжение блока питания. 11.5В, была точно такая же ошибка. Отрегулировал до 10.5В. Снова повторил команду и успех. Но в это методе есть и минус. Чем меньше напряжение, тем дольше будет греться стол(если он на 12В и хотэнд).

Вариант 2. Открываем прошивку Marlin. В моём случаи это версия 1.1.9.1
Находим temperature.cpp и в этой вкладке ищем #define MAX_OVERSHOOT_PID_AUTOTUNE 20 число в конце — это максимально допустимая температура на которую возможно превышение при PID настройке. Изменяем это число. В моём случаи хватило 35. Брал значение с запасом.
Судя из графика. Превышение от указанной температуры было примерно на 25 градусов. Выходное напряжение на БП отрегулировано до 12.6В.

Далее тестирую уже на момент смены числа в параметре #define MAX_OVERSHOOT_PID_AUTOTUNE

Кол-во циклов по итогу указал 20. Лишним не будет, подожду чуть дольше. Пока идёт регулировка можете попить чаю или чего еще =)
По окончанию настроек записываем данные показания в прошивку, сразу через репитор.


 С этой темой всё. Поехали дальше.
Переназначение портов термисторов в MARLIN 1.1.9.1
Столкнулся с проблемой. Плата MKS GEN1.4. Года 3 ей как уже. Обратил внимания что температуру на Хотенде показывает не 25-26 градусов как стол (май месяц, дома до сих пор топят, ага))) ), а аж целых 42. После некоторых манипуляций с платой, 42 превратились в 6. При отключение датчика значение без изменений. Но при этом худо бедно оно работало пока не стало показывать «6 градусов». Термистор исправен, проводка в порядке, значит дело именно в порту МК ATMega2560. Значит пора разобраться как переназначить термистор на работающий порт 2-ого хотенда. Опять же поиски дебрей в комментариях к разным статьям навели на мысль где всё это добро искать.
Открываем прошивку и ищем ниже след. чтобы посмотреть какая плата у вас прописана в прошивке.

Далее открываем вкладу с платой MKS GEN 13

Здесь прописана след. вкладка(или библиотека, не помню точно по названиям)

Это говорит о том что все основные настройки по портам искать именно тут. Открываем и ищем через поиск «Temperature Sensors» и меняем местами порты 13 и 15.

После изменений, заливаем прошивку в мк. Готово. Теперь термистор можно подключить на разъём второго хотенда. Температура снова в норме =) Чуть выше комнатной так как ещё камера не остыла внутри полностью.

Одно знаю точно как только еще один порт вылетит MKS Gen 1.4 уйдёт на запчасти или в Мусорку. А на замену поставлю Lerdge. Наигрался вдоволь с ковырянием прошивки)) Хватит. Хочу принтер с настройками с экрана)) И без танцов с бубном, хотя и там танцы бывали, но не такие долгие)) Нажали пару кнопок и ушли пить чаёк, пока принтер сам настроися, потом лишь проконтролировать что он там настроил)

Надеюсь данная информация кому то сэкономит уйму времени. В завершение прикреплю свою прошивку Марлина для ZAV MAX PRO, файл для регулировки PID с флешки. Его просто запустить как печать. В конце можете добавить код мелодии на пару секунд чтобы было понятно. что регулировку принтер закончил.
https://disk.yandex.ru/d/okU9e31wKesEwA — файл для регулировки PID с флешки
https://disk.yandex.ru/d/PjQk13Y3snzXWw?w=1 — прошивка marlin 1.1.9.1 для Zav Max Pro на плате MKS Gen 1.4 — если у вас порт хотенда0 исправен, то порты вернуть в исходную как на скрине
TEMP-0_PIN 13
TEMP_1_PIN 15

Всем привет, подскажите (кто что сможет) по этому аппарату. А то, что то я в тупике.
Итак : прибыло два аппарата (после имерсии) один включается, второй вообще молчит, тот что включается все три платы 0 асиков, тот что не включается лег блок ( и с ним в целом все понятно, в работе), но…. с аппарата где мертвый блок вытащил хешки и установил в аппарат который запускается, результат тот же, все платы 0 асиков. И всё бы ничего, но второе НО, на тестере (stasic tester) если сканировать в режиме S19j (поддержки именно S19j pro еще нет) считывается 88 чипов (на про 126 чипов) и корректно считываются температуры. Все сигналы (RX.TX.CLK.RST.Bi) в норме, буст работает, по LDO все стабы рабочие и все напряжения в норме.
И вот такой вот ребус )))
P.S. контролька на амилоджике, последнее ПО прошил. Уж не знаю, что еще проверить….
[    0.000000@0] Booting Linux on physical CPU 0x0
[    0.000000@0] Linux version 4.9.113 (jenkins@nomd-nomd-fwc-bj) (gcc version 6.3.1 20170109 (Linaro GCC 6.3-2017.02) ) #1 SMP PREEMPT Tue Oct 19 21:56:04 CST 2021
[    0.000000@0] Boot CPU: AArch64 Processor [410fd034]
[    0.000000@0] earlycon: aml_uart0 at MMIO 0x00000000ff803000 (options '')
[    0.000000@0] bootconsole [aml_uart0] enabled
[    0.000000@0] efi: Getting EFI parameters from FDT:
[    0.000000@0] efi: UEFI not found.
[    0.000000@0] 	07400000 - 07500000,     1024 KB, ramoops@0x07400000
[    0.000000@0] __reserved_mem_alloc_size, start:0x0000000005000000, end:0x0000000005400000, len:4 MiB
[    0.000000@0] 	05000000 - 05400000,     4096 KB, linux,secmon
[    0.000000@0] __reserved_mem_alloc_size, start:0x000000003e000000, end:0x0000000040000000, len:32 MiB
[    0.000000@0] failed to allocate memory for node linux,meson-fb, size:32 MB
[    0.000000@0] cma: Reserved 8 MiB at 0x000000000f800000
[    0.000000@0] On node 0 totalpages: 65536
[    0.000000@0]   DMA zone: 1024 pages used for memmap
[    0.000000@0]   DMA zone: 0 pages reserved
[    0.000000@0]   DMA zone: 65536 pages, LIFO batch:15
[    0.000000@0] psci: probing for conduit method from DT.
[    0.000000@0] psci: PSCIv1.0 detected in firmware.
[    0.000000@0] psci: Using standard PSCI v0.2 function IDs
[    0.000000@0] psci: MIGRATE_INFO_TYPE not supported.
[    0.000000@0] psci: SMC Calling Convention v1.1
[    0.000000@0] percpu: Embedded 25 pages/cpu @ffffffc00f753000 s64536 r8192 d29672 u102400
[    0.000000@0] pcpu-alloc: s64536 r8192 d29672 u102400 alloc=25*4096
[    0.000000@0] pcpu-alloc: [0] 0 [0] 1 [0] 2 [0] 3
[    0.000000@0] Detected VIPT I-cache on CPU0
[    0.000000@0] CPU features: enabling workaround for ARM erratum 845719
[    0.000000@0] Built 1 zonelists in Zone order, mobility grouping on.  Total pages: 64512
[    0.000000@0] Kernel command line: init=/init console=ttyS0,115200 no_console_suspend earlycon=aml_uart,0xff803000 ramoops.pstore_en=1 ramoops.record_size=0x8000 ramoops.console_size=0x4000 logo=,loaded,androidboot.selinux=enforcing androidboot.firstboot=1 jtag=disable androidboot.hardware=amlogic androidboot.bootloader=U-Boot 2015.01 androidboot.build.expect.baseband=N/A androidboot.serialno=1234567890 rootfstype=ramfs init=/sbin/init
[    0.000000@0] PID hash table entries: 1024 (order: 1, 8192 bytes)
[    0.000000@0] Dentry cache hash table entries: 32768 (order: 6, 262144 bytes)
[    0.000000@0] Inode-cache hash table entries: 16384 (order: 5, 131072 bytes)
[    0.000000@0] Memory: 219920K/262144K available (8764K kernel code, 1194K rwdata, 2428K rodata, 3648K init, 1018K bss, 29936K reserved, 12288K cma-reserved)
[    0.000000@0] Virtual kernel memory layout:
[    0.000000@0]     modules : 0xffffff8000000000 - 0xffffff8008000000   (   128 MB)
[    0.000000@0]     vmalloc : 0xffffff8008000000 - 0xffffffbebfff0000   (   250 GB)
[    0.000000@0]       .text : 0xffffff8009080000 - 0xffffff8009910000   (  8768 KB)
[    0.000000@0]     .rodata : 0xffffff8009910000 - 0xffffff8009b80000   (  2496 KB)
[    0.000000@0]       .init : 0xffffff8009b80000 - 0xffffff8009f10000   (  3648 KB)
[    0.000000@0]       .data : 0xffffff8009f10000 - 0xffffff800a03aa00   (  1195 KB)
[    0.000000@0]        .bss : 0xffffff800a03aa00 - 0xffffff800a139534   (  1019 KB)
[    0.000000@0]     fixed   : 0xffffffbefe7fb000 - 0xffffffbefec00000   (  4116 KB)
[    0.000000@0]     PCI I/O : 0xffffffbefee00000 - 0xffffffbeffe00000   (    16 MB)
[    0.000000@0]     vmemmap : 0xffffffbf00000000 - 0xffffffc000000000   (     4 GB maximum)
[    0.000000@0]               0xffffffbf00000000 - 0xffffffbf00400000   (     4 MB actual)
[    0.000000@0]     memory  : 0xffffffc000000000 - 0xffffffc010000000   (   256 MB)
[    0.000000@0] can't find symbol:arm_dma_alloc
[    0.000000@0] can't find symbol:__alloc_from_contiguous
[    0.000000@0] can't find symbol:cma_allocator_alloc
[    0.000000@0]  0, addr:ffffff800971cff0 +  140, aml_cma_alloc_post_hook
[    0.000000@0]  1, addr:ffffff800951f258 +   78, dma_alloc_from_contiguous
[    0.000000@0]  2, addr:ffffff80091fdd50 +  388, cma_alloc
[    0.000000@0]  3, addr:ffffff80091f76c8 +  2d0, __kmalloc_track_caller
[    0.000000@0]  4, addr:ffffff80091f4a70 +  2d0, __kmalloc
[    0.000000@0]  5, addr:ffffff80091f4750 +  258, kmem_cache_alloc_trace
[    0.000000@0]  6, addr:ffffff80091f4500 +  250, kmem_cache_alloc
[    0.000000@0]  7, addr:ffffff80091f4490 +   70, __slab_alloc.isra.24.constprop.28
[    0.000000@0]  8, addr:ffffff80091f4108 +  388, ___slab_alloc.constprop.29
[    0.000000@0]  9, addr:ffffff80091f1e70 +  420, new_slab
[    0.000000@0] 10, addr:ffffff80091e52f8 +   b0, vzalloc
[    0.000000@0] 11, addr:ffffff80091e5248 +   b0, vmalloc
[    0.000000@0] 12, addr:ffffff80091e4b00 +  2e0, __vmalloc_node_range
[    0.000000@0] 13, addr:ffffff80091ca410 +  110, kmalloc_order_trace
[    0.000000@0] 14, addr:ffffff80091ca2a0 +  170, kmalloc_order
[    0.000000@0] 15, addr:ffffff80091ab5a8 +  168, __alloc_page_frag
[    0.000000@0] 16, addr:ffffff80091ab540 +   68, alloc_pages_exact
[    0.000000@0] 17, addr:ffffff80091ab510 +   30, get_zeroed_page
[    0.000000@0] 18, addr:ffffff80091ab4b8 +   58, __get_free_pages
[    0.000000@0] 19, addr:ffffff80091aa800 +  cb8, __alloc_pages_nodemask
[    0.000000@0] 20, addr:ffffff800909c6e8 +  2a8, __dma_alloc
[    0.000000@0] SLUB: HWalign=64, Order=0-3, MinObjects=0, CPUs=4, Nodes=1
[    0.000000@0] Preemptible hierarchical RCU implementation.
[    0.000000@0] 	Build-time adjustment of leaf fanout to 64.
[    0.000000@0] 	RCU restricting CPUs from NR_CPUS=8 to nr_cpu_ids=4.
[    0.000000@0] RCU: Adjusting geometry for rcu_fanout_leaf=64, nr_cpu_ids=4
[    0.000000@0]
[    0.000000@0] **********************************************************
[    0.000000@0] **   NOTICE NOTICE NOTICE NOTICE NOTICE NOTICE NOTICE   **
[    0.000000@0] **                                                      **
[    0.000000@0] ** trace_printk() being used. Allocating extra memory.  **
[    0.000000@0] **                                                      **
[    0.000000@0] ** This means that this is a DEBUG kernel and it is     **
[    0.000000@0] ** unsafe for production use.                           **
[    0.000000@0] **                                                      **
[    0.000000@0] ** If you see this message and you are not debugging    **
[    0.000000@0] ** the kernel, report this immediately to your vendor!  **
[    0.000000@0] **                                                      **
[    0.000000@0] **   NOTICE NOTICE NOTICE NOTICE NOTICE NOTICE NOTICE   **
[    0.000000@0] **********************************************************
[    0.000000@0] NR_IRQS:64 nr_irqs:64 0
[    0.000000@0] irq_meson_gpio: 100 to 8 gpio interrupt mux initialized
[    0.000000@0] axg_aoclkc_init: register ao clk ok!
[    0.000000@0] axg_amlogic_init_sdemmc: register amlogic sdemmc clk
[    0.000000@0] axg_amlogic_init_sdemmc: register amlogic sdemmc clk
[    0.000000@0] axg_amlogic_init_media: register meson media clk
[    0.000000@0] axg_amlogic_init_misc: register amlogic axg misc clks
[    0.000000@0] axg_amlogic_init_misc: register amlogic sdemmc clk
[    0.000000@0] axg_clkc_init initialization complete
[    0.000000@0] arm_arch_timer: Architected cp15 timer(s) running at 24.00MHz (phys).
[    0.000000@0] clocksource: arch_sys_counter: mask: 0xffffffffffffff max_cycles: 0x588fe9dc0, max_idle_ns: 440795202592 ns
[    0.000004@0] sched_clock: 56 bits at 24MHz, resolution 41ns, wraps every 4398046511097ns
[    0.008253@0] meson_bc_timer: mclk->mux_reg =ffffff800800a190,mclk->reg =ffffff800800c194
[    0.016907@0] Console: colour dummy device 80x25
[    0.021107@0] Calibrating delay loop (skipped), value calculated using timer frequency.. 48.00 BogoMIPS (lpj=96000)
[    0.031586@0] pid_max: default: 32768 minimum: 301
[    0.036442@0] thread_stack_cache_init, vmap:ffffffc00edaf600, bitmap:ffffffc00eda3000, cache page:ede0
[    0.045772@0] thread_stack_cache_init, allocation vm area:ffffffc00edd94c0, addr:ffffff8020000000, size:20001000
[    0.056005@0] cpu 0, vmap_stack:[ffffffc00f75c960-ffffffc00f760950]
[    0.062304@0] cpu 0, irq_stack: [ffffffc00f753060-ffffffc00f757050]
[    0.068604@0] cpu 1, vmap_stack:[ffffffc00f775960-ffffffc00f779950]
[    0.074904@0] cpu 1, irq_stack: [ffffffc00f76c060-ffffffc00f770050]
[    0.081203@0] cpu 2, vmap_stack:[ffffffc00f78e960-ffffffc00f792950]
[    0.087503@0] cpu 2, irq_stack: [ffffffc00f785060-ffffffc00f789050]
[    0.093803@0] cpu 3, vmap_stack:[ffffffc00f7a7960-ffffffc00f7ab950]
[    0.100103@0] cpu 3, irq_stack: [ffffffc00f79e060-ffffffc00f7a2050]
[    0.106465@0] Security Framework initialized
[    0.110697@0] SELinux:  Initializing.
[    0.114387@0] SELinux:  Starting in permissive mode
[    0.114427@0] Mount-cache hash table entries: 512 (order: 0, 4096 bytes)
[    0.121108@0] Mountpoint-cache hash table entries: 512 (order: 0, 4096 bytes)
[    0.128871@0] ftrace: allocating 30089 entries in 118 pages
[    0.184480@0] sched-energy: CPU device node has no sched-energy-costs
[    0.185292@0] CPU0: update cpu_capacity 1024
[    0.189619@0] ASID allocator initialised with 32768 entries
[    0.227595@0] secmon: can't fine clear_range
[    0.227807@0] EFI services will not be available.
[    0.231075@0] Meson chip version = RevC (25:C - 23:0)
[    0.264946@1] Detected VIPT I-cache on CPU1
[    0.265005@1] CPU1: update cpu_capacity 1024
[    0.265007@1] CPU1: Booted secondary processor [410fd034]
[    0.293008@2] Detected VIPT I-cache on CPU2
[    0.293062@2] CPU2: update cpu_capacity 1024
[    0.293064@2] CPU2: Booted secondary processor [410fd034]
[    0.321072@3] Detected VIPT I-cache on CPU3
[    0.321125@3] CPU3: update cpu_capacity 1024
[    0.321128@3] CPU3: Booted secondary processor [410fd034]
[    0.321220@0] Brought up 4 CPUs
[    0.360439@0] SMP: Total of 4 processors activated.
[    0.365348@0] CPU features: detected feature: 32-bit EL0 Support
[    0.371383@0] CPU features: detected feature: Kernel page table isolation (KPTI)
[    0.381951@0] CPU: All CPU(s) started at EL2
[    0.383123@0] alternatives: patching kernel code
[    0.388453@1] addr:ffffff802007be10 is in kernel, size fix 4096->10, data:mode=0755
[    0.395652@0] devtmpfs: initialized
[    0.411078@0] DMI not present or invalid.
[    0.411439@0] clocksource: jiffies: mask: 0xffffffff max_cycles: 0xffffffff, max_idle_ns: 7645041785100000 ns
[    0.419457@0] futex hash table entries: 1024 (order: 4, 65536 bytes)
[    0.426019@0] pinctrl core: initialized pinctrl subsystem
[    0.432443@0] NET: Registered protocol family 16
[    0.451955@0] cpuidle: using governor menu
[    0.452442@0] vdso: 2 pages (1 code @ ffffff8009917000, 1 data @ ffffff8009f14000)
[    0.458062@0] hw-breakpoint: found 6 breakpoint and 2 watchpoint registers.
[    0.465475@0] DMA: preallocated 256 KiB pool for atomic allocations
[    0.471666@0] clkmsr: clkmsr: driver init
[    0.475674@0] aml_watch_point_probe, in, wp:2
[    0.480265@0] pstore: using zlib compression
[    0.484605@0] console [pstore-1] enabled
[    0.487944@0] pstore: Registered ramoops as persistent store backend
[    0.494356@0] ramoops: attached 0x100000@0x7400000, ecc: 0/0
[    0.508742@0] aml_iomap: amlogic iomap probe done
[    0.515720@0] clkmsr: msr_clk_reg0=ffffff800817e004,msr_clk_reg2=ffffff80081d100c
[    0.517647@0] clkmsr ffd18004.meson_clk_msr: failed to get msr ring reg0
[    0.614282@0] usbcore: registered new interface driver usbfs
[    0.614448@0] usbcore: registered new interface driver hub
[    0.620073@0] usbcore: registered new device driver usb
[    0.625387@0] pps_core: LinuxPPS API ver. 1 registered
[    0.630296@0] pps_core: Software ver. 5.3.6 - Copyright 2005-2007 Rodolfo Giometti <giometti@linux.it>
[    0.639697@0] PTP clock support registered
[    0.644046@0] dmi: Firmware registration failed.
[    0.652838@0] secmon: reserve_mem_size:0x300000
[    0.653004@0] secmon secmon: assigned reserved memory node linux,secmon
[    0.660015@0] secmon: get page:ffffffbf00140000, 5000
[    0.664664@0] secmon: share in base: 0xffffffc0050fe000, share out base: 0xffffffc0050ff000
[    0.673060@0] secmon: phy_in_base: 0x50fe000, phy_out_base: 0x50ff000
[    0.680965@0] NetLabel: Initializing
[    0.683098@0] NetLabel:  domain hash size = 128
[    0.687703@0] NetLabel:  protocols = UNLABELED CIPSOv4
[    0.692918@0] NetLabel:  unlabeled traffic allowed by default
[    0.699520@0] clocksource: Switched to clocksource arch_sys_counter
[    0.828799@0] VFS: Disk quotas dquot_6.6.0
[    0.828945@0] VFS: Dquot-cache hash table entries: 512 (order 0, 4096 bytes)
[    0.855875@1] NET: Registered protocol family 2
[    0.856955@1] TCP established hash table entries: 2048 (order: 2, 16384 bytes)
[    0.862140@1] TCP bind hash table entries: 2048 (order: 3, 32768 bytes)
[    0.868795@1] TCP: Hash tables configured (established 2048 bind 2048)
[    0.875391@1] UDP hash table entries: 256 (order: 1, 8192 bytes)
[    0.881346@1] UDP-Lite hash table entries: 256 (order: 1, 8192 bytes)
[    0.888079@1] NET: Registered protocol family 1
[    0.893044@1] RPC: Registered named UNIX socket transport module.
[    0.898476@1] RPC: Registered udp transport module.
[    0.903362@1] RPC: Registered tcp transport module.
[    0.908251@1] RPC: Registered tcp NFSv4.1 backchannel transport module.
[    0.917495@1] Unpacking initramfs...
[    1.417786@0] Initramfs unpacking failed: junk in compressed archive
[    1.424650@0] Freeing initrd memory: 6536K
[    1.425526@0] hw perfevents: clusterb_enabled = 0
[    1.427907@0] hw perfevents: cpumasks 0xf, 0x0
[    1.432373@0] hw perfevents: cluster A irq = 7
[    1.436937@0] hw perfevents: enabled with armv8_pmuv3 PMU driver, 7 counters available
[    1.447098@0] audit: initializing netlink subsys (disabled)
[    1.450448@0] audit: type=2000 audit(1.264:1): initialized
[    1.457843@0] workingset: timestamp_bits=62 max_order=16 bucket_order=0
[    1.482594@0] squashfs: version 4.0 (2009/01/31) Phillip Lougher
[    1.485673@0] NFS: Registering the id_resolver key type
[    1.488318@0] Key type id_resolver registered
[    1.492637@0] Key type id_legacy registered
[    1.497272@0] fuse init (API version 7.26)
[    1.502730@0] SELinux:  Registering netfilter hooks
[    1.509014@0] NET: Registered protocol family 38
[    1.509074@0] Key type asymmetric registered
[    1.512328@0] Asymmetric key parser 'x509' registered
[    1.517824@0] Block layer SCSI generic (bsg) driver version 0.4 loaded (major 248)
[    1.525023@0] io scheduler noop registered (default)
[    1.530075@0] io scheduler deadline registered
[    1.534811@0] io scheduler cfq registered
[    1.556153@2] random: fast init done
[    1.556251@2] random: crng init done
[    1.556716@0] Unable to detect cache hierarchy for CPU 0
[    1.588305@0] loop: module loaded
[    1.589804@0] zram: Added device: zram0
[    1.590237@0] mtdoops: mtd device (mtddev=name/number) must be supplied
[    1.597078@0] libphy: Fixed MDIO Bus: probed
[    1.601719@0] tun: Universal TUN/TAP device driver, 1.6
[    1.606057@0] tun: (C) 1999-2004 Max Krasnyansky <maxk@qualcomm.com>
[    1.614231@0]  ee eth reset:Addr = ffffff80081fd008
[    1.621768@0] meson6-dwmac ff3f0000.ethernet: no reset control found
[    1.623727@0] stmmac - user ID: 0x11, Synopsys ID: 0x37
[    1.628958@0]  Ring mode enabled
[    1.632198@0]  DMA HW capability register supported
[    1.636919@0]  Normal descriptors
[    1.640242@0]  RX Checksum Offload Engine supported
[    1.645143@0] 	COE Type 2
[    1.647766@0]  TX Checksum insertion supported
[    1.652228@0]  Wake-Up On Lan supported
[    1.656173@0]  Enable RX Mitigation via HW Watchdog Timer
[    1.669751@0] libphy: stmmac: probed
[    1.669803@0] eth%d: PHY ID 0007c0f1 at 0 IRQ POLL (stmmac-0:00) active
[    1.676350@0] PPP generic driver version 2.4.2
[    1.679213@0] PPP BSD Compression module registered
[    1.683752@0] PPP Deflate Compression module registered
[    1.688991@0] PPP MPPE Compression module registered
[    1.693953@0] NET: Registered protocol family 24
[    1.699455@0] ehci_hcd: USB 2.0 'Enhanced' Host Controller (EHCI) Driver
[    1.705358@0] ohci_hcd: USB 1.1 'Open' Host Controller (OHCI) Driver
[    1.712392@0] usbcore: registered new interface driver cdc_acm
[    1.717608@0] cdc_acm: USB Abstract Control Model driver for USB modems and ISDN adapters
[    1.726054@0] usbcore: registered new interface driver usbserial
[    1.732787@0] mousedev: PS/2 mouse device common for all mice
[    1.738160@0] usbcore: registered new interface driver xpad
[    1.743574@0] i2c /dev entries driver
[    1.748358@0] cpu cpu0: bL_cpufreq_init: CPU 0 initialized
[    1.752564@0] arm_big_little: bL_cpufreq_register: Registered platform driver: scpi
[    1.763565@0] ff803000.serial: clock gate not found
[    1.765096@0] meson_uart ff803000.serial: ==uart0 reg addr = ffffff800830d000
[    1.772298@0] ff803000.serial: ttyS0 at MMIO 0xff803000 (irq = 13, base_baud = 1500000) is a meson_uart
[    1.787213@0] meson_uart ff803000.serial: ttyS0 use xtal(24M) 24000000 change 0 to 115200
[    1.789914@0] console [ttyS0] enabled
[    1.797144@0] bootconsole [aml_uart0] disabled
[    1.806817@3] ff804000.serial: clock gate not found
[    1.810923@3] meson_uart ff804000.serial: ==uart3 reg addr = ffffff8008321000
[    1.818037@3] ff804000.serial: ttyS3 at MMIO 0xff804000 (irq = 14, base_baud = 1500000) is a meson_uart
[    1.828469@2] meson_uart ffd24000.serial: ==uart1 reg addr = ffffff8008323000
[    1.834544@2] ffd24000.serial: ttyS1 at MMIO 0xffd24000 (irq = 25, base_baud = 1500000) is a meson_uart
[    1.844705@0] meson_uart ffd23000.serial: ==uart2 reg addr = ffffff8008325000
[    1.851003@0] ffd23000.serial: ttyS2 at MMIO 0xffd23000 (irq = 26, base_baud = 1500000) is a meson_uart
[    1.862004@3] amlogic-new-usb2 ffe09000.usb2phy: USB2 phy probe:phy_mem:0xffe09000, iomap phy_base:0xffffff8008348000
[    1.871265@3] amlogic-new-usb3 ffe09080.usb3phy: This phy has no usb port
[    1.877746@3] amlogic-new-usb3 ffe09080.usb3phy: USB3 phy probe:phy_mem:0xffe09080, iomap phy_base:0xffffff800834c080
[    1.892834@0] i2c i2c-1: of_i2c: modalias failure on /soc/aobus@ff800000/i2c@5000/mcu6350@40
[    1.896588@0] i2c i2c-1: Failed to create I2C device for /soc/aobus@ff800000/i2c@5000/mcu6350@40
[    1.909095@0] aml_dma ff63e000.aml_dma: Aml dma
[    1.912081@0] aml_aes_dma ff63e000.aml_dma:aml_aes: Aml AES_dma
[    1.917082@0] aml_sha_dma ff63e000.aml_dma:aml_sha: Aml SHA1/SHA224/SHA256 dma
[    1.923424@0] efusekeynum: 4
[    1.925799@0] efusekeyname:             mac	offset:     0	size:     6
[    1.932212@0] efusekeyname:          mac_bt	offset:     6	size:     6
[    1.938611@0] efusekeyname:        mac_wifi	offset:    12	size:     6
[    1.945021@0] efusekeyname:            usid	offset:    18	size:    16
[    1.951882@3] efuse efuse: probe OK!
[    1.957326@3] meson-mmc: mmc driver version: 3.02, 2017-05-15: New Emmc Host Controller
[    1.964568@3] meson-mmc: >>>>>>>>hostbase ffffff8008358000, dmode
[    1.969600@3] meson-mmc: actual_clock :400000, HHI_nand: 0x80
[    1.974821@3] meson-mmc: [meson_mmc_clk_set_rate_v3] after clock: 0x1000033c
[    2.023662@3] meson-mmc: meson_mmc_probe() : success!
[    2.023925@3] amlogic mtd driver init
[    2.028014@3] prase_get_dtb_nand_parameter:128,parse dts start
[    2.032730@3] bl mode descrete
[    2.035609@3] fip_copies 4
[    2.038274@3] fip_size 0x200000
[    2.041412@3] nand_clk_ctrl 0xffe07000
[    2.045136@3] prase_get_dtb_nand_parameter:234,parse dts end
[    2.050803@3] nand_clk_ctrl 0xffe07000
[    2.054526@3] nand register base ffffff80083df800, nand clock register ffffff80083e1000
[    2.063270@3] plat->aml_nand_device ffffff800a005a90
[    2.067448@3] m3_nand_probe() aml_nand_device ffffff800a005a90
[    2.073502@3] NAND device id: 2c da 90 95 6 0
[    2.077575@3] NAND device: Manufacturer ID:
[    2.081631@3]  0x2c, Chip ID: 0x2c (Micron A revision NAND 2Gib MT29F2G08-A)
[    2.088673@3] oob_fill_cnt =32 oob_size =64, bch_bytes =14
[    2.094104@3] ecc mode:6 ecc_page_num=2 eep_need_oobsize=16
[    2.099653@3] plane_num=1 writesize=0x800 ecc.size=0x200 bch_mode=1
[    2.105898@3] mtd->oobavail: 0x8
[    2.109397@3] aml_nand_init 2119: plat-name:bootloader
[    2.114217@3] Creating 1 MTD partitions on "bootloader":
[    2.119521@3] 0x000000000000-0x000000200000 : "bootloader"
[    2.128621@2] bootloader initialized ok
[    2.128764@2] plat->aml_nand_device ffffff800a005a90
[    2.133760@2] m3_nand_probe() aml_nand_device ffffff800a005a90
[    2.139872@2] NAND device id: 2c da 90 95 6 0
[    2.143865@2] NAND device: Manufacturer ID:
[    2.147930@2]  0x2c, Chip ID: 0x2c (Micron A revision NAND 2Gib MT29F2G08-A)
[    2.154972@2] oob_fill_cnt =32 oob_size =64, bch_bytes =14
[    2.160406@2] ecc mode:6 ecc_page_num=2 eep_need_oobsize=16
[    2.165954@2] plane_num=1 writesize=0x800 ecc.size=0x200 bch_mode=1
[    2.172199@2] mtd->oobavail: 0x8
[    2.175672@2] aml_nand_init 2119: plat-name:nandnormal
[    2.180568@2] bbt_start=20
[    2.183179@2] env_start=24
[    2.185886@2] key_start=32
[    2.188570@2] dtb_start=40
[    2.191238@2] ddr_start=44
[    2.193948@2] nbbt: info size=0x800 max_scan_blk=24, start_blk=20
[    2.200442@2] get_free_node 43: bitmap=0
[    2.203913@2] get_free_node 55: bitmap=1
[    2.208004@2] get_free_node 43: bitmap=1
[    2.211712@2] get_free_node 55: bitmap=3
[    2.215804@2] get_free_node 43: bitmap=3
[    2.219493@2] get_free_node 55: bitmap=7
[    2.223395@2] nbbt : phy_blk_addr=20, ec=0, phy_page_addr=0, timestamp=1
[    2.230082@2] nbbt free list:
[    2.233030@2] blockN=21, ec=-1, dirty_flag=0
[    2.237276@2] blockN=22, ec=-1, dirty_flag=0
[    2.241523@2] blockN=23, ec=-1, dirty_flag=0
[    2.245770@2] aml_nand_scan_rsv_info 1141: page_num=1
[    2.251182@2] nbbt valid addr: 280000
[    2.254439@2] aml_nand_bbt_check 1306 bbt is valid, reading.
[    2.260081@2] aml_nand_read_rsv_info:423,read nbbt info at 280000
[    2.266333@2] nenv: info size=0x10000 max_scan_blk=32, start_blk=24
[    2.272762@2] get_free_node 43: bitmap=7
[    2.276278@2] get_free_node 55: bitmap=f
[    2.280370@2] get_free_node 43: bitmap=f
[    2.284078@2] get_free_node 55: bitmap=1f
[    2.288257@2] get_free_node 43: bitmap=1f
[    2.292051@2] get_free_node 55: bitmap=3f
[    2.296230@2] get_free_node 43: bitmap=3f
[    2.300025@2] get_free_node 55: bitmap=7f
[    2.304203@2] get_free_node 43: bitmap=7f
[    2.307998@2] get_free_node 55: bitmap=ff
[    2.312177@2] get_free_node 43: bitmap=ff
[    2.315971@2] get_free_node 55: bitmap=1ff
[    2.320238@2] get_free_node 43: bitmap=1ff
[    2.324118@2] get_free_node 55: bitmap=3ff
[    2.328191@2] nenv : phy_blk_addr=24, ec=0, phy_page_addr=0, timestamp=1
[    2.334862@2] nenv free list:
[    2.337809@2] blockN=25, ec=-1, dirty_flag=0
[    2.342056@2] blockN=26, ec=-1, dirty_flag=0
[    2.346302@2] blockN=27, ec=-1, dirty_flag=0
[    2.350549@2] blockN=28, ec=-1, dirty_flag=0
[    2.354796@2] blockN=29, ec=-1, dirty_flag=0
[    2.359042@2] blockN=30, ec=-1, dirty_flag=0
[    2.363289@2] blockN=31, ec=-1, dirty_flag=0
[    2.367537@2] aml_nand_scan_rsv_info 1141: page_num=32
[    2.384881@2] nenv valid addr: 310000
[    2.384915@2] nkey: info size=0x8000 max_scan_blk=40, start_blk=32
[    2.389274@2] get_free_node 43: bitmap=3ff
[    2.393157@2] get_free_node 55: bitmap=7ff
[    2.397422@2] get_free_node 43: bitmap=7ff
[    2.401303@2] get_free_node 55: bitmap=fff
[    2.405569@2] get_free_node 43: bitmap=fff
[    2.409450@2] get_free_node 55: bitmap=1fff
[    2.413801@2] get_free_node 43: bitmap=1fff
[    2.417770@2] get_free_node 55: bitmap=3fff
[    2.422123@2] get_free_node 43: bitmap=3fff
[    2.426090@2] get_free_node 55: bitmap=7fff
[    2.430443@2] get_free_node 43: bitmap=7fff
[    2.434409@2] get_free_node 55: bitmap=ffff
[    2.438762@2] get_free_node 43: bitmap=ffff
[    2.442730@2] get_free_node 55: bitmap=1ffff
[    2.447168@2] get_free_node 43: bitmap=1ffff
[    2.451223@2] get_free_node 55: bitmap=3ffff
[    2.455468@2] nkey : phy_blk_addr=-1, ec=0, phy_page_addr=0, timestamp=0
[    2.462141@2] nkey free list:
[    2.465088@2] blockN=32, ec=-1, dirty_flag=0
[    2.469334@2] blockN=33, ec=-1, dirty_flag=0
[    2.473581@2] blockN=34, ec=-1, dirty_flag=0
[    2.477828@2] blockN=35, ec=-1, dirty_flag=0
[    2.482074@2] blockN=36, ec=-1, dirty_flag=0
[    2.486321@2] blockN=37, ec=-1, dirty_flag=0
[    2.490567@2] blockN=38, ec=-1, dirty_flag=0
[    2.494814@2] blockN=39, ec=-1, dirty_flag=0
[    2.499061@2] aml_nand_scan_rsv_info 1141: page_num=16
[    2.504174@2] nkey valid addr: fffffffffffe0000
[    2.508681@2] aml_nand_key_check 1251 NO key exist
[    2.513449@2] ndtb: info size=0x20000 max_scan_blk=44, start_blk=40
[    2.520107@2] get_free_node 43: bitmap=3ffff
[    2.523937@2] get_free_node 55: bitmap=7ffff
[    2.528376@2] get_free_node 43: bitmap=7ffff
[    2.532430@2] get_free_node 55: bitmap=fffff
[    2.536868@2] get_free_node 43: bitmap=fffff
[    2.540923@2] get_free_node 55: bitmap=1fffff
[    2.545256@2] ndtb : phy_blk_addr=40, ec=0, phy_page_addr=0, timestamp=1
[    2.551927@2] ndtb free list:
[    2.554858@2] blockN=41, ec=-1, dirty_flag=0
[    2.559121@2] blockN=42, ec=-1, dirty_flag=0
[    2.563368@2] blockN=43, ec=-1, dirty_flag=0
[    2.567615@2] aml_nand_scan_rsv_info 1141: page_num=64
[    2.584915@2] ndtb valid addr: 500000
[    2.584950@2] nddr: info size=0x20000 max_scan_blk=46, start_blk=44
[    2.589398@2] get_free_node 43: bitmap=1fffff
[    2.593539@2] get_free_node 55: bitmap=3fffff
[    2.598065@2] get_free_node 43: bitmap=3fffff
[    2.602205@2] get_free_node 55: bitmap=7fffff
[    2.606538@2] nddr : phy_blk_addr=-1, ec=0, phy_page_addr=0, timestamp=0
[    2.613209@2] nddr free list:
[    2.616156@2] blockN=44, ec=-1, dirty_flag=0
[    2.620402@2] blockN=45, ec=-1, dirty_flag=0
[    2.624650@2] aml_nand_scan_rsv_info 1141: page_num=64
[    2.629763@2] nddr valid addr: fffffffffffe0000
[    2.634270@2] aml_nand_ddr_check 1281 NO ddr exist
[    2.639040@2] tpl: off 8388608, size 8388608
[    2.773315@2] Creating 6 MTD partitions on "nandnormal":
[    2.773362@2] 0x000000800000-0x000001000000 : "tpl"
[    2.784855@1] 0x000001000000-0x000001200000 : "misc"
[    2.788201@3] 0x000001200000-0x000002200000 : "recovery"
[    2.800415@1] 0x000002200000-0x000004200000 : "boot"
[    2.819972@1] 0x000004200000-0x000004700000 : "config"
[    2.824703@1] 0x000004700000-0x000010000000 : "nvdata"
[    2.927595@0] nandnormal initialized ok
[    2.927709@0] aml_ubootenv_init: register env chardev
[    2.931587@0] aml_ubootenv_init: register env chardev OK
[    2.936287@0] amlnf_dtb_init: register dtb cdev
[    2.941230@0] amlnf_dtb_init: register dtd cdev OK
[    2.945465@0] mtd_nand_probe 267 , err = 0
[    2.950810@0] aml_vrtc rtc: rtc core: registered aml_vrtc as rtc0
[    2.956059@0] input: aml_vkeypad as /devices/platform/rtc/input/input0
[    2.963208@0] unifykey: storage in base: 0xffffffc005000000
[    2.967643@0] unifykey: storage out base: 0xffffffc005040000
[    2.973235@0] unifykey: storage block base: 0xffffffc005080000
[    2.979047@0] unifykey: probe done!
[    2.983241@0] unifykey: no efuse-version set, use default value: -1
[    2.988775@0] unifykey: key unify config unifykey-num is 6
[    2.994294@0] unifykey: key unify fact unifykey-num is 6
[    2.999557@0] unifykey: unifykey_devno: f200000
[    3.004518@2] unifykey: device unifykeys created ok
[    3.009003@2] unifykey: aml_unifykeys_init done!
[    3.013897@2] sysled: module init
[    3.017387@2] meson_wdt ffd0f0d0.watchdog: start watchdog
[    3.022143@2] meson_wdt ffd0f0d0.watchdog: creat work queue for watch dog
[    3.029577@1] meson_wdt ffd0f0d0.watchdog: AML Watchdog Timer probed done
[    3.038288@3] dmc_monitor_probe
[    3.039133@3] page_trace_module_init, create sysfs failed
[    3.045009@3] defendkey defendkey: Reserved memory is not enough!
[    3.050254@3] defendkey: probe of defendkey failed with error -22
[    3.056584@3] GACT probability NOT on
[    3.059935@3] Mirror/redirect action on
[    3.063727@3] u32 classifier
[    3.066554@3]     Actions configured
[    3.070136@3] Netfilter messages via NETLINK v0.30.
[    3.075439@3] nf_conntrack version 0.5.0 (2048 buckets, 8192 max)
[    3.081624@3] ctnetlink v0.93: registering with nfnetlink.
[    3.087473@3] xt_time: kernel timezone is -0000
[    3.091191@3] ipip: IPv4 and MPLS over IPv4 tunneling driver
[    3.097923@3] ip_tables: (C) 2000-2006 Netfilter Core Team
[    3.102546@3] arp_tables: arp_tables: (C) 2002 David S. Miller
[    3.108017@3] Initializing XFRM netlink socket
[    3.113583@3] NET: Registered protocol family 10
[    3.119213@3] mip6: Mobile IPv6
[    3.120123@3] ip6_tables: (C) 2000-2006 Netfilter Core Team
[    3.126077@3] sit: IPv6, IPv4 and MPLS over IPv4 tunneling driver
[    3.134087@3] NET: Registered protocol family 17
[    3.136351@3] NET: Registered protocol family 15
[    3.140923@3] bridge: filtering via arp/ip/ip6tables is no longer available by default. Update your scripts to load br_netfilter if you need this.
[    3.154075@3] l2tp_core: L2TP core driver, V2.0
[    3.158461@3] l2tp_ppp: PPPoL2TP kernel driver, V2.0
[    3.163388@3] l2tp_ip: L2TP IP encapsulation support (L2TPv3)
[    3.169134@3] l2tp_netlink: L2TP netlink interface
[    3.173937@3] l2tp_eth: L2TP ethernet pseudowire support (L2TPv3)
[    3.180002@3] l2tp_debugfs: L2TP debugfs support
[    3.184538@3] l2tp_ip6: L2TP IP encapsulation support for IPv6 (L2TPv3)
[    3.191187@3] NET: Registered protocol family 35
[    3.196154@3] Key type dns_resolver registered
[    3.200671@3] Registered swp emulation handler
[    3.204576@3] Registered cp15_barrier emulation handler
[    3.209764@3] Registered setend emulation handler
[    3.214513@3] disable EAS feature
[    3.219308@1] registered taskstats version 1
[    3.236376@3] dwc3 ff500000.dwc3: Configuration mismatch. dr_mode forced to host
[    3.742850@3] xhci-hcd xhci-hcd.0.auto: xHCI Host Controller
[    3.742946@3] xhci-hcd xhci-hcd.0.auto: new USB bus registered, assigned bus number 1
[    3.751248@3] xhci-hcd xhci-hcd.0.auto: hcc params 0x0220f664 hci version 0x100 quirks 0x02010010
[    3.759672@3] xhci-hcd xhci-hcd.0.auto: irq 22, io mem 0xff500000
[    3.767191@2] hub 1-0:1.0: USB hub found
[    3.769608@2] hub 1-0:1.0: 1 port detected
[    3.774253@2] xhci-hcd xhci-hcd.0.auto: xHCI Host Controller
[    3.779242@2] xhci-hcd xhci-hcd.0.auto: new USB bus registered, assigned bus number 2
[    3.787147@2] usb usb2: We don't know the algorithms for LPM for this host, disabling LPM.
[    3.796789@3] hub 2-0:1.0: USB hub found
[    3.799191@3] hub 2-0:1.0: config failed, hub doesn't have any ports! (err -19)
[    3.806531@3] usb usb2: Unsupported the hub
[    3.811339@3] aml_vrtc rtc: setting system clock to 2015-01-01 00:00:08 UTC (1420070408)
[    3.819345@3] dwc_otg ff400000.dwc2_a: dwc_otg_driver_probe(ffffffc00e15b000)
[    3.819421@3] dwc_otg: usb0: type: 2 speed: 0, config: 0, dma: 0, id: 0, phy: ffe09000, ctrl: 0
[    3.827319@3] dwc_otg ff400000.dwc2_a: base=0xffffff8008580000
[    3.827332@3] dwc_otg ff400000.dwc2_a: dwc_otg_device=0xffffffc00c3f2a00
[    3.927873@1] dwc_otg: Core Release: 3.10a
[    3.927930@1] dwc_otg: Setting default values for core params
[    3.932131@1] dwc_otg: curmode: 0, host_only: 0
[    3.936632@1] dwc_otg ff400000.dwc2_a: DMA config: BURST_DEFAULT
[    3.949164@1] dwc_otg: Using Buffer DMA mode
[    3.949202@1] dwc_otg: OTG VER PARAM: 1, OTG VER FLAG: 1
[    3.953105@1] dwc_otg: Working on port type = SLAVE
[    3.957963@1] dwc_otg: Dedicated Tx FIFOs mode
[    3.965059@0] thermal thermal_zone0: binding zone soc_thermal with cdev thermal-cpufreq-0 failed:-22
[    3.971724@0] cpucore_cooling_register, max_cpu_core_num:4
[    3.984269@0] gxbb_pm: enter meson_pm_probe!
[    3.984327@0] no vddio3v3_en pin
[    3.985976@0] pm-meson aml_pm: Can't get switch_clk81
[    3.991112@0] gxbb_pm: meson_pm_probe done
[    3.996038@0] meson_uart ff803000.serial: ttyS0 use xtal(24M) 24000000 change 115200 to 115200
[    4.002389@0] Freeing unused kernel memory: 3648K
[    4.016748@0] meson_uart ff803000.serial: ttyS0 use xtal(24M) 24000000 change 115200 to 115200
[    4.277915@1] ubi0: attaching mtd5
[    4.296783@1] ubi0: scanning is finished
[    4.301441@3] ubi0: attached mtd5 (name "config", size 5 MiB)
[    4.301574@3] ubi0: PEB size: 131072 bytes (128 KiB), LEB size: 126976 bytes
[    4.308638@3] ubi0: min./max. I/O unit sizes: 2048/2048, sub-page size 2048
[    4.315545@3] ubi0: VID header offset: 2048 (aligned 2048), data offset: 4096
[    4.322653@3] ubi0: good PEBs: 40, bad PEBs: 0, corrupted PEBs: 0
[    4.328711@3] ubi0: user volume: 1, internal volumes: 1, max. volumes count: 128
[    4.336085@3] ubi0: max/mean erase counter: 13/6, WL threshold: 4096, image sequence number: 3362079202
[    4.345491@3] ubi0: available PEBs: 0, total reserved PEBs: 40, PEBs reserved for bad PEB handling: 4
[    4.354658@1] ubi0: background thread "ubi_bgt0d" started, PID 1075
[    4.367777@0] UBIFS (ubi0:0): background thread "ubifs_bgt0_0" started, PID 1079
[    4.384329@3] UBIFS (ubi0:0): recovery needed
[    4.420296@3] UBIFS (ubi0:0): recovery completed
[    4.420600@3] UBIFS (ubi0:0): UBIFS: mounted UBI device 0, volume 0, name "config_data"
[    4.427307@3] UBIFS (ubi0:0): LEB size: 126976 bytes (124 KiB), min./max. I/O unit sizes: 2048 bytes/2048 bytes
[    4.437344@3] UBIFS (ubi0:0): FS size: 2793472 bytes (2 MiB, 22 LEBs), journal size 1015809 bytes (0 MiB, 6 LEBs)
[    4.447565@3] UBIFS (ubi0:0): reserved for root: 131942 bytes (128 KiB)
[    4.454155@3] UBIFS (ubi0:0): media format: w4/r0 (latest is w4/r0), UUID B381F50F-4ED2-44A4-BEBF-D138D5BC2291, small LPT model
[    4.478982@0] ubi2: attaching mtd6
[    5.158930@0] ubi2: scanning is finished
[    5.166074@1] ubi2: attached mtd6 (name "nvdata", size 185 MiB)
[    5.166377@1] ubi2: PEB size: 131072 bytes (128 KiB), LEB size: 126976 bytes
[    5.173490@1] ubi2: min./max. I/O unit sizes: 2048/2048, sub-page size 2048
[    5.180354@1] ubi2: VID header offset: 2048 (aligned 2048), data offset: 4096
[    5.187447@1] ubi2: good PEBs: 1480, bad PEBs: 0, corrupted PEBs: 0
[    5.193695@1] ubi2: user volume: 1, internal volumes: 1, max. volumes count: 128
[    5.201055@1] ubi2: max/mean erase counter: 2/1, WL threshold: 4096, image sequence number: 3917940917
[    5.210335@1] ubi2: available PEBs: 0, total reserved PEBs: 1480, PEBs reserved for bad PEB handling: 4
[    5.219716@0] ubi2: background thread "ubi_bgt2d" started, PID 1087
[    5.232820@3] UBIFS (ubi2:0): background thread "ubifs_bgt2_0" started, PID 1091
[    5.249437@1] UBIFS (ubi2:0): recovery needed
[    5.290289@2] UBIFS (ubi2:0): recovery completed
[    5.290600@2] UBIFS (ubi2:0): UBIFS: mounted UBI device 2, volume 0, name "nvdata_data"
[    5.297321@2] UBIFS (ubi2:0): LEB size: 126976 bytes (124 KiB), min./max. I/O unit sizes: 2048 bytes/2048 bytes
[    5.307339@2] UBIFS (ubi2:0): FS size: 185384960 bytes (176 MiB, 1460 LEBs), journal size 9269248 bytes (8 MiB, 73 LEBs)
[    5.318169@2] UBIFS (ubi2:0): reserved for root: 4952683 bytes (4836 KiB)
[    5.324930@2] UBIFS (ubi2:0): media format: w4/r0 (latest is w4/r0), UUID BA7E6781-1356-4A44-A8AD-B533B5AD62E4, small LPT model
[    5.537611@0] eth0: device MAC address 02:b5:89:97:9c:ff
[    5.620528@3] meson6-dwmac ff3f0000.ethernet eth0: fail to init PTP.
[    5.621813@3] IPv6: ADDRCONF(NETDEV_UP): eth0: link is not ready
[    5.838223@0] uart_trans: loading out-of-tree module taints kernel.
[    5.840531@0] register uart_trans chrdev success.
[    5.844072@0] meson_uart ff804000.serial: ttyS3 use xtal(24M) 24000000 change 0 to 9600
[    5.851640@0] tty port open success [/dev/ttyS3]!
[    5.856378@0] meson_uart ff804000.serial: ttyS3 use xtal(24M) 24000000 change 9600 to 115200
[    5.864677@0] init sucess for tty struct (246:3)  [/dev/ttyS3]
[    5.870831@0] meson_uart ffd23000.serial: ttyS2 use xtal(24M) 24000000 change 0 to 9600
[    5.878465@0] tty port open success [/dev/ttyS2]!
[    5.883134@0] meson_uart ffd23000.serial: ttyS2 use xtal(24M) 24000000 change 9600 to 115200
[    5.891583@0] init sucess for tty struct (246:2)  [/dev/ttyS2]
[    5.897662@0] meson_uart ffd24000.serial: ttyS1 use xtal(24M) 24000000 change 0 to 9600
[    5.905331@0] tty port open success [/dev/ttyS1]!
[    5.910003@0] meson_uart ffd24000.serial: ttyS1 use xtal(24M) 24000000 change 9600 to 115200
[    5.918408@0] init sucess for tty struct (246:1)  [/dev/ttyS1]
[    5.924524@3] create workqueue success!
[    7.667839@3] meson6-dwmac ff3f0000.ethernet eth0: Link is Up - 100Mbps/Full - flow control rx/tx
[    7.671127@3] IPv6: ADDRCONF(NETDEV_CHANGE): eth0: link becomes ready
[   17.754948@0] uart trans dev open.
[   17.755057@0] uart_buf virt addr = 0xffffffc00bd40000
[   17.757963@0] uart_buf phys addr = 0x0bd40000
[   17.762159@0] uart_buf pfn       = 0x0000bd40
[   17.766859@0] uart trans stop send work timer.
[   17.771182@0] uart trans set chain exist bits:0x4.
[   17.775690@0] uart trans set work queue count 768.
[   30.404445@0] nf_conntrack: default automatic helper assignment has been turned off for security reasons and CT-based  firewall rule not found. Use the iptables CT target to attach helpers instead.
[   76.512002@0] uart set baud to: 4098
[  114.793984@0] uart trans stop send work timer.
[  115.113094@0] uart trans stop send work timer.
[  126.170689@3] uart trans start send work timer.


===========================================Miner log===========================================
2015-01-01 00:00:15 Miner compile time: Tue Oct 19 21:30:41 CST 2021 type: Antminer S19j Pro
2015-01-01 00:00:16 This is fix-freq version
2015-01-01 00:00:16 Miner compile time: Tue Oct 19 21:30:41 CST 2021 type: Antminer S19j Pro
2015-01-01 00:00:16 commit version: ce69be1 2021-10-19 19:57:55, build by: jenkins 2021-10-19 21:46:16
2015-01-01 00:00:16 opt_multi_version     = 1
2015-01-01 00:00:16 opt_bitmain_ab        = 1
2015-01-01 00:00:16 mid_auto_gen          = 1
2015-01-01 00:00:16 opt_bitmain_work_mode = 0
2015-01-01 00:00:16 port 439 already exported
2015-01-01 00:00:16 port 454 already exported
2015-01-01 00:00:16 no board pluged in socket 439
2015-01-01 00:00:16 port 440 already exported
2015-01-01 00:00:16 port 455 already exported
2015-01-01 00:00:16 no board pluged in socket 440
2015-01-01 00:00:16 port 441 already exported
2015-01-01 00:00:16 port 456 already exported
2015-01-01 00:00:16 port 438 already exported
2015-01-01 00:00:16 port 453 already exported
2015-01-01 00:00:16 port 446 already exported
2015-01-01 00:00:16 port 445 already exported
2015-01-01 00:00:16 Note: front fan is power on!
2015-01-01 00:00:16 Note: rear fan is power on!
2015-01-01 00:00:16 start the http log.
2015-01-01 00:00:16 httpListenThread start ret=0
2015-01-01 00:00:16 start listen on 6060 ...
2015-01-01 00:00:16 load machine BHB42601 conf
2015-01-01 00:00:16 machine : BHB42601
2015-01-01 00:00:16 chain_num 4, chain_domain_num 42, chain_asic_num 126, domain_asic_num 3
2015-01-01 00:00:16 bad chain id = 3
2015-01-01 00:00:19 bad chain id = 3
2015-01-01 00:00:21 ==========================capability start==========================
2015-01-01 00:00:21 board num = 1
2015-01-01 00:00:21 board id = 2, chain num = 1
2015-01-01 00:00:21 	chain id = 2
2015-01-01 00:00:21 ==========================capability end============================
2015-01-01 00:00:21 chain num = 1
2015-01-01 00:00:22 load chain 2 eeprom data
2015-01-01 00:00:22 fan_eft : 0  fan_pwm : 100
2015-01-01 00:00:22 create thread get_nonce_and_register_thread
2015-01-01 00:00:22 fixed working voltage = 1360
2015-01-01 00:00:22 Chain [2] PCB Version: 0x0130
2015-01-01 00:00:22 Chain [2] BOM Version: 0x0010
2015-01-01 00:00:22 bad chain id = 3
2015-01-01 00:00:22 Fan check passed.
2015-01-01 00:00:22 uart_trans addr:0xf6e43000.
2015-01-01 00:00:23 chain[2] PIC jump to app
2015-01-01 00:00:24 Check chain[2] PIC fw version=0x89
2015-01-01 00:00:24 create thread pic_heart_beat_thread
2015-01-01 00:00:24 max sensor num = 4
2015-01-01 00:00:24 STATUS_INITED: soc init done!
2015-01-01 00:00:24 temperature_monitor_thread start...
2022-08-10 13:24:17 start to init...
2022-08-10 13:24:17 i2c_sim_init start
2022-08-10 13:24:17 init gpio477
2022-08-10 13:24:17 init gpio476
2022-08-10 13:24:18 i2c_sim_init end
2022-08-10 13:24:19 power open power_version = 0x71
2022-08-10 13:24:20 power type version: 0x0071
2022-08-10 13:24:20 Enter sleep to make sure power release finish.
2022-08-10 13:24:51 Slept 30 seconds, diff = 1.
2022-08-10 13:24:52 set_voltage_by_steps to 1500.
2022-08-10 13:24:54 chain avg vol rise to 15.38
2022-08-10 13:24:56 start up min temp by 75a = 26
2022-08-10 13:25:02 chain avg vol drop to 0.78
2022-08-10 13:25:06 Chain[2]: find 0 asic, times 0
2022-08-10 13:25:09 chain avg vol rise to 15.36
2022-08-10 13:25:13 chain avg vol drop to 0.86
2022-08-10 13:25:17 Chain[2]: find 0 asic, times 1
2022-08-10 13:25:18 chain avg vol rise to 14.62
2022-08-10 13:25:18 chain avg vol drop to 0.73
2022-08-10 13:25:21 chain avg vol rise to 15.36
2022-08-10 13:25:25 chain avg vol drop to 0.86
2022-08-10 13:25:29 Chain[2]: find 0 asic, times 2
2022-08-10 13:25:30 chain avg vol rise to 14.77
2022-08-10 13:25:30 chain avg vol drop to 0.71
2022-08-10 13:25:31 Chain 2 only find 0 asic, will power off hash board 2
2022-08-10 13:25:31 ERROR_SOC_INIT: soc init failed!
2022-08-10 13:25:31 stop_mining: soc init failed!
2022-08-10 13:25:31 uninit_temp_info
2022-08-10 13:25:31 do not read temp anymore...
2022-08-10 13:25:31 cancel thread
2022-08-10 13:25:31 cancel thread
2022-08-10 13:25:31 ****power off hashboard****
2022-08-10 13:25:31 over max temp, pcb temp 255 (max 75), chip temp 255(max 95) pcb temp rise 0 chip temp rise 0, total_exit_failure 0
2022-08-10 13:25:31 Sweep error string = P:1.
2022-08-10 13:25:31 ERROR_TEMP_TOO_HIGH: over max temp
2022-08-10 13:25:31 stop_mining: over max temp
2022-08-10 13:25:31 ****power off hashboard****
2022-08-10 13:25:35 temp monitor thread exit
2022-08-10 13:25:46 Version num 65536
2022-08-10 13:25:46 Mask num 0x1fffe000
2022-08-10 13:25:46 Note: addrInterval or corenum is not initialized.
не тот лог приложил, правильный ло
===========================================Miner log===========================================
2015-01-01 00:00:15 Miner compile time: Tue Oct 19 21:30:41 CST 2021 type: Antminer S19j Pro
2015-01-01 00:00:16 This is fix-freq version
2015-01-01 00:00:16 Miner compile time: Tue Oct 19 21:30:41 CST 2021 type: Antminer S19j Pro
2015-01-01 00:00:16 commit version: ce69be1 2021-10-19 19:57:55, build by: jenkins 2021-10-19 21:46:16
2015-01-01 00:00:16 opt_multi_version     = 1
2015-01-01 00:00:16 opt_bitmain_ab        = 1
2015-01-01 00:00:16 mid_auto_gen          = 1
2015-01-01 00:00:16 opt_bitmain_work_mode = 0
2015-01-01 00:00:16 port 439 already exported
2015-01-01 00:00:16 port 454 already exported
2015-01-01 00:00:16 port 440 already exported
2015-01-01 00:00:16 port 455 already exported
2015-01-01 00:00:16 port 441 already exported
2015-01-01 00:00:16 port 456 already exported
2015-01-01 00:00:16 port 438 already exported
2015-01-01 00:00:16 port 453 already exported
2015-01-01 00:00:16 port 446 already exported
2015-01-01 00:00:16 port 445 already exported
2015-01-01 00:00:16 Note: front fan is power on!
2015-01-01 00:00:16 Note: rear fan is power on!
2015-01-01 00:00:16 start the http log.
2015-01-01 00:00:16 httpListenThread start ret=0
2015-01-01 00:00:16 start listen on 6060 ...
2015-01-01 00:00:16 load machine BHB42601 conf
2015-01-01 00:00:16 machine : BHB42601
2015-01-01 00:00:16 chain_num 4, chain_domain_num 42, chain_asic_num 126, domain_asic_num 3
2015-01-01 00:00:16 bad chain id = 3
2015-01-01 00:00:19 bad chain id = 3
2015-01-01 00:00:21 ==========================capability start==========================
2015-01-01 00:00:21 board num = 3
2015-01-01 00:00:21 board id = 0, chain num = 1
2015-01-01 00:00:21 	chain id = 0
2015-01-01 00:00:21 board id = 1, chain num = 1
2015-01-01 00:00:21 	chain id = 1
2015-01-01 00:00:21 board id = 2, chain num = 1
2015-01-01 00:00:21 	chain id = 2
2015-01-01 00:00:21 ==========================capability end============================
2015-01-01 00:00:21 chain num = 3
2015-01-01 00:00:22 load chain 0 eeprom data
2015-01-01 00:00:23 load chain 1 eeprom data
2015-01-01 00:00:23 load chain 2 eeprom data
2015-01-01 00:00:23 fan_eft : 0  fan_pwm : 100
2015-01-01 00:00:23 create thread get_nonce_and_register_thread
2015-01-01 00:00:23 fixed working voltage = 1360
2015-01-01 00:00:23 Chain [0] PCB Version: 0x0130
2015-01-01 00:00:23 Chain [0] BOM Version: 0x0010
2015-01-01 00:00:23 Chain [1] PCB Version: 0x0130
2015-01-01 00:00:23 Chain [1] BOM Version: 0x0010
2015-01-01 00:00:23 Chain [2] PCB Version: 0x0130
2015-01-01 00:00:23 Chain [2] BOM Version: 0x0010
2015-01-01 00:00:23 bad chain id = 3
2015-01-01 00:00:23 Fan check passed.
2015-01-01 00:00:23 uart_trans addr:0xf747e000.
2022-08-10 13:40:48 chain[0] PIC jump to app
2022-08-10 13:40:49 Check chain[0] PIC fw version=0x89
2022-08-10 13:40:50 chain[1] PIC jump to app
2022-08-10 13:40:52 Check chain[1] PIC fw version=0x89
2022-08-10 13:40:53 chain[2] PIC jump to app
2022-08-10 13:40:54 Check chain[2] PIC fw version=0x89
2022-08-10 13:40:54 create thread pic_heart_beat_thread
2022-08-10 13:40:54 max sensor num = 4
2022-08-10 13:40:54 STATUS_INITED: soc init done!
2022-08-10 13:40:54 temperature_monitor_thread start...
2022-08-10 13:41:07 start to init...
2022-08-10 13:41:07 i2c_sim_init start
2022-08-10 13:41:07 init gpio477
2022-08-10 13:41:07 init gpio476
2022-08-10 13:41:07 i2c_sim_init end
2022-08-10 13:41:08 power open power_version = 0x71
2022-08-10 13:41:10 power type version: 0x0071
2022-08-10 13:41:10 Enter sleep to make sure power release finish.
2022-08-10 13:41:12 chain avg vol drop to 9.21
2022-08-10 13:41:41 Slept 30 seconds, diff = 1.
2022-08-10 13:41:42 set_voltage_by_steps to 1500.
2022-08-10 13:41:45 chain avg vol rise to 10.42
2022-08-10 13:41:46 chain avg vol rise to 15.34
2022-08-10 13:41:47 start up min temp by 75a = 27
2022-08-10 13:41:54 chain avg vol drop to 5.54
2022-08-10 13:41:57 Chain[0]: find 0 asic, times 0
2022-08-10 13:42:01 chain avg vol rise to 10.41
2022-08-10 13:42:02 chain avg vol rise to 15.35
2022-08-10 13:42:05 chain avg vol drop to 10.47
2022-08-10 13:42:06 chain avg vol drop to 0.56
2022-08-10 13:42:09 Chain[0]: find 0 asic, times 1
2022-08-10 13:42:13 chain avg vol rise to 15.34
2022-08-10 13:42:17 chain avg vol drop to 5.54
2022-08-10 13:42:21 Chain[0]: find 0 asic, times 2
2022-08-10 13:42:23 Chain 0 only find 0 asic, will power off hash board 0
2022-08-10 13:42:25 chain avg vol rise to 15.33
2022-08-10 13:42:30 chain avg vol drop to 0.56
2022-08-10 13:42:33 Chain[1]: find 0 asic, times 0
2022-08-10 13:42:37 chain avg vol rise to 15.33
2022-08-10 13:42:41 chain avg vol drop to 8.02
2022-08-10 13:42:45 Chain[1]: find 0 asic, times 1
2022-08-10 13:42:49 chain avg vol rise to 15.33
2022-08-10 13:42:53 chain avg vol drop to 8.06
2022-08-10 13:42:57 Chain[1]: find 0 asic, times 2
2022-08-10 13:42:59 Chain 1 only find 0 asic, will power off hash board 1
2022-08-10 13:43:00 chain avg vol rise to 15.36
2022-08-10 13:43:05 chain avg vol drop to 0.83
2022-08-10 13:43:09 Chain[2]: find 0 asic, times 0
2022-08-10 13:43:09 chain avg vol rise to 15.23
2022-08-10 13:43:10 chain avg vol drop to 0.64
2022-08-10 13:43:12 chain avg vol rise to 15.38
2022-08-10 13:43:17 chain avg vol drop to 0.78
2022-08-10 13:43:21 Chain[2]: find 0 asic, times 1
2022-08-10 13:43:24 chain avg vol rise to 15.36
2022-08-10 13:43:29 chain avg vol drop to 0.78
2022-08-10 13:43:33 Chain[2]: find 0 asic, times 2
2022-08-10 13:43:33 chain avg vol rise to 15.23
2022-08-10 13:43:34 chain avg vol drop to 0.54
2022-08-10 13:43:35 Chain 2 only find 0 asic, will power off hash board 2
2022-08-10 13:43:35 ERROR_SOC_INIT: soc init failed!
2022-08-10 13:43:35 stop_mining: soc init failed!
2022-08-10 13:43:35 uninit_temp_info
2022-08-10 13:43:35 do not read temp anymore...
2022-08-10 13:43:35 cancel thread
2022-08-10 13:43:35 cancel thread
2022-08-10 13:43:35 ****power off hashboard****
2022-08-10 13:43:35 over max temp, pcb temp 255 (max 75), chip temp 255(max 95) pcb temp rise 0 chip temp rise 0, total_exit_failure 0
2022-08-10 13:43:35 Sweep error string = P:1.
2022-08-10 13:43:35 ERROR_TEMP_TOO_HIGH: over max temp
2022-08-10 13:43:35 stop_mining: over max temp
2022-08-10 13:43:35 ****power off hashboard****
2022-08-10 13:43:38 temp monitor thread exit