- 1. Create a Form with a GlobalKey
- 2. Add a TextFormField with validation logic
- 3. Create a button to validate and submit the form
- How does this work?
- Interactive example
Apps often require users to enter information into a text field.
For example, you might require users to log in with an email address
and password combination.
To make apps secure and easy to use, check whether the
information the user has provided is valid. If the user has correctly filled
out the form, process the information. If the user submits incorrect
information, display a friendly error message letting them know what went
wrong.
In this example, learn how to add validation to a form that has
a single text field using the following steps:
- Create a
Formwith aGlobalKey. - Add a
TextFormFieldwith validation logic. - Create a button to validate and submit the form.
1. Create a Form with a GlobalKey
First, create a Form.
The Form widget acts as a container for grouping
and validating multiple form fields.
When creating the form, provide a GlobalKey.
This uniquely identifies the Form,
and allows validation of the form in a later step.
import 'package:flutter/material.dart';

// Define a custom Form widget.
class MyCustomForm extends StatefulWidget {
  const MyCustomForm({super.key});

  @override
  MyCustomFormState createState() {
    return MyCustomFormState();
  }
}

// Define a corresponding State class.
// This class holds data related to the form.
class MyCustomFormState extends State<MyCustomForm> {
  // Create a global key that uniquely identifies the Form widget
  // and allows validation of the form.
  //
  // Note: This is a `GlobalKey<FormState>`,
  // not a GlobalKey<MyCustomFormState>.
  final _formKey = GlobalKey<FormState>();

  @override
  Widget build(BuildContext context) {
    // Build a Form widget using the _formKey created above.
    return Form(
      key: _formKey,
      child: Column(
        children: <Widget>[
          // Add TextFormFields and ElevatedButton here.
        ],
      ),
    );
  }
}
2. Add a TextFormField with validation logic
Although the Form is in place,
it doesn’t have a way for users to enter text.
That’s the job of a TextFormField.
The TextFormField widget renders a material design text field
and can display validation errors when they occur.
Validate the input by providing a validator() function to the
TextFormField. If the user’s input isn’t valid,
the validator function returns a String containing
an error message.
If there are no errors, the validator must return null.
For this example, create a validator that ensures the
TextFormField isn’t empty. If it is empty,
return a friendly error message.
TextFormField(
  // The validator receives the text that the user has entered.
  validator: (value) {
    if (value == null || value.isEmpty) {
      return 'Please enter some text';
    }
    return null;
  },
),
3. Create a button to validate and submit the form
Now that you have a form with a text field,
provide a button that the user can tap to submit the information.
When the user attempts to submit the form, check if the form is valid.
If it is, display a success message.
If it isn’t (the text field has no content) display the error message.
ElevatedButton(
  onPressed: () {
    // Validate returns true if the form is valid, or false otherwise.
    if (_formKey.currentState!.validate()) {
      // If the form is valid, display a snackbar. In the real world,
      // you'd often call a server or save the information in a database.
      ScaffoldMessenger.of(context).showSnackBar(
        const SnackBar(content: Text('Processing Data')),
      );
    }
  },
  child: const Text('Submit'),
),
How does this work?
To validate the form, use the _formKey created in
step 1. You can use the _formKey.currentState()
method to access the FormState,
which is automatically created by Flutter when building a Form.
The FormState class contains the validate() method.
When the validate() method is called, it runs the validator()
function for each text field in the form.
If everything looks good, the validate() method returns true.
If any text field contains errors, the validate() method
rebuilds the form to display any error messages and returns false.
Interactive example
import 'package:flutter/material.dart';

void main() => runApp(const MyApp());

class MyApp extends StatelessWidget {
  const MyApp({super.key});

  @override
  Widget build(BuildContext context) {
    const appTitle = 'Form Validation Demo';

    return MaterialApp(
      title: appTitle,
      home: Scaffold(
        appBar: AppBar(
          title: const Text(appTitle),
        ),
        body: const MyCustomForm(),
      ),
    );
  }
}

// Create a Form widget.
class MyCustomForm extends StatefulWidget {
  const MyCustomForm({super.key});

  @override
  MyCustomFormState createState() {
    return MyCustomFormState();
  }
}

// Create a corresponding State class.
// This class holds data related to the form.
class MyCustomFormState extends State<MyCustomForm> {
  // Create a global key that uniquely identifies the Form widget
  // and allows validation of the form.
  //
  // Note: This is a GlobalKey<FormState>,
  // not a GlobalKey<MyCustomFormState>.
  final _formKey = GlobalKey<FormState>();

  @override
  Widget build(BuildContext context) {
    // Build a Form widget using the _formKey created above.
    return Form(
      key: _formKey,
      child: Column(
        crossAxisAlignment: CrossAxisAlignment.start,
        children: [
          TextFormField(
            // The validator receives the text that the user has entered.
            validator: (value) {
              if (value == null || value.isEmpty) {
                return 'Please enter some text';
              }
              return null;
            },
          ),
          Padding(
            padding: const EdgeInsets.symmetric(vertical: 16.0),
            child: ElevatedButton(
              onPressed: () {
                // Validate returns true if the form is valid, or false otherwise.
                if (_formKey.currentState!.validate()) {
                  // If the form is valid, display a snackbar. In the real world,
                  // you'd often call a server or save the information in a database.
                  ScaffoldMessenger.of(context).showSnackBar(
                    const SnackBar(content: Text('Processing Data')),
                  );
                }
              },
              child: const Text('Submit'),
            ),
          ),
        ],
      ),
    );
  }
}Most modern applications require some type of input from a user. Whether it be a signup, login, or feedback form, learning how to implement a text field is an important skill to master as a developer.
In Flutter, there are two types of text field widgets that we can use to get user input. One is TextField and the other one is TextFormField, a slightly more advanced version of TextField. TextFormField provides more functionalities than TextField, such as build form validation and the ability to set initial text value directly.
If your text field requires only one or two inputs from the user, I suggest using the TextField widget. Otherwise if you want to create a larger form with multiple input fields and validation, it’s better to go with the TextFormField widget.
Creating a basic TextField
Creating a basic TextField widget is straightforward. Apply the TextField widget inside your widget tree where you want it to appear. This will add a default TextField with default styling:
TextField(
    )
Creating a basic TextFormField
You can add TextFormField in the same manner as TextField. There is no visual difference between these two widgets:
TextFormField(
    )
Styling a text field
Styling a text field to personalize your application is easily done by setting InputDecoration to the decoration property of the TextField/TextFormField widget:
     TextField(
            decoration: InputDecoration(
              filled: true,
              fillColor: Colors.blueAccent,
              border: OutlineInputBorder(
                borderSide: BorderSide.none,
                borderRadius: BorderRadius.circular(50)
              ),
            ),
          )
You must set the filled value to true if you want to apply a background color to your text field. Otherwise, the background color will not be affected.

Changing text color
Text color can be changed using the style property of the TextField widget. You can also change the cursor color by setting the color to the cursorColor property:
        TextField(
              cursorColor: Colors.black,
              style: TextStyle(
                color: Colors.white
              ),
              decoration: InputDecoration(
                filled: true,
                fillColor: Colors.blueAccent,
                border: OutlineInputBorder(
                  borderSide: BorderSide.none,
                  borderRadius: BorderRadius.circular(50)
                ),
              ),
            )

Adding hint text
Hint text is used to give users an idea about the input values that are accepted by the text field. You can use the hintText property to add a hint to the text field which will disappear when you begin typing. The default color is grey, but you can add hintStyle to change the text styling:
    TextField(
        decoration: InputDecoration(
          hintStyle: TextStyle(color: Colors.blue),
          hintText: "Enter your name"
        ),
      )

Adding multi-line support
By default, TextField shows as a single line. But we can specify the maximum number of lines to be supported via the maxLines property. This will not limit the number of lines you can add, it only shows the specified number of lines at a time. If you want to expand the field based on the amount of input text, you can set null to the maxLines property:
        TextField(
          maxLines: 5,
        ),

Reading input value
Reading the user’s input is the most important feature of your text field. In Flutter, this can be done using TextEditingController.
First, create a TextEditingController and set it as a controller property of your TextField widget.
In this example, I have added an extra Button and Text widget which will show the added text when you click the “Show Text” button.
When you press the button, it will set the textController value to the displayText variable. displayText has been set as the text of the Text widget, so when you press “Show Text” you can see the input text appear:
class _TextFormState extends State<TextFormSample> {
  TextEditingController textController = TextEditingController();
  String displayText = "";

  @override
  Widget build(BuildContext context) {
    return Column(
      children: [
        TextField(
          controller: textController,
          maxLines: null,
        ),
        ElevatedButton(onPressed: (){
          setState(() {
            displayText = textController.text;
          });
        }, child: Text("Show Text")),
        Text(displayText,style: TextStyle(fontSize: 20),)
      ],
    );
  }
}

Pre-populating text
Pre-populating values when loading the text field will be useful in scenarios like profile updates and login screens. The TextField widget itself doesn’t have a property to set an initial value, but this can be done using TextEditingController.
Create a TextEditingController, set a value to the text property of the constructor, and it will populate to the widget when it loads the first time:
  TextEditingController textController = TextEditingController(text: "Initial Text");

  @override
    Widget build(BuildContext context) {
      return Center(
        child: TextField(
          controller: textController,
        ),
      );
    }
Then use the initialValue property in TextFormField to create your pre-populated text:
        TextFormField(
          initialValue: "Initial Text",
        )
Changing keyboards based on input type
You may have seen applications show different keyboard layouts for different input types, like number pads for phone numbers or an “@” button for emails. This can be done in Flutter via the keyboardType property. It accepts TextInputType with multiple options like number, date, phone, name, and email address:
     TextField(
        keyboardType: TextInputType.number,
      )


Converting a normal text field to a password field
By setting the obscureText property to true you can convert a plain text field to a password field, which masks the input values.
The default of this property will show dots to mask password characters. But you can change this by setting the obscuringCharacter value to anything you’d like; here, I chose asterisks:
     TextField(
        obscureText: true,
        obscuringCharacter: "*",
      )

Restricting the number of characters
The maxLength property accepts integer values to specify the maximum number of characters accepted by the particular field. After adding this property, if users enter a value with more characters than specified in maxLength, it will block the input automatically:
     TextField(
        maxLength: 2,
      )

Restricting and allowing input values
Utilizing validation in your text field to restrict certain characters or digits is a must to reduce user errors.
Flutter’s inputFormatter property allows you to set an array of filters to the TextField widget. It will accept two types:
- Allowing specific characters, which can be set using
FilteringTextInputFormatter.allow() - Denying specific characters, which can be set using
FilteringTextInputFormatter.deny()
The following is an example of what your code might look like if you’re denying certain characters:
TextField(
        inputFormatters: [FilteringTextInputFormatter.deny(RegExp("[0-9]+"))],
      )
If a user enters a denied character, the text field will not display an error to the user. It simply blocks or allows specified characters based on the input.
However, adding error messages with validation is simple, which is what we are going to talk about next.
Validating input with error messages
Applying an error message to TextField and TextFormField is slightly different because of the availability of certain properties. Let’s take a look at how you can validate input with error messages in each of these widgets.
Input validation error messages in TextField
There is no direct property to add an error message in TextField. But you can set an errorText property in InputDecoration based on the validated value.
In the following example, I determine if the input value is empty and a number, and change the isANumber value to true or false based on the result. Based on the isANumber value you can set the error text, as I did here with “Please enter a number”:
class _LoginFormState extends State<LoginForm> {

  TextEditingController textController = TextEditingController();
  RegExp digitValidator  = RegExp("[0-9]+");
  bool isANumber = true;
  @override
  Widget build(BuildContext context) {
    return Center(
      child:
      TextField(
        onChanged: (inputValue){
          if(inputValue.isEmpty || digitValidator.hasMatch(inputValue)){
            setValidator(true);
          } else{
            setValidator(false);
          }
        },

        decoration: InputDecoration(
          errorText: isANumber ? null : "Please enter a number"
        ),
      ),
    );
  }
  void setValidator(valid){
    setState(() {
      isANumber = valid;
    });
  }
}

You can easily customize error text color by setting TextStyle to the errorStyle property.
You can change the border color using the focusedErrorBorder and errorBorder properties. errorBorder will be shown when there is no focus on the field. Therefore, be sure to set both of those properties when changing the border color:
TextField(
        onChanged: (inputValue){
          if(inputValue.isEmpty || digitValidator.hasMatch(inputValue)){
            setValidator(true);
          } else{
            setValidator(false);
          }
        },

        decoration: InputDecoration(
          errorText: isANumber ? null : "Please enter a number",
          errorStyle: TextStyle(color: Colors.purpleAccent),
          focusedErrorBorder: UnderlineInputBorder(borderSide: BorderSide(color: Colors.purpleAccent)),
          errorBorder: UnderlineInputBorder(borderSide: BorderSide(color: Colors.purpleAccent))
        ),
      )

Input validation error messages in TextFormField
The main difference between TextFormField and TextField is that the TextFormField widget uses the Form widget, which can contain multiple TextField widgets.
In Flutter, creating a validated Form with TextFormField is simple.
More great articles from LogRocket:
- Don’t miss a moment with The Replay, a curated newsletter from LogRocket
- Learn how LogRocket’s Galileo cuts through the noise to proactively resolve issues in your app
- Use React’s useEffect to optimize your application’s performance
- Switch between multiple versions of Node
- Discover how to animate your React app with AnimXYZ
- Explore Tauri, a new framework for building binaries
- Compare NestJS vs. Express.js
First, create a Form widget and add two TextFormField widgets with a button (I used ElevatedButton) and Text.
The important thing to remember when creating a Form widget is that you must first create a GlobalKey which is required to access the Form. After creating a GlobalKey, you can set that key to the key property of the Form widget.
TextFormField contains a property called a validator. You can access field values in the validator callback function and validate differently based on the returned value. For the first text field, we will check whether it is empty, or whether the value is a digit using a regular expression. If that condition fails you can return an error message for that particular field.
In the onPressed event, you can check the form validity using the GlobalKey object and change the isValidForm value to true or false to show a message in the below Text widget:
class _NumberFormState extends State<NumberForm> {

  var _numberForm = GlobalKey<FormState>();
  RegExp _digitRegex = RegExp("[0-9]+");
  bool isValidForm = false;
  @override
  Widget build(BuildContext context) {
    return Center(
      child: Form(
        key: _numberForm,
        child:
        Column(
          children: [
            TextFormField(
              validator: (inputValue){
                if(inputValue.isEmpty || !_digitRegex.hasMatch(inputValue)){
                  return "Please enter number";
                }
                return null;
              },
            ),
            TextFormField(
              validator: (inputValue){
                if(inputValue.isEmpty){
                  return "Please Fill before";
                }
                return null;
              },
            ),
            ElevatedButton(
              onPressed: (){
                if(_numberForm.currentState.validate()){
                    setState(() {
                      isValidForm = true;
                    });
                } else{
                  setState(() {
                      isValidForm = false;
                    });
                }
            }, child: Text("Check Number")),
            Text( isValidForm ? "Nice" : "Please Fix error and Submit ")
          ],
        )),
    );
  }
}

Conclusion
I hope this article gave you a better idea about how to customize and use different properties in Flutter’s TextField and TextFormField widgets.
LogRocket: Full visibility into your web and mobile apps

LogRocket is a frontend application monitoring solution that lets you replay problems as if they happened in your own browser. Instead of guessing why errors happen, or asking users for screenshots and log dumps, LogRocket lets you replay the session to quickly understand what went wrong. It works perfectly with any app, regardless of framework, and has plugins to log additional context from Redux, Vuex, and @ngrx/store.
In addition to logging Redux actions and state, LogRocket records console logs, JavaScript errors, stacktraces, network requests/responses with headers + bodies, browser metadata, and custom logs. It also instruments the DOM to record the HTML and CSS on the page, recreating pixel-perfect videos of even the most complex single-page and mobile apps.
Try it for free.
TextField Widget is used to get data from users and perform the desired operation…So, in this article, we will go through how to do Textfield Validation In Flutter.
A Minimal Example of what you want:
class MyHomePage extends StatefulWidget {
  @override
  MyHomePageState createState() {
    return new MyHomePageState();
  }
}

class MyHomePageState extends State<MyHomePage> {
  final _text = TextEditingController();
  bool _validate = false;

  @override
  void dispose() {
    _text.dispose();
    super.dispose();
  }

  @override
  Widget build(BuildContext context) {
    return Scaffold(
      appBar: AppBar(
        title: Text('TextField Demo'),
      ),
      body: Center(
        child: Column(
          mainAxisAlignment: MainAxisAlignment.center,
          children: <Widget>[
            Text('Error Showed if Field is Empty on Submit button Pressed'),
            TextField(
              controller: _text,
              decoration: InputDecoration(
                labelText: 'Enter the Value',
                errorText: _validate ? 'Value Can't Be Empty' : null,
              ),
            ),
            ElevatedButton(
              onPressed: () {
                setState(() {
                  _text.text.isEmpty ? _validate = true : _validate = false;
                });
              },
              child: Text('Submit'),
              style: ElevatedButton.styleFrom(
                primary: Colors.blueAccent,//button background color
                onPrimary: Colors.white,//button text color
                shape: RoundedRectangleBorder(
                  borderRadius: BorderRadius.circular(25),
                )
              )
            )
          ],
        ),
      ),
    );
  }
}
TextFormField is also a better option for validation. Flutter handles error text itself, so we don’t require to use variable _validate. It will check at runtime whether you satisfied the condition or not.
final confirmPassword = TextFormField(
  controller: widget.confirmPasswordController,
  obscureText: true,
  decoration: InputDecoration(
    prefixIcon: Icon(Icons.lock_open, color: Colors.grey),
    hintText: 'Confirm Password',
    errorText: validatePassword(widget.confirmPasswordController.text),
    contentPadding: EdgeInsets.fromLTRB(20, 10, 20, 10),
  ),
);

String? validatePassword(String value) {
  if (value == null || !(value.length > 5) && value.isNotEmpty) {
    return "Password should contain more than 5 characters";
  }
  return null;
}
Note: The user must add at least one character to get this error message. Using a TextFormField with a validator.
class MyHomePageState extends State<MyHomePage> {
  final _formKey = GlobalKey<FormState>();

  @override
  Widget build(BuildContext context) {
    return Scaffold(
      appBar: AppBar(
        title: Text('TextFormField validator'),
      ),
      body: Form(
        key: _formKey,
        child: Column(
          mainAxisAlignment: MainAxisAlignment.center,
          children: <Widget>[
            TextFormField(
              decoration: InputDecoration(
                hintText: 'Enter text',
              ),
              textAlign: TextAlign.center,
              validator: (text) {
                if (text == null || text.isEmpty) {
                  return 'Text is empty';
                }
                return null;
              },
            ),
            ElevatedButton(
              onPressed: () {
                if (_formKey.currentState!.validate()) {
                  // TODO submit
                }
              },
              child: Text('Submit'),
            )
          ],
        ),
      ),
    );
  }
}
You can do something like this
class _validateTextField extends State<validateTextField> {
  TextEditingController userNameController = TextEditingController();
  bool userNameValidate = false, isUserNameValidate = false;

  @override
  Widget build(BuildContext context) {
    return Scaffold(
      appBar: AppBar(
        title: Text(widget.title),
      ),
      body: Center(
          child: Column(
              mainAxisAlignment: MainAxisAlignment.center,
              children: <Widget>[
                TextField(
                  controller: userNameController,
                  decoration: InputDecoration(
                      labelText: 'Enter Username',
                      errorText: isUserNameValidate ? 'Please enter a Username' : null
                  ),
                ),
                SizedBox(height: 50,),
                OutlinedButton(
                  onPressed: () {
                    validateTextField(userNameController.text);
                  },
                  child: Text('Validate'),
                  style: OutlinedButton.styleFrom(
                    side: BorderSide(
                      width: 2,
                      color: Colors.blue,
                      style: BorderStyle.solid,
                    ),
                  ),
                ),
              ]
          )
      ),
    );
  }
}
Create Function – This function will validate whether the value you entered is validate or not. And call it at the click of a submit or validate button.
bool validateTextField(String userInput) {
  if (userInput.isEmpty) {
    setState(() {
      isUserNameValidate = true;
    });
    return false;
  }
  setState(() {
    isUserNameValidate = false;
  });
  return true;
}
The above code will give us output like the below:
- If you use TextFormField then you could easily implement ‘Error below your text fields’.
- You can do this without using _validate or any other flags.
- In this example, I have used the validator method of the TextFormField Widget. This makes the work a lot easier and readable at the same time.
- I also used FormState to make the work easier.
void main() {
  runApp(MyApp());
}

class MyApp extends StatelessWidget {
  final _form = GlobalKey<FormState>(); //for storing form state.

//saving form after validation
void _saveForm() {
    final isValid = _form.currentState!.validate();
    if (!isValid) {
      return;
    }
  }

  @override
  Widget build(BuildContext context) {
    return MaterialApp(
      home: Scaffold(
        body: Form(
          key: _form, //assigning key to form

          child: ListView(
            children: <Widget>[

              TextFormField(
                decoration: InputDecoration(labelText: 'Full Name'),
                validator: (text) {
                  if (text == null || !(text.length > 5) && text.isNotEmpty) {
                    return "Enter valid name of more then 5 characters!";
                  }
                  return null;
                },
              ),

              TextFormField(
                decoration: InputDecoration(labelText: 'Email'),
                validator: (text) {
                  if (text == null || !(text.contains('@')) && text.isNotEmpty) {
                    return "Enter a valid email address!";
                  }
                  return null;
                },
              ),

              ElevatedButton(
                child: Text('Submit'),
                onPressed: () => _saveForm(),
              )
            ],
          ),
        ),
      ),
    );
  }
}
Stay connected for more articles like flutter textfield validation without form, password validation in flutter, flutter form( autovalidate), flutter regex validation, flutter form validation bloc, flutter registration form, flutter form builder, textformfield flutter, etc.
Conclusion:
Thanks for being with us on a Flutter Journey !!! Hope you have learned about How to Do Textfield Validation In Flutter.
Keep Learning !!! Keep Fluttering !!!
So in this article, we have been through How to Do Textfield Validation In Flutter.
Drop us your valuable suggestion/feedback in the comments.
If you are still confused about something in Flutter development!! Do let us know…we would love to assist
FlutterAgency.com is our portal Platform dedicated to Flutter Technology and Flutter Developers. The portal is full of cool resources from Flutter like Flutter Widget Guide, Flutter Projects, Code libs and etc.
FlutterAgency.com is one of the most popular online portals dedicated to Flutter Technology and daily thousands of unique visitors come to this portal to enhance their knowledge of Flutter.
Got An App Idea?
Consult Our Developer Now
Ever needed to use a TextField and validate the text on the fly as the user types?
In this example, we show a custom error hint and disable the submit button if the text is empty or too short.
If you wanted to implement this functionality in Flutter, how would you do it?
People on StackOverflow seem to have many opinions about it, and indeed there are two main ways of doing this:
- Use a
TextFieldwith aTextEditingControllerand aValueListenableBuilderto update the UI. - Use a
Formand aTextFormFieldalong with aGlobalKeyto validate and save the text field data.
In this article, we’ll explore both solutions so you can learn how to work with text input in Flutter.
sponsor
Code with Andrea is free for everyone. Help me keep it that way by checking out this sponsor:

Cut your code-review time by 40% for free! gitStream is the free dev tool that automates away the pull-request & code-review problems plaguing cycle time in over 90% of engineering teams.
1. Flutter TextField Validation with TextEditingController
To get started, let’s build the basic UI first.
Basic UI with TextField and ElevatedButton
Step one is to create a StatefulWidget subclass that will contain both our TextField and the submit button:
class TextSubmitWidget extends StatefulWidget {
  const TextSubmitWidget({Key? key, required this.onSubmit}) : super(key: key);
  final ValueChanged<String> onSubmit;

  @override
  State<TextSubmitWidget> createState() => _TextSubmitWidgetState();
}
Note how we added an
onSubmitcallback. We will use this to inform the parent widget when the user presses the «Submit» button upon entering a valid text.
Next, let’s create the State subclass:
class _TextSubmitWidgetState extends State<TextSubmitWidget> {
  @override
  Widget build(BuildContext context) {
    return Column(
      mainAxisSize: MainAxisSize.min,
      crossAxisAlignment: CrossAxisAlignment.stretch,
      children: [
        TextField(
          decoration: InputDecoration(
            labelText: 'Enter your name',
            // TODO: add errorHint
          ),
        ),
        ElevatedButton(
          // TODO: implement callback
          onPressed: () {},
          child: Text(
            'Submit',
            style: Theme.of(context).textTheme.headline6,
          ),
        )
      ],
    );
  }
}
This is a simple Column layout that contains a TextField and an ElevatedButton.
If we run this code inside a single-page Flutter app, both the text field and the submit button will show:
Next, we want to add all the validation logic and update the UI according to these rules:
- if the text is empty, disable the submit button and show
Can't be emptyas an error hint - if the text is not empty but too short, enable the submit button and show
Too shortas an error hint - if the text is long enough, enable the submit button and remove the error hint
Let’s figure out how to implement this.
Adding a TextEditingController
Flutter gives us a TextEditingController class that we can use to control our text field.
So let’s use it. All we have to do is to create it inside the State subclass:
class _TextSubmitWidgetState extends State<TextSubmitWidget> {
  // create a TextEditingController
  final _controller = TextEditingController();

  // dispose it when the widget is unmounted
  @override
  void dispose() {
    _controller.dispose();
    super.dispose();
  }

  ...
}
And then we can pass it to our TextField:
TextField(
// use this to control the text field
controller: _controller,
decoration: InputDecoration(
labelText: 'Enter your name',
),
),
We can also add a getter variable to control the _errorText that we pass to the TextField:
String? get _errorText {
  // at any time, we can get the text from _controller.value.text
  final text = _controller.value.text;
  // Note: you can do your own custom validation here
  // Move this logic this outside the widget for more testable code
  if (text.isEmpty) {
    return 'Can't be empty';
  }
  if (text.length < 4) {
    return 'Too short';
  }
  // return null if the text is valid
  return null;
}

// then, in the build method:
TextField(
  controller: _controller,
  decoration: InputDecoration(
    labelText: 'Enter your name',
    // use the getter variable defined above
    errorText: _errorText,
  ),
),
With this in place, we can add some custom logic to the onPressed callback inside our button:
ElevatedButton(
  // only enable the button if the text is not empty
  onPressed: _controller.value.text.isNotEmpty
      ? _submit
      : null,
  child: Text(
    'Submit',
    style: Theme.of(context).textTheme.headline6,
  ),
)
Note how we call a _submit method if the text is not empty. This is defined as follows:
void _submit() {
  // if there is no error text
  if (_errorText == null) {
    // notify the parent widget via the onSubmit callback
    widget.onSubmit(_controller.value.text);
  }
}
But if we run this code, the TextField always shows the error text and the submit button remains disabled even if we enter a valid text:
What’s the deal? 🧐
Widget rebuilds and setState()
The problem is that we are not telling Flutter to rebuild our widget when the text changes.
We could fix this by adding a local state variable and updating it with a call to setState() inside the onChanged callback of our TextField:
// In the state class
var _text = '';

// inside the build method:
TextField(
  controller: _controller,
  decoration: InputDecoration(
    labelText: 'Enter your name',
    errorText: errorText,
  ),
  // this will cause the widget to rebuild whenever the text changes
  onChanged: (text) => setState(() => _text),
),
With this change our UI updates on the fly and behaves as expected:
But a local state variable is not necessary because our TextEditingController already holds the text value as it changes.
As a proof of this, we could make an empty call to setState() and everything would still work:
onChanged: (_) => setState(() {}),
But forcing a widget rebuild like this seems a bit of an anti-pattern. There must be a better way.
How to use TextEditingController with ValueListenableBuilder
As it turns out, we can wrap our widget tree with a ValueListenableBuilder that takes our TextEditingController as an argument:
@override
Widget build(BuildContext context) {
  return ValueListenableBuilder(
    // Note: pass _controller to the animation argument
    valueListenable: _controller,
    builder: (context, TextEditingValue value, __) {
      // this entire widget tree will rebuild every time
      // the controller value changes
      return Column(
        mainAxisSize: MainAxisSize.min,
        crossAxisAlignment: CrossAxisAlignment.stretch,
        children: [
          TextField(
            controller: _controller,
            decoration: InputDecoration(
              labelText: 'Enter your name',
              errorText: _errorText,
            ),
          ),
          ElevatedButton(
            onPressed: _controller.value.text.isNotEmpty
                ? _submit
                : null,
            child: Text(
              'Submit',
              style: Theme.of(context).textTheme.headline6,
            ),
          )
        ],
      );
    },
  );
}
As a result, both the TextField and ElevatedButton will rebuild when the text changes:
But why are we allowed to pass our TextEditingController to the ValueListenableBuilder?
ValueListenableBuilder(
  // this is valid because TextEditingController implements Listenable
  valueListenable: _controller,
  builder: (context, TextEditingValue value, __) { ... }
)
Well, ValueListenableBuilder takes an argument of type ValueListenable<T>.
And TextEditingController extends ValueNotifier<TextEditingValue>, which implements ValueListenable<ValueListenable>. This is how these classes are defined in the Flutter SDK:
class TextEditingController extends ValueNotifier<TextEditingValue> { ... }
class ValueNotifier<T> extends ChangeNotifier implements ValueListenable<T> { ... }
So here we have it. We can use ValueListenableBuilder to rebuild our UI when the TextEditingController value changes. 👍
Note about the validation UX
The example above works but has one drawback: we are showing a validation error right away before the user has the chance to enter any text.
This is not good UX. It would be better to only show any errors after the text has been submitted.
We can fix this by adding a _submitted state variable that is only set to true when the submit button is pressed:
class _TextSubmitWidgetState extends State<TextSubmitWidget> {
  bool _submitted = false;

  void _submit() {
    setState(() => _submitted = true);
    if (_errorText == null) {
      widget.onSubmit(_controller.value.text);
    }
  }

  ...
}
Then, we can use it to conditionally show the error text:
TextField(
  controller: _controller,
  decoration: InputDecoration(
    labelText: 'Enter your name',
    // only show the error text if the form was submitted
    errorText: _submitted ? _errorText : null,
  ),
)
And with this change in place, the error text only shows after we submit the form:
Much better.
Flutter TextField Validation with TextEditingController: Summary
Here are the key points we covered so far:
- When we work with text input, we can use
TextEditingControllerto get the value of aTextField. - If we want our widgets to rebuild when the text changes, we can wrap them with a
ValueListenableBuilderthat takes theTextEditingControlleras an argument.
This works, but it is a bit tricky to set up. Wouldn’t it be nice if we could use some high-level APIs to manage form validation?
That’s exactly what the Form and TextFormField widgets are for.
So let’s figure out how to use them by implementing the same solution with a form.
2. Flutter Form Validation with TextFormField
Here’s an alternative implementation of the _TextSubmitWidgetState that uses a Form:
class _TextSubmitWidgetState extends State<TextSubmitForm> {
  // declare a GlobalKey
  final _formKey = GlobalKey<FormState>();
  // declare a variable to keep track of the input text
  String _name = '';

  void _submit() {
    // validate all the form fields
    if (_formKey.currentState!.validate()) {
      // on success, notify the parent widget
      widget.onSubmit(_name);
    }
  }

  @override
  Widget build(BuildContext context) {
    // build a Form widget using the _formKey created above.
    return Form(
      key: _formKey,
      child: Column(
        mainAxisSize: MainAxisSize.min,
        crossAxisAlignment: CrossAxisAlignment.stretch,
        children: [
          TextFormField(
            decoration: const InputDecoration(
              labelText: 'Enter your name',
            ),
            // use the validator to return an error string (or null) based on the input text
            validator: (text) {
              if (text == null || text.isEmpty) {
                return 'Can't be empty';
              }
              if (text.length < 4) {
                return 'Too short';
              }
              return null;
            },
            // update the state variable when the text changes
            onChanged: (text) => setState(() => _name = text),
          ),
          ElevatedButton(
            // only enable the button if the text is not empty
            onPressed: _name.isNotEmpty ? _submit : null,
            child: Text(
              'Submit',
              style: Theme.of(context).textTheme.headline6,
            ),
          ),
        ],
      ),
    );
  }
}
Here’s how the code above works:
- We declare a
GlobalKeythat we can use to access the form state and pass it as an argument to theFormwidget. - We use a
TextFormFieldrather than aTextField. - This takes a
validatorfunction argument that we can use to specify our validation logic. - We use a separate
_namestate variable and update it in theonChangedcallback of theTextFormFieldwidget (note how this is used in theonPressedcallback of theElevatedButton). - Inside the
_submit()method, we call_formKey.currentState!.validate()to validate all the form data. If this is successful, we notify the parent widget by callingwidget.onSubmit(_name).
The Flutter FormState class gives us validate and save methods that make it easier to manage the form data.
AutovalidateMode
To decide when the TextFormField validation takes place, we can pass an autovalidateMode argument. This is an enum defined as follows:
/// Used to configure the auto validation of [FormField] and [Form] widgets.
enum AutovalidateMode {
  /// No auto validation will occur.
  disabled,

  /// Used to auto-validate [Form] and [FormField] even without user interaction.
  always,

  /// Used to auto-validate [Form] and [FormField] only after each user
  /// interaction.
  onUserInteraction,
}
By default, AutovalidateMode.disabled is used.
We could change this to AutovalidateMode.onUserInteraction so that our TextFormField validates when the text changes:
TextFormField(
  decoration: const InputDecoration(
    labelText: 'Enter your name',
  ),
  // validate after each user interaction
  autovalidateMode: AutovalidateMode.onUserInteraction,
  // The validator receives the text that the user has entered.
  validator: (text) {
    if (text == null || text.isEmpty) {
      return 'Can't be empty';
    }
    if (text.length < 4) {
      return 'Too short';
    }
    return null;
  },
)
But as we said before, we only want to enable validation after the form has been submitted.
So let’s add a _submitted variable like we did before:
class _TextSubmitFormState extends State<TextSubmitForm> {
  final _formKey = GlobalKey<FormState>();
  String _name = '';
  // use this to keep track of when the form is submitted
  bool _submitted = false;

  void _submit() {
    // set this variable to true when we try to submit
    setState(() => _submitted = true);
    if (_formKey.currentState!.validate()) {
      _formKey.currentState!.save();
      widget.onSubmit(_name);
    }
  }
}
Then, inside the TextFormField we can do this:
TextFormField(
  autovalidateMode: _submitted
      ? AutovalidateMode.onUserInteraction
      : AutovalidateMode.disabled,
)
The end result is exactly what we want: the error hint only shows after we submit the form if the text is invalid:
sponsor
Code with Andrea is free for everyone. Help me keep it that way by checking out this sponsor:
Cut your code-review time by 40% for free! gitStream is the free dev tool that automates away the pull-request & code-review problems plaguing cycle time in over 90% of engineering teams.
Conclusion
We have now explored two different ways of validating a form in Flutter.
You can find the complete source code and play with both solutions on Dartpad:
- Flutter TextField Validation with TextEditingController
- Flutter Form Validation with TextFormField
Which one should you use?
I recommend using Form and TextFormField, as they give you some high-level APIs that make it easier to work text input, and they are better suited if you have multiple form fields on the same page.
With that said, TextEditingController gives you more fine-grained control and lets you get and set the text, which can be handy when you need to pre-fill a text field. You can find more details in the TextEditingController documentation.
And if you want to learn more about working with forms, check the official documentation on Flutter.dev.
Happy coding!
Flutter has many different types of built-in input widgets like DatePicker, Checkbox, Slider, Radio Button, Dropdown Button amongst others for the time being we’re going to focus on the text.
Everybody has used a TextField to get information from the user. TextField is simple widgets, simply means a way of capturing a collection of data from the end-user.

As you can see we have a simple text field widget. By default when you add a TextField you will get the material styling.
Input Decoration
This allows to added behavior object without affecting the object itself. It will add visual enhancements to your TextFormField without actually changing the text because the TextFormField itself is pretty basic.
TextFormField(decoration: const InputDecoration(
                        icon: const Icon(Icons.person),
                        hintText: 'Enter your name',
                        labelText: 'Name'),
                        ....)
Input widgets can accept a number of properties. You can change the fill color, content patent, content padding, border ever border focus. You could change how that site with a disabled counter text.
The InputDeclaration does have some limitations. Label and Error messages are limited to text only. If you want a label to then that’s possible but if you want to add a star for required or if you want to add an exclamation mark if your message is invalid then it’s not possible.
As many of you know that to make apps secure you want to make sure that the information that users enter is valid and you want to display a nice friendly message as you can see.

Flutter Form Framework
You can probably come up with your own validation framework but Flutter has a set of form widgets that manages validation as along with other few features as well.

There are two types of widgets Form and FormField<T>. This represents Form in the widget tree and a Form will have FormField descendants that could be the string, int or a custom class.
The Form widgets maintain the states of the FormField and it stores data such as the current value and the validity.
Each FormField can handle its own validation but Form itself can coordinate and at once validates every FormField widgets. It can traverse down the tree, find every descendent of FormField and validate each one in turn.

FormField is a wrapper that adds validation to an existing input widget. It can also add saving and reset functionality. It’s uniform and consistent across all form widgets.
Validating TextFormField
Now I’m just going to explain a little bit more about validating TextFormFields.
1.Create a Form with a global key.
final _formKey = GlobalKey<FormState>();
...

body: Center(
          child: Form(
              key: _formKey,
              autovalidate: false,
              ....
In the case of a TextFormField the first thing you would do is create a Form and create a GlobalKey of the type FormField state. Then you will add that key to your Form
2. Add a FormField with validation logic
TextFormField( .....
                  validator: (value) {
                      if (value.isEmpty) {
                        return 'Please enter name';
                      }
                      return null;
                    },
It’s simple as you see there we want to make sure that username is required. Make sure that there is a value if not then the field is invalid and we will turn the message otherwise we return null indicating that is valid.
3. Create a button to validate and submit of the Form
Finally, we can call the validate function and then we submit the data.
onPressed: () {
                        if (_formKey.currentState.validate()) {
                          print("Process data");
                          ...
                        } else {
                          print('Error');
                        }
                      },
                      child: Text('Create'),
                    ),
How validation work
It records the valid function of every single FormField. Every FormField has it’s own validate function and within that validate function it will invoke the validator. The error message is displayed in the TextField. If FormFields is invalid this function will return false if all FormField is valid then it will return true and you can go ahead and process and submit the data.
String Length Validation
Simply add this code to any TextFormField to limit the length of characters to the passed in value. In our case, we will limit the name to 20 characters.
TextFormField(
       ......
[new LengthLimitingTextInputFormatter(20)],)
Phone Number Validation
A keyboard type of phone makes easier for a user to enter a phone number. For our validation, we’ll use a standard 10-digit Indian phone format.
TextFormField(
                    ...
                    keyboardType: TextInputType.phone,
                    inputFormatters: [
                      new WhitelistingTextInputFormatter(
                          new RegExp(r'^[0-9]*$')),
                      new LengthLimitingTextInputFormatter(10)
                    ],
                    ...
                  ),
What the above pattern does is essentially create a whitelist of characters we want to allow the user to enter. If a character doesn’t match this whitelist, it is discarded and not allowed to be entered. This keeps the user from entering anything other digits.
final RegExp phoneRegex = new RegExp(r'^[6-9]d{9}$');
TextFormField(
                  ....
                    validator: (value) {
                      if (!phoneRegex.hasMatch(value)) {
                        return 'Please enter valid phone number';
                      }
                      return null;
                    },
                    ...
                  ),
In addition to whitelisting characters, we need to tell the user when they have an issue with their entry.
Email Address Validation
The email address enter by the user will be validated against this regular expression and if it doesn’t pass, then the user will see a message informing them to correct their entry.
final RegExp emailRegex = new RegExp(
      r"^[a-zA-Z0-9.!#$%&'*+/=?^_`{|}~-][email protected][a-zA-Z0-9](?:[a-zA-Z0-9-]{0,253}[a-zA-Z0-9])?(?:.[a-zA-Z0-9](?:[a-zA-Z0-9-]{0,253}[a-zA-Z0-9])?)*$");


 TextFormField(
                    ...
                    keyboardType: TextInputType.emailAddress,
                    validator: (value) {
                      if (!emailRegex.hasMatch(value)) {
                        return 'Please enter valid email';
                      }
                      return null;
                    },
                    ...
                  ),
Password Cross Input Validation
The confirm password field needs to know the value of the password field in order to check that the passwords don’t match.
final _passwordFieldKey = GlobalKey<FormFieldState<String>>();
TextFormField(
                    key: _passwordFieldKey,
                    obscureText: true,
                    ....
             ),
TextFormField(
                    obscureText: true,
                    decoration: const InputDecoration(
                        labelText: 'Conform Password'),
                    validator: (value) {
                      if (value != _passwordFieldKey.currentState.value) {
                        return 'Password do not match';
                      }
                      return null;
                    },
                  ),
We can create a password field kay. When we pass that key into our TextFormField we can get access to the state of the password field and then get the value and then here we can do our check and then return the desired error message.
The Save Function
Another feature of the FormField is save() function. Save function will allow you just to save all the value at once if you want to save the values on submission. It’s pretty simple you have an save() function, in this case, we’re just assigning the value to state variable.
TextFormField(
                    ...
                    onSaved: (value) {
                      user.phoneNo = value;
                    },
                  ),
Like validate() what save will do is it will go through every FormField and invoke save functional every form filter to invoke the save function of every FormField.
Auto Validation
Use the auto validate property if you want to validate on changed. A lot of the time when you have a form you want the validation. What you can do is that once you press submit for the first time you can set auto validate to true so that as soon as you correct your mistake the other message goes away.
Download this project from GitHub
If you are building the sign-in or sign-up page in Android application, then Obviously you need to validate the Text field. otherwise, it can be null or empty. This will cause save the null values into the database. Then further make the application less impact. So to overcome this problem we need to prior check that there can not be a empty text field. So that null value can not be saved into the database. A sample video is given below to get an idea about what we are going to do in this article.
Step By Step Implementation
Step 1: Create a New Project in Android Studio
To set up Flutter Development on Android Studio please refer to Android Studio Setup for Flutter Development, and then create a new project in Android Studio please refer to Creating a Simple Application in Flutter.
Step 2: Import the material package
Adding material package that gives us the important functions and calls the runApp method in the main function that will call our application.
import 'package:flutter/material.dart';
void main() {
   runApp(RunMyApp());
}
Step 3: Creating stateful Widget
Now we have to make a stateful widget and then return the materialApp widget which allows us the set the title and theme and many more or default values.
Step 4: Create the text editing controller
Create the text editing controller to retrieve the text from the Text field. You can refer to this article to Retrieve the text from the text field.
final _text = TextEditingController();  //texteditingcontroller
bool _validate = false;  //variable to store the bool value
Step 5: Check the text field is empty or not while pressing the button.
ElevatedButton(
                 onPressed: () {
                   setState(() {
                     _text.text.isEmpty ? _validate = true : _validate = false;
                   });
                 },
                 child: Text('Submit'),
               )
Here , _text.text.isEmpty we are checking using the text editing controller. If empty validate variable will assign with false otherwise assign with true. And finally according to the value of validate we can raise the error in the text field as shown in the output video.
Final Code
Dart
import 'package:flutter/material.dart';
void main() {
runApp(MyHomePage());
}
class MyHomePage extends StatefulWidget {
@override
MyHomePageState createState() {
return new MyHomePageState();
}
}
class MyHomePageState extends State<MyHomePage> {
final _text = TextEditingController();
bool _validate = false;
@override
void dispose() {
_text.dispose();
super.dispose();
}
@override
Widget build(BuildContext context) {
return MaterialApp(
theme: ThemeData(primarySwatch: Colors.green),
home: Scaffold(
appBar: AppBar(
title: Text('TextField Validation'),
),
body: Center(
child: Padding(
padding: const EdgeInsets.all(300.0),
child: Column(
mainAxisAlignment: MainAxisAlignment.center,
children: [
Text('Error Showed if Field is Empty on Submit button Pressed'),
TextField(
controller: _text,
decoration: InputDecoration(
labelText: 'Enter the Value',
errorText: _validate ? 'Value Can't Be Empty' : null,
),
),
SizedBox(
height: 10,
),
ElevatedButton(
onPressed: () {
setState(() {
_text.text.isEmpty ? _validate = true : _validate = false;
});
},
child: Text('Submit'),
)
],
),
),
),
),
);
}
}
Output
In this example, we are going to show you the easiest way to validate TextFiled or TextFormField in Flutter App. Validation is very important to retrieve correct data from users. See the example below to validate email, full name, phone number, credit card number, URL, and many more.
To validate the correctness of data, you can use Regular Expression (Regex) with the pattern.
RegExp(r'^[a-z A-Z]+$')This pattern allows upper/lower case alphabets and space.
RegExp(r'^[w-.][email protected]([w-]+.)+[w-]{2,4}$')This regex checks email with domain extension length. Allows 2 to 4 domain extension lengths. For example, .com has 3 characters, .np as 2 characters, .store as 4 characters.
RegExp(r'^[+]*[(]{0,1}[0-9]{1,4}[)]{0,1}[-s./0-9]*$')This pattern allows «+» single sign at first.
if(fname.text.length > 10){
    //length of textfield with controller "name" has more than 10 characters.
}
import 'package:flutter/material.dart';
void main(){
runApp(MyApp());
}
class MyApp extends StatelessWidget{
@override
Widget build(BuildContext context) {
return MaterialApp(
home: Home(),
);
}
}
class Home extends StatefulWidget{
@override
_HomeState createState() => _HomeState();
}
class _HomeState extends State<Home> {
final formKey = GlobalKey<FormState>(); //key for form
@override
Widget build(BuildContext context) {
return Scaffold(
appBar: AppBar(
title: Text("Form Validation"),
backgroundColor: Colors.indigoAccent,
),
body: Container(
padding: EdgeInsets.all(20),
child: Form(
key: formKey, //key for form
child:Column(children: [
TextFormField(
decoration: InputDecoration(
labelText: 'Enter Name'
),
validator: (value){
if(value.isEmpty || !RegExp(r'^[a-z A-Z]+$').hasMatch(value)){
//allow upper and lower case alphabets and space
return "Enter Correct Name";
}else{
return null;
}
},
),
TextFormField(
decoration: InputDecoration(
labelText: 'Enter Phone Number'
),
validator: (value){
if(value.isEmpty || !RegExp(r'^[+]*[(]{0,1}[0-9]{1,4}[)]{0,1}[-s./0-9]*$').hasMatch(value)){
// r'^[0-9]{10}$' pattern plain match number with length 10
return "Enter Correct Phone Number";
}else{
return null;
}
},
),
TextFormField(
decoration: InputDecoration(
labelText: 'Enter Email'
),
validator: (value){
if(value.isEmpty || !RegExp(r'^[w-.][email protected]([w-]+.)+[w-]{2,4}$').hasMatch(value)){
return "Enter Correct Email Address";
}else{
return null;
}
},
),
ElevatedButton(
onPressed: (){
if(formKey.currentState.validate()){
//check if form data are valid,
// your process task ahed if all data are valid
}
},
child: Text("Submit Data")
)
],
),
),
)
);
}
}
class Home extends StatefulWidget{
  @override
  _HomeState createState() => _HomeState();
}

class _HomeState extends State<Home> {
  TextEditingController fname = TextEditingController();
  bool texterror = false;

  @override
  void initState() {
    fname.text = "";
    super.initState();
  }

  @override
  Widget build(BuildContext context) {
    return  Scaffold(
          appBar: AppBar(
             title: Text("TextField Validation"),
             backgroundColor: Colors.indigoAccent,
          ),
          body: Container(
            padding: EdgeInsets.all(20),
            child: Column(children: [
                     TextField(
                       controller: fname,
                       decoration: InputDecoration(
                         labelText: "Your Name",
                         errorText: texterror?"Enter Correct Name":null,
                       )
                     ),

                     ElevatedButton(
                      onPressed: (){
                         if(fname.text.isEmpty || !RegExp(r'^[a-z A-Z]+$').hasMatch(fname.text)){
                              setState(() {
                                texterror = true;
                              });
                          }else{
                             setState(() {
                                texterror = false;
                              });
                          }
                      },
                      child: Text("Submit Data")
                    )

                ],
            )
          )
       );
  }
}
Furthermore, you can validate data easily without using Regex. For that, add validators flutter package to your dependency by adding the following line in pubspec.yaml file:
dependencies:
  flutter:
    sdk: flutter
  validators: ^3.0.0
Import package to Script:
import 'package:validators/validators.dart';if(isEmail(value)){
//value is email
}if(isURL(value)){
//value is web URL link
}if(isAlpha(value)){
//value has alphabets only
}if(isCreditCard(value)){
//value is credit card number
}if(isCreditCard(value)){
//value is credit card number
}- contains — check if the string contains the seed.
- equals — check if the string matches the comparison.
- isAfter — check if the string is a date that’s after the specified date.
- isAlphanumeric — check if the string str contains only letters and numbers.
- isBefore — check if the string is a date that’s before the specified date.
- isFloat — check if the string str is a float.
- isFQDN — check if the string str is a fully qualified domain name (e.g. domain.com).
- isHexadecimal — check if the string stris a hexadecimal number.
- isHexColor — check if the string str is a hexadecimal color.
- isInt — check if the string str is an integer.
- isIP — check if the string str is IP version 4 or 6.
- isISBN — check if the string is an ISBN (version 10 or 13).
- isJSON — check if the string is valid JSON.
- isLength(String str, int min, [int? max]) — check if the length of the string str falls in a range.
- isLowercase — check if the string str is lowercase.
- isMongoId — check if the string is a valid hex-encoded representation of a MongoDB ObjectId.
- isNull — check if the string str is null.
- isNumeric — check if the string str contains only numbers.
- isPostalCode — Check if the string is postal or zip code.
- isUppercase — check if the string str is uppercase.
- isUUID — check if the string is a UUID (version 3, 4 or 5).
- matches — check if string str matches the Regex pattern.
In this way, you can validate TextFormFiled or TextField data with Dart Regex and package in Flutter App.
The Form widget allows you to validate the user input and display a message if validation fails. For example, you can use a Form widget to check if a user has given the email and password combination.
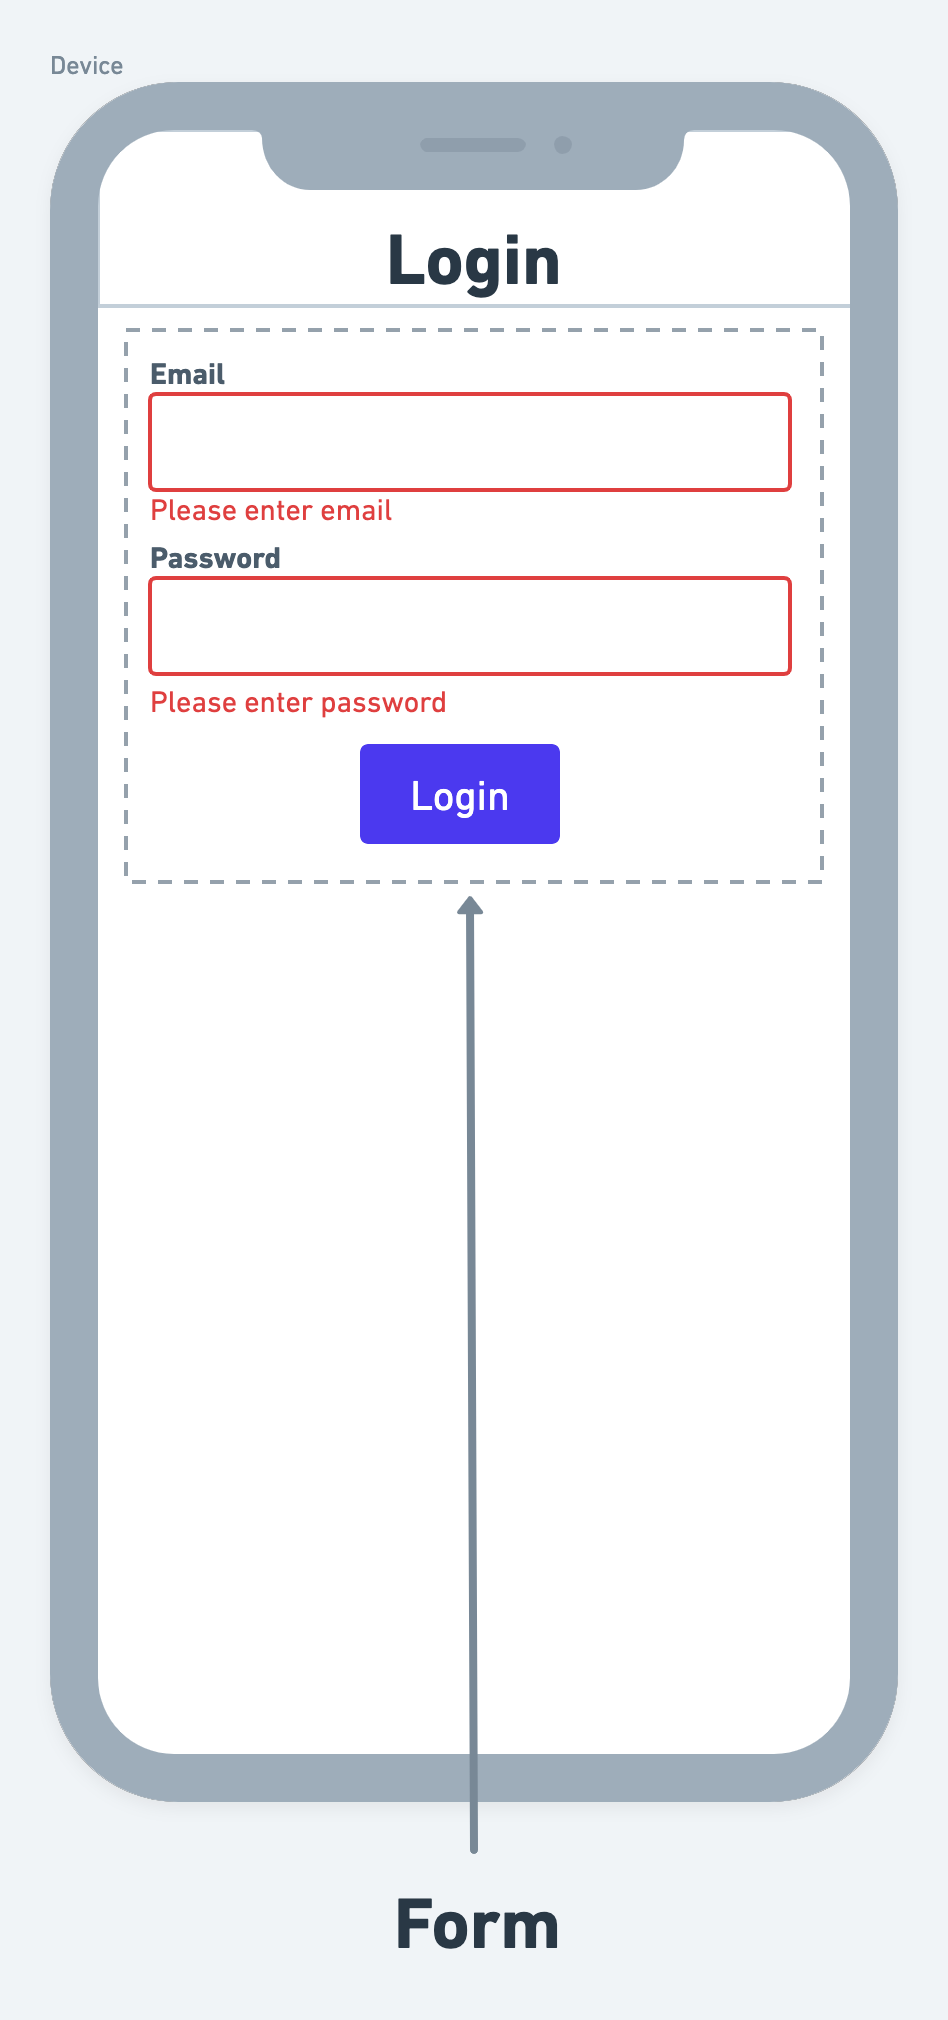
Let’s build a basic example of a signup form that looks like below:
.gif?alt=media&token=81e0e09e-9837-4317-9057-51de60ffae27)
Building and validating a Form includes the following steps:
Here’s an example of building a page that contains the signup form:
-
First, drag the Form widget from the Form Elements tab (in the Widget Panel) or add it directly from the widget tree.
-
Inside the form, add the
Column
widget from the Layout Elements tab and add some padding around it.
-
Add a
TextField
(under Form Elements) inside the Column to accept the email and give it a name.
-
Add one more
TextField
inside the Column to accept the password and give it a name.
-
Add one more
Button
to submit the form.
To add validation on a Form:
-
Select the Form widget from the widget tree or from the canvas area.
-
Move to the Property Editor (on the right side of your screen) and scroll down to the Validation section.
-
Identify the TextField on which you would like to add the validation and checkmark the box on the right side.
-
Inside the Error Message input box, provide the message that will be displayed below the TextField if a user leaves the TextField without entering anything inside.
-
Inside the Min Required Character, enter the number. This is the minimum character required for the validation to pass. For example, If you provide a value as 9 and a user enters value as [email protected] (which is 6 characters) then the validation fails and an error message will be displayed.
-
Inside the Minimum Character Error Text input box, provide the message that will be displayed if a user doesn’t provide the required characters.
-
-
To add validation on actions such as Date/Time Picker, PlacePicker, etc, find the action name and checkmark the box on the right side.
-
Checkmark the Add Action on Error. This will perform an action if a user has not specified the value.
-
Select the Action Type to Show Snack Bar. You can also choose to show the Alert Dialog for the error message.
-
Under the Snack Bar Message Section, Inside the Value input box, specify the message you would like to appear on the snack bar.
-
Find the Background Color property, click on the box next to Unset, select any dark/light color, and then click Use Color or click on Unset and enter a Hex Code directly. You can also choose the color by clicking on the Palette and Simple button.
-
Similarly, find the Text Color property and set the color.
-
.gif?alt=media&token=60423c4a-955d-4333-9b3d-f46cbe8058ac)
3. Adding Action to Validate Form
3. Adding Action to Validate Form
You can add an action to validate a form by visiting the following page:
Instead of showing an error message when the user submits the form, you can let them know about the error as they type inside the TextField widget if the validation fails. This becomes really helpful if you are presenting a long form to users.
.gif?alt=media&token=2074d08f-89fa-40bd-8549-d0cde4148ead)
-
Select the Form widget from the widget tree or from the canvas area.
-
Move to the Property Editor (on the right side of your screen) and scroll down to the Validation section.
-
Checkmark the Automatically Validate property (click on it).
.gif?alt=media&token=8ca22d8e-1c4b-48d5-a80c-30084bb21ba5)
Validating a Form on TextField On Submit
Validating a Form on TextField On Submit
You can also validate a form when you are done entering a value inside the TextField using the On Submit action.
.gif?alt=media&token=ef410816-c906-4ad1-9887-c801c797a2fe)
To validate a form on TextField On Submit:
-
Select the TextField widget from the widget tree or from the canvas area.
-
Click + Add Action button
-
Select the Action Type as Validate Form.
-
Set the Select Form to Validate to your Form name.
.gif?alt=media&token=19c2c986-2c79-4ee0-871b-40ec18bf6508)
The
Properties Panel
can be used to customize the behavior of your Container widget.
Here
are the instructions on how to add padding.
Here
are the instructions on adjusting the alignment.
Please find the instructions to show/hide the widget
here