Управление ветками
Теперь, когда вы уже попробовали создавать, объединять и удалять ветки, пора познакомиться с некоторыми инструментами для управления ветками, которые вам пригодятся, когда вы начнёте использовать ветки постоянно.
Команда git branch делает несколько больше, чем просто создаёт и удаляет ветки.
При запуске без параметров, вы получите простой список имеющихся у вас веток:
$ git branch
  iss53
* master
  testing
Обратите внимание на символ *, стоящий перед веткой master: он указывает на ветку, на которой вы находитесь в настоящий момент (т. е. ветку, на которую указывает HEAD).
Это означает, что если вы сейчас сделаете коммит, ветка master переместится вперёд в соответствии с вашими последними изменениями.
Чтобы посмотреть последний коммит на каждой из веток, выполните команду git branch -v:
$ git branch -v
  iss53   93b412c Fix javascript issue
* master  7a98805 Merge branch 'iss53'
  testing 782fd34 Add scott to the author list in the readme
Опции --merged и --no-merged могут отфильтровать этот список для вывода только тех веток, которые слиты или ещё не слиты в текущую ветку.
Чтобы посмотреть те ветки, которые вы уже слили с текущей, можете выполнить команду git branch --merged:
$ git branch --merged
  iss53
* master
Ветка iss53 присутствует в этом списке потому что вы ранее слили её в master.
Те ветки из этого списка, перед которыми нет символа *, можно смело удалять командой git branch -d; наработки из этих веток уже включены в другую ветку, так что ничего не потеряется.
Чтобы увидеть все ветки, содержащие наработки, которые вы пока ещё не слили в текущую ветку, выполните команду git branch --no-merged:
$ git branch --no-merged
  testing
Вы увидите оставшуюся ветку.
Так как она содержит ещё не слитые наработки, попытка удалить её командой git branch -d приведёт к ошибке:
$ git branch -d testing
error: The branch 'testing' is not fully merged.
If you are sure you want to delete it, run 'git branch -D testing'.
Если вы действительно хотите удалить ветку вместе со всеми наработками, используйте опцию -D, как указано в подсказке.
|
Подсказка |
Если в качестве аргумента не указан коммит или ветка, то опции Вы всегда можете указать дополнительный аргумент для вывода той же информации, но относительно указанной ветки предварительно не извлекая и не переходя на неё. |
Переименование ветки
|
Внимание |
Не переименовывайте ветки, которые всё ещё используются другими участниками. |
Предположим, у вас есть ветка с именем bad-branch-name, и вы хотите изменить её на corrected-branch-name, сохранив при этом всю историю.
Вместе с этим, вы также хотите изменить имя ветки на удалённом сервере (GitHub, GitLab или другой сервер).
Как это сделать?
Переименуйте ветку локально с помощью команды git branch --move:
$ git branch --move bad-branch-name corrected-branch-nameВетка bad-branch-name будет переименована в corrected-branch-name, но это изменение пока только локальное.
Чтобы все остальные увидели исправленную ветку в удалённом репозитории, отправьте её туда:
$ git push --set-upstream origin corrected-branch-nameТеперь проверим, где мы сейчас находимся:
$ git branch --all
* corrected-branch-name
  main
  remotes/origin/bad-branch-name
  remotes/origin/corrected-branch-name
  remotes/origin/main
Обратите внимание, что текущая ветка corrected-branch-name, которая также присутствует и на удалённом сервере.
Однако, старая ветка всё ещё по-прежнему там, но её можно удалить с помощью команды:
$ git push origin --delete bad-branch-nameТеперь старое имя ветки полностью заменено исправленным.
Изменение имени главной ветки
|
Предупреждение |
Изменение имени ветки, например master/main/mainline/default, сломает интеграции, службы, вспомогательные утилиты и скрипты сборки, которые использует ваш репозиторий. |
Переименуйте локальную ветку master в main с помощью следующей команды:
$ git branch --move master mainПосле этого, локальной ветки master больше не существует, потому что она была переименована в ветку main.
Чтобы все остальные могли видеть новую ветку main, вам нужно отправить её в общий репозиторий.
Это делает переименованную ветку доступной в удалённом репозитории.
$ git push --set-upstream origin mainВ итоге, состояние репозитория становится следующим:
$ git branch --all
* main
  remotes/origin/HEAD -> origin/master
  remotes/origin/main
  remotes/origin/master
Ваша локальная ветка master исчезла, так как она заменена веткой main.
Ветка main доступна в удалённом репозитории.
Старая ветка master всё ещё присутствует в удалённом репозитории.
Остальные участники будут продолжать использовать ветку master в качестве основы для своей работы, пока вы не совершите ряд дополнительных действий.
Теперь, для завершения перехода на новую ветку перед вами стоят следующие задачи:
-
Все проекты, которые зависят от текущего, должны будут обновить свой код и/или конфигурацию.
-
Обновите конфигурацию всех запускаемых тестов.
-
Исправьте скрипты сборки и публикации артефактов.
-
Поправьте настройки репозитория на сервере: задайте новую ветку по умолчанию, обновите правила слияния, а также прочие настройки, которые зависят от имени веток.
-
Обновите документацию, исправив ссылки, указывающие на старую ветку.
-
Слейте или отмените запросы на слияние изменений, нацеленные на старую ветку.
После того, как вы выполнили все эти задачи и уверены, что ветка main работает так же, как ветка master, вы можете удалить ветку master:
$ git push origin --delete masterThere can be a couple of scenarios wherein you would wish to delete branch. Following are some of the possible scenarios:
- Delete git branch locally
- Delete git branch remotely
- Delete git branch both locally and globally
- Perform git merge and Delete git branch
We will cover all these scenarios individually with the best recommendation to do this the right way.
Prepare Environment
I have setup my repository git_examples using GitLab.
Following is my git version:
deepak@ubuntu:~/git_examples$ git --version
git version 2.32.0
I will clone my repository from gitlab to my local workstation:
deepak@ubuntu:~/git_examples$ git clone git@gitlab.com:golinuxcloud/git_examples.git
Git delete branch locally
If your branch is only available on your local workstation repository then you must follow this section. Currently I have following branch in the local repository of my workstation:
deepak@ubuntu:~/git_examples$ git branch
  issue-5632
  issue-6291
  issue-9538
* main
  my-feature-branch
To check the list of remote branches (i.e. branch which are available on the remote gitlab server):
deepak@ubuntu:~/git_examples$ git branch --remotes
  origin/HEAD -> origin/main
  origin/main
  origin/my-feature-branch
So the following branch are only present on my local workstation only but not on the remote:
  issue-5632
  issue-6291
  issue-9538
Since these branches are not available on remote, so I just need to delete them locally.
ALSO READ: Git rebase explained in detail with examples
Scenario-1: Fix error: Cannot delete branch ‘XXX’ checked out at ‘YYY’
To delete a branch locally use the following command syntax:
git branch --delete|-d <local_branch_name>
First step, make sure you are not part of the branch which you wish to delete or else you will get this error:
deepak@ubuntu:~/git_examples$ git switch issue-6291
Switched to branch 'issue-6291'

deepak@ubuntu:~/git_examples$ git branch --delete issue-6291
error: Cannot delete branch 'issue-6291' checked out at '/home/deepak/git_examples'
As you can see, I switched to issue-6291 branch and then trying to delete the same branch leads to an ERROR.
So to delete the branch, you must checkout as a different branch first.
deepak@ubuntu:~/git_examples$ git switch main
Switched to branch 'main'
Your branch is ahead of 'origin/main' by 2 commits.
  (use "git push" to publish your local commits)
Check your current branch:
deepak@ubuntu:~/git_examples$ git branch
  issue-5632
  issue-6291
  issue-9538
* main
  my-feature-branch
Now try to delete your branch:
deepak@ubuntu:~/git_examples$ git branch --delete issue-6291
Deleted branch issue-6291 (was e126b0b).
Scenario-2: Fix error: The branch ‘XXX’ is not fully merged.
Let us try to delete another of our local branch:
deepak@ubuntu:~/git_examples$ git branch --delete issue-5632
error: The branch 'issue-5632' is not fully merged.
If you are sure you want to delete it, run ‘git branch -D issue-5632‘. This error is caused because we have some un-merged changes in branch issue-5632 due to which the branch delete has failed.
ALSO READ: Git rename branch — local and remote (PROPERLY)
In such case either you can delete the branch forcefully or merge the changes and then perform the delete operation.
Solution-1: Perform merge and delete git branch
I will push these changes to a new branch issue-5632 on the remote gitlab server.
deepak@ubuntu:~/git_examples$ git push origin issue-5632
Enumerating objects: 5, done.
Counting objects: 100% (5/5), done.
Compressing objects: 100% (2/2), done.
Writing objects: 100% (4/4), 319 bytes | 159.00 KiB/s, done.
Total 4 (delta 1), reused 0 (delta 0), pack-reused 0
remote:
remote: To create a merge request for issue-5632, visit:
remote:   https://gitlab.com/golinuxcloud/git_examples/-/merge_requests/new?merge_request%5Bsource_branch%5D=issue-5632
remote:
To gitlab.com:golinuxcloud/git_examples.git
 * [new branch]      issue-5632 -> issue-5632
This will create a merge request with main branch and will also create a new branch on the remote server.
To merge this into main branch, switch to main branch:
deepak@ubuntu:~/git_examples$ git switch main
Switched to branch 'main'
Your branch is ahead of 'origin/main' by 2 commits.
  (use "git push" to publish your local commits)
Check your current branch
deepak@ubuntu:~/git_examples$ git branch
  issue-5632
  issue-9538
* main
  my-feature-branch
Merge issue-5632 branch into main
deepak@ubuntu:~/git_examples$ git merge issue-5632
Updating e126b0b..cf00196
Fast-forward
 test-5632/patch-1 | 0
 1 file changed, 0 insertions(+), 0 deletions(-)
 create mode 100644 test-5632/patch-1
Verify the git log to confirm the merge:
deepak@ubuntu:~/git_examples$ git log --oneline
cf00196 (HEAD -> main, origin/issue-5632, issue-5632) Added patch-1
e126b0b (origin/my-feature-branch, my-feature-branch, issue-9538) Adding new group
5e04f57 Created new script to add groups
1b6369c (origin/main, origin/HEAD) Added create_users.sh script
6297a37 Updated script2.sh in main branch
...
Now you can go ahead and delete the local branch:
deepak@ubuntu:~/git_examples$ git branch --delete issue-5632
Deleted branch issue-5632 (was cf00196).
NOTE:
At this stage we have created a branch issue-5632 on the remote gitlab server as well which will still be present and need to be handled separately. We will cover this in next section of this article.
ALSO READ: git branch management with examples [Beginners]
Solution-2: Forcefully delete local branch
If you do not wish to merge your changes, then you can forcefully delete the branch locally using --delete --force or -D:
So you can use:
git branch --delete --force <branch_to_be_deleted>
OR
git branch -D <branch_to_be_deleted>
Git delete branch remotely
To delete a branch from the remote, use any of the following syntax:
git push origin --delete <branch>   # Git version 1.7.0 or newer
git push origin -d <branch>         # Shorter version (Git 1.7.0 or newer)
git push origin :<branch>           # Git versions older than 1.7.0
Following are the list of remotely available branches on my gitlab server:
deepak@ubuntu:~/git_examples$ git branch --remotes
  origin/HEAD -> origin/main
  origin/issue-5632
  origin/main
  origin/my-feature-branch
These are the list of locally available branch:
deepak@ubuntu:~/git_examples$ git branch
* issue-9538
  main
  my-feature-branch
Scenario-1: When branch is available only on the remote (not locally)
Since, issue-5632 branch is available only on the remote server as we have already deleted it on the local repo. To delete this branch also from the remote we will use:
deepak@ubuntu:~/git_examples$ git push origin --delete issue-5632
To gitlab.com:golinuxcloud/git_examples.git
 - [deleted]         issue-5632
Verify the list of branch on the remote to make sure your branch was deleted successfully:
deepak@ubuntu:~/git_examples$ git branch --remotes
  origin/HEAD -> origin/main
  origin/main
  origin/my-feature-branch
ALSO READ: Move content from one git repo to another [5 simple steps]
Scenario-2: When there are un-merged changes locally
I have pushed issue-9538 to the remote gitlab server, so now this branch is also available on the remote:
deepak@ubuntu:~/git_examples$ git branch --remotes
  origin/HEAD -> origin/main
  origin/issue-9538
  origin/main
  origin/my-feature-branch
I will commit some changes into this branch, but will not merge it with main branch:
deepak@ubuntu:~/git_examples$ git branch
* issue-9538
  main
  my-feature-branch

deepak@ubuntu:~/git_examples$ git add bugs/patch-9538

deepak@ubuntu:~/git_examples$ git commit -m "added patch for #9538" -a
[issue-9538 d850184] added patch for #9538
 1 file changed, 0 insertions(+), 0 deletions(-)
 create mode 100644 bugs/patch-9538
Let’s try to delete this branch on the remote repo server:
deepak@ubuntu:~/git_examples$ git push origin --delete issue-9538
To gitlab.com:golinuxcloud/git_examples.git
 - [deleted]         issue-9538
So, even though I was in issue-9538 branch and there were un-merged changes, but still the remote branch was successfully deleted. So these factors do not matter if we wish to delete remote branch.
With this step, the remote branch has been deleted but the local branch is still there along with the un-merged changes:
deepak@ubuntu:~/git_examples$ git branch
* issue-9538
  main
  my-feature-branch
So we must delete this branch locally as explained in section one of this article.
Delete git branch both locally and remotely
We have covered this topic separately, now lets understand the flow which should be followed when trying to delete a branch from both local and remote git server.
ALSO READ: git undo commit before push [Practical Examples]
In my case my-feature-branch is available on both local and remote git server:
deepak@ubuntu:~/git_examples$ git branch
* issue-9538
  main
  my-feature-branch
Step-1: Switch to alternate branch
Make sure you are on a different branch and not in the one you plan to delete. To switch your branch you can use:
git checkout <different_branch>
OR
git switch <different_branch>
Since we are already on a different branch, we will ignore this step.
Step-2: Delete branch on the remote
Next we will delete the branch on the remote server first:
deepak@ubuntu:~/git_examples$ git push origin --delete my-feature-branch
To gitlab.com:golinuxcloud/git_examples.git
 - [deleted]         my-feature-branch
As you can verify, now my-feature-branch is deleted from remote but is still available locally:
deepak@ubuntu:~/git_examples$ git branch --all
* issue-9538
  main
  my-feature-branch
  remotes/origin/HEAD -> origin/main
  remotes/origin/main
Step-3: Delete branch locally
Now we can delete our branch locally. Since the remote branch is already deleted, we can safely use --delete --force or -D to perform a force delete of the git branch:
deepak@ubuntu:~/git_examples$ git branch --delete --force my-feature-branch
Deleted branch my-feature-branch (was e126b0b).
Verify the list of branch:
deepak@ubuntu:~/git_examples$ git branch --all
* issue-9538
  main
  remotes/origin/HEAD -> origin/main
  remotes/origin/main
Step-4: Pruning the obsolete local remote-tracking branch
Note that deleting X remote branch from the command line using a git push will also remove the local remote-tracking branch origin/X, so it is necessary to prune the obsolete remote-tracking branch with git fetch --prune or git fetch -p.
deepak@ubuntu:~/git_examples$ git switch main
Switched to branch 'main'
Perform a fetch on other machines after deleting remote branch, to remove obsolete tracking branches.
deepak@ubuntu:~/git_examples$ git fetch --all --prune
Fetching origin
ALSO READ: First Time Git Setup | Git Config Global
Summary
In this article we discussed in depth about different commands using which you can delete git branch both locally and remotely. You can safely remove a branch with git branch -d yourbranch. If it contains unmerged changes (ie, you would lose commits by deleting the branch), git will tell you and won’t delete it.
To delete a remote branch, use git push origin :mybranch, assuming your remote name is origin and the remote branch you want do delete is named mybranch.
Further Readings
git branch
This the second part of the series on Git. I hope that you have gone through the commands mentioned in the first part “Introduction To Code Version Control”. In this part, I will discuss the concept of branches and the various operations you could perform in Git to manage branches. To round things off, I will highlight Git commands that will help you manage branches and resolve branch conflicts.
Understanding Branches
Branches are separate working environments complete with working directories and staging environment. Every branch has its record of commits that could be merged with the master branch upon the successful completion of the project.
By default, every Git has a master branch. However, the developer(s) could create any number of branches. The developer could move across branches easily using commands. To manipulate branches (create, delete and rename) Git offers the command git branch. However, this command will not allow merging of the code and moving to another branch.
Why We Create Branches
At this point, an important question arises: Why do I need other branches, if I have a master branch for the project?
Let suppose you have a project where several developers produce several thousand lines of code. Every developer commits changes to the master branch. Now suppose, you wish to test specific features of the project without interfering with the main branch of the project. To do this, you need to create a separate branch of the code that you could safely test features without breaking the main code.
Working With Branches In Git
Working with branches in Git involves several commands:
git branch – List All Branches
This command shows a list of branches. Run the git branch in your terminal.

The * indicates that I am currently on the master branch.
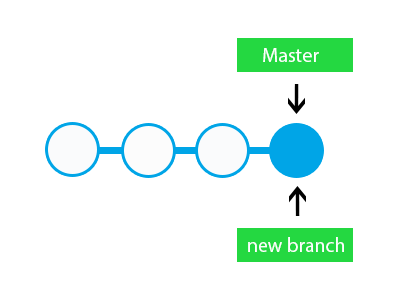
git branch <branch> – Create New Branch
It is easy to create new branches. Remember that a git branch is only a pointer placed on the the master branch when committing a new change. For creating branches, pass the name of branch with command:
git branch <branch name>. In the case of the example, the commands would look like: git branch newbranch
Now, When I run git branch again, the results will show that a new branch is added to the list.

Creating branches does not change the history of the repository. Instead, they add a pointer to the commit.
This command could also be used to change the name of the branch. To do this, Pass the new and old name of the branch in the following command:
git branch -m <old name> <new name>. For instance, the command git branch -m example title_branch will rename example branch to title_branch.
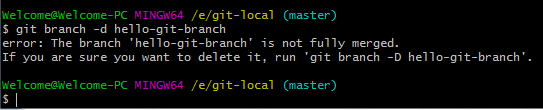
git branch -d <branch name> – Delete a Branch
Deleting a branch is easy enough!
Remember that before deleting a branch, make sure that you have merged it in the master branch. Once done, pass the branch name with git command to delete it.
git branch -d <branch name>. For instance, I have used git branch -d demobranch
![]()
If you do not merge the branch before deletion, An exception will be thrown:
error: The branch ‘crazy-experiment’ is not fully merged.
If you are sure you want to delete it run ‘git branch -D <branch name>’
The branch could be forced-deleted through the command git branch -D demobranch
git checkout <branch> – Switching Between Branches
Switching between branches is easy! The command is:
git checkout <branch name>. For instance, git checkout newbranch
At this stage, when I run the command: cat .git/HEAD. You should see that the reference Head has been also been set to this branch.

git checkout -b <branch> – Create & Switch Branches at the Same Time
You could create and switch to a newly created branch at the same time by this command.
git checkout -b newbranch
![]()
The checkout command tells Git to fetch the latest changes of the branch and ensure that the working directory has the latest code of that branch.
git checkout – Switching Branches with Uncommitted Changes
Git does not allow you to switch branches when you have uncommitted changes in the code.
Suppose, I have made changes in index.php. And, now I want to switch to newbranch from master. The command will show uncommitted file like this:

The results shows that there is an uncommitted file index.php.
git diff – Comparing Branches
You can also compare branches to see the changes between the two. For this, Git provides a comparison operator (..). Remember, for this operator to work, all changes should be committed in all the branches. To see the differences, run the command: git diff <branch name>..<branch name>. For instance: git diff master..newbranch
You can see the different versions of same code in the two branches. You need to choose which version is the old one.
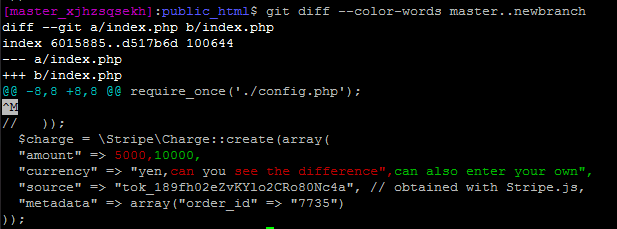
If you want to see the differences in same div, you can run the following command:
git diff –color-words master..newbranch. The result is:
You can also check whether the branches have the same version of code or that the branches differ in commits. For instance, you can check which branch has (or hasn’t) all the commits of other branches. Run the following command:
git branch –merged. In my case, the result looks like:
![]()
This means that the master branch has all the commits of the example branch, but it does not have all the commits of the newbranch.
git clone – Cloning Branches From the Repository
You probably know about cloning GitHub or Bitbucket projects using the HTTP URL: The command is:.
git clone https://github.com/shahroznawaz/testdemo.git
However, remember that when you clone a repository, it creates a local copy of the master branch.
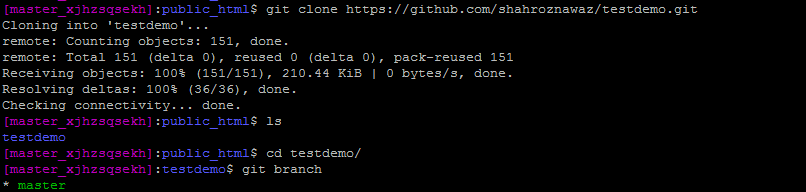
The local copy also has information of other branches, but remember that you need to pull individual branches from the repository. Run git branch -a and you will see the branches highlighted in red. The Head is placed on the master branch which was pulled.

Now to pull up the second branch, which is BR-02. Run the checkout command:
git checkout -b BR-02 origin/BR-02
This command will pull up the branch BR-02 and, additionally, create a local copy with the same name.

Now if you want to clone every branch from GitHub, you need to run some commands. First clone the repository with this clone command with the suffix .git
git clone –mirror https://github.com/shahroznawaz/testdemo.git .git
At this point, you will only see the .git folder because this is just an bear repository. Next run the command:
git config –bool core.bare false
The final command is:
git reset –hard. Now you will see all the branches from the GitHub repo.
Related: A Cheat Sheet For Git Commands
Merge Branches & Resolve Conflicts
While working on several branches, you need to merge the commits of individual branches into the master. This should be done when you have successfully tested the new feature code in a separate branch and now you are ready to merge it with the master branch.
Merge Two Branches
So far, I was working with two branches: master and newbranch. I will now add one more branch package and next, add some commits to it. I will now show how to merge the package branch.
First switch to the master branch and run the following Git command:
git merge <branch>. In my example, the command would be git merge package

Do the git log command to see whether the commits merged in the master. Merging branches is a complex process and often leads to merge conflicts. I will now define what conflicts are how to resolve these conflicts!
Why Conflicts Occur
In simple terms, conflicts occur when changes are made to the same line by two different people. Similarly, conflicts could also arise if one person edits a file and another deletes it.
To demonstrate the concept of conflicts, I have made changes in the same line of the index.php file in both branches. Now, when I merge these branches, a conflict message popups like this.
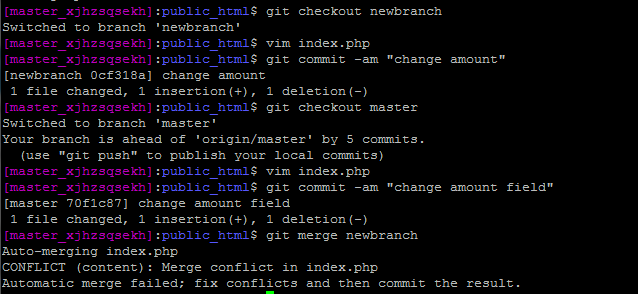
At this stage, when I open index.php, I discover that it contains extra message lines.
Changes in branch master: “amount” -> “total_amount”
Changes in branch newbranch: 10000 -> 50000
It adds the <<<<<<<Head line to indicate that the Head contains this change in master. And >>>>>>>newbranch showing the change in itself.
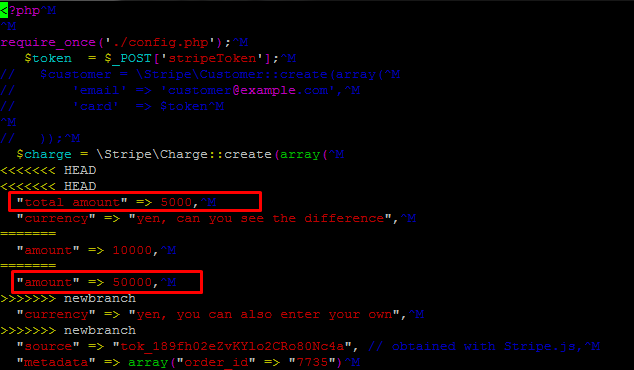
In this scenario, Git is not smart enough to merge changes itself. It will ask you to determine the latest copy of the code yourself.
Resolving Merge Conflicts
Git provides three ways of resolving conflicts:
- Aborting the merge
- Resolving conflicts manually
- Using Tools
If you don’t want to merge the branches, you can simply abort the merge process by following command:
git merge –abort
This command will abort the merge process and get you out of the conflict.
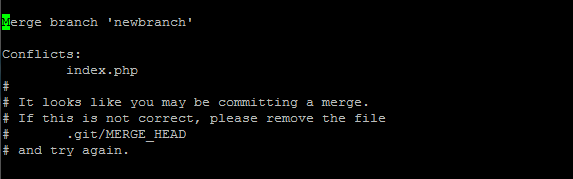
For resolving conflicts manually, you need to look at the file and remove the unwanted version changes in the file. Also remove >>>>>>Head & ====== from the lines and make sure that the file has proper code syntax. Save and commit the file.When you are between merge states, you do not need to write a commit message. Just type git commit and the pop-up window will indicate the conflict in the files. Remove the lines to resolve the conflict.
Now press Ctrl+O to overwrite the file. The command will ask you to enter the file’s name and then save it. Now check whetherthe two branches, master and newbranch will merge. Type git log –oneline and it will show all the commits in the master. Check the top most commit.
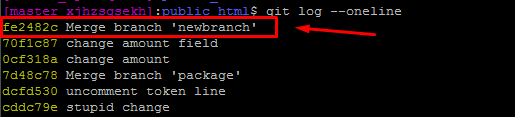
This means that the two branches have been successfully merged. Reconfirm this by running the command git branch –merge. The output will be all the branches that are merged in the master.

Several open source tools focus on working with Git and especially conflict resolution using a GUI that greatly simplifies matters. I cover some of these tools in a separate article. Git has a command to list all tools which can resolve conflicts. Simply type git mergetool and you will see thee list of available tools.
Stop Wasting Time on Servers
Cloudways handle server management for you so you can focus on creating great apps and keeping your clients happy.
Final Words
In this article I highlighted the concept of branches and how you could carry out branch related operations (creating, deleting, renaming and switching) using commands. I also discussed conflicts that arise during working with branches and how you could resolve these issues. I hope, by now, you could manage branches and resolve conflicts on your own. If you want to contribute to the article or have a question about the Git branches, feel free to comment below.
Share your opinion in the comment section.
COMMENT NOW
Share This Article
Customer Review at ![]()
“Cloudways hosting has one of the best customer service and hosting speed”
Sanjit C [Website Developer]

Shahroze Nawaz
Shahroze is a PHP Community Manager at Cloudways — A Managed PHP Hosting Platform. Besides his work life, he loves movies and travelling.
In this tutorial, I will explain how to remove Git branches locally as well as in the remote server. First, let us have a look at the general way of deleting branches both locally and remotely.
The command for removing a branch locally:
$ git branch –d <branch-name>
Suppose, the branch name we want to delete is tst-br. The command for removing this branch:
$ git branch –d tst-br
If Git Bash displays the message:
Error: The branch “tst-br” is not fully merged …
Then you may delete this by -D flag as shown below:
$ git branch -D tst-br
As such, -d flag is the alias for –delete, it requires you to fully merge the branch to be deleted to its upstream branch.
If you are want to remove this even branch is not fully merged then use the -D flag which is the alias for force delete i.e. –delete –force.
How to fully merge the branch?
Before running the command with -d flag, you may use this command for fully merging with upstream branch:
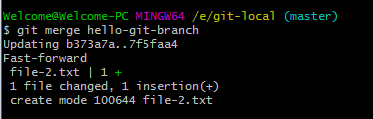
Suppose, our branch name that is not fully merged is hello-git-branch. To merge this branch, run this command after checking out into master branch i.e.:
$ git checkout master
Then run the merge command:
$ git merge hello-git-branch
If this branch has an upstream branch then execute these two commands:
$ git checkout hello-git-branch
$ push
And finally, for deleting the hello-git-branch with –d flag, execute these two commands:
$ git checkout master
$ branch -d hello-git-branch
How to undo removal operation of a branch?
If you accidentally removed a branch or just testing and want to undo the branch removal operation then this section describes how you may do this.
Suppose we want to recover the same branch as I deleted in above section i.e. hello-git-branch.
For recovering a branch, you need SHA1. The SHA1 code can be seen as you deleted a file (see picture below):

Take this code and create a new branch. For example:
$ git branch hello-git-branch 7f5faa4
(The SHA1 7f5faa4 will vary, so take the code from your Git Bash).
This command should create the branch from the same point where this was removed.
The SHA1 code mentioned above can be found immediately after you removed a branch and want to recover the branch. However, if you cleared the screen or restarted the Git Bash then this code won’t be visible.
You may learn more about getting the SHA1 here.
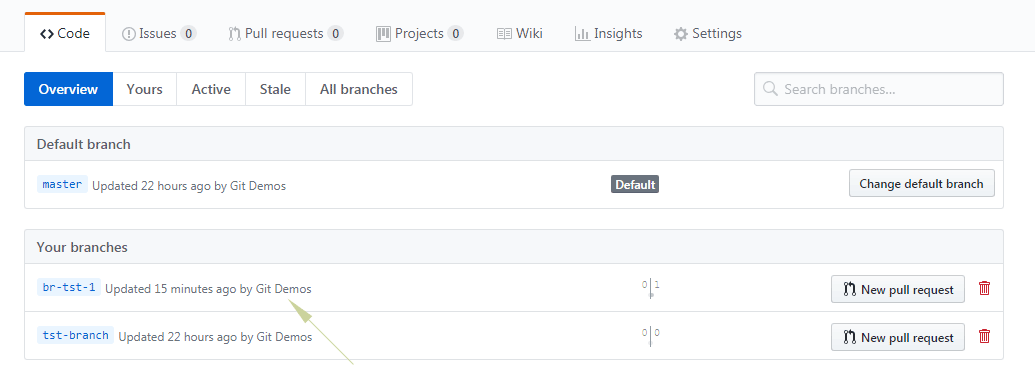
How to delete branches in Github (remotely)?
For deleting a branch from your remote repository (in this case Github), you may use the –delete. For the demo, we have a test repository on Github website. The repository contains two branches – one is the master while the other is hello-git-branch.
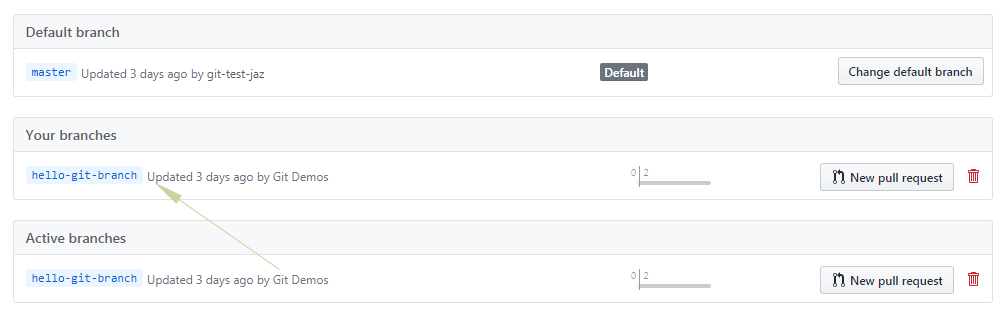
See how this branch is removed by this command:
git push origin –delete hello-git-branch
This command should remove the branch and as I refreshed the repo page in Github website, this is the result:

A step by step guide from creation to deleting a branch
For beginners, this section describes the process of creating a branch locally, adding a file, committing, adding that branch remotely and finally deleting the branch from local and remote repositories.
For that, consider we have a repository with the name tst-demo on Github (remotely) and on the local system.
The first step is creating a branch by this command namely br-tst-1.
$ git branch br-tst-1
A branch should be created in the local repo.
Now see what this and master branch contains by using the ls command:
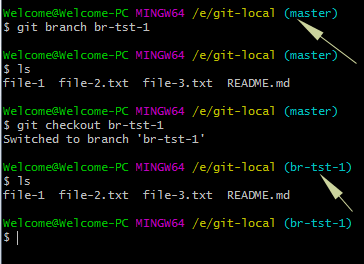
You can see, both branches contain the same files at this stage.
Adding a new file in br-tst-1 branch
In our repository folder in the local system, I placed a new file file-4.txt and this is how it is added in the br-tst-1 branch:
$ git add file-4.txt
Now commit the file by this command:
$ git commit -m “added file-4 for testing”
This should display the following message:
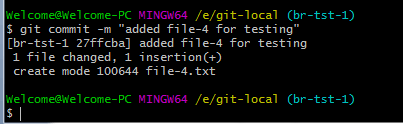
Just to remind, we are on the br-tst-1 branch by using checkout command.
Comparing the files in master and br-tst-1 branch
Again run the ls command for both branches after running the checkout command and compare the files:
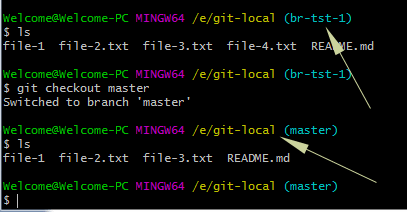
The above graphic shows that the master branch contains four files while our new branch br-tst-1 contains five files.
Creating the branch on the remote server
Now, it is time to create this branch on our remote repository i.e. Github server.
For seeing or making sure where Git Bash will create this branch in the remote repository, you may run this command:
$ git remote –v

This should list current active remote repository where our new branch will be created (as shown in above graphic).
Create the branch remotely
$ git push origin br-tst-1
This should create the branch remotely as shown in the graphic below:
Delete the branch locally
Back to our initial topic, deleting the Git branch: this command should remove the br-tst-1 branch from the local repo.
$ git branch -D br-tst-1
This command should delete the branch from the local repo even it is not fully merged. As mentioned in the initial part, you may use the –d flag that will display the error message if this branch is not fully merged.
Removing this branch from the remote repository:
Run this command:
$ git branch -D br-tst-1
The screenshot below shows the deletion message from the remote repo:
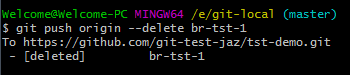
If you refresh the repository online, it should not display that branch anymore.
Ветви — это часть повседневного процесса разработки и одна из самых мощных функций Git. После слияния ветвь она не служит никакой цели, кроме исторических исследований. Обычно рекомендуется удалять ветку после успешного слияния.
В этом руководстве рассказывается, как удалить локальные и удаленные ветки Git.
Удалить локальную ветку Git
Команда git branch позволяет вам перечислять, создавать , переименовывать и удалять ветки.
Чтобы удалить локальную ветку Git, вызовите команду git branch с параметром -d ( --delete ), за которым следует имя ветки:
git branch -d branch_nameDeleted branch branch_name (was 17d9aa0).
Если вы попытаетесь удалить ветку, в которой есть не объединенные изменения, вы получите следующее сообщение об ошибке:
error: The branch 'branch_name' is not fully merged.
If you are sure you want to delete it, run 'git branch -D branch_name'.
Как видно из сообщения выше, чтобы принудительно удалить ветку, используйте параметр -D который является ярлыком для --delete --force :
git branch -D branch_nameОбратите внимание: если вы удалите несоединенную ветку, вы потеряете все изменения в этой ветке.
Чтобы вывести список всех ветвей, содержащих не объединенные изменения, используйте команду git branch --no-merged .
Если вы попытаетесь удалить текущую ветку, вы получите следующее сообщение:
error: Cannot delete branch 'branch_name' checked out at '/path/to/repository'
Вы не можете удалить ветку, в которой находитесь. Сначала переключитесь на другую ветку, а затем удалите branch_name :
git checkout mastergit branch -d branch_name
Удалить удаленную ветку Git
В Git локальная и удаленная ветки — это отдельные объекты. Удаление локальной ветки не удаляет удаленную ветку.
Чтобы удалить удаленную ветку, используйте команду git push с параметром -d ( --delete ):
git push remote_name --delete branch_nameГде remote_name обычно origin :
git push origin --delete branch_name...
- [deleted] branch_name
Также существует альтернативная команда для удаления удаленной ветки, которую, по крайней мере, для меня запомнить сложнее:
git push origin remote_name :branch_nameЕсли вы работаете над проектом с группой людей и пытаетесь удалить удаленную ветку, которая уже удалена кем-то другим, вы получите следующее сообщение об ошибке:
error: unable to push to unqualified destination: branch_name The destination refspec neither matches an existing ref on the remote nor begins with refs/, and we are unable to guess a prefix based on the source ref. error: failed to push some refs to '[email protected]:/my_repo'
В подобных ситуациях вам необходимо синхронизировать список веток с:
git fetch -pПараметр -p указывает Git перед загрузкой удалить все ссылки удаленного отслеживания, которые больше не существуют в удаленном репозитории.
Выводы
Мы показали вам, как удалить локальную и удаленную ветки Git. Ветви — это в основном ссылка на моментальный снимок ваших изменений и короткий жизненный цикл. После того, как ветка будет объединена с главной (или другой основной веткой), она больше не нужна, и ее следует удалить.
Если вы столкнулись с проблемой или хотите оставить отзыв, оставьте комментарий ниже.

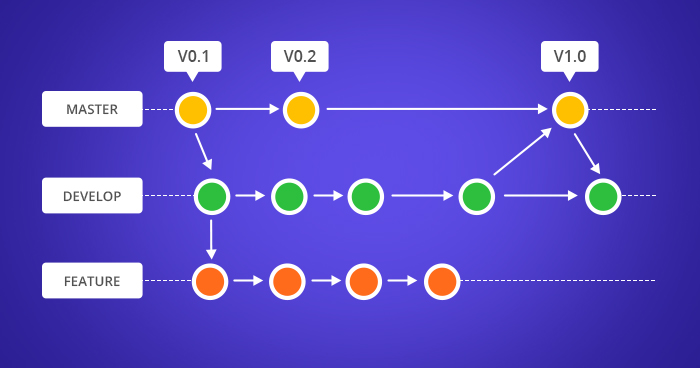
В этом документе подробно описывается команда git branch и рассматривается общая модель ветвления в Git. Возможность ветвления доступна в большинстве современных систем контроля версий. Однако эта операция в ряде систем может быть довольно затратной как по времени, так и по объему дискового пространства. В Git ветки — это элемент повседневного процесса разработки. По сути ветки в Git представляют собой указатель на снимок изменений. Если нужно добавить новую возможность или исправить ошибку (незначительную или серьезную), вы создаете новую ветку, в которой будут размещаться эти изменения. Объединить нестабильный код с основной базой кода становится сложнее, к тому же перед слиянием с основной веткой можно очистить историю работы над возможностью.

На представленной выше схеме показан репозиторий с двумя отдельными направлениями разработки: для небольшой функциональной возможности и для более масштабной. Разработка в отдельных ветках не только позволяет работать над ними параллельно, но и предотвращает попадание сомнительного кода в главную ветку main.
Git предлагает облегченную реализацию веток по сравнению с другими системами контроля версий. Вместо того чтобы копировать файлы из каталога в каталог, Git хранит ветку в виде ссылки на коммит. Получается, что ветка представляет собой вершину серии коммитов, а не контейнер для коммитов. История ветки распространяется через иерархические отношения с другими коммитами.
Во время чтения помните, что ветки в Git не похожи на ветки в SVN. Ветки в SVN используются только для фиксации периодических крупномасштабных наработок, а ветки в Git являются неотъемлемой частью повседневного рабочего процесса. Далее приводится более подробное описание внутренней архитектуры ветвления в Git.
Порядок действий
Ветка представляет собой отдельное направление разработки. Ветки выступают в качестве абстрактного представления для процесса редактирования/индексации/коммита. Можно рассматривать их как способ запросить новый рабочий каталог, раздел проиндексированных файлов и историю проекта. Новые коммиты записываются в историю текущей ветки, что приводит к образованию развилки в истории проекта.
Команда git branch позволяет создавать, просматривать, переименовывать и удалять ветки. Она не дает возможности переключаться между ветками или выполнять слияние разветвленной истории. Именно поэтому команда git branch тесно связана с командами git checkout и git merge.
Распространенные опции
Отображение списка веток в репозитории. Это синоним команды git branch --list.
Создание новой ветки с именем <ветка>. Эта команда не выполняет переключение на эту новую ветку.
Удаление указанной ветки. Это «безопасная» операция, поскольку Git не позволит удалить ветку, если в ней есть неслитые изменения.
Принудительное удаление указанной ветки, даже если в ней есть неслитые изменения. Эта команда используется, если вы хотите навсегда удалить все коммиты, связанные с определенным направлением разработки.
Изменение имени текущей ветки на <ветка>.
Вывод списка всех удаленных веток.
Создание веток
Важно понимать, что ветки — это просто указатели на коммиты. Когда вы создаете ветку, Git просто создает новый указатель. Репозиторий при этом никак не изменяется. Допустим, вы начинаете работать с репозиторием, который выглядит так:

Затем вы создаете новую ветку с помощью следующей команды.
git branch crazy-experimentИстория репозитория остается неизменной. Все, что вы получаете, — это новый указатель на текущий коммит:

Обратите внимание: эта команда только создает новую ветку. Чтобы добавить в эту ветку коммиты, необходимо выбрать ее с помощью команды git checkout, а затем использовать стандартные команды git add и git commit.
Создание удаленных веток
До сих пор все эти примеры демонстрировали работу с локальными ветками. Команда git branch работает и с удаленными ветками. Для выполнения операций на удаленных ветках сначала необходимо настроить удаленный репозиторий и добавить его в конфигурацию локального репозитория.
$ git remote add new-remote-repo https://bitbucket.com/user/repo.git
# Add remote repo to local repo config
$ git push <new-remote-repo> crazy-experiment~
# pushes the crazy-experiment branch to new-remote-repo
Эта команда отправит копию локальной ветки crazy-experiment в удаленный репозиторий <remote>.
Удаление веток
После того как вы завершите работу в ветке и сольете ее с основной базой кода, эту ветку можно будет удалить без потери истории:
git branch -d crazy-experimentОднако, если ветка не была слита, указанная выше команда выдаст сообщение об ошибке:
error: The branch 'crazy-experiment' is not fully merged. If you are sure you want to delete it, run 'git branch -D crazy-experiment'.Это защищает от потери доступа ко всему направлению разработки. Если вы действительно хотите удалить ветку (например, если эксперимент оказался неудачным), используйте флаг -D (с прописной буквой):
git branch -D crazy-experimentЭта команда удаляет ветку независимо от ее состояния и не выдает никаких предупреждений, поэтому используйте ее с осторожностью.
Предыдущие команды удаляют локальную копию ветки, но ветка может сохраниться в удаленных репозиториях. Для удаления ветки из удаленного репозитория выполните следующую команду.
git push origin --delete crazy-experimentили
git push origin :crazy-experimentЭта команда отправит удаленному репозиторию сигнал на удаление ветки crazy-experiment.
Резюме
В этом документе мы рассмотрели ветвление в Git и команду git branch. Команду git branch главным образом используют для создания, просмотра, переименования и удаления веток. Для дальнейшей работы с полученными ветками обычно используются другие команды, например git checkout. Подробнее об использовании команды git checkout в операциях с ветками, в том числе их переключения и слияния, см. на странице git checkout.
По сравнению с другими системами контроля версий, операции с ветками в Git являются экономичными и используются часто. Такая гибкость позволяет эффективно настроить рабочий процесс в Git. Дополнительную информацию о рабочих процессах в Git см. на наших страницах, где подробно обсуждаются: рабочий процесс с функциональными ветками, рабочий процесс Git-flow и рабочий процесс с форками.