A file can be removed easily from Git index and working directory by Git rm command. For example:
git rm some_file
After adding a file in Git, you may require removing it for different reasons and at various levels. You may remove it from the index, working tree as well as file system or just remove it from the index and working tree.
The next section takes you through different scenarios of removing files and directories in different states.
Scenario 1: The example of removing a file after a commit
In this example, I will delete a file after it is committed or staged for uploading/pushing to the remote repository.
Suppose, we added a file (tst1.txt) in our master branch in the local repo as follows:
$ git add tst1.txt
If you decided to remove the file at this stage then the above rm command won’t do that. That is, running the:
$ git rm tst1.txt
will produce the following error:
|
error: the following file has changes staged in the index: tst1.txt (use ——cached to keep the file, or —f to force removal) |
As we run the commit command:
$ git commit -m “Text file added”
|
[master 8547f8c] Text file added 1 file changed, 1 insertion(+) create mode 100644 tst1.txt |
if you decide to remove the file after a commit is made then simple rm command will remove it from the index as well as file system i.e. from the repo directory:
|
$ git rm tst1.txt rm ‘tst1.txt’ |
After running this command, if you look at the folder, the tst1.txt file should have been removed there as well.
What if I want to keep the file in the directory?
You may want to remove the file from the working tree or index only while keeping it in the file system. For example, you want to commit other changes in online repo while still need to work on a code file that has been staged for uploading.
In that case, you may run the rm command with –cached flag.
Suppose, we again have a tst1.txt file that has been added and committed and now we want to remove it from the working tree:
|
$ git rm ——cached tst1.txt |
If you check the folder, you will see the tst1.txt file is still there. After this command, just run the commit command and push the changes to the remote repository.
Removing a directory example
You may use the –r option in the Git rm command for removing a folder. Any files contained in the folder are also removed.
The –r option in rm command allows recursive removal if you provide a leading directory name.
To see it in action, I have created a directory with the name of code in our demo repository:
$ git add code
Committing the changes:
$ git commit -m “Folder added”
After that, the push command is used for uploading changes to the online repo:
$ git push origin master
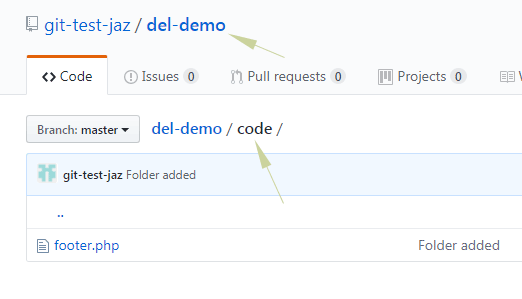
You can see, the online repo shows the code folder and a file inside it i.e. footer.php.
Deleting the directory:
$ git rm -r code
This should result in:
Committing the changes after removing the directory:
$ git commit -m “Code Folder removed”
Again running the push command:
$ git push origin master
If you refresh the online repo, the folder should have been removed there as well.
Keeping the folder in file system example
The above command removes the folder/files from the Git index and working tree as well as from the file system as well.
If you want to keep the folder in the file system and just remove it from the working tree then use the –cached option as follows. Consider, we have a folder code2 containing two files. This is added and committed in the local and remote repos. For deleting it from the repo:
|
$ git rm —r ——cached code2 |
If you look at the folder, the directory (code2) should be in place.
After commit command, if you run the push command, you will see the folder is no more exist in the online repo.
Deleting multiple files example
Suppose, we have a folder name “del-demo” that contains five text files (tst1.txt, tst2.txt tst3.txt tst4.txt tst5.txt). We want to remove three files by the single command and upload the changes. This is how it can be done:
$ git rm del-demo/tst2.txt del-demo/tst3.txt del-demo/tst4.txt
The output should be:
rm ‘del-demo/tst2.txt’
rm ‘del-demo/tst3.txt’
rm ‘del-demo/tst4.txt’
Now run the commit command:
$ git commit -m “Removed three text files”
The result:
|
[master 2a90231] Removed three text files 3 files changed, 3 deletions(—) delete mode 100644 del—demo/tst2.txt delete mode 100644 del—demo/tst3.txt delete mode 100644 del—demo/tst4.txt |
Now you are good to go for making a push and making changes online.
1. Introduction
In this tutorial, You’ll learn what are the git commands that can be used in everyday life. You’ll see the top git commands with examples. You can not imagine a developer’s life without using version control tools such as git, bitbucket, or any tool.
Because this makes like simple and easy to maintain the programming files and collaborate with your teammates.
Most of you do not use git commands either you use GUI plugins in IDE eclipse or Intelleji tools
But, if you know all these handy command and you will get confidence in dealing with the conflicts resolving manually from the terminal.

Git Tutorials
2. Handy Git Commands
Git Commands: Let us see what are the commands that are mostly used from the terminal or command prompt such as git bash in windows. At least the following should be known by all developers and most used in the software industry. We’ll discuss one by one from scratch.
Git Commands List:
- git config
- git init
- git clone
- git help
- git status
- git add
- git branch
- git commit
- git push
- git pull
- git checkout
- git stash
- git merge
- git reset
- git remote
- git diff
- git rm
- git log
- git show
- git tag
3. Git Command — «git config» With Example
This is the most important one but this is used only once when you join the new company or get a new laptop in the office. This is only a one-time job but if you want to change at any time such as name, email address using the «git config» command as below.
Names, email values can be set at the global, system, or user level.
Example Commands to set the user name and email address.
git config —global <property-name> <value>
git config —global user.name «JavaProgramTo.com»
git config —global user.email «admin@javaprogramto.com»
$ git config --global user.name "JavaProgramTo.com"
$ git config --global user.email "admin@javaprogramto.com"
$ git config --global user.email
admin@javaprogramto.com
$ git config --global user.name
JavaProgramTo.com
To see all the user configurations have been set in your machine use the «git config —list | grep ‘user’«
git config —list | grep ‘user’
user.email=admin@javaprogramto.com
user.name=JavaProgramTo.com
4. Git Command — «git init» Command With Example
«git init» is to convert a project into a git project. To see the current folder is under git or not using git status command or if the «.git» folder is present in the root directory it is git project.
If not a git project, just run the «git init» command at the root folder to convert into a git project.
git init
[$ pwd/Users/Documents/workspace/git-demo$ git statusfatal: not a git repository (or any of the parent directories): .git$ ls -a. .. file1.txt$ git initInitialized empty Git repository in /Users/Documents/workspace/git-demo/.git/$ ls -a. .. .git file1.txt$ git statusOn branch master
No commits yet
Untracked files:
(use «git add <file>…» to include in what will be committed)file1.txt
nothing added to commit but untracked files present (use «git add» to track)]
5. Git Command — «git clone» Command Example
If you want to clone any repo from GitHub or bitbucket or remote location then use ‘git clone «repo location»‘
git clone <remote-repo-location>
$ git clone https://github.com/JavaProgramTo/CoreJava.git
Cloning into ‘CoreJava’…
remote: Enumerating objects: 97, done.
remote: Counting objects: 100% (97/97), done.
remote: Compressing objects: 100% (53/53), done.
remote: Total 97 (delta 14), reused 95 (delta 12), pack-reused 0
Unpacking objects: 100% (97/97), done.
$
And also you can clone into a new folder. Here CoreJava git repo will be cloned into a new folder core-java-tutorials
$ git clone https://github.com/JavaProgramTo/CoreJava.git core-java-tutorials
Cloning into ‘core-java-tutorials’…
remote: Enumerating objects: 97, done.
remote: Counting objects: 100% (97/97), done.
remote: Compressing objects: 100% (53/53), done.
remote: Total 97 (delta 14), reused 95 (delta 12), pack-reused 0
Unpacking objects: 100% (97/97), done.
$ls
CoreJava core-java-tutorials file1.txt
6. Git Command — «git help» Command Example
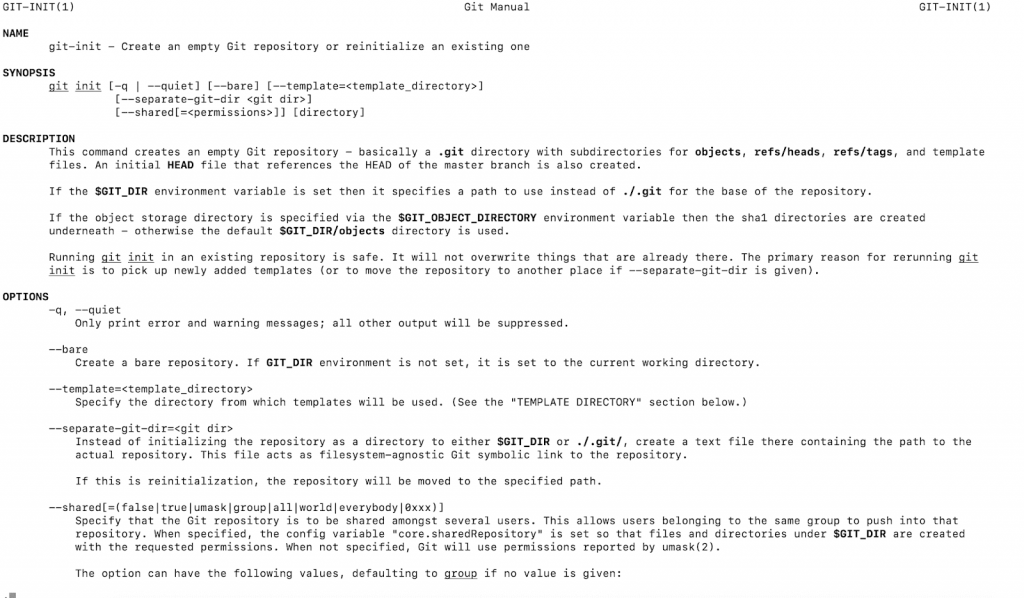
If you don’t know much about any command then. use «git help <command-name>» it pulls syntax and all its options.
git help <command-name>
$ git help init
It displays into a new editor as below and press ‘q’ to come out to the terminal.

7. Git Command — «git status» Command Example
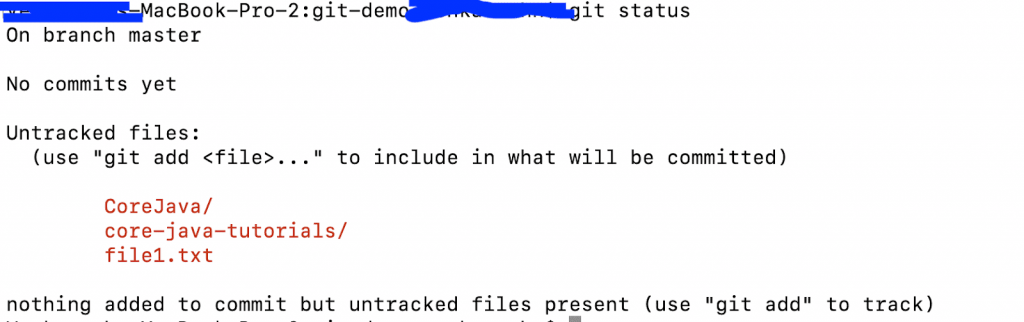
To see the list of files are modified and added to the stage in the current directory. And also show the current branch name.
git status
$ git status
On branch master
No commits yet
Untracked files:
(use «git add <file>…» to include in what will be committed)
CoreJava/
core-java-tutorials/
file1.txt
nothing added to commit but untracked files present (use «git add» to track)

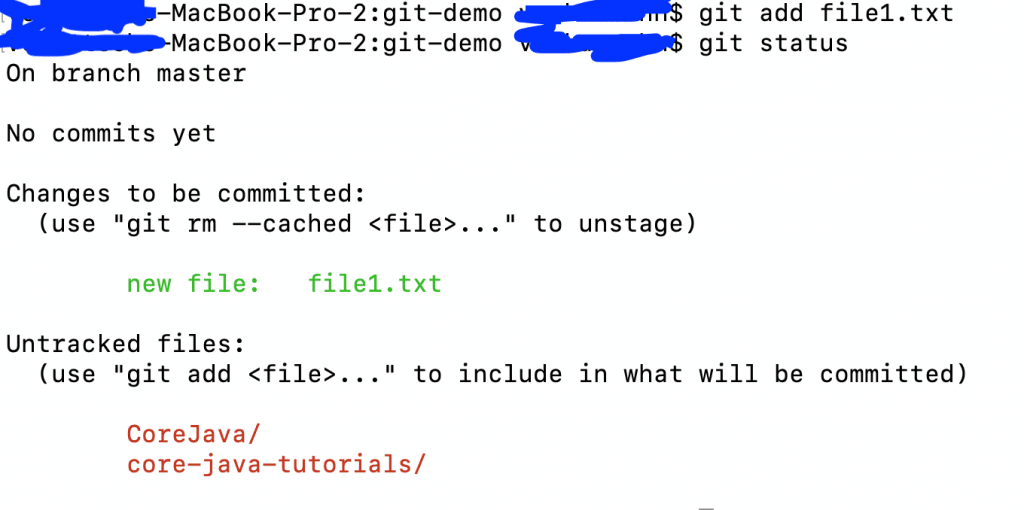
8. Git Command — «git add» Command Example
‘git add’ command to add new files or existing modified files to the git stage. This works from current directory.
After ‘git add’ command execution, files will be moved from untracked files to «changes to be committed«
git add <file-1-name>
$ git add file1.txt
$ git status
On branch master
No commits yet
Changes to be committed:
(use «git rm —cached <file>…» to unstage)
new file: file1.txt
Untracked files:
(use «git add <file>…» to include in what will be committed)
CoreJava/
core-java-tutorials/

Even you can add multiple files by delimiting the file names with space or use ‘*’ to add all files to the stage.
git add <file-1-name> <file-2-name>
for
git add *
9. Git Command — «git commit» Command Example
‘git commit’ command commit the files in stage area (Changes to be committed section) and creates a new commit id for this commit.
But these files are now not available on the git. At this stage, all files are on in your local machine as now.
git commit -m <commit-name>
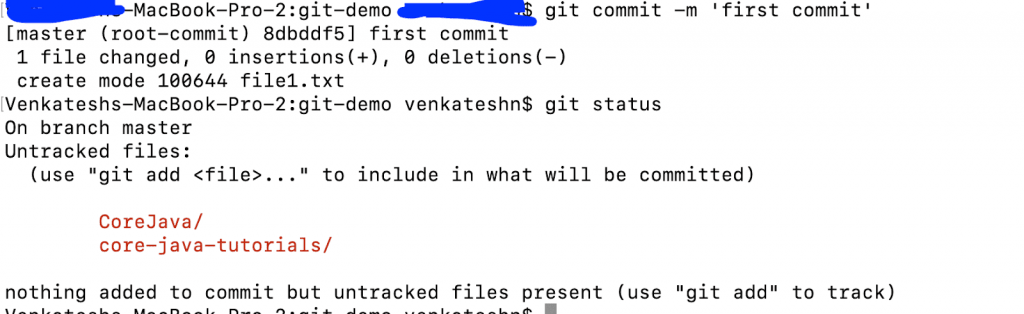
$ git commit -m ‘first commit’
[master (root-commit) 8dbddf5] first commit
1 file changed, 0 insertions(+), 0 deletions(-)
create mode 100644 file1.txt
Venkateshs-MacBook-Pro-2:git-demo venkateshn$ git status
On branch master
Untracked files:
(use «git add <file>…» to include in what will be committed)
CoreJava/
core-java-tutorials/
nothing added to commit but untracked files present (use «git add» to track)

10. Git Command — «git push» Command Example
After commit, use the ‘git push‘ command to move your changes to a remote repo that means from where repo is created.
git push
git push origin <branch-name> -> pusing the changes to a specific branch
git push -all —> pushing all branch changes to remote git.
$ git push
11. Git Command — «git pull» Command Example
If you have other changes those are committed by your teammate and to get the latest changes to use ‘git pull‘ command.
git pull -> pulls from the current branch
git pull <repo-url> -> pull change from the given repo
$ git pull
12. Git Command — «git branch» Command Example
To see all branches under this repo, use ‘git branch’
git branch
$ git branch
* master
develop
To see, all the remote branches using ‘git branch -r‘
git branch -r -> to see remote branches
git branch <new-branch> release -> to create a new branch from release branch.
13. Git Command — «git checkout» Command Example
If you have modified the file in local repo and you want to replace all the changes with the remote file, use ‘git checkout <file-name>‘
$git checkout file1.txt
14. Git Command — «git stash» Command Example
If you modified files in your local and do not want to commit immediately then use ‘git stash‘.
Now, modified files will be shown in the ‘git status’ command.
$ vi file1.txt
$ git status
On branch master
Changes not staged for commit:
(use «git add <file>…» to update what will be committed)
(use «git checkout — <file>…» to discard changes in working directory)
modified: file1.txt
Untracked files:
(use «git add <file>…» to include in what will be committed)
CoreJava/
core-java-tutorials/
no changes added to commit (use «git add» and/or «git commit -a»)
$ git stash
Saved working directory and index state WIP on master: 8dbddf5 first commit
$ git status
On branch master
Untracked files:
(use «git add <file>…» to include in what will be committed)
CoreJava/
core-java-tutorials/
nothing added to commit but untracked files present (use «git add» to track)
Added again some files to git stash. ‘save’ is optional and by defaults it does save.
$ git stash save
To see all the commits in the git stash use ‘git stash list’
$ git stash list
stash@{0}: WIP on master: 8dbddf5 first commit
stash@{1}: WIP on master: 8dbddf5 first commit
To get the latest changes from stash to stage, use ‘git stash pop’.
$ git stash pop
On branch master
Changes not staged for commit:
(use «git add <file>…» to update what will be committed)
(use «git checkout — <file>…» to discard changes in working directory)
modified: file1.txt
Untracked files:
(use «git add <file>…» to include in what will be committed)
CoreJava/
core-java-tutorials/
file2.txt
no changes added to commit (use «git add» and/or «git commit -a»)
Dropped refs/stash@{0} (9faef149414d5c6ab7047ed493c77a3b444e04e6)
Now see the list of all commits in the stash with the command ‘git stash list’
$ git stash list
stash@{0}: WIP on master: 8dbddf5 first commit
15. Git Command — «git branch» Command Example
‘git branch‘ command list all branches available in this repo.
This shows all branches untill your last ‘git pull‘. After, it pulls if any new branches created on the remote branch, and those can not be seen from the local branch.
$ git branch
develop
* master
To see only remote branches use «git branch -r» and use «git branch -a» to all remote and local branches.
$ git branch -r
origin/dummy
origin/master
$ git branch -a
develop
* master
remotes/origin/dummy
remotes/origin/master
$ git branch
develop
* master
16. Git Command — «git merge» Command Example
If you want to merge another branch to the current branch then use the ‘git merge‘ command.
Making the changes to develop branch and merging develop branch changes to the master branch.
$ git status
On branch develop
Changes to be committed:
(use «git reset HEAD <file>…» to unstage)
modified: file1.txt
Untracked files:
(use «git add <file>…» to include in what will be committed)
CoreJava/
core-java-tutorials/
file2.txt
Venkateshs-MacBook-Pro-2:git-demo venkateshn$ git commit -m ‘added line 2’
[develop 17569dd] added line 2
1 file changed, 3 insertions(+)
Merging develop branch commits into the master branch.
git merge develop -> merges the changes of develop branch into the current branch.
$ git checkout master
Switched to branch ‘master’
$ git merge develop
Updating 8dbddf5..17569dd
Fast-forward
file1.txt | 3 +++
1 file changed, 3 insertions(+)

17. Git Command — «git log» Command Example
To see all the commits version history in any branch or current branch, use ‘git log’ command.
$ git log
commit 94c3fcb44b57cc13a3bdadaabe708e1d0e38a16e (HEAD -> master)
Author: JavaProgramTo.com <admin@javaprogramto.com>
Date: Sun May 10 22:24:55 2020 +0530
adding file2
commit 17569dd273defd6ef7a4de554f20a966504fa629 (develop)
Author: JavaProgramTo.com <admin@javaprogramto.com>
Date: Sun May 10 22:17:12 2020 +0530
added line 2
commit 8dbddf5a2a5d2c4d14ceec7a4ea74db994b8dd10
Author: JavaProgramTo.com <admin@javaprogramto.com>
Date: Sun May 10 21:21:42 2020 +0530
first commit
By default, the ‘git log‘ command shows all the commits for the current branch but it provides different flags to do specific set of operations.
To see the file commits for a specific file then use ‘git log —follow <file-name>‘
To see the commits for file1.txt
$ git log —follow file1.txt
commit 17569dd273defd6ef7a4de554f20a966504fa629 (develop)
Author: JavaProgramTo.com <admin@javaprogramto.com>
Date: Sun May 10 22:17:12 2020 +0530
added line 2
commit 8dbddf5a2a5d2c4d14ceec7a4ea74db994b8dd10
Author: JavaProgramTo.com <admin@javaprogramto.com>
Date: Sun May 10 21:21:42 2020 +0530
first commit
To see all the commits for file2.txt
$ git log —follow file2.txt
commit 94c3fcb44b57cc13a3bdadaabe708e1d0e38a16e (HEAD -> master)
Author: JavaProgramTo.com <admin@javaprogramto.com>
Date: Sun May 10 22:24:55 2020 +0530
adding file2

18. Git Command — «git diff» Command Example
To see the difference among the modified files with remote files using ‘git diff‘ command.
$ git diff
diff —git a/pom.xml b/pom.xml
index f47e51e..8702bb4 100644
— a/pom.xml
+++ b/pom.xml
@@ -19,7 +19,7 @@
</properties>
<dependencie
—
+ <!— spring boot dev tools—>
<dependency>
<groupId>org.springframework.boot</groupId>
<artifactId>spring-boot-devtools</artifactId>
Now, add the modified file to git.
$ git add pom.xml
$ git diff
$
Now, git diff does not show the differences but still, you can see the diff wit flag ‘—staged‘.
git diff —staged
$ git diff —staged
diff —git a/pom.xml b/pom.xml
index f47e51e..8702bb4 100644
— a/pom.xml
+++ b/pom.xml
@@ -19,7 +19,7 @@
</properties>
<dependencie
—
+ <!— spring boot dev tools—>
<dependency>
<groupId>org.springframework.boot</groupId>
<artifactId>spring-boot-devtools</artifactId>
Another interesting way to see the differences between the two branches.
$ git diff master develop
19. Git Command — «git reset» Command Example
To remove the file from stage and file should be in the local system.
Look at the in-depth article on «git reset and git rm» commands to unstage a file.
Syntax: git reset <file-name>
$ git reset file1.txt
To unstage and remove all the files from a specific commit. But, all the files from this commit will remain as modified in the local machine.
git reset <commit-id>
$ git reset 6873c7a6c1135b3a977c9d14404e0fd652f566a8
Unstaged changes after reset:
M pom.xml
To discard all the changes from a commit and goes back to the specific commit.
$ git reset —hard 8dbddf5a2a5d2c4d14ceec7a4ea74db994b8dd10
HEAD is now at 8dbddf5 first commit
$ ls
CoreJava core-java-tutorials file1.txt
$
After resetting to the first commit, we are not seeing the file2.txt in the local file system. Because, if you use a ‘hard‘ flag then it removes all history of the files.
You must be careful when running git commands with a ‘hard‘ flag.
20. Git Command — «git rm» Command Example
This command deletes the file from your current local working directory and from the stage as well. Once you do commit and push then file will be removed from git repo permanently.
If you do not use any flag then ‘git rm’ command just remove the file.
$ ls
CoreJava core-java-tutorials file1.txt
$ git rm file1.txt
rm ‘file1.txt’
$ git status
On branch master
Changes to be committed:
(use «git reset HEAD <file>…» to unstage)
deleted: file1.txt
Untracked files:
(use «git add <file>…» to include in what will be committed)
CoreJava/
core-java-tutorials/
$ls
$
‘git rm’ command does not work with the staged file and works on only committed files.
Created now a new file3.txt and added to git. Then tried to remove using file3.txt file with ‘git rm file3.txt‘. This result in error saying use ‘—cached’ or ‘-f’ flag.
$ git rm file3.txt
error: the following file has changes staged in the index:
file3.txt
(use —cached to keep the file, or -f to force removal)
$
«—cached» flag is used to remove the file from staging and reserves the changes.
$ git rm —cached file3.txt
rm ‘file3.txt’
$ git status
On branch master
Changes to be committed:
Untracked files:
(use «git add <file>…» to include in what will be committed)
file3.txt
git rm -f file3.txt — Just deleted the file from local machine.
$ git add file3.txt
$ git status
On branch master
Changes to be committed:
(use «git reset HEAD <file>…» to unstage)
deleted: file1.txt
new file: file3.txt
Untracked files:
(use «git add <file>…» to include in what will be committed)
CoreJava/
core-java-tutorials/
$ git rm -f file3.txt
rm ‘file3.txt’
$ git status
On branch master
Changes to be committed:
(use «git reset HEAD <file>…» to unstage)
Untracked files:
(use «git add <file>…» to include in what will be committed)
$
21. Git Command — «git tag» Command Example
This command is used to give tags to the specified commit.
git tag <commit-d>
$ git tag 8dbddf5a2a5d2c4d14ceec7a4ea74db994b8dd10
$ git tag
8dbddf5a2a5d2c4d14ceec7a4ea74db994b8dd10
‘git tag’ command to see all the tags for a branch.
22. Git Command — «git show» Command Example
«git show» command shows the files metadata sections of contents changed in the commit. By default, it shows the result for the latest commit from the ‘git log‘ command.
$ git show
commit 68c7e111b3995a5104b1651550f29874733f2a96 (HEAD -> master, tag: 8dbddf5a2a5d2c4d14ceec7a4ea74db994b8dd10)
Author: JavaProgramTo.com <admin@javaprogramto.com>
Date: Sun May 10 22:51:59 2020 +0530
file one modified
diff —git a/file1.txt b/file1.txt
index e69de29..b806426 100644
— a/file1.txt
+++ b/file1.txt
@@ -0,0 +1 @@
+adding line 1
Highlighted in yellow color is the contents modified.
To see only file names for a commit.
use flag ‘—name-only’ in ‘git show’ command.
git show —name-only <commit-id>
$ git show —name-only c97949d3c04593bdc72478038c4ff76b17de9c8a
commit c97949d3c04593bdc72478038c4ff76b17de9c8a
Author: java-w3schools <venkivenki4b6@gmail.com>
Date: Sat May 9 23:36:22 2020 +0530
Spring Boot Data MongoDB: Projections and Aggregations Examples
pom.xml
src/main/java/com/javaprogramto/springboot/MongoDBSpringBootCURD/MongoDbSpringBootCurdApplication.java
src/main/java/com/javaprogramto/springboot/MongoDBSpringBootCURD/config/MongoDBConfig.java
src/main/java/com/javaprogramto/springboot/MongoDBSpringBootCURD/controller/projection/AggregationController.java
src/main/java/com/javaprogramto/springboot/MongoDBSpringBootCURD/controller/projection/EmployeeMongoRepoController.java
src/main/java/com/javaprogramto/springboot/MongoDBSpringBootCURD/controller/projection/MongoTemplateProjectionController.java
src/main/java/com/javaprogramto/springboot/MongoDBSpringBootCURD/model/AgeCount.java
src/main/java/com/javaprogramto/springboot/MongoDBSpringBootCURD/repository/EmployeeRepository.java
src/main/resources/application.properties
$
23. Conclusion
In conclusion, We’ve seen most used git commands in the software developer life every day from git bash or terminal.
If you know, all these commands then you can use git commands wisely.
If you have any questions in «Git Commands«, please post in the comments section. We will answer soon.

Version management is an important part of product-level development. It involves teamwork and affects the final release, launch and testing of products. The most popular version control system is git.There is a lot of GIT content, so this article tries to be as restrained as possible to introduce the basics of GIT
Summary
Role of version control system
Version Control System (Version Control System) is a system that records several file revisions. It has three functions:
1. Return from the current version to any version

2. View historical versions

3. Compare the differences between the two versions

git advantage
1. Fast
2. Simple design
3. Lightweight branching, which allows thousands of parallel development branches and provides strong support for non-linear development models
4. Ability to efficiently manage very large-scale projects like the linux kernel
5. Git has become the de facto standard, and almost all excellent front-end projects use git for version control
6. The community is mature and active, and the popularity of git cannot be separated from the contribution of github
Important concepts
To understand git, first understand the key concepts in Git
[Introduction to Terms]
repository warehouse
 branch Branch
 summary Summary
 track Tracking
 modify modification
 stage staging
 commit submission
 push Push
 Pull pull
 Clone clone
 Amendment Modification
 Merge merge
 Conflict conflict
 origin Origin
 upstream
 downstream
 verbose is long
 reflog reflux
[git directory]
Each project has a git directory (the.Git directory if git clone comes out), which is where git stores metadata and object databases.This directory is very important. Every time you clone a mirror warehouse, the actual copy is the data in this directory.
[Three states]
For any file, there are only three states in git: committed, modified, and staged.
Submitted: The file has been safely saved in the local database
 Modified: A file has been modified, but no save has been submitted
 Temporarily saved: Put the modified files in the list to be saved at the next submission
The three states of culture correspond to the three working areas where files flow: git’s working directory, staging area, and local warehouse

The following three work areas are explained separately
The working directory is content that is extracted independently of a version of the project
The staging area is a simple file that is typically placed in the.git directory.Sometimes people call this file an index file
The local repository is the.git directory
The basic git workflow is as follows:
1. Modify some files in the working directory
2. Take a snapshot of the modified file and save it to the staging area
3. Submit the update and permanently dump the file snapshot saved in the staging area to the Git directory
[commit hash value]
Before saving to git, all data is checksum calculated and used as a unique identifier and index for the data, not as a file name.
git uses the SHA-1 algorithm to calculate the checksum of the data, and calculates a SHA-1 hash value as a fingerprint string from the contents of the file or the structure of the directory.The string consists of 40 hexadecimal characters (0-9 and a-f) and looks like this:
23b9da6552252987aa493b52f8696cd6d3b00372
git configuration
Configuration Level
git has three levels of configuration
--local [default, high priority]: affects only this repository, file is.git/config

--global [medium priority]: git repository affecting all current users, file ~/.gitconfig

--system [low priority]: git repository affecting the whole system, file / etc/gitconfig
Basic Configuration
Generally on new systems, you need to configure your git workspace first.Configuration only takes one time and will follow the current configuration for future upgrades.Of course, you can always modify an existing configuration with the same command if you need to
1. User name
git config --global user.name "xiaohuochai"
2. Mailbox
git config --global user.email "121631835@qq.com"
3. Text Editor
git config --global core.editor "code --wait"
4. Change how git handles end-of-line bars
Windows ends a line with a carriage return (CR) and a line break (LF), whereas Mac and Linux only use a line break (LF) character.The code below tells git to convert carriage returns and line breaks to line breaks when submitting and not when checking out.This keeps carriage returns and line breaks in check-out files on Windows, and line breaks on Mac and Linux, as well as in the version Library
git config --global core.autocrlf input
5. Cancel the escape of Chinese
When using git, you often encounter situations where some Chinese file names or paths are escaped to xxxxxx, and the default escape can be changed by configuring
git config --global core.quotepath false
6. Only push is allowed to branch to a remote branch with the same name
git config --global push.default simple
View Configuration
git config --list # View all configurations
git config --list --global # View global configuration
git config user.name # View a configuration item
If you want to delete or modify the configuration, it is easier to open the ~/.git config file directly or modify the.git/config file
Configuration about Ignore
There are always files that don’t need to be managed by git s, and you don’t want them to always appear in the list of untracked files
You can create a file named.gitignore in the project root directory that lists file patterns to ignore
The format specification for the file.gitignore is as follows:
1. All empty lines or lines beginning with the comment symbol # will be ignored by git
2. Standard glob pattern matching can be used
3. Match pattern starts with backslash (/) to prevent recursion
4. Catalogs are ignored when matching patterns are followed by backslashes (/)
5. To ignore files or directories outside the specified mode, you can reverse the pattern by adding an exclamation mark (!)
Common settings for.gitignore files are as follows
node_modules/
ecosystem.json
.DS_Store
.idea
.vscode
SSH Configuration
If you want to do remote operations, i.e. push and pull code from the github remote server, one problem that needs to be solved is how does github know that I am submitting my code?
In addition to entering the user name and password each time, it is easier to configure SSH
Most git servers choose to use SSH public keys for authorization.Each user in the system must provide a public key for authorization
First, confirm that you already have a public key.SSH public keys are stored by default in the ~/.ssh directory of the account’s home directory. Files with a.pub suffix are public keys and the other file is keys
Then, use the following command to generate the SSH key, and then return all the way, using the default value
$ ssh-keygen -t rsa -b 4096 -C 121631835@qq.com
If everything goes well, you can find the.ssh directory in the user’s home directory, which contains two files, id_rsa and id_rsa.pub, which are the secret key pairs of SSH Key. id_rsa is a private key and cannot be leaked. id_rsa.pub is a public key and can safely tell anyone
The public key for SSH is as follows:
$ cat ~/.ssh/id_rsa.pub
ssh-rsa AAAAB3NzaC1yc2EAAAADAQABAAABAQC3ltgCdqTIrPuN6yMYCeSMg8shtM+TRBIULDmfeh/9lE51e2g2t8ytLxz/QrPu3jvvpBqMimyPxC0NyW38eIHP9dkXTS0V76LlXy1MZvIjP3SnaU3AJs/fke61wc9y9EdPfrpSjIZpG7Z134+huaioLhPRShRmUQjl3plC9a89fnCyzTmtix5fDKKFjU3ZU6uVSDPy8+o+vsTfwAPQ1ylaBbY733Y1shmd6Texwmb8ttkv1Xj31RdhTdSS2eI3pSN/Ld1GC6/d2u3zcLnC6T4+1WLd0KTm/lqdzB2uWSsnMBI11wfKdw3pqEI17oGrPxurmunoMPzyR/dHwkfwotwh 121631835@qq.com
Next, log in to gitHub and open the SSH Keys page in Settings

Then, point New SSH Key, fill in any Title, and paste the contents of the id_rsa.pub file in the Key text box
Configuration is complete when you click the Add SSH key button
Next, use ssh-T git@github.com to test if SSH is successfully configured
$ ssh -T git@github.com
Hi littlematch0123! You've successfully authenticated, but GitHub does not provide shell access.
Returning to the initial question in this section, how do I know the other person is GitHub when I request code?You also need GitHub to provide me with a public key, so choose yes to accept the other party’s public key the first time you connect to github, which is the code below
$ ssh -T git@github.com
The authenticity of host 'github.com (13.250.177.223)' can't be established.
RSA key fingerprint is 16:27:ac:a5:76:28:2d:36:63:1b:56:4d:eb:df:a6:48.
Are you sure you want to continue connecting (yes/no)? yes
warning: Permanently added 'github.com' (rsa) to the list of known hosts
Hi littlematch0123! You've successfully authenticated, but GitHub does not provide shell access.
git base operations
Initialize new warehouse
To start git management for an existing project, simply go to the directory where the project is located and execute
$ git init
After initialization, a directory named.Git appears in the current directory where all the data and resources required by git are stored.At present, however, all the files and directories inside have been initialized just according to the existing structure framework, but no tracking of any of the files in the management project has started yet.
Check file status
To determine which files are in what state, you can use the git status command
If you execute this command immediately after getting the repository, you will see output like this
$ git status
On branch master
Initial commit
nothing to commit(create/copy files and use "git add" to track)
This means that the working directory is now fairly clean.In other words, all tracked files have not been changed since the last submission, or no files have been created.
Now create a new file README, run git status after save exits to see it appear in the list of untracked files
$ git status
On branch master

No commits yet

Untracked files:
  (use "git add <file>..." to include in what will be committed)

    README.txt

nothing added to commit but untracked files present (use "git add" to track)
You can see in the status report that the newly created README file appears under «Untracked files».Untracked files mean git did not have them in the previous snapshot (commit)
Track new files
Use the command git add to start tracking a new file.So to track README files, run
$ git add README.txt
Use the command git add. to batch track files that are not tracked in all working directories
$ git add .
Run the git status command again and you will see that the README file has been tracked and is in a temporary state
$ git status
On branch master

No commits yet

Changes to be committed:
  (use "git rm --cached <file>..." to unstage)

    new file:   README.txt
Just below the line «Changes to be committed» is a temporary state
Temporarily save modified files
Now modify the file README.txt that you tracked before to change its contents to hello world
Then run the status command again and you’ll see a status report like this:
$ echo hello world > README.txt
$ git status
On branch master

No commits yet

Changes to be committed:
  (use "git rm --cached <file>..." to unstage)

    new file:   README.txt

Changes not staged for commit:
  (use "git add <file>..." to update what will be committed)
  (use "git checkout -- <file>..." to discard changes in working directory)

    modified:   README.txt
The file README.txt appears below the line «Changes not staged for commit» to indicate that the contents of the tracked file have changed, but have not yet been placed in the staging area.To temporarily save this update, you need to run the git add command
The git add command is a versatile command that can be used to start tracking new files, put tracked files in a staging area, mark conflicting files as resolved when merging, and so on, depending on the state of the target file.
Therefore, it would be more appropriate to interpret this command as «Add content to the next submission» rather than «Add a file to the project»
Now run git add to put README.txt in the staging area and see the output of git status
$ git status
On branch master

No commits yet

Changes to be committed:
  (use "git rm --cached <file>..." to unstage)

    new file:   README.txt
Submit Updates
Before each submission, use git status to see if it’s temporarily saved, and then run the submission command git commit
$ git commit
This will launch a text editor to enter instructions for this submission, which will display text information similar to the following
# Please enter the commit message for your changes. Lines starting
# with '#' will be ignored, and an empty message aborts the commit.
#
# On branch master
#
# Initial commit
#
# Changes to be committed:
#   new file:   README.txt
#
# Changes not staged for commit:
#   modified:   README.txt
#
You can see that the default submission message contains the output of the last run of git status in the comment line, with an empty line at the beginning requiring input of the submission instructions
You can also submit updates in a single line of commands by using the -m parameter followed by the submission instructions
$ git commit -m 'To update README content'
[master 34c5aa0] To update README content
 1 file changed, 1 insertion(+), 1 deletion(-)
After submission, it will prompt you which branch (master) is currently submitting, what is the complete SHA-1 checksum submitted (34c5aa0), and how many documents have been revised, how many lines have been added and deleted in this submission.
When submitting, add the -a option to git commit, and git will automatically save and submit all files that have been tracked
$ git commit -am 'To update README'
[master daa40d0] To update README
 1 file changed, 1 insertion(+), 1 deletion(-)
However, skipping the GIT add step is not equivalent to not using git add at all.Because git commit-a temporarily saves and submits all tracked files, this step is omitted.But a file that is not tracked needs to be made tracked using the GIT add command
Another way to submit is to use the -v or—verbose option, which is redundant when translated into Chinese. It not only reviews what has just been modified, but also forces the submission reason to be written in more detail.
take README 12345 out of content
# Please enter the commit message for your changes. Lines starting
# with '#' will be ignored, and an empty message aborts the commit.
#
# On branch master
# Changes to be committed:
#   modified:   README.txt
#
# ------------------------ >8 ------------------------
# Do not modify or remove the line above.
# Everything below it will be ignored.
diff --git a/README.txt b/README.txt
index 5c1d8ad..95d09f2 100644
--- a/README.txt
+++ b/README.txt
@@ -1 +1 @@
-hello world12345
 No newline at end of file
+hello world
 No newline at end of file
The output is as follows:
$ git commit --verbose
[master 2494a62] take README 12345 out of content
 1 file changed, 1 insertion(+), 1 deletion(-)
git view
Status overview
The output of the git status command is detailed, but its terminology is somewhat cumbersome.If you use the git status-s command or the git status —short command, you get a more compact format for the output
$ git status -s
 M README   # The file has been modified, but it has not been placed in the staging area yet
MM Rakefile # Modified in workspace after being submitted to staging area
A  lib/git.rb # Files newly added to the staging area
M  lib/simplegit.rb # The file was modified and placed in the staging area
?? LICENSE.txt # Newly added untracked files
Generally, the -s option is used with the -b option, where s stands for summary and B for branch.
$ git status -sb
## master...origin/master [ahead 1]
 M "git.md"
Status overview
If you know which line has changed, use the git diff command
The git diff command compares the difference between the current file in the working directory and the snapshot of the staging area, that is, the changes that have not been temporarily saved after modification, and if all the updated files have been temporarily saved, nothing will be left after running git diff
In the code below, the contents of the README.txt file change from’hello world1’to’hello world123′
$ git diff
diff --git a/README.txt b/README.txt
index 62b372b..6d7f756 100644
--- a/README.txt
+++ b/README.txt
@@ -1 +1 @@
-hello world1
 No newline at end of file
+hello world123
 No newline at end of file
If you want to see the difference between a temporary file and the last submitted snapshot, you can use the git diff—cached command
In the code below, the contents of the README.txt file change from empty to’hello world1′
$ git diff --cached
diff --git a/README.txt b/README.txt
new file mode 100644
index 0000000..62b372b
--- /dev/null
+++ b/README.txt
@@ -0,0 +1 @@
+hello world1
 No newline at end of file
View submission history
Use the git log command to view the submission history
$ git log
commit 3f7b9ed403e6d624651014a5d15c481463572c15 (HEAD -> master)
Author: xiaohuochai <121631835@qq.com>
Date:   Sun Dec 29 23:19:44 2019 +0800

    add b

commit ee5ae6f1dd5f620f4d2ac4a3702eb4814a062fce
Author: xiaohuochai <121631835@qq.com>
Date:   Sun Dec 29 23:15:10 2019 +0800

    delete c
By default, git log lists all updates by submission time, with the most recent updates at the top, with a SHA-1 checksum, author’s name and e-mail address, submission time, and a paragraph indented to show the submission instructions
Our common -p option expands to show differences in each submission, while -2 shows only the last two updates
$ git log -p -2
commit 3f7b9ed403e6d624651014a5d15c481463572c15 (HEAD -> master)
Author: xiaohuochai <121631835@qq.com>
Date:   Sun Dec 29 23:19:44 2019 +0800

    add b

diff --git a/b1 b/b1
new file mode 100644
index 0000000..e69de29

commit ee5ae6f1dd5f620f4d2ac4a3702eb4814a062fce
Author: xiaohuochai <121631835@qq.com>
Date:   Sun Dec 29 23:15:10 2019 +0800

    delete c

diff --git a/c b/c
deleted file mode 100644
index e69de29..0000000
In addition to displaying basic information, this option comes with every commit change.This parameter is useful when conducting a code review or when you are taking a quick look at changes to a partner’s commit submission
You can use the —oneline option to display each submission on a single line, which is useful when the number of submissions is large
$ git log --oneline
3f7b9ed (HEAD -> master) add b
ee5ae6f delete c
git command history
The git reflog command is ordered by all commit paths that have passed before, and is used to record each command, often in version-switching auxiliary operations
$ git reflog
git version switching
For git to switch versions, you must know which version is the current version.In git, HEAD is used to represent the current version, that is, the latest submission. The previous version was HEAD^. The last version was HEAD^. Of course, it is easier to write 100^ to the last 100 versions, so it is HEAD~100
First use git log —online to overview the current submission history
$ git log --oneline
e7422c8 (HEAD -> master) add b
ee5ae6f delete c
8760a0f add c
Use the command git reset —hard commit_id to switch between versions’history
 git reset --hard HEAD^
HEAD is now at ee5ae6f delete c
Use git log —online to review the submission history and find that the latest version is no longer visible
$ git log --oneline
ee5ae6f (HEAD -> master) delete c
8760a0f add c
What if you find the latest version of the submission?Git provides a command, git reflog, ordered by all commit paths passed before, to record each command
$ git reflog
ee5ae6f (HEAD -> master) HEAD@{0}: reset: moving to HEAD^
e7422c8 HEAD@{1}: commit (amend): add b
3f7b9ed HEAD@{2}: commit: add b
ee5ae6f (HEAD -> master) HEAD@{3}: commit: delete c
8760a0f HEAD@{4}: commit: add c
The results returned from the git reflog command show that e7422c8 is the latest version of commit id
Using the git reset —hard command below, restore the file to the latest version
$ git reset --hard e7422c8
HEAD is now at e7422c8 add b
git branch management
Almost every version control system supports branching in some way.Using branching means you can detach from the development main line and continue working without affecting it.
Branches in git are essentially just variable pointers to commit objects, a file containing the checksum of the objects they refer to (a 40-character SHA-1 string), so it’s cheaper to create and destroy a branch.To put it plainly, creating a new branch is as easy as writing 41 bytes (plus a line break) to a file, and of course it will be fast
git uses master as the default name for the branch.After several submissions, there is actually a master branch pointing to the last submission, which automatically moves forward each time it submits

Create Branch
Create a new branch pointer.For example, if you create a new testing branch, you can use the git branch command
$ git branch testing
This creates a new branch pointer on the current commit object

git holds a special pointer called HEAD, which is a pointer to a local branch in work (think of HEAD as an alias for the current branch).Running the git branch command simply creates a new branch but does not automatically switch to it, so in this case, it’s still working in the master branch
Switch Branch
To switch to another branch, execute the git checkout command.Now switch to the new testing branch so that HEAD points to the testing branch
$ git checkout testing

git checkout uses the -b option to create a new branch and switch to it, such as the iss53 branch
$ git checkout -b iss53
Merge Branches
You can use the git merge command to merge branches.Generally, merging branches occurs in three situations
1. Fast forward merge
If the current master branch is submitted directly upstream of the hotfix branch to be merged, git only needs to move the master branch pointer directly to the right.In other words, if you can go down one branch to reach another, git will simply move the pointer to the right when merging the two because there are no differences to resolve between the historical branches of this single line, so this merging process can be called Fast forward.
$ git checkout master
$ git merge hotfix
Updating f42c576..3a0874c
Fast-forward
 README | 1 -
 1 file changed, 1 deletion(-)
2. Conflict-free merge
As shown in the figure below, issue 53 is merged back into the master branch, and git does a simple triple-sum with the ends of the two branches (C4 and C5) and their common ancestors (C2).

$ git checkout master
$ git merge iss53
Auto-merging README
Merge made by the 'recursive' strategy.
 README | 1 +
 1 file changed, 1 insertion(+)
git takes a new snapshot of the result of the three-party merge and automatically creates a submission object (C6) that points to it.This submission object is special because it has two ancestors (C4 and C5)

3. Conflicting merges
If the same part of the same file is modified in different branches, git can’t cleanly merge the two (logically, this can only be decided by people).If you modify the modified part of hotfix during problem solving #53, you will get similar results as below
$ git merge iss53
Auto-merging index.html
CONFLICT (content): Merge conflict in index.html
Automatic merge failed; fix conflicts and then commit the result.
Git merges but does not submit, it stops and waits to resolve the conflict.To see which files conflict during merge, you can use git status to look up
$ git status
On branch master
You have unmerged paths.
  (fix conflicts and run "git commit")

Unmerged paths:
  (use "git add <file>..." to mark resolution)

        both modified:      index.html

no changes added to commit (use "git add" and/or "git commit -a")
Any file containing unresolved conflicts is listed as unmerged.GITS add standard conflict resolution tags to conflicting files that can be manually located and resolved.You can see that this file contains sections like the following:
<<<<<<< HEAD
<div id="footer">contact : email.support@github.com</div>
=======
<div id="footer">
  please contact us at support@github.com
</div>
>>>>>>> iss53
After all conflicts in all files have been resolved, running the git add command will mark them as resolved (essentially saving a snapshot to the staging area).Because once temporarily saved, the conflict is resolved
Run git status again to confirm that all conflicts have been resolved
$ git status
On branch master
Changes to be committed:
  (use "git reset HEAD <file>..." to unstage)

        modified:   index.html
If you confirm that all conflicts have been resolved, you can use git commit to complete this merge submission.Submission instructions are automatically generated
Merge branch 'iss53'

Conflicts:
  index.html
#
# It looks like you may be committing a merge.
# If this is not correct, please remove the file
#       .git/MERGE_HEAD
# and try again.
#
View Branches
The git branch command gives a list of all current branches without any parameters.The * character before the master branch indicates the current branch.That is, if updates are submitted now, the master branch will move forward as development progresses
$ git branch
  iss53
* master
  testing
To view information about the last submitted object for each branch, run git branch -v
$ git branch -v
  iss53   93b412c fix javascript issue
* master  7a98805 Merge branch 'iss53'
  testing 782fd34 add scott to the author list in the readmes
Delete Branch
Previous work has been consolidated into the master, so the iss53 branch is useless.You can delete it using the GIT branch-d command
$ git branch -d iss53
If a branch has not been merged, it needs to be deleted using the -D option
$ git branch -D iss53
git remote warehouse and branch
To participate in the collaboration of any git project, you must understand how to manage the remote warehouse.Remote warehouses refer to project warehouses hosted on the network that need to be managed to push or pull data and share progress when developing a project with others.Manage the work of remote warehouses, including adding remote libraries, removing remote libraries, managing remote library branches, defining whether they are tracked, and so on
A remote branch is an index of branches in a remote warehouse.They are some local branches that cannot be moved; they are updated only when git interacts with the network.A remote branch acts like a bookmark reminding you of the location of the branches above the last time you connected to a remote warehouse
A remote branch, such as origin/master branch, is usually represented as (remote warehouse name)/(branch name)
Clone Remote Warehouse
The command format for cloning a repository is git clone [url].For example, to clone the code repository git_learn, you can use the following command:
$ git clone git@github.com:littlematch0123/git_learn.git
This creates a directory named git_learn under the current directory, which contains a.Git directory to save all downloaded version records and then take out a copy of the latest version of the file.If you go into this new git_learn directory, you’ll see that all the files in the project are inside and ready for further development and use.If you want to define your own project directory name to be created when cloning, you can specify a new name at the end of the command above
$ git clone git@github.com:littlematch0123/git_learn.git learnGit
If the last character is a dot, all the files of the project will be stored in the current directory, but it is best to start with an empty directory
$ git clone git@github.com:littlematch0123/git_learn.git .
View remote warehouse
To see which remote repositories are currently configured, you can use the GIT remove command, which lists the short name of each remote repository.After cloning a project, you will see at least one remote repository named origin, which git uses by default to identify the original repository being cloned
$ git remote
origin
You can also add the -v option (v is short for—verbose, which means redundant in Chinese) to display the corresponding clone address.If you do not have push privileges, you will not see the address of the push
$ git remote -v
origin  git@github.com:littlematch0123/git_learn.git (fetch)
origin  git@github.com:littlematch0123/git_learn.git (push)
Add Remote Warehouse
Typically, a local git warehouse corresponds to a remote warehouse; however, in some cases, a local warehouse needs to associate multiple remote warehouses at the same time, such as publishing a project on both github and coding
Add a new remote repository, you can specify a name for future reference, run git remote add [shortname] [url]
$ git remote add coding git@git.coding.net:ehuo0123/git_learn.git
$ git remote -v
coding  git@git.coding.net:ehuo0123/git_learn.git (fetch)
coding  git@git.coding.net:ehuo0123/git_learn.git (push)
origin  git@github.com:littlematch0123/git_learn.git (fetch)
origin  git@github.com:littlematch0123/git_learn.git (push)
Push Local Branch
The git push command is used to push updates from local branches to remote hosts
$git push <remote host name> <local branch name>: <remote branch name>
The following command means to take out my local serverfix branch and push it to the serverfix branch of the remote repository
$ git push origin serverfix:serverfix
Branch names can be different, of course, but this is not recommended.
git push origin serverfix:awesomebranch
Because the local and remote branches have the same name, the following is a brief description
$ git push origin serverfix
If you want to push the local master branch to the origin server, you can run the following command
$ git push origin master
The following command pushes the current branch to the corresponding branch of the origin host, the master branch if the current branch is the master branch, and the x branch if the x branch
$ git push origin
Generally, the current branch has only one tracking branch, so the host name can be omitted
$ git push
If the current branch has a tracking relationship with multiple hosts, you can specify a default host using the -u option so that you can use git push later without any parameters
$ git push -u origin master
Push all local branches to the remote host regardless of whether there is a corresponding remote branch or not, using the -all option
$ git push --all origin
Grab data from server
Use the git fetch command to fetch data from all branches of the server
$ git fetch origin
remote: Enumerating objects: 4, done.
remote: Counting objects: 100% (4/4), done.
remote: Compressing objects: 100% (2/2), done.
remote: Total 3 (delta 0), reused 3 (delta 0), pack-reused 0
Unpacking objects: 100% (3/3), done.
From https://github.com/littlematch0123/git_learn
 * [new branch]      y          -> origin/y
If a branch name is added, only the data for that branch is updated
$ git fetch origin master
However, it is important to note that the fetch command only grabs data and does not automatically generate an editable copy (copy) locally.In other words, in this case, there won’t be a new Y branch — there’s only one origin/y pointer that can’t be modified
You can run git merge origin/y to merge these work into the current master branch
$ git merge origin/y
If you want to work on your own y branch, you can build it on a remote tracking branch:
$ git checkout -b y origin/y
Checking out a local branch from a remote tracking branch automatically creates what is called a «tracking branch» (the branch it tracks is called an «upstream branch»).A tracking branch is a local branch that has a direct relationship with a remote branch, and a tracking relationship is established between the local branch and the remote branch.
When a repository is cloned, it usually automatically creates a master branch that tracks origin/master
If you enter git pull on a tracking branch, git automatically identifies which server to grab and merge into which branch.So, in fact, git pull is the abbreviation git fetch followed by git merge FETCH_HEAD.
$git pull <remote host name> <remote branch name>: <local branch name>
For example, to retrieve the next branch of the origin host and merge with the local master branch, you need to write as follows
$ git pull origin next:master
If the remote branch (next) is to be merged with the current branch, the following
$ git pull origin next
If the current branch has a tracing relationship with a remote branch, git pull can omit the remote branch name
$ git pull origin
If the current branch has only one tracking branch, even the remote host name can be omitted
$ git pull
If no tracking information is prompted when git pull, the trace relationship between local and remote branches is not created. Use the command git branch —set-upstream branch-name origin/branch-name to set up the trace
Remove remote branch
If the local branch name is omitted, the specified remote branch is deleted because it is equivalent to pushing an empty local branch to a remote branch
The following command removes the x branch of the origin host
$ git push origin :x
# Equivalent to
$ git push origin --delete x
Remote Warehouse Delete and Rename
$ git remote rename coding cd # rename
$ git remote rm coding # delete
Distinguish remote warehouses
With the addition of multiple remote warehouses, the selection of warehouses is a problem when push ing and pull ing.True, it’s more rigorous, but in many cases, this distinction is redundant because you just need to keep the remote warehouses exactly the same, without having to distinguish them.
First look at the current git remote
$ git remote -v
origin  git@github.com:littlematch0123/git_learn.git (fetch)
origin  git@github.com:littlematch0123/git_learn.git (push)
Next, instead of adding additional remote warehouses, add additional URL s to existing remote warehouses
Add a remote address to an existing remote warehouse using git remote set-url —add <name> <url>.
$ git remote set-url --add origin git@git.coding.net:ehuo0123/git_learn.git
View the associated remote warehouse again:
$ git remote -v
origin  git@github.com:littlematch0123/git_learn.git (fetch)
origin  git@github.com:littlematch0123/git_learn.git (push)
origin  git@git.coding.net:ehuo0123/git_learn.git (push)
The push and pull operations are set exactly as they were originally and do not need to be adjusted
If you no longer need multiple warehouses, you can delete them using git remote set-url —delete <name> <url>.
$ git remote set-url --delete origin git@git.coding.net:ehuo0123/git_learn.git
git other operations
Delete Files
1. Delete the file from the working directory, simply use rm command, because it is not included in the GIT version library, git does not know
touch a # New a
rm a # Delete a
If Snake adds git rm a, it will prompt an error
$ git rm a
fatal: pathspec 'a' did not match any files
2. Deleting files from the staging area requires the GIT rm-f command to force deletion
touch b # New b
git add b # Add b to staging area
git rm -f b # Delete b
If git rm b is used, the following error will be prompted
$ git rm b
error: the following file has changes staged in the index:
    b
(use --cached to keep the file, or -f to force removal)
3. Delete files from the local repository using the git rm command
touch c # New c
git add c # Add c to staging area
git commit -m 'add c' # Submit to local warehouse
git rm c # Delete c
4. If you just want to delete the file from the git repository (that is, remove it from the staging area), you still want to keep it in the current working directory.In other words, just delete from the tracking list.For example, after some files have been accidentally incorporated into the repository, you may want to remove the trace without deleting the files so that you can later add them to the.gitignore file with the —cached option
$ git rm d --cached
File Rename
1. Rename files from the working directory and delete them directly using the mv command, because they are not included in the GIT version library and git does not know
touch a # New a
mv a a1 # Rename a to a1
If Snake adds git mv a a1, it will prompt an error
$ git mv a a1
fatal: not under version control, source=a, destination=a1
2. Rename files from a staging area or local repository by using the git mv command directly
$ git mv b1 b2
localhost:t bailiang$ git status
On branch master
Changes to be committed:
  (use "git reset HEAD <file>..." to unstage)

    renamed:    b1 -> b2
Undo
At any time, you may need to undo some of the actions you just did.However, it should be noted that some undo operations are irreversible, so be careful that if you make a mistake, you may lose some of your work.
1. Modify the last submission
Sometimes it is only after submission that a few files are missing or the submission information is written incorrectly.To undo the submission you just made, you can resubmit with the —amend option:
$ git commit --amend
If you forgot to temporarily save some changes when you just submitted, you can supplement the temporary operation before running—amend commit
$ git commit -m 'initial commit'
$ git add forgotten_file
$ git commit --amend
The three commands above ultimately result in only one submission, and the second submission corrects the first submission
2. Cancel temporary files
Use the GIT reset HEAD <file>… command to cancel the staging and restore the files in the staging area to the working directory
$ git reset HEAD a.txt
3. Cancel the modification of the file
Use the GIT checkout — <file>… command to restore the file to the state of the previous version.It is important to note that this command is dangerous and that any modifications to the file will disappear because you just copied another file to overwrite it.Don’t use this command unless you really don’t want that file
$ git checkout -- a.txt
Matters needing attention
1. Version control systems can only track changes to text files, such as TXT files, Web pages, all program codes, and so on.Pictures, videos and other binary files can also be managed by the version control system, but they can not track the changes of the files. They can only be string up with each change, that is, they only know the picture changed from 100KB to 120KB, but the version control system does not know or know what has changed.
Microsoft’s Word format is binary, so version control systems cannot track Word
Of course, there is a way to do this. You need to install the docx2txt program to convert a word document into a readable text file
Add the following line of text to the.gitattributes file:
*.docx diff=word
Write a script to wrap the output in a git-supported format.Create a file called docx2txt under the executable path and add these:
#!/bin/bash
docx2txt.pl $1 -
Add executable permissions to this file with chmod a+x.Finally, you need to configure git to use this script
$ git config diff.word.textconv docx2txt
Now if you compare the two snapshots, git will apply a «word» filter, docx2txt, to those files that end with.Docx.In this way, Word files can be efficiently converted into text files and compared
2. Do not use the Notepad that comes with Windows to edit any text files.The reason is that the Microsoft Notepad development team used a very unwise behavior to save UTF-8 encoded files. They cleverly added 0xefbbbf (hexadecimal) characters at the beginning of each file and encountered many incredible problems.
3. git commit-a M can be written as git commit-a-m, but not git commit-m-a.
4. Anything submitted in git can almost always be recovered, but any uncommitted items may no longer be found if lost
Common git commands
Basic operations
$ git init  #Initialize warehouse
$ git add <file> #Track new files, or put tracked files in staging area
$ git add .  #Batch Tracking of Untracked Files in All Working Directories
$ git rm <file> #Delete files from local repository
$ git rm -f <file> #Delete files from staging area
$ git rm --cached <file> #Delete from git repository, but keep in current working directory
$ git commit  #Submit the file to the local warehouse
$ git commit -m 'wrote a file'  #Submit updates in one line of command, followed by how the -m parameter submits instructions
$ git commit -am 'wrote a file'  #Save all tracked files temporarily and submit them together
$ git commit -v #Launch a text editor to enter instructions for this submission, which shows changes compared to the last submission
$ git commit --amend  #Modify Last Submission
$ git reset HEAD <file>  #Cancel temporary storage
$ git checkout -- <file>  #Restore file contents
View Operations
$ git status  #Check current file status
$ git status -s #State output in a more compact format
$ git diff  #View differences between working directory and staging area
$ git diff --cached  #View the differences between the staging area and a submission, defaulting to HEAD
$ git diff id1 id2  #View differences between submissions
$ git log  #View submission history
$ git log -p #Expand to show content differences per submission
$ git log -2 #Show only the last two updates
$ git log --oneline #Place each submission on a single line
$ git log --all #Show submission records for all branches
$ git log --graph  #Displays branch merge history represented by ASCII graphics
$ git reflog  #Order all commit paths passed before to record each command
Branch operation
$ git branch  #List all branches, with a * sign before the current branch
$ git branch -v  #View information about the last submitted object for each branch
$ git branch <branchName>  #New Branch
$ git branch -d <branchName>  #Delete Branch
$ git branch -D <branchName>  #Force branch deletion to delete branches that have not been merged
$ git checkout <branchName>   #Branch Switching
$ git checkout -b <branchName>  #Create a new branch and switch to it
$ git checkout -  #Move HEAD to previous branch
$ git merge <branchName>  #Merge target branch into current branch
$ git reset --hard <commit>  #Return the current branch to a historical version, and the submitted content will be copied to the staging area and working directory
Remote operation
$ git remote   #View all remote warehouses
$ git remote -v  #Show clone addresses corresponding to remote warehouses
$ git remote add [shortname] [url]  #Add a new remote warehouse
$ git remote rename pb paul   #Change the name of the remote library from pb to paul
$ git remote rm [shortname]   #Unassociate this remote library
$ git remote set-url --add <name> <url>  #Add additional URL s to existing remote warehouses
$ git remote set-url --delete <name> <url>  #Delete additional URL s to existing remote warehouses
$ git clone <address>  #Clone all branches of a remote warehouse
$ git push origin <branchName>  #Remove the local <branchName>branch and push it to the <branchName>branch of the remote warehouse
$ git fetch origin  #Grab data from all branches of the remote server
$ git pull origin <branchName>  #A combination of fetch and merge commands
$ git push origin :serverfix  #Delete serverfix branch on server
$ git push origin --delete serverfix  #Additional Writing to Delete Server Branches
A quick guide to how to use git commands and what are the top command that used by every developer in their daily life.
1. Introduction
In this tutorial, You’ll learn what are the git commands that can be used in everyday life. You’ll see the top git commands with examples. You can not imagine a developer’s life without using version control tools such as git, bitbucket, or any tool.
Because this makes like simple and easy to maintain the programming files and collaborate with your teammates.
Most of you do not use git commands either you use GUI plugins in IDE eclipse or Intelleji tools
But, if you know all these handy command and you will get confidence in dealing with the conflicts resolving manually from the terminal.
Git Tutorials
2. Handy Git Commands
Git Commands: Let us see what are the commands that are mostly used from the terminal or command prompt such as git bash in windows. At least the following should be known by all developers and most used in the software industry. We’ll discuss one by one from scratch.
Git Commands List:
- git config
- git init
- git clone
- git help
- git status
- git add
- git branch
- git commit
- git push
- git pull
- git checkout
- git stash
- git merge
- git reset
- git remote
- git diff
- git rm
- git log
- git show
- git tag
3. Git Config Command With Example
This is the most important one but this is used only once when you join the new company or get a new laptop in the office. This is only a one-time job but if you want to change at any time such as name, email address using the “git config” command as below.
Names, email values can be set at the global, system, or user level.
Example Commands to set the user name and email address.
git config –global <property-name> <value>
git config –global user.name “JavaProgramTo.com”
git config –global user.email “admin@javaprogramto.com”
|
01 02 03 04 05 06 07 08 09 10 11 |
|
To see all the user configurations have been set in your machine use the “
git config –list | grep ‘user’“
git config –list | grep ‘user’
user.email=admin@javaprogramto.com
user.name=JavaProgramTo.com
4. Git Init Command With Example
“git init” is to convert a project into a git project. To see the current folder is under git or not using git status command or if the “.git” folder is present in the root directory it is git project.
If not a git project, just run the “git init” command at the root folder to convert into a git project.
git init
$ pwd/Users/Documents/workspace/git-demo$ git statusfatal: not a git repository (or any of the parent directories): .git$ ls -a.  ..  file1.txt$ git initInitialized empty Git repository in /Users/Documents/workspace/git-demo/.git/$ ls -a.  ..  .git  file1.txt$ git statusOn branch master


No commits yet


Untracked files:
  (use "git add <file>..." to include in what will be committed)


 file1.txt


nothing added to commit but untracked files present (use "git add" to track)
5. Git clone Command Example
If you want to clone any repo from GitHub or bitbucket or remote location then use ‘git clone “repo location”‘
git clone <remote-repo-location>
$ git clone https://github.com/JavaProgramTo/CoreJava.git
Cloning into 'CoreJava'...
remote: Enumerating objects: 97, done.
remote: Counting objects: 100% (97/97), done.
remote: Compressing objects: 100% (53/53), done.
remote: Total 97 (delta 14), reused 95 (delta 12), pack-reused 0
Unpacking objects: 100% (97/97), done.
$
And also you can clone into a new folder. Here CoreJava git repo will be cloned into a new folder core-java-tutorials
$ git clone https://github.com/JavaProgramTo/CoreJava.git core-java-tutorials
Cloning into 'core-java-tutorials'...
remote: Enumerating objects: 97, done.
remote: Counting objects: 100% (97/97), done.
remote: Compressing objects: 100% (53/53), done.
remote: Total 97 (delta 14), reused 95 (delta 12), pack-reused 0
Unpacking objects: 100% (97/97), done.
$ls
CoreJava  core-java-tutorials file1.txt
6. Git Help Command Example
If you don’t know much about any command then. use “git help <command-name>” it pulls syntax and all its options.
git help <command-name>
$ git help init
It displays into a new editor as below and press ‘q’ to come out to the terminal.
7. Git Status Command Example
To see the list of files are modified and added to the stage in the current directory. And also show the current branch name.
git status
$ git status
On branch master

No commits yet

Untracked files:
  (use "git add <file>..." to include in what will be committed)

 CoreJava/
 core-java-tutorials/
 file1.txt
nothing added to commit but untracked files present (use “git add” to track)
8. Git Add Command Example
‘git add’ command to add new files or existing modified files to the git stage. This works from current directory.
After ‘git add’ command execution, files will be moved from untracked files to ” changes to be committed“
git add <file-1-name>
$ git add file1.txt
$ git status
On branch master
No commits yet
Changes to be committed:
(use “git rm –cached <file>…” to unstage)
new file: file1.txt
Untracked files:
(use “git add <file>…” to include in what will be committed)
CoreJava/
core-java-tutorials/
Even you can add multiple files by delimiting the file names with space or use
‘*’ to add all files to the stage.
git add <file-1-name> <file-2-name>
for
git add *
9. Git Commit Command Example
‘git commit’ command commit the files in stage area (Changes to be committed section) and creates a new commit id for this commit.
But these files are now not available on the git. At this stage, all files are on in your local machine as now.
git commit -m <commit-name>
$ git commit -m 'first commit'
[master (root-commit) 8dbddf5] first commit
 1 file changed, 0 insertions(+), 0 deletions(-)
 create mode 100644 file1.txt
Venkateshs-MacBook-Pro-2:git-demo venkateshn$ git status
On branch master
Untracked files:
  (use "git add <file>..." to include in what will be committed)

 CoreJava/
 core-java-tutorials/
nothing added to commit but untracked files present (use “git add” to track)
10. Git push Command Example
After commit, use the ‘git push‘ command to move your changes to a remote repo that means from where repo is created.
git push
git push origin <branch-name> -> pusing the changes to a specific branch
git push -all –> pushing all branch changes to remote git.
$ git push
11. Git Pull Command Example
If you have other changes those are committed by your teammate and to get the latest changes to use ‘
git pull‘ command.
git pull -> pulls from the current branch
git pull <repo-url> -> pull change from the given repo
$ git pull
12. Git Branch Command Example
To see all branches under this repo, use ‘git branch’
git branch
$ git branch
* master
develop
To see, all the remote branches using ‘git branch -r‘
git branch -r -> to see remote branches
git branch <new-branch> release -> to create a new branch from release branch.
13. Git Checkout Command Example
If you have modified the file in local repo and you want to replace all the changes with the remote file, use ‘git checkout <file-name>‘
$git checkout file1.txt
14. Git Stash Command Example
If you modified files in your local and do not want to commit immediately then use ‘
git stash‘.
Now, modified files will be shown in the ‘git status’ command.
$ vi file1.txt
$ git status
On branch master
Changes not staged for commit:
  (use "git add <file>..." to update what will be committed)
  (use "git checkout -- <file>..." to discard changes in working directory)

 modified:   file1.txt

Untracked files:
  (use "git add <file>..." to include in what will be committed)

 CoreJava/
 core-java-tutorials/

no changes added to commit (use "git add" and/or "git commit -a")
$ git stash
Saved working directory and index state WIP on master: 8dbddf5 first commit
$ git status
On branch master
Untracked files:
  (use "git add <file>..." to include in what will be committed)

 CoreJava/
 core-java-tutorials/

nothing added to commit but untracked files present (use "git add" to track)
nothing added to commit but untracked files present (use “git add” to track)
Added again some files to git stash. ‘save’ is optional and by defaults it does save.
$git stash save
To see all the commits in the git stash use ‘git stash list’
$ git stash list
stash@{0}: WIP on master: 8dbddf5 first commit
stash@{1}: WIP on master: 8dbddf5 first commit
To get the latest changes from stash to stage, use‘git stash pop‘.
$ git stash pop
On branch master
Changes not staged for commit:
  (use "git add <file>..." to update what will be committed)
  (use "git checkout -- <file>..." to discard changes in working directory)

 modified:   file1.txt

Untracked files:
  (use "git add <file>..." to include in what will be committed)

 CoreJava/
 core-java-tutorials/
 file2.txt

no changes added to commit (use "git add" and/or "git commit -a")
Dropped refs/stash@{0} (9faef149414d5c6ab7047ed493c77a3b444e04e6)
Now see the list of all commits in the stash with the command ‘git stash list’
$ git stash list
stash@{0}: WIP on master: 8dbddf5 first commit
15. Git Branch Command Example
‘git branch‘ command list all branches available in this repo.
This shows all branches untill your last ‘git pull‘. After, it pulls if any new branches created on the remote branch, and those can not be seen from the local branch.
$ git branch
  develop
* master
To see only remote branches use “git branch -r” and use “git branch -a” to all remote and local branches.
$ git branch -r
  origin/dummy
  origin/master
$ git branch -a
  develop
* master
  remotes/origin/dummy
  remotes/origin/master
$ git branch
  develop
* master
16. Git Merge Command Example
If you want to merge another branch to the current branch then use the ‘
git merge‘ command.
Making the changes to develop branch and merging develop branch changes to the master branch.
$ git status
On branch develop
Changes to be committed:
  (use "git reset HEAD <file>..." to unstage)

 modified:   file1.txt

Untracked files:
  (use "git add <file>..." to include in what will be committed)

 CoreJava/
 core-java-tutorials/
 file2.txt

Venkateshs-MacBook-Pro-2:git-demo venkateshn$ git commit -m 'added line 2'
[develop 17569dd] added line 2
 1 file changed, 3 insertions(+)
Merging develop branch commits into the master branch.
git merge develop -> merges the changes of develop branch into the current branch.
$ git checkout master
Switched to branch 'master'
$ git merge develop
Updating 8dbddf5..17569dd
Fast-forward
 file1.txt | 3 +++
 1 file changed, 3 insertions(+)
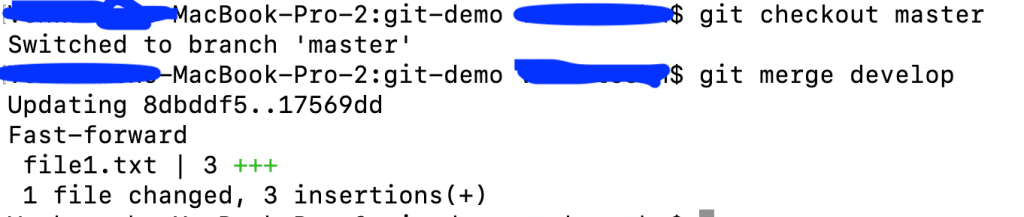
17. Git Log Command Example
To see all the commits version history in any branch or current branch, use
‘git log‘ command.
$ git log
commit 94c3fcb44b57cc13a3bdadaabe708e1d0e38a16e (HEAD -> master)
Author: JavaProgramTo.com <admin@javaprogramto.com>
Date:   Sun May 10 22:24:55 2020 +0530

    adding file2

commit 17569dd273defd6ef7a4de554f20a966504fa629 (develop)
Author: JavaProgramTo.com <admin@javaprogramto.com>
Date:   Sun May 10 22:17:12 2020 +0530

    added line 2

commit 8dbddf5a2a5d2c4d14ceec7a4ea74db994b8dd10
Author: JavaProgramTo.com <admin@javaprogramto.com>
Date:   Sun May 10 21:21:42 2020 +0530

    first commit
By default, the ‘git log‘ command shows all the commits for the current branch but it provides different flags to do specific set of operations.
To see the file commits for a specific file then use ‘
git log –follow <file-name>‘
To see the commits for file1.txt
$ git log --follow  file1.txt
commit 17569dd273defd6ef7a4de554f20a966504fa629 (develop)
Author: JavaProgramTo.com <admin@javaprogramto.com>
Date:   Sun May 10 22:17:12 2020 +0530

    added line 2

commit 8dbddf5a2a5d2c4d14ceec7a4ea74db994b8dd10
Author: JavaProgramTo.com <admin@javaprogramto.com>
Date:   Sun May 10 21:21:42 2020 +0530

    first commit
To see all the commits for file2.txt
$ git log --follow  file2.txt
commit 94c3fcb44b57cc13a3bdadaabe708e1d0e38a16e (HEAD -> master)
Author: JavaProgramTo.com <admin@javaprogramto.com>
Date:   Sun May 10 22:24:55 2020 +0530

    adding file2
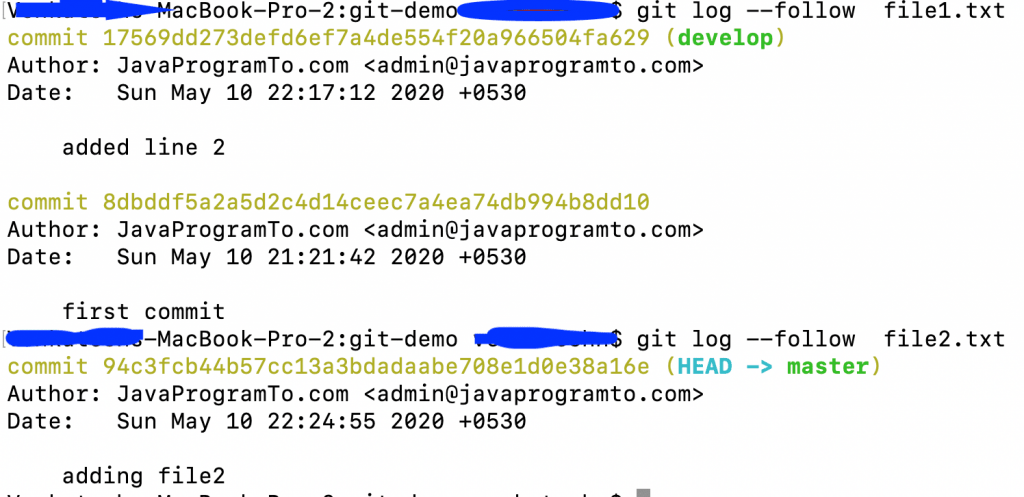
18. Git Diff Command Example
To see the difference among the modified files with remote files using
‘git diff‘ command.
$ git diff
diff --git a/pom.xml b/pom.xml
index f47e51e..8702bb4 100644
--- a/pom.xml
+++ b/pom.xml
@@ -19,7 +19,7 @@
        </properties>

        <dependencie
-
+               <!-- spring boot dev tools-->
                <dependency>
                        <groupId>org.springframework.boot</groupId>
                        <artifactId>spring-boot-devtools</artifactId>
Now, add the modified file to git.
$ git add pom.xml
$ git diff
$
Now, git diff does not show the differences but still, you can see the diff wit flag ‘–staged‘.
git diff –staged
$ git diff --staged
diff --git a/pom.xml b/pom.xml
index f47e51e..8702bb4 100644
--- a/pom.xml
+++ b/pom.xml
@@ -19,7 +19,7 @@
        </properties>

        <dependencie
-
+               <!-- spring boot dev tools-->
                <dependency>
                        <groupId>org.springframework.boot</groupId>
                        <artifactId>spring-boot-devtools</artifactId>
Another interesting way to see the differences between the two branches.
$git diff master develop
19. Git Reset Command Example
To remove the file from stage and file should be in the local system.
Look at the in-depth article on “git reset and git rm” commands to unstage a file.
Syntax: git reset <file-name>
$ git reset file1.txt
To unstage and remove all the files from a specific commit. But, all the files from this commit will remain as modified in the local machine.
git reset <commit-id>
$ git reset 6873c7a6c1135b3a977c9d14404e0fd652f566a8
Unstaged changes after reset:
M pom.xml
To discard all the changes from a commit and goes back to the specific commit.
$ git reset --hard 8dbddf5a2a5d2c4d14ceec7a4ea74db994b8dd10
HEAD is now at 8dbddf5 first commit
$ ls
CoreJava  core-java-tutorials file1.txt
$
After resetting to the first commit, we are not seeing the file2.txt in the local file system. Because, if you use a ‘hard‘ flag then it removes all history of the files.
You must be careful when running git commands with a ‘hard‘ flag.
20. Git Rm Command Example
This command deletes the file from your current local working directory and from the stage as well. Once you do commit and push then file will be removed from git repo permanently.
If you do not use any flag then‘git rm‘ command just remove the file.
$ ls
CoreJava  core-java-tutorials file1.txt
$ git rm file1.txt
rm 'file1.txt'
$ git status
On branch master
Changes to be committed:
  (use "git reset HEAD <file>..." to unstage)

 deleted:    file1.txt

Untracked files:
  (use "git add <file>..." to include in what will be committed)

 CoreJava/
 core-java-tutorials/

$ls
$
‘git rm’ command does not work with the staged file and works on only committed files.
Created now a new file3.txt and added to git. Then tried to remove using file3.txt file with ‘git rm file3.txt‘. This result in error saying use‘–cached’ or ‘-f’ flag.
$ git rm file3.txt
error: the following file has changes staged in the index:
    file3.txt
(use --cached to keep the file, or -f to force removal)
$
“–cached” flag is used to remove the file from staging and reserves the changes.
$ git rm --cached file3.txt
rm 'file3.txt'

$ git status
On branch master
Changes to be committed:

Untracked files:
  (use "git add <file>..." to include in what will be committed)
 file3.txt
git rm -f file3.txt – Just deleted the file from local machine.
$ git add file3.txt
$ git status
On branch master
Changes to be committed:
  (use "git reset HEAD <file>..." to unstage)

 deleted:    file1.txt
 new file:   file3.txt

Untracked files:
  (use "git add <file>..." to include in what will be committed)

 CoreJava/
 core-java-tutorials/


$ git rm -f file3.txt
rm 'file3.txt'
$ git status
On branch master
Changes to be committed:
  (use "git reset HEAD <file>..." to unstage)
Untracked files:
  (use "git add <file>..." to include in what will be committed)

$
21. Git Tag Command Example
This command is used to give tags to the specified commit.
git tag <commit-d>
$ git tag 8dbddf5a2a5d2c4d14ceec7a4ea74db994b8dd10
$ git tag
8dbddf5a2a5d2c4d14ceec7a4ea74db994b8dd10
‘git tag’ command to see all the tags for a branch.
22. Git Show Command Example
“git show” command shows the files metadata sections of contents changed in the commit. By default, it shows the result for the latest commit from the ‘git log‘ command.
$ git show
commit 68c7e111b3995a5104b1651550f29874733f2a96 (HEAD -> master, tag: 8dbddf5a2a5d2c4d14ceec7a4ea74db994b8dd10)
Author: JavaProgramTo.com <admin@javaprogramto.com>
Date:   Sun May 10 22:51:59 2020 +0530

    file one modified

diff --git a/file1.txt b/file1.txt
index e69de29..b806426 100644
--- a/file1.txt
+++ b/file1.txt
@@ -0,0 +1 @@
+adding line 1
Highlighted in yellow color is the contents modified.
To see only file names for a commit.
use flag ‘–name-only’ in ‘git show’ command.
git show –name-only <commit-id>
$ git show --name-only c97949d3c04593bdc72478038c4ff76b17de9c8a
commit c97949d3c04593bdc72478038c4ff76b17de9c8a
Author: java-w3schools <venkivenki4b6@gmail.com>
Date:   Sat May 9 23:36:22 2020 +0530

    Spring Boot Data MongoDB: Projections and Aggregations Examples

pom.xml
src/main/java/com/javaprogramto/springboot/MongoDBSpringBootCURD/MongoDbSpringBootCurdApplication.java
src/main/java/com/javaprogramto/springboot/MongoDBSpringBootCURD/config/MongoDBConfig.java
src/main/java/com/javaprogramto/springboot/MongoDBSpringBootCURD/controller/projection/AggregationController.java
src/main/java/com/javaprogramto/springboot/MongoDBSpringBootCURD/controller/projection/EmployeeMongoRepoController.java
src/main/java/com/javaprogramto/springboot/MongoDBSpringBootCURD/controller/projection/MongoTemplateProjectionController.java
src/main/java/com/javaprogramto/springboot/MongoDBSpringBootCURD/model/AgeCount.java
src/main/java/com/javaprogramto/springboot/MongoDBSpringBootCURD/repository/EmployeeRepository.java
src/main/resources/application.properties
$
23. Conclusion
In conclusion, We’ve seen most used git commands in the software developer life every day from git bash or terminal.
If you know, all these commands then you can use git commands wisely.
If you have any questions in “Git Commands”, please post in the comments section. We will answer soon.
Published on Java Code Geeks with permission by Venkatesh Nukala, partner at our JCG program. See the original article here: Top Git Commands With Examples
Opinions expressed by Java Code Geeks contributors are their own.
I would like to reopen it.
I currently have the following log:
««
[deleteHierarchy] Problem during remove : The git command failed.
Nov 14, 2019 4:19:05 PM SEVERE hudson.plugins.scm_sync_configuration.SCMManipulator deleteHierarchy
[deleteHierarchy] Problem during remove : The git command failed.
Nov 14, 2019 4:19:05 PM SEVERE hudson.plugins.scm_sync_configuration.SCMManipulator deleteHierarchy
[deleteHierarchy] Problem during remove : The git command failed.
Nov 14, 2019 4:19:05 PM SEVERE hudson.plugins.scm_sync_configuration.SCMManipulator deleteHierarchy
[deleteHierarchy] Problem during remove : The git command failed.
Nov 14, 2019 4:19:05 PM SEVERE hudson.plugins.scm_sync_configuration.SCMManipulator deleteHierarchy
[deleteHierarchy] Problem during remove : The git command failed.
Nov 14, 2019 4:19:05 PM SEVERE hudson.plugins.scm_sync_configuration.SCMManipulator deleteHierarchy
[deleteHierarchy] Problem during remove : The git command failed.
Nov 14, 2019 4:19:05 PM SEVERE hudson.plugins.scm_sync_configuration.SCMManipulator deleteHierarchy
[deleteHierarchy] Problem during remove : The git command failed.
Nov 14, 2019 4:19:05 PM SEVERE hudson.plugins.scm_sync_configuration.SCMManipulator deleteHierarchy
[deleteHierarchy] Problem during remove : The git command failed.
Nov 14, 2019 4:19:05 PM SEVERE hudson.plugins.scm_sync_configuration.SCMManipulator deleteHierarchy
[deleteHierarchy] Problem during remove : The git command failed.
Nov 14, 2019 4:19:05 PM SEVERE hudson.plugins.scm_sync_configuration.SCMManipulator deleteHierarchy
[deleteHierarchy] Problem during remove : The git command failed.
Nov 14, 2019 4:19:05 PM SEVERE hudson.plugins.scm_sync_configuration.SCMManipulator deleteHierarchy
[deleteHierarchy] Problem during remove : The git command failed.
Nov 14, 2019 4:19:05 PM SEVERE hudson.plugins.scm_sync_configuration.SCMManipulator deleteHierarchy
[deleteHierarchy] Problem during remove : The git command failed.
Nov 14, 2019 4:19:05 PM SEVERE hudson.plugins.scm_sync_configuration.SCMManipulator deleteHierarchy
[deleteHierarchy] Problem during remove : The git command failed.
Nov 14, 2019 4:19:05 PM SEVERE hudson.plugins.scm_sync_configuration.SCMManipulator deleteHierarchy
[deleteHierarchy] Problem during remove : The git command failed.
Nov 14, 2019 4:19:05 PM SEVERE hudson.plugins.scm_sync_configuration.SCMManipulator deleteHierarchy
[deleteHierarchy] Problem during remove : The git command failed.
Nov 14, 2019 4:19:05 PM SEVERE hudson.plugins.scm_sync_configuration.SCMManipulator deleteHierarchy
[deleteHierarchy] Problem during remove : The git command failed.
Nov 14, 2019 4:19:05 PM SEVERE hudson.plugins.scm_sync_configuration.SCMManipulator deleteHierarchy
[deleteHierarchy] Problem during remove : The git command failed.
Nov 14, 2019 4:19:05 PM SEVERE hudson.plugins.scm_sync_configuration.SCMManipulator deleteHierarchy
[deleteHierarchy] Problem during remove : The git command failed.
Nov 14, 2019 4:19:05 PM SEVERE hudson.plugins.scm_sync_configuration.SCMManipulator deleteHierarchy
[deleteHierarchy] Problem during remove : The git command failed.
Nov 14, 2019 4:19:05 PM SEVERE hudson.plugins.scm_sync_configuration.SCMManipulator deleteHierarchy
[deleteHierarchy] Problem during remove : The git command failed.
««
The last commit in the repo is
««
Author: ….
Date: Tue Oct 29 14:43:06 2019 +0200
««`
And today we are 14 November
In the same time th SCM status says SCM Sync status : ![]() Last operation @ Thu Nov 14 16:18:52 EET 2019
Last operation @ Thu Nov 14 16:18:52 EET 2019
which is incorrect and sometimes there is an error in the SCM status that says
««
SCM Sync status : ![]() <br/>Thu Nov 14 16:30:27 EET 2019 : Delete jobs/is docker Build<br/>Thu Nov 14 16:30:29 EET 2019 : Delete jobs/is docker Build<br/><br/>To remove this message, please <a href=’#’ onclick=’javascript:removeLog();’>click here</a>
<br/>Thu Nov 14 16:30:27 EET 2019 : Delete jobs/is docker Build<br/>Thu Nov 14 16:30:29 EET 2019 : Delete jobs/is docker Build<br/><br/>To remove this message, please <a href=’#’ onclick=’javascript:removeLog();’>click here</a>
««
So basically I can not use the SCM, I can not push to it I can not commit in it. Every change I make in jenkins is not in any way synchronized with SCM.
What else could I provide. This has happened about two weeks ago so I do not have a clear understanding how. But I have deleted a job.