Содержание
- Решаем проблему дисков GPT
- Способ 1: Настройка параметров BIOS
- Способ 2: Флешка UEFI
- Способ 3: Конвертирование GPT в MBR
- Способ 4: Удаление разделов
- Заключение
- Вопросы и ответы

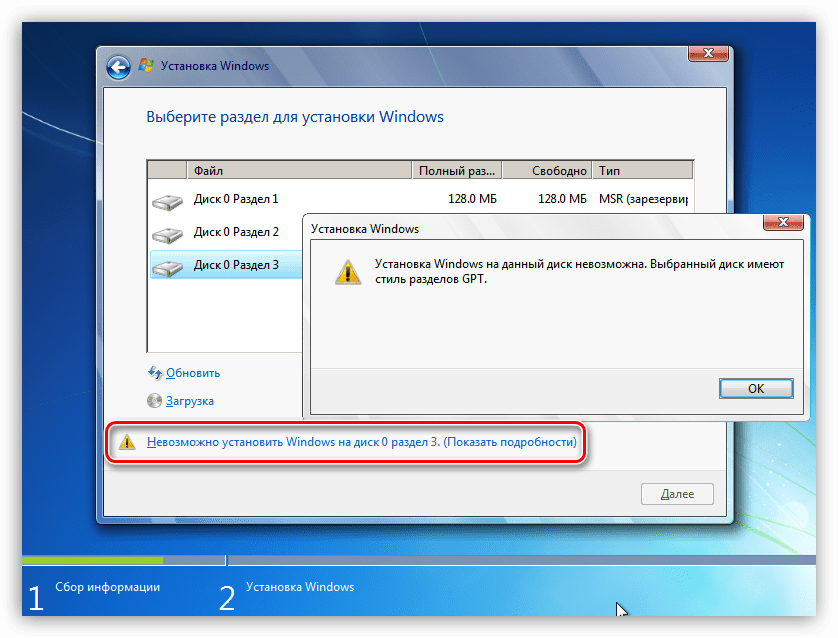
В настоящее время, когда в сети доступна практически любая информация, каждый пользователь способен установить на свой компьютер операционную систему. Вместе с тем даже такая простая, на первый взгляд, процедура может вызвать затруднения, выражающиеся в виде различных ошибок программы установки. Сегодня поговорим о том, как решить проблему с невозможностью инсталлировать Windows на диск формата GPT.
На сегодняшний день в природе существует два типа форматов дисков — MBR и GPT. Первым пользуется BIOS для определения и запуска активного раздела. Второй применяется с более современными версиями микропрограммного обеспечения – UEFI, которые имеют графический интерфейс для управления параметрами.
Ошибка, о которой мы сегодня говорим, возникает из-за несовместимости BIOS и GPT. Чаще всего это происходит из-за неправильных настроек. Также ее можно получить при попытке установки Windows х86 или несоответствии загрузочного носителя (флешки) требованиям системы.
Проблему с разрядностью решить довольно просто: перед началом установки убедитесь, что на носитель записан образ х64 операционной системы. Если образ универсальный, то на первом этапе нужно выбрать соответствующий вариант.
Далее разберем способы решения остальных проблем.
Способ 1: Настройка параметров BIOS
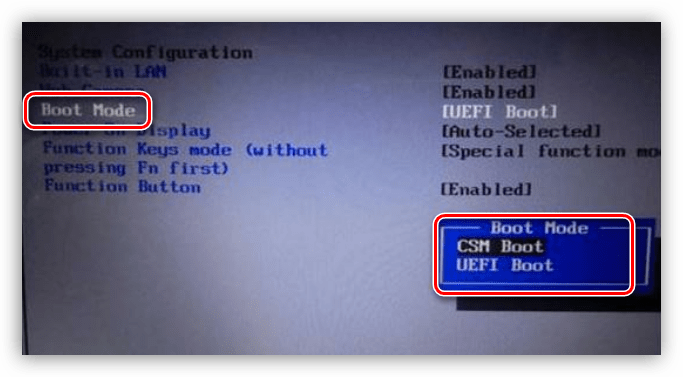
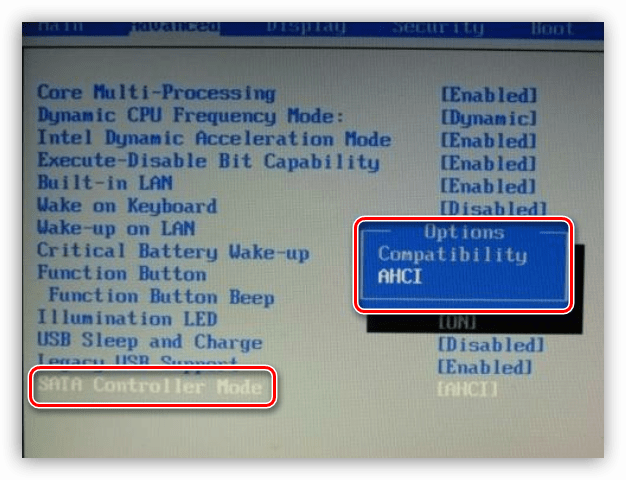
К возникновению данной ошибки могут привести измененные настройки БИОС, в котором отключена функция загрузки UEFI, а также включен режим «Secure Boot». Последний препятствует нормальному определению загрузочных носителей. Также стоит обратить внимание на режим работы SATA – он должен быть переключен в режим AHCI.
- UEFI включается в разделе «Features» либо «Setup». Обычно параметром по умолчанию является «CSM», его необходимо переключить на нужное значение.

- Режим защищенной загрузки можно отключить, выполнив в обратном порядке действия, описанные в статье ниже.
Подробнее: Отключаем UEFI в BIOS
- Режим AHCI можно включить в разделах «Main», «Advanced» или «Peripherals».
Подробнее: Включаем AHCI режим в BIOS

Если в вашем БИОС отсутствуют все или некоторые параметры, то придется поработать непосредственно с самим диском. Об этом поговорим ниже.
Способ 2: Флешка UEFI
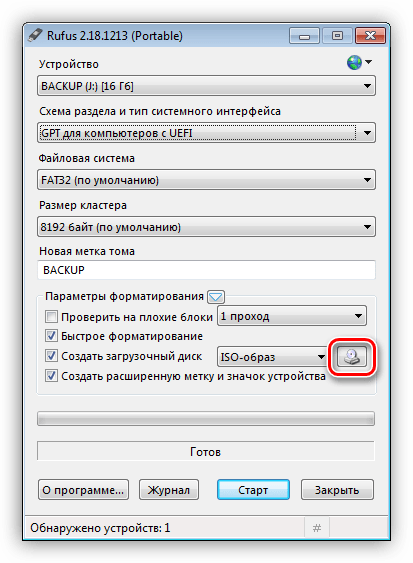
Такая флешка представляет собой носитель с записанным на него образом ОС, поддерживающий загрузку в UEFI. Если планируется установка Windows на GPT-диск, то желательно озаботиться ее созданием заранее. Делается это с помощью программы Rufus.
- В окне софта выбираем носитель, на который необходимо записать образ. Затем в списке выбора схемы раздела выставляем значение «GPT для компьютеров с UEFI».

- Нажимаем кнопку поиска образа.
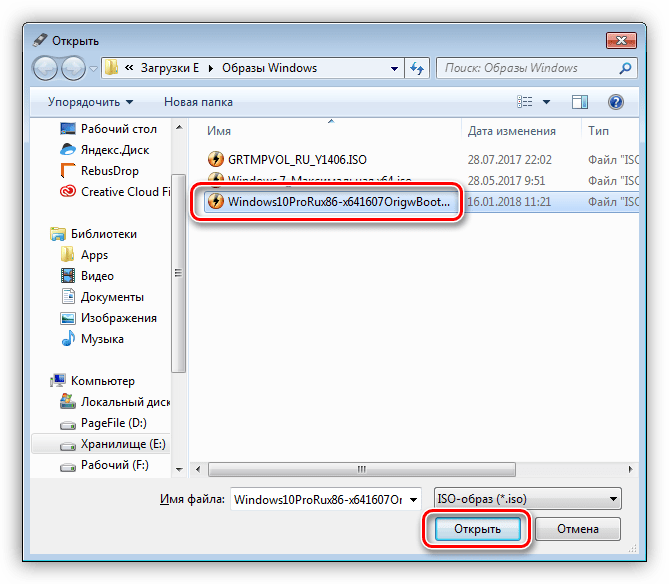
- Находим соответствующий файл на диске и нажимаем «Открыть».

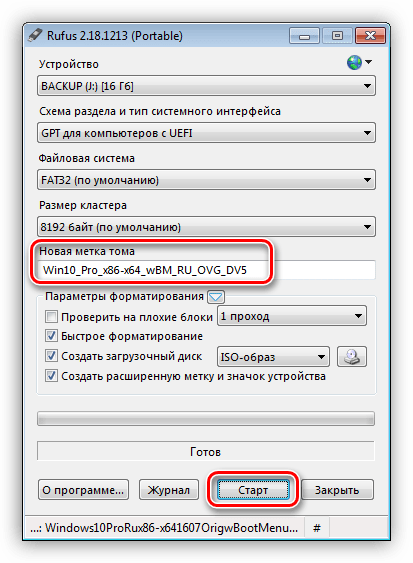
- Метка тома должна поменяться на название образа, после чего жмем «Старт» и ждем окончания процесса записи.

Если возможности создать UEFI-флешку нет, переходим к следующим вариантам решения.
Способ 3: Конвертирование GPT в MBR
Данный вариант подразумевает преобразование одного формата в другой. Сделать это можно как из загруженной операционной системы, так и непосредственно при установке Windows. Обратите внимание, что все данные на диске будут безвозвратно утрачены.
Вариант 1: Системные средства и программы

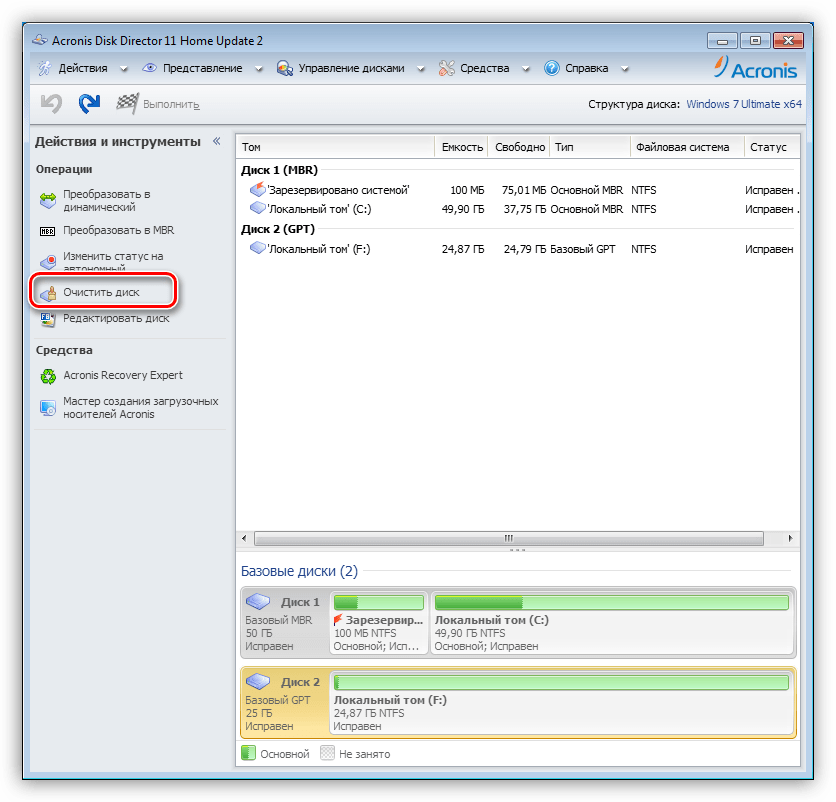
Для конвертирования форматов можно воспользоваться такими программами для обслуживания дисков, как Acronis Disk Director или MiniTool Partition Wizard. Рассмотрим метод с применением Акрониса.
- Запускаем программу и выбираем наш диск GPT. Внимание: не раздел на нем, а именно весь диск (см. скриншот).

- Далее находим в списке настроек слева «Очистить диск».
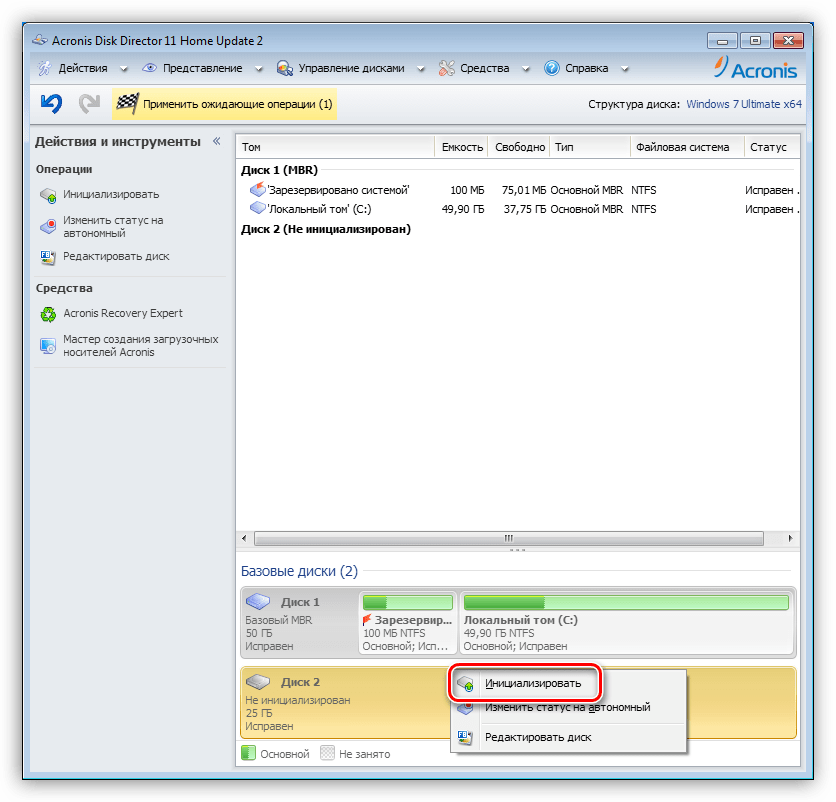
- Кликаем по диску ПКМ и выбираем пункт «Инициализировать».
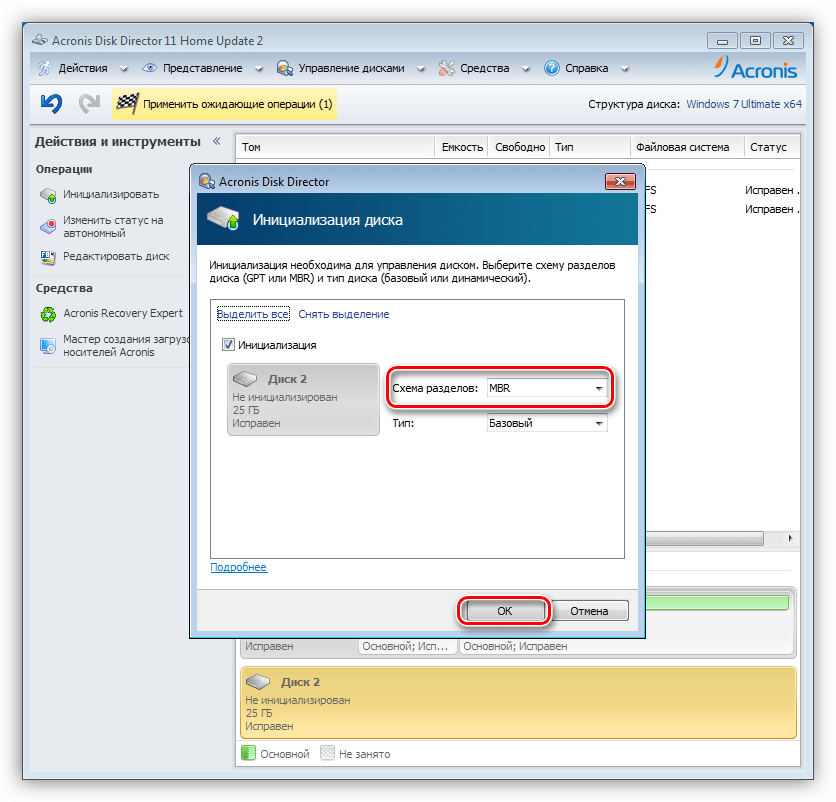
- В открывшемся окне настроек выбираем схему разделов MBR и жмем ОК.
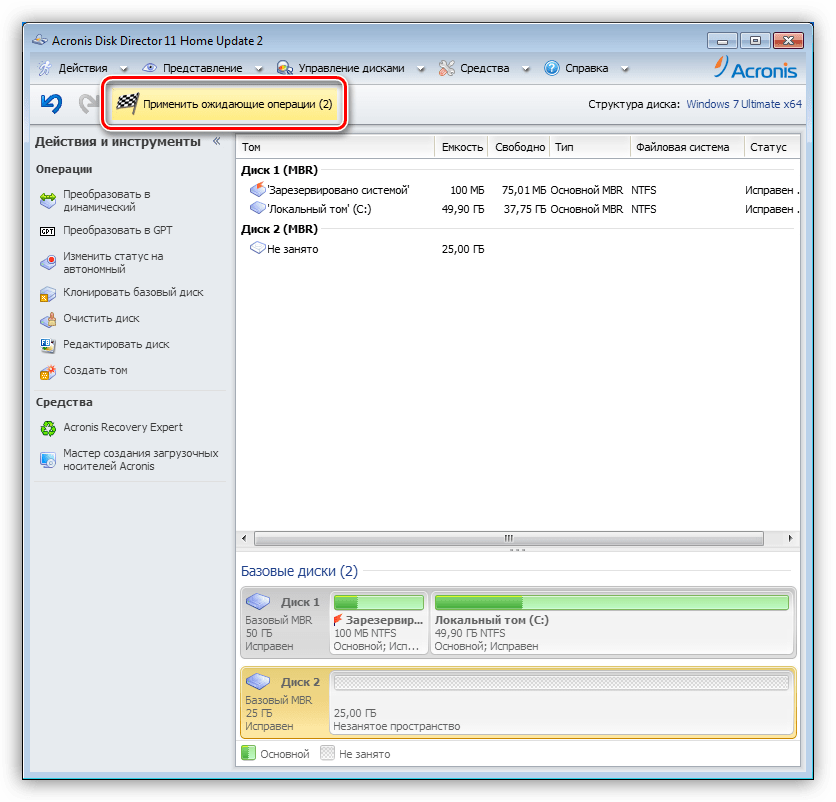
- Применяем ожидающие операции.

Средствами Windows это делается так:
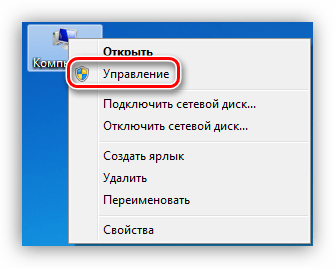
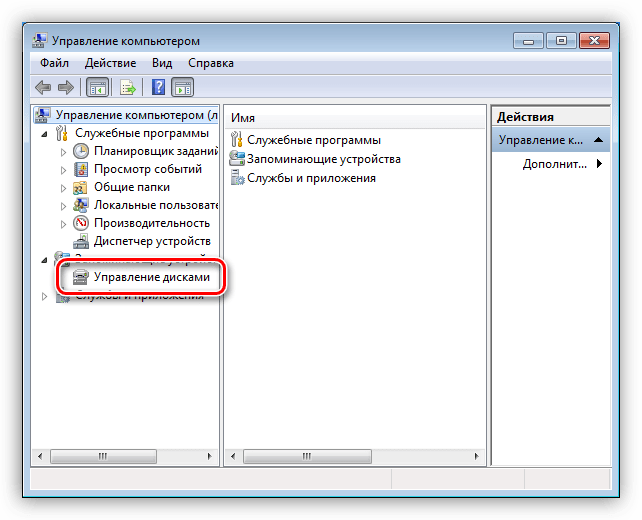
- Нажимаем ПКМ по значку компьютера на рабочем столе и переходим к пункту «Управление».

- Затем идем в раздел «Управление дисками».

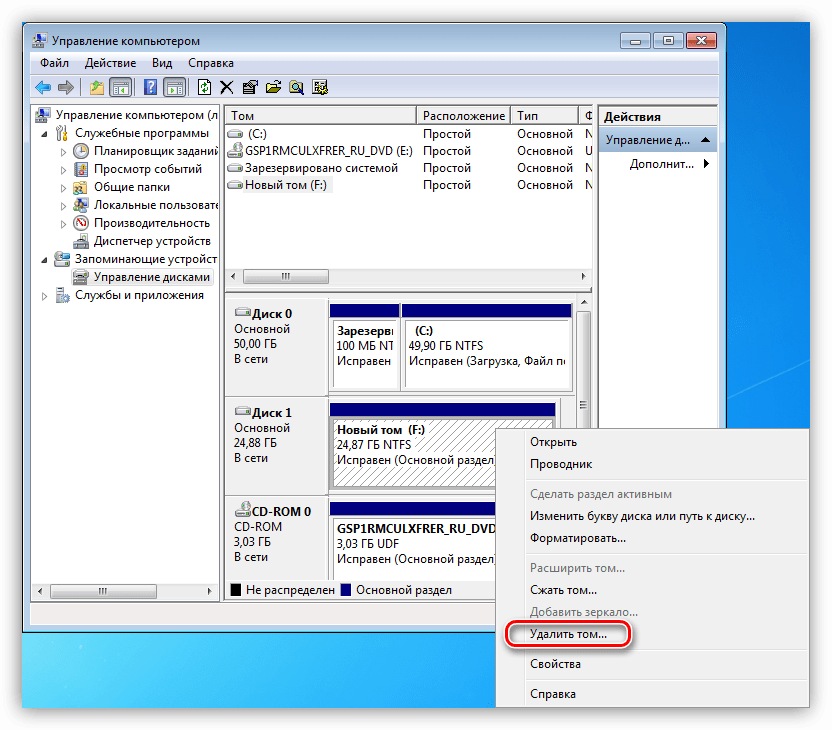
- Выбираем в списке наш диск, жмем ПКМ на этот раз по разделу и выбираем пункт «Удалить том».

- Далее кликаем правой кнопкой по основанию диска (квадрату слева) и находим функцию «Преобразовать в MBR-диск».


В таком режиме можно работать только с теми дисками, которые не являются системными (загрузочными). Если требуется подготовить к установке рабочий носитель, то это можно сделать следующим способом.
Вариант 2: Конвертирование при загрузке
Данный вариант хорош тем, что работает независимо от того, доступны ли в данный момент системные средства и софт или нет.
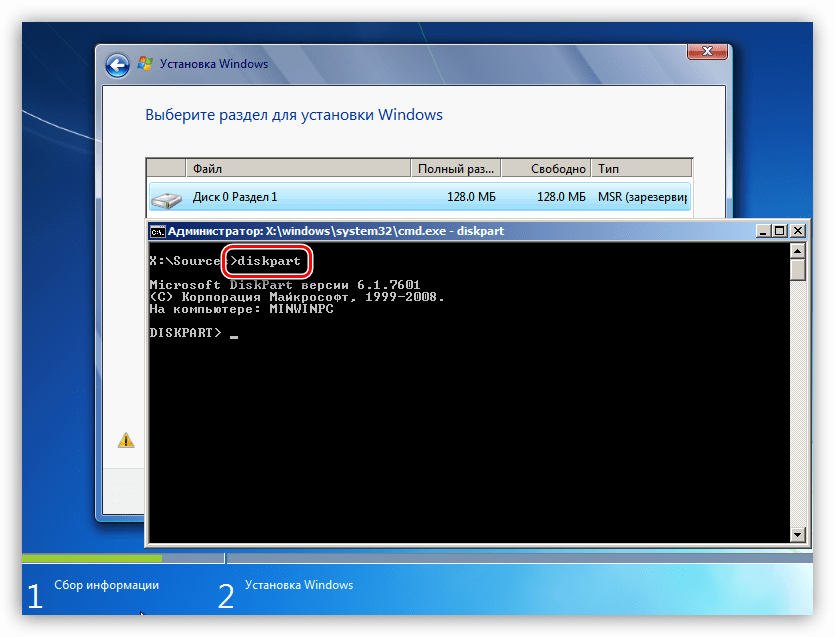
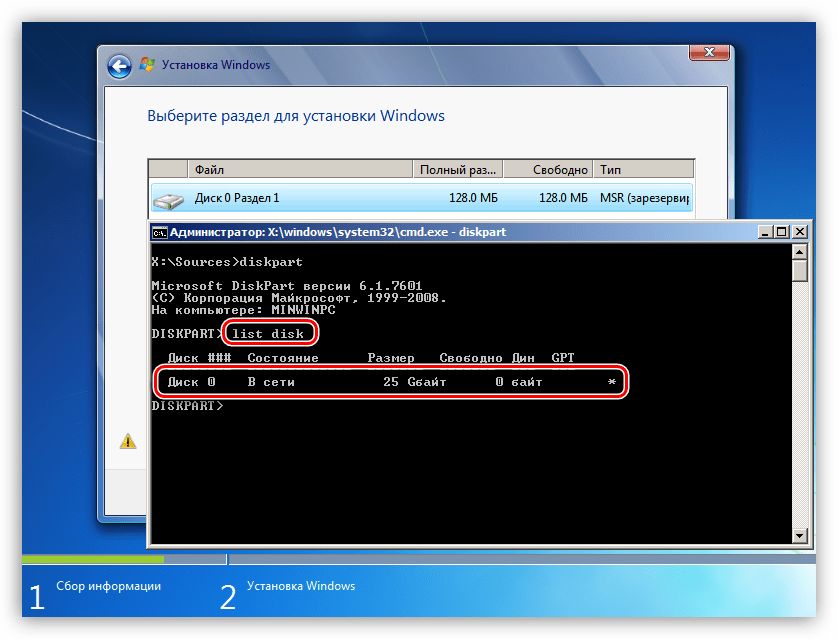
- На этапе выбора диска запускаем «Командную строку» с помощью комбинации клавиш SHIFT+F10. Далее активируем утилиту управления дисками командой
diskpart
- Выводим на экран список всех установленных в систему жестких дисков. Делается это путем ввода следующей команды:
list disk

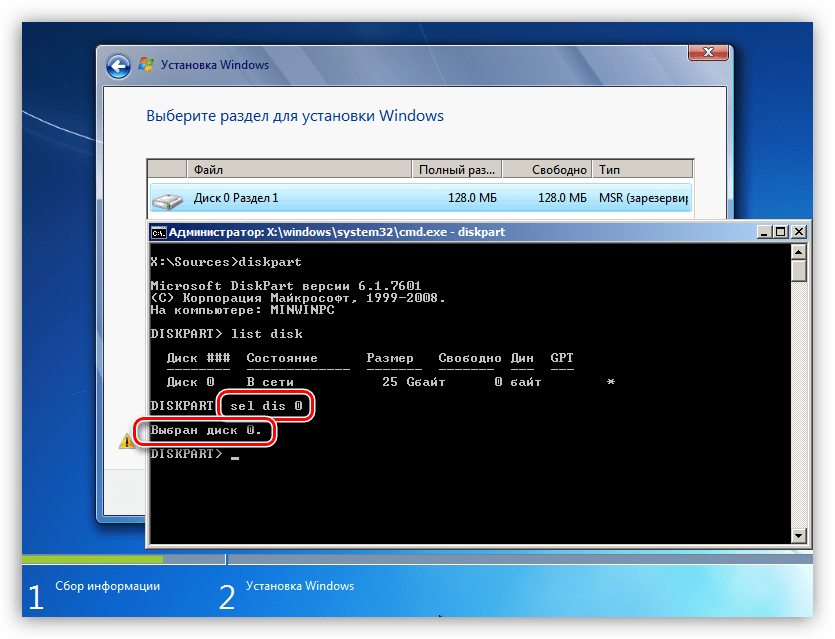
- Если дисков несколько, то необходимо выбрать тот, на который мы собираемся установить систему. Отличить его можно по размеру и структуре GPT. Пишем команду
sel dis 0

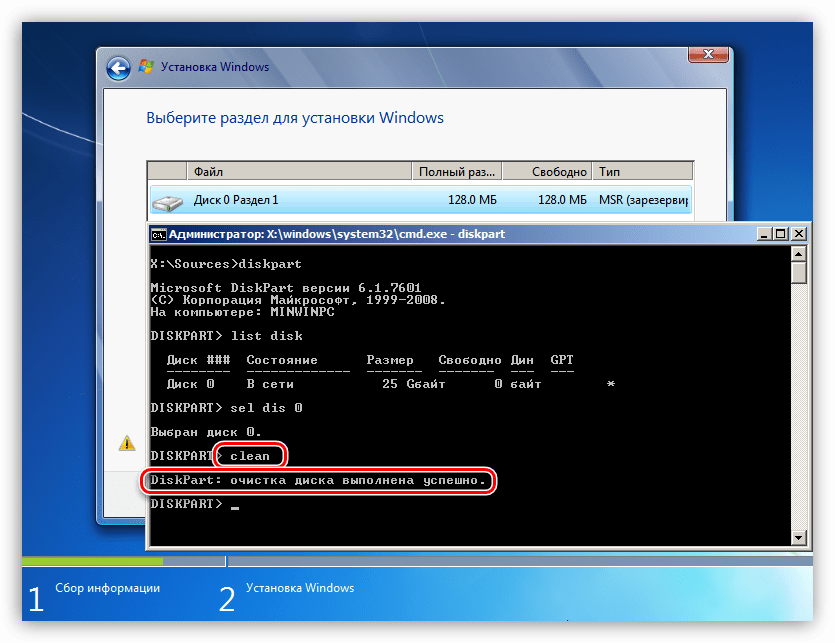
- Следующий шаг – очистка носителя от разделов.
clean

- Заключительный этап – конвертирование. В этом нам поможет команда
convert mbr

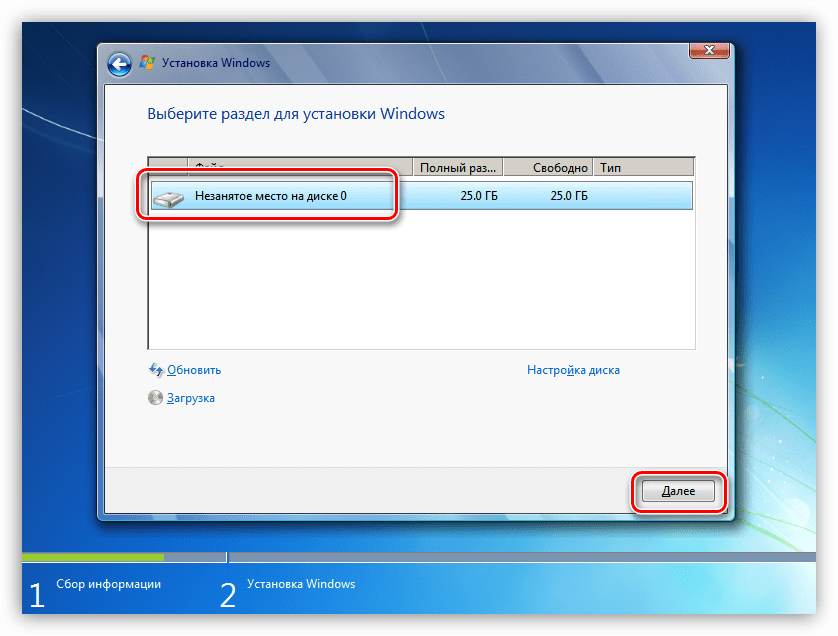
- Осталось только завершить работу утилиты и закрыть «Командную строку». Для этого дважды вводим
exitс последующим нажатием ENTER.

- После закрытия консоли жмем «Обновить».

- Готово, можно продолжать установку.


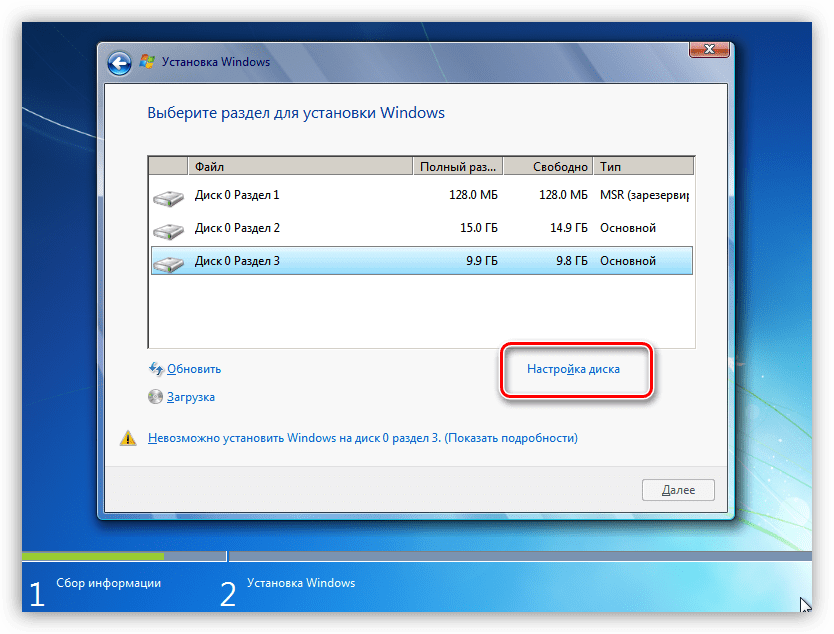
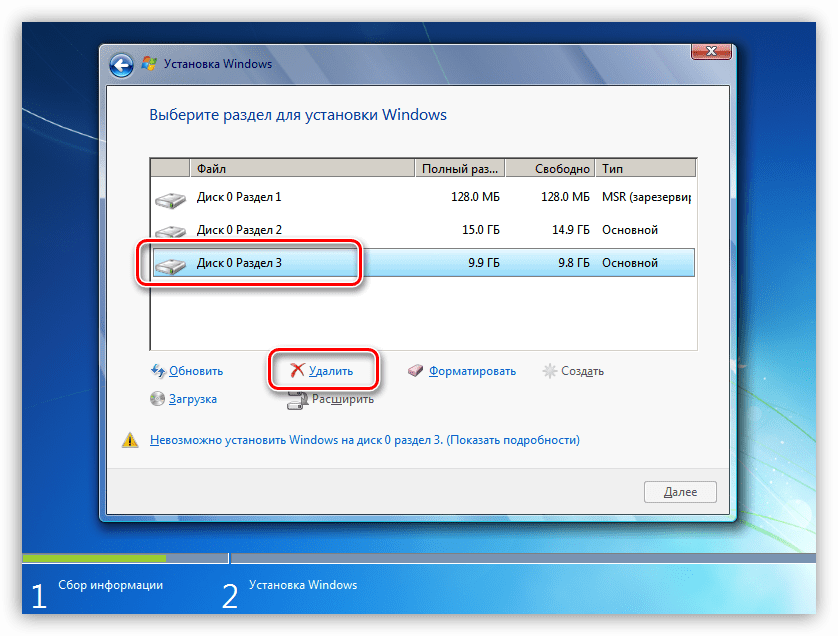
Способ 4: Удаление разделов
Этот способ поможет в тех случаях, когда по какой-то причине невозможно воспользоваться другими инструментами. Мы просто вручную удалим все разделы на целевом жестком диске.
- Нажимаем «Настройка диска».

- Выбираем каждый раздел по очереди, если их несколько, и жмем «Удалить».
- Теперь на носителе осталось только чистое пространство, на которое можно без проблем инсталлировать систему.


Заключение
Как становится ясно из всего написанного выше, проблема с невозможностью установки Windows на диски со структурой GPT решается довольно просто. Все приведенные способы могут выручить вас в разных ситуациях – от устаревшего БИОС до отсутствия под рукой необходимых программ для создания загрузочных флешек или работы с жесткими дисками.
Еще статьи по данной теме:
Помогла ли Вам статья?
Skip to content
На чтение 3 мин. Просмотров 29.6k. Опубликовано 03.09.2019
Некоторые владельцы ноутбуков HP сообщали об ошибке 3f0 при загрузке своих систем.
Код ошибки 3f0 сопровождается сообщением Загрузочное устройство не найдено. Пожалуйста, установите операционную систему на свой жесткий диск . Эта ошибка указывает на то, что системе не удалось найти жесткий диск.
Нам удалось собрать серию исправлений, призванных помочь вам раз и навсегда решить эту неприятную проблему.
Содержание
- Как сделать, если загрузочное устройство HP для ноутбука не найдено?
- 1. Hard reset вашего ноутбука
- 2. Сбросить настройки BIOS к настройкам по умолчанию
- 3. Используйте средство HP Hardware Diagnostics
- 4. Подключите ваш жесткий диск
Как сделать, если загрузочное устройство HP для ноутбука не найдено?
1. Hard reset вашего ноутбука
Чтобы выполнить полный сброс на ноутбуке со съемным аккумулятором, выполните следующие действия:
- Выключить систему
- Отключите ноутбук от каждого подключенного устройства и отсоедините шнур питания
- Выньте аккумулятор из его отсека
- Нажмите кнопку питания и удерживайте ее не менее 15 секунд
- Вставьте аккумулятор обратно и подключите адаптер переменного тока
- Включи ноутбук
- Если загрузка происходит нормально, подключите все необходимые устройства к ноутбуку.
Если у вас есть ноутбук с несъемным аккумулятором, выполните те же действия, не пытаясь вынуть аккумулятор, конечно.
2. Сбросить настройки BIOS к настройкам по умолчанию
- Выключите компьютер и дайте ему отдохнуть не менее 5 секунд
- Включите компьютер> нажмите F10 во время загрузки, чтобы получить доступ к меню BIOS
- После появления приглашения в меню BIOS нажмите клавишу F9, чтобы выбрать и загрузить настройки BIOS Setup по умолчанию.
- Нажмите F10, чтобы сохранить изменения и выйти из BIOS
- Выберите Да и нажмите Enter
- Перезагрузите компьютер и посмотрите, устранена ли проблема.
3. Используйте средство HP Hardware Diagnostics
- Включите компьютер и продолжайте нажимать Esc, пока не откроется меню> нажмите F2
-
В меню «Диагностика оборудования ПК» выберите «Тесты компонентов».

-
Выберите «Жесткий диск»> «Быстрая проверка»> «Запустить один раз».
- Если у вас несколько дисков, выберите «Тестировать все жесткие диски».
- Подождите, пока процесс не закончится, тогда результаты появятся на экране
- Если проблемы не исчезнут после завершения Быстрого теста, выберите Выполнить расширенный тест.


4. Подключите ваш жесткий диск
- Это деликатная задача. Если вы не можете выполнить его самостоятельно, обратитесь за профессиональной помощью.
-
Подключите жесткий диск, выполнив следующие действия:
- Выключите компьютер и отсоедините кабель питания
- Если у вас есть съемный аккумулятор, выньте его
- Отключите ваш жесткий диск, а затем подключите его обратно
- Соберите ваш компьютер и включите компьютер, чтобы увидеть, если это решило проблему.
Если сообщение об ошибке все еще появляется, обратитесь за профессиональной помощью, чтобы убедиться, что ваш жесткий диск не поврежден и нуждается в замене.
Дайте нам знать в разделе комментариев, если эта статья помогла вам решить проблему.
Содержание
- Windows Cannot Be Installed to a Disk? Here Are Solutions [Partition Manager]
- Summary :
- Quick Navigation :
- Error 1: Windows Cannot Be Installed to This Disk. The Selected Disk Is of the GPT Partition Style.
- Reasons
- Solutions
- Solution 1. Convert GPT Disk to MBR if the Motherboard Supports Legacy BIOS Only
- Error 2: Windows Cannot Be Installed to This disk. The Selected Disk Has an MBR Partition Table.
- Reasons
- Solutions
- Convert MBR Disk to GPT Disk to Fix the Error
- Error 3: Windows Cannot Be Installed on Dynamic Disk.
- Reasons
- Solutions
- Convert Dynamic Disk to Basic Disk to Solve the Problem
- Error 4: Windows Cannot Be Installed to This Disk. This Computer’s Hardware May not Support Booting to This Disk.
- Reasons
- Solutions
- Solution 1. Remove Hard Disk Protection
- Solution 2. Change SATA Controller Mode
- Error 5: Windows Cannot Be Installed to This Disk. The Disk May Fail Soon.
- Reasons
- Solutions
- Backup and Repair/Replace the Hard drive
- Error 6: Windows Cannot Be Installed to This Hard Disk Space, Windows Must Be Installed to a Partition Formatted in NTFS.
- Reasons
- Solutions
- Solution 1. Format the Partition with NTFS File System
- Solution 2. Clean the Whole Drive
- Summary
- ABOUT THE AUTHOR
- Windows 10 cannot be installed to this disk [ULTIMATE GUIDE]
- Windows 10 cannot be installed to this disk variations:
- First case – Windows 10 can’t install to this disk
- Second case – Windows 10 can’t install on GPT partitions
- Third case – Windows 10 can’t install on MBR partitions
- Fourth case – The computer hardware may not support booting
- Fifth case – Windows 10 can’t install on SSD
- Sixth case – The partition contains one or more dynamic volumes
Windows Cannot Be Installed to a Disk? Here Are Solutions [Partition Manager]
By Rodin | Follow | Last Updated November 29, 2020
Summary :

Windows cannot be installed to MBR/GPT disk? Windows cannot be installed to dynamic disk? These are the most common issues that can occur during the process of Windows 10/8/7 installation. This post shows how to address such issues with detailed steps given.
Quick Navigation :
When installing Windows OS (whether it is a clean install, reinstall or dual boot), you may receive various kinds of errors saying Windows cannot be installed to this disk. In this post, we will introduce 6 types of Windows installation errors as well as top corresponding solutions.
Error 1: Windows Cannot Be Installed to This Disk. The Selected Disk Is of the GPT Partition Style.
When installing Windows on a GPT disk, you may receive Windows cannot be installed on GPT disk error:
«Windows cannot be installed to this disk. The selected disk is of the GPT partition style.»
What causes this error?
Reasons
This is mainly because the motherboard supports Legacy BIOS only rather than both Legacy and UEFI or CSM boot. Under legacy BIOS mode, you can only install Windows to an MBR disk since traditional BIOS cannot recognize GPT partition, but data read/write on GPT disk is available as long as Windows supports it.
Solutions
To fix this error, firstly you need to enter BIOS Setup to see what the boot mode it is set to. Start/restart computer and continuously press a key to enter BIOS before the Windows logo appears. Different computers may require different keys, so you had better search «how to enter BIOS plus computer trademark or motherboard name» on the internet to find the exact key.
In BIOS, if you find no signal showing you are using a UEFI motherboard like the following picture shows, maybe you are using a traditional motherboard which supports legacy BIOS boot only. Under this situation, the only solution is to convert the GPT disk to an MBR disk.

Here are the deals:
Solution 1. Convert GPT Disk to MBR if the Motherboard Supports Legacy BIOS Only
1) Use Partition Wizard
MiniTool Partition Wizard Free Edition is a free yet outstanding partitioning tool for Windows NON-SERVER users, which helps to convert GPT disk to MBR disk without losing data when an existing Windows is available. However, you should know that Partition Wizard can only change non-system GPT disk to MBR disk without bringing any data loss. This works for all Windows XP/Vista/7/8/10 users.
Step 1: run MiniTool Partition Wizard.
Launch MiniTool Partition Wizard. Then right-click on the target disk to be converted and choose «Convert GPT Disk to MBR Disk«.

Step 2: confirm the conversion.
You will see the GPT attribute has turned to MBR. However, this is only pending operations for us to preview. Please press «Apply» to confirm the change. After the conversion, you will find that all data is still there.

2) Use Diskpart
It is possible to make the conversion during the installation process. Please do the following:
Step 1: call out CMD.
Once the error pops up, click «OK» to close the error and try pressing on «Shift + F10» to call out CMD. If the utility does not emerge, please go back to the install Windows interface, then press «Shift + F10» again to launch CMD.

Step 2: clean the disk and convert it to MBR.
Now you need to do a clean on the disk by typing the following commands:

When diskpart shows it has successfully converted the selected disk to MBR format, you can exit from this program and continue to install Windows.
3) Use Disk Management Utility
If another Windows OS is available on the same computer, then Disk Management utility is helpful. Try these operations:
Step 1: go to Disk Management.
Start the working Windows and enter the built-in Disk Management tool by right clicking the «Computer» icon on the desktop, choosing «Manage«, and selecting «Disk Management«.
Step 2: delete volume.
Delete all partitions or volumes on the GPT disk one by one via the right-click function «Delete Volume«.

Step 3: convert to MBR disk.
When the entire disk becomes an unallocated space, right click the GPT disk and choose «Convert to MBR Disk«. After these steps, the original GPT disk will be converted to an MBR disk, and then you can go on installing Windows on this disk.

Solution 2. Change Boot Mode If the Motherboard Supports Both Legacy and UEFI Boot
Currently, most motherboards support both the Legacy boot and UEFI boot, and users can choose the most appropriate one manually. If you select Legacy only, it will be impossible to install Windows on GPT disk. At this time, you can enter BIOS and set the boot mode to CSM boot or choose Both.
Once the change has been made, please press on F10 to save changes, and then you can install Windows on a GPT disk.
Error 2: Windows Cannot Be Installed to This disk. The Selected Disk Has an MBR Partition Table.
When installing Windows 7, Windows 8 or other newly released Windows OS, you may receive another error saying Windows cannot be installed on MBR disk:
«Windows cannot be installed on this disk. The selected disk has an MBR partition table. On EFI systems, Windows can only installed on GPT disks».
Why can’t Windows be installed on an MBR disk under EFI systems?
Reasons
To answer this question, you need to know something about UEFI + GPT boot. Under EFI systems, theoretically both an MBR disk and GPT disk can be used to boot operating systems, but Microsoft rules Windows can only be installed on a GPT disk. To fix this error, the best way is to convert the MBR disk to a GPT disk.
Solutions
Convert MBR Disk to GPT Disk to Fix the Error
Steps are nearly the same as those to convert GPT disk to MBR disk, and the only difference is that you need to convert disk to GPT rather than MBR. For converting without data loss, please see Convert MBR Disk to GPT Disk for more details.
That’s not all…In the former part, we have said most UEFI motherboards support both Legacy boot and UEFI boot but we can change it manually. If the error is caused by setting boot mode to be UEFI only, changing the mode to Both or CSM boot may fix the error, which has been introduced in Error 1.
Error 3: Windows Cannot Be Installed on Dynamic Disk.
When installing Windows on a dynamic disk, you may receive this message:
«Windows cannot be installed to this hard disk space. The partition contains one or more dynamic volumes that are not supported for installation».
Reasons
Why can’t Windows be installed on a dynamic disk? Let’s see what Microsoft Resource says.
«You can perform a fresh Windows installation on a dynamic volume only if that volume was converted from a basic volume and retained an entry in the partition table. Simple volumes converted from basic disks do not have an entry in the partition table unless they were system or boot volumes prior to conversion.»
That is to say users can only install Windows to a dynamic volume which was a boot partition or system partition before converting to a dynamic disk. Under this situation, if you want to go on installing Windows, a good solution is to convert a dynamic disk to a basic disk.
Solutions
Convert Dynamic Disk to Basic Disk to Solve the Problem
1) Use MiniTool Partition Wizard
MiniTool Partition Wizard is a Windows based partitioning tool that can help revert a dynamic disk to basic without any data loss. Here are detailed steps:
Step 1: run Partition Wizard and choose the function for dynamic disk conversion.
Launch MiniTool Partition Wizard. Right click on the dynamic disk you want to convert and choose «Convert Dynamic Disk to Basic Disk«.

Step 2: confirm operation.
You can have a preview that this dynamic disk will become a basic disk without data loss. At this time, press «Apply» to finish this conversion.

2) Use Disk Management Utility
Go to Disk Management and then delete all the volumes that were introduced one by one, which has been introduced in Error 1. After these steps, the dynamic disk will become basic automatically. However, if there is no Windows OS available but you have a Windows installation CD or DVD, make use of Diskpart.
3) Employ Diskpart
Step 1: run cmd.
Boot computer via the installation disc and open CMD by pressing on «Shift + F10«.
Step 2: delete volume in diskpart.
Type corresponding commands to delete all dynamic volumes one by one:
Step 3: After all volumes on the dynamic disk are deleted, type «convert basic«. Once Diskpart shows it has successfully converted the selected dynamic disk to basic, you can type «exit» to quit from Diskpart.

Nevertheless, if you do not want to delete any volume because of important data, there is a lossless solution below.
Error 4: Windows Cannot Be Installed to This Disk. This Computer’s Hardware May not Support Booting to This Disk.
Another error message you may receive during Windows installation is:
«Windows cannot be installed to this disk. This computer’s hardware may not support booting to this disk. Ensure the disk’s controller is enabled in the computer’s BIOS menu.»
Reasons
Generally speaking, there are 2 possible reasons:
Solutions
Solution 1. Remove Hard Disk Protection
For the first situation, please read the specification or contact a sales person to confirm whether there is hard disk protection if the computer is not configured by ourselves. If there is, remove the protection by following the instructions.
Solution 2. Change SATA Controller Mode
For the second situation, if we changed SATA Controller mode in BIOS before, try setting BIOS to factory settings. Different BIOS gives different options to set itself to factory settings, like Restore Defaults, Load BIOS Defaults, and Load Optimal Defaults, so you should choose the correct one according to practical situations.
However, when this solution does not work, you must change the hard disk mode manually in BIOS. If the current state is IDE, change it to AHCI. If the current mode is AHCI, change it to IDE, etc. Actually, if Compatibility or Compatible is given, you must choose this mode.
Moreover, when you are installing the Data Center or Enterprise Server edition of Windows Server 2008/R2 or later to a raw disk via CD or DVD, you may get the same error. This is because the default SAN policy during setup on new installations of Data Center or Enterprise SKUs is Offline Shared, which applies Offline and Read Only attributes to any presented disks that are on a shared bus and not considered as System or Boot disks.
RAW disks cannot be detected as System or Boot, leading to offline and read only attributes. As a result, you cannot install Windows to these kinds of disks. To solve the problem, configure the default SAN policy to OnlineAll. For detailed steps, please see the corresponding Setup Reports Error of Microsoft.
Error 5: Windows Cannot Be Installed to This Disk. The Disk May Fail Soon.
Sometimes you may receive the following error message when installing Windows:
«Windows cannot be installed to this disk. The disk may fail soon. If other hard disks are available, install Windows to another location.»
Reasons
When this error appears, it indicates there may be something wrong with the hard disk.
Solutions
Backup and Repair/Replace the Hard drive
At this time, you must stop Windows installation, and then backup important data immediately in case of a real disk failure. If there is not so much data that is required to back up, just copy and paste them to a safe place. However, if you want to backup all or a large number of data on the disk, using a third party disk clone software to back up the entire hard disk can save you a lot of time.
When the backup is made, check the health state of the disk by running a diagnosis and repair tools which can be downloaded either from the hard disk manufacturer’s website or from a professional downloading center. If Windows won’t boot, please download the ISO file and burn it to a CD or DVD on another computer, and then make a disk diagnosis via the bootable disc.
If errors are detected from your hard disk but cannot be repaired, replace the dying hard disk with a new one. However, if it is under warranty, send it back to the manufacturers because they will repair the disk or give you a new one.
Error 6: Windows Cannot Be Installed to This Hard Disk Space, Windows Must Be Installed to a Partition Formatted in NTFS.
When installing Windows on an old disk, you may receive a Windows cannot be installed to this hard disk space message:
«Windows cannot be installed to the hard disk space. Windows must be installed to a partition formatted in NTFS.»
What causes this error?
Reasons
This is mainly caused by an incompatible file system of the partition to be installed with Windows. Microsoft rules that Windows must be installed to a partition formatted in NTFS since Windows Vista.
Solutions
Solution 1. Format the Partition with NTFS File System
1) Use MiniTool Partition Wizard
Remember Windows won’t allow you to format the current boot partition no matter if you turn to Disk Management or CMD. If you have no operating system to use, formatting needs more effort. Thus, to make things easier, we strongly recommend using MiniTool Partition Wizard Bootable CD to cope with different situations with one solution. Please do the following:
Step 1: use Partition Wizard Bootable to boot your computer.
On the tool bar of each Partition Wizard paid editions, launch Bootable Media Builder to create a bootable CD/DVD disc or USB flash drive. Then set your computer to boot from the bootable media and finally enter MiniTool Partition Wizard Bootable.
Click on the partition to be formatted and select «Format Partition» from the operations menu.

Step 3: choose NTFS as the desired file system.
In the pop-up window, choose NTFS at file system and then click «OK» to continue.

Step 4: execute the operation.
Go back to the main interface and hit «Apply» to execute this change.
2) Use Windows Installation Disk
Also you can choose to format the partition during the installation. When you see «where do you want to install Windows», click on the target partition at first and then hit Drive Options (Advanced) to format it.
Solution 2. Clean the Whole Drive
Another solution for Windows should be installed to a partition formatted in NTFS is to clean the whole drive. You can also use MiniTool Partition Wizard Bootable CD to do this job (use Delete All Partitions), then Windows will make its partition automatically during installation.
Summary

Position: Columnist
Rodin is an enthusiastic IT writer focusing on Windows trends, disk partition management and data recovery. She loves to write and share her idea about the useful tips and tricks on personal computers’ maintenance.
If you are looking for methods to improve your computer performance, manage hard drives and recover data from different devices, Rodin can provide reliable solutions for data management.
Источник
Windows 10 cannot be installed to this disk [ULTIMATE GUIDE]


Installing Windows 10 isn’t always simple, and sometimes certain issues can occur. One of the most problematic issues is Windows cannot be installed to this disk error, so let’s see how to fix it.
How can I fix Windows 10 cannot be installed to this disk error? First, you have to determine on what kind of hard drive and partition you want to install Windows 10. In most cases, the error is caused by hardware incompatibility. After that, check your SATA device or use the diskpart tool.
For full instructions, check the guide below.
Windows 10 cannot be installed to this disk variations:
First case – Windows 10 can’t install to this disk
Solution 1 – Make sure that no additional hard drives are connected
Sometimes additional hard drive or storage devices can cause this error to appear, therefore you need to disconnect all hard drives except the one that you’re going to use to install Windows 10.
Users also reported that sometimes USB flash drives or SD cards can interfere with Windows 10 installation, so be sure to remove them all. If needs be, try to install Windows 10 from a DVD.
Solution 2 – Check your SATA device
According to users, this error can appear if your primary hard drive is attached to eSATA port, so be sure to connect it to a different port. In addition, be sure that your SATA controller is set to AHCI or RAID mode.
If you have CD, DVD or Blu-ray drive attached to eSATA or SATA 3 port, be sure to disconnect them and attach them to SATA 2 controller. Also, do not use enclosure casing with a SATA 3 HDD that is connected to a SATA 3 controller.
Second case – Windows 10 can’t install on GPT partitions
Solution 1 – Use diskpart tool
Before we start, we have to mention that this process will delete all files from your hard drive, so use it only if you don’t have any important files on your hard drive or if your PC is new and you’re installing Windows 10 for the first time.
Users reported this error while trying to choose a hard drive partition to install Windows 10, and according to them, they are unable to select any partition.
To fix this error you need to run diskpart tool and clean your hard drive. To do that, follow these steps:
Once again we have to mention that clean command will delete all files and partitions from a selected hard drive, therefore be sure to back up important files or use this solution if you have a new computer that doesn’t have any important files on it.
Solution 2 – Use legacy BIOS mode
If you’re getting this error, you can install Windows 10 using the Legacy BIOS mode. Using Legacy BIOS mode you will keep all your files, so it should be perfectly safe to use. To use Legacy BIOS, follow these steps:
Solution 3 – Use Rufus to create a bootable USB flash drive
Sometimes this error can appear if you’re using Media Creation Tool to create a bootable USB flash drive.
According to users, Media Creation Tool creates a USB flash drive that doesn’t support writing to GPT partitions, so if you have an MBR drive you won’t be able to use that USB flash drive for Windows 10 installation.
Fortunately for you there are many great third-party tools that can create a bootable flash drive for you. For example, you can use Rufus and Windows 10 ISO file to create a USB installation media, and you should be able to use that media with MBR drives without any problems.
Third case – Windows 10 can’t install on MBR partitions
Just like in the previous case, you can fix the problem with MBR partitions by cleaning your hard drive, but that solution is probably not the best since it will delete all partitions and files from your PC.
Luckily there are several different solutions that you can try.
Solution 1 – Disable EFI boot sources
According to users, you can fix this problem without deleting your files simply by disabling EFI Boot Sources in BIOS. To do that, follow these steps:
After disabling EFI Boot Sources you should be able to install Windows 10 without any issues. If the Windows 10 installation is successful, you need to go back to BIOS and enable EFI Boot Sources.
Solution 2 – Delete the partition and format it again
This solution might not be the best because you’ll lose your important files, so use it only if you have all your important files available backed up.
To delete the partition just choose the Delete option during the installation and click the New button to create a new partition. Format the new partition and you should be able to install Windows 10 without problems.
Solution 3 – Use a DVD drive
If you’re having this problem you should be able to circumvent it by using a DVD drive to install Windows 10. When installing Windows 10 from a DVD users are suggesting to use ODD option instead of EFI.
In addition, you can also try to use an external DVD drive to fix this problem.
Solution 4 – Disable UEFI boot
Newer motherboards support UEFI boot option, but sometimes UEFI boot can give you Windows cannot be installed to this disk error. To fix it, you need to enter BIOS and enable Legacy Boot option.
For more information on how to enter BIOS and how to use Legacy Boot, we strongly advise you to check your motherboard manual.
Some motherboards support both UEFI and Legacy boot so you can use both modes without having to disable anything. In some situations you can even fix this problem by disabling Legacy boot and using UEFI instead.
Solution 5 – Use diskpart to delete the problematic partition
Some users are suggesting to use diskpart to delete the problematic partition, and to do that you need to follow these steps:
Solution 6 – Wait until Press any key to boot from disk message appears again
Many motherboards support both UEFI and Legacy boot, and some motherboards will start UEFI boot first. If you see Press any key to boot from disk message, do not press anything.
If your motherboard has UEFI and Legacy boot enabled the same message will appear again. When Press any key to boot from disk message appears for the second time press any key to boot from a designated device.
Solution 7 – Use a USB 2.0 flash drive
Users reported that USB 3.0 flash drives don’t give them the option to choose MBR or Legacy boot while choosing a boot device, but you can fix this problem by using a USB 2.0 flash drive instead.
Fourth case – The computer hardware may not support booting
Solution 1 – Delete all partitions and convert your hard drive to GPT
To fix this error you might have to delete all your partitions. This procedure will delete all your files, therefore we urge you to create a backup before you start.
If your hard drive is larger than 2TB, you must convert it to GPT. To do that, use diskpart tool to clean your hard drive and then convert it to GPT.
For more instructions on how to do that be sure to check some of the previous solutions.
Solution 2 – Format your hard drive from Linux
If you don’t want to use command line to fix this problem, you can start your PC from a Live Linux CD. After Linux starts, locate the appropriate disk management tool and format it to FAT32 drive.
Be sure to use slow method to completely clean your hard drive. This procedure will delete all files from your hard drive, so be sure to back them up.
After your hard drive is formatted, try to install Windows 10 again.
Solution 3 – Disable unnecessary boot devices in BIOS
If you have multiple hard drives, USB flash drives or DVD drives on your PC, you might want to disable them from BIOS. All these drives can interfere with Windows 10 installation, so be sure to disable them from BIOS and try to install Windows 10 again.
For more information on how to disable boot devices be sure to check your motherboard manual.
Solution 4 – Connect your hard drive to Intel SATA 3 port instead of Marvell port
These types of problems can sometimes appear if your hard drive is not connected to Intel SATA 3 port, so be sure to connect it to Intel SATA 3 port on your PC.
In addition, set Intel SATA 3 controller to AHCI mode and turn on the SMART option. You can turn on both these options from BIOS.
Solution 5 – Connect your hard drive and optical drive to correct SATA ports
Some motherboards require that you connect your hard drive and optical drive to appropriate ports. Users reported that after connecting hard drive and optical drive to SATA 5 and SATA 6 ports on their motherboard the issue was resolved.
For more information on which SATA ports you should use, we strongly suggest to check your motherboard manual.
Solution 6 – Remove your USB installation media after first restart
Few users reported that you can avoid this issue simply by removing your USB installation media. According to users, you need to remove your installation media before your computer restarts during the setup process.
After the USB media is removed, the installation should continue without any issues. In addition, be sure that you don’t have any additional USB drives or devices attached to your PC.
We don’t know if this solution works, but couple of users reported that it fixed the issue for them, so feel free to give it a try.
Solution 7 – Check if your hard drive is on the list of boot devices
You won’t be able to install Windows 10 unless your hard drive is listed on the Boot list. If you changed the boot order it might be possible that you accidentally removed your hard drive from boot list thus causing this issue.
You can fix this problem simply by entering BIOS and checking if your hard drive is available on the boot list.
Few users reported that their hard drive had an exclamation mark before it in Boot options menu, meaning that the hard drive is disabled.
According to them, you can enable your hard drive again simply by using Ctrl + 1 shortcut. Keep in mind that different versions of BIOS might use different shortcuts, so check your motherboard manual for detailed explanation.
Solution 8 – Disable External Device Boot
Few users reported that you can fix this issue on Sony Vaio devices by disabling External Device Boot. According to them, the device finds more than one boot option from BIOS, but you can fix that by following these steps:
Solution 9 – Disable Intel Boot Security
If your device supports Intel Boot Security feature you should disable it from BIOS. Users reported that Intel Boot Security feature can interfere with Windows 10 installation, therefore be sure to disable this option in BIOS.
After disabling Boot Security Windows 10 should be installed without problems.
Solution 10 – Disable the AHCI mode
Using AHCI mode usually offers better performance, but sometimes it can prevent Windows 10 from installing properly.
Few users reported that you can fix this problem by disabling AHCI mode in BIOS so feel free to try that.
Solution 11 – Unplug your Ethernet cable
Many users reported that they fixed this issue simply by unplugging the Ethernet cable. We don’t know why Ethernet cable caused this problem, but if you’re getting The computer hardware may not support booting error be sure to try this solution.
Solution 12 – Set the boot order properly
Few users reported this error while selecting their USB drive as the boot device. According to them, the only way to fix this issue was to enter BIOS and set the USB flash drive as the first boot device.
For some strange reason the quick boot menu option wouldn’t work for them, but after changing the boot order in BIOS the issue was resolved.
Solution 13 – Set the partition to active
This error can sometimes occur if your installation partition isn’t set to active. To fix this problem you need to use diskpart tool and set your partition as active.
Keep in mind that using diskpart tool can lead to file loss, therefore we recommend that you back up your important files.
Fifth case – Windows 10 can’t install on SSD
Solution 1 – Be sure that your SSD is clean
According to users, installation problems with Windows 10 can occur if your SSD drive isn’t clean. To fix this problem be sure to remove all partitions and files from your SSD and try to install Windows 10 again.
In addition, be sure that AHCI is enabled.
Solution 2 – Try non-UEFI boot
Few users reported that you can fix this problem simply by using non-UEFI boot. There are also reports that you can fix this problem by disabling UEFI boot.
We already covered how to disable UEFI in one of our previous solutions, so be sure to check it out.
Solution 3 – Disconnect other SSD
If you have two or more SSDs in your PC you might experience this error. One of the simplest solutions is to disconnect all other SSD drives and check if that fixes the problem.
In addition, be sure to disconnect any storage devices from your PC.
Solution 4 – Use SATA 2 port
Users reported that this issue can occur if the SATA 3 expansion board is faulty, so you might want to try using SATA 2 port instead.
According to users, that they were able to install Windows 10 after connecting their SSD to SATA 2 port, so be sure to try that.
Solution 5 – Connect your DVD drive to motherboard
It seems that this issue appears when you connect both your SSD and DVD to the controller. One of the simplest solutions is to disconnect your DVD drive and connect it to the motherboard while keeping the SSD connected to controller.
After doing tha,t Windows 10 should install without any issues.
Solution 6 – Remove RAID configuration
Users reported this problem while using RAID, and according to them, removing RAID configuration from BIOS fixed this issue. After removing RAID, create it again, make it bootable and you should be able to install Windows 10.
Solution 7 – Make sure that your USB flash drive and SSD don’t match
This is a very unlikely issue, but users reported that Windows 10 installation can fail if you’re trying to install it with USB flash drive.
Users reported that they had problems with Corsair USB flash drive and SSD, but after replacing the Corsair flash drive with a different brand the issue was fixed.
Sixth case – The partition contains one or more dynamic volumes
Solution – Convert the your dynamic disk to basic disk
One way to fix this error is to use diskpart tool. Using this tool all your files and partitions from the selected disk will be deleted, therefore we urge you to back up important files before you start.
To create basic disk, start Command Prompt and enter diskpart. After diskpart starts, follow these steps:
According to users, you can use third-party tools such as Partition Wizard to convert dynamic disk to basic without losing any of your files.
Start Partition Wizard from Windows or boot Partition Wizard from a USB flash drive, right click your Disk and choose Convert Dynamic Disk To Basic Disk.
Click Apply button and restart your PC if you’re asked to. Even though using Partition Wizard shouldn’t remove your files, we strongly suggest to back them up just in case.
After your disk is converted to basic, try to install Windows 10 again.
Windows cannot be installed to this disk error can be a big problem and prevent you from installing Windows 10, but you should be able to fix this issue by using one of our solutions.
If you found another way to solve this error or you have any other question, feel free to share in the comments section below.
Источник