SSH timeout server not responding is a frustrating error message for users.
And, when it happens while making important server changes, things go for a real toss !
Usually, the SSH connection timeout occurs due to bad server settings, wrong IP hosts, firewall restrictions, etc.
At Bobcares we often get requests to fix ssh timeout error, as a part of our Server Management Services.
Today, let’s discuss the ssh timeout error and see how our Support Engineers fix it.
What is SSH timeout in a server?
SSH is a secure way to login to a remote machine over an insecure network. For instance, network services like login, remote command execution, etc. can be securely executed via SSH.
Usually, the session timeout is an event that indicates an inactive user. This event changes the status of an inactive user session to invalid. And the SSH user will get the message ‘ssh timeout server not responding’.
The typical error message appears as.
ssh: connect to host xx.xx.xx.xx port 22: Connection timed outHere xx.xx.xx.xx denotes the host IP that the user is trying to connect.
For users making important server changes, this timeout can be annoying.
A few reasons for this timeout error include incorrect host IP, firewall setting, port block, etc.
Causes and fixes for an SSH timeout error
So far, we saw the error in detail. Now let’s see the causes for the error and discuss how our Support Team fixes it for our customers.
1. Wrong hosts
Usually, SSH timeout errors show up when users give the wrong SSH hostname or outdated IP address.
Therefore, our Support Team begins checking by verifying the SSH connection details. We ensure that the users use correct host IP addresses, user details without any typo errors.
2. Change in SSH port
Some customers may change the default SSH port 22 to some custom port in their server. Then, when the customer tries to connect, the ssh timeout error shows up.
To check the SSH port we use the command,
netstat -l | grep sshThus, our Support Team will be able to find the port at which SSH runs. Further, we check the SSH configuration file at /etc/ssh/sshd_config and verify the port parameters.
3. Firewall restrictions
Many times, firewall settings can cause timeout errors while trying to connect using SSH. This can be due to some server-side settings or port blocks in some networks.
So, our Support Engineers check the firewall settings and make sure that it does not cause the ssh connection timeout.
For instance, we check the iptables to see if there are any IP restrictions.
iptables -nL | grep xx.xx.xx.xxWe remove the IP restrictions to fix the error.
How we can avoid ssh timeout?
So far, we saw how we fix the ssh timeout error. As part of our proactive server administration, our Server Administrators avoid ssh connection timeout by changing a few configuration settings. Let’s take a look at them now.
1. Client-side settings
Firstly, let’s see how our Support Engineers change the session timeout on the client-side.
To avoid session timeout for a user, we edit the ~/.ssh/config file.
So, in this configuration file, we add the following code.
Host *
ServerAliveInterval 120
ServerAliveCountMax 2
This indicates that a null packet is sent to the server every 120 seconds twice to keep the session alive.
2. Sever-side settings
Similarly, server-side settings also affect all client connections.
Hence, to make such a change, we edit the configuration file. In the /etc/ssh/sshd_config file we add the following.
KeepAlive yes
ClientAliveInterval 120
ClientAliveCountMax 2
These settings make the server send a null packet every 120 seconds. It shows a timeout after trying for two times.
[Still having trouble in fixing SSH timeout error? – We will help you.]
Conclusion
In short, ssh timeout server not responding error occur due to bad server settings, wrong host address, firewall settings and so on. Today, we discussed the fixes and saw how our Support Team proactively avoid timeout errors.
PREVENT YOUR SERVER FROM CRASHING!
Never again lose customers to poor server speed! Let us help you.
Our server experts will monitor & maintain your server 24/7 so that it remains lightning fast and secure.
GET STARTED
var google_conversion_label = «owonCMyG5nEQ0aD71QM»;
Содержание
- How to Troubleshoot SSH Connectivity Issues
- Errors
- Hostname Resolution
- Connection Timeout
- Connection Refused
- Solutions
- Checking Your Firewall
- Checking the SSH Service Status
- Checking the SSH Service Port
- Conclusion
- Устранение неполадок SSH: проблемы с подключением к серверу
- Требования
- Основные ошибки
- Разрешение имени хоста
- Истечение времени соединения
- Отказ в соединении
- Рекомендации по исправлению ошибок подключения
- Брандмауэр
- Проверка состояния сервиса SSH
- Проверка порта SSH
How to Troubleshoot SSH Connectivity Issues
When connecting an SSH client to an SSH server, the first step is establishing basic network connectivity. This article covers how to identify some common situations that would cause issues at this point in the process, how to resolve those situations, and additional resources to prevent them in the future.
Errors
Hostname Resolution
Most resolution errors occur when the reference to the SSH host can’t be mapped to a network address. While this is almost exclusively DNS related, the root cause isn’t always a DNS issue.
In an OpenSSH client, a command like ssh [email protected]ple.com may return an error like this:
In PuTTY, you might see an error window with text like this:
Here are some steps you can take to troubleshoot this error.
- Verify the hostname is properly spelled. Typographical errors can strike at any time.
- Verify that you can resolve the hostname on your client machine using the system ping command. Using third-party sites like WhatsMyDns.net to check beyond your own DNS caching can also help confirm the results.
If you’re having DNS resolution issues at any level, you can also use the Droplet IP address as an interim solution, as in ssh [email protected] instead of ssh [email protected] .
The following tutorials are a good resource to begin working out DNS configuration errors:
Connection Timeout
A connection timeout means that the client attempted to establish a network socket to the SSH server, but the server failed to respond within the timeout period.
In an OpenSSH client, a command like ssh [email protected] may give an error like this:
In PuTTY, you might see an error window with text like this:
Here are some steps you can take to troubleshoot this error.
- Verify that the host IP address is correct for the Droplet.
- Verify that your network supports connectivity over the SSH port being used. Some public networks may block port 22 or custom SSH ports. You can do this by, for example, testing other hosts using the same port with a known working SSH server. This can help you determine if the issue isn’t specific to your Droplet.
- Verify the Droplet firewall rules. Check that they’re not set to a default policy of DROP and the port is not added to allow connections.
Connection Refused
A connection being refused has some subtle differences from a timeout. This means that the request is being routed to the SSH host, but the host does not successfully accept the request.
In an OpenSSH client, a command like ssh [email protected] may return an error like this:
In PuTTY, you might see an error window with text like this:
In this situation, you may have the same root issue as with connection timeout errors, but there are some additional things you can check:
- Verify that the host IP address is correct for the Droplet.
- Verify that your network supports connectivity over the SSH port being used. Some public networks may block port 22 or custom SSH ports. You can do this by, for example, testing other hosts using the same port with a known working SSH server. This can help you determine if the issue isn’t specific to your Droplet.
- Verify the Droplet firewall rules. Check that they’re not set to a default policy of DROP and the port is not added to allow connections.
- Verify that the service is currently running and bound to the expected port.
Solutions
Checking Your Firewall
Some connectivity problems can be caused by firewall configurations. If your firewall is set up to block certain ports or services, it can prevent you from connecting. You can learn more about firewalls in What is a Firewall and How Does It Work?.
If you add a firewall rule that allows your local machine to connect by IP address, verify that the IP address assigned by your ISP has not changed. If it has, then you need to modify that firewall rule to permit the new IP address or address range.
How you check your firewall rules depends on which firewall your Droplet uses. Ubuntu servers usually run UFW; CentOS servers often use FirewallD. If you’re not using either, it’s likely that you’re using iptables.
For whichever firewall your system has, make sure to familiarize yourself with how to modify its rules. You also need to know which port your SSH service is using. By default, it’s 22 , but you can follow the Checking the SSH Service Port section below to confirm.
For Linux systems not running UFW or FirewallD, list your firewall rules using the iptables command with sudo or as the root user.
The following output would indicate that there are no rules in place that would block SSH traffic:
If you see rules or a default policy of REJECT or DROP , you should ensure that the INPUT chain allows the port your SSH service is running on, which is 22 by default.
For FirewallD users, use the firewall-cmd command to list the services:
The output should reveal the list of services including SSH (default port 22 ) to indicate that the firewall supports SSH traffic:
If you are using a custom port for SSH, you can check with the —list-ports option. If you created a custom service definition, you should still see SSH normally with —list-services .
Users working with UFW should use ufw status to inspect their firewall:
The output similarly shows the ports available:
Make sure that your SSH port is on the list.
Checking the SSH Service Status
If you can’t SSH to your Droplet, you should check that the SSH service is running. How to very the service is running varies from system to system.
On older OS versions (Ubuntu 14 and below, CentOS 6, Debian 6) this may use the service command backed by Upstart. More modern distributions with systemd use the systemctl command. Red Hat-based distributions (e.g. CentOS and Fedora) call the service sshd while Debian and Ubuntu call it ssh .
Similarly, on a server using systemd (like CentOS 7), use the systemctl command to check the status:
A running service shows output like this, with active (running) on the Active: line.
If the service is not running, the Active line displays inactive followed by recent journal entries for the service:
In this case, restart it with systemctl start sshd .
For systems using the service command, check the status of the SSH process with the following command (run as root or with sudo ):
Output like this, which includes the PID (process ID), indicates that the process is running as expected:
If it isn’t running, you’ll see output indicating the process is stopped:
In this case, restart it with service ssh start .
Checking the SSH Service Port
There are two general ways to check which port the SSH service is running on. One is checking the SSH configuration file, and the other is examining the running process.
On most systems, the SSH configuration file is /etc/ssh/sshd_config . The default port is 22 , but can be overridden by any configuration line in this file specifying a Port directive with a number.
You can search lines like this using grep:
You’ll see output like this with the port number:
If you know the service is running, you can confirm that the service is running on the expected port using ss (run with sudo or as the root user). Similar output is provided for the netstat -plnt command as well, but ss is the preferred command for querying socket information from the kernel.
The output you are looking for should reference the program name listening on the configured port. For example, this output shows that the SSH service is listening on all interfaces, * , on port 22 .
The interface references * and 0.0.0.0 indicate all interfaces on the Droplet. 127.0.0.1 indicates that the service is not publicly accessible. The relevant sshd_config directive is ListenAddress and should be commented out to default to all interfaces, or set to the public IP address of the Droplet.
Conclusion
If you need further help, you can open a support ticket. Make sure to include the following information:
- The username, host, and port you are using to connect.
- The authentication mechanism you expect to use.
- The full output of the errors linked to the stage of error, including verbose output of the SSH client
- All of the information you’ve gathered from troubleshooting so far.
- Anything you were unclear about while referencing this article.
Including all the above diagnostic information and clarifying where you are encountering the issue when trying to connect can help us quickly get up to speed with where your need on the issue is.
Источник
Устранение неполадок SSH: проблемы с подключением к серверу
В первой статье этой серии вы узнали о том, как и в каких ситуациях вы можете попробовать исправить ошибки SSH. Остальные статьи расскажут, как определить и устранить ошибки:
- Ошибки протокола: в этой статье вы узнаете, что делать, если сбрасываются клиентские соединения, клиент жалуется на шифрование или возникают проблемы с неизвестным или измененным удаленным хостом.
- Ошибки аутентификации: поможет устранить проблемы с парольной аутентификацией или сбросом SSH-ключей.
- Ошибки оболочки: это руководство поможет исправить ошибки ветвления процессов, валидации оболочки и доступа к домашнему каталогу.
Для взаимодействия SSH-клиента с SSH-сервером необходимо установить базовое сетевое подключение. Это руководство поможет определить некоторые общие ошибки подключения, исправить их и предотвратить их возникновение в будущем.
Требования
- Убедитесь, что можете подключиться к виртуальному серверу через консоль.
- Проверьте панель на предмет текущих проблем, влияющих на работу и состояние сервера и гипервизора.
Основные ошибки
Разрешение имени хоста
Большинство ошибок подключения возникает тогда, когда ссылка на хост SSH не может быть сопоставлена с сетевым адресом. Это почти всегда связано с DNS, но первопричина часто бывает не связана с DNS.
На клиенте OpenSSH эта команда:
может выдать ошибку:
ssh: Could not resolve hostname example.com: Name or service not known
В PuTTY может появиться такая ошибка:
Unable to open connection to example.com Host does not exist
Чтобы устранить эту ошибку, можно попробовать следующее:
- Проверьте правильность написания имени хоста.
- Убедитесь, что вы можете разрешить имя хоста на клиентской машине с помощью команды ping. Обратитесь к сторонним сайтам (WhatsMyDns.net, например), чтобы подтвердить результаты.
Если у вас возникают проблемы с разрешением DNS на любом уровне, в качестве промежуточного решения можно использовать IP-адрес сервера, например:
ssh user@111.111.111.111

# вместо

ssh user@example.com.
Истечение времени соединения
Эта ошибка значит, что клиент попытался установить соединение с SSH-сервером, но сервер не смог ответить в течение заданного периода ожидания.
На клиенте OpenSSH следующая команда:
выдаст такую ошибку:
ssh: connect to host 111.111.111.111 port 22: Connection timed out
В PuTTY ошибка выглядит так:
Network error: Connection timed out
Чтобы исправить ошибку:
- Убедитесь, что IP-адрес хоста указан правильно.
- Убедитесь, что сеть поддерживает подключение через используемый порт SSH. Некоторые публичные сети могут блокировать порт 22 или пользовательские SSH-порты. Чтобы проверить работу порта, можно, например, попробовать подключиться к другим хостам через этот же порт. Это поможет вам определить, не связана ли проблема с самим сервером.
- Проверьте правила брандмауэра. Убедитесь, что политика по умолчанию – не DROP.
Отказ в соединении
Эта ошибка означает, что запрос передается на хост SSH, но хост не может успешно принять запрос.
На клиенте OpenSSH следующая команда выдаст ошибку:
ssh user@111.111.111.111

ssh: connect to host 111.111.111.111 port 22: Connection refused
В PuTTY ошибка появится в диалоговом окне:
Network error: Connection refused
Эта ошибка имеет общие с ошибкой Connection Timeout причины. Чтобы исправить её, можно сделать следующее:
- Убедиться, что IP-адрес хоста указан правильно.
- Убедиться, что сеть поддерживает подключение через используемый порт SSH. Некоторые публичные сети могут блокировать порт 22 или пользовательские SSH-порты. Чтобы проверить работу порта, можно, например, попробовать подключиться к другим хостам через этот же порт.
- Проверить правила брандмауэра. Убедитесь, что политика по умолчанию – не DROP, и что брандмауэр не блокирует этот порт.
- Убедиться, что сервис запущен и привязан к требуемому порту.
Рекомендации по исправлению ошибок подключения
Брандмауэр
Иногда проблемы с подключением возникают из-за брандмауэра. Он может блокировать отдельные порты или сервисы.
В разных дистрибутивах используются разные брандмауэры. Вы должны научиться изменять правила и политики своего брандмауэра. В Ubuntu обычно используется UFW, в CentOS – FirewallD. Брандмауэр iptables используется независимо от системы.
Читайте также:
Чтобы настроить брандмауэр, нужно знать порт сервиса SSH. По умолчанию это порт 22.
Чтобы запросить список правил iptables, введите:
Такой вывод сообщает, что правил, блокирующих SSH, нет:
Chain INPUT (policy ACCEPT)

target     prot opt source               destination

Chain FORWARD (policy ACCEPT)

target     prot opt source               destination

Chain OUTPUT (policy ACCEPT)

target     prot opt source               destination
Если в выводе вы видите правило или политику по умолчанию REJECT или DROP, убедитесь, что цепочка INPUT разрешает доступ к порту SSH.
Чтобы запросить список правил FirewallD, введите:
Список, появившийся на экране, содержит все сервисы, которые поддерживаются брандмауэром. В списке должно быть правило:
dhcpv6-client http ssh
Если вы настроили пользовательский порт SSH, используйте опцию –list-ports. Если вы создали пользовательское определение сервиса, добавьте опцию –list-services, чтобы найти SSH.
Чтобы проверить состояние UFW, введите:
Команда вернёт доступные порты:
Status: active
To Action From
— —— —-
22 LIMIT Anywhere
443 ALLOW Anywhere
80 ALLOW Anywhere
Anywhere ALLOW 192.168.0.0
22 (v6) LIMIT Anywhere (v6)
443 (v6) ALLOW Anywhere (v6)
80 (v6) ALLOW Anywhere (v6)
В списке должен быть порт SSH.
Проверка состояния сервиса SSH
Если вы не можете подключиться к серверу по SSH, убедитесь, что сервис SSH запущен. Способ сделать это зависит от операционной системы сервера. В более старых версиях дистрибутивов (Ubuntu 14.04, CentOS 6, Debian  используется команда service. Современные дистрибутивы на основе Systemd используют команду systemctl.
Метод проверки состояния сервиса может варьироваться от системы к системе. В более старых версиях (Ubuntu 14 и ниже, CentOS 6, Debian 6) используется команда service, поддерживаемая системой инициализации Upstart, а в более современных дистрибутивах для управления сервисом используется команда systemctl.
Примечание: В дистрибутивах Red Hat (CentOS и Fedora) сервис называется sshd, а в Debian и Ubuntu – ssh.
В более старых версия используйте команду:
service ssh status
Если процесс работает должным образом, вы увидите вывод, который содержит PID:
ssh start/running, process 1262
Если сервис не работает, вы увидите:
В системах на основе SystemD используйте:
systemctl status sshd
В выводе должна быть строка active:
sshd.service — OpenSSH server daemon
Loaded: loaded (/usr/lib/systemd/system/sshd.service; enabled)
Active: active (running) since Mon 2017-03-20 11:00:22 EDT; 1 months 1 days ago
Process: 899 ExecStartPre=/usr/sbin/sshd-keygen (code=exited, status=0/SUCCESS)
Main PID: 906 (sshd)
CGroup: /system.slice/sshd.service
├─ 906 /usr/sbin/sshd -D
├─26941 sshd: [accepted] └─26942 sshd: [net]
Если сервис не работает, вы увидите в выводе inactive:
sshd.service — OpenSSH server daemon
Loaded: loaded (/usr/lib/systemd/system/sshd.service; enabled)
Active: inactive (dead) since Fri 2017-04-21 08:36:13 EDT; 2s ago
Process: 906 ExecStart=/usr/sbin/sshd -D $OPTIONS (code=exited, status=0/SUCCESS)
Process: 899 ExecStartPre=/usr/sbin/sshd-keygen (code=exited, status=0/SUCCESS)
Main PID: 906 (code=exited, status=0/SUCCESS)
Чтобы перезапустить сервис, введите соответственно:
service ssh start
systemctl start sshd
Проверка порта SSH
Существует два основных способа проверить порт SSH: проверить конфигурационный файл SSH или просмотреть запущенный процесс.
Как правило, конфигурационный файл SSH хранится в /etc/ssh/sshd_config. Стандартный порт 22 может переопределяться любой строкой в этом файле, определяющей директиву Port.
Запустите поиск по файлу с помощью команды:
grep Port /etc/ssh/sshd_config
Если вы уже убедились, что сервис работает, теперь вы можете узнать, работает ли он на требуемом порте. Для этого используйте команду ss. Команда netstat –plnt выдаст аналогичный результат, но команду ss рекомендуется использовать для запроса информации сокета из ядра.
В выводе должно быть указано имя программы и порт, который она прослушивает. Например, следующий вывод сообщает, что сервис SSH прослушивает все интерфейсы и порт 22.
State Recv-Q Send-Q Local Address:Port Peer Address:Port
LISTEN 0 128 *:22 *:* users:((«sshd»,pid=1493,fd=3))
LISTEN 0 128 . 22 . * users:((«sshd»,pid=1493,fd=4))
Символ * и 0.0.0.0 указывает, что все интерфейсы сервера прослушиваются. Строка 127.0.0.1 значит, что сервис не является общедоступным. В sshd_config директива ListenAddress должна быть закомментирована, чтобы прослушивать все интерфейсы, или должна содержать внешний IP-адрес сервера.
Если у вас не получается самостоятельно настроить соединение SSH, вы можете обратиться за помощью к службе поддержки своего хостинг-провайдера.
Источник
25 мая, 2017 11:40 дп
86 388 views
| Комментариев нет
Linux, SSH
В первой статье этой серии вы узнали о том, как и в каких ситуациях вы можете попробовать исправить ошибки SSH. Остальные статьи расскажут, как определить и устранить ошибки:
- Ошибки протокола: в этой статье вы узнаете, что делать, если сбрасываются клиентские соединения, клиент жалуется на шифрование или возникают проблемы с неизвестным или измененным удаленным хостом.
- Ошибки аутентификации: поможет устранить проблемы с парольной аутентификацией или сбросом SSH-ключей.
- Ошибки оболочки: это руководство поможет исправить ошибки ветвления процессов, валидации оболочки и доступа к домашнему каталогу.
Для взаимодействия SSH-клиента с SSH-сервером необходимо установить базовое сетевое подключение. Это руководство поможет определить некоторые общие ошибки подключения, исправить их и предотвратить их возникновение в будущем.
Требования
- Убедитесь, что можете подключиться к виртуальному серверу через консоль.
- Проверьте панель на предмет текущих проблем, влияющих на работу и состояние сервера и гипервизора.
Основные ошибки
Разрешение имени хоста
Большинство ошибок подключения возникает тогда, когда ссылка на хост SSH не может быть сопоставлена с сетевым адресом. Это почти всегда связано с DNS, но первопричина часто бывает не связана с DNS.
На клиенте OpenSSH эта команда:
ssh user@example.com
может выдать ошибку:
ssh: Could not resolve hostname example.com: Name or service not known
В PuTTY может появиться такая ошибка:
Unable to open connection to example.com Host does not exist
Чтобы устранить эту ошибку, можно попробовать следующее:
- Проверьте правильность написания имени хоста.
- Убедитесь, что вы можете разрешить имя хоста на клиентской машине с помощью команды ping. Обратитесь к сторонним сайтам (WhatsMyDns.net, например), чтобы подтвердить результаты.
Если у вас возникают проблемы с разрешением DNS на любом уровне, в качестве промежуточного решения можно использовать IP-адрес сервера, например:
ssh user@111.111.111.111
# вместо
ssh user@example.com.
Истечение времени соединения
Эта ошибка значит, что клиент попытался установить соединение с SSH-сервером, но сервер не смог ответить в течение заданного периода ожидания.
На клиенте OpenSSH следующая команда:
ssh user@111.111.111.111
выдаст такую ошибку:
ssh: connect to host 111.111.111.111 port 22: Connection timed out
В PuTTY ошибка выглядит так:
Network error: Connection timed out
Чтобы исправить ошибку:
- Убедитесь, что IP-адрес хоста указан правильно.
- Убедитесь, что сеть поддерживает подключение через используемый порт SSH. Некоторые публичные сети могут блокировать порт 22 или пользовательские SSH-порты. Чтобы проверить работу порта, можно, например, попробовать подключиться к другим хостам через этот же порт. Это поможет вам определить, не связана ли проблема с самим сервером.
- Проверьте правила брандмауэра. Убедитесь, что политика по умолчанию – не DROP.
Отказ в соединении
Эта ошибка означает, что запрос передается на хост SSH, но хост не может успешно принять запрос.
На клиенте OpenSSH следующая команда выдаст ошибку:
ssh user@111.111.111.111
ssh: connect to host 111.111.111.111 port 22: Connection refused
В PuTTY ошибка появится в диалоговом окне:
Network error: Connection refused
Эта ошибка имеет общие с ошибкой Connection Timeout причины. Чтобы исправить её, можно сделать следующее:
- Убедиться, что IP-адрес хоста указан правильно.
- Убедиться, что сеть поддерживает подключение через используемый порт SSH. Некоторые публичные сети могут блокировать порт 22 или пользовательские SSH-порты. Чтобы проверить работу порта, можно, например, попробовать подключиться к другим хостам через этот же порт.
- Проверить правила брандмауэра. Убедитесь, что политика по умолчанию – не DROP, и что брандмауэр не блокирует этот порт.
- Убедиться, что сервис запущен и привязан к требуемому порту.
Рекомендации по исправлению ошибок подключения
Брандмауэр
Иногда проблемы с подключением возникают из-за брандмауэра. Он может блокировать отдельные порты или сервисы.
Читайте также: Что такое брандмауэр и как он работает?
В разных дистрибутивах используются разные брандмауэры. Вы должны научиться изменять правила и политики своего брандмауэра. В Ubuntu обычно используется UFW, в CentOS – FirewallD. Брандмауэр iptables используется независимо от системы.
Читайте также:
- Основы UFW: общие правила и команды фаервола
- Настройка брандмауэра FirewallD в CentOS 7
- Основы Iptables: общие правила и команды брандмауэра
Чтобы настроить брандмауэр, нужно знать порт сервиса SSH. По умолчанию это порт 22.
Чтобы запросить список правил iptables, введите:
iptables -nL
Такой вывод сообщает, что правил, блокирующих SSH, нет:
Chain INPUT (policy ACCEPT)
target prot opt source destination
Chain FORWARD (policy ACCEPT)
target prot opt source destination
Chain OUTPUT (policy ACCEPT)
target prot opt source destination
Если в выводе вы видите правило или политику по умолчанию REJECT или DROP, убедитесь, что цепочка INPUT разрешает доступ к порту SSH.
Чтобы запросить список правил FirewallD, введите:
firewall-cmd --list-services
Список, появившийся на экране, содержит все сервисы, которые поддерживаются брандмауэром. В списке должно быть правило:
dhcpv6-client http ssh
Если вы настроили пользовательский порт SSH, используйте опцию –list-ports. Если вы создали пользовательское определение сервиса, добавьте опцию –list-services, чтобы найти SSH.
Чтобы проверить состояние UFW, введите:
ufw status
Команда вернёт доступные порты:
Status: active

To                         Action      From

--                         ------      ----

22                         LIMIT       Anywhere

443                        ALLOW       Anywhere

80                         ALLOW       Anywhere

Anywhere                   ALLOW       192.168.0.0

22 (v6)                    LIMIT       Anywhere (v6)

443 (v6)                   ALLOW       Anywhere (v6)

80 (v6)                    ALLOW       Anywhere (v6)
В списке должен быть порт SSH.
Проверка состояния сервиса SSH
Если вы не можете подключиться к серверу по SSH, убедитесь, что сервис SSH запущен. Способ сделать это зависит от операционной системы сервера. В более старых версиях дистрибутивов (Ubuntu 14.04, CentOS 6, Debian используется команда service. Современные дистрибутивы на основе Systemd используют команду systemctl.
Метод проверки состояния сервиса может варьироваться от системы к системе. В более старых версиях (Ubuntu 14 и ниже, CentOS 6, Debian 6) используется команда service, поддерживаемая системой инициализации Upstart, а в более современных дистрибутивах для управления сервисом используется команда systemctl.
Примечание: В дистрибутивах Red Hat (CentOS и Fedora) сервис называется sshd, а в Debian и Ubuntu – ssh.
В более старых версия используйте команду:
service ssh status
Если процесс работает должным образом, вы увидите вывод, который содержит PID:
ssh start/running, process 1262
Если сервис не работает, вы увидите:
ssh stop/waiting
В системах на основе SystemD используйте:
systemctl status sshd
В выводе должна быть строка active:
sshd.service - OpenSSH server daemon

Loaded: loaded (/usr/lib/systemd/system/sshd.service; enabled)

Active: active (running) since Mon 2017-03-20 11:00:22 EDT; 1 months 1 days ago

Process: 899 ExecStartPre=/usr/sbin/sshd-keygen (code=exited, status=0/SUCCESS)

Main PID: 906 (sshd)

CGroup: /system.slice/sshd.service

├─  906 /usr/sbin/sshd -D

├─26941 sshd: [accepted]

└─26942 sshd: [net]
Если сервис не работает, вы увидите в выводе inactive:
sshd.service - OpenSSH server daemon

Loaded: loaded (/usr/lib/systemd/system/sshd.service; enabled)

Active: inactive (dead) since Fri 2017-04-21 08:36:13 EDT; 2s ago

Process: 906 ExecStart=/usr/sbin/sshd -D $OPTIONS (code=exited, status=0/SUCCESS)

Process: 899 ExecStartPre=/usr/sbin/sshd-keygen (code=exited, status=0/SUCCESS)

Main PID: 906 (code=exited, status=0/SUCCESS)
Чтобы перезапустить сервис, введите соответственно:
service ssh start

systemctl start sshd
Проверка порта SSH
Существует два основных способа проверить порт SSH: проверить конфигурационный файл SSH или просмотреть запущенный процесс.
Как правило, конфигурационный файл SSH хранится в /etc/ssh/sshd_config. Стандартный порт 22 может переопределяться любой строкой в этом файле, определяющей директиву Port.
Запустите поиск по файлу с помощью команды:
grep Port /etc/ssh/sshd_config
Читайте также: Использование Grep и регулярных выражений для поиска текстовых шаблонов в Linux
Команда вернёт:
Port 22
Если вы уже убедились, что сервис работает, теперь вы можете узнать, работает ли он на требуемом порте. Для этого используйте команду ss. Команда netstat –plnt выдаст аналогичный результат, но команду ss рекомендуется использовать для запроса информации сокета из ядра.
ss -plnt
В выводе должно быть указано имя программы и порт, который она прослушивает. Например, следующий вывод сообщает, что сервис SSH прослушивает все интерфейсы и порт 22.
State       Recv-Q Send-Q              Local Address:Port                       Peer Address:Port

LISTEN      0      128                 *:22                                     *:*                   users:(("sshd",pid=1493,fd=3))

LISTEN      0      128                 :::22                                    :::*                  users:(("sshd",pid=1493,fd=4))
Символ * и 0.0.0.0 указывает, что все интерфейсы сервера прослушиваются. Строка 127.0.0.1 значит, что сервис не является общедоступным. В sshd_config директива ListenAddress должна быть закомментирована, чтобы прослушивать все интерфейсы, или должна содержать внешний IP-адрес сервера.
Если у вас не получается самостоятельно настроить соединение SSH, вы можете обратиться за помощью к службе поддержки своего хостинг-провайдера.
Tags: firewalld, Iptables, OpenSSH, PuTTY, SSH, UFW
0
1
Добрый день уважаемые пользователи форума. Вчера столкнулся со следующей проблемой. Необходимо удалённо подключиться к серверу по ssh, у моего коллеги всё работает, мне выдаёт connection timeout, в логах моей попытки войти нет. Демон работает, так же висит fail2ban, но он меня не банил. Аутентификация на сервере производится по паролю, порт стандартный: 22. Пытаюсь траблшутить уже 2 сутки-безрезультатно, в iptables проблем не нашёл. Вот выдача iptables -save. Заранее спасибо.
*mangle
:PREROUTING ACCEPT [19054217937:5419981294583]
:INPUT ACCEPT [19054217853:5419981288521]
:FORWARD ACCEPT [0:0]
:OUTPUT ACCEPT [18976440645:5412670462340]
:POSTROUTING ACCEPT [18976492207:5412680706625]
COMMIT

*filter
:INPUT DROP [8275849:428392224]
:FORWARD DROP [0:0]
:OUTPUT DROP [0:0]
:allowed - [0:0]
:bad_tcp_packets - [0:0]
:fail2ban-SSH - [0:0]
:icmp_packets - [0:0]
:tcp_packets - [0:0]
:udp_packets - [0:0]
-A INPUT -p tcp -m tcp --dport 22 -j fail2ban-SSH
-A INPUT -p icmp -m icmp --icmp-type 8 -m length --length 148 -m recent --set --                                                                                                             name pk --rsource -j ACCEPT
-A INPUT -p icmp -m icmp --icmp-type 8 -m length --length 149 -m recent --update                                                                                                              --hitcount 1 --name pk --rsource -j ACCEPT
-A INPUT -p icmp -m icmp --icmp-type 8 -m length --length 150 -m recent --update                                                                                                              --hitcount 2 --name pk --rsource -j ACCEPT
-A INPUT -p tcp -m tcp --dport 8181 -m recent --rcheck --hitcount 3 --name pk --                                                                                                             rsource -j ACCEPT
-A INPUT -p tcp -m tcp --dport 5902 -m recent --rcheck --hitcount 3 --name pk --                                                                                                             rsource -j ACCEPT
-A INPUT -p tcp -m tcp --dport 4422 -m recent --rcheck --hitcount 3 --name pk --                                                                                                             rsource -j ACCEPT
-A INPUT -p tcp -m tcp --dport 22 -m recent --rcheck --hitcount 3 --name pk --rs                                                                                                             ource -j ACCEPT
-A INPUT -p tcp -m tcp --dport 222 -m recent --rcheck --hitcount 3 --name pk --r                                                                                                             source -j ACCEPT
-A INPUT -p tcp -m tcp --dport 10000 -m recent --rcheck --hitcount 3 --name pk -                                                                                                             -rsource -j ACCEPT
-A INPUT -p tcp -m tcp --dport 35800 -m recent --rcheck --hitcount 3 --name pk -                                                                                                             -rsource -j ACCEPT
-A INPUT -p tcp -m tcp --dport 1521 -m recent --rcheck --hitcount 3 --name pk --                                                                                                             rsource -j ACCEPT
-A INPUT -p tcp -m tcp --dport 8080 -m recent --rcheck --hitcount 3 --name pk --                                                                                                             rsource -j ACCEPT
-A INPUT -p tcp -m tcp --dport 38080 -m recent --rcheck --hitcount 3 --name pk -                                                                                                             -rsource -j ACCEPT
-A INPUT -p tcp -m tcp --dport 48080 -m recent --rcheck --hitcount 3 --name pk -                                                                                                             -rsource -j ACCEPT
-A INPUT -p tcp -m tcp --dport 38443 -m recent --rcheck --hitcount 3 --name pk -                                                                                                             -rsource -j ACCEPT
-A INPUT -p tcp -m tcp --dport 48443 -m recent --rcheck --hitcount 3 --name pk -                                                                                                             -rsource -j ACCEPT
-A INPUT -p tcp -m tcp --dport 8180 -m recent --rcheck --hitcount 3 --name pk --                                                                                                             rsource -j ACCEPT
-A INPUT -p tcp -m tcp --dport 81 -m recent --rcheck --hitcount 3 --name pk --rs                                                                                                             ource -j ACCEPT
-A INPUT -p tcp -m tcp --dport 2812 -m recent --rcheck --hitcount 3 --name pk --                                                                                                             rsource -j ACCEPT
-A INPUT -p tcp -m tcp --dport 5904 -m recent --rcheck --hitcount 3 --name pk --                                                                                                             rsource -j ACCEPT
-A INPUT -p tcp -m tcp --dport 4022 -m recent --rcheck --hitcount 3 --name pk --                                                                                                             rsource -j ACCEPT
-A INPUT -p tcp -m tcp --dport 8338 -m recent --rcheck --hitcount 3 --name pk --                                                                                                             rsource -j ACCEPT
-A INPUT -p tcp -m tcp --dport 38090 -m recent --rcheck --hitcount 3 --name pk -                                                                                                             -rsource -j ACCEPT
-A INPUT -p tcp -m tcp --dport 8090 -m recent --rcheck --hitcount 3 --name pk --                                                                                                             rsource -j ACCEPT
-A INPUT -p icmp -m icmp --icmp-type 8 -m length --length 151 -m recent --remove                                                                                                              --name pk --rsource -j ACCEPT
-A INPUT -p tcp -j bad_tcp_packets
-A INPUT -d 154.240.188.65/32 -m state --state RELATED,ESTABLISHED -j ACCEPT
-A INPUT -i eth1 -p tcp -j tcp_packets
-A INPUT -i eth1 -p udp -j udp_packets
-A INPUT -i eth1 -p icmp -j icmp_packets
-A INPUT -p tcp -m state --state NEW -m tcp --dport 10050 -j ACCEPT
-A INPUT -p tcp -m state --state NEW -m tcp --dport 10051 -j ACCEPT
-A INPUT -p udp -m state --state NEW -m udp --dport 10050 -j ACCEPT
-A INPUT -p udp -m state --state NEW -m udp --dport 10051 -j ACCEPT
-A INPUT -s 127.0.0.1/32 -i lo -j ACCEPT
-A INPUT -s 154.240.188.65/32 -i lo -j ACCEPT
-A INPUT -d 224.0.0.0/8 -i eth1 -j DROP
-A INPUT -m limit --limit 30/min --limit-burst 30 -j LOG --log-prefix "IPT INPUT                                                                                                              packet died: " --log-level 7
-A FORWARD -m state --state RELATED,ESTABLISHED -j ACCEPT
-A FORWARD -m limit --limit 30/min --limit-burst 30 -j LOG --log-prefix "IPT FOR                                                                                                             WARD packet died: " --log-level 7
-A OUTPUT -s 127.0.0.1/32 -j ACCEPT
-A OUTPUT -s 154.240.188.65/32 -j ACCEPT
-A OUTPUT -m limit --limit 30/min --limit-burst 30 -j LOG --log-prefix "IPT OUTP                                                                                                             UT packet died: " --log-level 7
-A allowed -p tcp -m tcp --tcp-flags FIN,SYN,RST,ACK SYN -j ACCEPT
-A allowed -p tcp -m state --state RELATED,ESTABLISHED -j ACCEPT
-A allowed -p tcp -j DROP
-A bad_tcp_packets -p tcp -m tcp --tcp-flags SYN,ACK SYN,ACK -m state --state NE                                                                                                             W -j REJECT --reject-with tcp-reset
-A bad_tcp_packets -p tcp -m tcp ! --tcp-flags FIN,SYN,RST,ACK SYN -m state --st                                                                                                             ate NEW -j LOG --log-prefix "New not syn:"
-A bad_tcp_packets -p tcp -m tcp ! --tcp-flags FIN,SYN,RST,ACK SYN -m state --st                                                                                                             ate NEW -j DROP
-A fail2ban-SSH -j RETURN
-A icmp_packets -p icmp -m icmp --icmp-type 8 -j ACCEPT
-A icmp_packets -p icmp -m icmp --icmp-type 11 -j ACCEPT
-A icmp_packets -p icmp -j REJECT --reject-with icmp-host-unreachable
-A tcp_packets -s 150.170.66.224/32 -p tcp -m tcp --dport 22 -j allowed
-A tcp_packets -s 150.170.66.224/32 -p tcp -m tcp --dport 222 -j allowed
-A tcp_packets -s 150.170.66.224/32 -p tcp -m tcp --dport 4422 -j allowed
-A tcp_packets -s 150.170.66.224/32 -p tcp -m tcp --dport 10000 -j allowed
-A tcp_packets -s 150.170.66.224/32 -p tcp -m tcp --dport 35800 -j allowed
-A tcp_packets -s 150.170.66.224/32 -p tcp -m tcp --dport 48080 -j allowed
-A tcp_packets -s 150.170.66.224/32 -p tcp -m tcp --dport 38080 -j allowed
-A tcp_packets -s 150.170.66.224/32 -p tcp -m tcp --dport 1521 -j allowed
-A tcp_packets -s 150.170.66.224/32 -p tcp -m tcp --dport 1158 -j allowed
-A tcp_packets -s 150.170.66.224/32 -p tcp -m tcp --dport 80 -j allowed
-A tcp_packets -s 150.170.66.224/32 -p tcp -m tcp --dport 81 -j allowed
-A tcp_packets -s 150.170.66.224/32 -p tcp -m tcp --dport 443 -j allowed
-A tcp_packets -s 150.170.66.224/32 -p tcp -m tcp --dport 8080 -j allowed
-A tcp_packets -s 150.170.66.224/32 -p tcp -m tcp --dport 8338 -j allowed
-A tcp_packets -s 150.170.66.224/32 -p tcp -m tcp --dport 38443 -j allowed
-A tcp_packets -s 150.170.66.224/32 -p tcp -m tcp --dport 48443 -j allowed
-A tcp_packets -s 150.170.66.224/32 -p tcp -m tcp --dport 8580 -j allowed
-A tcp_packets -s 150.170.66.224/32 -p tcp -m tcp --dport 8542 -j allowed
-A tcp_packets -s 150.170.66.224/32 -p tcp -m tcp --dport 8543 -j allowed
-A tcp_packets -s 150.170.66.224/32 -p tcp -m tcp --dport 8181 -j allowed
-A tcp_packets -s 150.170.66.224/32 -p tcp -m tcp --dport 5901 -j allowed
-A tcp_packets -s 150.170.66.224/32 -p tcp -m tcp --dport 5931 -j allowed
-A tcp_packets -s 150.170.66.224/32 -p tcp -m tcp --dport 4022 -j allowed
-A tcp_packets -s 150.170.66.224/32 -p tcp -m tcp --dport 8180 -j allowed
-A tcp_packets -s 150.170.66.224/32 -p tcp -m tcp --dport 2812 -j allowed
-A tcp_packets -s 150.170.66.224/32 -p tcp -m tcp --dport 8338 -j allowed
-A tcp_packets -s 150.170.66.224/32 -p tcp -m tcp --dport 38090 -j allowed
-A tcp_packets -s 150.170.66.224/32 -p tcp -m tcp --dport 8090 -j allowed
-A tcp_packets -s 150.170.66.224/32 -p tcp -m tcp --dport 9992 -j allowed
-A tcp_packets -s 200.92.34.98/32 -p tcp -m tcp --dport 22 -j allowed
-A tcp_packets -s 200.92.34.98/32 -p tcp -m tcp --dport 4422 -j allowed
-A tcp_packets -s 200.92.34.98/32 -p tcp -m tcp --dport 1521 -j allowed
-A tcp_packets -s 200.92.34.98/32 -p tcp -m tcp --dport 80 -j allowed
-A tcp_packets -s 200.92.34.98/32 -p tcp -m tcp --dport 81 -j allowed
-A tcp_packets -s 200.92.34.98/32 -p tcp -m tcp --dport 443 -j allowed
-A tcp_packets -s 200.92.34.98/32 -p tcp -m tcp --dport 8080 -j allowed
-A tcp_packets -s 200.92.34.98/32 -p tcp -m tcp --dport 38080 -j allowed
-A tcp_packets -s 200.92.34.98/32 -p tcp -m tcp --dport 48080 -j allowed
-A tcp_packets -s 200.92.34.98/32 -p tcp -m tcp --dport 8181 -j allowed
-A tcp_packets -s 200.92.34.98/32 -p tcp -m tcp --dport 8180 -j allowed
-A tcp_packets -s 200.92.34.98/32 -p tcp -m tcp --dport 8338 -j allowed
-A tcp_packets -s 200.92.34.98/32 -p tcp -m tcp --dport 38090 -j allowed
-A tcp_packets -s 200.92.34.98/32 -p tcp -m tcp --dport 8090 -j allowed
-A tcp_packets -s 200.92.34.98/32 -p tcp -m tcp --dport 9992 -j allowed
-A tcp_packets -s 130.66.84.42/32 -p tcp -m tcp --dport 22 -j allowed
-A tcp_packets -s 130.66.84.42/32 -p tcp -m tcp --dport 222 -j allowed
-A tcp_packets -s 130.66.84.42/32 -p tcp -m tcp --dport 4422 -j allowed
-A tcp_packets -s 130.66.84.42/32 -p tcp -m tcp --dport 10000 -j allowed
-A tcp_packets -s 130.66.84.42/32 -p tcp -m tcp --dport 35800 -j allowed
-A tcp_packets -s 130.66.84.42/32 -p tcp -m tcp --dport 1521 -j allowed
-A tcp_packets -s 130.66.84.42/32 -p tcp -m tcp --dport 1158 -j allowed
-A tcp_packets -s 130.66.84.42/32 -p tcp -m tcp --dport 8080 -j allowed
-A tcp_packets -s 130.66.84.42/32 -p tcp -m tcp --dport 81 -j allowed
-A tcp_packets -s 130.66.84.42/32 -p tcp -m tcp --dport 38080 -j allowed
-A tcp_packets -s 130.66.84.42/32 -p tcp -m tcp --dport 48080 -j allowed
-A tcp_packets -s 130.66.84.42/32 -p tcp -m tcp --dport 38443 -j allowed
-A tcp_packets -s 130.66.84.42/32 -p tcp -m tcp --dport 48443 -j allowed
-A tcp_packets -s 130.66.84.42/32 -p tcp -m tcp --dport 8181 -j allowed
-A tcp_packets -s 130.66.84.42/32 -p tcp -m tcp --dport 5901 -j allowed
-A tcp_packets -s 130.66.84.42/32 -p tcp -m tcp --dport 5931 -j allowed
-A tcp_packets -s 130.66.84.42/32 -p tcp -m tcp --dport 4022 -j allowed
-A tcp_packets -s 130.66.84.42/32 -p tcp -m tcp --dport 8180 -j allowed
-A tcp_packets -s 130.66.84.42/32 -p tcp -m tcp --dport 2812 -j allowed
-A tcp_packets -s 130.66.84.42/32 -p tcp -m tcp --dport 8338 -j allowed
-A tcp_packets -s 130.66.84.42/32 -p tcp -m tcp --dport 38090 -j allowed
-A tcp_packets -s 130.66.84.42/32 -p tcp -m tcp --dport 8090 -j allowed
-A tcp_packets -s 130.66.84.42/32 -p tcp -m tcp --dport 9992 -j allowed
-A tcp_packets -p tcp -m tcp --dport 80 -j allowed
-A tcp_packets -p tcp -m tcp --dport 443 -j allowed
-A tcp_packets -s 56.24.33.78/32 -p tcp -m tcp --dport 38080 -j allowed
-A tcp_packets -p tcp -m tcp --dport 38443 -j allowed
-A tcp_packets -s 90.102.190.35/32 -p tcp -m tcp --dport 48443 -j allowed
-A tcp_packets -s 80.45.145.90/32 -p tcp -m tcp --dport 48443 -j allowed
-A tcp_packets -p tcp -m tcp --dport 48443 -j allowed
-A tcp_packets -p tcp -m tcp --dport 35800 -j allowed
COMMIT

*nat
:PREROUTING ACCEPT [16853004:854147660]
:POSTROUTING ACCEPT [84788048:5689648140]
:OUTPUT ACCEPT [84788048:5689648140]
COMMIT
SSH timeouts as a result of inactivity can be quite irritating. This usually compels you to reinitiate the connection and start all over again.
Thankfully, you can easily increase the SSH timeout limit and keep your SSH session alive even after some inactivity. This happens when either the server or the client sends null packets to the other system to keep the session alive.
Related Read: How to Secure and Harden OpenSSH Server
Let’s now explore how you can increase the SSH connection timeout in Linux.
Increase SSH Connection Timeout
On the server, head over to the /etc/ssh/sshd_config configuration file.
$ sudo vi /etc/ssh/sshd_config
Scroll and locate the following parameters:
#ClientAliveInterval
#ClientAliveCountMax
The ClientAliveInterval parameter specifies the time in seconds that the server will wait before sending a null packet to the client system to keep the connection alive.
On the other hand, the ClientAliveCountMax parameter defines the number of client alive messages which are sent without getting any messages from the client. If this limit is reached while the messages are being sent, the sshd daemon will drop the session, effectively terminating the ssh session.
The timeout value is given by the product of the above parameters i.e.
Timeout value = ClientAliveInterval * ClientAliveCountMax
For example, let’s say you have defined your parameters as shown:
ClientAliveInterval  1200
ClientAliveCountMax 3
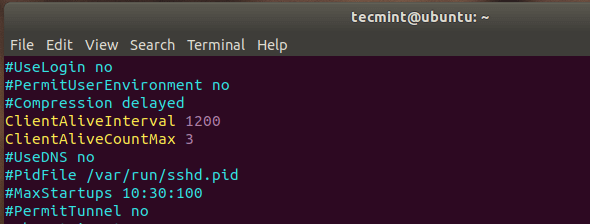
The Timeout value will be 1200 seconds * 3 = 3600 seconds. This is an equivalent of 1 hour, which implies that your ssh session will remain alive for idle time of 1 hour without dropping.
Alternatively, you can achieve the same result by specifying the ClientAliveInterval parameter alone.
ClientAliveInterval 3600
Once done, reload the OpenSSH daemon for the changes to come into effect.
$ sudo systemctl reload sshd
Conclusion
As an SSH security measure, it’s always advisable not to set the SSH timeout value to a huge value. This is to prevent someone from walking by and hijacking your session when you are away for an extended period of time. And that’s it for this topic.
If You Appreciate What We Do Here On TecMint, You Should Consider:
TecMint is the fastest growing and most trusted community site for any kind of Linux Articles, Guides and Books on the web. Millions of people visit TecMint! to search or browse the thousands of published articles available FREELY to all.
If you like what you are reading, please consider buying us a coffee ( or 2 ) as a token of appreciation.

We are thankful for your never ending support.