Содержание
- Непонятки с диском-появилась ошибка
- Непонятки с диском-появилась ошибка
- Непонятки с диском-появилась ошибка
- Непонятки с диском-появилась ошибка
- Непонятки с диском-появилась ошибка
- Непонятки с диском-появилась ошибка
- Непонятки с диском-появилась ошибка
- Непонятки с диском-появилась ошибка
- Непонятки с диском-появилась ошибка
- Непонятки с диском-появилась ошибка
- Непонятки с диском-появилась ошибка
- Непонятки с диском-появилась ошибка
- Непонятки с диском-появилась ошибка
- Непонятки с диском-появилась ошибка
- Непонятки с диском-появилась ошибка
- Непонятки с диском-появилась ошибка
- Re: Непонятки с диском-появилась ошибка
- Check and Repair Filesystem Errors With fsck Command in Linux
- Introduction to the fsck command
- Unmount the device before running fsck
- Understanding exit codes for the fsck command
- Practical usage of the fsck command
- Repair a USB disk and other removable devices
- Repair the root file system
- Отваливается ssd/ошибка nvme
Непонятки с диском-появилась ошибка
Установил ОС Линукс Минт 19.3-все работает нормально,но сегодня, при попытке исправить ошибки на диске, получил сообщение-error unmounting/dev/sda5:target is busy (udisks-error-quark,14) Что это такое и что с ним делать.Я не спец и поэтому спрашиваю в надежде что кто-нибудь подскажет решение.

Для выполнения проверки файловой системы на ошибки её нужно отмонтировать (отключить).
Если /dev/sda5 у тебя смонтирована как корневая файловая система или какая-либо часть корневой файловой системы, то тогда тебе нужно грузиться с LiveCD / LiveUSB диска и запускать проверку файловой системы на /dev/sda5.
Непонятки с диском-появилась ошибка
Да,смонтировано на Корень файловой системы. А если я отключу раздел(отмонтирую) данные не пропадут? Режим запущу и проверю раздел. Заранее благодарю.
А если я отключу раздел(отмонтирую) данные не пропадут?
Ничего не пропадёт если просто нормально отмонтировать. Другой вопрос, что там за ошибки появились, тут может и пропасть кое-что. И ещё вопрос: как раздел удалось примонтировать если он с ошибками, read only?
Непонятки с диском-появилась ошибка
А не легче будет ПОЛНОСТЬЮ переустановить систему?Как они,ошибки,появились?Я думаю,что просто до этого неправильно удалил один раздел-надо было в GParted,а я просто удалил в утилите Диски.
Если у тебя аппаратные проблемы с ЖД, переустановка системы не поможет от слова совсем.
Ты крайне невнятно описал проблему. Давай немного выводов:
Здесь тебе нужно подробнее рассказать, что делал и зачем.
Про переустановку Всеволод тебе пояснил.
Пусть сперва те выводы скинет, что я выше просил, узнаем хоть, как и что примонитровано. Попробуем прочекать после его ФС.
Потом надо быдет ещё smartmontools поставить и SMART у диска глянуть, если будет такая возможность.
А у Тебя далеко идущие планы :).
Ой, обычная ситуация. Смотрим сперва ФС, потом ЖД. Возможно, все не страшно и обойдется чеком.
Непонятки с диском-появилась ошибка
Хм, сейчас корень примонтирован у тебя в rw. Ладно, а что именно ты пытался исправить на диске, когда получил эту ошибку?
Непонятки с диском-появилась ошибка
Просто при попытке обновления-в частности ядра-получил это сообщение об ошибке.Да и при попытке исправить в утилите Диски получил эту ошибку.У меня один вопрос-с этой ошибкой «жить и работать» можно?Это я о компе.Сейчас ядро 5.4.0-48.
Непонятки с диском-появилась ошибка
Можно еще вопрос?Диск в норме?
Пока не знаю. У тебя какие-то непонятки с нумерацией разделов, ХЗ, чем вызваны. Но вроде не должны сильно мешать.
Все исправления/изменения производятся только на отмонтированных разделах, тут мог Диск и ругнуться.
А вот как ты ядро обновлял?
Непонятки с диском-появилась ошибка
Че? apt тут при чем? Я тебя какую команду выполнить просил?
Непонятки с диском-появилась ошибка
Ядро пытался обновить,но получил эту ошибку.Сейчас версия ядра 5.4.0-48
Что за ****** ты несешь?
Я так понимаю, эту ошибку можно получить при попытке отмонтировать раздел который в данный момент используется. Зачем его пытались отмонтировать?
sudo blkid -c /dev/null
Непонятки с диском-появилась ошибка
МЫ ПОТЕРЯЛИ ЕГО.
Непонятки с диском-появилась ошибка
Это я не тебе 🙂 ты просто долго не отвечал.
Непонятки с диском-появилась ошибка
Как ты пытался ядро обновить??
Непонятки с диском-появилась ошибка
Пришло обновление,пытался обновиться-получил эту ошибку. При попытке исправить в утилите Диски-этаже ошибка.
Непонятки с диском-появилась ошибка
Окей, я убедился. Теперь имеет смысл чекнуть ФС на ошибки. В Linux Mint это просто — в меню GRUB2 при загрузке выбираем rescue режим, а там fsck.
Непонятки с диском-появилась ошибка
Ну, мужик, Всеволод тебе написал — в rescue!!
Непонятки с диском-появилась ошибка
Ребята!Не ругайте меня сильно!Я прочитал,но как туда попасть-не знаю.Где взять этот grub2,если при загрузке я его НЕ ВИЖУ.
Esc нажать после BIOS. Выбрать rescue, там далее отдельный пункт fsck, чтобы вообще все за тебя автоматика сделала.
Или recovery — я уже забыл, как там это называется.
Непонятки с диском-появилась ошибка
Re: Непонятки с диском-появилась ошибка
Я бы туда не полез. Там темно и страшно, и гуя нету. Да и всё равно ОСь лучше переустановить, предварительно вдумчиво запланировав разметку. А то этот единственный пятый, да ещё на расширенном разделе, с имеющимися ошмётками под закос использования efi (остатки виндовсы, да?) — это как бы абздец в фундаменте твоей стройки. Оно, может быть, и так бы работало, но не всякое «ядро» при обновлении научено понимать такие замесы конструкций. Вот и не поняло чиво тут и где.
error unmounting/dev/sda5:target is busy
Подёргай шлейф, либо попробуй поменять интерфейсный кабель.
Можно также попробовать посмотреть в каком процессе участвует диск и попробовать придушить его.
Источник
Check and Repair Filesystem Errors With fsck Command in Linux
Sometimes bad things happen to good systems.
Fortunately, you’re a Linux user and you have fsck (file system check) to help with a potentially corrupted filesystem. This utility is used for checking and (optionally) repairing the file system.
There are several scenarios where you may want to use fsck. Typically, you would want to run this command if your system will not boot, a device (external drives or storage media) is not functioning properly, or if you have seen evidence of file corruption.
Fsck is a actually a «front-end» for a number of file system specific checkers like fsck.vfat, fsck.ext2, etc. These do not need to be specified, but you may be able to find more advanced options in the man pages of these more precise commands.
Introduction to the fsck command
The fsck command follows a pattern similar to most Linux commands.
If you do not specify a filesystem, the system will analyze your fstab file ( /etc/fstab ) for the devices to scan.
You will need to run the command either as root user or use it with sudo.
You can use fdisk or df command to list the hard drive in Linux. This way, you can specify which device to be checked with fsck command.
Unmount the device before running fsck
Do not run fsck on a mounted device, you will need to unmount the target first to avoid damage to your files.
If you try running fsck on a mounted device, you should see an error like this:
Running fsck on a normal, healthy drive looks like this:
While fsck accepts a device name like /dev/sda , you may elect to enter the UUID to avoid confusion with mounting and unmounting devices. The UUID is a fixed value assigned to your device and will not be affected by these system changes.
Understanding exit codes for the fsck command
This is a list of the codes that may be returned from fsck after inspecting a disk. Your exit code will be a sum of these codes if you analyze one disk. If you are using fsck on multiple devices, it will return the bit-wise OR of the two sums.
- 0 — No errors
- 1 — File system errors corrected
- 2 — System should be rebooted
- 4 — File system errors left uncorrected
- 8 — Operational error
- 16 — Usage or syntax error
- 32 — Fsck canceled by user request
- 128 — Shared library error
You can check the exit code of the last run command using echo $? command.
Practical usage of the fsck command
Now that you are a tad bit familiar with the fsck command, let’s see practical use cases of this command.
Repair a USB disk and other removable devices
For our purpose, let’s assume that you have already identified the problematic device /dev/sdb .
First, you need to make sure that the drive has been unmounted:
Now run the fsck command:
Check the output for any errors. If none displayed, check the exit code with echo $? .
There are also some option flags that we can add to allow some automated correction. These commands aren’t standardized though, and you should verify the filesystem type and compare documentation from that specific man page.
Despite that, generally you can use -p to allow fsck to automatically apply repairs.
Similarly, -y will apply corrections to any detected filesystem corruption.
Repair the root file system
You cannot unmount the root partition while the system is active. If you suspect your main file system is corrupted, you have to use a different approach here.
There are actually a few different options that you can use. You can run fsck at boot time, in rescue mode, or use a recovery-themed live cd.
Many Linux distributions will automatically force fsck at start up after a certain number of failed boot attempts. If you prefer to take matters into your own hands, you can schedule the system to do this ourselves.
Most modern Linux versions feature a tool called tune2fs.
Presuming your root device is dev/sda , this is the command you would enter.
Now, what’s actually happening is that you’re changing the system settings so that fsck is run every n number of boots (1 in the example). You could also set this to a standard time interval. The options are days, weeks, or months.
Let’s say that you want fsck to run any time that you boot if there hasn’t been a check in a week. You could use -i to specify the interval and the command would look like this.
If you’re using systemd, you can force run fsck at your next boot by entering the following:
Conclusion
You can always turn to the man-pages for more information. Just use man fsck in the terminal.
I hope you learned something new about the fsck command. If you have any comments or questions, please leave them below.
Источник
Отваливается ssd/ошибка nvme
Всем доброго времени суток. Прикупил себе INTEL SSD 7 и уже замучился с ним. Сначала оказалось, что он не полностью поддерживается моим ноутбуком аппаратно: версия чипсета ниже требуемой. Ладно, поставил загрузчик на прошлый hdd. Теперь, когда я работаю, спустя различные промежутки времени диск просто отваливается вместе со всей системой.
Memtest86+ ошибок не встречает
nvme_core.default_ps_max_latency_us=0 не помогает
обновление прошивки диска не помогло. Но диск стал отваливаться гораздо реже. Как правило это проиходит спустя короткий промежуток времени после запуска системы, либо вообще не происходит. Здесь либо новая версия ядра частично помогла, либо свежая прошивка диска.

Небось какое-нибудь энергосбережение виновато.

Тоже была проблема с SSD. Купил тупо подешевле, установил, а трим в линукс не работает. Беглое гугление показало, что производитель зафигачил прошивку, которая не подходит под мою материнку, хотя она обычная в общем, а новых прошивок не будет, так как компания уже почила в бозе, так что ничего не осталось, кроме как сдать назад.
Склоняюсь в эту же сторону. Попробую отключить.
Это какой-то заговор производителей) Как можно было предсказать ситуацию что в вашем, что в моем случае — не понятно. Версию чипсета в явном виде, например, нигде не публикуют. Модель разве что

А еще люди против белого списка совместимого оборудования )))
ты не написал про обновления прошивок на железках. Они последние?

S.M.A.R.T. диска дай
В моем случае на заговор не потянет — просто срубили бабла по-быстрому и самоликвидировались, а прошивку зафигачили ту, что была под рукой, за то коробка и оформление диска были на высоте, я ещё удивился, что так дёшево, относительно других. Просто перед этим у меня был положительный опыт с каким-то недорогим Adapta(так вроде бы), и линукс на нем погонял отлично, и в макбук потом засунул, всё без нареканий: трим работает, скорость отличная.
Хорошо, что не стал экономить на спичках и взял Samsung. Хотя тут скорей всего брак.
Прикрепил к шапке. Судя по выводу — все впорядке с диском.
белого списка совместимого оборудования
На материнку нет прошивок от производителя из достоверных источников. Поэтому страшно экспериментировать. На ssd проде бы нашел на сайте intel что-то. Буду пробовать.
Отключение энергосбережения параметром ядра nvme_core.default_ps_max_latency_us со значением 0 не помогло
Это из-за того, что диск отваливается постоянно с работающей системой, полагаю
Обновил прошивку на диске. Жду следующего падения

возможно поможет обновление драйвера nvme в биосе, например для моей платы z77-ds3h вендор вообще скипает инжект этого драйвера. но есть умельцы которые запили поддержку nvme + boot-target nvme.
proof
для других плат пошукать можно тут

возможно поможет обновление драйвера nvme в биосе, например для моей платы z77-ds3h вендор вообще скипает инжект этого драйвера.
Вот кстати да, у меня как-то было, что я купил nvme-диск, а он вообще никак на плате не заводился, хотя по спецификации модель была совместимая. Помогло обновление биоса платы до последней версии.
какой у тебя ssd ?
Моя плата — N150SD/N155SD. Для нее не нашел
Если ты мне, то в дампе смарта он есть —
AMI BIOS?
https://www.win-raid.com/t871f50-Guide-How-to-get-full-NVMe-support-for-all-S.
но на свой страх и риск
но в случае отсутствия плашки для перепрошивки биос-чипов и паяльной станции, я не стал бы рисковать.
Вам, товарищи, вообще лень торопиться что ли?
А еще люди против белого списка совместимого оборудования
Потому, что уже есть стандарты на протоколы и интерфейсы. Я вижу, что устройства чаще глючат сами по себе, а не совместно.
Никто не будет против, если будет стандарт на QVL в прошивке по категориям с большим покрытием и разными переключаемыми логиками, пользовательскими списками, пополняемые простым подтверждением (или сложней, но по желанию). Все же пора уже предохранять dma, usb4 на носу.
Источник
[sudo] пароль для valet:
root@pc-78:~# fdisk -l
Диск /dev/loop0: 55,3 MiB, 58007552 байт, 113296 секторов
Единицы: секторов по 1 * 512 = 512 байт
Размер сектора (логический/физический): 512 байт / 512 байт
Размер I/O (минимальный/оптимальный): 512 байт / 512 байт


Диск /dev/loop1: 290,4 MiB, 304545792 байт, 594816 секторов
Единицы: секторов по 1 * 512 = 512 байт
Размер сектора (логический/физический): 512 байт / 512 байт
Размер I/O (минимальный/оптимальный): 512 байт / 512 байт


Диск /dev/loop2: 30,3 MiB, 31735808 байт, 61984 секторов
Единицы: секторов по 1 * 512 = 512 байт
Размер сектора (логический/физический): 512 байт / 512 байт
Размер I/O (минимальный/оптимальный): 512 байт / 512 байт


Диск /dev/loop3: 31 MiB, 32432128 байт, 63344 секторов
Единицы: секторов по 1 * 512 = 512 байт
Размер сектора (логический/физический): 512 байт / 512 байт
Размер I/O (минимальный/оптимальный): 512 байт / 512 байт


Диск /dev/sda: 465,8 GiB, 500107862016 байт, 976773168 секторов
Единицы: секторов по 1 * 512 = 512 байт
Размер сектора (логический/физический): 512 байт / 4096 байт
Размер I/O (минимальный/оптимальный): 4096 байт / 4096 байт
Тип метки диска: dos
Идентификатор диска: 0xb389be3d

Устр-во    Загрузочный    начало     Конец   Секторы Размер Идентификатор Тип
/dev/sda2  *             1050624   2101247   1050624   513M             b W95 FA
/dev/sda3                2103294 975722495 973619202 464,3G             5 Расшир
/dev/sda4              975722496 976771071   1048576   512M             b W95 FA
/dev/sda5                2103296 975722495 973619200 464,3G            83 Linux

Раздел 3 начинается не на границе физического сектора.
Элементы таблицы разделов упорядочены не так, как на диске.
root@pc-78:~# lsblk
NAME   MAJ:MIN RM   SIZE RO TYPE MOUNTPOINT
loop0    7:0    0  55,3M  1 loop /snap/core18/1885
loop1    7:1    0 290,4M  1 loop /snap/vlc/1700
loop2    7:2    0  30,3M  1 loop /snap/snapd/9279
loop3    7:3    0    31M  1 loop /snap/snapd/9607
sda      8:0    0 465,8G  0 disk
├─sda2   8:2    0   513M  0 part
├─sda3   8:3    0     1K  0 part
├─sda4   8:4    0   512M  0 part
└─sda5   8:5    0 464,3G  0 part /
root@pc-78:~# cat /etc/fstab
# /etc/fstab: static file system information.
#
# Use 'blkid' to print the universally unique identifier for a
# device; this may be used with UUID= as a more robust way to name devices
# that works even if disks are added and removed. See fstab(5).
#
# <file system> <mount point>   <type>  <options>       <dump>  <pass>
# / was on /dev/sda6 during installation
UUID=ab2fdc9d-920b-424c-a2c5-75ca5a85de92 /               ext4    errors=remount-ro 0       1
/swapfile                                 none            swap    sw              0       0
root@pc-78:~# df -hT
Файл.система   Тип      Размер Использовано  Дост Использовано% Cмонтировано в
udev           devtmpfs   2,9G            0  2,9G            0% /dev
tmpfs          tmpfs      582M         1,4M  581M            1% /run
/dev/sda5      ext4       456G          68G  368G           16% /
tmpfs          tmpfs      2,9G          41M  2,9G            2% /dev/shm
tmpfs          tmpfs      5,0M         4,0K  5,0M            1% /run/lock
tmpfs          tmpfs      2,9G            0  2,9G            0% /sys/fs/cgroup
/dev/loop0     squashfs    56M          56M     0          100% /snap/core18/1885
/dev/loop1     squashfs   291M         291M     0          100% /snap/vlc/1700
/dev/loop2     squashfs    31M          31M     0          100% /snap/snapd/9279
tmpfs          tmpfs      582M          40K  582M            1% /run/user/1000
/dev/loop3     squashfs    31M          31M     0          100% /snap/snapd/9607
root@pc-78:~# cat /proc/mounts
sysfs /sys sysfs rw,nosuid,nodev,noexec,relatime 0 0
proc /proc proc rw,nosuid,nodev,noexec,relatime 0 0
udev /dev devtmpfs rw,nosuid,relatime,size=2940960k,nr_inodes=735240,mode=755 0 0
devpts /dev/pts devpts rw,nosuid,noexec,relatime,gid=5,mode=620,ptmxmode=000 0 0
tmpfs /run tmpfs rw,nosuid,noexec,relatime,size=595712k,mode=755 0 0
/dev/sda5 / ext4 rw,relatime,errors=remount-ro 0 0
securityfs /sys/kernel/security securityfs rw,nosuid,nodev,noexec,relatime 0 0
tmpfs /dev/shm tmpfs rw,nosuid,nodev 0 0
tmpfs /run/lock tmpfs rw,nosuid,nodev,noexec,relatime,size=5120k 0 0
tmpfs /sys/fs/cgroup tmpfs ro,nosuid,nodev,noexec,mode=755 0 0
cgroup /sys/fs/cgroup/unified cgroup2 rw,nosuid,nodev,noexec,relatime,nsdelegate 0 0
cgroup /sys/fs/cgroup/systemd cgroup rw,nosuid,nodev,noexec,relatime,xattr,name=systemd 0 0
pstore /sys/fs/pstore pstore rw,nosuid,nodev,noexec,relatime 0 0
cgroup /sys/fs/cgroup/cpu,cpuacct cgroup rw,nosuid,nodev,noexec,relatime,cpu,cpuacct 0 0
cgroup /sys/fs/cgroup/devices cgroup rw,nosuid,nodev,noexec,relatime,devices 0 0
cgroup /sys/fs/cgroup/freezer cgroup rw,nosuid,nodev,noexec,relatime,freezer 0 0
cgroup /sys/fs/cgroup/hugetlb cgroup rw,nosuid,nodev,noexec,relatime,hugetlb 0 0
cgroup /sys/fs/cgroup/rdma cgroup rw,nosuid,nodev,noexec,relatime,rdma 0 0
cgroup /sys/fs/cgroup/net_cls,net_prio cgroup rw,nosuid,nodev,noexec,relatime,net_cls,net_prio 0 0
cgroup /sys/fs/cgroup/memory cgroup rw,nosuid,nodev,noexec,relatime,memory 0 0
cgroup /sys/fs/cgroup/pids cgroup rw,nosuid,nodev,noexec,relatime,pids 0 0
cgroup /sys/fs/cgroup/blkio cgroup rw,nosuid,nodev,noexec,relatime,blkio 0 0
cgroup /sys/fs/cgroup/cpuset cgroup rw,nosuid,nodev,noexec,relatime,cpuset 0 0
cgroup /sys/fs/cgroup/perf_event cgroup rw,nosuid,nodev,noexec,relatime,perf_event 0 0
mqueue /dev/mqueue mqueue rw,relatime 0 0
systemd-1 /proc/sys/fs/binfmt_misc autofs rw,relatime,fd=42,pgrp=1,timeout=0,minproto=5,maxproto=5,direct,pipe_ino=12214 0 0
debugfs /sys/kernel/debug debugfs rw,relatime 0 0
hugetlbfs /dev/hugepages hugetlbfs rw,relatime,pagesize=2M 0 0
fusectl /sys/fs/fuse/connections fusectl rw,relatime 0 0
configfs /sys/kernel/config configfs rw,relatime 0 0
/dev/loop0 /snap/core18/1885 squashfs ro,nodev,relatime 0 0
/dev/loop1 /snap/vlc/1700 squashfs ro,nodev,relatime 0 0
/dev/loop2 /snap/snapd/9279 squashfs ro,nodev,relatime 0 0
tmpfs /run/user/1000 tmpfs rw,nosuid,nodev,relatime,size=595708k,mode=700,uid=1000,gid=1000 0 0
gvfsd-fuse /run/user/1000/gvfs fuse.gvfsd-fuse rw,nosuid,nodev,relatime,user_id=1000,group_id=1000 0 0
/dev/loop3 /snap/snapd/9607 squashfs ro,nodev,relatime 0 0
root@pc-78:~# ```
Hey friends,
Sorry if this is in the wrong section, mods, if so, please help me move it appropriately ![]()
The issue I’m having is with rebooting or powering off. It appears systemd is failing to unmount some devices and detaching DMs. Here’s the error I get at poweroff or reboot (which flashes across the screen briefly):
sd-umoun[3621]: Failed to unmount /oldroot: Device or resource busy
sd-umoun[3622]: Failed to unmount /oldroot/dev: Device or resource busy
shutdown[1]: Could not detach DM /dev/dm-2: Device or resource busy
shutdown[1]: Could not detach DM /dev/dm-0: Device or resource busy
shutdown[1]: Failed to finalize file systems, DM devices, ignoring.
My setup is fairly straightforward as this is a fresh/new install and I haven’t done much customization yet aside from installing some basic packages. My hardware is a Lenovo Carbon X1 Gen 8 which has a Skylake processor, Intel graphics (i915), 16gb RAM, and an NVME SSD.
I have two partitions on the NVME SSD: /dev/nvme0n1p1 is /boot (mounted as EFI boot partition) and /dev/nvme0n1p2 is a LUKS encrypted volume. Within the LUKS encrypted volume is LVM, with two logical volumes: one swap partition and one root partition.
To summarize the partitioning scheme, there is an EFI boot partition, and a root (ext4) and swap partition which both live in LVM on a LUKS encrypted partition.
I have the regular arch linux and linux-firmware packages and this repros 100% of the time using the default linux kernel. Additionally I have the zen kernel and this repros there as welll.
I use systemd-boot. My bootloader entry looks as follows (the zen kernel is identical aside from the vmlinuz-linux and initramfs):
title   Arch Linux
linux   /vmlinuz-linux
initrd  /intel-ucode.img
initrd  /initramfs-linux.img
options rd.luks.name=<UUID>=cryptlvm root=/dev/MyVolGroup/root resume=/dev/MyVolGroup/swap sysrq_always_enabled=1 rw quiet splash vt.global_cursor_default=0 loglevel=3 fbcon=nodefer nowatchdog
And mkinitcpio.conf (trimmed to uncommented lines only):
MODULES=(i915 vfat ext4)
BINARIES=()
FILES=()
HOOKS=(base systemd sd-plymouth autodetect keyboard modconf block sd-encrypt lvm2 fsck)
COMPRESSION="zstd"
COMPRESSION_OPTIONS=(-9)
And finally, my fstab entries (trimmed appropriately):
UUID=<UUID>	/         	ext4      	rw,noatime	0 1
UUID=<UUID>	/boot     	vfat      	rw,relatime,fmask=0022,dmask=0022,codepage=437,iocharset=ascii,shortname=mixed,utf8,errors=remount-ro,noauto,x-systemd.automount	0 2
UUID=<UUID>	none      	swap      	defaults  	0 0
One thing I should mention is that I’ve found mention of this here: https://bugs.archlinux.org/task/63697 — this alludes to either qemu or nvidia being the culprits (in some form or fashion), neither of which do I have installed. However, I _did_ notice that systemd-binftm.service is in a failed state, though I’ve not been able to figure out what the problem is. Disabling it completely, however, had zero impact on the primary issue mentioned in this thread regarding reboot/shutdown.
I…would like to figure out what’s up with binfmt but am not sure whether or not that is a red herring as far as the primary issue is concerned.
Any help would be appreciated. I’m concerned that I keep failing to unmount filesystems at poweroff/reboot and that there’s potential for disk corruption, especially since these NVME drives aren’t cheap. Thanks.
Last edited by cloverskull (2021-11-02 18:25:06)
| View previous topic :: View next topic | |||||||||||||||||||||||||||
| Author | Message | ||||||||||||||||||||||||||
|---|---|---|---|---|---|---|---|---|---|---|---|---|---|---|---|---|---|---|---|---|---|---|---|---|---|---|---|
| jordanh n00b Joined: 10 Oct 2021 |
|
||||||||||||||||||||||||||
| Back to top |
|
||||||||||||||||||||||||||
| Zucca Moderator 
Joined: 14 Jun 2007 |
|
||||||||||||||||||||||||||
| Back to top |
|
||||||||||||||||||||||||||
| jordanh n00b Joined: 10 Oct 2021 |
|
||||||||||||||||||||||||||
| Back to top |
|
||||||||||||||||||||||||||
| freke l33t Joined: 23 Jan 2003 |
|
||||||||||||||||||||||||||
| Back to top |
|
||||||||||||||||||||||||||
| jordanh n00b Joined: 10 Oct 2021 |
|
||||||||||||||||||||||||||
| Back to top |
|
||||||||||||||||||||||||||
| NeddySeagoon Administrator 
Joined: 05 Jul 2003 |
|
||||||||||||||||||||||||||
| Back to top |
|
||||||||||||||||||||||||||
| jordanh n00b Joined: 10 Oct 2021 |
|
||||||||||||||||||||||||||
| Back to top |
|
||||||||||||||||||||||||||
| NeddySeagoon Administrator
Joined: 05 Jul 2003 |
|
||||||||||||||||||||||||||
| Back to top |
|
||||||||||||||||||||||||||
| jordanh n00b Joined: 10 Oct 2021 |
|
||||||||||||||||||||||||||
| Back to top |
|
||||||||||||||||||||||||||
| NeddySeagoon Administrator
Joined: 05 Jul 2003 |
|
||||||||||||||||||||||||||
| Back to top |
|
||||||||||||||||||||||||||
| jordanh n00b Joined: 10 Oct 2021 |
|
||||||||||||||||||||||||||
| Back to top |
|
||||||||||||||||||||||||||
| pietinger Moderator Joined: 17 Oct 2006 |
|
||||||||||||||||||||||||||
| Back to top |
|
||||||||||||||||||||||||||
| NeddySeagoon Administrator
Joined: 05 Jul 2003 |
|
||||||||||||||||||||||||||
| Back to top |
|
||||||||||||||||||||||||||
| jordanh n00b Joined: 10 Oct 2021 |
|
||||||||||||||||||||||||||
| Back to top |
|
||||||||||||||||||||||||||
| figueroa Advocate 
Joined: 14 Aug 2005 |
|
||||||||||||||||||||||||||
| Back to top |
|
||||||||||||||||||||||||||
|

|
You cannot post new topics in this forum |
-
#1
Hello!
I recently updated from Proxmox VE 6.x to 7.1, on a system which was set up maybe on 5.x with root on ZFS. I read about the issue with booting zfs and read the web page about it at https://pve.proxmox.com/wiki/ZFS:_Switch_Legacy-Boot_to_Proxmox_Boot_Tool. I seem to have exactly the setup up described there, which should be updated.
I also want to move my boot disk from one 512GB nvme drive to another one, so I have the second one blank and ready to play with. /dev/nvme0n1 is the currently-running Proxmox rpool disk and /dev/nvme1n1 is the disk I’m trying to first set up correctly with proxmox-boot-tool and then move my rpool to that disk (not sure how I’ll do that yet).
Here is the disk layout on the currently running (old) disk:
Code:
Using /dev/nvme0n1
(parted) print
Model: Samsung SSD 970 PRO 512GB (nvme)
Disk /dev/nvme0n1: 512GB
Sector size (logical/physical): 512B/512B
Partition Table: gpt
Disk Flags:

Number  Start   End     Size    File system  Name  Flags
 1      17.4kB  1049kB  1031kB                     bios_grub
 2      1049kB  512GB   512GB   zfs          zfs
 9      512GB   512GB   8389kB
So on the new disk I created gpt partition table with partition 1 starting at 1MB size 512MB for the vfat booter, and partition 2 for the rest of the disk. Then I run the boot tool to format:
Code:
# proxmox-boot-tool format /dev/nvme1n1p1 --force
UUID="781D-2BD9" SIZE="536870912" FSTYPE="vfat" PARTTYPE="0fc63daf-8483-4772-8e79-3d69d8477de4" PKNAME="nvme1n1" MOUNTPOINT=""
Setting partition type of '/dev/nvme1n1p1' to 'c12a7328-f81f-11d2-ba4b-00a0c93ec93b'..
The operation has completed successfully.
Calling 'udevadm settle'..
Formatting '/dev/nvme1n1p1' as vfat..
mkfs.fat 4.2 (2021-01-31)
Done.
and then init
Code:
# proxmox-boot-tool init /dev/nvme1n1p1
Re-executing '/usr/sbin/proxmox-boot-tool' in new private mount namespace..
UUID="8B61-4540" SIZE="536870912" FSTYPE="vfat" PARTTYPE="c12a7328-f81f-11d2-ba4b-00a0c93ec93b" PKNAME="nvme1n1" MOUNTPOINT=""
Mounting '/dev/nvme1n1p1' on '/var/tmp/espmounts/8B61-4540'.
Installing grub i386-pc target..
Installing for i386-pc platform.
grub-install.real: warning: this GPT partition label contains no BIOS Boot Partition; embedding won't be possible.
grub-install.real: warning: Embedding is not possible.  GRUB can only be installed in this setup by using blocklists.  However, blocklists are UNRELIABLE and their use is discouraged..
grub-install.real: error: will not proceed with blocklists.
looks bad, so I check
Code:
# proxmox-boot-tool status
Re-executing '/usr/sbin/proxmox-boot-tool' in new private mount namespace..
E: /etc/kernel/proxmox-boot-uuids does not exist.
no go. look at partition table
Code:
# parted /dev/nvme1n1
GNU Parted 3.4
Using /dev/nvme1n1
Welcome to GNU Parted! Type 'help' to view a list of commands.
(parted) print
Model: Samsung SSD 970 PRO 512GB (nvme)
Disk /dev/nvme1n1: 512GB
Sector size (logical/physical): 512B/512B
Partition Table: gpt
Disk Flags:

Number  Start   End    Size   File system  Name     Flags
 1      1049kB  538MB  537MB  fat32        primary  boot, esp
 2      538MB   512GB  512GB               primary
What am I doing wrong? The instruction lead me to believe that doing this will allow me to boot the current (old) boot disk, though eventually I will want it to boot rpool from partition 2 on the same disk and I’ll remove the old disk. Thanks.
-
#2
I think you need a bios_grub partition from the (unaligned) start of the drive up to the (currently) first partition for GRUB. I don’t know how to do that with parted, but gdisk (using the expert menu to change alignment first) can create a EF02 partition from sector 34 to 2047.
-
#3
I guess I was hoping somehow magically grub didn’t need any other space, but it makes sense. Not only that, IT WORKS! Thank you avw!
Code:
# parted /dev/nvme1n1
GNU Parted 3.4
Using /dev/nvme1n1
Welcome to GNU Parted! Type 'help' to view a list of commands.
(parted) print
Model: Samsung SSD 970 PRO 512GB (nvme)
Disk /dev/nvme1n1: 512GB
Sector size (logical/physical): 512B/512B
Partition Table: gpt
Disk Flags:

Number  Start   End     Size    File system  Name     Flags
 3      17.4kB  1049kB  1031kB               primary  bios_grub
 1      1049kB  538MB   537MB   fat32        primary  boot, esp
 2      538MB   512GB   512GB                primary
Code:
# proxmox-boot-tool init /dev/nvme1n1p1
Re-executing '/usr/sbin/proxmox-boot-tool' in new private mount namespace..
UUID="8B61-4540" SIZE="536870912" FSTYPE="vfat" PARTTYPE="c12a7328-f81f-11d2-ba4b-00a0c93ec93b" PKNAME="nvme1n1" MOUNTPOINT=""
Mounting '/dev/nvme1n1p1' on '/var/tmp/espmounts/8B61-4540'.
Installing grub i386-pc target..
Installing for i386-pc platform.
Installation finished. No error reported.
Unmounting '/dev/nvme1n1p1'.
Adding '/dev/nvme1n1p1' to list of synced ESPs..
Refreshing kernels and initrds..
Running hook script 'proxmox-auto-removal'..
Running hook script 'zz-proxmox-boot'..
No /etc/kernel/cmdline found - falling back to /proc/cmdline
Copying and configuring kernels on /dev/disk/by-uuid/8B61-4540
    Copying kernel 5.13.19-2-pve
    Copying kernel 5.4.151-1-pve
Generating grub configuration file ...
Found background image: /usr/share/images/desktop-base/desktop-grub.png
Found linux image: /boot/vmlinuz-5.13.19-2-pve
Found initrd image: /boot/initrd.img-5.13.19-2-pve
Found linux image: /boot/vmlinuz-5.4.151-1-pve
Found initrd image: /boot/initrd.img-5.4.151-1-pve
done
Now… to clone my rpool. Hmm.
-
#4
If it were an MBR disk I would not need that… but GPT for the win.
-
#5
… for those playing along, even thought the new partition for zfs was a bit smaller, I was able to attach it to rpool so I briefly had a mirror (resilvered super fast), then detach the original boot drive. Shut down, pull original drive, reboot. Had to fix boot priorities in my UEFI/Bios but then it booted and so far seems happy.


Я уже писал о реанимации отвалившихся дисков NVMe. В первом случае у меня рассыпался namespace:
Реанимация NVMe диска в Linux
Вот втором случае namespace остался целым, но диск выпал из устройств PCI:
Реанимация NVMe диска в Linux — 2
Сегодня у нас очень похожий случай, NVMe диск выпал из устройств PCI, из mdadm массива, соответственно тоже. Если раньше реанимация проводилась на RAID1 массивах, то сегодня пострадал RAID10. Возможно, именно из-за этого процедура восстановления оказалась чуть сложнее.
Итак, тестовый стенд представляет собой сервер с операционной системой Oracle Linux. В сервере четыре NVME диска Samsung, которые объединены в зеркальный программный RAID10 массив.
Samsung SSD MZPLJ12THALA-00007 — NVMe 12.8 ТБ
Помимо этого в сервере есть ещё два NVME диска Samsung, которые объединены в зеркальный программный RAID1 массив.
Samsung SSD 3.2TB PCIe MZPLJ3T2HBJR-00007
Один из NVMe дисков в RAID10 массиве на сервере перестал работать. Массив, собранный с помощью mdadm, перешёл в состояние degraded. Сработал мониторинг, начинаем разбираться в ситуации. Сервер перезагружать нельзя, будем чинить прямо так.
Посмотрим состояние массивов:
cat /proc/mdstat
В массиве md30 работают три из четырёх дисков: [U_UU]. В качестве дисков массиву переданы четыре раздела:
- /dev/nvme0n1p1
- /dev/nvme2n1p1
- /dev/nvme3n1p1 (F)
- /dev/nvme5n1p1
По значку (F) видно, что /dev/nvme3n1p1 — faulty. Посмотрим подробности:
mdadm --detail /dev/md30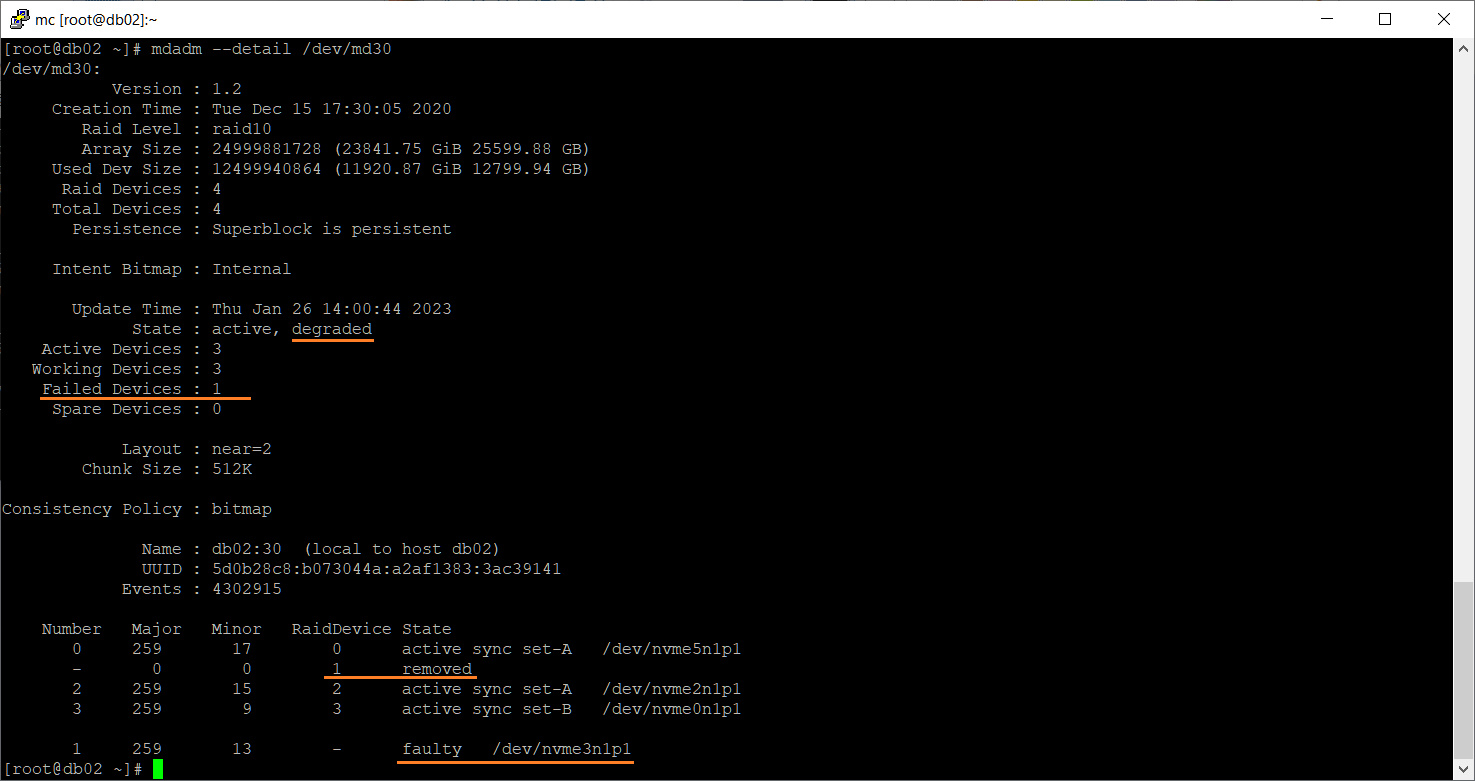
А диск-то у нас из массива не удалился на этот раз. Он числится в массиве и помечен как сбойный.
Посмотреть информацию об NVMe дисках можно с помощью утилиты nvme из пакета nvme-cli:
NVMe Command Line Interface (NVMe-CLI)
yum install nvme-cli
или
apt install nvme-cli

nvme list
Однако, утилита не смогла обнаружить диск /dev/nvme3n1. Видим пять устройств, а должно быть шесть. Можно посмотреть, определяется ли диск как PCI устройство командой lspci.
lspci | grep -E "NVMe|Non-Volatile"Диски бывают разные, у меня Samsung, можно и по-другому вычислить:
lspci | grep Samsung04:00.0 Non-Volatile memory controller: Samsung Electronics Co Ltd Device a824 41:00.0 Non-Volatile memory controller: Samsung Electronics Co Ltd Device a824 44:00.0 Non-Volatile memory controller: Samsung Electronics Co Ltd Device a824 47:00.0 Non-Volatile memory controller: Samsung Electronics Co Ltd Device a824 84:00.0 Non-Volatile memory controller: Samsung Electronics Co Ltd Device a824 87:00.0 Non-Volatile memory controller: Samsung Electronics Co Ltd Device a824
В списке присутствуют все шесть NVMe дисков из обоих RAID массивов. Нам нужно определить адрес сбойного диска.
cd /sys/bus/pci/drivers/nvme/
ll
Сравниваем два списка.
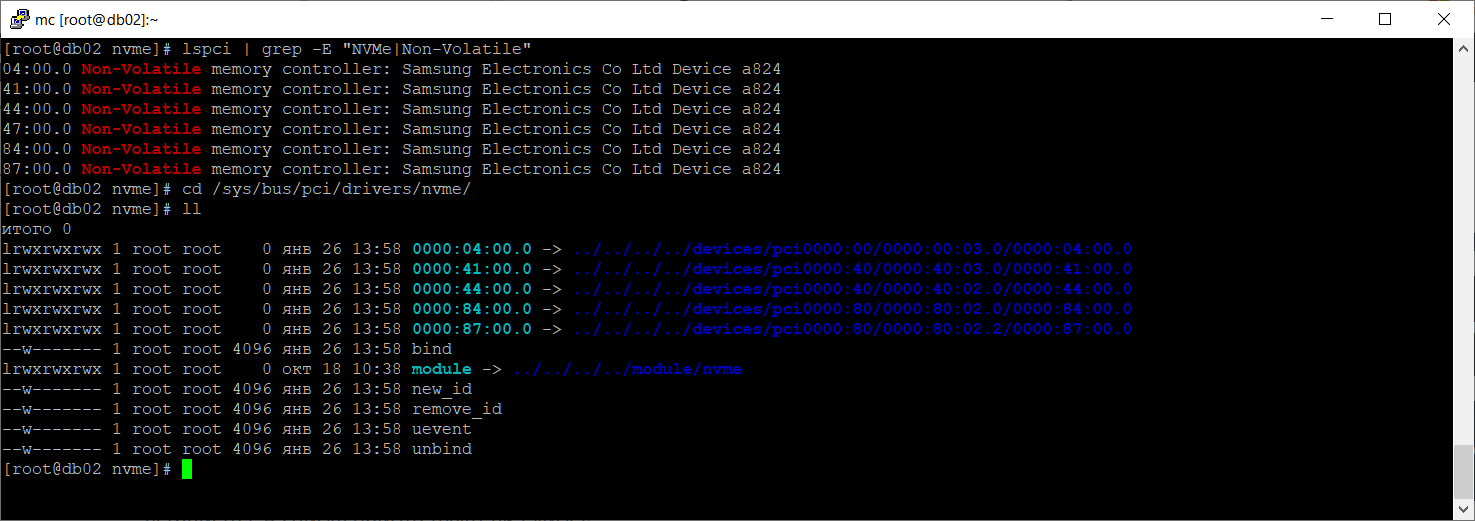
Драйвер устройства 0000:47:00.0 отсутствует, остальные есть. Удаляем отсутствующий диск из списка устройств и заново сканируем PCI.
echo 1 > /sys/bus/pci/devices/0000:47:00.0/remove
echo 1 > /sys/bus/pci/rescan
Здесь самое важное, не удалить что-нибудь не то. Если ошибиться с диском, то можно потерять данные.
nvme list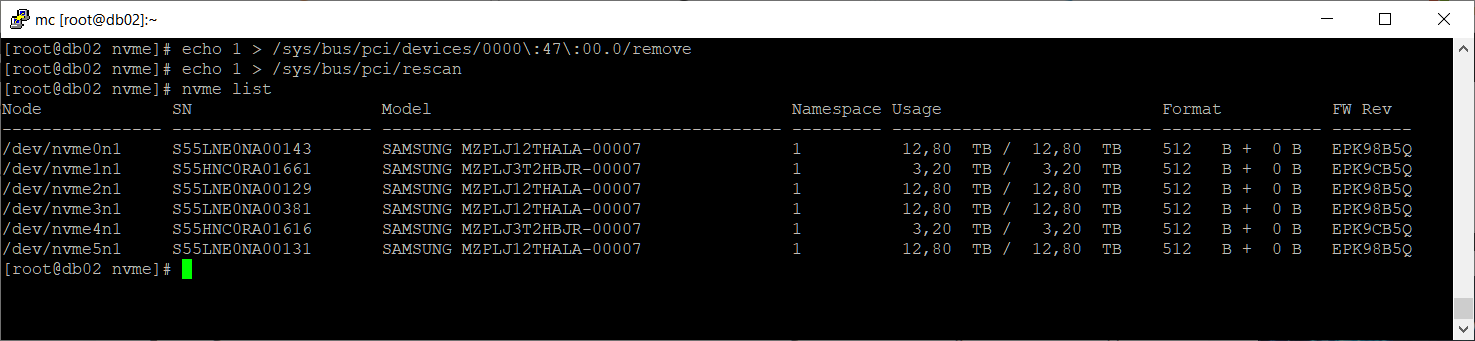
Диск /dev/nvme3n1 появился. Проверим ошибки:
nvme smart-log /dev/nvme3n1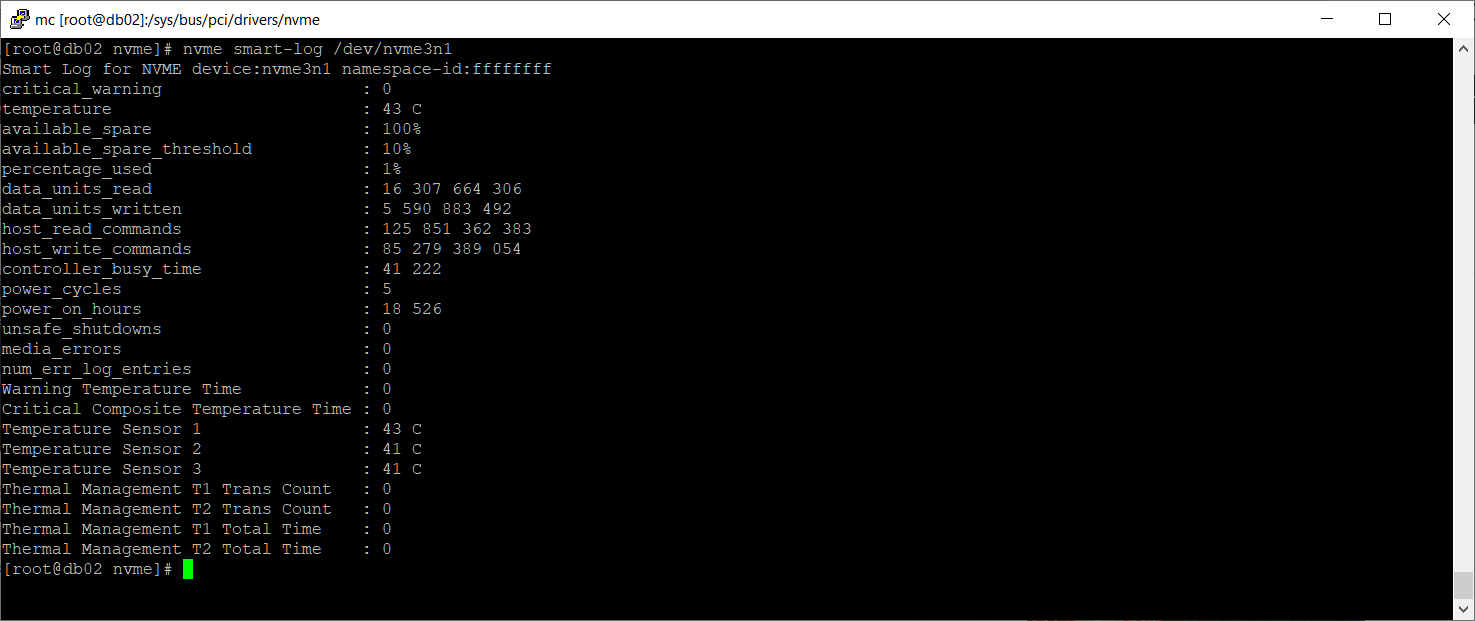
Странно, ошибок нет. Вероятно, сбой произошёл не по причине неисправности диска. Проверим namespace:
nvme id-ns /dev/nvme3n1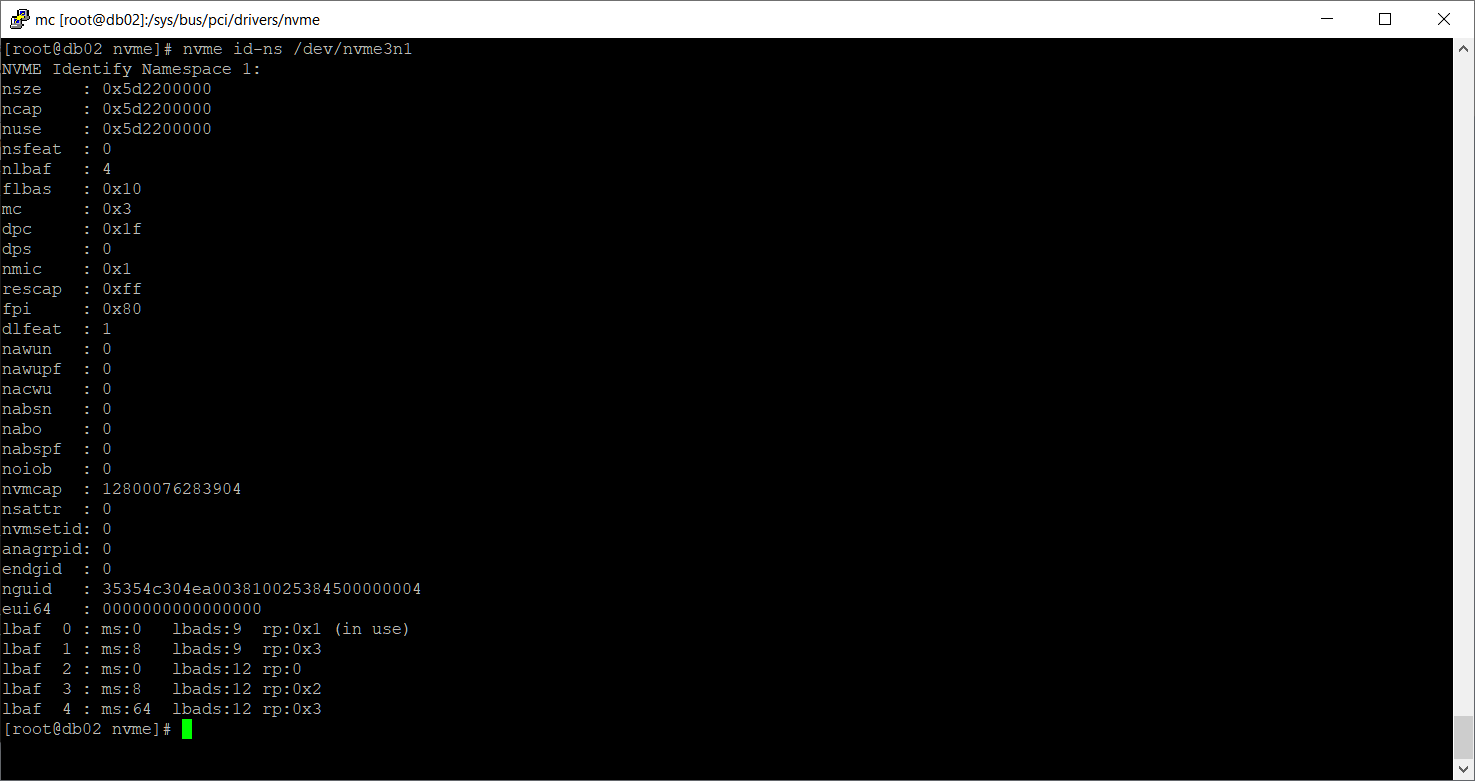
Namespace существует. Посмотрим раздел.
lsblk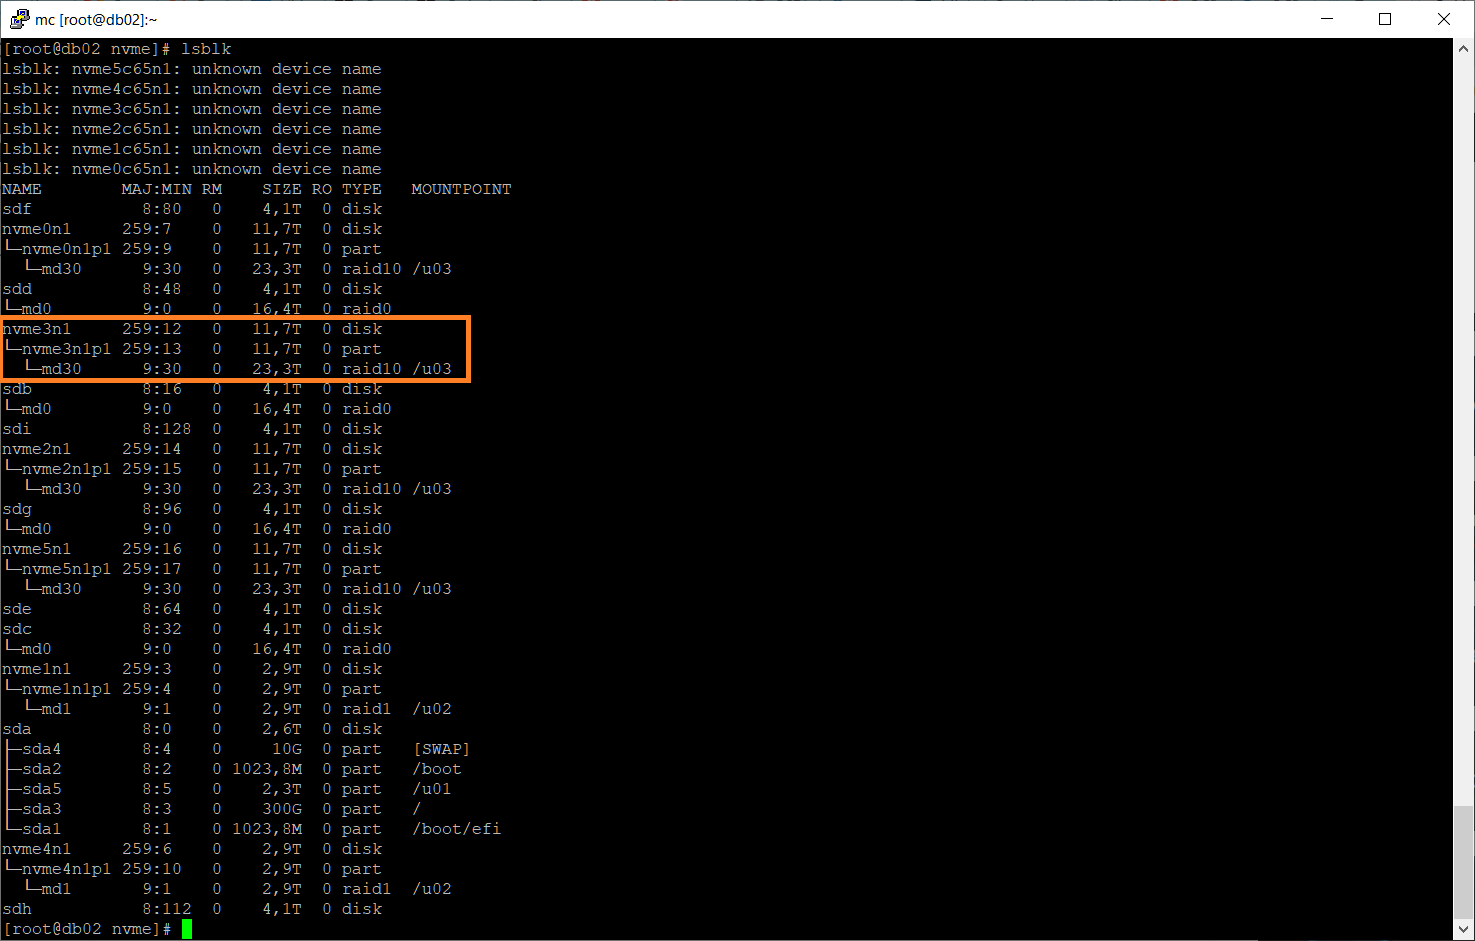
Раздел /dev/nvme3n1p1 существует. Поскольку раздел ещё числится в массиве как сбойный, выкинем его оттуда:
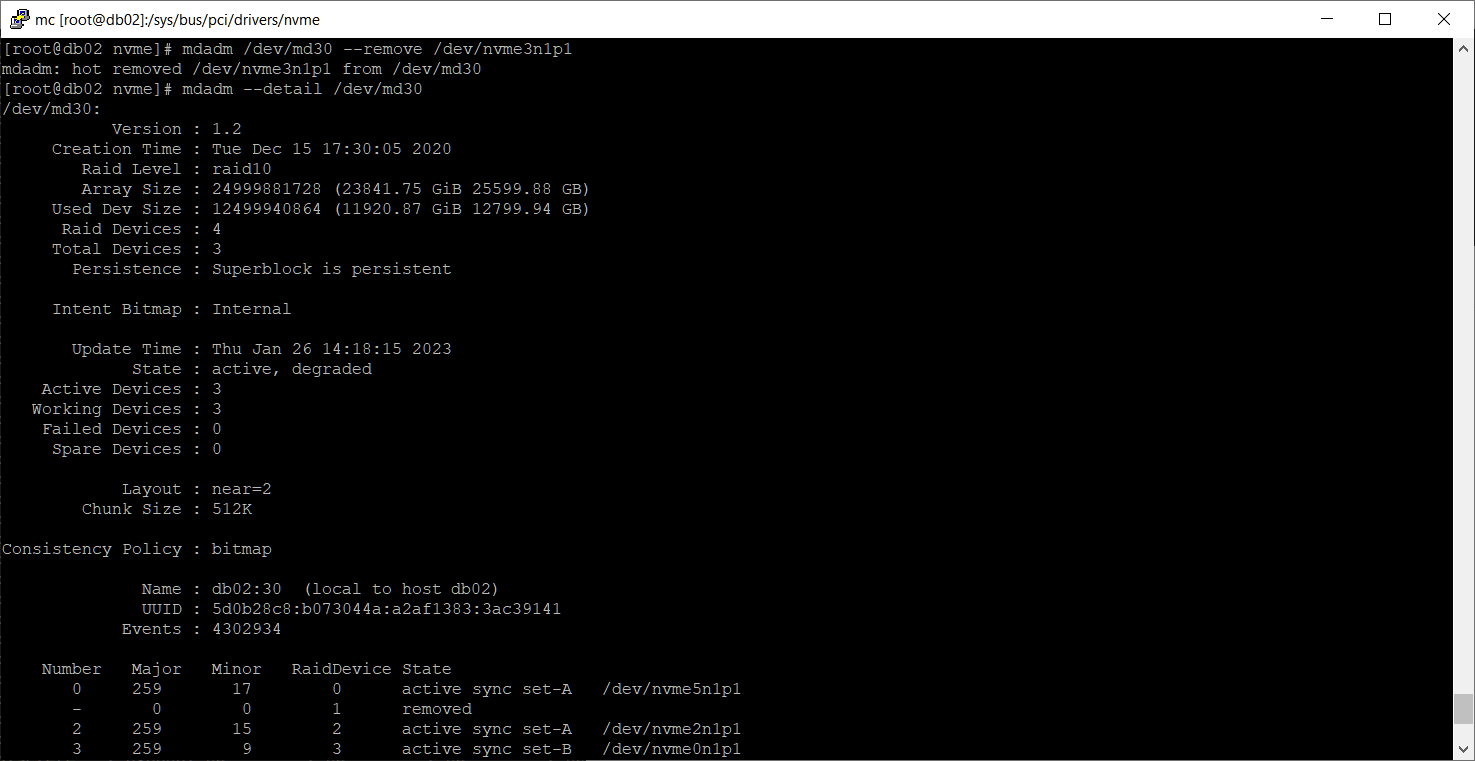
mdadm /dev/md30 --remove /dev/nvme3n1p1
mdadm --detail /dev/md30
Теперь сбойных дисков в массиве не числится.
Возвращаем диск в массив.
mdadm /dev/md30 --add /dev/nvme3n1p1
cat /proc/mdstat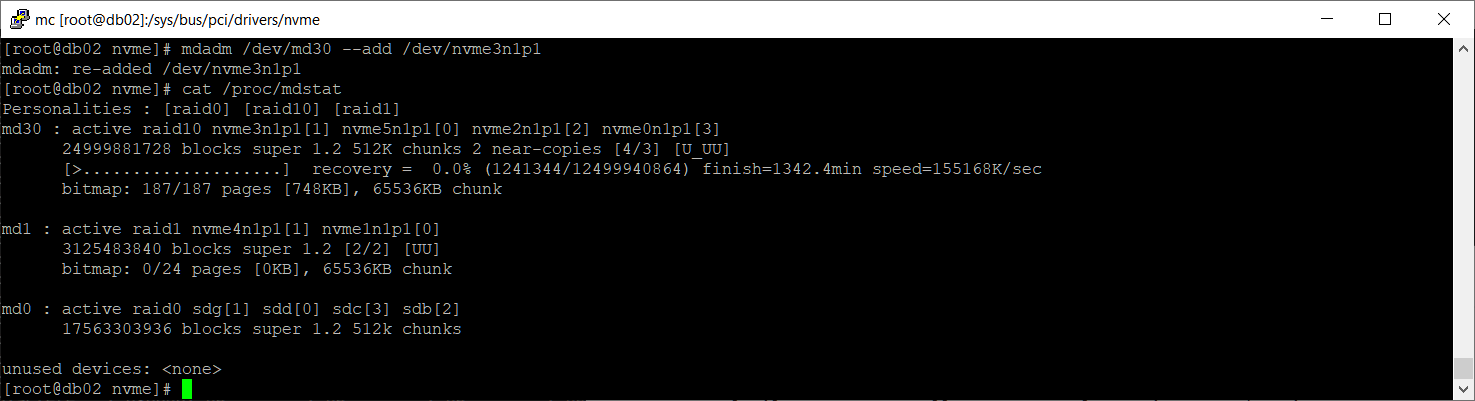
Массив начал восстанавливаться.
mdadm --detail /dev/md30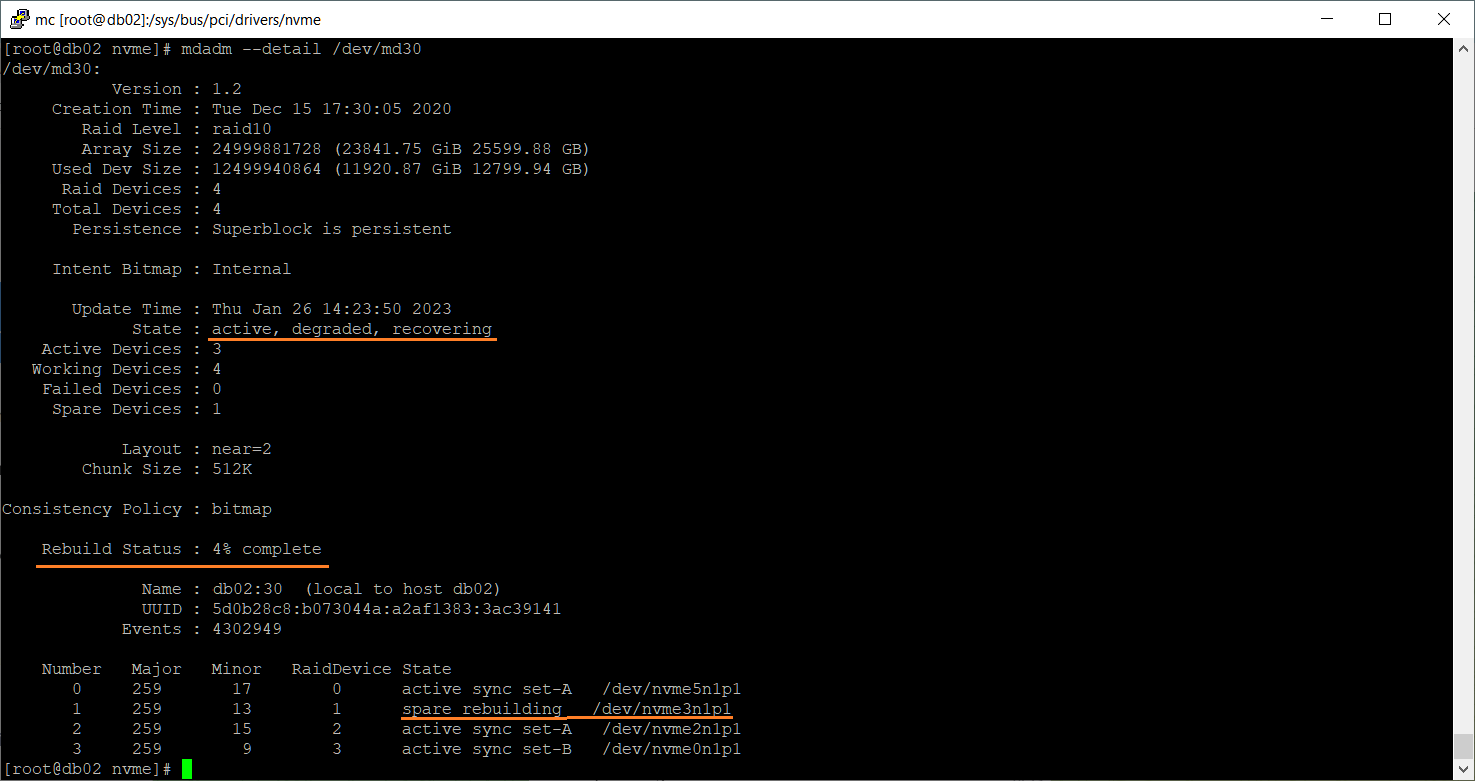
Осталось дождаться окончания процедуры перестроения массива.
Ссылки
Реанимация NVMe диска в Linux
Реанимация NVMe диска в Linux — 2