Содержание
- Cisco Collab Engineering Tips
- Michael White – CCIE #26626
- Choosing the correct OVA for deployment… it matters.
- Installation and Upgrade Guide for Cisco Unified Intelligence Center Release 11.0(1)
- Bias-Free Language
- Book Title
- Upgrades
- Results
- Chapter: Upgrades
- Upgrades
- About Upgrades
- Procedure
- Download Unified Intelligence Center Upgrade File
- Procedure
- Refresh Upgrade
- Upgrade VMware vSphere ESXi
- Virtual Machine Parameters to Support Refresh Upgrade
- Procedure
- Install the Upgrade COP File
- Before you begin
- Procedure
- Upgrade Unified Intelligence Center
- Before you begin
- Procedure
- Upgrade VMware Tools
- Procedure
- Change NIC Adapter Type
- Procedure
- Support for Aligned Partitions
- Procedure
- Access Unified OS Administration
- Procedure
- Upgrade From DVD/CD
- Procedure
- Upgrade From Remote Filesystem
- Procedure
- Revert to Previous Version
- Pre-requisites to Revert to Versions 10.x
- Procedure
- Procedure to revert to previous version
- Procedure
Cisco Collab Engineering Tips
Michael White – CCIE #26626
Choosing the correct OVA for deployment… it matters.
I’ve seen a couple customers run into an ugly issue that isn’t pleasant to resolve.
After upgrading their VOS (voice operating system)-based application (CUCM, CUC, CCX, etc.) to a new version the server boots and throws this warning/error:
The cause is all the cases that I’ve reviewed was the correct OVA not being used in the original deployment:
- Deploying without using an OVA at all (VMWare admin building the machine by hand)
- Deploying the incorrect OVA for the version of ESX you are on (e.g. vmv7 version with ESXi 5 rather than the correct vmv8 version).
- Deploying the incorrect OVA for the version of the application (e.g. deploying the CCX 10 OVA for the build of CCX9 and then upgrading to CCX10).
My process during a migration:
Know which version of the VOS app you are going to install; know the version of ESX you are running on and use the appropriate OVA.
For example if I had a production CUCM system on v9.1(2) and ESXi 5.5 and was replicating the CUCM system to a test environment to take it to v10.5, I must deploy the OVA for CUCM 9.1 vmv8 on the test environment. I’d DRS out/in and then upgrade the test environment to v10.5. (I would NOT deploy the v10.5 OVA for the 9.1 migration installation.) This migration example would not require the use of the 10.5 OVA at all.
Now for CUCM I’d actaully use Prime Collaboration Deployment to make this process MUCH easier (which WOULD use the v10.5 OVA). But for other apps like CUC or UCCX which don’t have PCD support yet, I’d use that process.
If you get a system with the error
The fix is ugly.
Workaround:
To correct the unaligned disk partitions you must:
1) Take a DRS backup of the system
2) Deploy a new virtual machine from an updated version of the OVA and
perform a fresh install of the previously-unaligned virtual machine. Details can be found
on this Virtualization DocWiki page:
http://docwiki.cisco.com/wiki/Implementing_Virtualization_Deployments
3) Perform a restore on the freshly-installed node, using the DRS backup taken in step 1
More Info:
If your virtual machine has unaligned disk partitions Cisco cannot provide support for
performance issues. The steps in the Workaround must be followed to put the virtual
machine in a supported state.
Once everything is on v10.x, RHEL6 (used in VOS 10.x) automatically aligns partitions. So this should not be an issue in the future once cured on your 9.x system.
Источник
Installation and Upgrade Guide for Cisco Unified Intelligence Center Release 11.0(1)
Bias-Free Language
The documentation set for this product strives to use bias-free language. For the purposes of this documentation set, bias-free is defined as language that does not imply discrimination based on age, disability, gender, racial identity, ethnic identity, sexual orientation, socioeconomic status, and intersectionality. Exceptions may be present in the documentation due to language that is hardcoded in the user interfaces of the product software, language used based on RFP documentation, or language that is used by a referenced third-party product. Learn more about how Cisco is using Inclusive Language.
Book Title
Installation and Upgrade Guide for Cisco Unified Intelligence Center Release 11.0(1)
Upgrades
View with Adobe Reader on a variety of devices
View in various apps on iPhone, iPad, Android, Sony Reader, or Windows Phone
View on Kindle device or Kindle app on multiple devices
Results
Chapter: Upgrades
Upgrades
This section explains how to upgrade Unified Intelligence Center software with engineering specials, minor releases, and maintenance releases as they become available.
An upgrade typically happens in place and requires no hardware change. To continue with Upgrade, see About Upgrades. To upgrade, you must obtain the upgrade executable file and then apply it using Access Cisco Unified OS Administration.
About Upgrades
From this release, to perform an upgrade of Unified Intelligence Center to 11.0(1), you must first perform an upgrade to 10.x from the previous versions and then upgrade to 11.0(1). For information on upgrade to 10.x, see http://www.cisco.com/c/en/us/support/customer-collaboration/unified-intelligence-center/tsd-products-support-series-home.html
The upgrade takes less than 1 hour. Perform a DRS backup on the primary Unified Intelligence Center server. To access the DRS application, direct your browser to https:// IP address of Unified Intelligence Center server:8443/drf. For more information, see the online help provided with the DRS application.
Before starting the software upgrade, back up your system data using the Disaster Recovery system application. For more information about backup, see the Administration Console User Guide for Cisco Unified Intelligence Center.
Upgrade and restart the Controller node first. Then upgrade and restart the members. All nodes must be on the same version of Unified Intelligence Center.
Two bootable partitions exist on your system: an active, bootable partition and an inactive, bootable partition. The system boots up and operates entirely on the partition that is marked as the active partition. Upgrade software installs on the inactive partition. The system continues to function normally on the active partition during the upgrade installation on the inactive partition.
When you are ready, you initiate a Switch Version action. You can do this using a CLI command utils system switch-version. You can also do it in the Cisco Unified OS Administration interface. The switch version action activates the inactive partition. The system reboots to the newly active (formerly inactive) partition that is running the new upgrade software. The preupgrade version of the software is in the inactive partition and remains there until the next upgrade.
Your configuration information moves automatically to the upgraded version in the active partition.
All configuration information in Unified Intelligence Center 10.x are preserved across an upgrade to Unified Intelligence Center 11.0(1), except in the case of the following scenario:
Procedure
Upgrade from 10.x to 11.0(1).
Perform a switchback to 10.x accordingly.
Log into Intelligence Center Administration page in 10.x and make new configuration changes.
Switch over to 11.0(1), the new configuration changes are not migrated when you switch over.
In the above scenario, if you make any configuration changes in 10.x release after a switchback, perform a full upgrade to Unified Intelligence Center 11.0(1) to reflect all the configuration changes.

Note
Note |
Database changes are stored on the database in the active partition. The database on the inactive partition does not get updated. If you make changes to the database after an upgrade and then decide to revert to the pre-upgrade software on the inactive partition, you must repeat those changes after switching the partition. |
Existing customers using VMware EXSi 4.x should first migrate to VMWare EXSi 5.1 or 5.5 before upgrading to Unified Intelligence Center 11.0(1).
Download Unified Intelligence Center Upgrade File
You might receive an upgrade file directly from Cisco Systems, but in most cases, you must download the file from the Cisco Systems Website.
Note
Note |
The download process on Cisco.com changes periodically. The following process was in place at the time this Installation doc was prepared. |
Procedure
Point your browser to the Download Software page for Cisco Unified Intelligence Center : https://software.cisco.com/download/type.html?mdfid=282163829&i=rm, and click the Unified Intelligence Center Software link.
Navigate to the folder and subfolder for the release you want.
Select the Unified Intelligence Center installer .iso file and click Download .
After successful log in, accept the license agreement and download/save the file to the desired location.
Do not rename the file before you install it, because if you do, the system will not recognize it as a valid file.
Do not unzip or untar the file. If you do, the system may not be able to read the upgrade files.
Make this file available on all nodes.
Refresh Upgrade
You can perform a refresh upgrade from 10.x to 11.0(1) on publisher and subscriber nodes of Unified Intelligence Center. Before you begin upgrade, perform a backup, for more information see About Upgrades.
VMware tools upgrade must be performed only on Unified Intelligence Center 10.x or 11.0(1). For Unified Intelligence Center 10.x, upgrade the VMware tools before applying the refresh upgrade COP and changing the virtual machine parameters Virtual Machine Parameters to Support Refresh Upgrade. For more information on VMware tools, see http://docwiki.cisco.com/wiki/VMware_Tools.
Upgrade VMware vSphere ESXi
If you use VMware vCenter Server in your deployment, upgrade VMware vCenter Server before upgrading VMware vSphere ESXi.
Upgrade VMWare vSphere ESXi on Side A and Side B servers to the latest version supported with this release of Packaged CCE . Packaged CCE uses standard upgrade procedures, which you can find using VMware documentation (https://www.vmware.com/support/pubs/).
Virtual Machine Parameters to Support Refresh Upgrade
Before you perform a refresh upgrade to 11.x, modify the following virtual machine settings: Red Hat Enterprise Linux version, Network Adapter, Memory and Video Card.
Procedure
Power down the virtual machine.
From VMWare VSphere , select the virtual machine > Edit Settings .
The Virtual Machine Properties window appears.
In the Options tab, select General Options and update the Guest Operating System from Red Hat Enterprise Linux 4(32-bit) to Red Hat Enterprise Linux 6(64-bit). Click OK .
Again select the virtual machine > Edit Settings . In the Hardware tab, update the following parameters:
Memory > Memory Size > 10GB
If you do not modify the memory size to 10GB, this message Warning! Old OVA detected. Update your OVA displays post an upgrade in the Cisco Unified Intelligence Center Administration and Command Line Interface page.
Video Card > Total Video Memory > 8MB
Power on the virtual machine and continue with the refresh upgrade.
Install the Upgrade COP File
Follow the steps to install the upgrade COP file using the Unified Intelligence Center Command line interface (CLI).
You can also install the COP using the upgrade procedure in the Cisco Unified Operating System Administration web interface. For details see the chapter on Access Unified OS Administration in the Unified Intelligence Center Installation and Upgrade document.
Note |
| Step 3 |
In a cluster setup, install the COP on the publisher node and restart it. Only then proceed with installation on all the subscriber nodes.
Before you begin
Unified Intelligence Center Release 10.x must be installed or upgraded on your system. Download the COP file ciscocuic.refresh_upgrade_v1.6.cop.sgn from the download software page for Cisco Unified Intelligence Center: https://software.cisco.com/download/home/282163829/type/282377062/release/11.6%25281%2529 to the SFTP server that can be accessed from the Unified Intelligence Center 10.x system.
Procedure
Log in to Unified Intelligence Center CLI and specify the System Administration username and password.
Enter the command utils system upgrade initiate to initiate the COP installation.
Select Remote File System from source list page.
Enter the remote path to the directory on the SFTP server where you have downloaded the COP file.
If the COP file is located on a Linux or UNIX server, you must enter a forward slash (/) at the beginning of the directory path. For example, if the COP file is in the patches directory, enter /patches . If the COP file is located on a Windows server, check with your system administrator for the correct directory path.
Enter the SFTP server name or IP address and then enter the credentials.
It is optional for you to enter the SMTP Host Server name.
Select the transfer protocol as SFTP. The system displays the list of COP files available in the SFTP location.
Select the number corresponding to the COP file that you want to install and press Enter .
Enter Yes when you are prompted to start installation. After COP installation, restart the box. If this is a single node, your installation ends here.
In a cluster setup, if this installation was performed on a publisher node, restart the box and then proceed with installation on the subscriber nodes (restart this procedure for every node in cluster).
Upgrade Unified Intelligence Center
Follow the steps to install the ISO file using the Unified Intelligence Center Command line interface (CLI).
You can also install the ISO using the upgrade procedure in the Cisco Unified Operating System Administration web interface. For details see Access Unified OS Administration in the Unified Intelligence Center Installation and Upgrade document.
Before you begin
Before you begin the refresh upgrade, check if the COP ciscocuic.refresh_upgrade_v1.6.cop.sgn is applied on the base version 10.x . Download the ISO file from the download software page for Cisco Unified Intelligence Center: https://software.cisco.com/download/home/282163829/type/282377062/release/11.6%25281%2529 to the SFTP server that can be accessed from the Cisco Unified Intelligence Center 10.x system.
Procedure
Log in to Unified Intelligence Center CLI and specify the System Administration username and password.
Enter the command utils system upgrade initiate to initiate the ISO installation.
Select Remote File System from source list page.
Enter the remote path to the directory on the SFTP server where you have downloaded the ISO file.
If the ISO file is located on a Linux or UNIX server, you must enter a forward slash (/) at the beginning of the directory path. For example, if the COP file is in the patches directory, enter / patches . If the ISO file is located on a Windows server, check with your system administrator for the correct directory path.
Enter the SFTP server name or IP address and then enter the credentials.
It is optional for you to enter the SMTP Host Server name.
Select the transfer protocol as SFTP. The system displays the list of ISO files available in the SFTP location.
Select the number corresponding to the ISO file that you want to install and press Enter.
Enter yes when you are prompted Switch to new version if the upgrade is successful (yes/no) and yes when you are prompted Start Refresh Upgrade (yes/no) .
Verify if the node is upgraded to 11.x, after successful switch version (where active version is 11.x and inactive version is 10.x).
In cluster setup, first complete the refresh upgrade on the publisher node and perform the refresh upgrade on the subscriber node. After successful upgrades, perform switch version using command utils system switch-version first on the publisher node and later on the subscriber nodes .
Verify if the nodes are upgraded to 11.x, after successful switch version of the publisher node and subscriber nodes (where active version is 11.x and inactive version is 10.x ).
Upgrade VMware Tools
Use this procedure to upgrade VMware tools from the VMware vSphere Client followed by the CLI command.
To upgrade VMware tools for Cisco Unified Intelligence Center:
Procedure
Power on the virtual machine.
Right-click the VM and select Guest > Install/Upgrade VMware Tools .
Select the Interactive Tools Upgrade option and click OK .
Open the administrator console and log in to command prompt.
Run the command utils vmtools refresh and confirm.
The server automatically reboots twice. This process takes a few minutes.
After reboot, from the vSphere client, select the VM and click the Summary tab.
Check for the VMware Tools status is “Running (Current)”.
Change NIC Adapter Type
Procedure
Power down the virtual machine.
From VMware VSphere, select the virtual machine > Edit Settings.
The Virtual Machine Properties window appears.
To add the new Network Adapter, on the Hardware tab, click Add . The Add Hardware window appears.
Select Device Type , Ethernet Adapter , Next . Select the adapter type VMXNET3 , Next, and click Finish.
To remove the existing Network Adapter 1, under the Hardware tab, select Network Adapter 1 , click Remove , and select OK .
Power on the virtual machine.
Support for Aligned Partitions
Unified Intelligence Center now supports aligned partitions, only if you perform a fresh install. If you perform an upgrade from the previous release, the platform detects the unaligned partitions and displays the following error: ERROR-UNSUPPORTED: Partitions unaligned
Unified Intelligence Center continues to function with unaligned partitions. However, to remove this error and benefit from aligned partitions, perform a fresh installation.
To support aligned partitions following an upgrade, perform these steps:
Procedure
Upgrade Unified intelligence Center to 11.0.
Perform a backup on the primary server using the Disaster Recovery System (DRS) application. Direct your browser to https://FQDN of cuic server:8443/drf to access the DRS application.
Perform fresh installation of Unified Intelligence Center 11.0.
Perform a restore from your backup using the DRS application. For more information on backup, see the Administration Console User Guide for Cisco Unified Intelligence Center 11.0(1) .
Access Unified OS Administration
Procedure
Enter http://x.x.x.x/cmplatform , where x.x.x.x is the IP address of the node.
Sign in using the username and password of the system administrator account.
Select Software Upgrades > Install/Upgrade to display the Software Installation/Upgrade page.
Figure 1. Software Upgrade Page 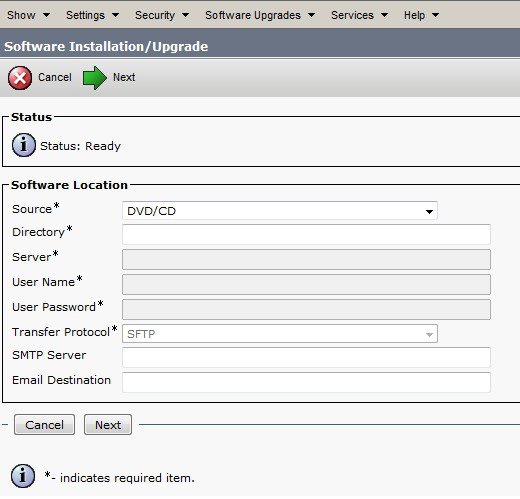
Upgrade From DVD/CD
Follow these steps if a DVD/CD is the source for your install or upgrade.
Procedure
Prepare a writeable DVD and insert it into the disc drive on the server that is to be upgraded.
Select DVD/CD from the Source list on the Software Upgrades > Install/Upgrade page .
In the Directory field, enter the path to the upgrade file.
If the file is in the root directory, enter a slash (/) in the Directory field.
To continue the upgrade process, click Next .
Choose the upgrade version that you want to install and click Next .
In the next window, monitor the progress of the download. If you encounter difficulties, see the Frequently Asked Question section.
When the download completes, Click Next .
If you want to install the upgrade and automatically reboot to the upgraded partition, choose Reboot to upgraded partition . The system restarts running the upgraded software.
If you want to install the upgrade and then manually reboot to the upgraded partition at a later time, do the following:
Choose Do not reboot after upgrade .
Click Next . The Upgrade Status window displays the Upgrade log.
When the installation completes, click Finish .
To restart the system and activate the upgrade, choose Settings > Version , and then click Switch Version .
The system restarts running the upgraded software.
Clear the browser cache and cookies manually before you start working on the new version of Unified Intelligence Center. For more information about clearing the cache and cookies, see your browser-specific documentation.
Upgrade From Remote Filesystem
Follow these steps if Remote Filesystem is the source for your install or upgrade.
Procedure
Choose Remote Filesystem from the Source list on the Software Upgrades > Install/Upgrade page.
Enter the path to the directory that contains the patch file on the remote system in the Directory field.
If the upgrade file is on a Linux or Unix server, you must enter a forward slash at the beginning of the directory path. For example, if the upgrade file is in the patches directory, enter /patches . If the upgrade file is on a Windows server, check with your system administrator for the correct directory path.
In the Server field, enter the server name or IP address.
In the User Name field, enter your username on the remote server.
In the User Password field, enter your password on the remote server.
Select the transfer protocol from the Transfer Protocol field.
To continue the upgrade process, click Next .
In the next window, monitor the progress of the download. If you encounter difficulties, see the Frequently Asked Question section.
When the download completes, click Next .
If you want to install the upgrade and automatically reboot to the upgraded partition, choose Reboot to upgraded partition . The system restarts running the upgraded software.
If you want to install the upgrade and then manually reboot to the upgraded partition at a later time, do the following:
Choose Do not reboot after upgrade .
Click Next . The Upgrade Status window displays the Upgrade log.
When the installation completes, click Finish .
To restart the system and activate the upgrade, choose Settings > Version , and then click Switch Version .
The system restarts running the upgraded software.
Note |
| Step 6 |
| Step 6 |
| Step 6 |
| Step 3 |
| Step 4 |
| Note | It takes about half an hour to complete the Switch Version and the restart. |
Step 12
Clear the browser cache before you start working on the new version of Unified Intelligence Center. For more information about clearing the cache and cookies, see your browser-specific documentation.
Revert to Previous Version
After upgrading, you can revert to the software version that was running before the upgrade, by restarting your system and switching to the software version on the inactive partition .
Note |
All nodes must be running the same version of Unified Intelligence Center. Reverting is an all-or-none operation when you operate a cluster of Unified Intelligence Center nodes. |
Pre-requisites to Revert to Versions 10.x
Before reverting to 10.x you have to follow the VM Parameter changes on CUIC 11.0(1).
Procedure
Power down the virtual machine.
From VMware VSphere, select the virtual machine > Edit Settings. The Virtual Machine Properties window appears.
To add the new Network Adapter, on the Hardware tab, click Add . The Add Hardware window appears.
Select Device Type, Ethernet Adapter, next select the adapter type E1000, next and click Finish.
To remove the existing Network Adapter 1(VMXNET3), under the Hardware tab, select Network Adapter 1, click Remove and select OK .
Procedure to revert to previous version
You can do this in two ways. You can use the CLI command utils system switch-version on each node.
You can also use the user interface in the Unified OS Administration.
Follow these steps to revert using Unified OS Administration:
Procedure
Open Unified OS Administration page entering the following URL: https://server-name/cmplatform, where server-name is the hostname or IP address of the node.
Sign in using the system administrator credentials.
Choose Settings > Version .
This opens the Version Settings screen, which shows the software version on both the active and inactive partitions. To switch versions and restart, click Switch Versions . When the system restarts, it boots to the now-active (formerly inactive) partition with your migrated data in place.
Источник
I’ve seen a couple customers run into an ugly issue that isn’t pleasant to resolve.
After upgrading their VOS (voice operating system)-based application (CUCM, CUC, CCX, etc.) to a new version the server boots and throws this warning/error:
VMware Installation: 2 vCPU Intel(R) Xeon(R) CPU E5640 @ 2.67GHz, disk 1: 80Gbytes, disk
2: 80Gbytes, 6144Mbytes RAM, ERROR-UNSUPPORTED: Partitions unaligned
The cause is all the cases that I’ve reviewed was the correct OVA not being used in the original deployment:
- Deploying without using an OVA at all (VMWare admin building the machine by hand)
- Deploying the incorrect OVA for the version of ESX you are on (e.g. vmv7 version with ESXi 5 rather than the correct vmv8 version).
- Deploying the incorrect OVA for the version of the application (e.g. deploying the CCX 10 OVA for the build of CCX9 and then upgrading to CCX10).
My process during a migration:
Know which version of the VOS app you are going to install; know the version of ESX you are running on and use the appropriate OVA.
For example if I had a production CUCM system on v9.1(2) and ESXi 5.5 and was replicating the CUCM system to a test environment to take it to v10.5, I must deploy the OVA for CUCM 9.1 vmv8 on the test environment. I’d DRS out/in and then upgrade the test environment to v10.5. (I would NOT deploy the v10.5 OVA for the 9.1 migration installation.) This migration example would not require the use of the 10.5 OVA at all.
Now for CUCM I’d actaully use Prime Collaboration Deployment to make this process MUCH easier (which WOULD use the v10.5 OVA). But for other apps like CUC or UCCX which don’t have PCD support yet, I’d use that process.
If you get a system with the error
ERROR-UNSUPPORTED: Partitions unaligned
The fix is ugly.
Workaround:
To correct the unaligned disk partitions you must:
1) Take a DRS backup of the system
2) Deploy a new virtual machine from an updated version of the OVA and
perform a fresh install of the previously-unaligned virtual machine. Details can be found
on this Virtualization DocWiki page:
http://docwiki.cisco.com/wiki/Implementing_Virtualization_Deployments
3) Perform a restore on the freshly-installed node, using the DRS backup taken in step 1
More Info:
If your virtual machine has unaligned disk partitions Cisco cannot provide support for
performance issues. The steps in the Workaround must be followed to put the virtual
machine in a supported state.
Once everything is on v10.x, RHEL6 (used in VOS 10.x) automatically aligns partitions. So this should not be an issue in the future once cured on your 9.x system.
CUC Manager CLI Access
From the Command-Line Interface we can perform various tasks that maybe we need to in the event of an emergency, like maybe reset the Administrative password or we can start and restart a service, that’s also very helpful. We could even shut down the system or switch between versions. What the system does is if you have upgraded from a previous version it keeps that. So maybe things aren’t going so well on the new upgraded version we can revert back to an older version that was running properly. So there is a whole bunch of commands. There are show commands, you can use a question mark to see what all the optional parameters are. There is even a set parameters and disable, unset is the disable. There is a File to manage files on the system. There’s a Run to start a process on the system. And we can use the up and down arrows for the command history.
Command Line Interface is starting up, please wait …
Welcome to the Platform Command Line Interface
VMware Installation:
2 vCPU: Intel(R) Xeon(R) CPU E5-2430 0 @ 2.20GHz
Disk 1: 80GB, ERROR-UNSUPPORTED: Partitions unaligned
2048 Mbytes RAM
admin:
delete*
file*
help
license*
quit
run*
set*
show*
unset*
utils*
The error which you are seeing above is because the CUCM wasn’t installed by using the OVA files provided by Cisco. Basically there is nothing to worry about if you are using such installation for demo or lab purposes.
Now be careful, even though you are kind of protected from yourself out there you could inadvertently change something that could make the operation of that server not so good, not so stable. So be careful when you are out there looking, try not to do too many changes when you are out there. Try not to delete parameters unless you really know that that is something that you need to do, so that you don’t bring that server down.
As Administrators there might be different levels of Administrators, I call it, that you want to have accessing the system. Some of them you might only want to give them a read-only view. Maybe it’s somebody who just adds users to the system and you don’t want them in managing phones and devices and other things, but you want them to be able to see that information, that’s your read-only. There is also no access, so you can deny people from even getting into certain areas. And then there is full access, which allows you to view and modify everything that is out there. And with this roles, we really setup groups and there is a group of resources, it’s on a menu basis in our applications and for standard roles we already have created the CCM End users and the CCM Administrative user accounts. There are other accounts out there too if you take a look, but we can go in and setup custom roles, and basically what happens is we go into that role and we say what particular menus we want them to have access to and then we give them the appropriate permissions, if it’s read or if it’s full access, whatever it is that we want to take place.
Custom Roles
In order to setup custom roles, which I highly advise, you need to know that the areas where we can do this is based on applications. The full-blown Administrative page, then we’ve got Serviceability, we’ve also got the Telephone Interface, that would be users. Then we also have the Database, Extension Mobility and then of course the end user themselves that can manage their own web pages. Now let’s say that I want to give someone access to manage route patterns, what I go in and do is I would say “okay, I want to have the Communications Manager Administrative application accessible to them and I would want to choose the menu option for the route pattern”, and now I would say whether or not they had no access read/full control and I would assign that to them.
User Management: Groups
Now to assign that user the permission, for example, to access that route pattern I would setup a group. And this is going to be a list of the application users and/or end-users that I want to have access to this resource. So, I would add a user group first, then I would add the user that I have created to the group, then assign that role, in my example that route pattern Administrator I would sign that role to the group. Now users that are within that group are going to have those appropriate permission. If we have two different groups and we’ve got a couple of different roles and resources and two different permission levels, what if I was a member of both? What is the default? Well the default is the maximum privilege level. So if I had full and read I would get full, right because that is the maximum level. So I would want to make sure too as I set these up that I take a look and make sure that I am not inadvertently giving someone permissions that they shouldn’t have to access certain resources.
Default and Custom Roles
Utilizing the default roles – there are some roles that are setup with phones, users and gateways. And the Administrator has no access to anything else in this default role. But we can create a new group and assign the relevant default roles to it. So you can see these different roles, Gateway Management, Phone Management, User Management. We assign all of those to the group, so now that user has permission to go in and manage those devices.
Now we can also create custom roles. So the Administrator can configure phones and users, and we can view a Calling Search Spaces and Partition configuration as well. We don’t want to have the Administrator to have any access to anything else, so we’ll create a new role specify the resources and then assign the custom role to that group.
Our Recommended Premium CCNA Training Resources
Операционная система Windows 7 до сих пор лидирует по количеству пользователей среди всех версий этой ОС. Несмотря на то, что уже давно вышло несколько новых, включая Windows 10. Продукты компании Microsoft стоят достаточно дорого, поэтому большинство используют пиратские версии. Любой продукт этой компании необходимо активировать специальными утилитами. Иногда возникают проблемы с активацией, и пользователи сталкиваются с сообщением Unsupported partition table в Виндовс Loader. Как поступить в этой ситуации, вы узнаете из этой статьи.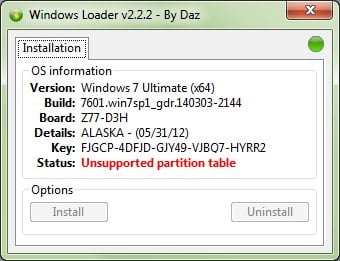
Содержание
- Причины, по которым появляется сообщение
- Решение ошибки
- Активация Виндовс 7 при помощи Windows Loader
- Как отформатировать диск GPT в MBR
Причины, по которым появляется сообщение
Данная ошибка в Виндовс 7 может появляться по нескольким причинам. Одна из самых распространенных — активатор блокирует встроенное программное обеспечение. При этом в активаторе может быть статус об успешной активации, но в системном окне все равно указана ограниченная версия на 30 дней. Проблема появляется и при установке ОС, когда в компьютере установлено несколько дисков с разной файловой архитектурой.
Читайте, как устранить ошибку: не удается подключиться к службе Windows.
Решение ошибки
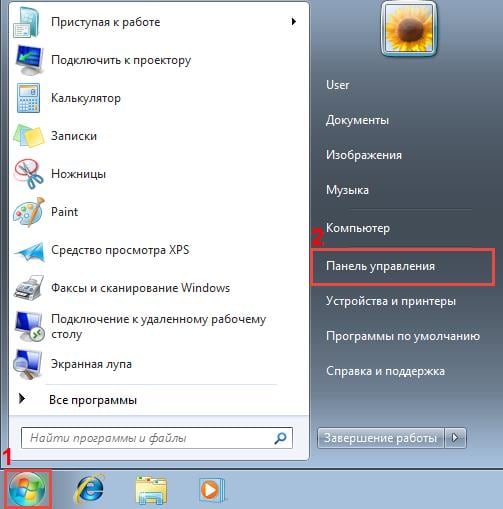
Чтобы решить ошибку при активации системы, необходимо для начала сделать, чтобы система показала скрытые данные. Для этого:
- Выберите большую кнопку «Пуск» и нажмите справа в открывшемся окне «Панель управления»;

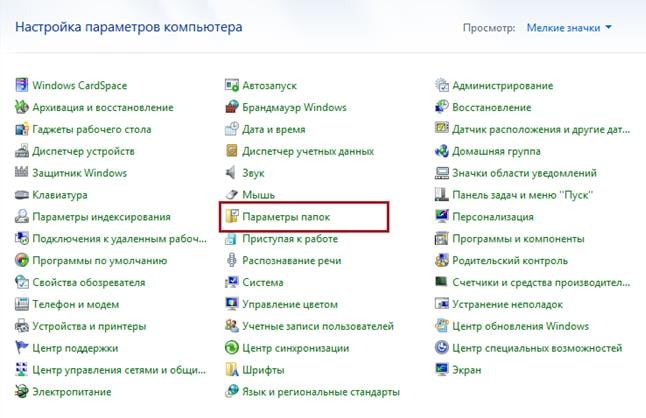
- Найдите в правом углу «Просмотр» ссылку. Отобразится окно, где нужно указать «Мелкие значки»;
- Вам нужно отыскать пункт «Параметры папок» и выбрать его;

- Вверху окна выберите вкладку «Вид» и в окне дополнительных параметров отыщите пункт «Показать скрытые папки». Установите галочку на нем.
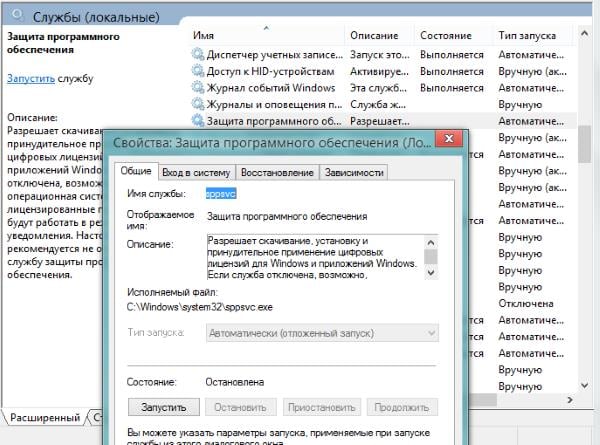
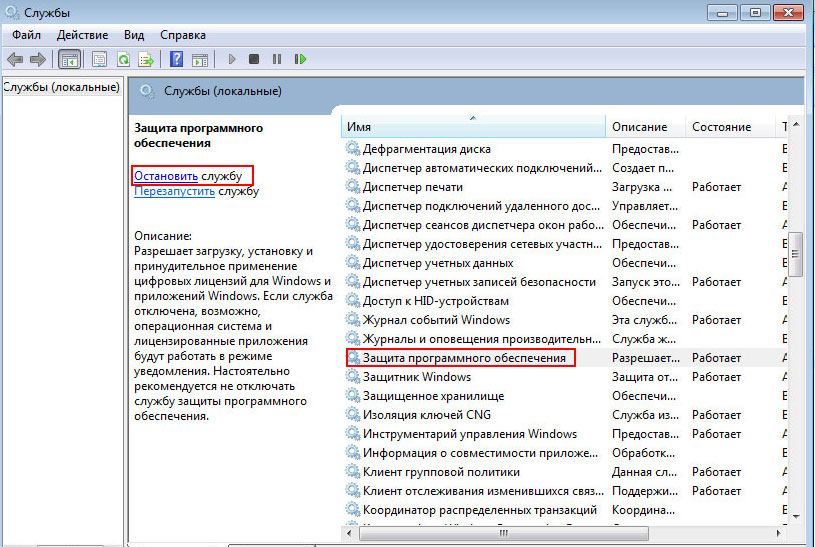
Теперь нам нужно остановить службу, которая в системе отвечает за защиту программного обеспечения. Для этого откройте службы:
- Нажмите вместе 2 клавиши — WIN+R, напишите латинскими символами «services.msc» и выберите клавишу ENTER;
- Вы увидите окно служб, где нам нужно найти строчку под названием «Защита программного обеспечения»;
- Выберите её ПКМ и нажмите «Свойства»;

- Здесь выберите в пункте «Тип запуска» параметр «Отключена»;
- Затем найдите кнопку «Остановить» и нажмите, ниже выберите «Применить», «Ок».
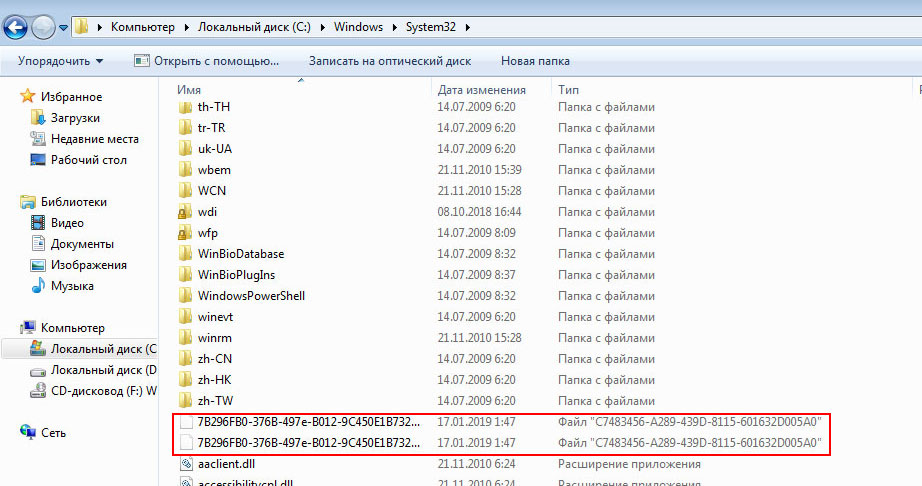
Далее нам нужно открыть системный диск и найти в нем пару файлов, которые вызываются ошибку Unsupported partition table в Windows Loader.
- Нажмите вместе WIN+E для открытия проводника, выберите системный диск (обычно это C:);
- Выберите папку «Windows», а в ней найдите «System32». В этой папке желательно воспользоваться поиском (он находится справа вверху), чтобы найти два файла, после которых стоит расширение .C7483456-A289-439d-8115-601632D005A0;
- Удалите эти два файла;
- Перейдите снова в службы Windows, найдите нашу отключенную строку защиты программ и запустите её. В типе запуска необходимо установить прежнее значение.
Устранение ошибки «c0000145 Application error» в Windows 7.
Активация Виндовс 7 при помощи Windows Loader
Утилита Windows Loader разработана для бесплатной активации операционных систем Windows. Её можно найти на различных ресурсах, включая торрент трекеры. Есть также русскоязычный сайт, посвященный этой утилите, находится он по адресу https://windows-loader.ru/. Активатор удобен тем, что работает в портативном режиме. Загрузите архив и распакуйте его. После этого нужно выбрать файл с расширением .exe.
Очень важно запускать утилиту от имени администратора, чтобы избежать ошибок. Для этого нажмите ПКМ и выберите «От имени администратора». При этом утилита активатор бессилен, если раздел имеет файловую архитектуру GPT. Запустите активатор и нажимаем кнопку «Install». Произойдет активация системы. Рядом можно заметить еще одну кнопку «Uninstall». Если её нажать, система вновь вернется в триал-версию.
А вы знаете, что делать, если служба аудио не запущена в Windows 7?
Как отформатировать диск GPT в MBR
Для изменения разметки жесткого диска есть как встроенные средства Windows, так и сторонние программы. Мы будем использовать системные средства. Поэтому если вы не хотите это делать вручную, можете найти на просторах интернета такую утилиту.
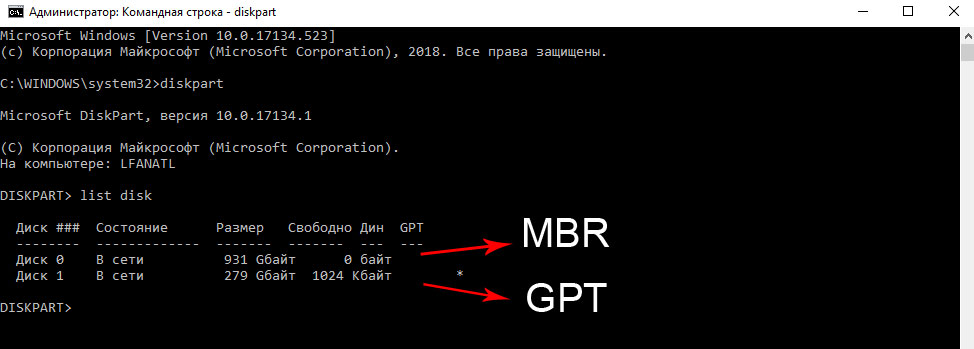
Если ошибка возникла при переустановке ОС Windows, нажмите 2 клавиши вместе — SHIFT+F10.
- Вы увидите перед собой командная строка. (Если открывать командную строку через систему, необходимо запускать её от имени администратора);
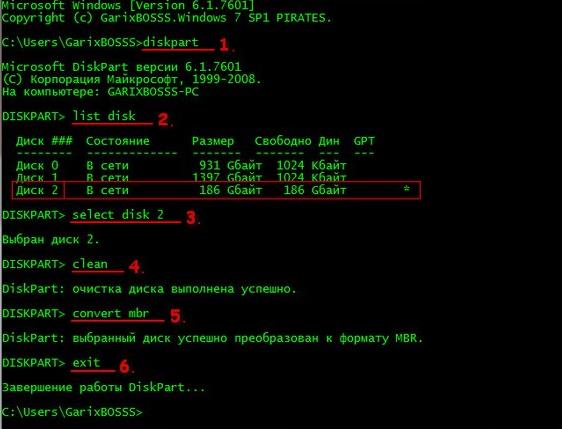
- Введите в строке команду «diskpart»;
- Здесь нужно написать латинскими еще одну команду «list disk» — она отображает все диски, подключенные к вашему компьютеру;
- Нужно ввести команду «select disk C». Если у вас система находится на другом диске, введите соответствующую букву диска;
- Далее введите «clean», за ней «detail disk»;
- Продолжаем вводить в командной строке параметры «select volume», ниже «delete volume»;
- Следующая команда преобразует диск в нужный нам формат «convert mbr»;
- В завершении введите «exit», чтобы выйти из строки.

Выполните указанный перечень команд
Это поможет избавиться от ошибки Unsupported partition table в Виндовс Loader, и она более не будет вам досаждать.
Опубликовано 10 января 2019 Обновлено 16 мая 2021
Инструкции
Время чтения 2 мин.Просмотры 1.2k.Опубликовано 01.08.2022
При попытке активировать Windows 7 с помощью программы Windows Loader By Daz может появиться сообщение об ошибке «Unsupported partition table». В переводе на русский это означает что используется неподдерживаемая таблица разделов. Расскажем почему оно возникает и что делать в этом случае.
Причины ошибки
Для хранения системной информации о разделах жёсткого диска существуют два стандарта: MBR и GPT.
MBR поддерживает диски ёмкостью не более 2 Тб, на котором можно создать до трёх разделов. Используется с материнскими платами со стандартным BIOS.
GPT – это более новая версия стандартна, которая может работать с жёсткими дисками до 9,4 ЗБ (зеттабайт) и позволяет создать 128 разделов.

Утилита Windows Loader By Daz может работать с разделами MBR. Но если используется стандарт GPT, то программа выдаст сообщение «Unsupported Partition Table», то есть о том, что у вас используется таблица разделов, которую активатор не поддерживает.
Чтобы узнать, какой стандарт используется нужно:

Как избавиться от этой ошибки
Рассмотрим несколько простых способов избавиться от этого сообщения.
Во-первых, можно попробовать активировать операционную систему другим активатором, например, KMSAuto, Windows 7 Loader ХЕ или RemoveWAT.
Во вторых, нужно сконвертировать разделы диска из GPT в MBR. Это можно сделать с помощью специальных программ для работы с жёсткими дисками, такими как Acronis Disk Director или Aomei Partition Assistant, или воспользоваться системными возможностями Windows 7.
Чтобы воспользоваться стандартными возможностями ОС, нужно:
- запустить загрузку с установочной флешки или диска;
- когда появится экран установки нажмите одновременно клавиши Shift+F10;
- наберите команду «diskpart»;
- чтобы увидеть список дисков, наберите «list disk», напротив нужного диска, в столбце GPT, будет стоять звёздочка;
- выберите диск, который нужно преобразовать и наберите select disk 2, где два – это идентификатор нужного раздела;
- введите команду «clean»;
- выполните команду «convert mbr»;
- чтобы выйти, наберите «exit».

Также эта проблема возникать из-за некорректной работы .Net Framework 4. В этом случае его рекомендуется удалить или переустановить.
Не смотря на более новые версии операционной системы windows, Большое кол-во людей остаются верными поклонниками windows 7, а большая половина из них пользуются пиратской версией. Для того, чтобы пользоваться комфортно и долгосрочно такой версией, ее нужно активировать. Тут к нам на помощь приходит такая утилита, как “Windows Loader”. Но к сожалению, она не всегда справляется с поставленной задачей и выдает ошибку “Unsupported partition table” в строке Status.
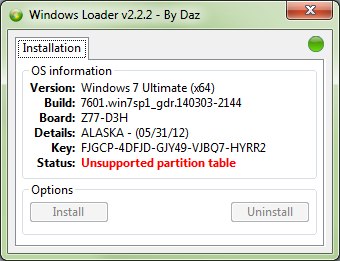
Unsupported partition table Windows Loader
Блокировать активацию вашей системы могут остаточные файлы лицензии, встроенные в некоторые обновления вспомогательные утилиты, для борьбы с пиратством. Возможно таблица разделов вашего жесткого диска не соответствует данному активатору.
Как устранить Unsupported partition table в Windows Loader
Удаляем обновления KB971033
Если вы только установили ОС, то перед тем как обновляться уберите из списка обновлений KB971033. В него встроена программа, которая будет проверять ключ перед каждым запуском, на что будет получать ответ с сервера что данный ключ уже используется, следовательно у вас будет слетать активация. Для отключения этого обновления в панели управления (далее ПУ) заходим в “центр обновления виндовс” и в списке важных обновлений ищем наше и убираем галочку.
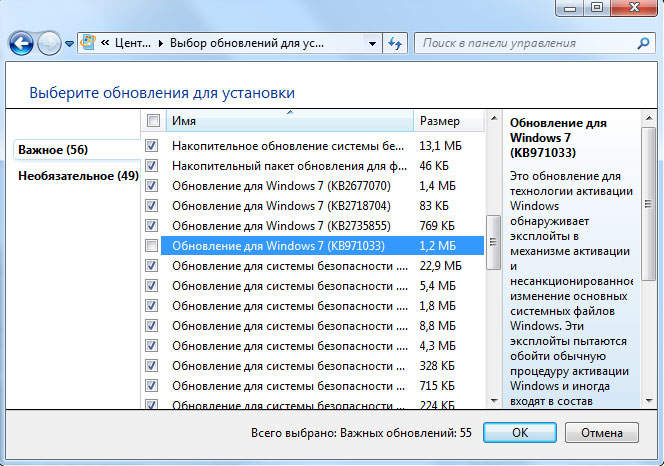
отключаем обновление
Если оно уже установлено на вашем ПК, его нужно удалить. Для этого в ПУ заходим “Программы и компоненты”, с лева ищем “просмотр установленных обновлений”, далее в списке находим “KB971033”, и удаляем. Для более удобного поиска воспользуйтесь строкой поиска. Если у вас нет данного обновления приступайте к следующему пункту.

удаляем обновление
Удаляем остаточные файлы лицензии
Файлы которые нам нужны скрыты от наших глаз, чтобы нам их увидеть нужно включить отображения скрытых файлов. Существует два способа, или в ПУ заходим в “Параметры папок”, или в проводнике в любой папке нажимаем “Alt”, после чего появится невидимое меню в нем кликаем “Сервис” и “Параметры папок”. В появившемся окне переключаемся на вкладку вид и листаем в низ. Где убираем галочку “Скрывать расширения для зарегистрированных типов файлов” и включаем “Показывать скрытые файлы, папки и диски”.

параметры папок
Теперь чтобы система дала нам стереть файлы, нужно отключить защиту. Заходим в ПУ, “Администрирование”, далее “службы” и ищем “Защита программного обеспечения”, выделяем ее и с лева вверху нажимаем остановить.
отключение службы
Дальше переходим в каталог “windows”, она находится в том разделе на котором установлена ваша ОС. И в папке “System32” ищем файлы с расширением “.C7483456-A289-439d-8115-601632D005A0”, для удобства обязательно воспользуйтесь поиском, и удаляем их. Для удаления сразу минуя корзину воспользуйтесь комбинацией “Shift”+”Delete”.
файлы которые надо удалить
Возвращаемся в службы и запускаем обратно нашу защиту. Теперь активируйте вашу систему.

запуск службы
Проверяем таблицу разделов жесткого диска
Жесткий диск вашего ПК может использовать разные таблицы разделов. Это может быть или MBR, или GPT. Это своего рода структура. Так вот, дело в том, что “Windows Loader” не работает с разделами GPT, данная структура так же покажет ошибку “Unsupported partition table”. В таком случае нужно переделывать винчестер под разделы MBR, а для этого придется форматировать винчестер, а значит и переустанавливать винду. В таком случае воспользуйтесь просто другим активатором. Для того, чтобы проверить в какой таблице разбит ваш жесткий диск, нужно в командной строке, запущенной от “Администратора” прописать следующие команды поочередно.“diskpart” и “list disk”. В окне появится список дисков подключенных к вашему пк, далее смотрим если напротив нужного вам диска в столбце GPT стоит звездочка, значит ваш диск в ГПТ, а если ее нет, соответственно MBR.
diskpart
Заключение
Для устранения ошибки “Unsupported partition table” в Windows Loader нужно удалить остаточные файлы лицензии. Данная ошибка может возникать если ваш жесткий диск разбит в GTP-таблице. Что бы в будущем у вас не возникало проблем с активацией, удалите обновления “KB971033” и отключите обновления виндовс. Если наши советы не исправили ошибку, активируйте систему другим активатором.
Оценка статьи:
![]() Загрузка…
Загрузка…