Содержание
- No vbmeta samsung что это
- Извлечение файла PIT из прошивки Samsung: руководство по разблокировке
- Необходимость извлечения файлов PIT из прошивки Samsung
- Как извлечь файл Samsung PIT из стандартной прошивки
- ШАГ 1: Загрузите стоковую прошивку
- ШАГ 2: Извлеките прошивку Samsung
- ШАГ 3: Извлеките файл CSC и получите файл Samsung PIT
- Как прошить файл Samsung PIT и разблокировать устройство
- ШАГ 1: Установите Один
- ШАГ 2. Загрузите устройство Samsung в режим загрузки
- ШАГ 3: Прошить файл Samsung PIT через Odin
- Файл Samsung PIT: что внутри
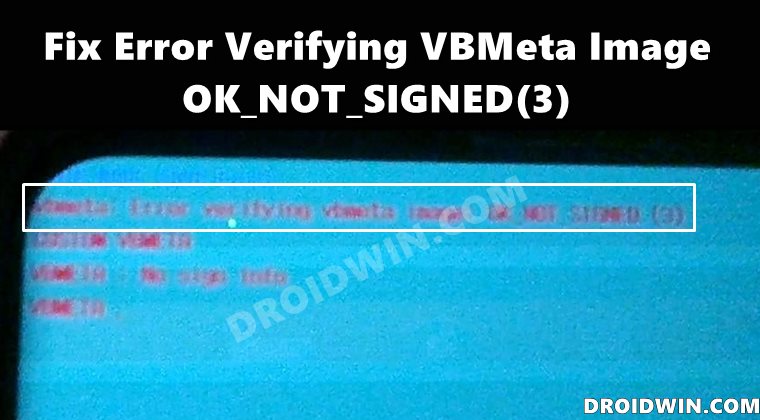
- How to Fix Error Verifying VBMeta Image OK_NOT_SIGNED(3)
- How to Fix Error Verifying VBMeta Image OK_NOT_SIGNED(3)
- Fix 1: Flash Stock Firmware via Odin
- Fix 2: Flash VBMeta.tar in CP Slot
- Fix 3: Flash PIT and Recovery.img.tar Files
- About Chief Editor
- [Q] Error validating footer No VBMETA
Извлечение файла PIT из прошивки Samsung: руководство по разблокировке
В этом руководстве мы покажем вам, как извлечь файл PIT из любой прошивки Samsung, прошить его на ваше устройство, а затем разблокировать. У каждого крупного OEM-производителя несколько иной подход к предоставлению стандартной прошивки для своих устройств. Например, Google упаковывает его в ZIP-пакет. В результате вам просто нужно распаковать через WinZIP или WinRAR, и вы сможете получить связанные файлы.
С другой стороны, все файлы разделов OnePlus загружаются в файл payload.bin. Чтобы извлечь этот файл BIN и получить его файлы, вам понадобится автономный инструмент. Кроме того, прошивки Oppo и Realme находятся внутри пакета OZIP. Это снова требует отдельного инструмента для извлечения. Но вы можете спросить, зачем нам извлекать пакет прошивки?
Ну, это в основном необходимо для двух целей: чтобы получить root права на ваше устройство, исправив стоковый boot.img через Magisk и прошив его с помощью команд Fastboot. Другое использование этого — разблокировать ваше устройство, что делается с помощью файлов разделов. После извлечения стоковой прошивки вы получите эти файлы, принадлежащие разным разделам вашего устройства. К ним относятся, например, system.img, recovery.img, vbmeta.img, boot.img.
Затем мы могли бы прошить все эти файлы по отдельности с помощью команд fastboot в соответствующие разделы, и ваше устройство будет готово к работе. Но когда дело доходит до Samsung, все идет наперекосяк. Это связано с тем, что южнокорейские гиганты совсем по-другому относятся ко всему процессу прошивки. Но в чем проблема и почему это приводит к путанице? Давайте проверим это! После этого мы перечислим шаги, чтобы извлечь файл PIT из прошивки Samsung, прошить его, а затем разблокировать ваше устройство.
Необходимость извлечения файлов PIT из прошивки Samsung
Во-первых, Samsung не размещает свои прошивки на своем официальном сайте. Но вы все равно можете загрузить то же самое с сайтов Frija Tool, SamMobile и других. Но даже после загрузки и извлечения прошивки вы не найдете файлы IMG раздела напрямую. Вместо этого вы получите файлы AP, BL, CP, CSC и HOME_CSC с расширением .tar.md5. Можем ли мы прошить эти файлы через Fastboot?
В общих случаях мы используем команды Fastboot для прошивки файлов в соответствующие разделы. Например, команда восстановление через fastboot flash recovery.img указывает CMD прошить файл recovery.img в раздел восстановления. Но в случае с Самсунгом перепрошивка производится через Odin. Но поскольку мы не указываем Odin, куда нужно прошивать файлы, как он определяет раздел? Вот тут-то и пригодится файл Samsung PIT, извлеченный из прошивки.
PIT означает таблицу информации о разделах, и, как видно из ее названия, она содержит все необходимые инструкции относительно того, какой файл нужно прошить и в каком разделе. Odin берет этот файл, считывает всю связанную с ним информацию, а затем выполняет процесс перепрошивки. Например, я распаковал PIT-файл устройства Samsung Galaxy S20 (SM-G980F) и обнаружил следующие имена файлов. [to know more about their block sizes and partitions, refer to the ‘Samsung PIT File: What’s Inside it’ section at the end of this guide].
- ul_key.bin
- sec_efs.img
- up_param.bin
- хранилище ключей.bin
- устойчивый.bin
- recovery.img
- modem_debug.bin
- nad_refer.bin
- dqmdbg.img
- vbmeta.img
- vbmeta_samsung.img
- метаданные.img
- оптика.img
- пользовательские данные.img
Наряду с этими файлами было также несколько зашифрованных данных, которые содержали инструкции, на каком разделе вам нужно прошить эти файлы. Таким образом, Odin возьмет этот файл PIT и выполнит процесс его перепрошивки. Однако. если вы в конечном итоге загрузите неправильный файл PIT в Odin или даже загрузите файл PIT, который не соответствует текущей версии прошивки, это приведет к проблемам с загрузочной петлей или программным кирпичом. Следовательно, чтобы разблокировать устройство Samsung, вам необходимо извлечь файл PIT из прошивки, а затем прошить его. Вот все необходимые инструкции для того же.
Как извлечь файл Samsung PIT из стандартной прошивки
Мы перечислили приведенные ниже инструкции в отдельные разделы для простоты понимания. Продолжайте в той же последовательности, как указано ниже. Droidwin и его участники не будут нести ответственность в случае термоядерной войны, если ваш будильник не разбудит вас, или если что-то случится с вашим устройством и данными, выполнив следующие шаги.
ШАГ 1: Загрузите стоковую прошивку

Прежде всего, вам нужно будет загрузить стандартную прошивку для вашего устройства Samsung. Хотя существует довольно много способов сделать это, я предпочитаю Frija Tool. Если вы также разделяете эту мысль, то обратитесь к нашему подробному руководству о том, как загрузить стоковую прошивку/ПЗУ Samsung с помощью Frija Tool.
ШАГ 2: Извлеките прошивку Samsung
После загрузки прошивки извлеките ее в любое удобное место на вашем ПК. Затем вы должны получить следующие пять файлов: AP, BL, CP, CSC и HOME_CSC. Файл PIT сохраняется внутри файла CSC, поэтому нам нужно будет извлечь файл CSC. Вот как это можно сделать.
ШАГ 3: Извлеките файл CSC и получите файл Samsung PIT
Чтобы извлечь файл Samsung PIT из файла прошивки CSC, вам понадобится программа 7-ZIP Extraction. WinZip и WinRAR не могли обрабатывать файлы TAR и MD5, поэтому мне пришлось использовать вышеупомянутое программное обеспечение.
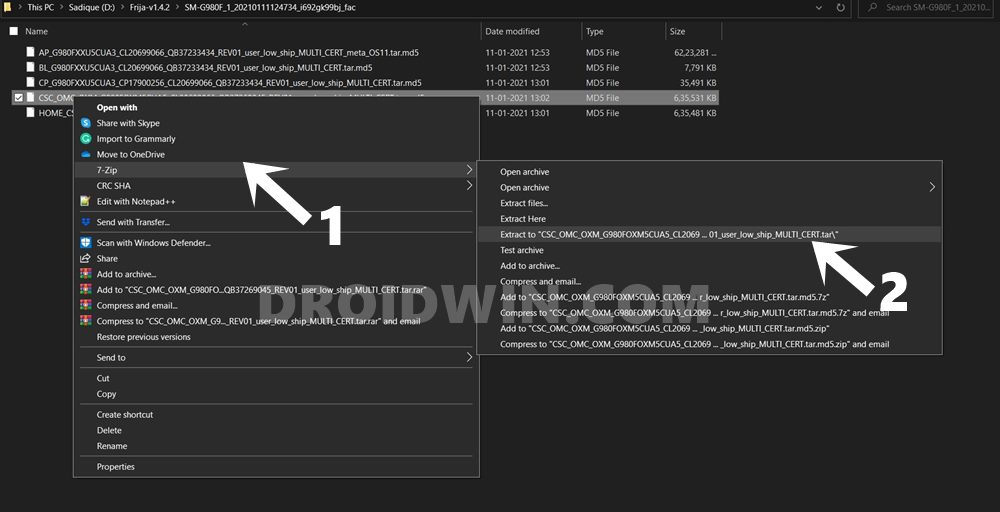
- Поэтому скачайте и установите 7-ZIP на свой компьютер.
- Затем щелкните правой кнопкой мыши файл CSC.tar.md5.
- Выберите 7ZIP > Извлечь в CSC.tar.
- Начнется процесс извлечения, который займет несколько минут.
После этого вы получите папку метаданных, несколько файлов LZ4 и необходимый файл PIT. Итак, теперь, когда мы извлекли файл Samsung PIT из файла прошивки CSC, пришло время прошить его на ваше устройство и разблокировать.
Как прошить файл Samsung PIT и разблокировать устройство
Вот необходимые инструкции, чтобы прошить файл Samsung PIT на ваше устройство, а затем разблокировать его. Следуйте вместе.
ШАГ 1: Установите Один
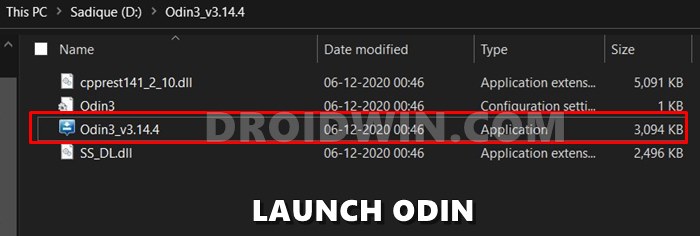
Что ж, нет смысла гадать, что мы будем использовать Odin Tool для прошивки этого PIT-файла. Поэтому загрузите и установите его на свой компьютер по данной ссылке: Один3-v3.14.4.zip. После загрузки извлеките его на свой компьютер и дважды щелкните файл Odin3_v3.14.4.exe, чтобы запустить инструмент.
ШАГ 2. Загрузите устройство Samsung в режим загрузки
Затем вам нужно будет загрузить ваше устройство в режим загрузки, чтобы Odin мог взаимодействовать с вашим устройством. Для этого вы можете обратиться к этому руководству: Как загрузить любое устройство Samsung в режим загрузки. Вот более короткие инструкции для того же самого:

- Выключите устройство. Затем одновременно нажмите и удерживайте клавиши увеличения и уменьшения громкости.
- Удерживая обе эти клавиши, подключите устройство к ПК через USB-кабель.
- Наконец, оставьте обе эти кнопки и нажмите клавишу увеличения громкости, чтобы загрузиться в режиме загрузки.
ШАГ 3: Прошить файл Samsung PIT через Odin
- Подключите устройство к ПК через USB-кабель (убедитесь, что оно загружено в режиме загрузки).
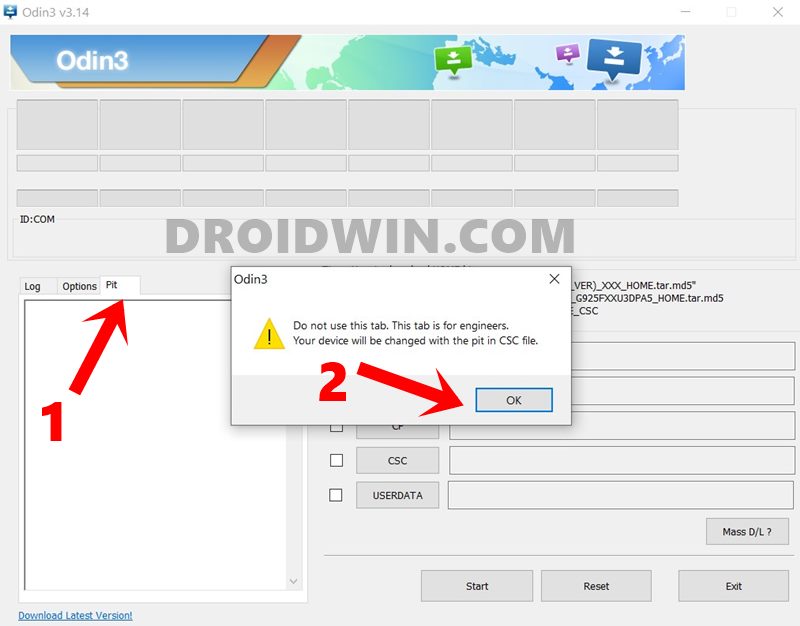
- Теперь запустите Odin Tool на своем ПК и перейдите в раздел PIT. Вы получите предупреждение, нажмите OK.

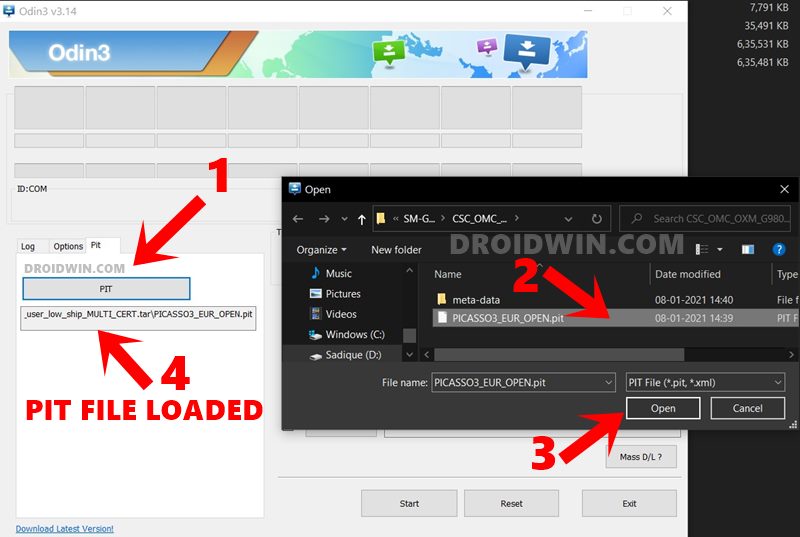
- Нажмите кнопку PIT, перейдите к извлеченному файлу PIT, выберите его и нажмите кнопку «Открыть», чтобы загрузить файл.
- Как только это будет сделано, вам также нужно будет загрузить другие файлы прошивки. Это связано с тем, что файл PIT никогда не прошивается отдельно, а со связанными с ним файлами. Поэтому загрузите файлы BL, AP, CP и CSC (обычный файл CAS, а не HOME CSC) в инструмент.
- Затем перейдите в раздел «Параметры» Odin и включите параметр «Переразметка».
- Наконец, нажмите кнопку «Пуск» и дождитесь завершения процесса. После завершения прошивки файла PIT вы должны получить сообщение Pass.

На этом мы завершаем руководство о том, как извлечь файл PIT из файла прошивки Samsung, прошить его на свое устройство через Odin, а затем разблокировать. Если у вас есть какие-либо вопросы относительно вышеупомянутых шагов, сообщите нам об этом в комментариях. Мы вернемся к вам с решением в ближайшее время.
Файл Samsung PIT: что внутри
Обычное извлечение файла PIT (после удаления двоичного значения) дает следующую информацию.

С другой стороны, если вы ищете полную информацию, включая двоичное значение, то вот что я получил.

Кроме того, преобразование файла PIT в файл XML позволило получить некоторую полезную информацию. Вот небольшой фрагмент того же:
В некоторых случаях вы также можете получить значения в шестнадцатеричном формате, как показано ниже (здесь столбцы соответствуют )
2000000 D000000 5000000 1000000 900300 180000 MODEMST1 nvrebuild1.bin 2000000 E000000 5000000 1000000 A80300 180000 MODEMST2 nvrebuild2.bin 2000000 F000000 5000000 1000000 C00300 680000 БОТИНКА boot.img 2000000 10000000 5000000 1000000 280400 780000 ВОССТАНОВЛЕНИЕ recovery.img 2000000 11000000 5000000 1000000 A00400 680000 FOTA 2000000 12000000 5000000 1000000 80500 EE370000 РЕЗЕРВНОЕ 2000000 13000000 5000000 1000000 2000000 EE3F0500 FSC 2000000 14000000 5000000 1000000 10000000 F03F0500 SSD 2000000 15000000 5000000 5000000 400500 400000 PERSIST persist.img.ext4 2000000 16000000 5000000 5000000 800500 480000 PERSDATA persdata.img.ext4 2000000 17000000 5000000 5000000 C80500 684D00 система .img.ext4 2000000 18000000 5000000 5000000 305300 A00F00 КЭШ-кэш.img.ext4 2000000 19000000 5000000 5000000 D06200 USERDATA userdata.img.ext4
Так что это были все технические детали, которые я смог получить в результате собственного тестирования, а также из надежных источников разработчиков с XDA. Если у вас есть дополнительные сведения обо всем этом, поделитесь с нами своей ценной информацией в комментариях.
In this guide, we will show you various methods to fix the Error Verifying VBMeta Image OK_NOT_SIGNED(3) issue. a VBMeta file is used to verify the integrity of the system so that your device is only able to boot the authorized and signed firmware. To bypass this restriction, many custom ROMs now come with their own custom vbmeta, but there are still a few that don’t. And for these sets of ROMs, you will need to manually flash the stock or blank vbmeta IMG files.
Well, to be fair, there are still some clouds of uncertainty regarding this file and its usage. And this is the major reason why we are witnessing an increase in the number of issues related to the vbmeta. Fortunately, in most cases, the fix for the same is fairly simple and easy to execute. And this guide shall make you aware of just that. This tutorial will list out four different methods to fix the Error Verifying VBMeta Image OK_NOT_SIGNED(3) issue. Follow along.
Table of Contents
How to Fix Error Verifying VBMeta Image OK_NOT_SIGNED(3)
There exist three different methods to rectify the aforementioned issue. As far as the success rate is concerned, I have personally tested the first fix and manage to fix the issue. The other two fixes, though not tested by me, have also given out successful results by the testers. So on that note, let’s get started. Droidwin and its members wouldn’t be held responsible in case of a thermonuclear war, your alarm doesn’t wake you up, or if anything happens to your device and data by performing the below steps.
Fix 1: Flash Stock Firmware via Odin
This has given the maximum success rate and is a pretty straightforward fix as well. All you need to do is just flash the stock ROM for your device via Odin. Here’s how:
STEP 1: Download Firmware via Frija
To begin with, download the stock firmware for your device and region (CSC) via the Frija Tool. You could also refer to our guide to carry out this task: How to Download Samsung Stock Firmware/ROM via Frija Tool.

STEP 2: Boot to Download Mode
Next up, boot your device to the download mode. For that, please refer to our instructions given in this guide: How to Boot any Samsung Device to Download Mode]. Or you could also refer to the below steps:

- Press Volume Down and Power button, until the phone restarts.
- Quickly plug back the USB cable and Hold Volume Up and then Press Volume UP again (OEM is now off and the Phone will reboot)
- Quickly press Volume UP & Down at the same time again *don’t remove USB cable*, until download mode comes up.
- This time only press Volume UP and your device should be booted.
STEP 3: Flash Firmware via Odin
Next up, download, and install the Odin Tool onto your PC. Using it, you will have to flash the firmware onto your device. You may refer to our guide for the same: How to Flash Stock Firmware via Odin. Or refer to the below shorter instructions: [do keep in mind that doing so will wipe off all the data from your device, so take a backup beforehand]:

- To begin with, extract the zip file that contains your stock firmware.
- Then in Odin, select the file that begins with BL and put it into the BL section, do the same with AP, CP, and CSC.
- Ignore the USERDATA field. For CSC do not use HOME_CSC, use CSC.
- Then press Start and you should be all set. The flashing will now start and could take a few minutes.
Once the flashing is complete, your device will boot to the OS and the issue should have been rectified. With this, we conclude the first method to fix the Error Verifying VBMeta Image OK_NOT_SIGNED(3) issue. Let’s now make you aware of the other two methods.
Fix 2: Flash VBMeta.tar in CP Slot
If you are getting this error message while flashing the TWRP Recovery, then apart from putting the TWRP in the AP slot of Odin, you will also have to put the vbmeta.IMG file in the CP Slot. You could get the vbmeta.img from the stock firmware that you had downloaded for your device via Frija or refer to our guide on How to Download and Flash a Blank vbmeta file.
So once the AP slot is filled with TWRP and the CP is filed with vbmeta, boot your device to the Download Mode and then start the flashing process of both these files via Odin. Once the flashing is complete, your device shall automatically boot to the OS. And this shall fix the Error Verifying VBMeta Image OK_NOT_SIGNED(3) issue as well.
Fix 3: Flash PIT and Recovery.img.tar Files
- To begin with, download the stock firmware for your device via Frija [How to Download Samsung Stock Firmware/ROM via Frija Tool].
- The downloaded firmware will be in ZIP, extract it. Then extract the CSC firmware file and get hold of the PIT file [How to Extract PIT File from Samsung Firmware].
- Likewise, also grab the recovery.img.lz4 from the extracted firmware. Then change this recovery file to recovery.img.tar by renaming it.
- Now launch the Odin Tool, go to the PIT section, click on the PIT button and load the PIT file.
- After that, put in recovery.img.tar in the AP slot of the tool.
- Now go to the Options tab of Odin and uncheck the Auto Reboot option.
- Finally, boot your device to the Download Mode and connect it to the PC via USB cable.
- Once your device is recognized by the tool, hit the Start button to initiate the flashing process.
- Once done, boot your device to recovery and then perform a factory reset (it will wipe off all the data).
- That’s it, you may now boot your device to the OS without any issues.


So with this, we round off the guide on how to fix the Error Verifying VBMeta Image OK_NOT_SIGNED(3) issue. We have shared three different methods for the same. Do let us know in the comments section which one spelled out success for you. Likewise, all queries are welcomed in the comments below.
About Chief Editor
Sadique Hassan
A technical geek by birth, he always has a keen interest in the Android platform right since the birth of the HTC Dream. The open-source environment always seems to intrigue him with the plethora of options available at his fingertips. “MBA by profession, blogger by choice!”
My friend’s phone had an update recently.
The update finished perfectly but after a while the phone shut down and when she turned it back on it showed this screen:
«Recovery: Error validating footer.
No VBMETA
VBMETA .»
The phone shutdown after a few hours and it’s not turning back on whatsoever
I don’t want the internal storage to be wiped so i found a way using Home_CSC but i can’t find a ROM with my carrier (i live in Syria) + the phone isn’t turning on anymore.
Is there any way to fix this without losing my internal storage?
If wiping the internal storage is the only way please tell me how to fix it too.
Thanks in advance! and really sorry if this isn’t the right place to post this i really have read the noobs guide. 
arana1
Senior Member
My friend’s phone had an update recently.
The update finished perfectly but after a while the phone shut down and when she turned it back on it showed this screen:
«Recovery: Error validating footer.
No VBMETA
VBMETA .»
The phone shutdown after a few hours and it’s not turning back on whatsoever
I don’t want the internal storage to be wiped so i found a way using Home_CSC but i can’t find a ROM with my carrier (i live in Syria) + the phone isn’t turning on anymore.
Is there any way to fix this without losing my internal storage?
If wiping the internal storage is the only way please tell me how to fix it too.
Thanks in advance! and really sorry if this isn’t the right place to post this i really have read the noobs guide.
Источник
error validating footer(6)
i was updating my s10plus software when a screen came saying downloading do not turn off target odin mode avb fail . i tried to flash it but odin was stuck at vendor.img for several hours. Then i quit odin and then a screen came saying that to recover from smart switch. Then i used a tool to fix the soft brick and now i am in the same downloading screen but this time saying error validating footer. i tried to flash again but am still stuck at vendor.img. i tried a different csc version and that stucks at system.img
PLEASE CAN SOMEONE HELP!!!!!!
Re: error validating footer(6)
Hi, where did you get the files from and are they correct to your device and region? Is yours international version or US ? Is this first time using odin?
I’ll leave a Link to register so you can communicate here as a guest account you can only post questions but can’t reply
https://forums.androidcentral.com/sh…d.php?t=409154
Re: error validating footer(6)
Hi thank you for replying quickly
yes it is my first time using odin
the firmware was correct to my device and region as i bought it from UAE and i got the firmware from samfw.com
Re: error validating footer(6)
Hi welcome to AC!
Ok let’s try this , download samfirm and frija tool from xda forums the latest ones and extract them , put your device model and region and we go from there .
Re: error validating footer(6)
yes i have tried frija but it get stuck showing a speed of 0bits per second
Re: error validating footer(6)
Hi welcome to AC!
Ok let’s try this , download samfirm and frija tool from xda forums the latest ones and extract them , put your device model and region and we go from there .
i have tried samfirm but it says coud not fetch info and authorization failed
Re: error validating footer(6)
Originally Posted by mustang7757
Hi welcome to AC!
Ok let’s try this , download samfirm and frija tool from xda forums the latest ones and extract them , put your device model and region and we go from there .
it also says check input data while i have written eveything correct
Re: error validating footer(6)
Originally Posted by Ali Malik1
yes i have tried frija but it get stuck showing a speed of 0bits per second
Originally Posted by Ali Malik1
i have tried samfirm but it says coud not fetch info and authorization failed
Which versions you have and did u get from. Xda forums ?
Whats your model number and region code?
Re: error validating footer(6)
Re: error validating footer(6)
I have already installed visual c plus 2008 and 2010 for samfirm to work and have also downloaded from xda version 0.3.6
1 Attachment(s)
Re: error validating footer(6)
Ok on firja I’m able to download that firmware
Attachment 329308
Re: error validating footer(6)
yes just like i said before i tried frija but when it is about to complete it gets stuck
Re: error validating footer(6)
Oh , let me wait to then end and test it out , be back
Re: error validating footer(6)
Re: error validating footer(6)
No problem, it’s decrypt the firmware right now
1 Attachment(s)
Re: error validating footer(6)
It download without a issue, so double check your connection Attachment 329309
Re: error validating footer(6)
Oh yes i tried it and the download was complete now i have to use odin and flash the firmware?
Re: error validating footer(6)
Originally Posted by Ali Malik1
Oh yes i tried it and the download was complete now i have to use odin and flash the firmware?
Extract the firmware after it downloads and put the files in all 4 corresponding slots and leave last slot in odin empty , use home csc in csc slot to avoid factory reset
Re: error validating footer(6)
I tried it but it is again stuck at vendor.img please help
Re: error validating footer(6)
Originally Posted by Ali Malik1
I tried it but it is again stuck at vendor.img please help
Can I see screenshot of odin where it’s at now?
It probably can take a few minutes to go past that
Re: error validating footer(6)
https://ibb.co/1RN9qsz
Still stuck at vendor.img
Re: error validating footer(6)
Wait until it responds don’t disconnect the phone from computer, does it show a white line across the phone also?
Re: error validating footer(6)
It has been 15 minutes yes it shows a white line which is also stuck
Re: error validating footer(6)
In the top right it also written custom binary blocked by oem lock
Re: error validating footer(6)
Give it 10 more minutes ,that’s normal on the phone as it’s transferring from odin .
If after 10 minutes still happening , download odin version from XDA site and retry again but when you plug into odin go to option and choose reboot bootloader so can erase that line on the phone .
Re: error validating footer(6)
Originally Posted by Ali Malik1
In the top right it also written custom binary blocked by oem lock
No problem, oem lock is meant to do other things this is stock Samsung firmware files
Re: error validating footer(6)
What should i do it is still stuck
Re: error validating footer(6)
And what if it is still stuck?
Re: error validating footer(6)
Originally Posted by Ali Malik1
What should i do it is still stuck
Give it 10 more minutes ,that’s normal on the phone as it’s transferring from odin .
If after 10 minutes still happening , download odin version from XDA site and retry again but when you plug into odin go to option and choose reboot bootloader so can erase that line on the phone .
Re: error validating footer(6)
Re: error validating footer(6)
Re: error validating footer(6)
Use3.14.1 odin or newer from XDA
Re: error validating footer(6)
It is still stuck now what should i do to cancel the flashing
Quit odin?
Re: error validating footer(6)
Is there something wrong with the ap file because the vendor.img file is in it?
Re: error validating footer(6)
Originally Posted by Ali Malik1
It is still stuck now what should i do to cancel the flashing
Quit odin?Originally Posted by Ali Malik1
Is there something wrong with the ap file because the vendor.img file is in it?
Cancel it , like I mentioned get odin 3.14.1or higher from XDA site and try that
Re: error validating footer(6)
I tried that and now it is stuck at system.img ������
Re: error validating footer(6)
Originally Posted by Ali Malik1
I tried that and now it is stuck at system.img ������
You download odin from XDA?
Re: error validating footer(6)
Re: error validating footer(6)
Ok , leave it connected and don’t do anything until odin says fail, pass or error
Re: error validating footer(6)
Re: error validating footer(6)
Ok cool , let’s see what odin says be patient we find out .
Re: error validating footer(6)
It is still stuck
 after 40 minutes
Re: error validating footer(6)
Thats strange , but leave it , we need to find out if odin will give a fail, pass or error to know what to do next , but it’s very long .
Re: error validating footer(6)
Okay in the vendor.img case i kept it for some hours but odin didnt give sign of fail or pass and was just stuck
Re: error validating footer(6)
Stop the process, you have good cable ? Also try another USB port on computer and what computer your using?
Re: error validating footer(6)
Hp laptop 15-da1xxx 8gb ram 64bit
Ok i will change the cable and try again
Re: error validating footer(6)
Ok and different port , should be ok the computer
Re: error validating footer(6)
It is stuck again
I used the original cable that came with the box and a different port
Should i use another laptop if it is the laptop problem?
Re: error validating footer(6)
Originally Posted by Ali Malik1
It is stuck again
I used the original cable that came with the box and a different port
Should i use another laptop if it is the laptop problem?That would be my next suggestion, try another computer
Re: error validating footer(6)
Re: error validating footer(6)
Re: error validating footer(6)
I tried a different laptop and that got stuck too
Re: error validating footer(6)
Very strange, let see what I can come up with tomorrow .
Re: error validating footer(6)
Have you been using home csc or regular csc ?
Re: error validating footer(6)
Re: error validating footer(6)
Ok flash it with just csc
Re: error validating footer(6)
It also gets stuck at system.img
Re: error validating footer(6)
Ok you’ll need to try PIT file
See if that works , I’m going get a article on how to extract the PIT file from the firmware and hopefully get you going .
Re: error validating footer(6)
Re: error validating footer(6)
Re: error validating footer(6)
Re: error validating footer(6)
I tried the pit method and on one laptop it gets stuck at system.img and on the other laptop it gets stuck at vendor
And i would also mention that when it gets stuck at vendor another red line in the top left appears saying custom binary system blocked by oem lock
Re: error validating footer(6)
Should i try tenoshare android reiboot pro?
Re: error validating footer(6)
Originally Posted by Ali Malik1
Should i try tenoshare android reiboot pro?
I never tried that, so don’t know.
This is a very straightforward process, something not right, I think.you should try xda forums and ask a Sr member there on their input .
Re: error validating footer(6)
I had asked someone in xda but there is no reply and a day has gone cant you help?
Re: error validating footer(6)
I think there is something wrong with the pit or vendor.img file
Re: error validating footer(6)
Originally Posted by Ali Malik1
I had asked someone in xda but there is no reply and a day has gone cant you help?
I’ve gone over things that could be possible through messages here , I would need to see the device in person which is not possible.
What windows are you running both computers? Usb port are not 3.0 ?
Originally Posted by Ali Malik1
I think there is something wrong with the pit or vendor.img file
I doubt it , you tried from multiple sources
I’m also trusting everything I’m saying you did exactly. Sometimes people don’t follow steps .
Re: error validating footer(6)
Both laptops have win 10 installed and have 3.0 usb port
Re: error validating footer(6)
Originally Posted by Ali Malik1
Both laptops have win 10 installed and have 3.0 usb port
Ahhh…you need to try this without 3.0 port
Re: error validating footer(6)
I think that’s your issue 3.0 port
Re: error validating footer(6)
Re: error validating footer(6)
You have a friend or relative you can use their windows computer it can be even window 7
Re: error validating footer(6)
I have a computer with 2.0 usb port should i try on that?
Re: error validating footer(6)
Originally Posted by Ali Malik1
I have a computer with 2.0 usb port should i try on that?
Yes definitely
Re: error validating footer(6)
Its stuck at vendor again should i try the pit file ?
Re: error validating footer(6)
As i said before when it gets stuck at vendor a red line in the top left comes saying custom binary blocked by oem lock
Re: error validating footer(6)
Originally Posted by Ali Malik1
Its stuck at vendor again should i try the pit file ?
Yeah on that computer try also the odin 3.14 , PIT , etc
Re: error validating footer(6)
I would also like to mention that when it gets stuck i cross the odin app and then use the hijacker tool to fix the soft brick which is that a screen comes up saying to use smart switch application. After fixing the soft brick the screen saying downloading do not turn off target comes up
Re: error validating footer(6)
Now i guess there is no solution as it is now also stuck at system.img even using pit
Re: error validating footer(6)
Originally Posted by Ali Malik1
I would also like to mention that when it gets stuck i cross the odin app and then use the hijacker tool to fix the soft brick which is that a screen comes up saying to use smart switch application. After fixing the soft brick the screen saying downloading do not turn off target comes up
Yeah something went wrong , and that tool might of did something, I tried but it’s something that now needs a person to look at .
Re: error validating footer(6)
Re: error validating footer(6)
Originally Posted by Ali Malik1
Thank you for your help
Your welcome!
Also try Smart switch on pc if you can get it download the FIRMWARE that way
Re: error validating footer(6)
Smart switch says device not supported
Re: error validating footer(6)
Hey can you help by using the tool
usb redirector technician edition?
Re: error validating footer(6)
Originally Posted by Ali Malik1
Hey can you help by using the tool
usb redirector technician edition?Never used that before, what does it do?
Re: error validating footer(6)
U can provide remote usb maintenance services such as flashing like when i plug my device in my computer u can access it from where i ever u r and fix it
Re: error validating footer(6)
Originally Posted by Ali Malik1
U can provide remote usb maintenance services such as flashing like when i plug my device in my computer u can access it from where i ever u r and fix it
Ahh ok like TeamViewer, I never did that before.
Problem I don’t have enough time , I’m running a business, forums and family .
Re: error validating footer(6)
yes just like team viewer
Oh no prob i was just suggesting
Re: error validating footer(6)
Originally Posted by Ali Malik1
yes just like team viewer
Oh no prob i was just suggestingTry couple different Odin versions from xda see if you can get it going on the computer with usb 2.0
Извлечение файла PIT из прошивки Samsung: руководство по разблокировке
В этом руководстве мы покажем вам, как извлечь файл PIT из любой прошивки Samsung, прошить его на ваше устройство, а затем разблокировать. У каждого крупного OEM-производителя несколько иной подход к предоставлению стандартной прошивки для своих устройств. Например, Google упаковывает его в ZIP-пакет. В результате вам просто нужно распаковать через WinZIP или WinRAR, и вы сможете получить связанные файлы.
С другой стороны, все файлы разделов OnePlus загружаются в файл payload.bin. Чтобы извлечь этот файл BIN и получить его файлы, вам понадобится автономный инструмент. Кроме того, прошивки Oppo и Realme находятся внутри пакета OZIP. Это снова требует отдельного инструмента для извлечения. Но вы можете спросить, зачем нам извлекать пакет прошивки?
Ну, это в основном необходимо для двух целей: чтобы получить root права на ваше устройство, исправив стоковый boot.img через Magisk и прошив его с помощью команд Fastboot. Другое использование этого — разблокировать ваше устройство, что делается с помощью файлов разделов. После извлечения стоковой прошивки вы получите эти файлы, принадлежащие разным разделам вашего устройства. К ним относятся, например, system.img, recovery.img, vbmeta.img, boot.img.
Затем мы могли бы прошить все эти файлы по отдельности с помощью команд fastboot в соответствующие разделы, и ваше устройство будет готово к работе. Но когда дело доходит до Samsung, все идет наперекосяк. Это связано с тем, что южнокорейские гиганты совсем по-другому относятся ко всему процессу прошивки. Но в чем проблема и почему это приводит к путанице? Давайте проверим это! После этого мы перечислим шаги, чтобы извлечь файл PIT из прошивки Samsung, прошить его, а затем разблокировать ваше устройство.
Необходимость извлечения файлов PIT из прошивки Samsung
Во-первых, Samsung не размещает свои прошивки на своем официальном сайте. Но вы все равно можете загрузить то же самое с сайтов Frija Tool, SamMobile и других. Но даже после загрузки и извлечения прошивки вы не найдете файлы IMG раздела напрямую. Вместо этого вы получите файлы AP, BL, CP, CSC и HOME_CSC с расширением .tar.md5. Можем ли мы прошить эти файлы через Fastboot?
В общих случаях мы используем команды Fastboot для прошивки файлов в соответствующие разделы. Например, команда восстановление через fastboot flash recovery.img указывает CMD прошить файл recovery.img в раздел восстановления. Но в случае с Самсунгом перепрошивка производится через Odin. Но поскольку мы не указываем Odin, куда нужно прошивать файлы, как он определяет раздел? Вот тут-то и пригодится файл Samsung PIT, извлеченный из прошивки.
PIT означает таблицу информации о разделах, и, как видно из ее названия, она содержит все необходимые инструкции относительно того, какой файл нужно прошить и в каком разделе. Odin берет этот файл, считывает всю связанную с ним информацию, а затем выполняет процесс перепрошивки. Например, я распаковал PIT-файл устройства Samsung Galaxy S20 (SM-G980F) и обнаружил следующие имена файлов. [to know more about their block sizes and partitions, refer to the ‘Samsung PIT File: What’s Inside it’ section at the end of this guide].
- ul_key.bin
- sec_efs.img
- up_param.bin
- хранилище ключей.bin
- устойчивый.bin
- recovery.img
- modem_debug.bin
- nad_refer.bin
- dqmdbg.img
- vbmeta.img
- vbmeta_samsung.img
- метаданные.img
- оптика.img
- пользовательские данные.img
Наряду с этими файлами было также несколько зашифрованных данных, которые содержали инструкции, на каком разделе вам нужно прошить эти файлы. Таким образом, Odin возьмет этот файл PIT и выполнит процесс его перепрошивки. Однако. если вы в конечном итоге загрузите неправильный файл PIT в Odin или даже загрузите файл PIT, который не соответствует текущей версии прошивки, это приведет к проблемам с загрузочной петлей или программным кирпичом. Следовательно, чтобы разблокировать устройство Samsung, вам необходимо извлечь файл PIT из прошивки, а затем прошить его. Вот все необходимые инструкции для того же.
Как извлечь файл Samsung PIT из стандартной прошивки
Мы перечислили приведенные ниже инструкции в отдельные разделы для простоты понимания. Продолжайте в той же последовательности, как указано ниже. Droidwin и его участники не будут нести ответственность в случае термоядерной войны, если ваш будильник не разбудит вас, или если что-то случится с вашим устройством и данными, выполнив следующие шаги.
ШАГ 1: Загрузите стоковую прошивку
Прежде всего, вам нужно будет загрузить стандартную прошивку для вашего устройства Samsung. Хотя существует довольно много способов сделать это, я предпочитаю Frija Tool. Если вы также разделяете эту мысль, то обратитесь к нашему подробному руководству о том, как загрузить стоковую прошивку/ПЗУ Samsung с помощью Frija Tool.
ШАГ 2: Извлеките прошивку Samsung
После загрузки прошивки извлеките ее в любое удобное место на вашем ПК. Затем вы должны получить следующие пять файлов: AP, BL, CP, CSC и HOME_CSC. Файл PIT сохраняется внутри файла CSC, поэтому нам нужно будет извлечь файл CSC. Вот как это можно сделать.
ШАГ 3: Извлеките файл CSC и получите файл Samsung PIT
Чтобы извлечь файл Samsung PIT из файла прошивки CSC, вам понадобится программа 7-ZIP Extraction. WinZip и WinRAR не могли обрабатывать файлы TAR и MD5, поэтому мне пришлось использовать вышеупомянутое программное обеспечение.
- Поэтому скачайте и установите 7-ZIP на свой компьютер.
- Затем щелкните правой кнопкой мыши файл CSC.tar.md5.
- Выберите 7ZIP > Извлечь в CSC.tar.
- Начнется процесс извлечения, который займет несколько минут.
После этого вы получите папку метаданных, несколько файлов LZ4 и необходимый файл PIT. Итак, теперь, когда мы извлекли файл Samsung PIT из файла прошивки CSC, пришло время прошить его на ваше устройство и разблокировать.
Как прошить файл Samsung PIT и разблокировать устройство
Вот необходимые инструкции, чтобы прошить файл Samsung PIT на ваше устройство, а затем разблокировать его. Следуйте вместе.
ШАГ 1: Установите Один
Что ж, нет смысла гадать, что мы будем использовать Odin Tool для прошивки этого PIT-файла. Поэтому загрузите и установите его на свой компьютер по данной ссылке: Один3-v3.14.4.zip. После загрузки извлеките его на свой компьютер и дважды щелкните файл Odin3_v3.14.4.exe, чтобы запустить инструмент.
ШАГ 2. Загрузите устройство Samsung в режим загрузки
Затем вам нужно будет загрузить ваше устройство в режим загрузки, чтобы Odin мог взаимодействовать с вашим устройством. Для этого вы можете обратиться к этому руководству: Как загрузить любое устройство Samsung в режим загрузки. Вот более короткие инструкции для того же самого:
- Выключите устройство. Затем одновременно нажмите и удерживайте клавиши увеличения и уменьшения громкости.
- Удерживая обе эти клавиши, подключите устройство к ПК через USB-кабель.
- Наконец, оставьте обе эти кнопки и нажмите клавишу увеличения громкости, чтобы загрузиться в режиме загрузки.
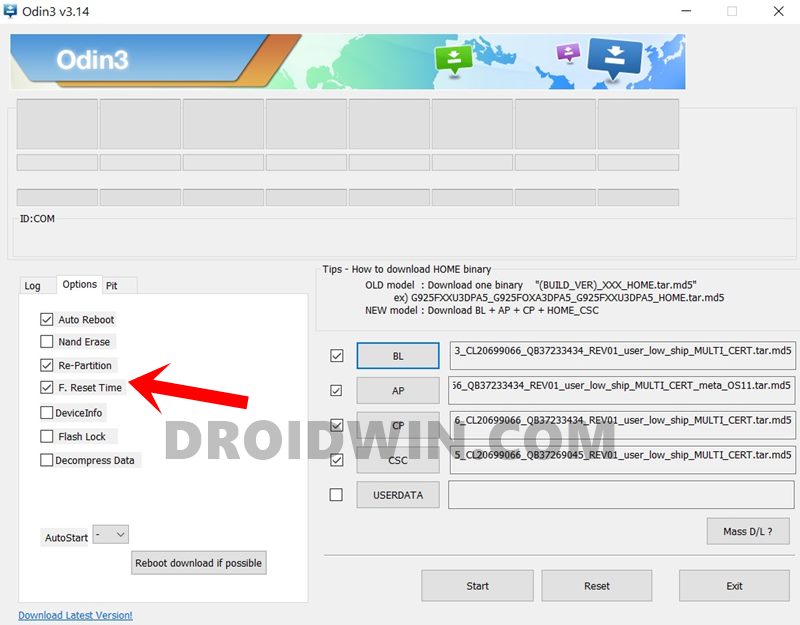
ШАГ 3: Прошить файл Samsung PIT через Odin
- Подключите устройство к ПК через USB-кабель (убедитесь, что оно загружено в режиме загрузки).
- Теперь запустите Odin Tool на своем ПК и перейдите в раздел PIT. Вы получите предупреждение, нажмите OK.

- Нажмите кнопку PIT, перейдите к извлеченному файлу PIT, выберите его и нажмите кнопку «Открыть», чтобы загрузить файл.

- Как только это будет сделано, вам также нужно будет загрузить другие файлы прошивки. Это связано с тем, что файл PIT никогда не прошивается отдельно, а со связанными с ним файлами. Поэтому загрузите файлы BL, AP, CP и CSC (обычный файл CAS, а не HOME CSC) в инструмент.
- Затем перейдите в раздел «Параметры» Odin и включите параметр «Переразметка».
- Наконец, нажмите кнопку «Пуск» и дождитесь завершения процесса. После завершения прошивки файла PIT вы должны получить сообщение Pass.

На этом мы завершаем руководство о том, как извлечь файл PIT из файла прошивки Samsung, прошить его на свое устройство через Odin, а затем разблокировать. Если у вас есть какие-либо вопросы относительно вышеупомянутых шагов, сообщите нам об этом в комментариях. Мы вернемся к вам с решением в ближайшее время.
Файл Samsung PIT: что внутри
Обычное извлечение файла PIT (после удаления двоичного значения) дает следующую информацию.
С другой стороны, если вы ищете полную информацию, включая двоичное значение, то вот что я получил.
Кроме того, преобразование файла PIT в файл XML позволило получить некоторую полезную информацию. Вот небольшой фрагмент того же:
В некоторых случаях вы также можете получить значения в шестнадцатеричном формате, как показано ниже (здесь столбцы соответствуют )
2000000 D000000 5000000 1000000 900300 180000 MODEMST1 nvrebuild1.bin 2000000 E000000 5000000 1000000 A80300 180000 MODEMST2 nvrebuild2.bin 2000000 F000000 5000000 1000000 C00300 680000 БОТИНКА boot.img 2000000 10000000 5000000 1000000 280400 780000 ВОССТАНОВЛЕНИЕ recovery.img 2000000 11000000 5000000 1000000 A00400 680000 FOTA 2000000 12000000 5000000 1000000 80500 EE370000 РЕЗЕРВНОЕ 2000000 13000000 5000000 1000000 2000000 EE3F0500 FSC 2000000 14000000 5000000 1000000 10000000 F03F0500 SSD 2000000 15000000 5000000 5000000 400500 400000 PERSIST persist.img.ext4 2000000 16000000 5000000 5000000 800500 480000 PERSDATA persdata.img.ext4 2000000 17000000 5000000 5000000 C80500 684D00 система .img.ext4 2000000 18000000 5000000 5000000 305300 A00F00 КЭШ-кэш.img.ext4 2000000 19000000 5000000 5000000 D06200 USERDATA userdata.img.ext4
Так что это были все технические детали, которые я смог получить в результате собственного тестирования, а также из надежных источников разработчиков с XDA. Если у вас есть дополнительные сведения обо всем этом, поделитесь с нами своей ценной информацией в комментариях.
How to Fix Error Verifying VBMeta Image OK_NOT_SIGNED(3)
In this guide, we will show you various methods to fix the Error Verifying VBMeta Image OK_NOT_SIGNED(3) issue. a VBMeta file is used to verify the integrity of the system so that your device is only able to boot the authorized and signed firmware. To bypass this restriction, many custom ROMs now come with their own custom vbmeta, but there are still a few that don’t. And for these sets of ROMs, you will need to manually flash the stock or blank vbmeta IMG files.
Well, to be fair, there are still some clouds of uncertainty regarding this file and its usage. And this is the major reason why we are witnessing an increase in the number of issues related to the vbmeta. Fortunately, in most cases, the fix for the same is fairly simple and easy to execute. And this guide shall make you aware of just that. This tutorial will list out four different methods to fix the Error Verifying VBMeta Image OK_NOT_SIGNED(3) issue. Follow along.
Table of Contents
How to Fix Error Verifying VBMeta Image OK_NOT_SIGNED(3)
There exist three different methods to rectify the aforementioned issue. As far as the success rate is concerned, I have personally tested the first fix and manage to fix the issue. The other two fixes, though not tested by me, have also given out successful results by the testers. So on that note, let’s get started. Droidwin and its members wouldn’t be held responsible in case of a thermonuclear war, your alarm doesn’t wake you up, or if anything happens to your device and data by performing the below steps.
Fix 1: Flash Stock Firmware via Odin
This has given the maximum success rate and is a pretty straightforward fix as well. All you need to do is just flash the stock ROM for your device via Odin. Here’s how:
STEP 1: Download Firmware via Frija
To begin with, download the stock firmware for your device and region (CSC) via the Frija Tool. You could also refer to our guide to carry out this task: How to Download Samsung Stock Firmware/ROM via Frija Tool.
STEP 2: Boot to Download Mode
Next up, boot your device to the download mode. For that, please refer to our instructions given in this guide: How to Boot any Samsung Device to Download Mode]. Or you could also refer to the below steps:
- Press Volume Down and Power button, until the phone restarts.
- Quickly plug back the USB cable and Hold Volume Up and then Press Volume UP again (OEM is now off and the Phone will reboot)
- Quickly press Volume UP & Down at the same time again *don’t remove USB cable*, until download mode comes up.
- This time only press Volume UP and your device should be booted.
STEP 3: Flash Firmware via Odin
Next up, download, and install the Odin Tool onto your PC. Using it, you will have to flash the firmware onto your device. You may refer to our guide for the same: How to Flash Stock Firmware via Odin. Or refer to the below shorter instructions: [do keep in mind that doing so will wipe off all the data from your device, so take a backup beforehand]:
- To begin with, extract the zip file that contains your stock firmware.
- Then in Odin, select the file that begins with BL and put it into the BL section, do the same with AP, CP, and CSC.
- Ignore the USERDATA field. For CSC do not use HOME_CSC, use CSC.
- Then press Start and you should be all set. The flashing will now start and could take a few minutes.
Once the flashing is complete, your device will boot to the OS and the issue should have been rectified. With this, we conclude the first method to fix the Error Verifying VBMeta Image OK_NOT_SIGNED(3) issue. Let’s now make you aware of the other two methods.
Fix 2: Flash VBMeta.tar in CP Slot
If you are getting this error message while flashing the TWRP Recovery, then apart from putting the TWRP in the AP slot of Odin, you will also have to put the vbmeta.IMG file in the CP Slot. You could get the vbmeta.img from the stock firmware that you had downloaded for your device via Frija or refer to our guide on How to Download and Flash a Blank vbmeta file.
So once the AP slot is filled with TWRP and the CP is filed with vbmeta, boot your device to the Download Mode and then start the flashing process of both these files via Odin. Once the flashing is complete, your device shall automatically boot to the OS. And this shall fix the Error Verifying VBMeta Image OK_NOT_SIGNED(3) issue as well.
Fix 3: Flash PIT and Recovery.img.tar Files
- To begin with, download the stock firmware for your device via Frija [How to Download Samsung Stock Firmware/ROM via Frija Tool].
- The downloaded firmware will be in ZIP, extract it. Then extract the CSC firmware file and get hold of the PIT file [How to Extract PIT File from Samsung Firmware].

- Likewise, also grab the recovery.img.lz4 from the extracted firmware. Then change this recovery file to recovery.img.tar by renaming it.
- Now launch the Odin Tool, go to the PIT section, click on the PIT button and load the PIT file.
- After that, put in recovery.img.tar in the AP slot of the tool.
- Now go to the Options tab of Odin and uncheck the Auto Reboot option.
- Finally, boot your device to the Download Mode and connect it to the PC via USB cable.
- Once your device is recognized by the tool, hit the Start button to initiate the flashing process.
- Once done, boot your device to recovery and then perform a factory reset (it will wipe off all the data).

- That’s it, you may now boot your device to the OS without any issues.
So with this, we round off the guide on how to fix the Error Verifying VBMeta Image OK_NOT_SIGNED(3) issue. We have shared three different methods for the same. Do let us know in the comments section which one spelled out success for you. Likewise, all queries are welcomed in the comments below.
About Chief Editor
Sadique Hassan
A technical geek by birth, he always has a keen interest in the Android platform right since the birth of the HTC Dream. The open-source environment always seems to intrigue him with the plethora of options available at his fingertips. “MBA by profession, blogger by choice!”
[Q] Error validating footer No VBMETA
My friend’s phone had an update recently.
The update finished perfectly but after a while the phone shut down and when she turned it back on it showed this screen:

«Recovery: Error validating footer.
No VBMETA
VBMETA .»
The phone shutdown after a few hours and it’s not turning back on whatsoever
I don’t want the internal storage to be wiped so i found a way using Home_CSC but i can’t find a ROM with my carrier (i live in Syria) + the phone isn’t turning on anymore.
Is there any way to fix this without losing my internal storage?
If wiping the internal storage is the only way please tell me how to fix it too.
Thanks in advance! and really sorry if this isn’t the right place to post this i really have read the noobs guide.
arana1
Senior Member
- Jan 19, 2022
- #2
My friend’s phone had an update recently.
The update finished perfectly but after a while the phone shut down and when she turned it back on it showed this screen:
«Recovery: Error validating footer.
No VBMETA
VBMETA .»
The phone shutdown after a few hours and it’s not turning back on whatsoever
I don’t want the internal storage to be wiped so i found a way using Home_CSC but i can’t find a ROM with my carrier (i live in Syria) + the phone isn’t turning on anymore.
Is there any way to fix this without losing my internal storage?
If wiping the internal storage is the only way please tell me how to fix it too.
Thanks in advance! and really sorry if this isn’t the right place to post this i really have read the noobs guide.

Ошибки при прошивки Samsung телефонов в ODIN. И так вы созрели до момента, что необходимо прошить свой Samsung. Скачали программу Odin, прочитали статью как прошить свой Android, нашли прошивку, но в момент ее установки все время выбивает ошибки? Как это все исправить и понять что происходит? Все ответы в данной статье!

1. После каждой выявленной ошибки, отключите смартфон или планшет от компьютера, выключите его и снова переведите в режим прошивки.
2. Перезапустите программу для прошивки Odin и подключите смартфон или планшет к компьютеру! Можете снова пробовать шить прошивку!
3. Самое главное! Только новые драйвера и только ОРИГИНАЛЬНЫЕ, ЦЕЛЫЕ и ДОРОГИЕ КАБЕЛИ (50% от всех ошибок являются кабели)!
Типичные ошибки при прошивки Samsung в ODIN
Ошибка подключения устройства
Вариант 1
<ID:0/005> File analysis..
<ID:0/005> SetupConnection..
<OSM> All threads completed. (succeed 0 / failed 1)
Вариант 2
<ID:0/005> File analysis..
<ID:0/005> SetupConnection..
<ID:0/005> Complete(Write) operation failed.
<OSM> All threads completed. (succeed 0 / failed 1)
Решение:
- Убедиться что устройство переведено в специальный режим обновления Downloading, если это не так то перевести;
- Убедиться в целостности используемого USB-шнура (при необходимости заменить), если кабель не оригинальный заменить на оригинальный. Кабель вставить в задний порт USB 2.0 системного блока компьютера.
Samsung «не виден» в Odin
В Odin не отображается ID и COM подключенного смартфона или планшета Samsung

Решение:
1. Убедиться что устройство переведено в специальный режим обновления Downloading, если это не так то перевести;
{rutube}27820823767eb149d68fcb23575e2fa7{/rutube}
2. Убедиться в целостности используемого USB-шнура (при необходимости заменить), если кабель не оригинальный заменить на оригинальный. Кабель вставить в задний порт USB 2.0 системного блока компьютера;
3. Скачать другую версию Odin;
4. Запустить Odin от имени администратора;
5. Перезагрузить компьютер;
6. Удалить программу Kies и драйверы Samsung, перезагрузить компьютер и снова их установить;
7. Временно отключить антивирусник;
8. Если на компьютере установлена еще одна ОС Windows, то попробовать произвести прошивку с нее или прошить на другом ПК;
9. Произвести прошивку на другом компьютере;
10. Убедиться что ваш Samsung не является китайской поделкой, если это не так то повторить пункты 1-9.
Процесс прошивки остановлен на процессе инициализации (проверка подключения)
Если при прошивке Samsung в программе ODIN появиться ошибка:
Вариант 1
<ID:0/004> SetupConnection..
<ID:0/004> Can’t open the serial(COM) port.
<OSM> All threads completed. (succeed 0 / failed 1)
Вариант 2
<ID:0/004> Odin v.3 engine (ID:4)..
<ID:0/004> File analysis..
<ID:0/004> SetupConnection..
<ID:0/004> Initialzation..
Решение: Необходимо подключить устройство в другой USB порт, либо попробовать прошить Samsung на другом компьютере.
Файл Прошивки битый: MD5 hash value is invalid
Если Odin не дает прошить Android и выдает подобную ошибку:
Added!!
Enter CS for MD5..
Check MD5.. Do not unplug the cable..
Please wait..
MD5 hash value is invalid
xxxxxxxxxxx.tar.md5 is invalid.
End…
Это означает что, вы скачали битый файл (недокачанный) или файл не верно подписан.
Решение: Стоит убедиться действительно ли файл прошивки скачанный полностью, если нет, то перекачать. Если файл скачан полностью, удалить с файла расширение .md5
Ошибки при прошивке разделов system.img, boot.img, recovery.img, sboot.bin, cache.img и других разделов
<ID:0/017> system.img
<ID:0/017> FAIL!
или
<ID:0/017> recovery.img
<ID:0/017> FAIL!
или
<ID:0/003> sboot.bin
<ID:0/003> NAND Write Start!!
<ID:0/003> FAIL!
или
FAIL!
Re-Partition operation failed.
All threads completed. (succeed 0 / failed 1)
и другие похожие варианты, но с разными разделами.
Может возникнуть из-за того, что вы пытаетесь прошить либо битый файл прошивки или от другого устройства Samsung ( у вас модель i9100, а прошиваете от i9300). Также это может быть следствие попытки понизить версию ОС Android.
Решение:
- Скачать прошивку с альтернативного источника, если присутствует какое либо описание к файлу, то прочитать;
- Убедиться что прошивка предназначена для вашего устройства Samsung;
- В случае необходимости понижения версии ОС Android, пересобрать прошивку удалив файл sboot.bin;
- В случае перехода с кастомной прошивки на официальную, в начале выполнить сброс (wipe data и wipe system).
Ошибки связанные с повреждением разделов памяти Samsung
Вариант 1
<ID:0/004> Get PIT for mapping..
<ID:0/004> Complete(Write) operation failed.
<OSM> All threads completed. (succeed 0 / failed 1)
Вариант 2
<ID:0/004> FAIL!
<ID:0/004>
<ID:0/004> Re-Partition operation failed.
<OSM> All threads completed. (succeed 0 / failed 1)
Вариант 3
<ID:0/004> Get PIT for mapping..
<ID:0/004> Complete(Write) operation failed.
<OSM> All threads completed. (succeed 0 / failed 1)
Данные проблемы могут возникнуть в следствие повреждения разметки секторов внутренних разделов флеш-памяти устройства, попытки прошить чужой или модифицированный PIT файл, либо поврежден загрузчик
Решение:
- Попытаться найти 4-х файловую сервисную прошивку в интернете, а также PIT файл для вашего устройства и произвести прошивку в Odin;
- В случае не удачной попытки обратиться в СЦ.
Ошибки с отсутствием возможности доступа к записи разделов
FAP LOCK:ON
Custom Binary(RECOVERY) Blocked By FAP Lock
Изменить несколько параметров в настройках:
1. Включить «Отладку по USB» и там в же настройках включить «Разблокировка OEM»;

2. Отключить «Удаленное управление» Samsung;

Samsung не запускается
Если у вас на экране похожее соображение, то это означает что предыдущая прошивка была прервана:

Решение:
- Найдите прошивку Samsung для своего устройства, скачайте ее, после чего установите с помощью Odin, после чего попробуйте снова загрузить девайс (если не сработает переходим ко второму пункту);
- Выполните сброс данных (wipe data/factory reset), после чего попробуйте снова загрузить девайс.
![]()
Nyalakan saran
Saran-otomatis membantu Anda mempersempit hasil pencarian dengan cepat, dengan menyarankan hasil yang mungkin cocok selagi Anda mengetik.
Menampilkan hasil untuk
Ganti mencari
Apakah maksud Anda:
![]()
-
Error validating footer
di Galaxy A 12-23-2021

В этом руководстве мы покажем вам различные способы устранения проблемы с проверкой ошибки VBMeta Image OK_NOT_SIGNED(3). файл VBMeta используется для проверки целостности системы, чтобы ваше устройство могло загружать только авторизованную и подписанную прошивку. Чтобы обойти это ограничение, многие пользовательские ПЗУ теперь поставляются со своей собственной настраиваемой vbmeta, но некоторые из них все еще отсутствуют. И для этих наборов ПЗУ вам нужно будет вручную прошить стоковые или пустые файлы IMG vbmeta.
Ну, честно говоря, все еще есть некоторая неопределенность в отношении этого файла и его использования. И это главная причина, по которой мы наблюдаем рост количество проблем, связанных с vbmeta. К счастью, в большинстве случаев исправить то же самое довольно просто и легко выполнить. И это руководство познакомит вас именно с этим. В этом руководстве будут перечислены четыре различных метода устранения проблемы с проверкой ошибки VBMeta Image OK_NOT_SIGNED(3). Следуйте вместе.
Существует три различных метода устранения вышеупомянутой проблемы. Что касается успеха, я лично протестировал первое исправление и смог исправить проблему. Два других исправления, хотя и не проверенные мной, также дали успешные результаты тестерам. Итак, на этой ноте приступим. Droidwin и его участники не будут нести ответственность в случае термоядерной войны, если ваш будильник не разбудит вас, или если что-то случится с вашим устройством и данными, выполнив следующие шаги.
Исправление 1: Flash Stock Firmware через Odin
Это дало максимальную вероятность успеха, а также довольно простое решение. Все, что вам нужно сделать, это просто прошить стандартную прошивку для вашего устройства через Odin. Вот как:
ШАГ 1: Скачайте прошивку бесплатно
Для начала скачайте стоковую прошивку для своего устройства и региона (CSC) через Frija Tool. Вы также можете обратиться к нашему руководству для выполнения этой задачи: Как загрузить стоковую прошивку/ПЗУ Samsung с помощью Frija Tool.
ШАГ 2: Загрузитесь в режим загрузки
Затем загрузите устройство в режиме загрузки. Для этого обратитесь к нашим инструкциям, приведенным в этом руководстве: Как загрузить любое устройство Samsung в режим загрузки]. Или вы также можете обратиться к следующим шагам:
- Нажимайте кнопку уменьшения громкости и питания, пока телефон не перезагрузится.
- Быстро подключите USB-кабель и удерживайте кнопку увеличения громкости, а затем снова нажмите кнопку увеличения громкости (OEM теперь выключен, и телефон перезагрузится).
- Быстро нажмите кнопку увеличения и уменьшения громкости еще раз * не отсоединяйте USB-кабель *, пока не появится режим загрузки.
- На этот раз нажмите только кнопку увеличения громкости, и ваше устройство должно загрузиться.
ШАГ 3: Прошивка прошивки через Odin
Затем загрузите и установите Odin Tool на свой компьютер. Используя его, вам нужно будет прошить прошивку на ваше устройство. Вы можете обратиться к нашему руководству для того же: Как прошить стоковую прошивку через Odin. Или обратитесь к приведенным ниже кратким инструкциям: [do keep in mind that doing so will wipe off all the data from your device, so take a backup beforehand]:
- Для начала распакуйте zip-файл, содержащий стоковую прошивку.
- Затем в Odin выберите файл, который начинается с BL и поместите его в раздел BL, проделайте то же самое с AP, CP и CSC.
- Игнорируйте поле USERDATA. Для CSC не используйте HOME_CSC, используйте CSC.
- Затем нажмите «Пуск», и все должно быть готово. Теперь начнется мигание, которое может занять несколько минут.
После завершения перепрошивки ваше устройство загрузится в ОС, и проблема должна быть устранена. На этом мы завершаем первый метод исправления ошибки проверки образа VBMeta OK_NOT_SIGNED(3). Давайте теперь познакомим вас с двумя другими методами.
Исправление 2: Flash VBMeta.tar в слоте CP
Если вы получаете это сообщение об ошибке при прошивке TWRP Recovery, то, помимо помещения TWRP в слот AP Odin, вам также нужно будет поместить файл vbmeta.IMG в слот CP. Вы можете получить vbmeta.img из стоковой прошивки, которую вы загрузили для своего устройства через Frija, или обратиться к нашему руководству о том, как загрузить и прошить пустой файл vbmeta.
Итак, как только слот AP заполнен TWRP, а CP заполнен с помощью vbmeta, загрузите свое устройство в режим загрузки, а затем запустите процесс прошивки обоих этих файлов через Odin. После завершения перепрошивки ваше устройство автоматически загрузится в ОС. И это также устранит проблему с ошибкой проверки VBMeta Image OK_NOT_SIGNED(3).
Исправление 3: файлы Flash PIT и Recovery.img.tar
- Для начала скачайте стоковую прошивку для своего устройства через Frija [How to Download Samsung Stock Firmware/ROM via Frija Tool].
- Загруженная прошивка будет в ZIP, распакуйте ее. Затем извлеките файл прошивки CSC и получите файл PIT. [How to Extract PIT File from Samsung Firmware].
- Точно так же возьмите recovery.img.lz4 из извлеченной прошивки. Затем измените этот файл восстановления на recovery.img.tar, переименовав его.
- Теперь запустите Odin Tool, перейдите в раздел PIT, нажмите кнопку PIT и загрузите файл PIT.
- После этого поместите recovery.img.tar в слот AP инструмента.
- Теперь перейдите на вкладку «Параметры» Odin и снимите флажок «Автоматическая перезагрузка».
- Наконец, загрузите устройство в режим загрузки и подключите его к ПК через USB-кабель.
- Как только инструмент распознает ваше устройство, нажмите кнопку «Пуск», чтобы начать процесс перепрошивки.
- После этого загрузите устройство для восстановления, а затем выполните сброс настроек (он сотрет все данные).
- Вот и все, теперь вы можете загрузить свое устройство в ОС без каких-либо проблем.
Итак, на этом мы завершаем руководство о том, как исправить ошибку проверки VBMeta Image OK_NOT_SIGNED(3). Мы поделились тремя разными методами для одного и того же. Дайте нам знать в разделе комментариев, какой из них принес вам успех. Кроме того, все вопросы приветствуются в комментариях ниже.