Содержание
- No vbmeta samsung что это
- Извлечение файла PIT из прошивки Samsung: руководство по разблокировке
- Необходимость извлечения файлов PIT из прошивки Samsung
- Как извлечь файл Samsung PIT из стандартной прошивки
- ШАГ 1: Загрузите стоковую прошивку
- ШАГ 2: Извлеките прошивку Samsung
- ШАГ 3: Извлеките файл CSC и получите файл Samsung PIT
- Как прошить файл Samsung PIT и разблокировать устройство
- ШАГ 1: Установите Один
- ШАГ 2. Загрузите устройство Samsung в режим загрузки
- ШАГ 3: Прошить файл Samsung PIT через Odin
- Файл Samsung PIT: что внутри
- How to Fix Error Verifying VBMeta Image OK_NOT_SIGNED(3)
- How to Fix Error Verifying VBMeta Image OK_NOT_SIGNED(3)
- Fix 1: Flash Stock Firmware via Odin
- Fix 2: Flash VBMeta.tar in CP Slot
- Fix 3: Flash PIT and Recovery.img.tar Files
- About Chief Editor
- [Q] Error validating footer No VBMETA
Извлечение файла PIT из прошивки Samsung: руководство по разблокировке
В этом руководстве мы покажем вам, как извлечь файл PIT из любой прошивки Samsung, прошить его на ваше устройство, а затем разблокировать. У каждого крупного OEM-производителя несколько иной подход к предоставлению стандартной прошивки для своих устройств. Например, Google упаковывает его в ZIP-пакет. В результате вам просто нужно распаковать через WinZIP или WinRAR, и вы сможете получить связанные файлы.
С другой стороны, все файлы разделов OnePlus загружаются в файл payload.bin. Чтобы извлечь этот файл BIN и получить его файлы, вам понадобится автономный инструмент. Кроме того, прошивки Oppo и Realme находятся внутри пакета OZIP. Это снова требует отдельного инструмента для извлечения. Но вы можете спросить, зачем нам извлекать пакет прошивки?
Ну, это в основном необходимо для двух целей: чтобы получить root права на ваше устройство, исправив стоковый boot.img через Magisk и прошив его с помощью команд Fastboot. Другое использование этого — разблокировать ваше устройство, что делается с помощью файлов разделов. После извлечения стоковой прошивки вы получите эти файлы, принадлежащие разным разделам вашего устройства. К ним относятся, например, system.img, recovery.img, vbmeta.img, boot.img.
Затем мы могли бы прошить все эти файлы по отдельности с помощью команд fastboot в соответствующие разделы, и ваше устройство будет готово к работе. Но когда дело доходит до Samsung, все идет наперекосяк. Это связано с тем, что южнокорейские гиганты совсем по-другому относятся ко всему процессу прошивки. Но в чем проблема и почему это приводит к путанице? Давайте проверим это! После этого мы перечислим шаги, чтобы извлечь файл PIT из прошивки Samsung, прошить его, а затем разблокировать ваше устройство.
Необходимость извлечения файлов PIT из прошивки Samsung
Во-первых, Samsung не размещает свои прошивки на своем официальном сайте. Но вы все равно можете загрузить то же самое с сайтов Frija Tool, SamMobile и других. Но даже после загрузки и извлечения прошивки вы не найдете файлы IMG раздела напрямую. Вместо этого вы получите файлы AP, BL, CP, CSC и HOME_CSC с расширением .tar.md5. Можем ли мы прошить эти файлы через Fastboot?
В общих случаях мы используем команды Fastboot для прошивки файлов в соответствующие разделы. Например, команда восстановление через fastboot flash recovery.img указывает CMD прошить файл recovery.img в раздел восстановления. Но в случае с Самсунгом перепрошивка производится через Odin. Но поскольку мы не указываем Odin, куда нужно прошивать файлы, как он определяет раздел? Вот тут-то и пригодится файл Samsung PIT, извлеченный из прошивки.
PIT означает таблицу информации о разделах, и, как видно из ее названия, она содержит все необходимые инструкции относительно того, какой файл нужно прошить и в каком разделе. Odin берет этот файл, считывает всю связанную с ним информацию, а затем выполняет процесс перепрошивки. Например, я распаковал PIT-файл устройства Samsung Galaxy S20 (SM-G980F) и обнаружил следующие имена файлов. [to know more about their block sizes and partitions, refer to the ‘Samsung PIT File: What’s Inside it’ section at the end of this guide].
- ul_key.bin
- sec_efs.img
- up_param.bin
- хранилище ключей.bin
- устойчивый.bin
- recovery.img
- modem_debug.bin
- nad_refer.bin
- dqmdbg.img
- vbmeta.img
- vbmeta_samsung.img
- метаданные.img
- оптика.img
- пользовательские данные.img
Наряду с этими файлами было также несколько зашифрованных данных, которые содержали инструкции, на каком разделе вам нужно прошить эти файлы. Таким образом, Odin возьмет этот файл PIT и выполнит процесс его перепрошивки. Однако. если вы в конечном итоге загрузите неправильный файл PIT в Odin или даже загрузите файл PIT, который не соответствует текущей версии прошивки, это приведет к проблемам с загрузочной петлей или программным кирпичом. Следовательно, чтобы разблокировать устройство Samsung, вам необходимо извлечь файл PIT из прошивки, а затем прошить его. Вот все необходимые инструкции для того же.
Как извлечь файл Samsung PIT из стандартной прошивки
Мы перечислили приведенные ниже инструкции в отдельные разделы для простоты понимания. Продолжайте в той же последовательности, как указано ниже. Droidwin и его участники не будут нести ответственность в случае термоядерной войны, если ваш будильник не разбудит вас, или если что-то случится с вашим устройством и данными, выполнив следующие шаги.
ШАГ 1: Загрузите стоковую прошивку

Прежде всего, вам нужно будет загрузить стандартную прошивку для вашего устройства Samsung. Хотя существует довольно много способов сделать это, я предпочитаю Frija Tool. Если вы также разделяете эту мысль, то обратитесь к нашему подробному руководству о том, как загрузить стоковую прошивку/ПЗУ Samsung с помощью Frija Tool.
ШАГ 2: Извлеките прошивку Samsung
После загрузки прошивки извлеките ее в любое удобное место на вашем ПК. Затем вы должны получить следующие пять файлов: AP, BL, CP, CSC и HOME_CSC. Файл PIT сохраняется внутри файла CSC, поэтому нам нужно будет извлечь файл CSC. Вот как это можно сделать.
ШАГ 3: Извлеките файл CSC и получите файл Samsung PIT
Чтобы извлечь файл Samsung PIT из файла прошивки CSC, вам понадобится программа 7-ZIP Extraction. WinZip и WinRAR не могли обрабатывать файлы TAR и MD5, поэтому мне пришлось использовать вышеупомянутое программное обеспечение.
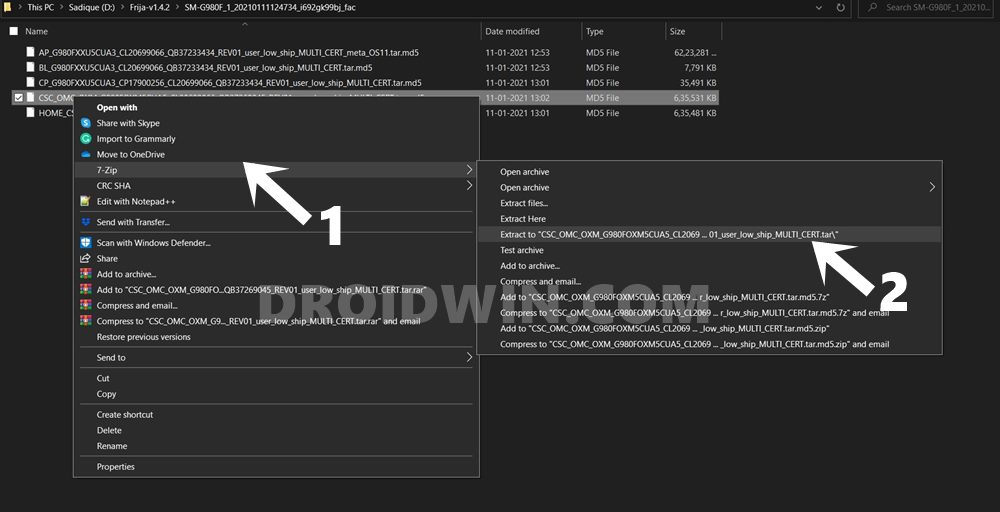
- Поэтому скачайте и установите 7-ZIP на свой компьютер.
- Затем щелкните правой кнопкой мыши файл CSC.tar.md5.
- Выберите 7ZIP > Извлечь в CSC.tar.
- Начнется процесс извлечения, который займет несколько минут.
После этого вы получите папку метаданных, несколько файлов LZ4 и необходимый файл PIT. Итак, теперь, когда мы извлекли файл Samsung PIT из файла прошивки CSC, пришло время прошить его на ваше устройство и разблокировать.
Как прошить файл Samsung PIT и разблокировать устройство
Вот необходимые инструкции, чтобы прошить файл Samsung PIT на ваше устройство, а затем разблокировать его. Следуйте вместе.
ШАГ 1: Установите Один
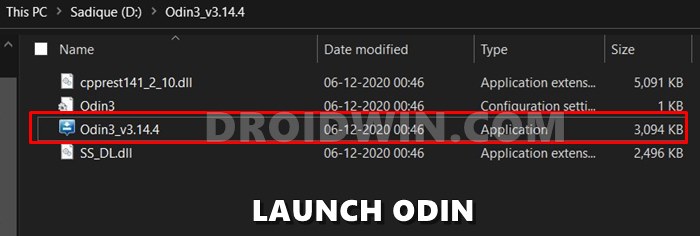
Что ж, нет смысла гадать, что мы будем использовать Odin Tool для прошивки этого PIT-файла. Поэтому загрузите и установите его на свой компьютер по данной ссылке: Один3-v3.14.4.zip. После загрузки извлеките его на свой компьютер и дважды щелкните файл Odin3_v3.14.4.exe, чтобы запустить инструмент.
ШАГ 2. Загрузите устройство Samsung в режим загрузки
Затем вам нужно будет загрузить ваше устройство в режим загрузки, чтобы Odin мог взаимодействовать с вашим устройством. Для этого вы можете обратиться к этому руководству: Как загрузить любое устройство Samsung в режим загрузки. Вот более короткие инструкции для того же самого:

- Выключите устройство. Затем одновременно нажмите и удерживайте клавиши увеличения и уменьшения громкости.
- Удерживая обе эти клавиши, подключите устройство к ПК через USB-кабель.
- Наконец, оставьте обе эти кнопки и нажмите клавишу увеличения громкости, чтобы загрузиться в режиме загрузки.
ШАГ 3: Прошить файл Samsung PIT через Odin
- Подключите устройство к ПК через USB-кабель (убедитесь, что оно загружено в режиме загрузки).
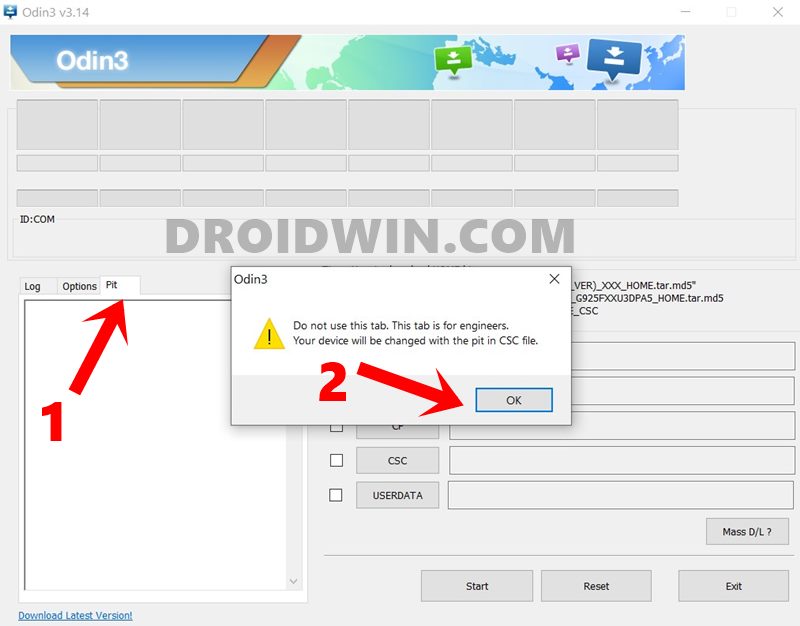
- Теперь запустите Odin Tool на своем ПК и перейдите в раздел PIT. Вы получите предупреждение, нажмите OK.

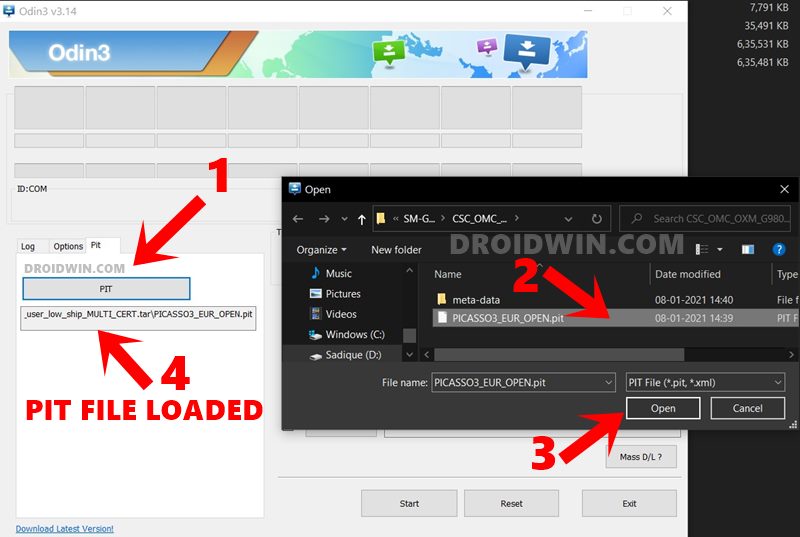
- Нажмите кнопку PIT, перейдите к извлеченному файлу PIT, выберите его и нажмите кнопку «Открыть», чтобы загрузить файл.
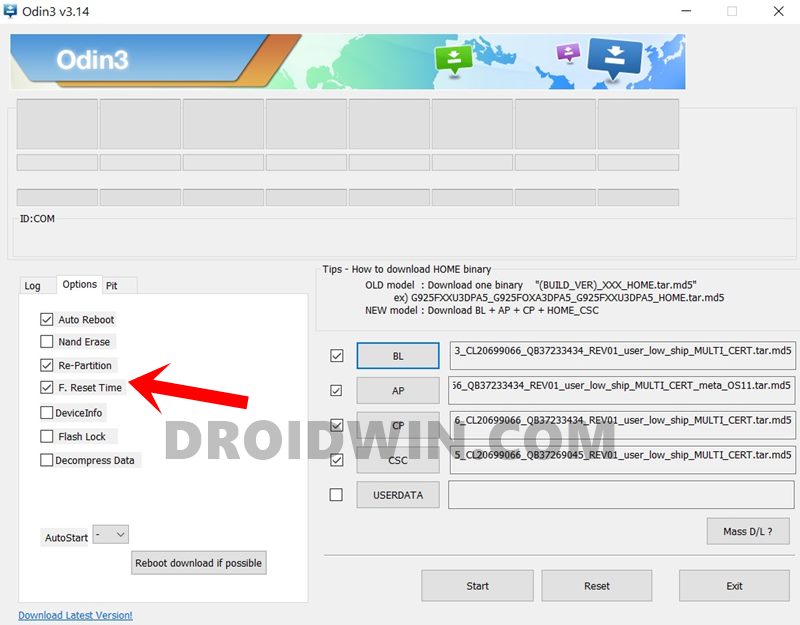
- Как только это будет сделано, вам также нужно будет загрузить другие файлы прошивки. Это связано с тем, что файл PIT никогда не прошивается отдельно, а со связанными с ним файлами. Поэтому загрузите файлы BL, AP, CP и CSC (обычный файл CAS, а не HOME CSC) в инструмент.
- Затем перейдите в раздел «Параметры» Odin и включите параметр «Переразметка».
- Наконец, нажмите кнопку «Пуск» и дождитесь завершения процесса. После завершения прошивки файла PIT вы должны получить сообщение Pass.

На этом мы завершаем руководство о том, как извлечь файл PIT из файла прошивки Samsung, прошить его на свое устройство через Odin, а затем разблокировать. Если у вас есть какие-либо вопросы относительно вышеупомянутых шагов, сообщите нам об этом в комментариях. Мы вернемся к вам с решением в ближайшее время.
Файл Samsung PIT: что внутри
Обычное извлечение файла PIT (после удаления двоичного значения) дает следующую информацию.

С другой стороны, если вы ищете полную информацию, включая двоичное значение, то вот что я получил.

Кроме того, преобразование файла PIT в файл XML позволило получить некоторую полезную информацию. Вот небольшой фрагмент того же:
В некоторых случаях вы также можете получить значения в шестнадцатеричном формате, как показано ниже (здесь столбцы соответствуют )
2000000 D000000 5000000 1000000 900300 180000 MODEMST1 nvrebuild1.bin 2000000 E000000 5000000 1000000 A80300 180000 MODEMST2 nvrebuild2.bin 2000000 F000000 5000000 1000000 C00300 680000 БОТИНКА boot.img 2000000 10000000 5000000 1000000 280400 780000 ВОССТАНОВЛЕНИЕ recovery.img 2000000 11000000 5000000 1000000 A00400 680000 FOTA 2000000 12000000 5000000 1000000 80500 EE370000 РЕЗЕРВНОЕ 2000000 13000000 5000000 1000000 2000000 EE3F0500 FSC 2000000 14000000 5000000 1000000 10000000 F03F0500 SSD 2000000 15000000 5000000 5000000 400500 400000 PERSIST persist.img.ext4 2000000 16000000 5000000 5000000 800500 480000 PERSDATA persdata.img.ext4 2000000 17000000 5000000 5000000 C80500 684D00 система .img.ext4 2000000 18000000 5000000 5000000 305300 A00F00 КЭШ-кэш.img.ext4 2000000 19000000 5000000 5000000 D06200 USERDATA userdata.img.ext4
Так что это были все технические детали, которые я смог получить в результате собственного тестирования, а также из надежных источников разработчиков с XDA. Если у вас есть дополнительные сведения обо всем этом, поделитесь с нами своей ценной информацией в комментариях.
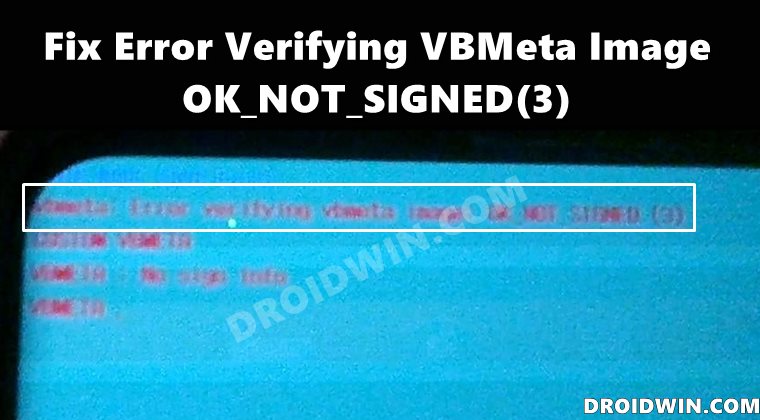
In this guide, we will show you various methods to fix the Error Verifying VBMeta Image OK_NOT_SIGNED(3) issue. a VBMeta file is used to verify the integrity of the system so that your device is only able to boot the authorized and signed firmware. To bypass this restriction, many custom ROMs now come with their own custom vbmeta, but there are still a few that don’t. And for these sets of ROMs, you will need to manually flash the stock or blank vbmeta IMG files.
Well, to be fair, there are still some clouds of uncertainty regarding this file and its usage. And this is the major reason why we are witnessing an increase in the number of issues related to the vbmeta. Fortunately, in most cases, the fix for the same is fairly simple and easy to execute. And this guide shall make you aware of just that. This tutorial will list out four different methods to fix the Error Verifying VBMeta Image OK_NOT_SIGNED(3) issue. Follow along.
Table of Contents
How to Fix Error Verifying VBMeta Image OK_NOT_SIGNED(3)
There exist three different methods to rectify the aforementioned issue. As far as the success rate is concerned, I have personally tested the first fix and manage to fix the issue. The other two fixes, though not tested by me, have also given out successful results by the testers. So on that note, let’s get started. Droidwin and its members wouldn’t be held responsible in case of a thermonuclear war, your alarm doesn’t wake you up, or if anything happens to your device and data by performing the below steps.
Fix 1: Flash Stock Firmware via Odin
This has given the maximum success rate and is a pretty straightforward fix as well. All you need to do is just flash the stock ROM for your device via Odin. Here’s how:
STEP 1: Download Firmware via Frija
To begin with, download the stock firmware for your device and region (CSC) via the Frija Tool. You could also refer to our guide to carry out this task: How to Download Samsung Stock Firmware/ROM via Frija Tool.

STEP 2: Boot to Download Mode
Next up, boot your device to the download mode. For that, please refer to our instructions given in this guide: How to Boot any Samsung Device to Download Mode]. Or you could also refer to the below steps:

- Press Volume Down and Power button, until the phone restarts.
- Quickly plug back the USB cable and Hold Volume Up and then Press Volume UP again (OEM is now off and the Phone will reboot)
- Quickly press Volume UP & Down at the same time again *don’t remove USB cable*, until download mode comes up.
- This time only press Volume UP and your device should be booted.
STEP 3: Flash Firmware via Odin
Next up, download, and install the Odin Tool onto your PC. Using it, you will have to flash the firmware onto your device. You may refer to our guide for the same: How to Flash Stock Firmware via Odin. Or refer to the below shorter instructions: [do keep in mind that doing so will wipe off all the data from your device, so take a backup beforehand]:

- To begin with, extract the zip file that contains your stock firmware.
- Then in Odin, select the file that begins with BL and put it into the BL section, do the same with AP, CP, and CSC.
- Ignore the USERDATA field. For CSC do not use HOME_CSC, use CSC.
- Then press Start and you should be all set. The flashing will now start and could take a few minutes.
Once the flashing is complete, your device will boot to the OS and the issue should have been rectified. With this, we conclude the first method to fix the Error Verifying VBMeta Image OK_NOT_SIGNED(3) issue. Let’s now make you aware of the other two methods.
Fix 2: Flash VBMeta.tar in CP Slot
If you are getting this error message while flashing the TWRP Recovery, then apart from putting the TWRP in the AP slot of Odin, you will also have to put the vbmeta.IMG file in the CP Slot. You could get the vbmeta.img from the stock firmware that you had downloaded for your device via Frija or refer to our guide on How to Download and Flash a Blank vbmeta file.
So once the AP slot is filled with TWRP and the CP is filed with vbmeta, boot your device to the Download Mode and then start the flashing process of both these files via Odin. Once the flashing is complete, your device shall automatically boot to the OS. And this shall fix the Error Verifying VBMeta Image OK_NOT_SIGNED(3) issue as well.
Fix 3: Flash PIT and Recovery.img.tar Files
- To begin with, download the stock firmware for your device via Frija [How to Download Samsung Stock Firmware/ROM via Frija Tool].
- The downloaded firmware will be in ZIP, extract it. Then extract the CSC firmware file and get hold of the PIT file [How to Extract PIT File from Samsung Firmware].
- Likewise, also grab the recovery.img.lz4 from the extracted firmware. Then change this recovery file to recovery.img.tar by renaming it.
- Now launch the Odin Tool, go to the PIT section, click on the PIT button and load the PIT file.
- After that, put in recovery.img.tar in the AP slot of the tool.
- Now go to the Options tab of Odin and uncheck the Auto Reboot option.
- Finally, boot your device to the Download Mode and connect it to the PC via USB cable.
- Once your device is recognized by the tool, hit the Start button to initiate the flashing process.
- Once done, boot your device to recovery and then perform a factory reset (it will wipe off all the data).
- That’s it, you may now boot your device to the OS without any issues.


So with this, we round off the guide on how to fix the Error Verifying VBMeta Image OK_NOT_SIGNED(3) issue. We have shared three different methods for the same. Do let us know in the comments section which one spelled out success for you. Likewise, all queries are welcomed in the comments below.
About Chief Editor
Sadique Hassan
A technical geek by birth, he always has a keen interest in the Android platform right since the birth of the HTC Dream. The open-source environment always seems to intrigue him with the plethora of options available at his fingertips. “MBA by profession, blogger by choice!”
My friend’s phone had an update recently.
The update finished perfectly but after a while the phone shut down and when she turned it back on it showed this screen:
«Recovery: Error validating footer.
No VBMETA
VBMETA .»
The phone shutdown after a few hours and it’s not turning back on whatsoever
I don’t want the internal storage to be wiped so i found a way using Home_CSC but i can’t find a ROM with my carrier (i live in Syria) + the phone isn’t turning on anymore.
Is there any way to fix this without losing my internal storage?
If wiping the internal storage is the only way please tell me how to fix it too.
Thanks in advance! and really sorry if this isn’t the right place to post this i really have read the noobs guide. 
arana1
Senior Member
My friend’s phone had an update recently.
The update finished perfectly but after a while the phone shut down and when she turned it back on it showed this screen:
«Recovery: Error validating footer.
No VBMETA
VBMETA .»
The phone shutdown after a few hours and it’s not turning back on whatsoever
I don’t want the internal storage to be wiped so i found a way using Home_CSC but i can’t find a ROM with my carrier (i live in Syria) + the phone isn’t turning on anymore.
Is there any way to fix this without losing my internal storage?
If wiping the internal storage is the only way please tell me how to fix it too.
Thanks in advance! and really sorry if this isn’t the right place to post this i really have read the noobs guide.
Источник
На основании Вашего запроса эти примеры могут содержать грубую лексику.
На основании Вашего запроса эти примеры могут содержать разговорную лексику.
Error validating wallet integrity. Possibly corrupted.
Ошибка проверки целостности бумажника. Вероятно, бумажник повреждён.
Другие результаты
Could not report errors when validating sub-expression. Errors property is null for RuleValidation instance associated with type.
Не удалось сообщить об ошибках при проверке подвыражения. Свойство Errors не определено для экземпляра операции RuleValidation, связанного с типом.
A validation error occurred when validating the instance document.
Во время проверки правильности документа экземпляра произошла ошибка проверки правильности.
ERROR: Negotiate Authentication validating user — ФopyM IT-KB
Validating against a set of rules (Electrical Rules Check) to detect errors and omissions.
Проверку электрических правил проектирования для выявления ошибок и упущений.
Validating your website is very important because there are code errors which will cause serious styling problems from an online design perspective.
Проверка вашего веб-сайта важна, потому что есть ошибки кода, которые могут вызвать серьезные проблемы со стилем с точки зрения веб-дизайна.
By validating requirements in a variety of ways we can find identify the most likely bottlenecks and errors before implementation.
Иными словами, тестируя и проверяя требования под разными углами, мы сможем обнаружить и разрешить большинство ошибок и неясностей еще до начала этапа реализации.
If a validating parser finds a validity error, it will report it to the application on whose behalf it’s parsing the document.
Если проверяющий анализатор находит ошибку, то сообщает о ней приложению, от имени которого он обрабатывает документ.
It is designed for validating data at runtime, so it throws (or returns) detailed runtime errors.
Он предназначен для проверки данных во время выполнения, поэтому он генерирует (или возвращает) подробные ошибки времени выполнения.
Validating via W3C can only be done when an accurate DOCTYPE declaration is formed, which is employed to spotlight errors in code.
Утверждение через ШЗС может только быть сделано, когда правильная декларация DOCTYPE сделана, который используется, чтобы выдвинуть на первый план ошибки в кодексе.
The Board noted that the Tribunal lacked adequate procedures for validating budget assumptions and for preventing computation errors in the budget costing sheets.
Комиссия отметила, что у Трибунала отсутствуют надлежащие процедуры для проверки бюджетных предположений и для предотвращения ошибок в расчетах в ведомостях расходов.
The next step is to move only after testing and validating the site in order to identify any errors that may affect its performance.
К следующему этапу стоит переходить только после проведения тестирования и проведения валидации сайта с целью выявления допущенных ошибок, которые могут сказываться на его работоспособности.
If the error occurs every time, you try to recover your email from your email client software, then you should consider validating your client settings.
Если ошибка сокета 10060 возникает каждый раз, когда вы пытаетесь получить электронную почту из вашего почтового клиентского программного обеспечения, то вам следует рассмотреть возможность проверки настроек вашего клиента.
The technology will reduce the need for manual data management by the regulator FEDCom and improve the quality of data by automatically validating the numbers, which will help avoid human errors.
Технология уменьшит потребность в ручном управлении данными регулятором FEDCom и улучшит их качество данных за счёт автоматической валидации информации, что поможет избежать человеческих ошибок.
Not only are errors detected during integration testing difficult and time-consuming for developers to reproduce, even validating that it has been fixed is difficult (i.e., a developer creates a fix but then needs to wait four hours to learn whether the integration tests now pass).
Сложным является даже процесс проверки того, что они действительно исправлены (то есть разработчик создает исправление, но затем необходимо ждать четыре часа, чтобы узнать, успешно ли завершилось интеграционное тестирование).
The programme looks for errors and rationalizes, verifying numbers of digits, etc. and puts data into temporary storage before final storage is initiated by «validating» the data.
Эта программа позволяет находить ошибки, устранять их посредством проверки числа цифр и т.д., и временно хранить данные до их записи в окончательном виде после «подтверждения» данных.
The National Registry of Population and Personal Identification has the obligation to check on the accuracy and relevance of the data recorded, by validating fields to avoid errors in data entry and by requiring certain fields to be defined to prevent the omission of important information.
Национальный реестр народонаселения и личной идентификации обязан проверять точность и актуальность заносимых в него сведений путем проверки соответствующих полей базы данных для недопущения ошибок ввода и обязательного занесения информации в некоторые поля для исключения случаев пропуска важной информации.
With the advent of corporations and consolidated reporting (1904), auditors expanded their observations and inspections from the search for errors on accounts to monitoring cash flows and validating reporting.
С появлением корпораций и консолидированной отчетности (1904) аудиторы расширили свои наблюдения и проверки от поиска ошибок по счетам до контроля за денежными потоками и подтверждения достоверности отчетности.
The minimum setting and measurement current range of the 63004-150-60 is 2A and the current error is less than 2mA which makes it suitable for these tests and validating the regulatory compliance of Energy Star.
Минимальная настройка и диапазон измерения тока 63004-150-60 составляет 2А, при погрешности измерения менее 2 мА, что делает данную нагрузку пригодной для таких испытаний и позволяет проводить подтверждение соответствия требованиям Energy Star.
A review in which participants step through an artifact or set of artifacts with the intention of validating the requirements or designs, as well as to identify requirements or design errors, inconsistencies, omissions, inaccuracies, or conflicts.
Walkthrough — Сквозной контроль: Рассмотрение, в котором участники проходят через артефакт или набор артефактов с целью проверки требований или дизайна, а также определяют ошибки требований или дизайна, несоответствия, упущения, неточности или конфликты.
Результатов: 20. Точных совпадений: 1. Затраченное время: 96 мс
Documents
Корпоративные решения
Спряжение
Синонимы
Корректор
Справка и о нас
Индекс слова: 1-300, 301-600, 601-900
Индекс выражения: 1-400, 401-800, 801-1200
Индекс фразы: 1-400, 401-800, 801-1200
![]()
Nyalakan saran
Saran-otomatis membantu Anda mempersempit hasil pencarian dengan cepat, dengan menyarankan hasil yang mungkin cocok selagi Anda mengetik.
Menampilkan hasil untuk
Ganti mencari
Apakah maksud Anda:
![]()
-
Error validating footer
di Galaxy A 12-23-2021


In this post, I will discuss how to get Samsung FRP tools for PC.
These tools function beautifully in the FRP lock subject, and each of the
tools listed below has unique capabilities and the capacity to overcome
the FRP lock. So, to reset FRP, download FRP Unlock tool and follow our easy steps.
subscribe or thank it does not cost anything that motivates me to continue uploading more content subscribing or thanking it costs nothing that motivates me to keep uploading more content HERE the tool used in the video fd tool v 3 8 full crack flash downgrade repair imei and more installation and functions motorolas qualcomm how to remove the original imei when it is in 0 with FD Tool V 3 8 HERE example all the Galaxy SEARCH the firmware in pages how to know the firmware or company of any galaxy it does not matter that it has a broken screen new method Galaxy S1 until S20 how to know the correct firmware for a correct flashing new method Galaxy J1 to J8 how to know the correct firmware for a correct flashing new method all Galaxy A10 to A70 blue screen error Emergency solution how to remove automatic system updates on all Galaxy samsung galaxy which is binary and correct flashing the BL, AP, CP, CSC and Pit files which name they carry and which mean to extract the modem of any rom of Galaxy MCT V2 11 solution for the galaxy with blue screen flashing with MCT Pro V2 put any galaxy in download mode when home does not work enter any galaxy in recovery mode without the buttons no longer battles in your downloads by MEGA download without limit buy your first month easy payment for OXXO mega create account 2020 mega is already paying commissions (HERE)))))) how to translate any youtube video with subtitles in any language how to translate any youtube video with subtitles in any language (HERE)))))) search for a quick video within a well expressed youtube channel search for a quick video within a well expressed youtube channel twitter I AM RESPONDING MESSAGES INSTAGRAM I AM RESPONDING MESSAGES group face book
Another method for FRP
The only method to deactivate a Samsung account from a phone without a password is to contact Samsung to locate and delete the account. If you wish to begin the procedure on your Samsung phone, follow the comprehensive instructions below.
- Unlock your phone, then launch the Samsung phone settings app from the app drawer.
- Scroll down until you see «Cloud and Accounts.» Also, on the next page, select the «Accounts» tab.
- Then, from the choices, select «Samsung Accounts» and then «My profile.» When prompted to enter your email address and password on the account screen, select «Forgot your ID and Password.» A popup will appear on the screen; from there, select your preferred browser.
- A prompted browser prompts you to enter your ID and password, as well as your email address. After that, Samsung will send you an email with a link to reset your password.
- Return to your Samsung account settings and select «Remove Account» from the top-right menu bar.
Help Save me — Every Donation Counts
To see the full content, share this page by clicking one of the buttons below
This website is a well-known promoter of mobile repair. Hello everyone, today I’m going to talk about mobile difficulties. Nowadays, mobile is a vital part of our lives. We use it often at work, and we encounter several issues when using it. It might be a hardware or software issue with the phone. However, whether it is mobile software or hardware difficulties, I have described how to simply repair those issues here. Hardware Problems: In this section, we will go into hardware in depth. We will have detailed details on the hardware issue. In a nutshell, a mobile phone hardware problem occurs when any component within the phone becomes broken.
For instance, if any portion of the mobile falls and breaks, it is also due to hardware; similarly, if the mobile goes into water, it is also due to hardware; and if an I.C. is broken, it is also due to hardware. or charging issues brought on by this gear A software problem typically implies that there is a problem with the mobile operating system, such as a software problem if the applications do not operate or a software problem if the mobile phone restarts or remains on the logo.
If we forget the password on our mobile phone and it has to be unlocked, we have a software problem. However, whether it is a mobile software or hardware problem, I have outlined how to simply address it below. To troubleshoot mobile software or hardware issues, go to gsm.vpnwp.com . After arriving here, you will notice numerous categories such as solutions, gsm assistance, android tricks, gsm news, and so on. You will also notice issues and solutions, as well as a search box through which you may locate the solution of your choosing.