Forum rules
Before you post please read how to get help. Topics in this forum are automatically closed 6 months after creation.
-
ScrealVl
GNS3 Could not find Dynamips
Hi everyone, I am new to Linux Community. I just recently installed Linux Mint Cinnamon 19.
And I have a problem on Installing OIS on GNS3. It says that «Error while creating node: Could not find Dynamips»
Kindly see the picture below. Thanks!
https://scontent.fmnl6-1.fna.fbcdn.net/ … e=5C8A10A6
Last edited by LockBot on Wed Dec 28, 2022 7:16 am, edited 1 time in total.
Reason: Topic automatically closed 6 months after creation. New replies are no longer allowed.
-
genesisjoec
- Level 1

- Posts: 2
- Joined: Sun Dec 30, 2018 1:54 pm

Re: GNS3 Could not find Dynamips
Post
by genesisjoec » Sun Dec 30, 2018 2:01 pm
Hello I am having this exact issue.
I see Lionix posted «Already solved, Path /usr/bin/dwp»
When I tried that however, I get the following:
root@genesisjoec-Lenovo-ideapad-510-15ISK:~# /usr/bin/dwp
/usr/bin/dwp: fatal error: no output file specified
root@genesisjoec-Lenovo-ideapad-510-15ISK:~#
-
Victorpap
Re: GNS3 Could not find Dynamips
Post
by Victorpap » Mon Aug 19, 2019 8:26 pm
Hi,
I encountered recently the same problem and i found a solution for it.
You have to open Preferences, Dynamips, Local Settings and on «Path to Dynamips» you have to input:
/usr/bin/dwp
Hope that would be useful. ![]()
today, i will make video tutorial about routing static with GNS3, but i found problem. when i use ethernet switch i get this message error in console (Server error from http://127.0.0.1:8000: SW1: Could not find Dynamips) and icons switch appear in the letter «E».
complete error :
Running GNS3 version 1.4.5 on Linux (64-bit) with Python 3.5.1 Qt 5.5.1.
Copyright (c) 2006-2016 GNS3 Technologies.
Use Help -> GNS3 Doctor to detect common issues.=>
Server error from http://127.0.0.1:8000: SW1: Could not find Dynamips
Server error from http://127.0.0.1:8000: SW2: Could not find Dynamips
Server error from http://127.0.0.1:8000: SW3: Could not find Dynamips
Server error from http://127.0.0.1:8000: SW1: Could not find Dynamips
Server error from http://127.0.0.1:8000: SW2: Could not find DynamipsServer error from http://127.0.0.1:8000: PC1: No path to a VPCS executable has been set
how to solved Server http://127.0.0.1:8000: SW1: Could not find Dynamips ?
1. Install dependencies for Dybamips
$ sudo pacman -S libelf libpcap cmake
2. Install Dynamips
$ cd /tmp
$ curl -L https://github.com/GNS3/dynamips/archive/v0.2.15.tar.gz | tar -xz
$ cd dynamips*
$ mkdir build && cd $_
$ cmake ..
$ sudo make install
$ sudo setcap cap_net_admin,cap_net_raw=ep $(which dynamips)
for file v0.2.15.tar.gz you can edit with new release, Refer to the GNS3 dynamips repository for more information.
3. Verify the version for Dynamips
$ cd $HOME
$ dynamips 2> /dev/null | grep version
Cisco Router Simulation Platform (version 0.2.15-amd64/Linux stable)
$ getcap $(which dynamips)
/usr/local/bin/dynamips = cap_net_admin,cap_net_raw+ep
Succcess.
How to solved Server error from http://127.0.0.1:8000: PC1: No path to a VPCS executable has been set ??
1. Install Vpcs
Refer to the Virtual PC Simulator project site for more information.
$ sudo pacman -S subversion
$ cd /tmp
$ svn checkout svn://svn.code.sf.net/p/vpcs/code/trunk vpcs-code
$ cd vpcs-code/src
$ sed -i ‘s/i386/x86_64/’ Makefile.linux
$ sed -i ‘s/-s -static//’ Makefile.linux
$ make -f Makefile.linux
$ strip —strip-unneeded vpcs
$ sudo mv vpcs /usr/local/bin
2. Verify Version for Vpcs
$ cd $HOME
$ type vpcs
vpcs is /usr/local/bin/vpcs
$ vpcs -v | grep version
Welcome to Virtual PC Simulator, version 0.8b
Содержание
- Troubleshoot GNS3
- Installation Problems#
- On MacOSX#
- On Microsoft Windows#
- On linux#
- Dynamips#
- My IOS configuration is not saving#
- My router crash#
- Dynamips take 100% of my CPU#
- VMware#
- “VMware vmrun tool could not be found” when using VMware workstation player#
- vmrun exit with Unknown error#
- vmrun timeout#
- I can’t find VMWare virtual machines in GNS3#
- VirtualBox#
- Invalid VBoxManage executable name VirtualBox.exe#
- Cannot start VM because hardware virtualization (VT-x/AMD-V) is already used by another software like VMware or KVM#
- The following physical network interfaces were not found: vboxnet0#
- I have trouble with my ASA 8#
- KVM acceleration cannot be used (/dev/kvm doesn’t exist). You can turn off KVM support in the gns3_server.conf by adding enable_kvm = false to the [Qemu] section#
- IOU process has stopped, return code#
- My IOS configuration is not saving#
- My VPCS configuration is not saving#
- Links#
- My link between a device on my local machine and a remote device is not working#
- When I use a SSH tunnel link is not working#
- When I connect to a server behind a nat link is not working#
- GNS3 VM#
- KVM support available : false#
- I can’t use KVM on ESXi#
- Could not find the default VM directory with VMware player#
- KVM is not working on VirtualBox#
- Error while executing VMware command#
- Cloud#
- I can’t use the cloud on ESXi#
- I have issue with a VMnet#
- My cloud doesn’t work on Windows#
- GNS3 is not working in tmux on OSX#
- Windows#
- QSslSocket: cannot resolve SSL_set_alpn_protos#
- Solved — Could not find Dynamips and No path to a VPCS executable has been set GNS3
- Posted by E-Learning on Friday, April 22, 2016
- Dynamips error in gns3
- Who is online
Troubleshoot GNS3
Installation Problems#
On MacOSX#
THE DMG IS DAMAGED
You need to allow untrusted applications in your OSX settings.
“GNS3” CAN’T BE OPENED BECAUSE IT IS FROM AN UNIDENTIFIED DEVELOPER.
You need to allow untrusted applications in your OSX settings.
On Microsoft Windows#
UPDATE FOR UNIVERSAL C RUNTIME IN WINDOWS KB2999226
If GNS3 ask you for Update for Universal C Runtime in Windows KB2999226 you need to install it. In theory this is distributed via Windows Update but you can force manual installation:
On Window 7 you need service pack 1.
If you can’t install it you need to investigate why Windows Update is no longer working on your system it could be a virus blocking all updates including security updates.
API-MS-WIN-CRT-RUNTIME-L1-1-0.DLL IS MISSING
Make sure all the Windows update are installed and your computer as reboot. On Window 7 you need service pack 1. If not working download: http://download.microsoft.com/download/8/5/e/85edb843-93af-4daa-ad1e-c33dfa95b2ea/vc_redist.x64.exe
Install and reboot
GNS3 STOP WORKING WHEN I OPEN A FILE
If you have Dell Backup and Recovery (or Alien Respawn for Alienware) you need to uninstall or upgrade it to version >= 1.9.2.8. This software conflict with other application using Qt.
On linux#
ICON ARE TINY Solution from fedora wiki:
Start gns3 in a terminal like this:
Dynamips#
If you have any issue with Dynamips make sure you are using one of the recommended images listed here
My IOS configuration is not saving#
Like a real hardware you need to save the configuration before the device is powered off. You can do that with write memory command.
My router crash#
This could be due to not enough memory.
Dynamips take 100% of my CPU#
This could be an invalid IDLE PC value. Edit your router and fix it.
VMware#
“VMware vmrun tool could not be found” when using VMware workstation player#
The free version of VMware doesn’t provide vmrun the command line utility for controlling VMware your need to download it for free from https://www.vmware.com/support/developer/vix-api/
vmrun exit with Unknown error#
This error mean VMware has failed due to an internal error. But the VMware tools don’t provide informations when something is wrong on his side.
- The VM is corrupted
- Your VMware installation as expired
- VMware ask you something in the GUI
- Permissions issue with your VMware installation
It’s very important to run GNS3 and VMware under the same user.
How to troubleshoot:
- Start the faulty VM in the GUI
- If VM is not working reimport it
- If the VM doesn’t work try to import a different VM
- If this VM doesn’t work reinstall GNS3
vmrun timeout#
This issue is often related to a problem with your antivirus / firewall.
See the official answer from VMware:
I can’t find VMWare virtual machines in GNS3#
The player version of VMware have limitation and if your VM are not in the default directory sometimes GNS3 could not found the VM.
This problem doesn’t occur with the paid version of VMware because a central database is available to third parties applications.
VirtualBox#
Invalid VBoxManage executable name VirtualBox.exe#
In the GNS3 settings the path for your VBoxManage is incorrect. VirtualBox.exe is the VirtualBox executable, VBoxManage is the application from VirtualBox for controlling VirtualBox it’s two different executables.
Cannot start VM because hardware virtualization (VT-x/AMD-V) is already used by another software like VMware or KVM#
Another virtualization software (VMware, Qemu with KVM, Hyper-V. ) is already running on your computer and use your CPU hardware virtualization. Only one program can benefits of the hardware acceleration. You need to stop the other program if you want to start VirtualBox.
The following physical network interfaces were not found: vboxnet0#
The default VirtualBox interface network interface are not installed on your system. You can fix that in VirtualBox preference or by reinstalling VirtualBox.
Make sure to read the documentation: https://gns3.com/support/docs/asa-2 And follow the recommendation.
I have trouble with my ASA 8#
Asa 8 is not supported use ASAv instead: https://gns3.com/support/docs/asa-2
KVM acceleration cannot be used (/dev/kvm doesn’t exist). You can turn off KVM support in the gns3_server.conf by adding enable_kvm = false to the [Qemu] section#
This mean the remote server where you try to run Qemu doesn’t support KVM (hardware acceleration for Qemu). Read this documentation to enable it if possible: KVM support available: false
To ignore this error in the file
IOU process has stopped, return code#
If you see this error the image has crashed. IOU is an experimental technology from Cisco and have no warranty to be stable. The best is to try with a different images.
My IOS configuration is not saving#
Like a real hardware you need to save the configuration before the device is powered off. You can do that with write memory command.
My VPCS configuration is not saving#
Like a real hardware you need to save the configuration before the device is powered off. You can do that with the save command.
Links#
My link between a device on my local machine and a remote device is not working#
GNS3 will communicate between device on random UDP port (you can configure the port range in the configuration file of the server and in the GUI). This mean both server need to be able to communicate directly on this ports check your firewall rules.
When I use a SSH tunnel link is not working#
SSH tunnel is not supported, use a VPN like OpenVPN instead
When I connect to a server behind a nat link is not working#
NAT is not supported, use a VPN like OpenVPN instead
GNS3 VM#
KVM support available : false#
The virtualisation software where the GNS3 VM is running doesn’t support nested virtualization. Many possible reason:
- VirtualBox doesn’t support it; you can’t enable it
- Your CPU doesn’t support virtualization
- The virtualization instructions are not enabled in your BIOS
- The hardware virtualization is not enabled for this VM in VMware
- For ESXi it’s require manual operation (see below)
I can’t use KVM on ESXi#
In order to use KVM (hardware acceleration for Qemu VMS) you need to enable the nested virtualization on the GNS3 VM in ESXi. Depending on how you administrate the ESXi it could be a checkbox in your interface or a configuration file to change.
Could not find the default VM directory with VMware player#
A limitation of the free version of VMware player doesn’t allow you to change the default VM directory for third parties applications.
You can fix it by: Editing the file %Appdata%VMwarepreferences.ini And add a line like this:
KVM is not working on VirtualBox#
It’s a limitation of VirtualBox. If you want to use KVM in a VM you need VMware.
Error while executing VMware command#
If you see a dialog like that:
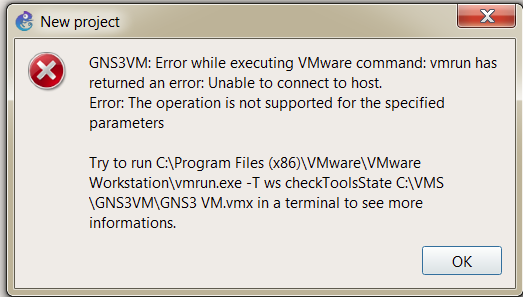
This mean GNS3 try to send a command to VMware but it’s doesn’t work due to an issue with your VMware installation.
- First try to run the command in a terminal to see if VMware don’t ask you something in a message dialog (when launched from GNS3 VMware will fail but will not display dialog)
- Make sure GNS3 and VMware run under the same user. If you use “Run as administrator” it will start GNS3 under a different user than you standard user and VMware will not know how to connect.
- If you use VMware player make sure you have the last VIX api installed
- If you use VMware workstation make sure the VIX api is not installed
Cloud#
I can’t use the cloud on ESXi#
If you are on ESXi by default for security reason you are not allowed to inject raw packet in an interface. You need to enable the promiscuous mode on the interface.
I have issue with a VMnet#
Do not directly use a VMnet in a cloud. Instead use the built in support for VMware (go to preferences / VMware and add the VM).
My cloud doesn’t work on Windows#
Try to replace Winpcap by Npcap: https://github.com/nmap/npcap/releases If you didn’t reboot since GNS3 install you could also try to reboot.
GNS3 is not working in tmux on OSX#
You need to fix your tmux configuration:
Windows#
QSslSocket: cannot resolve SSL_set_alpn_protos#
You have an old Open SSL installation on your system. This installation take the priority on GNS3 bundled version. You need to upgrade your Open SSL or uinstall it.
Источник
Solved — Could not find Dynamips and No path to a VPCS executable has been set GNS3
Posted by E-Learning on Friday, April 22, 2016
today, i will make video tutorial about routing static with GNS3, but i found problem. when i use ethernet switch i get this message error in console (Server error from http://127.0.0.1:8000: SW1: Could not find Dynamips) and icons switch appear in the letter «E».
complete error :
Running GNS3 version 1.4.5 on Linux (64-bit) with Python 3.5.1 Qt 5.5.1.
Copyright (c) 2006-2016 GNS3 Technologies.
Use Help -> GNS3 Doctor to detect common issues.
=>
Server error from http://127.0.0.1:8000: SW1: Could not find Dynamips
Server error from http://127.0.0.1:8000: SW2: Could not find Dynamips
Server error from http://127.0.0.1:8000: SW3: Could not find Dynamips
Server error from http://127.0.0.1:8000: SW1: Could not find Dynamips
Server error from http://127.0.0.1:8000: SW2: Could not find Dynamips
Server error from http://127.0.0.1:8000: PC1: No path to a VPCS executable has been set
1. Install dependencies for Dybamips
$ cd /tmp
$ curl -L https://github.com/GNS3/dynamips/archive/v0.2.15.tar.gz | tar -xz
$ cd dynamips*
$ mkdir build && cd $_
$ cmake ..
$ sudo make install
$ sudo setcap cap_net_admin,cap_net_raw=ep $(which dynamips)
for file v0.2.15.tar.gz you can edit with new release, Refer to the GNS3 dynamips repository for more information.
3. Verify the version for Dynamips
$ cd $HOME
$ dynamips 2> /dev/null | grep version
Cisco Router Simulation Platform (version 0.2.15-amd64/Linux stable)
$ getcap $(which dynamips)
/usr/local/bin/dynamips = cap_net_admin,cap_net_raw+ep
$ sudo pacman -S subversion
$ cd /tmp
$ svn checkout svn://svn.code.sf.net/p/vpcs/code/trunk vpcs-code
$ cd vpcs-code/src
$ sed -i ‘s/i386/x86_64/’ Makefile.linux
$ sed -i ‘s/-s -static//’ Makefile.linux
$ make -f Makefile.linux
$ strip —strip-unneeded vpcs
$ sudo mv vpcs /usr/local/bin
$ cd $HOME
$ type vpcs
vpcs is /usr/local/bin/vpcs
$ vpcs -v | grep version
Welcome to Virtual PC Simulator, version 0.8b
Источник
Dynamips error in gns3
I’ve installed the latest GNS3 (0.8.2 all-in-one) on my Windows 7 64 bit machine (see gns3.ini config below).
For some reason, I’m not able to start dynamips. It is really frustrating, as I have tried numerous things. The following things I have tested (after reading through the forums):
- manually point to the dynamips.exe location
- installed GNS3 in 32 bit folder (x86) as well as in the 64bit Program Files folder on Windows
- Totally disabled Windows firewall& virus scan software
- Downloaded dynamips from the website and installed that version over the supplied one
- Used other ports
- Ran GSN3 as administrator (right click > Run as administrator)
In all conditions, dynamips is unable to start, when pushing the test button. Obviously, when I add a router or etherswitch, GNS3 hangs and gives the joyfull message «Failed to start dynamips».
File comment: hypervisor error
gns3_hypervisor-error.png [ 8.55 KiB | Viewed 19624 times ]
In all conditions, I was able to start dynamips via the command line, with output & the command list. As seen via netstat -a TCP is listening on port7200 for the localhost.
As I have to use GNS3 for school, I am very very frustrated, because I have to hand in some exercises and Wireshark traces this week.
I hope someone can help me, or give additional tips, on how to fix this..
[GNS3]
version=2050
lang=en
project_startup=true
relative_paths=true
slow_start=0
autosave=0
console=putty.exe -telnet %h %p
use_shell=true
bring_console_to_front=false
gui_show_status_points=true
gui_use_manual_connection=true
gui_draw_selected_rectangle=true
project_directory=D:\ymajik\_telecom\GNS3
ios_directory=D:\ymajik\_telecom\GNS3
scene_width=2000
scene_height=1000
auto_check_for_update=true
last_check_for_update=1333434697
console_delay=0.5
[Capture]
working_directory=C:\Users\ymajik\AppData\Local\Temp
capture_reader_cmd=tail.exe -f -c +0b %c | »C:\Program Files (x86)\Wireshark\wireshark.exe» -k -i —
auto_start_cmd=false
| Attachments: |
| File comment: gns3.ini gns3.ini [3.82 KiB] Downloaded 959 times |
Last edited by ymajik on Tue Apr 03, 2012 12:19 pm, edited 1 time in total. Top
![]()
| grossmj | |||||||||||||||||||||||||||||||||||||||||||||||||||||||
|
Joined: Sat Oct 11, 2008 1:41 pm |
|
Сегодня мы рассмотрим разнесение на разные компьютеры оболочки GNS3 и эмулятора Cisco IOS Dynamips.
Дано:
мощный сервер (дом/работа/Hetzner/Amazone) и достаточно слабое рабочее место (ноутбук/нетбук/etc.).
Задача:
перенести нагрузку от эмуляции большого числа IOS на сервер для комфортной работы.
Решение:
Будут рассмотрены несколько вариантов — штатный (! Да, вы не замечали в настройках вкладку «Гипервизоры»? ) и работающие с костылями [unix way], но на мой взгляд несколько удобней.
Для работы будем использовать следующее ПО:
— GNS3 0.8.2-BETA, но должно работать и на ветке 0.7.x
— Dinamips 0.2.8-RC2
— Linux Ununtu 11.10 / Windows 7
— bash, tmux, ssh
- Вариант 1 — штатный
— Server: Linux
— Server: Windows
— Client: Linux
— Client: Windows - Вариант 2 — unix way
- Вариант 3 — unix way/ part 2
- PS1 — baseconfig.txt
- PS2 — tmux
Вариант 1 — штатный
Как это работает.
На сервере запускается dynamips в режиме гипервизора. На клиенте (рабочая станция с GNS3) отключается управление локальными гипервизорами и прописываются удаленные.
Server: Linux
$ sudo apt-get install dynamips
$ cd /tmp
$ dynamips -H 7220
Cisco Router Simulation Platform (version 0.2.8-RC2-amd64)
Copyright (c) 2005-2007 Christophe Fillot.
Build date: Jan 18 2011 19:25:29

Hypervisor TCP control server started (port 7220).
Если вы видите подобное сообщение о запуске сервера — все работает.
Перед запуском гипервизора необходимо перейти в «рабочую» директорию, т.к. в процессе работы он создает много временных файлов. В данном случае они нас не интересуют, поэтому будем работать в папке tmp.
Можно оставить сервер и перейти в другой терминал или остановить гипервизор.
^CHypervisor: closing control sockets.
Hypervisor: closing remote client connections.
Shutdown in progress...
Shutdown completed.
Для удобства советую использовать tmux.
Также при использовании брандмауэра не забудьте сделать в нем исключения на входящий порт гипервизора (в данном случае TCP 7220) и консольные соединения (настраиваются в GNS3).
Гипервизор готов, осталось подготовить образы IOS.
Скачиваем образ с сайта cisco.com или, в случает отсутствия подписки, с известного торрент трекера.
Не забываем для ускорения загрузки распаковывать образы, для этого с сайта GNS3 скачиваем «Cisco image unpacker 0.1 source code».
$ mkdir ~/IOS
$ cd ~/IOS
$ mv ~/Downloads/Unpack-0.1_src.tar.bz2 ./
$ mv ~/Downloads/c2600-ipbasek9-mz.124-17.bin  ./
$ tar -xjf Unpack-0.1_src.tar.bz2
$ rm Unpack-0.1_src.tar.bz2
$ python ./Unpack/unpack.py --format=IOS c2600-ipbasek9-mz.124-17.bin
warning [c2600-ipbasek9-mz.124-17.bin]:  17812 extra bytes at beginning or within zipfile
(attempting to process anyway)
IOS binary image successfully unpacked in c2600-ipbasek9-mz.124-17.bin.unpacked
Server: Windows
Как говорят знающие люди — dynamips под win работает стабильно хуже, но приступим к установке.
Качаем «GNS3 v0.8.2 BETA all-in-one».
После установки открываем папку с GNS3 и dynamips и находим .bat файл для запуска гипервизора.

Можно вынести ярлык в удобное место, например на рабочий стол, т.к. запускать его придется часто.
Далее в редакторе правим порт с стандартного 7200 на 7220:
rem Launch a local copy of dynamips
set dynamips=%CD%dynamips.exe
cd %TEMP%
start /belownormal /B /wait "Dynamips" "%dynamips%" -H 7220
pause
После запуска окно консоли должно выглядеть подобным образом
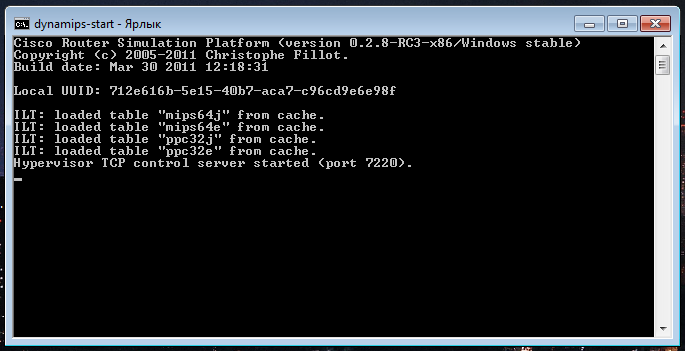
Все остальные действия не сильно отличаются от таковых под Linux (см. выше):
— открыть порты в брандмауэре;
— скачать образы IOS;
— распаковать образ, распаковщик.
Client: Linux
В Ubuntu можно установить GNS3 через пакеты
$ sudo apt-get install gns3
Но там довольно старая версия (0.7.4), поэтому скачаем исходники. Компилировать ничего не придется, т.к. он написан на питоне. Для удовлетворения всех зависимостей сначала установим GNS3 из пакета, затем скачаем последнюю версию из репазитория.
$ sudo apt-get install gns3
$ sudo apt-get install mercurial
$ cd ~/IOS/
$ hg clone http://code.gns3.net/gns3-devel
$ cd gns3-devel
$ ./gns3.pyw

Edit->Preferences проверяем настройки локального динамипса.
Не забываем нажать «Test Settings»

Edit->IOS images and hypervisors
В поле HOST вводим ip адрес нашего сервера с dynamips, PORT — порт, выбранный для ручного запуска dynamips.
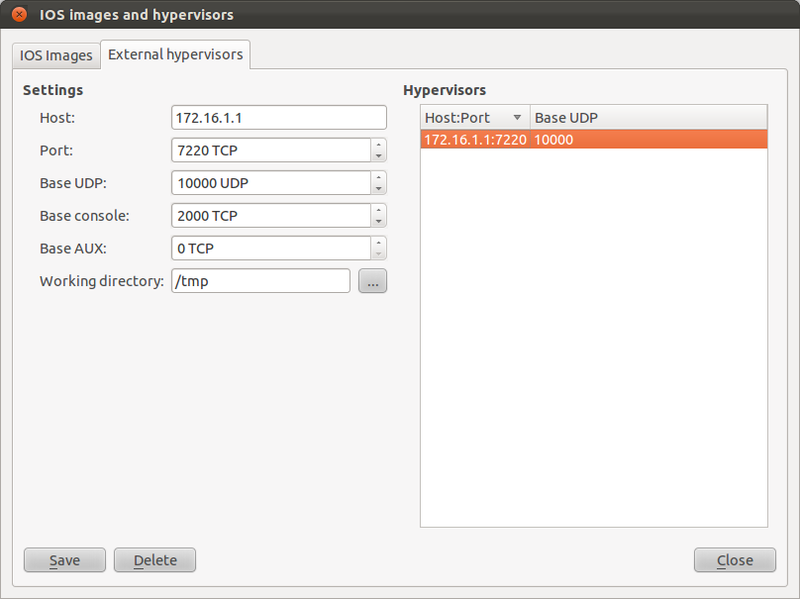
Теперь во вкладке IOS images добавляем образ.

ВАЖНО. Путь к «Image file» и «Base config» указываются на сервере. Для пользователя, из-под которого запущен dynamips, эти файлы должны быть доступны на чтение.
Локально таких файлов может не существовать.
Убираем пункт «Use the hypervisor manager» и выделяем нужный сервер.
После чего сохраняем. В списке образов мы видим что обращение будут идти не на локальный гипервизор, а на таковой на сервере 172.16.1.1.
Долее как обычно создаем топологию и работаем.
Client: Windows
Отсюда качаем и устанавливаем «GNS3 v0.8.2 BETA all-in-one» — собранную последюю версию GNS3.
Все настройки соответствуют клиенту под Linux.
Вариант 2 — unix way
Минусов у штатного решения два:
— необходимость вручную логиниться на удаленный сервер для запуска гипервизора;
— открытый канал управляющего соединения с гипирвизором и консолями.
При запуске гипирвизора с ключем «-H 7220» dynamips открывает прослушивающий сокет на всех доступных адресах:
$ sudo netstat --numeric --listening --program | grep dynamips
tcp        0      0 0.0.0.0:7220            0.0.0.0:*               LISTEN      12756/dynamips
Никакой авторизации и шифрования не предусмотрено и, при включенном режиме «паранойя», такое в интернет не выставляется. Возможности повесить гипервизор на определенный ip, например 127.0.0.1, нет, и порт в любом случае необходимо закрывать брандмауэром.
На первый взгляд, необходимо использовать VPN, что выходит за рамки данной стати.
Так же при локальной работе менеджер гипирвизоров при некоторых обстоятельствах запускает несколько копий dynamips на разных портах.
Вариант решения — настраиваем GNS3 на работу с локальным dynamips, но создаем прослойку, которая открывает удаленное соединение по ssh до сервера, автоматически запускает там гипервизор и пробрасывает порты поверх своего шифрованного соединения. Фактически это будет один скрип, запускаемый с разными ключами — для управляющего соединения и для удаленной консоли.
Приступим!
NOTE. Для корректной работы должна быть настроена аутентификация в SSH по ключам || править скрипт.
NOTE. Версия GNS3 должна быть выше 0.8.2 beta2(например из репазитория), т.к. в ней присутвует баг, при котором управляющий скрипт не может правильно погасить удаленный dynamips.
Edit->Preferences в настройки локального dynamips и вместо его бинарника пишем путь до нашего скрипта
/home/%username%/IOS/rdyn.shТакже изменяем строку подключения к консоли
gnome-terminal -t %d -e '/home/%username%/rdyn.sh -R %p' >/dev/null 2>&1 &Не забываем выставитт полный путь к файлу в комманде и заменить переменные в скрипте.
#!/usr/bin/env bash

HOST=host.tld
#HOST=2001:470::1
PORT=4444
USER=username

#######################################

WRKDIR='/tmp'
DYNAMIPS='/usr/bin/dynamips'

RCMD=$1
RPORT=$2
SSHOPT="-a -T -q -x -o ExitOnForwardFailure=yes -o TCPKeepAlive=yes -o BatchMode=yes -o ControlPersist=10 -o ControlPath=/tmp/rdyn.%h.%p.%r -p $PORT $USER@$HOST "
TELNETCMD="ssh -N -f -L 127.0.0.1:$2:127.0.0.1:$2 $SSHOPT"

########################################
trap quit INT TERM HUP KILL

function quit {
if [ $RCMD = '-H' ] ; then
  ssh $SSHOPT "pkill -f "$DYNAMIPS -H $RPORT"" &
else
  pkill -f "$TELNETCMD"
fi
exit
}
########################################

if [ "$1" = '' ] ; then
  echo 'Error: script expects some commands.'
  exit
fi

ssh -M -f $SSHOPT exit > /dev/null 2>&1

if [ "$1" = '--help' ] ; then
  ssh $SSHOPT "$DYNAMIPS --help"
else
  if [ "$1" = '-H' ] ; then
    ssh -L 127.0.0.1:$2:127.0.0.1:$2 $SSHOPT "cd $WRKDIR ; $DYNAMIPS -H $2" 2> /dev/null &
    while :  ; do
      wait;
      sleep 1;
    done
  else
    $TELNETCMD > /dev/null 2>&1
    telnet 127.0.0.1 $2
    pkill -f "$TELNETCMD"
    read
  fi
fi
Принцип работы:
— попытка запустить мастер соединение с сервером (завершается по idle таймауту автоматически);
в процессе работы создается достаточно много dynamips-over-ssh и telnet-over-ssh сессий и мультиплексирование, в данном случае, заметно ускоряет работу.
— создание ловушки для корректной остановки удаленного dynamips;
— запуск гипервизора или telnet соединения.
Вариант 3 — unix way/ part 2
Проброс X11 GUI приложения.
Плюсы: работает, причем все и «из коробки».
Минусы: медленно. Удовлетворительный результат только в пределах LAN при маленьких задержках и больших скоростях.
$ ssh -X -C username@host.tld gns3
-C включает сжатие
-X активирует проброс X11 сессии /не забываем включить ‘X11Forwarding yes’ в sshd_config/
Но в случае использования X11 Forwording мы, фактически, лишаемся возможности загружать .net файлы и просматривать сохраненные конфигурации локально.
Для пользователи тяжелых оболочек могут воспользоватся встроенными функциями. Например Nautilus умеет добавлять в закладки sftp линки.
Возможен более универсальный вариант в связке fuse+ssh= sshfs.
Эта тема уже обсуждалась на хабре, поэтому будет только идея.
Создаем в домашнем каталоге основную папку для работы с GNS и вспомогательный скрипт.
$ sshfs username@host.tld:/home/%username%/CISCO ~/CISCO
$ cat << ENDL > ~/CISCO/rgns3
ssh -X -C username@host.tld gns3 $1
ENDL
$ chmod +x ~/CISCO/rgns3
Модель работы:
— Скачиваем, например, лабораторную. Допустим, ROUTE: EIGRP.
— Монтируем sshfs.
— Распаковываем архив в ~/CISCO
— Запускаем
$ ~/CISCO/rgns3 ~/CISCO/EIGRP/topology.netPS1
baseconfig.txt
!
hostname %h
no ip domain-lookup
line con 0
exec-timeout 0 0
logging synchronous
privilege level 15

service timestamps debug datetime msec

line vty 0 15
no login
exec-timeout 0 0
logging synchronous
privilege level 15
Это не боевая конфигурация и имеет проблемы с безопасностью, но для обучения удобна.
PS2
Настройка tmux для работы с консолями dynamips.
В tmux я создаю отдельную сессию для консолей, а из GNS3 только добавляю соединение к существующей.
$ cat gconsole.sh
unset TMUX;
tmux new-session -d -s GNS3 >/dev/null 2>&1
gnome-terminal -e '/usr/bin/tmux attach-session -t GNS3'
GNS3 Edit->Preferences «Terminal command»
unset TMUX; tmux new-window -t GNS3 -n '%d' 'telnet %h %p ; cat' >/dev/null 2>&1 &и при использование dynamips-over-ssh варианта
unset TMUX; tmux new-window -t GNS3 -n '%d' '/home/%username%/IOS/rdyn.sh -R %p' >/dev/null 2>&1 &