Добрый день!
При загрузке медиафайлов появляется ошибка HTTP. Как ее исправить?

Ответ
Эта ошибка обычно возникает, когда Вы загружаете изображение или другие файлы в WordPress с помощью встроенного загрузчика мультимедиа.
Есть несколько причин, которые могут привести к ошибке HTTP при попытке загрузить файлы с помощью медиазагрузчика WordPress. В принципе, WordPress не может понять причину, и поэтому он отображает общее сообщение об ошибке.
Для решения задачи существует несколько способов. Рассмотрим их более подробно.
Способ 1. Убедитесь, что ошибка HTTP не временная
Во-первых, Вы должны подождать несколько минут, а затем повторить попытку загрузить файл изображения. Эта ошибка иногда бывает вызвана необычным трафиком и низкими ресурсами сервера, которые автоматически фиксируются на большинстве серверов хостинга WordPress. Если это не сработает, попробуйте загрузить другой файл изображения. Если другой файл загружен успешно, попробуйте сохранить исходный файл изображения меньшего размера и повторите загрузку.
Наконец, Вы можете попробовать сохранить файл в другом формате. Например, смените jpeg на png с помощью программного обеспечения для редактирования изображений. После этого повторите загрузку файла.
Если все эти шаги все равно приводят к ошибке, это означает, что ошибка не вызвана временным сбоем и определенно требует вашего непосредственного внимания.
Способ 2. Увеличьте предел памяти WordPress
Наиболее распространенной причиной этой ошибки является нехватка памяти для использования WordPress. Чтобы исправить это, Вам нужно увеличить объем памяти, который PHP может использовать сервере. Это можно сделать, добавив следующий код в основной конфигурационный файл wp-config.php:
define ('WP_MEMORY_LIMIT', '256M');
Этот код увеличивает предел памяти WordPress до 256 МБ, чего будет достаточно для устранения проблем с ограничениями памяти.
Способ 3. Измените библиотеку редактора изображений, используемую WordPress
WordPress работает на PHP, который использует два модуля для обработки изображений. Эти модули называются GD Library и Imagick. “Движок” может использовать любой из них, в зависимости от того, какой из них доступен.
Тем не менее, Imagick, как известно, часто сталкивается с проблемами памяти, вызывающими ошибку HTTP во время загрузки изображений. Чтобы исправить это, Вы можете сделать библиотеку GD редактором изображений по умолчанию.
Для этого необходимо добавить этот код в файл functions.php Вашей темы:
function wpschool_image_editor_default_to_gd( $editors ) {
    $gd_editor = 'WP_Image_Editor_GD';
    $editors = array_diff( $editors, array( $gd_editor ) );
    array_unshift( $editors, $gd_editor );
    return $editors;
}
add_filter( 'wp_image_editors', 'wpschool_image_editor_default_to_gd' );
Если Вы не знаете, как редактировать functions.php, то в этом случае Вам поможет плагин ProFunctions.
После добавления кода Вы можете повторить загрузку файлов с помощью загрузчика мультимедиа. Если это не решит проблему, можете удалить этот код и попробовать другие методы, описанные в этом материале.
Способ 4. Использование метода .htaccess
Этот метод позволяет Вам контролировать, как Imagick использует серверные ресурсы. Многие хостинг-провайдеры ограничивают способность Imagick использовать несколько потоков для более быстрой обработки изображений. Однако это приведет к появлению ошибки HTTP при загрузке изображений. Простой способ исправить это – добавить следующий код в файл .htaccess, который находится в корневом каталоге сайта:
SetEnv MAGICK_THREAD_LIMIT 1
Этот код просто ограничивает модель Imagick одним потоком для обработки изображений.
Также читайте: 504 тайм аут шлюза – что это, методы решения.
Нажмите, пожалуйста, на одну из кнопок, чтобы узнать понравилась статья или нет.
Содержание
- How to Fix the HTTP Image Upload Error in WordPress
- Correcting the HTTP Upload Error
- 75 Comments
- Internal Server Error
- Как исправить ошибку HTTP Image Upload Error?
- Ответ
- Способ 1. Убедитесь, что ошибка HTTP не временная
- Способ 2. Увеличьте предел памяти WordPress
- Способ 3. Измените библиотеку редактора изображений, используемую WordPress
- Способ 4. Использование метода .htaccess
How to Fix the HTTP Image Upload Error in WordPress
46 Seconds to Read
When working with images in WordPress, it is possible that you get an error when uploading to your site. This error is a rather vague HTTP error. This can leave many people puzzled as to how to fix this. Here we will show you one method to correct the error in your WordPress site.
Correcting the HTTP Upload Error
- Log into your cPanel dashboard.
- Using the file manager, navigate to your WordPress site’s root directory.
- Locate and open the .htaccess file for editing.
- Add the following line of code at the top of the file:
SetEnv MAGICK_THREAD_LIMIT 1 - Save the changes to the .htaccess file.
Now you should be able to upload the image to your WordPress site without issue. If your problems persist, we recommend following our WordPress Troubleshooting guide.
My website is open at https://smartbrains.com/ and i want to shift it at https://www.smartbrains.com/ i solved the canonical issue but still web page is open without www. can you please help me
Please follow the directions in this article on forcing WWW in .htaccess.
Worked – thank you!
for me changing image size to 1380*280 px or below works.
You made it simple! Worked like a charm! Thanks for posting & sharing.
For me it was a $%*ing apostrophe in the file name, didn’t even notice it….
Thanks for the tip!! 😀
It’s perfectly work for me. Thank you.
It didn’t work for me
I recommend following our WordPress Troubleshooting guide to narrow the cause down further.
Thank you,
John-Paul
Disabling Akismet worked for me as well (I had also added the line at the top of the .htaccess file).
For me i didnt have to edit my htaccess file. after i removed the apostrophe from the file name, it uploaded with no problem. so I guuss its probably some plugin or the core that is not accepting certain characters. Anyways im glad you guys have a solution.
Perfect! Thank you!
any chance you could explain what causes the errror? I tried PSD 6 and PSD CC both gave the error before you fixed it.
As per this post in the WordPress.org support community, there can be a number of reasons for the error. It may vary based on what you have installed or the configuration of your site.
Worked for me! Thanks.
You are welcome! We are glad that we could help!
Same here. I got an HTTP error on PNG images, but after I changed them all to JPG, they uploaded in record time.
For you that worry that you have to go do this to retrospectively to sites you already my have, here you can use this:
find . -type f -name “.htaccess” -exec sh -c ‘echo SetEnv MAGICK_THREAD_LIMIT 1 >> “$1″‘ — <> ;
Thanks for your feedback and contribution to the community!
Thanks!! its works..
It works! Thanks so much…
Great done
its work
thx a lot dude
i’ve been searchin a lot but this is awesome
Excellent! It worked after clearing the cache.Thanks
If you’re uploading Word files I found that saving it into an older format version such as 2004 doc worked.
The recommended change didn’t work.
I reduced the filesize to something quite small, that didn’t work.
I changed the format to .jpg form .png worked immediately.
i tried it on my wordpress site but still showing HTTP error
what should i do?
Make sure that you have cleared your browser cache and re-logged into the administrator dashboard. Also, make sure that the command is at the top of the .htaccess file and that you’re in the appropriate .htaccess file (there can be more than one). If you continue to have the error, then you may need to consult with a developer or contact our live support team.
Thanks, Akismet is the one to disable in my case
This is a great! It’s working fine for me.
I PUT THIS IN HTACCESS FILE AT THE VERY TOP.
Disabling the plugin Askimet (my Hello Dolly plugin was disabled long before this problem arose) fixed the issue for me. Thank you so much!
Excellent, this worked very good
Awesome, fixed my problem in a snap!
Just a quick thanks for this fix. It absolutely worked a dream. I’ve encountered this problem on a few sites lately and will try this every time. (BTW it was another host’s cpanel so it’s not just for Inmotion hosted sites).
I had been having the same issue and after some troubleshooting, i found wordpress default plugin Akismet and Hello Dolly was responsible. It may not be the same but this might be it in may cases like mine… Hope it helps
I had the same problem but managed to resolve it using the following method. All of my images had been optimised using Photoshop and saving for Web & Devices. These .jpg images failed to upload. I opened up each image and just did a “save as” which uncompressed the files by quite a margin (150 KB instead of 40-50 KB). They uploaded successfully and at the same time were shrunk considerably back to circa 40-50 KB so all was well. My uneducated guess is the upload fails as the images were already compressed to the maximum. Not had any problems since I discovered that uploading also compressed files. Hope this helps.
Tried the edit but to no avail. Am I correct in assuming the fix is peculiar to InMotion Hosting?
No, this is not specific to InMotion. If the above fix does not work, you may want to try the Force Regenerate Thumbnails plugin. That seems to also have success.
So I was having this problem as well, and that got me here.
I had a plugin “WP Smush” installed. Was the first I deactivated, and viola! All images are uploading…. I think you should add “all image compressing/editing plugins should be deactivated first.
This fix also applies to a base WordPress installation with no image manipulation plugins. It relates to a core WordPress image function.
Thank you for sharing this helpful article. This problem was occurring on my site ( https://####.com) After reading your article, I solved it. That’s why thank you again!
Rakibul, we’re so glad that we were able to help!
I have found a great solution for you here in this website https://blog.khojdo.com/http-error-while-image-upload-in-wordpress-version-4-7-2-step-by-step-tutorial-solved/
Dipesh, thank you very much for sharing! Please keep in mind as well that there may be other causes to this issue beyond the ones discussed in the article here, as well as in your link.
Hi. Thanks for the fix.
But I have to add this code to my .htaccess file everyday….
The next day I get the same error. And I have to add this code again…
What do I have to do to fix this error permanently…
Sorry for the problem with your .htaccess file. Either your file is being hacked every day or you have a security plugin that is taking the change that you apply out. If you suspect a hack, then make sure that you have replaced your cPanel password and then check to see that you change is staying in place after you have applied it. Make sure to check your security options too, as they may be keeping a specific version of the file in place.
If you have any further questions or comments, please let us know.
Regards,
Arnel C.
I’ve tried it all man. Nothing has worked. I still have a few lessor important sites on WordPress, but I moved my most important site over to Squarespace. Could not be happier. I was a loyal user for years but WordPress has permanently lost me at this point, at least for any site of importance. A seemingly un-fixable error is not ok.
I eventually found a fix, by changing the PHP version used for sites, from 5.5 to 5.6.
Our hosting company default version of PHP is 5.5.x. and they say, if you want to use PHP 5.6.x, or 7.0.x explicitly, just add one of the following commands to your .htaccess file.
PHP 5.5 (Default)
AddHandler application/x-httpd-php55 .php
PHP 5.6
AddHandler application/x-httpd-php56 .php
PHP 7.0
AddHandler application/x-httpd-php70 .php
Hey there guys, I know there’s already a solution to this problem, but for some reason, I’m getting this issue in WordPress 4.7.1 and your fix is giving me an Internal server Error
Internal Server Error
The server encountered an internal error or misconfiguration and was unable to complete your request.
Please contact the server administrator at [email protected] to inform them of the time this error occurred, and the actions you performed just before this error.
More information about this error may be available in the server error log.
Additionally, a 500 Internal Server Error error was encountered while trying to use an ErrorDocument to handle the request.
This is a pretty general error. You will want to contact your hosting support so they can look at your logs for the specific error message and correct it.
I tried this fix numerous times, but it hasn’t worked for me.
Neil, I’m sorry to hear that this method was unable to resolve your issue. Unfortunately, as the article mentions this is a vague HTTP error, and the proposed solution listed here is only one possible fix. You may wish to contact your web host’s Support if possible, and ask them for account-specific assistance.
I have added the line of code at the top but when I reopen the .htcacces file after saving it’s not appearing?
Ensure you have the correct file permissions to modify the .htaccess file.
Thank you,
John-Paul
Unfortunately I spoke too soon. Tried this fix on a second WordPress site of mine (that’s more important) and I still get the HTTP Error. However, so far it happens less than it used to, so not sure what’s going on.
Sigh. I knew it was too good to be true. Back to searching. Maybe I just need to move on from WordPress. They have to know this is a bug by now, it’s been years! Yet there is still no permanent fix.
I recommend following our WordPress Troubleshooting guide to narrow down the cause.
If your problems persist, you can try disabling mod security (the steps may differ if you are hosted elsewhere), renaming your .htaccess file, or changing your PHP version .
If you still have issues, you may have to replace your core WordPress files.
Thank you,
John-Paul
This fix just saved my life! Well, not quite, but almost. I have been dealing with this ridiculous error for the better part of a year. I basically gave myself an ultimatum to either fix this error soon, or I would have to abandon the entire WordPress platform altogether. It has absolutely killed my productivity when composing new posts.
I have tried every kind of fix up until I found your post on wordpress.org, which then led me back here. Here’s the WP post: https://wordpress.org/support/topic/http-error-on-media-upload-7/page/2/
And when I say I tried everything, I mean EVERYTHING! I literally thought I had tried every fix out there by now. By a miracle I found this. So far so good! I was able to upload seven pictures at once with zero errors. It’s probably been more than a year since that last happened. Thank you so much!
And for others that have little experience with this, I literally put the code from step 4 as the very first line in the file. Saved it, and boom. Fixed. FINALLY! Here’s to hoping it’s a permanent solution!
Thanks a bunch for this. This certainly helped in fixing the HTTP image error message on my WordPress blog.
Thank you! This has been driving me nuts recently but this has done the trick.
Inmotion should really include it in their instructions they send after a VPS upgrade.
I had the same problem after I upgraded to VPS but I had to wade through a lot of other answers on Google before I found this one.
This worked for me too.
I too upgraded from a shared hosting plan to VPS, and ran into the same issue. Adding this line to the top of my .htaccess file fixed it right away. I have about 6 sites, but so far only one has been affected by thius issue.
This post helps me solve the problem after upgrade plan from Shared host to VPS.
Just want to inform to everyone that have the same case should try this one.
Scott – Where do I edit the .htaccess template in my VPS servers?
Because right now I have to add the SetEnv MAGICK_THREAD_LIMIT 1 to every .htaccess file after installing WordPress for new websites.
The above mentioned is already in the htacces file now. But I still have the problem? Any suggestions are welcome.
Thank you for contacting us. I recommend following our WordPress troubleshooting guide, to narrow down the cause.
Источник
Как исправить ошибку HTTP Image Upload Error?
При загрузке медиафайлов появляется ошибка HTTP. Как ее исправить?
Ответ
Эта ошибка обычно возникает, когда Вы загружаете изображение или другие файлы в WordPress с помощью встроенного загрузчика мультимедиа.
Есть несколько причин, которые могут привести к ошибке HTTP при попытке загрузить файлы с помощью медиазагрузчика WordPress. В принципе, WordPress не может понять причину, и поэтому он отображает общее сообщение об ошибке.
Для решения задачи существует несколько способов. Рассмотрим их более подробно.
Ещё читайте: Connection timed out – перевод ошибки и меры по устранению.
Способ 1. Убедитесь, что ошибка HTTP не временная
Во-первых, Вы должны подождать несколько минут, а затем повторить попытку загрузить файл изображения. Эта ошибка иногда бывает вызвана необычным трафиком и низкими ресурсами сервера, которые автоматически фиксируются на большинстве серверов хостинга WordPress. Если это не сработает, попробуйте загрузить другой файл изображения. Если другой файл загружен успешно, попробуйте сохранить исходный файл изображения меньшего размера и повторите загрузку.
Наконец, Вы можете попробовать сохранить файл в другом формате. Например, смените jpeg на png с помощью программного обеспечения для редактирования изображений. После этого повторите загрузку файла.
Если все эти шаги все равно приводят к ошибке, это означает, что ошибка не вызвана временным сбоем и определенно требует вашего непосредственного внимания.
Способ 2. Увеличьте предел памяти WordPress
Наиболее распространенной причиной этой ошибки является нехватка памяти для использования WordPress. Чтобы исправить это, Вам нужно увеличить объем памяти, который PHP может использовать сервере. Это можно сделать, добавив следующий код в основной конфигурационный файл wp-config.php:
Этот код увеличивает предел памяти WordPress до 256 МБ, чего будет достаточно для устранения проблем с ограничениями памяти.
Способ 3. Измените библиотеку редактора изображений, используемую WordPress
WordPress работает на PHP, который использует два модуля для обработки изображений. Эти модули называются GD Library и Imagick. “Движок” может использовать любой из них, в зависимости от того, какой из них доступен.
Тем не менее, Imagick, как известно, часто сталкивается с проблемами памяти, вызывающими ошибку HTTP во время загрузки изображений. Чтобы исправить это, Вы можете сделать библиотеку GD редактором изображений по умолчанию.
Для этого необходимо добавить этот код в файл functions.php Вашей темы:
Если Вы не знаете, как редактировать functions.php, то в этом случае Вам поможет плагин ProFunctions.
После добавления кода Вы можете повторить загрузку файлов с помощью загрузчика мультимедиа. Если это не решит проблему, можете удалить этот код и попробовать другие методы, описанные в этом материале.
Способ 4. Использование метода .htaccess
Этот метод позволяет Вам контролировать, как Imagick использует серверные ресурсы. Многие хостинг-провайдеры ограничивают способность Imagick использовать несколько потоков для более быстрой обработки изображений. Однако это приведет к появлению ошибки HTTP при загрузке изображений. Простой способ исправить это – добавить следующий код в файл .htaccess, который находится в корневом каталоге сайта:
Этот код просто ограничивает модель Imagick одним потоком для обработки изображений.
Нажмите, пожалуйста, на одну из кнопок, чтобы узнать понравилась статья или нет.
Источник
Every platform has some pros and cons. Talking about cons, almost every platform gives some errors which are frustrating and annoying like database connection errors, HTTP errors, white screen errors, etc. You must know how to get rid of them and know the way out of such errors and problems.
Like any other platform, WordPress also runs into HTTP errors when you try to upload images using a build-in media uploader without giving any reason for that error. This error is annoying as you spent considerable time choosing the image for your blog post and spent a lot of time editing that image as per your blog need. Finally, after doing all these you try to upload that image to WordPress and you get an HTTP error with no cause. This is frustrating.
Sometimes, when you upload an image in WordPress using the built-in media uploader, you get an HTTP image upload error. This is frustrating, as we do not get the actual cause of the error. In this article, you will come to know the possible causes of these types of errors and their solutions.
What is an HTTP error during uploading images?
In WordPress, during uploading an image you may face an HTTP image upload error. This error is basically the code that indicates that something went wrong during the upload and needs to be fixed. This type of error occurs when you try to upload media to WordPress using a built-in media uploader.

Unlike browser errors, where we get the error code and can reference that error code for the actual problem and its solution, WordPress errors are a little difficult to solve (as we do not get the actual cause of the error).
However, WordPress can not figure out the actual cause of these errors but these errors can be fixed using the solutions in this article.
What are the reasons that cause HTTP errors when uploading images?
There are many reasons for these errors to occur such as too large image files, plugin causing issues, WordPress memory limitation, etc. WordPress is unable to figure out the actual cause of the error. We need to figure out the cause and then fix it.
Some causes of the error are:
1. Plugin Issue
If the HTTP error occurs after installing some new WordPress plugin, then chances are there that plugin might be causing the issue or hindering the media upload that causes an error.
2. Theme Issue
If you have switched to a different theme and observed the HTTP error, then possibilities are there that theme might be causing the error.
3. WordPress Memory Limit
There are chances that your WordPress memory limit is low and hence during the upload of media, it runs into memory shortage, and consequently, it causes the error while uploading any media.
4. Default image editor
Imagick is the default image editor of WordPress and is known for consuming more memory than other image editor libraries. When you upload the media, it exhausts the available memory in WordPress causing the error.
5. Wrong filename
Sometimes, we unintentionally insert a special character in the filename. If any special character, like colon or semi-colon, is present in the name of the file, WordPress will give the HTTP error.
How to fix the HTTP errors during image upload
As WordPress does not figure out the actual cause of the error and we need to figure it out and fix it. So we need to try the hit and trial method in order to fix the error. We have already discussed some causes of this type of error and now we will see the solution to the above causes and some more causes.
Some of the solutions are:
1. Refresh the page
The first and foremost thing you should do whenever you encounter an HTTP error is to refresh your browser page. There are possibilities that your browser might have lost connection temporarily with WordPress and the uploading process simply failed to complete.
Sometimes, WordPress logs you out, for whatever reason, when you refresh the page you see the login page and a message “Your session has expired. Please log in to continue where you left off.” This indicates that your login session has expired and you must log in again to continue.

2. Check your filename
Sometimes, you end up editing your image file by naming it including the special characters. This gives an error in uploading that file to WordPress.
Check the name of your file. It should not contain a special character like a semicolon, equal sign, apostrophes, etc (dashes are OK). If it is there remove it and try re-uploading it with a new name (without special characters).

If the error persists, then follow the next solutions.
3. Switch the Browser
It might be possible( but the possibility is less) that the error is unrelated to the website and the browser is causing the issue, you may try switching the browser and re-upload the image.
This may solve the problem. If not, read on for more solutions.
4. Reduce the size of the file
The size of the file may be the reason for that error. In order to get rid of that error reduce the size of the file which you want to upload. You may decrease the width/height (pixels) of the image to reduce the size of the file. You can use the tools available offline as well as online to optimize the image for you.
There are many plugins available that can do this for you when you upload the image.
5. Make sure the error is not temporary
You may get an HTTP error in WordPress on uploading images or any other media sometimes because of low server resources or unusual network traffic on WordPress hosting servers. This issue is fixed automatically after the network traffic is reduced or resources needed by your website are available on WordPress hosting servers, and your website can use them. You may experience this too, resulting in an HTTP error while uploading images or other media.
In this case, you should wait for a few minutes so that traffic is reduced or necessary resources are available to use on hosting servers and try re-uploading the media. Also, try reducing the size of the image or the format of the image and uploading it. If it does not work then try other solutions.
6. Deactivate Plugin
There are some situations where some plugins like image optimization plugins (they tie directly into the media library) and security plugins like WordFence hinders the uploading of the image and thereby, give up the HTTP error while uploading the image. Security plugins are sometimes too restrictive and hinder the uploading of the image.
If you have recently installed any plugin, and then get the HTTP error on image upload. There might be a possibility that the plugin is causing the issue. You may uninstall the plugin and try re-uploading the image. This might solve the issue. If not, follow other solutions.

If you do not want to affect your live site then simply clone the site to the staging environment and then try out the solutions on the cloned site. Later, apply these changes to your live site.
7. Switch Theme
The same is the case with themes, although they do not directly tie into the media library sometimes, themes may also cause this issue. In this case, backup your data and switch to a default theme (twenty seventeen), and then try to upload the image.
However, changing the theme of your WordPress site will not affect your data as your data is safely stored in the database. You may also stage up your live site and change the theme on your staged site to see the results without affecting your live site. Later, switch the theme on your live site as well.

This might solve the problem if the HTTP error is occurring because of the theme.
8. Check uploads folder permission
When there is a permission error for any folder in WordPress, it gives an appropriate message of not being able to write to the directory. But this is not always the case. If WordPress is infected with malware or hacked, there could be a lot of permission-related issues. So it is better to check the folder permission before attempting other solutions.
The main folder to be concerned about is /wp-content/uploads. This is the folder where all files are stored which are uploaded via the media library.
You can use the FTP client to see the permission of your uploads folder.

According to the WordPress Codex, all directories should be 755 (drwxr-xr-x) or 750.
9. Increase WordPress Memory Limit
One of the causes of this type of error is the lack of memory available for WordPress to use to upload the image in the background. This cause is the most common cause in the case of shared WordPress hosting. In order to fix it, you must increase the memory limit of WordPress so that PHP can use it on the server.
To increase the memory limit of WordPress, you need to add the following code to your wp-config.php file. The wp-config.php file is present in the root folder of the website.
|
define( ‘WP_MEMORY_LIMIT’, ‘256M’ ); |
This code will increase the memory limit of WordPress to 256MB, which is enough to upload the media.
10. Change WordPress Image Editor Library
WordPress uses PHP and to handle images PHP uses two modules. These modules are the GD library and Imagick. WordPress uses either of them depending on the availability of the library. They both are great in their work but Imagick is known for exhausting available memory and running into memory issues causing the HTTP error because of lack of available memory.
To fix this issue, we can change the default Image Editor Library to the GD library.
To do this, just add the following code to your theme’s functions.php or a site-specific plugin.
|
functionwpb_image_editor_default_to_gd( $editors) { $gd_editor= ‘WP_Image_Editor_GD’; $editors= array_diff( $editors, array( $gd_editor) ); array_unshift( $editors, $gd_editor); return$editors; } add_filter( ‘wp_image_editors’, ‘wpb_image_editor_default_to_gd’); |
After adding this code to the functions.php, try re-uploading the image. If it does not work, remove the code from the theme’s functions.php and try other solutions.
11. Make Changes to the .htaccess file
The .htaccess file is present in the root folder of your website and it acts as the control of the website. It controls the requests to the functions. Many shared hosting providers limit Imagick to use multiple threads for faster image uploading which causes the HTTP error.
To fix this issue, you can add the following code to your .htaccess file:
|
SetEnv MAGICK_THREAD_LIMIT 1 |
This code limits Imagick to using a single thread to process the image.
Now, try re-uploading your image and check if the problem is solved.
12. Check the PHP Version
WordPress requires PHP version 5.2.4 or above (since WordPress version 3.2) to run smoothly. Some hosts use an older version of PHP. If the PHP version is older then you may get this type of error.
The solution to this is to ask your hosting company to upgrade your PHP version or choose a hosting company that provides you with a newer and stable version of PHP.
13. Disable mod_security
Mod_security is basically an open source firewall that may hinder in uploading of images and give the WordPress HTTP error. In order to disable the mod_security so that it does not hinder the process of image uploading, you can add the following code to your .htaccess file on the top.
|
<IfModule mod_security.c> SecFilterEngine Off SecFilterScanPOST Off </IfModule> |
This code will disable the mod_security firewall and thereby, preventing the WordPress HTTP error to occur during the file upload.
14. Clear the Cache
Are you still getting the error? There might be a possibility that you have solved the error previously while attempting previous solutions and the error which you are seeing is coming from the cached data of your browser. Clear the cache memory of the browser and try uploading the image. This may solve the issue.
15. Install Add From Server Plugin
If you have tried all of the solutions listed above and are still unable to solve the problem then last but not least solution is to install the free plugin available name Add Server Plugin.

This is a temporary solution for the issue, you can add this plugin to your website till you are waiting for a response from your WordPress host or a developer on how to get the WordPress HTTP error resolved.
It can be considered a good temporary solution if you are in the middle of some important task. It was originally developed to allow you to add very large files via SFTP.
Important: This plugin is no longer maintained or supported. Use this plugin at your own risk.
16. Talk to customer support
If none of the above-mentioned methods work, the last option only left is to contact your web hosting customer support.
While for any type of error you must contact your customer support but it should be your last resort. If you have tried all the mentioned methods and still encounter the same error, there are higher chances that it causes due to some issue from the server side.
So, by contacting the support team of your web host, their expert team may be able to figure out the issue and resolve it as soon as possible.
Conclusion
Due to lack of exact reason, encountering an HTTP error when uploading pics on WordPress can be irritating and frustrating. But the best part is, that you can still able to fix this issue, by using the above-mentioned methods and you do not need to add any code or access core files.
If even the customer support team isn’t able to help you, you can move anytime to the more reliable and better WordPress host (WPOven).
If you have more solutions to fix HTTP errors while uploading pics that we have not mentioned in our post, Feel free to mention them in the comment section below, we will definitely add them.
Frequently Asked Questions
What does an HTTP error mean when uploading a photo?
HTTP error is a code that occurs when you are trying to upload a picture to WordPress. This error can be frustrating but it is temporary and generally fixed automatically.
Why am I getting HTTP error when uploading images to WordPress?
Since the HTTP error when uploading images to WordPress can occur multiple of reasons, Some of the most common reasons are:
1. Plugin compatibility Issue
2. Theme Issue
3. WordPress Memory Limit
4. Default image editor
5. Wrong filename
6. Issue from the server side
How do I fix a photo upload problem?
You can fix a photo upload problem by using these simple methods:
1. Refresh the page
2. Check your filename
3. Switch the Browser
4. Reduce the size of the file
5. Make sure the error is not temporary
6. Deactivate Plugin
7. Switch Theme
8. Check uploads folder permission
9. Increase WordPress Memory Limit
Change WordPress Image Editor Library
Are you getting HTTP error while uploading image in WordPress? The good news is, you are not alone. Recently, one of my client had a problem in uploading image in WordPress and here’s what I learnt while fixing the issue. Generally, this error occurs while uploading an image and in most cases, the error appears even if the image was uploaded to the media folder or no thumbnails being generated.
Sometimes the error might occur only for a particular image. So you might have to try uploading a different image to see if the problem occurs again. However, there are plenty of reason for HTTP error and here are few.

Due to bigger image size
Probably, you are uploading an image with very high resolution. For example, my client was uploading an image of size 4254px x 1483px and its size on disk was 3.22MB. Though WordPress upload page supports image size of 64MB (this might differ on your WordPress installation), it still ended up in throwing HTTP error.
Fix: To fix this error, I had to decrease the image size to less than 1200px. Some users in WordPress forum suggests, if the width of your post content is 700px, then you should not upload an image larger than that (well, this suggestion is not entirely true, because I have been uploading bigger images for while in this site).
Due to Plugin conflict
If you had installed a plugin recently, then try disabling/deactivate it and upload the image again. Sometimes, the plugin might conflict with an image upload and trigger HTTP error.
Disable Image optimizer plugins
Are you using any image optimizer plugin, such as EWWW image optimizer then try disabling it and upload the image again. For example, I had installed EWWW image optimizer plugin on my client website. After seeing HTTP error in the image upload page, I navigated to Media page to see if the image has uploaded or not. The image was uploaded successfully, but the Image Optimizer column said “Not processed“.

Fix: Sometimes, the optimizer plugins may not be able to process the uploaded image. Hence, I deactivated the plugin and uploaded the image successfully.
Note:
But image optimizer plugins are important to improve your site’s load time. You should activate the plugin after uploading the problematic image.
Due to PHP Memory limit
The error might be due to the memory limit in PHP. Try adding the below line in wp-config.php file and upload the image again.
define( 'WP_MEMORY_LIMIT', '256M' );
If your hosting does not allow to increase PHP memory limit, then you may need to contact them to fix the issue.
You may also increase memory limit by adding the below line in .htaccess (for those who don’t have access to php.ini)
php_value memory_limit 256M
Note:
If your server or hosting does not have enough memory, then you will end up in seeing “500 Internal Server error”. In such cases, this solution is not for you.
If you have an access to php.ini in your web server, then change the value of ‘memory_limit‘ as shown below.
$ vim /etc/php.ini

memory_limit = 256M
Due to Mod_security
Try to turn off “SecFilterEngine” and “SecFilterScanPOST” in mod_security. To do that, add the below lines in .htaccess located in wp-admin directory.
<IfModule mod_security.c>
 SecFilterEngine Off
 SecFilterScanPOST Off
 </IfModule>
500 Internal server error – async-upload.php
Check if you see an error in JavaScript console while you see HTTP error. For example, you will see an error as shown in the below screenshot.
![]()
The 500 internal server means, something is wrong in the server, but the server couldn’t find an exact reason for the problem.
Try excluding async-upload.php (file upload script) from server authentication by adding the below code in .htaccess file located in wp-admin directory.
<FilesMatch "(async-upload.php)$">
 Satisfy Any
 Order allow,deny
 Allow from all
 Deny from none
 </FilesMatch>
Image filename has an apostrophe
Make sure that the image you are uploading does not have a filename containing apostrophe. Few users have faced HTTP error when the filename contained apostrophe.
Issue with Image Manipulation library
Try changing the image manipulation library by adding the below code in theme’s functions.php file.
add_filter( 'wp_image_editors', 'change_graphic_lib' );

function change_graphic_lib($array) {
  return array( 'WP_Image_Editor_GD', 'WP_Image_Editor_Imagick' );
}
If the image is uploaded successfully, then you should also see thumbnail being generated properly.
Finally, the HTTP error can occur due to any of the above said reasons. So it’s better to try out only one solution at a time and see if that works for you before moving on to the next option.
Have you faced this error? Let’s know how you fixed it in the comment section below.
While uploading images to the media library, sometimes an unexpected HTTP error might crop up. This could throw a spanner in your plans to write an engaging blog post.
Such HTTP upload errors are not very common in WordPress, but they can occur sometimes. Fortunately, the image upload errors in WordPress can be fixed quite easily using one of the 9 methods I have described in this post.
You can also check out solutions to the other common WordPress errors that you could experience sometimes.
So let’s dive in.
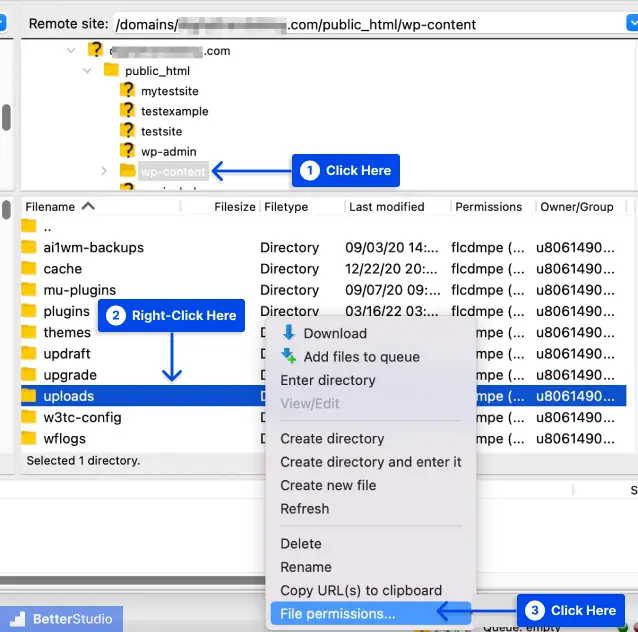
1. Image Upload Errors Due to Incorrect File Permissions
The most common reason for the image upload error is incorrect file permissions of the Uploads folder in WordPress.

To rectify this, you should navigate to the directory in which WordPress is installed. You can use either the File Manager in your hosting panel or an SFTP program like FileZilla for this.
Here you can see the wp-content folder within which is the Uploads folder. Right-click the folder name to access the ‘File attributes’ or ‘File permissions’.
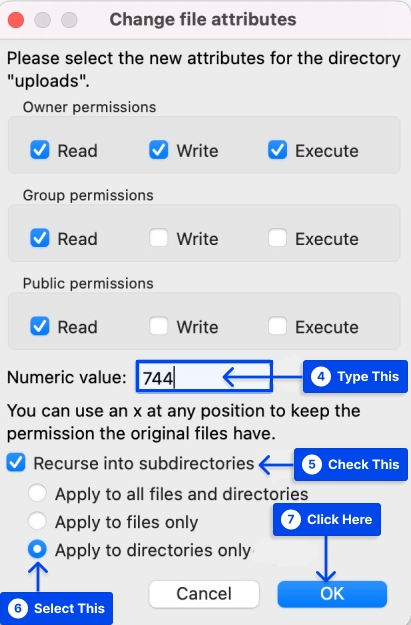
Within the File Attributes, you should set the permissions to 755. Select the check box next to ‘Recurse into subdirectories‘ and ‘Apply to directories only‘.

Now try uploading the image to your media library.
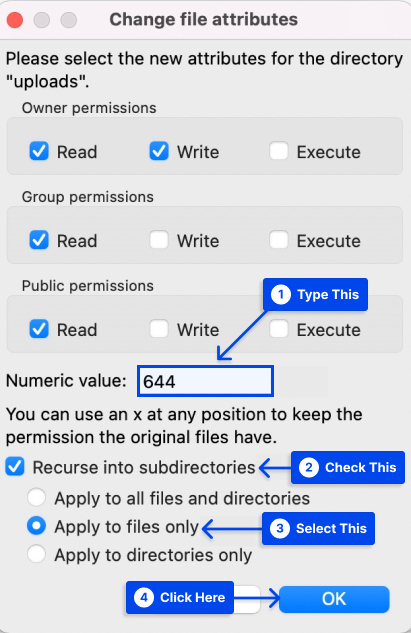
If you still cannot upload images, again open the File Attributes or Permissions of the Uploads folder in your WordPress installation. Now set the file permissions to 644, and select the check box next to ‘Recurse into subdirectories‘ and ‘Apply to files only‘.
Did this solve your HTTP image upload issue? If not, continue to the next solution below.

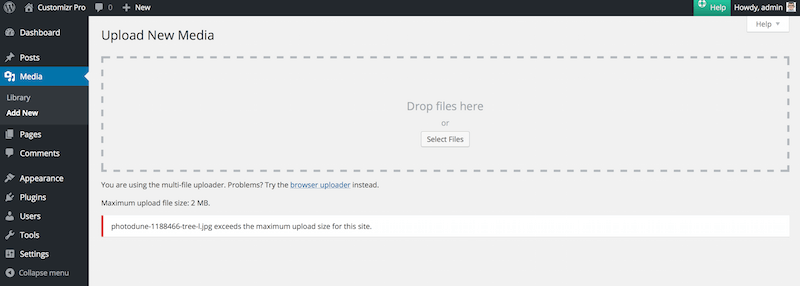
2. Try Browser Upload
The problem could also lie with the default WordPress media file uploader. To get around this problem, click the ‘browser uploader’ link in the Upload New Media panel of your WordPress dashboard.

Now try uploading the image. If the image was uploaded, it was a problem with the default file uploader. If you still face the image uploading error, try out the next fix.
3. Check the Image Dimensions
Did you know that WordPress sets a maximum image dimension for uploads? If you try uploading images larger than the maximum image dimension, it could result in an image upload error.
First, you should check out the maximum image dimensions allowed. To do this, go to Settings > Media.

Here you can see the dimensions in pixels for Large-sized media.
If the image you’re trying to upload exceeds this dimension, it could throw an error.
So, you should first resize your image using a free program like Paint for Windows or Paintbrush for Mac before uploading it in WordPress.
4. Increase the upload file size limit
WordPress displays the maximum file size limit for uploads, as set by your hosting provider.

For instance, Dreamhost allows a maximum file upload size of 512 MB. If the limit is less, say 10 MB, and you are trying to upload a larger-sized file, you can increase the upload limit using these methods.
1 .htaccess method
In the root WordPress installation directory, look for the .htaccess file. Now enter the following lines in this file and save:
php_value upload_max_filesize 64M
php_value post_max_size 128M
php_value memory_limit 256M
php_value max_execution_time 300
php_value max_input_time 300
2. functions.php method
Go to Appearance > Theme Editor and edit the functions.php (Theme Functions) file. Enter the following snippet:
@ini_set('upload_max_size', '64M');
@ini_set('post_max_size', '64M');
@ini_set('max_execution_time', '300');
But if you use this method, then you should remember that these settings will return to the default if you change your theme. In this case, you will need to again edit and update your functions.php file.
3. php.ini method
You can also edit the php.ini file in your root WordPress installation to increase the maximum file size limit. If this file is not present, you can create a file named php.ini (which is a settings file) and upload it in your parent WordPress directory.
The following snippet should go in the php.ini file that you’re editing or creating.
upload_max_filesize = 25M
post_max_size = 13M
memory_limit = 15M
If none of the three methods work, then you should contact your hosting provider to increase the file upload limit.
ad
5. Unsupported File Type
The HTTP image upload error could also result due to an unsupported file type.
By default, WordPress only allows for certain types of files for security reasons. The common file formats include:
- Images like .png, .gif, .jpg
- Documents such as .doc, .xls, .ppt, .pdf
- Audio like .wav, .mp3, .mp4
- Video like .mpg, .mov, .wmv
So, you should make sure that you are uploading a file type that is supported by WordPress.
You should also check the name of the file to ensure that is in the correct format.
For instance, an image file with the name xyz.png.webp may result in an uploading error. The correct name should be xyz.png.
6. Insufficient PHP Memory
WordPress requires sufficient PHP memory to work correctly. The recommended PHP memory is 256 MB. If your hosting provider has set a lower memory limit, it might cause HTTP image uploading errors.
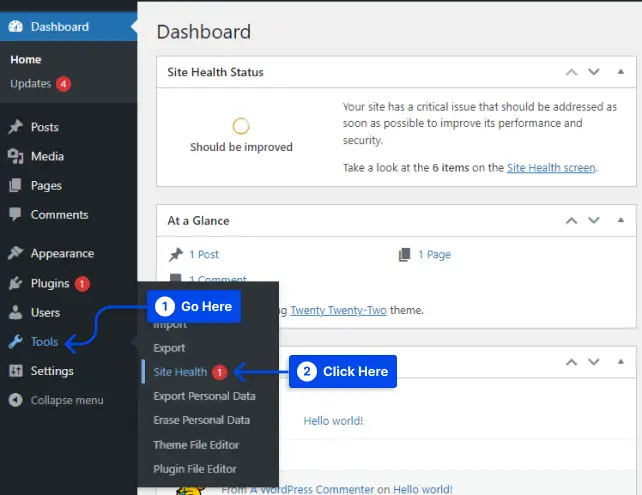
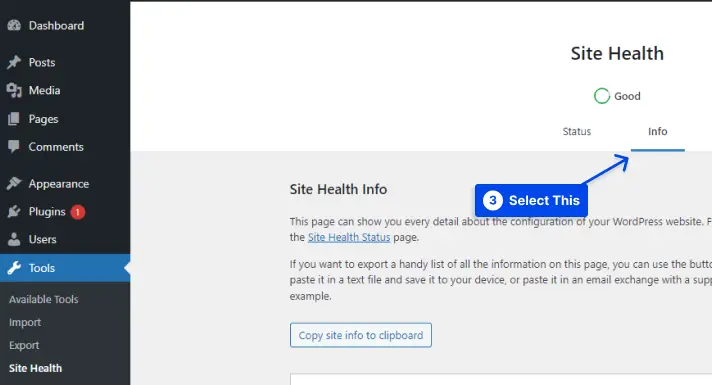
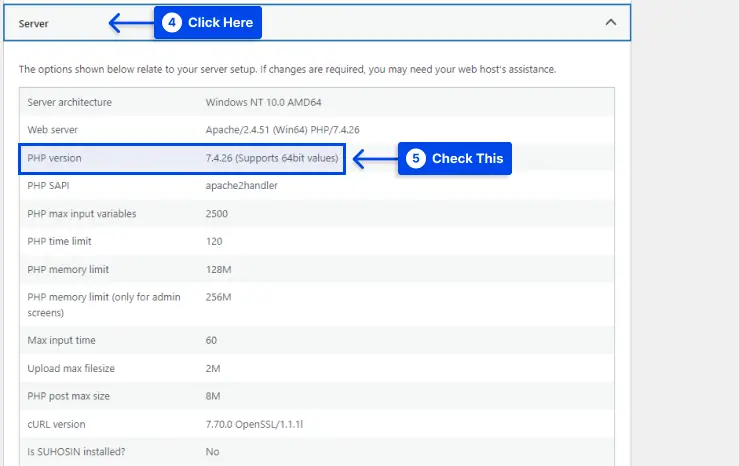
Before increasing the PHP memory limit, you should first check the current maximum limit. To do this navigate to the Site Health dashboard in WordPress by going to Tools > Site Health
Click the Info tab and then click the Server dropdown.
Here you can see various information related to your server. But we are interested in the max PHP memory limit.

If it is less than 256 MB, then add the following line to your wp-config.php file. This file is present in your root WordPress directory and can be accessed using your hosting panel’s File Manager or an SFTP program like FileZilla.
define('WORDPRESS_MEMORY_LIMIT', '256');
Notice that you can also check your maximum file upload size limit in the Info panel.
7. Outdated PHP Version
You can also check your PHP version in the Info tab of the Site Health dashboard. It is preferable to use the latest version of PHP (8.x) if supported by your web host.
If your site is running on a PHP version lower than 7.0 it could various issues including the image upload error.
In this case, you should head over to your hosting panel and check if you can upgrade your website to the latest PHP version or not.
Quality hosts like Dreamhost provide the option to upgrade to the latest PHP version in their hosting panel.
If you cannot upgrade your PHP version manually then contact your web hosting support to upgrade your PHP version for you.
Did this resolve the image upload error? If not, try out the next solution below.
8. Clear the Browser Cache
Sometimes, a simple trick like clearing the browser cache can solve such image upload errors. So go ahead and press CTRL+SHIFT+DELETE simultaneously to clear the cache.
9. Plugin Conflict
If clearing the browser cache also did not solve the uploading error, then maybe one of your plugins or themes is causing it.
So, go to your Plugins panel and deactivate all the plugins. Now activate each plugin one by one. Whenever you activate a plugin, you should try to upload the file to your media library. If you’re able to upload the file without any error means that a plugin conflict was the cause of the error.
You can try this out for your themes as well by switching over the default WordPress theme.
I hope you were able to resolve the HTTP image upload error using one of the 9 methods that I described here. However, if the error persists, please get in touch with your web host to rectify it for you.
Or you can order our tried and tested WordPress Error Fixing Service to get professional and timely help in fixing the image upload issue on your website.
Download the WordPress SEO eBook
Go from WordPress SEO Zero to Hero in no time. Also receive 2 Bonus PDFs with this free eBook.
Give it a try. You will thank yourself later.
Are you seeing the HTTP error while uploading media in WordPress? This error usually occurs when you are uploading an image or other files to WordPress using the built-in media uploader. In this article, we will show you how to easily fix the HTTP image upload error in WordPress.

What Causes HTTP Error During Media Upload in WordPress?
There are a number of things that could lead to a HTTP error when you are trying to upload files using the WordPress media uploader. Basically, WordPress is unable to figure out the cause and that’s why it displays the generic ‘HTTP error’ message.

The frustrating part is that this error message doesn’t give you any clue as to what may have caused it. This means that you will have to try different solutions to find the cause and fix the error.
That being said, let’s take a look at how to troubleshoot and fix the HTTP error during media upload in WordPress.
1. Make Sure The HTTP Error is Not Temporary
First, you should wait a few minutes and then try uploading your image file again. This error is sometimes caused by unusual traffic and low server resources, which are automatically fixed on most WordPress hosting servers.
If that doesn’t work, then you may want to try uploading a different image file. If the other file uploads successfully, then try saving your original image file to a smaller size and retry uploading.
Lastly, you may want to try saving the file to a different format. For example, change jpeg to png using an image editing software. After that, retry uploading the file.
If all these steps result in the HTTP error, then this means that the error is not caused by a temporary glitch and definitely needs your immediate attention.
2. Increase WordPress Memory Limit
The most common cause of this error is lack of memory available for WordPress to use. To fix this, you need to increase the amount of memory PHP can use on your server.
You can do this by adding the following code to your wp-config.php file.
define( 'WP_MEMORY_LIMIT', '256M' );
This code increases the WordPress memory limit to 256MB, which would be enough to fix any memory limit issues.

3. Change Image Editor Library Used by WordPress
WordPress runs on PHP which uses two modules to handle images. These modules are called GD Library and Imagick. WordPress may use either one of them depending on which one is available.
However, Imagick is known to often run into memory issues causing the http error during image uploads. To fix this, you can make the GD Library your default image editor.
You can do this by simply adding this code to your theme’s functions.php file or a site-specific plugin.
function wpb_image_editor_default_to_gd( $editors ) {
	$gd_editor = 'WP_Image_Editor_GD';
	$editors = array_diff( $editors, array( $gd_editor ) );
	array_unshift( $editors, $gd_editor );
	return $editors;
}
add_filter( 'wp_image_editors', 'wpb_image_editor_default_to_gd' );
After adding this code, you can retry uploading files using the media uploader. If this doesn’t solve the issue, then you can remove this code and try other methods described in this article.
4. Using The .htaccess Method
This method allows you to control how Imagick uses server resources. Many shared hosting providers limit Imagick’s ability to use multiple threads for faster image processing. However, this would result in you seeing the http error when uploading images.
An easy fix is be to add the following code in your .htaccess file:
SetEnv MAGICK_THREAD_LIMIT 1
This code simply limits Imagick to use a single thread to process images.
We hope this article helped you fix the HTTP error during media upload in WordPress. You may also want to see our WordPress troubleshooting guide as well as the ultimate list of most common WordPress errors and how to fix them.
If you liked this article, then please subscribe to our YouTube Channel for WordPress video tutorials. You can also find us on Twitter and Facebook.
Disclosure: Our content is reader-supported. This means if you click on some of our links, then we may earn a commission. See how WPBeginner is funded, why it matters, and how you can support us.
Editorial Staff at WPBeginner is a team of WordPress experts led by Syed Balkhi. We have been creating WordPress tutorials since 2009, and WPBeginner has become the largest free WordPress resource site in the industry.
The following documentations reviews the most common problems occuring when uploading images in WordPress, and provides solutions for them :
- Image file name
- HTTP error When Uploading Image
- Unable to create directory and broken images in the Media Library
- File exceeds the upload_max_filesize
Check your image file name
The first thing to check is the name of the image. If the file name contains any special character (like a semi-colon or an equals sign etc) it might not be uploaded.
HTTP error When Uploading Image
This happens when you are trying to upload an image that is large in pixel size, for example an image with 3000 x 2000 pixel. Which is too large for your server to process.
Some server shows error even when your image is less than 3000 x 2000 pixel, it all depends on your server resources.
HTTP error.
Solutions
The following are some solutions available to fix your HTTP error issue in WordPress.
Decrease your image size before uploading.
- If you are using a Mac, you can use the Preview App to reduce the size of your image.
- For a PC you can use the Paint Application.
- In Customizr and Customizr Pro theme, the boxed slider image size is 1170px x 500px, therefore you can reduce your image around that size before uploading.
- Reduce image size by trial and error until you are able to upload it without any error.
Increase PHP Memory
- Contact your web hosting company and ask them to increase your PHP memory limit. Increase gradually until you are able to upload an image size which is acceptable by you. At least around width of 2000px.
- If you prefer to do it yourself, you can add the following in your wp-config.php. This will only work if your hosting package has that amount of memory. Increase gradually until you are able to upload an image size which is acceptable by you.
define( 'WP_MEMORY_LIMIT', '256M' );
- You can also try increasing your memory by adding the following in your .htaccess file. This will only work if your hosting package has that amount of memory. Increase gradually until you are able to upload an image size which is acceptable by you.
Note: Some web hosting does not allow this and you will have a 500 internal server error. In this case you will have to remove this code.php_value memory_limit 256M
- If you have access to your web server’s php.ini file, you can find the memory_limit and increase it’s size. This will only work if your hosting package has that amount of memory. Increase gradually until you are able to upload an image size which is acceptable by you.
memory_limit = 256M
ModSecurity
- Your server may have mod_security, and it might be causing problems.
Disable it to see if that is the problem.
To do this, make an .htaccess file in your wp-admin directory.
Add the following code to it:<IfModule mod_security.c> SecFilterEngine Off SecFilterScanPOST Off </IfModule>
That will disable mod_security for the upload file receiving code in the wp-admin.
Note: Remove this if it’s causing any error on your server.
Access Control based on Authentication
- If you’re using Access Control based on Authentication on your Webserver (often known as htpasswd, Basic Authentiaction, password protected directory or similar), WordPress is not able to handle it for Flash Uploader, Cron and XMLRPC. Related files need to be excluded to work. At the following in your .htaccess file at your WordPress root folder.
# Exclude the file upload and WP CRON scripts from authentication
<FilesMatch "(async-upload.php|wp-cron.php|xmlrpc.php)$">
    Satisfy Any
    Order allow,deny
    Allow from all
    Deny from none
</FilesMatch>
Plugin conflict
- You may have installed a plugin that’s causing this issue. Please proceed to disable one plugin at a time. Clear your cache and browser history and revisit media uploader to upload your image ( keep the pixel size small ) and see if you are successful.
Unable to create directory and broken images in the Media Library
If you are unable to see the thumbnails in your media library, and you are encountering the following error while uploading an image.
Unable to create directory wp-content/uploads/2016/02. Is its parent directory writable by the server?

This happens when your wp-content/uploads folder’s permission has been changed. This could happen when you accidentally changed it’s permission or your web hosting technician might be doing some maintenance work and accidentally reset it’s folder permission.
Solution
- Login to your server by using your favorite FTP program. (how to use a FTP software with WordPress ? )
- Navigate to wp-content/uploads/
- Use your FTP program to change the uploads folder permission to 755, apply to all enclosed items.
This will make sure all items and folders within your uploads folder is set to 755. - Clear your browser cache.
- Login to WordPress and visit your Media Library, you should be seeing all thumbnails of your uploaded image.
- You should be able to upload an image without seeing the unable to create directory error.
File exceeds the upload_max_filesize
This happens when your PHP Upload Max Filesize (upload_max_filesize) set in your php.ini file, is smaller than the file size of the image that you are trying to upload.
Look into your System Information for the value of PHP Upload Max Filesize, you will need to increase it to a higher and healthier value.
..exceeds the maximum upload size for this site.
Solutions
The following are some solutions available to fix your exceeded upload max filesize issue in WordPress.
Contact your Hosting Company
Yes, this is the most prefer way. Contact your hosting company and show them a screenshot of your error or write to them the error message. Ask them to assist in increasing the following values, until you are able to upload your image. Your hosting company may have restrictions on these values.
upload_max_filesize
post_max_size
max_execution_time
max_input_time
Preferably to the following values.
upload_max_filesize 64M
post_max_size 64M
max_execution_time 300
max_input_time 300
Editing php.ini File
The php.ini file is the default PHP configuration file. Most of the Shared Hosting Company does not allow access to this file. If you are certain that you have access to php.ini file on your server, you may proceed with the following steps.
- Access it using your FTP program. ( how to use a FTP software with WordPress ? )
- Backup a copy of this file before attempting to edit it.
- Open it and find the following values, one at a time (They are located at different lines within the file)
upload_max_filesize
post_max_size
max_execution_time
max_input_time
- Preferably, edit them to the following values.
upload_max_filesize 64M
post_max_size 64M
max_execution_time 300
max_input_time 300
Using .htaccess file
In WordPress, there is a .htaccess file. WordPress uses this file to manipulate how Apache (server) serves files from its root directory, and subdirectories. Therefore, this file is very important. Do not edit what’s originally written in this file. You can add some directives at the end of the file to increase the PHP Upload Max Filesize. Learn more about the htaccess file in WordPress here.
- Use your favorite FTP program to access your WordPress installation.
- Go to the root directory, it’s the directory where you can find your wp-config.php file. You should be able to find your .htaccess file.
- Download a copy of it onto your computer to save as backup.
- Open it and added the following into a newline at the end of the file.
php_value upload_max_filesize 64M
php_value post_max_size 64M
php_value max_execution_time 300
php_value max_input_time 300
- Save your changes and overwrite the .htaccess file on your server.
- Go back to your System Information and check if your values have changed.
If not, you should contact your hosting company for assistance in editing these values in your php.ini file.
External Resources
- How to Fix HTTP error when uploading images (wordpress.stackexchange.com)
- HTTP Error on Media Upload (wp.org)
- Media Uploader Problems (wp.org)
Did this answer your question?
Thanks for the feedback
There was a problem submitting your feedback. Please try again later.
Last updated on December 3, 2020
How do you fix image upload issues in WordPress? Images are an essential component of any website since they enhance the overall appearance of your website. Most of us can only imagine writing a blog post incorporating visual elements.
The text on your blog will always play a significant role in the SEO of the site. However, if you include images with your post, you can make the text stand out and drive more traffic to the site.
When frequently uploading images to your WordPress website, you may encounter an error message sometimes when you can’t upload images in WordPress or can’t upload images to the WordPress media library.
However, there is no fear; even the most obscure image uploading problems, such as when media files exist in the upload folder but not showing up, can be corrected.
This article will discuss what causes image upload issues in WordPress and present various effective methods to fix them.
What Causes The Image Upload Issue in WordPress?
Typically, WordPress image upload issues are caused by incorrect file permissions. Your WordPress files are stored on your web hosting server and require specific permissions.
In this case, WordPress cannot read or upload files on the hosting server due to incorrect file permissions.
There are several reasons why this may occur. One is a misconfiguration of your shared hosting server, where the permissions are changed without your intervention.
For example, a web hosting provider may have unexpectedly conducted an upgrade that changed file permissions.
If everything else functions correctly, you can fix the image upload issue by applying the correct file permissions to your website.
How to Fix Image Upload Issues in WordPress?
One of the most common image problems in WordPress is the failure to upload images. Fortunately, this can be resolved easily, and you can do it yourself.
Various methods will be described in this section to help you easily fix the image upload issue in WordPress:
Method 1: Check File Permissions
You can solve the image upload issue in WordPress by changing the file permissions. Follow these steps to do this:
- Connect your website through FTP.
- Go to the /wp-content/ folder.
- Right-click on the uploads folder and select File permissions.
- Type 744 into the number value box.
- Check the box next to the option Recurse into subdirectories.
- Select the radio option that says Apply to directories only.
- Click on the OK button.
The file permissions will now be applied to the directories by your FTP client. If it doesn’t work, try to set the value to 755 and do the rest of the process again.
It is then necessary to set the permissions for all the files in the uploads directory. Follow these steps to do this:
- Right-click the uploads directory and select the File permissions option.
- Set the numeric value to 644 in the file permissions dialogue box.
- Check the box next to Recurse into subdirectories.
- Select the radio option that says Apply to files only.
- Click the OK button.
FTP client now changes the permissions of all files in the uploads folder. It is now possible to return to your WordPress administrator area and attempt to upload the images again. It should resolve your website’s image upload problem.
Method 2: Check File Size
There is also the possibility that the image is too large in dimensions and file size. Image compression tools can be used to reduce the image’s size.
If you have this problem frequently, you can increase the limit by adding the following code to your site’s php.ini file:
upload_max_filesize = 128M

post_max_size = 128M

max_execution_time = 300
Method 3: Invalid Image File Name
The file name may cause WordPress image upload issues, mainly if it contains special characters ($, *, &, # …) or accent letters (ñ, á, é).
If this is the case, rename the file and remove the special characters and accents, then upload the file to WordPress once more.
Method 4: Increase the Memory Limit
You may encounter an HTTP error when you attempt to upload an image to your WordPress website.
It is possible for this to occur when server resources are low, or there is unusual traffic on the server. It is always worthwhile to wait a few minutes before re-uploading the image.
You may exceed the WordPress memory limit if the issue still needs to resolve itself.
A secure file transfer protocol (SFTP) will allow you to increase the amount of memory PHP uses on your server.
Follow these steps to do this:
- Connect to your via SFTP.
- Open your wp-config file.
- Add the following code to the file, which will increase the limit to 256MB:
define( 'WP_MEMORY_LIMIT', '256M' );Alternatively, if this does not resolve your issue, there is the possibility that threading is the problem.
In WordPress, images are processed either through the GD Library module or the Imagick module, depending on which is available.
In order to increase the speed of image processing, Imagick uses multiple threads. However, some shared hosting providers restrict Imagick’s use of multiple threads. As a result, HTTP errors may occur.
A simple fix for this problem is to add the following code to your .htaccess file:
SetEnv MAGICK_THREAD_LIMIT 1.Method 5: Clear Your WordPress Site Cache
You can resolve your image upload issues by clearing your WordPress site cache if your site is using a caching plugin.
It depends on the caching plugin you selected and how you proceed if you believe caching might cause this error.
For example, if you’re using the W3 Total Cache plugin, you can clear the cache by following these steps:
- Go to your WordPress dashboard.
- Go to Performance from your WordPress toolbar.
- Click on Purge All Caches.
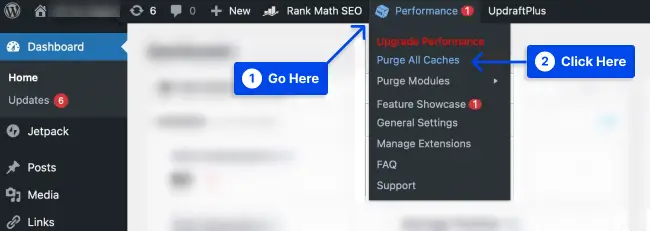
You should start by checking out the plugin’s Settings menu if you need help clearing the cache in your particular plugin. You can also find official documentation on the developer’s website.
Method 6: Deactivate All WordPress Plugins
WordPress relies heavily on plugins to function. If you are using any plugins, disable them one at a time to see if this resolves your image upload issue.
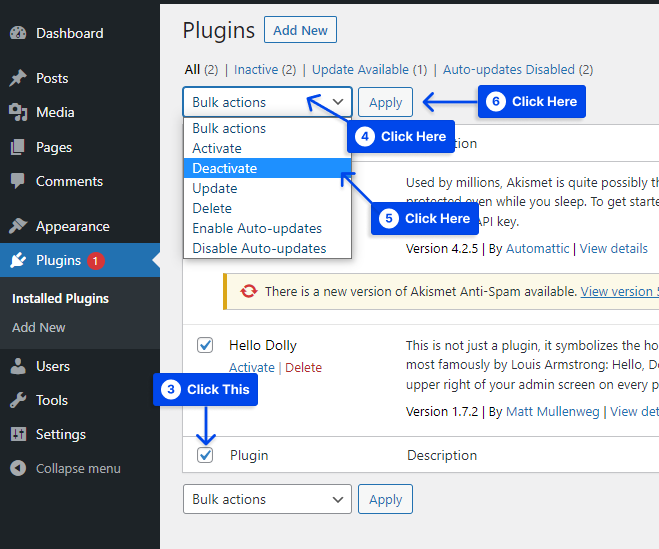
So, follow these steps to deactivate your WordPress plugins:
- Go to Plugins in your WordPress dashboard.
- Click on the Installed Plugins option.

- Choose plugins from the list.
- Select the Deactivate option from the drop-down menu.
- Click on the Apply button.
Note: If this does not resolve the issue, you may contact the plugin developer to see if they can assist you in solving the trouble with your website’s image uploads.
Method 7: Try the Browser Uploader
When all of the above approaches have been exhausted and you are still experiencing problems, you can use the built-in file uploader in your browser.
The browser uploader does not support drag-and-drop or multiple file selections like the WordPress image uploader.
In some cases, however, it may be beneficial to use this workaround to upload a file quickly.
Follow these steps to use this method:
- Go to Media in your WordPress dashboard.
- Click on the Add New option.
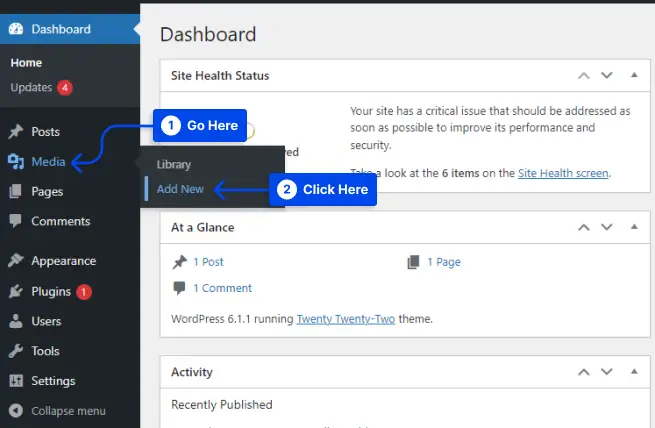
- Click on the browser uploader link.

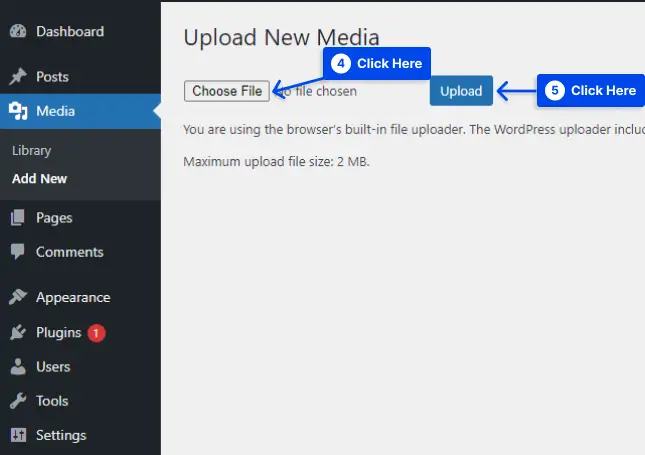
- Click on the Choose File button.
This brings up the file selection dialogue, where you can choose the image as usual to upload.
- Click on the Upload button.
As a test, you can upload an image using the WordPress standard image uploader to determine whether this fix has resolved your issue with image uploads.
Method 8: Switch To Another browser
There are occasionally problems with HTTP when using Google Chrome. Changing your browser may assist you in determining whether your website is causing the problem or your browser.
If you can upload the file using another browser, you should contact the support team for your chosen platform to find the cause of the problem.
Method 9: Check the PHP Version
You must check the PHP version of your site. Anything lower than version 7 is likely to cause problems, mainly if you are using the most recent version of WordPress.
PHP 7.4 or higher is recommended for WordPress, although it will also function with older versions.
Follow these steps to check the PHP version of your site:
- Go to Tools in your WordPress dashboard.
- Click on the Site Health option.
- Click on the Info tab.
- Choose the Server section.
- Check the PHP version.
If you are experiencing difficulty uploading an image, you can update the PHP version from the hosting dashboard.
Once you have updated the PHP version, you should no longer experience any issues with image uploads.
Method 10: Readjust Image Editors to Use a Single Thread
WordPress uses Imagick and the GD Library as its default image editor. With these editors, you can process images using multiple threads, accelerating the image’s display.
In some cases, all web hosts do not support the multi-thread feature. If this occurs, an HTTP error may occur when an image file is uploaded.
In order to resolve this issue, you will need to make the necessary changes to the .htaccess file. Follow these steps to do this:
- Open your website through FTP.
- Open the .htaccess file within the WordPress root folder.
- Add the following code to the file:
SetEnv MAGICK_THREAD_LIMIT 1- Verify that this has resolved the issue of an undefined image being uploaded.
The following code can be tested if it is not:
# Exclude the file upload and WP CRON scripts from authentication Satisfy Any Order allow,deny Allow from all Deny from noneMethod 11: Fix Missing Temporary Folder Error in WordPress
An error regarding a missing temporary folder prevents users from uploading images, updating WordPress, and adding add-ons.
The main cause of this error may be the PHP settings on your web server. Depending on the PHP settings, you can store some data in a temporary folder, which must be relocated as soon as possible.
WordPress must have access to these folders when uploading an image, updating your WordPress, and installing a plugin.
If these folders cannot be accessed, you will receive an error message entitled Missing temporary folders.
Follow these steps to do this:
- Connect to your host with an FTP client or through cPanel.
- Look for wp-config.php file.
- Open the folder in an editor, or download it to your computer and re-upload it later.
- Copy and paste the following code before “
That’s all, stop editing! Happy blogging”:
define('WP_TEMP_DIR', dirname(__FILE__) . '/wp-content/temp/');- Save the changes and re-upload the file.
- Go to the wp-content folder.
- Create a new folder and call it “Temp”.
- Go back to your WordPress website and try to upload your image again.
Method 12: Fix the HTTP error while uploading an image in GoDaddy
You may be familiar with GoDaddy as a popular web hosting service. cPanel can be accessed through GoDaddy.
In order to correct an HTTP error when uploading an image in GoDaddy, you must copy and paste the following code into your function.php file:
<?php

add_filter( 'wp_image_editors', 'betterstudio_change_graphic_lib' );

function betterstudio_change_graphic_lib($array) {

return array( 'WP_Image_Editor_GD', 'WP_Image_Editor_Imagick' );

}

?>
Method 13: Fix the HTTP error while uploading an image in DreamHost
In DreamHost, HTTP errors may occur when uploading images are the most common errors that go unnoticed.
In most cases, you will need to change your hosting provider, or you can resolve the issue by deactivating your themes and plugins.
However, the best course is to deactivate or delete your plugins and themes first.
Conclusion
This article has discussed why image upload issues occur in WordPress and various effective methods to fix these problems.
Please accept our sincere thanks for reading this article. You are welcome to post your questions or comments in the comments section.
As a follower of our Facebook and Twitter pages, you will be updated on our latest articles.