Содержание
- Error while powering on failed to start the virtual machine
- Error while powering on failed to start the virtual machine
- Virtual Admin
- Pages
- Monday, 30 May 2016
- Failed to start the virtual machine. The specified device is not a valid physical disk device
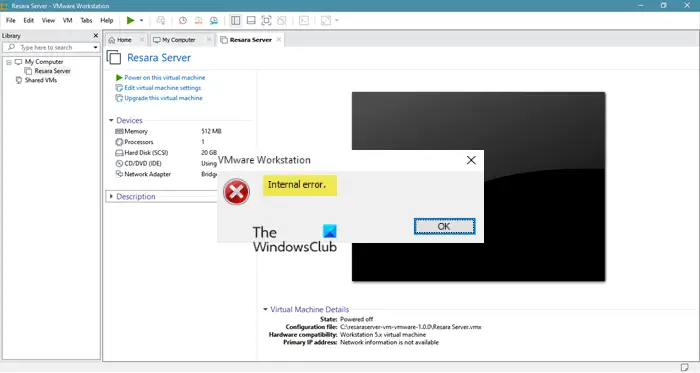
- How to fix VMware Internal Error while powering on
- What causes the VMware Workstation Internal Error?
- Fix VMware Internal Error
- 1] Check Vmware Authorization Service
- 2] Repair VMware
- 3] Check your antivirus
- 4] Restart VM Services
- 5] Reinstall VMware
- How do I fix VMware not working?
Error while powering on failed to start the virtual machine

- Mark as New
- Bookmark
- Subscribe
- Mute
- Subscribe to RSS Feed
- Permalink
- Report Inappropriate Content
The SW in case is:
VMware Workstation 15 Pro. Version 15.1.0 build-13591040.
The host OS in both cases is 64-bit Windows 10. The guest OS is 64-bit Windows 7.
I want to copy a Virtual Machine from one computer to another. I copy the whole directory containing all the files (at least that is what I thought).
I can open the virtual machine but when I try to power the machine up I get these error messages:
«VMware Workstation cannot find the virtual disk «C:ToolsVM-ware maskinerKALAE1VMWin7KALAE1VMWin7-0.vmdk». Verify the path is valid and try again.
The system cannot find the file specified
Cannot open the disk ‘C:ToolsVM-ware maskinerKALAE1VMWin7KALAE1VMWin7-0.vmdk’ or one of the snapshot disks it depends on.
Module ‘Disk’ power on failed.
Failed to start the virtual machine.»
I have tried to pick both «copied» and «moved» but with the same result.

- Mark as New
- Bookmark
- Subscribe
- Mute
- Subscribe to RSS Feed
- Permalink
- Report Inappropriate Content
KALAE1VMWin7-0.vmdk specifies a physical disk — is that physical device still available ?
Do you start WS with elevated rights — use right click «run as admin»
Please attach KALAE1VMWin7-0.vmdk to your next reply.
________________________________________________
Do you need support with a VMFS recovery problem ? — send a message via skype «sanbarrow»
I do not support Workstation 16 at this time .
- Mark as New
- Bookmark
- Subscribe
- Mute
- Subscribe to RSS Feed
- Permalink
- Report Inappropriate Content
And ? — does the file «C:ToolsVM-ware maskinerKALAE1VMWin7KALAE1VMWin7-0.vmdk» exist ?
________________________________________________
Do you need support with a VMFS recovery problem ? — send a message via skype «sanbarrow»
I do not support Workstation 16 at this time .
- Mark as New
- Bookmark
- Subscribe
- Mute
- Subscribe to RSS Feed
- Permalink
- Report Inappropriate Content
KALAE1VMWin7 is the folder I have copied containing (as far as I know) the full virtual machine.
The files in the folder is:
c:ToolsVM-ware maskinerKALAE1VMWin7caches 22-06-2019 23:46 —-
c:ToolsVM-ware maskinerKALAE1VMWin7vmware-2.log 514.285 22-06-2019 18:09 -a—
c:ToolsVM-ware maskinerKALAE1VMWin7vmware-1.log 382.192 22-06-2019 21:15 -a—
c:ToolsVM-ware maskinerKALAE1VMWin7vmware-0.log 375.880 22-06-2019 21:38 -a—
c:ToolsVM-ware maskinerKALAE1VMWin7vmware.log 67.103 26-06-2019 08:53 -a—
c:ToolsVM-ware maskinerKALAE1VMWin7KALAE1VMWin7-s034.vmdk 524.288 22-06-2019 12:29 -a—
c:ToolsVM-ware maskinerKALAE1VMWin7KALAE1VMWin7-s033.vmdk 589.824 09-06-2019 11:42 -a—
c:ToolsVM-ware maskinerKALAE1VMWin7KALAE1VMWin7-s032.vmdk 589.824 09-06-2019 11:42 -a—
c:ToolsVM-ware maskinerKALAE1VMWin7KALAE1VMWin7-s031.vmdk 589.824 09-06-2019 11:42 -a—
c:ToolsVM-ware maskinerKALAE1VMWin7KALAE1VMWin7-s030.vmdk 589.824 09-06-2019 11:42 -a—
c:ToolsVM-ware maskinerKALAE1VMWin7KALAE1VMWin7-s029.vmdk 589.824 09-06-2019 11:42 -a—
c:ToolsVM-ware maskinerKALAE1VMWin7KALAE1VMWin7-s028.vmdk 589.824 09-06-2019 11:42 -a—
c:ToolsVM-ware maskinerKALAE1VMWin7KALAE1VMWin7-s027.vmdk 589.824 09-06-2019 11:42 -a—
c:ToolsVM-ware maskinerKALAE1VMWin7KALAE1VMWin7-s026.vmdk 589.824 09-06-2019 11:42 -a—
c:ToolsVM-ware maskinerKALAE1VMWin7KALAE1VMWin7-s025.vmdk 589.824 09-06-2019 11:42 -a—
c:ToolsVM-ware maskinerKALAE1VMWin7KALAE1VMWin7-s024.vmdk 327.680 22-06-2019 12:29 -a—
c:ToolsVM-ware maskinerKALAE1VMWin7KALAE1VMWin7-s023.vmdk 524.288 05-06-2019 09:52 -a—
c:ToolsVM-ware maskinerKALAE1VMWin7KALAE1VMWin7-s022.vmdk 524.288 05-06-2019 09:52 -a—
c:ToolsVM-ware maskinerKALAE1VMWin7KALAE1VMWin7-s021.vmdk 524.288 05-06-2019 09:52 -a—
c:ToolsVM-ware maskinerKALAE1VMWin7KALAE1VMWin7-s020.vmdk 524.288 05-06-2019 09:52 -a—
c:ToolsVM-ware maskinerKALAE1VMWin7KALAE1VMWin7-s019.vmdk 524.288 05-06-2019 09:52 -a—
c:ToolsVM-ware maskinerKALAE1VMWin7KALAE1VMWin7-s018.vmdk 1.140.523.008 22-06-2019 21:38 -a—
c:ToolsVM-ware maskinerKALAE1VMWin7KALAE1VMWin7-s017.vmdk 524.288 05-06-2019 09:52 -a—
c:ToolsVM-ware maskinerKALAE1VMWin7KALAE1VMWin7-s016.vmdk 65.536 22-06-2019 12:29 -a—
c:ToolsVM-ware maskinerKALAE1VMWin7KALAE1VMWin7-s015.vmdk 524.288 09-05-2019 13:04 -a—
c:ToolsVM-ware maskinerKALAE1VMWin7KALAE1VMWin7-s014.vmdk 524.288 09-05-2019 13:04 -a—
c:ToolsVM-ware maskinerKALAE1VMWin7KALAE1VMWin7-s013.vmdk 524.288 22-06-2019 12:29 -a—
c:ToolsVM-ware maskinerKALAE1VMWin7KALAE1VMWin7-s012.vmdk 524.288 22-06-2019 12:29 -a—
c:ToolsVM-ware maskinerKALAE1VMWin7KALAE1VMWin7-s011.vmdk 997.785.600 22-06-2019 21:38 -a—
c:ToolsVM-ware maskinerKALAE1VMWin7KALAE1VMWin7-s010.vmdk 2.089.484.288 22-06-2019 21:38 -a—
c:ToolsVM-ware maskinerKALAE1VMWin7KALAE1VMWin7-s009.vmdk 3.672.899.584 22-06-2019 21:38 -a—
c:ToolsVM-ware maskinerKALAE1VMWin7KALAE1VMWin7-s008.vmdk 2.895.380.480 22-06-2019 21:38 -a—
c:ToolsVM-ware maskinerKALAE1VMWin7KALAE1VMWin7-s007.vmdk 2.311.847.936 22-06-2019 21:38 -a—
c:ToolsVM-ware maskinerKALAE1VMWin7KALAE1VMWin7-s006.vmdk 3.922.853.888 22-06-2019 21:38 -a—
c:ToolsVM-ware maskinerKALAE1VMWin7KALAE1VMWin7-s005.vmdk 3.303.931.904 22-06-2019 21:38 -a—
c:ToolsVM-ware maskinerKALAE1VMWin7KALAE1VMWin7-s004.vmdk 1.655.701.504 22-06-2019 21:38 -a—
c:ToolsVM-ware maskinerKALAE1VMWin7KALAE1VMWin7-s003.vmdk 2.050.424.832 22-06-2019 21:38 -a—
c:ToolsVM-ware maskinerKALAE1VMWin7KALAE1VMWin7-s002.vmdk 4.227.399.680 22-06-2019 21:38 -a—
c:ToolsVM-ware maskinerKALAE1VMWin7KALAE1VMWin7-s001.vmdk 4.180.475.904 22-06-2019 21:38 -a—
c:ToolsVM-ware maskinerKALAE1VMWin7KALAE1VMWin7-0-pt.vmdk 64.512 18-06-2019 13:13 -a—
c:ToolsVM-ware maskinerKALAE1VMWin7KALAE1VMWin7-0.vmdk 1.011 22-06-2019 21:34 -a—
c:ToolsVM-ware maskinerKALAE1VMWin7KALAE1VMWin7.vmxf 3.603 15-05-2019 10:54 -a—
c:ToolsVM-ware maskinerKALAE1VMWin7KALAE1VMWin7.vmx 3.955 26-06-2019 08:53 -a—
c:ToolsVM-ware maskinerKALAE1VMWin7KALAE1VMWin7.vmsd 0 09-05-2019 13:04 -a—
c:ToolsVM-ware maskinerKALAE1VMWin7KALAE1VMWin7.vmdk 1.949 22-06-2019 21:34 -a—
c:ToolsVM-ware maskinerKALAE1VMWin7KALAE1VMWin7.nvram 8.684 22-06-2019 18:09 -a—
Источник
Error while powering on failed to start the virtual machine

- Mark as New
- Bookmark
- Subscribe
- Mute
- Subscribe to RSS Feed
- Permalink
- Report Inappropriate Content
I did install Valorant before having the problem.
So I have been trying to create virtual machine with VMware workstation 15 pro and was not able to power it on.
Here is the message I get when i use «power on this virtual machine»:
This virtual machine failed to switch to 64 bit mode. This failure might be due to a lack of available memory on the host.
Module ‘Monitor’ power on failed.
Failed to start the virtual machine.
— Ubuntu LTS 18.04 iso
My computer has:
— Windows 10 Education
— More than 100Gb of free space (hard disk)
— Motherboard: an asrock phantom
— CPU: amd ryzen 5 3600x
— Antivirus: Windows defender
— Updating windows (normal updates)
— Keeping the default parameters while creating the vm
— Limiting the RAM to 250mb
— limiting the hard disk to 1Gb
— Checking that SVM and SMT are enabled for virtualization in the Bios
— Using VMware workstation Player 15, same issue
— Using virtualbox with the same configuration, it is working
— enabling/disablings Windows Hyper-V
— Disabling windows defender my firewalls
Here is my vmware.log file:
Here are the last lines if you do not wish to dl the entire file:
2020-04-19T19:23:13.805+02:00| vmx| I125: Host AMD-V Capabilities:
2020-04-19T19:23:13.805+02:00| vmx| I125: SVM Revision: 1
2020-04-19T19:23:13.805+02:00| vmx| I125: ASIDs Supported: 32768
2020-04-19T19:23:13.805+02:00| vmx| I125: Nested Paging: yes
2020-04-19T19:23:13.805+02:00| vmx| I125: SVM GMET: yes
2020-04-19T19:23:13.805+02:00| vmx| I125: LBR Virtualization: yes
2020-04-19T19:23:13.805+02:00| vmx| I125: SVM Lock: yes
2020-04-19T19:23:13.805+02:00| vmx| I125: NRIP Save: yes
2020-04-19T19:23:13.805+02:00| vmx| I125: TSC Rate MSR: yes
2020-04-19T19:23:13.805+02:00| vmx| I125: VMCB Clean Bits: yes
2020-04-19T19:23:13.805+02:00| vmx| I125: Flush by ASID: yes
2020-04-19T19:23:13.805+02:00| vmx| I125: Decode Assists: yes
2020-04-19T19:23:13.805+02:00| vmx| I125: Pause Filter: yes
2020-04-19T19:23:13.805+02:00| vmx| I125: Pause Filter Threshold: yes
2020-04-19T19:23:13.805+02:00| vmx| I125: Monitor_PowerOn: HostedVSMP skew tracking is disabled
2020-04-19T19:23:13.805+02:00| vmx| I125: Loaded crosspage: .crosspage. Size = 4096 bytes.
2020-04-19T19:23:13.805+02:00| vmx| I125: vmm64-modules: [vmm.vmm64, vmce-vmce.vmm64, viommu-none.vmm64, vprobe-none.vmm64, hv-svm.vmm64, gphys-npt.vmm64, callstack-none.vmm64, swstats-none.vmm64, gi-none.vmm64, gmm-none.vmm64, ahci-ahci.vmm64, !ahciRegs=0x0, !ahciShared=0x1000, !e1000Shared=0x1c00, !vmSamples=0x2480, !theIOSpace=0x24c0, !ttGPPerVcpu=0x8800, =0x0, numVCPUsAsAddr=0x1, =0x8840, =0x20915, =0xfffffffffc000000, =0x8b65e, ]
2020-04-19T19:23:13.805+02:00| vmx| I125: vmm64-vcpus: 1
2020-04-19T19:23:13.818+02:00| vmx| I125: Module ‘Monitor’ power on failed.
2020-04-19T19:23:13.818+02:00| vmx| I125: VMX_PowerOn: ModuleTable_PowerOn = 0
2020-04-19T19:23:13.818+02:00| vmx| I125: Vix: [mainDispatch.c:1163]: VMAutomationPowerOff: Powering off.
2020-04-19T19:23:13.819+02:00| vmx| I125: Win32U_GetFileAttributes: GetFileAttributesExW(«C:UsersXDocumentsVirtual MachinesUbuntu 64-bitUbuntu 64-bit.vmpl», . ) failed, error: 2
2020-04-19T19:23:13.819+02:00| vmx| I125: Policy_SavePolicyFile: invalid arguments to function.
2020-04-19T19:23:13.819+02:00| vmx| I125: PolicyVMX_Exit: Could not write out policies: 15.
2020-04-19T19:23:13.819+02:00| vmx| I125: WORKER: asyncOps=0 maxActiveOps=0 maxPending=0 maxCompleted=0
2020-04-19T19:23:13.819+02:00| WinNotifyThread| I125: WinNotify thread exiting
2020-04-19T19:23:13.822+02:00| vmx| I125: Vix: [mainDispatch.c:4215]: VMAutomation_ReportPowerOpFinished: statevar=1, newAppState=1873, success=1 additionalError=0
2020-04-19T19:23:13.822+02:00| vmx| I125:
2020-04-19T19:23:13.822+02:00| vmx| I125+ Power on failure messages: This virtual machine failed to switch to 64 bit mode. This failure might be due to a lack of available memory on the host.
2020-04-19T19:23:13.822+02:00| vmx| I125+ Module ‘Monitor’ power on failed.
2020-04-19T19:23:13.822+02:00| vmx| I125+ Failed to start the virtual machine.
I cannot seem to find any related issues or solutions that fits my problem.
Thank you in advance for any help provided.
Источник
Virtual Admin
About VMware Virtualization | Linux | Storage Guide
Pages
Monday, 30 May 2016
Failed to start the virtual machine. The specified device is not a valid physical disk device
In ESXi 6, if you try to Power On Virtual machine you may get below Error.
The specified device is not a valid physical disk device.
An error was received from the ESX host while powering on VM VM-name.
Failed to start the virtual machine.
Module Disk power on failed.
Cannot open the disk ‘/vmfs/volumes/4f15231a-c162b6a6-0c01-5ef3fcc2c22b/vm-name/vm-name1.vmdk’ or one of the snapshot disks it depends on.
The specified device is not a valid physical disk device

Also if you try to consolidate Virtual machine disk, you will receive below error.
The virtual disk is either corrupted or not a supported format.
Issue
You encounter this issue if you have configured ESXi scratch location at the root location of Local datastore or SAN datastore instead of folder on datastore.
Workaround
Take snapshot of Vm and delete it and immediately try to Power On. This will not fix the issue permanently.
Permanent fix
Reconfigure scratch location on ESXi host and point it to folder inside datastore.
1. Login to vCenter or ESXi Host.
2. Browse the datastore where you want to configure Scratch Location.
3. Create new folder for specific esxi Host e.g. esxi01-scratch
4. Get the datastore UUID
From ESXI configuration, select the datastore and from the datastore details note down the datastore UUID.

5. Select ESXi Host and go to Configuration –> Advance settings.
From Advance settings, select ScratchConfig
Источник
How to fix VMware Internal Error while powering on
For many users, VMware is a go-to platform for creating and using Virtual Machine. It allows you to have multiple Operating Systems on a single host computer. But as of late, many users started complaining about VMware Internal Error and want to see some solutions to resolve the problem. That’s why we have accumulated and created some solutions that will help you in fixing the Internal Error in your VMware.
What causes the VMware Workstation Internal Error?
This error is caused when trying to open a VM in the VMware. So, the very obvious cause, in this case, would be the failure of the VMware authorization service. If it fails to start the VM won’t start and as a result, you will see the error question. Another reason that can cause this issue is your antivirus mistaking VM for a virus. This is not rare and sometimes, your antivirus or even the Windows Security system thinks that an app or a game is a virus and stops their working. There is a fix for this that we will talk about later in this article. There are some other reasons such as corrupted VM or VMware and some workaround that we will see hereinafter.
Fix VMware Internal Error
Let us start fixing VMware Internal Error by updating your system. You need to check for updates and install the latest one. If the issue is because of a bug then updating will resolve it. However, if installing the latest build is to no avail then you can try to follow solutions to resolve the issue.
- Check VMware Authorization Service
- Repair VMware
- Check your antivirus
- Restart VM Services
- Reinstall VMware
Let us talk about them in detail.
First of all, you need to check the VMware Authorization Service and make sure that it is enabled and has administrator privilege. As for the latter, you don’t need to do anything extra, if you are logged in as administrator then that’s enough. To check the Vmware Authorization Service you need to follow the given steps.
- Open Services.
- Look for Vmware Authorization Service, right-click on it and select Properties.
- Make sure the Startup Type is Automatic and the service is running. If not you have to start the service.
You can also try restarting the service if it’s enabled, this will fix any glitch that the service may have. After doing that, see if the issue persists.
2] Repair VMware
If you are seeing the issue because of a corrupted VMware app then the best way to resolve it is by repairing the application. You can follow the given steps to do the same.
- Open Settings.
- Go to Apps.
- Look for VMware.
- For Windows 11: Click on the three vertical dots and click Modify/Repair.
- For Windows 10: Select the app and click Modify/Repair.
Then an installation wizard will pop up. There, you need to click Next and then Repair. Hopefully, this will resolve your issue.
3] Check your antivirus
If you are not dealing with a corrupted app then maybe your antivirus is blocking the VM from running on the system. This is not seldom and is an issue many computer apps are dealing with. So, if you have a third-party application, you can either disable the security or whitelist VMWare. You have to do the same with Windows Defender, either turn it off temporarily or allow VMware through the firewall.
4] Restart VM Services
Sometimes, the issue is because of a glitch, and in that case, restarting all the VM Services is the way to go. So, you need to execute some commands. Therefore, pull out Command Prompt as an administrator from the Start Menu.
Execute the following commands to stop the services.
Execute the following commands to restart the services
Finally, restart your computer and see if the issue persists.
5] Reinstall VMware
If nothing works then restarting VMware is your last resort. So, just uninstall VMware and then reinstall it to see if the issue persists.
Hopefully, you are able to resolve the VMware issue with the solutions mentioned here.
How do I fix VMware not working?
VMware may not work because of many different reasons such as corrupted app clients or corrupted VMX files. But you need to know the exact error message and then search it on our website as all the different error messages mean different things. You should also execute the solutions mentioned here as they are more than capable to resolve almost all the VMware-related issues.
Источник
В работе имеется Blade-сервер Dell VRTX на лезвиях которых используется гипервизор VMware vSphere 6.5. Так как все лезвия используют одну дисковую корзину VRTX, то перемещениемиграция виртуальных машин осуществляется путем обычного разрегистрирования на одном лезвии и регистрация на другом.
Такой метод миграции VM соответственно требует обязательного выключения машины, в отличии от использования vCenter. Но vCenter дорогой и не каждая организация готова его себе позволить, как в моем случае.
В очередной раз понадобилось переместить VM (webserver_1) с одного лезвия на другой и в процессе этого столкнулся с трудностями запуска VM на целевом лезвии. В качестве памятки себе опишу свою проблему и ее решение.
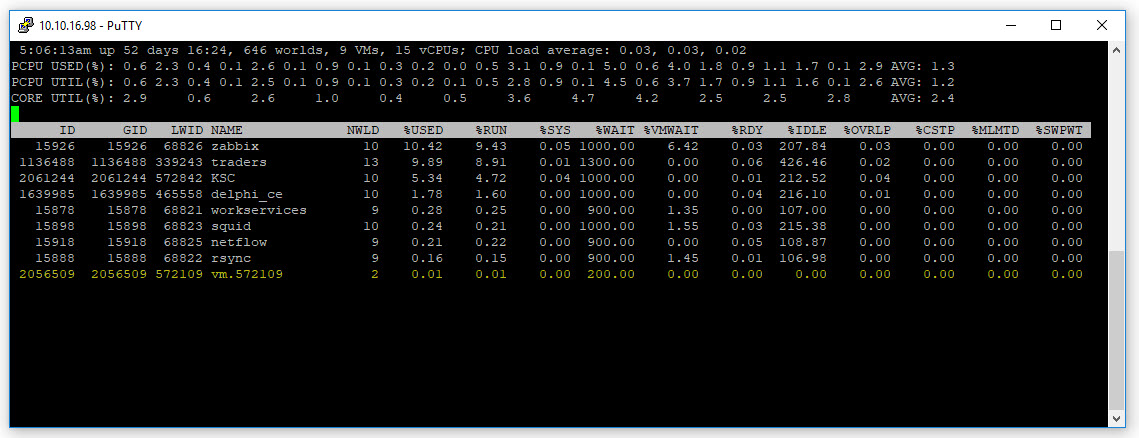
На исходном лезвии выполнил завершение работы на виртуальной машине, но она не выключилась. Решил принудительно завершить ее работу через консоль, но в активных процессах виртуальную машину (webserver_1) не обнаружил, а вместо нее висела виртуальная машина с названием vm.572109.
Принудительно завершил процесс vm.572109 и разрегистрировал ее из текущего лезвия. На другом лезвии зарегестрировал ее и попытался запустить, но она не запустилась.
Долго висел статус «Running…»

После некоторого времени система выдала ошибки неудачного запуска VM:
- Failed — An error occurred while creating temporary file for /vmfs/volumes/52d528e0-0d3b4675-5b88-18a99bdc13c1/webserver_1/webserver_1.vmx: The file already exists
- Failed to start the virtual machine (error -18)

Эти ошибки означают что виртуальная машина, а точнее ее *.vmx файл (конфигурационный файл VM) заблокирован другим хостом и поэтому доступа к нему нет.
Через консоль видно что в каталоге VM присутствует файл блокировки *.vmx~
|
1 2 3 4 5 6 7 8 9 10 11 12 13 14 15 16 17 18 |
ls —l total 37925912 —rw———— 1 root root 2344806 Nov 23 10:08 vmware—1.log —rw———— 1 root root 210642 Nov 23 10:51 vmware—2.log —rw———— 1 root root 183345 Nov 23 10:58 vmware—3.log —rw———— 1 root root 362461 Nov 27 04:54 vmware.log —rw———— 1 root root 1311232 Nov 27 04:53 webserver_1—ctk.vmdk —rw———— 1 root root 21474836480 Nov 27 04:53 webserver_1—flat.vmdk —rw———— 1 root root 8684 Nov 27 04:53 webserver_1.nvram —rw———— 1 root root 612 Nov 26 21:20 webserver_1.vmdk —rw———— 1 root root 44 Nov 26 21:20 webserver_1.vmsd —rwx——— 1 root root 3867 Nov 27 04:53 webserver_1.vmx —rw———— 1 root root 3445 Oct 9 05:07 webserver_1.vmxf —rwx——— 1 root root 3868 Nov 27 04:53 webserver_1.vmx~ —rw———— 1 root root 6554112 Nov 27 04:53 webserver_2—ctk.vmdk —rw———— 1 root root 107374182400 Nov 27 04:53 webserver_2—flat.vmdk —rw———— 1 root root 618 Nov 26 21:20 webserver_2.vmdk |
Смотрим какой хост держит блокировку файла. Выполняем команду:
|
vmkfstools —D webserver_1.vmx |
В выводе видим владельца блокировки файла:
- 5d988d2f-2f22bc92-f10e-18a99bdc13db — где 18a99bdc13db mac-адрес (18:a9:9b:dc:13:db) хоста.
|
Lock [type 10c00001 offset 246724608 v 67168, hb offset 4161536 gen 203, mode 0, owner 5d988d2f—2f22bc92—f10e—18a99bdc13db mtime 10479 num 0 gblnum 0 gblgen 0 gblbrk 0] Addr <4, 529, 15>, gen 66976, links 1, type reg, flags 0, uid 0, gid 0, mode 100700 len 3867, nb 1 tbz 0, cow 0, newSinceEpoch 1, zla 2, bs 8192 |
Если в выводе 00000000-00000000-0000-000000000000 , то это значит что файл никем не заблокирован
Методом просмотра по каждому хосту ESXi вкладки Physical NICs находим нужный хост который держит блокировку файла.

Либо через консоль можно вывести параметры сетевых адаптеров:
|
Name PCI Driver Link Speed Duplex MAC Address MTU Description vmnic0 0000:01:00.0 bnx2x Up 1000Mbps Full 18:a9:9b:dc:13:db 1500 QLogic Corporation NetXtreme II BCM57810 10 Gigabit Ethernet vmnic1 0000:01:00.1 bnx2x Up 1000Mbps Full 18:a9:9b:dc:13:de 1500 QLogic Corporation NetXtreme II BCM57810 10 Gigabit Ethernet |
На искомом хосте необходимо завершить процесс который держит блокировку. Находим LWID процесса по имени файла блокировки (webserver_1.vmx~) командой:
|
vmkvsitools lsof | grep webserver_1.vmx~ |
Процесс найден:
|
572109 vmx FILE 46 /vmfs/volumes/52d528e0—0d3b4675—5b88—18a99bdc13c1/webserver_1/webserver_1.vmx~ |
Завершаем принудительно процесс командой:
Обращаю внимание что 572109 это LWID моего процесса, в команду kill поставляем свой LWID!
Теперь если снова проверим состояние блокировки файла webserver_1.vmx, то видим что более он никем не заблокирован:
|
vmkfstools —D webserver_1.vmx Lock [type 10c00001 offset 246724608 v 67168, hb offset 4161536 gen 203, mode 0, owner 00000000—00000000—0000—000000000000 mtime 10479 num 0 gblnum 0 gblgen 0 gblbrk 0] Addr <4, 529, 15>, gen 66976, links 1, type reg, flags 0, uid 0, gid 0, mode 100700 len 3867, nb 1 tbz 0, cow 0, newSinceEpoch 1, zla 2, bs 8192 |
После всех этих манипуляй у меня успешно запустилась VM на целевом лезвии. Вот такие случаются ньюансы при подобном методе переноса VM между лезвиями Dell VRTX.
ПОНРАВИЛАСЬ ИЛИ ОКАЗАЛАСЬ ПОЛЕЗНОЙ СТАТЬЯ, ПОБЛАГОДАРИ АВТОРА
![]() Загрузка…
Загрузка…
While powering on a Virtual Machine, I encountered Module VPMC Power on failed error. In this article, I will show you how to fix Module ‘VPMC’ Power on failed for VMware Virtual Machine.
Normally, a Virtual Machine in VMware fails to Power on if there is no enough memory available on the system or if there is an issue with VM itself.
Whenever a VM fails to start, the error details presented are important in troubleshooting why the Virtual Machine failed to power on.

In my case, the VM configuration was not edited or modified in any way however I still couldn’t power on my virtual machine in VMware Workstation.
First, let’s look at the error message that you see when you attempt to power on the virtual machine.
Virtualized performance counters require at least one available functioning counter. Module ‘VPMC’ power on failed. Failed to start the virtual machine.

Reviewing the vmware.log file located within the VM’s folder revealed the following errors:
2022-05-05T16:45:28.316Z In(05) vmx Win32U_GetFileAttributes: GetFileAttributesExW("D:BSBLUESTACKS.vmpl", …) failed, error: 2
2022-05-05T16:45:28.316Z In(05) vmx Win32U_GetFileAttributes: GetFileAttributesExW("D:BSBLUESTACKS.vmpl", …) failed, error: 2
After spending a lot of time researching on this issue, it seems like the solution to fix Module VPMC Power on failed for Virtual Machine is to disable the CPU performance counters for VM.
CPU Performance Monitoring Counters (PMCs) provide a way for software to monitor and measure processor performance. These counters are commonly used by tools such as software profilers.
There are two ways to disable the CPU performance counters for a VM:
- Edit the Virtual Machine settings and uncheck the CPU performance counters from Processor settings.
- Edit the VM configuration file .vmx file and set VPMC=False.
The easiest way is to edit the VM settings and make the changes. Power off the VM and click Edit virtual machine settings.

On the Virtual Machine settings window, click the Hardware tab. Select Processors and under Virtualization engine, uncheck the option “Virtualize CPU performance counters“. Click OK to save the changes you made.
Now power on the VM and you shouldn’t see Module VPMC Power on failed error. The VM boots up like before, and you can continue with your work.


Prajwal Desai is a Microsoft MVP in Enterprise Mobility. He writes articles on SCCM, Intune, Configuration Manager, Microsoft Intune, Azure, Windows Server, Windows 11, WordPress and other topics, with the goal of providing people with useful information.