Содержание
- MaryFi – настройка виртуальной Wi-Fi сети в Windows
- MaryFi: настройка виртуальной точки доступа в Windows
- WiFi Network Not Showing Up on Computer [Best Fixes]
- Try these fixes
- Why is my WiFi network not showing up in my computer?
- Method 1: Enable the WiFi service
- Way 1: Enable the WiFi service with the WiFi switch
- Way 2: Check your network settings
- Method 2: Turn on WLAN AutoConfig service
- Method 3: Update WiFi network driver
- Method 4: Restart your modem and WiFi router
- What is WiFi Network Frequency
- Method 5: Enable SSID broadcast for your WiFi
- Method 6: Check the device interference
- Method 7: Switch to ChromeOS
MaryFi – настройка виртуальной Wi-Fi сети в Windows
Бесплатная утилита MaryFi представляет собой инструмент с помощью которого есть возможность превратить Wi-Fi адаптер вашего ноутбука в маршрутизатор. При помощи этой очень удобной программы можно без труда пользоваться интернетом на мобильных устройствах без покупки wi-fi роутера.
Ваш ноутбук, или компьютер с внешним адаптером, будет в роли маршрутизатора. Для этого потребуется бесплатно скачать MaryFi и изучить несложный набор действий по созданию виртуального Wi-Fi.
Перед началом настройки программы необходимо скачать и установить ее на компьютер. Скачать MaryFi можно с нашего сайта. Установка очень простая достаточно запустить .exe файл и следовать инструкции. Далее запускаем приложение ярлыком на рабочем столе. Чтобы виртуальный Wi-Fi маршрутизатор функционировал правильно, нужно выполнить следующие действия.
MaryFi: настройка виртуальной точки доступа в Windows
1. Открыв рабочее окно MaryFi, создаем название сети и пишем пароль. Здесь не существует каких-либо ограничений. Логин и пароль вы можете назначить любой. Для открытия видимости символов ключа требуется нажать на кнопку «Показывать». Пароль и имя указывайте английскими буквами. Пароль, минимум 8 символов.
 2. Далее жмем «Запустить Wi-Fi» и ждем, когда индикатор внизу окна переключится с «выкл» на «вкл». Затем нажимаем функцию «Показать сетевое подключение», которая открывает вкладку со всеми сетевыми соединениями. В этом окне должна появиться виртуальная сеть, которую мы создавали. Чаще всего оно определяется как «Беспроводное соединение 2» (или 3) и имеет название «Virtual WiFi miniport adapter»;
 3. В случае выполнения всех действий правильно переходим к настройке соединения, которое осуществляет доступ вашего ноутбуку к интернету. Чтобы разрешить раздачу Wi-Fi на все устройства, нужно зайти в «Свойства» из контекстного меню сети.
 Далее открываем вкладку «Доступ», разрешаем использование подключения для других устройств и отмечаем галочкой созданный виртуальный Wi-Fi (Беспроводное соединение 2).
 На этом создание маршрутизатора на ноутбуке закончена. Для проверки функционирования сети нужно перейти на панели задач в раздел беспроводных сетей компьютера и найти среди списка доступных соединений созданную виртуальную точку доступа. Если программа работает правильно, то под названием Wi-Fi появится надпись «Доступ к интернету».
Выполнив эти простые действия можно пользоваться интернетом на любом телефоне, планшете, телевизоре и других устройствах с поддержкой Wi-Fi. После запуска виртуально сети, ваши устройства уже должны увидеть новую сеть. Остается только подключить их используя пароль, который вы указали в программе. C программой MaryFi есть возможность упростить действия по подключению к сети, а также сэкономить на приобретении дополнительного сетевого оборудования.
Попробуйте полностью отключить антивирус и фаервол. Как правило, эти программы блокируют доступ к интернету. Так же, проверьте настройки общего доступа к интернету.
Рекомендуем вам ознакомится с другими программами для настройки виртуальной сети в Windows, которые мы собрали на этой странице.
Источник
WiFi Network Not Showing Up on Computer [Best Fixes]
Last Updated: 5 months ago
When you try to connect to the internet on your laptop but your usual WiFi network is not showing up, it’s very frustrating. But don’t worry; you can fix it. Read on to learn how…
Try these fixes
Here are some solutions for you to try. You don’t need to try them all; just try each one in turn until everything’s working again.
Why is my WiFi network not showing up in my computer?
Generally speaking, there are several causes for this issue:
- The WiFi problem
- The connecting problem
- The incorrect WiFi configuration in your WiFi router and your computer
- The missing or outdated WiFi driver issue
However, the good news is you can easily troubleshoot your problem and solve it. This guideline introduces 6 methods for you to troubleshoot.
Method 1: Enable the WiFi service
The problem happens most likely because your Windows disables the WiFi service. You can’t connect to the WiFi if your Windows disables it. So you can try these steps to enable WiFi service. There are two places you can check.
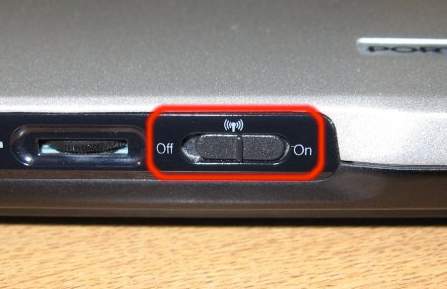
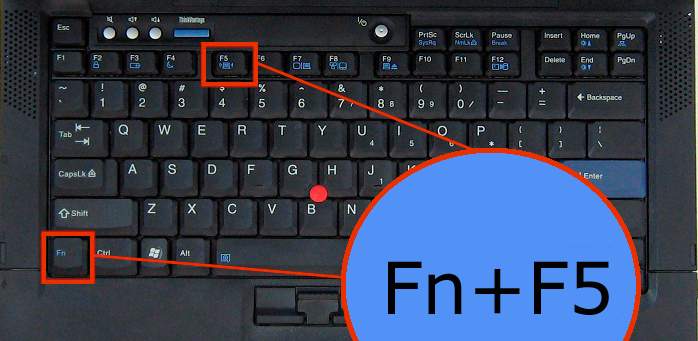
Way 1: Enable the WiFi service with the WiFi switch
Some laptops, such as HP, Lenovo, Dell, have a switch or a key on your keyboard to turn on/off WiFi (like Fn+F5). Check the switch or keys and turn your WiFi service on.
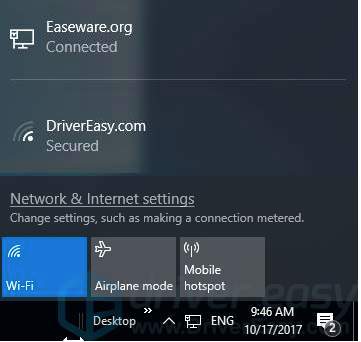
Way 2: Check your network settings
If you don’t have the WiFi switch on your laptop or computer, you can check it in your system.
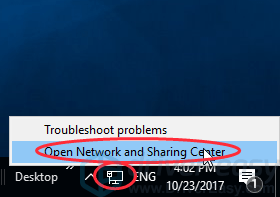
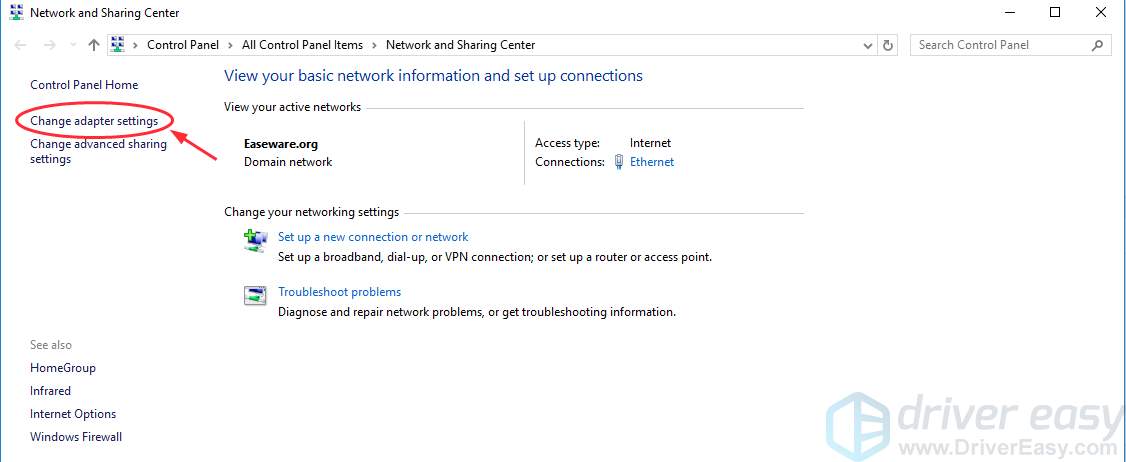
1) Right click the Internet icon, and click Open Network and Sharing Center.
2) Click Change adapter settings.
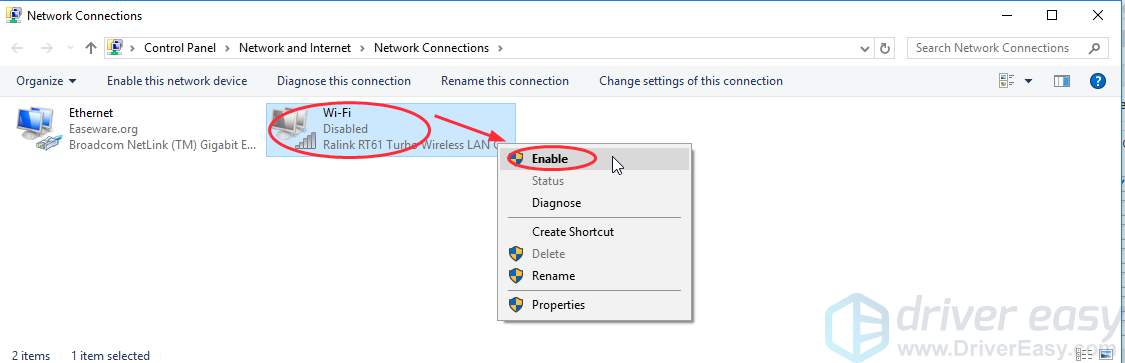
3) Right click WiFi, and click Enable. Note: if it has enabled, you will see Disable when right click on WiFi (also referred to Wireless Network Connection in different computers).
4) Restart your Windows and reconnect to your WiFi again.
Method 2: Turn on WLAN AutoConfig service
WLAN AutoConfig service (also referred to Wireless Configuration in Windows XP) can configure wireless security and connectivity settings. When enabled, WLAN AutoConfig settings apply to all IEEE 802.11 wireless network adapters installed on your computer. Moreover, when the WiFi becomes available, it will automatically connect to a preferred wireless network. You can follow these steps to enable it:
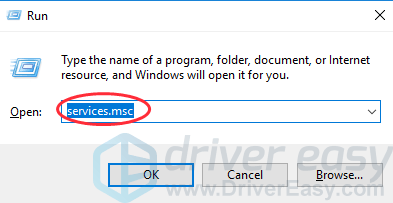
1) On your keyboard, press Windows logo key + R at the same time to invoke the Run box, and type services.msc, then press Enter.
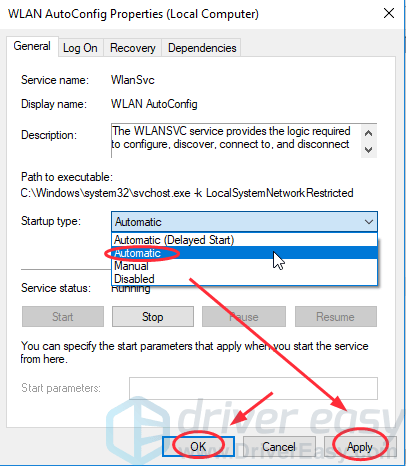
2) Right click Wlan AutoConfig (if you are using Windows XP, right click Wireless Configuration), and click Properties.

3) Select Automatic in Startup type, then click Apply, and click OK
4) Restart your PC and reconnect to your WiFi network to see if your WiFi shows up.
Method 3: Update WiFi network driver
Wireless network driver allows your operating system to communicate with your wireless and network adapters. If your wireless network is not showing up on laptop, it is probably due to the missing, outdated, or corrupt drivers.
There are two ways to update drivers: manually and automatically.
Manually update driver – You can manually update the network driver by searching the correct driver that is matched with your Windows OS on the manufacturer’s website, and install it in your computer. This requires the time and computer skills.
Automatically update driver – If you don’t have time or patience to manually update drivers, you can do that automatically with Driver Easy.
Driver Easy will detect the drivers condition in your computer, and install the correct drivers for your PC. More importantly, with Driver Easy, you don’t need to struggle figuring out the Operating System, and you don’t need to worry about making mistakes while processing. That will tremendously save your time and patience.
You can update your drivers automatically with either the FREE or Pro version of Driver Easy. It only takes 2 simple clicks with the Pro version (and you will get full support and a 30-day money back guarantee).
1) Download and install Driver Easy (at first connect your computer to the Internet via Ethernet cable).
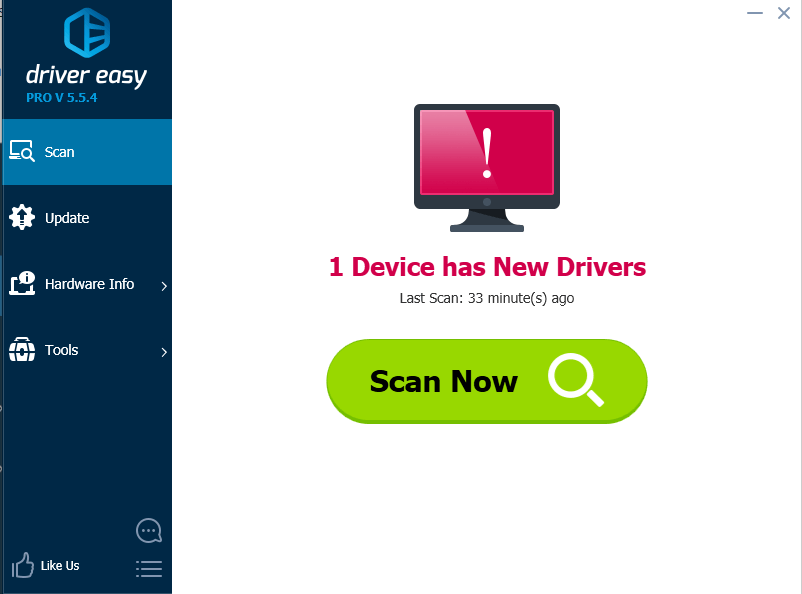
2) Run Driver Easy and click Scan Now. Then Driver Easy will scan your computer and detect any problem drivers
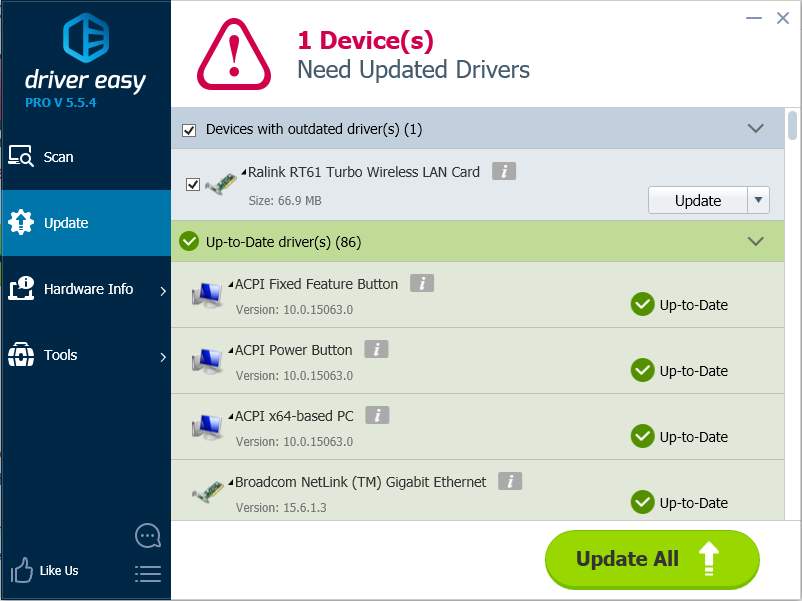
3) Click Update button next to the driver name to download the correct driver (you can do that with the FREE version), then install it in your computer.
Or click Update All to automatically download and install the correct version of all the problem drivers (you can do that with Pro version, and you will be prompted to upgrade when you click Update All).
4) After updating the drivers, restart your computer, then connect to the WiFi network again, and see if your problem solves.
Method 4: Restart your modem and WiFi router
If the problem occurs to your own WiFi network at home, you can also check the WiFi itself to see if it’s your WiFi issue, including the router issue, SSID broadcast and device interference mentioned below.
This problem can be probably caused by the Internet Service Provider (ISP) issue. Restarting your modem and wireless router can help you reconnect to your ISP. Note: anyone who is connecting to the network will be disconnected temporarily while you are doing this.
1) Unplug your wireless router and modem from power source (remove the battery if your modem has a battery backup).
2) Wait for at least 30 seconds.
3) Plug your wireless router and modem back into power source again (put the battery back to the modem).
4) On your PC, reconnect to your WiFi network, then see if it shows up.
What is WiFi Network Frequency
Tips: If it is the first time to connect to the WiFi, you will need to pay attention to the WiFi network frequency. You can’t connect if your computer uses mismatched frequency with your router’s.
Usually WiFi network frequency has 2.4 GHz and 5 GHz. Luckily many routers are dual-band model now, so it both supports 2.4 GHz and 5 GHz band. To check your WiFi network frequency, you can go to the router manufacturer’s website. While you can also check your Windows WiFi network frequency: type netsh wlan show drivers in the Command Prompt and press Enter, then it will show you the supported protocols.
Generally speaking, 802.11a/ac uses the 5 GHz band, 802.11b/g uses the 2.4 GHz band, and 802.11n uses either the 2.4 GHz or 5 GHz band. if they don’t match or include the frequencies of your router, the WiFi network won’t show up on your computer.
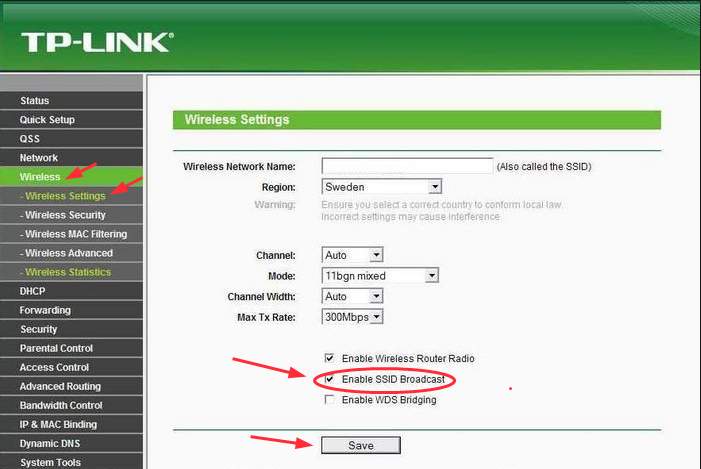
Method 5: Enable SSID broadcast for your WiFi
Service Set Identifier (SSID) broadcast is what makes your WiFi network visible to your network adapter. Once you disable SSID broadcast, your WiFi network won’t show up in the list.
Tips: Many people disable SSID broadcast for security concerns. By doing this, they can hide the WiFi network, so the network name won’t be seen by others. But the first time to connect to the WiFi network, you’ll have to configure the profile settings manually, including the network name and security mode. After making the initial connection, devices can remember these settings and will not need to be specially configured again.
You can try the instructions below to enable your SSID broadcast. The specific interface may vary from different computers. Here we take TP-link WiFi router as an example:
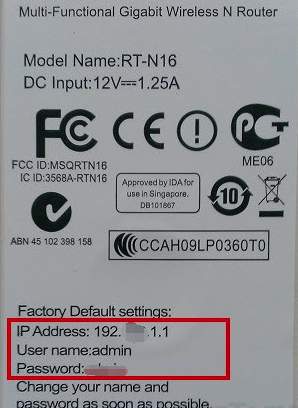
1) Go and see the IP address, username and password on your wireless router.
2) Open your browser on PC or mobile phone (connect to the Internet via Ethernet cable on your PC or use mobile phone that has internet connection).
3) Type the IP address in your browser, and press Enter.

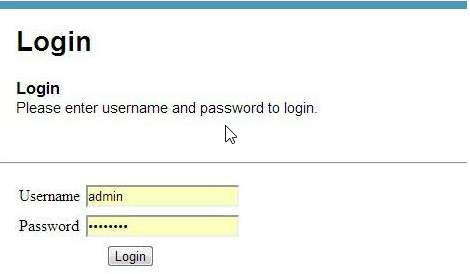
4) Type your User name and Password, then click Login.
5) Go to Wireless > Wireless Settings. Check the box next to Enable SSID broadcast, and click Save.
7) Restart your PC and reconnect to your WiFi network.
Method 6: Check the device interference
The WiFi signals can be interfered by many household devices, such as your cordless phone, microwave oven, Bluetooth speaker, etc. because they use the same 2.4 GHz or 5 GHz frequencies. Therefore, you can check these devices to see if it’s where the problem lies in.
1) Turn off those devices, and unplug the power source
2) On your PC, try to connect your WiFi again, and see if it shows up.
3) If the problem solves, it seems to result from the devices interference. Then move your modem and wireless router to another place, so they are not in the same light with the household devices.
In addition to the way mentioned above, you can also buy a 5 GHz router or dual band router, because many household devices use the frequency of 2.4GHz. So using a router of 5 GHz can avoid most interference.
Method 7: Switch to ChromeOS
Windows is a very old technology. Sure, Windows 10 is relatively new, but it’s still just the latest iteration of a decades-old operating system, designed for a bygone era (pre-internet).
Now that we have the internet, fast connection speeds, free cloud storage, and endless web apps (like Gmail, Google Docs, Slack, Facebook, Dropbox and Spotify), the entire Windows way of doing things – with locally installed programs and local file storage – is totally outdated.
Why is that a problem? Because when you’re constantly installing uncontrolled third-party programs, you’re constantly opening the door to viruses and other malware. (And Windows’ insecure permission system compounds this problem.)
Plus the way Windows manages installed software and hardware has always been a problem. If your computer shuts down unexpectedly, or a program installs, uninstalls or updates incorrectly, you can get ‘registry’ corruptions. That’s why Windows PCs always slow down and become unstable over time.
Also because everything’s installed and saved locally, it doesn’t take long before you run out of disk space, and your disk gets fragmented, which makes everything even slower and more unstable.
For most people, the simplest way to solve Windows problems is to ditch Windows altogether, and switch to a faster, more reliable, more secure, easier to use and cheaper operating system…
ChromeOS feels much like Windows, but instead of installing heaps of programs to email, chat, browse the internet, write documents, do school presentations, create spreadsheets, and whatever else you normally do on a computer, you use web apps. You don’t need to install anything at all.
That means you don’t have virus and malware problems, and your computer doesn’t slow down over time, or become unstable.
And that’s just the start of the benefits…
To learn more about the benefits of ChromeOS, and to see comparison videos and demos, visit GoChromeOS.com.
That’s all about it. If it helps, share with us which method that helps. If the WiFi network still doesn’t show up in the network list, and you are not sure how to deal with it, please feel free to leave us a comment below and we will see what more we can do to help.
Источник
Форум
![]()
Error while writting network settings to computer в программе MaryFi
вопрос: что за ошибка :error while writting network settings to computer. и что надо сделать чтобы подключит марифи
Гость
![]()
1
![]()
1
![]()
3
![]()
2
24.09.2013, 09:33
Если переводить дословно, то данная ошибка обозначат ошибку записи сетевых настроек на компьютер. Так как я не пользовался этой программой, то могу лишь предположить, что проблема или в самих настройках или же программу можно попробовать запустить от имени администратора.
![]()
0
![]()
2
17.10.2014, 13:51
компьютер выдает во такую запись error writting network setting to computer.
помогите настроить maryfi/
Вопрос и ответы были вам полезны?

Да

Нет
Попробуйте также:

Бесплатная утилита MaryFi представляет собой инструмент с помощью которого есть возможность превратить Wi-Fi адаптер вашего ноутбука в маршрутизатор. При помощи этой очень удобной программы можно без труда пользоваться интернетом на мобильных устройствах без покупки wi-fi роутера.
Ваш ноутбук, или компьютер с внешним адаптером, будет в роли маршрутизатора. Для этого потребуется бесплатно скачать MaryFi и изучить несложный набор действий по созданию виртуального Wi-Fi.
Перед началом настройки программы необходимо скачать и установить ее на компьютер. Скачать MaryFi можно с нашего сайта. Установка очень простая достаточно запустить .exe файл и следовать инструкции. Далее запускаем приложение ярлыком на рабочем столе. Чтобы виртуальный Wi-Fi маршрутизатор функционировал правильно, нужно выполнить следующие действия.
MaryFi: настройка виртуальной точки доступа в Windows
1. Открыв рабочее окно MaryFi, создаем название сети и пишем пароль. Здесь не существует каких-либо ограничений. Логин и пароль вы можете назначить любой. Для открытия видимости символов ключа требуется нажать на кнопку «Показывать». Пароль и имя указывайте английскими буквами. Пароль, минимум 8 символов.
2. Далее жмем «Запустить Wi-Fi» и ждем, когда индикатор внизу окна переключится с «выкл» на «вкл». Затем нажимаем функцию «Показать сетевое подключение», которая открывает вкладку со всеми сетевыми соединениями. В этом окне должна появиться виртуальная сеть, которую мы создавали. Чаще всего оно определяется как «Беспроводное соединение 2» (или 3) и имеет название «Virtual WiFi miniport adapter»;
3. В случае выполнения всех действий правильно переходим к настройке соединения, которое осуществляет доступ вашего ноутбуку к интернету. Чтобы разрешить раздачу Wi-Fi на все устройства, нужно зайти в «Свойства» из контекстного меню сети.
Далее открываем вкладку «Доступ», разрешаем использование подключения для других устройств и отмечаем галочкой созданный виртуальный Wi-Fi (Беспроводное соединение 2).
На этом создание маршрутизатора на ноутбуке закончена. Для проверки функционирования сети нужно перейти на панели задач в раздел беспроводных сетей компьютера и найти среди списка доступных соединений созданную виртуальную точку доступа. Если программа работает правильно, то под названием Wi-Fi появится надпись «Доступ к интернету».
Выполнив эти простые действия можно пользоваться интернетом на любом телефоне, планшете, телевизоре и других устройствах с поддержкой Wi-Fi. После запуска виртуально сети, ваши устройства уже должны увидеть новую сеть. Остается только подключить их используя пароль, который вы указали в программе. C программой MaryFi есть возможность упростить действия по подключению к сети, а также сэкономить на приобретении дополнительного сетевого оборудования.
Если подключение к созданной сети есть, но интернет не работает:
Попробуйте полностью отключить антивирус и фаервол. Как правило, эти программы блокируют доступ к интернету. Так же, проверьте настройки общего доступа к интернету.
Рекомендуем вам ознакомится с другими программами для настройки виртуальной сети в Windows, которые мы собрали на этой странице.
|
0 / 0 / 0 Регистрация: 15.05.2014 Сообщений: 34 |
|
|
1 |
|
|
23.05.2014, 00:42. Показов 9704. Ответов 9
Провайдер запретил раздачу интернета. Причем запретил не только словесно, но и поставил какое-то оборудование или ПО. Когда пытаюсь раздать интернета с ноутбука мне выдают ошибку что нет драйверов или сетевая карта не поддерживает это действие. Пробовал три программы для раздачи. В другом месте я с первого раза создаю сеть. Как только прихожу домой, все программы отказываются раздавать. Как можно обойти это? Добавлено через 49 минут
__________________
0 |

|
Programming Эксперт 94731 / 64177 / 26122 Регистрация: 12.04.2006 Сообщений: 116,782 |
23.05.2014, 00:42 |
|
9 |
|
1061 / 665 / 75 Регистрация: 15.07.2012 Сообщений: 2,270 |
|
|
23.05.2014, 07:27 |
2 |
|
Vladyka_Elrond, Покажите результат команды: Но наличие ограничений со стороны провайдера не должно влиять на возможность «расшаривания» доступа к интернету на вашем компе.
мне выдают ошибку что нет драйверов или сетевая карта не поддерживает это действие Заодно укажите:
0 |

|
0 / 0 / 0 Регистрация: 15.05.2014 Сообщений: 34 |
|
|
23.05.2014, 14:50 [ТС] |
3 |
|
VexMD, Windows 7 домашняя. Использую программы Maryfi, VirtualRouter Plus 2.1.0. Добавлено через 8 минут VirtualRouter пишет: Virtual Router Plus could not be started. Supported hardware may not have been found Maryfi: Error When starting hotspot Please be sure to install Microsoft Virtual Wi-Fi, and have the last update to your wireless card from manufacturer website.
0 |
|
10931 / 6786 / 1815 Регистрация: 25.12.2012 Сообщений: 28,715 |
|
|
23.05.2014, 15:19 |
4 |
|
Error When starting hotspot Please be sure to install Microsoft Virtual Wi-Fi, and have the last update to your wireless card from manufacturer website. 1) ven dev скопируй из Диспетчер устройств — ПКМ по физическому адаптеру — cвойства — сведения — ид оборудования — первую строку скопируй (сtrl+C) и сюда выложи 2)
Windows 7 домашняя базовая или расширенная?
0 |
|
0 / 0 / 0 Регистрация: 15.05.2014 Сообщений: 34 |
|
|
23.05.2014, 17:47 [ТС] |
5 |
|
insect_87, для проводного PCIVEN_1969&DEV_1073&SUBSYS_035B1025&REV_C0 windows 7 домашняя расширенная
0 |
|
10931 / 6786 / 1815 Регистрация: 25.12.2012 Сообщений: 28,715 |
|
|
23.05.2014, 17:52 |
6 |
|
1) разрядность системы какая?
0 |
|
0 / 0 / 0 Регистрация: 15.05.2014 Сообщений: 34 |
|
|
23.05.2014, 17:56 [ТС] |
7 |
|
insect_87, 1) разрядность 64 2) Aspire 5745G 3) да интернет приходит по кабелю и раздается через виртуальную точку доступа
0 |
|
10931 / 6786 / 1815 Регистрация: 25.12.2012 Сообщений: 28,715 |
|
|
23.05.2014, 18:12 |
8 |
|
удали старые драйвера — диспетчер устройств — пкм по каждому из адаптеров — свойства — драйвер — удалить
0 |
|
0 / 0 / 0 Регистрация: 15.05.2014 Сообщений: 34 |
|
|
23.05.2014, 18:20 [ТС] |
9 |
|
Зачем переустанавливать драйвера если у другого провайдера точка нормально создается?
0 |
|
10931 / 6786 / 1815 Регистрация: 25.12.2012 Сообщений: 28,715 |
|
|
23.05.2014, 18:32 |
10 |
|
я это вот откуда взял
Error When starting hotspot Please be sure to install Microsoft Virtual Wi-Fi, and have the last update to your wireless card from manufacturer website. ну а если все же грешишь на ttl, то вот почитай, что такое как настройка TTL в Windows 7 , первая ссылка твоя ЗЫ
0 |
Windows’ remote access technology is quite incredible. It allows you to easily troubleshoot issues, download files, or configure settings on your remote PC.
However, it’s frustrating when you encounter issues while trying to connect to a remote PC. Just when you’re about to get connected, you see an error message that reads, “The remote computer requires Network Level Authentication (NLA).”
Lucky for you, we’ve got all the solutions to this issue. So, let’s dive in and fix your remote connection problems.
1. Check Your Internet Connection

In most cases, «The remote computer that you are trying to connect to requires NLA» error might stem from your PC (and not the remote machine). So, resolving it will involve configuring a few settings on your device.
To get started, ensure that there aren’t any issues with your internet connection. Here are some quick fixes that could help:
- Check all your network cables and ensure there are no loose connections.
- Ensure your internet connection is active and stable. Start by testing your Wi-Fi speed with a speed test tool. If the internet speed is okay, consider resetting your router and refreshing your connection.
2. Restore the Network Settings to their Default

You’re likely to bump into «The remote computer requires NLA» error based on how you’ve configured your network settings. So, you could resolve the problem by restoring your network settings to their default.
Now, here’s how to restore the network settings via the Command Prompt:
- Press Win + R to open the Run command dialog box.
- Type CMD and press Ctrl + Shift + Enter to open an elevated Command Prompt.
- Type the following command and press Enter:
netsh int ip set DNS
From there, type the following command and press Enter:
netsh winsock reset
3. Disable and Re-Enable NLA Settings Via System Settings
Disabling and re-enabling the NLA settings on your device could help. Let’s take a look at how you can do this:
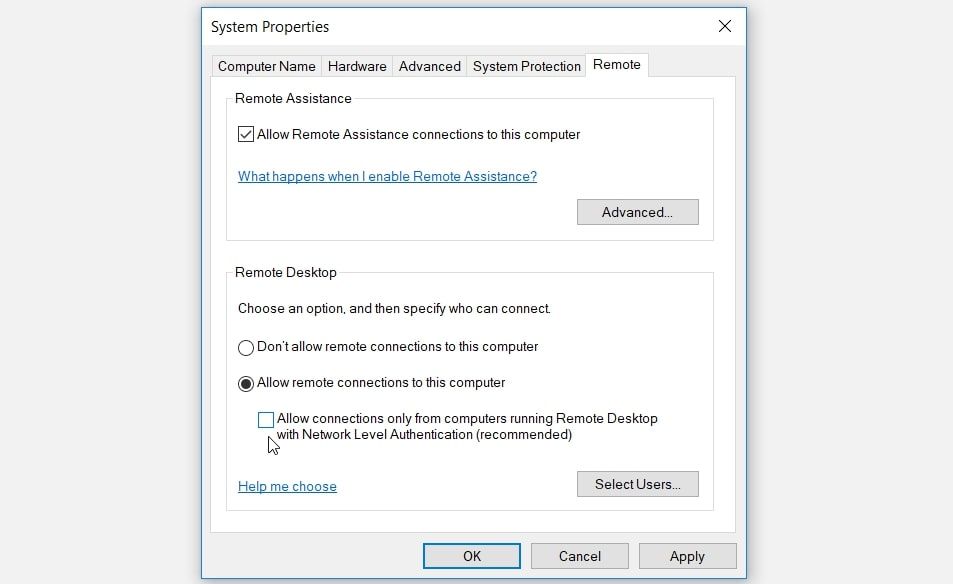
- Press Win + R to open the Run command dialog box.
- Type sysdm.cpl and press Enter to open the System Properties window.
- Navigate to the Remote tab.
- Uncheck the Allow connections only from computers running Remote Desktop with Network Level Authentication (recommended) box.
- Press Apply and then press OK. From there, restart your PC to save these changes.
Next, re-enable the NLA settings through these steps:
- Open the System Properties window as per the previous steps.
- Check the Allow connections only from computers running Remote Desktop with Network Level Authentication (recommended) box.
- Click Apply, click OK, and then restart your PC to apply these changes.
4. Disable and Re-Enable NLA Settings Via PowerShell

If the system settings didn’t resolve the issue, then PowerShell could help. So, we’ll explore how you can disable and re-enable the NLA settings with this tool.
To disable the NLA settings, follow these steps:
- Press Win + R to open the Run command dialog box.
- Type PowerShell and press Ctrl + Shift + Enter to open an elevated PowerShell window.
- Next, type the following command:
$TargetMachine = “Target-Machine-Name”(Get-WmiObject -class “Win32_TSGeneralSetting” -Namespace rootcimv2terminalservices -ComputerName $TargetMachine -Filter “TerminalName=’RDP-tcp'”).SetUserAuthenticationRequired(0)
Replace the “Target-Machine-Name” command with the name of your device. From there, press Enter to run the command.
Finally, wait for the process to complete and then restart your device.
Now, re-enable the NLA settings through these steps:
- Open PowerShell as per the previous steps.
- Enter the same command but replace SetUserAuthenticationRequired(0) with SetUserAuthenticationRequired(1).
- Press Enter to run the command and then restart your PC when the process is complete.
5. Configure NLA Settings Via the Local Group Policy Editor

Are you still struggling to resolve «The remote computer requires NLA» error? Let’s now disable and re-enable the NLA settings using the Local Group Policy Editor:
To disable the NLA settings, follow these steps:
- Press Win + R to open the Run command dialog box.
- Type gpedit.msc and press Enter to open the Local Group Policy Editor.
- Navigate to Computer Configuration > Administrative Templates > Windows Components > Remote Desktop Services > Remote Desktop Session Host > Security.
- Double-click the Require user authentication for remote connections by using Network Level Authentication option on the right.
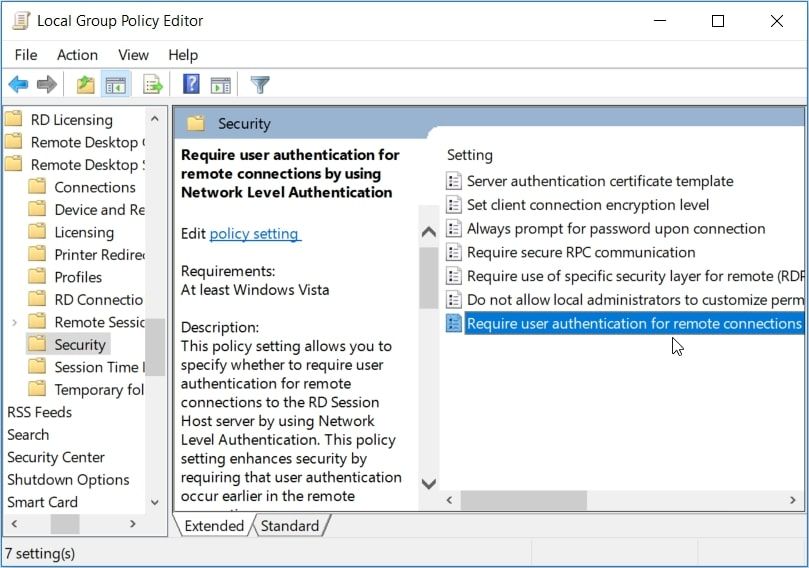
In the next window, check the Not Configured or Disabled box. Next, press Apply, press OK, and then restart your PC.
Finally, follow these steps to re-enable the NLA settings:
- Open the Local Group Policy Editor and navigate to the Security option as per the previous steps.
- Double-click the Require user authentication for remote connections by using Network Level Authentication option.
- In the next window, check the Enabled box, press Apply and then press OK. Finally, restart your PC to apply these changes.
6. Update or Reinstall the Network Drivers

This issue might be caused by corrupted or incompatible network drivers. So, you can either update or reinstall these drivers to get rid of this error.
Firstly, update your network drivers by following these steps:
- Press Win + X and select Device Manager from the options.
- Double-click the Network adapters option to expand it.
- Right-click your PC’s network adapter and click Update driver.
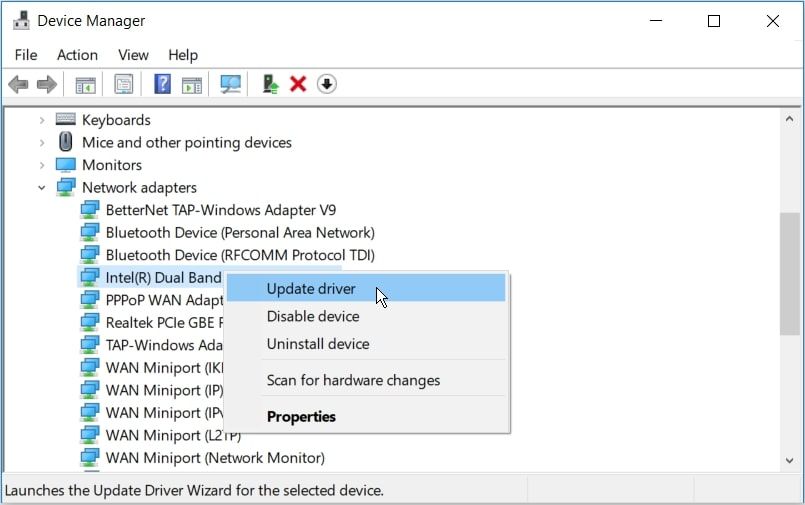
Next, select Search automatically for updated driver software. From there, follow the on-screen instructions to complete the process.
If the issue persists, try reinstalling the network adapters through these steps:
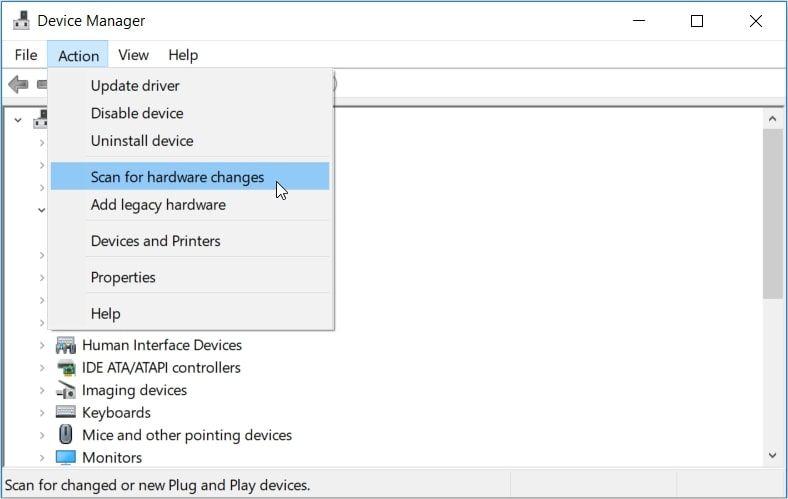
- Open the Device Manager and expand the Network adapters option as per the previous steps.
- Right-click your PC’s network adapter and select Uninstall device.
- Navigate to the Action tab and select Scan for hardware changes. Finally, restart your PC to apply these changes.
7. Use Windows’ Built-In Troubleshooters
Windows’ built-in troubleshooters can help resolve this issue. In this case, we’ll tackle the problem by running the Internet Connections troubleshooter, the Network Adapters troubleshooter, and the Incoming Connections troubleshooter.
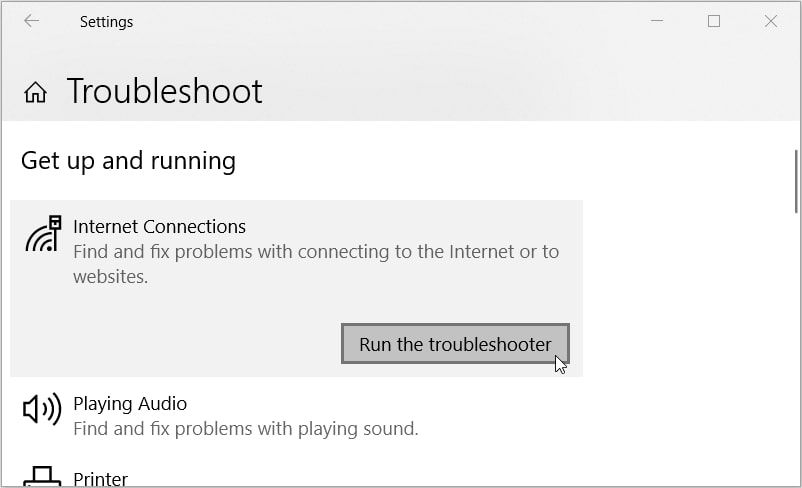
Let’s start with the Internet Connections troubleshooter:
- Navigate to Win Start Menu > PC Settings > Update & Security and select Troubleshoot on the left-hand side pane.
- Click the Internet Connections troubleshooter on the right-hand side pane and press Run the troubleshooter.
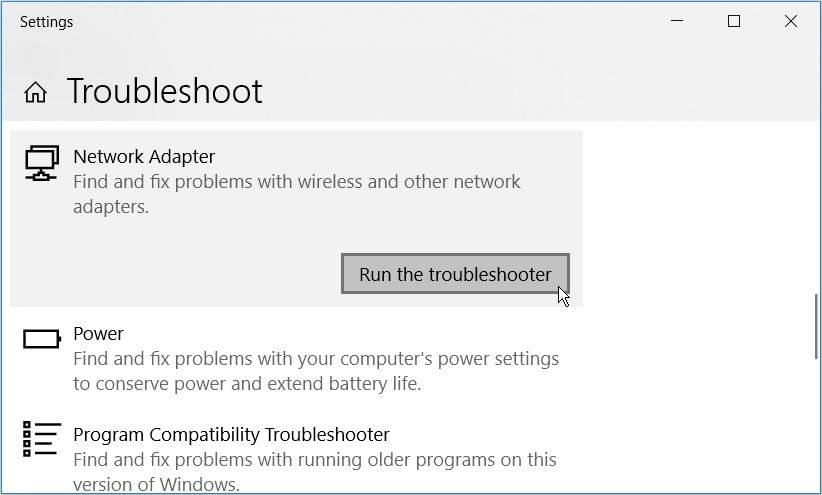
From there, you can use the Network Adapters troubleshooter. This will find and fix problems with the network adapters on your device.
To run this tool, follow these steps:
- Open the Troubleshoot settings window as per the previous steps.
- Click the Network Adapters troubleshooter on the right-hand side and press the Run the troubleshooter button.
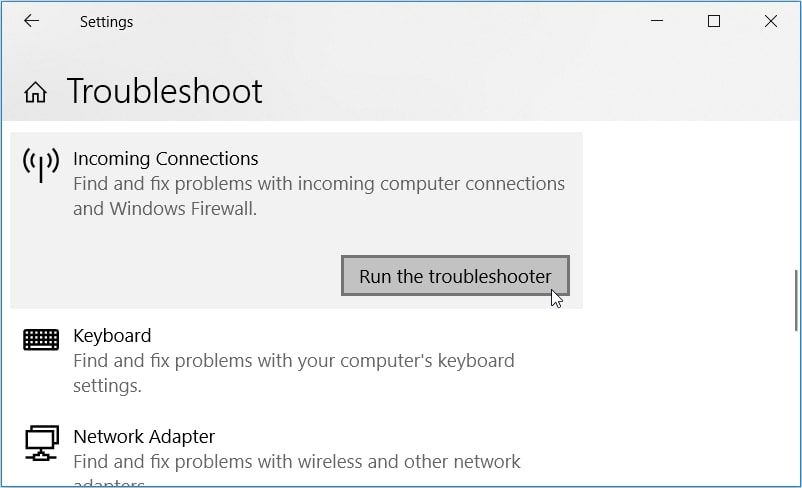
Finally, run the Incoming Connections troubleshooter. This will find and fix incoming computer connection problems.
Here’s how you can run this tool:
- Open the Troubleshoot settings window as per the previous steps.
- Click the Incoming Connections troubleshooter on the right and press the Run the troubleshooter button.
Restart your PC to apply all these changes.
Easily Connect to Your Remote Device Using Windows’ Remote Access Technology
“The Remote Computer Requires Network Level Authentication (NLA)” error is quite frustrating. The worst part is that it usually comes in many forms.
For example, the error might read, «the remote computer requires network level authentication which your computer does not support.» Sometimes it reads, «the remote computer that you are trying to connect to requires network level authentication.»
Regardless of how this error appears on your device, you can fix it using the methods we’ve covered. And if the problem persists, try applying these fixes on the remote device too.
-
#1
Здравствуйте, есть один проблемный компьютер, который не соединяется с vpn шлюзом через SSL vpn. Точнее я заметил, что если на комп не устанавливать приложение polar flow sync то все работает. Но все равно хочется разобраться, т.к удалить приложение для синхронизации часов нельзя. При попытке установить соединение через VPN, появляются последовательно два сообщения об ошибках:
Сообщение №1
Код:
The VPN client was unable to modify the IP forwarding table. A VPN connection will not be established. Please restart your computer or device, then try again.Сообщение №2
Код:
AnyConnect was not able to establish a connection to the specified secure gateway. Please try connecting again.При этом в логах windows пробегают сообщения об ошибках anyconnect с eventid кодами 1, 2 источник Engineering Debug Details
Код:
Тип события:    Ошибка
Источник события:    acvpnui
Категория события:    Engineering Debug Details
Код события:    2
Дата:        30.05.2016
Время:        15:33:19
Пользователь:        Н/Д
Компьютер:    MICROSOF-CB770D
Описание:
Function: ConnectMgr::launchCachedDownloader
File: .ConnectMgr.cpp
Line: 6946
Invoked Function: ConnectMgr :: launchCachedDownloader
Return Code: 3 (0x00000003)
Description: Cached Downloader terminated abnormally
и еще
Код:
Тип события:    Предупреждение
Источник события:    acvpnui
Категория события:    Engineering Debug Details
Код события:    1
Дата:        30.05.2016
Время:        15:33:19
Пользователь:        Н/Д
Компьютер:    MICROSOF-CB770D
Описание:
Function: ProfileMgr::getProfileNameFromHost
File: .ProfileMgr.cpp
Line: 793
No profile available for host vpn.work.ru.
и еще
Код:
Тип события:    Ошибка
Источник события:    acvpnagent
Категория события:    Engineering Debug Details
Код события:    2
Дата:        30.05.2016
Время:        15:33:24
Пользователь:        Н/Д
Компьютер:    MICROSOF-CB770D
Описание:
Function: CThread::invokeRun
File: .UtilityThread.cpp
Line: 435
Invoked Function: IRunnable::Run
Return Code: -32112629 (0xFE16000B)
Description: BROWSERPROXY_ERROR_NO_PROXY_FILE
и еще
Код:
Тип события:    Ошибка
Источник события:    acvpnui
Категория события:    Engineering Debug Details
Код события:    2
Дата:        30.05.2016
Время:        15:33:53
Пользователь:        Н/Д
Компьютер:    MICROSOF-CB770D
Описание:
Function: CTransportWinHttp::SendRequest
File: .CTransportWinHttp.cpp
Line: 1229
Invoked Function: CTransportWinHttp::processRequestResponse
Return Code: -30015449 (0xFE360027)
Description: CTRANSPORT_ERROR_SET_RESPONSE_DATA
Вобщем не знаю что мешает соединению, подскажите как подружить Polar Flow и Cisco AnyConnect?
PS Заметил что с PolarFlow ставится Bonjour, может быть это из-за него? Хотя удаление bonjour не помогло…
Последнее редактирование модератором: 14.03.2019
-
#4
Нужно отключить Internet Connection Sharing
Пуск -> Выполнить -> services.msc
Службу Internet Connection Sharing (ICS) -> Отключено