Содержание
- How to open a message box (WPF .NET)
- Display a message box
- Handle a message box response
- Окно сообщения об ошибке для WinForms и WPF приложений
- UI error display window with task async in WPF
- 2 Answers 2
- Открытие окна сообщения (WPF .NET)
- Отображение окна сообщения
- Обработка ответа в окне сообщения
- How to show an unhandled exception window in WPF
- The WindowExceptionHandler class
- Creating the exception window
- Handle exception or exit application?
- A sample project
- Summary
How to open a message box (WPF .NET)
A message box is a dialog box that is used to quickly display information and optionally allow users to make decisions. Access to the message box is provided by the MessageBox class. A message box is displayed modally. And the code that displays the message box is paused until the user closes the message box either with the close button or a response button.
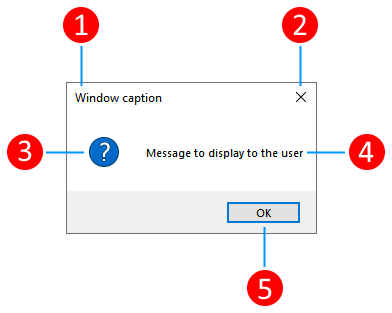
The following illustration demonstrates the parts of a message box:

- A title bar with a caption (1).
- A close button (2).
- Icon (3).
- Message displayed to the user (4).
- Response buttons (5).
For presenting or gathering complex data, a dialog box might be more suitable than a message box. For more information, see Dialog boxes overview.
Display a message box
To create a message box, you use the MessageBox class. The MessageBox.Show method lets you configure the message box text, title, icon, and buttons, shown in the following code:
The MessageBox.Show method overloads provide ways to configure the message box. These options include:
- Title bar caption
- Message icon
- Message text
- Response buttons
Here are some more examples of using a message box.
Display an alert.
The previous code displays a message box like the following image:
It’s a good idea to use the options provided by the message box class. Using the same alert as before, set more options to make it more visually appealing:
The previous code displays a message box like the following image:

Display a warning.
The previous code displays a message box like the following image:

Ask the user a question.
The previous code displays a message box like the following image:
Handle a message box response
The MessageBox.Show method displays the message box and returns a result. The result indicates how the user closed the message box:
When a user presses the buttons at the bottom of the message box, the corresponding MessageBoxResult is returned. However, if the user presses the ESC key or presses the Close button (#2 in the message box illustration), the result of the message box varies based on the button options:
| Button options | ESC or Close button result |
|---|---|
| Ok | Ok |
| OkCancel | Cancel |
| YesNo | ESC keyboard shortcut and Close button disabled. User must press Yes or No. |
| YesNoCancel | Cancel |
For more information on using message boxes, see MessageBox and the MessageBox sample.
Источник
Окно сообщения об ошибке для WinForms и WPF приложений

Приветствую!
В статье посвященной моему профайлеру для Entity Framework-a, я вкратце описал примененную мной форму для сообщения пользователю об исключительной ошибке в приложении. После оценки количества скачиваний примера кода, было решено выделить этот пример в отдельный проект, а также добавить поддержку WPF приложений.
Исходники библиотеки вместе с примерами опубликованы на CodePlex под свободной лицензией MIT: https://uiexceptionhandler.codeplex.com/
Подробности под катом.
Введение
Всем известно, что приложения периодически падают по самым разным причинам, при этом, крайне желательно показывать пользователю дружественное сообщение об ошибке в приложении, вместо стандартного сообщения Windows.
Что получилось
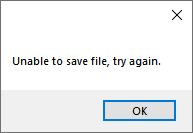
При подключенной библиотеке, в случае падения приложения будет показано следующие сообщение с просьбой добавить описание шагов которые привели к ошибке и свой email для ответа, при этом текст ошибки сохраняется в лог файл. 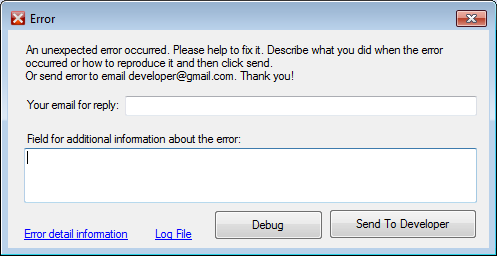
При клике по кнопке «Error detail information» выводиться дополнительная информация об ошибке: 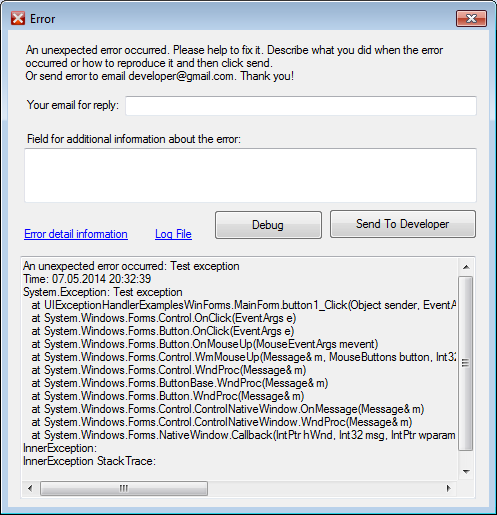
Кнопка Debug позволяет подключить отладчик Visual Studio.
Кнопка «Send to Developer» отправляет письмо на почту разработчику. В случае ошибки отправки сообщения, пользователю будет предложено самому отправить лог файл разработчику на почту.
Отправленное разработчику сообщение придет в таком виде: 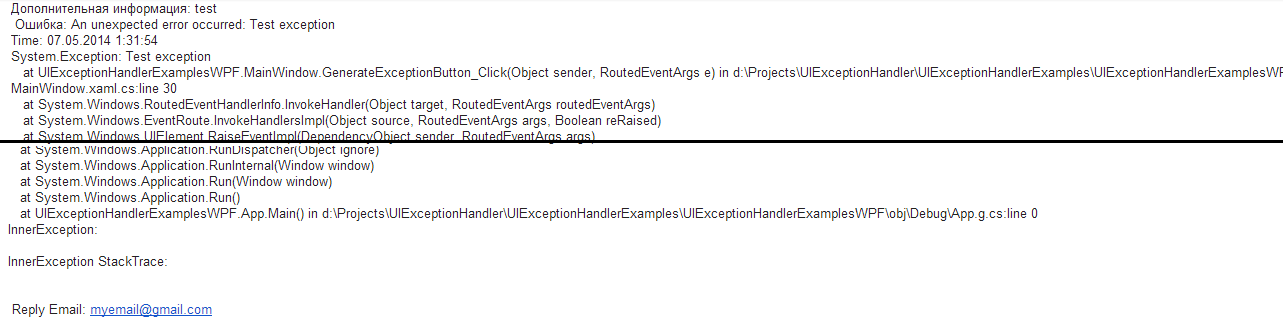
Использование
1. Забрать последнюю версию кода https://uiexceptionhandler.codeplex.com/SourceControl/latest
2. Собрать в Release mode.
3. Из папки «UIExceptionHandlerLibsDeploy» подключить в проект библиотеку UIExceptionHandlerWinForms.dll в случае WinForms приложения и UIExceptionHandlerWPF.dll в случае WPF приложения.
4. Инициализировать путем вызова статического метода с рядом параметров:
Как это работает
Статический метод UIException.Start подписывает метод HandleError на событие AppDomain.CurrentDomain.UnhandledException:
В качестве библиотеки для логгирования используется NLog. Для того чтобы избежать появления лишних xml файлов, вся конфигурация Nlog-а делается в коде:
Чтобы добиться максимальной простой интеграции в проект, я решил все используемые сборки объединить в одну библиотеку. Делается это при помощи приложения ILMerge, путем добавления скрипта в post-build событие:

Послесловие
Данное решение было написано для достаточно крупного проекта, применяется уже более 2-х лет, значительно улучшив процесс исправления ошибок, поскольку о каждом падении приложения узнаешь моментально, без дополнительной нотификации от пользователя.
Надеюсь это все будет кому-то полезно!
Всем спасибо за внимание!
Источник
UI error display window with task async in WPF
I am new to async and was wondering if any improvement can be made to the solution I put together from scattered information on the web.
The following (working) code shows how a button press runs logic and if there are any errors they will appear in the returned task.Exception.Handle variable which I can check in my ContinueWith code. If it’s not null, I open the error dialog window for the user. By passing in FromCurrentSynchronizationContext , I get to open the window on the UI thread and avoid issues with UI thread access.
Any improvements to make it more readable or suggest a different patter for this would be much welcomed.

2 Answers 2
This is a good fit for async await:
Regarding async await As you can see using async and await removes quite a bit of noise from the code. In general async void is smelly and should only be used for eventhavndlers. In your case it feels like a decent fit since you handle the exceptions. Async void means it cannot be awaited.
Regarding command: While I agree that this looks like a fit for a RelayCommand it is not trivial due to the async.
Here is a good read on commands for async scenarios.
Most RelayCommand implementations handle raising CanExecuteChanged poorly by calling CommandManager.InvalidateRequerySuggested which is very inefficient.
Here is a nice implementation.
Regarding scheduling Always be explicit with .ConfigureAwait(true|false) when awaiting. The default is true which means that the code continues on the synchronizationcontext it came from. This is a strange default in my opinion and ConfigureAwait is a poorly named method. In your case I think the logger and windowManager should be thread agnostic enabling .ConfigureAwait(false) Suggested implementation:
The upside with implementing it like this is that the caller will not need to remember to call it on the UI thread. It is the job of the windowmanager to schedule if needed. Hence fixing many potential bugs in one place.
Regarding the pattern Using a flag like this is fine and will work well if you refactor to relaycommand. A try-finally block makes it clear in my opinion.
Источник
Открытие окна сообщения (WPF .NET)
Окно сообщения — это диалоговое окно, которое используется для быстрого отображения информации. Дополнительно оно позволяет пользователям принимать решения. Доступ к окну сообщения предоставляется классом MessageBox. Окно сообщения отображается в модальном режиме. А выполнение кода, отображающего окно сообщения, приостанавливается, пока пользователь не закроет окно сообщения с помощью кнопки закрытия или кнопки ответа.
На следующем рисунке демонстрируются части окна сообщения:
- Заголовок окна с подписью (1).
- Кнопка «Закрыть» (2).
- Значок (3).
- Сообщение, отображаемое пользователю (4).
- Кнопки ответа (5).
Для представления или сбора сложных данных диалоговое окно может подходить больше, чем окно сообщения. Дополнительные сведения см. в разделе Общие сведения о диалоговых окнах.
Отображение окна сообщения
Чтобы создать окно сообщения, используйте класс MessageBox. Метод MessageBox.Show позволяет настроить текст, заголовок, значок и кнопки окна сообщения, как показано в следующем коде:
Перегрузки метода MessageBox.Show предоставляют способы настройки окна сообщения. Вот какие параметры доступны:
- Заголовок окна
- Значок сообщения
- Текст сообщения
- Кнопки ответа
Ниже приведено еще несколько примеров использования окна сообщения.
Предыдущий код отображает окно сообщения, как показано на следующем рисунке:

Рекомендуется использовать параметры, предоставляемые классом окна сообщения. Используя то же оповещение, что и раньше, задайте дополнительные параметры, чтобы сделать его визуально более привлекательным:
Предыдущий код отображает окно сообщения, как показано на следующем рисунке:

Предыдущий код отображает окно сообщения, как показано на следующем рисунке:

Задает вопрос пользователю.
Предыдущий код отображает окно сообщения, как показано на следующем рисунке:

Обработка ответа в окне сообщения
Метод MessageBox.Show используется для отображения окна сообщения и возвращения результата. Результат показывает, как пользователь закрыл окно сообщения:
Когда пользователь нажимает кнопки в нижней части окна сообщения, возвращается соответствующий результат MessageBoxResult. Однако, если пользователь нажимает клавишу ESC или кнопку Закрыть (№ 2 на рисунке окна сообщения), результат окна сообщения зависит от параметров кнопки:
| Параметры кнопок | Результат для кнопки ESC или Закрыть |
|---|---|
| Ok | Ok |
| OkCancel | Cancel |
| YesNo | Клавиша клавиатуры ESC и кнопка Закрыть отключены. Пользователю необходимо нажать Yes (Да) или No (Нет). |
| YesNoCancel | Cancel |
Дополнительные сведения об использовании окон сообщений см. в описании MessageBox и примере MessageBox.
Источник
How to show an unhandled exception window in WPF
In the previous post, we created a base class that listens for unhandled exceptions in our .NET application. In this post we will derive from that class to show an error window for every unhandled exception that occurs in our program.
The WindowExceptionHandler class
Let’s start with the WindowExceptionHandler. This class inherits from GlobalExcptionHanderBase (which we implemented in the previous post) and implements the OnUnhandledException(Exception) method. This method will be called whenever there is an unhandled exception in our application.
Inside that method, we create an instance of the ExceptionWindow class, set its DataContext property and display it by calling exceptionWindow.Show().
Notice that the code is wrapped inside a Dispatcher.BeginInvoke(..) call. This is because the OnUnhandledException(..) method might be called from a thread other then the main thread. To make sure that our ExceptionWindow is created and shown on the main (dispatcher) thread we post our exception window creation with BeginInvoke(..) to be executed on the next dispatcher frame.
Creating the exception window
The content of an exception error window will be very different depending on your use case. If the window is for development purpose only, we probably want as much technical information about the exception as possible. If its presented to the non technical user, it might be better to just let them know that something went wrong without any technical details at all.
For the purpose of this post, we create a exception window that hides the details behind an expander control. The following screenshot shows the expanded window:
 Screenshot of the expanded exception window
Here is the XAML code that creates the above window
To access the exceptions details via databinding the DataContext property of the window is set to an instance of the ExceptionWindowVM class.The view model holds the Exception object and its type as a string property:
We could have used the Exception object itself as DataContext. But there is no Type property on the Exception class to bind to. There are of course other ways to display the type string but wrapping the exception in a view model makes the code easily extendable for future requirements.
To setup the WindowExceptionHandler in our application we just need to new up an instance of the class somewhere. This is typically done in a place where all the wiring of the application happens. In this sample project its simply the App’s constructor in App.xaml.cs:
Thats all the code we need to show an exception window for every unhandled exception in our application!
Handle exception or exit application?
Once the exception windows shows up, there was an unhandled exception in our application. Which options do we give to the user now? Can she just close the exception window and use our application like before or is it better to shut down the application?
The application might work as expected even after an unhandled exception. But we have no way to proof this inside our global exception handler. Since the exception was not handled by our applications code, it might have corrupted the application state. Letting the user work with our application in this situation can be very dangerous. In the best case the app might work just like before, or there might be further exceptions. But it might also leave our application in a state where the user can do things she might not be allowed to or …, … the possibilities for error are endless.
In case of an unhandled exception in a real world application, we have no other choice then to shut down the application. This is why there is an “Exit application” button instead of an “OK” button on the exception window. There is also an event handler for the Closed event of the exception window to exit the app when the user presses the X on button.
A sample project
The MainWindow of the sample project for this post comes with a few buttons that throw different kind of exceptions. The simplest one is a normal exception that is thrown on the main thread. Then there is a button that produces an UnobservedTaskException on the finalizer thread and there are the bad ones that throw exceptions on worker threads.
As explained in the previous post, exceptions on threads other then the main thread cannot be handled and will terminate the process. This means our exception window wont work for these exceptions.
To make it work, we need to catch all exceptions on worker threads and re-throw them on to the main (dispatcher) thread. The code behind the last button “Throw on another Thread handled” does exactly that.
It wraps the business logic inside a Try-Catch block and throws the exception on the dispatcher.
If you use the Task or Task for asynchronous programming in your application, a lot of these problems are handled for you. Exceptions in async methods are catched by the framework and are stored in the returning Task object. Awaiting the task will then re-throw the exception on the calling thread. Unless you are using async void… In an async void method there is no Task object returned so the exception cannot be stored and will be thrown on whatever thread the method’s code is executed. This might not be the main thread. So do not create async void methods, but if you do, wrap the await part in a Try-Catch block and re-throw the exception on the dispatcher as above. Here is a handy ThrowOnDispatcher() extension method for this situation:
Summary
We used the GobalExceptionHandlerBase class from the previous post to create a WindowExceptionHandler that shows an exception window for every unhandled exception that occurs in our application.
We saw that it is important to shut down the application after an unhandled exception because we might have corrupted the application state and that exceptions on worker threads will terminate our application without a chance to display an error to the user.
All the code for this post can be found on this Github repository
Источник
In the previous post, we created a base class that listens for unhandled exceptions in our .NET application. In this post we will derive from that class to show an error window for every unhandled exception that occurs in our program.
The WindowExceptionHandler class
Let’s start with the WindowExceptionHandler. This class inherits from GlobalExcptionHanderBase (which we implemented in the previous post) and implements the OnUnhandledException(Exception) method. This method will be called whenever there is an unhandled exception in our application.
Inside that method, we create an instance of the ExceptionWindow class, set its DataContext property and display it by calling exceptionWindow.Show().
    /// <summary>
    /// This ExceptionHandler implementation opens a new
    /// error window for every unhandled exception that occurs.
    /// </summary>
    class WindowExceptionHandler : GlobalExceptionHandlerBase
    {
        /// <summary>
        /// This method opens a new ExceptionWindow with the
        /// passed exception object as datacontext.
        /// </summary>
        public override void OnUnhandledException(Exception e)
        {
            Application.Current.Dispatcher.BeginInvoke(new Action(() => {
                var exceptionWindow = new ExceptionWindow();
                exceptionWindow.DataContext = new ExceptionWindowVM(e);
                exceptionWindow.Show();
            }));
        }
    }
Notice that the code is wrapped inside a Dispatcher.BeginInvoke(..) call. This is because the OnUnhandledException(..) method might be called from a thread other then the main thread. To make sure that our ExceptionWindow is created and shown on the main (dispatcher) thread we post our exception window creation with BeginInvoke(..) to be executed on the next dispatcher frame.
Creating the exception window
The content of an exception error window will be very different depending on your use case. If the window is for development purpose only, we probably want as much technical information about the exception as possible. If its presented to the non technical user, it might be better to just let them know that something went wrong without any technical details at all.
For the purpose of this post, we create a exception window that hides the details behind an expander control. The following screenshot shows the expanded window:
Here is the XAML code that creates the above window
<Window x:Class="Tcoc.ExceptionHandler.Windows.ExceptionWindow"
        xmlns="http://schemas.microsoft.com/winfx/2006/xaml/presentation"
        xmlns:x="http://schemas.microsoft.com/winfx/2006/xaml"
        xmlns:d="http://schemas.microsoft.com/expression/blend/2008"
        xmlns:mc="http://schemas.openxmlformats.org/markup-compatibility/2006"
        Title="Unexpected application error"
        Width="700"
        MaxHeight="650"
        ResizeMode="NoResize"
        SizeToContent="Height"
        mc:Ignorable="d">
    <Window.Resources>
        <Style x:Key="Label"
               TargetType="TextBlock">
            <Setter Property="FontWeight" Value="Bold" />
            <Setter Property="Margin" Value="0,8,0,4" />
        </Style>
        <Style x:Key="Content"
               TargetType="TextBlock">
            <Setter Property="Margin" Value="0,4,0,8" />
        </Style>
    </Window.Resources>
    <Grid>
        <Grid.RowDefinitions>
            <!--  Info  -->
            <RowDefinition Height="auto" />
            <!--  Exception details  -->
            <RowDefinition Height="*" />
            <!--  Button  -->
            <RowDefinition Height="auto" />
        </Grid.RowDefinitions>

        <!--  Info  -->
        <TextBlock Margin="16"
                   FontSize="14"
                   Text="An unexpected error occured. The application state might be corrupted."
                   TextWrapping="Wrap" />

        <!--  Exception details  -->
        <Border Grid.Row="1"
                MaxHeight="450"
                Background="#EEEEEE">
            <Expander Margin="16,8,16,8"
                      Header="Exception Details">

                <ScrollViewer HorizontalScrollBarVisibility="Auto"
                              VerticalScrollBarVisibility="Auto">
                    <StackPanel>
                        <!--  Exception Message  -->
                        <TextBlock Style="{StaticResource Label}"
                                   Text="Exception message" />
                        <TextBlock Grid.Column="1"
                                   Text="{Binding Exception.Message, Mode=OneWay, TargetNullValue=-}"
                                   TextWrapping="Wrap" />
                        <!--  Exception Type  -->
                        <TextBlock Style="{StaticResource Label}"
                                   Text="Exception type" />
                        <TextBlock Style="{StaticResource Content}"
                                   Text="{Binding ExceptionType, Mode=OneWay, TargetNullValue=-}" />
                        <!--  Callstack  -->
                        <TextBlock Style="{StaticResource Label}"
                                   Text="Callstack" />
                        <TextBlock Style="{StaticResource Content}"
                                   Text="{Binding Exception.StackTrace, Mode=OneWay, TargetNullValue=-}" />
                        <!--  Inner exception  -->
                        <TextBlock Style="{StaticResource Label}"
                                   Text="Inner exception" />
                        <TextBlock Style="{StaticResource Content}"
                                   Text="{Binding Exception.InnerException, Mode=OneWay, TargetNullValue=-}" />
                    </StackPanel>
                </ScrollViewer>
            </Expander>
        </Border>
        <!--  Close Button  -->
        <Button Grid.Row="2"
                Margin="16"
                Padding="8"
                HorizontalAlignment="Right"
                Click="OnExitAppClick"
                Content="Exit Application" />
    </Grid>
</Window>
To access the exceptions details via databinding the DataContext property of the window is set to an instance of the ExceptionWindowVM class.The view model holds the Exception object and its type as a string property:
    class ExceptionWindowVM
    {
        public Exception Exception { get; }

        public string ExceptionType { get; }

        public ExceptionWindowVM(Exception exc)
        {
            Exception = exc;
            ExceptionType = exc.GetType().FullName;
        }
    }
We could have used the Exception object itself as DataContext. But there is no Type property on the Exception class to bind to. There are of course other ways to display the type string but wrapping the exception in a view model makes the code easily extendable for future requirements.
To setup the WindowExceptionHandler in our application we just need to new up an instance of the class somewhere. This is typically done in a place where all the wiring of the application happens. In this sample project its simply the App’s constructor in App.xaml.cs:
    public partial class App : Application
    {
        private readonly WindowExceptionHandler _exceptionHandler;

        public App()
        {
            _exceptionHandler = new WindowExceptionHandler();
        }
    }
Thats all the code we need to show an exception window for every unhandled exception in our application!
Handle exception or exit application?
Once the exception windows shows up, there was an unhandled exception in our application. Which options do we give to the user now? Can she just close the exception window and use our application like before or is it better to shut down the application?
The application might work as expected even after an unhandled exception. But we have no way to proof this inside our global exception handler. Since the exception was not handled by our applications code, it might have corrupted the application state. Letting the user work with our application in this situation can be very dangerous. In the best case the app might work just like before, or there might be further exceptions. But it might also leave our application in a state where the user can do things she might not be allowed to or …, … the possibilities for error are endless.
In case of an unhandled exception in a real world application, we have no other choice then to shut down the application. This is why there is an “Exit application” button instead of an “OK” button on the exception window. There is also an event handler for the Closed event of the exception window to exit the app when the user presses the X on button.
A sample project
The MainWindow of the sample project for this post comes with a few buttons that throw different kind of exceptions. The simplest one is a normal exception that is thrown on the main thread. Then there is a button that produces an UnobservedTaskException on the finalizer thread and there are the bad ones that throw exceptions on worker threads.
As explained in the previous post, exceptions on threads other then the main thread cannot be handled and will terminate the process. This means our exception window wont work for these exceptions.
To make it work, we need to catch all exceptions on worker threads and re-throw them on to the main (dispatcher) thread. The code behind the last button “Throw on another Thread handled” does exactly that.
        private void RaiseExceptionOnThreadSafe(object sender, RoutedEventArgs e)
        {
            Thread t = new Thread(() =>
            {
                try
                {
                    // Some business logic
                    // ...
                    throw new SampleException("Sample");
                }
                catch (Exception exc)
                {
                    // Catch all exceptions on the worker thread and
                    // re-throw them on the dispatcher to prevent an
                    // application crash without exception window.
                    exc.ThrowOnDispatcher();
                }
            });
            t.Start();
        }
It wraps the business logic inside a Try-Catch block and throws the exception on the dispatcher.
If you use the Task or Task<T> for asynchronous programming in your application, a lot of these problems are handled for you. Exceptions in async methods are catched by the framework and are stored in the returning Task object. Awaiting the task will then re-throw the exception on the calling thread. Unless you are using async void… In an async void method there is no Task object returned so the exception cannot be stored and will be thrown on whatever thread the method’s code is executed. This might not be the main thread. So do not create async void methods, but if you do, wrap the await part in a Try-Catch block and re-throw the exception on the dispatcher as above. Here is a handy ThrowOnDispatcher() extension method for this situation:
        public static void ThrowOnDispatcher(this Exception exc)
        {
            Application.Current.Dispatcher.BeginInvoke(new Action(() => {
                // preserve the callstack of the exception
                ExceptionDispatchInfo.Capture(exc).Throw();
            }));
        }
Summary
We used the GobalExceptionHandlerBase class from the previous post to create a WindowExceptionHandler that shows an exception window for every unhandled exception that occurs in our application.
We saw that it is important to shut down the application after an unhandled exception because we might have corrupted the application state and that exceptions on worker threads will terminate our application without a chance to display an error to the user.
All the code for this post can be found on this Github repository
A WPF application:
If you’re familiar with C# or any of the other .NET languages that you may use with WPF, then exception handling should not be new to you: Whenever you
have a piece of code that are likely to throw an exception, then you should wrap it in a try-catch block to handle the exception gracefully. For instance,
consider this example:
private void Button_Click(object sender, RoutedEventArgs e)
{
	string s = null;
	s.Trim();
}
Obviously it will go wrong, since I try to perform the Trim() method on a variable that’s currently null. If you don’t handle the exception, your
application will crash and Windows will have to deal with the problem. As you can see, that isn’t very user friendly:

In this case, the user would be forced to close your application, due to such a simple and easily avoided error. So, if you know that things might go
wrong, then you should use a try-catch block, like this:
private void Button_Click(object sender, RoutedEventArgs e)
{
	string s = null;
	try
	{
		s.Trim();
	}
	catch(Exception ex)
	{
		MessageBox.Show("A handled exception just occurred: " + ex.Message, "Exception Sample", MessageBoxButton.OK, MessageBoxImage.Warning);
	}
}
However, sometimes even the simplest code can throw an exception, and instead of wrapping every single line of code with a try- catch block, WPF lets you
handle all unhandled exceptions globally. This is done through the DispatcherUnhandledException event on the Application class. If
subscribed to, WPF will call the subscribing method once an exception is thrown which is not handled in your own code. Here’s a complete example, based on
the stuff we just went through:
<Window x:Class="WpfTutorialSamples.WPF_Application.ExceptionHandlingSample"
        xmlns="http://schemas.microsoft.com/winfx/2006/xaml/presentation"
        xmlns:x="http://schemas.microsoft.com/winfx/2006/xaml"
        Title="ExceptionHandlingSample" Height="200" Width="200">
    <Grid>
        <Button HorizontalAlignment="Center" VerticalAlignment="Center" Click="Button_Click">
            Do something bad!
        </Button>
    </Grid>
</Window>
using System;
using System.Windows;
namespace WpfTutorialSamples.WPF_Application
{
public partial class ExceptionHandlingSample : Window
{
public ExceptionHandlingSample()
{
InitializeComponent();
}
private void Button_Click(object sender, RoutedEventArgs e)
{
string s = null;
try
{
s.Trim();
}
catch(Exception ex)
{
MessageBox.Show("A handled exception just occurred: " + ex.Message, "Exception Sample", MessageBoxButton.OK, MessageBoxImage.Warning);
}
s.Trim();
}
}
}Notice that I call the Trim() method an extra time, outside of the try-catch block, so that the first call is handled, while the second is not. For the
second one, we need the App.xaml magic:
<Application x:Class="WpfTutorialSamples.App"
             xmlns="http://schemas.microsoft.com/winfx/2006/xaml/presentation"
             xmlns:x="http://schemas.microsoft.com/winfx/2006/xaml"
             DispatcherUnhandledException="Application_DispatcherUnhandledException"
             StartupUri="WPF Application/ExceptionHandlingSample.xaml">
    <Application.Resources>
    </Application.Resources>
</Application>
using System;
using System.Windows;
namespace WpfTutorialSamples
{
public partial class App : Application
{
private void Application_DispatcherUnhandledException(object sender, System.Windows.Threading.DispatcherUnhandledExceptionEventArgs e)
{
MessageBox.Show("An unhandled exception just occurred: " + e.Exception.Message, "Exception Sample", MessageBoxButton.OK, MessageBoxImage.Error);
e.Handled = true;
}
}
}

We handle the exception much like the local one, but with a slightly different text and image in the message box. Also, notice that I set the e.Handled
property to true. This tells WPF that we’re done dealing with this exception and nothing else should be done about it.
Summary
Exception handling is a very important part of any application and fortunately, WPF and .NET makes it very easy to handle exceptions both locally and
globally. You should handle exceptions locally when it makes sense and only use the global handling as a fallback mechanism, since local handling allows
you to be more specific and deal with the problem in a more specialized way.
This article has been fully translated into the following languages:
-
Chinese
-
Czech
-
Danish
-
Dutch
-
French
-
German
-
Hungarian
-
Italian
-
Japanese
-
Korean
-
Persian
-
Polish
-
Portuguese
-
Romanian
-
Russian
-
Slovak
-
Spanish
-
Ukrainian
-
Vietnamese
Is your preferred language not on the list? Click here to help us translate this article into your language!
- Download source files — 16.6 Kb

Introduction
Since the dawn of software development, the single biggest threat to reliable information has been end-users. After decades of the existence of computers, why do we still need to inform users that «the Start Date should always be less than the End Date», or that «First Name is a required field»? Since User.Current.Electrocute() won’t be added to the .NET Framework until .NET 4.0, most of us generally have to resort to displaying some kind of UI cues to politely tell the user what they’ve done wrong, and how they can fix it.
Under Windows Forms, we had the ErrorProvider, and under ASP.NET, we had Validator controls. In Windows Presentation Foundation, the approach is going to change, but the goal remains the same: telling users that something is wrong. In this article, I’ll discuss how input validation is designed to be handled in Windows Presentation Foundation (hereafter referred to as WPF). Specifically, I’ll discuss the ExceptionValidationRule class, creating custom ValidationRules, how to display errors, when to display errors (UpdateSourceTriggers), and finally, an alternative approach using an implementation of the Windows Forms ErrorProvider for WPF.
Table of Contents
- Welcome to WPF Validation
- Very Simple Validation: ExceptionValidationRule
- Displaying Errors
- Customized ValidationRules
- Controlling When to Validate: UpdateSourceTriggers
- Where Does an ErrorProvider Fit in?
- IDataErrorInfo
- Creating our ErrorProvider
- Conclusion
- Special Thanks
Welcome to WPF Validation
If you never spent much time with Windows Forms or data binding, I’m hoping that this article will remain simple enough to follow along. Validation in Windows Presentation Foundation takes an approach very similar to ASP.NET validation, in that most «business rules» are enforced on the user interface and applied to specific controls and bindings. This approach is quite simple to understand and implement, but some proponents of «rich domain models» and object-oriented designs (including myself) have some problems with it. As we approach the end of the article, I’ll discuss why this is and a way to do things differently, but still leveraging some of the strengths of WPF.
On the other hand, if you did spend a lot of time using Windows Forms, and made heavy use of the ErrorProvider/IDataErrorInfo approach to validation, you might be disheartened to know that there isn’t one in Windows Presentation Foundation. Luckily, since I too was disappointed about having to enforce everything «on the UI», towards the end of the article, I’ll show how to create an ErrorProvider for use in your Windows Presentation Foundation applications. However, even if you’re convinced that validating on the UI is a Bad Idea (TM), I’d encourage you to read the full article as I’ll discuss some of the other validation features in WPF that you can still leverage.
Warning: All of the sample code was written using the BETA 2 release of .NET 3.0, and subsequently, some of it may have changed. Hopefully, the concepts will stay the same though, otherwise this will be a very wasted article 
Very Simple Validation: ExceptionValidationRule
Most of the time when we talk about validation, we’re talking about validating user input (other kinds of validation are outside the scope of this article). Let’s look at the most simple kind of built-in validation offered by WPF — the ExceptionValidationRule. To begin our example, let’s create a simple Customer class:
public class Customer
{
    private string _name;

    public string Name
    {
        get { return _name; }
        set { _name = value; }
    }
}
Writing classes is fun, but you’ll probably never convince people to pay you unless you can add some kind of UI to let them interact with your classes. Since this article is about Windows Presentation Foundation, let’s use XAML to create our UI. As we’re smart developers, we’ll also use data binding:
<TextBox Text="{Binding Path=Name}" />
Before we go any further, it’s important to note that the odd-looking markup above is actually just a kind of shorthand for writing this:
<TextBox>
    <TextBox.Text>
        <Binding Path="Name" />
     </TextBox.Text>
</TextBox>
Now, let’s say one of your requirements is that customer names are mandatory. To implement this constraint, you could change your customer’s Name property to look like this:
public string Name
{
    get { return _name; }
    set
    {
        _name = value;
        if (String.IsNullOrEmpty(value))
        {
            throw new ApplicationException("Customer name is mandatory.");
        }
    }
}
Using WPF Validation Rules on our data binding, we can display this error automatically. All we need to do is make use of the ValidationRules property on our binding, like this:
<TextBox>
    <TextBox.Text>
        <Binding Path="Name">
            <Binding.ValidationRules>
                <ExceptionValidationRule />
            </Binding.ValidationRules>
        </Binding>
    </TextBox.Text>
</TextBox>
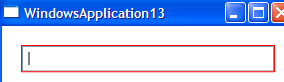
If you ran this code, you’d see something which looks like this:
Displaying Errors
Windows Presentation Foundation has a static class inside the System.Windows.Controls namespace, imaginatively named «Validation«. It has a number of static dependency properties which you can apply to any control. The ones we’re most interested in are:
Errors— A list of error messages that apply to the bindings on this control.HasError— Indicates whether there are any errors in theErrorsproperty.ErrorTemplate— AControlTemplatewe can apply if there is an error.
By default, the Validation class uses an ErrorTemplate that has a red border around the control, which is why we get a red border in the program above. If the default red borders aren’t your thing, I’ll understand. You might want thick green borders with orange exclamation marks:
![]()
To achieve the look you’re after, you could define your own control template:
<Application.Resources>
  <ControlTemplate x:Key="TextBoxErrorTemplate">
    <DockPanel LastChildFill="True">
      <TextBlock DockPanel.Dock="Right"
        Foreground="Orange"
        FontSize="12pt">!!!!</TextBlock>

      <Border BorderBrush="Green" BorderThickness="1">
         <AdornedElementPlaceholder />
      </Border>
    </DockPanel>
  </ControlTemplate>
</Application.Resources>
The AdornerElementPlaceholder is used to say «put the invalid control here». Once you’ve created this template, you can then reuse it on your customer name TextBox by setting the Validation.ErrorTemplate attached property:
<TextBox
    Validation.ErrorTemplate="{StaticResource TextBoxErrorTemplate}">
    [...]
    <TextBox>
Or, to save having to set the ErrorTemplate every time, you could do it in a WPF Style. If we were to set the style’s TargetType to TextBox, and don’t use a key, all text boxes in our application will automatically receive this style:
<Style TargetType="{x:Type TextBox}">
    <Setter Property="Validation.ErrorTemplate">
        <Setter.Value>
            <ControlTemplate>
                <DockPanel LastChildFill="True">
                    <TextBlock DockPanel.Dock="Right"
                        Foreground="Orange"
                        FontSize="12pt">
                        !!!!
                    </TextBlock>
                    <Border BorderBrush="Green" BorderThickness="1">
                        <AdornedElementPlaceholder />
                    </Border>
                </DockPanel>
            </ControlTemplate>
        </Setter.Value>
    </Setter>
</Style>
Now, green borders are all well and good, but they don’t exactly tell the users what they’ve done wrong. Since we included the error message in the exception we were throwing earlier, we can make use of the static Validation.Errors attached property to get this value and use it as a property on our TextBox. The most common example is to set the ToolTip, like so:
<Style TargetType="{x:Type TextBox}">

    [... SNIP: The code from above ...]

    <Style.Triggers>
        <Trigger Property="Validation.HasError" Value="true">
            <Setter Property="ToolTip"
                Value="{Binding RelativeSource={RelativeSource Self},
                       Path=(Validation.Errors)[0].ErrorContent}"/>
        </Trigger>
    </Style.Triggers>
</Style>
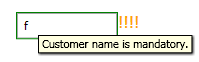
Now, if we mouse over the TextBox while it’s in an error state, we’ll get a tool-tip telling us what we did wrong:
All we need to do is place that style in our application resources, ensure we apply any validation rules to our bindings, and voila!
On a more advanced note, if you would rather show the errors somewhere else than in the ToolTip, such as in the TextBlock where the orange exclamation marks were, you could use a style like this:
<Style TargetType="{x:Type TextBox}">
    <Setter Property="Validation.ErrorTemplate">
        <Setter.Value>
            <ControlTemplate>
                <DockPanel LastChildFill="True">
                    <TextBlock DockPanel.Dock="Right"
                        Foreground="Orange"
                        FontSize="12pt"
                        Text="{Binding ElementName=MyAdorner,
                               Path=AdornedElement.(Validation.Errors)
                               [0].ErrorContent}">
                    </TextBlock>
                    <Border BorderBrush="Green" BorderThickness="1">
                        <AdornedElementPlaceholder Name="MyAdorner" />
                    </Border>
                </DockPanel>
            </ControlTemplate>
        </Setter.Value>
    </Setter>
</Style>

Customized Validation Rules
I know what you’re thinking: «Do I have to throw exceptions?»
I’m glad you asked. If you remember our customer’s Name property above, you’ll remember we were throwing an exception in order to display the errors using an ExceptionValidationRule. I’m sure most people will agree that throwing exceptions isn’t really the optimal way of signaling that we have user input errors. Apart from the performance penalties, personally, I believe that «user input» errors aren’t exactly «exceptional«, and so they are not exactly what exceptions were designed for.
If you hunt around the framework, you’ll see that the ExceptionValidationRule class inherits from an abstract ValidationRule class. The ValidationRule class looks like this:
public abstract class ValidationRule
{
    public abstract ValidationResult Validate(
        object value,
        CultureInfo culture);
}
When we created our binding earlier, I had some XAML that resembled this:
<Binding Path="Name">
    <Binding.ValidationRules>
        <ExceptionValidationRule />
    </Binding.ValidationRules>
</Binding>
The truth is, we could have used anything that inherits from the ValidationRule base class. Let’s create a custom ValidationRule designed just to validate the lengths of strings.
namespace MyValidators
{
    public class StringRangeValidationRule : ValidationRule
    {
        private int _minimumLength = -1;
        private int _maximumLength = -1;
        private string _errorMessage;

        public int MinimumLength
        {
            get { return _minimumLength; }
            set { _minimumLength = value; }
        }

        public int MaximumLength
        {
            get { return _maximumLength; }
            set { _maximumLength = value; }
        }

        public string ErrorMessage
        {
            get { return _errorMessage; }
            set { _errorMessage = value; }
        }

        public override ValidationResult Validate(object value,
            CultureInfo cultureInfo)
        {
            ValidationResult result = new ValidationResult(true, null);
            string inputString = (value ?? string.Empty).ToString();
            if (inputString.Length < this.MinimumLength ||
                   (this.MaximumLength > 0 &&
                    inputString.Length > this.MaximumLength))
            {
                result = new ValidationResult(false, this.ErrorMessage);
            }
            return result;
        }
    }
}
Our validator has three properties: a MinimumLength, a MaximumLength, and an ErrorMessage string which is shown if the value doesn’t fit within the range. We’re now ready to use it in our XAML.
First, we’ll need to reference it in our XML namespaces at the top of the file:
<Window [...]
    xmlns:validators="clr-namespace:MyValidators" />
Now we can add it to our binding’s ValidationRules:
<Binding Path="Name">
    <Binding.ValidationRules>
         <validators:StringRangeValidationRule
            MinimumLength="1"
            ErrorMessage="A name is required." />
     </Binding.ValidationRules>
</Binding>
If you’ve added the styles I gave above, that should be all you need to do to show validation messages.
Controlling When to Validate: UpdateSourceTriggers
If you ran any of the sample code above, you’ll notice that the validation only takes place when you hit Tab or click away from the text box. That’s a good default for most cases, but if you’d like validation to take place at other times, you can use the UpdateSourceTrigger property on your binding.
The UpdateSourceTrigger property can take one of three possible values:
- The default is
LostFocus, which means that the bound data source will be updated and validated when the UI element loses focus (such as when you tab away, or click on another element). - The second option is
PropertyChanged, which occurs when the property you are binding to (theTextBox‘sTextproperty in the example above) is changed. This enables you to validate whenever the user types or changes the value, without having to wait until they tab away (this is great for filtering a list of things). - Finally, there’s the
Explicitoption, which only happens when you tell it to happen.
To make use of the UpdateSourceTrigger property in our code, all we’d need to do is set it in our binding:
<TextBox>
    <TextBox.Text>
        <Binding Path="Name" UpdateSourceTrigger="PropertyChanged">
            <Binding.ValidationRules>
                <ExceptionValidationRule />
            </Binding.ValidationRules>
        </Binding>
    </TextBox.Text>
</TextBox>
For more information on UpdateSourceTriggers, see the MSDN page for the UpdateSourceTrigger enumeration.
Where Does an ErrorProvider Fit in?
We’ve already discussed that the ExceptionValidationRule isn’t a nice way of validating. Some of the problems you may have with creating custom validation rules as I showed above are:
- Our business «rules» are defined in markup, hidden inside our bindings, and can be hard to locate and maintain, as well as difficult to reuse.
- We can’t easily get a «list» of all of the broken rules on a form in order to perform other logic — such as determining if the customer can be saved when the «Save» button is clicked.
Defining business rules in markup may not be such a problem for some applications, but in applications with rich business objects such as Trial Balance, or applications using rich frameworks such as CSLA, or in cases where the rules are shared across many screens or applications, you may find this to be a big limitation. If this isn’t a problem for you, you might not get much out of the rest of this article.
This means that the ValidationRules approach isn’t very useful to some of us. However, all is not lost, as we can still make use of the static Validation class, and of its use of styles and control templates to control the display of errors.
IDataErrorInfo
The IDataErrorInfo interface has been kicking around since .NET 1.1, and was used heavily in DataSets as well as used by many business object frameworks. You’ll find this gem in the System.ComponentModel namespace. If you’ve been reading my blog for some time, hopefully this interface isn’t a stranger to you.
IDataErrorInfo was designed for reporting errors to user interface controls from the objects they are bound to. The DataGrid (1.1) and DataGridView (2.0) in Windows Forms both detected the presence of this interface on objects they were bound to automatically, and showed any errors without any work. The Windows Forms ErrorProvider could automatically be used to display errors on any control that came from the objects they (and the ErrorProvider) were bound to, all without any extra code being written.
To refresh your memory, this is how we would have used this interface in .NET 2.0:
public class Customer : IDataErrorInfo
{
    private string _name;

    public string Name
    {
        get { return _name; }
        set { _name = value; }
    }

    public string Error
    {
        get
        {
            return this[string.Empty];
        }
    }

    public string this[string propertyName]
    {
        get
        {
            string result = string.Empty;
            propertyName = propertyName ?? string.Empty;
            if (propertyName == string.Empty || propertyName == "Name")
            {
                if (string.IsNullOrEmpty(this.Name))
                {
                    result = "Name cannot be blank!";
                }
            }
            return result;
        }
    }
}
Back then, all we had to do was bind a grid to our Customer object, and any errors would be automatically reported. If we bound the Customer‘s Name to a TextBox, we just had to drag an ErrorProvider onto the form, set its DataSource to our Customer object, and all of our validation was done for us.
Sadly, IDataErrorInfo appears to have been benched in WPF, as there doesn’t seem to be any built-in support for it. This means that there is no ErrorProvider component in WPF either. Since the concept of an ErrorProvider is pretty simple, let’s have a go at making one ourselves.
More on IDataErrorInfo…
The MSDN entry for IDataErrorInfo is a good starting point. For a deeper discussion of the IDataErrorInfo interface and a better way to implement business object validation, you might enjoy my recent Delegates and Business Objects article on the CodeProject. Rocky Lhotkas’ brilliant CSLA architecture also makes extensive use of the IDataErrorInfo interface.
Creating our ErrorProvider
The ErrorProvider that I have built (found in the attached sample code) inherits from the WPF Decorator class, which means you can «put stuff inside it». To use it, you just need to do something like this:
<validators:ErrorProvider>
    <StackPanel>
        <TextBox Text="{Binding Path=Name}" />
        <TextBox Text="{Binding Path=Age}" />
    </StackPanel>
</validators:ErrorProvider>
My ErrorProvider works by cycling through all of the controls that are inside of it, and looking for any data bindings on their properties. When a value of one of the bound properties changes, it checks if its DataContext implements IDataErrorInfo, and if so, it gets any error messages, and displays them using the built-in static Validation class. That means you can use the styles and control templates that I showed above, whilst keeping all of your validation logic in another class.
Cycling through the control hierarchy in WPF is done using the LogicalTreeHelper class. The code itself is a little long to post here, but is included in the sample code download at the top of the page.
Using the WPF ErrorProvider brings a number of benefits:
- Your XAML is much more compact, as you don’t need to add a list of
ValidationRules to each binding. - All of your validation can be done by your business objects, rather than at the UI. This lets you have great encapsulation on your objects while still having an informative UI.
- You can call the
Validate()method on theErrorProviderto force validation, and check if the controls are valid, rather than having to inspect each one. - You can use the
GetFirstInvalidElement()method to get the first control with an error on your form, to set focus to it easily. This is great if, for example, your «Save» button has been clicked but you want to show them that they still have errors.
Conclusion
Whether you choose to use custom ValidationRules, my ErrorProvider, or simply throw exceptions, I hope I have given you enough information to make an educated decision that suits your project.
If your applications have a very rich domain model, you may find the ErrorProvider approach helpful. If your application is very service oriented, or very UI centric, ValidationRules might be all you need.
Of course, if none of these approaches suit your requirements, you could always hold out for .NET 4.0 and the introduction of User.Current.Electrocute()
Special Thanks
I would like to give a special thanks to Paul Czywcynski of TempWorks who has done a lot of testing with my ErrorProvider and given me a couple of bug fixes to make it work in a few places that I hadn’t tried.
I’d also like to thank Mike Brown, who pointed me to the LogicalTreeHelper and also pointed me to ValidationRules (of course, he didn’t mention them until after I’d done my ErrorProvider ).
My name is Paul Stovell. I live in Brisbane and develop an automated release management product, Octopus Deploy. Prior to working on Octopus I worked for an investment bank in London, and for Readify. I also work on a few open source projects. I am a Microsoft MVP for Client Application Development.
Hi,
You can implement Binding Validation in WPF.
Method one: throw ApplicationException
 public partial class ExceptionValidationRule_sample : Window
    {
        public ExceptionValidationRule_sample()
        {
            InitializeComponent();
        }
    }
    public class ExceptionValidationRule_sample_ViewModel
    {
        private string _name;

        public string Name
        {
            get { return _name; }
            set
            {
                _name = value;
               // your validation rule
                if (String.IsNullOrEmpty(value))
                {
                    throw new ApplicationException("Name is mandatory.");
                }
            }
        }
    }
    <Window.DataContext>
        <local:ExceptionValidationRule_sample_ViewModel/>
    </Window.DataContext>
    <StackPanel>
    <TextBox Margin="10,10,200,10" >
            <TextBox.Style>
                <Style TargetType="{x:Type TextBox}">
                    <Setter Property="Validation.ErrorTemplate">
                        <Setter.Value>
                            <ControlTemplate>
                                <DockPanel LastChildFill="True">
                                    <TextBlock DockPanel.Dock="Right" Foreground="Red"  FontSize="12pt"
                                               Text="{Binding ElementName=MyAdorner,Path=AdornedElement.(Validation.Errors)[0].ErrorContent}">
                                    </TextBlock>
                                    <Border BorderBrush="Green" BorderThickness="1">
                                        <AdornedElementPlaceholder Name="MyAdorner" />
                                    </Border>
                                </DockPanel>
                            </ControlTemplate>
                        </Setter.Value>
                    </Setter>
                </Style>
            </TextBox.Style>
            <TextBox.Text>
                <Binding Path="Name" UpdateSourceTrigger="PropertyChanged">
                    <Binding.ValidationRules>
                        <ExceptionValidationRule />
                    </Binding.ValidationRules>
                </Binding>
            </TextBox.Text>
        </TextBox>
    </StackPanel>
You can also custom rule by implement the ValitaionRule class.
public partial class ValidationRule_sample : Window
    {
        public ValidationRule_sample()
        {
            InitializeComponent();
        }
    }
    public class ValidationRule_sample_ViewModel
    {
        private string _name;

        public string Name
        {
            get { return _name; }
            set
            {
                _name = value;
            }
        }
    }
    public class StringRangeValidationRule : ValidationRule
    {
        private int _minimumLength = -1;
        private int _maximumLength = -1;
        private string _errorMessage;

        public int MinimumLength
        {
            get { return _minimumLength; }
            set { _minimumLength = value; }
        }

        public int MaximumLength
        {
            get { return _maximumLength; }
            set { _maximumLength = value; }
        }

        public string ErrorMessage
        {
            get { return _errorMessage; }
            set { _errorMessage = value; }
        }

        public override System.Windows.Controls.ValidationResult Validate(object value, CultureInfo cultureInfo)
        {
            System.Windows.Controls.ValidationResult result = new System.Windows.Controls.ValidationResult(true, null);
            string inputString = (value ?? string.Empty).ToString();
            if (inputString.Length < this.MinimumLength ||
                   (this.MaximumLength > 0 &&
                    inputString.Length > this.MaximumLength))
            {
                result = new System.Windows.Controls.ValidationResult(false, this.ErrorMessage);
            }
            return result;
        }
    }
 <Window.DataContext>
        <local:ValidationRule_sample_ViewModel />
    </Window.DataContext>
    <StackPanel Grid.Column="0">
        <!--LostFocus-->
        <TextBox Margin="10,10,200,10" >
            <TextBox.Style>
                <Style TargetType="{x:Type TextBox}">
                    <Setter Property="Validation.ErrorTemplate">
                        <Setter.Value>
                            <ControlTemplate>
                                <DockPanel LastChildFill="True">
                                    <TextBlock DockPanel.Dock="Right" Foreground="Red"  FontSize="12pt"
                                               Text="{Binding ElementName=MyAdorner,Path=AdornedElement.(Validation.Errors)[0].ErrorContent}">
                                    </TextBlock>
                                    <Border BorderBrush="Green" BorderThickness="1">
                                        <AdornedElementPlaceholder Name="MyAdorner" />
                                    </Border>
                                </DockPanel>
                            </ControlTemplate>
                        </Setter.Value>
                    </Setter>
                </Style>
            </TextBox.Style>
            <TextBox.Text>
                <Binding Path="Name" UpdateSourceTrigger="LostFocus">
                    <Binding.ValidationRules>
                        <local:StringRangeValidationRule MinimumLength="1" ErrorMessage="A name is required." />
                    </Binding.ValidationRules>
                </Binding>
            </TextBox.Text>
        </TextBox>

        <!--PropertyChanged-->
        <TextBox Margin="10,10,200,10" >
            <TextBox.Style>
                <Style TargetType="{x:Type TextBox}">
                    <Setter Property="Validation.ErrorTemplate">
                        <Setter.Value>
                            <ControlTemplate>
                                <DockPanel LastChildFill="True">
                                    <TextBlock DockPanel.Dock="Right" Foreground="Red"  FontSize="12pt"
                                               Text="{Binding ElementName=MyAdorner,Path=AdornedElement.(Validation.Errors)[0].ErrorContent}">
                                    </TextBlock>
                                    <Border BorderBrush="Green" BorderThickness="1">
                                        <AdornedElementPlaceholder Name="MyAdorner" />
                                    </Border>
                                </DockPanel>
                            </ControlTemplate>
                        </Setter.Value>
                    </Setter>
                </Style>
            </TextBox.Style>
            <TextBox.Text>
                <Binding Path="Name" UpdateSourceTrigger="PropertyChanged">
                    <Binding.ValidationRules>
                        <local:StringRangeValidationRule MinimumLength="1" ErrorMessage="A name is required." />
                    </Binding.ValidationRules>
                </Binding>
            </TextBox.Text>
        </TextBox>

        <!--Explicit-->
        <TextBox Margin="10,10,200,10" >
            <TextBox.Style>
                <Style TargetType="{x:Type TextBox}">
                    <Setter Property="Validation.ErrorTemplate">
                        <Setter.Value>
                            <ControlTemplate>
                                <DockPanel LastChildFill="True">
                                    <TextBlock DockPanel.Dock="Right" Foreground="Red"  FontSize="12pt"
                                               Text="{Binding ElementName=MyAdorner,Path=AdornedElement.(Validation.Errors)[0].ErrorContent}">
                                    </TextBlock>
                                    <Border BorderBrush="Green" BorderThickness="1">
                                        <AdornedElementPlaceholder Name="MyAdorner" />
                                    </Border>
                                </DockPanel>
                            </ControlTemplate>
                        </Setter.Value>
                    </Setter>
                </Style>
            </TextBox.Style>
            <TextBox.Text>
                <Binding Path="Name" UpdateSourceTrigger="Explicit">
                    <Binding.ValidationRules>
                        <local:StringRangeValidationRule MinimumLength="1" ErrorMessage="A name is required." />
                    </Binding.ValidationRules>
                </Binding>
            </TextBox.Text>
        </TextBox>
    </StackPanel>
Method two: IDataErrorInfo
 public IDataErrorInfo_sample()
        {
            InitializeComponent();
            Customer cus = new Customer();
            this.DataContext = cus;
            cus.Name = "Bob Ding";
        }
        public class Customer : IDataErrorInfo
        {
            private string _name;

            [Display(Name = "Name")]
            [RegularExpression(@"^(?=.*[a-z])(?=.*[A-Z])(?=.*d).+$")]
            public string Name
            {
                get { return _name; }
                set { _name = value; }
            }

            public string Error
            {
                get
                {
                    return this[string.Empty];
                }
            }

            public string this[string propertyName]
            {
                get
                {
                    string result = string.Empty;
                    propertyName = propertyName ?? string.Empty;
                    if (propertyName == string.Empty || propertyName == "Name")
                    {
                        if (string.IsNullOrEmpty(this.Name))
                        {
                            result = "Name cannot be blank!";
                        }
                    }
                    return result;
                }
            }
        }
 <StackPanel>
        <TextBox Margin="10,10,200,10"  Text="{Binding Path=Name, Mode=TwoWay, NotifyOnValidationError=True, UpdateSourceTrigger=PropertyChanged, ValidatesOnDataErrors=true}">
            <TextBox.Style>
                <Style TargetType="{x:Type TextBox}">
                    <Setter Property="Validation.ErrorTemplate">
                        <Setter.Value>
                            <ControlTemplate>
                                <DockPanel LastChildFill="True">
                                    <TextBlock DockPanel.Dock="Right"
                                       Foreground="Red"
                                       Margin="5,0,5,0"
                                       Text="*"/>
                                    <Border BorderBrush="Red" BorderThickness="1">
                                        <AdornedElementPlaceholder Name="ph"/>
                                    </Border>
                                </DockPanel>
                            </ControlTemplate>
                        </Setter.Value>
                    </Setter>
                    <Style.Triggers>
                        <Trigger Property="Validation.HasError" Value="true">
                            <Setter Property="ToolTip" Value="{Binding RelativeSource={x:Static RelativeSource.Self}, Path=(Validation.Errors)[0].ErrorContent}"/>
                        </Trigger>
                    </Style.Triggers>
                </Style>
            </TextBox.Style>
        </TextBox>
        <TextBox></TextBox>
    </StackPanel>

You can refer these links:
https://docs.microsoft.com/en-us/dotnet/framework/wpf/data/how-to-implement-binding-validation
Validation in WPF
Validation in Windows Presentation Foundation
Best Regards,
Bob
MSDN Community Support
Please remember to click «Mark as Answer» the responses that resolved your issue, and to click «Unmark as Answer» if not. This can be beneficial to other community members reading this thread. If you have any compliments or complaints to
MSDN Support, feel free to contact MSDNFSF@microsoft.com.
In this post, I will show how you can present user input validation errors to the user. By default, WPF shows a red border around the TextBox when the entered value is invalid. But in this case, our user has no idea what is wrong with entered data. We need to inform the user by providing an error message on the view.
To show you available option I created a sample project. You can find it under the link: https://github.com/kmatyaszek/WPFValidationDisplayErrors
In our sample project, we have four TextBox elements. Each of them presents a different style of presenting the occurred error to the user. When an error occurs (user entered value equals test) on the data binding the attached property Validation.HasError property is set to true on the target element of the data binding process (in our case it’s TextBox element). So we can use this property to indicate if the value entered by the user is invalid. We also can use Validation.Errors attached property to retrieve error message.
Below you can see the output of our sample project. As you can see when I typed value test to each of the TextBox each of them shows me an error message in the different form.
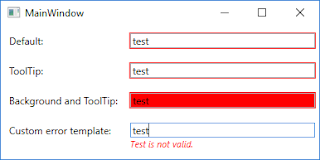
In this example, I focused on presenting the error message to the user so I decided to use the ValidatesOnExceptions mechanism (to read more about this please go to the following link: WPF Validation — Using ValidatesOnExceptions). Let’s look at the source code especially on XAML code.
<Window x:Class="WPFValidationDisplayErrors.MainWindow"
        xmlns="http://schemas.microsoft.com/winfx/2006/xaml/presentation"
        xmlns:x="http://schemas.microsoft.com/winfx/2006/xaml"
        xmlns:d="http://schemas.microsoft.com/expression/blend/2008"
        xmlns:mc="http://schemas.openxmlformats.org/markup-compatibility/2006"
        mc:Ignorable="d"
        Title="MainWindow" Height="200" Width="400">
    <Window.Resources>
        <Style TargetType="Label">
            <Setter Property="Margin" Value="5" />
            <Setter Property="VerticalAlignment" Value="Center" />
        </Style>
        <Style x:Key="DefaultTextBoxStyle" TargetType="TextBox">
            <Setter Property="Margin" Value="5" />
            <Setter Property="VerticalAlignment" Value="Center" />
        </Style>

        <Style x:Key="ToolTipWithErrorMessageOnErrorStyle" TargetType="TextBox" BasedOn="{StaticResource DefaultTextBoxStyle}">
            <Style.Triggers>
                <Trigger Property="Validation.HasError" Value="True">
                    <Setter Property="ToolTip" Value="{Binding RelativeSource={RelativeSource Self}, Path=(Validation.Errors)[0].ErrorContent}" />
                </Trigger>
            </Style.Triggers>
        </Style>

        <Style x:Key="RedBackgroundOnErrorStyle" TargetType="TextBox" BasedOn="{StaticResource ToolTipWithErrorMessageOnErrorStyle}">
            <Style.Triggers>
                <Trigger Property="Validation.HasError" Value="True">
                    <Setter Property="Background" Value="Red" />
                </Trigger>
            </Style.Triggers>
        </Style>

        <Style x:Key="CustomErrorControlOnErrorStyle" TargetType="TextBox" BasedOn="{StaticResource DefaultTextBoxStyle}">
            <Setter Property="Validation.ErrorTemplate">
                <Setter.Value>
                    <ControlTemplate>
                        <StackPanel>
                            <AdornedElementPlaceholder x:Name="placeholder" />
                            <TextBlock FontSize="11" FontStyle="Italic" Foreground="Red"
                                       Text="{Binding ElementName=placeholder, Path=AdornedElement.(Validation.Errors)[0].ErrorContent}" />
                        </StackPanel>
                    </ControlTemplate>
                </Setter.Value>
            </Setter>
        </Style>
    </Window.Resources>
    <Grid Grid.IsSharedSizeScope="True">
        <Grid.RowDefinitions>
            <RowDefinition Height="Auto" />
            <RowDefinition Height="Auto" />
            <RowDefinition Height="Auto" />
            <RowDefinition Height="Auto" />
        </Grid.RowDefinitions>
        <Grid.ColumnDefinitions>
            <ColumnDefinition Width="Auto" SharedSizeGroup="Labels" />
            <ColumnDefinition Width="*" />
        </Grid.ColumnDefinitions>

        <Label Content="Default:" />
        <TextBox Grid.Column="1"
                 Text="{Binding Path=Default, Mode=TwoWay, ValidatesOnExceptions=True, UpdateSourceTrigger=PropertyChanged}"
                 Style="{StaticResource DefaultTextBoxStyle}" />

        <Label Content="ToolTip:" Grid.Row="1" />
        <TextBox Grid.Column="1" Grid.Row="1"
                 Text="{Binding Path=ToolTip, Mode=TwoWay, ValidatesOnExceptions=True, UpdateSourceTrigger=PropertyChanged}"
                 Style="{StaticResource ToolTipWithErrorMessageOnErrorStyle}" />

        <Label Content="Background and ToolTip:" Grid.Row="2" />
        <TextBox Grid.Column="1" Grid.Row="2"
                 Text="{Binding Path=Background, Mode=TwoWay, ValidatesOnExceptions=True, UpdateSourceTrigger=PropertyChanged}"
                 Style="{StaticResource RedBackgroundOnErrorStyle}" />

        <Label Content="Custom error template:" Grid.Row="3" />
        <TextBox Grid.Column="1" Grid.Row="3"
                 Text="{Binding Path=CustomError, Mode=TwoWay, ValidatesOnExceptions=True, UpdateSourceTrigger=PropertyChanged}"
                 Style="{StaticResource CustomErrorControlOnErrorStyle}" />
    </Grid>
</Window>
As you can see in the above code snippet we defined TextBox styles in the Window resources section. As I mentioned before to indicate if we should show error message we’re using attached Validation.HasError property. In the first row is presented default behavior of the validation errors in WPF, it only shows a red border around the TextBox. In the second row, I created a custom style to show an error message in the tooltip. In the third row, I added the background color if the value is invalid. And in the last row, I created custom error template to show error message right below TextBox.