This page will help you resolve common error codes that XGen generates.
- Failed to find hair/Clumping1/bc_body_fred.ptx. Searched path includes: ./xgen/ … (XgUtil)
-
This message appears when XGen cannot locate the file in any of the XGen Data Path-specified directories listed in the message. There are two cases where this missing file message occurs:
- the file is missing.
- the file exists, but is located in a different directory. In this case, add the directory to the Edit File Path from the Collection menu in the XGen window.
- The collision module is dependent on an AnimWires module above it for wire guided method. Either that AnimWires module is inactive or deactivated from errors, or does not have the “affectCollision” option checked. (Collision)
- This message, and the following «Dependency check fails» message, often show up together. Verify the settings from both the Collision and AnimWires modifiers. These errors occur when an error causes the AnimWires modifier is deactivated by XGen.
- Dependency check fails. Deactivating the module. (Collision)
- This message, and the above «Collision modifier is dependent on an AnimWires modifier» message, often show up together. Verify the settings from both the Collision and AnimWires modifiers. These errors occur when an error causes the AnimWires modifier is deactivated by XGen.
- Error reading vertex list for meshes:mel(xgmTriMeshData(“vertices”,”someCollisionModule”)) Deactivating the module. (Collision)
-
There are two cases in which this error occurs. Normally you see this error if the assigned collision mesh object is missing. If this is the case, locate the missing object(s) and re-import them. This message also appears if the assigned collision object is not of the correct type, as the Collision modifier currently only works with triangular/quad meshes.
Note: Quad meshes are triangulated internally at each frame, which is not as efficient as using pre-triangulated meshes. It is recommended that you use triangular meshes for increased efficiency.
- No pipe data is found with the name fxCollisionWire__subdiv. (FXModule)
-
This message appears when XGen cannot find pipe data in the Collision modifier emitted from the AnimWires modifier when using one of the two wire-guided collision methods (Wire Flex or Wire Stiff).
To fix this error, first be sure the wire-guided method is the method you want to use. Wire-guided methods are primarily used for resolving collisions involving the primitives that follow the anim wires that have reached collision free using other methods. Wire-guided methods resolve collisions more consistently across the frame range due to the nature of underlying dynamics. However, as “Flexible” and “Stiff” methods resolve collisions based on intersections with collision objects, popping can occur at different frames.
To use wire-guided methods, you need an AnimWires modifier above the Collision modifier and ensure that the Affect Collision option is on. Otherwise, switch to either Flexible or Stiff in the Collision modifier.
- Clumping guide ID larger than number in xuv file (bc_body_rhinAA): 132611(guide ID) 128777(xuv file size) (Clumping)
- This message appears when the clumping xuv file is out of sync with its description. Regenerate the clumping data. This error occurs when the map indicates more clumps than the xuv file.
- Could not find clump guide vertex cv attribute (WireSupport)
- This message appears when the modifier could not locate the clump guide cv attribute that should have been emitted by the clumping modifier. Verify that cvAttr activated in the modifier with which you are using this modifier. For example, if CurveClump is selected, you must have cvAttr active in the curve clumping modifier that you wish to preserve (activating it in more than one modifier will result in the last activated modifier being preserved). If you are using a baked broom then the cvAttr option must be activated prior to the baking process as the cv attribute will be written into the XPD files.
- Could not find clump guide weights cv attribute (PreserveClumps)
- This message appears when the modifier could not find the clump guide Clump Scale attribute normally emitted by your clumping modifier. This problem is similar to the «Could not find clump guide vertex» message, above, but this error does not occur without the other message appearing first.
- Could not find blind data for clump guide (PreserveClumps)
- This message appears when no blind data for your clump guide has been found. The blind data is a chunk of data your primitive holds. When this error appears, the missing data is the clump guide location, which lets you reposition the clump guide onto the model to account for animation and deformation. If your groom is “live”, that is, not using an active baked groom manager, this should not happen. If this message appears when you have a baked groom, you may be using old XPD files.
- Unable to find closest cv on clump guide (PreserveClumps)
-
This message signifies that one of your clumping guides is invalid. The cv attribute was found, but the guide held within it is incorrect. This can be caused when ignoring another clumping modifier message. Search for a message about the inability to locate active guides in the message console and resolve that error first.
Note: It is good practice to resolve errors from the top down in the message console.
This error means that the particular clump will not be preserved, which while it may not be evident, can result in incorrect shading.
- Failed to evaluate _xform = mel(xgmWind(“_xform”, “someWindModule”)). (Description: someDescription; Module: someWindModule) ) (Wind)
- This message appears when there is a missing noise locator in the Wind modifier. To check whether a locator exists, open the XGen Window, open the Wind modifier UI in the Modifiers tab, and click the button to the right of the Noise Locator field. This opens a menu where you can select Select Bound Faces. If the missing locator exists, it is selected. Otherwise, a warning appears in Maya Script Editor. Importing in the locator resolves this problem. If there is no locator, you will not have wind effects on the primitives. It will behave as if the Wind modifier had been deactivated.
- Failed to evaluate _xform = mel(xgmWind(“_regionXform”, “someWindModule”)). (Description: someDescription; Module: someWindModule) ) (Wind)
- This error message is similar to the previous one and occurs when the region locator used by Wind modifier is missing. Follow the steps in the «Failed to evaluate _xform» message above to verify that a locator exists. If regionActive is not activated in your Wind modifier, you can ignore this message.
- Zeroing a pixel in map since all points were disqualified. (Clumping)
- This message appears when you generate a clumping map for a “sub” clumping modifier. The error indicates that XGen has processed a clump from the “parent” clumping modifier, but was unable to locate points within the clump region for the sub-clump. XGen cannot determine what color to paint the map so it default to black, effectively deactivating clumping for that modifier. XGen spend time attempting to locate a valid guide so painting the black pixels slows map generation. When the map is complete, find the black area Paint3d and add a point within each parent clump to be filled with black.
- Failed to find even one legal guide for geomName:proxyName (faceId:u,v) (Primitive)
-
There are two situations where this message appears:
- If you attempt to create a primitive at the given location, or
- if you attempt t to create a procedural clumping guide at the given location.
These situations are both similar as the location specified cannot find a valid guide with which to create a primitive, despite your using cv interpolation. When you do this, the primitive is culled or clump guide is deactivated.
To resolve this issue, determine which of the two error cases is yours. If there is no procedural clumping modifiers, the problem is with the primitives. The problem is also with the primitives if you deactivate all of your procedural clumping modifiers and still see this error. If no message appears, it indicates that your problem is with the clumping. Either way, the problem is often caused by a bad density map that lets XGen generate a primitive in an unexpected location.
Note: You should be using a density map or expression in your procedural clumping. Try “(myMainDensityExpression) > 0” as an expression, using your density expression from your main description inside the parenthesis.
- Cant bind to nothing. Use UNbind. someDescription->somePatch (SubdPatch)
- This message appears when you use an XGen file that needs to bind to data in the xgeom file but the geometry is missing. This can be caused by unlocking the XGen container and rendering. Open the xgeom file you are using and verify that it has the appropriate geometry. If you do not find geometry, re-bake out the geometry files.
- Size of fileset and geomset given dont agree (MFAXGenModule)
- This message requires that the XGen file set number matches the geometry file set number. Verify that the numbers of the input filesets match in the mfa command.
- Warning: Description CLUMPING1_brow_XGen_pennAAdoes not have renderman as its active renderer. Skipping. (MFAXGenModule)
- This message occurs when you render a description that does not have renderman as its active renderer. This is usually the case for clumping descriptions since they are not intended to be rendered. Ignore the warning if the description is a clumping description.
- Warning: Multiple cvs on primitives are bound to the last cv of the wire #X someWire. Wire may be too short. (AnimWires)
- The message is a level 2 warning that appeasr when you have wires shorter than the primitives that are bound to them. Ideally, each cv of the primitive is bound to a different cv on the wire, otherwise this may result in unexpected animation. Ideally anim wires are longer than all the primitives. Adjust the length of the anim wires to remove the warnings.
- Warning: No intersection found between prim #X and wire. cvs from wire and prim are inside collision object. (Collision)
- This message occurs nwhen cvs on the primitive and the anim wire it is bound to are both inside the collision object(s). This wire-guided method relies on anim wires to resolve collisions, and this requires all anim wires to be collision-free. When this condition is not satisfied, the collisions are unlikely to resolve properly. Check your wires if this message occurs.
- Can’t find ptex file: …/xgen/…Color/Shape.ptx. {WARNING} Plugin warning: Unrecognized attribute “geomName_XS” in token reference “${userS.geomName_XS,..$,AA}” (Shader)
- This message occurs only when old material is used for some of the geometry. If you see this error message, update your material and the error should resolve.
Содержание
- Resolving XGen Errors
- Resolving XGen Errors
- Resolving XGen Errors
- Resolving XGen Errors
- Resolving XGen Errors
Resolving XGen Errors
By:
This page will help you resolve common error codes that XGen generates.
To fix this error, first be sure the wire-guided method is the method you want to use. Wire-guided methods are primarily used for resolving collisions involving the primitives that follow the anim wires that have reached collision free using other methods. Wire-guided methods resolve collisions more consistently across the frame range due to the nature of underlying dynamics. However, as “Flexible” and “Stiff” methods resolve collisions based on intersections with collision objects, popping can occur at different frames.
To use wire-guided methods, you need an AnimWires modifier above the Collision modifier and ensure that the Affect Collision option is on. Otherwise, switch to either Flexible or Stiff in the Collision modifier.
Clumping guide ID larger than number in xuv file (bc_body_rhinAA): 132611(guide ID) 128777(xuv file size) (Clumping) This message appears when the clumping xuv file is out of sync with its description. Regenerate the clumping data. This error occurs when the map indicates more clumps than the xuv file. Could not find clump guide vertex cv attribute (WireSupport) This message appears when the modifier could not locate the clump guide cv attribute that should have been emitted by the clumping modifier. Verify that cvAttr activated in the modifier with which you are using this modifier. For example, if CurveClump is selected, you must have cvAttr active in the curve clumping modifier that you wish to preserve (activating it in more than one modifier will result in the last activated modifier being preserved). If you are using a baked broom then the cvAttr option must be activated prior to the baking process as the cv attribute will be written into the XPD files. Could not find clump guide weights cv attribute (PreserveClumps) This message appears when the modifier could not find the clump guide Clump Scale attribute normally emitted by your clumping modifier. This problem is similar to the «Could not find clump guide vertex» message, above, but this error does not occur without the other message appearing first. Could not find blind data for clump guide (PreserveClumps) This message appears when no blind data for your clump guide has been found. The blind data is a chunk of data your primitive holds. When this error appears, the missing data is the clump guide location, which lets you reposition the clump guide onto the model to account for animation and deformation. If your groom is “live”, that is, not using an active baked groom manager, this should not happen. If this message appears when you have a baked groom, you may be using old XPD files. Unable to find closest cv on clump guide (PreserveClumps) This message signifies that one of your clumping guides is invalid. The cv attribute was found, but the guide held within it is incorrect. This can be caused when ignoring another clumping modifier message. Search for a message about the inability to locate active guides in the message console and resolve that error first.
- If you attempt to create a primitive at the given location, or
- if you attempt t to create a procedural clumping guide at the given location.
These situations are both similar as the location specified cannot find a valid guide with which to create a primitive, despite your using cv interpolation. When you do this, the primitive is culled or clump guide is deactivated.
Источник
ситуация такая — сделал небольшой проект, при его открытии на следующий день выскакивают ошибки вроде этой
C:/Program Files/Autodesk/Maya2016/plug-ins/xgen/presets/Hair_V03_Desk/Clumping1/Maps/scalp.ptx (Part of path doesn’t exist)
то-есть, программа ищет и не может найти карту в пресетах плагина, где её никогда и не было, я сохранял карты в папке проекта в другом месте
Вопрос — как с этим бороться? ( попытался использовать File Path Manager, пока ничего не вышло), но как сделать чтобы при сохранении сцены такая проблема не возникала в принципе?

ага
то же самое с Фюром
не может найти — бла бла бла
а я уже разобрался — там во-первых, нельзя открывать сцену просто так, надо сначала установить проект, и при необходимости переопределить пути к конкретным картам ( если речь идёт об xGen), там у меня стоял relative path, то-есть карты искались исключительно внутри текущего проекта
Maya Fur Renderer [Finished]
==========================================================================
Maya Fur Renderer: Creating directory
// Error: file: J:/Program Files/Autodesk/Maya2016/scripts/fur/FurPluginCreateUI.mel line 8767: The directory «» could not be created. //
// Error: line 1: (Mayatomr) : //untitled_pTorusShape1_eqMap_1.ifffailed reading texture map //
// Error: line 1: (Mayatomr.Geometry) : pTorus1_FurFeedbackShape: FUR renderer returned an error, fur description ignored //
и фюр не рендерит
что делать?

Никогда не пробовал XGenить мех.
Но знаю что у XGen-а проблемы с рендером (по крайней мере в 14,15-ой). Рекомендуется всю геометрию из партиклов, перегонять через МЕЛ файл в инстансы. Тогда без проблем рендерит и ВиРей и Арнольд и т.д.
кстати, раз уж пошла такая пьянка, нет мыслей как заставить работать Арнольд в Майе 2016?
Вопрос не о взломе, майка его попросту не видит, притом что в списке плагинов Арни вроде присутствует ( неактивный), при попытке загрузить пишет, что не найдена процедура mtoa ( в Майке 2014 всё прекрасно работает)
Наткнулся в инете на форум Вконктакте с участием господина Чернеги в том числе, где обсуждалась проблема установки Арнольда, правда, ещё 1-й версии, нашел там несколько системных переменных, засунул их ещё и в переменные среды для верности, нифига не помогло
нет мыслей как заставить работать Арнольд в Майе 2016?
Вопрос не о взломе, майка его попросту не видит, притом что в списке плагинов Арни вроде присутствует ( неактивный), при попытке загрузить пишет, что не найдена процедура mtoa ( в Майке 2014 всё прекрасно работает)
У меня работает нормально, никаких переменных не прописывал, версия 1.2.4.3
В папке документыmaya2016modules файл mtoa.mod есть? Версию 2016 устанавливали?
посмотрел — файл есть, версия та-же самая (1243), естественно, под 16-ю майку, все файлы рассовал куда положено, и ничерта..
у меня работает арнольд, только ФюмФХ рендерит погано и не подключается к Йети…
а что делать со мной? почему Фюр не работает?
видел урок, правда по xGen, там автор перед рендером Арнольдом кэшировал в Алембик
ИСПРАВЛЕНИЕ: Не удалось создать D3D, ошибка устройства D3D9 [Steam Games]
Ошибки при запуске — слишком привычное явление для геймеров, как будто игра чувствует наше желание играть и отказывается дать нам то, что мы ищем. Так обстоит дело с Failed to create D3D device или менее распространенным, но не менее раздражающим Failed to create D3D9 device error .
Обе эти ошибки сообщают игроки, запускающие игры через Steam, и, похоже, они касаются только нескольких игр:
- Left 4 Dead 2
- CS: GO
- Borderlands 1 и 2
- Портал
- Ракетная лига
К счастью, для исправления ошибок D3D и D3D9 необходимо выбрать один и тот же путь, поскольку они имеют общую причину. Основная причина связана с графикой, в частности с драйвером видеокарты.
Мы предпримем обычные шаги по устранению неполадок, когда вы увидите эти ошибки.
Как исправить ошибку «Не удалось создать устройство D3D или D3D9»?
1. Перезагрузите компьютер.
- Перейдите в Пуск> Питание> Перезагрузка.
Вы пробовали выключить и снова включить? Есть причина, по которой айтишники говорят это все время. При большинстве ошибок первое, что вы должны сделать, это перезагрузить устройство.
Это очистит память и даст вашей системе возможность перезагрузить все файлы, необходимые для работы.
Процесс перезагрузки стирает текущее состояние программного обеспечения, что во многих случаях является всем, что нужно для устранения ошибок.
2. Проверьте целостность файлов игры.
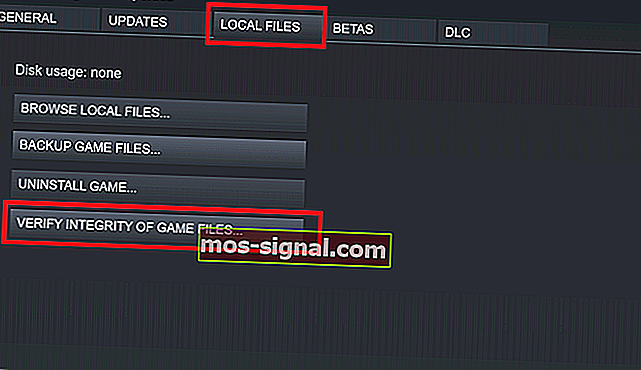
- Щелкните правой кнопкой мыши проблемную игру
- Перейти к свойствам
- Перейдите на вкладку Local Files.
- Нажмите на Проверить целостность файлов игры.
Valve любезно добавила в Steam возможность проверять, не были ли файлы вашей игры каким-либо образом повреждены или что-то отсутствует в каталоге установки игры.
Это может помочь, если ваше антивирусное или антивредоносное программное обеспечение решило заблокировать файл или поместить его в карантин.
Если ошибка « Не удалось создать устройство D3D» или «Устройство D3D9» было вызвано ошибкой графического драйвера, перезапуск системы может решить проблему.
Steam не отвечает на вашем ПК? Попробуйте эти простые решения
3. Обновите Windows до последней версии.

- Откройте настройки (сочетание клавиш Win + i)
- Перейти к обновлению и безопасности
- Нажмите Проверить наличие обновлений
Постоянное обновление вашей операционной системы Windows важно, потому что вы извлекаете выгоду из последних исправлений ошибок и обновлений безопасности.
Иногда эти обновления включают исправления совместимости, которые могут исправить такие ошибки, как « Не удалось создать устройство D3D» или « Ошибка создания устройства D3D9» .
4. Обновите графические драйверы.

Для видеокарт nVidia:
- Открыть GeForce Experience
- Перейдите на вкладку Драйверы
- Нажмите на проверки обновлений с
- Как только новый драйвер будет найден, нажмите Экспресс-установка или Выборочная установка.
- Перезагрузите компьютер
Для видеокарт AMD:
- Щелкните правой кнопкой мыши на рабочем столе
- Выберите программное обеспечение AMD Radeon
- В разделе «Драйверы и программное обеспечение» нажмите » Проверить наличие обновлений».
- Установите новый драйвер и перезагрузитесь
Один из лучших способов исправить ошибку «Не удалось создать устройство D3D или D3D9» — это обновить драйвер видеокарты.
Эти ошибки вызваны проблемой с видеокартой или ее драйвером, поэтому в большинстве случаев решением будет обновление драйвера.
Чтобы сделать еще один шаг вперед, мы настоятельно рекомендуем выполнить чистую установку графического драйвера или использовать такую утилиту, как DDU, для полного удаления графического драйвера перед установкой нового.
Примечание. Если вы используете DDU для удаления графического драйвера, вам необходимо перейти на веб-сайт производителя видеокарты и вручную загрузить драйвер или графическое программное обеспечение (GeForce Experience или AMD Adrenalin).
Не знаете, как использовать DDU? Нет проблем, у нас есть руководство, чтобы показать вам.
5. Установите параметры запуска игры.
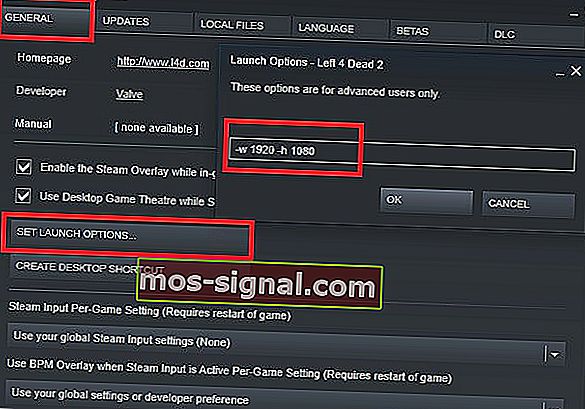
- Открыть Steam
- Щелкните игру правой кнопкой мыши
- Выбрать свойства
- На вкладке «Общие» выберите « Установить параметры запуска».
- Тип -w 1920 -h 1080
- Нажмите ОК > Закрыть
- Запустить игру
Примечание: вместо 1920 и 1080 используйте собственное разрешение вашего монитора.
Это заставит игру запуститься с указанным разрешением. Поскольку некоторые из этих игр немного старше, они не всегда работают с новым оборудованием и более высокими разрешениями.
Это может вызвать проблему, когда игра пытается запустить с низким разрешением, поэтому вам нужно будет принудительно установить желаемое разрешение.
6. Запускаем игру в режиме совместимости.
- Перейдите в папку с установкой игры (щелкните игру правой кнопкой мыши в Steam> Управление> Обзор локальных файлов )
- Щелкните правой кнопкой мыши исполняемый файл
- Выбрать свойства
- Перейдите на вкладку » Совместимость».
- Либо запустите средство устранения неполадок совместимости, либо установите флажок и вручную выберите старую версию Windows для запуска игры.
После того, как вы включили режим совместимости, вы сможете запустить игру, и это должно очистить ошибку Failed to create D3D or D3D9 device .
7. Включите службы для исправления ошибки «Не удалось создать устройство D3D».
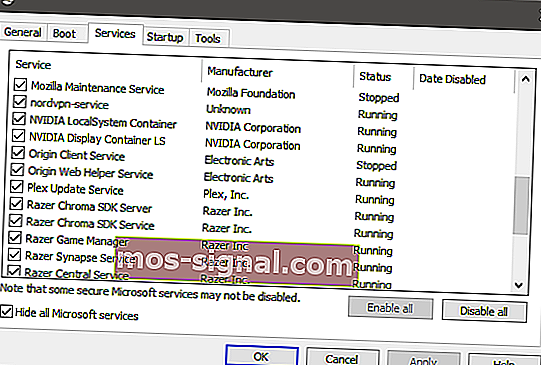
Откройте окно запуска (сочетание клавиш Win + R)
- Введите msconfig
- Перейдите на вкладку Services
- Убедитесь, что все сервисы nVidia или AMD включены
- Примечание. Если вы не знаете, какие это службы, нажмите « Включить все».
- Перезагрузите компьютер
В погоне за большей производительностью некоторые пользователи отключают определенные службы, которые они считают несущественными, но мы не можем не подчеркнуть этого достаточно: вы никогда не должны отключать их, если вы не вносите 100% изменений, поскольку это может привести к сбоям игры или даже хуже того, нестабильность системы.
Эти исправления помогут вам исправить ошибки «Не удалось создать устройство D3D» и «Не удалось создать устройство D3D9» при запуске игр в Steam.
Если у вас возникнут другие проблемы с играми Steam, сообщите нам об этом в разделе комментариев ниже.
FAQ: Проблемы с устройством D3D или D3D9
- Что такое ошибка устройства D3D?
D3D (Direct 3D) — это компонент DirectX API, который ваша система использует для визуализации графики. Если у вас возникли проблемы с D3D, это руководство покажет вам, как их исправить. Для получения дополнительной информации о Direct3D ознакомьтесь с нашей подробной статьей.
- Что означает ошибка D3D?
Когда вы получаете сообщение об ошибке D3D, это означает, что у вас проблема с графическим адаптером. Чтобы узнать, как ее исправить, выполните действия, перечисленные выше.
- Как исправить ошибку D3D CSGO?
Обновите графический драйвер до последней версии, затем следуйте инструкциям из этого руководства.
Источник
Error creating direct3d 9 graphical engine


Only other thing i can think of is windows corrupting the Dx files, Try updating windows, or it could be a framework issue, or last resort format your computer.
What OS are you running and what service packs do you have installed?
I know some of these things do not have anything to do with your vid card but they can affect the running of programs, Not having your net framework updated can cause the game too stop running.

I also had that error when I was trying to make a DayZ dedicated server. If I copied the server files to DayZ’s directory (which I had to do to make the server work), that would always happen.
But I fixed it by deleting the server files and getting the normal files back.
Maybe your DayZ files are corrupted? I dunno.
Just to say that the problem might not be DX, but maybe the DayZ files themselves.
Источник
Ошибка Direct3D initialization error при запуске игры. Что делать?
У меня в Windows 10 при запуске некоторых игр появляется ошибка «Direct3D initialization error». Windows шла вместе с ноутбуком, версия «Домашняя для одного языка».
Скажите, может ли эта ошибка быть из-за версии Windows, и как ее исправить?
Вообще, подобная ошибка не редкость, особенно после переустановки Windows (в вашем случае, после покупки ноутбука, так как в магазинах редко устанавливаются все необходимые библиотеки и драйвера, необходимые для комфортной работы устройства).
Появляется она, как правило, после попытки запустить какую-нибудь игру — либо сразу, либо в игре будет просто черный экран, а свернув ее вы увидите это окно.
В этой статье остановлюсь на основных причинах появления подобной ошибки, и покажу на примере как от нее избавиться.
Типичный вид ошибки

Что делать с ошибкой Direct3D
Обновление DirectX
Самая частая причина появления подобной ошибки связана с отсутствием библиотеки👉 DirectX. Причем, не обязательно, что она у вас не установлена, возможно у вас просто нет какого-то конкретного файла из библиотеки.
DirectX — специальная библиотека для программистов. Используется в большинстве случаев при разработке игр. Пакет доступен для установки и обновления на официальном сайте Microsoft. Более подробно от этом можете узнать на сайте Википедии.
Поэтому, рекомендую посмотреть требования запускаемой вами игры, и посмотреть, какая версия DirectX установлена у вас на ПК.
Чтобы узнать, какой DirectX у вас на ПК, нажмите:
- сочетание кнопок Win+R, чтобы открылось окно » Выполнить «;
- далее впишите команду dxdiag и нажмите Enter (см. скриншот ниже).
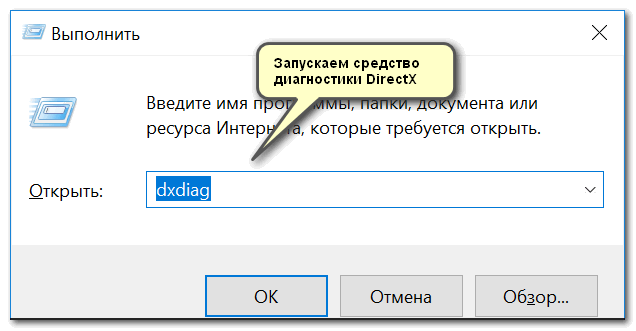
Запускаем средство диагностики DirectX (DxDiag)
Далее во вкладке «Система» будут представлены все необходимые данные: версия вашей ОС Windows, ваша видеокарта, звуковое устройства, версия BIOS, и версия DirectX (см. на красный квадрат на скрине ниже) .
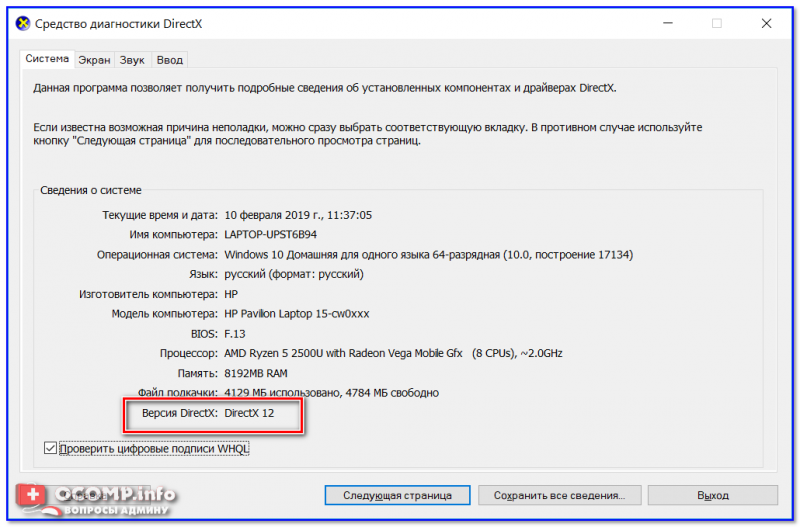
Средство диагностики DirectX / Кликабельно
Для обновления DirectX на сайте Microsoft есть специальный веб-установщик. Перейдите на нужную страницу и скачайте его. Далее запустите, согласитесь с условиями лицензионного соглашения, и ждите пока работает мастер.
Принятие условий лиц. соглашения DirectX
В конце операции вы должны увидеть сообщение о том, что установка DirectX завершена, нужные пакеты обновлены и пр. Либо, как вариант, мастер сообщит вам о том, что новая версия DirectX уже установлена и в обновлении не нуждается.
Рекомендую после этого перезагрузить компьютер, а затем попробовать запустить игру.
Установка DirectX завершена
Как правило, после такого обновления, игра начинает работать как нужно.
Если у вас нет интернета (либо он медленный или сайт Microsoft недоступен, выдает ошибку и т.д.), DirectX можно обновить с помощью игр: почти на половине дисков с играми есть новая версия DirectX (прим.: новая на момент запуска игры, конечно) . Поэтому, вам достаточно взять более-менее современную игру и установив ее, обновите DirectX.
Проблема с драйвером видеокарты
Если ошибка все так же появляется, возможно ваша видеокарта отключена в диспетчере устройств (такое может быть, например, у ноутбуков с 2-мя видеокартами), либо у вас просто не обновлены/не установлены драйвера на видеокарту.
Как проверить наличие драйверов и включена ли видеокарта
Самый простой способ, воспользоваться диспетчером устройств. Чтобы его открыть:
- нажмите кнопки Win+R;
- далее введите devmgmt.msc и нажмите Enter.

Запуск диспетчера устройств — devmgmt.msc
Далее откройте вкладку «Видеоадаптеры» , и посмотрите, все ли видеокарты включены, и не горит ли напротив них желтый восклицательный знак (указывающий на проблемы с драйверами, пример —  ).
).
Ниже на скриншоте показано, что один видеоадаптер отключен и не задействован. Часто ошибка с Direct3D связана как раз с этим.
Intel HD включена, NVIDIA выключена
Чтобы включить адаптер, просто щелкните по нему правой кнопкой мышки и выберите функцию «Задействовать» . Пример на скрине ниже.
После этого перезагрузите компьютер, затем попробуйте открыть игру.
В некоторых случаях одна из видеокарт может быть отключена в BIOS компьютера (например, если у вас на ноутбуке стоит дискретная и встроенная видеокарты) . Чтобы проверить так ли это, зайдите в BIOS, обычно, в разделе MAIN можно найти режим работы графики (Graphic mode). Пример показан на фото ниже.
👉 Кнопки для входа в BIOS для разных производителей ноутбуков/ПК — см. инструкцию
Как обновить драйвера на видеокарту:
- Способ №1 : зайти на официальный сайт производителя вашего ноутбука и скачать их оттуда. Если не знаете точную модель ноутбука, воспользуйтесь программами для определения характеристик компьютера;
- Способ №2 : воспользоваться специальными программами для автоматического поиска и обновления драйверов. Самый простой и быстрый вариант, на самом деле. К тому же, программы проверят необходимые библиотеки для игр (например, Drive Booster, рекомендую);
- Способ №3 : работать в ручном режиме, через диспетчер устройств. Более подробно об этом см. здесь.
Используйте режим совместимости
Не так давно я тестировал ноутбук с относительно новым процессором AMD Ryzen 5 2500U и столкнулся с одной интересной особенностью.
Обновил DirectX, установил все необходимые драйвера, различные пакеты и дополнения к играм — однако, часть игр не запускалась, показывая ошибку Direct3D. (особенность: все игры были старыми, что наводило на разные мысли. ) .
Довольно сильно я был удивлен, когда открыл свойства исполняемого файла игры, перешел во вкладку «Совместимость» и поставил галочку напротив пункта «Запустить игру в режиме совместимости с Windows XP SP 2» — игра стала нормально работать, никаких ошибок, связанных с Direct3D, больше не было.
Примеры, что нужно сделать, приведены на скринах ниже.
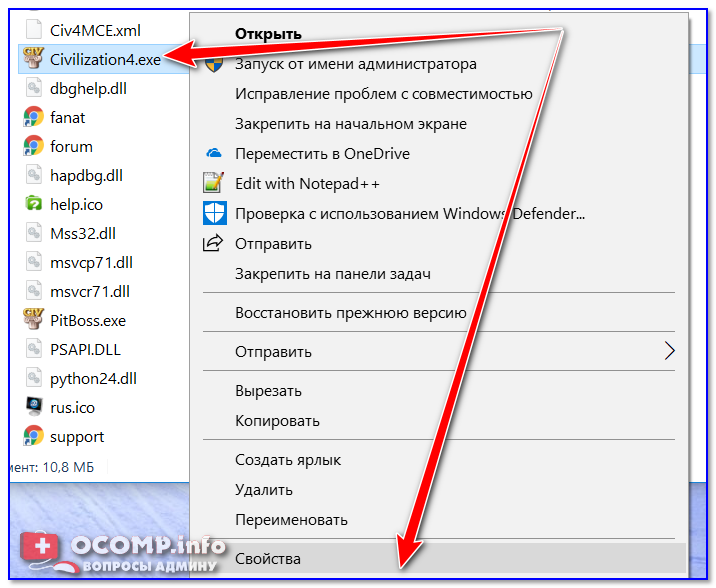
Открываем свойства исполняемого файла игры
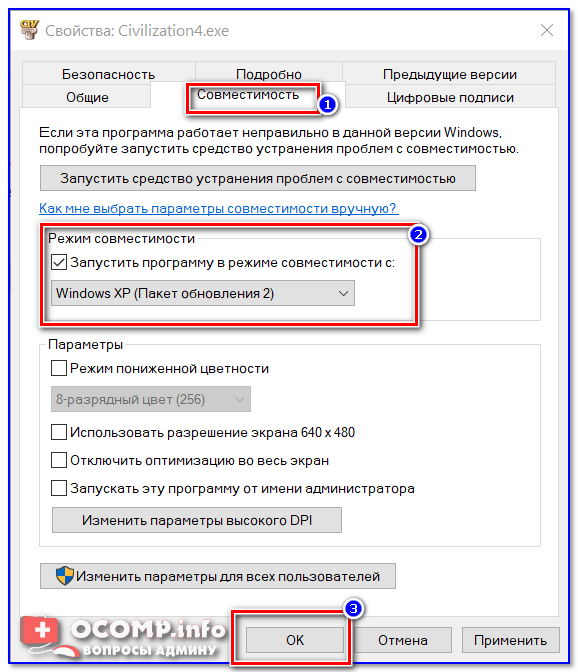
Запустить игру в режиме совместимости с Windows XP SP 2

Как запустить старую игру на новом компьютере — см. способы и примеры
PS
Если ничего не помогло из выше написанного, то также рекомендую еще обновить пакет Microsoft Visual C++ и NET Framework.
На этом все, всем всего доброго!
Первая публикация: 19.03.2017
Статья откорректирована: 17.12.2020
Источник