Содержание
- Command Line Interface
- Options
- Basic configuration
- -c , —config
- —no-eslintrc
- —global
- —parser
- —parser-options
- Caching
- —cache
- —cache-file
- —cache-location
- Specifying rules and plugins
- —rulesdir
- —plugin
- Ignoring files
- —ignore-path
- —no-ignore
- —ignore-pattern
- Using stdin
- —stdin
- —stdin-filename
- Handling warnings
- —quiet
- —max-warnings
- Output
- -o , —output-file
- -f , —format
- —color , —no-color
- Miscellaneous
- —debug
- -h , —help
- -v , —version
- —no-inline-config
- —print-config
- Ignoring files from linting
- Command Line Interface
- Run the CLI
- Pass Multiple Values to an Option
- Options
- Basic Configuration
- —no-eslintrc
- -c , —config
- —global
- —parser
- —parser-options
- —resolve-plugins-relative-to
- Specify Rules and Plugins
- —plugin
- —rulesdir
- Fix Problems
- —fix-dry-run
- —fix-type
- Ignore Files
- —ignore-path
- —no-ignore
- —ignore-pattern
- Use stdin
- —stdin
- —stdin-filename
- Handle Warnings
- —quiet
- —max-warnings
- Output
- -o , —output-file
- -f , —format
- —color and —no-color
- Inline Configuration Comments
- —no-inline-config
- —report-unused-disable-directives
- Caching
- —cache
- —cache-file
- —cache-location
- —cache-strategy
- Miscellaneous
- —env-info
- —no-error-on-unmatched-pattern
- —exit-on-fatal-error
- —debug
- -h , —help
- -v , —version
- —print-config
- Exit Codes
Command Line Interface
To run ESLint on Node.js, you must have npm installed. If npm is not installed, follow the instructions here: https://www.npmjs.com/
Once npm is installed, run the following
This installs the ESLint CLI from the npm repository. To run ESLint, use the following format:
Please note that when passing a glob as a parameter, it will be expanded by your shell. The results of the expansion can vary depending on your shell, and its configuration. If you want to use node glob syntax, you have to quote your parameter (using double quotes if you need it to run in Windows), as follows:
Options
The command line utility has several options. You can view the options by running eslint -h .
Options that accept array values can be specified by repeating the option or with a comma-delimited list (other than —ignore-pattern which does not allow the second style).
Basic configuration
-c , —config
This option allows you to specify an additional configuration file for ESLint (see Configuring ESLint for more).
This example uses the configuration file at
It also accepts a module ID of a sharable config.
This example directly uses the sharable config eslint-config-myconfig .
—no-eslintrc
Disables use of configuration from .eslintrc and package.json files.
This option enables specific environments. Details about the global variables defined by each environment are available on the configuration documentation. This option only enables environments; it does not disable environments set in other configuration files. To specify multiple environments, separate them using commas, or use the option multiple times.
This option allows you to specify which file extensions ESLint will use when searching for JavaScript files in the directories you specify. By default, it uses .js as the only file extension.
Note: —ext is only used when the arguments are directories. If you use glob patterns or file names, then —ext is ignored.
For example, eslint lib/* —ext .js will match all files within the lib/ directory, regardless of extension.
—global
This option defines global variables so that they will not be flagged as undefined by the no-undef rule. Any specified global variables are assumed to be read-only by default, but appending :true to a variable’s name ensures that no-undef will also allow writes. To specify multiple global variables, separate them using commas, or use the option multiple times.
—parser
This option allows you to specify a parser to be used by eslint. By default, espree will be used.
—parser-options
This option allows you to specify parser options to be used by eslint. Note that the available parser options are determined by the parser being used.
Caching
—cache
Store the info about processed files in order to only operate on the changed ones. The cache is stored in .eslintcache by default. Enabling this option can dramatically improve ESLint’s running time by ensuring that only changed files are linted.
Note: If you run ESLint with —cache and then run ESLint without —cache , the .eslintcache file will be deleted. This is necessary because the results of the lint might change and make .eslintcache invalid. If you want to control when the cache file is deleted, then use —cache-location to specify an alternate location for the cache file.
—cache-file
Path to the cache file. If none specified .eslintcache will be used. The file will be created in the directory where the eslint command is executed. Deprecated: Use —cache-location instead.
—cache-location
Path to the cache location. Can be a file or a directory. If no location is specified, .eslintcache will be used. In that case, the file will be created in the directory where the eslint command is executed.
If a directory is specified, a cache file will be created inside the specified folder. The name of the file will be based on the hash of the current working directory (CWD). e.g.: .cache_hashOfCWD
Important note: If the directory for the cache does not exist make sure you add a trailing / on *nix systems or in windows. Otherwise the path will be assumed to be a file.
Specifying rules and plugins
—rulesdir
This option allows you to specify another directory from which to load rules files. This allows you to dynamically load new rules at run time. This is useful when you have custom rules that aren’t suitable for being bundled with ESLint.
The rules in your custom rules directory must follow the same format as bundled rules to work properly. You can also specify multiple locations for custom rules by including multiple —rulesdir options:
Note that, as with core rules and plugin rules, you still need to enable the rules in configuration or via the —rule CLI option in order to actually run those rules during linting. Specifying a rules directory with —rulesdir does not automatically enable the rules within that directory.
—plugin
This option specifies a plugin to load. You can omit the prefix eslint-plugin- from the plugin name.
Before using the plugin, you have to install it using npm.
This option specifies rules to be used. These rules will be merged with any rules specified with configuration files. (You can use —no-eslintrc to change that behavior.) To define multiple rules, separate them using commas, or use the option multiple times. The levn format is used for specifying the rules.
If the rule is defined within a plugin, you have to prefix the rule ID with the plugin name and a / .
Ignoring files
—ignore-path
This option allows you to specify the file to use as your .eslintignore . By default, ESLint looks in the current working directory for .eslintignore . You can override this behavior by providing a path to a different file.
—no-ignore
Disables excluding of files from .eslintignore , —ignore-path and —ignore-pattern .
—ignore-pattern
This option allows you to specify patterns of files to ignore (in addition to those in .eslintignore ). You can repeat the option to provide multiple patterns. The supported syntax is the same as in the .eslintignore file. You should quote your patterns in order to avoid shell interpretation of glob patterns.
Using stdin
—stdin
This option tells ESLint to read and lint source code from STDIN instead of from files. You can use this to pipe code to ESLint.
—stdin-filename
This option allows you to specify a filename to process STDIN as. This is useful when processing files from STDIN and you have rules which depend on the filename.
Handling warnings
—quiet
This option allows you to disable reporting on warnings. If you enable this option, only errors are reported by ESLint.
—max-warnings
This option allows you to specify a warning threshold, which can be used to force ESLint to exit with an error status if there are too many warning-level rule violations in your project.
Normally, if ESLint runs and finds no errors (only warnings), it will exit with a success exit status. However, if —max-warnings is specified and the total warning count is greater than the specified threshold, ESLint will exit with an error status. Specifying a threshold of -1 or omitting this option will prevent this behavior.
Output
-o , —output-file
Enable report to be written to a file.
When specified, the given format is output into the provided file name.
-f , —format
This option specifies the output format for the console. Possible formats are:
You can also use a custom formatter from the command line by specifying a path to the custom formatter file.
When specified, the given format is output to the console. If you’d like to save that output into a file, you can do so on the command line like so:
This saves the output into the results.txt file.
—color , —no-color
This option forces the enabling/disabling of colorized output. You can use this to override the default behavior, which is to enable colorized output unless no TTY is detected, such as when piping eslint through cat or less .
Miscellaneous
This option will start config initialization wizard. It’s designed to help new users quickly create .eslintrc file by answering a few questions, choosing a popular style guide, or inspecting your source files and attempting to automatically generate a suitable configuration.
The resulting configuration file will be created in the current directory.
This option instructs ESLint to try to fix as many issues as possible. The fixes are made to the actual files themselves and only the remaining unfixed issues are output. Not all problems are fixable using this option, and the option does not work in these situations:
- This option throws an error when code is piped to ESLint.
- This option has no effect on code that uses a processor, unless the processor opts into allowing autofixes.
—debug
This option outputs debugging information to the console. This information is useful when you’re seeing a problem and having a hard time pinpointing it. The ESLint team may ask for this debugging information to help solve bugs.
-h , —help
This option outputs the help menu, displaying all of the available options. All other options are ignored when this is present.
-v , —version
This option outputs the current ESLint version onto the console. All other options are ignored when this is present.
—no-inline-config
This option prevents inline comments like /*eslint-disable*/ or /*global foo*/ from having any effect. This allows you to set an ESLint config without files modifying it. All inline config comments are ignored, e.g.:
- /*eslint-disable*/
- /*eslint-enable*/
- /*global*/
- /*eslint*/
- /*eslint-env*/
- // eslint-disable-line
- // eslint-disable-next-line
—print-config
This option outputs the configuration to be used for the file passed. When present, no linting is performed and only config-related options are valid.
Ignoring files from linting
ESLint supports .eslintignore files to exclude files from the linting process when ESLint operates on a directory. Files given as individual CLI arguments will be exempt from exclusion. The .eslintignore file is a plain text file containing one pattern per line. It can be located in any of the target directory’s ancestors; it will affect files in its containing directory as well as all sub-directories. Here’s a simple example of a .eslintignore file:
A more detailed breakdown of supported patterns and directories ESLint ignores by default can be found in Configuring ESLint.
Источник
Command Line Interface
The ESLint Command Line Interface (CLI) lets you execute linting from the terminal. The CLI has a variety of options that you can pass to configure ESLint.
Run the CLI
ESLint requires Node.js for installation. Follow the instructions in the Getting Started Guide to install ESLint.
Most users use npx to run ESLint on the command line like this:
Please note that when passing a glob as a parameter, it is expanded by your shell. The results of the expansion can vary depending on your shell, and its configuration. If you want to use node glob syntax, you have to quote your parameter (using double quotes if you need it to run in Windows), as follows:
Note: You can also use alternative package managers such as Yarn or pnpm to run ESLint. Please refer to your package manager’s documentation for the correct syntax.
Pass Multiple Values to an Option
Options that accept multiple values can be specified by repeating the option or with a comma-delimited list (other than —ignore-pattern , which does not allow the second style).
Examples of options that accept multiple values:
Options
You can view all the CLI options by running npx eslint -h .
Basic Configuration
—no-eslintrc
Disables use of configuration from .eslintrc.* and package.json files.
- Argument Type: No argument.
—no-eslintrc example
-c , —config
This option allows you to specify an additional configuration file for ESLint (see Configuring ESLint for more).
- Argument Type: String. Path to file.
- Multiple Arguments: No
-c , —config example
This example uses the configuration file at
If .eslintrc.* and/or package.json files are also used for configuration (i.e., —no-eslintrc was not specified), the configurations are merged. Options from this configuration file have precedence over the options from .eslintrc.* and package.json files.
This option enables specific environments.
- Argument Type: String. One of the available environments.
- Multiple Arguments: Yes
Details about the global variables defined by each environment are available in the Specifying Environments documentation. This option only enables environments. It does not disable environments set in other configuration files. To specify multiple environments, separate them using commas, or use the option multiple times.
—env example
This option allows you to specify which file extensions ESLint uses when searching for target files in the directories you specify.
- Argument Type: String. File extension.
- Multiple Arguments: Yes
- Default Value: .js and the files that match the overrides entries of your configuration.
—ext is only used when the the patterns to lint are directories. If you use glob patterns or file names, then —ext is ignored. For example, npx eslint «lib/*» —ext .js matches all files within the lib/ directory, regardless of extension.
—ext example
—global
This option defines global variables so that they are not flagged as undefined by the no-undef rule.
- Argument Type: String. Name of the global variable. Any specified global variables are assumed to be read-only by default, but appending :true to a variable’s name ensures that no-undef also allows writes.
- Multiple Arguments: Yes
—global example
—parser
This option allows you to specify a parser to be used by ESLint.
- Argument Type: String. Parser to be used by ESLint.
- Multiple Arguments: No
- Default Value: espree
—parser example
—parser-options
This option allows you to specify parser options to be used by ESLint. The available parser options are determined by the parser being used.
- Argument Type: Key/value pair separated by colon ( : ).
- Multiple Arguments: Yes
—parser-options example
—resolve-plugins-relative-to
Changes the directory where plugins are resolved from.
- Argument Type: String. Path to directory.
- Multiple Arguments: No
- Default Value: By default, plugins are resolved from the directory in which your configuration file is found.
This option should be used when plugins were installed by someone other than the end user. It should be set to the project directory of the project that has a dependency on the necessary plugins.
- When using a config file that is located outside of the current project (with the —config flag), if the config uses plugins which are installed locally to itself, —resolve-plugins-relative-to should be set to the directory containing the config file.
- If an integration has dependencies on ESLint and a set of plugins, and the tool invokes ESLint on behalf of the user with a preset configuration, the tool should set —resolve-plugins-relative-to to the top-level directory of the tool.
—resolve-plugins-relative-to example
Specify Rules and Plugins
—plugin
This option specifies a plugin to load.
- Argument Type: String. Plugin name. You can optionally omit the prefix eslint-plugin- from the plugin name.
- Multiple Arguments: Yes
Before using the plugin, you have to install it using npm.
—plugin example
This option specifies the rules to be used.
- Argument Type: Rules and their configuration specified with levn format.
- Multiple Arguments: Yes
These rules are merged with any rules specified with configuration files. If the rule is defined in a plugin, you have to prefix the rule ID with the plugin name and a / .
To ignore rules in .eslintrc configuration files and only run rules specified in the command line, use the —rules flag in combination with the —no-eslintrc flag.
—rule example
—rulesdir
Deprecated: Use rules from plugins instead.
This option allows you to specify another directory from which to load rules files. This allows you to dynamically load new rules at run time. This is useful when you have custom rules that aren’t suitable for being bundled with ESLint.
- Argument Type: String. Path to directory. The rules in your custom rules directory must follow the same format as bundled rules to work properly.
- Multiple Arguments: Yes.
Note that, as with core rules and plugin rules, you still need to enable the rules in configuration or via the —rule CLI option in order to actually run those rules during linting. Specifying a rules directory with —rulesdir does not automatically enable the rules within that directory.
—rulesdir example
Fix Problems
This option instructs ESLint to try to fix as many issues as possible. The fixes are made to the actual files themselves and only the remaining unfixed issues are output.
- Argument Type: No argument.
Not all problems are fixable using this option, and the option does not work in these situations:
- This option throws an error when code is piped to ESLint.
- This option has no effect on code that uses a processor, unless the processor opts into allowing autofixes.
If you want to fix code from stdin or otherwise want to get the fixes without actually writing them to the file, use the —fix-dry-run option.
—fix example
—fix-dry-run
This option has the same effect as —fix with the difference that the fixes are not saved to the file system. Because the default formatter does not output the fixed code, you’ll have to use another formatter (e.g. —format json ) to get the fixes.
- Argument Type: No argument.
This makes it possible to fix code from stdin when used with the —stdin flag.
This flag can be useful for integrations (e.g. editor plugins) which need to autofix text from the command line without saving it to the filesystem.
—fix-dry-run example
—fix-type
This option allows you to specify the type of fixes to apply when using either —fix or —fix-dry-run .
- Argument Type: String. One of the following fix types:
- problem — fix potential errors in the code
- suggestion — apply fixes to the code that improve it
- layout — apply fixes that do not change the program structure (AST)
- directive — apply fixes to inline directives such as // eslint-disable
- Multiple Arguments: Yes
This option is helpful if you are using another program to format your code, but you would still like ESLint to apply other types of fixes.
—fix-type example
Ignore Files
—ignore-path
This option allows you to specify the file to use as your .eslintignore .
- Argument Type: String. Path to file.
- Multiple Arguments: No
- Default Value: By default, ESLint looks for .eslintignore in the current working directory.
Note: —ignore-path is not supported when using flat configuration ( eslint.config.js ).
—ignore-path example
—no-ignore
Disables excluding of files from .eslintignore files, —ignore-path flags, —ignore-pattern flags, and the ignorePatterns property in config files.
- Argument Type: No argument.
—no-ignore example
—ignore-pattern
This option allows you to specify patterns of files to ignore (in addition to those in .eslintignore ).
- Argument Type: String. The supported syntax is the same as for .eslintignore files, which use the same patterns as the .gitignore specification. You should quote your patterns in order to avoid shell interpretation of glob patterns.
- Multiple Arguments: Yes
—ignore-pattern example
Use stdin
—stdin
This option tells ESLint to read and lint source code from STDIN instead of from files. You can use this to pipe code to ESLint.
- Argument Type: No argument.
—stdin example
—stdin-filename
This option allows you to specify a filename to process STDIN as.
- Argument Type: String. Path to file.
- Multiple Arguments: No
This is useful when processing files from STDIN and you have rules which depend on the filename.
—stdin-filename example
Handle Warnings
—quiet
This option allows you to disable reporting on warnings. If you enable this option, only errors are reported by ESLint.
- Argument Type: No argument.
—quiet example
—max-warnings
This option allows you to specify a warning threshold, which can be used to force ESLint to exit with an error status if there are too many warning-level rule violations in your project.
- Argument Type: Integer. The maximum number of warnings to allow. To prevent this behavior, do not use this option or specify -1 as the argument.
- Multiple Arguments: No
Normally, if ESLint runs and finds no errors (only warnings), it exits with a success exit status. However, if —max-warnings is specified and the total warning count is greater than the specified threshold, ESLint exits with an error status.
—max-warnings example
Output
-o , —output-file
Write the output of linting results to a specified file.
- Argument Type: String. Path to file.
- Multiple Arguments: No
-o , —output-file example
-f , —format
This option specifies the output format for the console.
- Argument Type: String. One of the built-in formatters or a custom formatter.
- Multiple Arguments: No
- Default Value: stylish
If you are using a custom formatter defined in a local file, you can specify the path to the custom formatter file.
An npm-installed formatter is resolved with or without eslint-formatter- prefix.
When specified, the given format is output to the console. If you’d like to save that output into a file, you can do so on the command line like so:
-f , —format example
Use the built-in compact formatter:
Use a local custom formatter:
Use an npm-installed formatter:
—color and —no-color
These options force the enabling/disabling of colorized output.
- Argument Type: No argument.
You can use these options to override the default behavior, which is to enable colorized output unless no TTY is detected, such as when piping eslint through cat or less .
—color and —no-color example
—no-inline-config
This option prevents inline comments like /*eslint-disable*/ or /*global foo*/ from having any effect.
- Argument Type: No argument.
This allows you to set an ESLint config without files modifying it. All inline config comments are ignored, such as:
- /*eslint-disable*/
- /*eslint-enable*/
- /*global*/
- /*eslint*/
- /*eslint-env*/
- // eslint-disable-line
- // eslint-disable-next-line
—no-inline-config example
—report-unused-disable-directives
This option causes ESLint to report directive comments like // eslint-disable-line when no errors would have been reported on that line anyway.
- Argument Type: No argument.
This can be useful to prevent future errors from unexpectedly being suppressed, by cleaning up old eslint-disable comments which are no longer applicable.
When using this option, it is possible that new errors start being reported whenever ESLint or custom rules are upgraded.
For example, suppose a rule has a bug that causes it to report a false positive, and an eslint-disable comment is added to suppress the incorrect report. If the bug is then fixed in a patch release of ESLint, the eslint-disable comment becomes unused since ESLint is no longer generating an incorrect report. This results in a new reported error for the unused directive if the report-unused-disable-directives option is used.
—report-unused-disable-directives example
Caching
—cache
Store the info about processed files in order to only operate on the changed ones. Enabling this option can dramatically improve ESLint’s run time performance by ensuring that only changed files are linted. The cache is stored in .eslintcache by default.
- Argument Type: No argument.
If you run ESLint with —cache and then run ESLint without —cache , the .eslintcache file will be deleted. This is necessary because the results of the lint might change and make .eslintcache invalid. If you want to control when the cache file is deleted, then use —cache-location to specify an alternate location for the cache file.
Autofixed files are not placed in the cache. Subsequent linting that does not trigger an autofix will place it in the cache.
—cache example
—cache-file
Deprecated: Use —cache-location instead.
Path to the cache file. If none specified .eslintcache is used. The file is created in the directory where the eslint command is executed.
—cache-location
Specify the path to the cache location. Can be a file or a directory.
- Argument Type: String. Path to file or directory. If a directory is specified, a cache file is created inside the specified folder. The name of the file is based on the hash of the current working directory, e.g.: .cache_hashOfCWD .
- Multiple Arguments: No
- Default Value: If no location is specified, .eslintcache is used. The file is created in the directory where the eslint command is executed.
If the directory for the cache does not exist make sure you add a trailing / on *nix systems or on Windows. Otherwise, the path is assumed to be a file.
—cache-location example
—cache-strategy
Strategy for the cache to use for detecting changed files.
- Argument Type: String. One of the following values:
- metadata
- content
- Multiple Arguments: No
- Default Value: metadata
The content strategy can be useful in cases where the modification time of your files changes even if their contents have not. For example, this can happen during git operations like git clone because git does not track file modification time.
—cache-strategy example
Miscellaneous
This option runs npm init @eslint/config to start the config initialization wizard. It’s designed to help new users quickly create an .eslintrc file by answering a few questions. When you use this flag, the CLI does not perform linting.
- Argument Type: No argument.
The resulting configuration file is created in the current directory.
—init example
—env-info
This option outputs information about the execution environment, including the version of Node.js, npm, and local and global installations of ESLint.
- Argument Type: No argument.
The ESLint team may ask for this information to help solve bugs. When you use this flag, the CLI does not perform linting.
—env-info example
—no-error-on-unmatched-pattern
This option prevents errors when a quoted glob pattern or —ext is unmatched. This does not prevent errors when your shell can’t match a glob.
- Argument Type: No argument.
—no-error-on-unmatched-pattern example
—exit-on-fatal-error
This option causes ESLint to exit with exit code 2 if one or more fatal parsing errors occur. Without this option, ESLint reports fatal parsing errors as rule violations.
- Argument Type: No argument.
—exit-on-fatal-error example
—debug
This option outputs debugging information to the console. Add this flag to an ESLint command line invocation in order to get extra debugging information while the command runs.
- Argument Type: No argument.
This information is useful when you’re seeing a problem and having a hard time pinpointing it. The ESLint team may ask for this debugging information to help solve bugs.
—debug example
-h , —help
This option outputs the help menu, displaying all of the available options. All other options are ignored when this is present. When you use this flag, the CLI does not perform linting.
- Argument Type: No argument.
-h , —help example
-v , —version
This option outputs the current ESLint version onto the console. All other options are ignored when this is present. When you use this flag, the CLI does not perform linting.
- Argument Type: No argument.
-v , —version example
—print-config
This option outputs the configuration to be used for the file passed. When present, no linting is performed and only config-related options are valid. When you use this flag, the CLI does not perform linting.
- Argument Type: String. Path to file.
- Multiple Arguments: No
—print-config example
Exit Codes
When linting files, ESLint exits with one of the following exit codes:
- 0 : Linting was successful and there are no linting errors. If the —max-warnings flag is set to n , the number of linting warnings is at most n .
- 1 : Linting was successful and there is at least one linting error, or there are more linting warnings than allowed by the —max-warnings option.
- 2 : Linting was unsuccessful due to a configuration problem or an internal error.
Источник
I know this is a rather old issue, but I’m just seeing it now and I’d like to throw in my two cents:
A file being skipped due to being in an ignore file seems to fall pretty clearly into the class of an informational message, not a warning. It’s not really something that went wrong, it’s expected and intentional. Usually warnings means something unexpected and possibly wrong, but non-fatal, while errors mean definitely wrong and fatal. It’s a little trickier in the case of eslint since what we often call «warnings» and «errors» are actually the main output of the program.
With that in mind it might be better to emulate *nix command line tools. They usually have the concept of a verbosity level — There are fatal errors (or just errors), warnings, informational messages, and sometimes «debug» messages that output nearly every line of code. Only errors and warnings are output by default, unless you pass a —verbose/-v flag, or a flag more specific to the type of message you want to see. For some tools you can also pass —quiet to restrict the output to the strictly necessary (errors), or —silent to turn it all off. Personally I think that —quiet and —silent don’t make any sense for eslint, at least not for the linting warnings and errors. Those warnings and errors are the entire output of the tool — if you’re running it from the command line and there’s a —silent option, the tool is basically useless except for the pass/fail exit code. So it seems like it’s important to differentiate «result» or «output» errors and warnings, and «real» errors and warnings coming from eslint itself. The «result» should always come through to stdout (not stderr), it’s the entire purpose of the tool. If you really don’t need it at all then pipe it to /dev/null. And the opposite for the «real» ones, those should always be on stderr.
Conclusion: Treat ignored files as an informational message, don’t show them by default, show them with a —verbose/-v or —show-ignored-files/-i flag, and segregate them in the code and the output streams from eslint-result warnings and errors.
To run ESLint on Node.js, you must have npm installed. If npm is not installed, follow the instructions here: https://www.npmjs.com/
Once npm is installed, run the following
This installs the ESLint CLI from the npm repository. To run ESLint, use the following format:
eslint [options] [file|dir|glob]*
Such as:
or:
Please note that when passing a glob as a parameter, it will be expanded by your shell. The results of the expansion can vary depending on your shell, and its configuration. If you want to use node glob syntax, you have to quote your parameter (using double quotes if you need it to run in Windows), as follows:
Options
The command line utility has several options. You can view the options by running eslint -h.
eslint [options] file.js [file.js] [dir]

Basic configuration:
  -c, --config path::String    Use configuration from this file or shareable config
  --no-eslintrc                Disable use of configuration from .eslintrc
  --env [String]               Specify environments
  --ext [String]               Specify JavaScript file extensions - default: .js
  --global [String]            Define global variables
  --parser String              Specify the parser to be used
  --parser-options Object      Specify parser options

Caching:
  --cache                      Only check changed files - default: false
  --cache-file path::String    Path to the cache file. Deprecated: use --cache-location - default: .eslintcache
  --cache-location path::String  Path to the cache file or directory

Specifying rules and plugins:
  --rulesdir [path::String]    Use additional rules from this directory
  --plugin [String]            Specify plugins
  --rule Object                Specify rules

Ignoring files:
  --ignore-path path::String   Specify path of ignore file
  --no-ignore                  Disable use of ignore files and patterns
  --ignore-pattern [String]    Pattern of files to ignore (in addition to those in .eslintignore)

Using stdin:
  --stdin                      Lint code provided on <STDIN> - default: false
  --stdin-filename String      Specify filename to process STDIN as

Handling warnings:
  --quiet                      Report errors only - default: false
  --max-warnings Int           Number of warnings to trigger nonzero exit code - default: -1

Output:
  -o, --output-file path::String  Specify file to write report to
  -f, --format String          Use a specific output format - default: stylish
  --color, --no-color          Force enabling/disabling of color

Miscellaneous:
  --init                       Run config initialization wizard - default: false
  --fix                        Automatically fix problems
  --debug                      Output debugging information
  -h, --help                   Show help
  -v, --version                Output the version number
  --no-inline-config           Prevent comments from changing config or rules
  --print-config path::String  Print the configuration for the given file
Options that accept array values can be specified by repeating the option or with a comma-delimited list (other than --ignore-pattern which does not allow the second style).
Example:
eslint --ext .jsx --ext .js lib/

eslint --ext .jsx,.js lib/
Basic configuration
-c, --config
This option allows you to specify an additional configuration file for ESLint (see Configuring ESLint for more).
Example:
eslint -c ~/my-eslint.json file.js
This example uses the configuration file at ~/my-eslint.json.
It also accepts a module ID of a sharable config.
Example:
eslint -c myconfig file.js
This example directly uses the sharable config eslint-config-myconfig.
--no-eslintrc
Disables use of configuration from .eslintrc and package.json files.
Example:
eslint --no-eslintrc file.js
--env
This option enables specific environments. Details about the global variables defined by each environment are available on the configuration documentation. This option only enables environments; it does not disable environments set in other configuration files. To specify multiple environments, separate them using commas, or use the option multiple times.
Examples:
eslint --env browser,node file.js
eslint --env browser --env node file.js
--ext
This option allows you to specify which file extensions ESLint will use when searching for JavaScript files in the directories you specify.
By default, it uses .js as the only file extension.
Examples:
# Use only .js2 extension
eslint . --ext .js2

# Use both .js and .js2
eslint . --ext .js --ext .js2

# Also use both .js and .js2
eslint . --ext .js,.js2
Note: --ext is only used when the arguments are directories. If you use glob patterns or file names, then --ext is ignored.
For example, eslint lib/* --ext .js will match all files within the lib/ directory, regardless of extension.
--global
This option defines global variables so that they will not be flagged as undefined by the no-undef rule. Any specified global variables are assumed to be read-only by default, but appending :true to a variable’s name ensures that no-undef will also allow writes. To specify multiple global variables, separate them using commas, or use the option multiple times.
Examples:
eslint --global require,exports:true file.js
eslint --global require --global exports:true
--parser
This option allows you to specify a parser to be used by eslint. By default, espree will be used.
--parser-options
This option allows you to specify parser options to be used by eslint. Note that the available parser options are determined by the parser being used.
Examples:
echo '3 ** 4' | eslint --stdin --parser-options=ecmaVersion:6 # will fail with a parsing error
echo '3 ** 4' | eslint --stdin --parser-options=ecmaVersion:7 # succeeds, yay!
Caching
--cache
Store the info about processed files in order to only operate on the changed ones. The cache is stored in .eslintcache by default. Enabling this option can dramatically improve ESLint’s running time by ensuring that only changed files are linted.
Note: If you run ESLint with --cache and then run ESLint without --cache, the .eslintcache file will be deleted. This is necessary because the results of the lint might change and make .eslintcache invalid. If you want to control when the cache file is deleted, then use --cache-location to specify an alternate location for the cache file.
--cache-file
Path to the cache file. If none specified .eslintcache will be used. The file will be created in the directory where the eslint command is executed. Deprecated: Use --cache-location instead.
--cache-location
Path to the cache location. Can be a file or a directory. If no location is specified, .eslintcache will be used. In that case, the file will be created in the directory where the eslint command is executed.
If a directory is specified, a cache file will be created inside the specified folder. The name of the file will be based on the hash of the current working directory (CWD). e.g.: .cache_hashOfCWD
Important note: If the directory for the cache does not exist make sure you add a trailing / on *nix systems or in windows. Otherwise the path will be assumed to be a file.
Example:
eslint "src/**/*.js" --cache --cache-location "/Users/user/.eslintcache/"
Specifying rules and plugins
--rulesdir
This option allows you to specify another directory from which to load rules files. This allows you to dynamically load new rules at run time. This is useful when you have custom rules that aren’t suitable for being bundled with ESLint.
Example:
eslint --rulesdir my-rules/ file.js
The rules in your custom rules directory must follow the same format as bundled rules to work properly. You can also specify multiple locations for custom rules by including multiple --rulesdir options:
eslint --rulesdir my-rules/ --rulesdir my-other-rules/ file.js
Note that, as with core rules and plugin rules, you still need to enable the rules in configuration or via the --rule CLI option in order to actually run those rules during linting. Specifying a rules directory with --rulesdir does not automatically enable the rules within that directory.
--plugin
This option specifies a plugin to load. You can omit the prefix eslint-plugin- from the plugin name.
Before using the plugin, you have to install it using npm.
Examples:
eslint --plugin jquery file.js
eslint --plugin eslint-plugin-mocha file.js
--rule
This option specifies rules to be used. These rules will be merged with any rules specified with configuration files. (You can use --no-eslintrc to change that behavior.) To define multiple rules, separate them using commas, or use the option multiple times. The levn format is used for specifying the rules.
If the rule is defined within a plugin, you have to prefix the rule ID with the plugin name and a /.
Examples:
eslint --rule 'quotes: [2, double]'
eslint --rule 'guard-for-in: 2' --rule 'brace-style: [2, 1tbs]'
eslint --rule 'jquery/dollar-sign: 2'
Ignoring files
--ignore-path
This option allows you to specify the file to use as your .eslintignore. By default, ESLint looks in the current working directory for .eslintignore. You can override this behavior by providing a path to a different file.
Example:
eslint --ignore-path tmp/.eslintignore file.js
eslint --ignore-path .gitignore file.js
--no-ignore
Disables excluding of files from .eslintignore, --ignore-path and --ignore-pattern.
Example:
eslint --no-ignore file.js
--ignore-pattern
This option allows you to specify patterns of files to ignore (in addition to those in .eslintignore). You can repeat the option to provide multiple patterns. The supported syntax is the same as in the .eslintignore file. You should quote your patterns in order to avoid shell interpretation of glob patterns.
Example:
eslint --ignore-pattern '/lib/' --ignore-pattern '/src/vendor/*' .
Using stdin
--stdin
This option tells ESLint to read and lint source code from STDIN instead of from files. You can use this to pipe code to ESLint.
Example:
cat myfile.js | eslint --stdin
--stdin-filename
This option allows you to specify a filename to process STDIN as. This is useful when processing files from STDIN and you have rules which depend on the filename.
Example
cat myfile.js | eslint --stdin --stdin-filename=myfile.js
Handling warnings
--quiet
This option allows you to disable reporting on warnings. If you enable this option, only errors are reported by ESLint.
Example:
--max-warnings
This option allows you to specify a warning threshold, which can be used to force ESLint to exit with an error status if there are too many warning-level rule violations in your project.
Normally, if ESLint runs and finds no errors (only warnings), it will exit with a success exit status. However, if --max-warnings is specified and the total warning count is greater than the specified threshold, ESLint will exit with an error status. Specifying a threshold of -1 or omitting this option will prevent this behavior.
Example:
eslint --max-warnings 10 file.js
Output
-o, --output-file
Enable report to be written to a file.
Example:
eslint -o ./test/test.html
When specified, the given format is output into the provided file name.
-f, --format
This option specifies the output format for the console. Possible formats are:
- checkstyle
- codeframe
- compact
- html
- jslint-xml
- json
- junit
- stylish (the default)
- table
- tap
- unix
- visualstudio
Example:
eslint -f compact file.js
You can also use a custom formatter from the command line by specifying a path to the custom formatter file.
Example:
eslint -f ./customformat.js file.js
When specified, the given format is output to the console. If you’d like to save that output into a file, you can do so on the command line like so:
eslint -f compact file.js > results.txt
This saves the output into the results.txt file.
--color, --no-color
This option forces the enabling/disabling of colorized output. You can use this to override the default behavior, which is to enable colorized output unless no TTY is detected, such as when piping eslint through cat or less.
Examples:
eslint --color file.js | cat
eslint --no-color file.js
Miscellaneous
--init
This option will start config initialization wizard. It’s designed to help new users quickly create .eslintrc file by answering a few questions, choosing a popular style guide, or inspecting your source files and attempting to automatically generate a suitable configuration.
The resulting configuration file will be created in the current directory.
--fix
This option instructs ESLint to try to fix as many issues as possible. The fixes are made to the actual files themselves and only the remaining unfixed issues are output. Not all problems are fixable using this option, and the option does not work in these situations:
- This option throws an error when code is piped to ESLint.
- This option has no effect on code that uses a processor, unless the processor opts into allowing autofixes.
--debug
This option outputs debugging information to the console. This information is useful when you’re seeing a problem and having a hard time pinpointing it. The ESLint team may ask for this debugging information to help solve bugs.
-h, --help
This option outputs the help menu, displaying all of the available options. All other options are ignored when this is present.
-v, --version
This option outputs the current ESLint version onto the console. All other options are ignored when this is present.
--no-inline-config
This option prevents inline comments like /*eslint-disable*/ or
/*global foo*/ from having any effect. This allows you to set an ESLint
config without files modifying it. All inline config comments are ignored, e.g.:
/*eslint-disable*//*eslint-enable*//*global*//*eslint*//*eslint-env*/// eslint-disable-line// eslint-disable-next-line
Example:
eslint --no-inline-config file.js
--print-config
This option outputs the configuration to be used for the file passed. When present, no linting is performed and only config-related options are valid.
Example:
eslint --print-config file.js
Ignoring files from linting
ESLint supports .eslintignore files to exclude files from the linting process when ESLint operates on a directory. Files given as individual CLI arguments will be exempt from exclusion. The .eslintignore file is a plain text file containing one pattern per line. It can be located in any of the target directory’s ancestors; it will affect files in its containing directory as well as all sub-directories. Here’s a simple example of a .eslintignore file:
node_modules/*
**/vendor/*.js
A more detailed breakdown of supported patterns and directories ESLint ignores by default can be found in Configuring ESLint.
--fix
This option instructs ESLint to try to fix as many issues as possible. The fixes are made to the actual files themselves and only the remaining unfixed issues are output. Not all problems are fixable using this option, and the option does not work in these situations:
- This option throws an error when code is piped to ESLint.
- This option has no effect on code that uses a processor, unless the processor opts into allowing autofixes.
If you want to fix code from stdin or otherwise want to get the fixes without actually writing them to the file, use the --fix-dry-run option.
--fix-dry-run
This option has the same effect as --fix with one difference: the fixes are not saved to the file system. This makes it possible to fix code from stdin (when used with the --stdin flag).
Because the default formatter does not output the fixed code, you’ll have to use another one (e.g. json) to get the fixes. Here’s an example of this pattern:
getSomeText | npx eslint
This flag can be useful for integrations (e.g. editor plugins) which need to autofix text from the command line without saving it to the filesystem.
--fix-type
This option allows you to specify the type of fixes to apply when using either --fix or --fix-dry-run. The four types of fixes are:
-
problem— fix potential errors in the code -
suggestion— apply fixes to the code that improve it -
layout— apply fixes that do not change the program structure (AST) -
directive— apply fixes to inline directives such as// eslint-disable
You can specify one or more fix type on the command line. Here are some examples:
npx eslint --fix --fix-type suggestion .npx eslint --fix --fix-type suggestion --fix-type problem .npx eslint --fix --fix-type suggestion,layout .
This option is helpful if you are using another program to format your code but you would still like ESLint to apply other types of fixes.
Ignoring files
--ignore-path
This option allows you to specify the file to use as your .eslintignore. By default, ESLint looks in the current working directory for .eslintignore. You can override this behavior by providing a path to a different file.
Example:
npx eslint --ignore-path tmp/.eslintignore file.jsnpx eslint --ignore-path .gitignore file.js
--no-ignore
Disables excluding of files from .eslintignore, --ignore-path, --ignore-pattern, and ignorePatterns property in config files.
Example:
npx eslint --no-ignore file.js
--ignore-pattern
This option allows you to specify patterns of files to ignore (in addition to those in .eslintignore). You can repeat the option to provide multiple patterns. The supported syntax is the same as for .eslintignorefiles, which use the same patterns as the .gitignorespecification. You should quote your patterns in order to avoid shell interpretation of glob patterns.
Example:
npx eslint --ignore-pattern '/lib/' --ignore-pattern '/src/vendor/*' .
Using stdin
--stdin
This option tells ESLint to read and lint source code from STDIN instead of from files. You can use this to pipe code to ESLint.
Example:
cat myfile.js | npx eslint --stdin
--stdin-filename
This option allows you to specify a filename to process STDIN as. This is useful when processing files from STDIN and you have rules which depend on the filename.
Example
cat myfile.js | npx eslint --stdin --stdin-filename=myfile.js
Handling warnings
--quiet
This option allows you to disable reporting on warnings. If you enable this option, only errors are reported by ESLint.
Example:
npx eslint --quiet file.js
--max-warnings
This option allows you to specify a warning threshold, which can be used to force ESLint to exit with an error status if there are too many warning-level rule violations in your project.
Normally, if ESLint runs and finds no errors (only warnings), it will exit with a success exit status. However, if --max-warnings is specified and the total warning count is greater than the specified threshold, ESLint will exit with an error status. Specifying a threshold of -1 or omitting this option will prevent this behavior.
Example:
npx eslint --max-warnings 10 file.js
Output
-o, --output-file
Enable report to be written to a file.
Example:
npx eslint -o ./test/test.html
When specified, the given format is output into the provided file name.
-f, --format
This option specifies the output format for the console. Possible formats are:
- checkstyle
- compact
- html
- jslint-xml
- json
- junit
- stylish (the default)
- tap
- unix
- visualstudio
Example:
npx eslint -f compact file.js
You can also use a custom formatter from the command line by specifying a path to the custom formatter file.
Example:
npx eslint -f ./customformat.js file.js
An npm-installed formatter is resolved with or without eslint-formatter- prefix.
Example:
npm install eslint-formatter-prettynpx eslint -f pretty file.js
When specified, the given format is output to the console. If you’d like to save that output into a file, you can do so on the command line like so:
npx eslint -f compact file.js > results.txt
This saves the output into the results.txt file.
--color, --no-color
This option forces the enabling/disabling of colorized output. You can use this to override the default behavior, which is to enable colorized output unless no TTY is detected, such as when piping eslint through cat or less.
Examples:
npx eslint
--no-inline-config
This option prevents inline comments like /*eslint-disable*/ or /*global foo*/ from having any effect. This allows you to set an ESLint config without files modifying it. All inline config comments are ignored, e.g.:
/*eslint-disable*//*eslint-enable*//*global*//*eslint*//*eslint-env*/// eslint-disable-line// eslint-disable-next-line
Example:
npx eslint --no-inline-config file.js
--report-unused-disable-directives
This option causes ESLint to report directive comments like // eslint-disable-line when no errors would have been reported on that line anyway. This can be useful to prevent future errors from unexpectedly being suppressed, by cleaning up old eslint-disable comments which are no longer applicable.
Warning: When using this option, it is possible that new errors will start being reported whenever ESLint or custom rules are upgraded. For example, suppose a rule has a bug that causes it to report a false positive, and an eslint-disable comment is added to suppress the incorrect report. If the bug is then fixed in a patch release of ESLint, the eslint-disable comment will become unused since ESLint is no longer generating an incorrect report. This will result in a new reported error for the unused directive if the report-unused-disable-directives option is used.
Example:
npx eslint --report-unused-disable-directives file.js
Caching
--cache
Store the info about processed files in order to only operate on the changed ones. The cache is stored in .eslintcache by default. Enabling this option can dramatically improve ESLint’s running time by ensuring that only changed files are linted.
Note: If you run ESLint with --cache and then run ESLint without --cache, the .eslintcache file will be deleted. This is necessary because the results of the lint might change and make .eslintcache invalid. If you want to control when the cache file is deleted, then use --cache-location to specify an alternate location for the cache file.
Note: Autofixed files are not placed in the cache. Subsequent linting that does not trigger an autofix will place it in the cache.
--cache-file
Path to the cache file. If none specified .eslintcache will be used. The file will be created in the directory where the eslint command is executed. Deprecated: Use --cache-location instead.
--cache-location
Path to the cache location. Can be a file or a directory. If no location is specified, .eslintcache will be used. In that case, the file will be created in the directory where the eslint command is executed.
If a directory is specified, a cache file will be created inside the specified folder. The name of the file will be based on the hash of the current working directory (CWD). e.g.: .cache_hashOfCWD
Important note: If the directory for the cache does not exist make sure you add a trailing / on *nix systems or in windows. Otherwise the path will be assumed to be a file.
Example:
npx eslint "src*.js" --cache --cache-location "/Users/user/.eslintcache/"
--cache-strategy
Strategy for the cache to use for detecting changed files. Can be either metadata or content. If no strategy is specified, metadata will be used.
The content strategy can be useful in cases where the modification time of your files change even if their contents have not. For example, this can happen during git operations like git clone because git does not track file modification time.
Example:
npx eslint "src*.js" --cache --cache-strategy content
Miscellaneous
--init
This option will run npm init @eslint/config to start config initialization wizard. It’s designed to help new users quickly create .eslintrc file by answering a few questions, choosing a popular style guide.
The resulting configuration file will be created in the current directory.
--env-info
This option outputs information about the execution environment, including the version of Node, npm, and local and global installations of ESLint. The ESLint team may ask for this information to help solve bugs.
--no-error-on-unmatched-pattern
This option prevents errors when a quoted glob pattern or --ext is unmatched. This will not prevent errors when your shell can’t match a glob.
--exit-on-fatal-error
This option causes ESLint to exit with exit code 2 if one or more fatal parsing errors occur. Without this option, fatal parsing errors are reported as rule violations.
--debug
This option outputs debugging information to the console. This information is useful when you’re seeing a problem and having a hard time pinpointing it. The ESLint team may ask for this debugging information to help solve bugs. Add this flag to an ESLint command line invocation in order to get extra debug information as the command is run (e.g. npx eslint --debug test.js and npx eslint test.js --debug are equivalent)
-h, --help
This option outputs the help menu, displaying all of the available options. All other options are ignored when this is present.
-v, --version
This option outputs the current ESLint version onto the console. All other options are ignored when this is present.
--print-config
This option outputs the configuration to be used for the file passed. When present, no linting is performed and only config-related options are valid.
Example:
npx eslint --print-config file.js
Ignoring files from linting
ESLint supports .eslintignore files to exclude files from the linting process when ESLint operates on a directory. Files given as individual CLI arguments will be exempt from exclusion. The .eslintignore file is a plain text file containing one pattern per line. It can be located in any of the target directory’s ancestors; it will affect files in its containing directory as well as all sub-directories. Here’s a simple example of a .eslintignore file:
temp.js**/vendor/*.js
A more detailed breakdown of supported patterns and directories ESLint ignores by default can be found in Ignoring Code.
Exit codes
When linting files, ESLint will exit with one of the following exit codes:
-
0: Linting was successful and there are no linting errors. If the--max-warningsflag is set ton, the number of linting warnings is at mostn. -
1: Linting was successful and there is at least one linting error, or there are more linting warnings than allowed by the--max-warningsoption. -
2: Linting was unsuccessful due to a configuration problem or an internal error.
© OpenJS Foundation and other contributors
Licensed under the MIT License.
https://eslint.org/docs/latest/user-guide/command-line-interface
ESLint
8.30
-
yoda
Require or disallow «Yoda» conditions Some problems reported by this rule are automatically fixable the command line option Yoda conditions are so named
-
Command Line Interface
ESLint requires Node.js for installation.
-
Configuration Files
ESLint supports configuration files several formats: If there are multiple configuration files in same directory, ESLint will only use one.
-
Using a configuration from a plugin
A plugin is an npm package that can add various extensions to ESLint.
Поскольку JavaScript — это интерпретируемый язык, ошибки, допущенные в коде, выявляются во время его выполнения. Чтобы увидеть ошибки до запуска кода, используется инструмент, который называется линтер. Для поиска ошибок применяется статический анализ кода и используются особые правила.
Файл конфигурации eslint
Перед установкой расширения «ESLint» устанавливаем пакет eslint — локально (рекомендуется) или глобально (не рекомендуется). Расширение будет сначала искать локальный пакет, а в случае неудачи — глобальный.
$ npm install eslint --save-dev # локальная установка
$ npm install eslint --global # глобальная установка
После установки расширения создаем файл конфигурации с правилами проверки кода:
$ npx eslint --init # если пакет установлен локально
$ eslint --init # если пакет установлен глобально
How would you like to use ESLint?
    To check syntax only
    To check syntax and find problems √
    To check syntax, find problems, and enforce code style
What type of modules does your project use?
    JavaScript modules (import/export) √
    CommonJS (require/exports)</li>
    None of these
Which framework does your project use?
    React
    Vue.js
    None of these √
Does your project use TypeScript? No / Yes
Where does your code run?
    Browser √
    Node.js √
What format do you want your config file to be in?
    JavaScript
    YAML
    JSON √
После этого будет создан json-файл конфигурации .eslintrc.json:
{
    "env": { // предоставляет предопределенные глобальные переменные
        "browser": true,
        "es2021": true,
        "node": true
    },
    "extends": "eslint:recommended", // рекомендуемый набор правил
    "parserOptions": {
        // версия синтаксиса ECMAScript: 5 (по умолчанию), 6 (или 2015), ..., 12 (2021), 13 (2022)
        "ecmaVersion": "latest",
        // script (значение по умолчанию) или module (если используются модули ECMAScript)
        "sourceType": "module"
    },
    "rules": {
        // можно переопределять recommended правила и добавлять правила, которых нет в recommended
    }
}
Если выбрать js-формат файла конфигурации — получим .eslintrc.js:
module.exports = {
    env: {
        browser: true,
        es2021: true,
        node: true,
    },
    extends: 'eslint:recommended',
    parserOptions: {
        ecmaVersion: 'latest',
        sourceType: 'module',
    },
    rules: {},
}
Рекомендуемый набор правил eslint:recommended выгллядит следующим образом:
{
    "constructor-super": "error", // проверка вызова super() в конструкторе
    "for-direction": "error", // проверка цикла for на конечное число итераций
    "getter-return": "error", // требовать return в getter
    "no-async-promise-executor": "error", // запрет async функции-исполнителя в Promise
    "no-case-declarations": "error", // запрет объявления переменных, функций и классов в case
    "no-class-assign": "error", // class A {} — запрет на приваивание нового значения A
    "no-compare-neg-zero": "error", // запрет на сравнение x === -0
    "no-cond-assign": "error", // запрет на присваивание в условиях
    "no-const-assign": "error", // запрет на изменение константы
    "no-constant-condition": "error", // запрет на константу в условии
    "no-control-regex": "error", // запрет на упр.символы в регулярках (ASCII от 0 до 31)
    "no-debugger": "error", // запрет на использование debugger
    "no-delete-var": "error", // запрет на использование delete с переменной
    "no-dupe-args": "error", // запрет одинаковых параметров в объявлений ф-ции
    "no-dupe-class-members": "error", // запрет повторяющихся членов класса
    "no-dupe-else-if": "error", // запрет повторяющихся условий в цепочках if-else-if
    "no-dupe-keys": "error", // запрет повторяющихся ключей в литералах объектов
    "no-duplicate-case": "error", // запрет повторяющихся значений case
    "no-empty": "error", // запрет пустых блоков кода — if(…) {пусто}
    "no-empty-character-class": "error", // запрет на пустые символьные классы [] в регулярках
    "no-empty-pattern": "error", // запрет пустых шаблонов деструктурирования let {} = foo
    "no-ex-assign": "error", // запрет переназначения err в catch — try {…} catch (err) {err = 1}
    "no-extra-boolean-cast": "error", // запрет лишних логических приведений — if (!!a) {…}
    "no-extra-semi": "error", // запрет лишних точек с запятой — let x = 5;;
    "no-fallthrough": "error", // запрет case без break и без комментария «fall through»
    "no-func-assign": "error", // запрет переназначения объявления function
    "no-global-assign": "error", // запрет переназначения глобальных переменных — window = {}
    "no-import-assign": "error", // запрет переназначения импорта — import a from …; a = 1
    "no-inner-declarations": "error", // запрет объявления ф-ций и переменных внутри блоков кода
    "no-invalid-regexp": "error", // запрет недопустимых строк регулярных выражений в RegExp()
    "no-irregular-whitespace": "error", // запрет неправильных пробельных символов
    "no-loss-of-precision": "error", // запрет литеральных чисел, которые теряют точность
    "no-misleading-character-class": "error", // запрет проблемных регулярных выражений
    "no-mixed-spaces-and-tabs": "error", // запрет смешанных отступов из пробелов и табуляций
    "no-new-symbol": "error", // запрет new Symbol()
    "no-nonoctal-decimal-escape": "error", // запрет 8 и 9 в строковых литералах
    "no-obj-calls": "error", // запрет вызова свойств глобального объекта как функций — Math()
    "no-octal": "error", // запрет восьмеричных литералов — x = 071 (теперь х равен 57)
    "no-prototype-builtins": "error", // запрет вызова некоторых методов прототипа на объекте
    "no-redeclare": "error", // запрет повторного объявления переменной
    "no-regex-spaces": "error", // запрет использования нескольких пробелов в регулярках
    "no-self-assign": "error", // запрет присваивания переменной самой себе — x = x
    "no-setter-return": "error", // // запрет на return в setter
    "no-shadow-restricted-names": "error", // запрет имен переменных и ф-ций типа NaN, undefined
    "no-sparse-arrays": "error", // запрет разреженных массивов
    "no-this-before-super": "error", // запрет в конструкторе использовать this до вызова super()
    "no-undef": "error", // запрет на использование необъявленных переменных
    "no-unexpected-multiline": "error", // запрет запутанных многострочных выражений
    "no-unreachable": "error", // запрет недостижимого кода после return, throw, continue и break
    "no-unsafe-finally": "error", // запрет return, throw, break и continue внутри блока finally
    "no-unsafe-negation": "error", // запрет отрицания левого операнда в операторах отношения
    "no-unsafe-optional-chaining": "error", // запрет использования foo?.bar в некоторых ситуациях
    "no-unused-labels": "error", // запрет неиспользуемых меток
    "no-unused-vars": "error", // запрет неиспользуемых переменных
    "no-useless-backreference": "error", // запрет бесполезных обратных ссылок в регулярках
    "no-useless-catch": "error", // запрет ненужных catch
    "no-useless-escape": "error", // запрет ненужных escape-символов
    "no-with": "error", // запрет использования with
    "require-yield": "error", // требовать yield для функции-генератора
    "use-isnan": "error", // требовать isNaN() для проверки NaN
    "valid-typeof": "error" // требовать для typeof допустимых строк "string", "undefined", "object"
}
Давайте добавим в файл конфигурации еще несколько правил:
{
    "env": {
        "browser": true,
        "es2021": true,
        "node": true
    },
    "extends": "eslint:recommended",
    "parserOptions": {
        "ecmaVersion": "latest",
        "sourceType": "module"
    },
    "rules": {
        "linebreak-style": ["error", "unix"], // символ(ы) конца строки
        "quotes": ["error", "single"], // использовать одинарные кавычки
        "semi": ["error", "never"], // точка с запятой в конце операторов
        "indent": ["error", 4, { "SwitchCase": 1 }], // отступы в коде из 4 пробелов с учетом switch...case
        "arrow-parens": ["error", "as-needed"], // скобки вокруг единственного параметра стрелочной функции
        "object-curly-spacing": ["error", "always"], // пробелы между скобками в литералах объектов
        "array-bracket-spacing": ["error", "never"], // пробелы между скобками в массивах
        "quote-props": ["error", "as-needed"], // свойства объекта в кавычках или без кавычек
        "no-trailing-spaces": "error", // не должно быть пробелов в конце строки
        "no-tabs": "error", // символы табуляции в коде запрещена везде
        "comma-dangle": ["error", { // запятая после последнего элемента массива или объекта
            "arrays": "always-multiline",
            "objects": "always-multiline",
            "imports": "never",
            "exports": "never",
            "functions": "never"
        }],
        "brace-style": ["error", "1tbs"], // правила для фигурных скобкок для блоков кода
        "keyword-spacing": "error", // пробел слева и справа для ключевых слов
        "no-multi-spaces": "error", // не допускается несколько пробелов подряд
        "eqeqeq": "error", // использовать === и !== вместо == и !=
        "camelcase": "error", // имена переменных и функций в стиле camelCase
        "max-len": ["error", 100], // максимальная длина строки
        "no-multiple-empty-lines": "error" // не больше 2 пустых строк подряд
    }
}
Внутри rules можно не только добавлять новые правила, но и переопределять правила, заданные в наборе eslint:recommended (или вовсе отключить некоторые правила установкой значения off).
ESLint будет искать файл конфигурации сначала в рабочей директории проекта, и далее — во всех родительских директориях вплоть до корневой. При этом директивы из первого найденного .eslintrc.json будут дополняться директивами из следующих найденных файлов. Если директивы противоречат друг другу, приоритет будет у того файла конфигурации, который был найден раньше. Поиск вверх по иерархии прекращается, когда найден файл конфигурации, содержащий настройку root в значении true. Так что мы можем использовать один файл конфигурации для всех проектов — только желательно добавить в него директиву root.
[projects]
    .eslintrc.json содержит {"root":true, …}
    [one-project]
       index.js
       package.json
       ..........
    [two-project]
       index.js
       package.json
       ..........
Файл конфигурации VS Code
Это файл settings.json, здесь нужно разрешить работу расширения и указать, какие файлы проверять и форматировать:
{
    ..........
    // По умолчанию форматирование кода запрещено
    "editor.formatOnSave": false, // форматировать код при сохранении файла
    "editor.formatOnPaste": false, // форматировать при вставке фрагмента кода
    "editor.codeActionsOnSave": [], // набор действий при сохранении файла
    "editor.defaultFormatter": null,
    // Разрешить или запретить расширения eslint и prettier
    "prettier.enable": true, // нужен рестарт vs code
    "eslint.enable": true,
    // Настройки форматирования javascript
    "eslint.format.enable": false, // запретить или разрешить форматирование
    "eslint.run": "onType", // запускать проверку кода по мере печати кода
    "eslint.probe": [ // какие файлы нужно проверять
        "javascript"
    ],
    "[javascript]": {
        // formatOnSave считается устаревшей, рекомендуется использовать codeActionsOnSave
        "editor.formatOnSave": false,
        "editor.formatOnPaste": true,
        "editor.codeActionsOnSave": [
            "source.formatDocument", // форматирование prettier
            "source.fixAll.eslint" // исправление ошибок eslint
        ],
        // "editor.defaultFormatter": "dbaeumer.vscode-eslint"
        "editor.defaultFormatter": "esbenp.prettier-vscode"
    },
    ..........
}
Вообще говоря, расширение «ESLint» может решать две задачи — проверка кода и форматирование. Проверка кода — это поиск таких мест в коде, которые могут привести к ошибкам. Устранение таких узких мест — задача разработчика, эту нельзя поручить машине. Форматирование — это удаление пробелов, замена табуляций, перенос фигурных скобок. Такие действия не меняют логику работы кода, это можно поручить машине.
Но в примере выше расширение «ESLint» только проверяет код, а форматированием занимается расширение «Prettier» (см. здесь). Опция eslint.format.enable имеет значение false, а опция editor.defaultFormatter имеет значение esbenp.prettier-vscode. Форматирование у «ESLint» странное — например, в отличие от «Prettier», не выполняется разбиение длинных строк на две или три. Так что эту работу лучше оставить расширению «Prettier».
Проблема в том, что такая конфигурация толком не работает — расширения «ESLint» и «Prettier» для VS Code мешают друг другу.
Расширение «Prettier» не работает при сохранении, если editor.formatOnSave имеет значение false. То есть, «Prettier» вообще никак не реагирует на source.formatDocument — хотя в документации написано, что codeActionsOnSave заменяет и расширяет настройку formatOnSave.
С другой стороны, если выставить formatOnSave в true — перестает работать source.fixAll.eslint. Точнее говоря — внесенные «ESLint» изменения в код тут же затираются форматированием «Prettier» — formatOnSave срабатывает после codeActionsOnSave.
Можно форматировать (Alt+Shift+F) с использованием «Prettier». И можно исправить ошибки при сохранении (Ctrl+S) с использованием «ESLint». Возможно, причина этого в том, что VS Code активно развивается, постоянно добавляются новые возможности — и это просто временный баг, который пропадет при очередном обновлении.
Оказывается, есть расширение «Format Code Action» от Rohit Gohri для VS Code, которое позволяет решить эту проблему. После установки можно форматировать с использовием расширения «Prettier» по Alt+Shift+F. А при сохранении по Ctrl+S — сначала отработает форматирование «Prettier», а потом — исправление ошибок «ESLint». При этом «ESLint» будет затирать исправления «Prettier», если правила «ESLint» противоречат правилам «Prettier». Кроме того, можно изменить порядок запуска, если поменять местами элементы массива codeActionsOnSave.
Исходные коды здесь, директория eslint-prettier-together. Правила ESLint и Prettier имеют противоречия, так что видно, как одни исправления затирают другие. В принципе, если убрать противоречия, то такая конфигурация имеет право на жизнь. Но ниже мы рассмотрим более удачные способы подружить ESLint и Prettier.
ESLint и Prettier вместе, первый способ
У нас две проблемы. Первая — расширения «ESLint» и «Prettier» для VS Code мешают друг другу. Вторая — правила форматирования prettier могут противоречить правилам форматирования eslint. Давайте отредактируем файлы конфигурации .prettierrc и .eslintrc.json таким образом, чтобы спровоцировать такую ситуацию.
{
    "arrowParens": "avoid",
    "bracketSpacing": true,
    "endOfLine": "lf",
    "htmlWhitespaceSensitivity": "css",
    "insertPragma": false,
    "jsxBracketSameLine": false,
    "jsxSingleQuote": false,
    "printWidth": 80,
    "proseWrap": "preserve",
    "quoteProps": "as-needed",
    "requirePragma": false,
    "semi": false, // без точки с запятой в конце оператора
    "singleQuote": true,
    "tabWidth": 4,
    "trailingComma": "es5",
    "useTabs": false,
    "vueIndentScriptAndStyle": true,
    "embeddedLanguageFormatting": "auto"
}
{
    "env": {
        "browser": true,
        "es2021": true,
        "node": true
    },
    "extends": "eslint:recommended",
    "parserOptions": {
        "ecmaVersion": "latest",
        "sourceType": "module"
    },
    "rules": {
        "arrow-parens": ["error", "as-needed"],
        "object-curly-spacing": ["error", "always"],
        "array-bracket-spacing": ["error", "never"],
        "quote-props": ["error", "as-needed"],
        "semi": ["error", "always"], // точка с запятой в конце оператора
        "quotes": ["error", "single"],
        "linebreak-style": ["error", "unix"],
        "indent": ["error", 4, { "SwitchCase": 1 }],
        "no-trailing-spaces": "error",
        "no-tabs": "error",
        "comma-dangle": ["error", {
            "arrays": "always-multiline",
            "objects": "always-multiline",
            "imports": "never",
            "exports": "never",
            "functions": "never"
        }],
        "brace-style": ["error", "1tbs"],
        "keyword-spacing": "error",
        "no-multi-spaces": "off",
        "eqeqeq": "error",
        "camelcase": "error",
        "max-len": ["error", 100],
        "no-multiple-empty-lines": "error"
    }
}
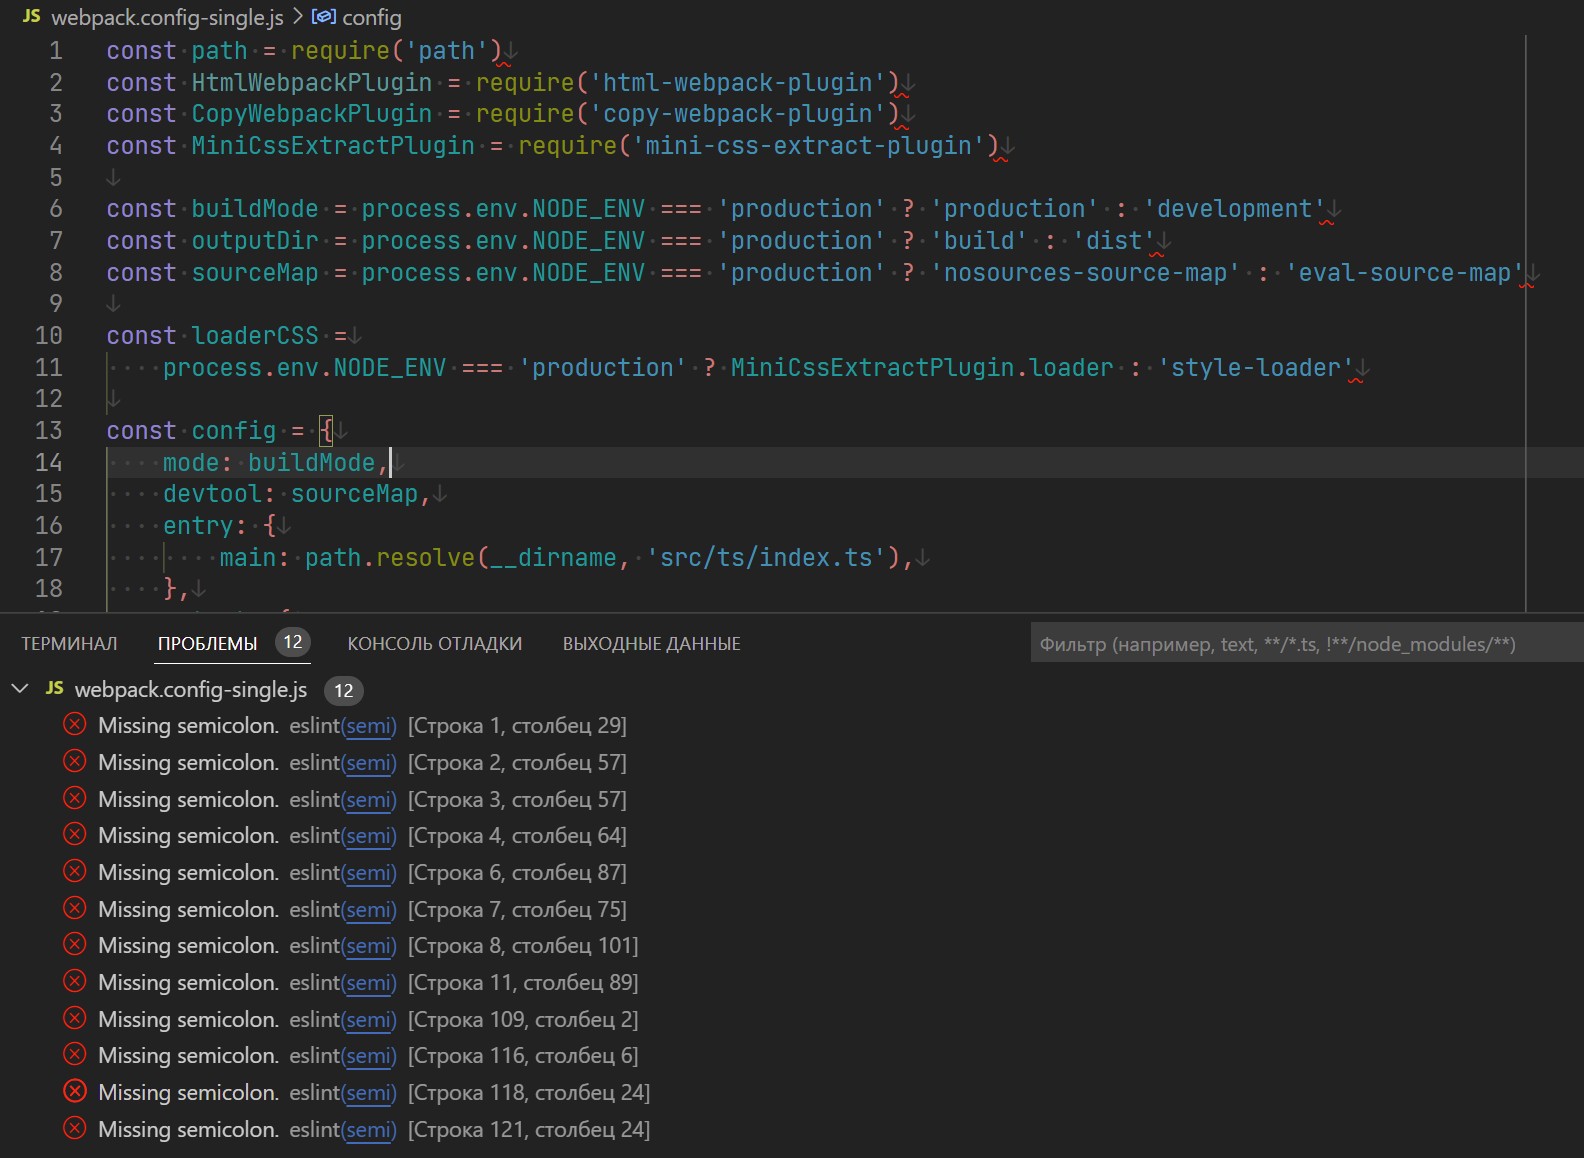
После форматирования с использованием prettier (Alt+Shift+F) — получим множество сообщений «Missing semicolon» от eslint:
Чтобы скрестить ежа и ужа — установим пакет eslint-plugin-prettier, который позволит запускать prettier как правило eslint. Также потребуется установить пакет prettier — если он не был установлен ранее. То есть, мы вообще не будем использовать расширение VS Code «Prettier» при работе с js-файлами.
$ npm install prettier eslint-plugin-prettier --save-dev
{
    "devDependencies": {
        "eslint": "^8.20.0",
        "eslint-plugin-prettier": "^4.2.1",
        "prettier": "^2.7.1"
    }
}
Редактируем файл конфигурации .eslintrc.json:
{
    "root": true,
    "env": {
        "browser": true,
        "es2021": true,
        "node": true
    },
    "extends": [
        "eslint:recommended"
    ],
    "parserOptions": {
        "ecmaVersion": "latest",
        "sourceType": "module"
    },
    "plugins": ["prettier"],
    "rules": {
        "prettier/prettier": "error"
    }
}
Мы убрали из .eslintrc.json все правила, связанные с форматированием. Правила форматирования теперь только в .prettierrc — противоречий больше нет. И теперь это работает так — формально defaultFormatter теперь расширение «ESLint». Но фактически форматированием занимается prettier. Проблемы с форматированием будут подчеркнуты зеленой волнистой линией. А правила из eslint:recommended будут подчеркнуты оранжевой или красной волнистой линией.
{
    ..........
    // По умолчанию форматирование кода запрещено
    "editor.formatOnSave": false, // форматировать код при сохранении файла
    "editor.formatOnPaste": false, // форматировать при вставке фрагмента кода
    "editor.codeActionsOnSave": [], // набор действий при сохранении файла
    "editor.defaultFormatter": null,
    // Разрешить или запретить расширения eslint и prettier
    "prettier.enable": true, // нужен рестарт vs code
    "eslint.enable": true,
    // Настройки форматирования javascript
    "eslint.format.enable": true, // NEW запретить или разрешить форматирование
    "eslint.run": "onType", // запускать проверку кода по мере печати кода
    "eslint.probe": [ // какие файлы нужно проверять
        "javascript"
    ],
    "eslint.rules.customizations": [
        // для проблем форматирования кода уровень info
        {"rule": "prettier/prettier", "severity": "info"}
    ],
    "[javascript]": {
        // NEW устаревшая настройка editor.formatOnSave больше не нужна
        "editor.formatOnPaste": true,
        "editor.codeActionsOnSave": [
            "source.fixAll.eslint"
        ],
        "editor.defaultFormatter": "dbaeumer.vscode-eslint" // NEW форматирование eslint
    },
    ..........
}
Работает форматирование и исправление по сочетанию клавиш Alt+Shift+F + проверка кода по мере печати + форматирование и исправление при сохранении Ctrl+S. Теперь нет необходимости использовать устаревшую настройку formatOnSave. Впрочем, можно сделать и по старинке, с использованием formatOnSave.
{
    ..........
    // По умолчанию форматирование кода запрещено
    "editor.formatOnSave": false, // форматировать код при сохранении файла
    "editor.formatOnPaste": false, // форматировать при вставке фрагмента кода
    "editor.codeActionsOnSave": [], // набор действий при сохранении файла
    "editor.defaultFormatter": null,
    // Разрешить или запретить расширения eslint и prettier
    "prettier.enable": true, // нужен рестарт vs code
    "eslint.enable": true,
    // Настройки форматирования javascript
    "eslint.format.enable": true, // запретить или разрешить форматирование
    "eslint.run": "onType", // запускать проверку кода по мере печати кода
    "eslint.probe": [ // какие файлы нужно проверять
        "javascript"
    ],
    "eslint.rules.customizations": [
        // для проблем форматирования кода уровень info
        {"rule": "prettier/prettier", "severity": "info"}
    ],
    "[javascript]": {
        "editor.formatOnPaste": true,
        "editor.formatOnSave": true,
        "editor.defaultFormatter": "dbaeumer.vscode-eslint"
    },
    ..........
}
Цвет волнистой линии для подчеркивания можно задать в настройках VS Code settings.json
{
    ..........
    "workbench.colorCustomizations": {
        "editorError.foreground": "#FF0000",
        "editorWarning.foreground": "#FF9933",
        "editorInfo.foreground": "#00AA00",
    },
    ..........
}
Исходные коды здесь, директория eslint-prettier-together-one.
Для линтинга и форматирования typescript-кода нужно установить еще два пакета и внести изменения в eslintrc.json.
$ npm install @typescript-eslint/parser @typescript-eslint/eslint-plugin --save-dev
{
    "root": true,
    "env": {
        "browser": true,
        "es2021": true,
        "node": true
    },
    "extends": [
        "eslint:recommended",
        "plugin:@typescript-eslint/recommended"
    ],
    "parser": "@typescript-eslint/parser",
    "parserOptions": {
        "ecmaVersion": "latest",
        "sourceType": "module"
    },
    "plugins": [
        "@typescript-eslint",
        "prettier"
    ],
    "rules": {
        "prettier/prettier": "error"
    }
}
{
    ..........
    // По умолчанию форматирование кода запрещено
    "editor.formatOnSave": false, // форматировать код при сохранении файла
    "editor.formatOnPaste": false, // форматировать при вставке фрагмента кода
    "editor.codeActionsOnSave": [], // набор действий при сохранении файла
    "editor.defaultFormatter": null,
    // Разрешаем работу расширений prettier и eslint
    "prettier.enable": true, // разрешить работу расширения prettier (нужен рестарт vs code)
    "eslint.enable": true, // разрешить работу расширения eslint
    // Настройки prettier и eslint для файлов javascript, typescript и react
    "eslint.format.enable": true, // запретить или разрешить форматирование
    "eslint.run": "onType", // запускать проверку кода по мере печати кода
    "eslint.probe": ["javascript", "typescript"], // какие файлы нужно проверять
    "eslint.rules.customizations": [
        // для проблем форматирования кода уровень info
        {"rule": "prettier/prettier", "severity": "info"}
    ],
    "[javascript]": {
        "editor.formatOnPaste": true,
        "editor.formatOnSave": true,
        "editor.defaultFormatter": "dbaeumer.vscode-eslint",
    },
    "[javascriptreact]": {
        "editor.formatOnPaste": true,
        "editor.formatOnSave": true,
        "editor.defaultFormatter": "dbaeumer.vscode-eslint",
    },
    "[typescript]": {
        "editor.formatOnPaste": true,
        "editor.formatOnSave": true,
        "editor.defaultFormatter": "dbaeumer.vscode-eslint",
    },
    "[typescriptreact]": {
        "editor.formatOnPaste": true,
        "editor.formatOnSave": true,
        "editor.defaultFormatter": "dbaeumer.vscode-eslint",
    },
    ..........
}
Набор правил Standard
Кроме набора правил eslint:recommended есть еще несколько популярных наборов — Standard, Airbnb, Google и другие. Давайте для примера посмотрим, как использовать правила Standard — этот набор гораздо больше eslint:recommended и предупреждений об ошибках будет больше.
$ npm install eslint-config-standard eslint-plugin-promise eslint-plugin-import eslint-plugin-n --save-dev
{
    "devDependencies": {
        "eslint": "^8.20.0",
        "eslint-config-standard": "^17.0.0",
        "eslint-plugin-import": "^2.26.0",
        "eslint-plugin-n": "^15.2.4",
        "eslint-plugin-prettier": "^4.2.1",
        "eslint-plugin-promise": "^6.0.0",
        "prettier": "^2.7.1"
    }
}
{
    "root": true,
    "env": {
        "browser": true,
        "es2021": true,
        "node": true
    },
    "extends": [
        "standard"
    ],
    "parserOptions": {
        "ecmaVersion": "latest",
        "sourceType": "module"
    },
    "rules": {}
}

Standard включает в себя не только правила поиска ошибок, но и правила форматирования — так что мы опять упираемся в проблему противоречий с правилами prettier. Давайте установим модуль eslint-config-prettier, который отключит все правила, которые противоречат prettier.
$ npm install eslint-config-prettier --save-dev
{
    "devDependencies": {
        "eslint": "^8.20.0",
        "eslint-config-prettier": "^8.5.0",
        "eslint-config-standard": "^17.0.0",
        "eslint-plugin-import": "^2.26.0",
        "eslint-plugin-n": "^15.2.4",
        "eslint-plugin-prettier": "^4.2.1",
        "eslint-plugin-promise": "^6.0.0",
        "prettier": "^2.7.1"
    }
}
{
    "root": true,
    "env": {
        "browser": true,
        "es2021": true,
        "node": true
    },
    "extends": [
        "standard",
        "plugin:prettier/recommended"
    ],
    "parserOptions": {
        "ecmaVersion": "latest",
        "sourceType": "module"
    },
    "rules": {}
}
Настройка plugin:prettier/recommended на самом деле делает следующее:
{
    "root": true,
    "env": {
        "browser": true,
        "es2021": true,
        "node": true
    },
    "extends": [
        "standard",
        "prettier"
    ],
    "parserOptions": {
        "ecmaVersion": "latest",
        "sourceType": "module"
    },
    "plugins": ["prettier"],
    "rules": {
        "prettier/prettier": "error",
        "arrow-body-style": "off",
        "prefer-arrow-callback": "off"
    }
}
Исходные коды здесь, директория eslint-prettier-standard-one.
Особенности конфигурации
Программисты обожают наводить тень на плетень — и разработчики ESLint не исключение. Два фрагмента ниже из файла конфигурации эквивалентны.
"plugins": [
    "react",       // npm module eslint-plugin-react
    "prettier"     // npm module eslint-plugin-prettier
]
"plugins": [
    "eslint-plugin-react",
    "eslint-plugin-prettier"
]
Еще запутаннее, когда имена плагинов начинаются с @ (пространство имен). Нужно учитывать, что @foo и @foo/bar находятся в одном пространстве имен, но это два разных плагина (npm-модуля). Два фрагмента ниже из файла конфигурации эквивалентны.
"plugins": [
    "@foo",               // npm module @foo/eslint-plugin
    "@foo/bar"            // npm module @foo/eslint-plugin-bar
]
"plugins": [
    "@foo/eslint-plugin",
    "@foo/eslint-plugin-bar"
]
И еще один важный момент — когда в extends используется префикс plugin:
"extends": [
    "plugin:foo/bar",
],
Это значит, что плагин eslint-plugin-foo содержит в себе набор правил bar:
// код плагина eslint-plugin-foo
module.exports = {
    configs: {
        bar: {
            plugins: ["foo"], // допускается foo вместо eslint-plugin-foo
            env: ["browser"],
            rules: {
                semi: "error",
                "foo/one": "error", // допускается foo вместо eslint-plugin-foo
                "foo/two": "error",
                "eslint-plugin-foo/three": "error",
            }
        },
        baz: {
            plugins: ["foo"], // допускается foo вместо eslint-plugin-foo
            env: ["node"],
            rules: {
                semi: "warn",
                "foo/one": "off", // допускается foo вместо eslint-plugin-foo
                "foo/two": "error",
                "eslint-plugin-foo/three": "off",
            }
        }
    }
};
Поиск:
IDE • JavaScript • Web-разработка • Конфигурация • Настройка • Плагин • Установка • Файл • ESLint • Prettier