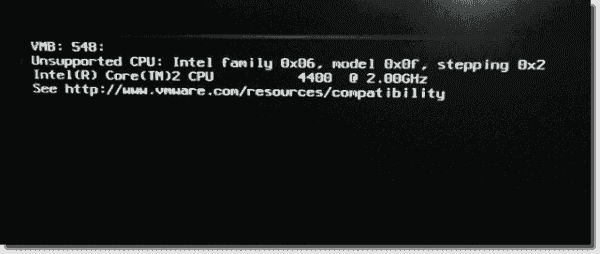
Пот установке или обновлении хостов VMware ESXi до 6.7 или 7.x на хостах со старыми моделями процессоров, может появится ошибка Unsupported CPU.
VMB: 611:
Unsupported CPU: Intel family 0x06, model 0x1a, stepping 0x5
Intel(R) Xeon(R) CPU E5520 @ 2.27GHz
See http://www.vmware.com/resources/compatibility
При чистой установке ESXi ошибка выглядит так:
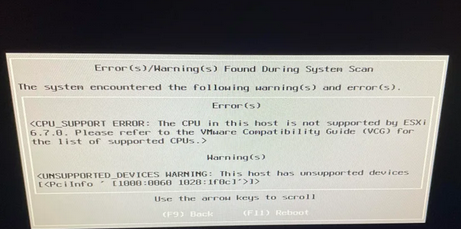
Error:
CPU_SUPPORT_ERROR: The CPU in this host is not supported by ESXI 6.7.0. Please refer ti the VMware Compatibility Guide (VCG) for the list of supported CPUs.
Эта проблема возникает при установке ESXi на сервера с моделями CPU, которые VMware считает устаревшим. В данный момент эта проблема относится к процессорам Intel 6 поколения ( Intel Family 6 ) на микроархитектуре Westmere (выпускались начиная с 2010).
- WSM-EP, Westmere-EP (2C) – шестиядерные Core i7-990X, Core i7-980X, Xeon 36xx, Xeon 56xx
- WSM-EX, Westmere-EX (2F) – десятиядерные E7-x8xx-series
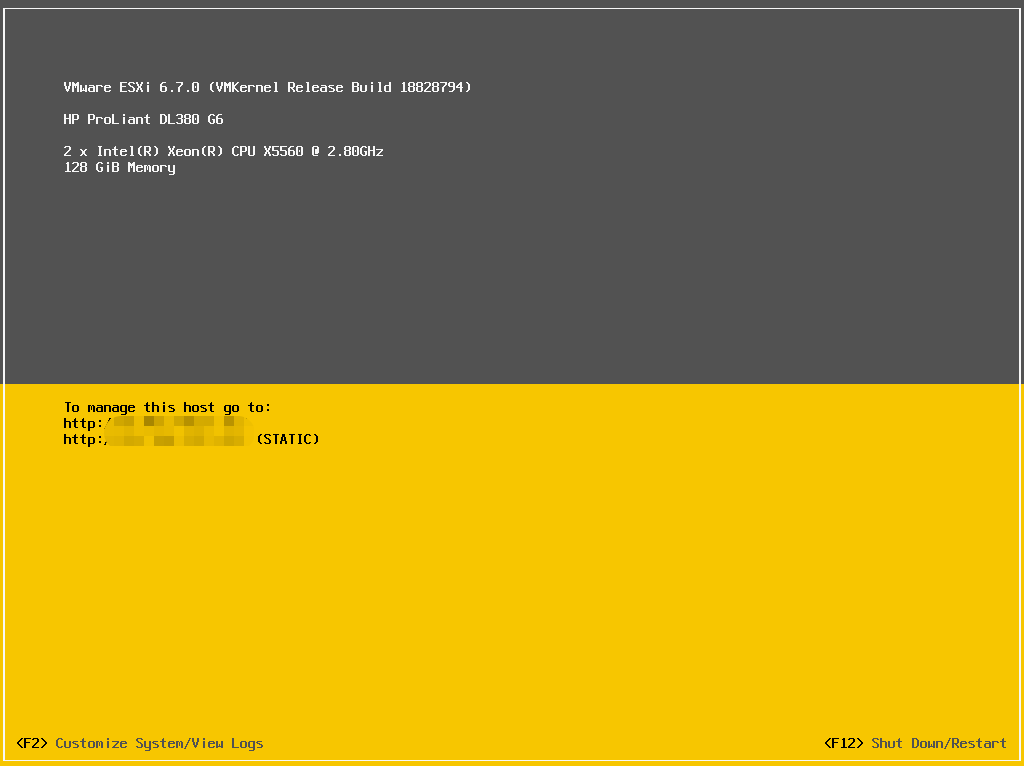
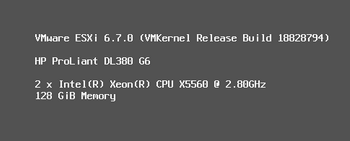
В частности, я столкнулся с этой проблемой на сервере HP ProLiant DL380 G6 с Intel Xeon E5520.
Для запуска ESXi на серверах со старыми моделями процессоров, нужно добавить в меню загрузки ESXi параметр “allowLegacyCPU=true”.
Для этого нажмите при загрузке Shift+O и выполните команду:
<ENTER: Apply options and boot>
> cdromBoot runweasel allowLegacyCPU=true

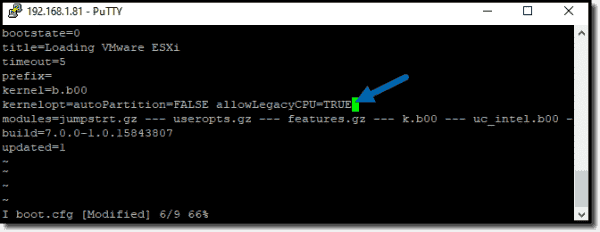
Однако этот параметр будет действовать только до следующей перезагрузки хоста ESXi. Поэтому нужно добавить его в файл boot.cfg. Этот файл находится в корне одного из системных разделов.
Подключитесь к хосту ESXi по SSH и найдите файл boot.cfg:
# find / | grep boot.cfg
В моем случае я нашел два таких файла (/bootbank/boot.cfg и /altbootbank/boot.cfg), поэтому отредактировал оба. Нужно добавить опцию allowLegacyCPU=true в параметре kernelopt. Например, у меня получился такой файл:
bootstate=0
title=Loading VMware ESXi
timeout=5
prefix=
kernel=b.b00
kernelopt=autoPartition=FALSE allowLegacyCPU=true
modules=jumpstrt.gz --- useropts.gz --- features.gz --- k.b00 --- uc_intel.b00 --- uc_amd.b00 --- uc_hygon.b00 --- procfs.b00 --- vmx.v00 --- vim.v00 --- tpm.v00 --- sb.v00 --- s.v00 --- bnxtnet.v00 --- bnxtroce.v00 --- brcmfcoe.v00 --- brcmnvme.v00 --- elxiscsi.v00 --- elxnet.v00 --- i40en.v00 --- i40iwn.v00 --- iavmd.v00 --- igbn.v00 --- iser.v00 --- ixgben.v00 --- lpfc.v00 --- lpnic.v00 --- lsi_mr3.v00 --- lsi_msgp.v00 --- lsi_msgp.v01 --- lsi_msgp.v02 --- mtip32xx.v00 --- ne1000.v00 --- nenic.v00 --- nfnic.v00 --- nhpsa.v00 --- nmlx4_co.v00 --- nmlx4_en.v00 --- nmlx4_rd.v00 --- nmlx5_co.v00 --- nmlx5_rd.v00 --- ntg3.v00 --- nvme_pci.v00 --- nvmerdma.v00 --- nvmxnet3.v00 --- nvmxnet3.v01 --- pvscsi.v00 --- qcnic.v00 --- qedentv.v00 --- qedrntv.v00 --- qfle3.v00 --- qfle3f.v00 --- qfle3i.v00 --- qflge.v00 --- rste.v00 --- sfvmk.v00 --- smartpqi.v00 --- vmkata.v00 --- vmkfcoe.v00 --- vmkusb.v00 --- vmw_ahci.v00 --- crx.v00 --- elx_esx_.v00 --- btldr.v00 --- esx_dvfi.v00 --- esx_ui.v00 --- esxupdt.v00 --- tpmesxup.v00 --- weaselin.v00 --- loadesx.v00 --- lsuv2_hp.v00 --- lsuv2_in.v00 --- lsuv2_ls.v00 --- lsuv2_nv.v00 --- lsuv2_oe.v00 --- lsuv2_oe.v01 --- lsuv2_oe.v02 --- lsuv2_sm.v00 --- native_m.v00 --- qlnative.v00 --- vdfs.v00 --- vmware_e.v00 --- vsan.v00 --- vsanheal.v00 --- vsanmgmt.v00 --- xorg.v00 --- imgdb.tgz --- state.tgz
build=6.7.0-1.25.18828794
updated=1
Однако может появится другая ошибка, когда вы попытаетесь запустить виртуальную машину на таком хосте ESXi.
Failed to power on virtual machine on xxx. This host doesn’t support virtualizing real mode. The intel VMX Unrestricted Guest feature is necessary to run this virtual machine on an Intel Processor.

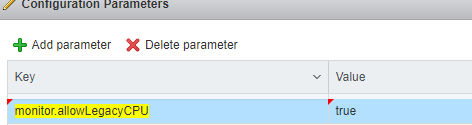
Для решения этой проблемы, нужно добавить специальный параметр в конфигурационный vmx файл виртуальной машины:
- Выберите ВМ -> Edit
- Перейдите в VM Options -> Advanced -> Edit Configuration
- Нажмите Add parameter и добавьте строку
monitor.allowLegacyCPU = true 
- После этого вы сможете включить виртуальную машину.
Installation with Legacy CPU
If you try to install ESXi 7 on an hardware with older CPU(s) that is no longer officially supported by VMware, you will get a error message similar to this when booting the installation medium:
VMB: 611:
Unsupported CPU: Intel family 0x06, model 0x1a, stepping 0x5
Intel(R) Xeon(R) CPU		E5520  @ 2.27GHz
See http://www.vmware.com/resources/compatibility
Even if it is unsupported it might work in practice.
To bypass this error in the boot, do as follows:
- Reboot into boot media again
- After the ESXi boot menu when the “Loading ESXi Installer” is starting click
SHIFT+Owithin 5 seconds to add boot options. - Type “
allowLegacyCPU=true” behind the line. Like this:
<ENTER: Apply options and boot>
> cdromBoot runweasel allowLegacyCPU=true- Click ENTER and continue installation as normal.
- Eventually you will come across error messages like this:
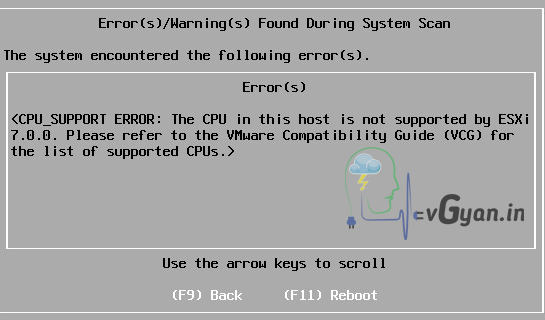
Error(s)/Warning(s) Found During System Scan

			Warning(s)

<CPU_SUPPORT WARNIG: The CPU in this host is not supported by
ESXi 7.0.0. Please refer to the VMware Compatibility Guide (VCG)
for the list of supported CPUs.>- Click ENTER to continue, and finnish the installation.
- After the installation medium is removed and the server is restarted the boot options have to be set every time you restart the server.
This can be avoided, read on.
Permanently allow boot from Legacy CPU
The easiest way to accomplish automatic boot with a legacy CPU is to do as follows:
- Shut down the ESXi Server and remove the boot-USB-drive.
- Insert the drive in another computer. It will contain two FAT-partitions.
- Open the the drive with multiple files including BOOT.CFG, and open it in a text-editor.
One of the partitions is just containing a BOOT.CFG file and nothing else. this is NOT the one you should edit.
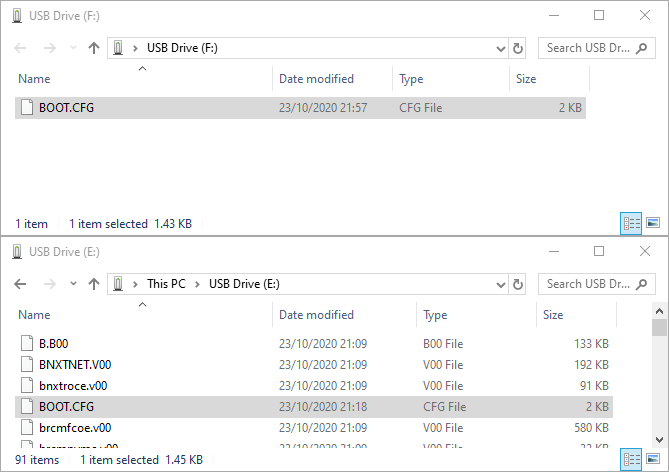
BOOT.CFG on
- Add “
allowLegacyCPU=true” to the end of the line starting with “kernelopt=“
bootstate=0
title=Loading VMware ESXi
timeout=5
prefix=
kernel=b.b00
kernelopt=autoPartition=FALSE allowLegacyCPU=true
modules=jumpstrt.gz --- useropts.gz --- features.gz --- k.b00 --- uc_intel.b00 --- uc_amd.b00 --- uc_hygon.b00 --- procfs.b00 --- vmx.v00 --- vim.v00 --- tpm.v00 --- sb.v00 --- s.v00 --- bnxtnet.v00 --- bnxtroce.v00 --- brcmfcoe.v00 --- brcmnvme.v00 --- elxiscsi.v00 --- elxnet.v00 --- i40en.v00 --- i40iwn.v00 --- iavmd.v00 --- igbn.v00 --- iser.v00 --- ixgben.v00 --- lpfc.v00 --- lpnic.v00 --- lsi_mr3.v00 --- lsi_msgp.v00 --- lsi_msgp.v01 --- lsi_msgp.v02 --- mtip32xx.v00 --- ne1000.v00 --- nenic.v00 --- nfnic.v00 --- nhpsa.v00 --- nmlx4_co.v00 --- nmlx4_en.v00 --- nmlx4_rd.v00 --- nmlx5_co.v00 --- nmlx5_rd.v00 --- ntg3.v00 --- nvme_pci.v00 --- nvmerdma.v00 --- nvmxnet3.v00 --- nvmxnet3.v01 --- pvscsi.v00 --- qcnic.v00 --- qedentv.v00 --- qedrntv.v00 --- qfle3.v00 --- qfle3f.v00 --- qfle3i.v00 --- qflge.v00 --- rste.v00 --- sfvmk.v00 --- smartpqi.v00 --- vmkata.v00 --- vmkfcoe.v00 --- vmkusb.v00 --- vmw_ahci.v00 --- crx.v00 --- elx_esx_.v00 --- btldr.v00 --- esx_dvfi.v00 --- esx_ui.v00 --- esxupdt.v00 --- tpmesxup.v00 --- weaselin.v00 --- loadesx.v00 --- lsuv2_hp.v00 --- lsuv2_in.v00 --- lsuv2_ls.v00 --- lsuv2_nv.v00 --- lsuv2_oe.v00 --- lsuv2_oe.v01 --- lsuv2_oe.v02 --- lsuv2_sm.v00 --- native_m.v00 --- qlnative.v00 --- vdfs.v00 --- vmware_e.v00 --- vsan.v00 --- vsanheal.v00 --- vsanmgmt.v00 --- xorg.v00 --- imgdb.tgz --- state.tgz
build=7.0.0-1.25.16324942
updated=1- Save the file and move the drive back to the server
- Start the server, ESXi should now boot up without the need of any manual boot option input.
Fixing “This host does not support virtualizing real mode” error
Now when VMware ESXi 7.0 is up and running and all looks good you still might run into problems, not unlikely this one (when trying to start a VM):
Failed to power on virtual machine Home-Assistant. This host does not support virtualizing real mode. The Intel "VMX Unrestricted Guest" feature is necessary to run this virtual machine on an Intel processor. Click here for more details.
Power On VM
Key
haTask-2-vim.VirtualMachine.powerOn-3629474806
Description
Power On this virtual machine
Virtual machine:

Home-Assistant
State
Failed - This host does not support virtualizing real mode. The Intel "VMX Unrestricted Guest" feature is necessary to run this virtual machine on an Intel processor.

Errors
- This host does not support virtualizing real mode. The Intel "VMX Unrestricted Guest" feature is necessary to run this virtual machine on an Intel processor.
- Module 'CPUIDEarly' power on failed.
- Failed to start the virtual machine.
This issue has to be solved for every current and future VM, but the process is easy and fast when you know how.
- Click “Edit” on the VM
- Select “VM Options”
- Open “Advanced” and select “Edit Configuration…”
- Click “Add parameter” and fill as follows:
Key:monitor.allowLegacyCPU
Value:true
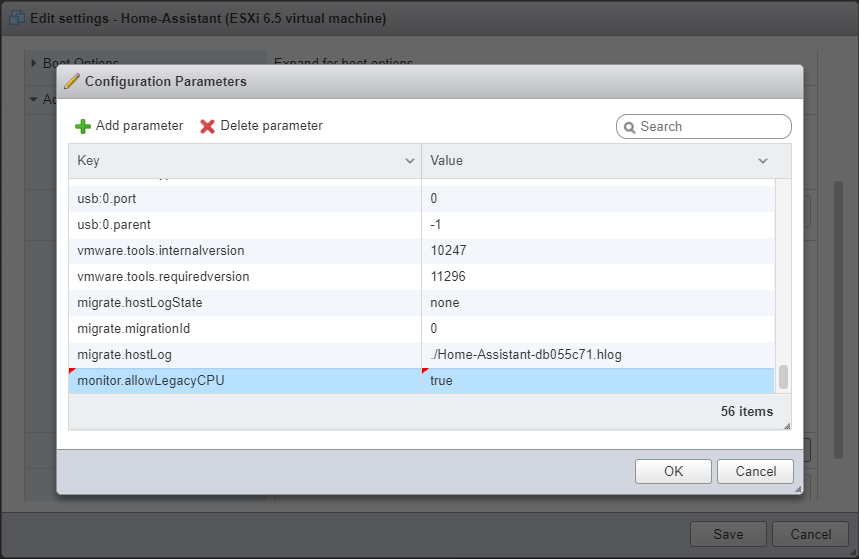
- Click “OK” and “Save”
- The VM should now work, but be patient. It can take a very long time to boot.
I hope this is to good use. Running unsupported is however not recommended, but for uncritical servers why not.
Sources:
- https://www.youtube.com/watch?v=RbHGeN-T-dg
- https://www.virtuallyghetto.com/2020/04/quick-tip-allow-unsupported-cpus-when-upgrading-to-esxi-7-0.html
- https://planetvm.net/blog/?p=3253
- https://www.enterpriseinfosec.net/install-vmware-esxi-7-on-a-r710-with-an-intel-55xx-cpu/
Содержание
- Ошибка установки VMware ESXi: Unsupported CPU
- Русские Блоги
- Процесс установки ESXi6.7 и обработка ошибок
- оглавление
- Предисловие
- Готов к работе
- установка
- Инициализация IOV зависла
- Отсутствие драйвера сетевой карты
- Установите ESXi6.7
- Multiboot could not setup the video subsystem
- Создать виртуальную машину
- В конце концов
- Русские Блоги
- Ошибка сетевых адаптеров при установке esxi
- 1. Причина ошибки
- 2. Подтвердите собственную модель сетевой карты.
- 3. Загрузите драйвер сетевой карты.
- 4. Вставьте драйвер видеокарты в iso файл.
- Виртуализация vSphere, Hyper-V, Xen и Red Hat
- Более 5820 заметок о виртуализации, виртуальных машинах VMware, Microsoft и Xen, а также Kubernetes
- Ошибка CPU_SUPPORT_ERROR при установке виртуального (Nested) VMware ESXi 7 — что делать?
- Виртуализация vSphere, Hyper-V, Xen и Red Hat
- Более 5820 заметок о виртуализации, виртуальных машинах VMware, Microsoft и Xen, а также Kubernetes
- Ошибка «Fatal CPU mismatch on feature» при установке VMware ESXi 7 или 8 на сервер с процессором Intel
Ошибка установки VMware ESXi: Unsupported CPU
Пот установке или обновлении хостов VMware ESXi до 6.7 или 7.x на хостах со старыми моделями процессоров, может появится ошибка Unsupported CPU.
При чистой установке ESXi ошибка выглядит так:
Эта проблема возникает при установке ESXi на сервера с моделями CPU, которые VMware считает устаревшим. В данный момент эта проблема относится к процессорам Intel 6 поколения ( Intel Family 6 ) на микроархитектуре Westmere (выпускались начиная с 2010).
- WSM-EP, Westmere-EP (2C) – шестиядерные Core i7-990X, Core i7-980X, Xeon 36xx, Xeon 56xx
- WSM-EX, Westmere-EX (2F) – десятиядерные E7-x8xx-series
В частности, я столкнулся с этой проблемой на сервере HP ProLiant DL380 G6 с Intel Xeon E5520.
Для запуска ESXi на серверах со старыми моделями процессоров, нужно добавить в меню загрузки ESXi параметр “allowLegacyCPU=true”.
Для этого нажмите при загрузке Shift+O и выполните команду:
> cdromBoot runweasel allowLegacyCPU=true
Однако этот параметр будет действовать только до следующей перезагрузки хоста ESXi. Поэтому нужно добавить его в файл boot.cfg. Этот файл находится в корне одного из системных разделов.
Подключитесь к хосту ESXi по SSH и найдите файл boot.cfg:
# find / | grep boot.cfg
В моем случае я нашел два таких файла (/bootbank/boot.cfg и /altbootbank/boot.cfg), поэтому отредактировал оба. Нужно добавить опцию allowLegacyCPU=true в параметре kernelopt. Например, у меня получился такой файл:
Однако может появится другая ошибка, когда вы попытаетесь запустить виртуальную машину на таком хосте ESXi.
Для решения этой проблемы, нужно добавить специальный параметр в конфигурационный vmx файл виртуальной машины:
- Выберите ВМ ->Edit
- Перейдите в VM Options ->Advanced ->Edit Configuration
- Нажмите Add parameter и добавьте строку monitor.allowLegacyCPU = true

- После этого вы сможете включить виртуальную машину.
Источник
Русские Блоги
Процесс установки ESXi6.7 и обработка ошибок
оглавление
- Инициализация IOV зависла
- Отсутствие драйвера сетевой карты
- Установите ESXi6.7
- Multiboot could not setup the video subsystem
- Создать виртуальную машину
- В конце концов
Предисловие
ESXi устанавливается непосредственно на физический сервер («голое железо») и делится на несколько логических серверов, а именно на виртуальные машины. По сравнению с обычной ОС на персональных компьютерах, установите программное обеспечение виртуальных машин, такое как VMware Fusion, а затем выделите пространство для создания виртуальных машин. Машина. ESXi больше используется для серверов и более эффективна.
Готов к работе
- win7
- u диск
- ESXi зеркало
- Драйвер сетевой карты
- Программное обеспечение для переупаковки изображений
- u программа для записи дисков
Позвольте мне объяснить одно за другим:
- Win7 используется для запуска программы для переупаковки образов ESXi-Customizer и программы записи на дискету.
- Флэш-накопитель USB используется для записи образа ESXi.
- Для загрузки зеркала требуется учетная запись vmware,Зеркальный адрес загрузки
- При установке ESXi обычно отсутствуют драйверы сетевой карты, поэтому их можно упаковать только вручную.Адрес загрузки драйвера сетевой картыЯ под net55-r8168.
- Программное обеспечение для переупаковки образов ESXi-Customizer используется для упаковки драйвера в образ. Используется ESXi-Customizer-v2.7.2. Он немного устарел, но все еще прост в использовании. Обратите внимание, что его можно запустить только под win7, но не под win10.
- U дискеты с программным обеспечением для записи дисков не упоминаются, другие программы для записи также в порядке.
установка
Инициализация IOV зависла
Если вы используете Core Duo 4-го поколения, вы столкнетесь с первой ошибкой. Вы застряли при инициализации IOV. Решение состоит в том, чтобы удерживать shift + O перед входом. Затем введите noIOMMU , Обратите внимание, что в начале есть пробел. Нажмите Enter.

После установки, перед запуском нужно shift + O. Затем введите noIOMMU
Наконец, после входа в систему, интерфейс управления> F2 входит в конфигурацию> вход> параметры устранения неполадок> включить Esxi Shell> alt + F1> войти> выполнить
alt + F2 exit, а затем вы можете отключить оболочку ESXI.
Отсутствие драйвера сетевой карты
Если вы используете официальный образ, то у 80% из них отсутствует драйвер сетевой карты. Вы увидите следующую картину:

Для этого нужны инструменты, упомянутые ранее, вручную загрузить драйвер и упаковать его в зеркало. Это несложно, поэтому я не буду вдаваться в подробности.
Установите ESXi6.7
Затем вы можете начать настоящую установку, просто следите за процессом, это не сложно.


После завершения клиент может получить доступ к серверу по ip.

Multiboot could not setup the video subsystem
Как правило, после завершения установки вы увидите эту ошибку перед загрузкой. Основная причина заключается в том, что разрешение не достигнуто, и вам необходимо войти в BIOS для настройки. Найдите CSM Configuration> Video и перейдите на UEFI.
Создать виртуальную машину
Создание виртуальной машины аналогично обычной работе программного обеспечения виртуальной машины: в два этапа загружается образ на сервер, а затем создается соответствующая виртуальная машина.


В конце концов
Общий процесс не является громоздким, но некоторые ошибки являются головной болью. Мне нравится помнить, что он нравится, и до встречи в разделе комментариев, если у вас есть комментарии или предложения.
Источник
Русские Блоги
Ошибка сетевых адаптеров при установке esxi
содержание
При установке esxi могут возникнуть следующие ситуации
1. Причина ошибки
Сообщение об ошибке: Нет сетевых адаптеров
Описание ошибки: не найден драйвер сетевой карты. Это связано с тем, что драйвер сетевой карты текущего устройства не добавлен в сам файл iso, и вам необходимо вручную импортировать драйвер вашей собственной сетевой карты.

2. Подтвердите собственную модель сетевой карты.
(Если вы не можете использовать команду для подтверждения модели сетевой карты, вы можете выбрать инструмент обнаружения оборудования в системе PE Лао Маотао, чтобы проверить, какая модель сетевой карты)
У меня здесь две сетевые карты, одна проводная сетевая карта Realtek 8111/8168/8411 И беспроводная сетевая карта Broadcom Limited BCM4313 , Независимо от использования беспроводной связи, импортируется только драйвер 8111.
3. Загрузите драйвер сетевой карты.
Посмотрите на картинку ниже, чтобы найти свою собственную сетевую карту

Нажмите, чтобы скачать драйвер сетевой карты в формате VIB

4. Вставьте драйвер видеокарты в iso файл.
Необходимо использовать программное обеспечение ESXi-Customizer-v2.7.2
ESXi-Customizer После завершения загрузки дважды щелкните, чтобы открыть его, и он будет автоматически распакован, чтобы получить следующие файлы:

Суффикс .cmd Это файл запуска, который представляет собой сценарий. По умолчанию этот сценарий может поддерживать только win8.1. Пользователи Win10 сообщат об ошибке при его открытии:

В настоящее время мы используем текстовый редактор для редактирования файла ESXi-Customizer.cmd.
Добавьте код красного поля ниже и сохраните

Затем повторно запустите файл ESXi-Customizer.cmd.

Если вы не видите этот файл при выборе файла VIB, см. Изображение ниже.

Первый выбирает официальный исходный iso-файл образа, второй — это загруженный каталог диска (файл VIB), а третий — выходная папка ( Примечание: iso-файл будет регенерирован здесь, мы используем этот iso-файл для установки esxi) , После его выбора нажмите RUN, чтобы завершить его одним ключом, что очень удобно.
Если вы считаете, что приведенная выше конфигурация слишком громоздка, бывает, что ваша сетевая карта r8168 Вы можете использовать ссылку ниже, чтобы скачать напрямую
Источник
Виртуализация vSphere, Hyper-V, Xen и Red Hat
Более 5820 заметок о виртуализации, виртуальных машинах VMware, Microsoft и Xen, а также Kubernetes

VM Guru / News / Ошибка CPU_SUPPORT_ERROR при установке виртуального (Nested) VMware ESXi 7 — что делать?
|
Ошибка CPU_SUPPORT_ERROR при установке виртуального (Nested) VMware ESXi 7 — что делать?Реклама: При развертывании новой версии платформы VMware vSphere 7 в виртуальной машине (вложенные/nested ESXi) на серверах со старыми процессорами вы можете столкнуться с тем, что ваш CPU не поддерживается со стороны платформы: CPU_SUPPORT ERROR Такая ситуация, например, произошла у Rajesh Radhakrishnan на сервере HP 380 G7, где он развертывал виртуальный ESXi 7.0 на платформе vSphere 6.0 Update 3:
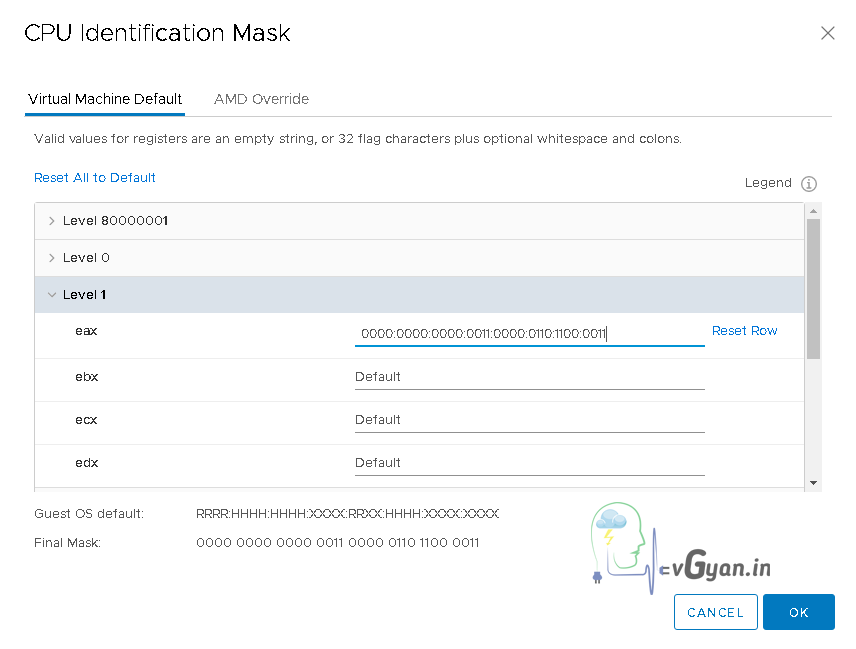
В этом случае вы все равно можете установить гипервизор ESXi седьмой версии. Для этого вам надо открыть настройки виртуальной машины:
В разделе CPUID Mask нажать ссылку Advanced и далее вбить в регистре eax для Level 1 следующие значения:
После этого включайте ВМ, где будет установлен ESXi 7, и проходите до конца установки:
После этого ваш ESXi 7 спокойно загрузится. Затем нужно откатить маскирование функций CPU к исходной чистой конфигурации, удалив значение регистра eax:
Обратите внимание, что такая конфигурация не поддерживается в производственной среде! Поэтому используйте такие виртуальные ESXi 7 только для тестирования и других некритичных задач. Источник Виртуализация vSphere, Hyper-V, Xen и Red HatБолее 5820 заметок о виртуализации, виртуальных машинах VMware, Microsoft и Xen, а также Kubernetes |
|
VM Guru / News / Ошибка «Fatal CPU mismatch on feature» при установке VMware ESXi 7 или 8 на сервер с процессором Intel |
Ошибка «Fatal CPU mismatch on feature» при установке VMware ESXi 7 или 8 на сервер с процессором IntelРеклама: Как написали коллеги с сайта virten.net, при установке платформы VMware ESXi 7 или 8 на сервер с процессорами Intel Core 12 поколения возникает розовый экран смерти (PSOD), содержащий следующие сообщения: HW feature incompatibility detected; cannot start Fatal CPU mismatch on feature «Hyperthreads per core» Проблема здесь заключается в том, что новая архитектура процессоров Intel идет с ядрами двух типов — Performance-cores и Efficient-cores. Начиная с vSphere 7.0 Update 2, в ядро гипервизора был добавлен параметр cpuUniformityHardCheckPanic для того, чтобы избежать подобной проблемы, которая проявляется в следующих версиях платформы виртуализации:
1. Итак, в самом начале установки ESXi нажимаете SHIFT+O, чтобы изменить параметры загрузки. Далее в появившейся строке вводите: cpuUniformityHardCheckPanic=FALSE
2. После этого нажимаете Enter и дожидаетесь окончания установки. 3. Затем во время первой загрузки опять нажимаете SHIFT+O и вводите ту же самую строчку. 4. А уже когда гипервизор загрузится, нужно добавить следующую строчку в параметры ядра, чтобы отключить проверку, а ESXi не вылетал в розовый экран при каждой загрузке: # esxcli system settings kernel set -s cpuUniformityHardCheckPanic -v FALSE Также есть метод, описанный для установки через механизм автоматизированного развертывания Kickstart: 1. Создаем флэшку USB с ISO-образом ESXi, как написано здесь. 2. Открываем файл /efi/boot/boot.cfg в редакторе и добавляем следующую опцию в строчку kernelopt= параметров ядра: ks=usb:/KS.CFG cpuUniformityHardCheckPanic=FALSE
3. Далее вам надо создать файл /KS.CFG для конфигурации Kickstart и в секциях %post (пост-параметры установки, но до первой загрузки) и %firstboot (первая загрузка) добавить следующее: 4. Далее можете провести установку с USB-флэшки, а через пару минут вы уже сможете получить доступ к ESXi через консоль или по SSH. 5. Если вы используете механизм Secure Boot, то обычно секция %firstboot не применяется (так работает по умолчанию на большинстве систем). Поэтому вам потребоваться ввести команды этой секции вручную или отключить Secure Boot. С командами раздела %post все будет в порядке. 6. По окончании установки через Kickstart все будет работать: Источник Adblock |


VMware vSphere 7.0 and ESXi 7.0 raised the requirements when it comes to CPU and CPU compatibility. As with any major version of ESXi, there are new CPUs that are supported as well as old CPUs that are reaching the end of support.
Contents
- ESXi 7.0 hardware requirements
- ESXi 7.0 unsupported CPUs
- Check the CPU model in the VMware Compatibility Guide
- Workarounds
- Conclusion
- Author
- Recent Posts

Vladan Seget is an independent consultant, professional blogger, vExpert 2009-2021, VCAP-DCA/DCD and MCSA. He has been working for over 20 years as a system engineer.
This basically means that if you have an older system that has an older CPU, you should check whether this system will be supported with ESXi 7.0. Today’s article is focused on vSphere 7.0 and unsupported CPUs.
Before upgrading your ESXi to 7.0, you have to upgrade your vCenter Server. Here is our detailed article: How to Upgrade to vCenter 7.0
When you try to install ESXi 7.0 on a server with an unsupported CPU, you’ll see a message like this.
VMware ESXi unsupported CPU message
However, there is also a workaround that allows you to bypass the ESXi unsupported CPU check. We’ll talk about this later because the workaround is unsupported by VMware.
ESXi 7.0 hardware requirements
- CPU details: VMware ESXi0 basically needs a CPU with at least two CPU cores, which is the majority of CPUs today.
- BIOS Settings: NX/XD bit to be enabled for the CPU in the BIOS.
- 4 Gb of RAM: This is the bare minimum, but as virtualization needs memory for your VMs, the more you have, the better.
- Modern Guest OS: If you want to run 64-bit VMs, you’ll need support for Intel VT-x or AMD RVI, which must be enabled on x64 CPUs within the BIOS.
- Boot Device: 8 GB for USB or SD devices, and 32 GB for other device types such as HDD, SSD, or NVMe.
- Storage: SCSI, SATA via supported storage controller.
Note: Due to changes in the partitioning scheme, you can no longer revert to the previous version of ESXi (via SHIFT-R). This was always the case with VMware ESXi; however, now, you’d have to create a backup of the boot device before the upgrade.
ESXi 7.0 unsupported CPUs
There are two family models that are no longer compatible and won’t work under ESXi 7.0. Those CPUs were basically made during the 2010 era, so it’s about time for them to retire.
- Intel Family 6, Model = 2C (Westmere-EP)
- Intel Family 6, Model = 2F (Westmere-EX)
The Westmere-EP architecture was based on two- to six-core CPUs, while Westmere-EX was a ten-core CPU model. This was Intel’s CPU architecture right after Nehalem (my first lab). It was about 10 years ago, yes.
Now you might wonder how to easily check whether the CPU is compatible and supported or not.
Check the CPU model in the VMware Compatibility Guide
You can check the CPU by going to the compatibility page at VMware.
From the list selection, you can select the ESXi model and CPU series. Then hit the Update and View Results button.

Select ESXi 7.0 and your CPU model
The page will refresh and show you the results of the server model with the CPU and supported ESXi 7.0 version.
If you don’t see any results, your CPU is not supported. Try with a newer CPU if you think you’re having issues.
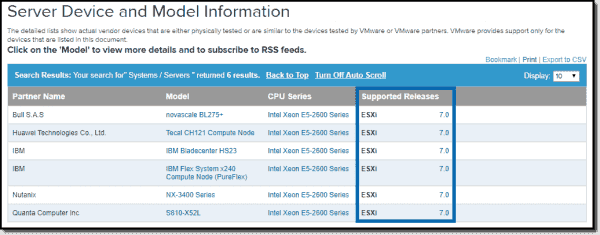
Server device and model information
Workarounds
Are there workarounds? Yes, of course. The first is advice to someone who is looking to run VMware virtualization software on older hardware. If your hardware is 4–5 years old, you might hit the limit of compatibility (or you will soon), but for now, you should still be able to run ESXi 7.0.
If your system is not listed on the VMware compatibility page, you can still run your ESXi 7.0 on it, but don’t expect Support to help you out if you hit some hard problem.
You can still run some less critical production workloads or your company monitoring solution on that hardware, but most likely, you’d want to sell this hardware and purchase newer equipment.
If you still want to run an ESXi 7.0 and you know that your CPU is not supported and your installation gets you to the page with an error message, there is a solution.
Disclaimer: Note that I have not personally tested this solution as I don’t have an old CPU to perform the tests. The solution was described in VMware forums and on a few blogs. So, take it or leave it.
You’ll have to be directly at the server console or remotely via ILO, DRAC, or IPMI. When you run the installer, use this shortcut:
Shift + O
(Note: this is the letter «O,» not the zero «0»).
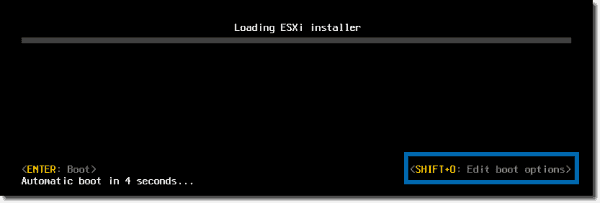
Enter Shift plus O
That changes the screen to the one below and allows you to enter a special parameter that enables you to bypass the validation during the installation/upgrade.
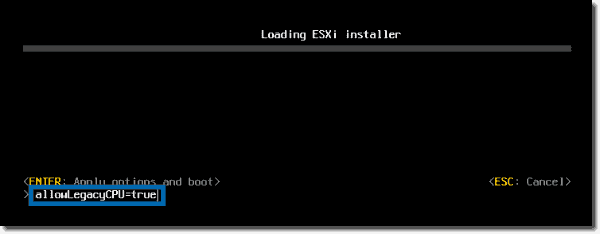
Allow Legacy CPU value
Remember that this is not supported by VMware.
Note that the parameter you entered to bypass the installer will be lost after reboot. If you want to keep this value, you have to edit the boot.cfg file, which is located on the media you’re booting from. You may be booting from a local SATA drive, USB stick, or other media, so it depends on your configuration.
Basically, you have to edit the boot.cfg file located in two places on the boot media. You can find this file in /bootbank/boot.cfg and in /altbootbank/boot.cfg.
There is a «kernelopt» section where you can append this parameter.
Allow Legacy CPU via SSH
This is not advice to proceed or not to proceed. It’s a tip, and you can use it if you want. Personally, as I said, I would not use it to «force» a run on a production system, but this can be a perfect fit on test or home lab systems that still work and that can be used for learning or running test scenarios.
Subscribe to 4sysops newsletter!
Conclusion
As you can see, checking the hardware for compatibility on the VMware site isn’t difficult. It might also be interesting to check for network interface cards (NICs), as with ESXi 7.0, many legacy Linux drivers have been phased out. As those drivers were necessary to run, for example, many Realtek-based NICs, it seems those will no longer work under ESXi 7.0. But you can still upgrade your NICs to supported ones or seek another workaround if there is one. Good luck.
Hi All,
With the recent release of vSphere 6.7 many of us who built home lab environments just hit a dead end on the upgrades due to CPU incompatibilities. Taking the fact that some of us have built quite extensive versions of the labs with rather expensive equipment, it makes a situation even more difficult, since if we would like to upgrade all the back-end equipment then this would require tremendous financial support which we usually can’t get out of nowhere. So I was thinking about some potential workarounds with hopes that some of you may pop into this discussion and provide additional ideas.
In my lab I have various types of machines some of which are fully supported at this time for running ESXi 6.7 but the question of «until when ?» is always out there. So far I managed to run most of my hardware up till ESXi 6.5 without any issues regardless of the warning message that my CPU’s are falling into the scope of unsupported stuff, but oh well we never care about such warnings when it comes to home labs right ? 
Anyway so my stuff is organized as follow. I have one ESXi Cluster based on Xeon E5-2620 CPU’s which runs absolutely fine with ESXi 6.7, however I have another ESXi Cluster based on older Intel Core i7-950 CPU’s and I’m using it for testing some vCloud Director related VCD features. Unfortunately this second cluster definitely doesn’t fall into the scope of upgrading it to ESXi 6.7 and for my worst luck it just refused to boot up when I tried to enforce it to v6.7 via the offline-depot upgrading method. The machines were always getting back to the black screen stating that my CPU type is unsupported.
Personally I’m not very happy with VMware’s decision on completely dropping out the older CPU’s because this seriously limits the options for home labs and frankly I don’t even think we usually test the most complex features requiring the additional hardware support. Of course I agree to some extend with the decision to limit support for extremely old machines and especially when it comes to production environment, but on the contrary I have another very old ESXi cluster based on Intel Core 2 Quad Q9550 CPU’s which still totally works with ESXi 6.5 and I’m using it occasionally for testing out vCloud Edge related services. So I found it kinda unnecessary that VMware went too drastic on this decision instead of letting the home-lab users to test out on their own equipment what may or may not work. Anyway…
So in my case upgrading the hardware from scratch on at least two cluster of 3 machines to new generation is totally going to drain my finances and therefore I started to look for some workarounds to this. My main idea here was to try the nested-virtualization method by installing ESXi 6.7 on the top of ESXi 6.5 layer and enforce the VM via CPUID modifications to actually think that it does have a supported CPU class underneath. I took the approach by making a test VM on one of my Intel Core i7-950 CPU based machines (still running ESXi 6.5). When I boot the VM and try to install ESXi 6.7 the obvious result was this one:

At this point I decided to play around a bit with the EAX registers and implement a mask that would enforce ESXi 6.7 to think the VM has a different CPU model and stepping. Since my knowledge on CPUID implementation is somewhat limited I just decided to take the EAX register from one of my Intel E5-2620 based hosts instead:

Once I applied the mask, I was able to install ESXi 6.7 without any issues. I didn’t even have to rebrand the CPU via the 0x80000002 registers in order to be able to install the new OS, so it seems that ESXi 6.7 is primarily looking at the CPU Family ID, model and stepping for the initial CPU identification procedure.

While this method is not ideal at all (in fact it’s a very ugly workaround) at least it provided the option to install the new OS and therefore to put hands on the basic functionality. Not sure if this method is suitable for nested virtualization, but if I get some time I’ll definitely test it out. I suppose the EAX registers could be tweaked a bit better in order to be able to support certain set of features, so if anyone has a good idea on how to craft a better CPUID EAX registers purely for lab uses with as much compatibility on features as possible, feel free to put your magic in this thread.
Any other workarounds on running ESXi 6.7 on unsupported CPU’s are also very much welcomed.
ESXi 7.0 CPU_SUPPORT_ERROR; Nested ESXi On Unsupported CPU
Hi all,
As you all know VMware recently released vSphere 7.0 and I was trying to explore what’s new with the latest release. Based on the new prerequisites to setup ESXi 7.0 in the nested environment, I have encountered CPU compatibility issues and it stops my home lab deployment.
In this article, we will discuss the steps to resolve the CPU_SUPPORT_ERROR which may come while installing nested ESXi 7.0 on your unsupported hardware. Most of the time this issue comes when we try to install nested ESXi 7.0 on top of legacy hardware.
I have a few HP 380 G7 rack servers running with vSphere 6.0 and I got CPU_SUPPORT ERROR error while installing nested ESXi 7.0. find the below screenshot for more reference.
Error: CPU_SUPPORT_ERROR: The CPU in this host is not supported by ESXi 7.0.0
Here is the solution for Install the ESXi 7.0 on unsupported legacy hardware.
- Shutdown the Nested ESXi 7.0 virtual machine.
- Right-click on the Virtual Machine and Edit Settings.
- Navigate to CPUID Mask option and Click on Advanced.
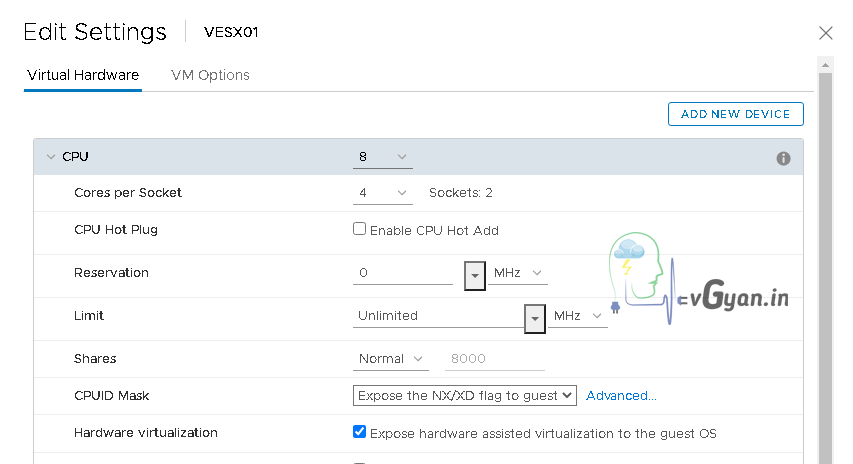
On the Level 1 field use the following into the EAX field based on the base hardware.
- Intel CPUs: 0000:0000:0000:0011:0000:0110:1100:0011
- AMD CPUs: 0000:0000:0110:0000:0000:1111:0001:0000

In my scenario, I am using Intel CPU code, paste the code the Click OK.
Now boot your nested ESXi 7.0 virtual machine and start the installation and it will be succeeded.
Finally, Nested ESXi 7.0 VM installed and booted.

Next, we have to remove the CPU ID set for the nested ESXi 7.0 virtual machine.
- Shutdown the Nested ESXi 7.0 virtual machine.
- Right-click on the Virtual Machine and Edit Settings.
- Navigate to CPUID Mask option and Clik on Advanced.
From Level 1, click Reset Row to Default and click OK.
Now the CPU ID returned to normal, time to explore the new features.
That’s all guys.. will discuss more on vSphere 7.0.0 in an upcoming post, stay tuned… 
I hope you enjoyed reading this post. Feel free to share this with others if it is worth sharing!!!
Follow vGyan on Facebook, Twitter, and YouTube!!!

Leave a comment Hide comments
Если при попытке установки или обновления появилась ошибка Unsupported CPU, то не все так плохо. Расскажем как запустить ESXI 6.7 или 7.x на неподдерживаемых CPU.
Как выглядит эта ошибка Unsupported CPU на ESXI
VMB: 611:
Unsupported CPU: Intel family 0x06, model 0x1a, stepping 0x5
Intel(R) Xeon(R) CPU		E5520  @ 2.27GHz
See http://www.vmware.com/resources/compatibility
Можно загрузить ESXI все равно, если в меню загрузки нажать Ctrl+O, а затем дописать параметр “allowLegacyCPU=true”
Выглядит это так:
<ENTER: Apply options and boot>
> cdromBoot runweasel allowLegacyCPU=true
Однако после перезагрузки хоста этот параметр придется снова добавлять таким же способом… Поэтому необходимо его поместить в файл boot.cfg в строке, которая начинается с “kernelopt=”. Находится этот файл в корне одного из системных разделов. Через ssh можно найти этот файл так:
# find / | grep boot.cfg
У меня нашло два таких файла, я в двух и добавил этот параметр. Должно получиться что-то такое:
bootstate=0
title=Loading VMware ESXi
timeout=5
prefix=
kernel=b.b00
kernelopt=autoPartition=FALSE allowLegacyCPU=true
modules=jumpstrt.gz --- useropts.gz --- features.gz --- k.b00 --- uc_intel.b00 --- uc_amd.b00 --- uc_hygon.b00 --- procfs.b00 --- vmx.v00 --- vim.v00 --- tpm.v00 --- sb.v00 --- s.v00 --- bnxtnet.v00 --- bnxtroce.v00 --- brcmfcoe.v00 --- brcmnvme.v00 --- elxiscsi.v00 --- elxnet.v00 --- i40en.v00 --- i40iwn.v00 --- iavmd.v00 --- igbn.v00 --- iser.v00 --- ixgben.v00 --- lpfc.v00 --- lpnic.v00 --- lsi_mr3.v00 --- lsi_msgp.v00 --- lsi_msgp.v01 --- lsi_msgp.v02 --- mtip32xx.v00 --- ne1000.v00 --- nenic.v00 --- nfnic.v00 --- nhpsa.v00 --- nmlx4_co.v00 --- nmlx4_en.v00 --- nmlx4_rd.v00 --- nmlx5_co.v00 --- nmlx5_rd.v00 --- ntg3.v00 --- nvme_pci.v00 --- nvmerdma.v00 --- nvmxnet3.v00 --- nvmxnet3.v01 --- pvscsi.v00 --- qcnic.v00 --- qedentv.v00 --- qedrntv.v00 --- qfle3.v00 --- qfle3f.v00 --- qfle3i.v00 --- qflge.v00 --- rste.v00 --- sfvmk.v00 --- smartpqi.v00 --- vmkata.v00 --- vmkfcoe.v00 --- vmkusb.v00 --- vmw_ahci.v00 --- crx.v00 --- elx_esx_.v00 --- btldr.v00 --- esx_dvfi.v00 --- esx_ui.v00 --- esxupdt.v00 --- tpmesxup.v00 --- weaselin.v00 --- loadesx.v00 --- lsuv2_hp.v00 --- lsuv2_in.v00 --- lsuv2_ls.v00 --- lsuv2_nv.v00 --- lsuv2_oe.v00 --- lsuv2_oe.v01 --- lsuv2_oe.v02 --- lsuv2_sm.v00 --- native_m.v00 --- qlnative.v00 --- vdfs.v00 --- vmware_e.v00 --- vsan.v00 --- vsanheal.v00 --- vsanmgmt.v00 --- xorg.v00 --- imgdb.tgz --- state.tgz
build=6.7.0-1.25.18828794
updated=1