Содержание
- ИТ База знаний
- Полезно
- Навигация
- Серверные решения
- Телефония
- Корпоративные сети
- Ошибки Cannot open the disk при включении виртуальной машины ESXi
- Неисправности
- Интенсив по Виртуализации VMware vSphere 7
- Решение
- System cannot find the file specified
- The parent virtual disk has been modified since the child was created
- Дополнительная информация
- Интенсив по Виртуализации VMware vSphere 7
- Полезно?
- Почему?
- Disk is error free esxi
- Описание проблемы
- Методы решения
- Когда есть остатки снапшотов
- Blog of Khlebalin Dmitriy
- (Дорогу осилит идущий…)
- Cannot open the disk or… VMware ESX cannot find the virtual disk… в VMware vSphere 6.7.
- Ошибка при запуске виртуальной машины — vmware esx cannot find the virtual disk
ИТ База знаний
Курс по Asterisk
Полезно
— Узнать IP — адрес компьютера в интернете
— Онлайн генератор устойчивых паролей
— Онлайн калькулятор подсетей
— Калькулятор инсталляции IP — АТС Asterisk
— Руководство администратора FreePBX на русском языке
— Руководство администратора Cisco UCM/CME на русском языке
— Руководство администратора по Linux/Unix
Навигация
Серверные решения
Телефония
FreePBX и Asterisk
Настройка программных телефонов
Корпоративные сети
Протоколы и стандарты
Ошибки Cannot open the disk при включении виртуальной машины ESXi
Не удается открыть диск

Неисправности
Вы не можете запустить виртуальную машину и получаете сообщения об ошибках зависимости диска и отсутствии файла.

Интенсив по Виртуализации VMware vSphere 7
Самое важное про виртуализацию и VMware vSphere 7 в 2-х часовом онлайн-интенсиве от тренера с 30-летним стажем. Для тех, кто начинает знакомство с виртуализацией и хочет быстро погрузиться в предметную область и решения на базе VMware
- В случае отсутствия файлов вы видите такие ошибки, как:
- В случае отсутствия файлов, в файле vmware.log виртуальной машины есть сообщения, похожие на:
- В случае сбоя зависимости снимка диска, в файле vmware.log виртуальной машины не будет ошибки «Невозможно найти указанный файл» (cannot find the file specified), но Вы увидите сообщения о том, что родительский виртуальный диск был изменён:
Эти ошибки могут возникать, если дескриптор диска виртуальной машины (VMDK) или файл данных отсутствуют или цепочка снимков стала несовместимой.
Решение
Это решение разбито на 2 части, в зависимости от проблемы:
- Вы не можете запустить виртуальную машину из-за ошибки system cannot find the file specified (Система не может найти указанный файл) или других ошибок, например — file not found (Файл не найден).
- Вы не можете запустить виртуальную машину из-за того, что the parent virtual disk has been modified since the child was created (Родительский виртуальный диск был изменён с момента создания дочернего диска).
System cannot find the file specified
Вы должны убедиться, что файлы диска виртуальной машины представлены должным образом.
- Для каждого диска, включая снимок диска, должен быть файл дескриптора в виде vmName.vmdk
- Кроме того, для базового диска также должен существовать файл с расширением flat.vmdk или separse.vmdk в виде vmName-flat.vmdk или vmName-separse.vmdk .
- Для снимка диска, должен быть файл с разрешением delta.vdmk или sesparse.vmdk в виде vmName-######-delta.vmdk или vmName-######-separse.vmdk .
Если файлы дескриптора отсутствуют, то Вам необходимо создать их заново.
Если файлы данных (-flat, -delta или –sparse) отсутствуют, возможно, потребуется восстановить виртуальную машину из резервной копии.
The parent virtual disk has been modified since the child was created
Эта проблема обычно возникает из-за несоответствия идентификатора содержимого (CID). Чтобы устранить несоответствие CID, необходимо отредактировать файлы дескрипторов VMDK, чтобы обеспечить согласованность цепочки снимков.
Дополнительная информация
Для дисков RDM не будет файла –flat или –sesparse для базового диска. Физический режим RDM будет иметь файл в виде vmName-rdmp.vmdk . Виртуальный режим RDM будет иметь файл в виде vmName-rdm.vmdk .
Если дескриптор RDMA отсутствует, его также можно создать заново.
Интенсив по Виртуализации VMware vSphere 7
Самое важное про виртуализацию и VMware vSphere 7 в 2-х часовом онлайн-интенсиве от тренера с 30-летним стажем. Для тех, кто начинает знакомство с виртуализацией и хочет быстро погрузиться в предметную область и решения на базе VMware
Полезно?
Почему?
😪 Мы тщательно прорабатываем каждый фидбек и отвечаем по итогам анализа. Напишите, пожалуйста, как мы сможем улучшить эту статью.
😍 Полезные IT – статьи от экспертов раз в неделю у вас в почте. Укажите свою дату рождения и мы не забудем поздравить вас.
Источник
Disk is error free esxi
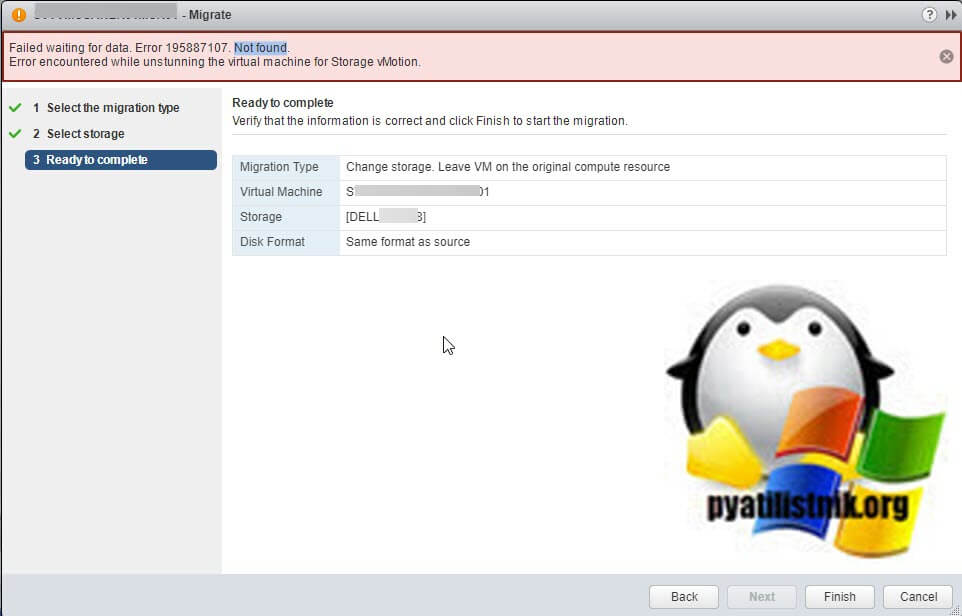
Добрый день! Уважаемые читатели и гости IT блога Pyatilistnik.org. В прошлый раз мы с вами успешно установили гипервизор ESXI 6.5. Сегодня я вам покажу очень интересную ситуацию в которую я попал несколько дней назад. Потребовалось мне с мигрировать виртуальную машину с одного датастора на другой, вроде бы простая операция, но она у меня выскочила с ошибкой «Failed waiting for data. Error 195887107. Not found«. Давайте я покажу причины и решение данной проблемы.
Описание проблемы
Как я и писал выше мне нужно было сделать storage migration, в результате мне мой vCenter Server 6.5 выдал сообщение:
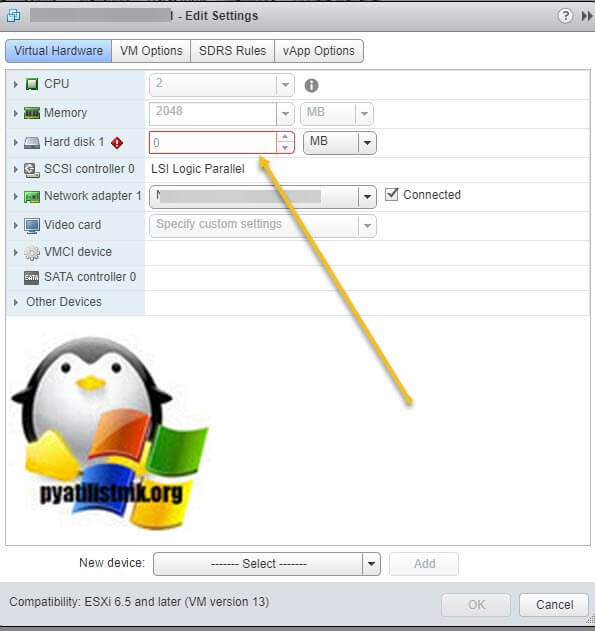
Если зайти в свойства данной виртуальной машины, то вы увидите, что у вашего виртуального диска размер 0 МБ.
Я начал разбираться в данном вопросе в плане поиска причины и нашел несколько вариантов:
- У вас криво ранее смигрировались файлы виртуальной машины
- Причиной могла быть система резервного копирования Veeam Backup & Replication, которая не смогла удалить снапшот или криво его сделала. Простой пример у вас делалось задание резервного копирования, и в этот момент вы мигрировали ее, в результате Veeam может натворить дел
- Третья проблема, это ранее созданные ручные снапшоты, которые могли быть неправильно удалены или слиты, ниже я рассмотрю все варианты.
Методы решения
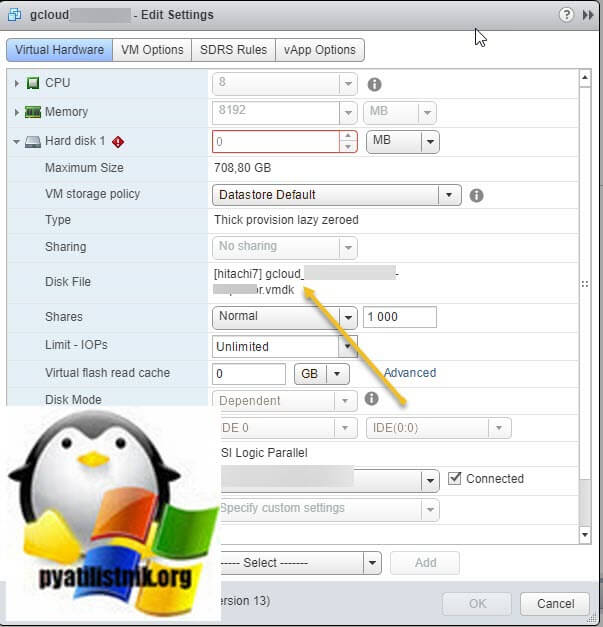
Первым делом вам нужно зайти на датастор на котором у вас лежит ваша виртуальная машина и сделать просмотр файлов. Для того, чтобы удостовериться, что виртуальная машина располагает виртуальные диски именно там, я вам советую проверить информацию в дополнительных свойствах виртуального диска и посмотреть поле «Disk File«.
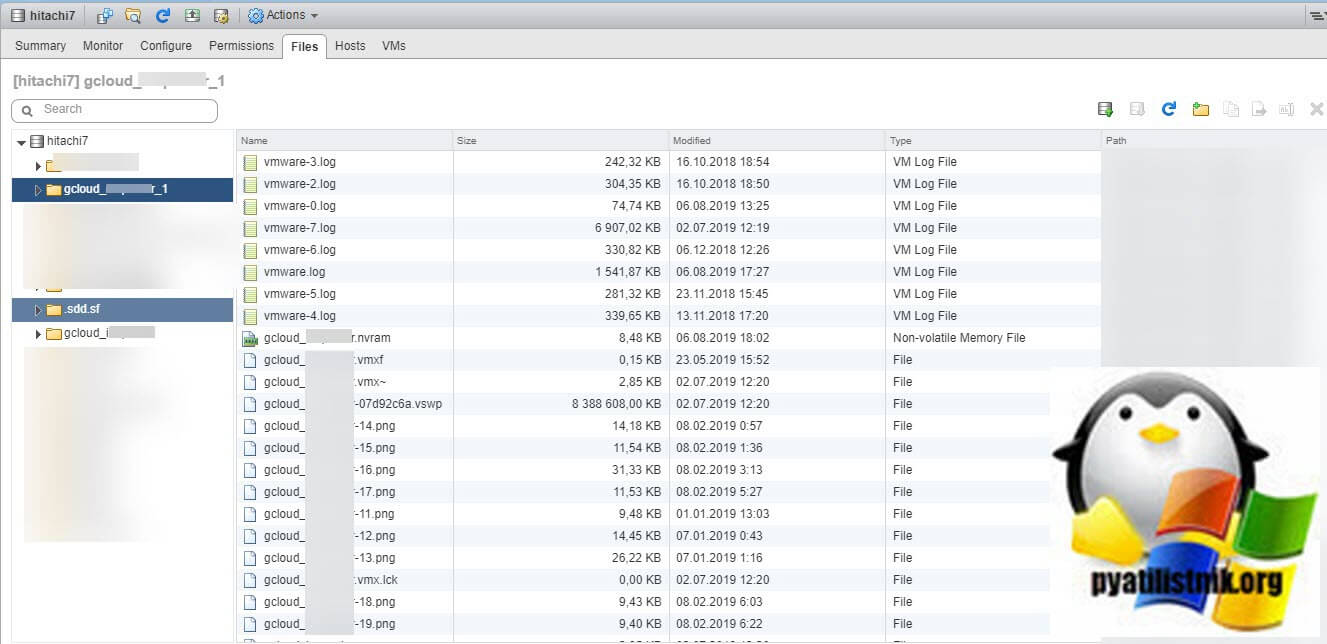
Открыв свой датастор я увидел, что у меня виртуальная машина имеет две папки, первая имеет просто название виртуальной машины, а вторая добавляет в название _1.
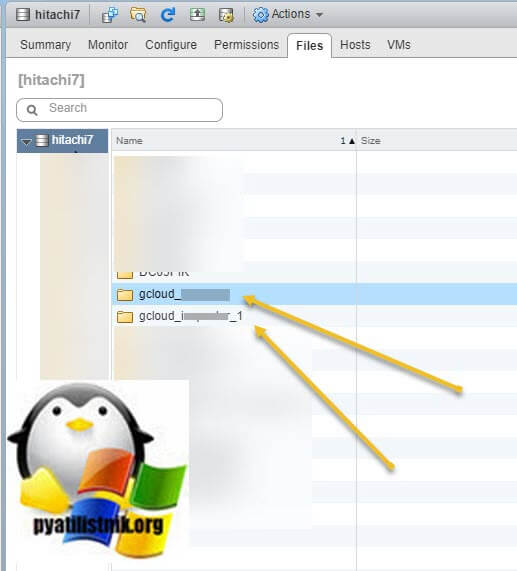
Папка с нормальным именем содержала виртуальный диск виртуальной машины.
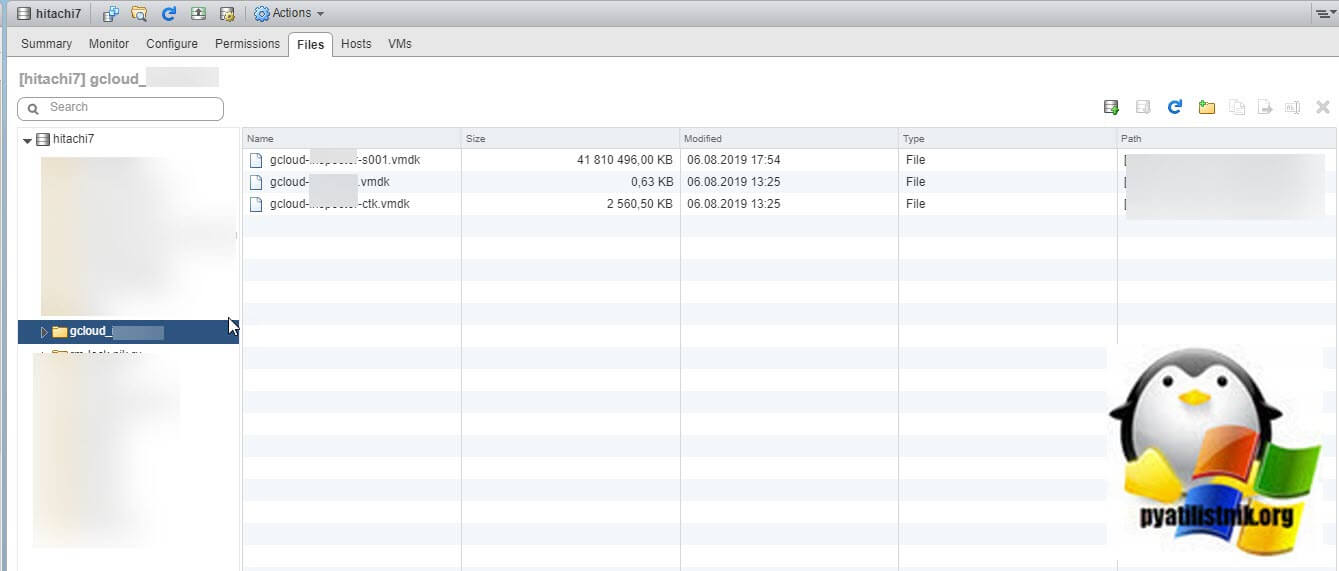
А вот папка с префиксом _1 уже содержала остальные файлы, среди них конфиг vmx, своп файл и многое другое (Про структуру файлов виртуальной машины ESXI читайте по ссылке).
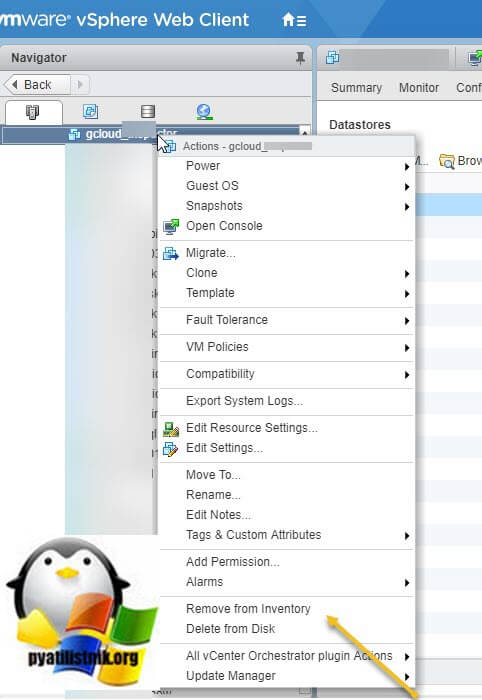
Согласитесь, что ситуация не правильная, не только исходя из того, что я не могу мигрировать виртуальную машину на другие диск, так еще и перестало работать задание по резервному копированию или я не могу на живую произвести расширение диска у виртуалки. При таком сценарии поправить все очень просто. Выключаем виртуальную машину. Нам необходимо вручную перенести конфигурационные файлы из папки с префиксом _1 в основную. Для этого на выключенной виртуалке щелкните правым кликом и выберите пункт «Remove from inventory«, чтобы удалить именно из списка, а не с диска.
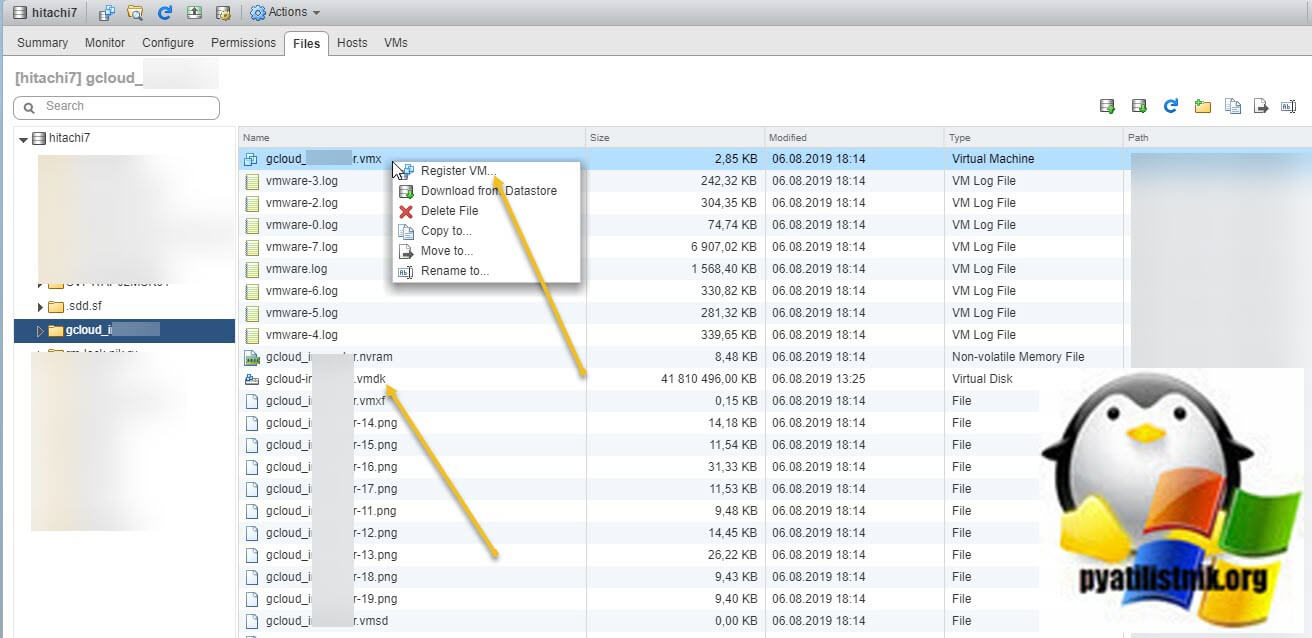
Далее вы переносите нужные файлы, после чего необходимо заново зарегистрировать виртуальную машину. Для этого кликаем по файлу с расширением vmx и выберите пункт «Register VM«. Указываем нужный датастор и хост Vmware ESXI на котором будет зарегистрирована виртуалка.
В результате чего я получил работоспособную виртуальную машину у которой исчезла проблема с нулевым отображение размера ее виртуального диска и ошибка «Failed waiting for data. Error 195887107. Error encountered while unstunning the virtual machine for Storage vMotion» исчезла.
Когда есть остатки снапшотов
Снапшоты — это состояния системы на момент создания, хранятся в виде файлов flat.vmdk, это по сути дельты от основного виртуального диска. Бывают ситуации, что у вас по какой-то причине хост или vCenter может не видеть их в диспетчере снимков, но на уровне файлов виртуальной машины они есть, в таком случае вы можете попробовать так же выкрутиться, как я и показывал выше. Удалить виртуалку из списка, указав «Remove from inventory». После чего попробовать ее зарегистрировать и желательно на другом хосте. Все ваши снапшоты будут определены в менеджере снимков. Чтобы удостовериться, что виртуальная машина работает со снапшота, достаточно скачать из нее конфигурационный файл vmx, открыть его текстовым редактором и найти пункт, например scsi:0.fileName = «/vmfs/volumes/58c96930-c8f04/searcher/searcher-00010-flat.vmdk». Как видите тут диск имеет приписку -00010-flat.
Еще есть одна возможная операция, если у вас не получится после регистрации увидеть ваши снапшоты. Что вы делаете, включаете ssh у ESXI и подключаетесь через Putty или другую утилиту. Переходим в расположение вашей виртуальной машины.
Источник
Blog of Khlebalin Dmitriy
(Дорогу осилит идущий…)
Cannot open the disk or… VMware ESX cannot find the virtual disk… в VMware vSphere 6.7.
Мой коллега Данила, решил недавно «заморочиться» с файловер кластером Microsoft, на нем же поднять кластер SQL, на нем же настроить кластер 1С. В тестовой среде были подняты две ноды:

И в качестве хранилища баз, обоим нодам был презентован vmdk раздел 2гб (соответственно на сервере он стал диском d: ), где и были размещены базы SQL сервера.
В целом это все нормально работало, до тех пор, пока не решили принудительно средствами VmWare, как это делаем обычно, расширить диск до 15гб. Раздел благополучно расширился, но после его расширения, обе ноды отказались стартовать, выпадая с ошибкой:
Cannot open the disk or… VMware ESX cannot find the virtual disk…
Из данной ошибки видно, что ESX не может найти виртуальный диск .vmdk по сему обе ноды не стартуют.
В базе датастора необходимо найти диск, файл -flat.vmdk, это как раз файл с данными нашего vmdk раздела.
.vmdk -конфиг,
-flat.vmdk — файл с данными.
1) При помощи консоли (ssh или putty) заходим по ssh на ESX хост:
ssh root@
мне проще и быстрее использовать для этого WinSCP:

2) Переходим в папку, в которой находятся файлы нашей виртуальной машины:
cd /vmfs/volumes/ /

3) Теперь нам необходимо узнать точный размер flat диска (здесь в любом случае уже потребуется командная строка):
ls -l -flat.vmdk

Запоминаем текущий размер — 16106127360 (он у вас безусловно будет другим)
4) Далее при помощи команды vmkfstools нужно создать новый (временный) vmdk файл с именем, например, temp.vmdk и точным размером файла flat (то что мы узнали в предыдущем пункте), тип диска выберем thin (тонкий – то есть растущий по мере наполнения его данными) и адаптером lsilogic (его можно не указывать).
vmkfstools -c 16106127360 -d thin -a lsilogic temp.vmdk

Как видно, на картинке, файлы у нас благополучно появились в директории:

5) У вас должно получиться два файла – temp.vmdk и temp-flat.vmdk. Последний файл нам не нужен, удалим его:
rm temp-flat.vmdk
Или просто клавишей Del в WinSCP 🙂

6) Теперь переименуем temp.vmdk в нужное нам название, то есть в .vmdk:
mv temp.vmdk .vmdk
В WinSCP правой кнопкой, «Переименовать».
7) Vmdk файл – это конфигурационный файл диска, соответственно нам необходимо его отредактировать. При помощи редактора VI открываем файл:
vi .vmdk
Находим в нем строчку:
RW 31457280 VMFS «temp-flat.vmdk»
Соответственно изменяем «temp-flat.vmdk» на « .vmdk».

Сохраняемся и выходим из редактора.
Если это была бы обычная виртуальная машина, то проблема была бы решена, но у нас кластер, и для кластера нам необходим другой тип диска и скорее всего при запуске нод, высветится вот такая ошибка:
Самый простой способ «законвертить» его:
В итоге, обе ноды благополучно стартанули с общим диском, но сам кластер Microsoft не завелся сразу, пришлось передобавить этот диск уже в самом кластере, но самое важное данные, и они целы.
Диск должен быть подмонтирован вот таким способом:
Источник
Ошибка при запуске виртуальной машины — vmware esx cannot find the virtual disk
2019-05-23 2019-05-23 Рубрики
Блог (Время на чтение: 1 мин.)
vmware esx cannot find the virtual disk
Перестала запускаться виртуальная машина. В процессе гугления выяснилось, что в каталоге с виртуальной машиной отсутствует файл с конфигурацией. Восстановим (создадим) его.
В VMware vSphere включаем ssh, и коннектимся. Затем переходим в каталог с нашей виртуальной машиной
Смотрим размер flat-диска

При помощи утилиты vmkfstools создаем новый vmdk-файл
После выполнения этого действия в каталоге появится 2 файла:
Удаляем файл с данными
Переименовываем new.vmdk в нужный нам и редактируем его
Находим строку и меняем:
Так же, у меня в каталоге присутствовали файы
Как мне удалось выяснить, это файл с данными и файл конфигурации, которые появились после того, как сделали snapshot
Смотрим содержимое файла конфигурации srv-virtual-010-000002.vmdk
Нас интересуют строки:
Значение parentCID файла srv-virtual-010-000002.vmdk соответствует значению CID файла srv-virtual-010-000001.vmdk
Но файл srv-virtual-010-000001.vmdk у нас отсутствует, и мы в начале статьи создали новый файл конфигурации srv-virtual-010.vmdk
Смотрим его содержимое:
Теперь редактируем файл конфигурации srv-virtual-010-000002.vmdk, в котором меняем значение parentCID и parentFileNameHint
После всех этих манипуляций моя виртуальная машина запустилась
У блога появился хостинг, его любезно предоставила компания Облакотека. Облакотека — облачные сервисы для создания и управления виртуальной ИТ-инфраструктурой.
Если вам понравился мой блог и вы хотели бы видеть на нем еще больше полезных статей, большая просьба поддержать этот ресурс.
Если вы размещаете материалы этого сайта в своем блоге, соц. сетях, и т.д., убедительная просьба публиковать обратную ссылку на оригинал
Источник
Posted by K_9 2015-03-19T20:27:58Z
Hi all;
I have a Windows Server 2008 R2 VM on ESXi 5.1 host managed by vCenter 5.5.
The VM C drive is suffering Event ID 55 (The file system structure on disk is corrupt and unusable. Please run the chkdsk utility on the volume «Drive_letter:»)
CHKDSK fixes the issue for few days, and then the issue occurs again.
Any idea how to check the VMDK disk for errors?
Thank you.
6 Replies
-
The VMDK is just a file that sits on top of another file structure. Is this local disk, SAN or something else?
Was this post helpful?
thumb_up
thumb_down
-

All the storage is on EMC SANs… Is there a way to check the VMDK file integrity «check for errors. Other VMs on the same host are all ok.
Was this post helpful?
thumb_up
thumb_down
-
You run a check disk just as you normally would from within the VM that has the troubled disk attached. If you need to check individual file integrity (VHDx/VMDK’s are just files to begin with) then on VMware ESXi, this is how you do it:
http://kb.vmware.com/selfservice/microsites/search.do?language=en_US&cmd=displayKC&externalI… Opens a new window
Was this post helpful?
thumb_up
thumb_down
-
I know this is old—we have a similar issue happening with a 2008 server on ESX 6.5. Every couple of weeks we get such severe corruption it crashes. Did you ever get it to stop?
Was this post helpful?
thumb_up
thumb_down
-
There is actually a check and repair option now in
VMKFSTOOLS with -x (lowercase) I found it detailed on this website’s page http://www.enterprisedaddy.com/2016/08/use-vmkfstools-virtual-disks/ Opens a new window I don’t know when this was included in the tool, but its worth checking to see if its there for you.
Was this post helpful?
thumb_up
thumb_down


To totally unlock this section you need to Log-in
Login
On a VMware ESX infrastructure (especially during VM migration between two not connected ESX) there could be a tedious scenario: once you have extracted a VM from the old ESX and imported to the new one you realize that the VM’s VMX file is probably corrupted.
Normally, you could (and should) recreate a missing or corrupt VMX file by restoring it from a backup, but it could not work either.
An easy way for recreating a VMX file is usually the usage of VMware Infrastructure Client (VIC), via vSphere Web Portal or via CLI/RCLI: you will recreate a new VM inside the new infrastructure and then you will re-add the VMDK (virtual disks) files to the new VM, or you could also point the new VM’s drives to the existing disk (VMDK) files of the server with the corrupt/missing VMX file.
To begin this process and make things clean we will first remove (not the data) the VM from the VMware Infrastructure clients inventory list (right click on the VM and select Remove from Inventory).
Then to replace a corrupted VMX file you can rename, preferable option, or delete the offending VMX file.
First start the New Virtual Machine Wizard and select a Virtual Machine Configuration type of Custom.

The next screen of the wizard will ask for a Name for the new VM. Make sure the name you type in here matches the name of the directory on your VMFS partition that hosts the VM with the missing/corrupt VMX file.
If you enter in a different name here the New Virtual Machine Wizard will create a directory of that name that will contain the VMX file (along with a couple of other files important to the running of the VM) whilst your disk (VMDK) file(s) could be located in another directory (this is not a real problem but could bring confusion).
Even if there could be situations (very few) where you may want to keep your disk and configuration files separate, you really should keep them all together to reduce the risk of any confusion and accidental moves or deletions of these VM related files.

The next screen of the VM creation process will ask for the location of the datastore (LUN). As mentioned above, in most situations it is best to select the same LUN/Disk on which the VMDK (disk) files are located.

From now on we will go through the next few steps of the process for select and adjust (if required) any of the VM configuration parameters (eg: Guest OS, number of virtual processors, memory, etc).
When you get to the Select a Disk screen then select Use an existing virtual virtual disk and select the primary VMDK boot disk file for the VM with the missing/corrupt VMX file.

Proceed through the rest of the GUI process until you get to the Ready to Complete New Virtual Machine screen. At this point if you wish to add any additional secondary disks then check the Edit the virtual machine settings before submitting box and add in any additional disks, NICs, etc.

Once complete then press the Finish button. Within the VMware Infrastructure Client interface you will now see the newly recreated VM back in the inventory list.
Using the Datastore Browser navigate to the folder of VM and you should now see a freshly created VMX file.

Using CLI for Creating VMX
VMware ESX Server has tools available for command-line creation and cloning of virtual machines. These tools are available via the service console and require that you access the service console with root-level privileges.
As we already know, the .vmx file holds the VM’s configuration which, in the large part, is hardware related. If required, you can edit this file manually using a text editor.
Alternatively, power off the VM and use the vSphere client to affect any changes from the VM’s Configuration Parameters found using right-click on the VM and then choosing Edit Settings.
To create a new dummy, but working, .vmx file we will create a dummy VM named TestVM and stored on the local datastore:
$ vim-cmd vmsvc/createdummyvm testVM [LocalDatastore_001]/testVM/testVM.vmx
Checking:
$ vim-cmd vmsvc/getallvms
Vmid    Name                     File                     Guest OS    Version   Annotation
1      testVM   [LocalDatastore_001] testVM/testVM.vmx   otherGuest   vmx-10
At this point, if we have downloaded and opened the original .vmx file, using a common text editor (such as Notepad++ or anything else) we could see some lines like the following (that represent the first HDD attached to a VM):
scsi0:0.deviceType = "scsi-hardDisk"
scsi0:0.fileName = "EXAMPLE.vmdk"
sched.scsi0:0.shares = "normal"
scsi0:0.present = "TRUE"
Knowing this we could copy and paste/replace, in our new testVM.vmx file, these lines or adapting the testVM.vmx file with info gathered by the old .vmx file (take note that in this example the HDD file will need to be placed in the same folder as the .vmx file).
At this point, with the new testVM.vmx we can try powering on the new dummy VM:
$ vim-cmd vmsvc/power.on 1
Get runtime informations about the running VM:
$ vim-cmd vmsvc/get.runtime 1
Runtime information
(vim.vm.RuntimeInfo) {
   dynamicType = ,
   host = 'vim.HostSystem:ha-host',
   connectionState = "connected",
   powerState = "poweredOn",
   faultToleranceState = "notConfigured",
   dasVmProtection = (vim.vm.RuntimeInfo.DasProtectionState) null,
   toolsInstallerMounted = false,
   suspendTime = ,
   bootTime = "2015-02-04T00:28:55.507435Z",
   suspendInterval = 0,
   question = (vim.vm.QuestionInfo) null,
   memoryOverhead = 36478976,
   maxCpuUsage = 2496,
   maxMemoryUsage = 32,
   numMksConnections = 0,
   recordReplayState = "inactive",
   cleanPowerOff = ,
   needSecondaryReason = ,
   onlineStandby = false,
   minRequiredEVCModeKey = ,
   consolidationNeeded = false,
   featureRequirement = (vim.vm.FeatureRequirement) [
      (vim.vm.FeatureRequirement) {
         dynamicType = ,
         key = "cpuid.SSE3",
         featureName = "cpuid.SSE3",
         value = "Bool:Min:1",
      },
      (vim.vm.FeatureRequirement) {
         dynamicType = ,
         key = "cpuid.SSSE3",
         featureName = "cpuid.SSSE3",
         value = "Bool:Min:1",
      },
      (vim.vm.FeatureRequirement) {
         dynamicType = ,
         key = "cpuid.NX",
         featureName = "cpuid.NX",
         value = "Bool:Min:1",
      },
      (vim.vm.FeatureRequirement) {
         dynamicType = ,
         key = "cpuid.RDTSCP",
         featureName = "cpuid.RDTSCP",
         value = "Bool:Min:1",
      },
      (vim.vm.FeatureRequirement) {
         dynamicType = ,
         key = "cpuid.Intel",
         featureName = "cpuid.Intel",
         value = "Bool:Min:1",
      }
   ],
   vFlashCacheAllocation = 0,
}
Once finished the control we will be able to power it off:
$ vim-cmd vmsvc/power.off 1
And finally we will be able to get informations about the datastore location of VM:
$ vim-cmd vmsvc/get.datastores 1
name                 LocalDatastore_001
url                  /vmfs/volumes/54d15e2c-eeeeeeee-9cff-080027b1c126
capacity             10468982784
freeSpace            9544138752
accessible           1
type                 VMFS
multipleHostAccess   <unset>
Finally, type the following all on one line in the console window to register the new virtual machine with the ESX server:
vmware-cmd -s register "Your Path"/testVM/testVM.vmx
Your Path should be in a similar format to /vmfs/volumes/storage1/.
A returned value of «1» after running this command indicates a successful registration of the virtual machine, so now open up the GUI of your ESX server to verify that the new VM is listed.
If so, you are ready to power on the virtual machine and install your operating system directly from vSphere Client (Web too). You have successfully created a new virtual machine utilizing the VMware command-line tools.
In case of corrupted VMDK
Usually VMDK could corrupt pretty easily if not well maintained (during migrations, hard copy, etc.). If your host machine restarts unexpectedly or if the VM is not shut down properly etc. you may then experience issues the next time you try to restart.
One of the most common issue regarding VMDKs is that the VM takes for ever to load/startup or presents you with a black screen and no progress: in this case usually we will need to go to the directory where your VM files reside, search for and delete all directories and files ending in .lck (lock files).
A second usual scenario is showed with the following message:
Warning: the system was unable to load a page of memory; this can be caused by network problems or a failing hard disk drive.
In this case this error will be related not to the VMDK file directly, but to .vmem and .vmss files that reside in the same directory. To quickly fix this issue we will have to go to the VM directory and delete all .vmem and .vmss files.
These files represent the state of you VM before it was last shut down and are used to restore it to this state during start-up once the VM is restarted.
If these files are corrupted for some reason, the VM startup will show the error above. Deleting these files allows you to reboot your VM OS with a clean slate.
However, if we suspect that a VMDK file has been corrupted we can attempt a recovery using the vmkfstools command line tool with specific options that will check and/or repair the virtual disk in case of an unclean shutdown.
vmkfstools --fix check /vmfs/volumes/esx4-1-local-storage-1/dummy/dummy.vmdk
Disk is error free
Another scenario in which we could think that a VM is corrupted is when we are using an Open Virtualization Format (OVF) or Open Virtualization Appliances (OVA) of EFI (Unified Extensible Firmware Interface) Shell based Linux virtual machines and after the importing they fail to boot.
In this case the cause is not the corrupted VMDK but the missing .nvram file: the .nvram file is not exported with the OVF and OVA files.
To fix this issue we will need to follow this procedure:
- Take a copy of the original source virtual machine’s NVRAM file (vmname.nvram) from the virtual machine folder.
- Deploy the OVF/OVA to the new virtual machine.
- Power on and attempt to boot the new virtual machine. This will fail. It will generated a new NVRAM file in the virtual machine datastore folder.
- Power off the new virtual machine.
- Copy the original NVRAM file into the destination folder, and rename it accordingly to overwrite the existing NVRAM file created previously.
- Power on and boot the new virtual machine.
Finally, if the VMDK is really corrupted, we could try to use ddrescue Linux utility, following this procedure:
- Use a Linux VM and connect to an ESXi host that has access to the VMFS-volume.
- Then connect also to a second ESXi with a healthy datastore.
mkdir /esxi-in
sshfs -o ro [email protected]:/ /esxi-in
mkdir /esxi-out
sshfs [email protected]:/ /esxi-out
NOTE: SSHFS (SSH Filesystem) is a filesystem client to mount and interact with directories and files located on a remote server or workstation over a normal ssh connection. It will let us to mount a remote SSH system as it was a local folder on our local system.
Now, using ddrescue utility, which is a data recovery tool, we will be able to try a recovery of the whole VMDK:
ddrescue /esxi-in/vmfs/volumes/datastore-damaged/vm-name/disk-with-i-o-errors-flat.vmdk /esxi-out/vmfs/volumes/healthy-datastore/recovery/fixed-disk-flat.vmdk /esxi-out/vmfs/volumes/healthy-datastore/recovery/fixed-disk-flat.vmdk.log
Make sure to create a log-file. If this works you can regard the fixed-disk-flat.vmdk as healthy.
If you don’t want to use (or you can’t use an external VM or system to connect to two ESX hosts) the ddrescue approach you can try try to clone the VMDK with vmkfstools:
vmkfstools -i disk-with-i-o-errors.vmdk fixed-disk.vmdk
If that works without vmkfstools-errors you can regard fixed-disk.vmdk as healthy.
You can achieve the same result by using dd utility from an ESX host (on console or from SSH):
dd if=disk-with-i-o-errors-flat.vmdk of=fixed-disk-flat.vmdk bs=1M
Even in this case, if the process complete successfully the VMDK can be assumed as healthy. Note that dd utility could fail (read-only access) if Storage I/O Control (SIOC) is enabled on the VMFS datastore. SIOC is a protective layer and should be disabled to use this last approach.

Command for directly working with the (virtual) disk at host level.
With this command you can destroy whole virtual machines if you do not take the right precautions (hint: BACKUPS) and are not familiar with the command.
Usage
vmkfstools [options] target
Whereby target can be either a physical disk, a virtual disk or a device.
The command is mostly known for using it to manipulate virtual disks.
Beware that if you are working with a virtual disk that in most cases the virtual machine itself should be shut down.
Options
from the help page of the command.
OPTIONS FOR FILE SYSTEMS
vmkfstools -C --createfs [vmfs3|vmfs5]
              -b --blocksize #[mMkK]
              -S --setfsname fsName
          -Z --spanfs span-partition
          -G --growfs grown-partition
  deviceName
          -P --queryfs -h --humanreadable
          -T --upgradevmfs
  vmfsPath
OPTIONS FOR VIRTUAL DISKS
vmkfstools -c --createvirtualdisk #[gGmMkK]
              -d --diskformat [zeroedthick|
                               thin|
                               eagerzeroedthick]
              -a --adaptertype [buslogic|lsilogic|ide|
                                lsisas|pvscsi]
          -w --writezeros
          -j --inflatedisk
          -k --eagerzero
          -K --punchzero
          -U --deletevirtualdisk
          -E --renamevirtualdisk srcDisk
          -i --clonevirtualdisk srcDisk
              -d --diskformat [zeroedthick|
                               thin|
                               eagerzeroedthick|
                               rdm:<device>|rdmp:<device>|
                               2gbsparse]
          -X --extendvirtualdisk #[gGmMkK]
              [-d --diskformat eagerzeroedthick]
          -M --migratevirtualdisk
          -r --createrdm /vmfs/devices/disks/...
          -q --queryrdm
          -z --createrdmpassthru /vmfs/devices/disks/...
          -v --verbose #
          -g --geometry
          -x --fix [check|repair]
          -e --chainConsistent
  vmfsPath
OPTIONS FOR DEVICES
          -L --lock [reserve|release|lunreset|targetreset|busreset|readkeys|rea                              dresv] /vmfs/devices/disks/...
          -B --breaklock /vmfs/devices/disks/...

vmkfstools -H --help
Examples
Export a VM disk
Export a VM disk in 2GB chunks, note that since ESXi 5.1+ the 2GB sparse driver is disabled.
vmkfstools -i /vmfs/volumes/storagename/YourVM/YourVM.vmdk -d 2gbsparse /vmfs/volumes/storage2/YourVM/YourVM.vmdk
Check or repair a disk
-x, --fix -[check|repair]
This option will check and/or repair the virtual disk in case of an unclean shutdown.
Example:
vmkfstools --fix check /vmfs/volumes/esx4-1-local-storage-1/dummy/dummy.vmdk
Disk is error free
Set a UUID
-J, --miscop [setuuid | getuuid]
‘setuuid´ option creates a unique identifier (UUID) for the virtual disk and stores the UUID in the descriptor file of the
virtual disk. If the descriptor file already contains a UUID, it will be overwritten with a new one.
Please make sure that the virtual disk does not have a UUID before using this option.
´getuuid´ option displays the UUID of the virtual disk.
dumpfs
dumpfs can be used by specifying either «-D | —dumpfs» and specifying a VMFS volume, file or folder.
Example:
# vmkfstools -D /vmfs/volumes/esx4-1-local-storage-1/

Lock [type 10c00001 offset 4292608 v 33, hb offset 3440640
gen 11, mode 0, owner 00000000-00000000-0000-000000000000 mtime 2509]
Addr <4, 0, 0>, gen 1, links 4, type dir, flags 0, uid 0, gid 0, mode 1755
len 1260, nb 1 tbz 0, cow 0, zla 1, bs 1048576
activehosts
activehosts can be used by specifying «—activehosts» and specifying a VMFS volume
Example:
# vmkfstools --activehosts /vmfs/volumes/esx4-1-local-storage-1/
Found 1 actively heartbeating hosts on volume '/vmfs/volumes/esx4-1-local-storage-1/'
(1): MAC address 00:50:56:92:3f:86
Displays the MAC address of the management interface of each host which is currently using the datastore.
This is also what vSphere HA uses to see if a host is still active.
punchzero
Since vSphere 5.1 there’s an option to shrink disks besides the normally required storage vmotion.
With the guest shut down you can run vmkfstools with the punchzero option.
Reclaim disk space by returning unused blocks of data in the virtual disk to the host OS.
Note that this will only work if your virtual disk is of type thin.
Before running it you will also need to zero out the unused blocks of data in the guest OS.
For a windows VM, you can use Microsoft’s tool sdelete.
Run it as
sdelete -z c:
Note that the -z option is needed as of sdelete version 1.6
For a linux based VM, run a command like:
cat /dev/zero > zero.fill;sync;sleep 1;sync;rm -f zero.fill
to zero out the unused space.
Note of warning that you should stop database -and other disk intensive- services before running the above.
Some more detailed descriptions and tips on zero-ing out data from your guest OS can be found at Shrink guest on hosted platform
Example:
# vmkfstools --punchzero disk.vmdk
vmfsDisk: 1, rdmDisk: 0, blockSize: 1048576
Hole Punching: 3% done.
After you’re done and list the VM from within the console, it looks like nothing has changed, in this example the disk is 10GB in size.
# ls -lh *.vmdk
-rw-------    1 root     root       10.0G Nov 27 20:58 disk-flat.vmdk
-rw-------    1 root     root         527 Nov 27 21:02 disk.vmdk
If you use the command du however then you can see the difference:
# du -hs *.vmdk
4.3G    disk-flat.vmdk
0       disk.vmdk
You can also use the vSphere Client data browser to see the effect of reclaiming disk space.
If you try to run this command against a VM living on NFS storage you might end up seeing the following error:
vmkfstools --punchzero myvmdk.vmdk
Not a supported filesystem type
The error is a bit confusing as you might expect vmkfstools to talk about the guest OS here, but it is actually reporting that NFS does not support the punchzero option.
Your solution is to either move the vmdk by hand to storage not located on VMFS or use storage vmotion to migrate to non NFS storage. On moving using storage vmotion, the zero data is already being discarded. So you can just storage vmotion back afterwards and you have reclaimed the lost disk space.
Links
Some useful vmkfstools ‘hidden’ options
William also has a list here