 Если установщик Windows 11, а возможно и какая-то программа или игра (такое тоже возможно) сообщает о том, что его не устраивает состояние безопасной загрузки и её необходимо включить — сделать это сравнительно легко, но возможны нюансы.
В этой инструкции подробно о способах включить безопасную загрузку на вашем компьютере или ноутбуке, при условии, что это возможно. Обратите внимание, если задача — установка Windows 11, существуют возможности запуска установки и без включенной безопасной загрузки (Secure Boot), например — создание загрузочной флешки в Rufus с отключением проверки совместимости при чистой установке, или обновление с обходом требований для установки.
Проверка состояния безопасной загрузки, особенности работы после включения
Прежде чем начать, о том, где вы можете проверить текущее состояние безопасной загрузки в Windows 11 или Windows 10:
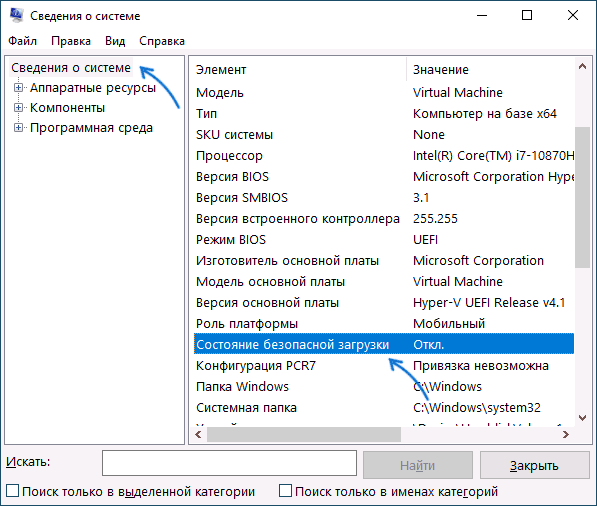
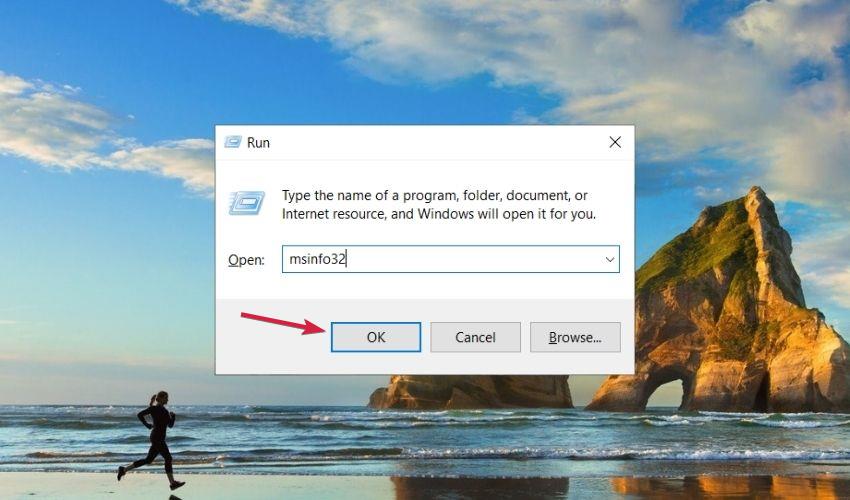
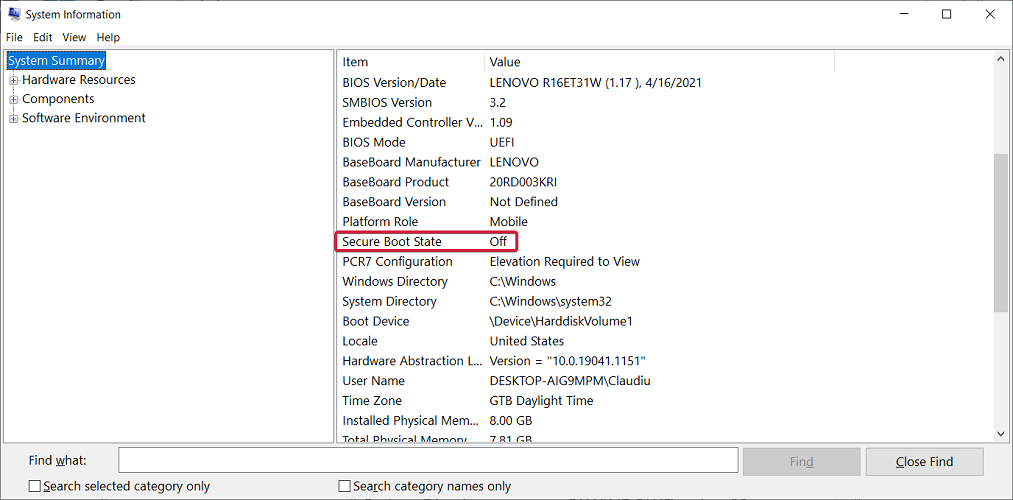
- Нажмите правой кнопкой мыши по кнопке «Пуск», выберите пункт «Выполнить», введите msinfo32 и нажмите Enter. В разделе «Сведения о системе» вы увидите пункт «Состояние безопасной загрузки» с её текущим статусом.

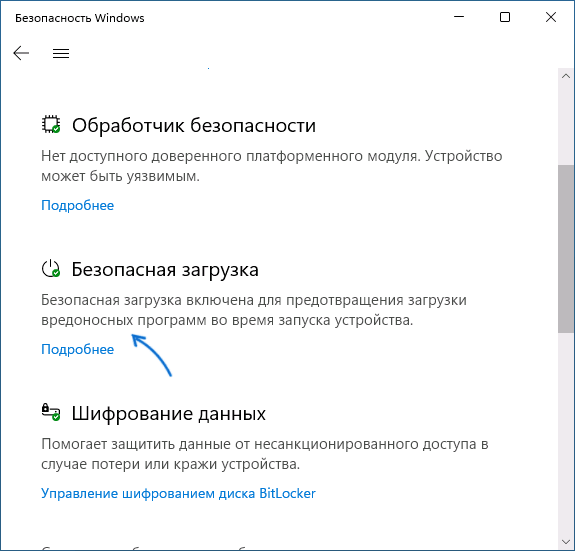
- Можно зайти в окно «Безопасность Windows», например, с помощью значка в области уведомлений и открыть раздел «Безопасность устройства». Если вы наблюдаете там пункт «Безопасная загрузка» с зеленой отметкой, она включена. Иначе — нет.

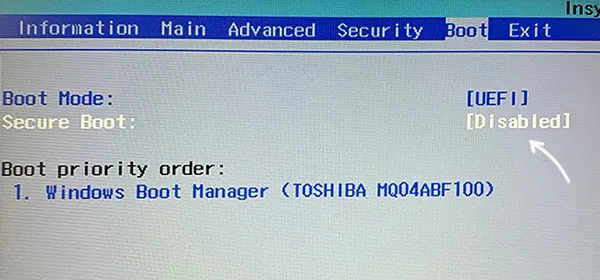
Ещё один важный момент: загрузка с включенной безопасной загрузкой возможна только для систем, установленных в UEFI-режиме на GPT диск.
Если, к примеру, у вас Windows 10 и установлена в Legacy-режиме на диск MBR, после включения Secure Boot она перестанет загружаться. Возможные варианты действий: конвертировать диск в GPT с помощью mbr2gpt.exe и включить UEFI-загрузку, либо использовать вариант с чистой установкой с флешки и обходом требований Windows 11, как было указано в начале статьи.
Включение безопасной загрузки Secure Boot в БИОС/UEFI
Само включение безопасной загрузки или Secure Boot выполняется не в Windows 11/10, а в БИОС/UEFI вашего компьютера или ноутбука. Для того, чтобы включить её, необходимо:
- Зайти в БИОС при включении/перезагрузке устройства. На ноутбуках для этого обычно используется клавиша F2 (или сочетание Fn+F2), которую необходимо ритмично нажимать сразу после появления заставки производителя (но бывают и другие варианты клавиши), на ПК как правило используется клавиша Delete. Более подробно: Как зайти в БИОС/UEFI на компьютере или ноутбуке.
- Найти раздел БИОС, на котором доступна опция включения (установка в Enabled) функции Secure Boot. Учитывайте, что на очень старых компьютерах такой настройки может и не быть. Как правило, она располагается где-то в разделе Security, Boot, System Configuration, иногда — Advanced Settings. Несколько примеров расположения будут приведены далее.
- Сменить состояние Secure Boot на Enabled (если ранее выполнялась очистка ключей Secure Boot, восстановить их), сохранить настройки БИОС/UEFI (обычно выполняется клавишей F10 или на вкладке Exit) и перезагрузиться обратно в систему.
Примеры расположения опции для включения безопасной загрузки (Secure Boot)
Ниже — несколько примеров, где можно найти опцию включения безопасной загрузки на разных материнских платах и ноутбуках. У вас может отличаться, но логика везде одна и та же.
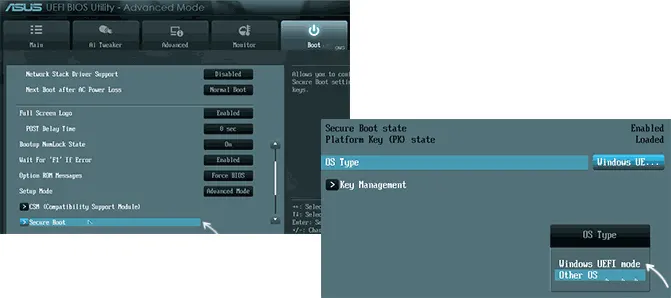
Ещё раз отмечу: включить безопасную загрузку можно только в случае, если у вас включен режим загрузки UEFI, а режим Legacy/CSM отключен, иначе опция будет недоступна. В некоторых вариантах БИОС переключение в режим загрузки UEFI выполняется путем выбора типа операционной системы (OS Type) между Windows 11/10/8 и «Other OS» (нужно выбрать Windows).
ASUS
На разных версиях материнских плат и ноутбуков включение Secure Boot реализовано слегка по-разному. Обычно пункт «Secure Boot» можно найти на вкладке «Boot» или «Security». При этом для OS Type может потребоваться выставить Windows UEFI Mode (параметр может и отсутствовать).
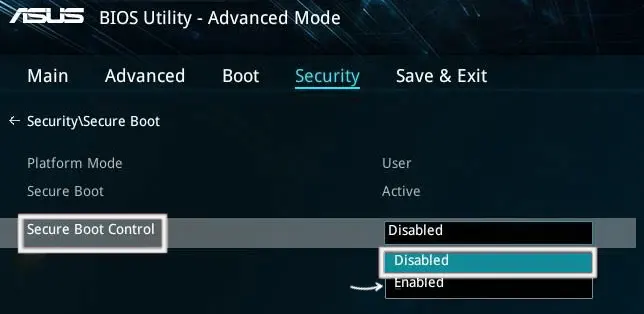
Также, для доступности пункта настройки безопасной загрузки в БИОС может потребоваться перейти в Advanced Mode, обычно — по клавише F7.
В некоторых случаях может потребоваться восстановление ключей безопасной загрузки, обычно выполняется следующим образом: в Advanced Mode в BIOS на вкладке Boot или в Secure Boot — Key Management выбираем Load Default PK и подтверждаем загрузку ключей по умолчанию.
AsRock
Настройка для включения безопасной загрузки на материнских платах AsRock обычно находится в разделе «Security».

Зайдя в раздел необходимо будет установить значение Secure Boot в Enabled, а если выбор недоступен, включить стандартный Secure Boot Mode и установить ключи по умолчанию (Install default Secure Boot keys).

Acer
Как правило, опция включения Secure Boot на ноутбуках Acer находится либо в разделе Advanced — System Configuration, либо в Boot или Authentication.
Также помните, о том, что должен быть включен режим загрузки UEFI, а не Legacy/CSM для возможности изменения состояния безопасной загрузки на Enabled.
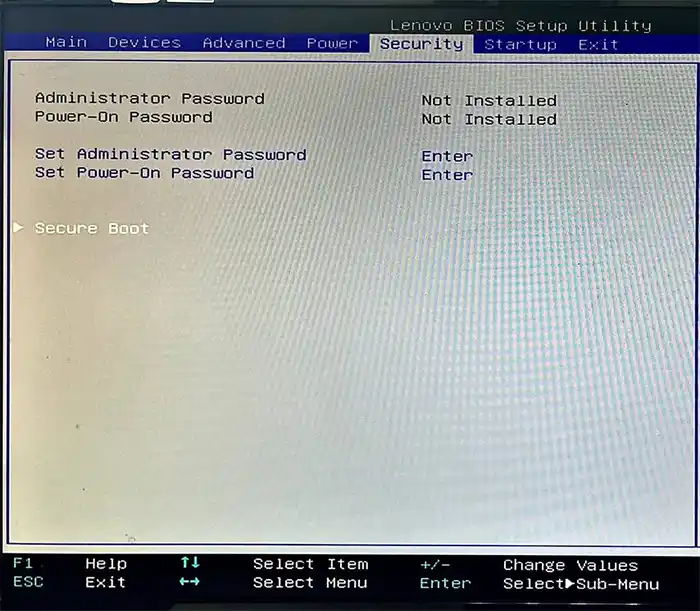
Lenovo
ПК и ноутбуки Lenovo имеют разные варианты интерфейса БИОС, но обычно нужная опция находится на вкладке Security, как на фото ниже:

Ещё один пример с ноутбука Lenovo:
Gigabyte
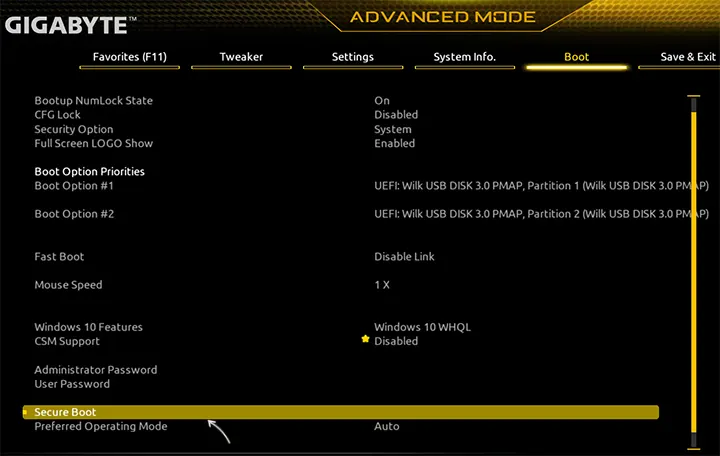
Варианты отключения Secure Boot на материнских платах и ноутбуках Gigabyte могут отличаться, обычно порядок действий следующий:
- На вкладке Boot или BIOS отключить CSM Support, и выбрать тип операционной системы или установить пункт Windows 8/10 Features в, соответственно, Windows 8/10, а не Other OS.
- После этого должен появиться пункт Secure Boot, в который необходимо зайти, чтобы включить безопасную загрузку.
Несколько дополнительных мест расположения опции включения Secure Boot (устанавливаем в Enabled) на старых Dell, Gigabyte, HP:

Также, если в вашем интерфейсе БИОС предусмотрен поиск, можно использовать его:

В случае, если вы не нашли способа включить безопасную загрузку на вашей материнской плате, либо её не удается перевести в Enabled, укажите её марку и модель в комментариях, я постараюсь подсказать, где именно требуется включать этот параметр. Кстати, часто достаточно просто сбросить настройки БИОС (Load Defaults на вкладке Exit), чтобы включить безопасную загрузку, так как на большинстве современных материнских плат она по умолчанию включена.
You can either activate Safe Boot or bypass its verification
by Loredana Harsana
Loredana is a passionate writer with a keen interest in PC software and technology. She started off writing about mobile phones back when Samsung Galaxy S II was… read more
Updated on August 25, 2022
Reviewed by
Vlad Turiceanu

Passionate about technology, Windows, and everything that has a power button, he spent most of his time developing new skills and learning more about the tech world. Coming… read more
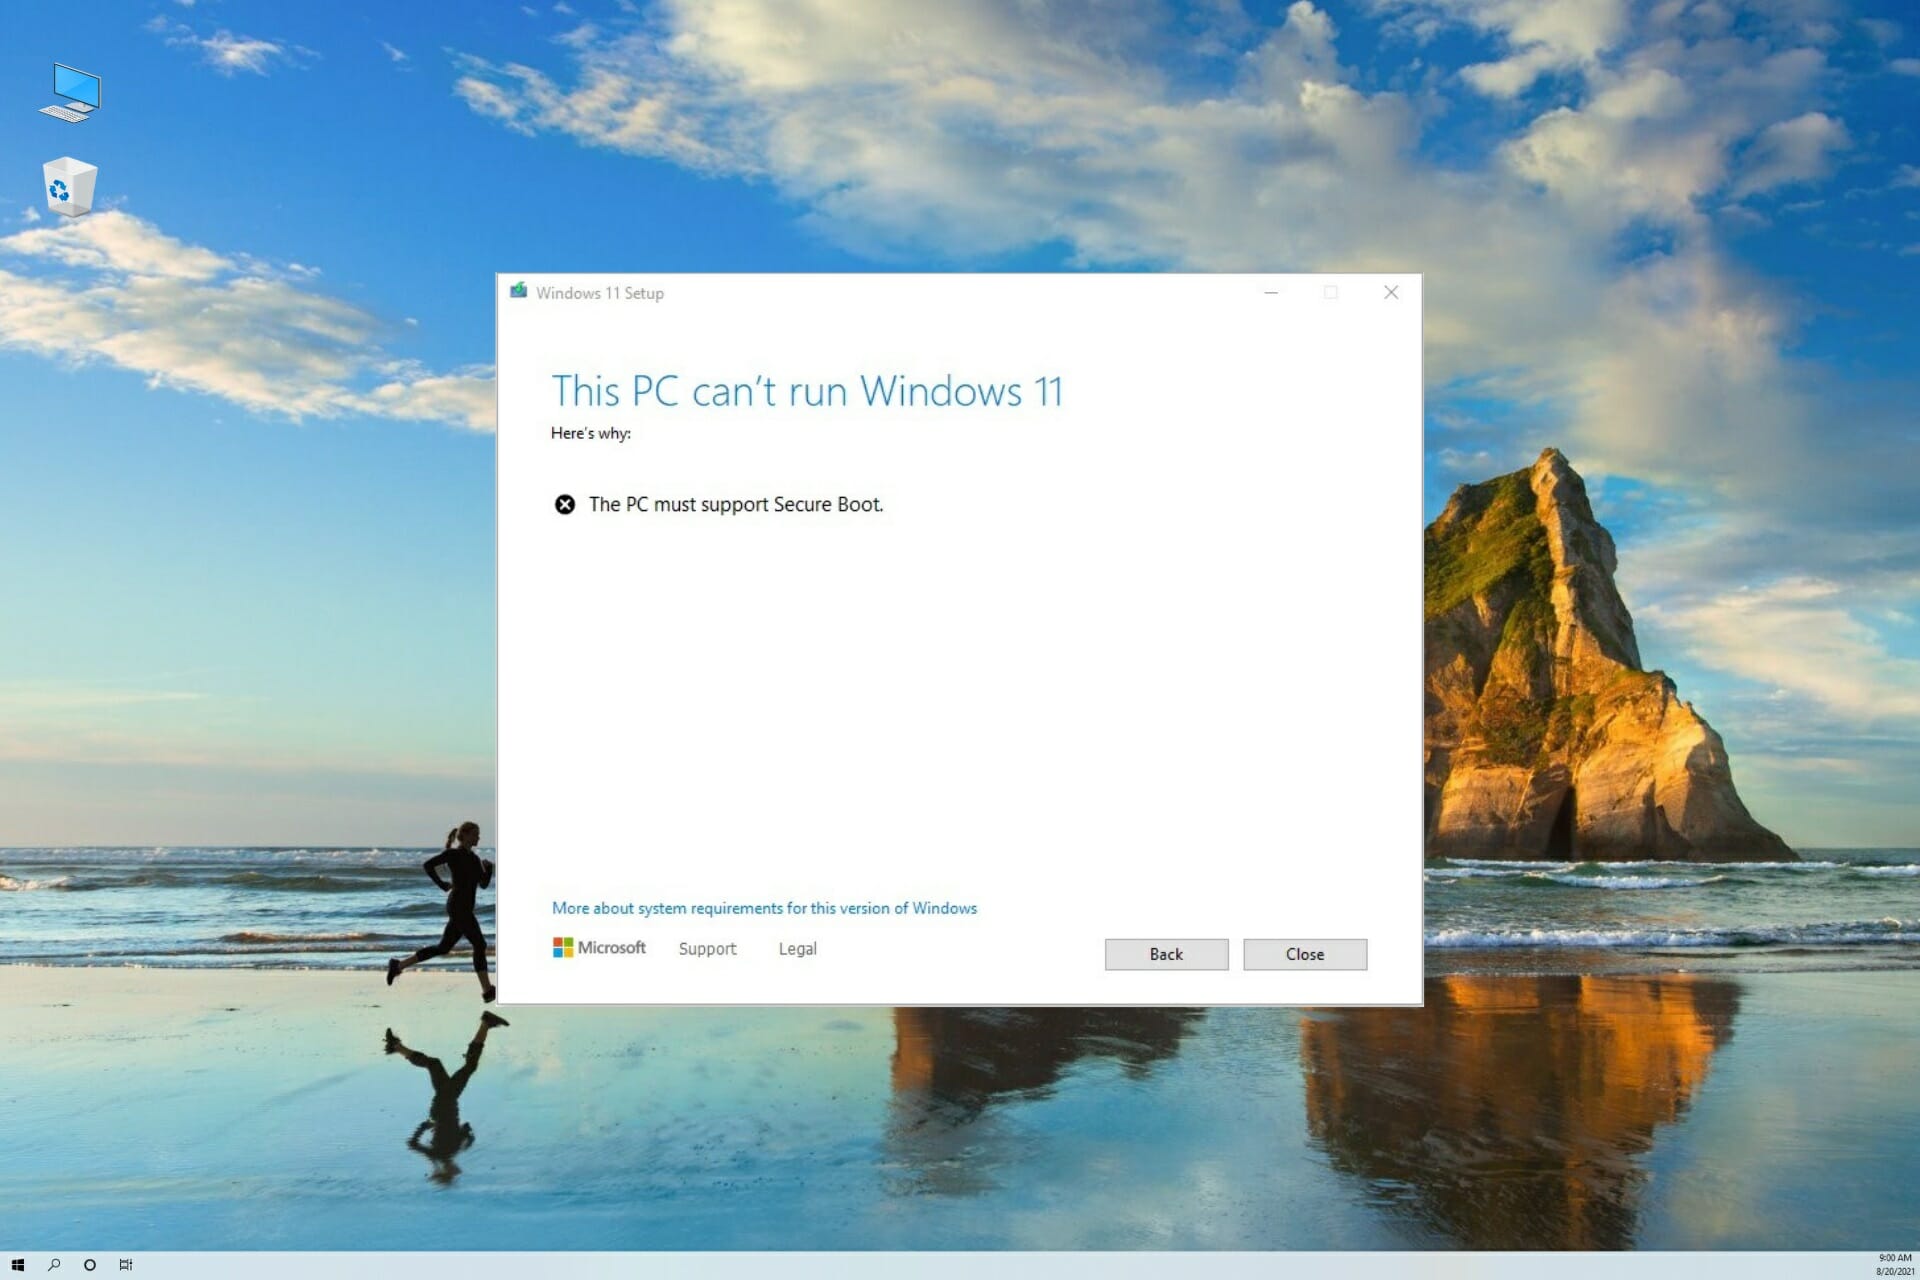
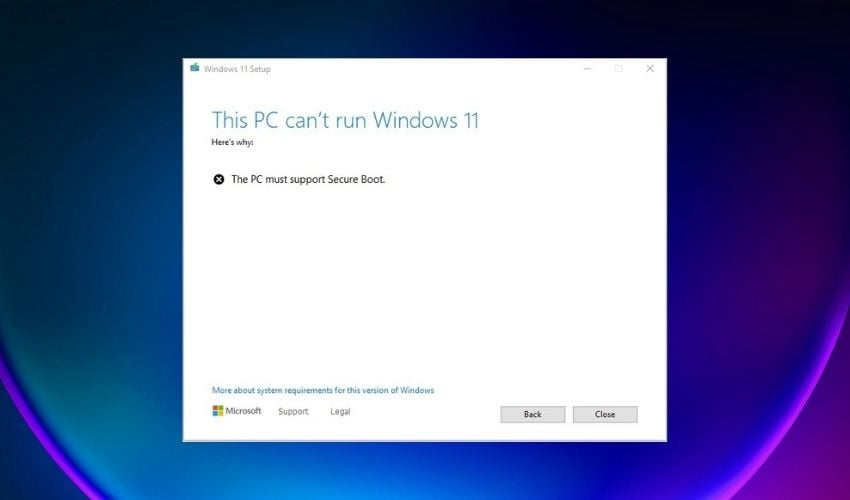
- If you encounter the error saying This PC must support Secure Boot, you won’t be able to go ahead with the Windows 11 installation.
- Microsoft made Secure Boot and TPM support mandatory for running Windows 11 and claims that this is crucial for the device’s security.
- Secure Boot ensures that the computer boots using only the OS trusted by the manufacturer.
XINSTALL BY CLICKING THE DOWNLOAD FILE
- Download Restoro PC Repair Tool that comes with Patented Technologies (patent available here).
- Click Start Scan to find Windows 11 issues that could be causing PC problems.
- Click Repair All to fix issues affecting your computer’s security and performance
- Restoro has been downloaded by 0 readers this month.
Windows 11 is officially available for download, so it comes as no surprise that you want to install it right away. Microsoft introduced a new set of system requirements, and Secure Boot is one of them. On some machines, it isn’t enabled by default.
This feature is part of the newest Unified Extensible Firmware Interface (UEFI) specification, and it basically defines a new interface between the OS and the firmware or BIOS.
If you don’t have this feature enabled, during the Windows 11 setup you will see the message This PC can’t run Windows 11 followed by This PC must support Secure Boot.
If your PC meets Windows 11’s hardware requirements but Secure Boot is disabled, enabling it in BIOS is not so complicated. Before that, here’s what you need to know about the Secure Boot feature.
What does This PC must support secure boot mean?
The most recent Unified Extensible Firmware Interface (UEFI) specification, version 2.3.1, includes Secure Boot as one of its features. This feature defines a completely new interface between the operating system and any firmware or BIOS that may be present.
A machine is better able to withstand malicious software attacks and infections when the Secure Boot feature has been activated. And all of its settings have been specified.
Windows 11 requires the UEFI Secure Boot feature in order to install it. Even if you have this feature, it might be turned off, hence the error messages:
- GigaByte This PC must support Secure Boot – Dell computers are no exception from Windows 11’s check for the Secure Boot feature.
- ASRock This PC must support Secure Boot – Follow the steps below in order to activate your UEFI Secure Boot feature.
- Lenovo This PC must Support Secure Boot – In case your Lenovo PC does not have the feature, you can try to bypass it by following the steps in our last section.
- This PC must support Secure Boot bypass – This is the general message that appears on users’ screen when they try to install Windows 11 but they don’t meet the requirements.
Follow along as we will show you how to turn on Secure Boot or how to bypass this check as well as the TPM 2.0 one.
Why should I enable Secure Boot?
When enabled, Secure Boot helps your computer to resist malware attacks that may not be detected by antivirus software. It identifies any unwanted modifications of the boot loaders and the system files by validating their digital signatures.
Practically, if such a trespassing action is detected, it will be blocked from running before it attacks or infects the system.
You can see the Secure Boot like a security gate. When you access it with a valid code, it will pass through the gate and will be executed. If not, Secure Boot blocks the code at the entry point.
Should you be worried if it is disabled? Clearly no. If you use your machine for basic tasks, you will still be safe.
However, you may see it as an important element in your computer’s security. That’s why enabling it is recommended as it helps you ensure better defense against all kinds of threats.
How do I fix This PC must support Secure Boot on Windows 11?
1. Check if Secure Boot is enabled without entering BIOS
- Press the Windows + R shortcut to open the Run application then type msinfo32 and click Yes or press Enter.

- Under System Summary, you will find an option called Secure Boot State. If it’s On it means that Secure Boot is enabled and if it’s Off, Secure Boot is disabled.

- If it’s disabled, follow the instructions from the next step to enable it.
Some PC issues are hard to tackle, especially when it comes to corrupted repositories or missing Windows files. If you are having troubles fixing an error, your system may be partially broken.
We recommend installing Restoro, a tool that will scan your machine and identify what the fault is.
Click here to download and start repairing.
One of the best things about Windows is that it’s very flexible. And easy to use and the same reflects in this scenario. To check if Secure Boot is enabled you don’t need to boot into BIOS and waste your time.
Instead, you can use msinfo32 just like we described in the steps above to check this information quickly.
- Enable Secure Boot on Windows 11 while in User Mode: 3 Tips
- Secure Boot stopped working? Here’s how we fixed the issue
- Don’t bother trying to run Valorant if you don’t have Secure Boot activated
2. How to enable Secure Boot for Windows 11 (from BIOS)
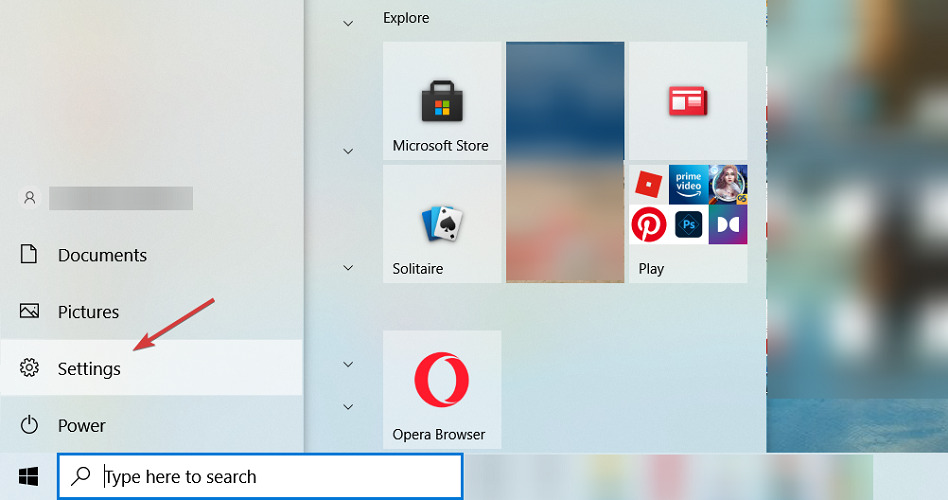
- Click on the Start button and select Settings.

- Then click on Update and Security.

- In the left tab, find and click on the Recovery option, then select the Restart now button.

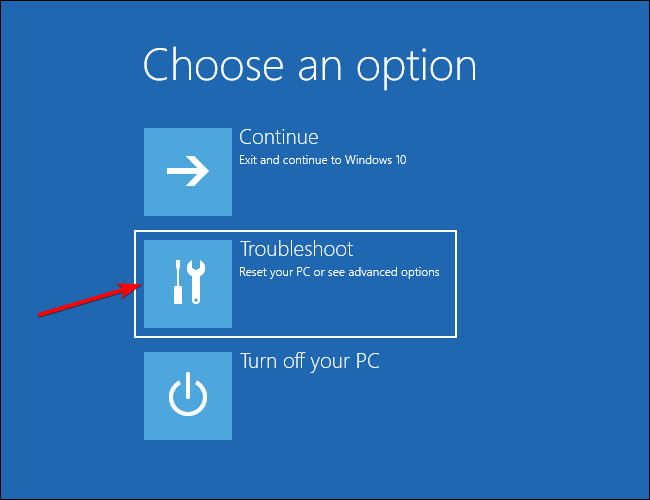
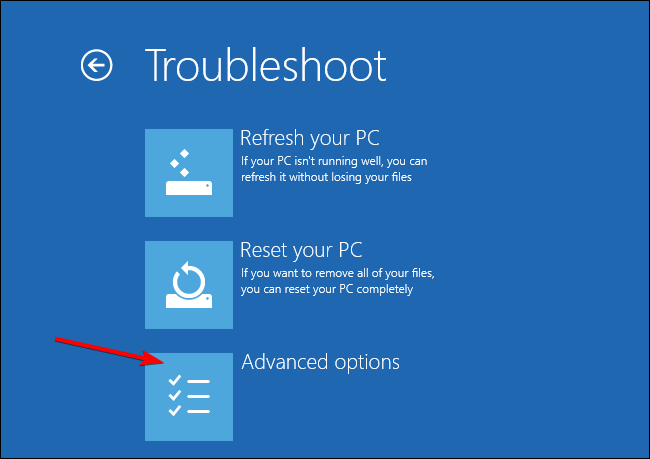
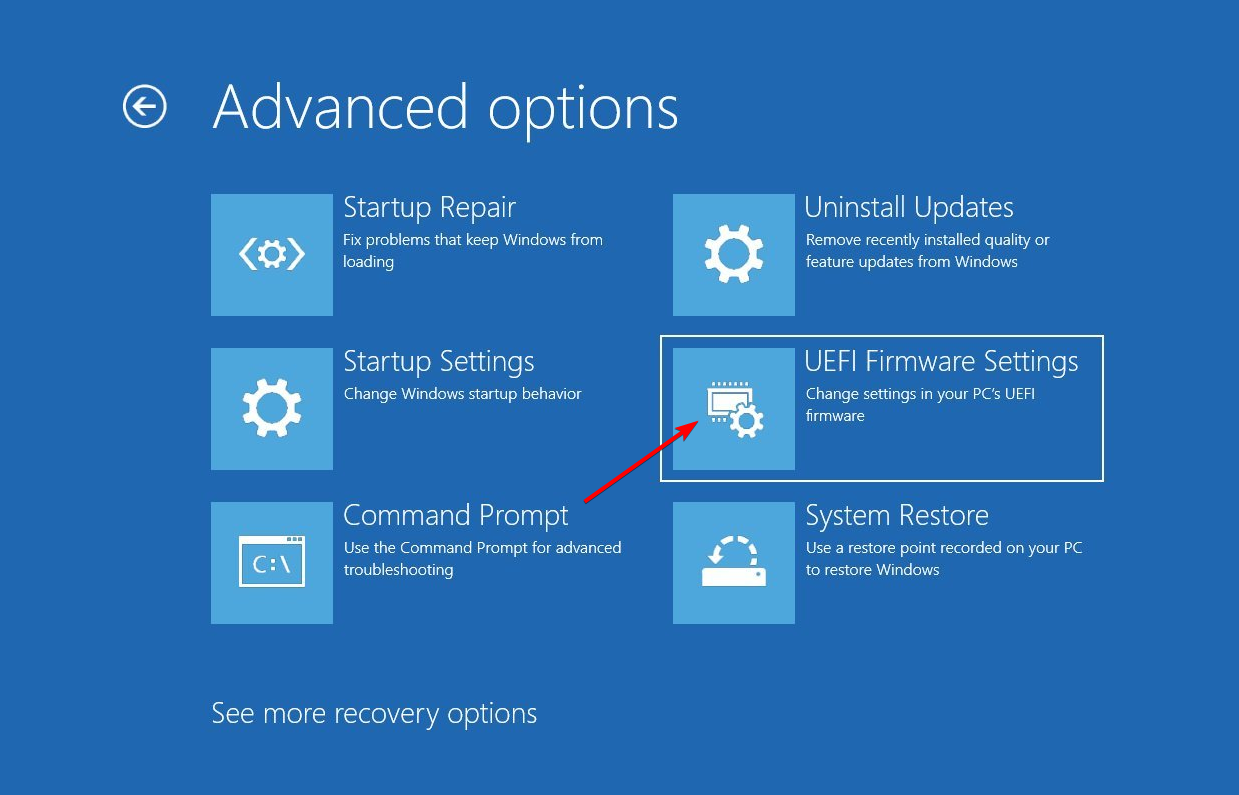
- When you get to the boot options, select Troubleshoot.

- Now click on Advanced options.

- Select the UEFI Firmware settings option.

- Your PC will then reboot into BIOS click on the Security, then select the Secure Boot option.
- Now enable the Secure Boot by toggling the option to On and accept the changes.
- Press F10 on your keyboard to save the changes and exit BIOS.
- After the system reboots, restart the Windows 11 installation process.


Remember, for this solution to work, you also need to have a UEFI boot system and not the Legacy BIOS. It’s another Windows 11 requirement that you need to comply with.
If you have to make extra changes, we have an article on how to switch from UEFI to Legacy BIOS but the guide can go both ways.
How do I enable TPM 2.0 and Secure Boot?
TPM is a security component and a prerequisite for Windows 11 that has been the focus of controversy due to the fact that it is required in order to install the most recent version of the operating system.
A lot of different manufacturers use the integrated version that is attached to other chips. The firmware-based versions are also quite common. And they operate within a reliable execution environment on your central processing unit (CPU).
Check out our post on how to enable TPM 2.0 in different versions of BIOS in order to be able to upgrade to Windows 11.
Can you install Windows 11 without Secure Boot?
It is no longer a secret that in order to install Windows 11, you will require TPM 2.0 and Secure Boot, but it is also no longer a secret that you may enable these features using the UEFI BIOS Mode.
On the other hand, we have a solution that will assist you in installing Windows 11 on Legacy BIOS without TPM 2.0 and Secure Boot checks being performed.
Make sure that you have a backup copy of all the crucial data on your drive before beginning the procedure, then take a look at how to install Windows 11 without Secure Boot.
How to bypass the Secure Boot requirement? (Insider account needed)
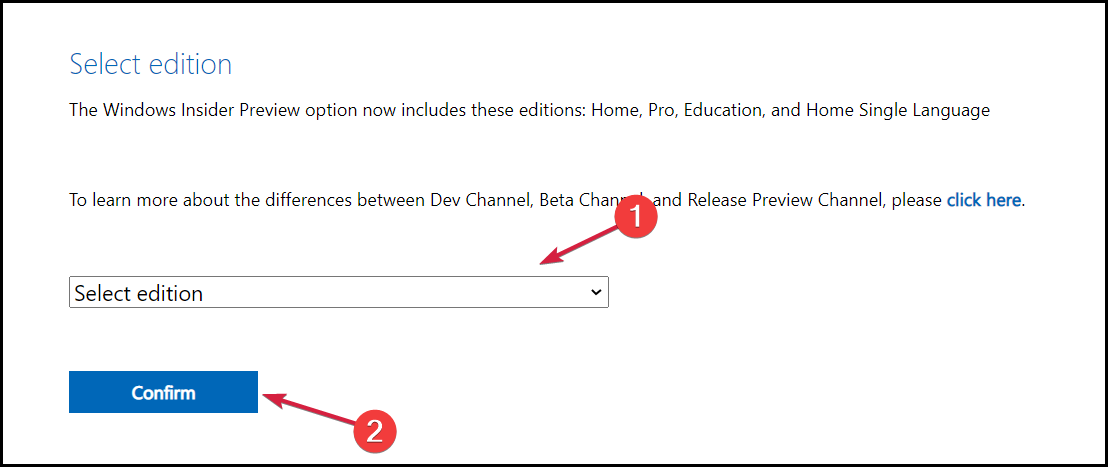
- Log into your Insider account, then head over Microsoft’s dedicated webpage, and download the Windows 11 Preview Build. You have to log into your Insider account and set into the Dev Channel.
- Choose Windows 11 under Select edition and click on Confirm.

- The download will start and you will get the Windows 11 ISO.
- Press the Windows + E combination from your keyboard to start File Explorer.
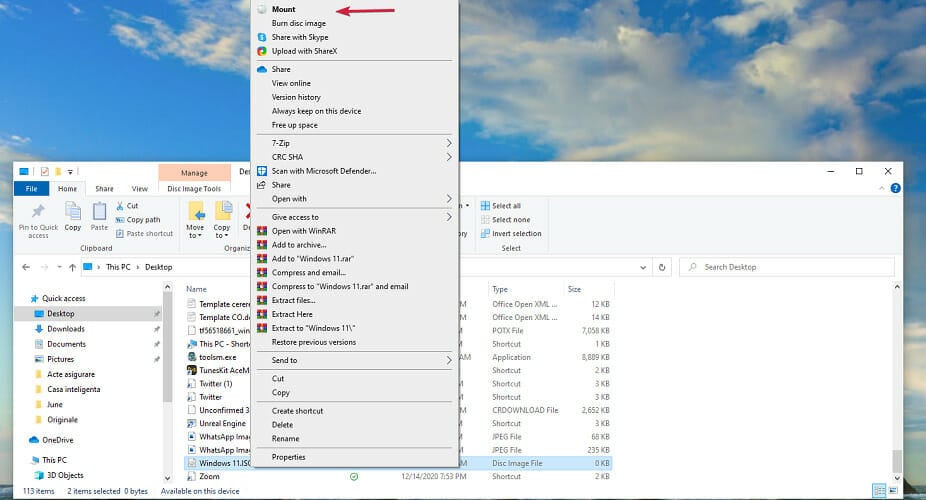
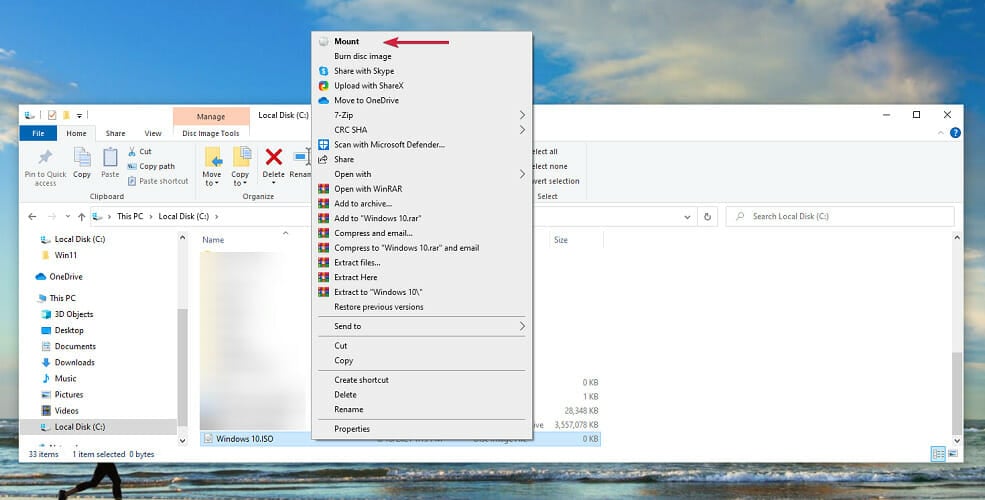
- Locate the Windows 11 ISO you just downloaded, right-click it, and select Mount.

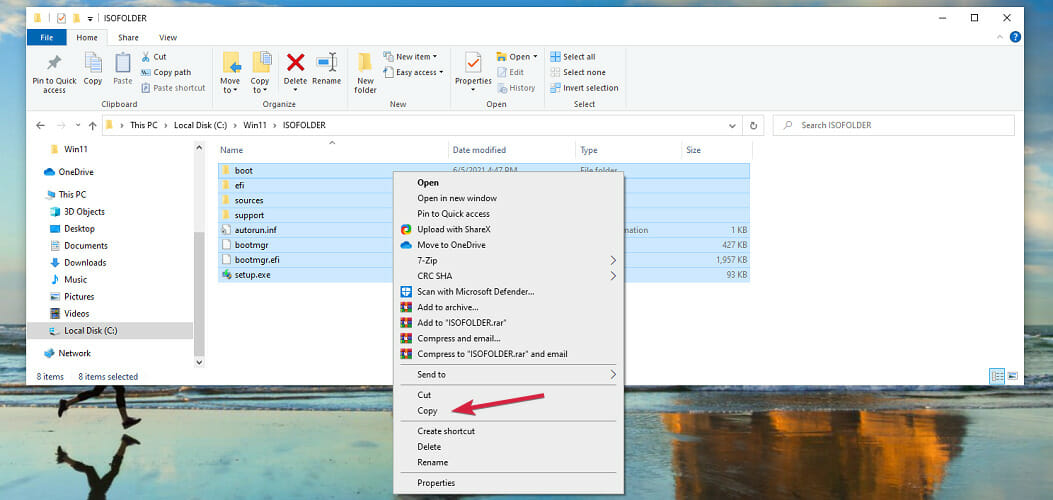
- Go to the Windows 11 image, select all files, right-click and then copy all files or use the Ctrl + C shortcut.

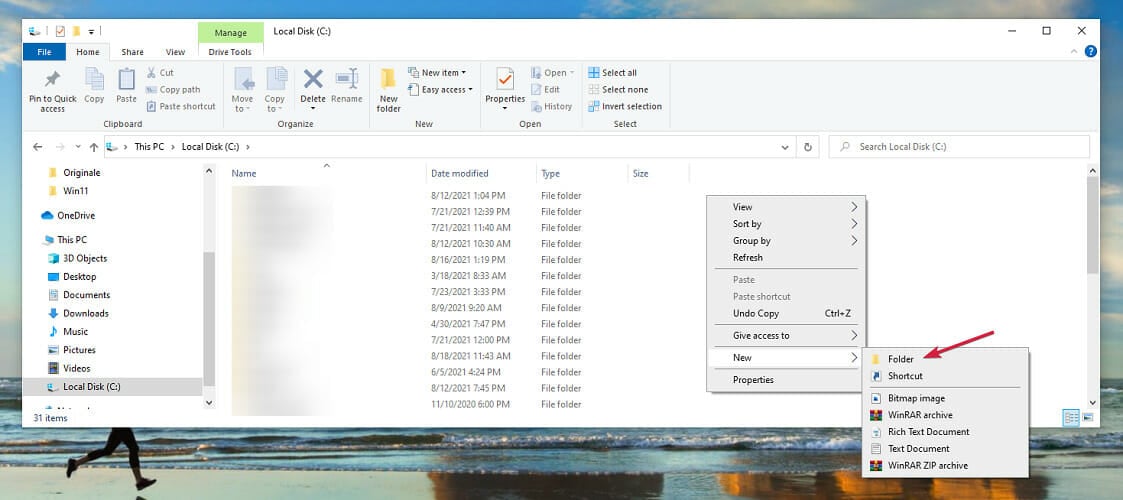
- Create a new folder by right-clicking an empty space on one of your drives and selecting New, then Folder.

- We suggest naming the folder Windows 11.
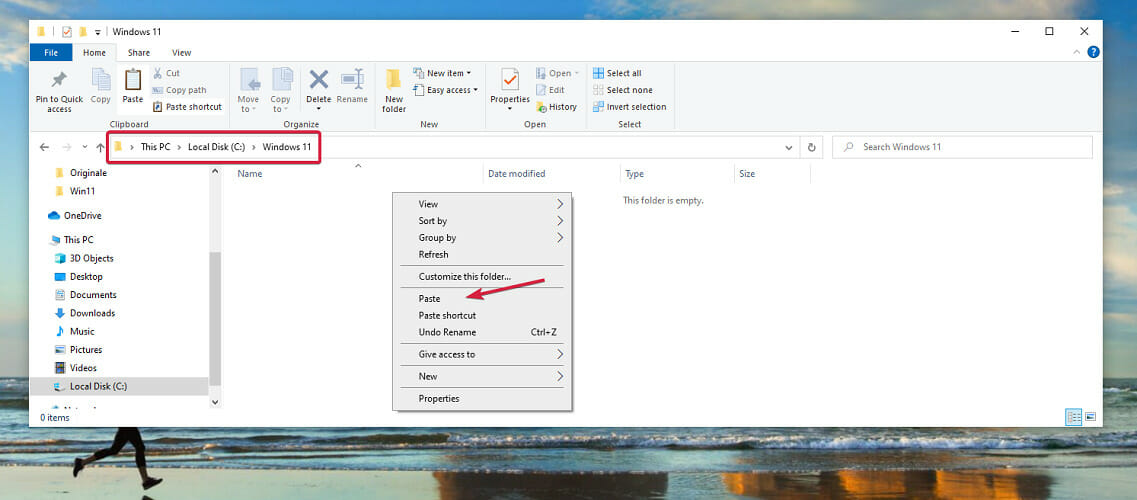
- Now open the folder and paste the contents by right-clicking an empty space and selecting Paste or by using the Ctrl + V shortcut.

- Mount a Windows 10 ISO just like you did for the Windows 11 ISO in this solution. If you don’t have a Windows 10 ISO, you can download one by using step 1 from this solution and select a Windows 10 ISO instead of the Windows 11 one.

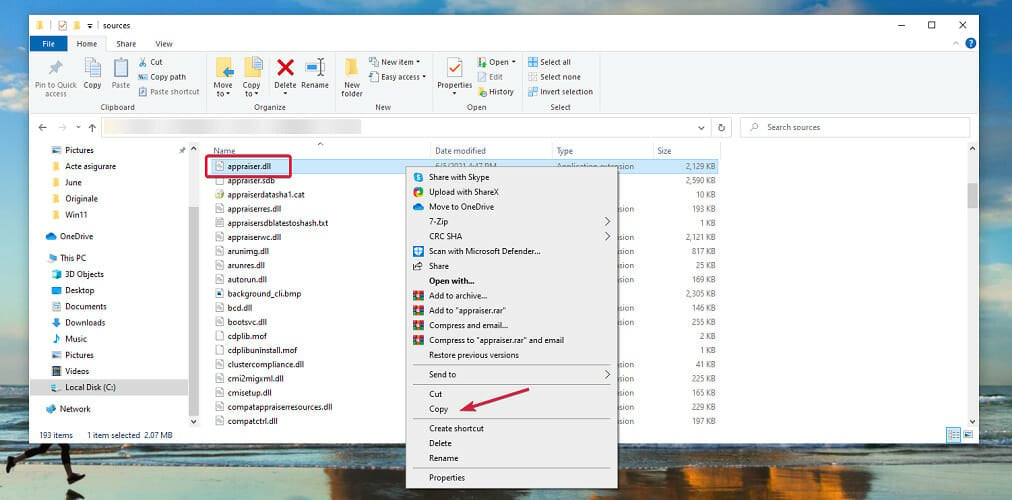
- Access the sources folder within the Windows 10 image.
- Locate the appraiserres.dll file, right-click on it, and select Copy.

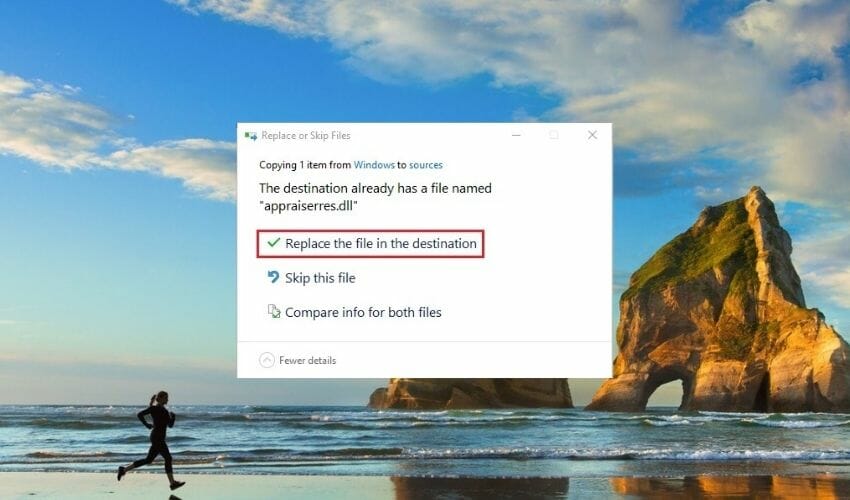
- Now go back to the Windows 11 folder you created earlier, open the sources folder, and paste the appraiserres.dll file.

- Select Replace the file in the destination.
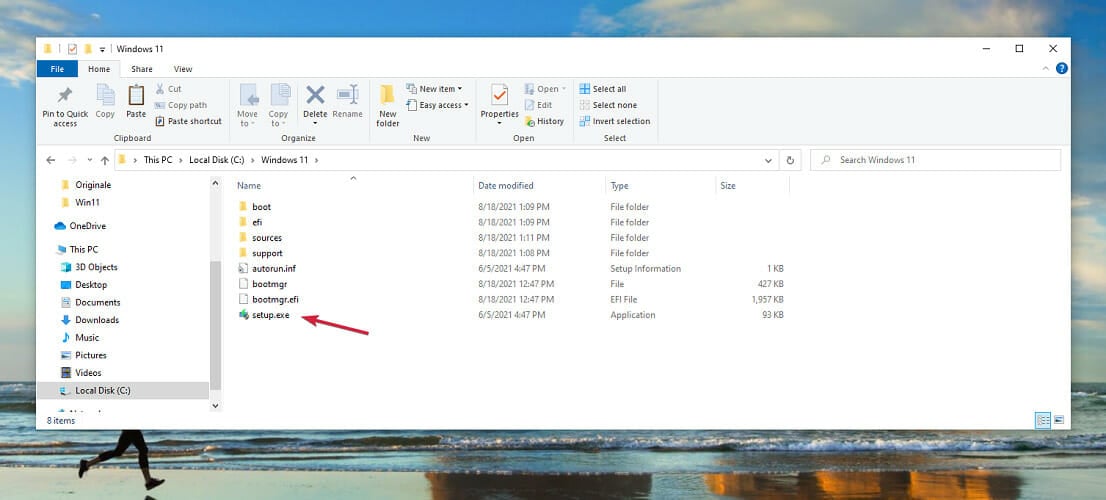
- Next, double-click the setup.exe file from the Windows 11 folder to start the installation.


This solution will enable you to bypass the Secure Boot check from the installation of Windows 11 so you won’t need to make any changes to your BIOS.
To download the Windows 11 ISO, you will need a Windows Insider account and you need to be listed in the Dev Channel. On the other hand, you can download the Windows 10 ISO without it.
So, the Secure Boot feature is not absolutely necessary but when it comes to your PC, nowadays you shouldn’t spare any efforts to protect your data and privacy.
Of course, you can also get an extra layer of defense with the best antiviruses with unlimited license that will help you forget all about activation headaches. Check out the updated list of antivirus programs for Windows 11 as well.
Did this article help you enable Secure Boot and solve the error This PC Must Support Secure Boot To Run Windows 11? Share your feedback in the comments section below.
Still having issues? Fix them with this tool:
SPONSORED
If the advices above haven’t solved your issue, your PC may experience deeper Windows problems. We recommend downloading this PC Repair tool (rated Great on TrustPilot.com) to easily address them. After installation, simply click the Start Scan button and then press on Repair All.
![]()
Newsletter
You can either activate Safe Boot or bypass its verification
by Loredana Harsana
Loredana is a passionate writer with a keen interest in PC software and technology. She started off writing about mobile phones back when Samsung Galaxy S II was… read more
Updated on August 25, 2022
Reviewed by
Vlad Turiceanu
Passionate about technology, Windows, and everything that has a power button, he spent most of his time developing new skills and learning more about the tech world. Coming… read more
- If you encounter the error saying This PC must support Secure Boot, you won’t be able to go ahead with the Windows 11 installation.
- Microsoft made Secure Boot and TPM support mandatory for running Windows 11 and claims that this is crucial for the device’s security.
- Secure Boot ensures that the computer boots using only the OS trusted by the manufacturer.
XINSTALL BY CLICKING THE DOWNLOAD FILE
- Download Restoro PC Repair Tool that comes with Patented Technologies (patent available here).
- Click Start Scan to find Windows 11 issues that could be causing PC problems.
- Click Repair All to fix issues affecting your computer’s security and performance
- Restoro has been downloaded by 0 readers this month.
Windows 11 is officially available for download, so it comes as no surprise that you want to install it right away. Microsoft introduced a new set of system requirements, and Secure Boot is one of them. On some machines, it isn’t enabled by default.
This feature is part of the newest Unified Extensible Firmware Interface (UEFI) specification, and it basically defines a new interface between the OS and the firmware or BIOS.
If you don’t have this feature enabled, during the Windows 11 setup you will see the message This PC can’t run Windows 11 followed by This PC must support Secure Boot.
If your PC meets Windows 11’s hardware requirements but Secure Boot is disabled, enabling it in BIOS is not so complicated. Before that, here’s what you need to know about the Secure Boot feature.
What does This PC must support secure boot mean?
The most recent Unified Extensible Firmware Interface (UEFI) specification, version 2.3.1, includes Secure Boot as one of its features. This feature defines a completely new interface between the operating system and any firmware or BIOS that may be present.
A machine is better able to withstand malicious software attacks and infections when the Secure Boot feature has been activated. And all of its settings have been specified.
Windows 11 requires the UEFI Secure Boot feature in order to install it. Even if you have this feature, it might be turned off, hence the error messages:
- GigaByte This PC must support Secure Boot – Dell computers are no exception from Windows 11’s check for the Secure Boot feature.
- ASRock This PC must support Secure Boot – Follow the steps below in order to activate your UEFI Secure Boot feature.
- Lenovo This PC must Support Secure Boot – In case your Lenovo PC does not have the feature, you can try to bypass it by following the steps in our last section.
- This PC must support Secure Boot bypass – This is the general message that appears on users’ screen when they try to install Windows 11 but they don’t meet the requirements.
Follow along as we will show you how to turn on Secure Boot or how to bypass this check as well as the TPM 2.0 one.
Why should I enable Secure Boot?
When enabled, Secure Boot helps your computer to resist malware attacks that may not be detected by antivirus software. It identifies any unwanted modifications of the boot loaders and the system files by validating their digital signatures.
Practically, if such a trespassing action is detected, it will be blocked from running before it attacks or infects the system.
You can see the Secure Boot like a security gate. When you access it with a valid code, it will pass through the gate and will be executed. If not, Secure Boot blocks the code at the entry point.
Should you be worried if it is disabled? Clearly no. If you use your machine for basic tasks, you will still be safe.
However, you may see it as an important element in your computer’s security. That’s why enabling it is recommended as it helps you ensure better defense against all kinds of threats.
How do I fix This PC must support Secure Boot on Windows 11?
1. Check if Secure Boot is enabled without entering BIOS
- Press the Windows + R shortcut to open the Run application then type msinfo32 and click Yes or press Enter.
- Under System Summary, you will find an option called Secure Boot State. If it’s On it means that Secure Boot is enabled and if it’s Off, Secure Boot is disabled.
- If it’s disabled, follow the instructions from the next step to enable it.
Some PC issues are hard to tackle, especially when it comes to corrupted repositories or missing Windows files. If you are having troubles fixing an error, your system may be partially broken.
We recommend installing Restoro, a tool that will scan your machine and identify what the fault is.
Click here to download and start repairing.
One of the best things about Windows is that it’s very flexible. And easy to use and the same reflects in this scenario. To check if Secure Boot is enabled you don’t need to boot into BIOS and waste your time.
Instead, you can use msinfo32 just like we described in the steps above to check this information quickly.
- Enable Secure Boot on Windows 11 while in User Mode: 3 Tips
- Secure Boot stopped working? Here’s how we fixed the issue
- Don’t bother trying to run Valorant if you don’t have Secure Boot activated
2. How to enable Secure Boot for Windows 11 (from BIOS)
- Click on the Start button and select Settings.
- Then click on Update and Security.
- In the left tab, find and click on the Recovery option, then select the Restart now button.
- When you get to the boot options, select Troubleshoot.
- Now click on Advanced options.
- Select the UEFI Firmware settings option.
- Your PC will then reboot into BIOS click on the Security, then select the Secure Boot option.
- Now enable the Secure Boot by toggling the option to On and accept the changes.
- Press F10 on your keyboard to save the changes and exit BIOS.
- After the system reboots, restart the Windows 11 installation process.
Remember, for this solution to work, you also need to have a UEFI boot system and not the Legacy BIOS. It’s another Windows 11 requirement that you need to comply with.
If you have to make extra changes, we have an article on how to switch from UEFI to Legacy BIOS but the guide can go both ways.
How do I enable TPM 2.0 and Secure Boot?
TPM is a security component and a prerequisite for Windows 11 that has been the focus of controversy due to the fact that it is required in order to install the most recent version of the operating system.
A lot of different manufacturers use the integrated version that is attached to other chips. The firmware-based versions are also quite common. And they operate within a reliable execution environment on your central processing unit (CPU).
Check out our post on how to enable TPM 2.0 in different versions of BIOS in order to be able to upgrade to Windows 11.
Can you install Windows 11 without Secure Boot?
It is no longer a secret that in order to install Windows 11, you will require TPM 2.0 and Secure Boot, but it is also no longer a secret that you may enable these features using the UEFI BIOS Mode.
On the other hand, we have a solution that will assist you in installing Windows 11 on Legacy BIOS without TPM 2.0 and Secure Boot checks being performed.
Make sure that you have a backup copy of all the crucial data on your drive before beginning the procedure, then take a look at how to install Windows 11 without Secure Boot.
How to bypass the Secure Boot requirement? (Insider account needed)
- Log into your Insider account, then head over Microsoft’s dedicated webpage, and download the Windows 11 Preview Build. You have to log into your Insider account and set into the Dev Channel.
- Choose Windows 11 under Select edition and click on Confirm.
- The download will start and you will get the Windows 11 ISO.
- Press the Windows + E combination from your keyboard to start File Explorer.
- Locate the Windows 11 ISO you just downloaded, right-click it, and select Mount.
- Go to the Windows 11 image, select all files, right-click and then copy all files or use the Ctrl + C shortcut.
- Create a new folder by right-clicking an empty space on one of your drives and selecting New, then Folder.
- We suggest naming the folder Windows 11.
- Now open the folder and paste the contents by right-clicking an empty space and selecting Paste or by using the Ctrl + V shortcut.
- Mount a Windows 10 ISO just like you did for the Windows 11 ISO in this solution. If you don’t have a Windows 10 ISO, you can download one by using step 1 from this solution and select a Windows 10 ISO instead of the Windows 11 one.
- Access the sources folder within the Windows 10 image.
- Locate the appraiserres.dll file, right-click on it, and select Copy.
- Now go back to the Windows 11 folder you created earlier, open the sources folder, and paste the appraiserres.dll file.
- Select Replace the file in the destination.
- Next, double-click the setup.exe file from the Windows 11 folder to start the installation.
This solution will enable you to bypass the Secure Boot check from the installation of Windows 11 so you won’t need to make any changes to your BIOS.
To download the Windows 11 ISO, you will need a Windows Insider account and you need to be listed in the Dev Channel. On the other hand, you can download the Windows 10 ISO without it.
So, the Secure Boot feature is not absolutely necessary but when it comes to your PC, nowadays you shouldn’t spare any efforts to protect your data and privacy.
Of course, you can also get an extra layer of defense with the best antiviruses with unlimited license that will help you forget all about activation headaches. Check out the updated list of antivirus programs for Windows 11 as well.
Did this article help you enable Secure Boot and solve the error This PC Must Support Secure Boot To Run Windows 11? Share your feedback in the comments section below.
Still having issues? Fix them with this tool:
SPONSORED
If the advices above haven’t solved your issue, your PC may experience deeper Windows problems. We recommend downloading this PC Repair tool (rated Great on TrustPilot.com) to easily address them. After installation, simply click the Start Scan button and then press on Repair All.
![]()
Newsletter
Как узнать, включена ли безопасная загрузка?
Проверьте инструмент системной информации
Запустите ярлык «Информация о системе». Выберите «Сводка системы» на левой панели и найдите элемент «Состояние безопасной загрузки» на правой панели. Вы увидите значение «Вкл.», Если безопасная загрузка включена, «Выкл.», Если она отключена, и «Не поддерживается», если она не поддерживается на вашем оборудовании.
Повторно включить безопасную загрузку
Или из Windows: перейдите к чудо-кнопке «Настройки»> «Изменить настройки ПК»> «Обновление и восстановление»> «Восстановление»> «Расширенный запуск: перезагрузить сейчас». Когда компьютер перезагрузится, перейдите в раздел Устранение неполадок> Дополнительные параметры: Настройки прошивки UEFI. Найдите параметр «Безопасная загрузка» и, если возможно, установите для него значение «Включено».
Как включить безопасную загрузку?
5. Включите безопасную загрузку — перейдите в раздел «Безопасная загрузка» -> «Включить безопасную загрузку» и установите флажок «Включить безопасную загрузку». Затем нажмите Применить, а затем выйдите в правом нижнем углу. Теперь компьютер перезагрузится и будет правильно настроен.
Нужно ли включать безопасную загрузку для Windows 10?
Ваша организация требует, чтобы вы включили безопасную загрузку Windows, которая является функцией безопасности, которая помогает защитить ваше устройство. Если вы используете мобильное устройство, обратитесь к своему специалисту по ИТ-поддержке, и он поможет вам включить безопасную загрузку.
Следует ли мне включить безопасную загрузку?
Перед установкой операционной системы необходимо включить безопасную загрузку. Если операционная система была установлена при отключенной безопасной загрузке, она не будет поддерживать безопасную загрузку, и потребуется новая установка. Для безопасной загрузки требуется последняя версия UEFI.
Как обойти загрузку UEFI?
Как отключить безопасную загрузку UEFI?
- Удерживая клавишу Shift, нажмите «Перезагрузить».
- Щелкните Устранение неполадок → Дополнительные параметры → Параметры запуска → Перезагрузка.
- Несколько раз нажмите клавишу F10 (настройка BIOS), прежде чем откроется «Меню запуска».
- Зайдите в Boot Manager и отключите опцию Secure Boot.
Как включить загрузку UEFI?
Выберите режим загрузки UEFI или режим загрузки устаревшего BIOS (BIOS)
- Откройте программу настройки BIOS. Загрузите систему. …
- На экране главного меню BIOS выберите Boot.
- На экране загрузки выберите режим загрузки UEFI / BIOS и нажмите Enter. …
- С помощью стрелок вверх и вниз выберите Legacy BIOS Boot Mode или UEFI Boot Mode, а затем нажмите Enter.
- Чтобы сохранить изменения и выйти из экрана, нажмите F10.
Следует ли включить загрузку UEFI?
Многие компьютеры с прошивкой UEFI позволяют включить устаревший режим совместимости с BIOS. В этом режиме микропрограмма UEFI функционирует как стандартный BIOS вместо микропрограммы UEFI. … Если на вашем компьютере есть эта опция, вы найдете ее на экране настроек UEFI. Вы должны включать это только в случае необходимости.
Что такое режим загрузки UEFI?
UEFI расшифровывается как Unified Extensible Firmware Interface. … UEFI поддерживает дискретные драйверы, в то время как BIOS поддерживает диски, хранящиеся в его ПЗУ, поэтому обновление прошивки BIOS немного затруднено. UEFI предлагает такую безопасность, как «Безопасная загрузка», которая предотвращает загрузку компьютера из неавторизованных / неподписанных приложений.
Как исправить неправильную настройку безопасной загрузки?
Включение безопасной загрузки
Или из Windows: перейдите к чудо-кнопке «Настройки»> «Изменить настройки ПК»> «Обновление и восстановление»> «Восстановление»> «Расширенный запуск: перезагрузить сейчас». Когда компьютер перезагрузится, перейдите в раздел Устранение неполадок> Дополнительные параметры: Настройки прошивки UEFI. Найдите параметр «Безопасная загрузка» и, если возможно, установите для него значение «Включено».
Опасно ли отключать безопасную загрузку?
Да, отключить безопасную загрузку «безопасно». Безопасная загрузка — это попытка Microsoft и поставщиков BIOS гарантировать, что драйверы, загружаемые во время загрузки, не были подделаны или заменены «вредоносным ПО» или плохим программным обеспечением. При включенной безопасной загрузке будут загружаться только драйверы, подписанные сертификатом Microsoft.
Что произойдет, если я отключу безопасную загрузку?
Функция безопасной загрузки помогает предотвратить вредоносное программное обеспечение и неавторизованную операционную систему во время процесса запуска системы, отключение которого приведет к загрузке драйверов, не разрешенных Microsoft.
Как отключить BIOS при запуске?
Откройте утилиту BIOS. Перейдите в Дополнительные настройки и выберите Настройки загрузки. Отключите быструю загрузку, сохраните изменения и перезагрузите компьютер.
Почему мне нужно отключить безопасную загрузку, чтобы использовать UEFI NTFS?
Первоначально разработанная в качестве меры безопасности, безопасная загрузка — это функция многих новых машин EFI или UEFI (чаще всего используется на ПК и ноутбуках с Windows 8), которая блокирует компьютер и предотвращает его загрузку в любую систему, кроме Windows 8. Это часто необходимо. , чтобы отключить безопасную загрузку, чтобы использовать все возможности вашего ПК.
Как работает безопасная загрузка UEFI?
Безопасная загрузка устанавливает доверительные отношения между UEFI BIOS и программным обеспечением, которое он в конечном итоге запускает (например, загрузчиками, ОС или драйверами и утилитами UEFI). После включения и настройки безопасной загрузки разрешается запускать только программное обеспечение или микропрограммное обеспечение, подписанное утвержденными ключами.
Ужесточение системных требований для Windows 11 изначально было предметом острых дискуссий – очень многие компьютеры, даже достаточно мощные, не обладают такими функциями, как TPM 2.0 и/или Secure Boot. Сегодня мы поговорим о безопасной загрузке (она же Secure Boot): что это такое, для чего нужна, как проверить наличие, включить или отключить.

Кратко о назначении Secure Boot
Под этим термином следует понимать специальный протокол, разработанный для тестирования операционных систем в момент их загрузки. Он является частью микропрограммного кода UEFI, а его деятельность заключается в проверке цифровой подписи загружаемых компонентов ОС, включая драйвера, и, если таковая не будет обнаружена, дальнейший запуск операционной системы останавливается с выдачей соответствующего ошибочного сообщения.
Такая проверка предотвращает загрузку вместе с операционной системой вредоносного кода, который может внедриться, например, в драйверы. Самый известный пример такого заражения – вирус Petya из категории вымогателей, который активно распространялся в сети в 2017 году.
Поскольку речь не идёт о проверке сигнатур и прочих хитростях, используемых антивирусными программами, сам модуль Secure Boot достаточно компактен, чтобы включить его в UEFI.
Такой подход имеет и недостатки – это совместимость на уровне операционных систем. В семействе Windows поддержка безопасной загрузки реализована, начиная с «восьмёрки», есть она и у некоторых ОС семейства Linux (Fedora, Debian, CentOS, Ubuntu и др.).
Но только в Windows 11 компьютер должен поддерживать безопасную загрузку на безусловном уровне, как и модуль TPM 2.0, реализуемый на аппаратном уровне. Впрочем, на программном уровне необходимость наличия этих функций реализована только факультативно, на этапе установки системы. В обычной работе компьютер вполне может обходиться и без них.
Как узнать наличие и статус Secure Boot
Если на вашем компьютере отсутствует или неактивны функция безопасной загрузки, вы просто не сможете обновиться с «десятки» до Windows 11. Так что первым делом нужно узнать, как конкретно у вас обстоят дела с этой фишкой. Сделать это можно несколькими способами. Например, с помощью встроенных в Windows 10 системных утилит (здесь и далее мы предполагаем, что будем обновляться или производить чистую установку именно с «десятки»):
Если в графе «Режим BIOS» указано Legacy, то в графе «Состояние безопасной загрузки» будет указано, что такой режим не поддерживается. Это не приговор, если у вас в UEFI и активирована эмуляция устаревшего BIOS, так иногда делают для обеспечения совместимости со старым ПО. В этом случае функцию эмуляцию (чаще всего она обозначается аббревиатурой CSM) нужно выключить, и проблема будет решена.
Если речь идёт об устаревшем BIOS, то здесь ситуация безвыходная, то есть придётся делать апгрейд или прибегать к другим не рекомендуемым Microsoft ухищрениям.
Итак, если вы убедились, что безопасная загрузка на вашем компьютере присутствует, можно приступать к её активации. Существует два способа, как сделать активной безопасную загрузку: через «параметры» Windows 10, и при загрузке ПК. Рассмотрим оба варианта – они равноценные, хотя первый намного проще.
Включение Secure Boot через «Параметры»
Последовательность действий должна быть такой:
ПК перезагрузится с активированной функцией Secure Boot. Если параметр Secure Boot Control отсутствует, скорее всего, безопасная загрузка здесь не поддерживается.
Включение безопасной загрузки при запуске Windows
Первым делом нам необходимо попасть в пользовательский интерфейс UEFI – у разных производителей чипсетов вход в настройки реализован по-своему, единого стандарта здесь не существует. Чаще всего для этого используются клавиши Delete и F2, но могут быть задействованы и другие функциональные клавиши.
Обычно эта информация выводится на стартовую заставку при загрузке системы, но она мелькает так быстро, что что-либо прочитать зачастую не представляется возможным. Можно найти эту информацию в документации, бумажной или онлайн, указав модель материнской платы.
Мы для удобства приводим таблицу, в которой указаны используемые ведущими производителями Motherboard клавиши для входа в BIOS:
| Производитель | Клавиши |
| HP | F10/Esc |
| Dell | F2/F12 |
| Acer | Delete/F2 |
| Lenovo | F1/F2 |
| Asus | Delete/F2 |
| Samsung | F2 |
| MSI | Delete |
| Toshiba | F2 |
Итак, после включения питания компьютера и появления заставки нажимаем нужную клавишу 2-4 раза ИП дожидаемся загрузки пользовательского интерфейса UEFI. Здесь жёстких стандартов тоже нет, поэтому состав меню UI может быть организован по-разному, хотя смысловая нагрузка микропрограммы будет примерно одинаковой.
Нам нужно искать параметр, включающий безопасную загрузку, то есть содержащий фразу Secure Boot. Чаще всего эта опция расположена в разделе «Boot», но в вашем случае это может быть и другая локация, например, раздел «System Configuration» или «Security».

Если ваши поиски не увенчались успехом, скорее всего, сам параметр необходимо где-то активировать, но здесь поможет только фирменная документация материнской платы или интернет. В последнем случае вам нужно определить модель своей МП, например, с помощью встроенной утилиты msinfo32, о которой мы уже упоминали, в разделе «Сведения о системе».
Найдя параметр Secure Boot, останется активировать его, присвоив значение Enabled и выйти из настроек UEFI с сохранением произведённых изменений.

Отключение безопасной загрузки
Если у вас стоит «десятка», может возникнуть необходимость в установке младших версий Windows или Linux. С включённой опцией Secure Boo вы этого не сможете сделать. Безопасная загрузка может стать помехой и для работы некоторых видеоадаптеров или другого «железа», особенно если это оборудование не оснащено цифровой подписью и будет определено при загрузке как ненадёжное. Сама загрузка ОС при этом прервётся.
Так что в этих случаях Secure Boot необходимо деактивировать. Способов, как отключить функцию безопасной загрузки Windows, существует тоже два, через «Параметры» и через настройки UEFI. Всё, что вам нужно сделать, – воспользоваться описанными выше инструкциями, а на завершающей стадии изменить значение параметра Secure Boot на Disabled.

Заключение
Включение Secure Boot – задача несложная. Может ли Windows 11 работать без этой функции? Вполне, она действительно нужна только при установке операционной системы. Но в сети уже выкладываются способы, как обойти такую проверку при инсталляции ОС, и эти методы можно использовать и для тех компьютеров, BIOS которых не поддерживает безопасную загрузку.