I installed the folder on drive that is not the operating drive. When I open the .exe I get an error message window that says, «ERROR: Exiftool not found! Metadata operations disabled»
How do resolve this error?
It sounds like you are talking about ExifTool GUI. Read the «Requirements and preparations» section of the ExifTool GUI manual for instructions.
— Phil
…where DIR is the name of a directory/folder containing the images. On Mac/Linux, use single quotes (‘) instead of double quotes («) around arguments containing a dollar sign ($).
Hi,
I’m having the same problem with EXIFTool GUI; I’ve followed the directions and have installed in a top level directory «C:mytools». The only thing I can think is that I’m running the .exe on a Mac using Parallels. Could this be the source of the problem?
Any advice would be much appreciated,
Best,
David
Hi David,
Can you open a cmd.exe window? If so, what happens when you type «exiftool»? If you can run exiftool this way, then ExifToolGUI should be able to find it. If you can’t run exiftool this way, then make sure «exiftool.exe» is placed somewhere in your Windows PATH.
— Phil
…where DIR is the name of a directory/folder containing the images. On Mac/Linux, use single quotes (‘) instead of double quotes («) around arguments containing a dollar sign ($).
I just encountered the same problem. The answer is that exiftool.exe is NOT in the ZIP file (as of 4/16/2014). You need to download the file- exiftool(-k).exe, put it in the same directory as ExifToolGUI.exe BUT rename it to just exiftool.exe.
Update: It now runs but on closing says it cannot save the GUI settings. It doesn’t seem to effect the results, i.e., it does copy EXIF. Maybe the exiftool.exe should be located somewhere else and someone can track that down.
…where DIR is the name of a directory/folder containing the images. On Mac/Linux, use single quotes (‘) instead of double quotes («) around arguments containing a dollar sign ($).
title: ‘Exiftool not found metadata operations disabled Sony camera shutter check how the investigation tutorial’
DATE: 2020-03-19 10:44:17
Tags: ExifTool
Exiftool not found metadata operations disabled
Introduce error
Many users are using ExiftoolGUI.exe program error «Exiftool not found metadata operations disabled», although able to open the main interface but are unable to analyze the picture display picture messages.


Error Sources
1. not installed correctly Exiftool
2.Exiftool not change the file name
Under 3.Exiftool and GUI is not in the same directory
Solutions, reference links
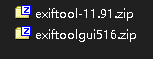
Official website to download exiftool-xx.xx.zip and exiftoolgui-xx.zip
Some do not have to download, xx is the version number, the latest edition to the next general. Make sure that both are good download
Decompression
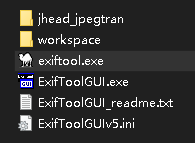
Two unzip the downloaded archive, will get a folder and an executable file
Rename
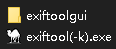
The extract from the exiftool (-k -). Exe rename exiftool.exe.
The exiftool.exe move to exiftoolgui folder

At this point re-run Exiftool GUI can be used normally, the original error has been resolved. After pressing the message investigate the above operation is not successful resolution of friends welcome.
How to view Nikon Sony camera with shutter number Exiftool GUI
Supported camera models
Actual operation
Take a picture with the camera with a query, jpg or raw formats can be
The pictures are just into the computer
According to the above steps installed ExiftoolGUI, run the program
Select a photo taken just after the program, select ALL Maker or in the Metadata area to the right
Program on the right displays information about the photo, identification number of the shutter is ShutterCount

Sony shutter simple web query
website link
View supported camera models
Click «Supported models» on the page, it will display the supported camera models
Instructions
Dragging an image to mark where there is a cloud, release the mouse; click on it or select a picture cloudy
Page will automatically parse out the number of shutter photograph, displayed as numbers displayed below
Thanks to the site developer
Sincere thanks Exiftool developer Phil Harvey
The tool suggestions, questions, comments,
If you have any suggestions or questions about this software, the website carried a message, the whole world will answer you
Support for authors
Sponsorship ta
Currently supports Paypal, Visa , etc., micro-channel and Alipay invalid. . . Gangster foreigners.
New issue
Have a question about this project? Sign up for a free GitHub account to open an issue and contact its maintainers and the community.
By clicking “Sign up for GitHub”, you agree to our terms of service and
privacy statement. We’ll occasionally send you account related emails.
Already on GitHub?
Sign in
to your account
Closed
rmharold opened this issue
Feb 14, 2021
· 24 comments
Closed
Exiftool not found
#110
rmharold opened this issue
Feb 14, 2021
· 24 comments
Comments
![]()
When I try to run jexiftoolgui I get an error that says the exiftool specified in preferences cannot be found. I cannot change the preferences. What should I do?
![]()
Which OS are you using? Where did you download exiftool and where did you install it?
Are you on windows and did you not rename «exiftool-k.exe» to «exiftool.exe»? As described on the Releases page where you downloaded JTG.
![]()
I’m having the same problem on Windows 10.
I have downloaded jExifToolGUI-1.8.1.0-win-x86_64_with-jre.zip and unzipped it. I exiftool.exe in the same folder and also under C:WindowsSystem32
Here is the log file:
#logback.classic pattern: %d{HH:mm:ss.SSS} [%thread] %-5level %logger{36} - %msg%n 11:48:32.879 [main] INFO org.hvdw.jexiftoolgui.Application - Start application 11:48:32.879 [main] INFO org.hvdw.jexiftoolgui.Application - Continuing in system language or, if not translated, in English 11:48:33.910 [AWT-EventQueue-0] INFO org.hvdw.jexiftoolgui.mainScreen - string for DB: C:UsersPhilippXPSjexiftoolgui_datajexiftoolgui.db 11:48:35.558 [AWT-EventQueue-0] INFO org.hvdw.jexiftoolgui.Utils - preference exiftool returned: null 11:48:35.664 [AWT-EventQueue-0] INFO org.hvdw.jexiftoolgui.Utils - exiftool_found mentions: true 11:48:35.758 [AWT-EventQueue-0] ERROR o.h.j.controllers.UpdateActions - Successfully did: creating the table userFavorites (1.4) 11:48:35.758 [AWT-EventQueue-0] ERROR o.h.j.controllers.UpdateActions - Successfully did: drop table CustomView 11:48:35.758 [AWT-EventQueue-0] ERROR o.h.j.controllers.UpdateActions - Successfully did: drop table CustomViewLines 11:48:35.758 [AWT-EventQueue-0] ERROR o.h.j.controllers.UpdateActions - Successfully did: drop table CustomEdit 11:48:35.774 [AWT-EventQueue-0] ERROR o.h.j.controllers.UpdateActions - Successfully did: drop table CustomEditLines 11:48:35.774 [AWT-EventQueue-0] ERROR o.h.j.controllers.UpdateActions - Successfully did: creating the table CustomMetadataset (1.6) 11:48:35.774 [AWT-EventQueue-0] ERROR o.h.j.controllers.UpdateActions - Successfully did: creating the table CustomMetadatasetLines (1.6) 11:48:35.867 [AWT-EventQueue-0] INFO org.hvdw.jexiftoolgui.mainScreen - OS name MICROSOFT 11:48:35.867 [AWT-EventQueue-0] ERROR o.h.j.controllers.CommandRunner - IOException error java.io.IOException: Cannot run program "C:/jExifToolGUI/exiftool.exeC:/Windows/System32/exiftool.exeC:/Windows/exiftool.exe": CreateProcess error=2, Das System kann die angegebene Datei nicht finden at java.base/java.lang.ProcessBuilder.start(Unknown Source) at java.base/java.lang.ProcessBuilder.start(Unknown Source) at org.hvdw.jexiftoolgui.controllers.CommandRunner.runCommand(CommandRunner.java:27) at org.hvdw.jexiftoolgui.mainScreen.setProgramScreenTexts(mainScreen.java:3545) at org.hvdw.jexiftoolgui.mainScreen.<init>(mainScreen.java:3679) at org.hvdw.jexiftoolgui.mainScreen.createAndShowGUI(mainScreen.java:3725) at java.desktop/java.awt.event.InvocationEvent.dispatch(Unknown Source) at java.desktop/java.awt.EventQueue.dispatchEventImpl(Unknown Source) at java.desktop/java.awt.EventQueue$4.run(Unknown Source) at java.desktop/java.awt.EventQueue$4.run(Unknown Source) at java.base/java.security.AccessController.doPrivileged(Native Method) at java.base/java.security.ProtectionDomain$JavaSecurityAccessImpl.doIntersectionPrivilege(Unknown Source) at java.desktop/java.awt.EventQueue.dispatchEvent(Unknown Source) at java.desktop/java.awt.EventDispatchThread.pumpOneEventForFilters(Unknown Source) at java.desktop/java.awt.EventDispatchThread.pumpEventsForFilter(Unknown Source) at java.desktop/java.awt.EventDispatchThread.pumpEventsForHierarchy(Unknown Source) at java.desktop/java.awt.EventDispatchThread.pumpEvents(Unknown Source) at java.desktop/java.awt.EventDispatchThread.pumpEvents(Unknown Source) at java.desktop/java.awt.EventDispatchThread.run(Unknown Source) Caused by: java.io.IOException: CreateProcess error=2, Das System kann die angegebene Datei nicht finden at java.base/java.lang.ProcessImpl.create(Native Method) at java.base/java.lang.ProcessImpl.<init>(Unknown Source) at java.base/java.lang.ProcessImpl.start(Unknown Source) ... 19 common frames omitted
![]()
Hi,
The logs mention «C:/jExifToolGUI/exiftool.exeC:/Windows/System32/exiftool.exeC:/Windows/exiftool.exe»
So inside C:jExifToolGUI, you have also exiftool.exe OR do you have exiftool-k.exe?
If you have exiftool-k.exe, rename it to exiftool.exe
![]()
Hi,
I have exiftool.exe and also exiftool-k.exe. It makes no difference.

![]()
I’m having the same problem on Windows 10. I have the latest exiftool (12.23) downloaded from exiftool.org. I renamed the file from exiftool(-k).exe to exiftool.exe and put in C:Windows directory, as instructions say at https://exiftool.org/install.html When I run jExifToolGUI.exe in jExifToolGUI-1.8.1.0-win-x86_64_with-jre folder or run jExifToolGUI.jar I get the same dialog box saying «The Exiftool specified in your preferences does not exist. Did you move/rename/delete it?» and the GUI never opens. It would be nice if the GUI would open and then I could see what my preferences are. I’ve never been able to get jExifToolGUI to work. Thanks for any help you may have 
![]()
Same problem here with Windows 10. I have exiftool installed through Strawberry Perl (and on the PATH), such that exiftool -ver prints 12.16 but I get java.io.IOException: Cannot run program "C:/Strawberry/perl/site/bin/exiftoolC:/Strawberry/perl/site/bin/exiftool.bat": CreateProcess error=2, The system cannot find the file specified So it’s finding something, but weirdly duplicating the executable path. To be clear, both of these files exist (C:/Strawberry/perl/site/bin/exiftool AND C:/Strawberry/perl/site/bin/exiftool.bat), so is it finding all matches on the path? philpav’s log shows not two but three of these, all mushed together.
![]()
Another user just reported a bug in #116.
Can it be that exiftool.exe is in a path containing spaces?
If so then that is indeed a bug.
![]()
Another user just reported a bug in #116.
Can it be that exiftool.exe is in a path containing spaces?
If so then that is indeed a bug.
As I said in my post above, exiftool.exe is in the Windows directory, in other words, path C:Windows in which there are no spaces.
How do I edit the preferences for jExifToolGUI.exe (to specify path for exiftool.exe)?
![]()
«How do I edit the preferences for jExifToolGUI.exe (to specify path for exiftool.exe)?»
What do you mean? manually, outside JTG?
outside you find them in windows in the registry.
HKEY_CURRENT_USERSOFTWAREJavaSoftPrefsorghvdwjexiftoolgui
![]()
The only way that I could get jexiftoolgui to work is to change the registry entry mentioned above and to run as an administrator in Windows. Will not work as a standard user, needs administrator privileges apparently.
The registry key change I did in order to make it work was the following:
ComputerHKEY_CURRENT_USERSOFTWAREJavaSoftPrefsorghvdwjexiftoolgui
Value name:
exiftool
Value data:
/C:///Windows//exiftool.exe
This works when running jExifToolGUI.exe as admin. Running as standard user, it reports:
Exiftool preference incorrect: The Exiftool specified in your preferences does not exist. Did you move/rename/delete it?
![]()
It is good that you mention this admin requirement, because now I understand what is going wrong. This is nothing in exiftool or JTG. This is a security setting of windows. If Windows requires admin rights «to do something», it means Windows considers this as a «dangerous» action requiring and admin to do this. I guess this is due to the fact that my app does not come from the Windows store and is therefore not registered as «safe» and can therefore not start an exe from c:windows.
The fact that exiftool.org describes to copy exiftool into c:windows is that Phil Harvey assumes you use exiftool as is. And to copy it into c:windows will copy it into the path. (and by the way: this is against microsoft guidelines)
I can’t change this as it would require me to go through the Micosoft Store to register, and I don’t want that, OR it would require admin rights for JTG to change this on installation. I don’t want to do that either because I don’t want an install app and I don’t want to use admin rights.
I will change the readme to explain that exiftool.exe can’t be used from the windows folder for Windows security reasons.
I already tried the same with two other packages using exiftool.exe. They have the same «issue».
Next to that: it is also on my todo list to include exiftool in my package as default to prevent all kind of issues (like the exiftool(-k).exe), and of course leave the Preference option if users want to use another, newer exiftool version
Thanks for the feedback.
![]()
I use a standard user account.
To allow ExifTool to run in a standard user account without administrator privileges I use Oliver Betz’s alternate ExifTool Windows installer, which is discussed on ExifTool’s homepage.
I am sure there are other ways to solve this problem.
My standard user account does not allow EXE, DLL, … to run in the AppData folders. See: #101
On my system, this is why jExifToolGUI requires the administrator privileges. It appears, and I could be wrong, jExifToolGUI places a temporary DLL in the AppData folders to do something.
![]()
It doesn’t have to do with sqlite (as far as I can test). I also test on my work laptop which does not allow anything at all.
Please find attach a link to a 1.9.0 beta. It does not contain an exe, but a bat file, a jar and the jre.
1.9.0-beta-windows
Running exiftool from c:windows is simply not possible. That would require admin rights from JTG and I don’t want that.
The other issue probably had to do with spaces in the path. That worked correctly in earlier versions but «somehow something» had changed.
Please test if this one works correct.
![]()
Used bat file to open. Received the prompt regarding the location of ExifTool. jExifToolGUI didn’t open. Tried again, no prompt, jExifToolGUI didn’t open, location of ExifTool per log is correct. Saw splash screen in both tests. No prompt for administrator privileges in either test. Thank you.
First try log:
#logback.classic pattern: %d{HH:mm:ss.SSS} [%thread] %-5level %logger{36} - %msg%n 15:46:40.580 [main] INFO org.hvdw.jexiftoolgui.Application - Start application 15:46:40.580 [main] INFO org.hvdw.jexiftoolgui.Application - Continuing in system language or, if not translated, in English 15:46:41.392 [AWT-EventQueue-0] INFO o.h.j.controllers.StandardFileIO - copied the initial database 15:46:41.392 [AWT-EventQueue-0] INFO org.hvdw.jexiftoolgui.mainScreen - string for DB: C:Usersmejexiftoolgui_datajexiftoolgui.db 15:46:46.767 [AWT-EventQueue-0] INFO org.hvdw.jexiftoolgui.Utils - preference exiftool returned: null 15:46:47.001 [AWT-EventQueue-0] INFO org.hvdw.jexiftoolgui.Utils - exiftool_found mentions: true
Second try log:
#logback.classic pattern: %d{HH:mm:ss.SSS} [%thread] %-5level %logger{36} - %msg%n 15:48:01.264 [main] INFO org.hvdw.jexiftoolgui.Application - Start application 15:48:01.264 [main] INFO org.hvdw.jexiftoolgui.Application - Continuing in system language or, if not translated, in English 15:48:01.873 [AWT-EventQueue-0] INFO org.hvdw.jexiftoolgui.mainScreen - string for DB: C:Usersmejexiftoolgui_datajexiftoolgui.db 15:48:01.873 [AWT-EventQueue-0] INFO org.hvdw.jexiftoolgui.Utils - preference exiftool returned: C:Program FilesExifToolExifTool.exe 15:48:02.748 [AWT-EventQueue-0] INFO org.hvdw.jexiftoolgui.Utils - exiftool_found mentions: true
![]()
I’m sorry.
I buillt in more error checks.
Please download this jar and copy it over the existing one from Yesterday.
And please try again.
![]()
The program would not open. Splash screen appears. The log:
#logback.classic pattern: %d{HH:mm:ss.SSS} [%thread] %-5level %logger{36} - %msg%n 08:35:45.275 [main] INFO org.hvdw.jexiftoolgui.Application - Start application 08:35:45.275 [main] INFO org.hvdw.jexiftoolgui.Application - Continuing in system language or, if not translated, in English 08:35:46.197 [AWT-EventQueue-0] INFO org.hvdw.jexiftoolgui.mainScreen - string for DB: C:Usersmejexiftoolgui_datajexiftoolgui.db 08:35:46.197 [AWT-EventQueue-0] INFO org.hvdw.jexiftoolgui.Utils - preference exiftool returned: C:Program FilesExifToolExifTool.exe 08:35:46.946 [AWT-EventQueue-0] INFO org.hvdw.jexiftoolgui.Utils - exiftool_found mentions: true
Today (I did not look yesterday), I looked to see if the DLL was appearing in the Temp folder. It is:

Thank you.
![]()
I have the same problem as others on v1.8.1 Windows 10, the application fails to launch displaying an error that it cannot find exiftool.
The log file is helpful and provides the following error
14:03:26.965 [AWT-EventQueue-0] ERROR o.h.j.controllers.CommandRunner — IOException error
java.io.IOException: Cannot run program «C:/Users/Joseph/Jexiftool/exiftool.exeC:/Windows/exiftool.exe»: CreateProcess error=2, The system cannot find the file specified

The Registry shows the same string as found in the log file (Thanks cpo-ux for pointing to the registry). I deleted one of the two entries, leaving the path to the Jexiftool parent directory where I had added the current (12.29) version of exiftool and the application launched.
![]()
hvdwolf
added
bug
Something isn’t working
and removed
wontfix
This will not be worked on
labels
Aug 20, 2021
![]()
All,
(After long period of inactivity)
I finally found the bug. In case Windows has multiple versions in the path, jExifToolGUI goes wrong. I didn’t test for this as this can’t happen on a Linux or MacOS system. Even with multiple versions it will only take the first found.
Windows doesn’t do that, as it shows multiple versions, but can still only use one.
Please check this Full Windows 1.9.0 beta.
https://mega.nz/file/IQlQmArC#MaH-KlgN9dUWBurcD5jT1dP58M7mjhY7MlevrqTOS-M
Other changes/fixes will be reported later in official changelog.
hvdwolf
added a commit
that referenced
this issue
Aug 20, 2021
![]()
![]()
This was tested on a clean Windows 10 installation and it resolves the issue. Thanks.
![]()
Thanks for the feedback 👍
![]()
Running under Win 10 64-bit
Had downloaded jExifToolGUI-1.8.1.0-win-x86_64.zip, installed it, but it failed without feedback.
Then I found the link which says «fixed in beta» from the issues list: jExifToolGUI-1.9.0.0_beta-win-x86_64_with-jre.zip
this version also fails without feedback
Then I ran an earlier version 1.4.1 and it loads without errors.
FWIW, I have several copies of Exiftool.exe on my system, in several different locations, for different testing purposes and even installed Exiftool.exe to C:Windows ( and renamed it as instructed)
My investigation with 1.8.1 version found that 1.81. had found 2 versions of Exiftool.exe and recorded them in the registry, in a somewhat curious format, but evidently could not decide which to use.
Still, it would be very helpful if there was some visible feedback to the user.
Since there is no installation needed, it also makes it difficult to really uninstall an older, non-working version and since it records details in the registry, it is even more dangerous to try and remove any left-overs and restart with a clean environment.
This is meant entirely as feedback. I have not had much chance to use the app, but found it does have some features I think will be very helpful.
![]()
The only way that I could get jexiftoolgui to work is to change the registry entry mentioned above and to run as an administrator in Windows. Will not work as a standard user, needs administrator privileges apparently.
The registry key change I did in order to make it work was the following:
ComputerHKEY_CURRENT_USERSOFTWAREJavaSoftPrefsorghvdwjexiftoolgui Value name: exiftool Value data: /C:///Windows//exiftool.exe
This works when running jExifToolGUI.exe as admin. Running as standard user, it reports: Exiftool preference incorrect: The Exiftool specified in your preferences does not exist. Did you move/rename/delete it?
I had to do the same thing even with the latest version to fix it.
![]()
This is not a BUG! The bug was that two (or more) installed versions of exiftool make JTG crash.
I will not change this and I will certainly not make my program a «require local admin» rights program because exiftool is installed on the wrong location. I know that Phil advises to do that, but if you check the exiftool forum, you will see that even there is it disapproved.
Putting an external program in c:windows is a very bad habit, and something Microsoft doesn’t want, already since Win3.x. Being a local admin on your system allows you to do so, BUT DON’T DO IT. Not one single program that is installable will do that.
It will prevent many programs that are not installed with local admin rights from being able to use it. Mine is one that can’t use it either because I want my program to function without local admin rights, like any program should apart from system tools. Please put exiftool on another location, but not on the location Microsoft doesn’t want to have it in.
That you can use exiftool from the command line because it is comfortably in the PATH (as that is why Phil is advising it), doesn’t mean other programs can use it.
![]()
After one day thinking: It is a «bug». My program now tries to use exiftool from c:windows, but when it finds an exiftool.exe in c:windows (or actually %SYSTEMROOT% if windows has been installed in another folder), it should simply refuse to use it.
But it is not the same as the original #110 which dealtt with multiple exiftools in the PATH.
Название: «ExifTool НЕ НАЙДЕНО METATA ОПЕРАЦИИ DISABED Sony камеры Как проверить Shutter Учебник»
date: 2020-03-19 10:44:17
tags: Exiftool
Exiftool not found metadata operations disabled
введение Ошибка
Многие пользователи используют exitoolGui.exe быть ошибка программы «ExifTool не найден метаданных Операции Disabled», хотя основной интерфейс может быть открыт, но это не представляется возможным проанализировать информацию об изображении.


Источник ошибки
ExifTool без надлежащей установки
Имя файла 2.Exiftool не изменился
3.Exiftool и GUI не в том же каталоге
Решение,Ссылка на ссылку
Официальный сайт скачать EXIFTOOL-XX.XX.ZIP и EXIFTOOLGUI-XX.ZIP
Там нет загрузки, XX это номер версии, как правило, самая последняя версия. Убедитесь, что два скачиваются

декомпрессия
Распакуйте два сжатых пакетов, получить папку и исполняемый файл

Rename
Экстрагируют exitool (-K -) будут распакованы EXE-переименован EXIFTOOL.EXE..
Переместить exitool.exe в папку ExiftoolGUI


В это время, повторно запустить ExifTool GUI, вы можете использовать его как обычно. Оригинал приглашение ошибки было решено. Друзья, которые не были успешно решены после вышеуказанных операций приглашаются для обсуждения.
Как просмотреть количество затворов Nikon камеры Sony с ExifTool GUI
Поддерживаемые модели камеры
текущая операция
Съемка фотографий с запросом, JPG или RAW формат может быть
Импорт фотографий вы только что взяли в свой компьютер
Установите ExiftoolGui, нажав шаги выше, запустите программу
После выбора фотографий только что, выберите Maker или все на площади Metadata справа.
Фотография отображаются на правой стороне программы, логотип заглушки Shuttercount

Простой веб-запрос Sony затвора
ссылка на сайт
Просмотр поддерживается модель камеры
Нажмите «Поддерживаемые модели» на веб-странице, вы будете отображать поддерживаемую модель камеры
инструкции
Перетащите изображение в место с облаком знаком, отпустите кнопку мыши, или нажмите на параметры облака
Веб-страница будет автоматически решить ряд ставней на фото, отображаются как число изображенного ниже
Спасибо разработчикам
Искренняя благодарность разработчикам ExifToolPhil Harvey
Предложения, вопросы, комментарии по этому инструменту
Если у вас есть какие-либо предложения или проблемы с этим программным обеспечением, вы можетеВеб-сайтОставьте сообщение, люди по всему миру ответит вам
Поддержка автора
TA спонсор TA
Текущая поддержкаPaypal、Visa Подождите, WeChat и Alipay являются недействительными. Отказ Отказ Daxie это иностранцы.
DPP 3.4.1 now available from Canon
hbx2004
•
Veteran Member
•
Posts: 3,162
Installing ExifToolGUI
Blake D T
wrote:I downloaded and extracted exiftoolGUI and extracted all files. I
downloaded and extracted exiftool(-k) v7.30, extracted it and renamed
it exiftool.exe. I put both files into 1 folder but when I click on
exiftoolGUI I get a message that says that exiftool.exe is not found.
I am running Windows XP version2. Am I doing something wrong?
Inside Windows Explorer, use menu Tools-Folder Options and select View tab. There you look after «Hide extensions for known file types». Is it checked? Uncheck it!
Now go to the folder containing exiftool & GUI… do you see:
exiftool.exe
-there? Or do you see «exiftool.exe.exe» (which is wrong)?
Bogdan
—
My pictures are my memories
http://freeweb.siol.net/hrastni3/
Keyboard shortcuts:
FForum
PPrevious
NNext
WNext unread
UUpvote
SSubscribe
RReply
QQuote
BBookmark
MMy threads
Color scheme?
Blue /
Yellow
Latest sample galleries
Latest in-depth reviews

The OM System M.Zuiko Digital ED 90mm F3.5 Macro IS PRO is finally here! Chris has opinions.

The Canon EOS R8 is the company’s latest mid-level full-frame mirrorless camera. It brings the sensor and autofocus from the EOS R6 II and combines them in a smaller, more affordable body.

The Canon EOS R50 is an entry-level, compact APS-C mirrorless camera. A 24MP RF-mount camera aiming to attract smartphone users and, perhaps, vloggers.

See what Chris and Jordan think of the Canon EOS R8 after shooting in Charleston, South Carolina.

The Canon EOS R50 is inexpensive. It’s tiny. Is it good? Jordan and Chris dodged alligators in South Carolina to find out.
Latest buying guides

Above $2500 cameras tend to become increasingly specialized, making it difficult to select a ‘best’ option. We case our eye over the options costing more than $2500 but less than $4000, to find the best all-rounder.

There are a lot of photo/video cameras that have found a role as B-cameras on professional film productions or even A-cameras for amateur and independent productions. We’ve combed through the options and selected our two favorite cameras in this class.

What’s the best camera for around $2000? These capable cameras should be solid and well-built, have both the speed and focus to capture fast action and offer professional-level image quality. In this buying guide we’ve rounded up all the current interchangeable lens cameras costing around $2000 and recommended the best.

Family moments are precious and sometimes you want to capture that time spent with loved ones or friends in better quality than your phone can manage. We’ve selected a group of cameras that are easy to keep with you, and that can adapt to take photos wherever and whenever something memorable happens.

What’s the best camera for shooting sports and action? Fast continuous shooting, reliable autofocus and great battery life are just three of the most important factors. In this buying guide we’ve rounded-up several great cameras for shooting sports and action, and recommended the best.
-
#1
I just got my GH4 a few days ago and am still learning my way around it. My biggest problem at the moment is how to process its RAW files, so for now, I’m shooting RAW + JPG large with minimum compression. I tried the SILKYPIX software that came with it. Yikes! That was an awful experience. Is there any photo editor that can process GH4 RAW files now? Or a way to convert them to DNG or TIFF? I normally use PSE 11, but PSE 12, nor any other Adobe product, supports GH4 RAW files yet. Corel PaintShop Pro X6 will open them, but the preview is flatter than a pancake, so it’s really hard to tell what you’re doing. FastPictureViewer Pro displays them nicely, but displays «(No Histogram Data)».
-
#2
I’ve seen other threads and read blogs where folks are still using their GH3s for work since there is no support yet. Check the other GH4 threads or send a message to Kirk Tuck on his blog. He seems like a good guy, I imagine he would respond
-
#3
Oh wow so Lightroom can’t work with RAW files coming from a GH4 yet? Good thing I can’t spring for one yet!!
-
#4
I hope Adobe waits a year or two to support, so I can sleep well at night, not thinking too much about having to get it
-
#5
I found mention a couple places of using a hex editor to replace the text GH4 with GH3 in the RAW file, so I gave that a shot. I used the free program Be.HexEditor. Be sure to save a copy of the RAW file BEFORE editing, because the Be.HexEditor program doesn’t have a «Save As …» option. Perhaps there is one that does? Anyway, this trick seems to work OK, but I’ve only tried it on one photo so far. This was shot in late afternoon at ISO 5,000.

to see EXIF info for this image (if available)
Peony closeup by lundyd, on Flickr
-
#6
I found mention a couple places of using a hex editor to replace the text GH4 with GH3 in the RAW file, so I gave that a shot. I used the free program Be.HexEditor. Be sure to save a copy of the RAW file BEFORE editing, because the Be.HexEditor program doesn’t have a «Save As …» option. Perhaps there is one that does? Anyway, this trick seems to work OK, but I’ve only tried it on one photo so far. This was shot in late afternoon at ISO 5,000.
A safer way to do this would be using ExifTool or ExifToolGUI — change the model from GH4 to GH3.
With ExifTool, the command would be: ‘exiftool -model=»GH3″ *.ORF’
-
#7
Photo Ninja will open GH4 files but it doesnt have a color profile as of yet. If you have a color checker you could create one yourself and import it into Photo Ninja. Or you could photograph the colorchecker and send it to Photo Ninja support and they will create one for you.
-
#8
Just found the new version of Iridient Developer supports GH4 raws. I verified it opens them.
-
#9
A safer way to do this would be using ExifTool or ExifToolGUI — change the model from GH4 to GH3.
With ExifTool, the command would be: ‘exiftool -model=»GH3″ *.ORF’
Thanks for the tip, dhazeghi. I’m not sure how much safer that would be, but it would certainly be easier to convert several files at once. But since I’m using a Panasonic camera, it would be ‘exiftool -model=»GH3″ *.RW2‘ Your example using *.ORF is correct for your Olympus cameras, but not for my Panny.
-
#10
Just found the new version of Iridient Developer supports GH4 raws. I verified it opens them.
Thanks, Ranger Rick. I wasn’t familiar with Iridient Developer, so I looked it up. Now I know why I didn’t know about it — it’s Mac only. I’m sure some Mac users here will find that useful. For now, I’ll use dhazeghi’s tip to edit a copy of the RAW files with exiftool.
-
#11
Thanks, Ranger Rick. I wasn’t familiar with Iridient Developer, so I looked it up. Now I know why I didn’t know about it — it’s Mac only. I’m sure some Mac users here will find that useful. For now, I’ll use dhazeghi’s tip to edit a copy of the RAW files with exiftool.
Sorry, LundyD, I forgot some are still on those legacy OSs
Sent from my iPad using Tapatalk
-
#12
A safer way to do this would be using ExifTool or ExifToolGUI — change the model from GH4 to GH3.
With ExifTool, the command would be: ‘exiftool -model=»GH3″ *.ORF’
It’s been eons since I’ve attempted to use a non-native program in the Windows command prompt! I’m running Windows 8.1 and have copied the exiftool.exe file to the C:WINDOWS directory. When I try to use it, I get the following error.
‘C:WINDOWSexiftool’ is not recognized as an internal or external command, operable program or batch file. Argh! Now, what? The ExifTools website says In Windows 7, running exiftool requires administrator privileges. If necessary, this may be enabled by right clicking on exiftool, then selecting «Run this program as administrator» from the Compatibility settings. If I right-click the file and select Run as administrator, ExifTool opens in a cmd window and spews out hundreds of lines of help a page at a time, then exits and closes the cmd window after all the help is read.  I’m not making much progress here.
-
#13
It’s been eons since I’ve attempted to use a non-native program in the Windows command prompt! I’m running Windows 8.1 and have copied the exiftool.exe file to the C:WINDOWS directory. When I try to use it, I get the following error.
‘C:WINDOWSexiftool’ is not recognized as an internal or external command, operable program or batch file. Argh! Now, what? The ExifTools website says In Windows 7, running exiftool requires administrator privileges. If necessary, this may be enabled by right clicking on exiftool, then selecting «Run this program as administrator» from the Compatibility settings. If I right-click the file and select Run as administrator, ExifTool opens in a cmd window and spews out hundreds of lines of help a page at a time, then exits and closes the cmd window after all the help is read.
Did you do this at the website above?
«2. ExifToolGUI
You can download GUI from here. GUI doesn’t need to be «installed». Just unzip ExifToolGUI.zip file into any directory, create Desktop shortcut and GUI is ready to use.
Note: It is not recommended to put ExifToolGUI.exe into directories owned by operating system (Windows and Program files), unless you know what you’re doing.
So, if you didn’t already, just create new directory on C drive (i.e. C:MyTools), put ExifToolGUI.exe there and create Desktop shortcut.
GUI doesn’t write anything into registry file or elsewhere. After first usage, all settings are written into «ExifToolGUI.ini» file, which is automatically created in the same folder where «ExifToolGUI.exe» has been started from.»
-
#14
No, Phil, I hadn’t installed ExifToolGUI. ExifTool would need to work before ExifToolGUI could work, since it’s just a graphical interface to ExifTool, which I haven’t been able to get to work. Just for grins & giggles, I did try ExifToolGUI, and it immediately responded «ERROR: ExifTool not found! Metadata operations disabled.» That looks a lot like the error I was getting in the cmd shell, so I guessed maybe it’s not found in the system path. I updated the path to be sure ExifTool was included, but no change. I’m stumped.
-
#15
Well, it turns out that if I type the full path in the CMD prompt, it works, even though the path is already included in the environment variable, so including it when typing the command should not be necessary. Grrr! Well, at least I was able to update an entire directory of files by typing a single command. Curiously, FastPictureViewer still shows the edited files as being shot with a DMC-GH4, but PSE 11 shows them shot with a DMC-GH3.
-
#16
Ack! I’ve discovered that ExifTool also changes the date taken field (DateTimeOriginal in ExifTool-speak) when I only tell it to change the camera model. Not nice! Now I suppose I need to find a parameter to prevent that. It appears that -P does the trick. It shouldn’t be necessary to tell a program not to do something you didn’t specifically tell it to do. It wouldn’t bother me if it only changed the file modified date, but to also change the date taken doesn’t make sense to me.
-
#17
I just learned that Iridient Raw Developer (Mac only) supports the GH4 with a version released on May 7.
-
#18
I found mention a couple places of using a hex editor to replace the text GH4 with GH3 in the RAW file, so I gave that a shot. I used the free program Be.HexEditor. Be sure to save a copy of the RAW file BEFORE editing, because the Be.HexEditor program doesn’t have a «Save As …» option. Perhaps there is one that does? Anyway, this trick seems to work OK, but I’ve only tried it on one photo so far. This was shot in late afternoon at ISO 5,000.
Subscribeto see EXIF info for this image (if available)
Peony closeup by lundyd, on Flickr
yep this works. It would be awesome if someone could create a script that would convert a folder with this GH4 RAWS to GH3 instead of doing one by one.
-
#19
Thanks for the tip, dhazeghi. I’m not sure how much safer that would be, but it would certainly be easier to convert several files at once. But since I’m using a Panasonic camera, it would be ‘exiftool -model=»GH3″ *.RW2‘ Your example using *.ORF is correct for your Olympus cameras, but not for my Panny.
For whatever reason, I cannot get this command to work:
exiftool -model=»GH3″ *.RW2
It tells me:
Error: File not found — *RW2
0 image files updated
1 files weren’t updated due to error
[Process completed]
I’ve got a couple dozen .rw2 files. Any thoughts?
-
#20
You need to tell the program where the files are located. And the model is actually DMC-GH3 instead of just GH3. Also, if you don’t include the -P option, it will change the date taken date & time to the time you ran the command — probably not what you want. So the command ends up like so:
exiftool -P -model=»DMC-GH3″ «path-to-your-photos*.RW2» where «path-to-your-photos» might be «D:My PicturesGH4 tests» or something similar.
ExifTool — очень функциональная и быстроразвивающаяся утилита для работы с метаданными изображений самых различных форматов. Она позволяет читать и редактировать метаданные. Данное приложение имеет текстовый интерфейс, что позволяет работать с ней из интерфейса других программ, на пример QGIS. Но для этого ее сначала нужно корректно установить в систему. Рассмотрим, как установить ExifTool в Windows и Linux.
- Установка ExifTool в Windows
- Установка ExifTool в Linux
- Установка ExifTool в Macintosh OS X
Установка ExifTool в Windows
Поскольку Windows системы сейчас имеют большее распространение, начнем с установки в Windows.
И скачиваем версию для вашей операционной системы.
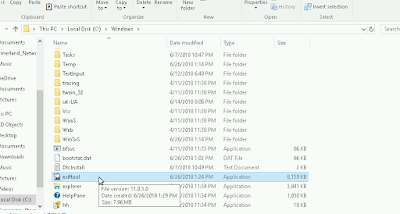
Для Windows нужно скачать ZIP-архив с исполняемым файлом.
Извлекаем из архива исполняемый файл exiftool(-k).exe
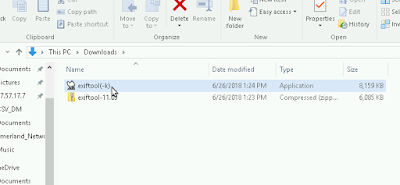
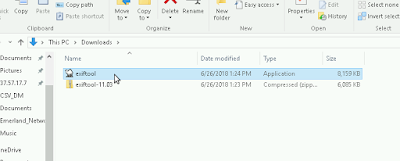
Переименовываем его в exiftool.exe без (-k)
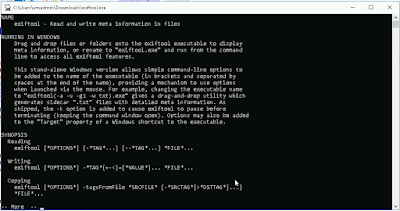
Запускаем этот файл, кликнув по нему 2 раза мышкой, или нажать по нему правой кнопкой мышки и из контекстного меню выбрать пункт «Открыть».
Должна запустится командная строка, в которой будет выведена информация про ExifTool и краткая инструкция как им пользоваться.
Если такого окна нет, а есть предупреждение, что исполняемый файл хочет запустится, соглашайтесь.
Далее переименованный файл exiftool.exe нужно переместить в системную папку «C:WINDOWS«.
На этом установка закончена. Для проверки корректности установки, запустите коммандную строку Windows и выполните в ней команду exiftool или exiftool.exe
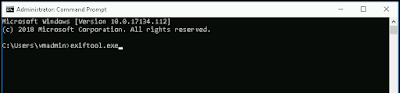
Если на предыдущих шагах Вы все сделали правильно, то увидите описание программы и краткие инструкции по работе с ней.

Больше информации про нюансы установки и удаления программы смотрите на официальной справочной странице:
https://sno.phy.queensu.ca/~phil/exiftool/install.html#Windows
Установка ExifTool в Linux
Установить ExifTool в Linux системы происходит быстрее.
Нужно скачать tar.gz архив с официального сайта.

Извлекаем содержимое из архива. Хоть через контекстное меню мышки «Извлечь сюда», хоть через терминал. В подробности вникать не буду, т. к. Вы наверняка умеете извлекать содержимое из архива.
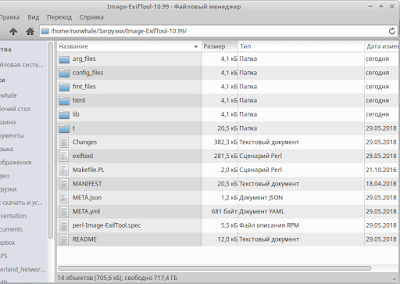
Далее нужно запустить терминал в созданной директории с содержимым архива. Тут уже у разных версий Linux начинаются отличия. В Xubuntu можно непосредственно в файловом менеджере Thunar, нажать правой кнопкой мышки по свободной зоне окна открытой директории, и из контекстного меню выбрать пункт «Открыть терминал».
Также можно в терминале перейти в нужный каталог при помощи команды cd
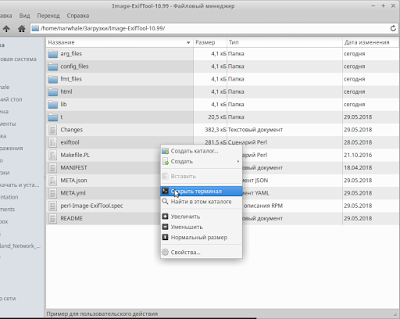
Далее, в терминале по очереди нужно выполнить 3 команды. Нужно подождать пока закончит выполнение каждая из команд, прежде чем запускать следующую.
perl Makefile.PL
make test
sudo make install
Если все команды выполнились без сообщений об ошибках, значит скорее всего Вы все сделали правильно!
Для проверки работоспособности выполните в терминале команду
exiftool
и нажмите <Enter>.
Если видите сообщение сообщение:
Syntax: exiftool [OPTIONS] FILE
Consult the exiftool documentation for a full list of options.
значит все OK!

Если же Вы видите сообщение:
Command ‘exiftool’ not found
значит где то не предыдущих шагах была ошибка.
Установка ExifTool в Macintosh OS X
Если Вы хотите в совершенстве овладеть функционалом QGIS, приглашаю посетить страницу моего онлайн курса «QGIS от новичка до профессионала» и ознакомится с его программой.
В курс включен концентрат моего 9-ти летнего опыта работы с QGIS для решения самых разных задач.
УЗНАТЬ БОЛЬШЕ О КУРСЕ
Если статья для тебя полезна, подписывайся на мои каналы и группы в соцсетях:
![]()
![]()
![]()
![]()
Я требовал mini_exiftool, 1.0.1 и установлен через gem. Но я до сих пор сталкиваюсь с проблемой Command 'exiftool' not found (MiniExiftool::Error).
1 ответы
Вам следует установить exiftool Инструмент CLI, вот как.
Создан 28 янв.
![]()
Не тот ответ, который вы ищете? Просмотрите другие вопросы с метками
ruby
exiftool
or задайте свой вопрос.
Содержание
- Как установить ExifTool в Windows и Linux
- Установка в Debian, Linux Mint, Kali Linux, Ubuntu и их производные
- Установка в Arch Linux, Manjaro, BlackArch
- Установка в Windows
- Описание опций и инструкции по применению
- Installing ExifTool
- Windows
- Stand-Alone Executable
- Full Perl Distribution
- MacOS
- MacOS Package
- Full Perl Distribution
- Uninstalling
- Unix Platforms
- ExifToolGUI for Windows v5.xx
- Introduction
- Requirements and preparations
- 1. ExifTool
- 2. ExifToolGUI
- 3. jhead.exe & jpegtran.exe
- 4. Wish to see thumbnails of raw image files?
- Content
- Program menu
- About
- Preferences
- Workspace manager
- Workspace definition file: Load/Save
- GUI color
- Options menu
- Don’t make backup files
- Preserve Date modified of files
- Ignore minor errors in metadata
- Show Exif:GPS in decimal notation
- Show sorted tags (not in Workspace)
- Show Composite tags in view ALL
- Don’t show duplicated tags
- Export/Import menu
- Export metadata into : TXT, MIE, XMP, EXIF, HTML files
- Copy metadata from single file
- Copy metadata into JPG or TIF files
- Copy metadata into all JPG or TIF files
- Import GPS data from : Log files
- Import GPS data from : Xmp files
- Extract preview image from selected: raw files
- Embed preview image into selected: raw files
- Modify menu
- Exif: DateTime shift
- Exif: DateTime equalize
- Exif: LensInfo from Makernotes
- Remove metadata
- Various menu
- File: Date modified as in Exif
- File: Name=DateTime+Name
- JPG: Lossless autorotate
- Filelist panel
- ExifTool direct panel
- Some examples for exercise:
- Using predefined ExifTool commands
- Modifying predefined commands
- Using args files
- Show Log Window button
- Metadata panel
- Edit metadata in Workspace
- Pop-up menu in Metadata panel
- GoogleMap panel
- Final words
ExifTool — это очень мощное приложение командной строки для чтения, записи и редактирования метаинформации в самых разных файлах. ExifTool поддерживает множество различных форматов метаданных, включая EXIF, GPS, IPTC, XMP, JFIF, GeoTIFF, ICC Profile, Photoshop IRB, FlashPix, AFCP и ID3, Lyrics3, а также примечания производителя многих цифровых камер Canon, Casio, DJI, FLIR, FujiFilm, GE, GoPro, HP, JVC/Victor, Kodak, Leaf, Minolta/Konica-Minolta, Motorola, Nikon, Nintendo, Olympus/Epson, Panasonic/Leica, Pentax/Asahi, Phase One, Reconyx, Ricoh, Samsung, Sanyo, Sigma/Foveon и Sony.

Установка в Debian, Linux Mint, Kali Linux, Ubuntu и их производные
Установка в Arch Linux, Manjaro, BlackArch
После этого исполнимый файл программы находится по пути /usr/bin/vendor_perl/exiftool. Поскольку файл не находится в переменной окружения $PATH, то для его запуска нужно указывать полный путь до файла:
Это можно исправить сделав ссылку на файл из каталога, входящего в $PATH, например, из /usr/bin/:
После этого программу можно запускать так:
Установка в Windows
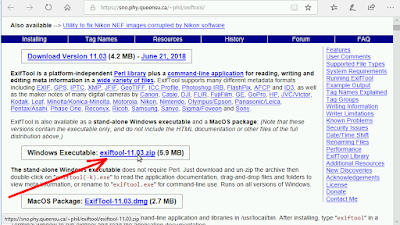
Перейдите на официальный сайт программы: https://exiftool.org/ и скачайте архив «Windows Executable».

Распакуйте скаченный файл exiftool(-k).exe.
Если запустить этот файл двойным кликом, то будет показана документация по ExifTool (на английском языке).
Название файла exiftool(-k).exe показывает, что программа запускается с опцией -k. Из-за использования скобок в имени файла, при запуске программы в командной строке его придётся каждый раз помещать в кавычки. Чтобы этого не делать, переименуйте файл в exiftool.exe.
Для полноценной работы с программой, её нужно запускать в командной строке. Если вы не знаете, что это такое, то прочитайте статью «Настройка рабочего окружения PowerShell в Windows и Linux».
Пример извлечения метаданных в Windows:
1. Откроем PowerShell — для этого нажмите Win+x и выберите «Windows PowerShell».
2. Допустим, файл exiftool.exe расположен в папке C:UsersMiAlDownloads, перейдём в неё с помощью команды cd:
3. Для извлечения метаданных из изображения, запустите команду вида:
К примеру, файл изображения с метаданными расположен по пути C:UsersMiAlDocumentstestingfoto20191106_181909.jpg, тогда команда для извлечения из него метаданных следующая:

Описание опций и инструкции по применению
Информацию об опциях этой программы и инструкции по использованию смотрите на этой странице (список инструкций в самом низу).
Источник
Note: ExifTool does not need to be installed to run. Just download and extract either the full Perl distribution on Mac/Linux, or the Windows EXE version on Windows, and run it directly. [But note that if you move the Perl «exiftool» application, you must also move its «lib» directory to the same location. This doesn’t apply to the Windows version which unpacks the libraries into a temporary directory.]
See the appropriate section below with instructions for installing or uninstalling ExifTool on your specific platform:
Also see these instructions for help running ExifTool.
Windows
In Windows, there is a choice of two different versions of ExifTool to install. The Perl distribution requires Perl to be installed on your system. (A good, free Perl interpreter can be downloaded from activeperl.com.)
If you don’t already have Perl, it is easier to install the stand-alone ExifTool executable, but note that the stand-alone version doesn’t include the HTML documentation or some other files of the full distribution.
Stand-Alone Executable
You can now double-click on » exiftool(-k).exe » to read the application documentation, or drag-and-drop files and folders to run exiftool on selected files. To install exiftool for use from the command line, continue with the following steps:
You can now run exiftool by typing » exiftool » at the command prompt. (To get to the command prompt, select «Run. » from the Windows «Start» menu, then type » cmd » and press Return.)
Full Perl Distribution
You must have Perl installed to use this version. (A free version of Perl can be downloaded from activeperl.com.)
MacOS
If you have installed the BSDSDK package from the Xcode Developer Tools (ie. if you have the » make » utility), you should follow the install procedure for Unix platforms in the next section instead of the steps below. The Unix install has the advantage of making the ExifTool library available for your Perl scripts, as well as installing the man pages and POD documentation.
Otherwise, you have a choice of two packages to install: The MacOS package, or the full Perl distribution. Both of the procedures below install the ExifTool files in the same location. Installing from the MacOS package is easier, but the full distribution includes HTML documentation and some other files not included in the MacOS package. Both versions run natively on PPC and Intel Macs.
MacOS Package
You can now run exiftool by typing » exiftool » in a Terminal window.
If this doesn’t work, then it is likely you have an older version of MacOS for which /usr/local/bin isn’t in the default PATH. To fix this, add the following line to your
/.profile settings using a text editor:
Full Perl Distribution
You can now run exiftool by typing » exiftool » in a Terminal window.
«ExifTool-12.33.pkg» can’t be opened because it is from an unidentified developer.
Uninstalling
Unix Platforms
You can now run exiftool by typing » exiftool «. Also, you can consult the ExifTool documentation with commands like:
Источник
Назваться любителем командной строки будет для меня как-то чересчур, скорее, я стал им добровольно-принудительно, т.к. после обновления OS X 10.7 на 10.8 перестала работать программа, которая до того вполне неплохо проставляла геотеги на отснятые фотографии. Здесь надо сделать отступление: на написание этой заметки меня сподвиг более или менее «соседний» материал под названием «Как сэкономить на фотоаппарате с GPS». В моём случае имеет место несколько менее извращённый подход к получению координат посещённых мест, а именно — запись трека GPS-навигатором, остальное же выполняется с помощью ExifTool.
Пожалуй, можно опустить получение удобоваримого формата трека, т.к. это вряд ли сопоставимо с темой заметки, а вот проставление геотегов — одна из задач, которую ExifTool чудесно выполняет.
Итак, предположим, что у Вас есть набор снимков, GPS-трек, ExifTool и часы камеры и GPS-устройства были синхронизированы (или Вы знаете разницу во времени). В таком случае следующая команда удобно совершит все действия над файлами *.tif в текущем каталоге (папке):
N.B.: я использую запись «exiftool», т.к. в моём случае (OS X) так оно вызовется относительно правильно, для Windows желательно будет добавить расширение (с уважением, К.О.).
Удобно? По-моему, относительно удобно. Лично мне тыкать мышью в поисках трек-файла часто отнимало больше времени, чем сразу прописать путь к нему.
Бывает потребность в обратном: удалении геотегов. Это тоже элементарно:
Но давайте рассмотрим и другие аспекты применения ExifTool.
Копирование EXIF-тегов
Я использую RAW-конвертор RPP, у которого есть опция, позволяющая включить или выключить копирование EXIF-тегов. Иногда это действительно удобно, но иногда — очень даже лишнее. Зазевавшись однажды, я заметил недостающую информацию уже после того, как были сгенерированы и обработаны все *.tiff. Но оказалось, что этот вариант — не проблема. Решение элементарно как для одиночного файла:
Так и для нескольких файлов в папке (предполагается, что оригиналы и производные лежат «рядом»):
Свалить в более или менее хронологическую кучу фотографии с разных камер
Переименование осуществляется только на основе даты из EXIF, имя файла-оригинала удаляется:
И без удаления имени оригинала:
N.B.: желательно, чтобы часы камер были предварительно синхронизированы (с уважением, К.О.).
В метаданные можно вписать Ваши титулы и email-ы
Вы же хотите, чтобы Вас потом можно было найти?
Извлечь определённые данные (на примере фокусного расстояния)
В ходе одной дискуссии у меня возникла необходимость ответить на вопрос о том, каковы наиболее популярные (у меня) фокусные расстояния. Но надо откуда-то взять исходные данные. Что ж, можно выгрузить информацию в текстовый файл, например, в формате :
Дальнейший анализ легко выполняется в любимом табличном процессоре (хотя мой друг, поленившись, втянул всё это в SQL-базу, для него так было быстрее).
Восстановить дату создания файла
В ходе манипуляций ExifTool поменяет дату создания файла (что, в принципе, логично, т.к. файлы переписываются). Восстановить дату создания оригинала легко:
Извлечение встроенных в RAW JPEG-ов
Иногда бывает полезно. Впрочем, это элементарно:
Добавить в EXIF данные о старой оптике
Имея в наличии арсенал старой оптики и всевозможные переходники для Sony Nex, у меня также есть желание знать, каким объективом я снимал. Это тоже вполне возможно:
На известном форуме любителей MF-оптики предлагается более изящный вариант, который требует создания файла-описания для каждой линзы, по виду:
После чего его применение будет несколько более тривиальным:
N.B.: последняя строка в файле-описании необязательна, т.к. она определяет запись «рабочего значения» диафрагмы, а оно, во-первых, может быть разным, а во-вторых, не всех действительно интересует. Ведь тогда надо его не только запомнить, но и проставить отдельно для всех фотографий…
Надеюсь, кому-то эта информация покажется интересной и/или пригодится, хотя она является, по большому счёту, выдержками из документации ExifTool. Однако, не всегда есть возможность читать всю документацию, потому «готовый рецепт» может пригодится. По крайней мере, я так полагаю. Удачи!
UPD1. В комментариях (здесь) советуют альтернативу для некоторых операций — я пока что не смотрел, но вдруг.
UPD2. А ещё — дельное напоминание о существовании Windows-GUI для ExifTool.
Источник
Introduction
Requirements and preparations
ExiftoolGUI should run on WinXP up to Win7-64bit. However, because GUI is developed in Win7 environment, I can’t guarantee backward compatibility.
1. ExifTool
You only need to download «Windows Executable» zip file from here. After unzipping, you will see:
Case A: exiftool(-k) or Case B: exiftool(-k).exe
Note: In case you’ve done something wrong in this regard, you’ll see an error message when GUI starts.
2. ExifToolGUI
You can download GUI from here. GUI doesn’t need to be «installed». Just unzip ExifToolGUI.zip file into any directory, create Desktop shortcut and GUI is ready to use.
Note: It is not recommended to put ExifToolGUI.exe into directories owned by operating system (Windows and Program files), unless you know what you’re doing.
So, if you didn’t already, just create new directory on C drive (i.e. C:MyTools), put ExifToolGUI.exe there and create Desktop shortcut.
GUI doesn’t write anything into registry file or elsewhere. After first usage, all settings are written into «ExifToolGUI.ini» file, which is automatically created in the same folder where «ExifToolGUI.exe» has been started from.
3. jhead.exe & jpegtran.exe
Note: To check if everything is ready, use menu Program>About.. first.
4. Wish to see thumbnails of raw image files?
That’s all you need. And when new ExifTool or GUI version is available, you only need to repeat process as described above.

Content
About
-displays ExifTool and GUI versions.
Preferences

Metadata language
Here you can choose the language for displaying metadata tag names and values in Metadata panel. Selected language is also used when working in ExifTool direct mode (output to Log window ), or when exporting metadata to external TXT files.
Enabling internet access
By default, this option is unchecked and if you are a bit paranoid, then keep it that way. In this case however, you won’t be able to use GUI’s GoogleMap feature for geotagging your images manually. After changing this option, you’ll need to close and reopen GUI, to make this feature available.
Default Startup & Export folder
I think, these two options don’t need some special explanation.
Save Filelist Details state on exit
If checked, then Details: button state and selected Filelist view (Standard filelist, Camera settings. etc.) are saved when closing GUI. Selected Thumbnails size is always saved.
Other settings tab (not shown in above screenshot)
Workspace: Move focus to next tag/line after value is entered
By default, when you hit Enter button to confirm changing tag value in Workspace, focus of selected tag/line automatically moves to next tag/line. If you prefer focus would remain on currently edited tag/line, then uncheck this option.
Workspace manager
Here you define what will be shown in Metadata panel when Workspace is selected. Besides ExifTool direct option, this is the most powerfull GUI feature.

Tag name column
Here you define tag name you prefer to be displayed for particular metadata tag. These tag names don’t have any influence on actual tag names and you can write anything here, i.e. instead of «ISO», you can have «Noise maker» here.
Tag names written here, can have different «behaviour» in case special character is used for their ending. For now, GUI uses following ending characters:
Note: I might use further special ending characters in future, so try to avoid their usage at the end (or start) of tag names.
I hope you can recognize the power of Workspace manager : YOU define any metadata tag you wish to change regulary. Btw. you can move defined tags up/down by clicking & moving tag name in first (Tag name) column.
Workspace definition file: Load/Save
GUI color
My humble attempt to keep GUI up to date. to some degree 🙂
Don’t make backup files
-if checked (default), then ExifTool won’t make «filename.ext_original» backup files. However, if you’re not sure what you’re doing, then you better uncheck this option.
Preserve Date modified of files
-no matter what I think about this, some prefer having this option checked.
Ignore minor errors in metadata
-by default, this option is unchecked. This results, in case metadata is not «as it should be», ExifTool will output warnings/errors messages when trying to modify such metadata. That is, ExifTool will refuse to write into file in case metadata is not in «perfect» condition, or if there’s a danger that you might lose some metadata by modifying it.
If this option is checked and metadata only contain «minor» errors (or only «minor» damage can occur), then ExifTool will do his job anyway.
Show Exif:GPS in decimal notation
-checked by default (because i.e. GoogleMap uses this notation as well).
Show sorted tags (not in Workspace)
-if this option is unchecked (default), then metadata tags are shown sorted as defined internally in metadata. Many times however, it’s quite hard to find particular tag in listing, so I can imagine, that this option will be checked most of the time.
Obviously, this setting has no influence on Workspace view output (see Workspace manager above).
Show Composite tags in view ALL
Composite tags aren’t «real» tags (their values are calculated from various existing tags), so they are shown optionally.
Don’t show duplicated tags
All above options will be saved when exiting GUI and thus be applied in next GUI start. Remaining options settings however, are only temporary (as long GUI is running) and are not checked by default:
Export metadata into : TXT, MIE, XMP, EXIF, HTML files
Every of these formats has different purpose: i.e. MIE is for making backup of complete metadata inside image file, HTML is ment for «studying» metadata structure, etc. So, try and see what suits your needs.
Copy metadata from single file
Copy metadata into JPG or TIF files
If single (JPG or TIFF) file is selected (=destination), then metadata can be copied from any other file containing metadata (incl. MIE file).
If multiple files are selected, then metatada will be imported only where source and target files have equal names.
Note: Because it’s assumed, that destination file has been modified inbetween (resized, etc.), not all metadata is desired to be copied. Because of this, you’ll be asked, if you also wish to copy following tags: 
-in 99% cases, there will be no reason to check any of above option.
Copy metadata into all JPG or TIF files
1. Select any destination file inside MyJpgDir1 folder. If you select any JPG file, then only JPG files will be processed; if you select TIF instead, then only TIF files will be processed.
2. Choose menu Copy metadata into all JPG or TIF files
3. Click on Yes button when asked
4. File browser will appear, where you select any (source) file inside MyRawDir1 folder. Note: You only need to select one file (to specify file extension).
5. A panel will appear, where you confirm/check which of «not desired» metadata you wish to be copied:
Note: Even if none of above is checked, the rest of metadata in source files (Exif, Xmp, etc.) will be copied into destination files.
Import GPS data from : Log files
This option allows geotagging your files in batch by using log file of your GPS device (see here for supported GPS files). 
Step 1: Select log file of your GPS device.
As usually in GUI, you must select files you wish to geotag, first. In most cases, folder content will contain series of «session» photos, so you will select all of them.
Step 3: Choose Reference DateTime value.
Here you define which photo DateTime values to compare with those in log file.
Import GPS data from : Xmp files
Embed preview image into selected: raw files
This does the opposite as previous option does. Because I didn’t noticed much interest from users, JPG images can be embedded (back) into CR2 raw files only. That is, I made this for my needs in first place.
Exif: DateTime shift

Exif: DateTime equalize

Exif: LensInfo from Makernotes
This will fill Exif:LensInfo of selected file(s) with relevant values from Makernotes data (where possible).
Remove metadata

Note, that in some cases (depends on image file format), it’s not possible/safe to remove metadata you’ve choosed for removing. In such cases, ExifTool will simply refuse to remove such metadata (also see Ignore minor errors in metadata menu above).
File: Date modified as in Exif
-use it, if you feel the need.
File: Name=DateTime+Name

JPG: Lossless autorotate
-this will phisically rotate selected JPG images according to Exif:Orientation value inside files.
Filelist panel

Refresh button
-will update folder (directory) content in filelist panel. This might be usefull in cases you’re interested on file characteristics changes (size, etc.) after applied operations.
File filter drop-down box
-is set to Show ALL files by default on every GUI startup and this behaviour can’t be changed. This drop-down box allready contain few predefined file filters and by clicking on Edit button, you can add additional filters which you need most often.
Details: button
-is «pressed» by default, which means, files are listed with detals about files. If this button is «de-pressed» then thumbnails are shown instead of file details.
Note: Only thumbnails for «registered» image files will be shown as images. Meaning, for raw image files, you’ll need to install appropriate raw «codec», to be able to see thumbnails and previews.
No matter how disappointed you might be, you can’t define/change tags shown in these predefined views. The main and only reason why’s that is: that’s the only way I could get reasonable speed to show this data.
By clicking on ExifTool direct button, you get an input field where ExifTool commands can be entered and executed: 
Some examples for exercise:
Using predefined ExifTool commands
There’s one predefined ExifTool command in GUI, so you can see what’s all about. To access it, you click on combo-box (blank on above image) and choose it: 
Once command is chosen, you can execute it by pressing Enter key (while you’re in edit field). If needed, you can modify displayed command and execute it, without actually changing predefined command.
Modifying predefined commands
By clicking on Edit predefined button, panel increases with additional options: 
Using args files
args file is a text file, usually containing several ExifTool commands, which are all executed by simple call of single args file. Here’s a example of args file, containing two commands, written by Notepad: Let’s save this text as «MyData.args». Note: File must be saved in the same folder where exiftool.exe is saved (or inside Windows folder).
To execute above commands in GUI (after desired image files are selected), we need to write the following Command into ExifTool direct panel:
-and press Enter key.
ExifTool full source version (can be downloaded on top of ExifTool main page) contains several predefined args files, which are ment for transferring «similar» metadata between sections. One of them is (for example) «xmp2iptc.args» file, which copies all «compatible» metadata from Xmp to Iptc section. And as said, there are more of them.
Show Log Window button
Note: In case of errors, Log window with relevant messages automatically appears after ExifTool ends processing files.

Edit metadata in Workspace
As mentioned, if you right-click on any tag shown in Metadata panel, a pop-up menu will appear:


GoogleMap panel

Show on map button
If selected image is geo-tagged (contains GPS data), then, after clicking on this button, you can see that geo-position on the map.
Get location button
Coordinates of current map cursor position on the map are shown in Find field (for copy/pasting, etc.).
Zoom trackbar
GoogleMap allready contains zoom tool. The difference is, that by using Zoom trackbar, you’re zooming on position where map cursor is. That is, when zooming, position of map cursor remains in the center of the map.
Find field
-for finding places easier.
Home button
-moves the map cursor to your predefined position.
Set^ button
Current map cursor position becomes Home position.
Geotag files button
By clicking on this button, all selected files will be geotagged with current map cursor position.
Final words
Many thanks to Phil, for providing space for GUI on his server and for trusting me to access it.
Bogdan Hrastnik
Modified on May, 2012
And if interested: first ExifToolGUI v1.00 was «published» on May 27th, 2007.
Источник