Error handling is a crucial part of any production-ready application. It’s often neglected when you are exploring project ideas and trying to learn. But you should never forget about it when you launch your project for public use.
Your users deserve to have the best experience and receive useful error messages. And you deserve the peace of mind that your application can handle all kinds of errors.
When you decide to handle errors yourself, you can add useful information to them, such as HTTP response status codes. You can separate critical errors from those caused by users. Doing error handling yourself gives you options like error logging or sending yourself an email.
In this post you will learn about the many parts of error handling, such as the following:
- catching all types of errors
- funneling all errors into a single error handler
- creating your own error-handling middleware
- setting up a custom error class
- implementing the error handler to process all errors
To just see the code, visit this demo repository.
Prerequisites
You should have an Express application set up with TypeScript.
These are the dependencies used in this post.
npm i express
npm i @types/express @types/node ts-node-dev typescript --save-dev
Catching Errors
To handle errors, you first must catch them. You could program the best error handler, but it wouldn’t matter if some errors would escape it.
Express can catch all synchronous errors and send them to its error-handling middleware.
To verify, try throwing an error in one of your routes.
router.get('/', (req: Request, res: Response) => {
  throw new Error('This is an error');

  res.json({ status: 'ok' });
});
Visit the / route in your browser and you should see an error.
Error: This is an error
    at /path/to/project/src/routes.ts:6:9
    ...
Express includes the stack trace in the error message you see in your browser. If you set Node environment to production (NODE_ENV=production), Express will hide the stack trace.
However, errors thrown in asynchronous code can go unnoticed by Express.
Catching Errors in Asynchronous Code
As just mentioned, Express doesn’t catch errors thrown in asynchronous code. Unless you are from the future and using Express 5. You can skip this section then.
For those stuck with Express 4, consider the following code that throws an error inside a promise. Something that could happen when reading user data from a database.
const getUserFromDb = () => {
  return new Promise(() => {
    throw new Error('This is an error');
  });
};

router.get('/', async (req: Request, res: Response) => {
  const data = await getUserFromDb();

  res.json({ user: data });
});
If you revisit the / route, the page won’t load and you will need to restart your application.
You need to catch errors in async code yourself. Otherwise Express won’t pass them to the default error-handling middleware. You can use try/catch and the NextFunction to do that.
import { NextFunction, Request, Response } from 'express';

router.get('/', async (req: Request, res: Response, next: NextFunction) => {
  try {
    const data = await getUserFromDb();

    res.json({ user: data });
  } catch (error) {
    next(error);
  }
});
Notice how you pass the caught error to next function. Any argument you pass to next, Express will treat as an error. By calling next(error), you jump from any middleware straight to the error-handling middleware.
The problem with try/catch approach is having to do it tens or hundreds of times as your app grows. It is repetitive, hence error-prone.
You can use a package dedicated to catching async errors for you. One such package is express-async-errors.
Install it as a dependency.
npm i express-async-errors
And import it before you register any router handlers.
// src/routes.ts

import 'express-async-errors';
import { NextFunction, Request, Response, Router } from 'express';

const router = Router();

const getUserFromDb = () => {
  return new Promise(() => {
    throw new Error('This is an error');
  });
};

router.get('/', async (req: Request, res: Response) => {
  const data = await getUserFromDb();

  res.json({ user: data });
});

export default router;
The express-async-errors package will make sure async errors in your routes get caught. And Express will be able to handle these errors.
So far you have learned that Express can catch errors in synchronous code and how to help it catch async errors. What about errors that Express doesn’t notice? You need to deal with unhandled rejections and uncaught exceptions yourself.
Dealing With Unhandled and Uncaught Errors
Sometimes an error goes unnoticed and Express doesn’t handle it. When Node.js encounters such errors, it emits events that you can listen to.
The first event you need to listen to is unhandledRejection. It happens when your code doesn’t handle a rejected Promise with a .catch().
const getUserFromDb = async () => {
  return new Promise((_, reject) => {
    reject('This is an error');
  });
};

router.get('/', async (req: Request, res: Response) => {
  getUserFromDb()
    .then(value => {
      res.json(value);
    })
});
Since this code doesn’t handle rejections from getUserFromDb with a .catch(), an UnhandledPromiseRejection warning shows up in Node.js console.
To fix it, you can register a listener function on the process object that handles the unhandledRejection event.
// src/process.ts

process.on('unhandledRejection', (reason: Error | any) => {
  console.log(`Unhandled Rejection: ${reason.message || reason}`);

  throw new Error(reason.message || reason);
});
Since rejections are used to return errors from Promises, you can throw an error with the given reason from the rejection.
In this case, Express won’t handle the thrown error anyway. You have created an uncaught exception. Any errors in your code base, that Express can’t handle, turn into uncaught exceptions. Luckily, you can catch them errors yourself.
To catch uncaught exceptions, listen to the uncaughtException event by setting up an event listener on the process object.
// src/process.ts

process.on('uncaughtException', (error: Error) => {
  console.log(`Uncaught Exception: ${error.message}`);

  errorHandler.handleError(error);
});
Here you want to funnel the errors into a function that handles them. Later in this post you will learn how to implement the handleError function.
You can crash your application by calling process.exit(1). Set up an automatic restart mechanism when your application exits with a non-zero code.
Don’t forget to import the code that registers the process event listener functions into your app.
// index.ts

import express, { Application } from 'express';
import './src/process';
You learned how to funnel uncaught errors into your own error handler. The errors caught in middleware functions are still handled by Express. If you want to handle them yourself, you need to create your own error-handling middleware.
Creating a Custom Error-Handling Middleware
To override default Express error responses, you need to create your own error-handling middleware.
An error-handling middleware differs from other middleware functions by having 4 parameters — err, req, res, next. Additionally, it has to be the last middleware you set up in your application. For this reason, call app.use(router) after all other app.use() calls in your index.ts. And register the error-handling middleware after registering other route handlers.
Now go ahead and register your custom error-handling middleware.
// src/routes.ts

import { NextFunction, Request, Response, Router } from 'express';
import { errorHandler } from './exceptions/ErrorHandler';

// ... all other routes

router.use((err: Error, req: Request, res: Response, next: NextFunction) => {
  errorHandler.handleError(err, res);
});
Similarly to how you previously handled uncaught exceptions, you can funnel all errors into errorHandler, which you will get to implement very soon. You should also pass the Response object to the error handler so you can use it to send a response.
You can have more than one error-handling middleware. To pass the error from one to another, call the next function and pass it the error.
// ... all other routes

router.use((err: Error, req: Request, res: Response, next: NextFunction) => {
  // 1. Log the error or send it to a 3rd party error monitoring software
  logger.logError(err);

  next(err);
});

router.use((err: Error, req: Request, res: Response, next: NextFunction) => {
  // 2. Send an email to yourself, or a message somewhere
  messenger.sendErrorMessage(err);

  next(err);
});

router.use((err: Error, req: Request, res: Response, next: NextFunction) => {
  // 3. Lastly, handle the error
  errorHandler.handleError(err, res);
});
The error will flow through the error-handling middleware functions from first to last (1-2-3).
The last error-handling middleware should send a response, so the client’s connection doesn’t hang up. In this case, handleError should send a response through the res argument.
You can also call next(err) in your last error-handling middleware to send it to Express error handler.
Good job, you have learned a lot. You have set up an error-handling middleware that funnels the caught errors into your error handler. Funneling both uncaught and caught errors, you are almost ready to handle them. One last thing you should do is create a custom error class. This will help to determine the severity of an error and what the HTTP response status code should be.
Creating Custom Error Class
You can use a custom error class to differentiate errors from one another. You might want to add data to an error or handle it differently than other types of errors.
One improvement you can do is attaching an HTTP response status code to your errors.
You can use an enum to map status codes to a human readable name. This way you don’t have to remember the numbers.
// exceptions/AppError.ts

export enum HttpCode {
  OK = 200,
  NO_CONTENT = 204,
  BAD_REQUEST = 400,
  UNAUTHORIZED = 401,
  NOT_FOUND = 404,
  INTERNAL_SERVER_ERROR = 500,
}
These are some of the most common status codes. Go ahead and add any other ones your application uses. You can use this MDN article as a reference.
Another improvement is separating critical application errors from those that are expected. For example, validation errors caused by user input are fine. Errors thrown from mistakes made by you, the developer, are bad.
Now go and create your own AppError class that extends the default Error class.
// exceptions/AppError.ts

export enum HttpCode { /*...*/ }

interface AppErrorArgs {
  name?: string;
  httpCode: HttpCode;
  description: string;
  isOperational?: boolean;
}

export class AppError extends Error {
  public readonly name: string;
  public readonly httpCode: HttpCode;
  public readonly isOperational: boolean = true;

  constructor(args: AppErrorArgs) {
    super(args.description);

    Object.setPrototypeOf(this, new.target.prototype);

    this.name = args.name || 'Error';
    this.httpCode = args.httpCode;

    if (args.isOperational !== undefined) {
      this.isOperational = args.isOperational;
    }

    Error.captureStackTrace(this);
  }
}
When you use super in a child class, you call the constructor of parent class. In this case, calling super will trigger Error class constructor, which sets the error’s message property to contain your description.
The required httpCode and description is what your application will return in responses. Optionally, you can give your error a name.
The isOperational property is what determines if this error is a serious mistake. Setting it to true means that the error is normal and the user should receive an explanation what caused it.
Any error that is not operational indicates a problem with your code, which you should investigate and fix.
Using the Custom Error Class
You use your AppError class whenever you want to fail the client’s request. Whether it be because user lacks permissions, their input is invalid, or they are not logged in. Or for any other reason you desire.
import { AppError, HttpCode } from './exceptions/AppError';

router.get('/user/:id', async (req: Request, res: Response) => {
  if (!res.locals.user) {
    throw new AppError({
      httpCode: HttpCode.UNAUTHORIZED,
      description: 'You must be logged in',
    });
  }

  const user = await getUserFromDb();

  if (!user) {
    throw new AppError({
      httpCode: HttpCode.NOT_FOUND,
      description: 'User you are looking for does not exist',
    });
  }

  res.json(user);
});
You are not limited to routes, you can throw AppError anywhere in your code. Remember to set isOperational to false when throwing a critical error.
Your error-handling middleware that you created earlier will catch all errors from your routes. It will then send them to your error handler, which you are now finally going to create.
Creating an Error Handler
Your error handler should distinguish errors that can be trusted. A trusted error doesn’t take much work, you just have to send an error response to the client. On the other hand, an error you can’t trust requires extra steps.
Start by creating an ErrorHandler class that can determine if an error can be trusted.
// exceptions/ErrorHandler.ts

import { Response } from 'express';
import { AppError, HttpCode } from './AppError';

class ErrorHandler {
  private isTrustedError(error: Error): boolean {
    if (error instanceof AppError) {
      return error.isOperational;
    }

    return false;
  }
}

export const errorHandler = new ErrorHandler();
You can’t trust any other error than your custom AppError. On top of that, if you set isOperational to false when throwing an AppError, you can’t trust such error either.
Now you should handle trustworthy errors coming into your error handler separately from the rest. Check if the error is trustworthy and send it to its dedicated function. Otherwise send it to a function for critical errors.
class ErrorHandler {
  private isTrustedError(error: Error): boolean { /* ...  */ }

  public handleError(error: Error | AppError, response?: Response): void {
    if (this.isTrustedError(error) && response) {
      this.handleTrustedError(error as AppError, response);
    } else {
      this.handleCriticalError(error, response);
    }
  }
}
If an error is trustworthy, it is an instance of AppError, so you can pass handleTrustedError an argument of error as AppError. Since trusted errors can only come from your error-handling middleware, your error handler always receives the Response object along with the error. So, pass it to handleTrustedError as well.
In case of untrustworthy errors, you will check if the response is defined. Because these errors can come from outside the request-response cycle. For example, when you handle an uncaught exception.
Handle a trusted error by sending the client a response with the HTTP status code and a message.
class ErrorHandler {
  // ...

  private handleTrustedError(error: AppError, response: Response): void {
    response.status(error.httpCode).json({ message: error.message });
  }
}
This is where you could also pass the name property to json(). Naming errors can be useful if you want to translate the error message on the client.
On the other hand, untrustworthy errors are dangerous, because they can make your application behave unexpectedly. Based on Node.js best practices on error handling, you should crash your application when you catch such error.
class ErrorHandler {
  // ...

  private handleCriticalError(error: Error | AppError, response?: Response): void {
    if (response) {
      response
        .status(HttpCode.INTERNAL_SERVER_ERROR)
        .json({ message: 'Internal server error' });
    }

    console.log('Application encountered a critical error. Exiting');
    process.exit(1);
  }
}
Since untrustworthy errors come from outside the error-handling middleware, you should check if Response is available. If it’s defined, send a generic server error message to the client.
This is where you would benefit from an automatic restart setup. If your application exits with a non-zero code, it should restart by itself, so you can crash on critical errors without much downtime.
I have written a post Graceful Shutdown in Express that explains how to create your own exit handler.
Of course, you can do much more than just exiting your application. You can set up error logging or notify yourself via email or a messaging service. You could also improve the shutdown procedure to be graceful, stopping all HTTP connections before the exit.
Summary
You are now knowledgeable of what goes into error handling in Express. Here’s a recap of the things you’ve learned:
- You need to use
express-async-errors, because Express can’t catch async errors on its own. - You can catch unhandled rejections and uncaught exceptions by listening to events with
process.on. - You can customize error handling by making your own error-handling middleware.
- You should use custom error class to save more information, such as status codes and trustworthiness of the error.
- You should treat untrustworthy errors seriously and probably just restart your application.
You can see the code in this demo repository.
Обработка ошибок
Функции промежуточного обработчика для обработки ошибок определяются так же, как и другие функции промежуточной обработки, но с указанием для функции обработки ошибок не трех, а четырех аргументов: (err, req, res, next). Например:
app.use(function(err, req, res, next) {
  console.error(err.stack);
  res.status(500).send('Something broke!');
});
Промежуточный обработчик для обработки ошибок должен быть определен последним, после указания всех app.use() и вызовов маршрутов; например:
var bodyParser = require('body-parser');
var methodOverride = require('method-override');

app.use(bodyParser());
app.use(methodOverride());
app.use(function(err, req, res, next) {
  // logic
});
Ответы, поступающие из функции промежуточной обработки, могут иметь любой формат, в зависимости от ваших предпочтений. Например, это может быть страница сообщения об ошибке HTML, простое сообщение или строка JSON.
В целях упорядочения (и для фреймворков более высокого уровня) можно определить несколько функций промежуточной обработки ошибок, точно так же, как это допускается для обычных функций промежуточной обработки. Например, для того чтобы определить обработчик ошибок для запросов, совершаемых с помощью XHR, и для остальных запросов, можно воспользоваться следующими командами:
var bodyParser = require('body-parser');
var methodOverride = require('method-override');

app.use(bodyParser());
app.use(methodOverride());
app.use(logErrors);
app.use(clientErrorHandler);
app.use(errorHandler);
В данном примере базовый код logErrors может записывать информацию о запросах и ошибках в stderr, например:
function logErrors(err, req, res, next) {
  console.error(err.stack);
  next(err);
}
Кроме того, в данном примере clientErrorHandler определен, как указано ниже; в таком случае ошибка явным образом передается далее следующему обработчику:
function clientErrorHandler(err, req, res, next) {
  if (req.xhr) {
    res.status(500).send({ error: 'Something failed!' });
  } else {
    next(err);
  }
}
“Обобщающая” функция errorHandler может быть реализована так:
function errorHandler(err, req, res, next) {
  res.status(500);
  res.render('error', { error: err });
}
При передаче какого-либо объекта в функцию next() (кроме строки 'route'), Express интерпретирует текущий запрос как ошибку и пропустит все остальные функции маршрутизации и промежуточной обработки, не являющиеся функциями обработки ошибок. Для того чтобы обработать данную ошибку определенным образом, необходимо создать маршрут обработки ошибок, как описано в следующем разделе.
Если задан обработчик ошибок с несколькими функциями обратного вызова, можно воспользоваться параметром route, чтобы перейти к следующему обработчику маршрута. Например:
app.get('/a_route_behind_paywall',
  function checkIfPaidSubscriber(req, res, next) {
    if(!req.user.hasPaid) {

      // continue handling this request
      next('route');
    }
  }, function getPaidContent(req, res, next) {
    PaidContent.find(function(err, doc) {
      if(err) return next(err);
      res.json(doc);
    });
  });
В данном примере обработчик getPaidContent будет пропущен, но выполнение всех остальных обработчиков в app для /a_route_behind_paywall будет продолжено.
Вызовы next() и next(err) указывают на завершение выполнения текущего обработчика и на его состояние. next(err) пропускает все остальные обработчики в цепочке, кроме заданных для обработки ошибок, как описано выше.
Стандартный обработчик ошибок
В Express предусмотрен встроенный обработчик ошибок, который обрабатывает любые возможные ошибки, встречающиеся в приложении. Этот стандартный обработчик ошибок добавляется в конец стека функций промежуточной обработки.
В случае передачи ошибки в next() без обработки с помощью обработчика ошибок, такая ошибка будет обработана встроенным обработчиком ошибок. Ошибка будет записана на клиенте с помощью трассировки стека. Трассировка стека не включена в рабочую среду.
Для запуска приложения в рабочем режиме необходимо задать для переменной среды NODE_ENV значение production.
При вызове next() с ошибкой после начала записи ответа
(например, если ошибка обнаружена во время включения ответа в поток, направляемый клиенту), стандартный обработчик ошибок Express закрывает соединение и отклоняет запрос.
Поэтому при добавлении нестандартного обработчика ошибок вам потребуется делегирование в стандартные
механизмы обработки ошибок в Express в случае, если заголовки уже были отправлены клиенту:
function errorHandler(err, req, res, next) {
  if (res.headersSent) {
    return next(err);
  }
  res.status(500);
  res.render('error', { error: err });
}
Обработка ошибок — это боль. Вы можете довольно далеко продвинуться без правильной обработки ошибок, но чем больше приложение, тем с большими проблемами вы столкнетесь. Чтобы действительно вывести вашу разработку API на новый уровень, вам следует взяться за решение этой задачи. Обработка ошибок — это обширная тема, и ее можно выполнять разными способами, в зависимости от приложения, технологий и многого другого. Это одна из тех вещей, которые легко понять, но трудно понять полностью.
Что мы будем делать
В этой статье мы собираемся объяснить удобный для новичков способ обработки ошибок в API Node.js + Express.js с помощью TypeScript. Мы собираемся объяснить, что такое ошибка, различные типы ошибок, которые могут возникнуть, и как их обрабатывать в нашем приложении. Вот некоторые вещи, которыми мы займемся в следующих главах:
- узнаем, что на самом деле такое «обработка ошибок» и с какими типами ошибок вы столкнетесь
- узнаем об объекте Node.js
Errorи о том, как его использовать - узнаем, как создавать собственные классы ошибок и как они могут помочь нам в разработке лучших API-интерфейсов и Node-приложений
- узнаем о промежуточном программном обеспечении Express и о том, как его использовать для обработки наших ошибок
- научимся структурировать информацию об ошибках и представлять ее потребителю и разработчику
Предусловие
Предупреждение! В этой статье предполагается, что вы уже кое-что знаете. Несмотря на то, что это удобно для новичков, вот что вам следует знать, чтобы извлечь из этой статьи максимальную пользу:
- рабочее знание Node.js
- рабочее знание Express.js (маршруты, промежуточное ПО и т. д.)
- основы TypeScript (и классы!)
- основы работы API и его написания с использованием Express.js
Хорошо. Мы можем начинать.
Что такое обработка ошибок и зачем она вам нужна?
Так что же такое «обработка ошибок» на самом деле?
Обработка ошибок (или обработка исключений) — это процесс реагирования на возникновение ошибок (аномальное/нежелательное поведение) во время выполнения программы.
Зачем нужна обработка ошибок?
Потому что мы хотим сделать исправление ошибок менее болезненным. Это также помогает нам писать более чистый код, поскольку весь код обработки ошибок централизован, вместо того, чтобы обрабатывать ошибки там, где мы думаем, что они могут возникнуть. В конце концов — код более организован, вы меньше повторяетесь, и это сокращает время разработки и обслуживания.
Типы ошибок
Есть два основных типа ошибок, которые нам необходимо различать и соответственно обрабатывать.
Операционные ошибки
Операционные ошибки представляют собой проблемы во время выполнения. Это не обязательно «ошибки», это внешние обстоятельства, которые могут нарушить ход выполнения программы. Несмотря на то, что они не являются ошибками в вашем коде, эти ситуации могут (и неизбежно будут) возникать, и с ними нужно обращаться. Вот некоторые примеры:
- Запрос API не выполняется по какой-либо причине (например, сервер не работает или превышен лимит скорости)
- Невозможно установить соединение с базой данных
- Пользователь отправляет неверные входные данные
- Системе не хватает памяти
Ошибки программиста
Ошибки программиста — это настоящие «ошибки», поэтому они представляют собой проблемы в самом коде. Как ошибки в синтаксисе или логике программы, они могут быть устранены только путем изменения исходного кода. Вот несколько примеров ошибок программиста:
- Попытка прочитать свойство объекта, которое не определено
- Передача некорректных параметров в функции
- не улавливая отвергнутого обещания
Что такое ошибка узла?
В Node.js есть встроенный объект Error который мы будем использовать в качестве основы для выдачи ошибок. При вызове он содержит набор информации, которая сообщает нам, где произошла ошибка, тип ошибки и в чем проблема. В документации Node.js есть более подробное объяснение.
Мы можем создать такую ошибку:
const error = new Error('Error message');
Итак, мы дали ему строковый параметр, который будет сообщением об ошибке. Но что еще есть в этом Error? Поскольку мы используем typescript, мы можем проверить его определение, что приведет нас к interface typescript:
const error = new Error('Error message');
Name и message не требуют пояснений, а stack содержит name, message и строку, описывающую точку в коде, в которой был создан Error. Этот стек на самом деле представляет собой серию стековых фреймов (подробнее о нем можно узнать здесь). Каждый фрейм описывает сайт вызова в коде, который приводит к сгенерированной ошибке. Мы можем вызвать стек console.log(),
и посмотрим, что он может нам сказать. Вот пример ошибки, которую мы получаем при передаче строки в качестве аргумента функции JSON.parse() (которая завершится ошибкой, поскольку JSON.parse() принимает только данные JSON в строковом формате):

Как мы видим, это ошибка типа SyntaxError с сообщением « Неожиданный токен A в JSON в позиции 0 ». Внизу мы видим кадры стека. Это ценная информация, которую мы, как разработчик, можем использовать для отладки нашего кода, определения проблемы и ее устранения.
Написание собственных классов ошибок.
Пользовательские классы ошибок
Как я упоминал ранее, мы можем использовать встроенный объект Error, поскольку он дает нам ценную информацию.
Однако при написании нашего API нам часто требуется предоставить нашим разработчикам и потребителям API немного больше информации, чтобы мы могли облегчить их (и нашу) жизнь.
Для этого мы можем написать класс, который расширит класс Error, добавив в него немного больше данных.
class BaseError extends Error {
  statusCode: number;

  constructor(statusCode: number, message: string) {
    super(message);

    Object.setPrototypeOf(this, new.target.prototype);
    this.name = Error.name;
    this.statusCode = statusCode;
    Error.captureStackTrace(this);
  }
}
Здесь мы создаем класс BaseError, расширяющий этот класс Error. Объект принимает statusCode(код состояния HTTP, который мы вернем пользователю) и message(сообщение об ошибке, как при создании встроенного объекта Node Error).
Теперь мы можем использовать класс Node BaseError вместо класса Error для добавления кода состояния HTTP.
// Import the class
import { BaseError } from '../utils/error';

const extendedError = new BaseError(400, 'message');
Мы будем использовать этот класс BaseError в качестве основы для всех наших пользовательских ошибок.
Теперь мы можем использовать класс BaseError, чтобы расширить его и сформировать все наши собственные ошибки. Это зависит от потребностей нашего приложения. Например, если мы собираемся иметь конечные точки аутентификации в нашем API, мы можем расширить класс BaseError и создать класс AuthenticationError:
class AuthenticationError extends BaseError {}
Он будет использовать тот же конструктор, что и наш BaseError, но как только мы используем его в нашем коде, он значительно упростит чтение и отладку кода.
Теперь, когда мы знаем, как расширить объект Error, мы можем сделать еще один шаг.
Типичная ошибка, которая может нам понадобиться, — это ошибка «не найдено». Допустим, у нас есть конечная точка, где пользователь указывает идентификатор продукта, и мы пытаемся получить его из базы данных. В случае, если мы не получим результатов по этому идентификатору, мы хотим сообщить пользователю, что продукт не был найден.
Поскольку мы, вероятно, собираемся использовать ту же логику не только для продуктов (например, для пользователей, карт, местоположений), давайте сделаем эту ошибку повторно используемой.
Давайте расширим класс BaseError, но теперь давайте сделаем код состояния по умолчанию 404 и поместим аргумент «свойство» в конструктор:
class NotFoundError extends BaseError {
  propertyName: string;

  constructor(propertyName: string) {
    super(404, `Property '${propertyName}' not found.`);

    this.propertyName = propertyName;
  }
}
Теперь при использовании класса NotFoundError мы можем просто дать ему имя свойства, и объект создаст для нас полное сообщение (statusCode по умолчанию будет 404, как вы можете видеть из кода).
// This is how we can use the error
const notFoundError = new NotFoundError('Product');
А вот как это выглядит при сбросе:

Теперь мы можем создавать различные ошибки в соответствии с нашими потребностями. Вот некоторые из наиболее распространенных примеров API:
- ValidationError (ошибки, которые можно использовать при обработке входящих пользовательских данных)
- DatabaseError (ошибки, которые вы можете использовать, чтобы сообщить пользователю, что существует проблема с взаимодействием с базой данных)
- AuthenticationError (ошибка, которую можно использовать, чтобы сообщить пользователю об ошибке аутентификации)
Идем на шаг дальше
Вооружившись этими знаниями, вы сможете сделать еще один шаг вперед. В зависимости от ваших потребностей вы можете добавить errorCode в класс BaseError, а затем использовать его в некоторых из ваших пользовательских классов ошибок, чтобы сделать ошибки более удобочитаемыми для потребителя.
Например, вы можете использовать коды ошибок в AuthenticationError чтобы сообщить потребителю тип ошибки аутентификации. A01 может означать, что пользователь не проверен, а A02 может означать, что срок действия ссылки для сброса пароля истек.
Подумайте о потребностях вашего приложения и постарайтесь сделать его как можно проще.
Создание и обнаружение ошибок в контроллерах
Теперь давайте посмотрим на образец контроллера (функцию маршрута) в Express.js.
const sampleController = (req: Request, res: Response, next: NextFunction) => {

  res.status(200).json({
    response: 'successfull',
    data: {
      answer: 42
    }
  });
};
Попробуем использовать наш собственный класс ошибок NotFoundError. Давайте воспользуемся функцией next (), чтобы передать наш настраиваемый объект ошибки следующей функции промежуточного программного обеспечения, которая перехватит ошибку и позаботится о ней (не беспокойтесь об этом, я объясню, как отлавливать ошибки через минуту).
const sampleController = async (req: Request, res: Response, next: NextFunction) => {

    return next(new NotFoundError('Product'))

  res.status(200).json({
    response: 'successfull',
    data: {
      answer: 42
    }
  });
};
Это успешно остановит выполнение этой функции и передаст ошибку следующей функции промежуточного программного обеспечения. Так вот оно?
Не совсем. Нам все еще нужно обрабатывать ошибки, которые мы не обрабатываем с помощью наших пользовательских ошибок.
Необработанные ошибки
Например, предположим, что вы пишете фрагмент кода, который проходит все проверки синтаксиса, но выдает ошибку во время выполнения. Эти ошибки могут случиться, и они будут. Как мы с ними справляемся?
Допустим, вы хотите использовать функцию JSON.parse(). Эта функция принимает данные JSON в виде строки, но вы даете ей случайную строку. Если передать этой функции, основанной на обещаниях, строку, она выдаст ошибку! Если не обработать, это вызовет ошибку UnhandledPromiseRejectionWarning.

Что ж, просто оберните свой код в блок try/catch и передайте любые ошибки по строке промежуточного программного обеспечения, используя next()(опять же, я скоро объясню это)!
И это действительно сработает. Это неплохая практика, поскольку все ошибки, возникающие из-за кода, основанного на обещаниях, будут обнаружены внутри блока .catch(). Однако у этого есть обратная сторона, а именно тот факт, что ваши файлы контроллера будут заполнены повторяющимися блоками try/catch, и мы не хотим повторяться. К счастью, у нас есть еще один козырь в рукаве.
Оболочка handleAsync
Поскольку мы не хотим писать наши блоки try/catch в каждом контроллере (функция маршрутизации), мы можем написать функцию промежуточного программного обеспечения, которая выполняет это один раз, а затем применяет ее к каждому контроллеру.
Вот как это выглядит:
const asyncHandler = (fn: any) => (req: Request, res: Response, next: NextFunction) => Promise.resolve(fn(req, res, next)).catch(next);
На первый взгляд это может показаться сложным, но это всего лишь функция промежуточного программного обеспечения, которая действует как блок try /catch с next(err) внутри catch(). Теперь мы можем просто обернуть его вокруг наших контроллеров, и все!
const sampleController = asyncHandler(async (req: Request, res: Response, next: NextFunction) => {
  JSON.parse('A string');

  res.status(200).json({
    response: 'successfull',
    data: {
      something: 2
    }
  });
});
Теперь, если возникнет такая же ошибка, мы не получим UnhandledPromiseRejectionWarning, вместо этого наш код обработки ошибок успешно ответит и зарегистрирует ошибку (разумеется, после того, как мы закончим ее писать. Вот как это будет выглядеть):

Как мне обрабатывать ошибки?
Хорошо, мы научились формировать ошибки. Что теперь?
Теперь нам нужно выяснить, как на самом деле с ними справиться.
Экспресс промежуточное ПО
Экспресс-приложение, по сути, представляет собой серию вызовов функций промежуточного программного обеспечения. Функция промежуточного программного обеспечения имеет доступ к объекту request, объекту response и функции next промежуточного программного обеспечения.
Экспресс с маршрутизацией каждого входящего запроса через эти промежуточные программы, начиная с первого по цепочке, до тех пор, пока ответ не будет отправлен клиенту. Каждая функция промежуточного программного обеспечения может либо передать запрос следующему промежуточному программному обеспечению с помощью функции next(), либо ответить клиенту и разрешить запрос.
Выявление ошибок в Express
В Express есть специальный тип функции промежуточного программного обеспечения, называемый «промежуточное программное обеспечение для обработки ошибок». У этих функций есть дополнительный аргумент err. Каждый раз, когда в функции промежуточного программного обеспечения next() передается ошибка, Express пропускает все функции промежуточного программного обеспечения и сразу переходит к функциям обработки ошибок.
Вот пример того, как его написать:
const errorMiddleware = (error: any, req: Request, res: Response, next: NextFunction) => {
  // Do something with the error
  next(error); // pass it to the next function
};
Что делать с ошибками
Теперь, когда мы знаем, как обнаруживать ошибки, мы должны что-то с ними делать. В API обычно нужно сделать две вещи: ответить клиенту и записать ошибку.
errorReponse промежуточное ПО (ответ клиенту)
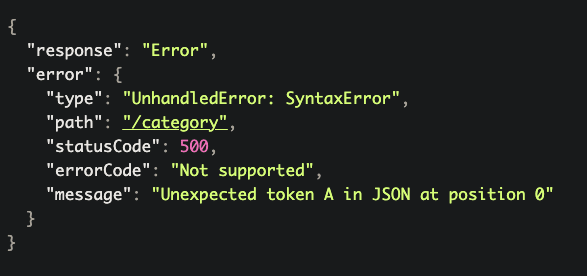
Лично при написании API я следую согласованной структуре ответов JSON для успешных и неудачных запросов:
// Success
{
    "response": "successfull",
    "message": "some message if required",
    "data": {}
}

// Failure
{
    "response": "error",
      "error": {
        "type": "type of error",
        "path": "/path/on/which/it/happened",
        "statusCode": 404,
        "message": "Message that describes the situation"
      }
}
А теперь мы собираемся написать промежуточное программное обеспечение, которое обрабатывает часть сбоя.
const errorResponse = (error: any, req: Request, res: Response, next: NextFunction) => {
  const customError: boolean = error.constructor.name === 'NodeError' || error.constructor.name === 'SyntaxError' ? false : true;

  res.status(error.statusCode || 500).json({
    response: 'Error',
    error: {
      type: customError === false ? 'UnhandledError' : error.constructor.name,
      path: req.path,
      statusCode: error.statusCode || 500,
      message: error.message
    }
  });
  next(error);
};
Давайте рассмотрим функцию. Сначала мы создаем логическое значение customError. Мы проверяем свойство error.constructor.name, которое сообщает нам, с какой ошибкой мы имеем дело. Если error.constructor.name это NodeError(или какая-то другая ошибка, которую мы не создавали лично), мы устанавливаем логическое значение false, в противном случае мы устанавливаем true. Таким образом, мы можем по-разному обрабатывать известные и неизвестные ошибки.
Далее мы можем ответить клиенту. Мы используем res.status() для установки кода состояния HTTP и используем функцию res.json() для отправки данных JSON клиенту. При записи данных JSON мы можем использовать логическое значение customError для установки определенных свойств. Например, если логическое значение false customError, мы установим тип ошибки UnhandledError, сообщая пользователю, что мы не ожидали этой ситуации, в противном случае мы устанавливаем его на error.constructor.name.
Поскольку свойство statusCode доступно только в наших настраиваемых объектах ошибок, мы можем просто вернуть 500, если оно недоступно (то есть это необработанная ошибка).
В конце концов, мы используем функцию next() для передачи ошибки следующему промежуточному программному обеспечению.
errorLog промежуточное ПО (регистрация ошибки)
const errorLogging = (error: any, req: Request, res: Response, next: NextFunction) => {
  const customError: boolean = error.constructor.name === 'NodeError' || error.constructor.name === 'SyntaxError' ? false : true;

  console.log('ERROR');
  console.log(`Type: ${error.constructor.name === 'NodeError' ? 'UnhandledError' : error.constructor.name}`);
  console.log('Path: ' + req.path);
  console.log(`Status code: ${error.statusCode || 500}`);
  console.log(error.stack);
};
Эта функция следует той же логике, что и предыдущая, с небольшой разницей. Поскольку это ведение журнала предназначено для разработчиков API, мы также регистрируем стек.
Как вы можете видеть, это будет просто console.log() данные об ошибке в системной консоли. В большинстве производственных API ведение журнала немного более продвинуто, запись в файл или запись в API. Поскольку эта часть построения API очень специфична для конкретного приложения, я не хотел слишком углубляться в нее. Теперь, когда у вас есть данные, выберите, какой подход лучше всего подходит для вашего приложения, и реализуйте свою версию ведения журнала. Если вы развертываетесь в облачной службе развертывания, такой как AWS, вы сможете загружать файлы журналов, просто используя функцию промежуточного программного обеспечения, описанную выше (AWS сохраняет все файлы console.log().
Теперь вы можете обрабатывать ошибки.
Вот так! Этого должно быть достаточно, чтобы вы начали обрабатывать ошибки в рабочем процессе TypeScript + Node.js + Express.js API. Обратите внимание, здесь есть много возможностей для улучшения. Этот подход не является лучшим и не самым быстрым, но он довольно прост и, что наиболее важно, снисходителен, и его быстро можно итерировать и улучшать по мере развития вашего проекта API, требующего большего от ваших навыков. Эти концепции очень важны, и с ними легко начать, и я надеюсь, что вам понравилась моя статья и вы узнали что-то новое.
December 17, 2018
- 1. TypeScript Express tutorial #1. Middleware, routing, and controllers
- 2. TypeScript Express tutorial #2. MongoDB, models and environment variables
- 3. TypeScript Express tutorial #3. Error handling and validating incoming data
- 4. TypeScript Express tutorial #4. Registering users and authenticating with JWT
- 5. TypeScript Express tutorial #5. MongoDB relationships between documents
- 6. TypeScript Express tutorial #6. Basic data processing with MongoDB aggregation
- 7. TypeScript Express tutorial #7. Relational databases with Postgres and TypeORM
- 8. TypeScript Express tutorial #8. Types of relationships with Postgres and TypeORM
- 9. TypeScript Express tutorial #9. The basics of migrations using TypeORM and Postgres
- 10. TypeScript Express tutorial #10. Testing Express applications
- 11. TypeScript Express tutorial #11. Node.js Two-Factor Authentication
- 12. TypeScript Express tutorial #12. Creating a CI/CD pipeline with Travis and Heroku
- 13. TypeScript Express tutorial #13. Using Mongoose virtuals to populate documents
- 14. TypeScript Express tutorial #14. Code optimization with Mongoose Lean Queries
- 15. TypeScript Express tutorial #15. Using PUT vs PATCH in MongoDB with Mongoose
Since not always everything goes perfectly, you need to expect the unexpected. To prepare for that, we cover TypeScript Express error handling and incoming data validation. Just as before, the repository for the tutorial is mwanago/express-typescript. If you find it helpful, feel free to give it a star.
In the previous part of the tutorial, we wrote a handler function to return a post with a specific ID:
|
private getPostById = (request: express.Request, response: express.Response) => { const id = request.params.id; this.post.findById(id) .then((post) => { response.send(post); }); } |
There is a slight problem with it though. If a post with a particular ID does not exist, its value in the callback function is null. We then send it, resulting in a response with a code 200 OK. It indicates that everything went fine and the user got a document that he requests, but this post is not empty in our database: it just does not exist. There is a big list of status codes that you can use, but in this case, we use 404 Not Found.
The 200 OK code if default when you use the send function. To change that, you need to call the status function, before using send.
|
private getPostById = (request: express.Request, response: express.Response) => { const id = request.params.id; this.post.findById(id) .then((post) => { if (post) { response.send(post); } else { response.status(404).send({ error: ‘Post not found’ }); } }); } |
Now when someone tries to access a post that does not exist, he is informed about what went wrong.

This outcome is good, but we can make our code better. We want to create errors from our route handlers and let the middleware worry about sending them. There is a default error handler built into Express. To use it, you need to call the next function with an argument (other than the string ‘route’).
|
private getPostById = (request: express.Request, response: express.Response, next: NextFunction) => { const id = request.params.id; this.post.findById(id) .then((post) => { if (post) { response.send(post); } else { next(‘Post not found’); } }); } |
Handling the error in this way results in a 500 Internal Server Error and the error page is rendered.

If we want to handle it differently, we need to create our Express error handling middleware
Express Error handling middleware
First, let’s create a class that we are going to use to throw errors.
src/exceptions/HttpException.ts
|
class HttpException extends Error { status: number; message: string; constructor(status: number, message: string) { super(message); this.status = status; this.message = message; } } export default HttpException; |
If you would like to know more about the Error object and the errors in general, check out Handling errors in JavaScript with try…catch and finally
Defining Express error handling middleware is almost the same as any other middleware, except we use four arguments instead of three, with the error being the additional first argument.
src/middleware/error.middleware.ts
|
import { NextFunction, Request, Response } from ‘express’; import HttpException from ‘../exceptions/HttpException’; function errorMiddleware(error: HttpException, request: Request, response: Response, next: NextFunction) { const status = error.status || 500; const message = error.message || ‘Something went wrong’; response .status(status) .send({ status, message, }) } export default errorMiddleware; |
Since Express runs all the middleware from the first to the last, your error handlers should be at the end of your application stack. If you pass the error to the next function, the framework omits all the other middleware in the chain and skips straight to the error handling middleware which is recognized by the fact that it has four arguments.
The last thing to do is to attach the error handling middleware to our app:
src/app.ts
|
1 2 3 4 5 6 7 8 9 10 11 12 13 14 15 16 17 18 19 20 21 22 23 24 25 26 27 28 29 30 31 32 33 34 35 36 37 38 39 40 41 42 43 44 45 46 47 48 49 |
import * as bodyParser from ‘body-parser’; import * as express from ‘express’; import * as mongoose from ‘mongoose’; import Controller from ‘./interfaces/controller.interface’; import errorMiddleware from ‘./middleware/error.middleware’; class App { public app: express.Application; constructor(controllers: Controller[]) { this.app = express(); this.connectToTheDatabase(); this.initializeMiddlewares(); this.initializeControllers(controllers); this.initializeErrorHandling(); } public listen() { this.app.listen(process.env.PORT, () => { console.log(`App listening on the port ${process.env.PORT}`); }); } private initializeMiddlewares() { this.app.use(bodyParser.json()); } private initializeErrorHandling() { this.app.use(errorMiddleware); } private initializeControllers(controllers: Controller[]) { controllers.forEach((controller) => { this.app.use(‘/’, controller.router); }); } private connectToTheDatabase() { const { MONGO_USER, MONGO_PASSWORD, MONGO_PATH, } = process.env; mongoose.connect(`mongodb://${MONGO_USER}:${MONGO_PASSWORD}${MONGO_PATH}`); } } export default App; |
|
private getPostById = (request: express.Request, response: express.Response, next: express.NextFunction) => { const id = request.params.id; this.post.findById(id) .then((post) => { if (post) { response.send(post); } else { next(new HttpException(404, ‘Post not found’)); } }); } |
We can use the HttpException in the same manner when a post that the user wants to delete or modify a post that doesn’t exist. That would mean creating the HttpException in the same way. To avoid redundant code, we can prepare an exception just for that situation.
src/exceptions/PostNotFoundException.ts
|
import HttpException from «./HttpException»; class PostNotFoundException extends HttpException { constructor(id: string) { super(404, `Post with id ${id} not found`); } } export default PostNotFoundException; |
|
1 2 3 4 5 6 7 8 9 10 11 12 13 14 15 16 17 18 19 20 21 22 23 24 25 26 27 28 29 30 31 32 33 34 35 36 |
private getPostById = (request: express.Request, response: express.Response, next: express.NextFunction) => { const id = request.params.id; this.post.findById(id) .then((post) => { if (post) { response.send(post); } else { next(new PostNotFoundException(id)); } }); } private modifyPost = (request: express.Request, response: express.Response, next: express.NextFunction) => { const id = request.params.id; const postData: Post = request.body; this.post.findByIdAndUpdate(id, postData, { new: true }) .then((post) => { if(post) { response.send(post); } else { next(new PostNotFoundException(id)); } }); } private deletePost = (request: express.Request, response: express.Response, next: express.NextFunction) => { const id = request.params.id; this.post.findByIdAndDelete(id) .then((successResponse) => { if (successResponse) { response.send(200); } else { next(new PostNotFoundException(id)); } }); } |
Validating incoming data
Another thing worth mentioning is validating input data to prevent the users from creating invalid documents in our collections. To do that I use a package called class-validator with an additional middleware.
The first thing to do is to create a data transfer object (DTO) file that carries data between our functions. It contains specification on how should the incoming data look.
src/posts/post.dto.ts
|
import { IsString } from ‘class-validator’; class CreatePostDto { @IsString() public author: string; @IsString() public content: string; @IsString() public title: string; } export default CreatePostDto; |
To use decorators with TypeScript, you need to add
«experimentalDecorators»: true to your
tsconfig.json
When we got that down, the only thing left is the validation middleware. Since the body of our request is a plain object, we need to transform it into our class first. To do that, I use the class-transformer package.
src/middleware/validation.middleware.ts
|
1 2 3 4 5 6 7 8 9 10 11 12 13 14 15 16 17 18 19 20 |
import { plainToClass } from ‘class-transformer’; import { validate, ValidationError } from ‘class-validator’; import * as express from ‘express’; import HttpException from ‘../exceptions/HttpException’; function validationMiddleware<T>(type: any): express.RequestHandler { return (req, res, next) => { validate(plainToClass(type, req.body)) .then((errors: ValidationError[]) => { if (errors.length > 0) { const message = errors.map((error: ValidationError) => Object.values(error.constraints)).join(‘, ‘); next(new HttpException(400, message)); } else { next(); } }); }; } export default validationMiddleware; |
The class-validator package validates the object, and if it finds some errors, the middleware calls the next function with the error details. Since we pass an error into the next function, the Express error middleware that we described above takes care of it. The errors variable keeps an array of errors, each of them having the constraints object with the details. This simple example creates a string of all of the issues.
The 400 Bad Request status code means that there is something wrong with the request that the client sent.
If you need to, you can also pass an array so that it can be easier to iterate over on the frontend
A thing left to do is to attach the middleware:
|
import validationMiddleware from ‘../middleware/validation.middleware’; import CreatePostDto from ‘./post.dto’; private initializeRoutes() { this.router.post(this.path, validationMiddleware(CreatePostDto), this.createPost); } |
Since we want it only on some of our endpoints, we attach it straight before the handler functions. In the example above, the middleware validates the data before the
this.createPost function runs.
Validating the PATCH handler data
It would be great to use that validation in our updating logic too. There is a small catch: in our CreatePostDto class, all fields are required, and we are using HTTP PATCH that allows for updating just some of the properties without passing the rest of them. There is an easy solution for that thanks to the skipMissingProperties option.
src/middleware/validation.middleware.ts
|
function validationMiddleware<T>(type: any, skipMissingProperties = false): express.RequestHandler { return (req, res, next) => { validate(plainToClass(type, req.body), { skipMissingProperties }) .then((errors: ValidationError[]) => { if (errors.length > 0) { const message = errors.map((error: ValidationError) => Object.values(error.constraints)).join(‘, ‘); next(new HttpException(400, message)); } else { next(); } }); }; } |
It skips validating all the properties that are missing, so if you are updating just a part of the document, it doesn’t cause an error just because a required property is not present.
|
private initializeRoutes() { this.router.patch(`${this.path}/:id`, validationMiddleware(CreatePostDto, true), this.modifyPost); this.router.post(this.path, validationMiddleware(CreatePostDto), this.createPost); } |
Summary
In this article, we’ve covered Typescript Express error handling. To do that we’ve created an Express error handling middleware and used the next function with an additional argument to pass the error to the error handling middleware. Aside from that, we’ve learned how to validate incoming data in our POST and PATCH handlers using the class-validator package. All those new skills will surely be useful, especially because the next part of the course will cover registering users and authentication.
Previous article
TypeScript Express tutorial #2. MongoDB, models and environment variables
Next article
TypeScript Express tutorial #4. Registering users and authenticating with JWT

on
April 29, 2021
A Guide to Error Handling in Express.js
Error handling often doesn’t get the attention and prioritization it deserves. Especially for newbie developers, there is more focus on setting up routing, route handlers, business logic, optimizing performance, etc. As a result, the equally (if not more) crucial error-handling part will likely be overlooked. Striving for the most optimized code and squeezing out every last ounce of performance is all well and good; yet, it’s important to remember all it takes is one unhandled error leak into your user interface to override all the seconds you helped your users save.
Because there are so many components involved in a successful, functioning web application, it is vital to foolproof your application by preparing for all possible errors and exceptions. If left mishandled, these errors can lead to a bad user experience and end up affecting your business. At the same time, errors provide critical information about potential errors in your application that could bring the whole thing down. Therefore, you must be thoughtful and intelligent about error handling in your application.
This post will c, Node.js’s most popular server-side framework (even though most of these concepts apply to other frameworks too). Express does a great job taking care of several unhandled errors and provides an easy-to-use, flexible API that developers can utilize to build error handling middleware.
Here’s an outline of what we’ll be covering so you can easily navigate or skip ahead in the guide:
- How does Error Handling Work in Express.js?
- Express Middleware Functions
- Default Error Handling in Express.js
- Handling Custom Errors
- Custom Handling for Each Route
- Writing your own Error Handling Middleware Functions
- Adding Multiple Middleware Handlers
- Basic Quick Tutorial: Setting up Error Handling in Express.js
How Does Error Handling Work in Express.js?
Express.js is the most popular Javascript server-side framework, perhaps, primarily because of its ease of usage and getting started. One of the many ways it makes things easier is by automatically catching all errors in route handlers, and allowing developers to extend route handling functionalities by leveraging useful middleware functions.
Before we see how all of this works, let’s briefly visit the concept of middleware functions in Express – most error handling functionality is achieved through these functions.
Express Middleware Functions
Middleware functions in Express are essentially functions that come into play after the server receives the request and before the response fires to the client. They have access to the request and the response objects. They can be used for any data processing, database querying, making API calls, sending the response, or calling the next middleware function (using the next() function).
Two aspects of middleware functions to keep in mind are:
- They are triggered sequentially (top to bottom) based on their sequence in code.
- They operate until the process exits, or the response has been sent back to the client.
Let’s understand this through a small example. Below we define two middleware functions using the .use() function and one route handler (skipping the boilerplate code for the sake of simplicity):
app.use((req, res, next) => {
  console.log("Middleware 1 called.")
  console.log(req.path)
  next() // calling next middleware function or handler
})

app.get('/', (req, res) => {
  console.log("Route handler called.")
  res.send("Hello world!") // response sent back – no more middleware called
})

app.use((req, res, next) => {
  console.log("Last middleware called❓") // not called
})
Here, each time the server receives a request, the first middleware is fired, followed by the corresponding route handler (using the next() function). However, because the response returns in this handler, the last middleware function is not called. Here’s the output:
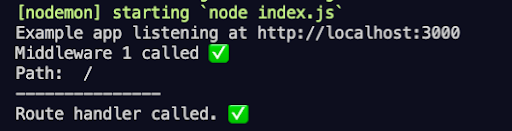 |
| Server output |
Several native as well as third-party middleware functions have been made available by the Express community and are widely for adding functionalities like session management, authentication, logging, redirecting, and so much more. This was a basic example of how middleware functions work. We will come back to them when discussing how to utilize them for error handling in our applications.
Default Error Handling in Express.js
Express implicitly takes care of catching your errors to prevent your application from crashing when it comes to error handling. This is especially true for synchronous route handler code. Let’s see how:
Synchronous Code
Synchronous code refers to statements of code that execute sequentially and one at a time. When an error encounters synchronous code, Express catches it automatically. Here’s an example of a route handler function where we simulate an error condition by throwing an error:
app.get('/', (req, res) => {
  throw new Error("Hello error!")
})
Express catches this error for us and responds to the client with the error’s status code, message, and even the stack trace (for non-production environments).
All of this is taken care of thanks to Express’s default built-in error handler middleware function inserted at the end of your code’s middleware stack. This automatic handling saves you from bulky try/catch blocks and explicit calls to the in-built middleware (shown below) while also providing some fundamental default error handling functionality.
app.get('/', (req, res, next) => {
  try {
      throw new Error("Hello error!")
  }
  catch (error) {
      next(error)
  }
})
You can also choose to create your own middleware function to specify your error handling logic.
Asynchronous Code
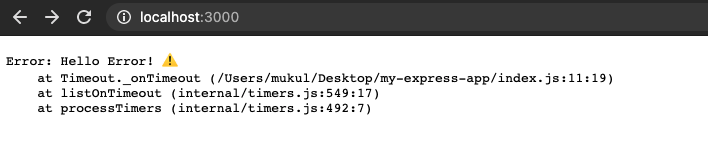
When writing server-side code, most of your route handlers are likely using asynchronous Javascript logic to read and write files on the server, query databases, and make external API requests. Let’s see whether Express can catch errors raised from asynchronous code as well. We’ll throw an error from inside the asynchronous setTimeout() function and see what happens:
app.get('/', (req, res) => {
  setTimeout(() => {
      console.log("Async code example.")
      throw new Error("Hello Error!")
  }, 1000)
})
As you can see, our server crashed because Express didn’t handle the error for us.
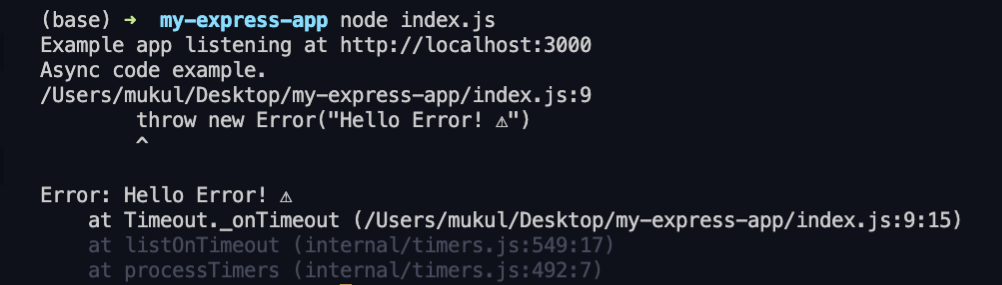 |
| Server output |
For handling errors raised during asynchronous code execution in Express (versions < 5.x), developers need to themselves catch their errors and invoke the in-built error handler middleware using the next() function. Here’s how:
app.get('/', (req, res, next) => {
  setTimeout(() => {
      try {
          console.log("Async code example.")
          throw new Error("Hello Error!")
      } catch (error) { // manually catching
          next(error) // passing to default middleware error handler
      }
  }, 1000)
}) |
| Browser output |
This is much better – we caught the error, and our server didn’t crash. This does look a little bulky because we used the setTimeout() function to demonstrate async behavior. This function does not return a promise and, therefore, can’t be chained with a quick .catch() function. However, most libraries that help with async operations return promises these days (e.g., the file system API). Below is an example of a more convenient and common way of catching errors from promises:
const fsPromises = require('fs').promises
app.get('/', (req, res, next) => {
  fsPromises.readFile('./no-such-file.txt')

     .then(data => res.send(data))

     .catch(err => next(err))
})
Note: Express 5.0 (currently in alpha) can automatically catch errors (and rejections) thrown by returned Promises.
Handling Custom Errors
Express’s default error-handling middleware is super helpful for beginners to take care of unexpected, unhandled errors. However, different developers and organizations would want their errors handled in their own way – some might want to write these to log files, others might want to alert the user or redirect them to another page, or all of the above.
Custom Handling for Each Route
An obvious, naive way of going about this would be to define your custom error handling logic for each route handler as so:
const express = require('express')
const fsPromises = require('fs').promises;

const app = express()
const port = 3000

app.get('/one', (req, res) => {
  fsPromises.readFile('./one.txt')
    .then(data => res.send(data))
    .catch(err => { // error handling logic 1
        console.error(err) // logging error
        res.status(500).send(err)
    })
})

app.get('/two', (req, res) => {
  fsPromises.readFile('./two.txt')
    .then(data => res.send(data))
    .catch(err => { // error handling logic 2
        console.error(err)
        res.redirect('/error') // redirecting user
    })
})

app.get('/error', (req, res) => {
  res.send("Custom error landing page.")
})

app.listen(port, () => {
  console.log(`Example app listening at http://localhost:${port}`)
})
Here, we specified two different handling logics – one for each route that attempts to read arbitrary files on the server. As you can imagine, this would get too redundant quickly and wouldn’t scale well as you add more and more routes.
Writing your Error Handling Middleware Functions
A much better option would be to leverage Express’s middleware functions here. You could write one or more middleware functions for handling errors in your application that all of your routes could utilize by making simple next() calls.
Middleware functions are much more convenient to work with than conventional functions because they automatically have access to the error, request, and response objects and can be invoked (or invoke others) based on their ordering using just the next() function.
You can create your own error handling middleware functions by adding the error argument to the function, apart from request, response, and next. Here is an example:
app.use((error, req, res, next) => {
  console.log("Error Handling Middleware called")
  console.log('Path: ', req.path)
  next() // (optional) invoking next middleware
})
Another thing to keep in mind is the ordering of the middleware. The error handler needs to specify middleware functions after the route handlers for the next(error) calls to be directed towards them.
Now let’s recreate the previous example, but this time with an error-handling middleware in place.
const express = require('express')
const fsPromises = require('fs').promises

const app = express()
const port = 3000

app.get('/one', (req, res, next) => {
  fsPromises.readFile('./one.txt') // arbitrary file
    .then(data => res.send(data))
    .catch(err => next(err)) // passing error to custom middleware
})

app.get('/two', (req, res, next) => {
  fsPromises.readFile('./two.txt')
    .then(data => res.send(data))
    .catch(err => {
        err.type = 'redirect' // custom prop to specify handling behaviour
        next(err)
    })
})

app.get('/error', (req, res) => {
  res.send("Custom error landing page.")
})

app.use((error, req, res, next) => {
  console.log("Error Handling Middleware called")
  console.log('Path: ', req.path)
  console.error('Error: ', error)

  if (error.type == 'redirect')
      res.redirect('/error')

   else if (error.type == 'time-out') // arbitrary condition check
      res.status(408).send(error)
  else
      res.status(500).send(error)
})


app.listen(port, () => {
  console.log(`Example app listening at http://localhost:${port}`)
})
Instead of defining the handling behavior inside each route, we place all our logic inside the middleware. Then, based on the kind of error, we can modify the error object (or throw a custom error) and accordingly deal with it in the middleware.
This allows us to achieve the same functionality as before, but more efficiently. Assuming these files are not present on the server, if we go to /one, the server logs the error and sends back a 500 (internal server error) response. We are redirected to the /error page after the error logs if we open /two. Below are the corresponding client and server outputs:
As you can imagine, this was a fairly basic example just to give you a sense of how you can decouple your error handling logic from the route handling into a middleware function. This extends to larger applications with hundreds of routes for increased modularity, reduced redundancy, easier maintenance, and more efficient exception handling.
Adding Multiple Middleware Handlers
In the previous section, we worked with just one middleware to handle all our errors. However, in practice, multiple middleware functions are usually employed for different aspects of error handling to have further abstractions. For example, one middleware for logging errors, another for responding to the client, perhaps another as a fail-safe catch-all handler, etc. Here’s a preview of the same based on our previous example:
// route handlers
app.get('/one')
app.get('/two')

app.get('/error')
// middleware

app.use(errorLogger)
app.use(errorResponder)
app.use(failSafeHandler)
Let’s write the code for this.
const express = require('express')
const fsPromises = require('fs').promises

const app = express()
const port = 3000

app.get('/one', (req, res, next) => {
  fsPromises.readFile('./one.txt')
  .then(data => res.send(data))
  .catch(err => next(err)) // passing error to custom middleware
})

app.get('/two', (req, res, next) => {
  fsPromises.readFile('./two.txt')
  .then(data => res.send(data))
  .catch(err => {
      err.type = 'redirect' // adding custom property to specify handling behaviour
      next(err)
  })
})

app.get('/error', (req, res) => {
  res.send("Custom error landing page.")
})

function errorLogger(error, req, res, next) { // for logging errors
  console.error(error) // or using any fancy logging library
  next(error) // forward to next middleware
}

function errorResponder(error, req, res, next) { // responding to client
  if (error.type == 'redirect')
      res.redirect('/error')
  else if (error.type == 'time-out') // arbitrary condition check
      res.status(408).send(error)
  else
      next(error) // forwarding exceptional case to fail-safe middleware
}

function failSafeHandler(error, req, res, next) { // generic handler
  res.status(500).send(error)
}

app.use(errorLogger)
app.use(errorResponder)
app.use(failSafeHandler)

app.listen(port, () => {
console.log(`Example app listening at http://localhost:${port}`)
})
This allows us to achieve the same functionality as in the previous code example, but in a more modular way that would scale better as you add more routes and handle more error conditions.
However, as previously discussed, when working with multiple middleware functions, one must keep an eye on their sequence and remember that each middleware should either respond to the client or invoke the subsequent one in the stack. If the server is just left to hang, the client continues to wait. For example, if we missed using next() in the first middleware (errorLogger), the subsequent middleware functions are not invoked, and therefore, no response fires.
Basic Quick Tutorial: Setting up Error Handling in Express.js
Now that we’ve covered almost all aspects of error handling in Express, theory-wise, let’s solidify our understanding of these concepts by creating a prototype Express application that handles errors using middleware methods in a relatively more realistic setting.
We’ll create an API that serves user posts data fetched from a dummy API (jsonplaceholder.typicode.com). We will then validate some of the posts’ properties based on some arbitrary criteria (e.g., the content length), raise custom errors if validation fails, capture these using our custom middleware, and process them accordingly.
Step 1: Create and Setup Project
First, create an empty folder, cd into it, generate an npm project, and install the dependencies.
mkdir my-express-app && cd my-express-app
npm init -y
npm i --save express node-fetch
Then, create files – index.js, routes.js, errors.js, and middleware.js. It is considered good practice to keep your routes, main file, and other utilities in separate files. Ideally, developers prefer different folders for better organization, but for our small prototype, just files would suffice.
 |
| Project files |
Step 2: Setup the Server
Now let’s write the code that will start our server in index.js.
// index.js
const express = require('express')
const app = express()
const port = 3000

app.listen(port, () => {
console.log(`Example app listening at http://localhost:${port}`)
})
We’ll start the server and make sure everything is working fine by running the node index.js command from inside the folder.
 |
| Console output |
Step 3: Create Some Routes
Now let’s create some routes in the routes.js file, and for now, just fetch some dummy JSON posts data from the dummy API (jsonplaceholder.typicode.com/posts), and serve it through our route. We will use Express’s Router module and export our routes – to import into our main index.js server file.
// routes.js
const express = require('express')
const fetch = require('node-fetch') // for making external API requests
const router = express.Router()
router.get('/', (req, res) => {
    res.send("Hello World!")
})

router.get('/user-posts', (req, res, next) => {
  fetch('https://jsonplaceholder.typicode.com/posts')
      .then(res => res.json())
      .then(data => {
          console.log(data)
          res.header("Content-Type",'application/json');
          res.send(JSON.stringify(data, null, 4)) // pretty print
        })
      .catch(err => next(err)) // pass to default error handler middleware
})

router.get('/error', (req, res) => {
  res.send("The URL you are trying to reach does not exist.")
})

module.exports = router // export routes
Now let’s import these routes into our server file.
// index.js
const express = require('express')
const routes = require('./routes') // importing routes

const app = express()
const port = 3000

app.use(routes) // initializing routes

app.listen(port, () => {
console.log(`Example app listening at http://localhost:${port}`)
})
Let’s fire up our browser and check whether the route is working.
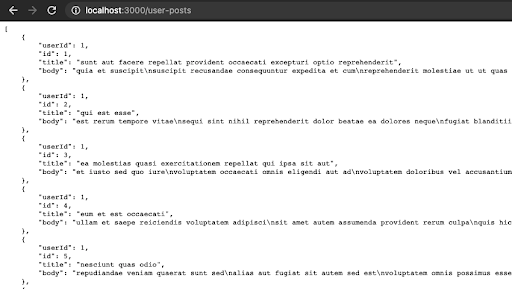 |
| Browser output |
Our server seems to be working fine here. Let’s do some error handling now.
Step 4: Creating and Handling Custom Errors
It is pretty helpful to create custom error classes for your applications by extending Node’s Error class in practice. These errors can raise issues specific to the application, for example – unauthorized access, unsuccessful payment, incorrect user input, etc. This allows developers to have more detailed information about the error conditions (through custom error messages and other properties), and therefore handle them better.
In our use case, let’s say we want to ensure that all the posts have a title of fewer than 100 characters and a body character count of fewer than 220 characters. If we don’t meet this condition, we want to raise a custom error message that alerts the developer about the same time.
Now that we have the error condition in mind, let’s create our custom error classes in the errors.js file.
// errors.js
class CharacterCountExceeded extends Error { // parent error
  constructor(post_id, content) {
      super();
      this.name = this.constructor.name // good practice

      if (this instanceof LongTitleError) // checking if title or body
          this.type = 'title'
      else if (this instanceof LongBodyError)
          this.type = 'body'

    this.message = `The character count of post (id: ${post_id}) ${this.type} is too long. (${content.length} characters)` // detailed error message
    this.statusCode = 500 // error code for responding to client
  }
}

// extending to child error classes
class LongTitleError extends CharacterCountExceeded { }
class LongBodyError extends CharacterCountExceeded { }

module.exports = {
    CharacterCountExceeded,
    LongTitleError,
    LongBodyError
}
First, we create one parent error class (CharacterCountExceeded) for all errors that involve an exceeded character count. The constructor for this class accepts the post’s ID and the content (of the title or body) to generate the required error message and specify an error code. Then we extend this class to create two more specific children classes (LongTitleError and LongBodyError) that refer to the particular error condition.
Now we will import these into our routes.js file, check for erroneous conditions inside our route handler, and throw these custom errors wherever required.
// routes.js
const express = require('express')
const fetch = require('node-fetch')
const router = express.Router()
const { LongTitleError, LongBodyError } = require('./errors');
router.get('/', (req, res) => {
  res.send("Hello World!")
})

router.get('/user-posts', (req, res, next) => {
  fetch('https://jsonplaceholder.typicode.com/posts')
      .then(res => res.json())
      .then(posts => {
          for (post of posts) {
              if (post.title.length > 100)
                  throw new LongTitleError(post.id, post.body)
              if (post.body.length > 220)
                  throw new LongBodyError(post.id, post.body)
          }
          console.log(posts)
          res.header("Content-Type", 'application/json')
          res.send(JSON.stringify(posts, null, 4)) // pretty print
      })
      .catch(err => next(err))
})

router.get('/error', (req, res) => {
    res.send("The URL you are trying to reach does not exist.")
})

module.exports = router
As you can see here, we traverse through all the posts, check for their title and body’s character count, and throw our custom errors accordingly. Here’s the output:

It turns out there was one post that had a body size of more than 220 characters, and we successfully captured it. At the moment, we are forwarding all our errors through the catch block to Express’s default error handler middleware. But what’s the fun in that?
Let’s create our own middleware functions and use them as we like.
Step 5: Adding Custom Error Handler Middleware
We’ll use the middleware.js file that we created before.
// middleware.js
const errorLogger = (err, req, res, next) => {
  console.error('x1b[31m', err) // adding some color to our logs
  next(err) // calling next middleware
}

const errorResponder = (err, req, res, next) => {
  res.header("Content-Type", 'application/json')
  res.status(err.statusCode).send(JSON.stringify(err, null, 4)) // pretty print
}
const invalidPathHandler = (req, res, next) => {
  res.redirect('/error')
}

module.exports = { errorLogger, errorResponder, invalidPathHandler }
Here, we add three middleware functions – one for logging errors, one for sending the error to the client, and one for redirecting a user from an invalid route to an error landing page. Now let’s import these into our main file and use them in our application.
// index.js
const express = require('express')
const routes = require('./routes')
const { errorLogger, errorResponder, invalidPathHandler } = require('./middleware')

const app = express()
const port = 3000

app.use(routes)

// middleware
app.use(errorLogger)
app.use(errorResponder)
app.use(invalidPathHandler)

app.listen(port, () => {
console.log(`Example app listening at http://localhost:${port}`)
})
Now let’s open our browser and see whether the middleware handles our LongBody error the way it’s supposed to.
 |
| Console output: Error object logged in red using the errorLogger middleware. |
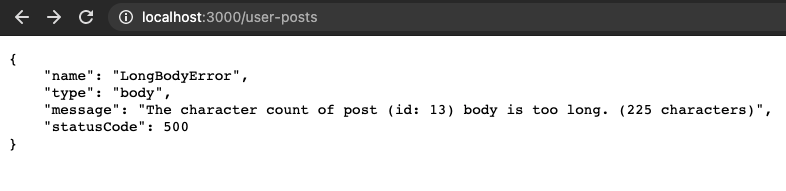 |
| Server’s error response using the errorResponder middleware. |
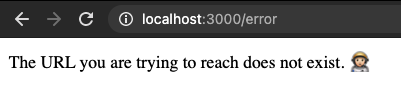 |
| Redirecting to the error landing page upon encountering an invalid path |
As you can see all our middleware functions are working as expected – in logging, responding to the client, and redirecting to the error landing page.
Wrapping it Up
We covered everything about error handling in Express.js – from default error handling of synchronous and asynchronous code to creating your own error classes and writing your own error-handling middleware functions.
Now go ahead and make sure to handle all your errors in your Express application in a clean, non-redundant, efficient, and easy to maintain way. And if you haven’t already, write your own middleware functions and play around with native and third-party ones to explore how they can be helpful for your applications. If you are serious about your application’s performance and want to spend less time debugging issues and more time building new features, consider checking out ScoutAPM for monitoring your Node.js app’s performance and get started with a 14-day free trial.
1. Introduction to the topic
1.1. Overview
Error handling is pain. You can get pretty far without handling errors correctly, but the bigger the application, the bigger the problems you’re going to face. To really take your API building to the next level, you should tackle the challenge head-on. Error handling is a broad subject, and it can be done in many ways, depending on the application, technologies and more. It’s one of those things that are easy to understand, but hard to fully grasp.
1.2. What we’ll be doing
In this article, we’re going to explain a beginner-friendly way of handling errors in Node.js + Express.js API with TypeScript. We are going to explain what an error is, different types of errors that can crop up and how to handle them in our application. Here are some of the things we’ll be doing in the next chapters:
- learning what “error handling” really is and the types of errors that you’ll encounter
- learning about the Node.js
Errorobject and how can we use it - learning how to create custom error classes and how they can help us develop better APIs and Node applications
- learning about Express middleware and how to use them to handle our errors
- learning how to structure the error information and present it to the consumer and developer
1.3. Prerequisites
DISCLAMER! This article assumes you already know some stuff. Even though this is beginner-friendly, here’s what you should know to get the most out of this article:
- working knowledge of Node.js
- working knowledge of Express.js (routes, middleware and such)
- basics of TypeScript (and classes!)
- basics of how an API works and is written using Express.js
Okay. We can begin.
2. What is error handling and why do you need it?
So what exactly is “error handling” really?
Error handling (or exception handling) is the process of responding to the occurrence of errors (anomalous/unwanted behaviour) during the execution of a program.
Why do we need error handling?
Because we want to make bug fixing less painful. It also helps us write cleaner code since all error handling code is centralized, instead of handling errors wherever we think they might crop up. In the end — the code is more organized, you repeat yourself less and it reduces development and maintenance time.
3. Types of errors
There are two main types of errors that we need to differentiate and handle accordingly.
3.1. Operational Errors
Operational errors represent runtime problems. They are not necessarily “bugs”, but are external circumstances that can disrupt the flow of program execution. Even though they’re not errors in your code, these situations can (and inevitably will) happen and they need to be handled. Here are some examples:
- An API request fails for some reason (e.g., the server is down or the rate limit is exceeded)
- A database connection cannot be established
- The user sends invalid input data
- system ran out of memory
3.2. Programmer errors
Programmer errors are the real “bugs” and so, they represent issues in the code itself. As mistakes in the syntax or logic of the program, they can be only resolved by changing the source code. Here are some examples of programmer errors:
- Trying to read a property on an object that is not defined
- passing incorrect parameters in a function
- not catching a rejected promise
4. What is a Node error?
Node.js has a built-in object called Error that we will use as our base to throw errors. When thrown, it has a set of information that will tell us where the error happened, the type of error and what is the problem. The Node.js documentation has a more in-depth explanation.
We can create an error like this:
const error = new Error('Error message');
Enter fullscreen mode
Exit fullscreen mode
Okay, so we gave it a string parameter which will be the error message. But what else does this Error have? Since we’re using typescript, we can check its definition, which will lead us to a typescript interface:
interface Error {
    name: string;
    message: string;
    stack?: string;
}
Enter fullscreen mode
Exit fullscreen mode
Name and message are self-explanatory, while stack contains the name, message and a string describing the point in the code at which the Error was instantiated. This stack is actually a series of stack frames (learn more about it here). Each frame describes a call site within the code that lead to the error being generated. We can console.log() the stack,
console.log(error.stack)
Enter fullscreen mode
Exit fullscreen mode
and see what it can tell us. Here’s an example of an error we get when passing a string as an argument to the JSON.parse() function (which will fail, since JSON.parse() only takes in JSON data in a string format):

As we can see, this error is of type SyntaxError, with the message “Unexpected token A in JSON at position 0”. Underneath, we can see the stack frames. This is valuable information we as a developer can use to debug our code and figure out where the problem is — and fix it.
5. Writing custom error classes
5.1. Custom error classes
As I mentioned before, we can use the built-in Error object, as it gives us valuable information.
However, when writing our API we often need to give our developers and consumers of the API a bit more information, so we can make their (and our) life easier.
To do that, we can write a class that will extend the Error class with a bit more data.
class BaseError extends Error {
  statusCode: number;

  constructor(statusCode: number, message: string) {
    super(message);

    Object.setPrototypeOf(this, new.target.prototype);
    this.name = Error.name;
    this.statusCode = statusCode;
    Error.captureStackTrace(this);
  }
}
Enter fullscreen mode
Exit fullscreen mode
Here we’re creating a BaseError class that extends the Error class. The object takes a statusCode (HTTP status code we will return to the user) and a message (error message, just like when creating Node’s built-in Error object).
Now we can use the BaseError instead of Node’s Error class to add the HTTP status code.
// Import the class
import { BaseError } from '../utils/error';

const extendedError = new BaseError(400, 'message');
Enter fullscreen mode
Exit fullscreen mode
We will use this BaseError class as our base for all our custom errors.
Now we can use the BaseError class to extend it and create all our custom errors. These depend on our application needs. For example, if we’re going to have authentication endpoints in our API, we can extend the BaseError class and create an AuthenticationError class like this:
class AuthenticationError extends BaseError {}
Enter fullscreen mode
Exit fullscreen mode
It will use the same constructor as our BaseError, but once we use it in our code it will make reading and debugging code much easier.
Now that we know how to extend the Error object, we can go a step further.
A common error we might need is a “not found” error. Let’s say we have an endpoint where the user specifies a product ID and we try to fetch it from a database. In case we get no results back for that ID, we want to tell the user that the product was not found.
Since we’re probably going to use the same logic for more than just Products (for example Users, Carts, Locations), let’s make this error reusable.
Let’s extend the BaseError class but now, let’s make the status code default to 404 and put a “property” argument in the constructor:
class NotFoundError extends BaseError {
  propertyName: string;

  constructor(propertyName: string) {
    super(404, `Property '${propertyName}' not found.`);

    this.propertyName = propertyName;
  }
}
Enter fullscreen mode
Exit fullscreen mode
Now when using the NotFoundError class, we can just give it the property name, and the object will construct the full message for us (statusCode will default to 404 as you can see from the code).
// This is how we can use the error
const notFoundError = new NotFoundError('Product');
Enter fullscreen mode
Exit fullscreen mode
And this is how it looks when it’s thrown:

Now we can create different errors that suit our needs. Some of the most common examples for an API would be:
- ValidationError (errors you can use when handling incoming user data)
- DatabaseError (errors you can use to inform the user that there’s a problem with communicating with the database)
- AuthenticationError (error you can use to signal to the user there’s an authentication error)
5.2. Going a step further
Armed with this knowledge, you can go a step further. Depending on your needs, you can add an errorCode to the BaseError class, and then use it in some of your custom error classes to make the errors more readable to the consumer.
For example, you can use the error codes in the AuthenticationError to tell the consumer the type of auth error. A01 can mean the user is not verified, while A02 can mean that the reset password link has expired.
Think about your application’s needs, and try to make it as simple as possible.
5.3. Creating and catching errors in controllers
Now let’s take a look at a sample controller (route function) in Express.js
const sampleController = (req: Request, res: Response, next: NextFunction) => {

  res.status(200).json({
    response: 'successfull',
    data: {
      answer: 42
    }
  });
};
Enter fullscreen mode
Exit fullscreen mode
Let’s try to use our custom error class NotFoundError. Let’s use the next() function to pass our custom error object to the next middleware function that will catch the error and take care of it (don’t worry about it, I’ll explain how to catch errors in a minute).
const sampleController = async (req: Request, res: Response, next: NextFunction) => {

    return next(new NotFoundError('Product'))

  res.status(200).json({
    response: 'successfull',
    data: {
      answer: 42
    }
  });
};
Enter fullscreen mode
Exit fullscreen mode
This will successfully stop the execution of this function and pass the error to the next middleware function. So, this is it?
Not quite. We still need to handle errors we don’t handle through our custom errors.
5.4. Unhandled mistakes
For example, let’s say you write a piece of code that passes all syntax checks, but will throw an error at runtime. These mistakes can happen, and they will. How do we handle them?
Let’s say you want to use the JSON.parse() function. This function takes in JSON data formated as a string, but you give it a random string. Giving this promise-based function a string will cause it to throw an error! If not handled, it will throw an UnhandledPromiseRejectionWarning error.

Well, just wrap your code inside a try/catch block, and pass any errors down the middleware line using next() (again, I will explain this soon)!
And this really will work. This is not a bad practice, since all errors resulting from promise-based code will be caught inside the .catch() block. This has a downside though, and it’s the fact that your controller files will be full of repeated try/catch blocks, and we don’t want to repeat ourselves. Luckily, we do have another ace up our sleeve.
5.5. handleAsync wrapper
Since we don’t want to write our try/catch blocks in every controller (route function), we can write a middleware function that does that once, and then apply it on every controller.
Here’s how it looks:
const asyncHandler = (fn: any) => (req: Request, res: Response, next: NextFunction) => Promise.resolve(fn(req, res, next)).catch(next);
Enter fullscreen mode
Exit fullscreen mode
It may look complicated at first, but it’s just a middleware function that acts as a try/catch block with next(err) inside the catch(). Now, we can just wrap it around our controllers and that’s it!
const sampleController = asyncHandler(async (req: Request, res: Response, next: NextFunction) => {
  JSON.parse('A string');

  res.status(200).json({
    response: 'successfull',
    data: {
      something: 2
    }
  });
});
Enter fullscreen mode
Exit fullscreen mode
Now, if the same error is thrown, we won’t get an UnhandledPromiseRejectionWarning, instead, our error handling code will successfully respond and log the error (once we finish writing it, of course. Here’s how it will look like):


6. How do I handle errors?
Okay, we learned how to create errors. Now what?
Now we need to figure out how to actually handle them.
6.1. Express middlewares
An express application is essentially a series of middleware function calls. A middleware function has access to the request object, the response object, and the next middleware function.
Express with route each incoming request through these middlewares, from the first down the chain, until the response is sent to the client. Each middleware function can either pass the request to the next middleware with the next() function, or it can respond to the client and resolve the request.
Learn more about Express middleware here.
6.2. Catching errors in Express
Express has a special type of middleware function called “Error-handling middleware”. These functions have an extra argument err. Every time an error is passed in a next() middleware function, Express skips all middleware functions and goes straight to the error-handling ones.
Here’s an example on how to write one:
const errorMiddleware = (error: any, req: Request, res: Response, next: NextFunction) => {
  // Do something with the error
  next(error); // pass it to the next function
};
Enter fullscreen mode
Exit fullscreen mode
6.3. What to do with errors
Now that we know how to catch errors, we have to do something with them. In APIs, there are generally two things you should do: respond to the client and log the error.
6.3.1. errorReponse middleware (responding to the client)
Personally, when writing APIs I follow a consistent JSON response structure for successful and failed requests:
// Success
{
    "response": "successfull",
    "message": "some message if required",
    "data": {}
}

// Failure
{
    "response": "error",
      "error": {
        "type": "type of error",
        "path": "/path/on/which/it/happened",
        "statusCode": 404,
        "message": "Message that describes the situation"
      }
}
Enter fullscreen mode
Exit fullscreen mode
And now we’re going to write a middleware that handles the failure part.
const errorResponse = (error: any, req: Request, res: Response, next: NextFunction) => {
  const customError: boolean = error.constructor.name === 'NodeError' || error.constructor.name === 'SyntaxError' ? false : true;

  res.status(error.statusCode || 500).json({
    response: 'Error',
    error: {
      type: customError === false ? 'UnhandledError' : error.constructor.name,
      path: req.path,
      statusCode: error.statusCode || 500,
      message: error.message
    }
  });
  next(error);
};
Enter fullscreen mode
Exit fullscreen mode
Let’s examine the function. We first create the customError boolean. We check the error.constructor.name property which tells us what type of error we’re dealing with. If error.constructor.name is NodeError (or some other error we didn’t personally create), we set the boolean to false, otherwise we set it to true. This way we can handle known and unknown errors differently.
Next, we can respond to the client. We use the res.status() function to set the HTTP status code and we use the res.json() function to send the JSON data to the client. When writing the JSON data, we can use the customError boolean to set certain properties. For instance, if the customError boolean is false, we will set the error type to ‘UnhandledError’, telling the user we didn’t anticipate this situation, otherwise, we set it to error.constructor.name.
Since the statusCode property is only available in our custom error objects, we can just return 500 if it’s not available (meaning it’s an unhandled error).
In the end, we use the next() function to pass the error to the next middleware.
6.3.2. errorLog middleware (logging the error)
const errorLogging = (error: any, req: Request, res: Response, next: NextFunction) => {
  const customError: boolean = error.constructor.name === 'NodeError' || error.constructor.name === 'SyntaxError' ? false : true;

  console.log('ERROR');
  console.log(`Type: ${error.constructor.name === 'NodeError' ? 'UnhandledError' : error.constructor.name}`);
  console.log('Path: ' + req.path);
  console.log(`Status code: ${error.statusCode || 500}`);
  console.log(error.stack);
};
Enter fullscreen mode
Exit fullscreen mode
This function follows the same logic as the one before, with a small difference. Since this logging is intended for developers of the API, we also log the stack.
As you can see, this will just console.log() the error data to the system console. In most production APIs logging is a bit more advanced, logging to a file, or logging to an API. Since this part of the API building is very application-specific, I didn’t want to dive in too much. Now that you have the data, choose what approach works best for your application and implement your version of logging. If you’re deploying to a cloud-based deploying service like AWS, you will be able to download log files by just using the middleware function above (AWS saves all the console.log()s).
7. You can handle errors now.
There you go! That should be enough to get you started with handling errors in a TypeScript + Node.js + Express.js API workflow. Note, there’s a lot of room for improvement here. This approach is not the best, nor the fastest, but is pretty straightforward and most importantly, forgiving, and quick to iterate and improve as your API project progresses and demands more from your skills. These concepts are crucial and easy to get started with, and I hope you’ve enjoyed my article and learned something new.
Here’s a GitHub repository I made so you can get the full picture: (coming soon)
Think I could’ve done something better? Is something not clear? Write it down in the comments.
Anyone else you think would benefit from this? Share it!
Get in touch: Telegram, Linkedin, Website
Thank you 🙂