Обработка ошибок
Функции промежуточного обработчика для обработки ошибок определяются так же, как и другие функции промежуточной обработки, но с указанием для функции обработки ошибок не трех, а четырех аргументов: (err, req, res, next). Например:
app.use(function(err, req, res, next) {
  console.error(err.stack);
  res.status(500).send('Something broke!');
});
Промежуточный обработчик для обработки ошибок должен быть определен последним, после указания всех app.use() и вызовов маршрутов; например:
var bodyParser = require('body-parser');
var methodOverride = require('method-override');

app.use(bodyParser());
app.use(methodOverride());
app.use(function(err, req, res, next) {
  // logic
});
Ответы, поступающие из функции промежуточной обработки, могут иметь любой формат, в зависимости от ваших предпочтений. Например, это может быть страница сообщения об ошибке HTML, простое сообщение или строка JSON.
В целях упорядочения (и для фреймворков более высокого уровня) можно определить несколько функций промежуточной обработки ошибок, точно так же, как это допускается для обычных функций промежуточной обработки. Например, для того чтобы определить обработчик ошибок для запросов, совершаемых с помощью XHR, и для остальных запросов, можно воспользоваться следующими командами:
var bodyParser = require('body-parser');
var methodOverride = require('method-override');

app.use(bodyParser());
app.use(methodOverride());
app.use(logErrors);
app.use(clientErrorHandler);
app.use(errorHandler);
В данном примере базовый код logErrors может записывать информацию о запросах и ошибках в stderr, например:
function logErrors(err, req, res, next) {
  console.error(err.stack);
  next(err);
}
Кроме того, в данном примере clientErrorHandler определен, как указано ниже; в таком случае ошибка явным образом передается далее следующему обработчику:
function clientErrorHandler(err, req, res, next) {
  if (req.xhr) {
    res.status(500).send({ error: 'Something failed!' });
  } else {
    next(err);
  }
}
“Обобщающая” функция errorHandler может быть реализована так:
function errorHandler(err, req, res, next) {
  res.status(500);
  res.render('error', { error: err });
}
При передаче какого-либо объекта в функцию next() (кроме строки 'route'), Express интерпретирует текущий запрос как ошибку и пропустит все остальные функции маршрутизации и промежуточной обработки, не являющиеся функциями обработки ошибок. Для того чтобы обработать данную ошибку определенным образом, необходимо создать маршрут обработки ошибок, как описано в следующем разделе.
Если задан обработчик ошибок с несколькими функциями обратного вызова, можно воспользоваться параметром route, чтобы перейти к следующему обработчику маршрута. Например:
app.get('/a_route_behind_paywall',
  function checkIfPaidSubscriber(req, res, next) {
    if(!req.user.hasPaid) {

      // continue handling this request
      next('route');
    }
  }, function getPaidContent(req, res, next) {
    PaidContent.find(function(err, doc) {
      if(err) return next(err);
      res.json(doc);
    });
  });
В данном примере обработчик getPaidContent будет пропущен, но выполнение всех остальных обработчиков в app для /a_route_behind_paywall будет продолжено.
Вызовы next() и next(err) указывают на завершение выполнения текущего обработчика и на его состояние. next(err) пропускает все остальные обработчики в цепочке, кроме заданных для обработки ошибок, как описано выше.
Стандартный обработчик ошибок
В Express предусмотрен встроенный обработчик ошибок, который обрабатывает любые возможные ошибки, встречающиеся в приложении. Этот стандартный обработчик ошибок добавляется в конец стека функций промежуточной обработки.
В случае передачи ошибки в next() без обработки с помощью обработчика ошибок, такая ошибка будет обработана встроенным обработчиком ошибок. Ошибка будет записана на клиенте с помощью трассировки стека. Трассировка стека не включена в рабочую среду.
Для запуска приложения в рабочем режиме необходимо задать для переменной среды NODE_ENV значение production.
При вызове next() с ошибкой после начала записи ответа
(например, если ошибка обнаружена во время включения ответа в поток, направляемый клиенту), стандартный обработчик ошибок Express закрывает соединение и отклоняет запрос.
Поэтому при добавлении нестандартного обработчика ошибок вам потребуется делегирование в стандартные
механизмы обработки ошибок в Express в случае, если заголовки уже были отправлены клиенту:
function errorHandler(err, req, res, next) {
  if (res.headersSent) {
    return next(err);
  }
  res.status(500);
  res.render('error', { error: err });
}
Error Handling refers to how Express catches and processes errors that
occur both synchronously and asynchronously. Express comes with a default error
handler so you don’t need to write your own to get started.
Catching Errors
It’s important to ensure that Express catches all errors that occur while
running route handlers and middleware.
Errors that occur in synchronous code inside route handlers and middleware
require no extra work. If synchronous code throws an error, then Express will
catch and process it. For example:
app.get('/', (req, res) => {
  throw new Error('BROKEN') // Express will catch this on its own.
})
For errors returned from asynchronous functions invoked by route handlers
and middleware, you must pass them to the next() function, where Express will
catch and process them. For example:
app.get('/', (req, res, next) => {
  fs.readFile('/file-does-not-exist', (err, data) => {
    if (err) {
      next(err) // Pass errors to Express.
    } else {
      res.send(data)
    }
  })
})
Starting with Express 5, route handlers and middleware that return a Promise
will call next(value) automatically when they reject or throw an error.
For example:
app.get('/user/:id', async (req, res, next) => {
  const user = await getUserById(req.params.id)
  res.send(user)
})
If getUserById throws an error or rejects, next will be called with either
the thrown error or the rejected value. If no rejected value is provided, next
will be called with a default Error object provided by the Express router.
If you pass anything to the next() function (except the string 'route'),
Express regards the current request as being an error and will skip any
remaining non-error handling routing and middleware functions.
If the callback in a sequence provides no data, only errors, you can simplify
this code as follows:
app.get('/', [
  function (req, res, next) {
    fs.writeFile('/inaccessible-path', 'data', next)
  },
  function (req, res) {
    res.send('OK')
  }
])
In the above example next is provided as the callback for fs.writeFile,
which is called with or without errors. If there is no error the second
handler is executed, otherwise Express catches and processes the error.
You must catch errors that occur in asynchronous code invoked by route handlers or
middleware and pass them to Express for processing. For example:
app.get('/', (req, res, next) => {
  setTimeout(() => {
    try {
      throw new Error('BROKEN')
    } catch (err) {
      next(err)
    }
  }, 100)
})
The above example uses a try...catch block to catch errors in the
asynchronous code and pass them to Express. If the try...catch
block were omitted, Express would not catch the error since it is not part of the synchronous
handler code.
Use promises to avoid the overhead of the try...catch block or when using functions
that return promises. For example:
app.get('/', (req, res, next) => {
  Promise.resolve().then(() => {
    throw new Error('BROKEN')
  }).catch(next) // Errors will be passed to Express.
})
Since promises automatically catch both synchronous errors and rejected promises,
you can simply provide next as the final catch handler and Express will catch errors,
because the catch handler is given the error as the first argument.
You could also use a chain of handlers to rely on synchronous error
catching, by reducing the asynchronous code to something trivial. For example:
app.get('/', [
  function (req, res, next) {
    fs.readFile('/maybe-valid-file', 'utf-8', (err, data) => {
      res.locals.data = data
      next(err)
    })
  },
  function (req, res) {
    res.locals.data = res.locals.data.split(',')[1]
    res.send(res.locals.data)
  }
])
The above example has a couple of trivial statements from the readFile
call. If readFile causes an error, then it passes the error to Express, otherwise you
quickly return to the world of synchronous error handling in the next handler
in the chain. Then, the example above tries to process the data. If this fails then the
synchronous error handler will catch it. If you had done this processing inside
the readFile callback then the application might exit and the Express error
handlers would not run.
Whichever method you use, if you want Express error handlers to be called in and the
application to survive, you must ensure that Express receives the error.
The default error handler
Express comes with a built-in error handler that takes care of any errors that might be encountered in the app. This default error-handling middleware function is added at the end of the middleware function stack.
If you pass an error to next() and you do not handle it in a custom error
handler, it will be handled by the built-in error handler; the error will be
written to the client with the stack trace. The stack trace is not included
in the production environment.
Set the environment variable NODE_ENV to production, to run the app in production mode.
When an error is written, the following information is added to the
response:
- The
res.statusCodeis set fromerr.status(orerr.statusCode). If
this value is outside the 4xx or 5xx range, it will be set to 500. - The
res.statusMessageis set according to the status code. - The body will be the HTML of the status code message when in production
environment, otherwise will beerr.stack. - Any headers specified in an
err.headersobject.
If you call next() with an error after you have started writing the
response (for example, if you encounter an error while streaming the
response to the client) the Express default error handler closes the
connection and fails the request.
So when you add a custom error handler, you must delegate to
the default Express error handler, when the headers
have already been sent to the client:
function errorHandler (err, req, res, next) {
  if (res.headersSent) {
    return next(err)
  }
  res.status(500)
  res.render('error', { error: err })
}
Note that the default error handler can get triggered if you call next() with an error
in your code more than once, even if custom error handling middleware is in place.
Writing error handlers
Define error-handling middleware functions in the same way as other middleware functions,
except error-handling functions have four arguments instead of three:
(err, req, res, next). For example:
app.use((err, req, res, next) => {
  console.error(err.stack)
  res.status(500).send('Something broke!')
})
You define error-handling middleware last, after other app.use() and routes calls; for example:
const bodyParser = require('body-parser')
const methodOverride = require('method-override')

app.use(bodyParser.urlencoded({
  extended: true
}))
app.use(bodyParser.json())
app.use(methodOverride())
app.use((err, req, res, next) => {
  // logic
})
Responses from within a middleware function can be in any format, such as an HTML error page, a simple message, or a JSON string.
For organizational (and higher-level framework) purposes, you can define
several error-handling middleware functions, much as you would with
regular middleware functions. For example, to define an error-handler
for requests made by using XHR and those without:
const bodyParser = require('body-parser')
const methodOverride = require('method-override')

app.use(bodyParser.urlencoded({
  extended: true
}))
app.use(bodyParser.json())
app.use(methodOverride())
app.use(logErrors)
app.use(clientErrorHandler)
app.use(errorHandler)
In this example, the generic logErrors might write request and
error information to stderr, for example:
function logErrors (err, req, res, next) {
  console.error(err.stack)
  next(err)
}
Also in this example, clientErrorHandler is defined as follows; in this case, the error is explicitly passed along to the next one.
Notice that when not calling “next” in an error-handling function, you are responsible for writing (and ending) the response. Otherwise those requests will “hang” and will not be eligible for garbage collection.
function clientErrorHandler (err, req, res, next) {
  if (req.xhr) {
    res.status(500).send({ error: 'Something failed!' })
  } else {
    next(err)
  }
}
Implement the “catch-all” errorHandler function as follows (for example):
function errorHandler (err, req, res, next) {
  res.status(500)
  res.render('error', { error: err })
}
If you have a route handler with multiple callback functions you can use the route parameter to skip to the next route handler. For example:
app.get('/a_route_behind_paywall',
  (req, res, next) => {
    if (!req.user.hasPaid) {
      // continue handling this request
      next('route')
    } else {
      next()
    }
  }, (req, res, next) => {
    PaidContent.find((err, doc) => {
      if (err) return next(err)
      res.json(doc)
    })
  })
In this example, the getPaidContent handler will be skipped but any remaining handlers in app for /a_route_behind_paywall would continue to be executed.
Calls to next() and next(err) indicate that the current handler is complete and in what state. next(err) will skip all remaining handlers in the chain except for those that are set up to handle errors as described above.

on
April 29, 2021
A Guide to Error Handling in Express.js
Error handling often doesn’t get the attention and prioritization it deserves. Especially for newbie developers, there is more focus on setting up routing, route handlers, business logic, optimizing performance, etc. As a result, the equally (if not more) crucial error-handling part will likely be overlooked. Striving for the most optimized code and squeezing out every last ounce of performance is all well and good; yet, it’s important to remember all it takes is one unhandled error leak into your user interface to override all the seconds you helped your users save.
Because there are so many components involved in a successful, functioning web application, it is vital to foolproof your application by preparing for all possible errors and exceptions. If left mishandled, these errors can lead to a bad user experience and end up affecting your business. At the same time, errors provide critical information about potential errors in your application that could bring the whole thing down. Therefore, you must be thoughtful and intelligent about error handling in your application.
This post will c, Node.js’s most popular server-side framework (even though most of these concepts apply to other frameworks too). Express does a great job taking care of several unhandled errors and provides an easy-to-use, flexible API that developers can utilize to build error handling middleware.
Here’s an outline of what we’ll be covering so you can easily navigate or skip ahead in the guide:
- How does Error Handling Work in Express.js?
- Express Middleware Functions
- Default Error Handling in Express.js
- Handling Custom Errors
- Custom Handling for Each Route
- Writing your own Error Handling Middleware Functions
- Adding Multiple Middleware Handlers
- Basic Quick Tutorial: Setting up Error Handling in Express.js
How Does Error Handling Work in Express.js?
Express.js is the most popular Javascript server-side framework, perhaps, primarily because of its ease of usage and getting started. One of the many ways it makes things easier is by automatically catching all errors in route handlers, and allowing developers to extend route handling functionalities by leveraging useful middleware functions.
Before we see how all of this works, let’s briefly visit the concept of middleware functions in Express – most error handling functionality is achieved through these functions.
Express Middleware Functions
Middleware functions in Express are essentially functions that come into play after the server receives the request and before the response fires to the client. They have access to the request and the response objects. They can be used for any data processing, database querying, making API calls, sending the response, or calling the next middleware function (using the next() function).
Two aspects of middleware functions to keep in mind are:
- They are triggered sequentially (top to bottom) based on their sequence in code.
- They operate until the process exits, or the response has been sent back to the client.
Let’s understand this through a small example. Below we define two middleware functions using the .use() function and one route handler (skipping the boilerplate code for the sake of simplicity):
app.use((req, res, next) => {
  console.log("Middleware 1 called.")
  console.log(req.path)
  next() // calling next middleware function or handler
})

app.get('/', (req, res) => {
  console.log("Route handler called.")
  res.send("Hello world!") // response sent back – no more middleware called
})

app.use((req, res, next) => {
  console.log("Last middleware called❓") // not called
})
Here, each time the server receives a request, the first middleware is fired, followed by the corresponding route handler (using the next() function). However, because the response returns in this handler, the last middleware function is not called. Here’s the output:
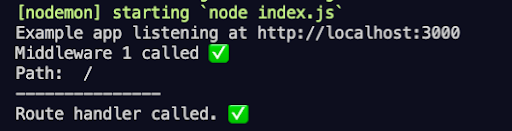 |
| Server output |
Several native as well as third-party middleware functions have been made available by the Express community and are widely for adding functionalities like session management, authentication, logging, redirecting, and so much more. This was a basic example of how middleware functions work. We will come back to them when discussing how to utilize them for error handling in our applications.
Default Error Handling in Express.js
Express implicitly takes care of catching your errors to prevent your application from crashing when it comes to error handling. This is especially true for synchronous route handler code. Let’s see how:
Synchronous Code
Synchronous code refers to statements of code that execute sequentially and one at a time. When an error encounters synchronous code, Express catches it automatically. Here’s an example of a route handler function where we simulate an error condition by throwing an error:
app.get('/', (req, res) => {
  throw new Error("Hello error!")
})
Express catches this error for us and responds to the client with the error’s status code, message, and even the stack trace (for non-production environments).
All of this is taken care of thanks to Express’s default built-in error handler middleware function inserted at the end of your code’s middleware stack. This automatic handling saves you from bulky try/catch blocks and explicit calls to the in-built middleware (shown below) while also providing some fundamental default error handling functionality.
app.get('/', (req, res, next) => {
  try {
      throw new Error("Hello error!")
  }
  catch (error) {
      next(error)
  }
})
You can also choose to create your own middleware function to specify your error handling logic.
Asynchronous Code
When writing server-side code, most of your route handlers are likely using asynchronous Javascript logic to read and write files on the server, query databases, and make external API requests. Let’s see whether Express can catch errors raised from asynchronous code as well. We’ll throw an error from inside the asynchronous setTimeout() function and see what happens:
app.get('/', (req, res) => {
  setTimeout(() => {
      console.log("Async code example.")
      throw new Error("Hello Error!")
  }, 1000)
})
As you can see, our server crashed because Express didn’t handle the error for us.
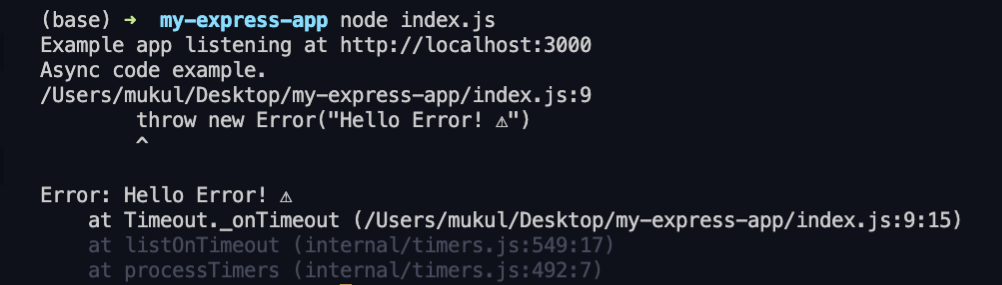 |
| Server output |
For handling errors raised during asynchronous code execution in Express (versions < 5.x), developers need to themselves catch their errors and invoke the in-built error handler middleware using the next() function. Here’s how:
app.get('/', (req, res, next) => {
  setTimeout(() => {
      try {
          console.log("Async code example.")
          throw new Error("Hello Error!")
      } catch (error) { // manually catching
          next(error) // passing to default middleware error handler
      }
  }, 1000)
})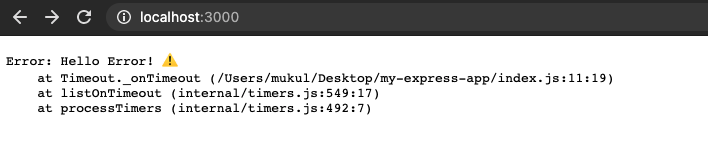 |
| Browser output |
This is much better – we caught the error, and our server didn’t crash. This does look a little bulky because we used the setTimeout() function to demonstrate async behavior. This function does not return a promise and, therefore, can’t be chained with a quick .catch() function. However, most libraries that help with async operations return promises these days (e.g., the file system API). Below is an example of a more convenient and common way of catching errors from promises:
const fsPromises = require('fs').promises
app.get('/', (req, res, next) => {
  fsPromises.readFile('./no-such-file.txt')

     .then(data => res.send(data))

     .catch(err => next(err))
})
Note: Express 5.0 (currently in alpha) can automatically catch errors (and rejections) thrown by returned Promises.
Handling Custom Errors
Express’s default error-handling middleware is super helpful for beginners to take care of unexpected, unhandled errors. However, different developers and organizations would want their errors handled in their own way – some might want to write these to log files, others might want to alert the user or redirect them to another page, or all of the above.
Custom Handling for Each Route
An obvious, naive way of going about this would be to define your custom error handling logic for each route handler as so:
const express = require('express')
const fsPromises = require('fs').promises;

const app = express()
const port = 3000

app.get('/one', (req, res) => {
  fsPromises.readFile('./one.txt')
    .then(data => res.send(data))
    .catch(err => { // error handling logic 1
        console.error(err) // logging error
        res.status(500).send(err)
    })
})

app.get('/two', (req, res) => {
  fsPromises.readFile('./two.txt')
    .then(data => res.send(data))
    .catch(err => { // error handling logic 2
        console.error(err)
        res.redirect('/error') // redirecting user
    })
})

app.get('/error', (req, res) => {
  res.send("Custom error landing page.")
})

app.listen(port, () => {
  console.log(`Example app listening at http://localhost:${port}`)
})
Here, we specified two different handling logics – one for each route that attempts to read arbitrary files on the server. As you can imagine, this would get too redundant quickly and wouldn’t scale well as you add more and more routes.
Writing your Error Handling Middleware Functions
A much better option would be to leverage Express’s middleware functions here. You could write one or more middleware functions for handling errors in your application that all of your routes could utilize by making simple next() calls.
Middleware functions are much more convenient to work with than conventional functions because they automatically have access to the error, request, and response objects and can be invoked (or invoke others) based on their ordering using just the next() function.
You can create your own error handling middleware functions by adding the error argument to the function, apart from request, response, and next. Here is an example:
app.use((error, req, res, next) => {
  console.log("Error Handling Middleware called")
  console.log('Path: ', req.path)
  next() // (optional) invoking next middleware
})
Another thing to keep in mind is the ordering of the middleware. The error handler needs to specify middleware functions after the route handlers for the next(error) calls to be directed towards them.
Now let’s recreate the previous example, but this time with an error-handling middleware in place.
const express = require('express')
const fsPromises = require('fs').promises

const app = express()
const port = 3000

app.get('/one', (req, res, next) => {
  fsPromises.readFile('./one.txt') // arbitrary file
    .then(data => res.send(data))
    .catch(err => next(err)) // passing error to custom middleware
})

app.get('/two', (req, res, next) => {
  fsPromises.readFile('./two.txt')
    .then(data => res.send(data))
    .catch(err => {
        err.type = 'redirect' // custom prop to specify handling behaviour
        next(err)
    })
})

app.get('/error', (req, res) => {
  res.send("Custom error landing page.")
})

app.use((error, req, res, next) => {
  console.log("Error Handling Middleware called")
  console.log('Path: ', req.path)
  console.error('Error: ', error)

  if (error.type == 'redirect')
      res.redirect('/error')

   else if (error.type == 'time-out') // arbitrary condition check
      res.status(408).send(error)
  else
      res.status(500).send(error)
})


app.listen(port, () => {
  console.log(`Example app listening at http://localhost:${port}`)
})
Instead of defining the handling behavior inside each route, we place all our logic inside the middleware. Then, based on the kind of error, we can modify the error object (or throw a custom error) and accordingly deal with it in the middleware.
This allows us to achieve the same functionality as before, but more efficiently. Assuming these files are not present on the server, if we go to /one, the server logs the error and sends back a 500 (internal server error) response. We are redirected to the /error page after the error logs if we open /two. Below are the corresponding client and server outputs:
As you can imagine, this was a fairly basic example just to give you a sense of how you can decouple your error handling logic from the route handling into a middleware function. This extends to larger applications with hundreds of routes for increased modularity, reduced redundancy, easier maintenance, and more efficient exception handling.
Adding Multiple Middleware Handlers
In the previous section, we worked with just one middleware to handle all our errors. However, in practice, multiple middleware functions are usually employed for different aspects of error handling to have further abstractions. For example, one middleware for logging errors, another for responding to the client, perhaps another as a fail-safe catch-all handler, etc. Here’s a preview of the same based on our previous example:
// route handlers
app.get('/one')
app.get('/two')

app.get('/error')
// middleware

app.use(errorLogger)
app.use(errorResponder)
app.use(failSafeHandler)
Let’s write the code for this.
const express = require('express')
const fsPromises = require('fs').promises

const app = express()
const port = 3000

app.get('/one', (req, res, next) => {
  fsPromises.readFile('./one.txt')
  .then(data => res.send(data))
  .catch(err => next(err)) // passing error to custom middleware
})

app.get('/two', (req, res, next) => {
  fsPromises.readFile('./two.txt')
  .then(data => res.send(data))
  .catch(err => {
      err.type = 'redirect' // adding custom property to specify handling behaviour
      next(err)
  })
})

app.get('/error', (req, res) => {
  res.send("Custom error landing page.")
})

function errorLogger(error, req, res, next) { // for logging errors
  console.error(error) // or using any fancy logging library
  next(error) // forward to next middleware
}

function errorResponder(error, req, res, next) { // responding to client
  if (error.type == 'redirect')
      res.redirect('/error')
  else if (error.type == 'time-out') // arbitrary condition check
      res.status(408).send(error)
  else
      next(error) // forwarding exceptional case to fail-safe middleware
}

function failSafeHandler(error, req, res, next) { // generic handler
  res.status(500).send(error)
}

app.use(errorLogger)
app.use(errorResponder)
app.use(failSafeHandler)

app.listen(port, () => {
console.log(`Example app listening at http://localhost:${port}`)
})
This allows us to achieve the same functionality as in the previous code example, but in a more modular way that would scale better as you add more routes and handle more error conditions.
However, as previously discussed, when working with multiple middleware functions, one must keep an eye on their sequence and remember that each middleware should either respond to the client or invoke the subsequent one in the stack. If the server is just left to hang, the client continues to wait. For example, if we missed using next() in the first middleware (errorLogger), the subsequent middleware functions are not invoked, and therefore, no response fires.
Basic Quick Tutorial: Setting up Error Handling in Express.js
Now that we’ve covered almost all aspects of error handling in Express, theory-wise, let’s solidify our understanding of these concepts by creating a prototype Express application that handles errors using middleware methods in a relatively more realistic setting.
We’ll create an API that serves user posts data fetched from a dummy API (jsonplaceholder.typicode.com). We will then validate some of the posts’ properties based on some arbitrary criteria (e.g., the content length), raise custom errors if validation fails, capture these using our custom middleware, and process them accordingly.
Step 1: Create and Setup Project
First, create an empty folder, cd into it, generate an npm project, and install the dependencies.
mkdir my-express-app && cd my-express-app
npm init -y
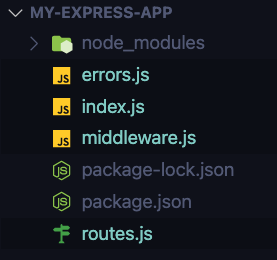
npm i --save express node-fetchThen, create files – index.js, routes.js, errors.js, and middleware.js. It is considered good practice to keep your routes, main file, and other utilities in separate files. Ideally, developers prefer different folders for better organization, but for our small prototype, just files would suffice.
 |
| Project files |
Step 2: Setup the Server
Now let’s write the code that will start our server in index.js.
// index.js
const express = require('express')
const app = express()
const port = 3000

app.listen(port, () => {
console.log(`Example app listening at http://localhost:${port}`)
})
We’ll start the server and make sure everything is working fine by running the node index.js command from inside the folder.
 |
| Console output |
Step 3: Create Some Routes
Now let’s create some routes in the routes.js file, and for now, just fetch some dummy JSON posts data from the dummy API (jsonplaceholder.typicode.com/posts), and serve it through our route. We will use Express’s Router module and export our routes – to import into our main index.js server file.
// routes.js
const express = require('express')
const fetch = require('node-fetch') // for making external API requests
const router = express.Router()
router.get('/', (req, res) => {
    res.send("Hello World!")
})

router.get('/user-posts', (req, res, next) => {
  fetch('https://jsonplaceholder.typicode.com/posts')
      .then(res => res.json())
      .then(data => {
          console.log(data)
          res.header("Content-Type",'application/json');
          res.send(JSON.stringify(data, null, 4)) // pretty print
        })
      .catch(err => next(err)) // pass to default error handler middleware
})

router.get('/error', (req, res) => {
  res.send("The URL you are trying to reach does not exist.")
})

module.exports = router // export routes
Now let’s import these routes into our server file.
// index.js
const express = require('express')
const routes = require('./routes') // importing routes

const app = express()
const port = 3000

app.use(routes) // initializing routes

app.listen(port, () => {
console.log(`Example app listening at http://localhost:${port}`)
})
Let’s fire up our browser and check whether the route is working.
 |
| Browser output |
Our server seems to be working fine here. Let’s do some error handling now.
Step 4: Creating and Handling Custom Errors
It is pretty helpful to create custom error classes for your applications by extending Node’s Error class in practice. These errors can raise issues specific to the application, for example – unauthorized access, unsuccessful payment, incorrect user input, etc. This allows developers to have more detailed information about the error conditions (through custom error messages and other properties), and therefore handle them better.
In our use case, let’s say we want to ensure that all the posts have a title of fewer than 100 characters and a body character count of fewer than 220 characters. If we don’t meet this condition, we want to raise a custom error message that alerts the developer about the same time.
Now that we have the error condition in mind, let’s create our custom error classes in the errors.js file.
// errors.js
class CharacterCountExceeded extends Error { // parent error
  constructor(post_id, content) {
      super();
      this.name = this.constructor.name // good practice

      if (this instanceof LongTitleError) // checking if title or body
          this.type = 'title'
      else if (this instanceof LongBodyError)
          this.type = 'body'

    this.message = `The character count of post (id: ${post_id}) ${this.type} is too long. (${content.length} characters)` // detailed error message
    this.statusCode = 500 // error code for responding to client
  }
}

// extending to child error classes
class LongTitleError extends CharacterCountExceeded { }
class LongBodyError extends CharacterCountExceeded { }

module.exports = {
    CharacterCountExceeded,
    LongTitleError,
    LongBodyError
}
First, we create one parent error class (CharacterCountExceeded) for all errors that involve an exceeded character count. The constructor for this class accepts the post’s ID and the content (of the title or body) to generate the required error message and specify an error code. Then we extend this class to create two more specific children classes (LongTitleError and LongBodyError) that refer to the particular error condition.
Now we will import these into our routes.js file, check for erroneous conditions inside our route handler, and throw these custom errors wherever required.
// routes.js
const express = require('express')
const fetch = require('node-fetch')
const router = express.Router()
const { LongTitleError, LongBodyError } = require('./errors');
router.get('/', (req, res) => {
res.send("Hello World!")
})
router.get('/user-posts', (req, res, next) => {
fetch('https://jsonplaceholder.typicode.com/posts')
.then(res => res.json())
.then(posts => {
for (post of posts) {
if (post.title.length > 100)
throw new LongTitleError(post.id, post.body)
if (post.body.length > 220)
throw new LongBodyError(post.id, post.body)
}
console.log(posts)
res.header("Content-Type", 'application/json')
res.send(JSON.stringify(posts, null, 4)) // pretty print
})
.catch(err => next(err))
})
router.get('/error', (req, res) => {
res.send("The URL you are trying to reach does not exist.")
})
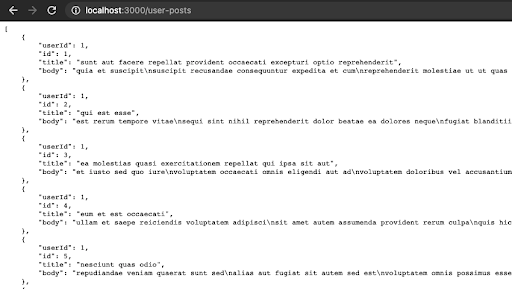
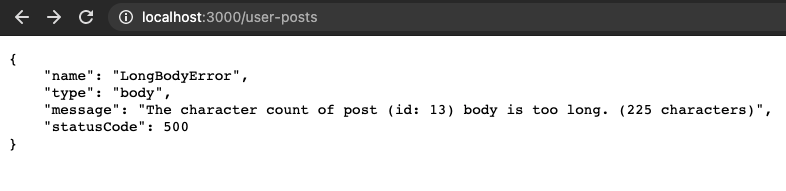
module.exports = routerAs you can see here, we traverse through all the posts, check for their title and body’s character count, and throw our custom errors accordingly. Here’s the output:

It turns out there was one post that had a body size of more than 220 characters, and we successfully captured it. At the moment, we are forwarding all our errors through the catch block to Express’s default error handler middleware. But what’s the fun in that?
Let’s create our own middleware functions and use them as we like.
Step 5: Adding Custom Error Handler Middleware
We’ll use the middleware.js file that we created before.
// middleware.js
const errorLogger = (err, req, res, next) => {
  console.error('x1b[31m', err) // adding some color to our logs
  next(err) // calling next middleware
}

const errorResponder = (err, req, res, next) => {
  res.header("Content-Type", 'application/json')
  res.status(err.statusCode).send(JSON.stringify(err, null, 4)) // pretty print
}
const invalidPathHandler = (req, res, next) => {
  res.redirect('/error')
}

module.exports = { errorLogger, errorResponder, invalidPathHandler }
Here, we add three middleware functions – one for logging errors, one for sending the error to the client, and one for redirecting a user from an invalid route to an error landing page. Now let’s import these into our main file and use them in our application.
// index.js
const express = require('express')
const routes = require('./routes')
const { errorLogger, errorResponder, invalidPathHandler } = require('./middleware')

const app = express()
const port = 3000

app.use(routes)

// middleware
app.use(errorLogger)
app.use(errorResponder)
app.use(invalidPathHandler)

app.listen(port, () => {
console.log(`Example app listening at http://localhost:${port}`)
})
Now let’s open our browser and see whether the middleware handles our LongBody error the way it’s supposed to.
 |
| Console output: Error object logged in red using the errorLogger middleware. |
 |
| Server’s error response using the errorResponder middleware. |
 |
| Redirecting to the error landing page upon encountering an invalid path |
As you can see all our middleware functions are working as expected – in logging, responding to the client, and redirecting to the error landing page.
Wrapping it Up
We covered everything about error handling in Express.js – from default error handling of synchronous and asynchronous code to creating your own error classes and writing your own error-handling middleware functions.
Now go ahead and make sure to handle all your errors in your Express application in a clean, non-redundant, efficient, and easy to maintain way. And if you haven’t already, write your own middleware functions and play around with native and third-party ones to explore how they can be helpful for your applications. If you are serious about your application’s performance and want to spend less time debugging issues and more time building new features, consider checking out ScoutAPM for monitoring your Node.js app’s performance and get started with a 14-day free trial.
Когда я только начинал работать с Express и пытался разобраться с тем, как обрабатывать ошибки, мне пришлось нелегко. Возникало такое ощущение, будто никто не писал о том, что мне было нужно. В итоге мне пришлось самому искать ответы на мои вопросы. Сегодня я хочу рассказать всё, что знаю об обработке ошибок в Express-приложениях. Начнём с синхронных ошибок.

Обработка синхронных ошибок
Если вам нужно обработать синхронную ошибку, то вы можете, для начала, с помощью инструкции throw, выдать такую ошибку в обработчике запроса Express. Обратите внимание на то, что обработчики запросов ещё называют «контроллерами», но я предпочитаю использовать термин «обработчик запросов» так как он кажется мне понятнее.
Вот как это выглядит:
app.post('/testing', (req, res) => {
  throw new Error('Something broke! ')
})
Такие ошибки можно перехватить с помощью обработчика ошибок Express. Если вы не написали собственный обработчик ошибок (подробнее об этом мы поговорим ниже), то Express обработает ошибку с помощью обработчика, используемого по умолчанию.
Вот что делает стандартный обработчик ошибок Express:
- Устанавливает код состояния HTTP-ответа в значение 500.
- Отправляет сущности, выполнившей запрос, текстовый ответ.
- Логирует текстовый ответ в консоль.

Сообщение об ошибке, выведенное в консоль
Обработка асинхронных ошибок
Для обработки асинхронных ошибок нужно отправить ошибку обработчику ошибок Express через аргумент next:
app.post('/testing', async (req, res, next) => {
  return next(new Error('Something broke again! '))
})
Вот что попадёт в консоль при логировании этой ошибки.

Сообщение об ошибке, выведенное в консоль
Если вы пользуетесь в Express-приложении конструкцией async/await, то вам понадобится использовать функцию-обёртку, наподобие express-async-handler. Это позволяет писать асинхронный код без блоков try/catch. Подробнее об async/await в Express можно почитать здесь.
const asyncHandler = require('express-async-handler')

app.post('/testing', asyncHandler(async (req, res, next) => {
  // Сделать что-нибудь
}))
После того, как обработчик запроса обёрнут в express-async-handler, то можно, так же, как было описано выше, выбросить ошибку с использованием инструкции throw. Эта ошибка попадёт к обработчику ошибок Express.
app.post('/testing', asyncHandler(async (req, res, next) => {
  throw new Error('Something broke yet again! ')
}))
Сообщение об ошибке, выведенное в консоль
Написание собственного обработчика ошибок
Обработчики ошибок Express принимают 4 аргумента:
- error
- req
- res
- next
Размещать их нужно после промежуточных обработчиков и маршрутов.
app.use(/*...*/)
app.get(/*...*/)
app.post(/*...*/)
app.put(/*...*/)
app.delete(/*...*/)

// Собственный обработчик ошибок нужно поместить после всех остальных промежуточных обработчиков
app.use((error, req, res, next) => { /* ... */ })
Если создать собственный обработчик ошибок, то Express прекратит использование стандартного обработчика. Для того чтобы обработать ошибку, нужно сформировать ответ для фронтенд-приложения, которое обратилось к конечной точке, в которой возникла ошибка. Это означает, что нужно выполнить следующие действия:
- Сформировать и отправить подходящий код состояния ответа.
- Сформировать и отправить подходящий ответ.
То, какой именно код состояния подойдёт в каждом конкретном случае, зависит от того, что именно произошло. Вот список типичных ошибок, к обработке которых вы должны быть готовы:
- Ошибка
400 Bad Request. Используется в двух ситуациях. Во-первых — тогда, когда пользователь не включил в запрос необходимое поле (например — в отправленной платёжной форме не заполнено поле со сведениями о кредитной карте). Во-вторых — тогда, когда в запросе содержатся некорректные данные (например — ввод в поле пароля и в поле подтверждения пароля разных паролей). - Ошибка
401 Unauthorized. Этот код состояния ответа применяется в том случае, если пользователь ввёл неправильные учётные данные (вроде имени пользователя, адреса электронной почты или пароля). - Ошибка
403 Forbidden. Используется в тех случаях, когда пользователю не разрешён доступ к конечной точке. - Ошибка
404 Not Found. Применяется в тех случаях, когда конечную точку невозможно обнаружить. - Ошибка
500 Internal Server Error. Применяется тогда, когда запрос, отправленный фронтендом, сформирован правильно, но на бэкенде при этом возникла какая-то ошибка.
После того, как определён подходящий код состояния ответа, его нужно установить с помощью res.status:
app.use((error, req, res, next) => {
  // Ошибка, выдаваемая в ответ на неправильно сформированный запрос
  res.status(400)
  res.json(/* ... */)
})
Код состояния ответа должен соответствовать сообщению об ошибке. Для этого нужно отправлять код состояния вместе с ошибкой.
Легче всего это сделать с помощью пакета http-errors. Он позволяет отправлять в ошибке три фрагмента информации:
- Код состояния ответа.
- Сообщение, сопутствующее ошибке.
- Любые данные, которые нужно отправить (это необязательно).
Вот как установить пакет http-errors:
npm install http-errors --saveВот как этим пакетом пользоваться:
const createError = require('http-errors')

// Создание ошибки
throw createError(status, message, properties)
Рассмотрим пример, который позволит как следует в этом всём разобраться.
Представим, что мы пытаемся обнаружить пользователя по адресу его электронной почты. Но этого пользователя найти не удаётся. В результате мы решаем отправить в ответ на соответствующий запрос ошибку User not found, сообщающую вызывающей стороне о том, что пользователь не найден.
Вот что нам нужно будет сделать при создании ошибки:
- Установить код состояния ответа как
400 Bad Request(ведь пользователь ввёл неправильные данные). Это будет наш первый параметр. - Отправить вызывающей стороне сообщение наподобие
User not found. Это будет второй параметр.
app.put('/testing', asyncHandler(async (req, res) => {
  const { email } = req.body
  const user = await User.findOne({ email })

  // Если пользователь не найден - выбросим ошибку
  if (!user) throw createError(400, `User '${email}' not found`)
}))
Получить код состояния можно с помощью конструкции error.status, а сообщение ошибки — с помощью error.message:
// Логирование ошибки
app.use((error, req, res, next) => {
  console.log('Error status: ', error.status)
  console.log('Message: ', error.message)
})
Результат логирования ошибки в консоли
Затем состояние ответа устанавливают с помощью res.status, а сообщение записывают в res.json:
app.use((error, req, res, next) => {
  // Установка кода состояния ответа
  res.status(error.status)

  // Отправка ответа
  res.json({ message: error.message })
})
Лично я предпочитаю отправлять в подобных ответах код состояния, сообщение и результат трассировки стека. Это облегчает отладку.
app.use((error, req, res, next) => {
  // Установка кода состояния ответа
  res.status(error.status)

  // Отправка ответа
  res.json({
    status: error.status,
    message: error.message,
    stack: error.stack
  })
})
▍Код состояния ответа, используемый по умолчанию
Если источником ошибки не является createError, то у неё не будет свойства status. Вот пример, в котором сделана попытка прочесть несуществующий файл с помощью fs.readFile:
const fs = require('fs')
const util = require('util')

// Преобразуем readFile из функции, использующей коллбэки, в async/await-функцию.
// Подробности об этом смотрите здесь: https://zellwk.com/blog/callbacks-to-promises
const readFilePromise = util.promisify(fs.readFile)

app.get('/testing', asyncHandler(async (req, res, next) => {
  const data = await readFilePromise('some-file')
})
У такого объекта ошибки не будет свойства status:
app.use((error, req, res, next) => {
  console.log('Error status: ', error.status)
  console.log('Message: ', error.message)
})
Результат логирования ошибки в консоли
В подобных случаях можно задать код ошибки, используемый по умолчанию. А именно, речь идёт об ошибке 500 Internal Server Error:
app.use((error, req, res, next) => {
  res.status(error.status || 500)
  res.json({
    status: error.status,
    message: error.message,
    stack: error.stack
  })
})
▍Изменение кода состояния ошибки
Предположим, мы собираемся прочитать некий файл, воспользовавшись данными, предоставленными пользователем. Если такого файла не существует, это значит, что нам нужно выдать ошибку 400 Bad Request. Ведь в том, что файл найти не удаётся, нет вины сервера.
В подобном случае нужно воспользоваться конструкцией try/catch для перехвата исходной ошибки. Затем нужно воссоздать объект ошибки с помощью createError:
app.get('/testing', asyncHandler(async (req, res, next) => {
  try {
    const { file } = req.body
    const contents = await readFilePromise(path.join(__dirname, file))
  } catch (error) {
    throw createError(400, `File ${file} does not exist`)
  }
})
▍Обработка ошибок 404
Если запрос прошёл через все промежуточные обработчики и маршруты, но так и не был обработан, это означает, что конечная точка, соответствующая такому запросу, не была найдена.
Для обработки ошибок 404 Not Found нужно добавить, между маршрутами и обработчиком ошибок, дополнительный обработчик. Вот как выглядит создание объекта ошибки 404:
// Промежуточные обработчики...
// Маршруты...

app.use((req, res, next) => {
  next(createError(404))
})

// Обработчик ошибок...
Сведения об ошибке
▍Замечания об ошибке ERR_HTTP_HEADERS_SENT
Не впадайте в панику если видите сообщение об ошибке ERR_HTTP_HEADERS_SENT: Cannot set headers after they are sent to the client. Она возникает из-за того, что в одном и том же обработчике многократно вызывается метод, устанавливающий заголовки ответа. Вот методы, вызов которых приводит к автоматической установке заголовков ответа:
- res.send
- res.json
- res.render
- res.sendFile
- res.sendStatus
- res.end
- res.redirect
Так, например, если вы вызовете методы res.render и res.json в одном и том же обработчике ответа, то вы получите ошибку ERR_HTTP_HEADERS_SENT:
app.get('/testing', (req, res) => {
  res.render('new-page')
  res.json({ message: '¯_(ツ)_/¯' })
})
В результате, в том случае, если вы сталкиваетесь с этой ошибкой, тщательно проверьте код обработчиков ответа и убедитесь в том, что в нём нет ситуаций, в которых вызывается несколько вышеописанных методов.
▍Обработка ошибок и потоковая передача данных
Если что-то идёт не так при потоковой передаче ответа фронтенду, то можно столкнуться с той же самой ошибкой ERR_HTTP_HEADERS_SENT.
В подобном случае обработку ошибок нужно передать стандартным обработчикам. Такой обработчик отправит ошибку и автоматически закроет соединение.
app.use((error, req, res, next) => {
  // Сделать это нужно только в том случае, если ответ передаётся в потоковом режиме
  if (res.headersSent) {
    return next(error)
  }

  // Остальной код обработки ошибок
})
Итоги
Сегодня я рассказал вам всё, что знаю об обработке ошибок в Express. Надеюсь, это поможет вам писать более надёжные Express-приложения.
Уважаемые читатели! Как вы обрабатываете ошибки в своих Node.js-проектах?


Github repository
Why do we need error handling at all?
Imagine that a client application (web, mobile…) is using the server. Sometimes we need to handle exceptions which appear in the application and we need to send a clear message to the user what is wrong. It is very important to have a working error handler inside the application in order to achieve better user experience and for many other reasons as well. Beside from the user experience, it is a good practice to catch errors in one place (all the errors go through the handler) so the developer can track the bugs/exceptions more easily.
Creating exceptions
An exception is created using the throw keyword inside the application.
throw Error('Error');
Enter fullscreen mode
Exit fullscreen mode
As soon as the application executes this line the normal flow is halted and the control is switched to the nearest exception handler. While in some other environments we can throw strings, objects etc, in Node.js we throw error objects. An error object is an object derived from Error or an instance of Error itself.
Throwing an error from derived Error object looks like:
class SomethingIsWrongError extends Error {
  constructor() {
    super('Something is wrong!');
  }
}
throw new SomethingIsWrongError();
Enter fullscreen mode
Exit fullscreen mode
Before we start creating our error handler we need to decide what is the right way to go. Most of my applications have supported/support multiple languages which means that the message needs to be translated into the language which the user has selected. We cannot show errors in English language if the user has selected Japanese language which means the error message needs to be translated somewhere. Either we translate the message on the server side or on the client side.
-
Server side translation
In order to translate the message on the server side we have to know to whom we are sending the exception in order to get the selected language from the user. Challenge of this approach is that a developer needs always to have the selected language of the user whenever an error message needs to be sent to the client side. -
Client side translation
Other solution is to send an unique error code and any additional data if needed so the translation of exceptions should be done on the client side based on the code and this is the solution which I prefer.
The client side needs to know:
- Status code.
- Unique error code. Every error has its own unique code.
- Metadata if any. If any additional dynamic data needs to be sent in order to translate the message like what is the maximum allowed input number etc.
In order to keep track of all the errors more easily, we need to create a class in which we will store all possible errors that we know about. When we throw an exception then we will refer to one of the codes found in that class.
Create a folder called error-handler in the root directory and this will be the place where we will create files for error handler logic. Create a file called error-code.ts with following code:
export class ErrorCode {
  public static readonly Unauthenticated = 'Unauthenticated';
  public static readonly NotFound = 'NotFound';
  public static readonly MaximumAllowedGrade = 'MaximumAllowedGrade';
  public static readonly AsyncError = 'AsyncError';
  public static readonly UnknownError = 'UnknownError';
}
Enter fullscreen mode
Exit fullscreen mode
We also need to have a model that we will return to the client. Create a file called error-model.ts inside error-handler folder with following code:
export class ErrorModel {
  /**
   * Unique error code which identifies the error.
   */
  public code: string;
  /**
   * Status code of the error.
   */
  public status: number;
  /**
   * Any additional data that is required for translation.
   */
  public metaData?: any;
}
Enter fullscreen mode
Exit fullscreen mode
And now we need to create the actual error exception object. Create a file called error-exception.ts inside error-handler folder with following code:
import { ErrorCode } from './error-code';

export class ErrorException extends Error {
  public status: number = null;
  public metaData: any = null;
  constructor(code: string = ErrorCode.UnknownError, metaData: any = null) {
    super(code);
    Object.setPrototypeOf(this, new.target.prototype);
    this.name = code;
    this.status = 500;
    this.metaData = metaData;
    switch (code) {
      case ErrorCode.Unauthenticated:
        this.status = 401;
        break;
      case ErrorCode.MaximumAllowedGrade:
        this.status = 400;
        break;
      case ErrorCode.AsyncError:
        this.status = 400;
        break;
      case ErrorCode.NotFound:
        this.status = 404;
        break;
      default:
        this.status = 500;
        break;
    }
  }
}
Enter fullscreen mode
Exit fullscreen mode
When we want to throw an error from our application we use exactly the class we created and one code from the available list of codes. We would throw an error like:
throw new ErrorException(ErrorCode.MaximumAllowedGrade, { max: 100 }); // object is optional
Enter fullscreen mode
Exit fullscreen mode
Error handler
Error handler is a special middleware in Node.js which takes 4 parameters. Regular route middleware takes 3 parameters: req, res and next. Error handler also takes these 3 parameters and one additional parameter which is the actual error. Those four parameters are (retrospectively):
- err
- req
- res
- next
Create file called error-handler.ts inside error-handler folder. The following handler will intercept all errors that occur in the application whether it is an exception that we know or an exception that we do not know. In order to recognize that it is an exception thrown by ourselves, we can recognize it by type of instance if (err instanceof ErrorException)
import { Request, Response, NextFunction } from 'express';
import { ErrorCode } from './error-code';
import { ErrorException } from './error-exception';
import { ErrorModel } from './error-model';

export const errorHandler = (err: Error, req: Request, res: Response, next: NextFunction) => {
  console.log('Error handling middleware called.');
  console.log('Path:', req.path);
  console.error('Error occured:', err);
  if (err instanceof ErrorException) {
    console.log('Error is known.');
    res.status(err.status).send(err);
  } else {
    // For unhandled errors.
    res.status(500).send({ code: ErrorCode.UnknownError, status: 500 } as ErrorModel);
  }
};
Enter fullscreen mode
Exit fullscreen mode
Now it is necessary to register this handler and we will register it as follows. The handler needs to be ‘lowered’ as far as possible in the application after all routes and other middlewares and handlers. If we specify routes or middlewares after registration of errorHandler then the error handler will not catch exceptions which appear in those routes or middlewares.
app.use(errorHandler); // registration of handler

app.listen(3000, () => {
  console.log('Application started on port 3000!');
});
Enter fullscreen mode
Exit fullscreen mode
Now we are ready to throw some errors.
app.get('/throw-unauthenticated', (req: Request, res: Response, next: NextFunction) => {
  throw new ErrorException(ErrorCode.Unauthenticated);
  // or
  // next(new ErrorException(ErrorCode.Unauthenticated))
});
app.get('/throw-maximum-allowed-grade', (req: Request, res: Response, next: NextFunction) => {
  throw new ErrorException(ErrorCode.MaximumAllowedGrade, { grade: Math.random() });
  // or
  // next(new ErrorException(ErrorCode.MaximumAllowedGrade, { grade: Math.random() }))
});
app.get('/throw-unknown-error', (req: Request, res: Response, next: NextFunction) => {
  const num: any = null;
  // Node.js will throw an error because there is no length property inside num variable
  console.log(num.length);
});
Enter fullscreen mode
Exit fullscreen mode
If you look at the code above, you will see that we have 2 known exceptions and one unknown. When we want to throw an exception from a route we can do it with the throw keyword or by calling the next function with an actual exception. Error handler will catch both exceptions. However, when it comes to async logic then it will be solved in another way which we will cover next.
Exceptions with promises
By Exress documentation:
Handling sync code:
Errors that occur in synchronous code inside route handlers and middleware require no extra work. If synchronous code throws an error, then Express will catch and process it. For example:
app.get('/', function (req, res) {
  throw new Error('BROKEN'); // Express will catch this on its own.
});
Enter fullscreen mode
Exit fullscreen mode
Handling async code:
For errors returned from asynchronous functions invoked by route handlers and middleware, you must pass them to the next() function, where Express will catch and process them. For example:
app.get('/', function (req, res, next) {
  fs.readFile('/file-does-not-exist', function (err, data) {
    if (err) {
      next(err); // Pass errors to Express.
    } else {
      res.send(data);
    }
  });
});
Enter fullscreen mode
Exit fullscreen mode
Starting with Express 5, route handlers and middleware that return a Promise will call next(value) automatically when they reject or throw an error. For example:
app.get('/user/:id', async function (req, res, next) {
  // if error appears in getUserById, express will automatically throw an error
  const user = await getUserById(req.params.id);
  res.send(user);
});
Enter fullscreen mode
Exit fullscreen mode
Let’s add code into our application for async code. The code will always throw an error and regarding if we are using express 4 or express 5, the application will catch the error.
const someOtherFunction = () => {
  const myPromise = new Promise((resolve, reject) => {
    setTimeout(() => {
      reject(new ErrorException(ErrorCode.AsyncError));
    }, 1000);
  });
  return myPromise;
};
app.get('/throw-async-await-error', async (req: Request, res: Response, next: NextFunction) => {
  // express 4
  try {
    await someOtherFunction();
  } catch (err) {
    next(err);
    // next line will not work as expected
    // throw err
  }
  // express 5
  // await someOtherFunction();
});
Enter fullscreen mode
Exit fullscreen mode
Wrapping up
In this tutorial we covered what exceptions are and how to throw an exception in application. We learned what we need to consider when handling exceptions in multi language applications. We learned to do everything necessary for the Node.JS application to successfully manage exceptions from creating necessary classes to creating a handler and registering it. And finally we learned how to throw exceptions and what to take care of when throwing exceptions in async or sync blocks.
Comming up: Authentication with JWT.