Содержание
- Как исправить диагностическую ошибку DELL 2000-0142
- Ошибка 2000-0142
- Метод 1. Выполните проверку диска в командной строке с помощью установочного диска Windows.
- Метод 2: Переустановите Windows
- Метод 3. Замените жесткий диск
- Метод 4: подключите неисправный жесткий диск и попытайтесь восстановить данные.
- Как исправить диагностическую ошибку DELL 2000-0142
- Ошибка 2000-0142
- Метод 1. Выполните проверку диска в командной строке с помощью установочного диска Windows.
- Метод 2: переустановите Windows
- Метод 3: замените жесткий диск
- Метод 4: подключите ошибочный жесткий диск и попробуйте восстановить данные
- Загрузите новое приложение Galaxy S5 Voice на свой Samsung Galaxy S4
- Читать далее
- Получите более быструю PIN-разблокировку на своем Samsung Galaxy S4, удалив шаг «ОК»
- Читать далее
- Получите плавающие уведомления и приложение Windows на вашем Samsung Galaxy S4
Как исправить диагностическую ошибку DELL 2000-0142
Когда ваш жесткий диск умирает, вы получаете очевидные симптомы, такие как постоянное повреждение данных, зависание при копировании или сохранении данных, длительное время запуска и постоянные экраны восстановления во время загрузки. Однако вы не можете точно сказать, связана ли проблема с жестким диском, если не выполните предзагрузочный анализ системы (PSA). Компьютеры Dell позволяют проводить комплексную PSA, также известную как ePSA, которая проверяет все оборудование в системе. К ним относятся, среди прочего, тесты памяти, тесты дисков, тесты вентиляторов, тесты устройств ввода и тесты жестких дисков. Чтобы запустить ePSA на dell, перезагрузите компьютер и нажмите F12, чтобы войти в меню загрузки, а затем выберите «диагностика». Следуя указанным симптомам, очень тревожно, когда пользователи получают диагностическую ошибку, указывающую на сбой диска. Эта ошибка содержит следующую информацию.
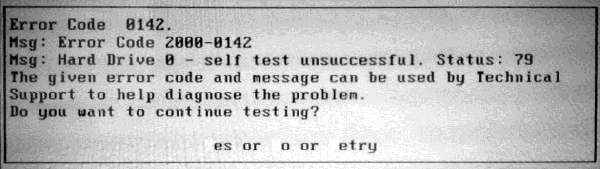
Код ошибки 0142
MSG: код ошибки 2000-0142
MSG: Hard Drive 1 – Self Test Unsuccessful Status 79 или Сообщение: Жесткий диск 0 – S/N WX51E43XWS20, короткое самотестирование не выполнено
Заданное Код и сообщение могут использоваться службой технической поддержки Dell для диагностики проблемы. Хотите продолжить тестирование?
Эта ошибка приведет к зацикливанию вашего компьютера при восстановлении при запуске. Так что же означает эта ошибка? И каковы решения этого? В данной статье будет рассмотрена эта проблема и даны попытки ее решения.
Ошибка 2000-0142
Проще говоря, это Ошибка означает, что ePSA не удалось успешно прочитать информацию с жесткого диска. Таким образом, ваш компьютер не запускается или будет иметь проблемы с запуском, потому что получение информации с диска ненадежно. Однако Windows безрезультатно пытается восстановить систему при запуске. Вот несколько различных причин, по которым вы можете вызвать это сообщение об ошибке на вашем компьютере Dell:
- Неисправность или смещение кабелей в корпусе вашего компьютера, подключение жесткого диска к материнская плата.
- Поврежденные данные или MBR (основная загрузочная запись) на жестком диске, что привело к сбою устройства.
- Сбой устройства в виде механического повреждения на жесткий диск. Перегрев и механические удары могут привести к деформации пластин, поломке считывающих головок и поломке шпинделей. Это означает, что ваши данные не могут быть прочитаны правильно, отсюда и проблема.
Если вы получаете эту ошибку, это означает, что ваш диск мертв, или он умирает, и сбой неизбежен. Крайне важно создать резервную копию данных на случай полного отказа. Вы можете попытаться оживить диск первыми двумя способами, указанными ниже, чтобы вы могли извлечь с него все важные данные. Помните, что если метод работает, вам потребуется замена жесткого диска, потому что в 95% случаев эти жесткие диски не могут прослужить дольше недели после этой ошибки..
Метод 1. Выполните проверку диска в командной строке с помощью установочного диска Windows.
Основная загрузочная запись содержит информацию о расположение вашей ОС и ядра. Это сообщает вашему компьютеру, откуда загружать ОС. В случае поврежденной MBR этот метод попытается восстановить все поврежденные данные. Если это сработает для вас, мы рекомендуем сделать резервную копию ваших данных на новый диск, поскольку возникшая ошибка указывает на неизбежный сбой диска. Для этого метода вам понадобится диск Windows (Win 7). Вы можете найти наше руководство по созданию диска Windows 10 https://appuals.com/how-to-create-windows-10-bootable-usb-using-rufus/или диска Windows 7 https://appuals.com/ create-windows-bootable-usb-or-dvd/.
- Вставьте установочный диск Windows 7 в дисковод, а затем запустите компьютер.
- Нажмите клавишу, когда вам будет предложено (или нажмите F8 при запуске и выберите DVD-привод из загрузочного меню).

- Выберите язык, время, валюту, клавиатуру или метод ввода, а затем нажмите Далее.
- Щелкните Восстановить компьютер.
- Щелкните операционную систему, которую вы хотите восстановить, а затем щелкните Далее.
- В диалоговом окне Параметры восстановления системы щелкните Командная строка.
- Тип Chkdsk/f/r или command и нажмите Enter, чтобы исправить поврежденные сектора и восстановить поврежденные данные.
Метод 2: Переустановите Windows
Этот метод также исправит все поврежденные файлы Windows или любой поврежденный или отсутствующий MBR данные. Перейдите на https://appuals.com/how-to-clean-install-windows-10/, чтобы получить руководство по чистой установке Windows 10. Если хотите, вы можете установить Windows 8 или Windows 7. Если это работает для вы, мы рекомендуем сделать резервную копию ваших данных, поскольку возникшая ошибка указывает на неизбежный сбой диска.
Метод 3. Замените жесткий диск
Если способы 1 и 2 никак не сработали, значит, на вашем диске произошел постоянный сбой, и его необходимо заменить. Взгляните на SSD (твердотельные диски) вместо HDD (жесткий диск), чтобы избежать этого разочарования в будущем. Поскольку в жестких дисках используются вращающиеся пластины и движущиеся головки, они более склонны к выходу из строя. Обычно это происходит через 3-5 лет использования.
Если система находится на гарантии, обратитесь в службу поддержки Dell с ошибкой, и они заменит диск. Гарантия производителя обычно распространяется на неисправный жесткий диск.
Метод 4: подключите неисправный жесткий диск и попытайтесь восстановить данные.
Вы Вы все равно можете попытаться восстановить ваши данные, если ваш диск вышел из строя методом 1 и 2. Нет никаких гарантий. Вам понадобится внешний конвертер USB HDD за несколько долларов (10 долларов). Вы также можете подключить его как дополнительный диск (не основной, на котором установлена ОС) к другому компьютеру. Настольные ПК обычно предоставляют дополнительные кабели для подключения другого диска SATA. Используйте любой метод, чтобы попытаться прочитать ваш диск. Если поврежден только ваш сектор MBR или файлы Windows, вы обнаружите, что все еще можете читать свой жесткий диск и получать доступ к своим данным. 
Эксперты по данным могут получить вашу информацию, изменив считывающие головки или пластину на работающие считывающие головки. В любом случае, это точный процесс, который будет стоить вам больших денег, поэтому убедитесь, что данные, которые вы сохраняете, стоят этих денег.
Источник
Как исправить диагностическую ошибку DELL 2000-0142

Видео: Fix Dell Diagnostic Error 2000-0142 on Windows 10
Когда ваш жесткий диск умирает, вы получите очевидные симптомы, такие как постоянное повреждение данных, зависание при копировании или сохранении данных, длительное время запуска и постоянные экраны восстановления во время загрузки. Однако вы не можете точно сказать, связана ли проблема с жестким диском, если не выполните предзагрузочный анализ системы (PSA). Компьютеры Dell позволяют проводить комплексную PSA, также известную как ePSA, которая проверяет все оборудование в системе. К ним относятся, среди прочего, тесты памяти, тесты дисков, тесты вентиляторов, тесты устройств ввода и тесты жестких дисков. Чтобы запустить ePSA на dell, перезагрузите компьютер и нажмите F12, чтобы войти в меню загрузки, а затем выберите «диагностика». Следуя указанным симптомам, очень тревожно, когда пользователи получают диагностическую ошибку, указывающую на сбой диска. Эта ошибка содержит следующую информацию.
Код ошибки 0142
MSG: код ошибки 2000-0142
MSG: Жесткий диск 1 — сбой самотестирования 79 или Msg: Hard Drive 0 — S / N WX51E43XWS20, короткое самотестирование не выполнено
Данный код и сообщение могут использоваться службой технической поддержки Dell для диагностики проблемы. Хотите продолжить тестирование?
Эта ошибка приведет к зацикливанию вашего компьютера при восстановлении при запуске. Так что же означает эта ошибка? И каковы решения этого? В данной статье будет рассмотрена эта проблема и даны попытки ее решения.
Ошибка 2000-0142
Проще говоря, эта ошибка означает, что ePSA не удалось успешно прочитать информацию с жесткого диска. Таким образом, ваш компьютер не запускается или не запускается, потому что получение информации с диска ненадежно. Однако Windows безуспешно пытается восстановить систему при запуске. Вот несколько различных причин, по которым вы можете вызвать это сообщение об ошибке на вашем компьютере Dell:
- Неисправные или смещенные кабели в корпусе вашего компьютера, соединяющие жесткий диск с материнской платой.
- Поврежденные данные или MBR (основная загрузочная запись) на жестком диске, что привело к сбою устройства.
- Выход из строя устройства в виде механического повреждения жесткого диска. Перегрев и механические удары могут привести к деформации пластин, поломке считывающих головок и поломке шпинделей. Это означает, что ваши данные не могут быть прочитаны правильно, отсюда и проблема.
Если вы получаете эту ошибку, это означает, что ваш диск неисправен или он умирает, и выход из строя неизбежен. Крайне важно создать резервную копию данных на случай полного отказа. Вы можете попробовать оживить диск с помощью первых двух методов, указанных ниже, чтобы вы могли извлечь с него все важные данные. Помните, что если метод работает, вам потребуется замена жесткого диска, потому что в 95% случаев эти жесткие диски не могут прослужить дольше недели после этой ошибки.
Метод 1. Выполните проверку диска в командной строке с помощью установочного диска Windows.
Основная загрузочная запись содержит информацию о расположении вашей ОС и ядра. Это сообщает вашему компьютеру, откуда загружать ОС. В случае поврежденной MBR этот метод попытается восстановить все поврежденные данные. Если это сработает для вас, мы рекомендуем выполнить резервное копирование данных на новый диск, поскольку возникшая ошибка указывает на неизбежный сбой диска. Для этого метода вам понадобится диск Windows (Win 7). Вы можете найти наше руководство по созданию диска Windows 10 https://appuals.com/how-to-create-windows-10-bootable-usb-using-rufus/ или диска Windows 7 https://appuals.com/ создать-окна-загрузочные-usb-или-dvd /.
- Вставьте установочный диск Windows 7 в дисковод и запустите компьютер.
- При появлении запроса нажмите клавишу (или нажмите F8 при запуске и выберите DVD-привод в меню загрузки).
- Выберите язык, время, валюту, клавиатуру или метод ввода, а затем нажмите «Далее».
- Щелкните Восстановить компьютер.
- Щелкните операционную систему, которую вы хотите восстановить, и нажмите кнопку Далее.
- В диалоговом окне Параметры восстановления системы щелкните Командная строка.
- Тип Чкдск / ф / р или команду и нажмите Enter, чтобы исправить поврежденные сектора и восстановить поврежденные данные.
Метод 2: переустановите Windows
Этот метод также исправит любые поврежденные файлы Windows или любые поврежденные или отсутствующие данные MBR. Посетите https://appuals.com/how-to-clean-install-windows-10/, чтобы получить руководство по чистой установке Windows 10. Если хотите, вы можете установить Windows 8 или Windows 7. Если это работает для мы рекомендуем сделать резервную копию ваших данных, поскольку возникшая ошибка указывает на неизбежный сбой диска.
Метод 3: замените жесткий диск
Если способы 1 и 2 никак не сработали, значит, ваш диск неисправен и требует замены. Взгляните на SSD (твердотельные накопители) вместо HDD (жесткого диска), чтобы избежать этого разочарования в будущем. Поскольку в жестких дисках используются вращающиеся пластины и движущиеся головки, они более склонны к сбоям. Обычно это происходит через 3-5 лет использования.
Если система находится на гарантии, обратитесь в службу поддержки Dell с сообщением об ошибке, и они заменит диск. Гарантия производителя обычно распространяется на неисправный жесткий диск.
Метод 4: подключите ошибочный жесткий диск и попробуйте восстановить данные
Вы все равно можете попробовать восстановить свои данные, если ваш диск вышел из строя методом 1 и 2. Нет никаких гарантий. Вам понадобится внешний конвертер USB HDD за несколько долларов (10 долларов). Вы также можете подключить его как дополнительный диск (не основной, на котором установлена ОС) к другому компьютеру. Настольные ПК обычно предоставляют дополнительные кабели для подключения другого диска SATA. Используйте любой из методов, чтобы попытаться прочитать ваш диск. Если поврежден только сектор MBR или файлы Windows, вы обнаружите, что все еще можете читать свой жесткий диск и получать доступ к своим данным.
Эксперты по данным могут получить вашу информацию, заменив считывающие головки или надев блюдо на работающие считывающие головки. В любом случае, это точный процесс, который будет стоить вам больших денег, поэтому убедитесь, что данные, которые вы сохраняете, стоят этих денег.
Загрузите новое приложение Galaxy S5 Voice на свой Samsung Galaxy S4
Есть много модов и настроек, которые вы можете сделать на своем amung Galaxy 4, чтобы он выглядел более свежим, например, с помощью более настраиваемой клавиатуры и лучшей разблокировки PIN-кода, но е.
Читать далее
Получите более быструю PIN-разблокировку на своем Samsung Galaxy S4, удалив шаг «ОК»
Если вы имели удовольствие владеть как устройством iO, так и устройством Android, вы, возможно, заметили одно тонкое отличие на экране разблокировки PIN-кода каждого из них. Экран блокировки Android т.
Читать далее
Получите плавающие уведомления и приложение Windows на вашем Samsung Galaxy S4
В середине 2013 года популярное пользовательское ПЗУ под названием Paranoid Android представило свою функцию многозадачности «Halo». В верхней части экрана появляются всплывающие уведомления.
Источник
Содержание
- 1 Ошибка 2000-0142
- 2 Способ 1. Выполните проверку диска в командной строке с помощью установочного диска Windows
- 3 Способ 2: переустановите Windows
- 4 Способ 3: заменить жесткий диск
- 5 Способ 4: подчинить ошибочный жесткий диск и попытаться восстановить данные
Когда ваш жесткий диск умирает, вы получите очевидные симптомы, такие как постоянное повреждение данных, зависание при копировании или сохранении данных, длительное время запуска и постоянное восстановление экранов во время загрузки. Однако вы не можете точно сказать, связана ли проблема с жестким диском, если вы не выполните анализ системы перед загрузкой (PSA). Компьютеры Dell поддерживают всеобъемлющий PSA, также известный как ePSA, который тестирует все оборудование в системе. К ним относятся тесты памяти, тесты дисков, тесты вентиляторов, тесты устройств ввода и HDD тесты среди других. Чтобы запустить ePSA в dell, перезагрузите компьютер и нажмите F12, чтобы войти в меню загрузки, а затем выберите «диагностика». После упомянутых симптомов очень тревожно, когда пользователи получают диагностическую ошибку, указывающую на сбой диска. Эта ошибка обнажает следующую информацию.
Код ошибки 0142
MSG: код ошибки 2000-0142
MSG: Жесткий диск 1 — самопроверка статуса неудачной 79 или же Msg: Жесткий диск 0 — S / N WX51E43XWS20, короткое самопроверка не удалась
Приведенный код и сообщение могут быть использованы службой технической поддержки Dell для диагностики проблемы. Хотите продолжить тестирование?
Эта ошибка приведет ваш компьютер в бесконечный цикл при запуске восстановления. Так что же означает эта ошибка? И каковы решения этого? В этой статье мы рассмотрим эту проблему и попытаемся ее решить.
Ошибка 2000-0142
Проще говоря, эта ошибка означает, что ePSA не может успешно считывать информацию с жесткого диска. В результате ваш компьютер не запустится или будет иметь проблемы с запуском, потому что получение информации с диска ненадежно. Windows, однако, попытается восстановить загрузку системы безрезультатно. Вот несколько причин, по которым вы можете вызвать это сообщение об ошибке на вашем компьютере Dell:
- Неисправность или неправильное расположение кабелей в корпусе вашего компьютера, соединяющее жесткий диск с материнской платой.
- Поврежденные данные или MBR (основная загрузочная запись) на жестком диске, что приводит к сбою устройства.
- Отказ устройства в виде механического повреждения жесткого диска. Перегрев и механические удары могут привести к деформации пластин, поломке головок считывателя и поломке шпинделей. Это означает, что ваши данные не могут быть прочитаны правильно, поэтому проблема.
Если вы получаете эту ошибку, это означает, что ваш диск мертв, или он умирает, и неисправность неизбежна. Первостепенное значение имеет резервное копирование данных в ожидании полного отказа. Вы можете попытаться восстановить диск двумя первыми способами, указанными ниже, чтобы вы могли извлечь с него все важные данные. Помните, что если метод работает, вам потребуется замена жесткого диска, потому что 95% времени эти жесткие диски не могут прослужить больше недели после этой ошибки.
Способ 1. Выполните проверку диска в командной строке с помощью установочного диска Windows
Основная загрузочная запись содержит информацию о местонахождении вашей ОС и ядра. Это говорит ваш компьютер, откуда загрузить ОС. В случае поврежденной MBR этот метод попытается восстановить любые поврежденные данные. Если это работает для вас, мы рекомендуем выполнить резервное копирование ваших данных на новый диск, поскольку возникшая ошибка указывает на неизбежный сбой диска. Для этого метода вам понадобится диск Windows (Win 7). Вы можете найти наше руководство по созданию диска Windows 10 https://appuals.com/how-to-create-windows-10-bootable-usb-using-rufus/ или диска Windows 7 https://appuals.com/ создание-окна-загрузочный-USB или-DVD /.
- Вставьте установочный диск Windows 7 в дисковод и запустите компьютер.
- Нажмите клавишу при появлении запроса (или нажмите F8 при запуске и выберите DVD-дисковод в меню загрузки).

- Выберите язык, время, валюту, клавиатуру или способ ввода и нажмите кнопку Далее.

- Нажмите Восстановить ваш компьютер.

- Выберите операционную систему, которую вы хотите восстановить, и нажмите кнопку Далее.

- В диалоговом окне «Параметры восстановления системы» нажмите «Командная строка».

- Тип Чкдск / ф / р или команду и нажмите ввод, чтобы исправить поврежденные сектора и восстановить поврежденные данные.

Способ 2: переустановите Windows
Этот метод также исправит любые поврежденные файлы Windows, или любые поврежденные или отсутствующие данные MBR. Зайдите на https://appuals.com/how-to-clean-install-windows-10/ за руководством по чистке установки Windows 10. Если вы предпочитаете, вы можете установить Windows 8 или Windows 7. В случае, если это работает для Вам мы рекомендуем выполнить резервное копирование ваших данных, поскольку возникшая ошибка указывает на неизбежный сбой диска.
Способ 3: заменить жесткий диск
Если методы 1 и 2 не сработали, значит, на вашем диске произошел постоянный сбой, и его необходимо заменить. Посмотрите на SSD (твердотельные накопители) вместо HDD (жесткий диск), чтобы избежать этого разочарования в будущем. Поскольку на жестких дисках используются вращающиеся пластины и движущиеся головки, они более подвержены сбоям. Это обычно происходит после 3 — 5 лет использования.
Если система находится на гарантии, обратитесь в службу поддержки Dell с ошибкой, и они заменят диск. Гарантия производителя обычно распространяется на неисправный жесткий диск.
Способ 4: подчинить ошибочный жесткий диск и попытаться восстановить данные
Вы все еще можете попытаться восстановить ваши данные, если на вашем диске произошел сбой метода 1 и 2. Нет гарантии. Вам понадобится внешний USB HDD конвертер за несколько долларов (10 $). Вы также можете подключить его в качестве дополнительного диска (не основного, на котором установлена ОС) к другому компьютеру. Настольные ПК обычно предоставляют дополнительные кабели для подключения другого диска SATA. Используйте любой метод, чтобы попытаться прочитать ваш диск. Если поврежден только ваш сектор MBR или файлы Windows, вы обнаружите, что по-прежнему можете читать жесткий диск и получать доступ к вашим данным.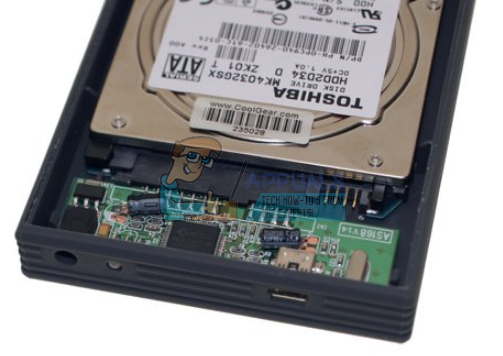
Эксперты по данным могут быть в состоянии получить вашу информацию путем замены считывающих головок или переноса диска на функционирующие считывающие головки. В любом случае, это точный процесс, который будет стоить вам много денег, поэтому убедитесь, что данные, которые вы сохраняете, стоят этих денег.
At the point when our computers are working legitimately, they’re completely a shelter to our efficiency, yet when they fall flat, they will in general make us feel more idiotic. When you hard drive is kicking the bucket, you will get clear indications like consistent data corruption, solidifying when copying data, long start-up times, and steady repair screens amid boot.
- Different Methods To Fix Dell Error code 2000 0142
- Sol 1: Run S.M.A.R.T Test on your system
- Sol 2 : Fixing the PSA or PSA error codes
- Sol 3 : Run Support Assist and check for any hardware or programming issue
If you experience an DELL error code 2000 0142, it means that there is a major issue with your computer’s hard drive. Indeed, this could be because of CPU disappointment, working framework crash, hard drive inability to finish an individual test, and numerous others.
Different Methods To Fix Dell Error code 2000 0142
Sol 1: Run S.M.A.R.T Test on your system
To remove the Dell laptop error code 2000 0142, you can run S.M.A.R.T (Self-Monitoring, Analysis, and Reporting Technology) test on the HDD to do some essential checking examination and to distinguish the conceivable purpose behind the hard drive failure, error code 2000 0151 is also associated with the hard drive . Follow the SMART test by following the below mentioned steps.
Step 1: Restart your PC/laptop and enter the BIOS Setup utility. If you are using Windows Vista or later version, continually press the F12 key while your framework is booting. For Windows XP, press the F1 key on a continuous basis to enter the BIOS Setup Utility.
Step 2: Choose the influenced hard drive and press Enter. Select SMART Support and again press Enter.
Step 3: Follow the given device test on your device.
- SMART Status Check: check the status of the HDD SMART status
- SMART Short Self – Test: It runs a short individual test on the HDD
- SMART Extended Self-Test: Run and expanded individual test on the HDD
Step 4: Once the test is finished, press Esc key.
If the above solution doesn’t work effectively, try out the second solution.
Sol 2 : Fixing the PSA or PSA error codes
Companies like Dell often face the hard drive error code 2000 0142. Dell is the company that uses a unique and proprietary hardware in the systems. In case system is unable to read your hard drive it occur due to error code 0146
By fixing the PSA or PSA v4236 error code 2000 0142, you can fix the issues with your Dell hard drive. Follow the below mentioned steps to begin with.
Step 1: Restart your Dell and over and again press F12 to enter One-time Boot Menu and pick Diagnostics. Adhere to the on-screen guidelines to finish the procedure. On the off chance that the test falls flat, note down the approval and error code.
Step 2: Browse to the Dell Support webpage, enter your Service Tag, click Submit and Diagnostic.
Sol 3 : Run Support Assist and check for any hardware or programming issue
- Run Dell Support Assist application, select Hardware Checkup
- From the given indicative tests, run Default, Stress or Scan a Specific Device demonstrative test
On the off chance that your PC/laptop is secured under hardware guarantee, you can contact the Dell service department for necessary assistance. Besides, before fixing the error 0142, make sure to back up the entirety of your vital data as there is a likelihood that the procedure may wipe it out. In any case, without reinforcement, you can select a data recuperation programming to recover your data from the HDD.
If nothing works, essentially supplant the influenced HDD with the upgraded one and restore every one of your data.
To resolve the issues on how to resolve Dell laptop Error Code 2000 0142, you can use any of the above mentioned solutions. In case of further assistance, you can contact tech experts for help. Contact the experts via helpline number and ask for the support.
Also, find here a complete guide to fix more issues/errors such as How To Connect HP Laptop To WiFi In Windows 7 & 10 and HP Laserjet p3015 Error 51.10. The steps are well-described and you will be able to follow them without any problem. With us, you get guaranteed solutions to fix all the types of errors or issues under a single roof.

Hard drive problems are pretty common in older laptops and sometimes in newer ones too. While the signs of a hard drive gone bad are quite easy to interpret (these include data corruption, extremely long boot/start-up time, slow read-write speeds, etc.), one needs to confirm that it is indeed the hard drive that is causing the said problems before running to the hardware store and buying a new replacement drive.
An easy way to confirm hard drive corruption is running a Pre-boot System Analysis (PSA) diagnostics test that is provided by most manufacturers. The ePSA or the Enhanced Pre-boot System Analysis test available on Dell computers checks all connected hardware to the system and includes sub-tests for memory, hard drive, fan and other input devices, etc. To run an ePSA test on your Dell system, restart your computer/laptop and keep pressing the F12 key until you enter the One-time boot menu. Finally, highlight Diagnostics and press enter.
Users performing an ePSA test often run into an error or two indicating disk failure/crash. The most common one is ‘Error Code 0142’ or ‘MSG: Error Code 2000-0142’.
If you are one of the unlucky Dell users that ran to the 2000-0142 diagnostic error, then you have come to the right place. In this article, we will be explaining the likely reasons for the said error and give you a couple of methods to fix Dell Diagnostic error 2000-0142 error.
What causes the Dell Diagnostic Error 2000-0142?
The ePSA diagnostic error code 2000-0142 implies that the hard disk drive (HDD) self-test was unsuccessful. In layman’s terms, the 2000-0142 error code means that the test failed to read information off your computer’s hard disk drive. Since there is trouble reading from the HDD, your computer may not start or will at least have some trouble booting up. The three most common reasons for the 2000-0142 diagnostic error are:
- Loose or incorrect SATA connections: SATA cables are used to connect your hard drive to your motherboard. An incorrect connection or a faulty/damaged cable will cause errors in reading data off your hard drive and therefore lead to the 2000-0142 error.
- Corrupt MBR: Hard drives store data on a platter surface which is divided into pie-shaped sectors and concentric tracks. The Master Boot Record (MBR) is the information contained in the very first sector of an HDD and it holds the location of the operating system. A corrupt MBR implies the PC can’t locate the OS and as a result, your computer will have difficulty or won’t boot up at all.
- Mechanical Damage: Damage in the form of a broken read-write head, spindle malfunction, cracked platter or any other damage to your hard drive can lead to the 2000-0142 error as data cannot be read.
Contents
- How to fix Diagnostic Error 2000-0142?
- Method 1: Check SATA cables
- Method 2: Perform a ‘Disk Check’ in the command prompt to repair MBR
- Method 3: Fix boot and rebuild BCD
- Method 4: Use MiniTool Partition Wizard to Backup Data and Repair MBR
- Method 5: Reinstall Windows
- Method 6: Replace your Hard Drive Disk
9 out of 10 times, the arrival of the diagnostic error 2000-0142 suggests that your hard drive is nearing its end. So it is important for users to backup their data to avoid losing any of it whenever the dreaded day arrives. Below are a few methods that you can use to salvage your data from a terminal hard drive (repairing MBR and reinstalling Windows OS) and finally, what steps you should take in case the hard drive has already stopped working (replacing the HDD).
Method 1: Check SATA cables
Before moving forward to the more advanced methods, we will first ensure that the problem isn’t caused due to IDE or SATA cables. Open up your computer and unplug the cables connecting the hard drive to the motherboard. Slightly blow wind into the connecting ends of the cable to get rid of any dirt that might be clogging the connection. Plug the cables and the hard drive back in, perform an ePSA test, and check if 2000-0142 the error still persists.
You should also try using the SATA cables to connect another hard drive or connect the suspected hard drive into another system to pinpoint the cause of the error. If you have another set of SATA cables available, try using them to connect the hard drive and make sure what’s the root cause.

Method 2: Perform a ‘Disk Check’ in the command prompt to repair MBR
As mentioned earlier, the information about the location of your operating system is stored in the Master Boot Record and it helps the computer know where to load the OS from. If the issue is caused due to a corrupted MBR, this method will help you recover any data.
If this works, we recommend that you backup your data to a brand new hard drive immediately, since the error you experienced indicates an approaching disk failure. You will need a bootable Windows disk to continue with this method – How to Create Windows 10 Bootable USB Flash Drive
1. Before you start the computer, insert the Windows installation disc in the disc drive.
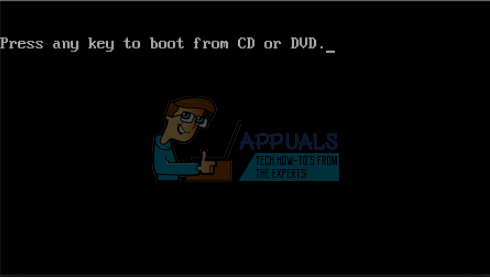
2. Once you see the prompt, press the required key. Alternatively, on startup, press F8 and choose DVD drive from the boot menu.
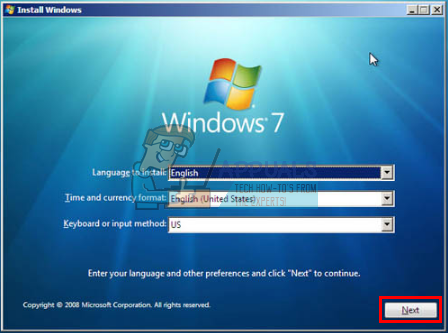
3. One by one, select the language to install, time and currency format, and Keyboard or input method, then click on ‘Next’.

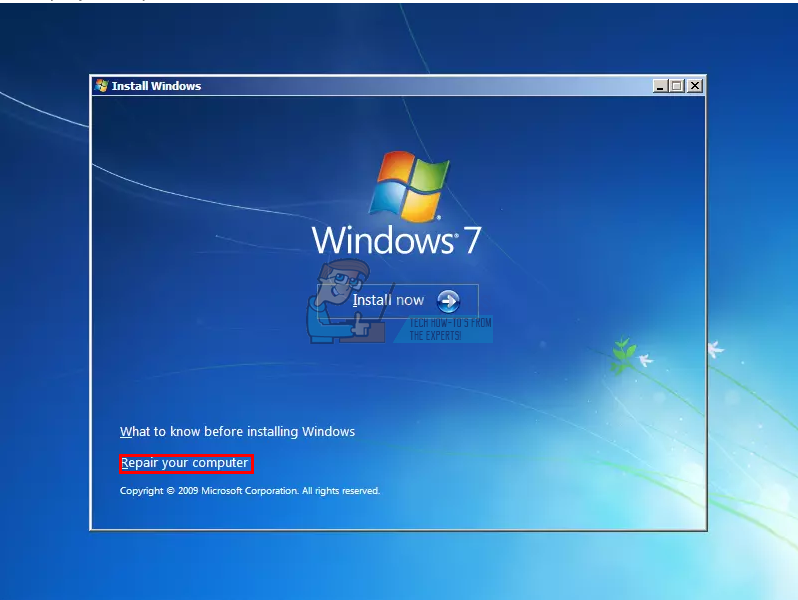
4. An ‘Install Windows’ window will pop up, click on ‘Repair your computer’.

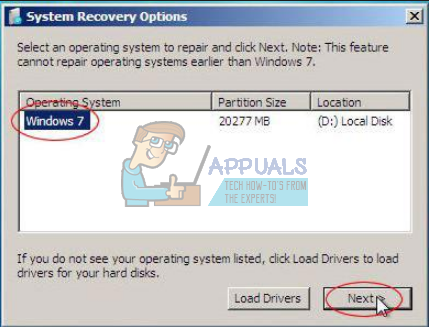
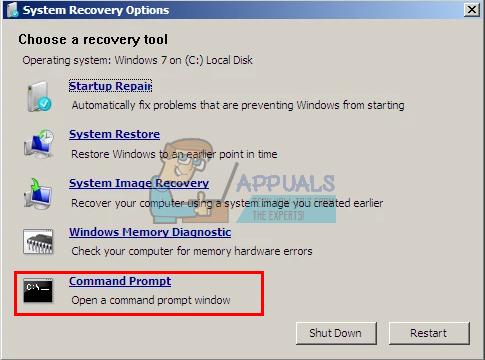
5. In the ‘System Recovery Options’, select the operating system that you want to repair. Once it is highlighted, click on ‘Next’.
6. In the following dialogue box, choose the ‘Command Prompt’ as the recovery tool.

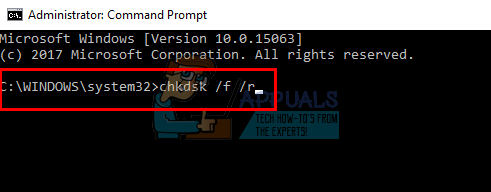
7. Once the Command Prompt window opens up, type ‘chkdsk /f /r’ and press enter. This will fix any bad sectors on the hard drive platter and repair the corrupt data.

Once the process ends, remove the Windows installation disc and switch on your computer. Check if the Dell Diagnostic Error 2000-0142 is still persisting or not.
Also Read: Does Quest Diagnostics Take Walk Ins?
Method 3: Fix boot and rebuild BCD
1. Open Command prompt and type the following commands one by one & hit enter:
bootrec.exe /rebuildbcd
bootrec.exe /fixmbr
bootrec.exe /fixboot

2. After completing each command successfully type exit.
3. Restart your PC to see if you boot to windows.
4. If you get an error in the above method then try this:
bootsect /ntfs60 C: (replace the drive letter with your boot drive letter)

5. And again try the above commands which failed earlier.
Also Read: 7 Ways to Fix Dell Touchpad Not Working
Method 4: Use MiniTool Partition Wizard to Backup Data and Repair MBR
Similar to the previous method, we will be creating a bootable USB or disc drive to help us retrieve data from the corrupt hard drive. Although, instead of creating a bootable Windows drive, we will be creating a bootable media drive for MiniTool Partition Wizard. The application is a partition management software for hard drives and is widely used for various hard drive related activities.
1. You will first need to find a computer running on the same OS as the problematic computer containing the corrupt hard drive. Connect an empty USB drive to the working computer.
2. Now, head over to Best Free Partition Manager for Windows | MiniTool Partition Wizard Free, download and install the required software on the working computer.
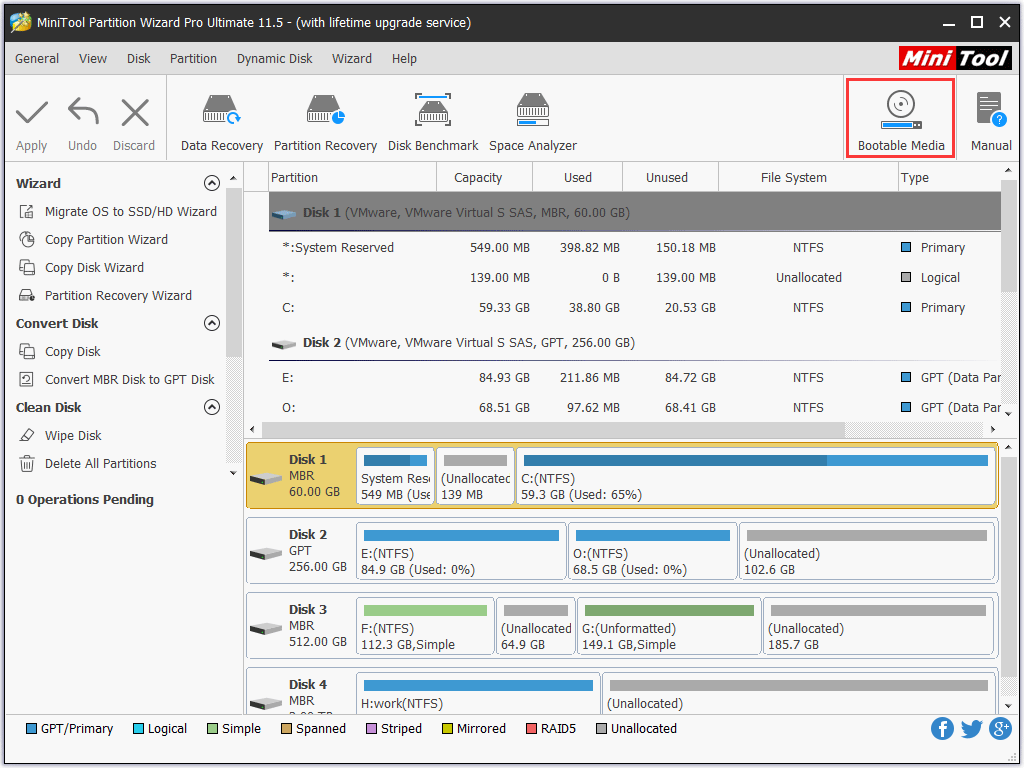
3. Once installed, launch the application and click on the Bootable Media feature present at the top right corner to make a bootable media drive. Unplug the USB drive once the bootable media drive is ready and plug it into the other computer.
4. When prompted, tap the required key to enter the BIOS menu and select the plugged in USB drive to boot from.
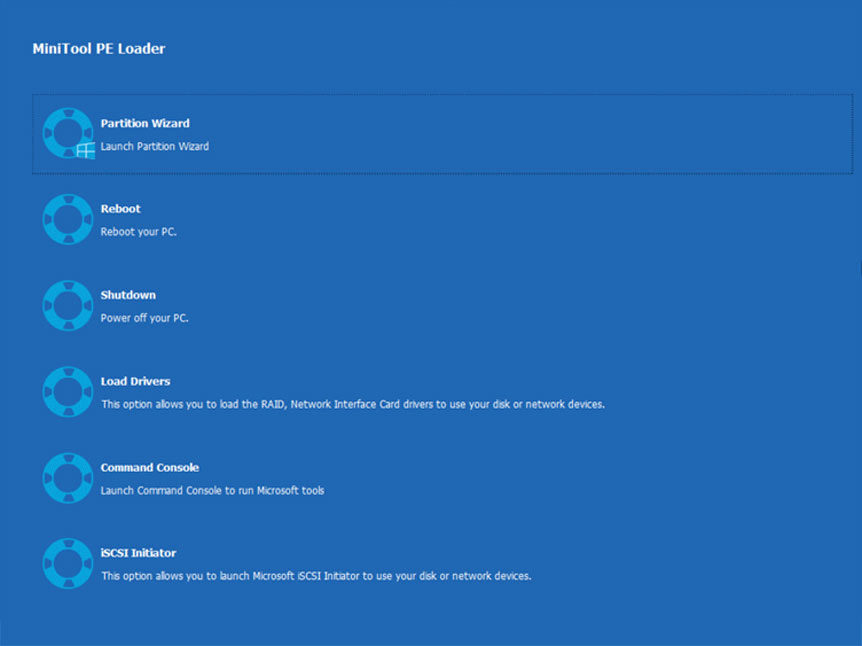
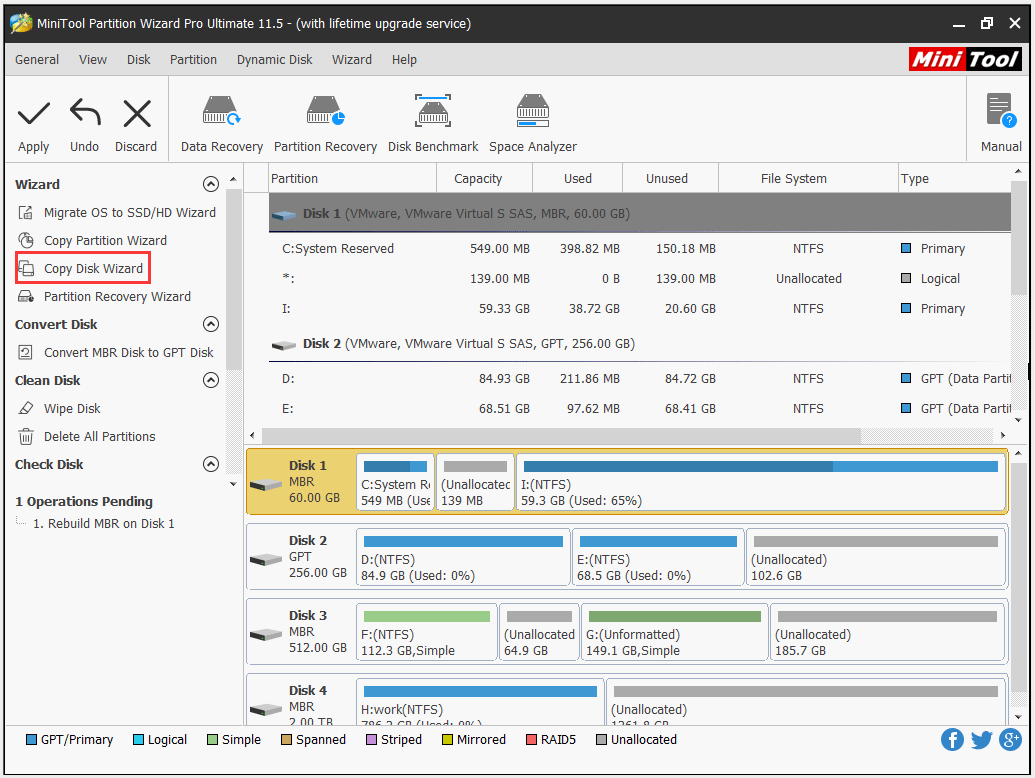
5. In the MiniTool PE Loader screen, click on Partition Wizard at the top of the list. This will launch the main user interface of MiniTool Partition Wizard.
6. Click on Data Recovery in the toolbar.
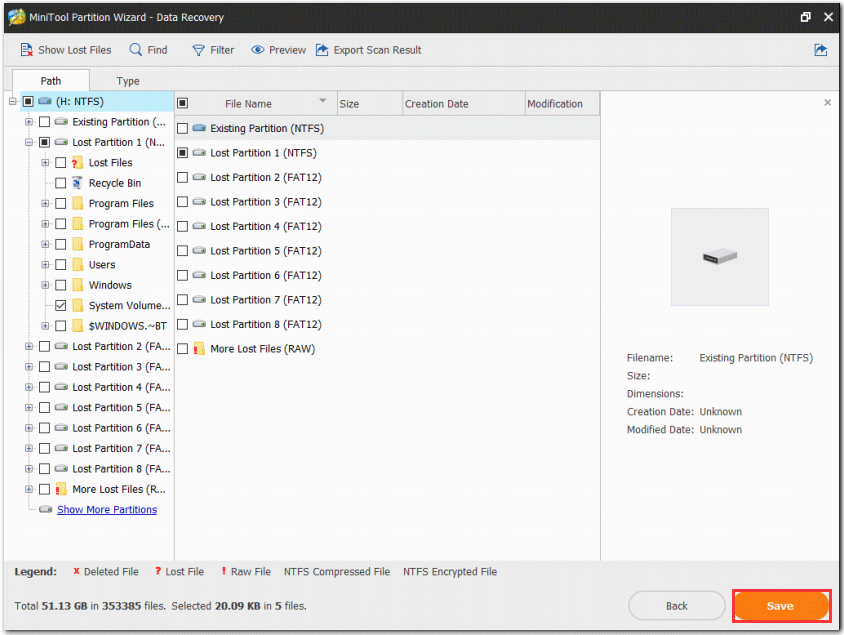
7. In the following Data Recovery window, select the partition from which data is to be recovered and click on Scan.
8. Select the files you would like to recover and click on the Save button.
Also, save the required files in a separate external hard drive or USB drive.
While we have the MiniTool Partition Wizard open, we can also try to repair the MBR through it. The process is simpler than the first method and only takes a few clicks.
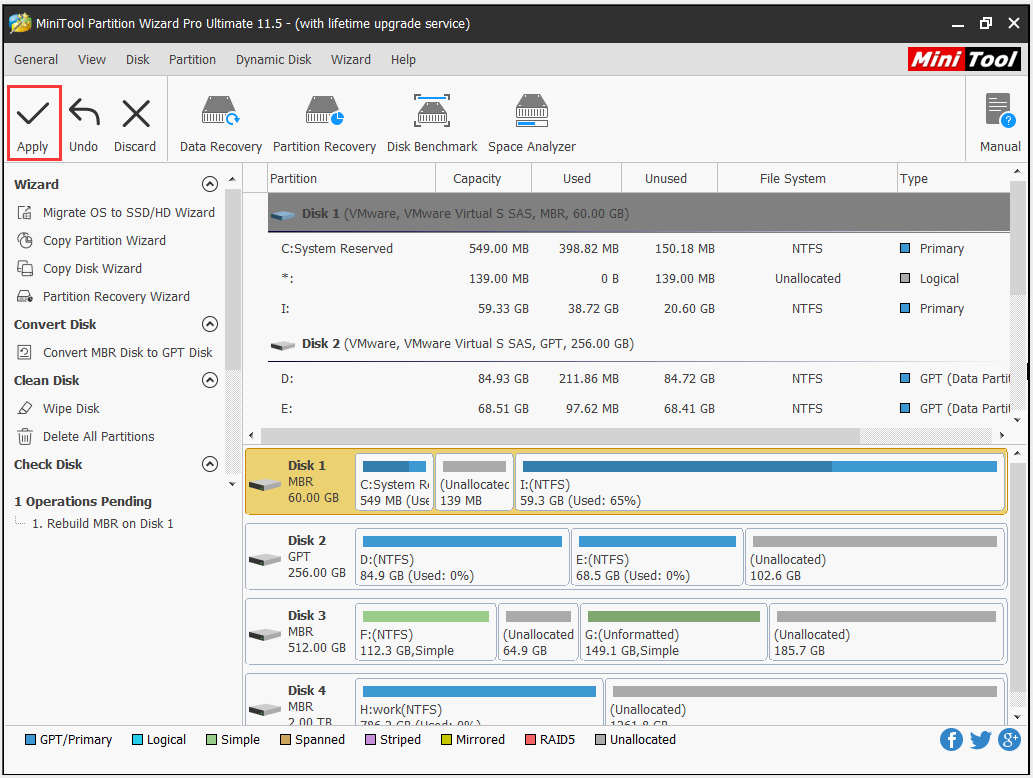
1. Start by selecting the system disk in the Disk Map and then click on the Rebuild MBR option present in the left panel under Check disk.
2. Click on the Apply option at the top of the windows to start rebuilding.
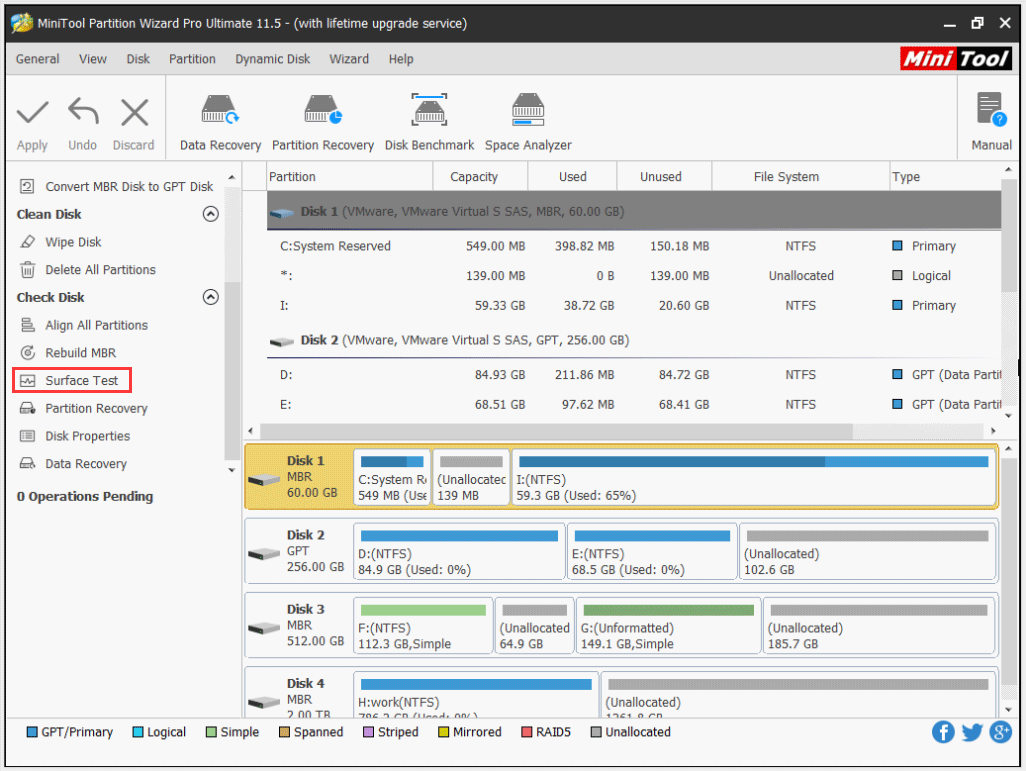
Once the application finishes rebuilding the MBR, perform a surface test to check for any bad sectors on the hard drive platter.
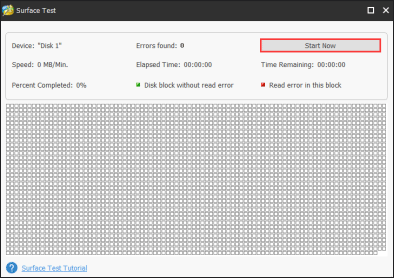
Select the hard drive that you just rebuild the MBR for and click on the Surface test in the left panel. On the following screen, click on Start Now. It’s likely that the results window will display both green and red squares. Red squares imply that there are a few bad sectors. To repair them, open Command Console of MiniTool Partition Wizard, type chkdsk/f/r and press enter.
Method 5: Reinstall Windows
If both the above methods failed, you should consider reinstalling windows. It may sound extreme at first but the process is not difficult at all. It can also help when your Windows is misbehaving or running slow. Reinstalling Windows will also correct any corrupt windows files and a corrupt or missing Master Boot Record data.
Before you start the reinstallation process, make sure you have all your important files backed up as reinstalling the OS formats all your existing data.
You will require a PC with a strong internet connection and a USB flash drive with at least 8GB of free space. Follow the steps to do a clean installation of Windows 10 and plug the bootable USB drive in the computer on which you wish to reinstall windows. Boot from the connected USB and follow the on-screen prompts to reinstall Windows.

Method 6: Replace your Hard Drive Disk
If neither performing a disk checkup nor reinstalling windows worked for you, your disk may be experiencing permanent failure and needs replacement.
If your system is under warranty, Dell’s support will replace the drive free of cost once you contact and inform them about this error. To check if your system is under warranty, visit Warranty & Contracts. If not, you can do it yourself.
The hard disk replacement process is easy but it differs from model to model, a simple internet search will let you know how to replace yours. You will need to buy a hard drive, we recommend that you buy a Solid State Drive (SSD) instead of a Hard Disk Drive (HDD). HDDs have moving heads and spinning platters, which makes them more prone to failure, usually after 3 to 5 years of use. Moreover, SSDs boast higher performance and may improve your computer’s experience.

Before you start the replacement process, make sure all your data is properly backed up. Remember to disconnect any telephone cables, USB cables, or networks from your system. Also, unplug the power cord.
Recommended: How to Change the Primary & Secondary Monitor on Windows
We hope you were able to fix Dell Diagnostic Error 2000-0142 on your system without losing any important data!
Are you bothered by the Dell error code 2000-0142? Why does this Dell error code appear? What’s the indication of this error code? What should you do when this error code shows up? In this post, MiniTool will outline the causes and influences of the error code 0142 and show what to do when this error code shows up.
Reasons for Dell Error Code 2000-0142
Many users reported that they ran into the error code 2000-0142 when they ran PSA diagnostics for some issues like BSOD.
Further reading:
Dell computers feature a comprehensive PSA (Pre-boot System Analysis), also known as ePSA. This feature tests all the hardware on the system, including memory, hard drive, fan, and input devices.
To run the diagnostic, you just need to restart your computer and press the F12 key to get into the boot menu, and then highlight Diagnostics on the boot menu and hit the Enter key.
This PSA/ePSA diagnostic error code means that Dell PSA fails to read information from the hard drive and even indicates that your hard drive is failing or has failed.
What are the reasons behind this error code? There are three main causes.
Cause 1: Loose SATA connection cables.
Cause 2: Corrupt MBR and bad sectors on the hard drive.
Cause 3: Mechanical damage, overheating damage, mechanical damage, including broken reader head and broken spindles, etc.
After learning about the reasons behind the hard drive error code 2000-0142, you may have some clues about what to do.
Before showing the detailed tutorial on how to resolve Dell error code 2000-0142, you can try checking the SATA cables first. If you cannot complete that by yourself, you should ask for help from professionals. If you find that something is wrong with the cables, replace it with a new one and then check whether the error code appears again.
If the SATA cable is not the culprit behind the error code 0142, please try the following workarounds to revive the hard drive before replacing it.
Retrieve the Lost Data Caused by Error Code 2000-0142
It is wise to restore the data from the hard drive in case the following fixes cause the second damage. You may fail to boot your system normally when the error code 0142 appears. In this situation, it is highly recommended to try MiniTool Partition Wizard to restore the data from the likely damaged hard drive.
With this toolkit, you can easily make a bootable USB/CD/DVD and then retrieve the data. Refer to the following tutorial.
Step 1: Prepare a normal computer that is running the same OS with the problematic computer and a USB (make sure there is no important data saved on the storage device as the following steps will wipe all data that has been saved on it). Insert the USB to computer.
Step 2: Purchase MiniTool Partition Wizard by clicking the button below, install it on the normal computer and launch it to get its main interface.
Buy Now
Step 3: Make a bootable USB by activating the Bootable Media feature of MiniTool Partition Wizard.
Step 4: When the creating process finishes, please remove the USB from the normal computer and then insert it to the problematic computer.
Step 5: Boot from the burned MiniTool Bootable USB. You will get the window of MiniTool PE Loader.
Step 6: When you access the main interface of the bootable MiniTool Partition Wizard, please click the Data Recovery feature displayed in the toolbar.

Step 7: On the Data Recovery window, please select the system-related partition from which you need to recover the data and then click the Scan button at the bottom. MiniTool Partition Wizard will start scanning the lost data
Step 8: Wait for the process finishing. Select the files for further use when the process is done and then click the Save button.
Note: It is suggested that you save the selected files to another storage, like USB or external hard drive as this hard drive seems to be failing.
Now, the important data has been retrieved and you can try the following methods to get rid of error code 0142. Please do not close this program as the specific methods below need to be completed via this toolkit.
Rebuild MBR and Repair the Existed Bad Sectors
From the above content, you may have noticed that corrupt MBR is one of the culprits behind the hard drive error code 2000-0142. You can also try MiniTool Partition Wizard to rebuild MBR. This way is the best choice if you do not have a Windows CD.
Note: Damaged MBR can be ascribed to the virus attack, mistake operations, or sudden power failure. Once the MBR is damaged, boot problems, including MBR error 3 and black screen will appear.
Now, let’s see how to rebuild MBR with MiniTool Partition Wizard.
Step 1: Select the system disk and then activate the Rebuild MBR feature from the left panel.

Step 2: Click the Apply button to execute this rebuilding.
This way is quite easy and convenient, right? There are also other ways to help you fix the damaged MBR. To figure out what they are, please read the following recommended article:
After rebuilding MBR, you can check whether there are bad sectors on your hard drive. To do that, you just need to click the Surface Test feature of MiniTool Partition Wizard.
Step 1: Highlight the hard drive you want to check in Disk Map and then click the Surface Test feature from the left panel.
Step 2: Click the Start Now button to start checking the selected disk health. After checking, this software will automatically show the test result.
Step 3: Check the test result. There are two test results:
- The result window just displays the green squares. This means that our hard drive is completely healthy without bad sectors.
- The result window displays green squares and red squares. This means that bad sectors emerge on your hard drive.
When running into the hard drive error code 2000-0142, it is likely that you will receive the second result. So, you need to repair these sectors by running the cmd command: chkdsk /f /r.
To run this command, you can launch the Command Console option on the window of MiniTool PE Loader.
When Command Prompt is launched, type the chkdsk/f/r command and then hit the Enter key to execute this command. Wait for the process coming to an end and the logical bad sectors can be repaired during the process.
Tip: Bad sectors can be divided into logical bad sectors and physical bad sectors. We can remove the former by running the above command. But can we remove the latter? You can check the answer by clicking Can We Remove Bad Sector from Hard Disk Permanently.
If this workaround helps you get rid of the error code 2000-0142, please back up the hard drive right now because this error you ran into indicates imminent disk failure.
We also recommend you to try MiniTool Partition Wizard to complete the hard disk backup. The built-in feature Clone Disk can help you move data from one drive to other storage devices with few steps, including hard drive, USB and SD card. Click the tutorial to finish this work.
Reinstall Windows
If the above way fails to work, you can try clean installation of Windows. This method will lead to data loss, so you should back up data important files before you reinstall Windows OS.
Once you complete the data backup, the following things you should prepare are:
- A normal PC with Internet connection.
- A black USB flash drive (at least 8GB).
Here is the tutorial on how to reinstall Windows OS (here take Windows 10 for example).
Step 1: Download Windows 10 Media Creation Tool by clicking the Download tool now button and then create installation media.
Step 2: After creating the Windows installation media, remove this drive from the computer and then connect it to the computer on which you want to install Windows.
Step 3: Restart the computer and boot from the USB. Wait for some minutes.
Step 4: On the Windows Setup window, select your preferred language, time, and keyboard. After that, click the Next button to continue.
Step 5: Click Install Now.
Step 6: Next, you are required to type the product key. If you have the key, type it. If not, you can choose I don’t have a product key. Follow the on-screen information to finish the clean installation.
Indeed, this method is helpful for some small-time periods. To speak it more clearly, it is unlikely to drastically change the situation if the error code 0142 is caused by the imminent hard drive failure. So, back up the current Windows OS is also necessary and then replace the hard drive with a new one.
Replace Hard Drive: SSD (Recommended)
If your computer is under warranty (your manufacturer warranty usually covers a failed HDD), you can contact Dell support with the error and they will offer you a new hard drive. If not, you should pay some money for a new hard drive from Amazon. The hard drive brand is not the only factor you need to consider in this situation. The type of hard drive is also needed to be thought twice.
It is highly recommended that you choose an SSD (solid-state drive) as the system drive instead of the HDD (hard disk drive). The reason is that the latter’s physical structure (spinning platters and moving heads) indicates that this kind of drive is more prone to failure. Furthermore, compared with HDDs, SSDs boast higher performance and this could improve your computer experience.
To upgrade to SSD with ease, please read the post Easily Migrate Windows 10 to SSD without Reinstalling OS Now.
Are you bothered by the irritating Dell error code 2000-0142 after conducting diagnostics? This post shows the reasons behind this error and the corresponding solutions.Click to Tweet
Disk failure is really a disaster! In your daily use, you should pay attention to the signs that indicate imminent hard drive failure.
Bottom Line
Hope the mentioned fixes can help you get rid of the hard drive error code 2000-0142. Here we would like to emphasize taking care of the daily use of hard disk.
If you have any doubts about the mentioned solutions to the error code 2000-0142, please leave them in the following comment zone or you can directly contact us via [email protected]. We will reply to you ASAP.
Error Code 2000-0142 FAQ
????️ What does error code 2000 0142 mean?
When the error code 2000 0142 appears on Dell, it indicate:
- Loose SATA connection cables.
- Corrupt MBR and bad sectors on the hard drive.
- Mechanical damage, overheating damage, mechanical damage, including broken reader head and broken spindles, etc.
????️ How do I fix error code 0142 on Dell?
There are some feasible fixes to this issue. But before you carry out them, you should restore the lost data from your hard drive to avoid the second damage brought by these fixes. After restoring the lost data, you can try the following fixes:
- Rebuild MBR and repair the existed bad sectors
- Reinstall Windows
- Replace hard drive: SSD (recommended).
A Dell Error Code 0142 is one of the many ominous, obtuse, indecipherable boot menu error messages you might end up seeing if your PC isn’t cooperating with you. Unfortunately, a Dell error code 2000-0142 can have dire consequences. If you encounter this problem, you may end up needing to replace your computer’s hard disk drive (Dell support will provide a replacement if your computer is still under warranty; contact Dell support to see if your system is under warranty).
Error 0142 is the Problem, Gillware is the Solution

What Causes Dell Hard Drive Error Code 2000-0142?
When you encounter a Dell ePSA error code, Dell’s PSA (pre-startup assessment) tool help Dell PC owners figure out which hardware components are causing a PC to fail. Depending on where the point of failure is, the tool will spit out a specific error code related to the failure. These failures can be related to corrupted memory, CPU failure, or an inability of your hard drive to pass a self-test.
This third example is what the Dell error code 2000-0142, sometimes also seen as “error code 2000:0142,” means. Occasionally, a Dell error 0142 can simply be fixed by adjusting the SATA cables connecting the hard drive to the motherboard. Make sure this fix is the first thing you try if you encounter an ePSA code, such as error code 2000-0142.
Unfortunately, the most likely cause of the Dell ePSA error code 2000-0142 is a hard disk failure. If you hear your hard drive making strange noises (clicking, beeping, grinding) or failing to spin up, you’ll know for sure that your hard drive is dead. However, your hard disk drive may also die on your without making any obvious or strange noises.
It’s a big hassle getting a new hard drive on your system, reinstalling your operating system, and getting everything set back up the way you like it, but it isn’t hard. What is hard is dealing with any irreplaceable files, like family photos or business documents, you need to have retrieved from your broken hard drive.
There are two likely causes of Dell Error Code 0142:
Loose SATA connection cables
Failed Short DST
A short DST is brief disk self-test in which your hard disk evaluates its own performance. If your drive is broken or damaged, it will not pass the DST.
RELATED ARTICLES:
- Dell Error Code 0141
- Short DST Failed!
- Dell Data Recovery Services
- Dell Hard Drive Error Codes
Gillware’s data recovery lab has a special partnership with Dell. If you are a Dell user and can’t retrieve the files from your system due to a hard drive failure or logical issue like diagnostic error code 2000-0142, get in touch with us. Whether you’ve encountered this Dell error code 2000-0142 on your system, or if you have a different issue, we are more than happy to provide you with our financially risk-free data recovery services.
Dell Error Code 0142: How Gillware Fixes the Problem
Here’s a data recovery case study from our lab where we were able to fix Dell error code 0142.
Dell Error Code 0142 Data Recovery Case Study: Samsung ST1000DL004 with Failed Read/Write Heads
Drive Model: Samsung ST1000DL004
Drive Capacity: 1 TB
Operating/File System: Windows
Data Loss Situation: Dell hard drive error code 2000:0142 error code in PSA diagnostic error tool – Hard disk failed, self-test unsuccessful
Type of Data Recovered: Business Documents, Quickbooks file
Binary Read: 8,4%
Gillware Data Recovery Case Rating: 9
- In this case, our client found that they could not start up their Dell PC due to boot failure.
- Using Dell’s PSA hardware diagnostic error tools, they encountered the Dell PSA error code 2000-0142.
- This particular PSA error code told the client that the 1 TB Samsung HDD inside their PC had failed – in this case, the code indicated a hard drive diagnostic error.
- The client took their hard drive to a local computer repair shop to see if anyone could salvage their data. The repair technicians then directed the client to us for our data recovery services.
After the hard drive arrived in our facility, it went straight over to our cleanroom for evaluation. Our cleanroom hard drive recovery engineers inspected the Samsung HDD to find the cause of its failure.
What they found, upon inspection, was that this 0142 error code had been caused by a failure of the magnetic read/write heads. The read/write heads are the hardest working components inside a hard drive. As such, they are also often the first components to fail.
The read/write heads themselves are tiny coils of copper resting on the ends of comparatively giant metal arms. A voice coil allows these arms to move up and down, carrying the heads just above the radius of the spinning disk platters. You will almost always find several heads in a modern HDD, stacked together to form a head stack array.
During normal operation, these heads float only a few nanometers above the platters. Electrical currents travel back and forth across the head stack arrays. This current can transmit and alter the magnetic field on small sectors of the platters. This process is how the heads perform both read and write operations to the hard drive.
Data Recovery Software to recover
lost or deleted data on Windows
If you’ve lost or deleted any crucial files or folders from your PC, hard disk drive, or USB drive and need to recover it instantly, try our recommended data recovery tool.
Retrieve deleted or lost documents, videos, email files, photos, and more
Restore data from PCs, laptops, HDDs, SSDs, USB drives, etc.
Recover data lost due to deletion, formatting, or corruption
Replacing Read/Write Heads to Fix Dell Error Code 0142
Replacing a hard drive’s failed read/write heads is a difficult and delicate procedure. Only professional hard drive data recovery experts should attempt it. Our engineers were able to find a compatible donor in our facility’s HDD donor library.
Sometimes it can take many sets of donor’s heads before our engineers find one that matches. This problem arises because individual hard drive calibrations are so unique that even donor heads from the same model of HDD may not perform adequately. Fortunately, it took only one set of read/write heads to get this Samsung hard drive into working condition.
Read/Write Heads Data Recovery Aftermath
After one set of replacement heads, our engineers could start reading data from the client’s HDD. The Samsung ST1000DL004 drive then went over to our logical imaging technicians. Using our proprietary data recovery tools, we made a forensic write-blocked image of the drive. We could perform logical analysis on this drive during the imaging process.
With the healthy replacement heads, we could read all of the hard drive’s file definitions. Once we had done that, we knew about all of the files on the disk the client needed recovering. We took advantage of the drive’s bitmap file so that we wouldn’t have to image the entire drive. By only imaging the used areas on the disk, we could save time and get the client their files faster.
Dell Error Code 0142: The Recovery Results
This data recovery case turned out to be a success. 99.9% of the client’s files on their hard drive lived inside only 8.4% of the device’s total capacity. There were a few unreadable sectors on the platters that got in the way of a perfect recovery. However, the client’s important business documents, including their most recent Quickbooks file, were pristine.
Our data recovery engineers then tested these files to make sure there was no corruption. After a request from the client, we presented them with a list of recovered files to look over. Our engineers rated this Dell error code 0142 data recovery case a high nine on our ten-point data recovery case rating scale.
If you have been getting the Dell Error Code 0142 message while trying to log into your Boot Menu or while trying to boot from the HDD, it is likely that the issue is coming due to an error with the Hard Disk. The error code that is displayed is “Error Code 2000-0142” and in this article, we have managed to fix the issue by using some simple steps that you can implement on your computer as well.

What Causes the Error Code 2000-0142 on your Computer?
After having to go through some major troubleshooting techniques and workarounds commonly used to fix the issue, we were able to conclude that the following are the most common triggers behind the issue.
- Bad Sectors: It is possible that there might be some bad sectors on your hard drive due to which the computer is facing issues while trying to run a test on it or boot from it. Therefore, we suggest that you repair these sectors by following the steps below.
- Boot Configuration Data: Sometimes, the Boot Configuration Data on the HDD might have been corrupted and due to this, the Error Code 2000-0142 might be triggered on the computer. Therefore, we suggest that you try to fix it by repairing this data.
- Cable Connections: In certain cases, the cable connections of the HDD might be loose and due to this, the error might be triggered. Therefore, we suggest that you try to make sure that these connections are proper and check to see if that fixes the issue.
Now that you have been taken through most of the reasons behind the issue, we can finally implement the solutions.
Before You Start:
You can try running the “SMART” test from your BIOS which will identify the possible reason for your hard drive’s failure. You can also try running some online diagnostic tools, but they might not be able to help much or help at all in this case.
You can also use a tool named “MiniTool Partition Wizard” to try rebuilding/repairing the MBR, which can possibly recover your hard drive to its original state, although its probability is very low. (Solution mentioned below).
How to fix error code 2000-0142 on your PC:
Solution 1: Run Disk Check Via CMD
Using this solution might help recover any corrupt data but even so, it is strongly recommended to backup all your data as the appearance of this error repeatedly can indicate imminent hard drive failure. Follow the steps below in order to carry out this solution:
- Insert your “Windows Disc” and start your PC.
- Restart your PC and press any key to get into the “Windows Installation Setup”.
- Then select “Repair your computer” and afterwards select your OS.
- Click “Command Prompt” in the following window.
- Next type in the following commands in the command prompt window and press “Enter” afterwards.
chkdsk /f /r

sfc /scannow

sfc / scannow - Check to see if doing so fixes the Error Code 2000-0142 on your computer.

Solution 2: Rebuild the Boot Configuration Data
If you can boot into windows then follow the steps below to rebuild the BCD using cmd:
- Press “Window + R” keys together, type in “cmd” in the Run dialogue box, and press the “Ctrl + Shift + Enter” keys on your keyboard.

Typing in cmd - Then type in the following commands and press “Enter” after each:

bootrec.exe /rebuildbcd

bootrec.exe /fixmbr

bootrec.exe /fixboot

bootsect /ntfs60 C:
- In the end “Restart” your PC and check to see if the error got resolved now.
Solution 3: Run “S.M.A.R.T” Test and Dell Diagnostics (PSA and ePSA)
- Restart your PC and get into the “BIOS Mode” by pressing the key mentioned on the logo screen.
- Choose your hard drive from the list and select “SMART support”.
- Then press “Enter” and choose any of the three tests, press “Esc” after the test is complete.
- Now, repeat the first step and in the BIOS, select “Diagnostics” and follow the on-screen instructions to complete the process.

Perform Hard Drive Smart Test - If need be, use the “Resource CD”, insert it in your PC, restart it and then head over to the BIOS and see if that works. You can try running multiple different tests and see what the end results are.
- Similarly, run the “Hardware” test as well.
- Look for or submit the given error code or log on to Dell’s website and wait for their response.

Solution 4: Run CHKDSK through A Different Approach
- Download “Windows XP” or get it from a friend and using “Rufus”, burn it into an empty “USB Drive”.
- Insert the USB drive into your PC and “Restart” it, head over to your BIOS, and choose the “USB Drive” to boot from.
- Select “Repair” and in the command prompt, type in the following command:
chkdsk c:
- Restart your PC afterward and see if the error code 2000-0142 is resolved now.
Solution 5: Check Your Cable Connections
There might be an issue with your SATA cable or the Power cable from PSU. The slot that you have connected your HDD to might be faulty. So, what you need to do is, use a different SATA cable and plug it into a different slot in your motherboard and change the power cable from your PSU to your HDD.
Solution 6: Reinstall Windows
Some of your system files might have gotten corrupted due to malware and viruses, beyond recovery. In this case, the only option available will be a clean reinstallation of Windows, i.e. formatting your hard drive and then reinstalling fresh windows. If you’re not a computer geek hire a technician so that he can perform this task for you.
Solution 7: Replace Your Hard Drive
If none of the above fixes worked for you then it is time to say goodbye to your failing hard drive, but first immediately backup all of your data to another hard drive. If your hard drive is in warranty then you should claim its warranty otherwise just get a brand-new hard drive. We would however recommend an SSD as it is much more superior to a hard drive and has almost no chances of failing on you. Some brands have started providing lifetime warranties on their SSDs which indicates how reliable they are.
Workaround:
If for some reason you are not able to access your hard drive at all after trying all of the above solutions, and you want your data to be recovered, this is a method you should follow, however, it is not guaranteed. You will need to get yourself an HDD converter that basically converts your Internal Hard Drive to an external hard drive so you can easily connect it through USB to your PC. Plug that into your laptop or another PC and see if you can recover your data. If that did not work then you can try contacting an expert who will use different methods, recover your data if it really is that important.
By now you will be able to overcome the Error Code 2000-0142 error easily but if not then feel free to Contact Us for more help.
When you hard drive is dying, you will get obvious symptoms like constant data corruption, freezing when copying or saving data, long start-up times, and constant repair screens during boot. However, you cannot tell for sure if the problem resides with the HDD unless you do a Pre-boot System Analysis (PSA). Dell computers allow a comprehensive PSA, also known as ePSA, which tests all the hardware on the system. These include memory tests, drive tests, fan tests, input devices tests and HDD tests among others. To run ePSA on dell, restart your PC and press F12 to get into the boot menu, and then select ‘diagnostics’. Following the mentioned symptoms, it is very alarming when users get a diagnostics error indicating a disk failure. This error bares the following information.
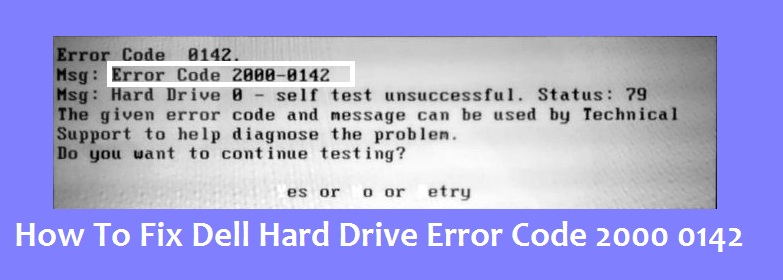
Error Code 0142
MSG: Error Code 2000-0142
MSG: Hard Drive 1 – Self Test Unsuccessful Status 79 or Msg: Hard Drive 0 – S/N WX51E43XWS20, short self test unsuccessful
The given code and message can be used by Dell Technical Support to help diagnose the problem. Do you want to continue testing?
This error will throw your PC into an endless loop on startup repair. So what does this error mean? And what are the solutions to it? This article will address this problem and give attempts to solving it.
Error 2000-0142
To put it simply, this error means that the ePSA could not successfully read information from the hard drive. By extension, your computer will not start, or will have trouble starting because retrieving information from the disk is not reliable. Windows will however attempt a system startup repair to no avail. Here are a few of the varied reasons that you might be bringing up this error message on your Dell computer:
- Faulty or misaligned cabling in your computer’s case, connecting your hard drive to the motherboard.
- Corrupted data or MBR (Master Boot Record) on the hard disk, causing the device to crash.
- Device failure, in the form of mechanical damage to the hard drive. Overheating and mechanical knocks can lead to warped platters, broken reader heads and broken spindles. This means that your data cannot be read correctly hence the problem.
If you get this error, it means your drive is dead, or it is dying and failure is imminent. It is paramount that you back-up your data pending complete failure. You can attempt reviving the disk with the first 2 methods below so that you can pull any important data off it. Remember that if the method works, you will need a hard drive replacement because 95% of the time, these hard drives cannot last beyond a week after this error.
Method 1: Perform a disk check in command prompt using a windows installation disk
The Master Boot Record holds information on the location of your OS, and kernel. This tells your computer from where to load the OS. In the case of a corrupt MBR, this method will attempt to recover any corrupt data. If it works for you, we recommend backing up your data to a new disk since the error you experienced indicates imminent disk failure. You will need a Windows disk (Win 7) for this method. You can find our guide on making a Windows 10 disk https://appuals.com/how-to-create-windows-10-bootable-usb-using-rufus/ or a Windows 7 disk https://appuals.com/create-windows-bootable-usb-or-dvd/.
- Put the Windows 7 installation disc in the disc drive, and then start the computer.
- Press a key when you are prompted (or press F8 on startup and choose DVD drive from the boot menu).
- Select a language, a time, a currency, a keyboard or an input method, and then click Next.
- Click Repair your computer.
- Click the operating system that you want to repair, and then click Next.
- In the System Recovery Options dialog box, click Command Prompt.
- Type Chkdsk /f /r or command and press enter to fix bad sectors and repair corrupt data.


Method 2: Reinstall Windows
This method will also correct any corrupt windows files, or any corrupt or missing MBR data. Go https://appuals.com/how-to-clean-install-windows-10/ for a guide on how to clean install Windows 10. If you prefer, you can install Windows 8 or Windows 7. In case this works for you, we recommend backing up your data since the error you experienced indicates imminent disk failure.
Method 3: Replace your Hard Drive Disk
If method 1 and 2 did not work in any way, then your disk has experienced permanent failure and will need replacement. Look into the SSD (Solid State Drives) instead of the HDD (Hard Disk Drive), to avoid this disappointment in the future. Since HDDs use spinning platters and moving heads, they are more prone to failure. This usually happens after 3 – 5 years of use.
If the system is under warranty, contact Dell support with the error and they’ll replace the drive. Your manufacturer warranty usually covers a failed HDD.
Method 4: Slave the erroneous hard disk and try to recover data
You can still try recovering your data if your disk failed method 1 and 2. There is no guarantee. You will need an external USB HDD converter for a few dollars (10$). You can also connect it as a secondary drive (not the primary that has the OS) to another computer. Desktop PCs usually provide extra cables for connecting another SATA drive. Use either method to try to read your disk. If it is only your MBR sector or Windows files that was corrupt, you will find that you can still be able to read your HDD and access your data.

Data experts can be able to retrieve your information by changing the read heads or taking your platter onto functioning read heads. Either way, this is a precision process that will cost you a lot of money, so make sure the data you are saving is worth the money.

Kevin Arrows
Kevin is a dynamic and self-motivated information technology professional, with a Thorough knowledge of all facets pertaining to network infrastructure design, implementation and administration. Superior record of delivering simultaneous large-scale mission critical projects on time and under budget.
Causes and Fixes for Dell Hard Drive “Error Code 2000-0142”
This error is one of the Dell PCs’ diagnostics errors. Like other manufacturers, Dell has its own diagnostics error codes which indicate corresponding issues with your Dell PC.
Stellar® Data Recovery offers a complete range of data recovery option to recover deleted data according to different data loss scenarios. Choose the most preferable data recovery option as per your need.
When you do a Pre-boot System Analysis (PSA) on your Dell PC, the output may show a message “error code 2000-0142”. The complete error message looks something like this:

Let’s see what are the causes of this error message and what does it signify.
Causes of Dell Hard Drive diagnostics error 2000:0142?
The Dell system’s PSA diagnostics returns the code 2000:0142 if:
- The SATA cable has malfunctioned or isn’t intact
- The hard drive has failed or failure is imminent because of:
- corrupt MBR (Master Boot Record)
- corrupt system files
- bad Sectors
- physical damages
[CAUTION]: If the reason for the error 0142 is physical damages to drive—burnt, water damaged, broken/damaged components, etc.—you should consider contacting a Professional Data Recovery Service Provider.
As the drives are delicate, playing around with a damaged hard drive might worsen the situation and lead to permanent data loss.
This signifies that unless the cause of this error is SATA connectivity issue, the error indicates that your drive might have failed or its failure is imminent. Hence, merely fixing the error shouldn’t be the target, as it might be a temporary fix and might result in a complete failure of the drive.
It’s the data which is important than the probably dead or dying drive. Therefore, we must try to recover the data in the first place by getting rid of the error.
So the first step should be towards identifying if:
- The issue lies with the SATA cable
- Or with the drive
To do this, we should check the SATA cable connectivity.
Make sure that the SATA cable that connects the hard drive to motherboard is intact. If yes, replace it with another working SATA cable, and see if it fixes the error.

If doing so doesn’t fix the error 0142, your drive might have crashed or it’s about to crash.
In such a case, the next course of action must be aimed at recovering the data from the affected drive.
Typically, this error doesn’t allow to boot Windows. When this happens, Windows tries to do a system startup repair but fails to do so, throwing your PC into an endless loop. But because you can’t access your data, how will you take the backup?
Let’s see how you can try to fix the Dell hard drive error 2000:0142, or at least workaround to get rid of the error to recover the data.

Get FREE Quote 1800 102 3232
Fix or Get Rid of the Dell Hard Drive Error 2000-0142 to Recover Data
The methods mentioned here may temporarily fix the Diagnostics error 2000:0142, or act as a workaround to access the data. But considering the implications of this error, you must backup/recover the data, if you’re able to access the data following the below-mentioned methods.
Note: The methods would involve forcing the probably crashed or crashing disk to extract data. The failed attempts reduce the chances of recovery, resulting in permanent data loss. Contacting a data recovery expert in the first place in such cases is recommended to maximize the chances of data recovery.
1. Connect the hard drive to another computer
- Pull out the affected drive
- Convert it to an external drive by enclosing it in a USB enclosure
- Connect it to a working system
- Now that your drive is connected as an external drive, you can try to recover your data
- If this doesn’t help, follow the next method.
[CAUTION]: If while doing so, the system couldn’t detect the drive, you must reach out to a Professional Data Recovery Service Provider so as to prevent permanent data loss.
2. Use Windows installation media to run CHKDSK command
MBR holds information about the location of the installed OS. When MBR gets corrupt, the system fails to find the installed OS, resulting in the diagnostics error 2000:0142.
You can use CHKDSK command—a windows inbuilt utility—to fix MBR corruption and hence the diagnostics error 2000:0142. It also helps in reading data from bad sectors. But because this error won’t allow you to boot to Windows, you’d need a Windows installation media to run the CHKDSK command. Let’s try to fix this error by using Windows installation media, and running the CHKDSK command:
- Connect the drive back to your PC as the internal drive
- Turn ON or restart your Dell PC
- Press the key used to get into BIOS setup utility while the PC turns ON. This is usually the F2 key (Refer the manufacturer’s manual)
- Navigate to «Boot» menu, and change the BIOS boot order to boot from the disk or USB.
- Select the preferred language and click next

f. Click Repair your computer

g. Select Troubleshoot

h. Next, choose Command Prompt

i. On the command prompt, run the command
chkdsk /f /r C:
Where, c is the drive letter on which your OS is installed
/f fixes errors
/r locates the bad sectors and tries to read information from them

j. If this method was able to fix the error, take the backup immediately. Else, try the one given below:
3. Reinstall Windows
As already discussed, corrupt system files could also be responsible for this error, try to reinstall Windows. Here’s how you can do it.
If none of the methods could fix the error© 0142, seek the help of a Professional Data Recovery Service Provider.
Since the diagnostics error points directly to drive-specific issues, it’s better not to play around with the affected drive. Using hit-and-trial methods to fix the error may lead to permanent data loss.
NOTE: the above given methods aren’t meant to fix the drive’s physically damages. In case of a physical damage, you cannot do much on your own. Hence, you must see a data recovery expert in such cases in the first hand.
Even if any of these methods were able to fix the error, it’s recommended to take the backup immediately because your drive might be failing and die soon.
Conclusion
In this article, we discussed about the Dell diagnostics error code 2000-0142. From the causes of Dell hard drive error code 0142, we got know that this error is a potential indicator of a dead or dying drive.
Therefore, we witnessed the importance of recovering/backing up the data as soon as we get access to it by following the mentioned methods.
We emphasized on contacting a Professional Data recovery experts in case of a physical failure or in case the methods couldn’t help you to get access to the data to recover it. This is to make sure that you don’t lose data permanently, as the drives are delicate, and playing around with them might result in permanent data loss.


92% of people found this article helpful