Содержание
- Настройка SNMP на хостах VMWare ESXi
- Служба SNMP Server в VMWare ESXi
- Настройка параметров SNMP агента в ESXi
- Настройка файервола ESXi для SNMP трафика
- Настройка параметров SNMP на хосте ESXi через PowerCLI
- Настройка протокола SNMPv3 на ESXI
- How to enable SNMP monitoring for VMWare ESXi 6.0/6.5
- Published by Tyler Woods on April 28, 2017 April 28, 2017
- 1. SSH to host
- 2. Set SNMP community string
- 3. Enable SNMP service
- 4. Adjust firewall
- 5. Restart SNMP service
- That’s it!
- Share this:
- 22 Comments
- Geandson Santos · February 3, 2020 at 7:57 am
- Stevenes · December 9, 2019 at 12:43 pm
- haikalshiddiq · May 15, 2019 at 3:55 am
- Farhan · September 4, 2018 at 7:29 am
- server user · August 28, 2018 at 4:30 pm
- Gayan · August 2, 2018 at 10:33 pm
- Android · June 14, 2018 at 3:21 pm
- Tyler Woods · June 27, 2018 at 1:29 am
- Rich Ericksen · June 7, 2018 at 12:31 am
- —wolfegang76 · February 7, 2018 at 3:46 pm
- Nikolay Nikolov · December 28, 2017 at 5:28 am
- Michael MacFaden · October 27, 2017 at 11:12 am
- Michael MacFaden · October 27, 2017 at 11:08 am
- Tyler Woods · October 27, 2017 at 11:12 am
- perry · October 10, 2017 at 12:51 pm
- Tyler Woods · October 11, 2017 at 1:37 am
- ibmnew · October 10, 2017 at 11:11 am
- Tyler Woods · October 11, 2017 at 1:33 am
- turnpike420 · July 19, 2017 at 10:40 am
- Attivazione di SNMP su VMWare ESXi 6.0/6.5 – ServerBay.it — Tutto quello che c’è da Sapere sul mondo Server · September 7, 2018 at 10:26 am
- על לינוקס, VMWare וטעות הקשורה לחיישנים – הבלוג של חץ ביז · May 5, 2018 at 2:47 pm
- دانلود ESXi VMware نسخه 6 – مجله کلیک · November 15, 2017 at 1:20 am
- A Guide to ESXi SNMP Configuration for ESXi Monitoring
- Preparing the Environment
- Enabling SSH Access on ESXi
- ESXi SNMP Configuration
- Configuring parameters of an SNMP agent
- Configuring ESXi Firewall
- Configuring SNMP v3
- SNMP Configuration of Multiple ESXi Hosts
- Conclusion
Настройка SNMP на хостах VMWare ESXi
Если вы хотите отслеживать состояние серверов VMWare ESXi в своей корпоративной системе мониторинга, вам нужно включить и настройки на хостах виртуализации службу SNMP. В этой статье мы покажем, как включить и настроить службу SNMP в VMWare ESXi 6.7 (статья подходит для всех актуальных версий ESXi, начиная с 5.5).
В ESXi есть встроенный SNMP агент, который может отправлять и получать запросы и трапы. Вы можете включить и настроить агент SNMP на ESXi хостах несколькими способами: через vCLI, PowerCLI, но не через графический интерфейса клиента vSphere.
Служба SNMP Server в VMWare ESXi
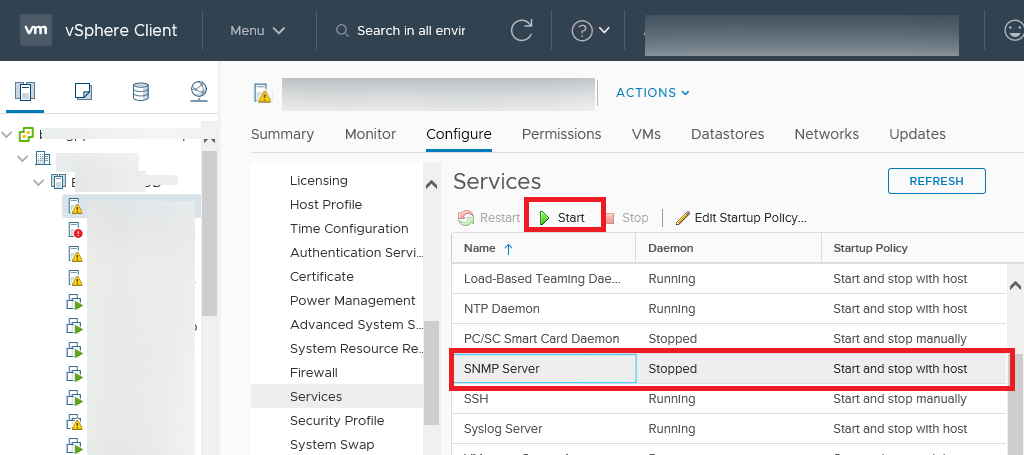
Из веба интерфейса vSphere вы можете только проверить, что служба SNMP сервер запушена, изменить режим ее запуска, остановить/перезапустить сервис. Перейдите на свой ESXi хост -> Configure -> Services -> SNMP Server. По умолчанию служба остановлена. Запустите ее.
Чтобы проверить текущие настройки SNMP, выполните команду:
esxcli system snmp get
SNMP не настроен: все параметры пустые, агент отключен:
Настройка параметров SNMP агента в ESXi
Укажем адрес сервера мониторинга (SNMP target), порт (по умолчанию 161 UDP) и имя SNMP community (обычно public):
esxcli system snmp set —targets=192.168.1.100@161/public
Либо вы можете указать имя community так:
esxcli system snmp set —communities YOUR_COMMUNITY_STRING
Дополнительно можно указать местоположение:
esxcli system snmp set —syslocation «Серверная Дуб. 22, МСК, RU»
esxcli system snmp set —syscontact admin@winitpro.ru
Теперь нужно включить сервис SNMP на хосте ESXi:
esxcli system snmp set —enable true
Чтобы протестировать конфигурацию SNMP:
esxcli system snmp test

Для применения настроек перезапустите службу SNMP командой:

esxcli system snmp set –r
Для отключения SNMP, выполните:
esxcli system snmp set —disable true
Настройка файервола ESXi для SNMP трафика
Вы можете разрешить трафик SNMP в файерволе хоста ESXi двумя способами. Чтобы разрешить получение SNMP запросов от любых устройств в сети:
esxcli network firewall ruleset set —ruleset-id snmp —allowed-all true
esxcli network firewall ruleset set —ruleset-id snmp —enabled true
Либо вы можете разрешить входящий трафик только от конкретного IP адреса вашего сервера мониторинга, или определенной IP подсети, в которой находятся ваши SNMP сервера:
esxcli network firewall ruleset set —ruleset-id snmp —allowed-all false
esxcli network firewall ruleset allowedip add —ruleset-id snmp —ip-address 192.168.1.0/24
Теперь вы можете мониторить ваши ESXi сервера.
Настройка параметров SNMP на хосте ESXi через PowerCLI
Если вам нужно быстро настроить параметры SNMP на нескольких хостах ESXi, вы можете воспользоваться скриптом в PowerCLI:
$ESXi = ‘msk-esxi01’
$Community = ‘Public’
$Target = ‘192.168.1.100’
$Port = ‘161’
#Подключение к хосту ESXi
Connect-VIServer -Server $sESXiHost
#Очистка текущих настроек SNMP
Get-VMHostSnmp | Set-VMHostSnmp -ReadonlyCommunity @()
#Настройка параметров SNMP
Get-VMHostSnmp | Set-VMHostSnmp -Enabled:$true -AddTarget -TargetCommunity $Community -TargetHost $Target -TargetPort $Port -ReadOnlyCommunity $Community
#Вывод текущиъ параметро SNMP
$Cmd= Get-EsxCli -VMHost $ESXiHost
$Cmd.System.Snmp.Get()
Если у вас есть продвинутая лицензия VMWare Enterprise Plus, вы можете настроить параметр SNMP на ESXi хостах через Host Profiles (Management -> Host Profiles -> your Profile -> SNMP Agent Configuration).
Настройка протокола SNMPv3 на ESXI
Выше мы рассмотрели, как включить и настроить на хостах ESXi SNMP агент версии 1 и 2. Начиная с ESXi 5.1 поддерживается более современная версия протокола – SNMP v3. Чтобы настроить более безопасный протокол SNMPv3, воспользуйтесь следующими командами.
Задаем протоколы аутентификации и шифрования:
esxcli system snmp set -a MD5 -x AES128
Генерируем хэши для паролей аутентификации и шифрования (замените authpass и privhash на нужный пароль):
esxcli system snmp hash —auth-hash authpass —priv-hash privhash —raw-secret
С помощью полученных хэшей (authhash и privhash), добавим пользователя:
esxcli system snmp set -e yes -C admin@winitpro.ru -u snmpuser/authhash/privhash/priv
Теперь нужно указать SNMP-таргет:
esxcli system snmp set –v3targets 192.168.1.100@161/user/priv/trap
Вы можете удаленно проверить SNMP конфигурацию с помощью Linux утилиты snmpwalk:
snmpwalk -v3 -u snmpuser -l AuthPriv -a SHA -A $ecret1 -x AES-X $ecret2 192.168.101.20
Источник
How to enable SNMP monitoring for VMWare ESXi 6.0/6.5
Published by Tyler Woods on April 28, 2017 April 28, 2017
You can do a lot of configuration of ESXi through the GUI, but one thing I’ve found that you cannot do is configure SNMP.
I can see in the GUI that SNMP service is stopped, and that’s about it:

- Even if you can manage to get the service started from the GUI, you’ll still have to set your community string somehow. I couldn’t exactly find a place to set that, so it’s off to the CLI we go.
So here’s how to enable SNMP and configure the community string/firewall on ESXi 6.0 or 6.5:
1. SSH to host
- SSH should be enabled. If not, enable it.

- Enter the following command to set your string, replacing YOUR_COMM_STRING with your own.

3. Enable SNMP service
- Enter the following command to enable the SNMP service

4. Adjust firewall
- Chances are that your ESXi firewall is already allowing this traffic, but just in case, allow connections from anywhere.
- This is very lenient but recommended for beginners or lab environments.


- A more secure approach would be to restrict access to a range of IPs or a particular host. In this case, we are only allowing 192.168.0.0-192.168.0.254 to poll SNMP.
5. Restart SNMP service
It took a good 30-45 seconds for the service to restart on my host. Once this is done, you can confirm that the service is running via GUI:

That’s it!
- Here’s a transcript of my shell session, for your reference:
] esxcli system snmp set — communities TYLERMADECOMM
] esxcli system snmp set — enable true
] esxcli network firewall ruleset set — ruleset — id snmp — allowed — all true
] esxcli network firewall ruleset set — ruleset — id snmp — enabled true
] / etc / init . d / snmpd restart
Personally I am utilizing OpenNMS Horizon to graph the SNMP Interface Data for the VM Network. Another popular alternative that I have used is LibreNMS which is much better graphically in my opinion.

I hope this helps. Thank you for reading.

Geandson Santos · February 3, 2020 at 7:57 am
Muito obrigado! Aqui funcionou perfeitamente.
Stevenes · December 9, 2019 at 12:43 pm
haikalshiddiq · May 15, 2019 at 3:55 am
Thanks bro for your article. very helpful with detail step 😀
Farhan · September 4, 2018 at 7:29 am
Hi SNMP on ESXi5.5 is not working, I have 3 Hosts in cluster, SNMP on two are working but one host is creating problem.
here is the error message when i test it using SNMPWALK:
%Failed to get value of SNMP variable. Timeout.
I have restarted the snmp service re-configure using commands mentioned in this post but still facing problem.
Any thoughts would be appreciated.
server user · August 28, 2018 at 4:30 pm
thanks work for me too
Gayan · August 2, 2018 at 10:33 pm
Worked for my Dell R640 ESXI 6.5 . Many thanks.
Android · June 14, 2018 at 3:21 pm
Is This Configuration for SNMP Trap Monitoring or SNMP Polling?
Tyler Woods · June 27, 2018 at 1:29 am
Rich Ericksen · June 7, 2018 at 12:31 am
i know this guy, and found this website randomly 🙂 It helped, thanks tyler.
—wolfegang76 · February 7, 2018 at 3:46 pm
Do these custom firewall settings persist across reboots. From what I’ve read, firewall changes do not persist unless you create a custom VIB and install it on the host…
Nikolay Nikolov · December 28, 2017 at 5:28 am
Thank you!! I’ve done this to my 4 esxi 6.5 hosts and all of them works fine!
Thank you again Tyler!
Michael MacFaden · October 27, 2017 at 11:12 am
BTW, To view the set of firewall rules:
esxcli network firewall ruleset rule list
Michael MacFaden · October 27, 2017 at 11:08 am
Now that its 2017, SNMPv3 has been a standard for 15 years .
Please consider using a SECURE protocol, for both ESXi and Virtual Center Server
configure your SNMP agents as follow:
http://blog.epijunkie.com/2015/03/enable-snmpv3-on-vmware-vcsa-6-0/
Tyler Woods · October 27, 2017 at 11:12 am
I appreciate your input, Michael!
Thanks,
Tyler Woods
perry · October 10, 2017 at 12:51 pm
Thanks for the guide Tyler. This worked perfectly on my host running ESXi 6.5.0 build-4564106. Your guide is infinitely easier to follow than the official guide from VMWare.
Tyler Woods · October 11, 2017 at 1:37 am
Perry, I’m happy that this worked for you and that it is easier to understand than the VMware KB
Thank you for your feedback!
ibmnew · October 10, 2017 at 11:11 am
The best and working guide I have seen on all my searches at VMWare. This site is so not user friendly. You nailed it, many thanx! Nice work.
Tyler Woods · October 11, 2017 at 1:33 am
Thank you for your kind words! I’m really glad this worked out for you.
turnpike420 · July 19, 2017 at 10:40 am
ESXi 6.0.0 build 4600944: when I follow the above and run “esxcli system snmp get” just before running the restart command it returns Enable: true; however after I run the restart command it returns Enable: false so I have to re-run “esxcli system snmp set –enable true”. Only then can I snmpwalk the ESXi system. Also, Enable: true is not persistent after an ESXi host reboot. The firewall and community name settings appear to remain persistent after reboot. I added the enable true line to /etc/rc.local.d/local.sh and that made it persistent after reboot.
Attivazione di SNMP su VMWare ESXi 6.0/6.5 – ServerBay.it — Tutto quello che c’è da Sapere sul mondo Server · September 7, 2018 at 10:26 am
[…] Condivido questo LINK che ho trovato particolarmente interessante. Attivazione di SNMP su VMWare ESXi 6.0/6.5 : LINK […]
על לינוקס, VMWare וטעות הקשורה לחיישנים – הבלוג של חץ ביז · May 5, 2018 at 2:47 pm
[…] אז מה קורה פה? מי שיקרא את המאמר הזה יבין שגם אם הוא יתאמץ וינדנד ליצרן לקבל VIB מתאים, יגלה שזה לא יעזור. יש באג, ועד כה (יצא כבר 6.7) זה לא תוקן. המסקנה: רוצה לנטר את המכונות ושדרגת ל-vCenter 6.5 ומעלה? תתחיל לנטר את המכונות עצמם. איך? קרא כאן. […]
دانلود ESXi VMware نسخه 6 – مجله کلیک · November 15, 2017 at 1:20 am
[…] How to enable SNMP monitoring for VMWare ESXi 6065 […]
Источник
A Guide to ESXi SNMP Configuration for ESXi Monitoring
Infrastructure monitoring is important for organizations because monitoring allows you to detect issues in time and prevent failures. If a failure occurs, early notifications about the failure allow you to start working on resolving related issues as soon as possible. In a VMware vSphere environment, it is recommended that you configure ESXi monitoring. One of the most affordable methods to monitor ESXi hosts is using built-in functionality and Simple Network Management Protocol (SNMP). A dedicated server with monitoring software must be configured in this case. This blog post covers ESXi SNMP configuration and explains how to enable SNMP on ESXi hosts.
Preparing the Environment
Here’s how to enable SNMP on ESXi:
- Enable Secure Shell (SSH)
- Configure SNMP
- Configure ESXi Firewall
I’m going to explain ESXi SNMP configuration using an example with one ESXi 7.0 host and one Ubuntu Linux machine on which monitoring software is installed.
The IP address of the ESXi host is 192.168.101.208.
The IP address of the Ubuntu Linux machine is 192.168.101.209.
Use your IP addresses and other values for the appropriate parameters when configuring ESXi monitoring via SNMP in your infrastructure to meet your configuration.
Enabling SSH Access on ESXi
SSH access on an ESXi host is needed to run ESXCLI commands on a host remotely. In order to enable SSH access to your ESXi host, you can use VMware Host Client. Open a web browser, enter the IP address of your ESXi host in the address bar, then enter credentials to log in.
In the Navigator pane, go to Host > Manage and click the Services tab.
Right-click TSM-SSH and, in the context menu, click Start.
On the screenshot below you see the started SSH server service on the ESXi host.

Now you can connect to the ESXi host from a machine with an SSH client installed. If you’re using Windows, you can use PuTTY, a free and convenient SSH client. In Linux, run the SSH client from the command line with the command:
ssh your_username@host_ip_address
Enter the IP address of your ESXi host and port TCP 22 (the default port number) in the session settings of the SSH client to connect to the ESXi host via SSH.

ESXi SNMP Configuration
Once SSH access to the ESXi host is established, you can configure VMware ESXi SNMP options. On ESXi hosts, SNMP can be configured only in the command-line interface. The graphical user interface (GUI) allows you only to start, stop, and restart the SNMP service.
Run the command in the console (terminal) and check the SNMP status on the ESXi host:
esxcli system snmp get
SNMP is disabled by default. The output for disabled SNMP on ESXi is shown on the screenshot. Most of the parameters are empty and or not configured.

Configuring parameters of an SNMP agent
Set SNMP parameters for an SNMP agent on the ESXi host. The SNMP agent is used to send notifications (SNMP traps and informs) to a monitoring server and receive GET, GETNEXT, and GETBULK requests.
Set the community name (“public” is the community name set by default). The community name in this example is “nakivo”.
esxcli system snmp set —communities nakivo
Set the SNMP target. The SNMP target is a server on which monitoring software is installed to handle SNMP traps and collect monitoring information. In my example, the SNMP target is the machine running Ubuntu Linux (192.168.101.209). UDP 161 is the default port used for SNMP and this port is defined in my ESXi SNMP configuration:
esxcli system snmp set —targets=192.168.101.209@161/nakivo
Specify a location, for example, the geographical location, address, datacenter, or a room where the server is located:
esxcli system snmp set —syslocation «Server room»
Specify contact information. The system administrator’s email address can be defined for this parameter:
esxcli system snmp set —syscontact michaelbose@nakivo.com
Enable SNMP on ESXi:
esxcli system snmp set —enable true
Check the SNMP status on the ESXi host again:
esxcli system snmp get
Now you can see that the parameters are configured.

The Engine ID is the unique identifier for the SNMP agent (used for SNMP v3). The Engine ID can be set with the command (optional):
esxcli system snmp set -engineid 544a33209458
SNMP status is running now. You can also open VMware Host Client, go to Host > Manage > Services, and check the status of the snmpd service.

Test current SNMP configuration.
esxcli system snmp test

If you edit SNMP settings after that, restart the SNMP agent with the command:
/etc/init.d/snmpd restart
As an alternative, you can restart ESXi SNMP in the VMware Host Client GUI in the Services tab. Right-click the service and click Restart in the context menu.

If you need to reset ESXi SNMP settings, use the command:
esxcli system snmp set -r
The command to disable SNMP on an ESXi host is:
esxcli system snmp set —enable false
You can check SNMP availability from a Linux machine if this Linux machine is the SNMP target. We use Ubuntu Linux for this purpose.
Install the required SNMP client on Ubuntu Linux if this client has not been installed yet:
sudo apt-get install snmp
Connect to the ESXi host via SNMP to check the parameters available for monitoring:
snmpwalk -v2c -c nakivo 192.168.101.208

You should see a long list of objects for ESXi monitoring via SNMP in the console output. These objects are management information bases (MIBs) and object identifiers (OIDs), which are elements of the hierarchical structure of monitoring parameters.
An SNMP MIB is a collection of information about objects (parameters and settings) that is organized hierarchically. There are scalar and tabular MIBs. MIBs can be standard and vendor-specific.
An SNMP OID is a uniquely identified managed object in the hierarchical MIB structure. Different levels of the tree are assigned by different organizations. Vendors can define special branches to monitor the parameters of their products.
An object name is a unique value for the entire MIB that is corresponding to the appropriate OID. For example, the object name for the OID 1.3.6.1.2.1.1.5 is sysName.
Configuring ESXi Firewall
You have to configure the firewall and enable SNMP access from monitoring servers to the ESXi host. You can set a subnet or a single IP address of allowed devices in the network.
We run these three commands to allow access from the 192.168.101.0/24 network to monitor ESXi via SNMP:
esxcli network firewall ruleset set —ruleset-id snmp —allowed-all false
esxcli network firewall ruleset allowedip add —ruleset-id snmp —ip-address 192.168.101.0/24
esxcli network firewall ruleset set —ruleset-id snmp —enabled true
Enter the IP address or a network address according to your network configuration.
A less secure configuration is to enable access from any network device:
esxcli network firewall ruleset set —ruleset-id snmp —allowed-all true
esxcli network firewall ruleset set —ruleset-id snmp —enabled true
ESXi SNMP configuration is done. Now you can configure your monitoring software on a monitoring server.
Configuring SNMP v3
SNMP v3 is a more secure version of the protocol providing key authentication and encryption. SNMP v3 configuration is more complicated and is supported since vSphere 5.1. Below is an overview of how to enable SNMP v3 on an ESXi host.
Set authentication protocol and privacy options.
esxcli system snmp set -a SHA1 -x AES128
SHA1 is the algorithm for cryptographic encryption, the cryptographic hash function (Secure Hash Algorithm 1).
AES128 is the encryption method (Advanced Encryption Standard with a 128-bit encryption key) using the symmetric block cipher.
Generate hashes by using a command like:
esxcli system snmp hash —auth-hash authpass —priv-hash privhash —raw-secret
In my case, the command is:
esxcli system snmp hash —auth-hash PasswordTest1 —priv-hash PasswordTest2 —raw-secret
Avoid using passwords provided in this example in production environments. Use strong unique passwords (the password must be at least 7 characters long). Save the generated hash strings. In my case, the hashes are as follows.

Use the generated hashes and add a user. Adding up to five users is supported.
esxcli system snmp set -e yes -C user -u snmpuser/authhash/privhash/priv
user is the contact email for the user
snmpuser is the username (can be up to 32 characters)
authhash is the authentication hash value
privhash is the privacy hash value
We add user1 and use hashes generated in the output of the previous command.
esxcli system snmp set -e yes -C user1@nakivo.com -u user1/831a798d1cda90ca1a3ab80d38f81a44c0851ada/38cf6f13d09a4651362338eac2c3d62b42514bc9/priv
You can create a user without security settings (no authentication and privacy) by using the command:
esxcli system snmp set —user user2/-/-/none
Define the SNMP target address:
esxcli system snmp set —v3targets 192.168.101.209@161/user1/priv/trap
Enable SNMP on ESXi:
esxcli system snmp set —enable true
Test SNMP settings:
esxcli system snmp test
You can use the extended command to test VMware SNMP configuration on ESXi:
esxcli system snmp test -u=user1 -A=PasswordTest1 -X=P2sswordTest2 -r
Where user1 is the name of the SNMP user that has been added to the configuration.
If the test is completed successfully, a message is displayed:
User validated correctly for given engine id and security level: protocols

Try to connect to the ESXi host via SNMP v3 from a monitoring Linux server (from the target side).
This command is used if no authentication parameters have been set:
snmpwalk -v3 -u user1 192.168.101.208
If you have set secure options, define them in the command:
snmpwalk -v3 -u user1 -l AuthPriv -a SHA -A PasswordTest1 -x AES -X PasswordTest2 192.168.101.208
Where user1 is the name of my user added to the ESXi SNMP configuration.

If you see the “Unknown user name” error when you test ESXi SNMP configuration, check whether you have added a user and defined the correct username in the next commands after adding the user. Keep in mind that if you change the agent’s Engine ID, the privacy protocol, or the authentication protocol after configuring users, these users become not valid. You need to reconfigure users in this case.
Also, pay attention to security settings because an incorrect SNMP configuration can constitute a threat and allow a malicious host to get information about an ESXi host. This information can be used to detect vulnerable places and initiate a cyber attack.
SNMP Configuration of Multiple ESXi Hosts
Using VMware host profiles can help you enable SNMP and configure multiple ESXi hosts more rationally if you have a large number of ESXi hosts in your vSphere environment.
To enable SNMP and configure multiple ESXi hosts, you must have the VMware vSphere Enterprise Plus license to use VMware Host Profiles in VMware vSphere Client. VMware SNMP settings for profiles of ESXi hosts are located in Management > Host Profiles > your Profile > SNMP Agent Configuration. You can also use vSphere PowerCLI to automate the configuration process of a large number of ESXi hosts to set ESXi SNMP configuration on them.
Conclusion
This blog post has explained how to enable SNMP on ESXi hosts to monitor VMware vSphere environments. ESXi SNMP configuration requires SSH access to ESXi hosts, configuring SNMP agents, and allowing access in the ESXi firewall. ESXi monitoring allows you to react in time if any issues are detected and improve the overall service availability. Don’t forget to perform VMware vSphere VM backup to avoid data loss and to be able to recover data and restore workloads if a disaster strikes. NAKIVO Backup & Replication is the universal data protection solution that provides a wide set of options to back up and recover VMware vSphere VMs and other data in a datacenter. Moreover, the latest version of the solution supports ESXi monitoring as a part of VMware vSphere monitoring.
Источник
-
RESOURCES AND INSIGHTS
Best practices and thought leadership for what’s next.
RESOURCES
Read our collection of educational resources and best practices content that will help guide you through your digital transformation.

BUSINESS EXPERIENCE TECH BRIEF
Read why delivering a great business experience starts with your enterprise architecture.
read now
AS-A-SERVICE TECH BRIEF
Discover how to simplify IT complexity with an As-a-Service Model.
view now

INTELLIGENT AUTOMATION SOLUTION BRIEF
Read how to tap into the power of automation to deliver business outcomes faster.
view now
CASE STUDIES
Read how our strategy-led approaches build and manage innovative solutions that help our customers align IT with critical business initiatives.

ATA ENGINEERING
Verinext implements modern infrastructure for ATA without impacting operational budget.
read now

CANOPY HEALTH
Verinext helps Canopy Health achieve its mission of providing refreshing, transparent care.
read now

GREYSTONE POWER
See how GreyStone Power modernized infrastructure for high availability and peace of mind with Verinext.
read now
INSIGHTS BLOG
Read our blog for expert insights, educational tips, best practices and more so you can make your next move with confidence.
-

Ensuring the Protection of Your Microsoft 365 Environment
Gallery
Ensuring the Protection of Your Microsoft 365 Environment

Ensuring the Protection of Your Microsoft 365 Environment
The Microsoft 365 portfolio encompasses Exchange Online, OneDrive, Microsoft Teams, […]
-
Surviving in the Wild West of Endpoint Protection
Gallery
Surviving in the Wild West of Endpoint Protection

Surviving in the Wild West of Endpoint Protection
Endpoints could be considered the Wild West of security. They […]
-
Why You Need to Modernize Your IT Infrastructure
Gallery
Why You Need to Modernize Your IT Infrastructure

Why You Need to Modernize Your IT Infrastructure
In a hybrid, multi-cloud world, enterprises are evaluating how as-a-service […]
UPCOMING EVENTS
Join in! Register today for one of our upcoming events where you can learn from the experts on how you can be ready for what’s next.
Verinext delivers
transformative business
technology so you’re ready
for whatever comes next.
Solutions
Customer Experiences
Data Protection
Digital Innovation
Hybrid Infrastructure
Intelligent Automation
Networking
Security
Services
Managed Services
Professional Services
Atlassian Services
Financial Services
24/7 Support
Insights
Blog
Resources
Events & Webinars
About
The Verinext Way
Partners
Newsroom
Leadership
Awards & Recognition
Philanthropy
Careers
Contact
Sign Up for Updates
First
Last
© 2023 Verinext. All Rights Reserved. | Privacy Policy | Cookie Policy | Site Map | Contact
Page load link
Go to Top
Если вы хотите отслеживать состояние серверов VMWare ESXi в своей корпоративной системе мониторинга, вам нужно включить и настройки на хостах виртуализации службу SNMP. В этой статье мы покажем, как включить и настроить службу SNMP в VMWare ESXi 6.7 (статья подходит для всех актуальных версий ESXi, начиная с 5.5).
В ESXi есть встроенный SNMP агент, который может отправлять и получать запросы и трапы. Вы можете включить и настроить агент SNMP на ESXi хостах несколькими способами: через vCLI, PowerCLI, но не через графический интерфейса клиента vSphere.
Содержание:
- Служба SNMP Server в VMWare ESXi
- Настройка параметров SNMP агента в ESXi
- Настройка файервола ESXi для SNMP трафика
- Настройка параметров SNMP на хосте ESXi через PowerCLI
- Настройка протокола SNMPv3 на ESXI
Служба SNMP Server в VMWare ESXi
Из веба интерфейса vSphere вы можете только проверить, что служба SNMP сервер запушена, изменить режим ее запуска, остановить/перезапустить сервис. Перейдите на свой ESXi хост -> Configure -> Services -> SNMP Server. По умолчанию служба остановлена. Запустите ее.
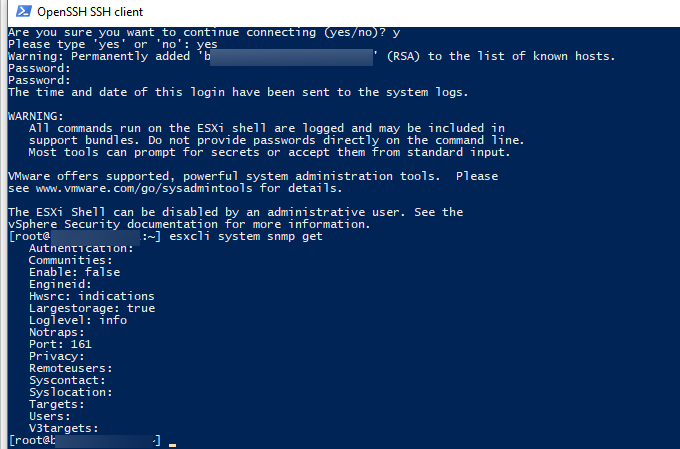
Включите SSH доступ на ESXi хосте и подключитесь к нему любым ssh-клиентом (я использую встроенный OpenSSH клиент Windows 10).
Чтобы проверить текущие настройки SNMP, выполните команду:
esxcli system snmp get
SNMP не настроен: все параметры пустые, агент отключен:
Authentication: Communities: Enable: false Engineid:

Hwsrc: indications Largestorage: true Loglevel: info Notraps: Port: 161 Privacy: Remoteusers: Syscontact: Syslocation: Targets: Users: V3targets:
Настройка параметров SNMP агента в ESXi
Укажем адрес сервера мониторинга (SNMP target), порт (по умолчанию 161 UDP) и имя SNMP community (обычно public):
esxcli system snmp set [email protected]/public
Либо вы можете указать имя community так:
esxcli system snmp set --communities YOUR_COMMUNITY_STRING
Дополнительно можно указать местоположение:
esxcli system snmp set --syslocation "Серверная Дуб. 22, МСК, RU"
Контакты:
esxcli system snmp set --syscontact [email protected]
Теперь нужно включить сервис SNMP на хосте ESXi:
esxcli system snmp set --enable true
Чтобы протестировать конфигурацию SNMP:
esxcli system snmp test
Для применения настроек перезапустите службу SNMP командой:
/etc/init.d/snmpd restart
Чтобы сбросить текущие настройки, выполните:
esxcli system snmp set –r
Для отключения SNMP, выполните:
esxcli system snmp set --disable true
Настройка файервола ESXi для SNMP трафика
Вы можете разрешить трафик SNMP в файерволе хоста ESXi двумя способами. Чтобы разрешить получение SNMP запросов от любых устройств в сети:
esxcli network firewall ruleset set --ruleset-id snmp --allowed-all true
esxcli network firewall ruleset set --ruleset-id snmp --enabled true
Либо вы можете разрешить входящий трафик только от конкретного IP адреса вашего сервера мониторинга, или определенной IP подсети, в которой находятся ваши SNMP сервера:
esxcli network firewall ruleset set --ruleset-id snmp --allowed-all false
esxcli network firewall ruleset allowedip add --ruleset-id snmp --ip-address 192.168.1.0/24
esxcli network firewall ruleset set --ruleset-id snmp --enabled true
Теперь вы можете мониторить ваши ESXi сервера.
Настройка параметров SNMP на хосте ESXi через PowerCLI
Если вам нужно быстро настроить параметры SNMP на нескольких хостах ESXi, вы можете воспользоваться скриптом в PowerCLI:
$ESXi = 'msk-esxi01'
$Community = 'Public'
$Target = '192.168.1.100'
$Port = '161'
#Подключение к хосту ESXi
Connect-VIServer -Server $sESXiHost
#Очистка текущих настроек SNMP
Get-VMHostSnmp | Set-VMHostSnmp -ReadonlyCommunity @()
#Настройка параметров SNMP
Get-VMHostSnmp | Set-VMHostSnmp -Enabled:$true -AddTarget -TargetCommunity $Community -TargetHost $Target -TargetPort $Port -ReadOnlyCommunity $Community
#Вывод текущиъ параметро SNMP
$Cmd= Get-EsxCli -VMHost $ESXiHost
$Cmd.System.Snmp.Get()
Если у вас есть продвинутая лицензия VMWare Enterprise Plus, вы можете настроить параметр SNMP на ESXi хостах через Host Profiles (Management -> Host Profiles -> your Profile -> SNMP Agent Configuration).
Настройка протокола SNMPv3 на ESXI
Выше мы рассмотрели, как включить и настроить на хостах ESXi SNMP агент версии 1 и 2. Начиная с ESXi 5.1 поддерживается более современная версия протокола – SNMP v3. Чтобы настроить более безопасный протокол SNMPv3, воспользуйтесь следующими командами.
Задаем протоколы аутентификации и шифрования:
esxcli system snmp set -a MD5 -x AES128
Генерируем хэши для паролей аутентификации и шифрования (замените authpass и privhash на нужный пароль):
esxcli system snmp hash --auth-hash authpass --priv-hash privhash --raw-secret
С помощью полученных хэшей (authhash и privhash), добавим пользователя:
esxcli system snmp set -e yes -C [email protected] -u snmpuser/authhash/privhash/priv
Теперь нужно указать SNMP-таргет:
esxcli system snmp set –v3targets [email protected]/user/priv/trap
Вы можете удаленно проверить SNMP конфигурацию с помощью Linux утилиты snmpwalk:
snmpwalk -v3 -u snmpuser -l AuthPriv -a SHA -A $ecret1 -x AES-X $ecret2 192.168.101.20
You can do a lot of configuration of ESXi through the GUI, but one thing I’ve found that you cannot do is configure SNMP.
I can see in the GUI that SNMP service is stopped, and that’s about it:
- Even if you can manage to get the service started from the GUI, you’ll still have to set your community string somehow. I couldn’t exactly find a place to set that, so it’s off to the CLI we go.
So here’s how to enable SNMP and configure the community string/firewall on ESXi 6.0 or 6.5:
1. SSH to host
- SSH should be enabled. If not, enable it.
2. Set SNMP community string
- Enter the following command to set your string, replacing YOUR_COMM_STRING with your own.
esxcli system snmp set --communities YOUR_COMM_STRING
3. Enable SNMP service
- Enter the following command to enable the SNMP service
esxcli system snmp set --enable true
4. Adjust firewall
- Chances are that your ESXi firewall is already allowing this traffic, but just in case, allow connections from anywhere.
esxcli network firewall ruleset set --ruleset-id snmp --allowed-all true
esxcli network firewall ruleset set --ruleset-id snmp --enabled true
- This is very lenient but recommended for beginners or lab environments.

- A more secure approach would be to restrict access to a range of IPs or a particular host. In this case, we are only allowing
192.168.0.0-192.168.0.254to poll SNMP.
esxcli network firewall ruleset set --ruleset-id snmp --allowed-all false
esxcli network firewall ruleset allowedip add --ruleset-id snmp --ip-address 192.168.0.0/24
esxcli network firewall ruleset set --ruleset-id snmp --enabled true
5. Restart SNMP service
/etc/init.d/snmpd restart
It took a good 30-45 seconds for the service to restart on my host. Once this is done, you can confirm that the service is running via GUI:
That’s it!
- Here’s a transcript of my shell session, for your reference:
[[email protected]:~] esxcli system snmp set --communities TYLERMADECOMM
[[email protected]:~] esxcli system snmp set --enable true
[[email protected]:~] esxcli network firewall ruleset set --ruleset-id snmp --allowed-all true
Already allowed all ip
[[email protected]:~] esxcli network firewall ruleset set --ruleset-id snmp --enabled true
[[email protected]:~] /etc/init.d/snmpd restart
root: snmpd Running from interactive shell, running command: esxcli system snmp set -e false.
root: snmpd setting up resource reservations.
root: snmpd opening firewall port(s) for notifications.
root: snmpd watchdog for snmpd started.
[[email protected]:~]
Personally I am utilizing OpenNMS Horizon to graph the SNMP Interface Data for the VM Network. Another popular alternative that I have used is LibreNMS which is much better graphically in my opinion.
I hope this helps. Thank you for reading.
Posted by jpluimers on 2020/08/10
I tried repeating VMware KB: Configuring Network Time Protocol (NTP) on ESX/ESXi hosts using the vSphere Client in ESXi 6.5 using the web-client (the steps are very similar, see [WayBack] How to configure ESXi 6.5 Network Time Protocol (NTP) via Host Client? | ESX Virtualization).
It failed with the non-descriptive “Failed – An error occurred during host configuration.”:

Viewing the details isn’t of much help as you do not get extra information:
Start Service Key haTask-ha-host-vim.host.ServiceSystem.start-139845177 Description Starts the service State Failed – An error occurred during host configuration. Errors

The /var/log/hostd.log did not get me further either:
2018-04-28T11:31:48.159Z info hostd[B881B70] [Originator@6876 sub=Vimsvc.TaskManager opID=4a8dc318 user=root] Task Created : haTask-ha-host-vim.host.ServiceSystem.start-139845360

2018-04-28T11:31:48.160Z verbose hostd[B881B70] [Originator@6876 sub=PropertyProvider opID=4a8dc318 user=root] RecordOp ADD: recentTask["haTask-ha-host-vim.host.ServiceSystem.start-139845360"], ha-host. Sent notification immediately.

2018-04-28T11:31:48.160Z verbose hostd[B881B70] [Originator@6876 sub=PropertyProvider opID=4a8dc318 user=root] RecordOp ADD: recentTask["haTask-ha-host-vim.host.ServiceSystem.start-139845360"], ha-taskmgr. Applied change to temp map.

2018-04-28T11:31:48.160Z verbose hostd[B881B70] [Originator@6876 sub=PropertyProvider opID=4a8dc318 user=root] RecordOp ASSIGN: info, haTask-ha-host-vim.host.ServiceSystem.start-139845360. Applied change to temp map.

2018-04-28T11:31:48.160Z info hostd[B881B70] [Originator@6876 sub=SysCommandPosix opID=4a8dc318 user=root] ForkExec(/etc/init.d/ntpd) 205307

2018-04-28T11:31:48.213Z info hostd[B881B70] [Originator@6876 sub=SysCommandPosix opID=4a8dc318 user=root] ForkExec(/etc/init.d/ntpd) 205309

2018-04-28T11:31:48.265Z info hostd[B881B70] [Originator@6876 sub=Default opID=4a8dc318 user=root] AdapterServer caught exception: vim.fault.PlatformConfigFault

2018-04-28T11:31:48.266Z info hostd[B881B70] [Originator@6876 sub=Vimsvc.TaskManager opID=4a8dc318 user=root] Task Completed : haTask-ha-host-vim.host.ServiceSystem.start-139845360 Status error

2018-04-28T11:31:48.266Z verbose hostd[B881B70] [Originator@6876 sub=PropertyProvider opID=4a8dc318 user=root] RecordOp ASSIGN: info, haTask-ha-host-vim.host.ServiceSystem.start-139845360. Applied change to temp map.

2018-04-28T11:31:48.266Z info hostd[B881B70] [Originator@6876 sub=Solo.Vmomi opID=4a8dc318 user=root] Activation [N5Vmomi10ActivationE:0x0c012328] : Invoke done [start] on [vim.host.ServiceSystem:serviceSystem]

2018-04-28T11:31:48.266Z verbose hostd[B881B70] [Originator@6876 sub=Solo.Vmomi opID=4a8dc318 user=root] Arg id:

--> "ntpd"

2018-04-28T11:31:48.266Z info hostd[B881B70] [Originator@6876 sub=Solo.Vmomi opID=4a8dc318 user=root] Throw vim.fault.PlatformConfigFault

2018-04-28T11:31:48.266Z info hostd[B881B70] [Originator@6876 sub=Solo.Vmomi opID=4a8dc318 user=root] Result:

--> (vim.fault.PlatformConfigFault) {

--> faultCause = (vmodl.MethodFault) null,

--> faultMessage = <unset>,

--> text = ""

--> msg = ""

--> }
This did not reveal any more information, so I started digging:
-
- In
/etc/init.d/ntpd, viaNTPD_CONFIG="/etc/ntp.conf"the/etc/ntp.confis queried:ntp_servers=`awk ' /^server[ t]*127.127/ {next} /^(server|peer)/ { if ($2 ~/^-/) {printf "%s " $3} else {printf "%s " $2}} ' < ${NTPD_CONFIG}` - This file did not have any servers configured:
# cat /etc/ntp.conf
restrict default kod nomodify notrap nopeer noquery
restrict 127.0.0.1
driftfile /etc/ntp.drift
- In
So it appeared that copy/paste this in the web-environment had not been persisted correctly:
0.pool.ntp.org

1.pool.ntp.org

2.pool.ntp.org

3.pool.ntp.org
I re-did the configuration by typing the correct data in stead of pasting and now everything worked fine: the service started and the config file has servers:
# cat /etc/ntp.conf
restrict default kod nomodify notrap nopeer noquery
restrict 127.0.0.1
server 0.pool.ntp.org
1.pool.ntp.org
2.pool.ntp.org
3.pool.ntp.org
driftfile /etc/ntp.drift
It would be so nice if /etc/init.d/ntpd would show why it performs return 1 and the service start mechanism would reflect that in the errors part of the failure message.
Verifying ntpd got the client information
Two steps:
- Check if
ntpdis running
Bad response (ensure the service is started, and starts with the host, see How to configure ESXi 6.5 Network Time Protocol (NTP) via Host Client? | ESX Virtualization):
[root@ESXi-X10SRH-CF:~] /etc/init.d/ntpd status
ntpd is not running
Good response:
[root@ESXi-X10SRH-CF:~] /etc/init.d/ntpd status ntpd is not running - Check if the ntpq can query the ntpd client status. It is is not running, then see step 1. If it is not initialising, then you might have a network problem
Bad response:
[root@ESXi-X10SRH-CF:~] ntpq -pn
ntpq: read: Connection refused
Response while waiting for an ntp refresh:
[root@ESXi-X10SRH-CF:~] ntpq -pn
     remote           refid      st t when poll reach   delay   offset  jitter
==============================================================================
 149.210.199.182 .INIT.          16 u    -   64    0    0.000    0.000   0.001
Good response:
[root@ESXi-X10SRH-CF:~] ntpq -pn
     remote           refid      st t when poll reach   delay   offset  jitter
==============================================================================
 149.210.199.182 193.79.237.14    2 u   61   64    1    3.423   -0.296   0.001
–jeroen
| #!/bin/sh | |
| # | |
| # Copyright 2007 VMware, Inc. All rights reserved. | |
| # | |
| # ntpd: | |
| # Start and stop the NTP daemon | |
| # | |
| # chkconfig: – 10 90 | |
| # description: Network Time Protocol (NTP) daemon. | |
| # | |
| SNTP=«/sbin/sntp« | |
| NTPD=«/sbin/ntpd« | |
| NTPD_CONFIG=«/etc/ntp.conf« | |
| NTPD_OPTS=«-g -n -c ${NTPD_CONFIG} -f /etc/ntp.drift« | |
| NTPD_RP=«ntpd« | |
| NTPD_TAG=«ntpd« | |
| export PATH=/bin:/sbin | |
| # | |
| # Sanity check | |
| # | |
| [ -x «${NTPD}« -a -f «${NTPD_CONFIG}« ] || exit 0 | |
| # | |
| # Log action | |
| # | |
| ntpd_log() { | |
| echo «${1}« | |
| logger ntpd «${1}« | |
| } | |
| # | |
| # Start ntpd | |
| # | |
| ntpd_start() { | |
| ntp_servers=`awk ‘ | |
| /^server[ t]*127.127/ {next} | |
| /^(server|peer)/ { | |
| if ($2 ~/^-/) {printf «%s » $3} | |
| else {printf «%s » $2}} | |
| ‘ < ${NTPD_CONFIG}` | |
| if [ -n «$(pidof -xs «${NTPD}«)« ] ; then | |
| return 1 | |
| fi | |
| # if the service is configured, start it | |
| if [ -n «$ntp_servers« ]; then | |
| ntpd_log «Starting ntpd« | |
| «${SNTP}« ++memreliable,group=${NTPD_RP} -K /dev/null -S $ntp_servers >/dev/null 2>&1 | |
| /sbin/watchdog.sh ++memreliable,group=${NTPD_RP} -d -t 100 -s «${NTPD_TAG}« «${NTPD}« ${NTPD_OPTS} >/dev/null 2>&1 | |
| else | |
| return 1 | |
| fi | |
| } | |
| # | |
| # Stop ntpd | |
| # | |
| ntpd_stop() { | |
| if [ -n «$(pidof -xs ${NTPD})« ] ; then | |
| ntpd_log «Stopping ntpd« | |
| # This only stops the watchdog process. | |
| /sbin/watchdog.sh -k «${NTPD_TAG}« | |
| if [ -n «$(pidof -xs «${NTPD}«)« ]; then | |
| pkill -HUP «${NTPD}« | |
| while [ -n «$(pidof -xs ${NTPD})« ] ; do | |
| pkill -HUP «${NTPD}« | |
| sleep 1 | |
| done | |
| fi | |
| else | |
| return 0 | |
| fi | |
| } | |
| # | |
| # Process comand line options | |
| # | |
| case «${1}« in | |
| start) | |
| ntpd_start | |
| retCode=$? | |
| if [ $retCode -eq 0 ] ; then | |
| # wait for ntpd to start (for a max of 5 seconds) | |
| sleepCount=0 | |
| while [ -z «$(pidof -xs «${NTPD}«)« ] && [ $sleepCount -lt 5 ] ; do | |
| sleep 1 | |
| let «sleepCount+=1« | |
| done | |
| fi | |
| exit $retCode | |
| ;; | |
| stop) | |
| ntpd_stop | |
| ;; | |
| status) | |
| if [ -n «$(pidof -xs «${NTPD}«)« ] ; then | |
| echo «ntpd is running« | |
| exit 0 | |
| else | |
| echo «ntpd is not running« | |
| exit 3 | |
| fi | |
| ;; | |
| restart) | |
| ntpd_stop | |
| ntpd_start | |
| ;; | |
| *) | |
| echo «Usage: $(basename «$0«) {start|stop|status|restart}« | |
| exit 1 | |
| ;; | |
| esac |
This entry was posted on 2020/08/10 at 18:00 and is filed under ESXi6.5, Power User, Virtualization, VMware, VMware ESXi.
You can follow any responses to this entry through the RSS 2.0 feed.
You can leave a response, or trackback from your own site.
Infrastructure monitoring is important for organizations because monitoring allows you to detect issues in time and prevent failures. If a failure occurs, early notifications about the failure allow you to start working on resolving related issues as soon as possible. In a VMware vSphere environment, it is recommended that you configure ESXi monitoring. One of the most affordable methods to monitor ESXi hosts is using built-in functionality and Simple Network Management Protocol (SNMP). A dedicated server with monitoring software must be configured in this case. This blog post covers ESXi SNMP configuration and explains how to enable SNMP on ESXi hosts.
Before we start
To effectively monitor your VMware vSphere infrastructure and detect performance issues before they get out of hand, use NAKIVO Backup & Replication. The solution allows protecting data and monitoring the performance of your VMware vSphere environment from the convenience of a single web-based interface. To learn more about the use of NAKIVO Backup & Replication for the protection of your VMware data, watch a free webinar.
Preparing the Environment
Here’s how to enable SNMP on ESXi:
- Enable Secure Shell (SSH)
- Configure SNMP
- Configure ESXi Firewall
I’m going to explain ESXi SNMP configuration using an example with one ESXi 7.0 host and one Ubuntu Linux machine on which monitoring software is installed.
The IP address of the ESXi host is 192.168.101.208.
The IP address of the Ubuntu Linux machine is 192.168.101.209.
Use your IP addresses and other values for the appropriate parameters when configuring ESXi monitoring via SNMP in your infrastructure to meet your configuration.
Enabling SSH Access on ESXi
SSH access on an ESXi host is needed to run ESXCLI commands on a host remotely. In order to enable SSH access to your ESXi host, you can use VMware Host Client. Open a web browser, enter the IP address of your ESXi host in the address bar, then enter credentials to log in.
In the Navigator pane, go to Host > Manage and click the Services tab.
Right-click TSM-SSH and, in the context menu, click Start.
On the screenshot below you see the started SSH server service on the ESXi host.
Now you can connect to the ESXi host from a machine with an SSH client installed. If you’re using Windows, you can use PuTTY, a free and convenient SSH client. In Linux, run the SSH client from the command line with the command:
ssh your_username@host_ip_address
Enter the IP address of your ESXi host and port TCP 22 (the default port number) in the session settings of the SSH client to connect to the ESXi host via SSH.
ESXi SNMP Configuration
Once SSH access to the ESXi host is established, you can configure VMware ESXi SNMP options. On ESXi hosts, SNMP can be configured only in the command-line interface. The graphical user interface (GUI) allows you only to start, stop, and restart the SNMP service.
Run the command in the console (terminal) and check the SNMP status on the ESXi host:
esxcli system snmp get
SNMP is disabled by default. The output for disabled SNMP on ESXi is shown on the screenshot. Most of the parameters are empty and or not configured.
Configuring parameters of an SNMP agent
Set SNMP parameters for an SNMP agent on the ESXi host. The SNMP agent is used to send notifications (SNMP traps and informs) to a monitoring server and receive GET, GETNEXT, and GETBULK requests.
Set the community name (“public” is the community name set by default). The community name in this example is “nakivo”.
esxcli system snmp set —communities nakivo
Set the SNMP target. The SNMP target is a server on which monitoring software is installed to handle SNMP traps and collect monitoring information. In my example, the SNMP target is the machine running Ubuntu Linux (192.168.101.209). UDP 161 is the default port used for SNMP and this port is defined in my ESXi SNMP configuration:
esxcli system snmp set —targets=192.168.101.209@161/nakivo
Specify a location, for example, the geographical location, address, datacenter, or a room where the server is located:
esxcli system snmp set —syslocation «Server room»
Specify contact information. The system administrator’s email address can be defined for this parameter:
esxcli system snmp set —syscontact michaelbose@nakivo.com
Enable SNMP on ESXi:
esxcli system snmp set —enable true
Check the SNMP status on the ESXi host again:
esxcli system snmp get
Now you can see that the parameters are configured.
The Engine ID is the unique identifier for the SNMP agent (used for SNMP v3). The Engine ID can be set with the command (optional):
esxcli system snmp set -engineid 544a33209458
SNMP status is running now. You can also open VMware Host Client, go to Host > Manage > Services, and check the status of the snmpd service.
Test current SNMP configuration.
esxcli system snmp test
If you edit SNMP settings after that, restart the SNMP agent with the command:
/etc/init.d/snmpd restart
As an alternative, you can restart ESXi SNMP in the VMware Host Client GUI in the Services tab. Right-click the service and click Restart in the context menu.
If you need to reset ESXi SNMP settings, use the command:
esxcli system snmp set -r
The command to disable SNMP on an ESXi host is:
esxcli system snmp set —enable false
You can check SNMP availability from a Linux machine if this Linux machine is the SNMP target. We use Ubuntu Linux for this purpose.
Install the required SNMP client on Ubuntu Linux if this client has not been installed yet:
sudo apt-get install snmp
Connect to the ESXi host via SNMP to check the parameters available for monitoring:
snmpwalk -v2c -c nakivo 192.168.101.208
You should see a long list of objects for ESXi monitoring via SNMP in the console output. These objects are management information bases (MIBs) and object identifiers (OIDs), which are elements of the hierarchical structure of monitoring parameters.
An SNMP MIB is a collection of information about objects (parameters and settings) that is organized hierarchically. There are scalar and tabular MIBs. MIBs can be standard and vendor-specific.
An SNMP OID is a uniquely identified managed object in the hierarchical MIB structure. Different levels of the tree are assigned by different organizations. Vendors can define special branches to monitor the parameters of their products.
An object name is a unique value for the entire MIB that is corresponding to the appropriate OID. For example, the object name for the OID 1.3.6.1.2.1.1.5 is sysName.
Configuring ESXi Firewall
You have to configure the firewall and enable SNMP access from monitoring servers to the ESXi host. You can set a subnet or a single IP address of allowed devices in the network.
We run these three commands to allow access from the 192.168.101.0/24 network to monitor ESXi via SNMP:
esxcli network firewall ruleset set —ruleset-id snmp —allowed-all false
esxcli network firewall ruleset allowedip add —ruleset-id snmp —ip-address 192.168.101.0/24
esxcli network firewall ruleset set —ruleset-id snmp —enabled true
Enter the IP address or a network address according to your network configuration.
A less secure configuration is to enable access from any network device:
esxcli network firewall ruleset set —ruleset-id snmp —allowed-all true
esxcli network firewall ruleset set —ruleset-id snmp —enabled true
ESXi SNMP configuration is done. Now you can configure your monitoring software on a monitoring server.
Configuring SNMP v3
SNMP v3 is a more secure version of the protocol providing key authentication and encryption. SNMP v3 configuration is more complicated and is supported since vSphere 5.1. Below is an overview of how to enable SNMP v3 on an ESXi host.
Set authentication protocol and privacy options.
esxcli system snmp set -a SHA1 -x AES128
Where:
SHA1 is the algorithm for cryptographic encryption, the cryptographic hash function (Secure Hash Algorithm 1).
AES128 is the encryption method (Advanced Encryption Standard with a 128-bit encryption key) using the symmetric block cipher.
Generate hashes by using a command like:
esxcli system snmp hash —auth-hash authpass —priv-hash privhash —raw-secret
In my case, the command is:
esxcli system snmp hash —auth-hash PasswordTest1 —priv-hash PasswordTest2 —raw-secret
Avoid using passwords provided in this example in production environments. Use strong unique passwords (the password must be at least 7 characters long). Save the generated hash strings. In my case, the hashes are as follows.
Authhash: 831a798d1cda90ca1a3ab80d38f81a44c0851ada
Privhash: 38cf6f13d09a4651362338eac2c3d62b42514bc9
Use the generated hashes and add a user. Adding up to five users is supported.
esxcli system snmp set -e yes -C user -u snmpuser/authhash/privhash/priv
Where:
user is the contact email for the user
snmpuser is the username (can be up to 32 characters)
authhash is the authentication hash value
privhash is the privacy hash value
We add user1 and use hashes generated in the output of the previous command.
esxcli system snmp set -e yes -C user1@nakivo.com -u user1/831a798d1cda90ca1a3ab80d38f81a44c0851ada/38cf6f13d09a4651362338eac2c3d62b42514bc9/priv
You can create a user without security settings (no authentication and privacy) by using the command:
esxcli system snmp set —user user2/-/-/none
Define the SNMP target address:
esxcli system snmp set —v3targets 192.168.101.209@161/user1/priv/trap
Enable SNMP on ESXi:
esxcli system snmp set —enable true
Test SNMP settings:
esxcli system snmp test
You can use the extended command to test VMware SNMP configuration on ESXi:
esxcli system snmp test -u=user1 -A=PasswordTest1 -X=P2sswordTest2 -r
Where user1 is the name of the SNMP user that has been added to the configuration.
If the test is completed successfully, a message is displayed:
User validated correctly for given engine id and security level: protocols
Try to connect to the ESXi host via SNMP v3 from a monitoring Linux server (from the target side).
This command is used if no authentication parameters have been set:
snmpwalk -v3 -u user1 192.168.101.208
If you have set secure options, define them in the command:
snmpwalk -v3 -u user1 -l AuthPriv -a SHA -A PasswordTest1 -x AES -X PasswordTest2 192.168.101.208
Where user1 is the name of my user added to the ESXi SNMP configuration.
If you see the “Unknown user name” error when you test ESXi SNMP configuration, check whether you have added a user and defined the correct username in the next commands after adding the user. Keep in mind that if you change the agent’s Engine ID, the privacy protocol, or the authentication protocol after configuring users, these users become not valid. You need to reconfigure users in this case.
Also, pay attention to security settings because an incorrect SNMP configuration can constitute a threat and allow a malicious host to get information about an ESXi host. This information can be used to detect vulnerable places and initiate a cyber attack.
SNMP Configuration of Multiple ESXi Hosts
Using VMware host profiles can help you enable SNMP and configure multiple ESXi hosts more rationally if you have a large number of ESXi hosts in your vSphere environment.
To enable SNMP and configure multiple ESXi hosts, you must have the VMware vSphere Enterprise Plus license to use VMware Host Profiles in VMware vSphere Client. VMware SNMP settings for profiles of ESXi hosts are located in Management > Host Profiles > your Profile > SNMP Agent Configuration. You can also use vSphere PowerCLI to automate the configuration process of a large number of ESXi hosts to set ESXi SNMP configuration on them.
Conclusion
This blog post has explained how to enable SNMP on ESXi hosts to monitor VMware vSphere environments. ESXi SNMP configuration requires SSH access to ESXi hosts, configuring SNMP agents, and allowing access in the ESXi firewall. ESXi monitoring allows you to react in time if any issues are detected and improve the overall service availability. Don’t forget to perform VMware vSphere VM backup to avoid data loss and to be able to recover data and restore workloads if a disaster strikes. NAKIVO Backup & Replication is the universal data protection solution that provides a wide set of options to back up and recover VMware vSphere VMs and other data in a datacenter. Moreover, the latest version of the solution supports ESXi monitoring as a part of VMware vSphere monitoring.