by Milan Stanojevic
Milan has been enthusiastic about technology ever since his childhood days, and this led him to take interest in all PC-related technologies. He’s a PC enthusiast and he… read more
Updated on January 17, 2022
- The PHASE1 INITIALIZATION FAILED error is a BSoD error usually caused by out-of-date drivers or faulty hardware.
- You can update your Windows 10 with a professional tool that downloads missing patches with just a few clicks.
- Fixing the stop code PHASE1 INITIALIZATION FAILED may also require running the BSoD troubleshooter option.
- We also advise you to try to remove your third-party antivirus tool or any other problematic software from your PC.
XINSTALL BY CLICKING THE DOWNLOAD FILE
This software will keep your drivers up and running, thus keeping you safe from common computer errors and hardware failure. Check all your drivers now in 3 easy steps:
- Download DriverFix (verified download file).
- Click Start Scan to find all problematic drivers.
- Click Update Drivers to get new versions and avoid system malfunctionings.
- DriverFix has been downloaded by 0 readers this month.
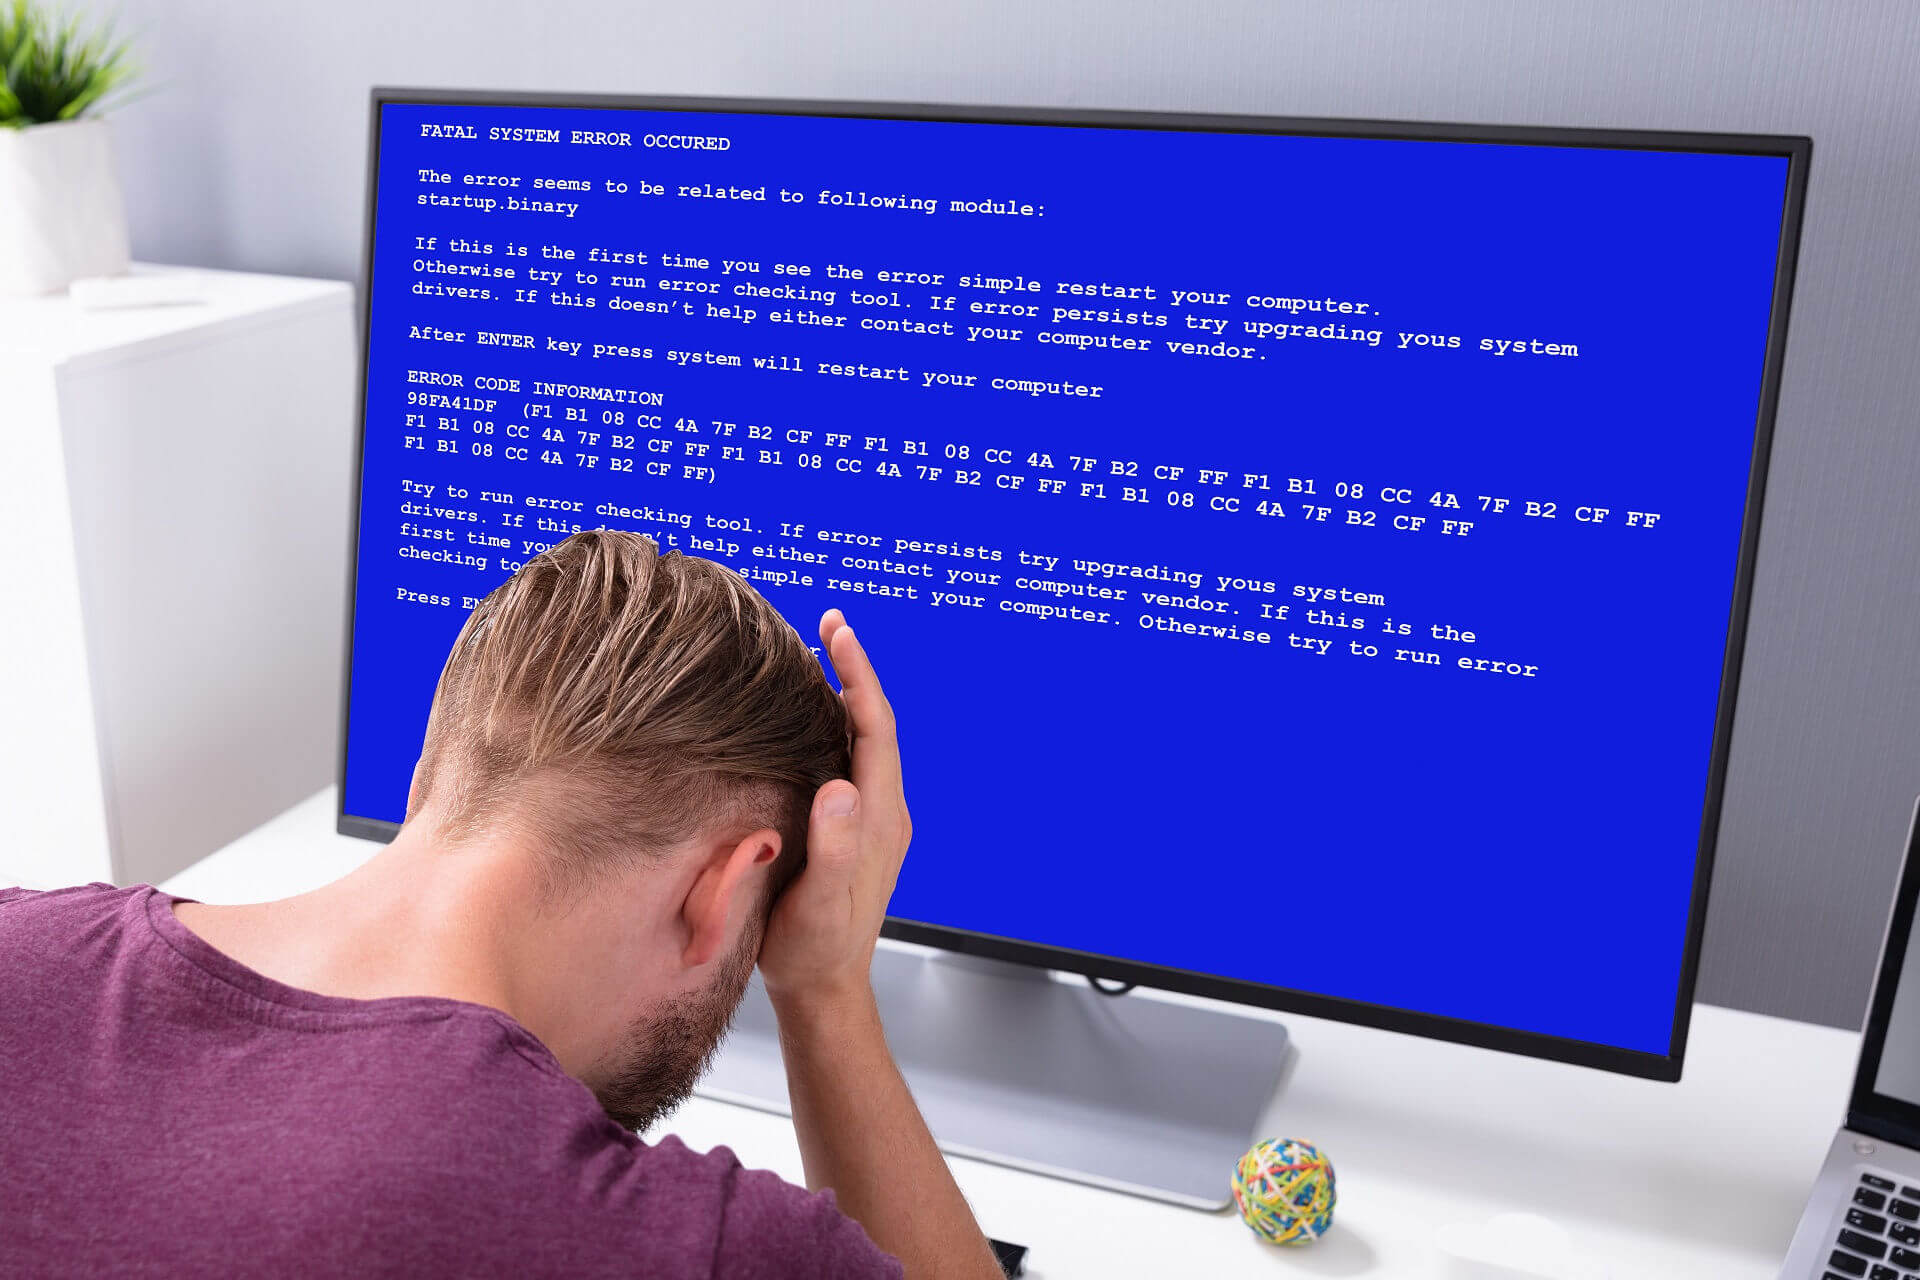
Computer errors are a common occurrence, but without a doubt, Blue Screen of Death errors are one of the most serious errors on Windows 10.
These errors are usually caused by certain software or faulty hardware. However, as you will see in this article there are many other causes that we will explore.
And since they are such a major problem, today we’re going to show you how to fix PHASE 1 INITIALIZATION FAILED errors.
How can I fix PHASE1 INITIALIZATION FAILED BSoD?
1. Make sure your Windows is up to date
Microsoft is constantly working on Windows 10, and if you wish to get the latest Windows 10 features, you’re advised to perform Windows updates regularly.
In addition to the latest features, these updates offer security and bug fixes, and often they fix many hardware and software issues.
So if you’re having problems with the PHASE INITIALIZATION FAILED BSoD error, we advise you to update Windows 10 as soon as you can.
2. Update your drivers
2.1. Perform a manual update
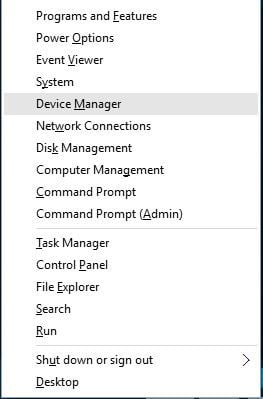
- Press Windows Key + X to open Power User Menu and select Device Manager from the list.

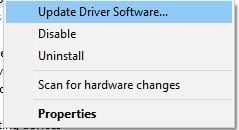
- When the Device Manager opens, locate the driver you want to update, right-click it, and choose Update Driver Software.

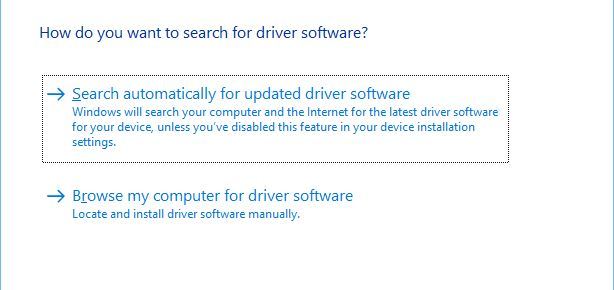
- Choose Search automatically for updated driver software and wait for the process to finish.

Drivers are a key component of Windows 10, and if a certain driver isn’t working properly, that can cause the session 1 initialization failed BSoD error to appear.
In order to update a certain driver, you need to visit your hardware manufacturer’s website, find the model of the device you wish to update, and download the latest drivers for it.
Alternatively, you can download all the necessary files by using Device Manager and then follow the steps we mentioned above.
2.2. Update drivers automatically
Searching for drivers on your own can be time-consuming. So, we advise you to use a tool that will do this for you automatically.
Using an automatic driver updater will certainly save you from the hassle of searching for drivers manually, and it will always keep your system up to date with the latest drivers.
This high-quality software will help you update drivers automatically in just a few seconds and prevent PC damage caused by installing the wrong driver versions.
⇒ Get DriverFix
3. Run the BSOD Troubleshooter
- Go to the Settings app.
- Navigate to the Update & Security section.
- Select Troubleshoot from the menu on the left.
- Select BSOD from the right pane and click Run the troubleshooter.

- Follow the instructions on the screen to complete the troubleshooter.
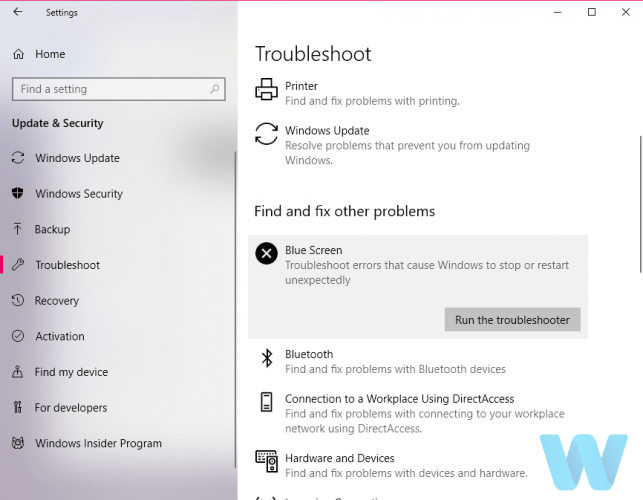
Now, we’re going to try Windows 10’s built-in troubleshooting tool. This tool can resolve basically any system-related problem you can think of, including the Windows 10 error, PHASE1 INITIALIZATION FAILED.
4. Run the SFC scan
- Go to Search, type cmd, and open Command Prompt as Administrator.
- Enter the following line and press Enter:
sfc/scannow
- Wait until the process is done (it may take a while).
- Now, close the Command Prompt and restart your computer.
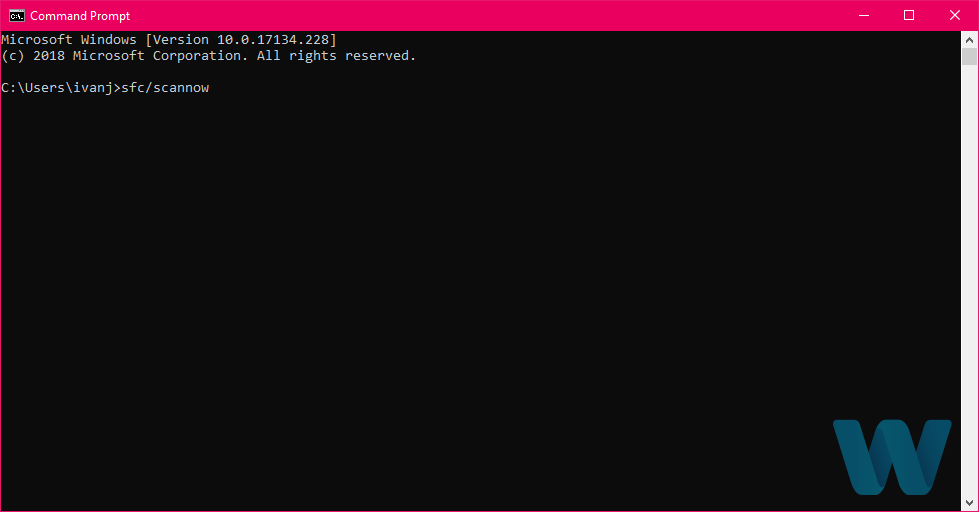
The SFC scan is another troubleshooting tool we’re going to try here. You can run the SFC scan from the command line, and it also scans your computer for potential flaws and resolves them (if possible).
5. Run DISM
5.1. Standard way
- Right-click Start and open Command Prompt (Admin).
- Paste the following command and press Enter:
DISM /Online /Cleanup-Image /RestoreHealth
- Wait until the scan is finished.
- Restart your computer and try updating again.
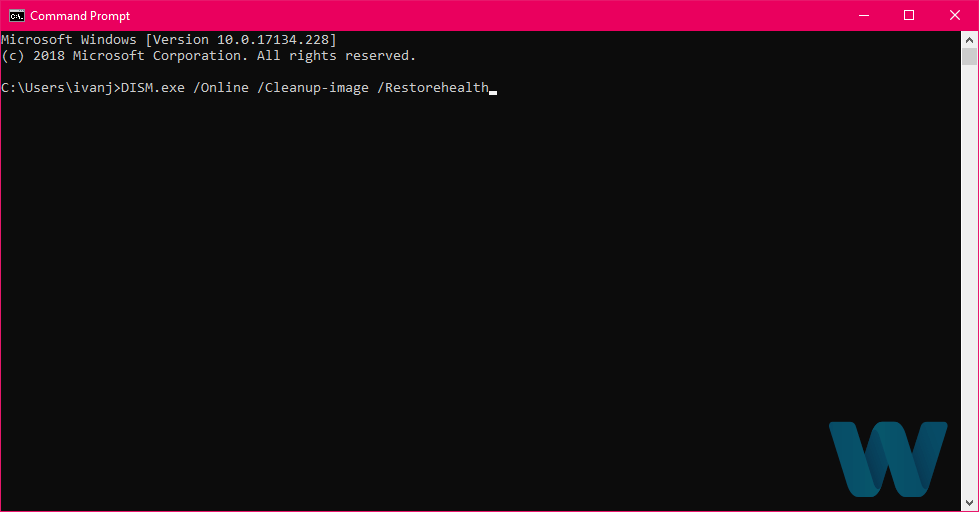
And the third tool we’re going to run is DISM. Deployment Image Servicing and Management is a tool that reloads the system image, which tends to resolve potential issues.
So, it might be helpful when resolving the PHASE1 INITIALIZATION FAILED error, as well.
5.2. With the Windows installation media
- Insert your Windows installation media.
- Right-click the Start menu and, from the menu, choose the Command Prompt (Admin).
- In the command line, type the following commands and press Enter after each:
dism /online /cleanup-image /scanhealthdism /online /cleanup-image /restorehealth
- Now, type the following command and press Enter:
DISM /Online /Cleanup-Image /RestoreHealth /source:WIM:X:SourcesInstall.wim:1 /LimitAccess
- Make sure to change an X value with the letter of the mounted drive with Windows 10 installation.
- After the procedure is finished, restart your computer.
6. Check the hard drive
- Enter the Advanced Startup (Restart your computer while holding the Shift key).
- Choose Troubleshoot, select Advanced Options.
- Select Command Prompt from the list of options.
- When Command Prompt appears, enter the following lines and press Enter after each line in order to run it:
bootrec.exe /rebuildbcd
bootrec.exe /fixmbrbootrec.exe /fixboot
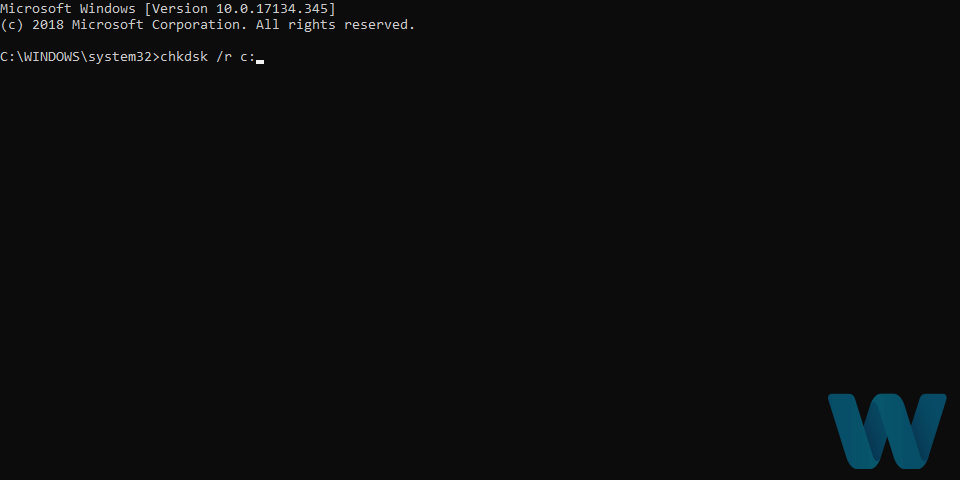
- Some users are also suggesting that you need to run additional chkdsk commands as well. To perform these commands, you need to know drive letters for all your hard drive partitions. In Command Prompt you should enter the following (but remember to use the letters that match your hard drive partitions on your PC):
chkdsk /r c:chkdsk /r d:This is just our example, so keep in mind that you have to perform chkdsk command for every hard drive partition that you have.
- Restart your computer and check if the issue is resolved.
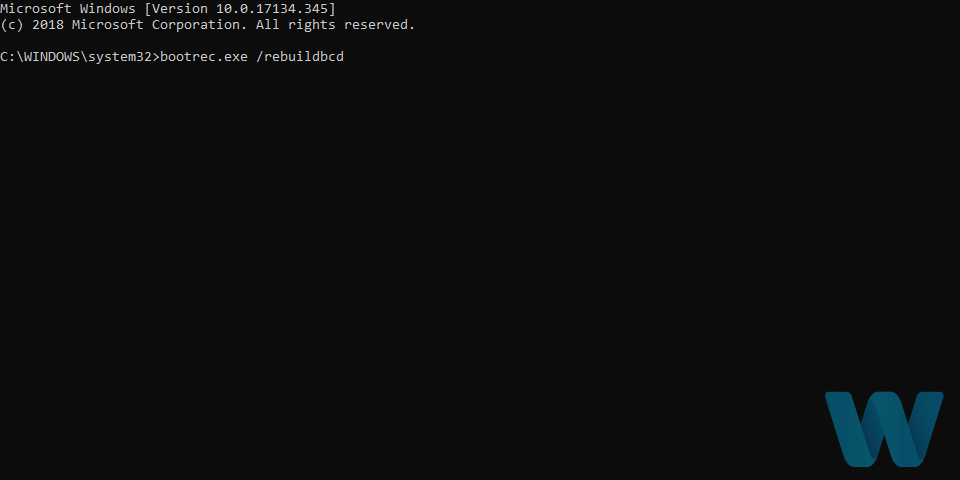
If there’s a problem with your hard drive or partitions, BSOD errors are quite possible. So, we’re going to run a test to see if everything is in its place.
7. Copy Catroot, Catroot2 and CodeIntegrity folders from a working PC
According to the users, PHASE1 INITIALIZATION FAILED BSoD error sometimes appears due to corrupted Catroot, Catroot2, and CodeIntegrity folders.
In order to fix this issue, users are suggesting copying these folders from a working computer and replace them. Before copying these files, make sure that both versions of Windows 10 are identical.
Some PC issues are hard to tackle, especially when it comes to corrupted repositories or missing Windows files. If you are having troubles fixing an error, your system may be partially broken.
We recommend installing Restoro, a tool that will scan your machine and identify what the fault is.
Click here to download and start repairing.
For example, if you’re using a 32-bit version of Windows 10, make sure to copy these folders from another computer that runs a 32-bit version of Windows 10.
8. Temporarily uninstall your antivirus software
In many cases your antivirus can be responsible for the stop code PHASE1 INITIALIZATION FAILED error and in order to fix it, it’s advised that you remove your antivirus software completely.
Removing your antivirus software is relatively simple, but to remove antivirus software completely including all the remaining files and registry keys it’s advised to use dedicated uninstaller tools.
Many antivirus companies offer these tools, and you can download them for free. If uninstalling your antivirus fixes this problem, you can install the latest version of your current antivirus software.
9. Check for problematic software
In some cases, your software can cause this error to appear, especially if you use VPN tools or any similar programs.
If you recently installed or updated certain software, uninstall that software in order to fix this Blue Screen of Death problem.
One of the most efficient methods that allow you to find out exactly what program is causing the Blue Screen of Death error is to access the BSoD file log location.
10. Perform System Restore or reset your PC
- Start the Automatic Repair process by restarting your computer while it boots. (You might have to repeat this step a few times before you access Automatic Repair options.)
- Choose Troubleshoot, select Advanced Options, click System Restore.
- Choose the restore point and follow the instructions.
If the problem is caused by problematic software or a driver, you can fix the PHASE1 INITIALIZATION FAILED BSoD error by performing a System Restore.
- Start Automatic Repair.
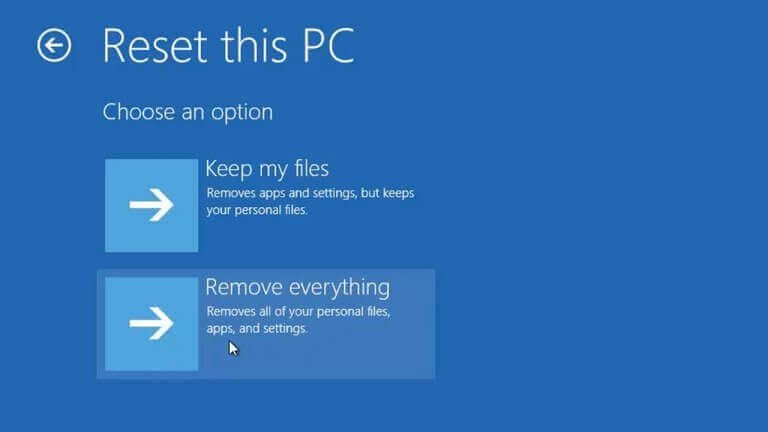
- Choose Troubleshoot then Reset your PC.
- Select Remove everything, choose Only the drive where Windows 10 is installed.
- Follow the process and wait for Windows 10 to install again.
If the System Restore didn’t fix the problem, you need to reset your PC. Before we start, we urge you to back up all your important files since this process will remove all files and folders from your C drive.
By performing this process you successfully deleted all files and folders from drive C thus removing any potential software problems.
If the error PHASE1 INITIALIZATION FAILED still appears, it’s most likely that it’s being caused by a hardware problem.
11. Check your hardware
If you recently installed any new hardware, make sure to replace it or remove it since it might not be fully compatible with your PC.
If no new hardware is installed, make sure to check your hard drive and RAM since they are the most likely causes of PHASE1 INITIALIZATION FAILED errors.
To check your RAM you can use tools such as MemTest86+, just make sure to keep the tool running for a couple of hours in order to perform a thorough scan.
If your RAM is working properly, the error is probably caused by another component. Users reported that your hard drive can also cause this error, so make sure to replace it.
You can also check out other solutions that can help you when it comes to the BSoD error, so take a look at these quick fixes for Black Screen of Death on Windows 10.
PHASE1 INITIALIZATION FAILED error can be problematic, especially if it’s caused by faulty hardware. We hope that some of our solutions were helpful to you and that you managed to fix this error.
We also strongly advise you to try a high-quality dedicated tool for fixing this type of error. See what apps we’re recommending, in this article on the best software for fixing BSOD errors.
See what are the most common factors that generate the Blue Screen of Death errors in this excellent article that explores all the causes for the BSoD on your Windows 10.
We’d like to hear more on this subject from you so please drop us a comment in the dedicated section below.
![]()
Newsletter
by Milan Stanojevic
Milan has been enthusiastic about technology ever since his childhood days, and this led him to take interest in all PC-related technologies. He’s a PC enthusiast and he… read more
Updated on January 17, 2022
- The PHASE1 INITIALIZATION FAILED error is a BSoD error usually caused by out-of-date drivers or faulty hardware.
- You can update your Windows 10 with a professional tool that downloads missing patches with just a few clicks.
- Fixing the stop code PHASE1 INITIALIZATION FAILED may also require running the BSoD troubleshooter option.
- We also advise you to try to remove your third-party antivirus tool or any other problematic software from your PC.
XINSTALL BY CLICKING THE DOWNLOAD FILE
This software will keep your drivers up and running, thus keeping you safe from common computer errors and hardware failure. Check all your drivers now in 3 easy steps:
- Download DriverFix (verified download file).
- Click Start Scan to find all problematic drivers.
- Click Update Drivers to get new versions and avoid system malfunctionings.
- DriverFix has been downloaded by 0 readers this month.
Computer errors are a common occurrence, but without a doubt, Blue Screen of Death errors are one of the most serious errors on Windows 10.
These errors are usually caused by certain software or faulty hardware. However, as you will see in this article there are many other causes that we will explore.
And since they are such a major problem, today we’re going to show you how to fix PHASE 1 INITIALIZATION FAILED errors.
How can I fix PHASE1 INITIALIZATION FAILED BSoD?
1. Make sure your Windows is up to date
Microsoft is constantly working on Windows 10, and if you wish to get the latest Windows 10 features, you’re advised to perform Windows updates regularly.
In addition to the latest features, these updates offer security and bug fixes, and often they fix many hardware and software issues.
So if you’re having problems with the PHASE INITIALIZATION FAILED BSoD error, we advise you to update Windows 10 as soon as you can.
2. Update your drivers
2.1. Perform a manual update
- Press Windows Key + X to open Power User Menu and select Device Manager from the list.
- When the Device Manager opens, locate the driver you want to update, right-click it, and choose Update Driver Software.
- Choose Search automatically for updated driver software and wait for the process to finish.
Drivers are a key component of Windows 10, and if a certain driver isn’t working properly, that can cause the session 1 initialization failed BSoD error to appear.
In order to update a certain driver, you need to visit your hardware manufacturer’s website, find the model of the device you wish to update, and download the latest drivers for it.
Alternatively, you can download all the necessary files by using Device Manager and then follow the steps we mentioned above.
2.2. Update drivers automatically
Searching for drivers on your own can be time-consuming. So, we advise you to use a tool that will do this for you automatically.
Using an automatic driver updater will certainly save you from the hassle of searching for drivers manually, and it will always keep your system up to date with the latest drivers.
This high-quality software will help you update drivers automatically in just a few seconds and prevent PC damage caused by installing the wrong driver versions.
⇒ Get DriverFix
3. Run the BSOD Troubleshooter
- Go to the Settings app.
- Navigate to the Update & Security section.
- Select Troubleshoot from the menu on the left.
- Select BSOD from the right pane and click Run the troubleshooter.
- Follow the instructions on the screen to complete the troubleshooter.
Now, we’re going to try Windows 10’s built-in troubleshooting tool. This tool can resolve basically any system-related problem you can think of, including the Windows 10 error, PHASE1 INITIALIZATION FAILED.
4. Run the SFC scan
- Go to Search, type cmd, and open Command Prompt as Administrator.
- Enter the following line and press Enter:
sfc/scannow - Wait until the process is done (it may take a while).
- Now, close the Command Prompt and restart your computer.
The SFC scan is another troubleshooting tool we’re going to try here. You can run the SFC scan from the command line, and it also scans your computer for potential flaws and resolves them (if possible).
5. Run DISM
5.1. Standard way
- Right-click Start and open Command Prompt (Admin).
- Paste the following command and press Enter:
DISM /Online /Cleanup-Image /RestoreHealth
- Wait until the scan is finished.
- Restart your computer and try updating again.
And the third tool we’re going to run is DISM. Deployment Image Servicing and Management is a tool that reloads the system image, which tends to resolve potential issues.
So, it might be helpful when resolving the PHASE1 INITIALIZATION FAILED error, as well.
5.2. With the Windows installation media
- Insert your Windows installation media.
- Right-click the Start menu and, from the menu, choose the Command Prompt (Admin).
- In the command line, type the following commands and press Enter after each:
dism /online /cleanup-image /scanhealthdism /online /cleanup-image /restorehealth
- Now, type the following command and press Enter:
DISM /Online /Cleanup-Image /RestoreHealth /source:WIM:X:SourcesInstall.wim:1 /LimitAccess
- Make sure to change an X value with the letter of the mounted drive with Windows 10 installation.
- After the procedure is finished, restart your computer.
6. Check the hard drive
- Enter the Advanced Startup (Restart your computer while holding the Shift key).
- Choose Troubleshoot, select Advanced Options.
- Select Command Prompt from the list of options.
- When Command Prompt appears, enter the following lines and press Enter after each line in order to run it:
bootrec.exe /rebuildbcdbootrec.exe /fixmbrbootrec.exe /fixboot
- Some users are also suggesting that you need to run additional chkdsk commands as well. To perform these commands, you need to know drive letters for all your hard drive partitions. In Command Prompt you should enter the following (but remember to use the letters that match your hard drive partitions on your PC):
chkdsk /r c:chkdsk /r d:This is just our example, so keep in mind that you have to perform chkdsk command for every hard drive partition that you have.
- Restart your computer and check if the issue is resolved.
If there’s a problem with your hard drive or partitions, BSOD errors are quite possible. So, we’re going to run a test to see if everything is in its place.
7. Copy Catroot, Catroot2 and CodeIntegrity folders from a working PC
According to the users, PHASE1 INITIALIZATION FAILED BSoD error sometimes appears due to corrupted Catroot, Catroot2, and CodeIntegrity folders.
In order to fix this issue, users are suggesting copying these folders from a working computer and replace them. Before copying these files, make sure that both versions of Windows 10 are identical.
Some PC issues are hard to tackle, especially when it comes to corrupted repositories or missing Windows files. If you are having troubles fixing an error, your system may be partially broken.
We recommend installing Restoro, a tool that will scan your machine and identify what the fault is.
Click here to download and start repairing.
For example, if you’re using a 32-bit version of Windows 10, make sure to copy these folders from another computer that runs a 32-bit version of Windows 10.
8. Temporarily uninstall your antivirus software
In many cases your antivirus can be responsible for the stop code PHASE1 INITIALIZATION FAILED error and in order to fix it, it’s advised that you remove your antivirus software completely.
Removing your antivirus software is relatively simple, but to remove antivirus software completely including all the remaining files and registry keys it’s advised to use dedicated uninstaller tools.
Many antivirus companies offer these tools, and you can download them for free. If uninstalling your antivirus fixes this problem, you can install the latest version of your current antivirus software.
9. Check for problematic software
In some cases, your software can cause this error to appear, especially if you use VPN tools or any similar programs.
If you recently installed or updated certain software, uninstall that software in order to fix this Blue Screen of Death problem.
One of the most efficient methods that allow you to find out exactly what program is causing the Blue Screen of Death error is to access the BSoD file log location.
10. Perform System Restore or reset your PC
- Start the Automatic Repair process by restarting your computer while it boots. (You might have to repeat this step a few times before you access Automatic Repair options.)
- Choose Troubleshoot, select Advanced Options, click System Restore.
- Choose the restore point and follow the instructions.
If the problem is caused by problematic software or a driver, you can fix the PHASE1 INITIALIZATION FAILED BSoD error by performing a System Restore.
- Start Automatic Repair.
- Choose Troubleshoot then Reset your PC.
- Select Remove everything, choose Only the drive where Windows 10 is installed.
- Follow the process and wait for Windows 10 to install again.
If the System Restore didn’t fix the problem, you need to reset your PC. Before we start, we urge you to back up all your important files since this process will remove all files and folders from your C drive.
By performing this process you successfully deleted all files and folders from drive C thus removing any potential software problems.
If the error PHASE1 INITIALIZATION FAILED still appears, it’s most likely that it’s being caused by a hardware problem.
11. Check your hardware
If you recently installed any new hardware, make sure to replace it or remove it since it might not be fully compatible with your PC.
If no new hardware is installed, make sure to check your hard drive and RAM since they are the most likely causes of PHASE1 INITIALIZATION FAILED errors.
To check your RAM you can use tools such as MemTest86+, just make sure to keep the tool running for a couple of hours in order to perform a thorough scan.
If your RAM is working properly, the error is probably caused by another component. Users reported that your hard drive can also cause this error, so make sure to replace it.
You can also check out other solutions that can help you when it comes to the BSoD error, so take a look at these quick fixes for Black Screen of Death on Windows 10.
PHASE1 INITIALIZATION FAILED error can be problematic, especially if it’s caused by faulty hardware. We hope that some of our solutions were helpful to you and that you managed to fix this error.
We also strongly advise you to try a high-quality dedicated tool for fixing this type of error. See what apps we’re recommending, in this article on the best software for fixing BSOD errors.
See what are the most common factors that generate the Blue Screen of Death errors in this excellent article that explores all the causes for the BSoD on your Windows 10.
We’d like to hear more on this subject from you so please drop us a comment in the dedicated section below.
![]()
Newsletter
![]()
I am getting a Failed to initialize device idx 0 (-13), can you help to fix the issue.
Downloadsteamredminer-v0.8.0-winteamredminer-v0.8.0-win> ./teamredminer.exe —list_devices
Team Red Miner version 0.8.0
[2021-01-27 16:36:11] Auto-detected AMD OpenCL platform 0
[2021-01-27 16:36:12] Excluding OpenCL device idx 1 on selected platform 0, duplicate device.
[2021-01-27 16:36:12] Detected 1 devices, listed in pcie bus id order:
[2021-01-27 16:36:12] Miner Platform OpenCL BusId Name Model Nr CUs
[2021-01-27 16:36:12] —— ——— —— ——— ————- ————————- ——
[2021-01-27 16:36:12] 0 0 0 07:00.0 gfx1030 AMD Radeon RX 6800 30
[2021-01-27 16:36:12] Successful clean shutdown.
Downloadsteamredminer-v0.8.0-winteamredminer-v0.8.0-win>teamredminer.exe -a ethash -o stratum+tcp://eu1.ethermine.org:4444 -u xxxxxxxxxxxxxx.trmtest -p x —enable_compute —debug
Team Red Miner version 0.8.0
[2021-01-27 16:35:48] Pool eu1.ethermine.org: Ethermine ethash auto mode detected, setting —eth_stratum=ethproxy
[2021-01-27 16:35:48] Auto-detected AMD OpenCL platform 0
[2021-01-27 16:35:48] Excluding OpenCL device idx 1 on selected platform 0, duplicate device.
[2021-01-27 16:35:48] Windows TDR delay value OK: 20 secs.
[2021-01-27 16:35:48] Windows TDR DDI delay value OK: 10 secs.
[2021-01-27 16:35:49] Initializing GPU 0.
[2021-01-27 16:35:49] Failed to initialize device idx 0 (-13)
[2021-01-27 16:35:49] Successful clean shutdown.
![]()
ASUS Radeon R9 380 4GB
Kawpow and Lyra2Rev3, same error on all algos;
start_kawpow.bat gives same error Failed to initialize device idx 0 (-13);
start_kawpow.bat
Team Red Miner version 0.8.1
[2021-02-18 16:43:17] Auto-detected AMD OpenCL platform 0
[2021-02-18 16:43:17] Auto-detected AMD OpenCL platform 2
[2021-02-18 16:43:17] Excluding OpenCL device idx 0 on selected platform 2, duplicate device.
[2021-02-18 16:43:17] Initializing GPU 0.
[2021-02-18 16:43:17] Failed to initialize device idx 0 (-13)
[2021-02-18 16:43:17] Successful clean shutdown.
teamredminer.exe —list_devices
Team Red Miner version 0.8.1
[2021-02-18 17:03:35] Auto-detected AMD OpenCL platform 0
[2021-02-18 17:03:35] Auto-detected AMD OpenCL platform 2
[2021-02-18 17:03:35] Excluding OpenCL device idx 0 on selected platform 2, duplicate device.
[2021-02-18 17:03:35] Detected 1 devices, listed in pcie bus id order:
[2021-02-18 17:03:35] Miner Platform OpenCL BusId Name Model Nr CUs
[2021-02-18 17:03:35] —— ——— —— ——— ————- ————————- ——
[2021-02-18 17:03:35] 0 0 0 01:00.0 Tonga AMD Radeon (TM) R9 380 Se 28
Thanks in advance
![]()
Team Red Miner version 0.8.1
[2021-03-04 19:57:40] Auto-detected AMD OpenCL platform 0
[2021-03-04 19:57:41] Initializing GPU 0.
[2021-03-04 19:57:41] Failed to initialize device idx 0 (-13)
[2021-03-04 19:57:41] Successful clean shutdown.
Presione una tecla para continuar . . .
Same here
![]()
Same issue here. Mining nimiq and the platform is auto detected but the first device fails to initialise:
Team Red Miner version 0.8.1[2021-03-18 10:10:11] Auto-detected AMD OpenCL platform 0
[2021-03-18 10:10:11] Starting Nimiq local proxy on port 4444 pointing to wss://nimiq.icemining.ca:2053
[2021-03-18 10:10:11] Nimiq proxy: Accepting connections on 0.0.0.0:4444
[2021-03-18 10:10:11] Initializing GPU 0.
[2021-03-18 10:10:11] Failed to initialize device idx 0 (-13)
[2021-03-18 10:10:11] Stopping Nimiq network proxy.
[2021-03-18 10:10:11] Successful clean shutdown.
Here’s the deivce list:
Team Red Miner version 0.8.1
[2021-03-18 10:05:58] Auto-detected AMD OpenCL platform 0
[2021-03-18 10:05:58] Detected 2 devices, listed in pcie bus id order:
[2021-03-18 10:05:58] Miner Platform OpenCL BusId Name Model Nr CUs
[2021-03-18 10:05:58] —— ——— —— ——— ————- ————————- ——
[2021-03-18 10:05:58] 0 0 0 03:00.0 gfx1012 Navi 14 [Radeon RX 5500/5 11
[2021-03-18 10:05:58] 1 0 1 07:00.0 gfx1012 Navi 14 [Radeon RX 5500/5 11
[2021-03-18 10:05:58] Successful clean shutdown.
Running Ubuntu 20.04 and ROCm.
![]()
The same issue.
         Team Red Miner version 0.8.1.1
[2021-03-29 08:06:17] Auto-detected AMD OpenCL platform 0
[2021-03-29 08:06:17] Auto-detected AMD OpenCL platform 1
[2021-03-29 08:06:18] Initializing GPU 0.
[2021-03-29 08:06:18] Failed to initialize device idx 0 (-13)
[2021-03-29 08:06:18] Successful clean shutdown
![]()
@nanom1t In the end I tried a couple of the mining operating systems out there — this negates the need to manage drivers etc yourself. Needless to say the problem was solved using Hive OS or mmPOS. These systems also give you lots of additional features and can both just boot from USB…
![]()
@naldertown I know about these operating systems, but I don’t need them. I just install Ubuntu and latest drivers.
![]()
Same here with 5700 XT on Ubuntu 20.04
          Team Red Miner version 0.8.2.1
[2021-04-30 16:56:46] Auto-detected AMD OpenCL platform 0
[2021-04-30 16:56:46] Initializing GPU 0.
[2021-04-30 16:56:46] Failed to initialize device idx 0 (-13)
[2021-04-30 16:56:46] Successful clean shutdown.
device_list output:
[2021-04-30 16:59:44] Auto-detected AMD OpenCL platform 0
[2021-04-30 16:59:44] Detected 1 devices, listed in pcie bus id order:
[2021-04-30 16:59:44] Miner Platform OpenCL BusId    Name          Model                     Nr CUs
[2021-04-30 16:59:44] ----- -------- ------ -------- ------------- ------------------------- ------
[2021-04-30 16:59:44]     0        0      0 03:00.0  gfx1010       Navi 10 [Radeon RX 5600 O     20
[2021-04-30 16:59:44] Successful clean shutdown.
![]()
Same here with 5700XT on Archlinux (Kernel 5.11.16, mesa 21.0.3-2)
          Team Red Miner version 0.8.2.1
[2021-05-02 02:10:40] Pool eu1.ethermine.org: Ethermine ethash auto mode detected, setting --eth_stratum=ethproxy
[2021-05-02 02:10:40] Auto-detected AMD OpenCL platform 0
[2021-05-02 02:10:40] Initializing GPU 0.
[2021-05-02 02:10:40] Failed to initialize device idx 0 (-13)
[2021-05-02 02:10:40] Successful clean shutdown.
device_list output:
          Team Red Miner version 0.8.2.1
[2021-05-02 02:11:09] Auto-detected AMD OpenCL platform 0
[2021-05-02 02:11:09] Detected 1 devices, listed in pcie bus id order:
[2021-05-02 02:11:09] Miner Platform OpenCL BusId    Name          Model                     Nr CUs
[2021-05-02 02:11:09] ----- -------- ------ -------- ------------- ------------------------- ------
[2021-05-02 02:11:09]     0        0      0 2f:00.0  gfx1010       Navi 10 [Radeon RX 5600 O     20
[2021-05-02 02:11:09] Successful clean shutdown.
![]()
For me this was solved by downgrading the AMD driver to an older version, now works fine.
I went from 21.10 back down to 20.50 and it works.
![]()
Confirmed — rolling the driver back fixed the issue here too.
![]()
Is there a fix coming for this? I switching mining software, ethminer and nsfminer work just fine. I think teamredminer has better and more consistent performance, when a new fix comes, I’ll switch back
![]()
Looks like Teamredminer does not support the latest versions of AMD drivers.
![]()
Failed to initialize device idx 0 (-13)
21.7.2
![]()
It does appear that the new 21.7.1 and newer drivers cause failure to initialize device errors.
I’m getting 0 (-13) on my Radeon VII
![]()
same here on 21.6.1
It does appear that the new 21.7.1 and newer drivers cause failure to initialize device errors.
I’m getting 0 (-13) on my Radeon VII
Содержание
- Failed to initialize DirectX
- Поддержка DirectX
- Драйвер видеокарты
- Компоненты DirectX
- Ноутбук
- Вопросы и ответы

Ошибки в играх, в которых «виноват» DirectX, встречаются довольно часто. В основном, игре требуется определенная редакция компонентов, которую не поддерживает операционная система или видеокарта. Об одной из таких ошибок и пойдет речь в этой статье.
Эта ошибка говорит нам о том, что не удалось инициализировать требуемую версию DirectX. Далее мы поговорим о причинах возникновения неполадки и попытаемся ее устранить.
Поддержка DirectX
Первым делом стоит убедиться в том, что Ваш графический ускоритель поддерживает требуемую версию API. В сообщении с ошибкой указано, чего от нас хочет приложение (игра), например, «Failed to initialize D3D11». Это значит, что необходимо наличие DX одиннадцатой версии. Выяснить возможности своей видеокарты можно либо на сайте производителя, либо при помощи специального софта.
Подробнее: Определяем, поддерживает ли видеокарта DirectX 11
Если поддержки нет, то, к сожалению, придется заменить «видюху» более новой моделью.
Драйвер видеокарты
Устаревшее программное обеспечение для графического адаптера может повлиять на нормальное определение игрой версии поддерживаемого DX. По сути, драйвер это такая программа, которая позволяет ОС и другому ПО взаимодействовать с железом, в нашем случае — с видеокартой. Если в драйвере нет нужного куска кода, то это общение может быть неполноценным. Вывод: необходимо обновить «дрова» для GPU.
Подробнее:
Как переустановить драйвера видеокарты
Обновляем драйвера видеокарты NVIDIA
Установка драйверов для графического адаптера AMD
Компоненты DirectX
Бывает так, что в силу каких-либо факторов файлы DirectX повреждены или удалены. Это могут быть действия вирусов или самого пользователя. Кроме того, в системе могут отсутствовать необходимые обновления библиотек. Это приводит к различным сбоям в работе программ, которые используют эти файлы. Решение здесь простое: нужно выполнить обновление компонентов DX.
Подробнее:
Как обновить библиотеки DirectX
Про удаление компонентов DirectX
Ноутбук
Чаще всего проблемы с определением железа и драйверами случаются в лэптопах при переустановке или обновлении операционной системы и программного обеспечения. Это обусловлено тем, что все драйвера пишутся под конкретную модель ноута. ПО, пусть даже скачанное с официальных сайтов NVIDIA, AMD или Intel, может работать некорректно и приводить к сбоям.
Функция переключения графических адаптеров в ноутбуках также может «давать осечки» и ноутбук будет использовать встроенную графику вместо дискретной. Такие неполадки могут приводить к тому, что требовательные игры и программы попросту не будут запускаться, выдавая ошибки.
Подробнее:
Включаем дискретную видеокарту
Переключаем видеокарты в ноутбуке
Причины и решения проблем с невозможностью установить драйвер на видеокарту
В статье, ссылка на которую представлена третьей сверху, в разделе «Ноутбуки», приведена информация о правильной установке драйверов лэптопа.
Подводя итоги, стоит заметить, что описанные в статье действия будут эффективны только в тех ситуациях, когда ошибка не вызвана серьезными неполадками в операционной системе. Если были случаи заражения вирусами и их действия привели не только к повреждению файлов DirectX, но и к более серьезным последствиям, то, скорее всего, придется прибегнуть к переустановке Windows.

Еще статьи по данной теме:
Помогла ли Вам статья?
В этой статье рассмотрим, что делать, если при запуске игры выдает ошибку: «Failed to initialize player» с деталями «Failed to initialize Direct3D», как исправить ее.
Полный текст ошибки:
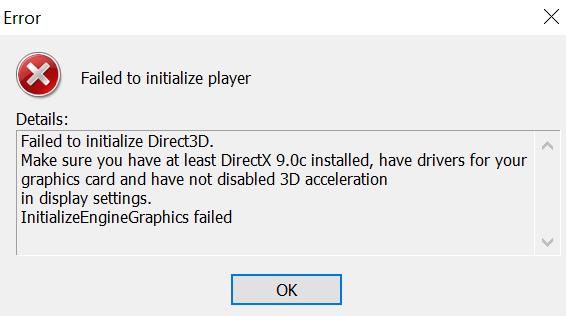
Failed to initialize player
Failed to initialize Direct3D.
Make sure you have at least DirectX 9.0c installed, have drivers for your graphics card and have not disabled 3D acceleration in display settings.
InitializeEngineGraphics failed
После нее часто появляется еще одна ошибка:
Untrusted system file (C:WindowsSustem32****.dll)
Что означает ошибка «Failed to initialize Direct3D»
«Failed to initialize Direct3D» — в переводе с английского на русский «Не удалось инициализировать Direct3D».
Direct3D – это компонент DirectX, который отвечает за интеграцию трехмерных графических изображений (3D-изображений).
Следовательно, данная ошибка возникает из-за того, что при запуске приложения (игры) на устройстве, системе не удалось найти компонент Direct3D, входящий в состав DirectX и отвечающий за 3D-графику.
Failed to initialize player: как исправить
Чтобы исправить ошибку «Failed to initialize player» «Failed to initialize Direct3D» необходимо последовательно выполнить следующие действия:
- Перейти на сайт Microsoft и установить исполняемую библиотеку DirectX;
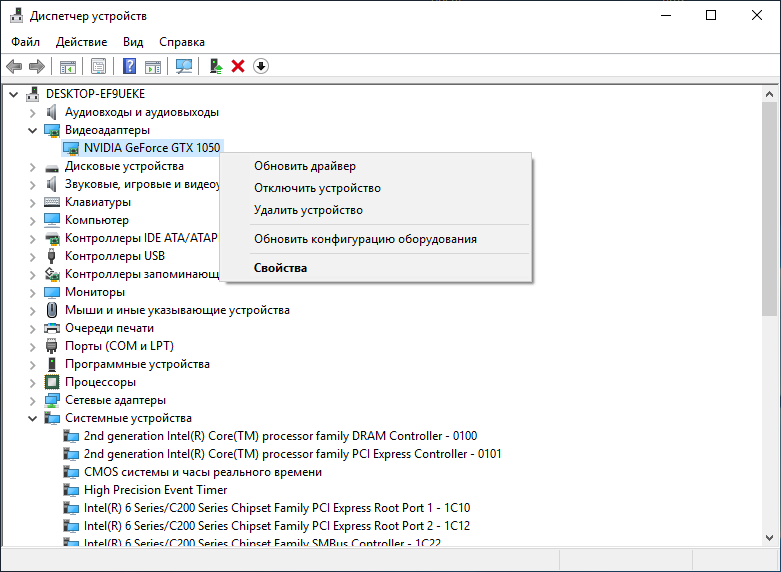
- Перейти в диспетчер устройств Windows, в разделе видеоадаптеров выбрать свою видеокарту и обновить на нее драйвер.

Это также можно сделать с помощью программы для обновления драйверов Driver Booster. - Открыть меню «Пуск» и выполнить команду dxdiag. Откроется окно диагностики DirectX. Следует перейти во вкладку «Экран» и убедится, что ускорение DirectDraw, ускорение Direct3D и ускорение текстур AGP включены. А также убедится, что в примечаниях нет сообщений о каких-либо ошибках или неисправностях в работе видеокарты.

- После проделанных действий следует перезагрузить компьютер.

Если ошибка появилась недавно, то можно выполнить восстановление системы Windows до того периода, когда данной проблемы не наблюдалось.
В некоторых случаях проблема ошибки инициализации Direct3D решается с помощью отката драйверов на видеокарту до более старой версии.
Не нашли ответ? Тогда воспользуйтесь формой поиска:
Содержание
- 1 Ошибка Direct3D initialization error при запуске игры. Что делать?
- 1.1 Что делать с ошибкой Direct3D..
- 1.2 Проблема с драйвером видеокарты
- 1.3 Используйте режим совместимости
- 2 Failed to initialize Direct3D [Fixed]
- 2.1 Try these fixes:
- 2.2 What is Direct3D and Why does the error happen?
- 2.3 Fix 1: Check your DirectX version and update it
- 2.4 How to check the DirectX version in Windows?
- 2.5 Fix 2: Update your graphics card driver
- 2.6 Fix 3: Reinstall Visual C++ Redistributables
Ошибка Direct3D initialization error при запуске игры. Что делать?

Один из типичных вопросов
Здравствуйте.
У меня в Windows 10 при запуске некоторых игр появляется ошибка «Direct3D initialization error». Windows шла вместе с ноутбуком, версия «Домашняя для одного языка». Скажите, может ли эта ошибка быть из-за версии Windows, и как ее исправить?
Доброго дня!
Вообще, подобная ошибка не редкость, особенно после переустановки Windows (в вашем случае, после покупки ноутбука, так как в магазинах редко устанавливаются все необходимые библиотеки и драйвера, необходимые для комфортной работы устройства). Появляется она, как правило, после попытки запустить какую-нибудь игру — либо сразу, либо в игре будет просто черный экран, а свернув ее вы увидите это окно.
В этой статье остановлюсь на основных причинах появления подобной ошибки, и покажу на примере как от нее избавиться…
Типичный вид ошибки
Что делать с ошибкой Direct3D..
Самая частая причина появления подобной ошибки связана с отсутствием библиотеки DirectX. Причем, не обязательно, что она у вас не установлена, возможно у вас просто нет какого-то конкретного файла из библиотеки.
DirectX — специальная библиотека для программистов. Используется в большинстве случаев при разработке игр. Пакет доступен для установки и обновления на официальном сайте Microsoft. Более подробно от этом можете узнать на сайте Википедии.
Страница на сайте Microsoft для загрузки современной версии DirectX — https://www.microsoft.com/ru-ru/Download/confirmation.aspx?id=35
Более старая версия DirectX 9.0c доступна по ссылке — https://www.microsoft.com/ru-ru/download/details.aspx?id=34429
Поэтому, рекомендую посмотреть требования запускаемой вами игры, и посмотреть, какая версия DirectX установлена у вас на ПК.
Чтобы узнать, какой DirectX у вас на ПК, нажмите:
- сочетание кнопок Win+R, чтобы открылось окно «Выполнить»;
- далее впишите команду dxdiag и нажмите Enter (см. скриншот ниже).
Запускаем средство диагностики DirectX (DxDiag)
Далее во вкладке «Система» будут представлены все необходимые данные: версия вашей ОС Windows, ваша видеокарта, звуковое устройства, версия BIOS, и версия DirectX (см. на красный квадрат на скрине ниже).
Средство диагностики DirectX / Кликабельно
Для обновления DirectX на сайте Microsoft есть специальный веб-установщик. Перейдите на нужную страницу и скачайте его. Далее запустите, согласитесь с условиями лицензионного соглашения, и ждите пока работает мастер.
Принятие условий лиц. соглашения DirectX
В конце операции вы должны увидеть сообщение о том, что установка DirectX завершена, нужные пакеты обновлены и пр. Либо, как вариант, мастер сообщит вам о том, что новая версия DirectX уже установлена и в обновлении не нуждается. Рекомендую после этого перезагрузить компьютер, а затем попробовать запустить игру.
Установка DirectX завершена
Как правило, после такого обновления, игра начинает работать как нужно.
ДОПОЛНЕНИЕ!
Если у вас нет интернета (либо он медленный или сайт Microsoft недоступен, выдает ошибку и т.д.), DirectX можно обновить с помощью игр: почти на половине дисков с играми есть новая версия DirectX (прим.: новая на момент запуска игры, конечно). Поэтому, вам достаточно взять более-менее современную игру и установив ее, обновите DirectX.
*
Проблема с драйвером видеокарты
Если ошибка все так же появляется, возможно ваша видеокарта отключена в диспетчере устройств (такое может быть, например, у ноутбуков с 2-мя видеокартами), либо у вас просто не обновлены/не установлены драйвера на видеокарту.
Как проверить наличие драйверов и включена ли видеокарта
Самый простой способ, воспользоваться диспетчером устройств. Чтобы его открыть:
- нажмите кнопки Win+R;
- далее введите devmgmt.msc и нажмите Enter.
Запуск диспетчера устройств — devmgmt.msc
Далее откройте вкладку «адаптеры», и посмотрите, все ли видеокарты включены, и не горит ли напротив них желтый восклицательный знак (указывающий на проблемы с драйверами, пример — ).
Ниже на скриншоте показано, что один видеоадаптер отключен и не задействован. Часто ошибка с Direct3D связана как раз с этим.
Intel HD включена, NVIDIA выключена
Чтобы включить адаптер, просто щелкните по нему правой кнопкой мышки и выберите функцию «Задействовать». Пример на скрине ниже.
Задействовать видеокарту
После этого перезагрузите компьютер, затем попробуйте открыть игру.
ДОПОЛНЕНИЕ!
В некоторых случаях одна из видеокарт может быть отключена в BIOS компьютера (например, если у вас на ноутбуке стоит дискретная и встроенная видеокарты). Чтобы проверить так ли это, зайдите в BIOS, обычно, в разделе MAIN можно найти режим работы графики (Graphic mode). Пример показан на фото ниже.
Как зайти в BIOS — https://ocomp.info/kak-voyti-v-bios.html
Кнопки для входа в BIOS для разных производителей ноутбуков/ПК — https://ocomp.info/goryachie-klavishi-dlya-vh-bios-boot-menu.html
Как обновить драйвера на видеокарту:
*
Используйте режим совместимости
Не так давно я тестировал ноутбук с относительно новым процессором AMD Ryzen 5 2500U и столкнулся с одной интересной особенностью…
Обновил DirectX, установил все необходимые драйвера, различные пакеты и дополнения к играм — однако, часть игр не запускалась, показывая ошибку Direct3D… (особенность: все игры были старыми, что наводило на разные мысли…).
Довольно сильно я был удивлен, когда открыл свойства исполняемого файла игры, перешел во вкладку «Совместимость» и поставил галочку напротив пункта «Запустить игру в режиме совместимости с Windows XP SP 2» — игра стала нормально работать, никаких ошибок, связанных с Direct3D, больше не было…
Примеры, что нужно сделать, приведены на скринах ниже…
Открываем свойства исполняемого файла игры
Запустить игру в режиме совместимости с Windows XP SP 2
Также в помощь!
Как запустить старую игру на новом компьютере — https://ocomp.info/kak-zapustit-staruyu-igru.html
PS
Если ничего не помогло из выше написанного, то также рекомендую еще обновить пакет Microsoft Visual C++ и NET Framework.
На этом все, всем всего доброго!
Источник: https://ocomp.info/oshibka-direct3d-initialization.html
Failed to initialize Direct3D [Fixed]

Does this look familiar? When launching a program, or playing a game in your computer, you must feel annoyed to always see this error message. It can read either:
- Failed to initialize Direct3D Make sure you have at least DirectX 9.0c installed, have drivers for your graphics card and have not disabled 3D acceleration in display settings.
InitializeEngineGraphics failed
- Failed initialize Direct3D with current settings
- Cannot initialize Direct3D device
- …
Try these fixes:
Fortunately, there are solutions to fix this problem. Below are the 3 solutions to fix the error Failed to initialize Direct3D. Try these fixes!
Note: The screenshots below come from Windows 10, but the fixes also work on Windows 8 and Window 7.
What is Direct3D and Why does the error happen?
Direct3D, which belongs to a part of DirectX, is a graphics application programming interface for Windows, which is used to render the three-dimensional graphics in applications or games Call of Duty, Tomb Raider, etc. Direct3D uses the hardware acceleration if it is available on the graphics card, and allows the hardware acceleration of the 3D rendering pipeline.
Why does this problem happen? There are various reasons for this problem, and the possible causes can be the old DirectX version, the missing or outdated video drivers, or the missing DLL files in your program file.
You can try the following solutions to fix it easily and quickly!
Fix 1: Check your DirectX version and update it
As then error message suggested, you can first of all, check the DirectX version in your computer to see if it meets the minimum requirement (DirectX 9.0c and later). If it’s older than the required version, you’ll need to update and install the latest DirectX in your Windows.
How to check the DirectX version in Windows?
Follow the instructions below to check the DirectX version in your Windows:
1) On your keyboard, press the Windows logo key + R at the same time to invoke the Run box.
2) Type dxdiag and click OK.
3) In the System tab, you will see the DirectX version as the screenshot shows. If it doesn’t meet the requirement (DirectX 9.0c and later), you should update your DirectX version in your system. Updating DirectX varies from Windows versions.
If you’re using Windows 10, Windows 8 and Windows 8.1, you’ll need to update Windows to update and install the latest DirectX; While if you’re using Windows 7, Windows Vista and Windows XP, you should install a service pack to update. Check the Microsoft support to update DirectX in different Windows system: How to install the latest version of DirectX.
4) Click the Display tab, in the DirectX Features section, check if Direct3D is enabled. If not, click to enable it.
This should fix the failed to initialize Direct3D issue. If the issue still persists, don’t worry, we have more solutions for you.
Fix 2: Update your graphics card driver
Graphics card driver issue can cause the failed to initialize Direct3D issue. If the video driver in your computer is missing or date, it can result in this problem and stop running the application or game. So you should update the graphics card driver to fix the error.
There are two ways to update the graphics drivers: manually and automatically.
Manually update driver – You can go to the manufacturer’s website of your graphics card, find the exact graphics card driver for your graphics adapter, and install it in your Windows.
You’ll need some computer skills and patience to update your drivers this way. You need to know for sure the right the driver online that matches with your Windows OS, download it and install it step by step.
Automatically update driver – If you don’t have the time, patience or computer skills to update the graphics card driver manually, you can do it automatically with Driver Easy.
With Driver Easy, you don’t have to search and find what drivers needed in your PC, nor to update drivers step by step. It can considerably help with almost all the issues related to drivers.
Furthermore, you can update your graphics card drivers automatically with either the FREE or Pro version of Driver Easy. It only takes 2 simple clicks with the Pro version (and you will get full support and a 30-day money back guarantee).
1) Download and install Driver Easy.
2) Run Driver Easy and click Scan Now. Then Driver Easy will scan your computer and detect any problem drivers.
3) Click the Update button next to the driver name to download the correct driver (you can do that with the FREE version), then install it in your computer.
Or click Update All to automatically download and install the correct version of all the problem drivers (you can do that with Pro version, and you will be prompted to upgrade when you click Update All).
4) After updating driver, restart your PC, and open your game/application to see if it works now.
This should solve your problem. If the error still appears, don’t worry. There’s one more solution you can try.
Fix 3: Reinstall Visual C++ Redistributables
To fix Failed to initialize Direct3D error, you can also try to reinstall the Visual C++ Redistributables packages in your computer. It may lack of the .dll files in the program files, so reinstalling the Visual C++ Redistributables can download the missing dll files in your computer, and the problem can be solved.
1) On your keyboard, press the Windows logo key
+ R at the same time.
2) Type appwiz.cpl in the Run box, and click OK.
3) You’ll see all the Microsoft Visual C++ Redistributable packages installed in your computer. Right click the one you want to uninstall, and click Uninstall, then follow the wizard to uninstall it.
4) After uninstalling, go to the Windows download page to download the corresponding Visual C++ Redistributable packages. 5) Run the downloaded file, and follow the wizard to install it in your computer.
6) After reinstallation, restart the computer and try to open the program that gives the error.
These are the best 3 solutions to fix Failed to initialize Direct3D in your Windows. If you have any questions or need any help, feel free to comment below and we’ll see what more we can do to help.
Источник: https://www.drivereasy.com/knowledge/failed-to-initialize-direct3d-fixed/